
manual - Pioneer DJ
DJ SYSTEM XDJ-RX http://pioneerdj.com/support/ The Pioneer DJ support site shown above offers FAQs, information on software and various other types of information and services to allow you to use your product in greater comfort. http://rekordbox.com/ For inquiries on rekordbox™, please see the online support site indicated above. Operating Instructions Contents How to read this manual ! Thank you for buying this Pioneer product. Be sure to read both this manual and the Operating Instructions (Quick Start Guide). Both contain important information that you should understand before using this product. ! In this manual, names of channels and buttons indicated on the product, names of menus in the software, etc., are indicated within square brackets ([ ]). (e.g. [CH1], [CUE] button, [Start] menu) Before start Features........................................................................................................ 3 Before you start Supported sources...................................................................................... 4 Usable media............................................................................................... 4 Playable music file formats........................................................................ 4 Preparing the software................................................................................ 5 Connections Connecting the input/output terminals..................................................... 6 Part names and functions Power section............................................................................................... 9 USB device section...................................................................................... 9 Deck section............................................................................................... 10 Browse section.......................................................................................... 17 Mixer section.............................................................................................. 23 Effect section.............................................................................................. 25 Operation Turning the power on................................................................................ 27 Turning the power off................................................................................ 27 Connecting and disconnecting USB devices......................................... 27 Playback..................................................................................................... 27 Playing the rekordbox library on a computer or mobile device............. 27 Outputting sound...................................................................................... 27 Mixing using the faders............................................................................. 28 Using quantize function............................................................................ 28 Changing the settings About the auto-play mode......................................................................... 29 About the auto standby function.............................................................. 29 About language settings........................................................................... 29 Setting preferences................................................................................... 29 Using the DJ software Installing the driver software.................................................................... 30 Operating DJ software by MIDI interface................................................ 31 Additional information Troubleshooting......................................................................................... 32 Error messages.......................................................................................... 33 List of icons displayed on the main unit display section........................ 34 About iPod/iPhone.................................................................................... 34 About trademarks and registered trademarks....................................... 34 Cautions on copyrights............................................................................. 34 2 En Before start Before start Features HOT CUE The unit is a DJ system integrating a DJ player and DJ mixer in a single unit and carrying over the high operability of Pioneer’s DJ products — the world standard for club equipment. You can play it like a real DJ using the music stored on your USB device or computer. The unit is equipped with a hot cue function for starting playback instantaneously from cue points that have been set in advance by simply pressing a button. Four hot cues can be set per deck. rekordbox(Mac/Windows)/rekordbox(iOS/ Android) AUTO BEAT LOOP The downloadable, free music management software or smartphone application rekordbox can be used to manage (analysis, settings, creation, history storage) music files on computers or mobile devices. Using music files managed with rekordbox in combination with the unit makes it possible to achieve outstanding DJ performances. ! The rekordbox version for Mac/Windows is described in this manual, as rekordbox (Mac/Windows) and the rekordbox version for mobile devices as rekordbox (iOS/Android). rekordbox is used to simultaneously indicate the editions of rekordbox (Mac/Windows) and rekordbox (iOS/Android), and to indicate the rekordbox function. USB EXPORT rekordbox music files and management data can be exchanged using a USB device. rekordbox LINK Export When the unit and the computer are connected by LAN cable, the rekordbox music files and management data can be directly transferred, which can eliminate the need to export them to a USB device. The unit and the computer can also be connected wirelessly using a wireless LAN router (or wireless LAN access point). SOUND CARD The unit is equipped with a MIDI interface. It also has a built-in sound card, allowing simple connections to other devices. DISPLAY The unit has a color LCD that is as big as 7-inches. When selecting sound tracks, you can view not only the text data, but also the jacket photos corresponding to that track. The combination of an easy-to understand GUI display of music files and an easy-to-operate rotary selector lets you select tracks without stress. The unit also simultaneously displays zoomable enlarged waveforms of the track on two decks. Playing status and SYNC status of each deck can be checked instantly. Based on the BPM of tracks, this function loop-plays the tracks by automatically setting the loop out point. LOOP SLICE It divides a loop into 4 sections, and has a loop slice function which can repeatedly play the divided sections. QUANTIZE The unit is equipped with a Quantize function letting you set points on beat for tracks analyzed with rekordbox, even if buttons are pressed roughly. When setting auto loop beats and beat effects, the points are automatically set to the beat nearest the position at which the button was pressed. With this unit, accurate, on-beat performances are possible without breaking the rhythm of the currently playing sound even when using hot cues and other functions during playback. SLIP MODE It has a sleep mode function which continues to play back the tracks in background during the Loop/Reverse/Scratch/Hot Cue/Loop Slice/Pause operations. This enables innovative DJ performances without changing the track’s development, even after Loop/Reverse/Scratch/Hot Cue/Loop Slice/Pause. BEAT EFFECTS The unit is equipped with eight types of BEAT EFFECTS that have been well-received in the DJM series. Various renderings can be achieved by using effects in conjunction with BPM. SOUND COLOR FX The unit is equipped with four effects allowing the sound to be changed in various ways. The mood of the sound can be easily modified, by simply pressing a button and turning the control. 3-BAND ISOLATOR USB REC Sound played on this unit during DJ performances can easily be recorded on USB devices (flash memory devices, etc.). The recorded sound can also be played on this unit. This unit is equipped with a 3-band equalizer allowing the volume of the high, medium and low frequency ranges to be adjusted separately. Not only can the tone be adjusted to your tastes, the sound for a certain range can be turned completely off by turning the control all the way counterclockwise (isolator function). BEAT SYNC STANDARD LAYOUT This function can be used to automatically synchronize the tempo (BPM) and beat positions on the left and right decks based on the track’s beat grid information as analyzed with rekordbox. Genuine beat mixing is easily possible without moving the [TEMPO] sliders. The unit carries over the control panel layout of the Pioneer CDJ/DJM series, the world standard for DJ units. It can be used just like a DJ equipment that is permanently installed in the club. En 3 Before you start Supported sources USB devices that cannot be used This unit supports the sources listed below. ! USB devices = Usable media (p.4) !Computer = Playing the rekordbox library on a computer or mobile device (p.27) ! Optical disc type devices such as external DVD/CD drives, etc., are not supported. ! USB hubs cannot be used. ! iPod cannot be used. (Music data on iPod touch or iPhone can only be played on this unit if it is added to the rekordbox (iOS/Android) library.) = iPod and iPhone that can be connected to this product (p.7) Usable media This unit supports USB mass storage class USB devices (external hard disks, portable flash memory devices, digital audio players, etc.). Folder layers Max. 8 layers (files in folders beyond the 8th layer cannot be played) Max. number of folders 999 folders Max. number of files 10 000 files Supported file systems FAT16, FAT32 ! ! ! ! Tracks managed by rekordbox can be played by connecting the mobile device on which the rekordbox (iOS/Android) is installed via a USB device. For the latest supported devices, see the below-mentioned Pioneer support DJ site. http://pioneerdj.com/support/ For rekordbox (iOS/Android), see the user’s manual rekordbox (iOS/Android). When there are many folders or files, some time may be required for loading. Folders and files exceeding the limits cannot be displayed. Cautions on using USB devices ! Some USB devices may not operate properly. Please note that Pioneer will accept no responsibility whatsoever for loss of data stored by the user on USB devices or other direct or indirect problems arising due to connection of USB devices to this unit. ! When the current above the permissible level is passed through the USB device insertion slot of this unit, the USB indicator will flash. The communication may be stopped by stopping the power supply to the USB device. To return to normal conditions, please remove the USB device connected to this unit. Avoid re-using the USB device for which the excess current has been detected. If you cannot return to the normal condition (cannot communicate) using the abovementioned procedure, turn this unit’s power off then back on. ! If multiple partitions are set on the USB device, only the first partition can be used. (When rekordbox library information is present, the partition containing the rekordbox library information has priority.) ! USB devices equipped with flash card readers may not operate. ! Depending on the USB device you are using, the desired performance may not be achieved. Playable music file formats This unit supports music files in the formats shown below. Type File extension Compatible formats Bit depth Bit rate Sampling frequency Encoding method MP3 .mp3 MPEG-1 AUDIO LAYER-3 16 bit 32 kbps to 320 kbps 32 kHz, 44.1 kHz, 48 kHz CBR, VBR MPEG-4 AAC LC 16 bit 16 kbps to 320 kbps 32 kHz, 44.1 kHz, 48 kHz CBR, VBR MPEG-2 AAC LC 16 bit 16 kbps to 320 kbps 32 kHz, 44.1 kHz, 48 kHz CBR, VBR AAC .m4a, .aac and .mp4 WAV .wav WAV 16 bit, 24 bit — 44.1 kHz, 48 kHz Uncompressed PCM AIFF .aif, .aiff AIFF 16 bit, 24 bit — 44.1 kHz, 48 kHz Uncompressed PCM About MP3 files About ID3 tags MP3 files include constant bit rate (CBR) and variable bit rate (VBR) files. Both types can be played on this unit, but the searching speed is slower for VBR files than for CBR files. To prioritize operability, we recommend recording files in CBR. The tag information types which can be registered from a music file are ID3 tags (v1, v1.1, v2.2.0, v2.3.0, and v2.4.0) or meta tags. About AAC files The file format for artwork images that can be added to music files is JPEG (extensions: “.jpg” or “.jpeg”). ! Files larger than 800 x 800 dots cannot be displayed. ! AAC is the abbreviation of “Advanced Audio Coding”, a basic format of audio compression technology used for MPEG-2 and MPEG-4. ! The file format and extension of AAC data depends on the application used to create the data. ! On this unit, in addition to AAC files encoded with iTunes® and with the extension “.m4a”, files with the extensions “.aac” and “.mp4” files can also be played. However, AAC files that are copyright-protected, such as those purchased from the iTunes Store, cannot be played. Also, depending on the version of iTunes in which the file was encoded, it may not be possible to play the file. 4 En About music file artwork About character displays MP3/AAC When displaying track names, etc., to display characters written in local codes other than Unicode, change the [LANGUAGE] setting. = About language settings (p.29) Preparing the software Before you start Music management software rekordbox and driver software are not included. To use rekordbox and the driver software, access the rekordbox site and Pioneer DJ Support site, and download the software. = Installing the driver software (p.30) ! The user is responsible for preparing the computer, network devices and other elements of the Internet usage environment required for a connection to the Internet. About rekordbox rekordbox is a software program allowing users who have purchased a Pioneer DJ player supporting rekordbox to manage music files to be used for DJ performances. Music file can be managed in various ways (analysis, setting, creation, history saving) by using the music management software rekordbox. An excellent DJ performance can be achieved by using the music files managed by rekordbox together with this unit. Acquiring rekordbox (Mac/Windows) 1 Open your web browser on your computer, and access the rekordbox site. http://rekordbox.com/ 2 Click [Download] in the rekordbox site and download rekordbox from the download page. ! For inquiries on rekordbox (Mac/Windows), please see the support site indicated above. About rekordbox (iOS/Android) Tracks managed by rekordbox can be played by connecting the mobile device on which the rekordbox (iOS/Android) is installed via a USB device. For the supported devices, see the Pioneer DJ support site (http://pioneerdj.com/support/). For rekordbox (iOS/Android), see the rekordbox (iOS/Android) user’s manual. ! For details on installing rekordbox (iOS/Android), see the Pioneer website (http://rekordbox.com/). Using the online support site Before making inquiries on rekordbox operating procedures or technical issues, read the rekordbox user’s manual, and check the FAQ provided on the rekordbox online support site. <rekordbox online support site> http://rekordbox.com/ En 5 Connections ! ! ! ! Connect the power cord after all the connections between devices have been completed. Be sure to turn off the power and unplug the power cord from the power outlet whenever making or changing connections. Refer to the operating instructions for the component to be connected. Be sure to use the included power cord. ! When using a LAN cable for connection, be sure to use either the LAN cable included with this product or an STP (shielded twisted pair) cable. ! Do not disconnect the LAN cable when music files and/or information are being shared using PRO DJ LINK. Connecting the input/output terminals Rear panel, front panel Computer Headphones Power amplifier, Power amplifier, powered speakers, etc. powered speakers, Power amplifier (for booth monitor) etc. rekordbox DJ software Microphone Analog player Microphone To power outlet DJ player R L 1 Front panel R L 2 R L L R 3 4 5 6 78 Connect headphones here. Both stereo phone plugs (Ø 6.3 mm) and stereo mini phone plugs (Ø 3.5 mm) can be used. ! There are two output terminals (one for a stereo phone jack and one for a mini-phone jack), but do not use both terminals simultaneously. If one is connected or disconnected while the other one is being used, the volume of the other one in use may increase or drop suddenly. 2MASTER1 terminals Connect a power amplifier, powered speakers, etc., here. Be sure to use these as balanced outputs. Be careful not to accidentally insert the power cord of another unit. 3MASTER2 terminals Connect a power amplifier, powered speakers, etc., here. 4BOOTH OUT terminals This is an output terminal for a booth monitor. 5LINE/PHONO terminals Connect a phono level output device (analog player (for MM cartridges), etc.) or a line level output device (DJ player, etc.) here. Switch the terminals’ function according to the connected device using the [LINE, PHONO] selector switch on this unit’s rear panel. 6LINE, PHONO selector switch Switches the function of the [LINE/PHONO] terminals. 7Kensington security slot 8LINK terminal Connect the LAN cable (included) here. En 9 a Power cord L 6 5 b c d Rear panel 1PHONES terminals 6 R 9SIGNAL GND terminal Connects an analog player’s ground wire here. This helps reduce noise when the analog player is connected. a USB terminal Connect to a computer. ! A USB hub cannot be used. ! To maintain performance, connect the unit and the computer directly using a USB cable compatible with USB 2.0. bMIC2 terminal Connects a microphone here. cMIC1 terminal Connects a microphone here. dAC IN Connect this to a power outlet. ! Connect the power cord after all the connections between devices have been completed. ! Be sure to use the included power cord. Basic style Playback on this unit is performed mainly using tracks prepared with rekordbox installed on a computer. For rekordbox operations, see the rekordbox (Mac/Windows) user’s manual. You can see the rekordbox (Mac/Windows) user’s manual from [Help] menu of rekordbox (Mac/Windows). rekordbox music files and data can be exchanged with this unit using a memory device (flash memory, hard disk, etc.), eliminating the need to take a computer into the DJ booth. Such information as playlists, cues, loops and hot cues set in advance with rekordbox can be used for playback. Computer USB device on which rekordbox data is recorded rekordbox USB device on which rekordbox data is recorded Connections PRO DJ LINK (USB Export) To power outlet Power cord PRO DJ LINK (LINK Export) ! Tracks in rekordbox can be selected and played when the computer is taken into a DJ booth and connected to a computer on which rekordbox is installed by LAN cable (CAT5e) or wireless LAN (Wi-Fi) router. Performances can be held using such information as playlists, cues, loops and hot cues that have been set ahead of time with rekordbox. ! Tracks in rekordbox can be selected and played when connected to a mobile device on which rekordbox (iOS/Android) is installed by USB cable or wireless LAN (Wi-Fi) router. Performances can be held using such information as playlists, cues, loops and hot cues that have been set ahead of time with rekordbox. ! With wired LAN connections, one computer on which rekordbox is installed can be connected. The unit cannot be connected to a player compatible to PRO DJ LINK. ! With wireless LAN (Wi-Fi) connections, up to two computers or mobile devices on which rekordbox is installed can be connected. ! Use the wireless router (available in the market) and access point (available in the market) which can obtain a sufficient communication speed such as IEEE802.11n, IEEE802.11g etc. Depending on the signal conditions in the usage environment or the wireless router and access point, PRO DJ LINK connections may not operate properly. iPod and iPhone that can be connected to this product ! This product is compatible with iPhone 6 Plus, iPhone 6, iPhone 5s, iPhone 5c, iPhone 5, iPhone 4s, iPhone 4, iPhone 3GS, and iPod touch (3rd, 4th, 5th generation). ! For the latest supported devices, see the below-mentioned Pioneer support DJ site. http://pioneerdj.com/support/ Using a LAN cable/USB cable rekordbox Mobile device on which rekordbox is installed Computer To power outlet Power cord En 7 Using a wireless router and access points rekordbox Computer Wireless router and access point To power outlet 8 En Power cord Mobile device on which rekordbox is installed Part names and functions 4 2 5 5 1 2 Part names and functions 6 3 5 6 3 1Power section (page 9 ) 2USB device section (page 9 ) 3Deck section (page 1 0) 4Browse section (page 1 7) 5Mixer section (page 2 3) 6Effect section (page 2 5) Power section USB device section 1 1u switch Press to turn the power on and off. = Turning the power on (p.27) 1 4 2 3 5 1 2 3 1Device insertion slot for USB 1, 2 Insert USB devices here. = Connecting and disconnecting USB devices (p.27) 2USB 1,2 indicator It lights, flashes when this unit is communicating with the USB device. = Connecting and disconnecting USB devices (p.27) 3USB1,2 STOP button Press this for over 2 seconds before disconnecting USB devices from this unit. = Connecting and disconnecting USB devices (p.27) En 9 4MASTER REC (WAKE UP) button 1LOOP IN/4BEAT (IN ADJUST) button ! MASTER REC: This is used to record the sound output from the unit on a USB device inserted in the device insertion slot for USB2. = Recording the performance (p.10) ! WAKE UP: Cancels the auto standby mode. = About the auto standby function (p.29) Use this to set and fine-adjust the loop in point. = Setting loops (p.13) 2LOOP OUT (OUT ADJUST) button Use this to set and fine-adjust the loop out point. = Setting loops (p.13) 3RELOOP/EXIT button 5TRACK MARK button It divides the tracks when they are being recorded on the USB device. = Splitting tracks while recording (p.10) Use this to return to loop playback (reloop) or cancel loop playback (loop exit). = Returning to Loop playback (Reloop) (p.13) = Canceling Loop playback (Loop Exit) (p.13) 4DIRECTION, REV button Recording the performance The same sound as the sound being output from the [MASTER1] terminal can be recorded as a WAV file on a USB device. ! The name of the files created when the sound is recorded is in the format [REC***.WAV] (*** is a 3-digit number). Use this to turn reverse playback on and off. This lights when playing in the reverse direction. = Playing in reverse (p.12) 5SLIP button = Using the slip mode (p.15) 1 Insert the USB device in the USB2 device insertion slot. 6TRACK SEARCH o, p buttons 2 Press the [MASTER REC (WAKE UP)] button. 7SEARCH m, n buttons Use these to search for the beginnings of tracks. Recording starts. The [MASTER REC (WAKE UP)] button lights. ! When the [MASTER REC (WAKE UP)] button is pressed again, the [MASTER REC (WAKE UP)] button turns off and recording stops. ! The recording capacity of a 1 GB USB device is about 90 minutes. The track is forwarded/reversed while the button is held in. = Forward and reverse scanning (p.11) 8Jog dial !Scratch When the [VINYL] mode is set and the jog dial is turned while touching a metal part on its top, the sound is played according to the direction and speed at which the jog dial is turned. = Operating the jog dial (p.12) ! Pitch bend The playing speed can be adjusted by turning the outer part of the jog dial during playback. = Operating the jog dial (p.12) Splitting tracks while recording Press the [TRACK MARK] button while recording. The currently recording track is split and stored on the USB device. The file is divided right at the point where the [TRACK MARK] button is pressed. From this point onwards, the sound can continue to be recorded as a new file. 9Jog dial display section Deck section = Jog dial display section (p.19) c d aCUE button e Sets a cue point or moves the cue point. = Setting Cue (p.12) 2 f 1 3 g h i 4 5 6 j 7 k 8 bf (PLAY/PAUSE) button Use this to play/pause tracks. = Playback (p.11) cCUE/LOOP CALL, c (LOOP 1/2X), d (LOOP 2X) buttons Use these to call out stored cue and loop points. = Calling out stored cue or loop points (p.14) When pressed during loop playback, the loop is cut or extended. = Cutting loops (Loop Cut) (p.13) = Extending loops (loop doubling) (p.13) dDELETE button Use this to delete cue and loop points. = Deleting stored cue or loop points (p.14) 9 a m n l o eMEMORY button Use this to store cue and loop points in the memory. = Storing cue or loop points (p.13) fVINYL SPEED ADJUST TOUCH/RELEASE control b Use this to adjust the speed at which playback slows down and stops when the top of the jog dial is pressed and the speed at which normal playback resumes when the top of the jog dial is released. = Adjusting the playback and stopping speeds (p.12) q p gVINYL MODE button Use this to switch between the [VINYL] mode and normal mode. = Switching the jog dial mode (p.12) 10 En hSYNC button Synchronizes to the master deck’s tempo. = Using the SYNC function (p.16) iMASTER button Use this to set the track loaded in this unit as the master for the beat sync function. = Using the SYNC function (p.16) jTEMPO RANGE button kMASTER TEMPO button Use this to turn the master tempo function on and off. = Adjusting the playing speed without changing the pitch (Master Tempo) (p.11) lTEMPO slider Use this to adjust the track playing speed. = Adjusting the playing speed (Tempo control) (p.11) mHOT CUE/CALL button You can use this button to switch to the Hot Cue function. = Using hot cues (p.14) Press one of the [TRACK SEARCH o, p] buttons. Press the [p] to move to the beginning of the next track. When [o] is pressed, playback returns to the beginning of the currently playing track. When pressed twice in a row, playback returns to the beginning of the previous track. ! It is not possible to move to a different category or folder with the track search function. Super fast search Turn the jog dial while pressing one of the [SEARCH m, n] buttons. The track is fast-forwarded/fast-reversed in the direction in which the jog dial is spun. ! When the [SEARCH m, n] button is released, this function is canceled. ! When you stop the jog dial from spinning, normal playback resumes. ! The fast-forward/fast-reverse speed can be adjusted according to the speed at which the jog dial is spun. Part names and functions The [TEMPO] slider’s range of variation switches each time this is pressed. = Selecting the playing speed adjustment range (p.11) Finding the beginnings of tracks (Track Search) nAUTO BEAT LOOP button You can use this button to switch to the Auto Beat Loop function. = Using Auto Beat Loops (p.14) oLOOP SLICE/EXIT button You can use this button to switch to the Loop Slice function. = Using Loop Slice (p.15) pSHIFT button When the Performance button is pressed while keeping the [SHIFT] button pressed, a different function is called out. qPerformance buttons Using with the hot cue function = Using hot cues (p.14) Using with the Auto Beat Loop function = Using Auto Beat Loops (p.14) Using with the Loop Slice function = Using Loop Slice (p.15) Playback Press the [f (PLAY/PAUSE)] button. If the auto-play mode of the [UTILITY] screen is OFF, the track is played to the end, then the stop mode is set. The next track is not played. Pausing During playback, press the [f (PLAY/PAUSE)] button. ! Playback resumes when [f (PLAY/PAUSE)] button is pressed again. Forward and reverse scanning Press one of the [SEARCH m, n] buttons. The track is scanned in the forward or reverse direction while one of the [SEARCH m, n] buttons is pressed. ! If the auto-play mode of the [UTILITY] screen is OFF, you cannot rewind to the previous track or skip ahead to the next track. ! It is not possible to move to a different category or folder during forward or reverse scanning. Super fast track search Turn the jog dial while pressing one of the [TRACK SEARCH o, p] buttons. The track is advanced at high speed in the direction in which the jog dial was turned. Adjusting the playing speed (Tempo control) Move the [TEMPO] slider forward or backward. The playing speed increases when the slider is moved to the [+] side (towards you), decreases when the slider is moved to the [–] side (away from you). The rate at which the playing speed is changed is indicated on the main unit display. Selecting the playing speed adjustment range Press the [TEMPO RANGE] button. The playing speed adjustment range switches each time the button is pressed. [WIDE, ±16, ±10, ±6] is displayed on the main unit display. ! Adjustment is possible in units of 0.02 % when [±6] % is selected, 0.04 % when [±10] % or [±16] % is selected, and 0.5 % when [WIDE] is selected. ! The [WIDE] adjustment range is ±100 %. When set to –100 %, playback stops. Adjusting the playing speed without changing the pitch (Master Tempo) Press the [MASTER TEMPO] button. The [MASTER TEMPO] button lights. The pitch does not change even when the playing speed is changed with the [TEMPO] slider. ! The sound is digitally processed, so the sound quality changes. En 11 Playing in reverse When the quantize function is on, there may be a slight delay in operation of this function in order to synchronize the beat. Press the [DIRECTION, REV] button. The [DIRECTION, REV] button lights and reverse playback starts. ! You cannot rewind to the previous track for reverse playback. ! The direction in which the playing speed is increased or decreased according to the direction in which the jog dial is turned is reversed. ! When operations such as track search and loop playback are performed during reverse playback, scratch play may not be available. Operating the jog dial ! The top of the jog dial has an embedded switch. Do not place objects on the jog dial or subject it to strong forces. ! Water or other liquids getting into the set will lead to malfunction. Switching the jog dial mode The jog dial has two modes. ![VINYL] mode: When a metal part of the top of jog dial is touched during playback, playback stops, and when the jog dial is turned at this point the sound is output according to the rotation of the jog dial. ! Normal mode: Playback does not stop even when a metal part of the top of jog dial is touched. Also, such operations as scratching cannot be performed. Press the [VINYL MODE] button. The jog mode switches to the [VINYL] mode and the [VINYL MODE] button lights. Scratch When the jog dial is set to the [VINYL] mode, the sound can be played according to the direction and speed at which the jog dial is turned by turning the jog dial while touching a metal part on its top. 1 Press the [VINYL MODE] button. Set the jog mode to the [VINYL] mode. 2 During playback, touch a metal part of the top of the jog dial. Playback stops. 3 While still touching a metal part of the top of the jog dial, turn the jog dial in the direction and at the speed at which you want to play the sound. Use this to adjust the speed at which playback slows down and stops when the top of the jog dial is pressed and the speed at which normal playback resumes when the top of the jog dial is released. Turn the [VINYL SPEED ADJUST TOUCH/RELEASE] control. The speed increases when turned clockwise, decreases when turned counterclockwise. ! When jog mode is set to VINYL mode, the speed at which playback starts and stops can be simultaneously changed when the [f (PLAY/PAUSE)] button is pressed. ! The following methods of adjustment can be set from the settings of the [UTILITY] screen. — TOUCH&RELEASE: Simultaneously adjusting the speed at which a playback slows and then stops and the speed at the playback returns to normal. — TOUCH: Adjusting only the speed at which a playback slows and then stops. — RELEASE: Adjusting only the speed at which playback returns to normal. Setting Cue 1 During playback, press the [f (PLAY/PAUSE)] button. Playback is paused. 2 Press the [CUE] button. The point at which the track is paused is set as the cue point. The [f (PLAY/PAUSE)] button flashes and the [CUE] button lights. No sound is output at this time. ! When a new cue point is set, the previously set cue point is canceled. Adjusting the cue point position 1 Press the [SEARCH m, n] buttons while pausing at the cue point. The [f (PLAY/PAUSE)] and [CUE] buttons flash. The cue point can be fine-adjusted in steps of 0.5 frames. 2 Press the [CUE] button. The position at which the button was pressed is set as the new cue point. ! When a new cue point is set, the previously set cue point is canceled. The sound is played according to the spinning direction and speed of the jog dial. Returning to Cue Point (Back Cue) 4 Take your finger off the metal part of the top of the jog dial. During playback, press the [CUE] button. Normal playback resumes. Pitch bend During playback, spin the outer section of the jog dial. The playing speed increases when spun clockwise, decreases when spun counterclockwise. When spinning is stopped, playback returns to the normal speed. ! When the jog mode is set to the normal mode, the same operation is possible by spinning the top of the jog dial. Frame search In the pause mode, spin the jog dial. The position at which the track is pausing can be moved in units of 0.5 frames. ! The approximate time for 0.5 frame is 6.7 msec. ! Spin clockwise to move in the direction of playback, counterclockwise to move in the opposite direction. The position moves 1.8 seconds per one full rotation of the jog dial. 12 Adjusting the playback and stopping speeds En The set immediately returns to the currently set cue point and pauses. ! When the [f (PLAY/PAUSE)] button is pressed, playback starts from the cue point. Checking Cue Point (Cue Point Sampler) Keep pressing the [CUE] button after returning to the cue point. Playback starts from the set cue point. Playback continues while the button is held in. Setting Cue Point during playback (Real Time Cue) During playback, press the [LOOP IN/4BEAT (IN ADJUST)] button at the point at which you want to set the cue point. The point at which the button was pressed is set as the cue point. Setting loops This function can be used to play specific sections repeatedly. Loop playback interval cannot be set for a previous or next track. ! When the quantize function is on, there may be a slight delay in operation of this function in order to synchronize the beat. (Reloop and auto beat loop only) Loop In Point is set. ! This operation is not necessary if you want to set the currently set cue point as the loop in point. 2 Press the [LOOP OUT (OUT ADJUST)] button at the point at which you want to end loop playback (the loop out point). The loop out point is set, and loop playback begins. Fine-adjusting the loop in point (loop in adjust) During playback, press the [LOOP IN/4BEAT (IN ADJUST)] button for over 1 second. A loop of 4 beats starting from the point at which the button was pressed is set automatically according to the BPM of the currently playing track, and loop playback starts. ! If the track’s BPM cannot be detected, the BPM is set to 120. Cutting loops (Loop Cut) During loop playback, press the [CUE/LOOP CALL, c (LOOP 1/2X)] button. The loop playing time is cut in half each time the button is pressed. Extending loops (loop doubling) During loop playback, press the [CUE/LOOP CALL, d(LOOP 2X)] button. The loop’s length is doubled each time the button is pressed. 1 During loop playback, press the [LOOP IN/4BEAT (IN ADJUST)] button. Using active loops The [LOOP IN/4BEAT (IN ADJUST)] button starts flashing rapidly, and the [LOOP OUT (OUT ADJUST)] button turns off. The loop in point’s time is displayed on the main unit display. 1 Connect the USB device to this unit. 2 Press one of the [SEARCH m, n] buttons. The loop in point can be adjusted in units of 0.5 frames. ! The same operation is possible using the jog dial. ! The loop in point’s range of adjustment is ±30 frames. ! The loop in point cannot be set at a point beyond the loop out point. Part names and functions 1 During playback, press the [LOOP IN/4BEAT (IN ADJUST)] button at the point at which you want to start loop playback (the loop in point). Setting loops automatically (4-beat Loop) 2 Load a track for which an active loop has been set with rekordbox. One loop stored in rekordbox can be set as the active loop. The set active loop point is displayed as a waveform, as shown below in 1. 3 Press the [LOOP IN/4BEAT (IN ADJUST)] button. Loop playback resumes. ! Normal loop playback also resumes if no operation is performed for over 10 seconds. Fine-adjusting the loop out point (loop out adjust) 1 During loop playback, press the [LOOP OUT (OUT ADJUST)] button. The [LOOP OUT (OUT ADJUST)] button starts flashing rapidly, and the [LOOP IN/4BEAT (IN ADJUST)] button turns off. The loop out point’s time is displayed on the main unit display. 2 Press one of the [SEARCH m, n] buttons. 1 When the set point is reached, the loop is set automatically and loop playback begins. Emergency loops With this unit, a 4-beat loop is set automatically to prevent the sound from being interrupted if a track can no longer continue to play. ! DJ playback is restricted during emergency looping. To cancel emergency looping, load the next track. The loop out point can be adjusted in units of 0.5 frames. ! The same operation is possible using the jog dial. ! The loop out point cannot be set at a point before the loop in point. Storing cue or loop points 3 Press the [LOOP OUT (OUT ADJUST)] button. 1 Connect the USB device to this unit. Loop playback resumes. ! Normal loop playback also resumes if no operation is performed for over 10 seconds. Canceling Loop playback (Loop Exit) During loop playback, press the [RELOOP/EXIT] button. Playback continues beyond the Loop Out Point without returning to the Loop In Point. 2 Set Cue Point or Loop Point. 3 Press the [MEMORY] button. [ MEMORY] is displayed on the main unit display for several seconds, then the point information is stored on the USB device. Stored cue and loop points are indicated [b] at the top of the waveform display. ! To store loop points, touch [MEMORY] during loop playback. Returning to Loop playback (Reloop) After canceling loop playback, press the [RELOOP/EXIT] button during playback. Playback returns to the previously set Loop In Point, and Loop playback resumes. En 13 Calling out stored cue or loop points 1 Connect the USB device to this unit. 2 Load the track whose cue or loop points you want to call out. Stored cue and loop points are indicated [b] at the top of the waveform display. 3 Press the [CUE/LOOP CALL, c(LOOP 1/2X)] or [CUE/LOOP CALL, d(LOOP 2X)] button. Press [CUE/LOOP CALL, c(LOOP 1/2X)] to call out a point before the currently playing position, [CUE/LOOP CALL, d(LOOP 2X)] to call out a point after the currently playing position. The track cues to the called out point and pauses. ! When multiple points are stored, a different point is called out each time the button is pressed. ! Loops set as active loops can also be called out as stored loops. ! If the point called has a comment set to it with the help of rekordbox, the comment is displayed in the area where the name of the track is displayed. ! The set comment list can also be displayed in the track list on the browse screen by pressing the rotary selector. Selecting a comment from the displayed list and pressing the [LOAD c, d] button will call the selected point out. 4 Press the [f (PLAY/PAUSE)] button. Normal or loop playback starts from the point that was called out. Deleting stored cue or loop points 1 Connect the USB device to this unit. 2 Load the track containing the cue point or loop points you want to delete. Stored cue and loop points are indicated [b] at the top of the waveform display. 3 Press the [CUE/LOOP CALL, c(LOOP 1/2X)] or [CUE/LOOP CALL, d(LOOP 2X)] button to call out the point to be deleted. The track cues to the called out point and pauses. ! When multiple points are stored, a different point is called out each time the button is pressed. 4 Press the [DELETE] button. The main unit display shows [ DELETED], and the selected point information is deleted. ! When a stored loop set as an active loop is deleted, the active loop is also deleted. Using hot cues When a hot cue is set, that point can be called out and played instantaneously. Up to 4 hot cues can be set per music track. Setting Hot Cue 1 Press the [HOT CUE/CALL] button to switch to the hot cue mode. 2 During playback or while pausing, press one of the Performance buttons at the point at which you want to set the hot cue. The point at which the button was pressed is set as the hot cue, and the corresponding Performance button turns blue. Simultaneously, the playback history is stored on the USB device. ! During loop playback, the loop is registered as a hot cue. ! The direction of playback is not recorded for hot cues. ! When a hot cue is set during scratch play, playback may stop temporarily. 14 En ! When the quantize function is on, there may be a slight delay in operation of this function in order to synchronize the beat. ! A hot cue which has already been recorded in the Performance button cannot be re-recorded. To store a new Hot Cue, first delete the stored Hot Cue. Playing hot cues During playback or while pausing, press one of the Performance buttons. The hot cue recorded at that button is called out and playback begins. The information of the loop play stored in a Performance button is different from the loop playback set by using the [LOOP IN/4BEAT (IN ADJUST)] or [LOOP OUT (OUT ADJUST)] buttons. ! After the loop stored in the Performance button is called out, you can cancel the loop playback by using the [RELOOP/EXIT] button. You can also fine-tune the loop in point with the help of the [LOOP IN/4BEAT (IN ADJUST)] button or the loop out point with the help of the [LOOP OUT (OUT ADJUST)] button. Calling out hot cues 1 Connect the USB device to this unit. 2 Load the track whose hot cue you want to call out. 3 Press the [HOT CUE/CALL] button while in the Hot Cue mode. The unit switches to the hot cue call out mode and the Performance buttons where hot cues are stored flash. 4 Press the Performance button corresponding to the Hot Cue to be called out. The hot cue is called out and the Performance button turns blue. ! If you don’t want to call out a hot cue, press [HOT CUE/CALL] without pressing the Performance button. The light of button turns off when hot cue is not called out. ! rekordbox can be preset so that hot cues are called out automatically when tracks are loaded. “ ” is displayed on the track list for tracks for which auto hot cue loading is set. Deleting hot cues Press one of the Performance buttons while keeping the [SHIFT] button pressed. The hot cue stored at the corresponding button is deleted, the button turns off, and a new hot cue can now be stored at that button. Using Auto Beat Loops A loop with the specified number of beats is set based on the BPM and the loop playback starts. 1 Switch to the Auto Beat Loop function by pressing the [AUTO BEAT LOOP] button. 2 Press the Performance button corresponding to the beats to want be set (1 beat, 2 beats, 4 beats, 8 beats). From the playback position where the Performance button was pressed, the loops corresponding to the number of beats set are automatically set, after which loop playback starts. During loop playback, the Performance button will flash. ! If the Performance button is pressed while keeping the [SHIFT] button pressed, you can specify the beats as 1/16 beats, 1/8 beats, 1/4 beats, 1/2 beats from the left edge. ! If the track’s BPM cannot be detected, the BPM is set to 120. Canceling loop To cancel a loop, either click the Performance button flashing when loop playback is ON, or press [RELOOP/EXIT] button. Using Loop Slice Slip pausing Loop Slice divides a loop into four sections, and plays the specified section intervals repeatedly while the Performance button is pressed. 1 Press the [VINYL MODE] button. 1 Switch to Loop Slice function by pressing the [LOOP SLICE/EXIT] button. 2 Press the [SLIP] button. 2 Press the Performance button corresponding to the beats to want be set (1 beat, 2 beats, 4 beats, 8 beats). 3 During playback, press the [f (PLAY/PAUSE)] button. From the playback position where the Performance button was pressed, the loops corresponding to the number of beats set are automatically set, after which loop playback starts. During loop playback, the Performance button will flash. ! If the track’s BPM cannot be detected, the BPM is set to 120. ! This operation is not necessary when switching over to loop slice function during loop playback. 4 Press the [f (PLAY/PAUSE)] button to cancel pause mode. This plays the specified section intervals repeatedly. To change the length of section interval without changing the length of the loop, press the [CUE/LOOP CALL c (LOOP 1/2X)] or [CUE/LOOP CALL d (LOOP 2X)] buttons while the Performance button is pressed. ! Loop Slice does not work for loops longer than 16 seconds. 4 Release your finger from the Performance button. ! Loop playback continues if [LOOP SLICE] of the [UTILITY] screen is [CONTINUE]. ! If the [LOOP SLICE] of the [UTILITY] screen is [SINGLE], the player plays the complete section interval and then instantaneously returns to the set cue point and pauses playback. Canceling loop Press the [LOOP SLICE/EXIT] button or the [RELOOP/EXIT] button. Cancels the loop and normal playback resumes. Using the slip mode When the slip mode is turned on, normal playback with the original rhythm continues in the background while in the pause (vinyl mode), scratch play, loop play, hot cue play and reverse play modes. When the slip mode is canceled, normal playback resumes from the point reached while the slip mode was turned on. ! When the quantize function is on, there may be a slight delay in operation of this function in order to synchronize the beat. (Only slip hot cue, Slip beat looping, Slip Loop Slice, and Slip Reversing) Display of the position playing in the background The mode switches to the slip mode. Normal playback continues in the background even while in the pause mode. The [SLIP] button flashes in beat with the sound playing in the background. Normal playback of the sound that was playing in the background resumes. Slip scratching Part names and functions 3 Keep the Performance button pressed. Set the jog mode to VINYL. 1 Press the [VINYL MODE] button. Set the jog mode to VINYL. 2 Press the [SLIP] button. The mode switches to the slip mode. 3 During playback, press the top of the jog dial. The scratch play mode is set. Normal playback continues in the background even while scratching. The [SLIP] button flashes with the beat of the sound playing in the background. 4 Release your hand from the top of the jog dial. Normal playback of the sound that was playing in the background resumes. Slip looping 1 Press the [SLIP] button. The mode switches to the slip mode. 2 Press the [LOOP IN/4BEAT (IN ADJUST)] button, then press the [LOOP OUT (OUT ADJUST)] button. Loop playback starts. Normal playback continues in the background even during loop playback. The [SLIP] button flashes in beat with the sound playing in the background. ! Loops of over 8 seconds cannot be set. ! The same operation is performed when the [LOOP IN/4BEAT (IN ADJUST)] button is pressed for over 1 second and a loop is set. 3 Press the [RELOOP/EXIT] button. Looping is canceled, and normal playback of the sound that was playing in the background resumes. Slip hot cue 1 Press the [SLIP] button. ! When in the slip mode, the currently playing position is indicated by a yellow line on the main unit display’s waveform display (overall waveform or enlarged waveform). The position playing in the background is indicated by a white line on the main unit display’s waveform display (overall waveform). The mode switches to the slip mode. 2 Press the [HOT CUE/CALL] button to switch to the hot cue mode. 3 Keep the Performance button pressed. Hot cueing begins. Normal playback of the sound playing in the background continues even while the Performance button is keep pressed. The [SLIP] button flashes in beat with the sound playing in the background. En 15 ! At the point 4 beats after hot cueing began, the slip hot cue mode is automatically canceled and normal playback of the sound that was playing in the background resumes. Slip reverse 4 Release your finger from the Performance button. The mode switches to the slip mode. Normal playback of the sound that was playing in the background resumes upon releasing your finger from the Performance button before 4 beats have elapsed from the starting position of the hot cue. 2 Press the [DIRECTION, REV] button while the playback is going on. Slip beat looping 1 Press the [SLIP] button. The mode switches to the slip mode. 2 Switch to the Auto Beat Loop function by pressing the [AUTO BEAT LOOP] button. 3 Keep the Performance button pressed. The loop is set automatically and loop playback begins. You can specify 1 beat, 2 beats, 4 beats, and 8 beats from the left end. Normal playback continues in the background even during loop playback. The [SLIP] button flashes in beat with the sound playing in the background. ! If the Performance button is pressed while keeping the [SHIFT] button pressed, you can specify the beats as 1/16 beats, 1/8 beats, 1/4 beats, 1/2 beats from the left edge. 4 Release your finger from the Performance button. Normal playback of the sound that was playing in the background resumes. 5 Press the [RELOOP/EXIT] button. The last loop that was set is played and the slip loop mode is set. Slip Loop Slice 1 Press the [SLIP] button. The mode switches to the slip mode. 2 Switch to Loop Slice function by pressing the [LOOP SLICE/EXIT] button. 3 Press the Performance button corresponding to the beats to want be set (1 beat, 2 beats, 4 beats, 8 beats). From the playback position where the Performance button was pressed, the loops corresponding to the number of beats set are automatically set, after which loop playback starts. During loop playback, the Performance button will flash. ! If the track’s BPM cannot be detected, the BPM is set to 120. ! This operation is not necessary when switching over to loop slice function during loop playback. 4 Keep the Performance button pressed. This plays the specified section intervals repeatedly. To change the length of section interval without changing the length of the loop, press the [CUE/LOOP CALL c (LOOP 1/2X)] or [CUE/LOOP CALL d (LOOP 2X)] buttons while the Performance button is pressed. ! Loop Slice does not work for loops longer than 16 seconds. 5 Release your finger from the Performance button. Directly migrates to Slip Loop. 6 Press the [LOOP SLICE/EXIT] button or the [RELOOP/EXIT] button. Looping is canceled, and normal playback of the sound that was playing in the background resumes. 16 En 1 Press the [SLIP] button. The [DIRECTION, REV] button lights and reverse playback starts. Normal playback continues in the background even during reverse playback. The [SLIP] button flashes in beat with the sound playing in the background. ! Slip reverse play is automatically canceled after 8 beats have elapsed from the position at which the [DIRECTION, REV] button was pressed. The playback returns to normal after reverting to the background and the [DIRECTION, REV] button turns off. ! If the [DIRECTION, REV] button is pressed before 8 beats have elapsed, the slip reverse cancels, and the normal playback of the sound that was playing in the background resumes. Canceling the slip mode Press the [SLIP] button. The slip mode is canceled. ! The slip mode is also canceled when a track is loaded. Using the SYNC function This function can be used to automatically synchronize the tempo (BPM) and beat positions on the left and right decks based on the tracks’ beat grid information as analyzed with rekordbox. ! Music files must be analyzed with rekordbox beforehand in order to use the SYNC function. For instructions on analyzing music files with rekordbox, see the rekordbox user’s manual. ! The following describes the procedure for synchronizing the [DECK 2] track to the [DECK 1] track. 1 Play a track that has been analyzed with rekordbox on [DECK 1]. The deck on which a track that has been analyzed with rekordbox is played first is set as the MASTER for the SYNC function. ! The master can also be specified by pressing the [MASTER] button. 2 Play a track that has been analyzed with rekordbox on [DECK 2]. 3 Press the [SYNC] button for [DECK 2]. [DECK 2] is synchronized to the tempo (BPM) and beat positions of the track playing on [DECK 1]. ! When the [SYNC] button is pressed again, the SYNC function turns off. ! Use the procedure below to restore the currently playing track’s tempo (BPM) to its original tempo after turning the SYNC function off. — Move the tempo slider to the position of the synchronized [TEMPO] (BPM), and then set it back to the center position. — Reload the same track. ! Depending on the track’s beat information, the sound may not be synchronized after the [SYNC] button is pressed. If this happens, the sound can be re-synchronized by pressing the [SYNC] button to turn the sync mode off then back on. bMain unit display Browse section = Main unit display (p.18) cBACK button 1 8 2 9 a b 4 5 7 6 c d e f Part names and functions 3 !Press: The screen moves back to the layer above. = Moving back up to a higher layer (p.20) ! Press for over 1 second: Press for over 1 second to move to the top layer. = Moving back up to a higher layer (p.20) dTAG TRACK/REMOVE button Use these to add and remove tracks from the tag list. = Adding tracks to the tag list (p.22) = Removing tracks from the tag list (p.22) eRotary selector fLOAD c, d buttons Loads the tracks on the specified [DECK]. = Playing media connected to or inserted in this unit (p.27) 1rekordbox button Displays the rekordbox library with PRO DJ LINK (LINK Export) connection. = Playing the rekordbox library on a computer or mobile device (p.27) 2MIDI button Press this to use DJ software. = Operating DJ software by MIDI interface (p.31) 3USB1 button, USB2 button Displays the contents of the connected USB device and mobile devices. = Playing media connected to or inserted in this unit (p.27) 4BROWSE button Press this to display the [BROWSE] screen. = Switching to the browse screen (p.19) 5TAG LIST button Press this to display the [TAG LIST] screen. = Editing tag lists (p.21) 6INFO button Press this to display the [INFO] screen. = Displaying the details of the currently loaded track (p.23) 7MENU (UTILITY) button !Press: Displays the menu screen. ! Press for over 1 second: The [UTILITY] screen is displayed. = Changing the settings (p.29) 8QUANTIZE (DECK) button Turns the quantize function of the deck and beat effects ON/OFF. = Using quantize function (p.28) 9DECK1/2 button Switches to the deck want to be active. aTIME MODE (AUTO CUE) button !Press: The main unit display’s time display mode switches to the elapsed time or remaining time display. ! Press for over 1 second: When pressed for over 1 second, auto cue turns on and off. = Setting auto cue (p.19) En 17 Main unit display Normal playback screen q 1 4 2 5 7 8 9 w v u t s 3 r a 6 b c d 2 e l p 3 f g h i j k m 1Information display section The enlarged waveform analyzed with rekordbox, etc., is displayed here. 2DECK1 information This indicates the information regarding DECK1. 3DECK2 information This indicates the information regarding DECK2. 4AUTO PLAY This lights up when the auto play mode is ON on the [UTILITY] screen. = About the auto-play mode (p.29) 5DECK This indicates the number of the deck displaying information. It also indicates whether that deck is active in the Information display section. 6DECK This indicates the number of the deck displaying information. 7Device This indicates the location of the track. 8Key Indicates the track’s key. 9Beat count down This indicates the number of bars or beats from the currently playing position to the nearest stored cue point. aTrack name You can set background color through rekordbox. bOn Air display This is displayed during the audio output from MASTER OUT. cTrack number display This indicates the track number (01 – 999). dCue/loop point memories This displays the position of cue point, loop point, and hot cue point recorded on the USB device by using the mark. The color of the cue point, loop point can be set through rekordbox. 18 En n o eCue point, hot cue point and loop point display The positions of cue points, loop points and hot cues are displayed as marks. fA. CUE This lights when auto cue is set. = Setting auto cue (p.19) gREMAIN This lights when the time display is set to the remaining time. hTime display (minutes, seconds, milliseconds) This displays the remaining time or elapsed time. iPlaying address display/scale display (1-minute intervals) The track is displayed as a bar graph. The current playback position is displayed as a white vertical line. When the elapsed time is displayed, the left edge of the graph lights. When the remaining time is displayed, the display turns off from the left side. The entire graph flashes slowly when there are less than 30 seconds remaining in the track, then begins flashing rapidly when less than 15 seconds remain. jWaveform display This displays the sound as a waveform. kPlaying speed display The value changes according to the position of the [TEMPO] slider. lPlaying speed adjustment range display This indicates the range in which the playing speed can be adjusted with respect to the original playing speed recorded on the medium. mLoop display This lights up during loop. = Setting loops (p.13) nLoop beat display This displays the number of beats currently set in the loop. oBPM (for deck) display section Displays BPM (Beats Per Minute) of the track currently being played. pQUANTIZE (For deck) This is displayed when the quantize function of the deck operation is ON. = Using quantize function (p.28) qZOOM and GRID ADJUST mode display rParameter display section (msec, BEAT) This displays the parameters specified for the individual effects. sBPM (for effects) display section When in the auto mode, this displays the automatically detected BPM value. The color of the characters turns green during manual input mode, and [TAP] is displayed. This displays the manually input BPM value. tQUANTIZE (for effects) This is displayed when the quantize function of the beat effect is ON. This is displayed in red when the quantize function is enabled, and in gray when the function is disabled. = Using quantize function (p.28) uChannel select display section The name of the channel to which the effect is applied is displayed. vEffect display section The name of the selected effect is displayed. = Using the beat effect function (p.25) wQUANTIZE This is displayed when the quantize function is ON. = Using quantize function (p.28) Jog dial display section When a track is loaded or the track search operation is performed, the silent section at the beginning of the track is skipped and the cue point is automatically set at the point immediately before the sound starts. Press the [TIME MODE (AUTO CUE)] button for over 1 second. Auto cue is set to on. [A. CUE] is displayed on the main unit display. ! When the [TIME MODE (AUTO CUE)] button is pressed again for over 1 second, auto cue is set to off. ! The auto cue level setting remains in the memory, even when the power is turned off. Changing the auto cue level The cue point to be set as the auto cue can be selected using one of the methods below. Setting the cue point by the acoustic pressure level identified as a silent section (8 levels) –36 dB, –42 dB, –48 dB, –54 dB, –60 dB, –66 dB, –72 dB and –78 dB Part names and functions When the rotary selector is pressed for over 1 second, the mode switches between the [ZOOM] mode and the [GRID ADJUST] mode. ![ZOOM] mode: Two waveforms can be simultaneously zoom in or out when the rotary selector is turned. ![GRID ADJUST] mode: When the rotary selector is turned, the beat grid is adjusted. Select the waveform to be adjusted by using [DECK1/2] button. The beat grid can be adjusted using the [MENU (UTILITY)] button. —[RESET]: Resets the adjusted beat grid. —[SNAP GRID (CUE)]: Moves the first beat to the position of the currently set cue. —[SHIFT GRID]: Reflects the results adjusted by using pitch bend during SYNC on the beat grid. Setting auto cue Automatically setting stored cues as cue points MEMORY: The stored cue point nearest the beginning of the track is set as the cue point for auto cueing. ! When [MEMORY] is set, [A. CUE] lights in white on the main unit display. ! The auto cue level setting remains in the memory, even when the power is turned off. 1 Press the [MENU (UTILITY)] button for over 1 second. The [UTILITY] screen is displayed. 2 Turn the rotary selector then press it. Select [A. CUE LEVEL]. 3 Turn the rotary selector then press it. The auto cue level setting changes. Browsing tracks The various devices and the rekordbox library on the connected computer can be browsed to display a list of the tracks. ! When a USB device that does not contain the rekordbox library information is browsed, the folders and tracks (music files) are displayed in a list with a tree structure. 1 Switching to the browse screen Press the device button corresponding to the device you want to display. 2 1Operation display When a button is pressed, the contents of the corresponding source are displayed on a list. ! When the browse screen is displayed, the [BROWSE] button lights. ! When the [BROWSE] button is pressed while the browse screen is displayed, the browse screen closes and the screen returns to the normal playback screen. When the [BROWSE] button is pressed again, the previous browse screen opens. This displays a playback position with 1 loop of 1.8 seconds. It turns during playback and stops in the pause mode. 2Jog touch detection display When the jog mode is set to VINYL, the top of the jog dial lights when pressed. En 19 Description of the screen 1 2 3 4 5 — When there is rekordbox library information on the USB device: That medium’s free space and used space, as well as the number of tracks, number of playlists and last modified dates in the library information — rekordbox on a computer or mobile device: The number of tracks and playlists in the library information Other browsing operations Rearranging tracks (Sort menu) 1List of contents The contents of the selected medium are displayed. 2Uppermost level Displays the name of the upper folder or media of the displayed item. You can set background color through rekordbox. 3Jacket photo Part of the artwork registered in rekordbox is displayed here. When the [INFO] button is pressed, the jacket photo turns off and the track names are displayed along the left edge. For lists of playlists and playing histories, a serial number is displayed. If there is no rekordbox library, the track names are constantly displayed along the left edge. 4Cursor Turn the rotary selector to move the cursor up and down. 5User-set categories The categories displayed with rekordbox can be selected. When the [INFO] button is pressed, the details of the track selected with the cursor are displayed. If there is no rekordbox library, the details of the track selected with the cursor are displayed. Basic operations on the browse screen Selecting items 1 Display the browse screen. = Switching to the browse screen (p.19) 2 Turn the rotary selector to select an item. The jump function can be used by pressing the rotary selector for over 1 second. = Searching using the jump function (p.20) 3 Press the rotary selector to enter the item. When there is a lower layer, that layer opens. When a menu, etc., is displayed, the selected item is entered. When the rotary selector is pressed while the cursor is set at a track, track menu is displayed. = Track menu (p.21) ! When the [LOAD c, d] button is pressed while the cursor is set to a track, that track is loaded in the specified [DECK]. Moving back up to a higher layer Press the [BACK] button while the browse screen is displayed. The screen moves back to the layer above. ! When the [BACK] button is pressed for over 1 second or the medium button for the medium being browsed is pressed, the display moves to the topmost level. ! To play a track on a USB device or a track in the rekordbox library on a computer or a mobile device, the information below can be viewed by pressing the [BACK] button at the topmost level. — When there is no rekordbox library information on the USB device: That medium’s free space and used space 20 En While browsing, the sort menu can be used to change the order of the tracks. ! This function only works in the following cases: — When browsing the rekordbox library on a computer or mobile device — When browsing the rekordbox library on a USB device 1 Display the rekordbox library. 2 When a list of the tracks is displayed, press the [MENU (UTILITY)] button. The sort menu appears on the screen. 3 Use the rotary selector to select and enter the sort item. The tracks on the list are sorted according to the selected item. ! The sort items displayed on the sort menu can be changed in the rekordbox settings. The rekordbox library on the USB device is reflected once it is re-exported after changing the settings. Searching for tracks ! This function only works in the following cases: — When browsing the rekordbox library on a computer or mobile device — When browsing the rekordbox library on a USB device Searching using the [SEARCH] category In the library browse mode, tracks can be search for using the [SEARCH] category. 1 Display the rekordbox library. 2 Use the rotary selector to select and enter the [SEARCH] category. A character appears at the bottom of the main unit display. 3 Use the rotary selector to input characters. Only the tracks including the character you have input are displayed. ! When more characters are input, only the tracks including the character string you have input are displayed. ! When the [BACK] button is pressed, the category selection screen reappears. Searching by using the key of the currently playing track When the displayed category is the key display, the key icon for tracks whose keys are a good match with the currently playing track’s key switches to green. Searching using the jump function The jump function can be used to instantaneously move to the track, category or folder you want to play. The jump function includes the two modes below. ! Letter jumping: Use this when the tracks are arranged or sorted in alphabetical order. ! Page jumping: Use this when tracks are not in alphabetical order or are not sorted. In the letter jump mode Storing the playing history 1 Display a list sorted in alphabetical order. Display a list sorted in alphabetical order, such as the rekordbox library or the track list on a USB device. 1 Connect the USB device to this unit. 2 Press the rotary selector for at least 1 second. Tracks that have been played for approximately 1 minute are stored on the playing history list. ! When a USB device is connected to this unit for the first time or when it is reconnected to this unit, a new playing history is automatically created on the USB device. ! When the same track is played two or more times consecutively, it may not be stored in the history. ! The maximum number of tracks that can be stored on a playing history list is 999. From the 1 000th track on, the oldest entries on the playing history are deleted to make room for the new entries. Up to 999 playing history lists can be created. ! When tracks are registered on the playing history list, their track names, etc., are displayed in green (indicating that they have been played). ! Tracks at the [PLAYLIST] category can be changed to green (played) using the [MENU] button. When changed, the tracks are registered on the playing history list. Switch to the letter jump mode. The first letter of the track or category selected with the cursor is enlarged. The cursor moves to tracks or categories starting with the selected character. ! If there are no tracks or categories starting with the selected character on the list, the cursor does not move. The characters displayed in the letter jump mode are letters A to Z, numbers 0 to 9 and certain symbols. In the page jump mode 1 Display a list not sorted in alphabetical order. Displays the list without sorting in alphabetical order such as folders on a USB device. 2 Press the rotary selector for at least 1 second. Deleting the playback history The mode switches to the page jump mode. 1 Connect the USB device to this unit. 3 Turn the rotary selector to select the page. 2 Display the rekordbox library. The display moves to the selected page. Using the information jump function 3 Use the rotary selector to select and enter the [HISTORY] category. A list of the playing history lists is displayed. The categories to which tracks belong can be displayed by selecting items displayed in the details. This function is convenient for searching for tracks in the same genre as the loaded track, tracks with similar BPMs, etc. 4 Turn the rotary selector and select the playing history list to be deleted. 1 Load a track. The remove menu is displayed. 2 At the normal playback screen, press the [INFO] button. The track’s details are displayed. = Displaying the details of the currently loaded track (p.23) 3 Select and enter the item. The screen switches to the browse screen and the category for the selected item is displayed. ! To close the browse screen, press the [BROWSE] button. ! It may not be possible to select items, for example for items with nothing to be displayed on the browse screen, items for which only icons are displayed in the details, etc. ! When a track is selected, the browse screen displayed directly before the track was loaded is displayed. ! Only the tracks can be selected from a USB device if it does not contain the rekordbox library. Track menu When the rotary selector is pressed while the track is selected or one of the comments in the comments list of loop/memory cue is selected, track menu is displayed. The track menu can be executed by using rotary selector. Track menu Browse LOAD TO DECK1 The track is loaded on DECK1 and playback starts. The point selected in DECK1 is called out. LOAD TO DECK2 The track is loaded on DECK2 and playback starts. The point selected in DECK2 is called out. CUE/LOOP LIST The comments list of memory cue set in rekordbox is displayed. — CANCEL Exiting from the Track menu. Tag List — Part names and functions 3 Turn the rotary selector to select the character or symbol. 2 Play tracks. 5 Press the [MENU (UTILITY)] button. 6 Turn the rotary selector to select and enter the range to be deleted. ![DELETE]: The currently selected playing history list is deleted. ![ALL DELETE]: All the playing history lists are deleted. ! When a USB device’s playing history is loaded as a rekordbox playlist, the previously loaded playing history is deleted from the USB device. ! For tracks in the [PLAYLIST] category, the tracks can be changed from green (played) to white (not played) using [MENU]. When this change is made, the tracks are deleted from the playing history list. 7 Use the rotary selector to select and enter [OK]. Editing tag lists Tracks to be played next or tracks selected according to DJ situations can be marked and collected on lists. The list of collected tracks is called the “tag list”. ! Up to 100 tracks per device can be added to a tag list. ! One tag list can be created per USB device. It is not possible to make a tag list containing tracks on different USB devices. ! It is not possible to register the same track in the same folder twice. Comments list of memory cue/loop En 21 1 2 3 4 5 ! When folders are added while in the folder browse mode, tracks for which ID3 tags, etc., have not been loaded a single time are registered using the file name as the track name. The artist names are not registered. ! After tracks have been added to the tag list, when the registered tracks are displayed on the track list on the browse screen or are loaded in a player and their ID3 tags, etc., are loaded, the file names switch to the track names and the artist names are also registered. Adding tracks from playlists All the tracks on a selected playlist can be added to the tag list. 1 Switch to the browse screen and select and enter the [PLAYLIST] category. 1List of contents The contents of the tag list are displayed here. 2Medium name The name of the medium on which the track is recorded is displayed here. 3Jacket photo Part of the artwork registered in rekordbox is displayed here. When the [INFO] button is pressed, the jacket photo turns off and serial numbers are displayed. 4Cursor Turn the rotary selector to move the cursor up and down. 5User-set categories The categories displayed with rekordbox can be selected. When the [INFO] button is pressed, the details of the track selected with the cursor are displayed. A list of the playlists is displayed, and a list of the tracks is displayed on the right half of the information display screen. 2 Set the cursor to the playlist, then press the [TAG TRACK/REMOVE] button. The playlist name flashes, and all the tracks on that playlist are added to the tag list. Loading tracks from the tag list 1 Press the [TAG LIST] button. The tag list is displayed. Adding tracks to the tag list Selecting tracks and adding them 1 Switch to the browse screen and display the list of tracks. 2 Set the cursor to the track and press the [TAG TRACK/ REMOVE] button. is displayed on the left side of the track, and the track is added to the tag list of that USB device. ! Tracks can be recorded in the tag list ahead of time using rekordbox. = For the operation, see the rekordbox (Mac/Windows) user’s manual. Adding loaded tracks 1 Load a track. 2 At the normal playback screen, press the [INFO] button. 3 Press the [TAG TRACK/REMOVE] button. The track loaded in this unit is added to the tag list. ! Tracks can be added to the tag list by pressing the [TAG TRACK/ REMOVE] button at the normal playback screen as well. ![DECK] of the track to be added can be selected by using the [DECK1/2] button. Adding entire categories or folders All the tracks in a selected category or folder can be added to the tag list. 1 Switch to the browse screen and select a category or folder that has tracks directly under it. A list of the tracks is displayed on the right half of the information display screen. 2 Set the cursor to the category or folder, then press the [TAG TRACK/REMOVE] button. The category or folder name flashes, and all the tracks in that category or folder are added to the tag list. 2 Use the rotary selector to select and enter [USB1] or [USB2]. A tag list in the selected USB device is displayed. 3 Use the rotary selector to select and enter the track you want to load. ! When the rotary selector is pressed while the cursor is set at a track, track menu is displayed. = Track menu (p.21) ! When the [LOAD c, d] button is pressed while the cursor is set to a track, that track is loaded in the specified deck of the unit. Removing tracks from the tag list Tracks can be removed from tag lists. Removing one track at a time 1 Press the [TAG LIST] button. The tag list is displayed. 2 Use the rotary selector to select and enter [USB1] or [USB2]. A tag list in the selected USB device is displayed. 3 Use the rotary selector to set the cursor to the track you want to remove. 4 Press the [TAG TRACK/REMOVE] button for over 1 second. Tracks can be removed from tag lists by pressing the [TAG TRACK/ REMOVE] button at the screens and in the situations described below. ! When the cursor is set to a track registered in the tag list on the browse screen ! When the normal playback screen or a track’s details screen is displayed while a track registered in the tag list is loaded Removing all the tracks 1 Press the [TAG LIST] button. The tag list is displayed. 2 Use the rotary selector to select and enter [USB1] or [USB2]. A tag list in the selected USB device is displayed. 22 En 3 Press the [MENU (UTILITY)] button. 1 Load a track. [LIST MENU] is displayed. 4 Use the rotary selector to select and enter [TAGLIST MENU]. [TAGLIST MENU] is displayed. 5 Use the rotary selector to select and enter [REMOVE ALL TRACKS]. The track’s details are displayed. ! Use [DECK1/2] button to select the [DECK] on which you want to see the track information. Changing track ratings The tracks’ ratings can be changed. Transforming the tag list into a playlist Tracks collected in tag lists can be converted into playlists. ! Converted playlists are displayed as items in the [PLAYLIST] category. 1 Select the rating displayed in the detailed information (display example: ). 2 Press the rotary selector for over 1 second, then turn the rotary selector clockwise or counterclockwise. The rating of the loaded track is changed. ![DECK] of the track to be edited can be selected by using the [DECK1/2] button. 1 Press the [TAG LIST] button. The tag list is displayed. 2 Use the rotary selector to select and enter [USB1] or [USB2]. A tag list in the selected USB device is displayed. Part names and functions 6 Use the rotary selector to select and enter [OK]. 2 At the normal playback screen, press the [INFO] button. Mixer section 3 Press the [MENU (UTILITY)] button. [LIST MENU] is displayed. 4 Use the rotary selector to select and enter [TAGLIST MENU]. [TAGLIST MENU] is displayed. 5 Use the rotary selector to select and enter [CREATE PLAYLIST]. 1 2 3 4 8 6 Use the rotary selector to select and enter [OK]. 2 8 7 9 9 Displaying the details of the currently loaded track 1 6 7 The contents of the tag list are converted into a playlist with the name [TAG LIST XXX]. ! If no rekordbox library information is stored on the USB device, the tag list cannot be converted into a playlist. ! When tag lists include both tracks being managed with rekordbox and tracks not being managed with rekordbox, only the tracks being managed with rekordbox are converted into playlists. The details of the currently loaded track can be checked. 5 d e e a 3 b c fg h f 1MIC1, 2 LEVEL controls Adjusts the audio level input to the [MIC] terminal. = Using a microphone (p.24) 1Deck information display This indicates the [DECK] where the track of which information is displayed is loaded, and the location of the loaded track. 2Track details This displays detailed information on the loaded tracks. 3Jacket photo and comment The jacket photo and comment about the loaded track are displayed. 2MIC EQ (HI, LOW) controls This adjusts the microphone’s sound quality. = Using a microphone (p.24) 3MIC (OFF, ON, TALK OVER) selector switch Turns the microphone on/off. = Using a microphone (p.24) En 23 4MIC (OFF, ON, TALK OVER) indicator This indicator lights up when the microphone is ON, and flashes when the talk over function is ON. = Using a microphone (p.24) 5BOOTH MONITOR control Adjusts the level of audio signals output from the [BOOTH OUT] terminal. = Audio is output from the [BOOTH OUT] terminal (p.25) 6MASTER LEVEL control Adjusts the audio level output from the [MASTER1] and [MASTER2] terminals. = Outputting sound (p.27) Adjusting the sound quality Turn the [HI], [MID], [LOW] controls for the respective channels. Switching the function of the [EQ/ISO (HI, MID, LOW)] controls The control can be switched between [EQ] or [ISOLATOR] through the settings on the [UTILITY] screen. —[EQ]: The equalizer function is set. —[ISOLATOR]: Functions as an isolator. 7DECK1, 2, PHONO1, 2/LINE1, 2 selector switch Used to select the [CH1] or [CH2] input source from among the devices connected to this unit. ! When set to [LINE/PHONO], the mixer section can be used as a DJ mixer. = Outputting sound (p.27) Monitoring sound with headphones 1 Connect headphones to the [PHONES] terminal. = Connecting the input/output terminals (p.6) 2 Press the [CUE (CH1)] or [CUE (CH2)] button. 8TRIM control Adjusts the level of audio signals input in each channel. = Outputting sound (p.27) 9EQ/ISO (HI, MID, LOW) controls The control can be switched between [EQ] or [ISOLATOR] through the settings on the [UTILITY] screen. These adjust the sound quality of the respective channels. = Adjusting the sound quality (p.24) aHEADPHONES MIXING control Adjusts the balance of the monitor volume between the sound of the deck whose [CUE (CH1)] or [CUE (CH2)]button is pressed and the master sound. = Monitoring sound with headphones (p.24) bHEADPHONES LEVEL control Adjusts the audio level output from the [PHONES] terminal. = Monitoring sound with headphones (p.24) cCUE (CH1, CH2) buttons Used to monitor the [CH1] or [CH2] sound. = Monitoring sound with headphones (p.24) dMaster level indicator Select the channel you want to monitor. ! This operation is not necessary to monitor the sound output from the [MASTER1] and [MASTER2] terminals (the sound of the master channel). 3 Turn the [HEADPHONES MIXING] control. — When turned counterclockwise: The volume of [CH1] and [CH2] becomes relatively louder. — At the center position: The volume of the [CH1] and [CH2] sound is the same as the volume of the sound output from the [MASTER1] and [MASTER2] terminals (the sound of the master channel). — When turned clockwise: The volume of the sound output from the [MASTER1] and [MASTER2] terminals (the sound of the master channel) becomes relatively louder. 4 Turn the [HEADPHONES LEVEL] control. Sound is output from the headphones. ! When the [CUE (CH1)] button or [CUE (CH2)] button is pressed again, monitoring is canceled. ! Monitoring of the sound output from the [MASTER1] and [MASTER2] terminals (the sound of the master channel) cannot be canceled. Displays the master output’s audio level. eChannel Level Indicator This displays the audio levels of the respective channels. fChannel fader Switches the channel fader’s curve characteristics from [ , , ] through the settings on the [UTILITY] screen. —[ ]: The curve rises suddenly at the back side. —[ ]: A curve between the ones above and below is set. —[ ]: The curve rises gradually (the sound gradually increases as the channel fader is moved away from the front side). = Mixing using the channel faders (p.28) gCROSS FADER CURVE (THRU, selector switch) , ) (crossfader curve This switches the crossfader curve characteristics. = Mixing using the faders (p.28) hCrossfader The sound of the respective channels is output according to the curve characteristics selected with the [THRU, , ] selector switch. —[THRU]: Choose this when you do not want to use the crossfader. —[ ]: Set here for a curve that rises gradually. —[ ]: Set here for a curve that rises steeply. (When the crossfader moves away from either the left or right edge, the sound is immediately output from the opposite side.) = Mixing using the crossfader (p.28) 24 En Using a microphone 1 Connect a microphone to the [MIC1] or [MIC2] terminal. 2 Set the [OFF, ON, TALK OVER] selector switch to [ON] or [TALK OVER]. —[ON]: The [MIC (OFF, ON, TALK OVER)] indicator turns on. —[TALK OVER]: The [MIC (OFF, ON, TALK OVER)] indicator flashes. ! When set to [TALK OVER], the sound of channels other than the [MIC] channel is attenuated by –20 dB when a sound of –10 dB or greater is input to the microphone. 3 Turn the [MIC1 LEVEL] or [MIC2 LEVEL] control. Adjust the level of the sound output from the [MIC] channel. ! Pay attention that rotating to the extreme right position outputs a very loud sound. 4 Input audio signals to the microphone. Adjusting the sound quality 5TAP (AUTO) button Turn the [MIC EQ (HI, LOW)] control of the [MIC] channel. — When turned fully clockwise, the attenuation of the bass sound is maximum. — When turned fully counterclockwise, the attenuation of the treble sound is maximum. Turn the [BOOTH MONITOR] control. Adjusts the level of audio signals output from the [BOOTH OUT] terminal. 6BEAT EFFECTS control Effect section 71, 2, MIC, CF1, CF2, and MASTER selector switch Switches between the various beat effects. = Using the beat effect function (p.25) This switches to the channel to which the beat effect is applied. = Using the beat effect function (p.25) 8TIME control Part names and functions Audio is output from the [BOOTH OUT] terminal Switches the BPM measurement mode. — AUTO mode: The BPM is measured automatically from the audio signal being input. The [AUTO] mode is set when this unit’s power is turned on. — TAP mode: The BPM is input manually by tapping the [TAP (AUTO)] button. When the [TAP (AUTO)] button is pressed, the TAP mode is set. ! The BPM measuring range in the AUTO mode is BPM = 70 -180. For some tracks, it may not be possible to measure the BPM correctly. ! BPMs set in the TAP mode are only valid for the beat effect function. = Inputting the BPM manually (p.26) Controls the temporal parameter of the beat effect. = Using the beat effect function (p.25) 1 9LEVEL/DEPTH control Adjusts the quantitative parameter of the beat effect. = Using the beat effect function (p.25) aON/OFF button Turns the beat effect on and off. = Using the beat effect function (p.25) 4 5 2 This function lets you instantaneously set various effects according to the tempo (BPM = Beats Per Minute) of the currently playing track. 3 6 3 Using the beat effect function 7 1 Turn the [BEAT EFFECTS] control. This selects the type of effect. 2 Turn the [1, 2, MIC, CF1, CF2, MASTER] selector switch. 8 9 a This selects the channel to which the effect is applied. ![1], [2]: The effect is applied to the sound of the respective channel. ![MIC]: The effect is applied to the sound of [MIC] channel. ![CF1], [CF2]: The effect is applied to the sound of the crossfader’s [1] (left) or [2] (right) side. ![MASTER]: The effect is applied to the sound of the [MASTER] channel. 3 Press the [BEAT c, d] buttons. Set the beat fraction for synchronizing the effect sound. The effect time corresponding to the beat fraction is set automatically. 1Main unit display = Main unit display (p.18) 2SOUND COLOR FX (NOISE, GATE/COMP, CRUSH, FILTER) buttons These turn the respective SOUND COLOR FX on and off. = Using the sound color FX function (p.26) 4 Press the [ON/OFF] button of the beat effect. The effect is applied to the sound. The effect’s time parameter can be adjusted by turning the [TIME] control. The effect’s quantitative parameter can be adjusted by turning the [LEVEL/DEPTH] control. The [ON/OFF] button flashes when the effect is on. ! When the [ON/OFF] button is pressed again, the effect turns off. 3COLOR control This changes the parameters of the SOUND COLOR FX of the different channels. = Using the sound color FX function (p.26) 4BEAT c, d buttons Set the beat fraction for synchronizing the effect sound. = Using the beat effect function (p.25) En 25 Types of BEAT EFFECT Descriptions Parameter DELAY A delay sound is output once according to the beat fraction set with the [BEAT c, d] buttons. When 1/2 beat delay sound is added, 4 beats become 8 beats. Number of beats: 1/8 to 16/1 TIME: 1 msec to 4 000 msec LEVEL/DEPTH: Sets the balance between the original sound and the delay sound. QUANTIZE: Enabled ECHO A delay sound is output several times and gradually attenuated according to the beat fraction set with the [BEAT c, d] buttons. With 1/1 beat echoes, the delay sounds are faded out according to the track’s tempo even after the input sound has been cut. Number of beats: 1/8 to 16/1 TIME: 1 msec to 4 000 msec LEVEL/DEPTH: Sets the balance between the original sound and the echo sound. QUANTIZE: Enabled This function adds a reverberation effect to the input sound. When the delay time is changed, the pitch changes simultaneously. Number of beats: 1/8 to 16/1 TIME: 10 msec to 4 000 msec LEVEL/DEPTH: Sets the balance between the original sound and the effect sound, and sets the quantitative parameter. QUANTIZE: Enabled This function adds a reverberation effect to the input sound. Number of beats: -TIME: 1 % to 100 % LEVEL/DEPTH: Sets the balance between the original sound and the effect sound. QUANTIZE: Disabled The sound is cut according to the beat fraction set with the [BEAT c, d] buttons. Number of beats: 16/1 to 8/1 TIME: 10 msec to 8 000 msec LEVEL/DEPTH: Sets the balance between the original sound and the effect sound. QUANTIZE: Enabled A 1-cycle flanger effect is produced according to the beat fraction set with the [BEAT c, d] buttons. Number of beats: 1/16 to 64/1 TIME: 10 msec to 32 000 msec LEVEL/DEPTH: The further the control is turned clockwise, the more the effect is stressed. When turned all the way counterclockwise, only the original sound is output. QUANTIZE: Enabled PITCH Changes the musical interval (pitch, key) within the range of 1 octave up and down. Number of beats: -TIME: –100 % to 100 % LEVEL/DEPTH: Sets the balance between the original sound and the effect sound. QUANTIZE: Disabled ROLL The sound being input at the point when the [ON/OFF] button is pressed is recorded, and the recorded sound is reversed then output repeatedly according to the beat fraction set with the [BEAT c, d] buttons. Number of beats: 1/16 to 16/1 TIME: 10 msec to 16 000 msec LEVEL/DEPTH: Sets the balance between the original sound and the roll sound. QUANTIZE: Enabled SPIRAL REVERB TRANS FLANGER ! ! ! ! 26 Inputting the BPM manually Effect Name “Number of beats” indicates the beats range that can be set while using that effect. “TIME” indicates the temporal parameter that can be set through [TIME] control. “LEVEL/DEPTH” indicates the quantitative parameter that can be set through [LEVEL/DEPTH] control. “QUANTIZE” indicates whether the effect support quantize function or not. En Tap the [TAP (AUTO)] button at least 2 times in rhythm with the beat (in quarter notes) of the sound being played. The average value of the interval at which the [TAP (AUTO)] button is tapped with a finger is displayed in the BPM (EFFECT) display section. ! To set the mode back to AUTO, press the [TAP (AUTO)] button for over 1 second. Using the sound color FX function These effects change in association with the [COLOR] controls for the different channels. 1 Press one of the [SOUND COLOR FX (NOISE, GATE/COMP, CRUSH, FILTER)] buttons. This selects the type of effect. The button that was pressed flashes. ! The same effect is set for [CH1] and [CH2]. 2 Turn the [COLOR] control. The effect is applied to the channel(s) for which the control(s) was (were) pressed. Types of SOUND COLOR FX effects Effect Name Descriptions [COLOR] control NOISE White noise generated inside the unit is mixed in via the filter and output. ! Turn the [TRIM] control of the respective channel to control the volume. Sound quality can be controlled by turning [EQ/ISO (HI, MID, LOW)] controls. Turn counterclockwise: The cutoff frequency of the filter through which the white noise passes gradually decreases. Turn clockwise: The cut-off frequency of the filter through which the white noise passes gradually increases. GATE/ COMP Turn counterclockwise: The sound becomes tighter with a reduced sense of volume, when the gate Adjusts the lower volume that effect is added to middle and high is higher than the specified pitch. value from the highest sound of Turn clockwise: The sound the original sound. becomes tighter with a reduced sense of volume, when the gate effect is added to low and high pitch. CRUSH Changes the original sound to a crushed-like sound for output. Turn counterclockwise: Increases the sound’s distortion. Turn clockwise: The sound is crushed before passing through the high pass filter. Outputs sound that has passed through a filter. Turn counterclockwise: Gradually decreases the low-pass filter’s cutoff frequency. Turn clockwise: Gradually increases the high-pass filter’s cutoff frequency. FILTER Operation Turning the power on 1 Make all the connections, then plug the power cord into a power outlet. = Connections (p.6) This unit’s indicators light and the power turns on. Turning the power off Press the [u] switch. This unit’s power turns off. ! Do not disconnect the USB device or turn off this unit’s power while the USB indicator is lit or flashing. Doing so could delete this unit’s management data and damage the USB device, making it impossible to read. Connecting and disconnecting USB devices Connecting USB devices Open the cover of the USB device insertion slot and connect the USB device. Disconnecting USB devices 1 Press the [USB STOP] button for over 2 seconds. Move the cursor and select the item. ! Press the rotary selector to move to a lower level in the folder. Press the [BACK] button to return to the level above. ! When the [BACK] button is pressed for over 1 second or the medium button for the medium being browsed is pressed, the display moves to the topmost level. 4 Use the rotary selector to select and enter the track you want to load. When the rotary selector is pressed while the cursor is set at a track, track menu is displayed. = Track menu (p.21) ! When the [LOAD c, d] button is pressed while the cursor is set to a track, that track is loaded in the specified deck of the unit. The track is loaded and playback starts. When the track is loaded, the screen switches to the normal playback screen. ! When a track has been loaded while pausing, press the [f (PLAY/PAUSE)] button to start playback. ! When auto cue is turned on, the disc pauses at the audio start position. In this case, press the [f (PLAY/PAUSE)] to start playback. = Setting auto cue (p.19) If the medium contains the rekordbox library If the USB device connected to this unit contains the rekordbox library information, the rekordbox library is displayed. ! Music files are displayed in the categories (album, artist, etc.) set with rekordbox. Playing the rekordbox library on a computer or mobile device Do not disconnect the USB device or turn off this unit’s power while the USB indicator is lit or flashing. Doing so could delete this unit’s management data and damage the USB device, making it impossible to read. Music files are displayed in the categories (album, artist, etc.) set with rekordbox. 2 Disconnect the USB device. The rekordbox library is displayed on this unit’s main unit display. ! To select a mobile device connected by USB, press the [USB] button. 3 Close the cover of the USB device insertion slot. Operation 2 Press the [u] switch. 3 Turn the rotary selector. 1 Press the [rekordbox] button. 2 Turn the rotary selector. Move the cursor and select the item. Playback This section describes basic track selection operations and how to switch the screen. Playing media connected to or inserted in this unit 1 Load the medium in this unit. = Connecting USB devices (p.27) 2 Press the media button (any of [USB1], [USB2]). The tracks or folders are displayed on a list. The medium whose contents are displayed on the main unit display can be switched. [USB1] button: Displays the contents on the USB device connected to USB1. [USB2] button: Displays the contents on the USB device connected to USB2. ! If the storage device (USB device) contains rekordbox library information, the rekordbox library is displayed. 3 Use the rotary selector to select and enter the track you want to load. When the rotary selector is pressed while the cursor is set at a track, track menu is displayed. = Track menu (p.21) ! When the [LOAD c, d] button is pressed while the cursor is set to a track, that track is loaded in the specified deck of the unit. Outputting sound Before the sound output, check that the unit and the surrounding devices are properly connected. = Connecting the input/output terminals (p.6) Set the volume of the power amplifier or powered speakers connected to the [MASTER1] and [MASTER2] terminals to an appropriate level. Note that loud sound may be output if the volume is set too high. En 27 To output the sound of channel 1 [CH1] To output the sound of [CH2] (channel 2), replace [CH1] with [CH2], [DECK 1] with [DECK 2] and [PHONO1/LINE1] with [PHONO2/LINE2] in the procedure below. 1 Switch the [DECK 1, PHONO1/LINE1] selector switch in the [CH1] section. Select the input source for [CH1] from among the devices connected to this unit. —[DECK 1]: Selects rekordbox, MIDI, USB1, USB2. —[PHONO1/LINE1]: Selects the device connected to the [PHONO1/LINE1] terminals. 2 Turn the [TRIM] control in the [CH1] section clockwise. Adjusts the audio level input to the [CH1] terminal. The [CH1] channel level indicator lights when audio signals are being properly input to [CH1]. Adjust the [TRIM] control so that the orange indicator lights where the track’s volume is highest (at the climax, etc.) Be careful that the red indicator does not light, or the sound could be distorted. 3 Move the [CH1] channel fader to the back side. The level of the sound output from the [CH1] terminals is adjusted. 4 Switch the [CROSS FADER CURVE (THRU, (Crossfader curve selector switch). , 5 Set the crossfader. Switch the channel whose sound is output from the speakers. — Left edge: The [CH1] sound is output. — Center position: The sound of [CH1] and [CH2] is mixed and output. — Right edge: The [CH2] sound is output. ! This operation is not necessary when the [CROSS FADER CURVE (THRU, , )] (crossfader curve selector switch) is set to [THRU]. 6 Turn the [MASTER LEVEL] control clockwise. Sound is output from the speakers. The master level indicator lights. Adjust the [MASTER LEVEL] control so that the orange indicator lights where the track’s volume is highest (at the climax, etc.). ! Adjust the master level indicator (red color) to ensure that it does not light, or the sound could be distorted. Mixing using the faders Prepare the unit in advance such that the sound of [CH1] is output from the speakers. = Outputting sound (p.27) For information on how to monitor sound, see the following: = Monitoring sound with headphones (p.24) Mixing using the channel faders 1 Set the [CROSS FADER CURVE (THRU, , )] (Crossfader curve selector switch) to [THRU]. 2 Switch the [DECK 2, PHONO2/LINE2] selector switch in the [CH2] section. 3 Turn the [TRIM] control in the [CH2] section clockwise. 4 Press the [CUE (CH2)] button. The sound of [CH2] is monitored from the headphones. 5 Turn the [HEADPHONES MIXING] control. This adjusts the balance of the monitor volume between the sound output from the [MASTER1] and [MASTER2] terminals (the sound of [CH1]) and the sound of [CH2]. En While checking the sound over the headphones, adjust the tempo of [CH2] track to match the tempo of [CH1] track. 7 While moving the [CH2] channel fader to the back, move the [CH1] channel fader to the front. While checking the sound output from the speakers, operate the channel faders to substitute the sound of [CH1] with the sound of [CH2]. Mixing is completed once only the [CH2] sound is being output from the speakers. Mixing using the crossfader 1 Set the [CROSS FADER CURVE (THRU, , )] (Crossfader curve selector switch) to [ ] or [ ]. 2 Operate [CH2]. Perform steps 2 to 6 at Mixing using the channel faders above. 3 Move the crossfader gradually to the right. While checking the sound output from the speakers, operate the crossfader to substitute the sound of [CH1] with the sound of [CH2]. Mixing is completed once only the [CH2] sound is being output from the speakers. )] This switches the crossfader curve characteristics. 28 6 Operate [DECK 2]. Using quantize function This function can be used to play auto beat loops, apply beat effects, etc., in tempo with the currently playing track based on the track’s beat grid information as analyzed with rekordbox. ! Music files must be analyzed with rekordbox beforehand in order to use the quantize function. For instructions on analyzing music files with rekordbox, see the rekordbox user’s manual. Press the [QUANTIZE (DECK)] button. Turns the quantize function on. When the quantize function is turned on, the points are automatically set to the nearest beat position when auto beat loops, beat effects, cues or hot cues are set. Furthermore, the auto beat loop, hot cue, playing in reverse, and beat effect functions can be used without breaking the beat. ! When the [QUANTIZE (DECK)] button is pressed again, the quantize function turns off. ! When the [QUANTIZE (DECK)] button is pressed and held for more than one second, quantize function of the deck operation can be turned on or off, without affecting the quantize function of the beat effect. ! The quantize function is disabled in [REVERB] and [PITCH] of the beat effect. Changing the settings 1 Press the [MENU (UTILITY)] button for over 1 second. The [UTILITY] screen is displayed. 2 Use the rotary selector to change the setting. 3 Press the rotary selector. The changed settings are stored. ! To close the [UTILITY] screen, press the [MENU (UTILITY)] button. About the auto-play mode About the auto standby function When the auto standby function is turned on, the power is automatically set to the standby mode after four hours have passed with all of the following conditions met. About language settings Select the language to be used for displaying track names and messages on the screen. ! When the language is changed, the messages on the main unit display are displayed in the selected language. ! When displaying track names, etc., to display characters written in local codes other than Unicode, change the [LANGUAGE] setting. Changing the settings ! When the auto-play mode is turned on, the auto-play mode icon in the upper left corner of the normal playback screen lights up and [A. CUE] turns off. The songs in the category/folder having the currently loaded song are continuously played until the end of the last song. ! The songs are played in the sequence of time at which the songs are loaded. That none of this unit’s buttons or controls are operated. That this unit’s channel level indicator is not lit. That the playback function is not operating. That no PRO DJ LINK connections are made. That no USB device is connected to the USB device insertion slot (Type A terminal) on the unit’s top panel. — That no computer is connected to the [ USB] terminal (Type B terminal) on the unit’s rear panel. ! When the [MASTER REC (WAKE UP)] button is pressed, the standby mode is canceled. ! This unit is shipped with the auto standby function turned on. If you do not want to use the auto standby function, set [AUTO STANDBY] to [OFF]. — — — — — Setting preferences Options settings Setting ranges Descriptions A. CUE LEVEL –36 dB/–42 dB/–48 dB/–54 dB/ –60 dB/–66 dB/–72 dB/–78 dB/MEMORY* Sets the auto cue level. = Changing the auto cue level (p.19) SLIP FLASHING ON*/OFF Sets whether or not the indicators of buttons, etc., for which the slip function is activated when the [SLIP] button is pressed flash. ON AIR DISPLAY ON*/OFF Set whether to display/hide the [ON AIR DISPLAY]. VINYL SPEED ADJUST TOUCH/RELEASE TOUCH&RELEASE*/TOUCH/RELEASE = Adjusting the playback and stopping speeds (p.12) AUTO PLAY MODE ON/OFF* = About the auto-play mode (p.29) LOOP SLICE CONTINUE*/SINGLE = Using Loop Slice (p.15) EQ CURVE EQ*/ISOLATOR CH FADER CURVE [ [ ]CH FADER CURVE1/[ ]CH FADER CURVE3 Sets the EQ/ISO (HI, MID, LOW) control function to [EQ] or [ISOLATOR]. ]CH FADER CURVE2*/ Sets the channel fader curve. = Mixer section (p.23) MASTER ATT –6 dB, –3 dB, 0 dB* Sets the master output attenuator. MIXER MODE XDJ-RX*/MIDI CONTROL = Changing the [MIXER MODE] (p.31) LANGUAGE — Sets the main unit display’s language. LCD BRIGHTNESS 1, 2, 3*, 4, 5 Sets the main unit display’s brightness. SCREEN SAVER ON*/OFF When set to [ON], the screen saver starts up in any of following cases: ! When no track is loaded in this unit for over 5 minutes ! When no operation is performed for over 100 minutes while in the pause or cue standby mode or when [END] is displayed on the deck display section. AUTO STANDBY ON*/OFF = About the auto standby function (p.29) VERSION No. — Displays this unit’s software version. *: Setting upon purchase En 29 Using the DJ software Installing the driver software 2 Click the [ASIO] tab. About the driver software This driver software is an exclusive driver for outputting audio signals from the computer. Obtaining the driver software 1 Launch a web browser on the computer and access the Pioneer DJ support site below. http://pioneerdj.com/support/ 2 Click [Software Download] under [XDJ-RX] on the Pioneer DJ support site. 3 Click the icon of the driver software to download the driver software from the download page. ! For information on installing the driver software, see the Pioneer DJ support site. Connecting this unit and a computer by USB 1 Connect this unit to your computer via a USB cable. ! If the buffer size is made large, drops in audio data (breaks in the sound) occur less easily, but the time lag due to the delay in the transfer of the audio data (latency) increases. Checking the version of the driver software = Connections (p.6) 2 Press the [u] switch. Turn on the power of this unit. ! The message [Installing device driver software] may appear when this unit is first connected to the computer or when it is connected to a different USB port on the computer. Wait a while until the message [Your devices are ready for use] appears. For Windows 1 Click the Windows [Start] menu>[All Programs]> [Pioneer]>[XDJ_RX]>[XDJ-RX Setting Utility]. ! For Windows 8, click [XDJ-RX Setting Utility] from the [Start] screen. 2 Click the [About] tab. Adjusting the buffer size (Windows) This unit functions as an audio device conforming to the ASIO standards. ! If an application using this unit as the default audio device (DJ software, etc.) is running, quit that application before adjusting the buffer size. 1 Click the Windows [Start] menu>[All Programs]> [Pioneer]>[XDJ_RX]>[XDJ-RX Setting Utility]. ! For Windows 8, click [XDJ-RX Setting Utility] from the [Start] screen. 30 En For Mac (OS X) Click the [Macintosh HD] icon > [Application] > [Pioneer] > [XDJ-RX] > [XDJ-RX driver version display utility]. Operating DJ software by MIDI interface This unit also outputs the operating data for the buttons and controls in MIDI format. If you connect a computer with a built-in MIDI-compatible DJ software via a USB cable, you can operate the DJ software on this unit. The sound of music files being played on the computer can also be output from the XDJ-RX. To use this unit as an audio device, install the driver software on the computer beforehand. This unit must also be selected in the DJ software’s audio output device settings. For details, see your DJ software’s operating instructions. 1 Connect the [ computer. USB] terminal of the unit to your = Connecting the input/output terminals (p.6) The connecting screen is displayed. For details on this unit’s MIDI messages, see “List of MIDI Messages”. ! “List of MIDI Messages” can be obtained from [MIDI-compatible software] of [Software Info] of [XDJ-RX] on the Pioneer DJ support site below. http://pioneerdj.com/support/ Changing the [MIXER MODE] There are two types of DJ software mixing modes, one for mixing using an external mixer and one for mixing within the DJ software. On this unit, either mixing mode can be used by changing the [MIXER MODE] setting on the [UTILITY] screen. 1 Press the [MENU (UTILITY)] button for over 1 second. The [UTILITY] screen is displayed. 2 Turn the rotary selector, select [MIXER MODE], then press the rotary selector. 3 Turn the rotary selector, select the mode you want to set, then press the rotary selector. —[XDJ-RX]: The sound is mixed by using the mixer section of the unit. —[MIDI CONTROL]: The sound is mixed within the DJ software. Set the DJ software’s audio output settings as described below. PIONEER XDJ-RX MASTER/CH1 L PIONEER XDJ-RX MASTER/CH1 R PIONEER XDJ-RX PHONES/CH2 L PIONEER XDJ-RX PHONES/CH2 R ! To close the [UTILITY] screen, press the [MENU (UTILITY)] button. Using the DJ software 2 Press the [BROWSE] button, and then press [MIDI] button. About MIDI messages 3 Press the [LOAD c, d] button. The deck or the mixer section for which the [LOAD c, d] button is pressed switches to control mode. 4 Launch the DJ software. Communication with the DJ software starts. ! The DJ software on the computer can be operated using the buttons and rotary selector on this unit. ! It may not be possible to use some buttons to operate the DJ software. ! When the [MIXER MODE] is set to [XDJ-RX], DJ software does not work in the mixer section. ! The control mode for the loaded deck or mixer section is canceled, when a track is loaded in the unit. 5 Change the control deck. ! Switch the control decks A, B to C, D by pressing the [DECK1/2] button. ! When [SHIFT] button and [DECK1/2] button is pressed simultaneously, only decks for which [SHIFT] button is pressed can be changed. En 31 Additional information Troubleshooting ! Incorrect operation is often mistaken for trouble or malfunction. If you think that there is something wrong with this component, check the points below and the [FAQ] for the [XDJ-RX] on the Pioneer DJ support site. http://pioneerdj.com/support/ Sometimes the problem may lie in another component. Inspect the other components and electrical appliances being used. If the problem cannot be rectified, ask your nearest Pioneer authorized service center or your dealer to carry out repair work. ! The unit may not operate properly due to static electricity or other external influences. If this happens, normal operation can be sometimes restored by removing the power cord after turning the power off, and turning the power back on after inserting the power cord into the power outlet. Power supply Problem Check Remedy The power is not turned on. None of the indicators light. Is the power cord properly connected? Plug in the power cord to an AC outlet. (page 6 ) Is the [u] switch of the power on? Turn the [u] switch of the power on. (page 27) Problem Check Remedy No sound or small sound. Are the [DECK 1, PHONO1/LINE1] and [DECK 2, PHONO2/LINE2] selector switches set to the proper positions? Switch the channel’s input source using the [DECK 1, PHONO1/LINE1] and [DECK 2, PHONO2/LINE2] selector switches. (page 27) Are the [TRIM] control, channel faders, crossfader and [MASTER LEVEL] control set to the proper positions? Set the [TRIM] control, channel faders, crossfader and [MASTER LEVEL] control to the proper positions. (page 2 7) Is the [LINE, PHONO] selector switch on this unit’s rear panel properly set? Properly set the [LINE, PHONO] selector switch on this unit’s rear panel according to the connected device. (page 6) Is the [MASTER LEVEL] control set to the proper position? Adjust the [MASTER LEVEL] control so that the master level indicator’s orange indicator lights at the peak level. (page 2 7) Is the [TRIM] control set to the proper position? Adjust the [TRIM] control so that the channel level indicator’s orange indicator lights at peak level. (page 2 7) Is the [LINE, PHONO] selector switch on this unit’s rear panel properly set? Properly set the [LINE, PHONO] selector switch on this unit’s rear panel according to the connected device. (page 6) Is the sound level input to the [MIC] terminal set to an appropriate level? Set the [MIC LEVEL] control to the proper position. (page 24) No sound is produced, or sound is distorted or noisy. Is this unit placed near a TV? Turn the TV’s power off or install this unit and TV away from each other. Microphone sound is not output or volume is low. Is the [MIC LEVEL] control set to the proper position? Set the [MIC LEVEL] control to the proper position. (page 24) Is the switch on this unit or the microphone turned off? Turn the switch on. Have you connected an analog player with a builtin phono equalizer? For analog players with built-in phono equalizers, use with the [LINE, PHONO] selector switch on this unit’s rear panel switched to [LINE]. (page 6 ) Audio output Distorted sound. Sound is distorted when an analog player is connected to this unit’s [LINE/PHONO] terminals. Or, lighting of the channel level indicator does not change even when the [TRIM] control is turned. If the analog player with built-in phono equalizer has a [LINE, PHONO] selector switch, switch it to [PHONO]. Is an audio interface for computers connected between the analog player and this unit? If the output of the audio interface for computers is line level, use with the [LINE, PHONO] selector switch on this unit’s rear panel switched to [LINE]. (page 6 ) If the analog player has a [LINE, PHONO] selector switch, switch it to [PHONO]. Display Problem Remedy When playing files recorded in VBR, it may happen that the set cannot detect the length of the track immediately and that some time is required for the playing address display to appear. The category is not displayed. Is the rekordbox library information stored on the USB device? Use a device onto which the library information has been exported from rekordbox. Is the USB device write-protected? Cancel the USB device’s write-protection so that this unit can write on it. Is the auto standby function activated? This unit is shipped with the auto standby function turned on. If you do not want to use the auto standby function, set [AUTO STANDBY] to [OFF]. (page 2 9) Nothing is displayed. 32 Check The playing address display is not — displayed in the remaining time mode. En Functions and operations Problem Check Remedy Can’t crossfade. , )] Is the [CROSS FADER CURVE (THRU, (crossfader curve selector) switch set to [THRU]? Set the [CROSS FADER CURVE (THRU, , )] (crossfader curve selector) switch to a position other than [THRU]. (page 2 7) Back cue function does not work. Is a cue point set? Set a cue point. (page 1 2) Beat effect does not work. Is the [LEVEL/DEPTH] control set to the center position? Turn the [LEVEL/DEPTH] control clockwise or counterclockwise. (page 2 5) Is the [TRIM] control set to the proper position? Set the [TRIM] control to the proper position. (page 25) Is the [SOUND COLOR FX (NOISE, GATE/COMP, CRUSH, FILTER)] button pressed? Press any of the [SOUND COLOR FX (NOISE, GATE/COMP, CRUSH, FILTER)] buttons. (page 26) Color effect does not work. Is the [COLOR] control set to the proper position? Set the [COLOR] control to the proper position. (page 26) SYNC function does not work. Has the music file been analyzed? Analyze the file. (page 16) SYNC function does not work even when files are analyzed. Is the beat grid irregular? Is the beat grid properly tapped? Set the beat grid properly. (page 1 9) Are the BPMs of the tracks in the two decks too different? The SYNC function will not work properly if the BPM of the track on the deck for which the [SYNC] button is pressed is outside the adjustable tempo range of the track on the deck for which the [SYNC] button is not pressed. Are you scratching? The SYNC function is disabled while scratching. Settings are not stored in the memory. Has the power been turned off directly after changing the setting? After changing settings, wait at least 10 seconds before turning the power off. Always turn off the power by pressing [u] switch. Problem Check Remedy USB device is not recognized. Is the USB device properly connected? Connect the device securely (all the way in). Is the USB device connected via a USB hub? USB hubs cannot be used. Is the USB device supported by this unit? This unit supports such USB mass storage class USB devices as external hard disks and portable flash memory devices. Is the file format supported by this unit? Check that the file format of the connected USB device is supported on the unit. (page 4) — Turn the power off, wait 1 minute, then turn the power back on. Is there a large number of folders or files recorded on the USB device? When there are many folders or files, some time may be required for loading. Are files other than music files stored on the USB device? When files other than music files are stored in folders, time is required to read them as well. Do not store files or folders other than music files on the USB device. Time is required to read USB devices (flash memory drives and hard discs). Playback does not start when a track is loaded from a USB device. Are the files playable? Check that the file format of the playing track is supported on the unit. (page 4) Is the auto cue function activated? Press and hold the [TIME MODE(AUTO CUE)] button for one second or more, and disable the auto cue function. (page 1 9) File cannot be played. Is the file copyright-protected (by DRM)? Copyright-protected files cannot be played. Music files cannot be played. Are the music files damaged? Play music files that are not damaged. Additional information USB devices DJ software Problem Check Remedy DJ software on a computer cannot be operated. Is the USB cable properly connected? Connect the unit and the computer directly by using the USB cable. USB hub cannot be used. (page 6 ) DJ software’s sound is not properly output. Are the DJ software’s output settings and this unit’s [MIXER MODE] setting properly set? Check the DJ software’s settings, then check this unit’s settings on the [UTILITY] screen and set the proper signal path. (page 31) Is the driver software properly set? Set the driver software properly. Is the driver software’s latency value suitable? Set the driver software’s latency to a suitable value. Sound being played is interrupted when using DJ software. Set the DJ software’s latency to a suitable value. Error messages When this unit cannot operate normally, an error code appears on the display. Check the table below and take the measures indicated. If an error code not shown on the table below is displayed, or if the same error code is displayed again after taking the indicated action, contact your store of purchase or a nearby Pioneer service station. Error code Error type Description of error Cause and action E-8302 CANNOT PLAY TRACK Track data (files) on the storage device cannot be read correctly. The track data (file) may be corrupt. dCheck whether the track (file) can be played on another player, etc., capable of playing the same formats as this unit. E-8304 E-8305 UNSUPPORTED FILE FORMAT Music files that cannot be played normally are loaded. Format is wrong. dReplace with music files in the proper format. En 33 List of icons displayed on the main unit display section Genre Rating Time Playing Edit the rating Artist Year Bit rate Registered in tag list WAIT Album Remixer DJ play count rekordbox Track/file name Label Date library added Computer Hot cue Original artist Open folder USB Playlist HISTORY Key Close folder Comment Tempo (BPM) Color Search MEMORY CUE comments About iPod/iPhone ! This product has been developed and tested based on the iPod/iPhone software versions indicated on the Pioneer support DJ site. (http://pioneerdj.com/support/) ! Compatibility with this product may be lost if a version other than the one indicated on the Pioneer support DJ site is installed on your iPod/iPhone. ! Note that Pioneer does not offer any guarantee regarding the operation of iPod/iPhone. ! Pioneer will accept no responsibility whatsoever for any loss of data on iPod/iPhone during use. ! With iPod/iPhone, material that is not copyrighted or the material for which duplication and playback is legally permitted may be duplicated and played by individuals on a private basis. Infringement of copyrights is prohibited by law. About trademarks and registered trademarks ! Pioneer and rekordbox are trademarks or registered trademarks of the PIONEER CORPORATION. ! Windows is a registered trademark of Microsoft Corporation in the United States and other countries. ! Adobe and Reader are either registered trademarks or trademarks of Adobe Systems Incorporated in the United States and/or other countries. ! ASIO is a trademark of Steinberg Media Technologies GmbH. ! “Made for iPod” and “Made for iPhone” mean that an electronic accessory has been designed to connect specifically to iPod or iPhone, respectively, and has been certified by the developer to meet Apple performance standards. Apple is not responsible for the operation of this device or its compliance with safety and regulatory standards. Please note that the use of this accessory with iPod or iPhone may affect wireless performance. ! iPhone, iPod, iPod touch, Mac, Macintosh and OS X are trademarks of Apple Inc., registered in the U.S. and other countries. !Android™ is a trademark of Google Inc. ! iOS is a trademark on which Cisco holds the trademark right in the US and certain other countries. ! Wi-Fi is a registered mark of the Wi-Fi Alliance. ! This software is based in part on the work of the Independent JPEG Group. The software in this unit uses in part software of the Independent JPEG Group. About using MP3 files This product has been licensed for nonprofit use. This product has not been licensed for commercial purposes (for profit-making use), such as broadcasting (terrestrial, satellite, cable or other types of broadcasting), streaming on the Internet, Intranet (a corporate network) or other types of networks or distributing of electronic information (online digital music distribution service). You need to acquire the corresponding licenses for such uses. For details, see http://www.mp3licensing.com. 34 En Cautions on copyrights rekordbox restricts playback and duplication of copyright-protected music contents. ! When coded data, etc., for protecting the copyright is embedded in the music contents, it may not be possible to operate the program normally. ! When rekordbox detects that coded data, etc., for protecting the copyright is embedded in the music contents, processing (playback, reading, etc.) may stop. Recordings you have made are for your personal enjoyment and according to copyright laws may not be used without the consent of the copyright holder. ! Music recorded from CDs, etc., is protected by the copyright laws of individual countries and by international treaties. It is the full responsibility of the person who has recorded the music to ensure that it is used legally. ! When handling music downloaded from the Internet, etc., it is the full responsibility of the person who has downloaded the music to ensure that it is used in accordance with the contract concluded with the download site. — The specifications and design of this product are subject to change without notice. © 2014 PIONEER CORPORATION. All rights reserved. <DRI1257-A>


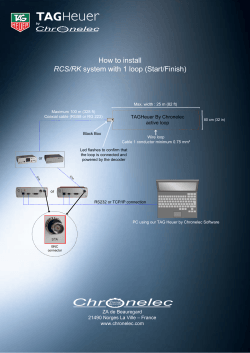


© Copyright 2026