
isel-4-axes servo motor control card UPMV 4/12
isel-4-axes isel servo motor control card UPMV 4/12 Version 3.00, 3.10, 3.20 Operation Instructions Page • Important references • Contents • • • • • • • Hardware manual Software manual Appendix A Appendix B PARKON.EXE PAREIN.EXE License agreement B.326 003.03/2000.27/E I VII (chapter 1 and 2) (chapter 3) (circuit diagram) (isel-intermediate format) (configuration program) (setting program) 1 26 182 183 197 213 247 About these instructions About these instructions In this manual you find different symbols marking important information for easy and fast reference. Danger Caution Reference Example Supplementary information © iselautomation GmbH & Co. KG 1998 All rights reserved No part of this publication may be reproduced, stored in a retrieval system, or transmitted without the prior writers permission of iselautomation GmbH & Co. KG. iselautomation GmbH & Co. KG have taken care in preparation of this manual, but make no expressed or implied of any kind and assume no responsibility for errors or omissions. iselautomation GmbH & Co. KG retains the right to make changes to these manual at any time without notice. In spite of every care, printing errors and errors can not be excluded. We welcome any suggestions and remarks on faults. Manufactor: Co. iselautomation GmbH & Co.KG Bürgermeister-Ebert-Str. 40 D-36124 Eichenzell Fax: +49-6659-981-776 E-Mail: [email protected] http://www.isel.com Important references Important references for using this isel servomotor controller card UPMV 4/12 This manual is aimed for the PC-card UPMV 4/12. In this manual you can find: - the description of the PC-card, both for the hardware and for the enclosed driver software - the description of the configuration program PARKON.EXE - the description of the setting program PAREIN.EXE The successive steps at the installation of the hardware and software are described now: 1. Hardware installation - adjustment of the basis address of the card (look chapter 2.2 in the hardware manual) - adjustment of the hardware interrupt number (look chapter 2.3 and 2.4 in the hardware manual) - adapt the encoder signals and the encoder voltage (look chapter 2.7 in the hardware manual) - install the card in a computer with the DOS/WINDOWS operating system of Microsoft You need a lengthened ISA-Bus-connector. If you use a Pentium chip you have to make changes in the BIOS (look chapter 2.4 in the hardware manual and 3.2.12.2 in the software manual) - connect the card to the power unit and the mechanic The 50pin connector is the hardware interface of the card to the outer world (look chapter 2.9 in the hardware manual). If you use an isel servo controller, you can connect it with the enclosed cable. - If you change your driver version from 3.00 or 3.00A to 3.10 you should absolutely read point 6. - our standard driver version is 3.10 (at delivery). If you furthermore use the older versions 3.00 or 3.00A you should absolutely read point 7. I Important references 2. Software installation - use the program INSTALL.BAT to copy the enclosed software. The directory \SERVO on your hard disc includes all programs you need for the card. 3. Put the card into operation - set up a initialisation file with PARKON.EXE (look to the right manual). The enclosed initialisation file EXAMPLE.INI should be an example. If you use an isel servo controller you should absolutely read the right manual. - put into operation of the card and your system with PAREIN.EXE (look to the right manual). It is absolutely necessary to work through all sub menus for each axis in this program. 4. Driver software installation - you can install the driver with ISELDRV.EXE (look chapter 3.1 in the software manual). The installation process can be automized by entering the corresponding command line in the AUTOEXEC.BAT on your computer. 5. Start the applications program - you can start your application program. Without an application program you can’t use the functions of the driver and the card. Some useful applications programs of iselautomation are HPREMOTE, REMOTE, PRO-DIN, PRO-PAL etc. If you develop your own application program you should read very detailed the software manual. There you find all references and the programming interfaces. If you change your driver version from 3.00 or 3.00A to 3.10 you should absolutely read point 6. II Important references 6. Change the driver version 3.00 or 3.00A to version 3.10 To change the driver version 3.00 or 3.00A to version 3.10 following steps are necessary: 6.1 Change of the hardware on the PC-card - demand a new PLD-modul with the marking SE_LIW3N - remove the PC-card - change the PLD-modul on the PC-card PLD-modul to change - Please pay attention to the right pin position of the PLD-modul. Pin 20 Pin 11 PLD-modul: SE_LIW3N Pin 1 Pin 10 You can find the pin number of the PLD-modul by means of the half circle mark at the edge. On the circuit board of the PC card (drawing) pin 1 has to be down on left side (further information’s you can find in the hardware manual, chapter 2.8). - build in the PC-card again. III Important references 6.2 Change the driver software - Install the new driver software You should make by all means a copy of the old software including the initialisation file. Afterwards you can install the new driver version by starting the program INSTALL.BAT on the disks. All necessary programs will be copied to the directory /SERVO. If you use a different directory name for the servo driver you can copy the programs from /SERVO into the old directory. - Change the old initialisation file to the new driver version 3.10. Start the new configuration program PARKON.EXE for changing the old initialisation file *.INI of you system to an initialisation file of the driver version 3.10. The conversion is done in the menu: File/..Conversion. At the conversion all system parameters are taken over in the new initialisation file. Please pay attention to the enlargement. a) In the menu Software/..Ref_switch you can define the scan code of the key for the interruption of the reference drive. The standard key is ESCAPE key. With the setting program PAREIN.EXE you can find out the scan code of each key. b) In the menu Software/..Überwachungsport you can set? the input and output ports to control your system. If your system is not an isel-system aou should read the manual for the setting program PARKON.EXE. Otherwise please contact us. We will help you. c) In the menu Hardware/..V_Axis factor you can define the speed factors of the axes. You can find out these factors with the help of the setting program PAREIN.EXE. d) In the menu Hardware/.. V_Reduction the circle reducing factor? and the path reducing factor? is set to 1. In the new version you shouldn’t change this values any more. e) In the menu Hardware/..Controller you can define, whether the axeregulator? in case of (run after error) Nachlauffehlers? should be eliminated or not. Standard is „Off“, the axe controller are eliminated. The program will be closed not until the initialisation file is saved. IV Important references Please read the manual of PARKON.EXE to get more information’s. - Complete the new initialisation file with the setting program PAREIN.EXE. a) In the menu System/..PC-card the hardware of the card is tested. Please note that the software can’t check, whether the PLD-modul is changed yet or not. b) In the menu System/..Überwachung you can check the configuration of the Überwachungsports. In case of an isel-system you can use the standard setting, which is feed with the configuration program PARKON.EXE. c) In the menu System/..ref._key you can find out the scan code of the key, which interrupts the Referenzfahrt. You should use the standard key ESCAPE. d) In the menu Axe/..Posi._controller you can find out the velocity factors of the axes. You don’t have to determine the control parameter anew. Please read by all means the right chapter in the manual of the setting program PAREIN.EXE. 6.3 Changes of the application software - Adapting the surface programs If you write your own application programs you have to make some changes, otherwise your programs will not run with the new driver version. All necessary information to make your changes you will find in chapter 2.8 of the hardware manual and in chapter 3.2.15 of the software manual. If you use our surface software (HPREMOTE, REMOTE, PRO-DIN, PRO-PAL etc) you have to demand the new versions from iselautomation. The old surface software doesn’t run with the new driver version. 7. Using the old driver versions 3.00 oder 3.00A Now we deliver only the standard PC-card and the belonging driver software version 3.10. If you still want to use the old driver version 3.00 or 3.00A you have to demand additional the old PLD-modul with the mark SE_LIW2N and the old driver software. Analog to point 6.1 you can exchange the old PLD-modul for the new one. V Important references 8. Using the driver version 3.20 The driver version 3.20 is compare to the version 3.10 a software extension. With the version 3.20 you have the possibility to consider the different acceleration behaviour of the motor in the lower and upper range of number of revolution. There is no hardware difference between these both versions. To update the driver version from 3.10 to 3.20 is made easy by converting the initialisation file with PARKON.EXE to the new version. To update the driver version from 3.00 and 3.00A to 3.20 is similar like the update to version 3.10. VI Contents Contents Hardware description ............................................................................. 1 1 Introduction ..................................................................................................... 1 1.1 Step motor or servo motor? .................................................................................1 1.2 The difference between a handling system and a CNC processing unit with regard to the control system ................................................................................3 1.3 What you will get from us and what you have to contribute yourself ..................6 1.4 Why this design? ..................................................................................................8 2 The PC card ................................................................................................... 10 2.1 The layout of the PC card...................................................................................10 2.2 The base address of the PC card and the individual port addresses ...............12 2.3 The axis controllers.............................................................................................14 2.4 The timers, the hardware interrupts and the unlucky owners of Pentium computers with PCI bus .....................................................................................17 2.5 Safety measures of a servo controller................................................................18 2.6 The allocation of the input and output ports ......................................................20 2.7 Connection of the encoder.................................................................................22 2.8 Driver version 3.10 and hardware differences to version 3.00...........................23 2.9 The allocation of the 50-pin RIBBON connector ................................................24 Software description............................................................................. 26 3 The Software Driver for the Controlling of Servo Motors ........................... 26 3.1 How you can install the driver ............................................................................26 3.2 3.2.1 3.2.2 3.2.3 3.2.4 3.2.5 3.2.5.1 3.2.5.2 3.2.5.3 3.2.6 3.2.6.1 3.2.7 3.2.8 3.2.9 Some preliminary explanations on the software driver......................................30 The movement segment.....................................................................................30 How is a movement segment realized? .............................................................32 How to generate a profile using the isel intermediate format ............................34 How the path processing is realized ..................................................................37 How to use the path generator...........................................................................42 Using the object files for the calculation of the path data..................................43 Using the BAHN.EXE program for the calculation of the path data ..................49 Possible errors in the calculation of the path data.............................................52 Safety of the equipment .....................................................................................54 Watch-Dog signal and control byte....................................................................54 The reference run ...............................................................................................60 Speed-dependent peripheral control .................................................................62 The data format, the units micrometer, angular second and the special figure NO MOVE VALUE ........................................................................64 VII Contents 3.2.10 3.2.11 3.2.12 3.2.13 3.2.14 3.2.15 3.2.16 3.2.17 3.2.18 3.2.19 3.2.20 The many speeds and how can they be calculated.......................................... 67 The controller and its parameters...................................................................... 72 How you can use the driver ............................................................................... 75 The two-digit complementary presentation of the numbers ............................. 77 Has the driver already been installed? .............................................................. 79 Driver version 3.10 and software differences to version 3.00............................ 81 No movement or jerky movement, what have you done wrong? ..................... 83 Interpolation time ............................................................................................... 84 Starting the driver with option switch /DSM for controlling the main spindle ... 84 What will you have to do to use our control system under WINDOWS NT/2000? .............................................................................. 85 Possible errors when calling up the driver ........................................................ 86 3.3 3.3.1 3.3.2 3.3.3 3.3.4 3.3.5 3.3.6 3.3.7 3.3.8 3.3.9 3.3.10 3.3.11 3.3.12 3.3.13 3.3.14 3.3.15 3.3.16 3.3.17 3.3.18 3.3.19 3.3.20 3.3.21 3.3.22 3.3.23 3.3.24 3.3.25 3.3.26 3.3.27 3.3.28 3.3.29 3.3.30 3.3.31 3.3.32 3.3.33 3.3.34 3.3.35 3.3.36 3.3.37 3.3.38 3.3.39 3.3.40 Driver functions .................................................................................................. 98 Function 1: Requesting for the driver version ................................................... 98 Function 2: Reset ............................................................................................... 98 Function 3: Switching the Test mode on or off ............................................... 100 Function 4: Changing the control parameters ................................................ 101 Function 5: Requesting for the driver status.................................................... 102 Function 6: Reference run ............................................................................... 110 Function 7: Definition of a time delay .............................................................. 111 Function 8: Switching on or off of the manual mode ...................................... 112 Function 9: Switching on or off of the Teach-In mode .................................... 113 Function 10: Start-Stop-Break-Abort ............................................................... 115 Function 11: Setting of the current point as the work piece zero point .......... 116 Function 12: Setting of the work piece zero point........................................... 117 Function 13: Deleting of the work piece zero point......................................... 118 Function 14: Setting of the software limit switches ......................................... 118 Function 15: Blocking /Releasing of software limit switches .......................... 119 Function 16: Reading of a byte from an input port ......................................... 120 Function 17: Output of a byte to an output port.............................................. 121 Function 18: Requesting for the actual positions of the axes ......................... 121 Function 19: Requesting for the actual tool speed ......................................... 122 Function 20: Setting of the segment speed .................................................... 123 Function 21: Setting of the change factor of the tool speed ........................... 124 Function 22: Setting of the Teach-In speed .................................................... 125 Function 23: Setting of the rapid speed .......................................................... 126 Function 24: Relative linear normal movement ............................................... 127 Function 25: Absolute linear normal movement.............................................. 129 Function 26: Relative linear rapid movement .................................................. 130 Function 27: Absolute linear rapid movement................................................. 131 Function 28: Relative circular movement ........................................................ 132 Function 29: Absolute circular movement....................................................... 134 Function 30: Relative helix movement............................................................. 135 Function 31: Absolute helix movement ........................................................... 138 Function 32: Setting of the path speed ........................................................... 139 Function 33: Path movement........................................................................... 140 Function 34: Requesting for the path parameters........................................... 145 Function 35: Changing of the ramp parameters ............................................. 146 Function 36: Reading of a bit of a predefined input port ................................ 150 Function 37: Reading of a predefined input port ............................................ 151 Function 38: Output of a bit at a predefined output port................................. 151 Function 39: Output to a predefined output port ............................................ 152 Function 40: Reading of a bit of a predefined output port .............................. 153 VIII Contents 3.3.41 3.3.42 3.3.43 3.3.44 3.3.45 3.3.46 3.3.47 3.3.48 3.3.49 3.3.50 3.3.51 3.3.52 3.3.53 3.3.54 3.3.55 3.3.56 3.3.57 3.3.58 3.3.59 3.3.60 3.3.61 3.3.62 3.3.63 3.3.64 3.3.65 3.3.66 3.3.67 3.3.68 3.3.69 Function 41: Reading of a predefined output port...........................................154 Function 42: Initialization of all predefined output ports ..................................154 Function 43: Switching on and off of the speed-dependent output at a predefined output port......................................................................................155 Function 44: Reserving or releasing of a data byte .........................................156 Function 45: Reading of a reserved data byte .................................................157 Function 46: Writing of a reserved data byte ...................................................157 Function 47: Switching-on or switching-off of Sleep Mode .............................157 Function 48: Activation/Deactivation of the safety circuit ................................158 Function 49: Checking of the control byte .......................................................159 Function 50: Requesting for the desired positions of the axes with reference to the work piece zero point.............................................................160 Function 51: Requesting for the desired positions of the axes with reference to the reference point .......................................................................161 Function 52: Requesting for the running time of the driver .............................162 Function 53: Reading of the monitoring input ports ........................................163 Function 54: Output at the monitoring output ports ........................................164 Function 55: Reading of the monitoring output ports......................................166 Function 56: Initialization of the monitoring output ports ................................166 Function 57: Switching of the axes ..................................................................167 Function 58: Setting of the radius for the working on a cylinder surface .......169 Function 59: Use last axis in Spindle mode ....................................................171 Function 60: Define the location of use of the spindle axis ............................173 Function 61: Set the spindle speed change factor .........................................173 Function 62: Set a new spindle speed ............................................................174 Function 63: Position the spindle axis.............................................................176 Function 64: Enable/disable Manual mode of the spindle axis ......................177 Function 65: Poll the status of the spindle axis...............................................178 Function 66: Poll the movement parameters of the spindle axis....................179 Function 67: Enable or disable the Handwheel mode....................................180 Function 68: Stop a Handwheel movement....................................................182 Function 69: Poll the parameters for the Handwheel mode ...........................182 Appendix A: Encoder allocation of the isel servo motor control card UPMV 4/12 ............................... 183 Appendix B: Overview of the isel intermediate format for controlling the isel machines .............................................. 184 PARKON ....................................................................................... 198 1 Introduction ................................................................................................. 198 2 The FILE main menu .................................................................................... 198 3 The Hardware main menu ........................................................................... 200 4 The Software main menu ............................................................................ 209 5 The Info main menu..................................................................................... 212 6 Possible Errors during the Configuration of the Parameters ................... 212 IX Contents PAREIN ....................................................................................... 214 1 Introduction PAREIN .................................................................................. 214 2 The File main menu ..................................................................................... 215 2.1 The Open submenu ......................................................................................... 215 2.2 The Save submenu .......................................................................................... 215 2.3 The Save As ... submenu ................................................................................. 215 2.4 The Print submenu........................................................................................... 215 2.5 The Terminate submenu ............................................................................. 216 3 The Equipment main menu ......................................................................... 216 3.1 The Card submenu .......................................................................................... 216 3.2 The Monitoring submenu................................................................................. 216 3.3 The Ref._Key submenu.................................................................................... 218 3.4 The Input/Output Port submenu ...................................................................... 218 4 The Axis main menu .................................................................................... 219 4.1 The Selection submenu ................................................................................... 220 4.2 The Sequence submenu.................................................................................. 220 4.3 The Axis fixing submenu .................................................................................. 221 4.4 The V_Control submenu .................................................................................. 221 4.5 The Offset submenu......................................................................................... 223 4.6 The Encoder submenu .................................................................................... 224 4.7 4.7.1 4.7.2 4.7.3 The Position Control submenu ........................................................................ 225 General Remarks ............................................................................................. 225 The work menu for the dimensioning of the PID control................................. 226 The dimensioning of the PID-Filter .................................................................. 228 4.8 The Conversion submenu................................................................................ 234 4.9 4.9.1 4.9.2 The Ramp submenu......................................................................................... 236 The experimental plotting of the maximum ramp............................................ 236 Determination of the maximum speed ............................................................ 239 4.10 The Switch submenu ....................................................................................... 241 4.11 The Bridging submenu .................................................................................... 243 4.12 The Enable/Disable submenu.......................................................................... 244 4.13 The Dead Time submenu ................................................................................ 244 5 The INFO main menu................................................................................... 245 6 Possible errors when setting the parameters............................................ 245 X Introduction Hardware description 1 Introduction 1.1 Step motor or servo motor? At first we would like to explain the most important differences between a control system for step motors and one for servo motors. If step motors are operated within defined working ranges, a feedback of the movement data is not necessary. This results in an open-loop-control circuit that is very easy to handle (see illustration 1.1). That is the decisive reason for the widespread use of step motors. Furthermore, step motors are considerably less expensive than servo motors. Application programme Signalgeneration Signalconversion Step motor 1 Mechanism/ tool Signalconversion Step motor 2 Mechanism/ tool Other step motors Illustration 1.1: Step motor control as open-loop-control circuits Illustration 1.1 shows the example of a control system for several step motors. The generation of ramps, the interpolation and the synchronization of the motors, among other things, form part of the Signal Generation function block. The output signals of this function block are mostly pulses and directions for the individual motors. The Signal Conversion function block uses these signals to switch the currents in the individual motor coils on or off and furthermore to change the strength of the current during the microstep operation. The openloop-control circuit enables a very simple starting-up of the control system. Taking into consideration the loading capacity of the motors and the power output stages you are buying a step motor control system that you only have to connect to your equipment in order to have a functioning drive system. It really could not be any easier. In a control system for servo motors all this is no longer that simple. Illustration 1.2 shows a control system with servo motors. 1 Introduction Application programme Signalgeneration Position control Speed control Current control Servomotor 1 Mechanism/ tool Current control Servomotor 2 Mechanism/ tool Generation of tacho signal Generation of position signal Position control Speed control Generation of tacho signal Generation of position signal Other servo motors Illustration 1.2: Servo motor control with closed control loops The block circuit diagram of a servo motor control is much more complex than that of a step motor control. The Signal Generation function block has the same functions here as in the step motors and supplies the position information mostly as output signals. The servo motors are controlled in control loops through the feedback of the output information. The outer control loop is the position control loop which is absolutely necessary for the positioning. From the comparison between the desired and the actual position, the position control calculates the desired value for the speed. The speed control for the positioning is not absolutely necessary. This control loop is optional but it offers you great advantages with regard to the dynamics and the synchronous operation of the drive system. This is usual, in particular, in the case of sophisticated drive systems. However, there are also systems in which the speed control loop is required for the system stability. In contrast to the position control which works digitally the speed control is generally realized in an analogue design. The output of the speed control serves as the input for the current control (that is, the desired current value). This current control is often already integrated into the power output stage. A control structure as shown in illustration 1.2 is also called a cascade control in the field of automatic control technology. For the control, one always needs measuring systems in order to record the output signals. That, among other things, is a reason why a drive system with servo motors is more expensive than one with step motors. But it is also possible to derive the speed information from the position information by using appropriate software or hardware solutions and in this way replace the measuring system for the recording of the speed. The quality of a servo drive system depends greatly on the control structures used and on the dimensioning of the control parameters. Because of the peculiarities of a closed control loop an unfavourable selection may, under certain circumstances, lead to the instability of the system. The selection of the 2 Introduction control structure is not difficult. Except from a few exotic structures, such as for e. g. the state control, you can always fall back on the PID structures that have long proven themselves in practice. The dimensioning of the control parameters on the other hand is a science all by itself. (But even here we will not desert you. We will provide you with the setting program PAREIN.EXE which will assist you in the starting-up of your servo equipment including the dimensioning of the PID controls). Everything that has been said up till now argues against the use of servo motors. But if you observe the trend in the market, you will notice that more and more users are using drive systems with servo motors. What are the strengths of the servo motor or what are the weaknesses of the step motor? The greatest strength of a step motor (the open-loop-control circuit) is at the same time its greatest weakness. Because there is no control of the number of steps actually carried out, one always has to ensure that a step motor should only be operated well below its performance limit, as otherwise there will be step losses. In practice these step losses occur frequently. The danger is particularly great when the acceleration of the equipment is great. Another weakness becomes apparent during low speeds as the step motors operate in visible jerks under these conditions. Step motors are furthermore not suitable for high speeds because the step losses increase greatly in such cases. In addition to this, it is rather uncomfortable being near a drive system using step motors due to the considerable noise produced by such a system. Other disadvantages, such as the proneness to resonance, the low degree of efficiency, the poor synchronization, etc. also advocate the increasing use of servo motors. 1.2 The difference between a handling system and a CNC processing unit with regard to the control system A handling system is concerned with the movement from one point in space to another. How this is done is of little interest and there is no synchronisation between the axes. The small example in illustration 1.3 will show you what this means. Y Ending point End position of the Y_axis Starting position of the Y_axis Starting point X Starting position of the X_axis Illustration 1.3: End position of the X_axis PTP movement progress in the example of a handling system with 2 axes 3 Introduction While the Y-axis has already reached its end position, the X-axis is still on its way there. This is a typical movement progress for a handling system. This type of control is called PTP control (Point To Point). Besides the simple PTP control, there is also the synchronous PTP control (see illustration 1.4). Ending point Y End position of the Y_axis Starting position of the Y_axis Starting point X Starting position of the X_axis Illustration 1.4: End position of the X_axis Synchronous PTP movement progress in the example of a handling system with two axes The example in illustration 1.4, even though somewhat exaggerated, shows clearly the main characteristic of a synchronous PTP control. All axes reach their end positions at the same time. For this purpose it does not matter how the tool (e. g. a gripping device) moves through space. The tool moves from the starting point to the ending point along a curve in space that is not defined. The simple PTP control and the synchronous PTP control are the main control types for handling systems. In the case of a CNC control, this is no longer so simple. Here the requirement is that the tool moves along a predefined curve from its starting position to its end position (see illustration 1.5). This is called interpolation. The curves that are most often used for interpolation are the straight line (linear interpolation) and the circle (circular interpolation). But, in the case of the circular interpolation, we must add that it concerns mostly a circle on one of the main planes XY, YZ and XZ. If the other axes that do not belong to one of the main planes move during the circular interpolation, a helix interpolation is created. Therefore it can be said that the circular interpolation is a special case of the helix interpolation. Other types of interpolation, such as for e. g. the elliptic interpolation or the three-dimensional circular interpolation, are not very often used even though it would not be considerably more difficult to realize them. 4 Introduction Y Ending point End position of the Y_axis Linear interpolation Starting position of the Y_axis Circular interpolation Starting point Starting position of the X_axis Illustration 1.5: X End position of the X_axis Linear and circular interpolation in the example of a CNC processing unit with two axes In comparison to the CNC control, the PTP control is child play because the interpolation is much more difficult to realize. Furthermore, the different structures of CNC machines require different interpolation algorithms with a different amount of calculations. Most of the CNC machines have the so-called TTT structure, that means, the main axes X, Y and Z are linear axes and form a spatial Cartesian coordinate system. The letter T stands for Translate. For other structures whose main axes are partly linear axes and partly rotation axes, the interpolation algorithms require an immense calculation power as different transformations must be carried out in real time here in order to realize the synchronization between the axes. 5 Introduction 1.3 What you will get from us and what you have to contribute yourself For this product, we will supply you with the following : - 1 PC card - 1 driver program ISELDRV.EXE with the programming manual - 1 initialisation program ISELINI.EXE - 1 assembler routine KON_INS.ASM with the corresponding object file KON_INS.OBJ - 1 configuration program PARKON.EXE with manual - 1 initialisation file SERVO.INI as example - 1 setting program PAREIN.EXE with manual - 1 installation program, INSTALL.BAT, with the auxiliary files, ISELINST.EXE and ISELDRV.CFG, - 1 auxiliary file, _ENTER_, - Object files BAHN_S.OBJ, BAHN_M.OBJ, BAHN_C.OBJ and BAHN_L.OBJ as well as the executable program BAHN.EXE for the calculation of the path data for the 3D-path processing (optionally available) - 1 manual Our product is designed for the control of up to 4 servo motors through the power output stages with the ± 10 V input. The PC card requires an ISA 16-bit slot in the PC. A digital PID position control has already been implemented for each motor on the PC card. In addition, the PC card has freely programmable 16-bit timers as well as separate inputs and outputs that can be used for SPS functions or limit or reference switches. Apart from the digital position controls, the card does not have an intelligence of its own (see Section 1.4). A 50-pin ribbon connector serves as the interface to the outside world. The driver program, which is designed as a TSR program (Terminated Stay Resident) can be installed on a PC with an MS/DOS operating system from Version 4.1 onwards. The driver program ISELDRV.EXE can be easily used on a PC with WINDOWS 3.xx or WINDOWS 95 or OS/2 from a DOS screen. The driver takes over the functions of the Signal Generation block (see illustration 1.1 and 1.2). The 4-axes linear interpolation and the 2-axes circular interpolation as well as the helix interpolation are for equipment with a TTT structure. For all other structures, a synchronous PTP control can be easily realized with the driver. Each axis can be configured either as a rotation or as a linear axis. 6 Introduction To make the work easier for you, the driver also makes several additional functions available. These functions make it easy for you to realize a CNC equipment or a positioning system. The initialisation program ISELINI.EXE is an auxiliary program for the driver. It is called up by the driver during the installation in order to read the equipment parameters from an initialisation file. In this way, we can keep the resident driver small. The assembler routine KON_INS.ASM with the object file KON_INS.OBJ can be used in your application program to determine whether our driver is already installed in your PC or not and through which interrupt the driver can be activated. The configuration program PARKON.EXE helps you to adjust the driver to your equipment (see the manual for this). The supplied initialisation file EXAMPLE.INI serves solely as example for you. The setting program PAREIN.EXE is a valuable tool during the start-up of a servo equipment. With this program you can, among other things, dimension the control parameters very quickly or determine the ramps of the individual axes (see the manual for this). The installation program INSTALL.BAT with the auxiliary files ISELINST.EXE and ISELDRV.CFG installs our software on your PC. During this, a directory with the name SERVO is generated. All the necessary files are automatically copied into this directory. The auxiliary file _ENTER_ is a simple file with a single character ENTER. In connection with the re-routing character ‘<’, this file simulates the operation of the ENTER key. Using this, the driver can be installed without the pressing of the ENTER key. This way of start-up is very useful if the driver is to be placed in the AUTOEXEC.BAT file. With the optionally obtainable object files BAHN_S.OBJ, BAHN_M.OBJ, BAHN_C.OBJ and BAHN_L.OBJ as well as the executable program BAHN.EXE, you can generate the required path data for a 3D-path processing. You can also write your own application program to tell the driver what to do. The communication between your program and the driver is carried out via an interrupt that is defined by you. 7 Introduction 1.4 Why this design? Illustration 1.6 shows how your program and your equipment will work together with our driver and our PC card. Application programme Interrupt call-ups Driver for MS_DOS from Version 4.1 onwards AT_Bus PC_slot-in card Axis 1 Illustration 1.6: Axis 2 Axis 3 Axis 4 Function structure of an equipment that is controlled by the driver Our driver is a MS-DOS program. In the age of WINDOWS and OS/2, a MS-DOS program might seem a bit old-fashioned. But due to the widespread use of MS-DOS every new PC operating system is forced to ensure the compatibility to MS-DOS. For this reason, you can install our driver on any PC with common operating systems such as WINDOWS 3.xx or WINDOWS 95 or OS/2. However, the installation has to be carried out in a DOS screen. Every program has his favourite language. One loves to program in C, the other perhaps in PASCAL or BASIC. In order to take this variety into consideration as well as to ensure a smooth data exchange between an application program and our software, we have designed our software as a resident program that exchanges data with an application program via interrupt call-ups. The use of interrupt call-ups for the communication is a common method for programming under MS DOS. Almost all programs that want to make use of the resources of BIOS or of MS DOS must also call up corresponding interrupts. In C, PASCAL or TURBO BASIC there are already corresponding commands for the calling-up of an interrupt. In other programming languages that do not have such commands available, appropriate substitute routines must be used to call up interrupts. 8 Introduction We have already said in the previous paragraph that our PC card does not have its own intelligence. The necessary intelligence needed by a CNC machine or a positioning system for the interpolation, coordinating etc., is provided by the driver through the utilisation of the PC resources. We will explain below why we have taken this direction. These days the PC is a mass product (i. e.: it is cheap) and prices are falling. On the other hand, its performance capabilities are increasing steadily. Assuming that our PC card had its own intelligence and interpolation, coordinating, etc. would be carried out solely by this intelligence, then the PC would only be responsible for the communication between the operator and the machine. That, of course, would be a pure waste of resources. Furthermore, when using the PC, you do not have to worry about whether the capability of your PC is sufficient or not to control a CNC machine or a positioning system. From the time point of view, our driver together with our user surface works without problems on a 286/15 MHz computer, even during the interpolation phase for 4 axes. The utilisation of the intelligence of a PC has another great advantage for you and for us. For a future expansion, we are no longer limited by an intelligence on the PC card that cannot be easily expanded. Only the capability of the PC is our upper limit. 9 The PC card 2 The PC card 2.1 The layout of the PC card Technical data • Four PID controls with a sampling time of 0.35 ms and 12-bit D/A-converter for the controlling of up to four servo axes through ± 10 V signals • power source of 5 V or 12 V (e. g. for encoder, etc.) • TTL or RS422 interface for incremental encoder • 32-bit positions, speed and acceleration register • 32-bit position recording • 14 opto-insulated inputs (e. g. for limit switches, reference switches, etc.) • 3 opto-insulated outputs • 50-pin RIBBON connector The PC card is the hardware part of our product. It is designed for the operation of up to 4 axes. A standard signal of ± 10 V with a resolution of 12 bit is available as output signal for the control of consecutive power amplifiers. All components for the evaluation of the encoder signals that are necessary for a feedback are also on the card. For the connection to the peripheral, 14 opto-insulated inputs and 3 optoinsulated outputs are available for a 24 V operation. Using a timer module on the card, a real time clock can in principle be used for general applications. The real time clock can be interrupted. An interrupt operation of the LM chip is also possible via the hardware. Please note that the timer channels as well as a part of the inputs and outputs are used internally during the use of the driver ISELDRV and are no longer available to the user. You can use encoders with a supply voltage of 5 V or 12 V. For the installation in a control computer, a 16-bit slot is necessary. We have designed our card in such way that as large a range of applications as possible can be covered. You as the user have to configure the card by setting the jumpers to suit your requirements and your system. The positions of all the components that are of importance to you are shown in illustration 2.1. 10 The PC card Illustration 2.1: Layout of the PC card 11 The PC card Here is an overview of the various jumpers, plugs and potentiometers. Name Potentiometer Potentiometer Potentiometer Potentiometer Potentiometer Potentiometer Potentiometer Potentiometer Designation P100 P200 P300 P400 P101 P201 P301 P401 Function Offset of the 1st amplifier stage X-axis Offset of the 1st amplifier stage Y-axis Offset of the 1st amplifier stage Z-axis Offset of the 1st amplifier stage A-axis Offset of the 2nd amplifier stage X-axis Offset of the 2nd amplifier stage Y-axis Offset of the 2nd amplifier stage Z-axis Offset of the 2nd amplifier stage A-axis Jumper Jumper Jumper Jumper J1 J2 J3 J700 Base address of the card Interrupt for timer module Interrupt for LM628 module Incremental transmitter power supply 5 V or 12 V U6 U9 U13 Input port Input port Output port ST1 50-pin ribbon plug Plug 2.2 The base address of the PC card and the individual port addresses The card occupies a range of the input/output port addresses in the PC. The axes controllers, the timers as well as the input and output ports can be operated through the respective port addresses. Through the Jumper J1 you can stipulate a base address for the card. This defines the addresses of all the ports on the card. During the creation of the initialisation file by the configuration program PARKON (see manual for that), you only need to enter this base address. From that, the driver calculates all the port addresses that it needs. The setting of the base address at Jumper J1 requires that you know which addresses are still available on your computer. Otherwise there may be an address conflict between our card and other cards in the PC. Then the reset key is the one that has to suffer again. Here we can give you a tip: In an AT computer, the address range 300h - 31Fh is always reserved for the user. If you do not have any other additional cards in the PC you can utilise this address range without any problems. 12 The PC card The setting of the base address at Jumper J1 is explained in the following paragraphs. All address references are based on the HEXADECIMAL system. Example of the base address 300h: J1 A9 0 A8 0 A7 C A6 C A5 C 0 = PIN open C = PIN closed A4 C All the following descriptions refer to the base address 300h that has been set for the delivery! LM servo control A9 A8 A7 A6 A5 A4 ________________________ Base address A3 0 0 A2 0 0 A1 0 0 A0 0 1 Allocation LM1 LM1 ADR. 300 301 0 0 0 0 1 1 0 1 LM2 LM2 302 303 0 0 1 1 0 0 0 1 LM3 LM3 304 305 0 0 1 1 1 1 0 1 LM4 LM4 306 307 When addressing the LM servo modules, the following applies: --> even numbered address odd numbered address Command byte Data byte e. g. Adr. 300h Adr. 301h Timer module I82C54 A9 A8 A7 A6 A5 A4 ________________________ Base address A3 1 1 1 1 A2 0 0 0 0 A1 0 0 1 1 A0 0 1 0 1 Allocation Channel 0 Channel 1 Channel 2 Control port ADR. 308 309 30A 30B 13 The PC card Input/output port A9 A8 A7 A6 A5 A4 ________________________ Base address A3 1 1 A2 A1 A0 1 0 0 1 0 1 Allocation ADR. 30C 30D The addresses 30C and 30D have the same meaning for a read/write access to the input/output ports. Address 30C / 30D Address 30C / 30D A9 A8 A7 A6 A5 A4 ________________________ Base address A3 1 1 write output port U13 read input port U6 A2 1 1 A1 1 1 A0 0 1 Allocation ADR. 30E 30F In the case of a read access, the addresses 30E and 30F have the same meaning. Address 30E / 30F read input port U9 A write access to the addresses 30E/30F has no effect as there is no physical output port. 2.3 The axis controllers For each axis, there is an axis controller of Type LM628 (manufacturer: National Semiconductor) on the PC card. The LM chip is supplied with a quartz frequency of 6 MHz. The LM628 chip generates a ± 10 V actuating signal via a series-connected 12-bit D/A converter. If required the LM629 can be installed. Instead of the ± 10 V interface described above, this component facilitates the operation with a PWM signal and an allocated direction bit (choice of positive or negative direction). In this version, the connection of the D/A converter part is not necessary (optional order). The addresses of the individual axis controllers are listed in the above section. The positions of the individual axis controllers on the card are shown in Illustration 2.1. The signals which are required by LM628 for the evaluation of the actual positions and which must be supplied by an encoder that is attached to the positioning element are processed on the PC card and then made available to LM628. At the time of delivery the PC card is preseted with RS422 output for the connection of the encoder channels for the servo motors with integrated encoders that are available from iselautomation. The connection of the receivers for the encoder signal processing can also be carried out for encoder outputs that are connected to ground without additionally supplied inverse signals. The maximum encoder signal voltage should not exceed 12 V. 14 The PC card The standard outputs of the servo axes are ± 10 V through internal amplifier settings. An offset setting is possible via the potentiometer for the first analog amplifier stage. e. g. X-axis P100 for offset setting Y-axis P200 for offset setting The zero point of the second amplifier stage can also be set at the potentiometer allocated to the axis in question. e. g. X-axis P101 Setting of the slope Y-axis P201 Setting of the slope That might sound somewhat time-consuming but it is only necessary for any re-adjustments as we have already set the offset and the reference voltage for you at our plant. - Changes must be carried out by an expert. Improper handling of the card can result in permanent impairment of the functions! If you have made changes on the card and the original state has not been retained, then the warranty becomes void! An incremental encoder power supply of 5 V or 12 V can be set with the jumper J700. For the DC servo motors that are available from iselautomation, the setting of the jumper to an encoder power supply of 5 V is necessary. Check the voltage at the fuse SI1 before connecting the encoder of the servo motors to the peripheral connector! The voltage supplied at the peripheral connector for the encoder is provided by the PC power supply unit and is protected on the PLUS power supply side by fuse SI1. J700 Bridge 2-1 Bridge 2-3 5 V encoder power supply 12 V encoder power supply Appropriate protective measures against transients should be provided for in front of the connector! Internally, a protection is provided for the encoder power supply that is made available to the outside via the fuse SI1. The negated signals of the encoder signals A, B and index are not absolutely necessary but their presence can significantly improve the certainty of the data transfer between the encoders and the axis controllers. The same also applies when encoders with a supply voltage of 12 V are used. 15 The PC card Only a screened cable between the PC card and the equipment can guarantee data transfers without interference. If you are not using the ISELDRV.EXE driver you have the option of programming and using the axis controllers individually. When programming the axis controllers LM628 or LM629 please refer to the data sheets of the company National Semiconductor for this. Use Jumper 3 if you want the axis controllers to trigger interrupts (see illustration 2.2). Axis controller 1 Axis controller 2 J3 IRQ10 IRQ11 IRQ12 Axis controller 3 IRQ15 Axis controller 4 Output bit 1 Illustration 2.2: Interrupt outputs of the axis controllers You can select the interrupt for the axis controllers using Jumper 3. All axis controllers use one common interrupt. However, by evaluating the internal status registers of the axis controllers you can determine at any time which axis controller is triggering the interrupt. You can switch the interrupt on or off by using the data bit 1 of the output port. The timer on our PC card, too, is able to trigger interrupts (see Section 2.4). Therefore, there must be no conflict between the Jumpers 2 and 3 in the configuration. When using the ISELDRV.EXE driver you must not short Jumper 3. 16 The PC card 2.4 The timers, the hardware interrupts and the unlucky owners of Pentium computers with PCI bus For time measurements as well as the generating of cyclical timer interrupts, there is the timer module 8254 (Manufacturer: INTEL) on the PC card. In accordance with the above description, the timer occupies four consecutive addresses, starting with the base address set +08h, e. g. the addresses 308h, 309h, 30Ah, 30Bh. +5V 3 MHz Timer 8254 CLK 0 GATE 0 OUT 0 CLK 1 GATE 1 J2 OUT 1 IRQ 11 IRQ 12 CLK 2 IRQ 15 GATE 2 OUT 2 Output port Bit 0 Illustration 2.3: Block circuit of the timer module 8254 on the PC card 17 The PC card The timer is meant for internal use if you are making use of our driver ISELDRV.EXE. The driver uses the timer for generating hardware interrupts and for measuring time. You have the choice of connecting the output of the timer to IRQ10 (Pin 1 to Pin 8) or to IRQ11 (Pin 2 to Pin 7). The setting of the hardware interrupt IRQ10 or IRQ11 is done with Jumper 2 and has to correspond to the input in the configuration program PARKON (see manual for this). The driver uses data bit 0 of the output port to switch the hardware interrupt on and off. The hardware interrupts IRQ12 and IRQ15 are available but must not be used by you. Please note that the axis controllers are also able to trigger hardware interrupts (see Section 2.3). Therefore there must be no conflict between the Jumpers 2 and 3 in the configuration. When using the driver ISELDRV.EXE, you must not short Jumper 3. The timer 0 and the timer 2 are connected in a cascade arrangement. The clock input of timer 0 is supplied with a frequency of 3 MHz. The timers 0 and 2 are used internally by the driver ISELDRV.EXE for the time measurements. The cyclical interrupt generated by IRQ10 or IRQ11 is responsible for the generation of the interpolation cycle within our driver ISELDRV.EXE. If this interrupt for some reasons cannot be triggered a movement - except for the reference run - and the output of the Watch Dog signal are not possible. For the carrying out of the reference run the driver does not require a cyclical interrupt. In Pentium computers of the later generation that are equipped with PCI bus the IRQ’s including IRQ10 and IRQ11 are managed internally by the BIOS. In the BIOS you can define yourself which IRQ you want to use or not to use. As a standard feature IRQ10 and IRQ11 are blocked in the BIOS. That means in order to be able to use our PC card and the driver ISELDRV.EXE you have to configure the BIOS of your Pentium computer yourself. 2.5 Safety measures of a servo controller To make the mechanics last longer each axis of an equipment normally has two hardware limit switches, one at each end. When one of these limit switches is operated the movement must be interrupted immediately. If there is a fault in the hardware limit switch the switching-off of the power output or the blocking of the current in the direction of the active hardware switch is necessary (see Section 3.2.6.2). The second method is certainly simpler and better. However, you can only use this method if the power output modules support this. If the power output modules have to be completely switched off when a hardware limit switch has been triggered, you have to ensure that it is possible to switch on the power output modules again in order to move out of the hardware limit switches. 18 The PC card The same also applies to the reference run if for economical reasons your equipment is using the hardware limit switches as reference switches. In the following we are going to describe one of the ways to solve this problem (see illustration 2.4). L im it s w itc h 1 B rid g in g o f th e s a fe ty c irk u it P in 4 3 - R IB B O N c o n n e c to r L im it s w itc h 2 L im it s w itc h 3 W a tc h -D o g P in 4 0 RIBBON connector C o n tro l re la y Illustration 2.4: Basic circuit diagram of the safety circuit The Pin 43 of the RIBBON connector is the opto-insulated output of the output port of the PC card (see Section 2.5). In order to bridge the safety circuit you can always output a value via this pin as described in Illustration 2.4. When the safety circuit is closed the hardware limit switches are no longer effective. The switching-on of the power output modules is possible even when a hardware limit switch is active. Please note that the bridging of the safety circuit only lasts as long as necessary, that is, you should output the appropriate value to Pin 43 as quickly as possible in order to re-activate the safety circuit. If you are using our driver you should use function 48 to switch the safety circuit on or off (see Section 3.3.48). The Pin 40 of the RIBBON connector is also an opto-insulated output of the output port of the PC card. If you are using the driver, a Watch Dog signal is output to this Pin at regular intervals. If you integrate the Watch Dog signal into the safety circuit as shown in Illustration 2.4, the servo controller is switched off the instant the Watch Dog signal is no longer there. This could happen in the 19 The PC card case of a software crash. If you are not using the driver, you will have to generate the Watch Dog signal yourself (see Section 2.5). That is, you have to organize an alternating output of 0, 1, 0, 1 at this output port yourself in order to trigger the control relay. When the hardware limit switches are bridged, the safety switches of the numerical axes are switched off! That means, particular care has to be taken with all measures for accident prevention! Improper operation of the controllers in this operation mode may result in the impairment of the machine functions! 2.6 The allocation of the input and output ports The digital inputs/outputs realized on the card are separated at the 50-pin RIBBON connector. There are 14 opto-insulated inputs and 3 opto-insulated outputs for 24 V operation. From the allocation of the input and output ports, you will know immediately which data bit is at which pin of the peripheral connector. It is to be noted which ports are used internally by the driver and therefore are no longer available to the user. The inputs are connected externally with 24 V (internally = 1). For the outputs, the opto-couplers are connected with a maximum of 50 mA (open emitter). OUT: 24 V PIN 41 IN: PIN 25 PIN 43 PIN 18 GND Illustration 2.5: Opto-insulated inputs and outputs of the PC card It follows a description of the meaning of each input and output port. The allocation of these bits is dependent upon the isel servo controller. Other allocations are certainly possible. Output port U13: (Base address + 0Ch) The output port U13 is available for the system control and for general tasks. After a RESET and POWER-ON, all outputs of this output port are erased. 20 The PC card Data bit 0 Data bit 1 Data bit 2 Data bit 3 Data bit 4 Data bit 5 Data bit 6 Data bit 7 Enable Timer Interrupt DB0 = 1 Enable (LM628 Axis 1 - 4) Interrupt DB1 = 1 Initialisation of Watch Dog 0/1 or 1/0 alternation; within a time of less than 1.8 seconds as long as DB3 = 0, this alternation guarantees the On-condition of the opto-coupler (PIN 43) Lock Watch Dog DB3 = 1 --> opto-coupler always through-controlled OUT 1 DB4 = 1 --> opto-coupler through-controlled Enable/Disable of power output stages (PIN 16) OUT 2 DB5 = 1 --> opto-coupler through-controlled Bridging of the safety circuit in the controller (PIN 40) 0 --> Disable 1 --> Enable (Bridging) of the safety circuit) not used not used Input port U6 : (Base address + 0Ch) Bit at the data bus Data bit 0 Data bit 1 Data bit 2 Data bit 3 Data bit 4 Data bit 5 Data bit 6 Data bit 7 PIN 21 45 20 44 19 Designation INPUT 9 (Reference switch) INPUT 10 (Reference switch) INPUT 11 (Reference switch) INPUT 12 (Reference switch) INPUT 13 (Error - Output stage) Connected with Watch Dog not used, when reading back 1 not used, when reading back 1 Input port U9 : (Base address 0Eh) Bit at the data bus Data bit 0 Data bit 1 Data bit 2 Data bit 3 Data bit 4 Data bit 5 Data bit 6 Data bit 7 PIN 25 49 24 48 23 47 22 46 Designation INPUT 1 (Limit switch) INPUT 2 (Limit switch) INPUT 3 (Limit switch) INPUT 4 (Limit switch) INPUT 5 (Limit switch) INPUT 6 (Limit switch) INPUT 7 (Limit switch) INPUT 8 (Limit switch) The input channels INPUT 1 to INPUT 13 are used internally by the driver for the scanning of the reference and limit switches. 21 The PC card 2.7 Connection of the encoder This section describes the connection possibilities of our control card for various encoders. This information is only of importance to those users who purchase our PC card as a separate device and want to use it in their developments. Our PC card works only with incremental encoders. An operation with absolute encoders is not possible. The signals of Tracks A and B must have a phase displacement of 90°. The rotation direction of the motor is derived from these two signals and the resolution of the encoder is quadrupled. The reference signal Z of the rotation incremental encoder, which signals a full rotation of the motor, is not fed back in order to save space. To supply the encoder with current, you can use the 5 V or 12 V power supply of the PC through our PC card. You can use Jumper J700 to define the supply voltage for the encoder (see illustration 2.1). The respective settings are: Position 1-2 Position 3-2 5 V supply voltage of the external encoder 12 V supply voltage of the external encoder. For an external supply voltage of the encoder, you have to connect your GND signal to the corresponding terminal of the RIBBON connector in order to ensure a common reference potential (Pin 50). The encoder input connection on our PC card is generally adjustable for the operation of encoders with signals according to the RS422 standard as well as for the operation of encoders whose signals are connected to ground. RS422 is generally to be recommended for a trouble-free operation. In the case that the signals A, /A and B, /B are supplied by the encoder according to the RS422 specification, a line termination has to be set on the PC card for the prevention of line reflections (for each channel) in order to ensure a trouble-free reception. The resistance should be in the range of 220 Ohm (see illustration 2.6). The resistor is placed between the signal lines A and /A as well as B and /B. The connection pads are provided on the PC card. 220 Ohm _ A or B + /A or /B e. g. MC3686 Illustration 2.6: 22 Signal adjustment for encoder according to RS422 specification The PC card If the encoder supplies the signals A, /A and B, /B with ground connection the line signals that are not used have to be set to LOW voltage level via internal voltage dividers. In the case of a supply voltage of e. g. 5 V the line signals that are not used have to be reduced to approx. 2.2 V (see illustration 2.7). Should your encoders work with different signal levels they have to be adjusted externally. 5 Volt 4K7 4K7 _ A or B + /A or /B 3K3 e. g. MC3686 Illustration 2.7: Signal adjustment for encoder with ground connection If you have to adjust the encoders yourself you should have it done by an expert. The encoder input circuit is shown in Appendix A. 2.8 Driver version 3.10 and hardware differences to version 3.00 In comparison to driver version 3.00, version 3.10 requires a minor change in the hardware on the PC card UPMV4/12. The adjustment applies only to the two output ports at the Pins 40 and Pin 43 of the RIBBON connector. Illustration 2.8 shows the difference. WatchDog modul Data bit 2 PIN 43 Output port Base address +0Ch PIN 40 Data bit 5 Bridging of the safetey circuit during the reference run Enable/Disable of the servo controller Hardware for the driver version 3.00 WatchDog_Signal PIN 40 WatchDog modul Data bit 2 Bridging of the safetey circuit during the reference run Output port Base address +0Ch Data bit 5 & PIN 43 Enable/Disable of the servo controller Hardware for the driver version 3.10 Illustration 2.8: Hardware differences between driver versions 3.00 and 3.10 23 The PC card In version 3.00 the isel servo controller is released or blocked by the signal at Pin 40. The Watch Dog signal at Pin 43 bridges the safety circuit automatically during the reference run. In version 3.10 the servo controller is released by the Watch Dog signal at Pin 40. If the driver software has crashed no Watch Dog signal is triggered. The servo controller is switched off immediately. The bridging of the safety circuit for the reference run and for the moving out of an active hardware limit switch is realized by setting data bit 5 at Pin 43. The change in version 3.10 is necessary due to the constant monitoring of the software by the Watch Dog signal. The change in the hardware is only realized by the changing of component U14 (see illustration 2.1). It is a PLD. If you want to switch from driver version 3.00 to version 3.10 you can request for the new PLD from us at any time. When ordering you should note the name of the old and the new PLD: driver version version 3.00 version 3.10 PLD name SE_LIW2N SE_LIW3N When inserting the new PLD you have to look out for the Pin number of the PLD. The half-circle marking on the board and the half-circle marking on the casing of the PLD have to point in the same direction. The software and the hardware of the two versions 3.00 and 3.10 are not compatible to one another. 2.9 The allocation of the 50-pin RIBBON connector The connector used is a 50 pin RIBBON connector with the following PIN allocations: PIN 1 2 3 4 5 6 7 8 9 10 11 12 13 14 15 24 DIRECTION IN IN IN IN IN IN IN IN IN OUT IN IN IN IN OUT MEANING Index Track Encoder Servo 4 Negative Index Track Encoder Servo 4 Negative Track A Encoder Servo 4 Negative Track B Encoder Servo 4 Negative Index Track Encoder Servo 3 Negative Track A Encoder Servo 3 Negative Track B Encoder Servo 3 Negative Index Track Encoder Servo 2 Negative Track A Encoder Servo 2 ± 10 V Desired Value Servo 4 Negative Track B Encoder Servo 2 Negative Index Track Encoder Servo 1 Negative Track A Encoder Servo 1 Negative Track B Encoder Servo 1 ± 10 V Desired Value Servo 2 The PC card 16 OUT 17 18 OUT IN 19 20 21 22 23 24 25 26 27 28 29 30 31 32 33 34 35 36 37 38 39 40 IN IN IN IN IN IN IN OUT IN IN IN IN IN IN IN IN OUT IN IN IN OUT OUT 41 IN 42 43 OUT OUT 44 45 46 47 48 49 50 IN IN IN IN IN IN IN Emitter Opto-coupler OUT 1 Enable/Disable of the power output stages Analog GND GND external I/O voltage supply GND earth I/O power supply INPUT 13 Anode Opto-coupler INPUT 11 Anode Opto-coupler INPUT 9 Anode Opto-coupler INPUT 7 Anode Opto-coupler INPUT 5 Anode Opto-coupler INPUT 3 Anode Opto-coupler INPUT 1 Anode Opto-coupler + Power Supply Encoder Power Supply Track A Encoder Servo 4 Track B Encoder Servo 4 Index Track Encoder Servo 3 Track A Encoder Servo 3 Track B Encoder Servo 3 Index Track Encoder Servo 2 Track A Encoder Servo 2 Track B Encoder Servo 2 ± 10 V Desired Value Servo 3 Index Track Encoder Servo 1 Track A Encoder Servo 1 Track B Encoder Servo 1 ± 10 V Desired Value Servo 1 Emitter Opto-coupler OUT Watch Dog Signal Voltage of the external I/O power supply 18 V < I/O power supply < 26 V Analog GND Emitter Opto-coupler OUT Release of the safety circuit of the controller INPUT 12 Anode Opto-coupler INPUT 10 Anode Opto-coupler INPUT 8 Anode Opto-coupler INPUT 6 Anode Opto-coupler INPUT 4 Anode Opto-coupler INPUT 2 Anode Opto-coupler GND Encoder Power Supply 25 Software driver Software description 3 The Software Driver for the Controlling of Servo Motors 3.1 How you can install the driver The heart of the control system is the driver ISELDRV.EXE (isel driver). After the loading it remains in the main memory and occupies approximately 110 kByte. From this point onwards, it takes over for you as the user, such operations as for e. g. the interpolation and the coordinating of the movements of the axes, the management of the system, the communication with the hardware ... Besides noticing that there is less memory space available in the main memory of the PC, you as the user, will notice absolutely no difference between the state prior to and after the loading of the driver, that is, you can continue to work with the PC as usual. It actually does not make any difference whether you work with other programs now or start your own programs in order to make use of the services of the driver. In case of not enough memory to start your own programs we recommend to use memory optimizing programs, e. g. MEMMAKER from MICROSOFT or to uninstall other residential drivers. The loading of the driver and the removal of an already installed driver from the memory of the PC is very simple because you do not have to apply anything other than the DOS conventions. You start the driver with the command line: [Drive:\] [Path] ISELDRV.EXE *.INI or with the command line [Drive:\] [Path] ISELDRV.EXE *.INI <_ENTER_ "*.INI" stands for the initialisation file that you have generated with our PARKON.EXE configuration program (see manual for this). It should be noted that the driver expects to find the initialisation file in the same directory in which the driver itself is stored. (Please note that the driver and the initialisation file are stored in the same directory.) During the start-up the driver calls up the ISELINI.EXE initialisation program. This initialisation program must also be stored in the same directory as the driver and the initialisation file. The initialisation program has the task to read all the necessary parameters and standard values from the stated initialisation file and to initialize the driver with the read values. 26 Software driver If you start the driver with the diversion character < and with our enclosed _ENTER_ file it is not necessary to press the ENTER key afterwards. In this case the setup of the driver is running automatically. From the message that appears on the monitor you can check whether the driver has been successfully loaded or whether it has been removed or not. One of the following messages should be expected on the monitor: Wrong format of the initialisation file The initialisation file is write-protected and internally has it own format. This message indicates that for some reason the format of the file had been changed. The driver can no longer read the parameters from the file properly and therefore cannot be installed or removed. There is nothing else you can do but to generate the initialisation file again with the help of the configuration program. Wrong name of the initialisation file The initialisation file entered by you cannot be found in the directory in which the driver is stored. Therefore the driver cannot be installed or removed. Missing initialisation file You have forgotten to state the name of the initialisation file. Therefore, the driver cannot be installed or removed. Too many parameters You should enter nothing else on the command line than the name of the driver and the name of the initialisation file. In this case, you have obviously entered something else on the command level. The driver can no longer interpret the command line correctly. Thus, the driver can neither be installed nor removed. Initialisation program does not exist The ISELINI.EXE initialisation program does not exist in the directory that contains the driver and the initialisation file. Therefore the driver can neither be installed nor removed. You have to copy the initialisation program into this directory in order to be able to start the driver. Initialisation program cannot be executed In most cases this error message indicates that your computer has insufficient free memory. Therefore the driver is unable to call up the ISELINI.EXE initialisation program. In this case you should remove some resident programs in your computer in order to create the space. The data carrier cannot be accessed During the start-up, the driver calls up the ISELINI.EXE initialization program to read the equipment parameters in the initialization file. Using the data carrier (diskette or hard disk) on which the driver is stored, the read values are 27 Software driver transferred to the driver. If this data carrier cannot be read or written to, you will see this error message. The data carrier is full During the start-up the driver will call up the ISELINI.EXE initialization program to read the equipment parameters in the initialization file. Using the data carrier (diskette or hard disk) on which the driver is stored. The read values are transferred to the driver. If this data carrier is full, this error message will appear on the monitor. Computer too slow. Driver not installed During the generation of the initialisation file with the PARKON.EXE initialisation program you can define what percentage of the computing power of your computer will be available to the driver. During the start-up the driver checks whether the computing power allocated to it is sufficient for it to carry out its tasks. If that is not the case this error message appears. The driver is not installed. In this case you have to increase the percentage of the computing power that is available to the driver. The percentage of the computing power that is allocated to the driver should not exceed 75 % as your application program also needs a certain computing time. If it still does not work then you will have to install a co-processor in your computer. In most cases the absence of a co-processor is the reason for this error message. For our equipment we have mostly used the value 50 %. Warning: Computer is slow. Installation of the driver is carried out by pressing the J key. This error message constitutes a borderline case. If, in spite of this, you are installing the driver by using the j key or the J key, you have to expect that the driver will be not be able to carry out the movements of your equipment uniformly because of a lack of computing power. Any other key has the effect that the driver will not be installed. By using the PARKON.EXE configuration program you can increase the percentage of the computing power that is available to the driver and thus avoid this warning. The percentage of computing power that is allocated to the driver should not exceed 75 % as your application program also needs a certain computing time. If it still does not work then you will have to install a co-processor in your computer. In most cases the absence of a co-processor is the reason for this error message. Too many resident programs in the memory There are too many resident programs in the memory of the PC. The driver could not be installed. In order to facilitate the installation, you will have to remove some of the resident programs. After that, the PC will again have space for the driver. 28 Software driver No or defective PC card or wrong configuration You have either forgotten to insert the supplied card or you have entered a wrong base address of the card into the initialisation file (see manual for the PARKON.EXE configuration program). It is also possible that the PC card is defective. Then the driver can, of course, not be installed. Unknown error The driver is unable to locate the source of the error. In the case of this error message, the driver is not installed. Switching-on of the servo amplifiers (Continue with ENTER) You have finally succeeded in installing the driver. With this message the driver reminds you to switch on the servo amplifiers. After the ENTER key has been pressed the DOS prompt reappears on the monitor. The driver is properly installed. The PC is yours once again. From this moment onwards you can communicate with the driver via the interrupt interface that you yourself have defined. If you start the driver with the option [<_ENTER_] you don’t have to press the ENTER key. The diversion character < and the _ENTER_ file substitute the ENTER key. In spite of this the massage is shown. Driver already installed. Remove by pressing the E key The driver is already installed. If you want to remove the driver from the memory, you have to press either the ‘e’ or the ‘E’ key. If you press one of these keys, the driver will try to uninstall itself from the memory. If the driver succeeds in doing so, the following message will appear on the monitor: Driver has been removed Should the removal be unsuccessful, you will either see the message: Wrong initialisation file. Driver has not been removed. or the message: Driver can no longer be removed. In the first case you have obviously used the wrong initialisation file. In the second case the restarting of the PC is the only way to get rid of the driver. If you press any key other than either 'e' or 'E' the following message will appear on the monitor: Driver remains resident in the memory. In that case, the driver will continue to be resident in the memory. 29 Software driver 3.2 Some preliminary explanations on the software driver 3.2.1 The movement segment A movement segment is a curve on which the tool moves from its present starting point to its ending point. If this is a previously defined curve, we will have an interpolation of the movement. In this case, the most used movement segments (in short: segments) are the linear and the circular segments. Correspondingly, we have then a linear interpolation and a circular interpolation. The circular interpolation is a special case of the helix interpolation (see section 3.3.30). As the helix interpolation is not so commonly used we are only talking about the circular interpolation even though our control offers the circular interpolation as well as the helix interpolation. Besides this, we also have a socalled PTP segment. A PTP segment exists if you have a PTP control. The curve along which the tool moves is an undefined curve. However, we have to add here that the term ‘PTP segment’ is a term defined by us. Every segment type is again divided into absolute and relative segments (see illustration 3.1). Linear segment Relative linear segment Absolute linear segment Movement segment Circular segment Circular relative segment Circular absolute segment PTP relative segment PTP segment Illustration 3.1: PTP absolute segment Various types of the frequently used movement segments In the following we will explain to you the differences between a relative and an absolute segment. In order to define a movement segment clearly it must first of all be known which type of segment this is (a linear, a circular segment or a PTP segment). The starting point of a segment is always known. This is the point at which the tool stands just before the segment is traversed. During the processing phase, during which the tool moves on various segments that follow one another, the ending point of a segment is at the same time the starting point of the next segment. In the case of a linear segment or a PTP segment you must also state the coordinates of the ending point. With that, a linear segment or a PTP segment are defined clearly. Due to the fact that the necessary data for a linear segment as well as for a PTP segment are identical, we will only talk about the linear segment in the following. It then depends only on the structure of the equipment whether a linear segment or a PTP segment is created. 30 Software driver In order to define a circular segment clearly, you must state the coordinates of the centre of the circle as well as the direction of the movement on the circle (clockwise or anti-clockwise) besides the coordinates of the ending point. Y We want to move the tool to this point Actual segment The tool stands here and this is the reference point Last segment Y_RelEnd X_RelEnd Zero point X X_RelEnd and Y_RelEnd are the coordinates of the ending point of the segment which are relative to the starting point of the segment. Illustration 3.2: Calculation of the relative coordinates using the example of a linear relative segment in the XY_plane The word Relative in the term ‘Relative segment’ has something to do with the reference point for the calculation of the coordinates. The reference point for these coordinates is the point at which the tool stands just before going over the segment. During the processing phase the reference point for each new segment is in principle its own starting point and at the same time the ending point of the preceding segment. Illustration 3.2 should help you to understand this. This illustration is only an example of how to calculate the coordinates of a linear relative segment in the XY-plane. You can determine the coordinates for other axes in the same way. In the case of a circular relative segment its starting point or the ending point of the previous segment serves as reference point, not only for the calculation of the coordinates of the ending point of the segment but also for the calculation of the coordinates of the centre of the circle. It is obvious that the reference point for the calculation of coordinates of the relative segments is changing constantly. Each relative segment has its own reference point and that is nothing else but its own starting point. In the case of absolute segments this fact no longer applies. Here, all segments have always the same reference point for the calculation of the coordinates. This is the origin of coordinates (in other words: the zero point). Illustration 3.3 shows clearly what is meant by this. 31 Software driver Y We want to move the tool to this point Actual segment The tool stands here Y_AbsEnd Last segment Zero point and this is the reference point X X_AbsEnd X_AbsEnd and Y_AbsEnd are the absolute coordinates of the ending point of the segment. The reference point is the origin of coordinates or the zero point. Illustration 3.3: Calculation of the absolute coordinates of the ending point using the example of a linear absolute segment in the XY-plane Illustration 3.3 shows an example for the calculation of the coordinates of a linear absolute segment in the XY-plane. Similarly you can determine the coordinates for other axes or for a circular absolute segment. However, we must add here that the origin of coordinates or zero point can be re-defined at any time. After that the new zero point applies as reference point for all absolute segments until once again a new zero point is defined. 3.2.2 How is a movement segment realized? Because of the inertia as well as the limited accelerating power of a drive system the interpolation must generate a suitable speed profile for the tool so that the tool will not go beyond the ending point of the segment (see illustration 3.4). This area is the path traversed Illustration 3.4: 32 Speed profile for the traversing of a segment t Software driver Illustration 3.4 shows the profile of the tool speed that is generated by our interpolation. It actually does not matter whether this concerns a linear or a circular segment. The difference between a linear and a circular segment lies rather in the profile of the axes speeds. In the case of a linear segment, the axes speeds have profiles similar to that shown in illustration 3.4. In the case of a circular segment, the axes speeds have profiles similar to a sine or cosine function. However, actually you do not have to worry about the profile of the axes speeds. The integration of the speed profile in the course of time is then the path traversed. Using our interpolation, it is possible to change the speeds in the range between 0 % and 140 % during the traversing of a segment. The technical term for this is "Override". Application program Interrupt call-ups Driver Traversing of a segment Time The process is active The process is not active Illustration 3.5: Parallel working between an application program and the driver. Here we would like to point out once more that the generation of the speed profiles is the task of the interpolation of our driver. You as the user need only to inform the driver of the segment parameters through the calling-up of the respective functions. After that the driver realizes the movement segment by itself. Depending on the desired tool speed as well as the segment to be traversed, the traversing of a movement segment can take very long. Of course it would be useless if the driver has control over the PC throughout this entire period of time. If this were the case, it would not be possible for you to influence the movement, that is, you would for example, be unable to change the speed or to stop the movement. For this reason, we have designed the driver in such a way that it realizes the traversing of a movement segment in the background. Illustration 3.5 shows the parallelism between an application program and the driver. Here the driver plays a passive role. In the case of most of the interrupt call-ups the driver is only activated for a very short period of time as the tasks to be executed can be carried out very quickly. Only during the traversing of a 33 Software driver movement segment can the execution time be longer. In this case the interrupt call-up has only the job of informing the driver of the segment parameters. After that the application program has once more the control over the PC. From this moment onwards, the driver works independently in the background. The interpolation, the output of the desired values to the axes controllers, etc. are carried out automatically. When the movement segment is finished the driver will de-activate itself automatically. The application program does not have to take care of that. Instead the application program can realize the communication between the user and the driver through the interrupt call-ups that are still allowed, such as for e. g. the requesting and displaying of the actual positions as well as the actual speed or the changing of the processing speed or the interruption of the processing process. Of course the application program can also prepare the data for the next segment during this time, such as for e. g. the reading of the data from a data carrier and the converting of the data to the appropriate format. Here we would like to point out once more that the application program and the driver share the computing time of the PC. Therefore you should not call up computation-intensive functions, such as the requesting for the actual positions (see section 3.3.18) or the requesting for the actual speed (see section 3.3.19) one after the other within a short period of time. Otherwise the driver would not get the computing time that it needs and that can lead to an uneven movement. The time interval between two call-ups should be at least 50 ... 100 ms. A time delay can easily be realized with function 7 (see section 3.3.7). 3.2.3 How to generate a profile using the isel intermediate format Normally a CNC equipment is used to produce work pieces with pre-defined profiles. In the case of a simple profile such as for e. g. a square or a circle it is generally no problem to divide this profile into individual movement segments and to program them "manually" via the respective driver functions. But in the case of a complex profile this way is no longer possible or no longer sensible. Normally a CAD or a plotting program is used to produce the desired profiles in such cases. The generated profiles are automatically divided into movement segments by the program used and then stored in a geometry file. If you have an interpreter that, amongst other things, can read and interpret these geometry files and convert them into driver functions you will have no more difficulties in creating a complex profile with your equipment. The disadvantage of this method lies in the multitude of CAD and plotting programs that are in the market, which store the geometry data in different formats in the geometry files. In the course of time standards such as for example HP/GL, ADI and NCI file formats have emerged. Because of the existence of these different formats you obviously also need different interpreters. This results in additional 34 Software driver time and money spent if you want to process different file formats on your CNC equipment (see illustration 3.6). HP/GL file format HP/GL interpreter NCI file format ADI file format NCI interpreter ADI interpreter Other file formats other interpreter ISELDRV.EXE driver for the control of servo motors Hardware and mechanics Illustration 3.6: Equipment control using different interpreters for different file formats In order to avoid the additional expenditure of having to have different interpreters, we have defined a so-called isel intermediate format. The various file formats are first of all converted by the respective converters to the isel intermediate format. In order to control your servo equipment through our driver, you will only need one interpreter that reads the isel intermediate format, interprets it and calls up the respective driver functions (see illustration 3.7). HP/GL file format HP/GL interpreter NCI file format ADI file format NCI interpreter ADI interpreter Other file formats other interpreter isel intermediate format Interpreter for isel intermediate format ISELDRV.EXE driver for the control of servo motors Hardware and mechanics Illustration 3.7: Equipment control using various converters and an interpreter At first glance the controlling of the equipment using the isel intermediate format seems to be more complicated. But you should not forget that the expenditure for an interpreter with an operating interface is considerably higher than that for a single converter. Another advantage lies in the path processing which is the subject of the next section of this manual. 35 Software driver If you would like to know the details of the isel intermediate format please refer to the manual for this. We want to explain the intermediate format briefly here so that you will be able to understand the path processing that is covered in the next section. The isel intermediate format is an ASCII format. Every command is on a separate line. At the beginning of the line is the sentence number. This is followed by a plain-text identification code for the command. After this are the respective command parameters, if the parameters are necessary. The set of commands can be expanded and contains at the moment various types of commands, such as for e. g. movement commands, commands for the changing of the tools, commands for the handling of the input/output ports. Some commands are shown as examples below. N000064 MOVEABS X1000 Y1000 Z1000 A0 This command describes an absolute linear segment that is traversed in the normal mode (see function 25 in section 3.3.25). The absolute coordinates of the ending point of the segment are marked by the letters X, Y, Z and A. N000011 FASTREL X5000 Y1000 Z11000 A100 This command describes a relative linear segment that is traversed in the rapid mode (see function 26 in section 3.3.26). The relative coordinates of the ending point of the segment are marked by the letters X, Y, Z and A. N000008 CWREL CX0 CY5000 X0 Y10000 Z1000 A20000 This command describes a relative circular segment that is traversed in clockwise direction. The coordinates of the centre of the circle are given by CX and CY. The ending point coordinates are marked by the letters X, Y, Z and A. N000016 GETTOOL 7 This command requests that the tool number 7 be fetched. N000005 COOLANT ON This command requests that the coolant pump be switched on. N000062 REF X Y Z A This command requests that the reference run be carried out for the axes X, Y, Z and A. 36 Software driver Apart from the path processing the use of the isel intermediate format is not absolutely necessary but recommended. If you are using our format you can make use of our ready-made software packages such as for e. g. converters for various formats or the interpreter for our intermediate format at any time. This can save you a lot of time and money. 3.2.4 How the path processing is realized Now it is possible to generate a complex profile by having the equipment process the individual segments of the profile one after the other. This segment-by-segment processing creates intermediate stops between two consecutive segments (see illustration 3.4). Most of the handling jobs can be solved very well by this segment-by-segment processing. For many processing jobs the segment-by-segment processing is absolutely sufficient although the intermediate stops between the segments have in most cases a negative effect on the processing quality. For many demanding processing jobs, there is a desire to create a profile consisting of several segments in one work process from beginning to end without intermediate stops. This type of processing is called path processing. Unofficially this path processing is sub-divided into 2D and 3D path processing. For a 2D path processing, the path traversing can be realized in one plane. The 3D path processing corresponds to the path traversing in three dimensions. It is obvious that a machine that is capable of a 3D path processing will also be able to carry out a 2D path processing. Apart from an improvement of the processing quality a much shorter processing time is attained with the path processing because there are no intermediate stops. In order to be able to realize the path processing a so-called speed profile for the entire profile must first of all be generated. For the path traversing the tool speed depends on this speed profile. On one hand the speed profile limits the maximum tool speed for the transition between any two consecutive segments in order to keep the path deviations at the transitions within a permissible margin of error. On the other hand the speed profile forces the tool to move in such manner that the ending point of the last segment of the profile can be reached without overshooting. The generating of the speed profile is a very complicated matter and requires that all segments of the profile are known in advance. In principle, there are two ways to generate the speed profile. In the first method a small window is placed over the profile to be processed. Through the segments that fit into this window, a speed profile is produced. During the processing the window is moved in the direction of the end of the profile. The speed profile is updated each time. The calculation of the speed profile is carried out in real-time. 37 Software driver In the second method the speed profile is completely calculated before the path traversing begins. For the first method, an enormous computing capacity is needed. Furthermore the calculated speed profile is not the best with regard to the overall profile because the speed profile can only be optimized inside the window. The disadvantage of the second method lies in the fact that a preliminary calculation is necessary. However we are of the opinion that the preliminary calculation time is negligible in comparison to the processing time. Apart from an optimal speed profile for the entire profile the handling during the path traversing is a lot easier here. For these reasons we have realized the path processing using the second method. Illustration 3.8 shows you the principle of our machine control including the path processing. HP/GL file format HP/GL interpreter NCI file format ADI file format NCI interpreter Other file formats ADI interpreter other interpreter isel intermediate format Path generator isel intermediate format with path data Interpreter for isel intermediate format ISELDRV.EXE driver for the control of servo motors Hardware and mechanics Illustration 3.8: Principle of the machine control with path processing This illustration shows that the path processing is an option of the machine control. You can control your machine with a segment-by-segment processing as well as with a path processing. This means a great deal of flexibility for you. The working principle of the path generator is quite simple. The path generator reads and interprets, one after another, the commands from the data file stored in the isel intermediate format. During this all consecutive movement commands that do not constitute a rapid movement are combined into a profile that is to be created with a path processing. A speed profile is then calculated 38 Software driver for this profile. Instead of the parameters of all segments that are part of the path the data of the speed profile are stored in the data file. All rapid movement commands and all commands that are not movement commands are interpreted by the path generator as the end of any existing path and re-stored without change into the data file. In this way it is possible for a data file to contain several profiles that are to be generated with the path processing. In between the profiles other actions, such as for e. g. tool changing, handling of the input and output ports, switching on or off of the coolant pump can be carried out without any problems. This shows the kind of flexibility that can be achieved. Illustration 3.9 shows an example of an input data file and an output data file of the path generator. Input data file of the path generator: ;******************************************** ; File example for the path generator ;******************************************** N000001 IMF_PBL_V1.0 N000002 FASTABS X500 Y-500 Z500 A500 N000003 WPZERO N000004 MOVEREL Y1000 Z1000 N000005 MOVEABS X1000 Y1000 Z-1000 N000006 COOLANT ON N000007 CCWREL I0 J-1000 X-1000 Y-1000 Z1000 N000008 VEL 10000 N000009 CCWABS I0 J1000 X1000 Y1000 Z-1000 N000010 COOLANT OFF N000011 REF XYZ Output data file of the path generator: ;******************************************** ; File example for the path generator ;******************************************** N000001 IMF_PBL_V1.0 N000002 FASTABS X500 Y-500 Z500 A500 N000003 WPZERO N000004 PATH 0000000002 39 Software driver 0000000001 07002CA22C4AD6C6B044571B8A48DED284420000000000007A44000 07A4400 000000F304353FF304353F00000000000000000000000000000000000 000000000000002 0700907A084A16C10B45B35D5A480000000000007A44000000000000 FAC42E F9E43E000000002EF964BF00000000000000000000000000000000000 00000 N000005 PATHEND N000006 COOLANT ON N000007 PATH 0000000003 0000000001 080000002CA22C497C59C444012A86439C829542010000007A44DB0 FC93FDB0F49400000000000007AC400007AC400007AC400007A446F 12833A83F9223F0000000002 0A0000401C46000000000000000000000000000000000000000000000 0000000000000000000000000000000000000000000000000000000000 0000000000000000003 080000002CA22C497C59C444012A864300000000010000007A44E4C B9640000000000000000000007A4400007A4400007A4400007AC46F1 2833A83F922BF N000008 PATHEND N000009 COOLANT OFF N000010 REF XYZ Illustration 3.9: Example of the input and output data file of the path generator In the data file a comment starts with the character ‘;’. Comments on separate lines are not evaluated. The first command of a data file must be the identification code IMF_PBL. The character string V1.0 directly after the identification code has no meaning for the path generator and is not taken into consideration by it. In this example the character string indicates the version number of the path generator. The identification code IMF_PBL is absolutely necessary as the path generator uses this identification code to differentiate its input data file from any other file. The command with the number 2 in the input data file is a command for the rapid movement. It is written unchanged into the output data file. The next command with the number 3 defines the present tool point as the new zero point of the work piece. This command is not a movement command. 40 Software driver It is also taken over unchanged into the output data file. The commands with the numbers 4 and 5 are consecutive movement commands that are combined by the path generator into a profile. It is not necessary to state a movement length that is 0 as in the case of the X-axis in command 4. As the command number 6 is not a movement command the profile ends here. The profile that is to be created by the path processing consists of the segments 4 and 5. From the parameters of these two segments the path generator calculates the speed profile, the data of which are also stored in the output data file. The beginning of the speed profile is marked by the identification code PATH. On the next line is the number of the movement segments that are part of this profile. In order to store the number of segments in the output data file exactly 12 bytes are required (the characters CARRIAGE RETURN and LINEFEED at the end of the line have been counted as well). After that the data of the speed profile for this profile are set. Each segment of the profile needs 3 lines in order to store the part of the speed profile on itself. The first line contains the segment number which is local within the profile. Including the characters CARRIAGE RETURN and LINEFEED at the end of the line the local segment number occupies exactly 12 bytes in the output data file. The next two lines contain the actual data of the speed profile for the segment. For space-saving reasons this data is not stored in a plain-text format as in the local segment number but in an internal ASCII format. Including the characters CARRIAGE RETURN and LINEFEED at the end of the line exactly 128 bytes are reserved for this in the output data file. Every segment needs a total of 140 bytes in the output data file in order to store the part of the speed profile on itself. The end of the speed profile is marked by the identification code PATHEND. The command number 6 that indicates the end of the first profile is stored back without change. The commands 7, 8 and 9 are combined by the path interpreter into the second profile which is to be created by the path processing. Although command 8 is not a movement command, it is considered to be a movement command by the path generator. In this way it is possible to set the path speed for the circle in command 9 to 10,000 without having to stop the movement. The speed profile of this profile is calculated and stored into the output data file. If the commands 10 and 11 were movement commands they too would be combined by the path generator into a profile. But as this is not the case the second profile also ends after three segments. The commands 10 and 11 are stored without any change into the output data file. 41 Software driver Our path generator is able to generate speed profiles for the 3D path processing. However, it should be noted that the fourth axis is simply ignored during the path processing. Even though our intermediate format allows the interpolating operation of all 4 axes for separate movement commands, it is at present not possible to manage the fourth axis during the path processing. The example in illustration 3.9 gives you an idea of how the path generator works. It should be noted that the path generator re-numbers the commands. The identification codes PATH and PATHEND for each profile that is combined into a path are also allocated new command numbers by the path generator. The information on the number of segments that are part of a profile as well as the local segment number within a profile are very useful in many cases. For example we can imagine that you are incorporating a display on your operating interface which would show the operator what percentage of the profile has already been processed. The command numbers for PATH and PATHEND as well as the local segment numbers can be used in your application program to create a possibility that would allow the operator to continue with the processing of the work piece from the actual point at which a fault had occurred after the processing fault had been rectified (for e. g. in the case of a broken milling cutter) (see driver function 34). After the path data has been generated and stored in the output data file there is obviously the question of how the interpreter can generate a path from this path data. Here we can briefly say that the task of the interpreter, as in the case of other commands, is limited to reading the path data from the file and transferring it via the respective functions to the driver (see driver function 33). It is solely the work of the driver to generate a path from this path data. 3.2.5 How to use the path generator The task of the path generator is the calculation and generation of the speed profile. It is not a part of the driver but a part of the application programs. For our product we are offering you the optional function Path Control. The path generator is available both in the form of object files that were created with the compiler Microsoft C7.00 as well as in the form of an executable program. If you are developing your application programs with a development environment from Microsoft you will be able to include these object files in your programs without problems. If you do not want to use these object files, for example, because your development environment is not from Microsoft you can use the supplied EXE program to calculate the path data. 42 Software driver The following files are supplied for a 3D path control: BAHN_S.OBJ BAHN_M.OBJ BAHN_C.OBJ BAHN_L.OBJ BAHN.EXE for the SMALL memory model for the MEDIUM memory model for the COMPACT memory model for the LARGE memory model executable program 3.2.5.1 Using the object files for the calculation of the path data If you want to make use of the path processing you will have to incorporate the relevant object file into your program and then call up the appropriate function in order to generate the speed profile from a data file with the isel intermediate format. After that it is the task of the interpreter to read in your application program, among other things, this path data from the data file that is created with the path generator and to transfer these to the driver via the appropriate function. The calling-up of the path generator in your program could appear as follows: void PathDataGenerator(char far *ParameterPointer); /*Function declaration*/ void main(void) { char far *ParameterPointer ; . . . PathDataGenerator(ParameterPointer) ; /* Calling-up of the function for the calculation of the speed profile */ . . . } In your program you only need to call up the function PathDataGenerator(). The rest is done by this function. It should be noted that the calling-up function must have a stack size of at least 10,000 bytes. The communication between your program and the function PathDataGenerator() is carried out via a memory area defined in your application program. Its starting address is the Far Pointer ParameterPointer. This memory area is exactly 84 bytes. The organization of this memory area is shown in Illustration 3.10. 43 Software driver Starting address of the memory area LSB MSB LSB MSB LSB MSB LSB MSB Byte 1 Byte 2 Byte 3 Byte 4 Byte 1 Byte 2 Byte 3 Byte 4 Byte 1 Byte 2 Byte 3 Byte 4 Byte 1 Byte 2 Byte 3 Byte 4 Function error code Interruption key code LSB MSB LSB MSB Circular plane Data file line number LSB MSB LSB MSB Byte 1 Byte 2 Byte 3 Byte 4 Byte 1 Byte 2 Byte 3 Byte 4 Byte 1 Byte 2 Byte 3 Byte 4 Byte 1 Byte 2 Byte 3 Byte 4 Zero point coordinate X LSB MSB Zero point coordinate Y LSB MSB Zero point coordinate Z LSB MSB Actual point coordinate X LSB MSB Byte 1 Byte 2 Byte 3 Byte 4 Byte 1 Byte 2 Byte 3 Byte 4 Byte 1 Byte 2 Byte 3 Byte 4 Byte 1 Byte 2 Byte 3 Byte 4 Actual point coordinate Y LSB MSB Actual point coordinate Z LSB MSB Initialization file pointer LSB MSB Input data file pointer LSB MSB Byte 1 Byte 2 Byte 3 Byte 4 Byte 1 Byte 2 Byte 3 Byte 4 Byte 1 Byte 2 Byte 3 Byte 4 Byte 1 Byte 2 Byte 3 Byte 4 Output data file pointer LSB MSB User function pointer LSB MSB Definition Axis X LSB Zylinder Radius X MSB LSB MSB Byte 1 Byte 2 Byte 3 Byte 4 Byte 1 Byte 2 Byte 3 Byte 4 Byte 1 Byte 2 Byte 3 Byte 4 Byte 1 Byte 2 Byte 3 Byte 4 Definition Axis Y LSB Zylinder Radius Y Definition Axis Z Zylinder Radius Z MSB Byte 1 Byte 2 Byte 3 Byte 4 LSB = Last Significant Byte (Lowest-order byte) MSB = Most Significant Byte (Highest-order byte) System structure Illustration 3.10: Memory area for the data exchange with the PathDataGenerator() function In the first 4-byte field Interruption Key Code you can define the ASCII code of any key of the keyboard. By pressing this key the user can interrupt the PathDataGenerator() function immediately during its processing. It then returns to the calling-up function with the appropriate error code. It should be noted here that an expanded IBM-ASCII code is not accepted, that is, the ASCII code of the interruption key lies in the range 0 ... 127. In the field Function Error Code the PathDataGenerator() function passes back an error code to the calling-up function. With this error code the calling-up 44 Software driver function can determine whether the PathDataGenerator() function has been executed correctly or not. If there is an error you can determine what error has occurred with the help of this error code. We will deal with the various possible errors in more detail at the end of this section. Through the field Data File Line Number the PathDataGenerator() function passes back the line number of the input data file to the calling-up function when there is an error. With the help of this line number you can determine at which point in the input data file the calculation has been interrupted. This is very useful for the error analysis. If there is no error the line number will be 0. It should be noted here that the line number of the input data file that is passed back can differ greatly from the command number in the file because of additional comment lines. In the field Circular Plane you must define the circular plane. As long as the circular plane is not changed by a command in the input data file the circular as well as the helix interpolation will take place on this plane. The allocation of the value in the field Circular Plane to the circular plane is as follows: Value 0 1 2 (otherwise) Circular Plane XY Plane XZ Plane YZ Plane YZ Plane Through the fields Zero Point Coordinate X, Zero Point Coordinate Y and Zero Point Coordinate Z you have to state the coordinates of the zero point of the work piece with reference to the reference point of the machine, that means, you have to state where the zero point of the work piece is defined before the program starts to process the data file. This information is important as all absolute coordinates in the movement commands take the zero point of the work piece as reference point. The coordinates are specified in micrometer [µm]. Through the fields Actual Point Coordinate X, Actual Point Coordinate Y and Actual Point Coordinate Z you have to state exactly where the tool stands immediately before the program starts to process the data file. The unit of the coordinates is micrometer [µm]. It should be noted that the point for the calculation of these actual point coordinates is not the reference point but the zero point of the work piece. The coordinates of the zero point of the work piece with reference to the reference point are transmitted to the Path Data Generator() function through the above-mentioned fields Zero Point Coordinate X, Zero Point Coordinate Y and Zero Point Coordinate Z. 45 Software driver Through the field Initialization File Pointer the Path Data Generator() function gets a Far Pointer which points to a character string. This character string is the name of the initialization file of the equipment (see manual for the PARKON.EXE configuration program). The file path must be specified. This information is necessary because all equipment parameters are contained in this initialization file. The Path Data Generator() function needs many of these equipment parameters to calculate the speed profile. Through the field Input Data File Pointer you have to specify a Far Pointer that points to a character string. This character string is the name of the input data file from which you want to have the path data calculated. The complete path must be specified. Through the field Output Data File Pointer you define what the output data file is to be called. The path data are stored in this output data file. The path must be specified. If a file with the same name already exists in this directory this already existing file is deleted without any warning. Through the field User Function Pointer you can specify a Far Pointer that points to a function defined by you. It is to be noted that the value in this field is only interpreted as a function pointer when the value is not 0. Otherwise this field is simply ignored. This function can only have a single parameter. It is a Long Number. The declaration of this function must appear as follows: void UserFunction (long number); This function is called up regularly within the Path Data Generator() function using the specified pointer. The percentage (0 ... 100) is transmitted via the single parameter of this function. This percentage states what percentage of the input data file has been processed. This function which is defined by you serves as an information channel between your application program and the Path Data Generator() function during the period of time in which the speed profile is calculated. In this way you can very simply, for example, bring a display onto your monitor screen which shows what percentage of the speed profile has already been calculated. The driver of version 3.1 onwards offers the possibility to switch between the axes (see function 57). After the switching-over you can work with the new axis allocation as per normal. The path processing is still possible like all other functions. Through the fields Definition Axis X, Definition Axis Y, Definition Axis Z you can inform the Path Data Generator() which axis you want to use as X-axis or as 46 Software driver Y-axis or as Z-axis during the path processing. The allocation of the axis numbers in these fields to the actual axes are as follows: Value 1 2 3 4 Axis X-axis Y-axis Z-axis A-axis We are going to use the following example to explain the interaction between the axis switching and the path processing. If Definition Axis X = 4 Definition Axis Y = 3 Definition Axis Z = 1 then the PathDataGenerator() will regard the A-axis of the equipment (axis number 4) as X-axis, the Z-axis of the equipment (Axis number 3) as Y-axis and the X-axis of the equipment (Axis number 1) as Z-axis. The axis-specific parameters such as axis acceleration, axis speed etc. are read from the initialization file. The coordinates of the axes X, Y and Z within the path are combined with the read parameters of the axes A, Z and X. From this the path data are calculated. The transfer of the path data to the driver is carried out as usual. But before the transfer you have to inform the driver of the desired axis allocation using function 57 in order to get a correct output. In most cases the switching of the axes is not needed. In this case you have to set Definition Axis X = 1 Definition Axis Y = 2 Definition Axis Z = 3. Parallel to the switching of the axes the driver from version 3.1 onwards offers the possibility to make engravings on a cylindrical body (see function 58). Using the fields Cylinder Radius X, Cylinder Radius Y and Cylinder Radius Z you can transfer the cylinder radii of the corresponding axes to the PathDataGenerator(). The path data for the engraving on the cylinder surface are calculated from this. The engraving on a cylinder surface is therefore easily possible in path mode. The transfer of the path data to the driver is carried out normally. However, prior to the transfer of the path data, you have to use function 58 to inform the driver of the same cylinder radius as here, in order to achieve a correct path data output. Please note that the radius data in the fields Cylinder Radius X, Cylinder Radius Y and Cylinder Radius Z are always together with the axis numbers in the fields Definition Axis X, Definition Axis Y, Definition Axis Z. 47 Software driver If for example Definition Axis Y = 4 and Cylinder Radius Y = 10,000 then the PathDataGenerator() will interpret the A-axis of the equipment as a Y-axis. The cylinder body which is affixed to the A-axis of the equipment has a radius of 10,000 µm. In connection with the axis-specific parameters of the A-axis of the equipment and the cylinder radius of 10,000 µm the coordinates of the Y-axis in the input data file are calculated into the corresponding path data for the Y-axis. For the engraving you can transfer the path data for the Y-axis to the driver after you have used function 57 to re-define the A-axis of the equipment as the Y-axis and have transferred the cylinder radius for the A-axis of the equipment (that is the current Y-axis) using function 58. The values in the fields Cylinder Radius X, Cylinder Radius Y and Cylinder Radius Z must be 0 if you do not intend to make an engraving on a cylinder. In the case of a cylinder radius that is greater than 0, the corresponding round axis is interpreted as a linear axis. Due to this fact and the switching of the axis, the structure of the equipment can be changed. Therefore, you have to state the new structure in the last field Equipment Structure. The allocation of the value of this field to the equipment structure is: Value 1 2 3 4 Equipment structure X_TTT structure XY_TTT structure XYZ_TTT structure NO_TTT structure With the help of the information on the new equipment structure the Path Data Generator() will decide whether a path processing is possible. The Path Data Generator() function places an error code in the Function Error Code field and returns to the calling-up function. Based on this error code the calling-up function can determine whether the calculation of the speed profile was successful or not. In Section 3.2.5.3 we will explain to you the possible errors in detail. 48 Software driver 3.2.5.2 Using the BAHN.EXE program for the calculation of the path data To calculate the path data you can also use the executable program BAHN.EXE instead of object files. You can call up BAHN.EXE directly from your application program through a command line. The calling-up of BAHN.EXE from within a C-program could appear as follows: #include <process.h> #include <stdlib.h> #include <errno.h> void main( void ) { int iErrorCode ; char cCommandLine[128+1] ; /* Form the command line */ . . . /* Calling up the command line */ iErrorCode = system( cCommandLine ) ; . . . } The format of the command line cCommandLine is: BAHN.EXE Par_File Input_File Output_File Ini_File In the following the meaning of the individual parameters on the command line is explained. BAHN.EXE: This is the executable program for calculating the path data. Par_File: This is a parameter file that contains the starting parameters for the calculation of the path data. You have to create a file in the binary data format that has the following structure: 49 Software driver Starting address of the memory area LSB MSB LSB MSB MSB LSB MSB LSB Byte 1 Byte 2 Byte 3 Byte 4 Byte 1 Byte 2 Byte 3 Byte 4 Byte 1 Byte 2 Byte 3 Byte 4 Byte 1 Byte 2 Byte 3 Byte 4 Function error code Interruption key code LSB MSB LSB MSB Circular plane Data file line number LSB MSB LSB MSB Byte 1 Byte 2 Byte 3 Byte 4 Byte 1 Byte 2 Byte 3 Byte 4 Byte 1 Byte 2 Byte 3 Byte 4 Byte 1 Byte 2 Byte 3 Byte 4 Zero point coordinate X LSB MSB Zero point coordinate Y LSB MSB Zero point coordinate Z LSB MSB Actual point coordinate X LSB MSB Byte 1 Byte 2 Byte 3 Byte 4 Byte 1 Byte 2 Byte 3 Byte 4 Byte 1 Byte 2 Byte 3 Byte 4 Byte 1 Byte 2 Byte 3 Byte 4 Actual point coordinate Y LSB MSB Actual point coordinate Z LSB MSB Monitor line number LSB MSB Monitor column number LSB MSB Byte 1 Byte 2 Byte 3 Byte 4 Byte 1 Byte 2 Byte 3 Byte 4 Byte 1 Byte 2 Byte 3 Byte 4 Byte 1 Byte 2 Byte 3 Byte 4 Definition Axis X LSB Zylinder Radius X MSB LSB Definition Axis Y MSB LSB Zylinder Radius Y MSB Byte 1 Byte 2 Byte 3 Byte 4 Byte 1 Byte 2 Byte 3 Byte 4 Byte 1 Byte 2 Byte 3 Byte 4 Definition Axis Z Illustration 3.11: Zylinder Radius Z System structure LSB = Last Significant Byte Lowest-order byte) MSB = Most Significant Byte (Highest-order byte) Structure of the parameter file for the calculation of the path data with BAHN.EXE Apart from the absence of the 4-bytes data fields Initialization File Pointer, Input File Pointer, Output File Pointer as well as User Function Pointer and the adding of the 4-bytes data fields Monitor Line Number as well as Monitor Column Number the structure of the parameter file in Illustration 3.11 is to a great extent identical to the structure of the memory area in Illustration 3.10 for the calculation of the path data with PathDataGenerator(). You can read about the meaning of the data fields in Illustration 3.11 in Section 3.2.5.1. When using BAHN.EXE it is not possible to call up a user function periodically. In order to be able to give an online indication in percentage of the path data calculation already carried out, you have to use the two parameters Monitor Line Number and Monitor Column Number. These two parameters fix the starting position on the monitor at which the BAHN.EXE program periodically outputs the desired percentage indication. This percentage indication has the 50 Software driver form “xxx%” and takes up exactly 4 text columns of a line. These two parameters have the value range as shown in Illustration 3.12. P(1,1) P(1,80) Monitor P(25,1) P(25,80) Monitor Line Number = 1, ... ,25 Monitor Column Number = 1, ... ,80 Illustration 3.12: Value range for Monitor Line Number and Monitor Column Number If the parameters Monitor Line Number and Monitor Column Number indicate a position outside the monitor (e. g. 0,0) there is no output. The generating of the parameter file in the binary format is a rather simple operation. First of all you have to define in your program a memory range with the same structure as in Illustration 3.11. After that the parameters in this memory range are defined. Then this complete memory range is written in the binary format into a file. This file is then the parameter file for your calculation. Like in the use of the PathDataGenerator() you will be given the error code for the calculation in the Function Error Code field after the calculation of the path data. The possible errors and their meanings are dealt with in detail in Section 3.2.5.3. Input_File The Input File is the data file in the isel intermediate format from which the path data are to be calculated. Output_File The Output File is the path data file in which the result of the calculation is to be stored. Ini File: The Ini File is the initialization file for your equipment. 51 Software driver 3.2.5.3 Possible errors in the calculation of the path data Various errors can occur during the calculation of the path data. During the use of PathDataGenerator() as well as during the use of BAHN.EXE the error code is sent back via the Function Error Code field. The possible errors and their meanings are explained in the following. Error code = 0: No error The output data file with the path data could be generated without error. The number 0 is shown in the Data File Line Number field. Error code = 1: Interruption key error The code for the interruption key in the Interruption Key Code field is incorrect, that is, the value in this field lies outside the range 0 ... 127. Error code = 2: Interruption error The Path Data Generator() function has been interrupted during its work by the pressing of the key defined in the Interruption Key Code field. The number of the last processed line of the input data file is shown in the Data File Line Number field. Error code = 3: Equipment structure error The path processing can only be carried out in equipment, the main axes of which form a Cartesian-system of coordinates on the plane or in space. The path processing is only possible if your equipment has the structure of type XY_TTT or of type XYZ_TTT (see manual for the PARKON.EXE configuration program). Error code = 4: Initialization file name error The name of the initialization file, the pointer of which is in the Initialization File Pointer field, is obviously wrong. Either the file name does not have the form *.INI or the stated file does not exist at all. Error code = 5: Initialization file format error The file, the name of which is indicated by the pointer in the Initialization File Pointer field does not have the internal format of an initialization file (see manual for the PARKON.EXE configuration program). Error code = 6: Input data file name error The input data file, the name of which is indicated by the pointer in the Input Data File Pointer field and from which the output data file is to be generated with the path data does not exist or at least not in the specified path. 52 Software driver Error code = 7: Input data file format error The input data file from which the output data file is to be generated with the path data does not have the internal format which a data file with isel intermediate format must have. Error code = 8: Input data file segment error The input data file has an incorrect command. Through the line number transmitted back to the Data File Line Number field the calling-up function can determine which line of the input data file this incorrect command is on. In most cases it concerns movement commands with a circular or helix interpolation. Error code = 9: Output data file name error It was not possible to create the output data file, the name of which is indicated by the pointer in the Output Data File Pointer field. In most cases this error indicates that the specified path does not exist or that the given name does not comply with the naming convention of MS DOS. Error code = 10: Parameter file error This error can occur in connection with the parameter file. It indicates that the transferred parameters are incorrect. The cause of the error code 10 could be one of the following: - par_file does not exist - file handler no longer exists - wrong format of the par file This error only occurs if you are using the BAHN.EXE program for the calculation of the path data. Error code = 11: Command line error When calling up the BAHN.EXE program for the calculation of the path data you have to form a command line that contains the necessary parameters. When the command line has an error, e. g. one of the parameters is missing, this error message will appear. This error only occurs if you are using the BAHN.EXE program for the calculation of the path data. Error code = 12: Axis number error The statement of the axis number in the fields Definition_Axis_X, Definition_Axis_Y, Definition_Axis_Z is wrong. The following can be the cause of the error: - the axis number is smaller than 1 - the axis number is greater than the number of axes of the equipment - at least two axis numbers in the fields are the same 53 Software driver This error occurs during the use of object files as well as during the use of BAHN.EXE. Please note that in the case of an error (that is error code greater than 0) the output data file was deleted before the PathDataGenerator() function or the BAHN.EXE program returns, that is, there is no output data file in the case of an error. 3.2.6 Safety of the equipment To ensure the safety of the servo equipment various measures are integrated into the driver. These measures are explained in the following subparagraphs. All these safety measures (Watch-Dog signal, monitoring of the hardware limit switches, the software limit switches and the run-out errors) run concurrently and supplement each other. For you as the user this means considerably increased safety for your servo equipment. 3.2.6.1 Watch-Dog signal and control byte After the installation in the memory the driver generates hardware interrupts via the interrupt source IRQ10 or IRQ11 at regular intervals of a few milliseconds (see manual for the PARKON program). The triggering of this interrupt does not depend on whether a movement is active in the background. During the interrupt service routine a so-called Watch-Dog signal is output at Pin 40 of the 50-pin RIBBON connector (see section 2.6). The state of the Watch-Dog signal changes periodically between a HIGH state and a LOW state. You should use this Watch- Dog signal to monitor your servo controller. If the Watch-Dog signal does not change its state within a certain period of time the servo controller has to switch itself off after a predefined period of time. The purpose of the Watch-Dog signal lies in the monitoring of the software. If the software on the control computer for some reason crashes the WatchDog signal no longer changes. After a certain period of time the servo controller switches itself off. No danger is created by that. In the interrupt service routine the contents of the so-called control byte is read after the Watch-Dog signal has been generated. The control byte is an input port, the use of which is optional. Using the PARKON program you can define the port address, the user mask as well as the port value for the error-free case. If the read port value and the error-free port value are different the movement of the equipment is interrupted immediately. An error flag is set internally in the driver. As long as this flag is active no movement is possible. Through this 54 Software driver control byte you can return up to 8 hardware signals. Each of these hardware signals is to represent a certain hardware-related error source. This control byte is most commonly used in the monitoring of the current of the servo controller. If the power of the servo controller fails the driver will notice this from the reading of the control byte. The movement is blocked immediately. If the power is returned at some stage the movement remains impossible as long as the reset function (driver function 2) is not called up. Therefore any uncontrolled movement is impossible. The monitoring of the encoder signals is another possible use of the control byte. 3.2.6.2 Hardware limit switch In order to protect the mechanical system each axis of an equipment has normally two so-called hardware limit switches (axis stops). At the axis stop the movement must be interrupted immediately. Otherwise it can happen that the controller with its integration part generates too high a motor current due to the existing difference between the desired and the actual position. The high motor current generates on one hand a great force which can lead to mechanical damages and on the other hand an excessive overheating which in a worst case scenario can damage the motor. Our driver offers you the support for up to two hardware limit switches per axis. The port address and the bit number to which the hardware limit switch is connected as well as the active level (high or low) can be set by you using the supplied PARKON configuration program. During a movement the driver constantly monitors the hardware limit switches. If one of the switches is activated the movement is interrupted immediately. Any existing remainder of the movement segment is lost irrevocably. After that a flag is set internally. As long as this flag is set the application program is unable to send any more movement segments to the driver unless the TeachIn mode is switched on (see section 3.3.9). In the Teach-In mode further movement segments are accepted by the driver in order to be able to realize a Teach-In movement. It should be pointed out here that the hardware limit switches are still being monitored in the Teach-In mode, that is, a movement is still interrupted immediately if one of the switches is activated. But in the Teach-In mode the above-mentioned flag is not set in the case of a fault, that means, the approach to one of the switches during the Teach-In mode has no effect on the further running. Neither can the switchingon or switching-off of the Teach-In mode affect the state of this flag. This flag, once it is set, can only be cancelled by a Reset (see section 3.3.2). This should be done anyway as a lot of driver functions are blocked when the flag is set. The measures that the driver takes in the case of an active hardware limit switch are software-based measures. Such measures are not sufficient for the 55 Software driver safety of a servo control. In addition the servo controller should ensure that in the case of a hardware limit switch fault either the power output modules are disconnected from the power supply immediately or that the currents in the active direction of the hardware limit switches are blocked. In the first solution you will not be able to move the axes in the case of a hardware limit switch fault. The moving out of a hardware limit switch is no longer easily possible. For this reason we have introduced the driver function 48 (see section 3.3.48). When calling up this function you can output a HIGH or LOW signal at Pin 43 of the RIBBON connector. When the hardware limit switches are active you should use this signal to bridge the safety circuit of the servo control. After the bridging it is again possible to switch on the power output modules. The moving out of the axes is no longer a problem. Please note that you should bridge the safety circuit of the servo control only as long as necessary. Otherwise the safety of the servo control is no longer ensured (see section 2.5). The second solution is only possible if the power output modules co-operate. Such power output modules have two inputs, one for the positive and one for the negative direction. Hardware limit switches are directly connected to these inputs. In the case of a fault the corresponding input is activated and the current in that direction is blocked immediately. The moving of the axes out of the hardware limit switches is still possible because only the current in the active direction is blocked. 3.2.6.3 Software limit switch The hardware limit switches limit the working space of your equipment “through the hardware”. Our driver also offers you the possibility to set socalled software limit switches. By calling up the appropriate function you can allow or block the use of the software limit switches or vary the positions of the software limit switches (see sections 3.3.14. and 3.3.15.). This possibility allows you to limit the working space of your equipment with particular flexibility. If the software limit switches are activated a movement is interrupted immediately, in case the equipment tries to exceed the limits set by you yourself. 56 Software driver Y P3 Y_PosEnd Working space P2 P1 Y_NegEnd X X_NegEnd X_PosEnd Impermissible movement Prohibited area Permissible movement Tool position X_NegEnd, X_PosEnd: Positions of the software limit switches on the X_axis Y_NegEnd, Y_PosEnd: Positions of the software limit switches on the Y_axis Illustration 3.13: Feasibility of a movement if software limit switches are used In contrast to the faults of the hardware limit switches any existing remainder of the interrupted movement segment is not lost. If you de-activate the software limit switches now or if you reset their positions the remainder of the segment is automatically traversed over. Another difference between a hardware limit switch fault and a software limit switch fault is that a new movement segment is still accepted by the driver during a software limit switch fault if there is no segment remainder. It must be noted that the control of the software limit switch is only possible during the traversing of a segment, that is, the driver starts first of all the movement. Immediately after that the feasibility of the movement is checked. In a negative case the movement is interrupted and you again have to deal with the remainder of the segment. In order to get rid of the remainder of the segment in this case, without the equipment having to move to the end of the segment, you must call up the reset function (see section 3.3.2). The remainder of a segment is only not noticed by the driver if it is in the Teach-In mode and if you delete the movement by using the stop function (see section 3.3.10). Just as with the hardware limit switches the software limit switches are still monitored by the driver during the Teach-In mode. Illustration 3.13 should show you what we mean by the feasibility of a movement in the case of the software limit switches. The software limit switches form a working space for the tool. Outside this space is the prohibited area. If there is no software limit switch fault any movement can be executed (see point P1). If this is not the case only those 57 Software driver movements that do not try to move the tool deeper into the prohibited area are allowed, that is, only movements that bring the tool back to the working space are allowed (see points P2 and P3). The feasibility of a movement therefore depends on the current tool position. 3.2.6.4 Run-out error and switching-off of axis controllers An additional safety lies in the fact that the driver monitors the so-called run-out error (another term for this is: contouring error). Every axis of an equipment has by nature a dead time that is always not zero. The dead time is nothing but the delay time of the equipment. Due to this dead time the desired speed signal and the actual speed signal can never run with the same timing. This then leads to the fact that there is always a difference that is not equal to zero between the desired position and the actual position during a movement (see illustration 3.14). This difference is the run-out error. Way End position Run-out error T t Dead time Illustration 3.14: Run-out error during a movement The upper limit of the run-out error results from the dead time can be roughly estimated in connection with the speed as follows: Run-out error = Dead time * Speed * Risk factor The dead time of the individual axes of your equipment can be easily determined with the help of the PAREIN.EXE setting program. The risk factor is important because every equipment is subjected to a certain load variation during the processing. The risk factor can be defined freely by you. A value of 200 % is reasonable. During a movement the driver constantly checks the run-out error. If the run-out error exceeds the upper limit calculated according to the above-mentioned formula one of the following faults is the cause for it: - The desired speeds have been set too high. The axes cannot achieve these values at all. - The encoder or encoder signal lines are not in order. 58 Software driver - The power output modules are defective or you have simply forgotten to switch them on. This carelessness occurs more often than you suppose. - A limit stop is reached. When the driver detects an inadmissible run-out error the movement is interrupt immediately. Any existing remainder of the segment is lost irrevocably. After that a flag is set internally which only can be cancelled by a Reset (see section 3.3.2). As long as this flag is set the you will not be able to call up most of the driver functions. A new movement segment is not accepted unless the driver is in the Teach-In mode. In this mode the run-out error is furthermore monitored. If the error occurs the movement is interrupt immediately. But the error flag is not set. The monitoring of the run-out error is important because a run-out error that is too big, that is, a too big deviation leads to a motor current that is too high. In worst case damages can incur at the motor and at the mechanics. For a controller with an integration part the run-out error may lead to a high motor current in the course of time, even though the run-out error has been noticed by the driver. In order to prevent this the driver offers you the option to switch off the controller in the case of a run-out error. If the controller has been switched off even large control deviations can no longer lead to a high motor current. Using the PARKON.EXE configuration program you can decide yourself whether the driver will switch off the controller automatically or not in the case of a run-out error. During the next movement the controller is automatically switched on again. You as the user will not notice anything at all about the switching-off and switching-on of the controller and do not have to concern yourself with it. You definitely should use the ability of the driver to switch off the controller if your power output modules do not have any hardware-based measures for limiting the current. If a hardware-based current limitation is possible the use is optional. 59 Software driver 3.2.7 The reference run In order to define the machine zero point a reference run must be carried out. That is generally the case for any equipment that does not use absolute position measuring systems. Absolute measuring systems are normally very expensive and require a complicated interface. On the other hand they work very reliably and do not have problems with malfunctions. Our PC card cannot work with absolute position measuring systems. Therefore the reference run is a must. We have taken into consideration two modes for the reference run. They are the standard mode and the non-standard mode. - In the standard mode the axis moves first of all at a constant speed to the reference switch until this switch is activated. Then the axis moves out of the switch at a very much slower speed. The point at which the switch changes its level is generally defined as the reference point or the machine zero point. - With the non-standard mode we want to take into consideration rotation axes which can rotate continuously. In the case of such rotation axes magnetic switches are normally used as reference switches. Here the standard mode can be used without problems but the symmetry of the axis after the reference run is not ensured (see illustration 3.13). In the non-standard mode the positions of the two switch-over points of the magnetic switch are determined. The centre point between these two switchover points is defined as the reference point or the machine zero point. magnetic switch endless rotary axis standard mode non-standard mode Illustration 3.15: Modes of the reference run for rotation axes with magnetic switches The hardware limit switches that are required for the limiting of the physical working range of the equipment are in many cases also used as reference switches for economical reasons. For this, we have already provided for the configuration of a separate switch or one of the two hardware limit switches as reference switch for every axis in the software (see also the manual for the PARKON.EXE configuration program). 60 Software driver During the reference run the hardware limit switch that is used as reference switch is activated. The hardware of your servo control can switch off the power output modules if the hardware limit switch is triggered, as we have already mentioned in Section 3.2.6.2. In this case hardware measures are required to prevent the switching-off of the power output modules. One possibility is the utilisation of the driver function 48 (see section 3.3.48). Prior to the reference run you have to call up this function in order to bridge the safety circuit of the servo controller. After the reference run the function has to be used once more in order to restart the safety circuit of the servo controller. If the power output modules have not been switched off but only the current in the active direction has been blocked you do not have to do anything during the reference run. In practice, the encoder index signal is usually used during the reference point approach (in this documentation usually referred to as "reference run" – transl.) in order to be able to define a machine zero point at a high accuracy. During its initial stage, referencing with index signal is similar to that without index signal. The difference is in the final stage. When moving away from the reference switch, not the point at which the reference point switch changes its level but the next following point at which the encoder index signal comes in is defined as the machine zero. The position of the index signal provided by the encoder once per revolution is independent of the accuracy of the reference point switch. In this way, a very high accuracy of the machine zero is achieved. The standard version of our driver software does not include this kind of referencing. To be able to carry out referencing with the encoder index signal, start the driver with the option switch /IR: [drive:\][path] ISELDRV.EXE *.INI [/IR]. When function 6 of the driver is called, referencing with encoder index signal is carried out automatically if the axis is in the standard referencing mode. The option switch /IR has no influence on the axes operated in non-standard referencing mode. There is no difference when calling function 6, no matter whether you want to carry out the referencing with or without index signal. Please note that you must provide for a hardware connection of the encoder index signals to the corresponding pins on the ribbon plug connector mounted on the plug-in card (see Section 2.9). Otherwise, error code 37 will appear when calling function 6 (see Section 3.2.20). Furthermore, you should take into account that the factory settings of our plug-in card are not designed for direct connection the of encoder index signals. To achieve this, a minor change of the resistor network is required. If this should be necessary, please contact our service technicians. 61 Software driver 3.2.8 Speed-dependent peripheral control For many processing jobs there is a necessity to control one or more peripherals according to the speed. For example during the processing with LASER it is often necessary to control the intensity of the LASER according to the speed. Or for the application of glue a considerably higher processing speed can be achieved if it is possible to control the opening of the nozzle valve according to the speed. These are two of the many applications where really significant advantages can be attained through a speed-dependent peripheral control. During the movement it is possible to request for the actual path speed of the equipment by calling up the appropriate driver function. This information can then be used in your application program for a speed-dependent control of the peripherals. As long as the run-out time caused by the inertia is so small as to be negligible this method can be used without any problems. However, if this is not the case a speed-dependent control is out of the question. This fact is clearly explained in illustration 3.16. Requesting for the actual speed Control command to peripherals Effect of the control command Time axis Processing time Run-out time of the peripherals Delay time Illustration 3.16: Delay of the effect of peripheral control commands The processing time needed by an application program to generate a corresponding control command for the peripherals from the actual speed in most cases is very small. If the delay time consisting of this processing time and the run-out time of the peripherals is no longer negligibly small this method is useless. Besides the possibility mentioned above you can also use a second method to realize a speed-dependent control with the driver. This improved method is simply based on the idea that the processing equipment itself also has a certain inertia. Every processing equipment needs a certain run-out time until the actual speed has reached its desired value. If the desired speed instead of the actual speed is used for the speed-dependent control the run-out time of the equipment compensates fully or partially the run-out time of the peripherals (see illustration 3.15). 62 Software driver Desired speed output to the equipment Control command to peripherals Actual speed achieves the desired value Time axis Delay of the output from the control command Run-out time of the peripherals Run-out time of the equipment Effect of the control command Illustration 3.17: Compensation of the run-out time of the peripherals by the run-out time of the equipment If the run-out time of the equipment is greater or the same as that of the peripherals the command for the control of the peripherals can be sent with an artificial delay. This artificial delay time can be varied in such a way that the control command takes effect at exactly the time when the actual speed reaches its desired value. In this way an exact speed-dependent control is achieved. But as you can see this method only functions if the run-out time of the equipment is greater or the same as that of the peripherals. This method is an improvement in comparison to the first method. But it is certainly not the solution for all cases. The second method is implemented and supported in our driver. As user, you can make use of this possibility by defining an output port with the help of the PARKON.EXE configuration program. At this output port the driver sends out regularly during the movement a value that is dependent on the desired speed. For you this output value is a piece of information on the speed of the equipment. With this information you can realize a speed-dependent peripheral control. You can even define the output range yourself by defining the maximum and minimum values. Before each movement, the driver calculates the speed factor from these limit values and the speed to be moved. The speed factor is: (Maximum value - Minimum value) Speed factor = ----------------------------------------------------1.4 * Movement speed During the traversing of the segment the movement speed is the same as the segment speed. During the path traversing it is the same as the path speed. 63 Software driver By using the factor 1.4 we want to take the Override of 140 % into consideration. The output value can be calculated as follows: Output value = Actual desired speed * Speed factor + Minimum value If the equipment is not moving, the minimum value is displayed. If the equipment is moving at maximum speed, the maximum value is displayed. You can define the delay time with which an exact speed-dependent control can be realized (see illustration 3.17) through the configuration program as well. The utilization of this speed-dependent output must be expressly stated via the configuration program. Otherwise the output does not take place. After the driver has been loaded you can block or release this output as necessary (see section 3.3.43). 3.2.9 The data format, the units micrometer, angular second and the special figure NO MOVE VALUE The application program and the driver must communicate and exchange data constantly. Of course the data must have a format that allows the application program as well as the driver to convert their data quickly and easily into this format as well as be able to read and interpret the data in this format quickly and easily. This requirement has the following consequence: The exchange data must be whole numbers in a two-digit complementary presentation because this data format is automatically supported by every very high-level language (see section 3.2.13). As user, you do not have to worry about the data transformation. There are two movement possibilities. One is the linear movement with length units such as for e. g. meter and millimetre. The second is the rotation movement with angle units such as for e. g. degree. On one hand it is very easy for you if you have only to work with units that you know. On the other hand the units must be chosen in such way that the movement parameters can be presented as whole numbers with sufficient accuracy. For these reasons we have chosen the unit micrometer for the linear movement. The following applies: 1 millimetre [mm] = 1,000 micrometer [µm] In nearly all application cases the accuracy of one micrometer is fully sufficient. For the rotation movement the unit angular second is used. The following applies: 1 rotation 1 degree [°] 64 = 360 degrees [°] = 60 angular minutes ['] and Software driver 1 angular minute ['] = 60 angular seconds ["] 1 rotation 1 rotation 1 degree [°] angular minutes ['] angular seconds ["] and angular seconds ["] Hence: = 21,600 = 1,296,000 = 3,600 In your application program first of all you must convert all movement data (position, speed and acceleration) from the conventional units, such as for e. g. millimetre and degree, into the unit micrometer or angular second before transferring the data to the driver. The movement data coming from the driver must of course be re-converted into the conventional units. But you can carry out all these to-and-fro conversions by simply introducing a so-called conversion factor for each axis. The whole conversion for each axis is then no more than a multiplication or a division with this conversion factor. In order to clarify this we will calculate two examples for you below. Example 1: Calculation of the conversion factor for a linear axis If the application program is using the unit millimetre [mm] we have the conversion factor = 1,000 because 1 millimetre is equal to 1,000 micrometer [µm]. If the axis is to be moved for a distance of 500 mm you have to transmit following distance to the driver: Movement distance * Conversion factor = 500 * 1,000 = 500,000 µm If the application program receives a value of 150,000 µm from the driver for the actual position request the distanced traversed is equal to: Movement distance in µm/Conversion factor = 150,000/1,000 = 150 mm 65 Software driver Example 2: Calculation of the conversion factor for a rotation axis If the application program is using the unit degree [°] we have the following Conversion factor = 3,600 because one degree is equal to 3,600 angular seconds ["]. If the axis is to be rotated by 10 degrees you must transmit to the driver an angle of: Rotation angle * Conversion factor = 10 * 3,600 = 36,000“ If the application program receives a value of 72,000 from the driver for the actual position request the rotation angle traversed is equal to: Rotation/Conversion factor = 72,000/3,600 = 20° You will certainly have noticed that the number of the encoder lines and the gear factor do not appear in the above calculations. This is because the driver has already taken them into consideration internally based on the parameters entered by you in the configuration file. The greatest advantage in the using of the units micrometer and angular second is the separation between the application program and the mechanics. The application program does not have to check which encoder or which gear factor the respective axis of the equipment has. In order to move the axes you must transmit to the driver the corresponding axis coordinates by calling up a movement function. For this, an axis coordinate has a special meaning, it is equal to: NO_MOVE_VALUE = 3FFFFFFFh = 1073741823 On one hand it is the greatest axis coordinate value that you can transmit to the driver because the axis controller (LM628 or LM629) cannot process any value that is greater than this. On the other hand you will never reach such a big axis coordinate with your equipment. Therefore we allocate a special meaning to this value. In the case of a relative coordinate the driver interprets this value as zero. For an absolute coordinate the current absolute coordinate is used instead of this value, that is, an axis coordinate of this number effects no movement of the axis. The same applies to coordinates of the centre point of a circular segment. Therefore this number is called NO_MOVE_ VALUE. In cases where you do not want to constantly carry the axis coordinates in your application program the use of this value is very advantageous. 66 Software driver 3.2.10 The many speeds and how can they be calculated You will come across various terms concerning speed in this manual. In order to prevent possible confusion we are going to explain these terms briefly here. Axis speed That is the speed of the individual axes of your equipment. Reference speeds In order to define the machine reference point you must carry out a so-called reference run for each of the axes of your equipment (see sections 3.2.7 and 3.3.6). First of all the axis is moved in the direction of the reference switch. This run lasts until the reference switch is activated. After that the axis moves back again. The return run lasts until the reference switch is no longer activated. The point at which the axis is after the return run is the reference point of the axis. In order to be able to carry out a quick reference run and to achieve a high repetitive accuracy of the reference point the speed for the movement to the reference switch is chosen to be considerably higher than that for the return movement from the switch. These two speeds are called reference speeds. You can set these two reference speeds for each axis separately by using the configuration program. The reference speeds belong to the category of the axes speeds. Segment speed This speed is that of the vectorial processing. If you call up one of the functions 24, 25, 28 and 29 (see sections 3.3.24, 3.3.25, 3.3.28 and 3.3.29) the driver uses this speed for the internal interpolation. But this speed is not always the same as the desired speed for the processing because internally the driver internally sets the desired speed as equal to the product of the segment speed and the so-called speed factor. With this you have the possibility to vary the processing speed by changing this speed factor (see section 3.3.21). It should be noted that the segment speed always refers to the tool, that is, this speed is made up of the axes speeds. How it is calculated is shown later on. The standard value of the segment speed can be set with the configuration program. New values can be defined by you via function 20 (see section 3.3.20). Path speed This speed is that of the path processing. If you call up function 33 (see section 3.3.33), the driver uses this speed for the internal interpolation. As in the vectorial processing the desired speed for the path processing is equal to the product of the path speed and the speed factor. This means that here too you have the possibility to vary the processing speed by changing this speed factor (see section 3.3.21). 67 Software driver The standard value of the path speed can be set with the configuration program. You can then define new values via function 32 (see section 3.3.32) The path speed refers to the tool, that is, this speed can be calculated from the axes speeds. How they are calculated is shown below. Rapid speed This speed is meant for the rapid mode. A rapid mode is of interest for a quick positioning, such as for e. g. for the changing of tools. If you call up function 26 or 27 (see sections 3.3.26 and 3.3.27) the driver will use this speed for the interpolation. As in the segment speed the desired speed for the traversing of the rapid segments can be changed by varying the speed factor because it is the product of the rapid speed and the speed factor. Later on we will show you how this rapid speed is combined from the individual axis speeds. You can set new values of the rapid speed by using function 23 (see section 3.3.23). The standard value can again be set in the configuration program. Teach-In speed This speed is meant for the Teach-In movement. During the call-up of function 24 or 25 (see sections 3.3.24 or 3.3.25) this speed is only used for the interpolation if the Teach-In mode had been switched on previously using function 9 (see section 3.3.9). For the traversing of the linear segments this speed factor however has no effect on whether the equipment is to move faster or slower. The driver uses this Teach-In speed directly for the interpolation, that is, it is always the same as the desired speed. The standard value and the new values of the Teach-In speed can be changed via the configuration program and function 22 (see section 3.3.22). Further below we will show you how the driver calculates the Teach-In speed from the speeds of the axes. Desired tool speed or tool speed This is the speed with which the tool of your equipment should move. It is obvious that this speed is made up of the individual speeds of the axes. These in turn depend on whether the Teach-In mode is active at that time or whether the driver wants to realize a rapid mode movement or whether it concerns a processing stage. The driver will then decide whether it should set the tool speed as the same as the Teach-In speed or the same as the product of the rapid speed and the speed factor or as the same as the product of the segment or path speed and the speed factor. During the reference run the tool speed is the same as the reference speed. 68 Software driver Actual tool speed or actual speed This is the speed with which the tool actually moves. It is of course desirable that the desired speed and the actual speed are always the same. But due to the interferences in a real equipment such dreams can never be fully realized. In general the actual value fluctuates around the desired value; the average value of the actual value has a tendency towards the desired value. Through Function 19 you can check the present actual speed (see section 3.3.19). The segment speed, path speed, rapid speed, Teach-In speed as well as the actual speed belong to the category of tool speed. They are all calculated in the same way from the individual speeds of the axes. In the following we will show you how they can be calculated in connection with the movement segment to be traversed. Linear segment The tool speed can be calculated in connection with the structure of the equipment and the actual movement segment. On the side of the equipment structure we have the X_TTT structure with the X_axis as the main axis, the XY_TTT structure with the X_axis and the Y_axis as the main axes, the XYZ_TTT structure with the 3 main axes X,Y,Z and the No_TTT structure (see section 1.2 and the manual for the PARKON.EXE configuration program). All axes that are not main axes are called coupled motion axes. On the side of the movement segment we have the normal and the coupled motion segment. For a normal segment the movement path of at least one of the main axes is not equal to zero. For a coupled motion segment the movements paths of all the main axes are equal to zero. It should be noted that each movement segment in a No_TTT structure is a coupled motion segment. For a normal segment the tool speed can be calculated from the speeds of the main axes. In the case of a coupled motion segment the tool speed is equal to the speed of the first coupled motion axis for which the movement path is not equal to zero. Here the order of the coupled motion axes is X, Y, Z, A. 69 Software driver The following example illustrates the aforesaid. For an equipment with the XY_TTT structure the following formula applies to a normal segment: Vtool = √ Vx2 + Vy2 For a coupled motion segment we have: Vtool = Vz if the movement path of the Z_axis is not equal to zero. Otherwise the following applies: Vtool = Va if the A_axis exists. For a normal segment the tool speed is really equivalent to the speed of the tool on the X_axis (for the X_TTT structure) or on the XY_plane (for the XY_TTT structure) or in space (for a XYZ_TTT structure). For a coupled motion segment, this is of course not the case. It may also be of interest to you to know how the individual speeds of the axes can be calculated from the tool speed. In order to do that first of all you must calculate the so-called segment length. In the case of a normal segment the segment length can be calculated from the movement paths of the main axes. For a coupled motion segment the segment length is equal to the movement path of the first coupled motion axis for which the movement path is not equal to zero. Here, the axes are again counted in the order of X, Y, Z, A. For each axis the movement factor is calculated. The movement factor is the quotient from the axis movement path and the segment length. The axis speed is equal to the product of the movement factor and the tool speed. The whole calculation is illustrated in the following example. For an equipment with an XY_TTT structure we have for a normal segment: BI = X2 + Y2 rel rel For a coupled motion segment we have: BI = Zrel if Zrel is not equal to zero. Otherwise we have: BI = Arel if the A_axis exists. Here, BI is the segment length. Xrel, Yrel, Zrel and Arel are the movement paths of the respective axes. 70 Software driver The speed of the respective axes can be calculated as follows: Vx = X rel --------------BI * Vtool Vy = Y rel --------------BI * Vtool Vz = Z rel --------------BI * Vtool Va = A rel --------------BI * Vtool Circular and helix segments: The driver allows a circular or a helix interpolation only if your equipment has an XY_TTT or XYZ_TTT structure. The tool speed is made up of the speeds of the axes that form the rotation plane. We have: Vtool = 2 2 V1 + V2 Here V1 and V2 are the axis speeds of the two axes that form the rotation plane. This can be the XY- or XZ- or YZ-plane. Vtool is the actual speed of the tool on the circular path. Unfortunately it is not as easy to calculate the axis speeds V1 and V2 from the tool speed as it is for a linear segment because they are cosine and sine functions. But for the third axis and the A-axis we have: V3 = Axis3rel --------------BI Va = A rel --------------BI Here axis3rel and Arel are the relative coordinates of the third axis and of the A-axis in the segment ending point. For a linear segment as well as for a circular or helix segment the speeds of the axes, apart from the time, use the same length unit as the axis position (micrometer or angular second). The unit of the tool speed is of course the same as that for the speeds of the axes from which it is calculated. 71 Software driver 3.2.11 The controller and its parameters Every axis of your equipment is monitored by an axis controller of type LM628 or LM629 that is located on the PC card. Among other things this chip offers you a digital PID control, the parameters of which must be set by you according to the specific characteristics of your equipment before using it. But before we take a closer look at the PID algorithm of this chip we would like to introduce you a bit more to the theory of control technology. A continuous or analogue PID control has the transfer function: G(s) = kp + ki / s + kd * s with s : operator of the LAPLACE_transformation kp: coefficient of the P-portion ki : coefficient of the I-portion kd: coefficient of the D-portion The product of the transfer function and the error signal E(s) (error signal = desired value - actual value) is the correcting variable U(s): U(s) = E(s) * kp + E(s) * ki / s + E(s) * kd * s Through the re-transformation into the time level we arrive at a time equation for the adjusting signal: t d e(t) u(t) = kp * e(t) + ki * e(t) d t + kd * d t 0 , whereby u(t) as well as e(t) are the adjusting signal as well as the error signal at the time level. By making this equation discretionary we arrive at the difference equation of a discontinuous or digital PID control: n U(nTa) = kp * E(nTa) + ki * Ta * E(iTa) + kd * i=0 t e(t) d t 0 P-portion with 72 Ta U(nTa) E(nTa) E((n-1)Ta) I-portion E(nTa) - E((n - 1)Ta) Ta d e(t) dt D-portion Sample time of the digital PID_filter Adjusting signal at point of time t = n * Ta Error signal at point of time t = n * Ta Error signal at point of time t = (n-1) * Ta Software driver This original difference equation looks nice but in practice it has only limited use. It has to be modified in order to adapt it to the real conditions. We are going to explain these problems in greater detail below. In the case of a scanning time Ta that is getting smaller the behaviour of a digital control tends towards that of an analog control. Because of this the error signal and the interferences can be controlled very quickly. But the smaller the scanning time Ta is the less accurate is the approximate calculation of the differentiation in the D-portion due to the interferences and the inaccuracies of the measuring systems. Therefore the difference equation is modified. The modified difference equation is: n E(kTs) - E((k-1)Ts) U(nTa) = kp * E(nTa) + ki * Ta * E(iTa) + kd * i=0 Ts Ts : Scanning time for the differentiation of the D_portion The scanning time Ts for the calculation of the differentiation does not necessarily have to be identical to the scanning time Ta of the control. The greater Ts the more accurate is the differentiation. But at the same time the stability of the closed system declines. A further modification of the difference equation concerns the integration of the I_portion. Under certain circumstances, such as for e. g. in the case of a large desired value, for which the error signal remains positive or negative for a very long time, this can result in a situation where the adjusting signal reaches a very large value because of the integration. On one hand the adjusting signal exceeds the limit of the final control element of the actual equipment. On the other hand a large value of the adjusting signal causes a great overshooting beyond the desired value. This has the effect that the positioning takes very long. Therefore it is customary in practice to limit the integration value. If the integration value exceeds the allowed range, the integration algorithm ceases to have effect. In this way, the integration value and therefore also the adjusting signal always remain limited. Now we would like to explain the digital PID control of the axis controller in greater detail since you have already familiarized yourself with the theory of a conventional PID control. The PID control of the axis controller has the difference equation: n U(nTa) = Kp * E(nTa) + Ki * E(iTa) + Kd * ( E(kTs) - E((k-1)Ts) ) i=0 with the two additional parameters Td and II, which, however, are not part of the difference equation. You will have already noticed that the term Ta is no 73 Software driver longer present in the I-portion nor the term 1/Ts in the D-portion. The reason for this is that these two parameters have already been taken into consideration in the parameters Ki or Kd. The modification of the differentiation is ensured by the parameter Td. Here we have the relationship: Ts = ( Td + 1 ) * Ta with Td = 0 ... 255 By changing Td you can vary the scanning time Ts of the differentiation. The parameter Td can only be a positive whole number between 0 and 255, that is, the scanning time Ts for the differentiation is always a whole-number multiple of the scanning time Ta. Generally Td should first of all be set to 0 during the starting-up. After all control parameters have been set Td can be increased step-by-step in order to find the optimum of the control behaviour. During this the factor Kd must be reduced correspondingly (see below). The limiting of the integration can be realized without problems with the parameter II. The following applies: II = 0 ... 32,767 = 0 ... (215 - 1) The parameter II can only be a whole and positive value in this range. After II has been set + II and - II are the upper and lower limit respectively for the integration. The I-portion of the control has of course no effect if you set II to 0. The value range 0 ... 32,767 for II is more than large enough, considering that the adjusting signal of the axis controller has a 12-bit resolution. In the case of a 12-bit resolution the adjusting signal lies in the range of - (212-1) ... + (212-1). Besides the two modifications with regard to the I-portion and the D-portion that are mentioned above there are other modifications for the PID-algorithm of the axis controllers. The reason for these modifications is purely calculatory. They are necessary to avoid rounding errors during calculations. Because of these modifications, we have the following conversion formulas between the parameters of the PID control in the controller and the parameters of a normal PID control: Kp = 256 * kp Ki = 65.536 * ki * Ta and Kd = 256 * kd / Ts = 256 * kd / (Td * Ta) 74 Software driver As in the case of Td and II, Kp, Ki and Kd can only be positive and whole number values. The following applies with regard to the value range: Kp = 0 ... 32,767 = 0 ... (215 - 1) Ki = 0 ... 32,767 = 0 ... (215 - 1) Kd = 0 ... 32,767 = 0 ... (215 - 1) The formulas given above form the basis for the calculation of the control parameters in the axis controller. First of all you can calculate the control parameters kp, ki and kd with any control design method that you are familiar with. From these parameters you can then calculate Kp, Ki and Kd. Of course you will have to round off Kp, Ki and Kd. The values Kp, Ki, Kd, II and Td are the values that you will eventually have to transmit to the axis controller either via the configuration program as standard values or via function 4 (see section 3.3.4). For all calculations you also need the value for the scanning time Ta of the digital control in the axis controller. The following applies: Ta = 2,048 / 6 MHz In this 6 MHz is the cycle frequency with which the chip LM628 or the chip LM629 on our PC card are working. The value 2048 is an internal constant of the chip. 3.2.12 How you can use the driver The driver makes various functions available to you. You can use these functions by calling up a so-called software interrupt. You can choose the number of this software interrupt yourself by using the configuration program (see the manual for the PARKON.EXE configuration program). Based on the data that you have stored in the individual processor registers before the calling-up of the interrupt the driver will know which function you want to use and how it should execute this function. After the function has been executed, the driver stores its data in the respective processor registers and returns. Based on the data passed back you will know how the function has been executed. At this point we should mention that only the 4 processor registers ax, bx, cx and dx are used for the data exchange between an application program and the driver and that the number of the function that is requested by you must always be loaded into the processor register ax and that it is always the processor register al that receives the error code for the execution of the requested function when the driver returns. 75 Software driver Until now we have been talking about an interrupt call-up but we have not told you yet how to realize an interrupt call-up. If you already know this programming technique you can continue reading the next section. But if this is not the case please read to the end of this section. After this, you will know how this is done. Before calling up an interrupt first of all you must store your data in the processor registers. After that you inform the processor which interrupt you want. The processor then calls up the corresponding interrupt routine. The called-up interrupt routine ends your work and returns. The data that the interrupt routine wants to transmit to you are stored in the processor registers. In this way, you have executed an interrupt call-up. In the following we will show you with a short example using the programming language C (Compiler Microsoft C 6.00A) how to call up an interrupt. #include <dos.h> void main (void) { int.IntNo ; union REGS ProReg; . IntNo = ... ; ProReg.x.ax = ... ; ProReg.h.bl = ... ; ProReg.h.bh = ... ; /* Declaration for the interrupt number*/ /* Declaration for the processor registers*/ /* Here you initialize the variable IntNo. with the number of the interrupt that you want to call up*/ /* Here you load the processor registers with your data */ /* Here you load the processor register ax */ /* Here you load the Low_Byte of processor register bx */ /* Here you load the High_Byte of processor register bx */ /* In the same way, you can load all other processor registers */ int86 (IntNo , &ProReg , &ProReg ) ; /* Here you call up your interrupt */ /* From this point onwards, the data that the interrupt routine wants to inform you of are in the ProReg. You can access this data by using the individual variables, such as for e. g. ProgReg.x.ax or ProgReg.x.bx .... */ . . } In the same way you can call up your interrupt in other programming languages. Of course, every programming language has its own commands to call up the interrupt. 76 Software driver 3.2.13 The two-digit complementary presentation of the numbers We have already mentioned at various points that the exchange data between an application program and the driver must be presented in a two-digit complementary format. Although we have often talked about this data format, we have not explained yet what exactly it is. That is why we would like to explain at this point of time how you can transform whole numbers into the twodigit complementary format. You do not have to concern yourself with the positive numbers as the transformation applies only to negative numbers. First of all you must calculate the amount of the negative number. This amount is negated bit-by-bit and after that, incremented by 1. The result is then the negative number in the two-digit complementary presentation. We are going to explain the process of the transformation using the numbers + 3 and - 3: 00000011B 11111100B 11111101B --> The positive number 3 or the amount of the negative number - 3 --> Bit-by-bit negation --> Incremented by 1 00000011B = 03H 11111101B = FDH --> Two-digit_complementary_presentation of + 3 --> Two-digit_complementary_presentation of - 3 This data format is supported by every high-level programming language. That is the decisive advantage of this data format. The exchange of the data between an application program and the driver is carried out via the processor registers. In the case of large quantities of data an additional memory area is also used, the starting address of which is transmitted through the processor registers. Apart from the address all data that are transmitted via the processor registers as well as via the additional memory area must be in the two-digit complementary format. For data that are transmitted via an additional memory area it also applies that the lowest-order byte of a number must always be at the lowest address, that is, at the starting address of the memory area reserved for this number and that the highest-order byte must always be at the highest address. This memory allocation is also supported by all high-level programming languages. In summary it can be said that you do not have to concern yourself at all with the data transformation and the allocation of the data to be transmitted to a memory area if you are writing your application program in a high-level programming language. It is only of interest if you program in assembler. Afterwards we would like to show you a little program in C in order to illustrate what we have told you above. 77 Software driver This example will show you how to declare the various types of variables and memory areas for the data exchange between your program and the driver. void main (void) { short ShortNumber; long LongNumber; */ The computer stores the two variables ShortNumber and LongNumber as two-digit complementary numbers in the memory. The variable ShortNumber occupies 2 bytes and the variable LongNumber occupies 4 bytes. The (void far*)&ShortNumber and (void far*)&LongNumber are the starting addresses of the memory area in question. For both variables, it applies that the lowest-order byte is at the starting address of the memory area reserved for it and the highest-order byte is at the highest address. */ struct { long X ; long Y ; long Z ; long A ; } Position ; */ The structure position occupies exactly 16 bytes in the memory. (void far *)&Position is the starting address of this memory area. Each of the variables Position X, Position Y, Position Z and Position A is presented as a two-digit complementary number and occupies 4 bytes in the memory. For each variable, it applies that the lowest-order byte is at the starting address of the memory area reserved for it and the highest-order byte is at the highest address. */ long Array[6]; /* Each element of Array is presented as a two-digit complementary number and occupies 4 bytes in the memory. For each variable, it applies that the lowest-order byte is at the starting address of the memory area reserved for it and the highest-order byte is at the highest address. The Array field occupies exactly 24 bytes in the memory. (void far*)&Array[1] or (void far *)Array is the starting address of this memory area. */ . . . } 78 Software driver 3.2.14 Has the driver already been installed? It is of course very embarrassing if an application program calls up a software interrupt to communicate with the driver even though the driver has not yet been installed. In such cases there is no other alternative but to press the Reset button of the PC. For this reason it is recommended that the application program should check at the beginning whether there is a driver or not. How can you check whether the driver has been installed or not? An interrupt call-up can of course not be used as it would not achieve anything if the driver has not been installed yet. In that case the Reset button has to suffer! As part of our product, we are offering you two small assembler routines CheckInstall and KonInstall, which you should incorporate into your program. (Before you continue reading, you should print out the supplied assembler routines in the KON_INS.ASM file). With the help of these routines you will be able to check for the presence of the driver and to determine the number of the software interrupt that is responsible for the communication between the application program and the driver. In order to avoid sources of errors in connection with the use of a wrong number of the software interrupt, the use of these assembler routines is strongly recommended, even though the number of the software interrupt may be known to you because you have to define it yourself (see manual for the PARKON.EXE configuration program). These routines make use of the fact that the driver converts the DOS multiplex interrupt 2F during its installation. In addition to this the driver also creates its own string of identification characters. The conversion of the multiplex interrupt 2F is a technique that is very often employed in the programming of resident programs. Every resident program converts this interrupt for its own routine and gets its own identification number that lies in the range 0C0h ... 0FFh. All numbers smaller than 0C0h are already occupied by DOS drivers. If the driver has already been installed it too will get its own identification number which lies in the range 0Ch ... 0FFh. In the routine CheckInstall the interrupt 2F is called up with the register ah that is equal to the identification number and the register al that is equal to 0. If the register al is equal to 0FFh after the call-up, it means that the identification number is occupied by some resident program. In order to be able to determine that this is our driver the checks have to be taken one step further. The new routine of the interrupt 2F that has been created by our driver stores the starting address of the aforementioned string of identification characters in the registers ds:si and the number of the software interrupt in the register ah before returning to the calling program. Using the 79 Software driver ds:si, CheckInstall checks whether this is the string of identification characters that has been created by the driver. If this is the case the register ax is set equal to the register ah. After that, CheckInstall returns to the calling routine KonInstall with the set Carry_Flag. From the set Carry_Flag and the register ax KonInstall will know that the driver has already been installed and which number the software interrupt has. If the registers ds:si do not point to the string of identification characters or if the register al is not equal to 0FFh after the calling-up of the interrupt 2F the identification number in ah is incremented by 1 and the whole process is repeated until ah is equal to 0FFh. If the string of identification characters cannot be found CheckInstall will return to KonInstall with the reset Carry_Flag. Because of this reset Carry_Flag KonInstall then knows that the driver has not been installed. Before its return to the calling application program the routine KonInstall loads the register ax with 0 if the driver is not installed. Otherwise the register ax is equal to the number of the software interrupt. You as the user do not have to concern yourself with the routine CheckInstall because this is called up by the routine KonInstall. Besides the source code you will also receive the object file of these two assembler routines from us. The object file was generated with Microsoft Macro Assembler Version 6.1. The routine KonInstall was written in such a way that it can be called up as a subprogram if you are writing your program in the programming language C. The integer return value of the C_Routine KonInstall is the value in the register ax. In the following example we will show you how you can use this routine in your program. short KonInstall (void) /* Prototype of the routine in C */ void main (void) { int software interrupt number; . . . /* From the return value of KonInstall( ) you can determine whether the driver has been installed or not and what number the software interrupt has.*/ if( (Software Interrupt Number = KonInstall( ) ) == 0) { ... /* The driver has not been installed yet */ 80 Software driver } or else { ... } /* The driver has already been installed */ . . . } If you are programming in a language other than C then you must modify these two assembler routines accordingly and re-translate them using the supplied source code. But that should not be a problem for you. 3.2.15 Driver version 3.10 and software differences to version 3.00 Apart from the hardware change (see section 2.7) the driver version 3.10 includes a number of changes and expansions that will be explained in the following. The biggest software change is connected to the change in hardware. It concerns the reference run and the key switch. The reference run no longer triggers a Watch-Dog signal at PIN 43 as in version 3.0. The bridging of the safety circuit has to be carried out separately via the output port at PIN 40. In order to do so you should use driver function 48. The key switch which in driver version 3.00 facilitates the manual bridging of the safety circuit has been completely removed from version 3.10, that is, the moving out of an active hardware limit switch has to be carried out using function 48 as well. In the driver version 3.10 we attach great importance to the safety of the equipment. One of the measures is the constant triggering of hardware interrupt IRQ10 or IRQ11. In version 3.00 the hardware interrupt is only triggered in the case of an active movement segment, that is, the hardware interrupt serves solely for the generating of the interpolation cycle. This has the disadvantage that the servo equipment cannot be monitored if there is no active movement segment in the background. In some situations, e. g. during the switching-on of the servo controller, this might result in jerky movements. In version 3.10 the hardware interrupt is constantly triggered, regardless of whether a movement segment is active or not. In this way it is possible to monitor the servo equipment constantly. 81 Software driver By introducing the control byte (see driver function 49) the driver is able to react immediately to such hardware faults as power failure, breaking of the encoder signal line, etc. An uncontrolled movement is no longer possible. Even a software crash is caught by the Watch-Dog signal. In this case the power to the servo controller is switched off immediately. No danger can result. If you require an exact time base you can use the new driver function 52. With this function you can request for the time that has lapsed since the installation of the driver at any time. You will be given the time in milliseconds but the exactness of the time stated is in micro-seconds. This function does not compete with function 7 with which you can use to realize a time delay. In servo equipment there is always a deviation between the actual and the desired position of the axes. With function 18 you can check the actual position of the axes at any time. The checking of the desired positions is very useful in many cases but unfortunately was not possible in driver version 3.00. In driver version 3.10 you can check on the desired positions very quickly and easily using the functions 50 and 51. Another change of the driver version 3.10 concerns the inputs and outputs. The functions 16 and 17 for the direct reading and writing of input and output ports are no longer supported. All input and output operations are carried out only via the driver. In this way we want to prevent you from randomly accessing every input and output port. In such cases it could be dangerous. Besides the functions 36 to 42 for the input and output operations via channel numbers we have introduced the functions 53 to 56. You can use these new functions to access two input and two output ports. These ports can be freely defined. By introducing these ports we want to achieve a clear separation between input and output ports for the user (functions 36 to 42) and input and output ports for control purposes (functions 53 to 56). For all output ports that are defined as in use the output values are stored internally in the driver. You can read back these values at any time (functions 40, 41 and 55). Furthermore these values are periodically output by the driver in its hardware interrupt routine to the output ports. In this way we want to force you to use the driver functions for the port output. If you are making the output directly without using the driver functions the old values will again be written to the ports in the next hardware interrupt routine. Thus, your direct output will not have any effect. Using function 57 you can switch the axes, that is, you can at any time change the axis numbering X, Y, Z, A internally in the driver. The switching of the axes is very useful for many application cases, e. g. for machines for series production. In connection with this function you can realize the engraving of a cylinder surface very easily by using function 58. 82 Software driver In addition to the axis controller parameters Kp, Ki, Kd, Il and Td we have also introduced the axis speed gain factor Kv. This factor is the dynamic characteristic value of the axis in question. Due to this factor you have to expand the memory range for the parameter transfer for function 4 by exactly 4 bytes in order to be able to transfer the factor Kv. 3.2.16 No movement or jerky movement, what have you done wrong? The data exchange with the driver is carried out via the software interrupt, the number of which you can define freely (see section 3.2.12). For the hardware interrupt you have the choice between IRQ10 and IRQ11 (see manual for the PARKON.EXE configuration program). The hardware interrupt is responsible for the generation of the interpolation cycle in which the interpolation points of the movement are calculated. If this interrupt cannot be triggered then the driver cannot calculate any interpolation points and thus there would be no movement. If the interrupt is only triggered irregularly then the interpolation points of the movement are also only calculated at irregular intervals. This would result in jerky movements. The various reasons that might result in you getting no movement or only a jerky movement are listed below. One of the reasons why the hardware interrupt is not triggered is that the interrupt selected by you (IRQ10 or IRQ11) is already in use by another hardware. You have then two choices. If one of the choices does not work you have to use the other. If it still does not work you have to free one of the hardware interrupts by removing the software and hardware in question that is occupying the hardware interrupt that you want. In the case of Pentium computers with PCI bus it can happen that you have to free the desired interrupt in the BIOS of your computer before you can use it (see section 2.4). The hardware interrupts can be blocked by hardware as well as software. On the Assembler level the command ‘CLI’ is responsible for the blocking of all interrupt requests. The counterpart is the command ‘STI’ for the release of the hardware interrupts. You should use the command ‘CLI’ as little as possible. If you do not have any other choice the interrupts should be released as soon as possible using the command ‘STI’. If you are programming in a high-level language like C or PASCAL it is likely that you will often use the library routines. As many library functions call up the command ‘CLI’ internally you unwittingly block the interrupts. Experience shows that the command ‘CLI’ is often used by the library routines that are responsible for the direct input via the keyboard or direct output to the monitor. The following are some of the routines of the programming language C: ‘printf()’, ‘scanf()’, ‘putch()’, ‘getch()’, ... . If a movement is active in the background you should use such routines as little as possible. 83 Software driver During a movement there is often the wish to get various information from the driver by calling up the respective functions. Often used functions are the function 5 for requesting the driver status as well as the functions 18 and 19 for requesting the actual positions and the actual speed. Due to the coordination of the data within the driver a calling-up of driver functions does not always but very often lead to a momentary blocking of hardware interrupts. For that reason alone it would be useful to insert a short time delay between the calling-up of the driver functions. Particularly critical is the requesting of actual positions because the controller chips LM628 are put under particular strain by this. A time delay of about 5 ms is very useful in such a case. 3.2.17 Interpolation time Whenever your application software calls-up a driver movement function, the driver needs a time (called interpolation time) to calculate interpolation data. After this time the driver starts the movement. The interpolation time depends on your PC. For a PC 486DX (66 MHz) we measured the following times: Interpolation method interpolation time Linear interpolation (function number 24, 25, 26, 27) 12.90 ms Cycle- and helix-interpolation (function number 28, 29, 30, 31) 14.24 ms This interpolation time is significant only for vectorial processing and not for path processing because the interpolation data are calculated previously with the path data generator. You can regard the interpolation time for the path processing as 0. 3.2.18 Starting the driver with option switch /DSM for controlling the main spindle This Start mode has been introduced to take into account the special features of the iselautomation user interface in conjunction with the spindle control. The driver with the option switch /DSM is started as follows: [drive:\][path] ISELDRV.EXE *.INI [/DSM] The function and the objective of the /DSM option switch is to use a free LM628 chip on the PC plug-in card UPMV4/12 to control the main spindle. If the driver has been started with this option switch and you call the function 59 to enable the spindle mode of the last axis, then not the last axis, but the axis after it is switched to Spindle mode. The number of axes included in the interpolation grouping will not change. 84 Software driver The following example will be used for illustration. You will define the number of axes with 3 using the program PARKON.EXE, i.e. your plant has three axes X, Y and Z. If the /DSM option switch is enabled and you have successfully called the function 59, then not axis Z, but axis A will be in Spindle mode, although your plant has only the axes Xm Y and Z by definition. These three axes continue to be included in the grouping of the interpolation axes. If the Spindle mode has been enabled in this way, this mode will be maintained for ever. Calling of function 59 to disable the Spindle mode will be denied immediately with error code 102. Even the RESET function will not be able to disable the Spindle mode. In contrast to the normal case, the axis switchover using function 57 will operate even if the Spindle mode is enabled. The axis standing in Spindle mode can be called as normal using the functions 60 to 66. If you have defined the number of axes with 4 using the program PARKON.EXE, the /DSM option switch will already be disabled when initialising the driver. Function 65 can be used at any time to interrogate whether or not the driver has been started with the /DSM option switch. You can use this Start mode for your own applications. But if you wish to, you can also use our software to control the spindle. The program SP_DIREC.EXE with documentation is supplied on the installation disk. 3.2.19 What will you have to do to use our control system under WINDOWS NT/2000? Our driver is an MS-DOS program, but you can run it without undue problems in the DOS window of WINDOWS 3.xx, 9x or OS/2 (see section 1.4). You can also start a DOS window under WINDOWS NT/2000. The safety mechanisms of WINDOWS NT/2000, however, do not allow direct hardware accesses, i.e. you cannot run our control system in the DOS window of WINDOWS NT/2000, since our driver directly accesses the hardware. To by-pass the safety mechanisms of WINDOWS NT/2000, you will still need an additional software disabling these mechanisms. There are four different providers. We have only tested the software DOS Enabler from Kithara Software (http://www.kithara.de). Due to the sophisticated functionality and the good price, it is recommended to use this software. The supplied documentation already describes in detail how to configure this software. In conjunction with our control system, we would like to add here something. To be able to use our driver, you will need a user interface, i.e. two DOS programs simultaneously run in a DOS window. It is therefore essential to create a batch program (*.bat). The batch program will first start the driver and then the user interface. It is, however, not sufficient to input the batch program in the Kithara Control Center. You must input both the batch program and the driver, as well as the user interface in the Kithara Control Center. It is not necessary to configure hardware resources for the batch program, but the hardware resources used have to be input for both the driver and the user 85 Software driver interface. The settings you have made will only come into effect if you restart your computer after configuring. 3.2.20 Possible errors when calling up the driver For each calling-up of a driver function the application program gets an error code in the register al among other things. Based on this error code you can determine whether the function has been executed properly by the driver. If this is not the case you can determine from the error code why the execution of the function has failed. In the following we will explain the individual error codes and their meanings. Error code = 0: No error The function has been accepted by the driver and has been executed without error. Error code = 1: Wrong function number You tried to call up a function that does not exist, that is, you have loaded a wrong function number into the register ax prior to the calling-up of the function. Error code = 2: The software interrupt is already active You tried to call up a function while another function request has not yet been finished, that is, a driver function was called up within a driver function. This error normally does not occur if you call up the driver functions only from an application program. However if you try to call up the driver functions from several processes that are independent of each other, such as for e. g. from your application program as well as from a hardware interrupt routine, this error might occur. But we would advise you not to use this method in your program because you will no longer be in a position to control the function call-ups and to react accordingly to any existing errors. It would tear your hair with rage. Error code = 3: Break error The function cannot be carried out because the Break function has been called up (see section 3.3.10). After you have called up the Break function a so-called Break flag is set internally in the driver. As long as this flag is set you can only call up the following functions: - Reset function (function 2) - Changing of the control parameters (function 4) - Requesting for status (functions 5 and 49) - Time functions (functions 7 and 52) - Switching on or off the manual mode (function 8) - Switching on or off the Teach-In mode (function 9) - Break function (function 10) - Reading of a port (functions 36, 37, 40, 41, 53, 55 and 56) 86 Software driver - Output to a port (functions 38, 39, 42, 48 and 54) - Requesting for the actual positions (function 18) - Requesting for the actual speed (function 19) - Requesting for the desired positions (functions 50 and 51) - Relative or absolute linear normal movement (functions 24 and 25) in the Teach-In mode - Operations with the reserved data bytes (functions 44, 45 and 46) - Setting the safety circuit output port (function 48) The Break flag can only be cancelled through the calling-up of the Reset function (function 2). Error code = 4: In mid-movement error The function cannot be executed because the driver is carrying out a movement segment in the background at the moment. If the traversing of a movement segment in the background has not been finished yet you will not be able to call up the following functions: - Switching-on or switching-off of the test mode (function 3) - Changing of the control parameters (function 4) - Reference run (function 6) - Switching-on of the manual mode (function 8) - Switching-on of the Teach-In mode (function 9) if the stop function has not been called up previously (see section 3.3.10) - Setting or deleting of the work piece zero point (functions 11, 12 and 13) - Movement functions (functions 24 to 31 and 33) if the Teach-In mode has not been switched on (see section 3.3.9) - Switching of the axes (function 57) - Definition of the cylinder radius (function 58) All other functions can be called up. Of particular interest to you are the functions 5, 18 and 19 for the requesting of the driver status, the actual positions and the actual tool speed. This gives you the possibility to display and check this information constantly in your application program. For the processing of a profile that consists of several movement segments you must request for the driver status constantly and check whether the traversing of a segment has been finished in order to transfer another movement segment to the driver. You can use function 21 to change the tool speed during the processing. Error code = 5: Software limit switch error This error can only occur if you call up function 14 or 15. With this error code the driver is trying to tell you that the tool is at present outside the working range defined by the software limit switches. By requesting for the driver status (function 5) you will be able to determine which software limit switches are active at that moment. 87 Software driver It should be noted that a software limit switch error can only occur if you allow the use of the software limit switches through function 15. If the use of the software limit switches is not allowed this error cannot occur either regardless of whether the tool is inside or outside the working range defined by the software limit switches at that moment. However, the occurrence of this error does not mean that the function (function 14 or 15) called up has not been executed. If you call up function 14 the new software limit switches are definitely accepted by the driver if the error for the setting of the software limit switches (error code = 6) does not occur. The same applies if you want to allow the use of the software limit switches (function 15). The use of the software limit switches is allowed in any case regardless of whether the software limit switch error occurs or not. Error code = 6: Error when setting the software limit switches This error can only occur if you call up function 14 in order to define new software limit switches. This error code informs you that at least for one axis the position value of the positive software limit switch is smaller or the same as the position value of the negative software limit switch. The new software limit switches are not accepted by the driver regardless of whether the use of the software limit switches is allowed at that moment or not. Furthermore the driver retains the old software limit switches if this error occurs. Error code = 7: Present hardware limit switch error This error informs you that at least one hardware limit switch is active at the moment. The function called up has not been carried out. By requesting for the driver status (function 5) you will always know which hardware limit switches are active at the moment. In the case of a hardware limit switch error you will only be able to call up the following functions: - Reset (function 2) - Switching-on or switching-off of the test mode (function 3) - Changing of the control parameters (function 4) - Requesting for the driver status (functions 5 and 49) - Reference run (function 6) - Time functions (functions 7 and 52) - Switching-on or switching-off of the manual mode (function 8) - Switching-on or switching-off of the Teach-In mode (function 9) - StartStopBreak function (function 10) if the Teach-In mode is switched on (see section 3.3.9) - Reading of a port (functions 36, 37, 40, 41, 53, 55 and 56) - Output to a port (functions 38, 39, 42, 48 and 54) - Requesting for the actual positions (function 18) - Requesting for the desired positions (functions 50 and 51) - Requesting for the actual speed (function 19) 88 Software driver - Movement functions (functions 24 and 25) if the Teach-In mode is switched on (see section 3.3.9) - Operations with the reserved data bytes (functions 44, 45 and 46) It should be pointed out here that the present status of the hardware limit switches are not changed by the reset function. Error code = 8: Hardware limit switch error during the processing The called-up function cannot be carried out because a hardware limit switch was active at some time during the processing. You must not confuse this error with the present hardware limit switch error (error code = 7). During the traversing of a movement segment the hard-ware limit switches are constantly monitored. If one of the hardware limit switches is active an internal flag is set. This flag remains until you call up the reset function. It should be noted that this flag is not set when a hardware limit switch is active if the movement is carried out in the Teach-In mode. This flag is an indicator that shows whether a hardware limit switch error had occurred during the processing or not. You can check on the state of this flag at any time by reading the driver status (function 5). If this flag is set you will only be able to call up one of the following functions: - Reset function (function 2) - Changing of the control parameters (function 4) - Requesting for status (functions 5 and 49) - Reference run (function 6) - Time functions (functions 7 and 52) - Switching-on or switching-off of the manual mode (function 8) - Switching-on or switching-off of the Teach-In mode (function 9) - StartStopBreak function (function 10) if the Teach-In mode is switched on (see section 3.9.9) - Reading of a port (functions 36, 37, 40, 41, 53, 55 and 56) - Output to a port (functions 38, 39, 42, 48 and 54) - Requesting for the actual positions (function 18) - Requesting for the actual speed (function 19) - Requesting for the desired positions (functions 50 and 51) - Movement functions (functions 24 and 25) if the Teach-In mode is switched on (see section 3.9.9) - Operations with the reserved data bytes (functions 44, 45 and 46) The calling-up of the reset function is the only way to correct this error. 89 Software driver Error code = 9: Reference run error The function cannot be carried out by the driver because there is at least one axis in your equipment for which you have not yet carried out a reference run. As long as the driver is not removed from the memory you only need to carry out the reference run once. Internally the driver reserves a so-called reference flag for each axis. After the reference run has been carried out this flag is set. Apart from the reference run function no other driver function can change the state of this flag. Even the reset function cannot change the state of this flag. As long as the reference error exists you can only call up one of the following functions: - Switching-on or switching-off of the test mode (function 3) - Changing of the control parameters (function 4) - Requesting for status (functions 5 and 49) - Reference run (function 6) - Time loop (function 7) - Reading of a port (functions 36, 37, 40, 41, 53, 55 and 56) - Output to a port (functions 38, 39, 42, 48 and 54) - Operations with the reserved data bytes (functions 44, 45 and 46) By reading the driver status you can determine at any time whether there is a reference error or not. However, you cannot establish for which axes the reference run has not been carried out yet. Error code = 10: Manual movement error The function cannot be carried out because the driver is switched to the manual mode at the moment (see section 3.3.8). If the manual mode is active you will not be able to call up the following functions: - Reference run (function 6) - Requesting for the actual speed (function 19) By reading the driver status you can always determine whether the manual mode is active at the moment or not. Error code = 11: Stop error This error only occurs if you want to carry out the reference run (function 6) while the driver is still in the Stop mode (see section 3.3.10). 90 Software driver Error code = 12: Teach-In error The function requested by you cannot be carried out by the driver because the Teach-In mode is active at the moment (see section 3.3.9). If the driver is in the Teach-In mode, you cannot call up the following functions: - Switching-on of the manual mode (function 8) - Switching-off of the Teach-In mode (function 9) while a movement segment is still active in the background - Start or Break function (function 10) - Changing of the speed factor (function 21) - Rapid movement functions (functions 26 and 27) - Circular movement functions (functions 28 and 29) By reading the driver status you can determine at any time whether the TeachIn mode is active or not at the moment. Error code = 13: Circular error This error can only occur in connection with the calling-up of function 28 or 29. This error indicates that the circle parameters that were transmitted to the driver are not correct, that is, the driver is not able to generate a circle or a circular arc from these parameters. This error can also occur if you request the driver to traverse a circle or a circular arc even though your equipment has only one axis or does not have a TTT structure. If your equipment has two axes the error will occur if you request for a circle or a circular arc on the XZ- or YZ-plane. Error code = 14: Axis error This error can only occur in connection with the calling-up of function 4. The axis number transmitted by you to the driver is incorrect, that is, this number lies outside the range 1 ... 4. Error code = 15: Run-out error The requested function cannot be carried out because there is a run-out error. During the execution of a movement segment the driver monitors constantly the run-out error (see section 3.2.6). If this error occurs an internal flag is set. As long as this flag is set you can only call up one of the following functions: - Reset function (function 2) - Changing of the control parameters (function 4) - Requesting for the status (functions 5 and 49) - Time functions (functions 7 and 52) - Switching-on or switching-off of the manual mode (function 8) - Switching-on or switching-off of the Teach-In mode (function 9) - Stop and Break function (function 10) if the Teach-In mode is switched on - Reading of a port (functions 36, 37, 40, 41, 53, 55 and 56) 91 Software driver - Output to a port (functions 38, 39, 42, 48 and 54) - Requesting for the actual positions (function 18) - Requesting for the desired positions (functions 50 and 51) - Requesting for the actual speed (function 19) - Movement functions (functions 24 + 25) if the Teach-In mode is switched on - Operations with the reserved data bytes (functions 44, 45 and 46) This flag can only be deleted by the reset function. Error code = 16: Reference run-out error This error can only occur in connection with the calling-up of the reference run function (function 6). It indicates that a run-out error has occurred during the reference run. The difference between this error and the run-out error with the error code 15 is that this error is not registered internally in the driver, for e. g. by the setting of a flag. Error code = 17: Speed error This error can only occur in connection with the calling-up of one of the functions 20, 22, 23 and 32. It indicates that you are trying to transfer a nonpositive speed value (≤ 0) to the driver. This speed value is not accepted by the driver, that is, the old speed value remains valid. Error code = 18: Helix error This error can only occur in connection with the calling-up of the functions 30 and 31. This error indicates that the parameters transferred to the driver are incorrect, that is, the driver is unable to generate a circle or a circular arc on the main plane from these parameters. It is also possible that the movement angle that has been transferred is negative. Furthermore, this error can also occur if your equipment has only one axis or if it does not have a TTT structure. If your equipment has two axes the error will also occur if the circular plane of the helix interpolation is the XZ- or YZ-plane. Error code = 19: Path data reloading error This error can only occur in connection with the path traversing (see function 33). This error indicates that the user program has not reloaded the path data in due time in the two data ranges during the path processing. If this error occurs the path is terminated immediately. The error is marked internally in the driver. As long as this flag is active you can only call up the following functions: - Reset function (function 2) - Changing of the control parameters (function 4) - Requesting for the status (functions 5 and 49) - Time functions (functions 7 and 52) - Switching-on or switching-off of the manual mode (function 8) 92 Software driver - Switching-on or switching-off of the Teach-In mode (function 9) - Stop and Break function (function 10) if the Teach-In mode is switched on - Reading of a port (functions 36, 37, 40, 41, 53, 55 and 56) - Output to a port (functions 38, 39, 42, 48 and 54) - Requesting for the actual positions (function 18) - Requesting for the desired positions (functions 50 and 51) - Requesting for the actual speed (function 19) - Movement functions (functions 24 + 25) if the Teach-In mode is switched on - Requesting for the path error parameters (function 34) - Operations with the reserved data bytes (functions 44, 45 and 46) This error flag can only be deleted by a reset. Error code = 20: Path equipment structure error This error can only occur in connection with the calling-up of function 33. It means that the path traversing is not possible in your equipment, that is, your equipment has only one axis or does not have a TTT structure. Error code = 21: Momentary control byte error Using a freely definable input port, you can return up to 8 hardware-based error signals to the driver (see section 3.2.6.1). This error signals that at least one error signal is active at that moment. Using function 49 you can check at any time which signals of the control byte are active. This way the error can be located. This error is marked internally in the driver. As long as this flag is active you can only call up the following functions: - Reset (function 2) - Requesting for the status (functions 5 and 49) - Time functions (functions 7 and 52) - Reading of a port (functions 36, 37, 40, 41, 53, 55 and 56) - Output to a port (functions 38, 39, 42, 48 and 54) - Requesting for the actual positions (function 18) - Requesting for the desired positions (functions 50 and 51) - Requesting for the actual speed (function 19) - Operations with the reserved data bytes (functions 44, 45 and 46) This error flag can only be deleted by removing the source of the error and by using the reset function after that. Error code = 22: Control byte error Using a freely definable input port, you can return up to 8 hardware-based error signals to the driver (see section 3.2.6.1). This error signals that at least one error signal has been active at some time or other. There is no way to check which error signal was active. This error is marked internally in the driver. As long as this flag is active you can only call up the following functions: 93 Software driver - Reset (function 2) - Requesting for the status (functions 5 and 49) - Time functions (functions 7 and 52) - Reading of a port (functions 36, 37, 40, 41, 53, 55 and 56) - Output to a port (functions 38, 39, 42, 48 and 54) - Requesting for the actual positions (function 18) - Requesting for the desired positions (functions 50 and 51) - Requesting for the actual speed (function 19) - Operations with the reserved data bytes (functions 44, 45 and 46) This error flag can only be deleted by a reset. Error code = 23: Bit number error This error can only occur during the calling-up of one of the functions 36, 38 and 40. It means that the bit number is incorrect (see sections 3.3.36, 3.3.38 and 3.3.40). Error code = 24: Port number error This error can only occur during the calling-up of the functions 37, 39 and 41. It means that the port number is incorrect (see sections 3.3.37, 3.3.39 and 3.3.41). Error code = 25: Output port error during the movement This error can only occur when calling up function 43. It means that the use of the 8-bit output is not allowed during the movement (see sections 3.2. ... and 3.3.40). The output during the movement is optional. It is set with the PARKON.EXE configuration program. Error code = 26: Secret code error This error can only occur in connection with the calling-up of the function 44, 45 or 46. It means that you tried to access a reserved byte through the wrong secret code. Error code = 27: Safety circuit bridging error If one of the hardware limit switches is active function 48 must be used in order to be able to switch on the servo controller (see section 3.2.6.2). The same thing happens for the reference run (see section 3.2.7). However, as long as the safety circuit of the servo controller is bridged the safety of the control is not ensured. In this state only the following functions can be executed for safety reasons: - Reset function (function 2) - Changing of the control parameters (function 4) - Requesting for the status (functions 5 and 49) - Time functions (functions 7 and 52) 94 Software driver - Switching-on or switching-off of the manual mode (function 8) - Switching-on or switching-off of the Teach-In mode (function 9) - Break function (function 10) - Reading of a port (functions 36, 37, 40, 41, 53, 55 and 56) - Output to a port (functions 38, 39, 42, 48 and 54) - Requesting for the actual positions (function 18) - Requesting for the actual speed (function 19) - Requesting for the desired positions (functions 50 and 51) - Relative or absolute linear normal movement (functions 24 and 25) in the Teach-In mode - Operations with the reserved data bytes (functions 44, 45 and 46) - Setting of the safety circuit output port (function 48) The bridging state is stored internally with a flag. The deleting of this flag is only possible with function 48. The reset function has no effect on this flag. Error code = 28: Reference interruption error During the reference run the entire computing time of the computer is taken up by the control. An interruption of the reference run is only possible with a key that is defined by you. The definition of the interruption key is carried out using the PARKON.EXE program. You can use the PAREIN.EXE program to determine the code of the interruption key. This error occurs only in connection with the calling-up of function 6 (see section 3.3.6) and is not stored internally. Error code = 29: Equipment structure error For the switching of the axes (function 57) and for the setting of the cylinder radius of a rotary axis (function 58) you have to enter the new equipment structure. When these two functions are called up the driver checks whether the new equipment structure is suitable for the type of axis (linear or rotary axis). This error is not stored internally. Error code = 30: Cylinder radius error This error occurs only when calling up function 58. For the conversion of a rotary axis into a linear axis for the purpose of the cylinder engraving you have to define the cylinder radius. The cylinder radius must not have a negative value. A zero value is only accepted for the converting back into a rotary axis. This error is not stored internally. Error code = 30: Cylinder radius error This error will only occur when function 58 is called. When converting a rotary axis to a linear axis for cylinder engraving, you must define the cylinder radius. The cylinder radius may not have a negative value. A value equal to zero will only be accepted when converting the axis back to a rotary axis. This error will internally not be stored. 95 Software driver Error code = 31: Spindle mode error If the last axis is not yet in Spindle mode, the following functions cannot be used: - Define the location of use of the spindle axis (function 60) - Define the spindle speed change factor (function 61) - Change the spindle axis speed (function 62) - Change the absolute position of the spindle axis (function 63) - Turn on Manual mode of the spindle axis (function 64) - Poll movement parameters of the spindle axis (function 66) If the last axis is in Spindle mode, the following functions cannot be used: - Switchover axes (function 57) Error code = 32: Spindle axis-in-movement error When the spindle axis is moving, the following functions cannot be used: - Turn off the Spindle mode (function 59) - Define the location of use of the spindle axis (function 60) - Change the spindle speed (function 62) if the spindle axis is in Position mode - Change the absolute position of the spindle axis (function 63) - Turn on Manual mode of the spindle axis (function 64) Error code = 33: Location-of-spindle-use error If you have defined the spindle axis for use along the path using function 60, the following functions can no longer be used: - Change the spindle speed (function 62). The spindle speed can only be changed using an appropriate command along the path (see Appendix B). - Change the absolute position of the spindle axis (function 63) - Turn on Manual mode of the spindle axis (function 64) Error code = 34: Spindle manual movement error If Manual mode of the spindle is active, the following functions cannot be used: - Path movement (function 33) - Change the spindle axis speed (function 62) - Change the absolute position of the spindle axis (function 63) 96 Software driver Error code = 35: Handwheel mode error If the axes are in Handwheel mode, the following functions cannot be used: - Turn on Manual mode (function 8) - Poll set positions (function 50 and function 51) - Movement functions (functions 25, 27, ... 31 and 33) If the axes are not in Handwheel mode, the following functions cannot be used: - Stop the handwheel movement (function 68) Error code = 36: Handwheel movement error If the axes being in Handwheel mode are still moving, the Handwheel mode cannot be turned off (function 67). Error code = 37: Encoder index signal error The driver has been started with the option switch /IR. The hardware-triggered signal of at least one encoder is missing. When calling function 6 to carry out the reference point approach, the driver will response with this error code. 97 Driver functions 3.3 Driver functions 3.3.1 Function 1: Requesting for the driver version Purpose Call-up parameter Result Requesting for the driver version ax = 1 function number bx, cx, dx undefined al error code bh; bl There are 6 ASCII characters in ch; cl in this register for the driver dh; dl version Comments: Due to constant improvements as well as expansion every software package has different versions up to the end of its life span. With the help of this function you can request for the driver version that is currently used by you. An ASCII character is stored in each of the registers bh, bl, ch, cl, dh and dl. If you combine these 6 ASCII characters in the order of bh, bl, ch, cl, dh, dl you will get the version number, for e. g. the version number 1.00 would result in the following allocation: bh = 49 bl = 46 ch = 48 cl = 48 dh = 0 dl = 0 (ASCII character: (ASCII character: (ASCII character: (ASCII character: (ASCII character: (ASCII character: 1) .) 0) 0) NULL NULL If the number of characters of the version number is smaller than 6 the remaining processor registers will have the value 0 (ASCII character: NULL). Feasibility during the movement: Yes Possible error codes: 0; 2 See also section: 3.2.17 3.3.2 Function 2: Reset Purpose Call-up parameter Result 98 Driver reset ax = 2 bx, cx, dx al bx, cx, dx function number undefined error code undefined Driver functions Comments: This function sets the driver back to its initial state as in the case of a new start. If the equipment is in the middle of a movement at this moment this movement is interrupted immediately. The Teach-In speed the path speed and the rapid speed are set back to their standard values. The change factor Kv for the tool speed is set to 100 (= 100 %) (see section 3.3.21). The software limit switches also take on their standard values again but are blocked. Any existing software limit switch error is, of course, erased. The reference point is defined as the work piece zero point. The driver is switched back to the normal operation mode if it has been in the Teach-In mode, the Test mode or the Manual mode. Furthermore, all axis controllers are initialized with the standard values of their parameters. The Break flag and the During movement hardware limit switch status flag, that indicate a hardware limit switch error during the processing, are reset to 0 (see section 3.3.5). There are a few things which the reset function does not affect. These are the reference flags of the axes, the current states of the hardware limit switches, the values of the output ports that can be activated through logical numbers and the contents of the data bytes that are reserved in the driver for the user. If you have carried out the reference run once it still applies after the reset that the reference run has already been carried out. You do not have to carry out the reference run again. The hardware limit switches do not change their current states because of the reset function, that is, the states of the hardware limit switches directly before and after the reset are identical. You can check on the states of the hardware limit switches at any time by calling up function 5. The values that are at the output ports, that can be activated through logical numbers, do not change during a reset (see sections 3.3.38 to 3.3.41). However, you can reset these output ports at any time to their initialization values that can be set with the configuration program (see section 3.3.42, 3.3.56) by calling up function 42. The contents of the data bytes that you have reserved in the driver for your own purposes also remain unchanged when the reset function is called up (see sections 3.3.44 to 3.3.46). We recommend the calling-up of this function before you terminate your application program. With this you would reset the driver to the original state that it is in at a new start. Feasibility during the movement: Yes Possible error codes: 0; 2 See also section: 3.2.17; 3.3.5 99 Driver functions 3.3.3 Function 3: Switching the Test mode on or off Purpose Call-up parameter Result Switching-on or -off of the Test mode ax = 3 function number bx sub functions cx, dx undefined al error code bx, cx, dx undefined Comments: During the phase of the start-up there are often errors that are not caused by your programs but by wrong configurations, for e.g., wrong addresses or wrong active levels of the switches etc. Therefore, it is very convenient for you if you have the possibility to switch off the checking of the hardware limit switches. Furthermore, it is certainly desirable that the reference run, that is often rather long, does not have to be repeated all the time. Due to these requests we have introduced the so-called Test mode. In connection with the value in the register bx, you can switch the Test mode on or off. The allocation of the value in bx to the individual subfunctions is as follows: bx 0 1 otherwise Sub functions Switching off the Test mode Switching on the Test mode Switching on the Test mode In the Test mode the driver treats the reference run and the hardware limit switches differently from the normal operation. But all other driver functions can still be used as in the normal operation. If you call up function 6 for the execution of the reference run in the Test mode the driver does not carry out a reference run in the actual sense but it sets the point at which the axis stands immediately prior to the calling-up as the reference point. After that the driver returns to your program. You must note that you have to call up the reference run function in spite of the switched-on Test mode, as otherwise you will get a reference error message when calling up many of the driver functions (see section 3.2.10). In the Test mode the driver continues to monitor the hardware limit switches. This means that you can still check on the state of the hardware limit switches at any time by calling up function 5. The difference from the normal operation is that in the Test mode the driver does not interrupt a movement when a hardware limit switch error occurs. The equipment continues the run as if the error does not exist, even though the driver continues to monitor the state of these switches. 100 Driver functions The run-out error is monitored in the Test mode as per normal. However, a run-out error does not interrupt the current movement. As in the case of the hardware limit switch errors you can check on the state of the run-out error at any time by calling up function 5. Feasibility during the movement: No Possible error codes: 0; 2; 3; 4; 8; 15; 19 See also section: 3.2.17 3.3.4 Function 4: Changing the control parameters Purpose Call-up parameter Result Changing of the control parameters of an axis ax = 4 function number bx segment address of the control parameters cx offset address of the control parameters dx undefined al error code bx, cx, dx undefined Comments: This function allows you to change the control parameters of the axes of your equipment. However, you can only change the parameters of one axis each time you call up this function. You have to store the information for which axis the change is to be made as well as the new control parameters in a memory range, the starting address of which is in bx:cx, when this function is called up. Illustration 3.18 shows the memory allocation for each parameter. As we do not have enough space here we have divided this memory range into two parts in illustration 3.18. In reality these two parts belong together. Starting address of the memory range in bx:cx LSB MSB LSB MSB MSB LSB MSB LSB Byte 1 Byte 2 Byte 3 Byte 4 Byte 1 Byte 2 Byte 3 Byte 4 Byte 1 Byte 2 Byte 3 Byte 4 Byte 1 Byte 2 Byte 3 Byte 4 Axis number LSB Kp MSB LSB Ki MSB LSB Kd MSB Byte 1 Byte 2 Byte 3 Byte 4 Byte 1 Byte 2 Byte 3 Byte 4 Byte 1 Byte 2 Byte 3 Byte 4 Il Td Kv LSB = Last Significant Byte MSB = Most Significant Byte Illustration 3.18: Allocation of the memory for the control parameters of the axes 101 Driver functions Every parameter that you want to transfer to the driver occupies exactly 4 bytes in the memory and is interpreted as a whole number in the two-digit complementary format. The first 4 bytes show the driver for which axis the change is to be carried out. The allocation of the value in these 4 bytes to the axes of the equipment is as follows: Axis number Equipment axis 1 X-axis 2 Y-axis 3 Z-axis 4 A-axis The following bytes contain the new values for Kp, Ki, Kd, Il and Td. Each of the parameters Kp, Ki, Kd and Il are limited internally by the driver to the value range of 0 ... 32,767 (0 ... 215 -1). If the value of one of the parameters is smaller than 0 it is set to 0 and if it is greater than 32,767 it is set to 32,767. As with these parameters Td is also limited. The value range for Td lies between 0 ... 255 (0 ... 28 -1). The value range for Kv lies between 1 ... 107 and therfore is much bigger than the value range of the other parameters. These limits are necessary as the parameters of the axis controllers can only lie within the stated value ranges for technical reasons (see section 3.2.6). After the driver has sent the new value to the axis controller of the axis in question it returns to the user program. Feasibility during the movement: No Possible error codes: 0; 2; 4; 14 See also section: 3.2.11, 3.2.13, 3.2.15, 3.2.17 3.3.5 Function 5: Requesting for the driver status Purpose Call-up parameter Result Requesting for the current status of the driver ax = 5 function number bx, cx, dx undefined al error code ah general status of the driver bx error status cx status of the hardware limit switch dx status of the software limit switch Comments: This is the only function for which the driver uses all registers ax, bx, cx and dx for the data transfer. The error code for the calling-up of this function is stored in al as always. In the other registers, you as the user, can evaluate the individual bits in order to detect the current state of the driver. Illustration 3.19 shows you how we number the bits of a byte. 102 Driver functions MSBit Bit 7 LSBit Bit 6 Bit 5 Bit 4 Bit 3 Bit 2 Bit 1 Bit 0 LSBit = Last Significant Bit (Niederwertigstes Bit) MSBit = Most Significant Bit (Höchstwertigstes Bit) Illustration 3.19: Numbering of the bits in a byte The general status of the driver is stored in ah. This status byte is to inform you whether a segment is traversed at the moment or whether the driver is in the Stop mode, Teach-In mode, Test mode or Manual mode. The role of each individual bit is described in the following. Register ah: Bit 0: Segment movement status =0 At the moment, there is no movement segment active in the background =1 At the moment, a movement segment is active in the background Bit 1: =0 =1 Stop status At the moment, the Stop mode is not active At the moment, the driver is in the Stop mode (see section 3.3.10) =0 =1 Teach-In status At the moment, the driver is not in the Teach-In mode At the moment, the driver is in the Teach-In mode (see section 3.3.9) =0 =1 Test status At the moment, the driver is not in the Test mode At the moment, the driver is in the Test mode (see section 3.3.3) =0 =1 Manual status At the moment, the driver is not in the Manual mode At the moment, the driver is in the Manual mode (see section 3.3.8) Bit 2: Bit 3: Bit 4: Bit 5: =0 =1 Path traversing status At the moment, no 3D path movement is carried out in the background At the moment, a 3D path movement is carried out in the background (see section 3.3.33) 103 Driver functions Bit 6: =0 =1 In-movement status At the moment, the equipment is at rest At the moment, the equipment is in the middle of a movement =0 =1 safety circuit bridging status At the moment, the safety circuit is not bridged At the moment, the safety circuit is bridged Bit 7: Using function 48, you can output a LOW or HIGH value at PIN 43 of the RIBBON connector. A LOW value at PIN 43 means that the safety circuit is not bridged, a HIGH value at PIN 43 means that the safety circuit is bridged. It should be noted that bit 0 and bit 6 have different roles. Bit 0 only shows whether a segment is being processed at the moment in the background of the driver. It is quite possible that the equipment does not move while a segment is active in the background. This is possible for e. g. if you call up the Stop function during the processing of a segment (see section 3.3.10) or if you set the change factor of the tool speed to 0 (see section 3.3.21). Via the bit 0 you can determine whether a processing is active in the background or not. If this is not the case you can delegate another process to the driver. This applies both to a segment processing as well as a path processing. Before the calling-up of a movement function (see sections 3.3.24 to 3.3.31 and 3.3.33) you have to check this bit. Through bit 6 you can check whether the equipment is presently in midmovement or not. The checking of this bit is necessary if you want to switch on the Teach-In mode after the calling-up of the Stop function during the processing (see section 2.3.9.). The Teach-In mode can only be activated if the equipment is not in mid-movement. The bit 6 is always equal to 0 if there is no processing active in the background, that is, if bit 0 is equal to 0. The error status of the driver is stored in bx. This error status shows you which error the driver has at the moment. The meaning of the individual bits is explained in the following. Register bl: Bit 0: =0 =1 Bit 1: =0 104 Reference run status The reference run has already been carried out for all axes. The reference run has not been carried out for at least one of the axes. As long as this bit is set, you will not be able to call up a number of driver functions. (see section 3.3.6) Break status The Break function has not been called up since the starting or the last resetting of the driver. Driver functions =1 Bit 2: =0 =1 Bit 3: =0 =1 Bit 4: =0 =1 The Break function has already been called up before. When this subfunction, which can be understood as an Emergency Off Function, is called up this bit is set to 1. As long as this bit is set most of the driver functions are not available. You can only set this bit back to 0 through a reset and thus allow the calling-up of the blocked functions again. (see section 3.3.10) Hardware limit switch status At the moment, no hardware limit switch is active. At the moment, at least one hardware limit switch is active. This bit shows you the current state of the hardware limit switches. In order to find out exactly which hardware limit switch is active at the moment you have to evaluate the register cx. When one of the hardware limit switches is active many driver functions are blocked. Software limit switch status At the moment, no software limit switch is active. At the moment, at least one software limit switch is active. After you have set and released the software limit switches the driver monitors the software limit switches constantly and this bit shows you the current state of the software limit switches. In order to find out exactly which software limit switches are active at the moment you have to evaluate the register dx. (see sections 3.3.14 and 3.3.15) During movement hardware limit switch status During the processing, no hardware limit switch has ever been or is activated. During the processing at least one hardware limit switch has been or is activated. During the processing of one of the movement functions in the background the driver constantly checks the hardware limit switches. If one of these hardware limit switches is activated the processing is interrupted immediately and this bit is set to 1. Due to this, many driver functions are blocked. You can only set this bit back to 0 through a reset. You should also note two special features of this bit. In the Teach-In mode the driver continues to monitor the hardware limit switches during the processing of a movement function and interrupts the movement immediately if one of the hardware limit switches is activated. But in this case this bit is not set to 1. Only during the processing, but not during a Teach-In movement, this bit is set to 1 if one of the hardware limit switches is activated. 105 Driver functions The second special feature of this bit occurs during the Test mode (see section 3.3.3). During the processing of one of the movement functions in the Test mode the hardware limit switches are monitored as usual. But when one of the hardware limit switches is activated the processing is not interrupted and this bit is not set to 1. You can continue to check on the current states of the hardware limit switches in the Test mode by calling up this function and by the subsequent evaluation of the register cx. Bit 5: =0 =1 Bit 6 : =0 =1 Bit 7 : 106 Run-out error status Since the loading and the last resetting of the driver the run-out errors of all axes have not exceeded the allowed limits during the processing of the movement functions. The run-out error of at least one axis has exceeded the allowed limit during the processing of a movement function. During the processing of the movement functions, the driver constantly monitors the run-out errors of all axes. If the run-out error of any one axis of the equipment exceeds the allowed limit the processing is interrupted immediately and this bit is set to 1. This will block many driver functions. This bit can only be set back to 0 through a reset. It must be noted that although in the Teach-In mode the driver continues to monitor the run-out errors and will interrupt a movement immediately if the allowed limit has been exceeded at an axis, this bit is not set to 1 in this case. That is, only during the processing, but not during a Teach-In movement, this bit is set to 1 if the allowed limits have been exceeded. Path data reloading error status Since the loading or the last resetting of the driver, there has been no reloading error during the 3D path processing. During a 3D path processing the driver reads the path data from two memory ranges that are reserved in the user program. The user program has the task to read the path data from a file and to reload these two memory ranges in good time. If for some reason the path data cannot be reloaded on time the so-called reloading error will occur. The path movement is interrupted immediately, irrespective of whether the Test mode is active at that moment or not. This bit is set to 1. The activating of the Test mode cannot ignore this error. This means that many driver functions remain blocked. You can only set this bit back to 0 through a reset. (see section 3.3.33) Current key switch status Driver functions =0 =1 At the moment, the key switch is not active. If the key switch is not used this bit is always set to 0. At the moment, at least one hardware error signal is active at the control byte. Using a freely definable control byte you can return up to 8 hardware error signals. The driver constantly compares the actual value of this input port with a value that is defined by you as correct. A difference between these two values is interpreted by the driver as a hardware error. Using function 49 you can locate the hardware error signals. Register bh: Bit 0: Control byte error status =0 Since the loading or since the last resetting of the driver, the hardware error signals at the control byte have never been active. =1 At least one of the hardware error signals had been active since the loading or since the last resetting of the driver or at least one of the hardware error signals is active at the moment. The difference between this bit and bit 7 of the register bl is that bit 7 shows the current error status of the control byte and this bit stores the error status of the control byte. It is quite possible that this bit is active while bit 7 shows an error-free current status if one of the hardware error signals is active at some time. It is not possible to check with the driver which of the hardware error signals was active. You can only use Function 49 to check on the current states of the hardware error signals. Bit 1 ... 7: =0 Reserved bits These bits are not used at the moment and are always set to 0. In order to know exactly which hardware limit switches are active at the moment and which are not you must evaluate the register cx. The register cl is responsible for all negative hardware limit switches and the register ch for all positive ones. 2 bits are allocated to each axis (one in cl and one in ch). If a bit is equal to 0 the corresponding hardware limit switch is not active at the moment. If a bit is equal to 1 the corresponding hardware limit switch is active at the moment. By using the supplied configuration program you can define the number of axes for your equipment. Furthermore, you can determine whether none or only one or both of the hardware limit switches of an axis are to be used (see section 4.3). The bits for hardware limit switches that are not used as well as for the hardware limit switches of the axes that are not used are always 0, that is, these hardware limit switches are not active as far as the user program is concerned. 107 Driver functions Register cl: Bit 0: =0 =1 Bit 1: Responsible for the negative hardware limit switch of the X-axis The hardware limit switch is not active at the moment. The hardware limit switch is active at the moment. =0 =1 Responsible for the negative hardware limit switch of the Y-axis The hardware limit switch is not active at the moment. The hardware limit switch is active at the moment. =0 =1 Responsible for the negative hardware limit switch of the Z-axis The hardware limit switch is not active at the moment. The hardware limit switch is active at the moment. =0 =1 Responsible for the negative hardware limit switch of the A-axis The hardware limit switch is not active at the moment. The hardware limit switch is active at the moment. Bit 2: Bit 3: Bit 4 ... 7: =0 Reserved bits These bits are not used at the moment and are always set to 0. Register ch: Bit 0: =0 =1 Responsible for the positive hardware limit switch of the X-axis The hardware limit switch is not active at the moment. The hardware limit switch is active at the moment. Bit 1: =0 =1 Responsible for the positive hardware limit switch of the Y-axis The hardware limit switch is not active at the moment. The hardware limit switch is active at the moment. =0 =1 Responsible for the positive hardware limit switch of the Z-axis The hardware limit switch is not active at the moment. The hardware limit switch is active at the moment. =0 =1 Responsible for the positive hardware limit switch of the A-axis The hardware limit switch is not active at the moment. The hardware limit switch is active at the moment. Bit 4 ... 7: =0 Reserved bits These bits are not used at the moment and are always set to 0. Bit 2: Bit 3: Through the evaluation of the register dx you can know exactly which software limit switches are active at the moment and which are not. As in the case of the hardware limit switches one bit each of the register dl is responsible for a negative software limit switch and one bit each of the register dh is responsible for a positive one. The bits for the software limit switches of an unused axis always appear as inactive to a user program. If the use of the software limit 108 Driver functions switches is not permitted, all bits are equal to 0 (see section 3.3.15). The meaning of the individual bits of dh and dl are explained in the following: Register dl: Bit 0: =0 =1 Bit 1: Responsible for the negative software limit switch of the X-axis The software limit switch is not active at the moment. The software limit switch is active at the moment. =0 =1 Responsible for the negative software limit switch of the Y-axis The software limit switch is not active at the moment. The software limit switch is active at the moment. =0 =1 Responsible for the negative software limit switch of the Z-axis The software limit switch is not active at the moment. The software limit switch is active at the moment. =0 =1 Responsible for the negative software limit switch of the A-axis The software limit switch is not active at the moment. The software limit switch is active at the moment. Bit 2: Bit 3: Bit 4 ... 7: =0 Reserved bits These bits are not used at the moment and are always set to 0. Register dh: Bit 0: =0 =1 Responsible for the positive software limit switch of the X-axis The software limit switch is not active at the moment. The software limit switch is active at the moment. Bit 1: =0 =1 Responsible for the positive software limit switch of the Y-axis The software limit switch is not active at the moment. The software limit switch is active at the moment. =0 =1 Responsible for the positive software limit switch of the Z-axis The software limit switch is not active at the moment. The software limit switch is active at the moment. =0 =1 Responsible for the positive software limit switch of the A-axis The software limit switch is not active at the moment. The software limit switch is active at the moment. Bit 2: Bit 3: Bit 4 ... 7: =0 Reserved bits These bits are not used at the moment and are always set to 0. Feasibility during a movement: Yes Possible error codes: 0; 2 See also section: 3.2.15; 3.2.17 109 Driver functions 3.3.6 Function 6: Reference run Purpose Call-up parameter Result Carrying out the reference run ax = 6 function number bx Axis code cx, dx undefined al error code bx, cx, dx undefined Comments: With this function, the driver enables you to carry out the reference run easily. All necessary parameters for the reference run can be set with the PARKON.EXE configuration program (see the manual for this). Each axis of your equipment has a corresponding bit in the register bl. From the values (0 or 1) of this bit, the driver decides whether the reference run is carried out or not. The register bh is still unused at the moment and should always be set to 0 during the calling-up of this function. The allocation of the bits of bl to the individual axes is shown below (see illustration 3.19 for the numbering of the individual bits in a byte). Register bl: Bit 0 : =0 =1 Bit 1: For X-axis No reference run Reference run =0 =1 For Y-axis No reference run Reference run =0 =1 For Z-axis No reference run Reference run =0 =1 For A-axis No reference run Reference run Bit 2: Bit 3: Bit 4 ... 7: Reserved bits These bits should always be set to 0 during the calling-up of the function. With the setting or resetting of the individual bits, you can realize the reference run for an axis as well as for a few axes by a single calling-up of the function. If you want to carry out the reference run for more than one axis, you should note that the driver carries out the reference run in the sequence Z, Y, X, A. If for e. g. you want to carry out the reference run for the X-, Z- and A-axis then you must set the bits 0, 2, 3 to 1 and the bit 1 to 0. The driver carries out the reference run first on the Z-axis, then on the X-axis and after that, on the A-axis. If you use the hardware limit switches as reference switches and if it is necessary at your controller you have to call-up first the function 48 and then 110 Driver functions the reference run, in order to bridge the safety circuit (see section 2.5 and 3.2.6.2). After the reference run it is recommended to de-activate the safety circuit immediately. Many driver functions remain blocked until you have carried out the reference run for all axes of your equipment. After each reference run the driver defines the point at which the tool stands immediately after the reference run, as the reference point of your equipment. This point is at the same time to be understood as the current machine zero point and the current work piece zero point. The result of this is that the reference run must be carried out directly after one another for all axes of your equipment. Otherwise it might happen that in the case of axes for which no reference run had been carried out, the positions of the reference point are not identical with the positions of the reference switches. Feasibility during the movement: No Possible error codes: 0; 2; 3; 4; 10; 11; 15; 16; 19; 22 See also section: 2.5; 3.2.6.2; 3.2.15; 3.2.17 3.3.7 Function 7: Definition of a time delay Purpose Call-up parameter Result Definition of a time delay ax = 7 function number bx:cx time intervall (1 ms ... 60,000 ms) dx undefined al error code bx, cx, dx undefined Comments: This function realizes for you a time delay between 1 ms ... 60,000 ms. With the calling-up of this function you can store the desired time interval which is given in milliseconds (ms), in bx:cx (see illustration 3.20). Illustration 3.20: The time intervall in bx:cx (unit Milliseconds ms) The driver interprets the value in bx:cx as a two-digit complementary number. 111 Driver functions If the number in bx:cx is greater than 60,000 the driver limits it to 60,000. If it is smaller than 1 it is set to 1. That means the time delay always lies within the range of 1 ... 60,000 ms. For this function you should note that the driver will only return to you when the desired delay time has run out. During this delay time your program has no control over the computer. Feasibility during the movement: Yes Possible error codes: 0; 2 See also section: 3.2.17 3.3.8 Function 8: Switching on or off of the manual mode Purpose Call-up parameter Result To move the equipment manually ax = 8 function number bx sub functions cx, dx undefined al error code bx, cx, dx undefined Comments: Normally you cannot move the individual axes of your equipment to and fro by hand because each axis has a closed control loop. This control loop prevents any movement that would move the axis out of its desired position. This function allows you to switch the so-called manual mode on or off with the value in the register bx. In this manual mode the driver switches off the control loop of the individual axis. Thus, you can move the axes by hand. The allocation of the value in bx to the individual subfunctions is as follows: bx 0 1 otherwise sub functions Switching off of the manual mode Switching on of the manual mode Switching on of the manual mode In the manual mode the positions of the axes are still monitored by the driver, that is, you can use the function 20 without problems if you want to check on the position of an axis. But the actual tool speed is no longer controlled. If you switch off the manual mode the driver will switch on the control loops again after it has defined the current positions of the axes as the new desired positions of the individual axes. This has the effect that the equipment stops at the point where it stood immediately prior to the switching-off of the manual mode. The manual mode does not cause any loss of position. If your equipment does not have any cascade speed control loops, then the manual mode always works. If the cascade speed control loops do exist the manual mode will only work if you use the data bit 0 of the output port 1 for the Enable/Disable of the power output stages (see sections 1.1 and 2.5 to 2.8). Feasibility during the movement: No Possible error codes: 0, 2; 4; 9; 12 See also section: 3.2.17 112 Driver functions 3.3.9 Function 9: Switching on or off of the Teach-In mode Purpose Call-up parameter Result Realization of the Teach-In movement ax = 9 function number bx sub functions cx, dx uxndefined al error code bx, cx, dx undefined Comments: This function allows you to realize Teach-In movements easily. The allocation of the value in the register bx to the individual subfunctions is as follows: bx 0 1 otherwise sub functions Switching off of the Teach-In mode Switching on of the Teach-In mode Switching on of the Teach-In mode You can only switch on the Teach-In mode if your equipment is not moving, that is, the driver should not carry out any movement in the background. If a movement is active in the background the Stop function must first of all be called up in order to bring the axes to a standstill (see section 3.3.10). If the driver is in the middle of the traversing of a movement segment the Stop mode must be switched on. Otherwise you will not be able to switch on the Teach-In mode. The check on whether the equipment is currently moving or not can be carried out by calling up function 5 and the subsequent evaluation of the bit 6 of the register ah (see section 3.3.5). The following peculiarities, which you must take note of, occur in the Teach-In mode: - With regard to the movement functions, you will only be able to call up the two functions 24 and 25 in the Teach-In mode (see section 3.3.24 and 3.3.25). If you call up one of these two functions the driver switches over its working memory, that is, it works with a memory range that is different from the usual one. Through this, it is ensured that the data of a movement segment are retained if this segment has not yet been fully processed when the Teach-In mode is switched on. - In the Teach-In mode the driver interpolates the movement segment with the Teach-In speed, the standard value of which can be set by you with the configuration program. However, you can change this speed at any time by calling up function 22 (see section 3.3.22). - In the Teach-In mode it is not possible to change the speed using function 21 (see sections 3.2.10 and 3.3.21). - If you call up the Stop function during the processing of a segment the movement is interrupted immediately (see section 3.3.10). The remainder of 113 Driver functions the segment is “forgotten“, that is, for the driver and for you the processing of the segment is already finished. This is the decisive difference from the normal case. In the normal case the remainder of the segment will not be lost after a Stop function. This remainder of the segment will be processed after a Start function (see section 3.3.10). - The Start function and the Stop function have only local effects within the Teach-In mode if they are called up in the Teach-In mode, that means, these two functions have no after-effects on the driver after the Teach-In mode is switched off. - You cannot call up the Break function while in the Teach-In mode (see section 3.3.10). - The handling of the hardware and software limit switch errors is different from the normal case (see sections 3.2.3 and 3.3.5). As in the switching-on you can only switch off the Teach-In mode if your equipment is no longer moving. After the switching-off of the Teach-In mode the driver returns to the using of the old memory range that it had before the Teach-In mode was switched on. You can process any existing segment remainder as usual with the Start function (see 3.3.10). The tool resumes work at the point where it was immediately after the switching-off of the Teach-In mode. It does not return to the point where it was before the Teach-In mode was switched on. This results in a shifting of the segment remainder (see illustration 3.21). End of segment TeachIn movement Segment remainder is shifted. Switching on of TeachIn Switching off of TeachIn Beginning of Segment X Illustration 3.21: Shifting of the movement segment after a Teach-In at the example of a linear segment Feasibility during the movement: Only after a calling-up of the Stop function Possible error codes: 0; 2; 4; 9; 15 See also section: 3.2.17 114 Driver functions 3.3.10 Function 10: Purpose Call-up parameter Result Start-Stop-Break-Abort With this, you can stop (Stop) or continue running (Start) your equipment after a Stop or interrupt the processing (Break and Abort) ax = 10 function number bx sub functions cx, dx undefined al error code bx, cx, dx undefined Comments: By setting the appropriate values in bx you can stop your machine during the traversing of a segment and after that, resume processing or interrupt the entire processing procedure. The allocation of the value in bx to the individual subfunctions is as follows: bx 0 1 2 3 otherwise Sub function Start (Resume after a stop) Stop Break (Emergency Off interruption) Abort (Interruption) Abort (Interruption) During the traversing of a segment you can call up this function with bx = 1 in order to stop the equipment. By doing this you switch on the so-called Stop mode of the driver. A calling- up of this function with bx = 0 allows the equipment to resume processing after that, that is, you switch off the Stop mode. By calling up function 5 you can check at any time whether the driver is currently in the Stop mode or not (see section 3.3.5). If you call up the Start sub function without having called up the Stop sub function prior to this the call-up will have no effect. If the Stop sub function is called up when your equipment is not currently traversing a segment the effect of this call-up remains effective until you call up a Start sub function. The equipment does not move if you use one of the movement functions (see sections 3.3.24 to 3.3.29) unless you have called up the Start function before this. The greatest advantage of these two subfunctions is that you can easily realize the Teach-In movements during the traversing of a movement segment (see section 3.3.9). You can call up the Break subfunction with bx = 2 at any time. When this function is called up your equipment stops immediately. During this, no braking ramps are generated, as in the case of the Stop sub function. Internally, a socalled Break flag is set to 1. 115 Driver functions You can always determine the status of this Break flag by calling up function 5 (see section 3.3.5). This sub function can be understood as the Emergency Off function. As long as the Break flag is set most of the driver functions, amongst them, all movement functions, will not be available. An exception to this is the Teach-In mode. If you switch on the Teach-In mode you will still be able to call up the two movement functions 24 and 25 (see sections 3.3.24 and 3.3.25). Thus, the Teach-In movement is possible even in the case of a Break error. The calling-up of the Reset function is the only possibility to reset this Break flag. The Abort subfunction with bx = 3 can be called up at any time. But the call-up has no effect if there is no processing in the background at that time. During the processing of a segment, a calling-up of this sub function will result in a ramp-supported stopping of the equipment, as in the case of the Stop subfunction. But in contrast to the Stop subfunction any existing segment remainder will be irretrievably lost in this case. This is irrespective of whether the Teach-In mode is active or not. No error flag is set for this. If the Teach-In mode is active this sub function has the same effect as the Stop sub function. The greatest advantage of this sub function is that in the normal mode you can interrupt a movement without using the Break sub function. No error flag is set for this. Feasibility during the movement: Yes Possible error codes: 0; 2; 3; 7; 8; 9; 12; 15; 19; 22; 27 See also section: 3.2.17 3.3.11 Function 11: zero point Purpose Call-up parameter Result Setting of the current point as the work piece Setting of the current point of the tool as the new work piece zero point ax = 11 function number bx, cx, dx undefined al error code bx, cx, dx undefined Comments: The point at which the tool stands at the moment is defined as the new work piece zero point by a calling-up of this function. The old work piece zero point is deleted. This new work piece zero point will remain the reference point for all subsequent absolute coordinate data until a new work piece zero point is defined. Feasibility during the movement: No Possible error codes: 0; 2; 3; 4; 7; 8; 9; 15; 19; 22; 27 See also section: 3.2.1; 3.2.17; 3.3.12 116 Driver functions 3.3.12 Function 12: Purpose Call-up parameter Result Setting of the work piece zero point Setting of the new work piece zero point ax = 12 function number bx segment address of the new work piece zero point cx offset address of the new work piece zero point dx undefined al error code bx, cx, dx undefined Comments: As in function 11 you can define a new work piece zero point by calling up this function. In bx:cx you transfer to the driver the starting address of a memory range in which the absolute coordinates of the new work piece zero point are stored. The reference point for these co-ordinates is the last defined work piece zero point. If you have not defined any work piece zero point yet, then the reference point will be the point referred to. Each axis coordinate occupies 4 bytes in the memory and is interpreted by the driver as a two-digit complementary number. Depending on the structure of the equipment the unit of the coordinates is either micrometer [µm] or arc second ["]. Illustration 3.22 shows the memory allocation for the individual absolute coordinates of the new work piece zero point. It should be noted that it is useful for your future applications to reserve 16 bytes of memory for the data exchange when calling up this function. However, that is not absolutely necessary; if for example your equipment has only 3 axes you need to reserve only 12 bytes in the memory for the 3 axes, X, Y and Z. Starting address of the memory range in bx:cx LSB MSB LSB MSB LSB MSB LSB MSB Byte 1 Byte 2 Byte 3 Byte 4 Byte 1 Byte 2 Byte 3 Byte 4 Byte 1 Byte 2 Byte 3 Byte 4 Byte 1 Byte 2 Byte 3 Byte 4 Absolute position of the WNP on the X-axis Absolute position of the WNP Absolute position of the WNP on the Y-axis on the Z-axis Absolute position of the WNP on the A-axis LSB = Last Significant Byte MSB = Most Significant Byte WNP = Work piece zero point Illustration 3.22: Allocation of the memory for the absolute coordinates of the new work piece zero point This new work piece zero point is then the reference point for all subsequent absolute co-ordinates until a new work piece zero point is defined. The old work piece zero point is deleted when this function is called up. Feasibility during the movement: No Possible error codes: 0; 2; 3; 4; 7; 8; 9; 15; 19; 22; 27 See also section: 3.2.1; 3.2.9; 3.2.13; 3.2.17; 3.3.11 117 Driver functions 3.3.13 Function 13: Purpose Call-up parameter Result Deleting of the work piece zero point Deleting of the work piece zero point ax = 13 function number bx, cx, dx undefined al error code bx, cx, dx undefined Comments: Using this function you can delete the work piece zero point. After a calling-up of this function the reference point is the new work piece zero point, that is, the reference point serves as the point of reference for all subsequent specifications of absolute coordinates. Feasibility during the movement: No Possible error codes: 0; 2; 3; 4; 7; 8; 9; 15; 19; 22 See also section: 3.2.1; 3.2.17; 3.3.11; 3.3.12 3.3.14 Function 14: Purpose Call-up parameter Result Setting of the software limit switches Setting of the software limit switches ax = 14 function number bx segment address of the software limit switch cx offset address of the software limit switch dx undefined al error code bx, cx, dx undefined Comments: With this function you can re-define both the negative as well as the positive software limit switches of all axes of your equipment. The new positions of the software limit switches of the individual axes are stored in the memory range, the starting address of which is transferred by you to the driver via bx:cx (see illustration 3.23). These new positions of the software limit switches are absolute coordinates and have the work piece zero point as the reference point. 118 Driver functions Starting address of the memory range in bx:cx LSB MSB LSB MSB LSB MSB LSB MSB Byte 1 Byte 2 Byte 3 Byte 4 Byte 1 Byte 2 Byte 3 Byte 4 Byte 1 Byte 2 Byte 3 Byte 4 Byte 1 Byte 2 Byte 3 Byte 4 PSWE of the X-axis LSB MSB NSWE of the X-axis LSB MSB PSWE of the Y-axis LSB MSB NSWE of the Y-axis LSB MSB Byte 1 Byte 2 Byte 3 Byte 4 Byte 1 Byte 2 Byte 3 Byte 4 Byte 1 Byte 2 Byte 3 Byte 4 Byte 1 Byte 2 Byte 3 Byte 4 PSWE of the Z-axis LSB = Last Significant Byte MSB = Most Significant Byte NSWE of the Z-axis PSWE of the A-axis NSWE of the A-axis PSWE = Positive software limit switch NSWE = Negative software limit switch Illustration 3.23: Allocation of the memory for the software limit switches Each value of the software limit switches is a whole two-digit complementary number and occupies 4 bytes in the memory range. Depending on the equipment structure the unit is either micrometer (µm) or arc second ("). The standard values of the software limit switches can be set with the PARKON.EXE configuration program (see the manual for this). It should be noted that it is useful for your future applications to reserve 32 bytes memory for the data exchange when calling up this function. However, that is not absolutely necessary; if your equipment has for e. g. only 3 axes you only need to reserve 24 bytes in the memory for the 3 axes, X, Y and Z. Feasibility during the movement: Yes Possible error codes: 0; 2; 3; 5; 6; 7; 8; 9; 15; 19; 22 See also section: 3.2.1; 3.2.9; 3.2.13; 3.2.17; 3.3.15 3.3.15 Function 15: Purpose Call-up parameter Result Blocking /Releasing of software limit switches Blocking or releasing of the software limit switches ax = 15 function number bx sub functions cx, dx undefined al error code bx, cx, dx undefined Comments: This function can be used to activate or de-activate the software limit switches. After the starting of the driver or after the reset the software limit switches are always blocked, that is, they are not active. It is only with this function that you can block or release the software limit switches. Although function 14 can define new software limit switches, it cannot activate or de-activate their use. 119 Driver functions In addition, it should be noted that you can define with the configuration program whether each axis of your equipment is to have no or only one or two hardware limit switches (see manual for the PARKON.EXE configuration program). In the case of the software limit switches this is no longer so. If you leave the use of the software limit switches open, every axis of your equipment will automatically have the positive and the negative software limit switch. The value in bx and its meaning is as follows: bx 0 1 sonst Meaning De-activating of software limit switches Activating of software limit switches Activating of software limit switches Feasibility during the movement: Yes Possible error codes: 0; 2; 3; 5; 7; 8; 9; 15; 19; 22 See also section: 3.2.6; 3.2.15; 3.3.14 3.3.16 Function 16: Purpose Call-up parameter Result Reading of a byte from an input port Reading from an input port ax = 16 function number bx port adress cx, dx undefined al error code bx contents of the input port cx, dx undefined Comments: This function enables you to read the contents of an input port. You must store the port address in bx. Upon the return of the driver you will obtain the port contents in bl. From version 3.10 this function is not availabl any more (see section 3.2.15). Instead of this function you should use the functions 36 and 37. When you call-up this function you get back the error code 1 „Wrong function number“. Feasibility during the movement: Yes Possible error codes: 0; 1; 2 See also section: 3.2.15, 3.2.17; 3.3.36; 3.3.37 120 Driver functions 3.3.17 Function 17: Purpose Call-up parameter Result Output of a byte to an output port Output of a byte to an output port ax = 17 function number bx port adress cx output value dx undefined al error code bx, cx, dx undefined Comments: This function enables you to output a byte to an output port. When calling up this function you must store the port address in bx and the output byte in cx. From version 3.10 this function is not available any more (see section 3.2.15). Instead of this function you should use the functions 38 to 42. When you call-up this function you get back the error code 1 „Wrong function number“. Feasibility during the movement: Yes Possible error codes: 0; 1; 2 See also section: 3.2.15; 3.2.17; 3.3.38; 3.3.39; 3.3.42 3.3.18 Function 18: Purpose Call-up parameter Result Requesting for the actual positions of the axes Requesting for the actual positions of the axes ax = 18 function number bx segment address of the actual positions cx ôffset address of the actual positions dx undefined al error code bx, cx, dx undefined Comments: This function enables you to check on the current actual positions of the axes of your equipment. In order to be able to make use of this function you must first of all reserve a memory range in your user program. The starting address of this memory range is stored in bx:cx during the calling-up of this function. With the help of this starting address the driver writes the actual positions of the axes into the memory range reserved by you (see illustration 3.24). For each axis the driver needs 4 bytes of memory. You have to interpret the value in these 4 bytes as a whole two-digit complementary number. It should be noted that it is useful for your future applications to reserve 16 bytes of memory for the data exchange when calling up this function. However, that is not absolutely necessary; if for example, your equipment has only 3 axes, you need only 12 bytes in the memory for the 3 axes, X, Y and Z. 121 Driver functions Starting address of the memory range in bx:cx LSB MSB LSB MSB MSB LSB LSB MSB Byte 1 Byte 2 Byte 3 Byte 4 Byte 1 Byte 2 Byte 3 Byte 4 Byte 1 Byte 2 Byte 3 Byte 4 Byte 1 Byte 2 Byte 3 Byte 4 cta osition of the axis cta osition of the axis cta osition of the axis cta osition of the axis S ast Significant yte S ost Significant yte Illustration 3.24: Allocation of the memory with the current actual positions of the axes The actual positions that you get back are absolute positions, that is, the actual positions have the work piece zero point as reference point. It should be noted that the work piece zero point after the loading or resetting of the driver is identical with the reference point. Depending on the structure of the equipment the unit of the actual positions is either micrometer [µm] or arc second ['']. Feasibility during the movement: Yes Possible error codes: 0; 2; 9 See also section: 3.2.9; 3.2.13; 3.2.17; 3.3.19 3.3.19 Function 19: Purpose Call-up parameter Result Requesting for the actual tool speed Requesting for the current actual tool speed ax = 19 function number bx, cx, dx undefined al error code bx:cx current actual speed dx undefined Comments: This function enables you to check on the current actual speed of the tool at any time. The driver stores the actual speed in bx:cx (see illustration 3.25). Illustration 3.25: The current actual speed in bx:cx 122 Driver functions You must interpret the value in bx:cx as a whole two-digit complementary number. Whether the unit of the tool speed is micrometer/second [µm/s] or arc second/second [''/s] depends on the structure of your equipment. Feasibility during the movement: Yes Possible error codes: 0; 2; 9; 10 See also section: 3.2.9; 3.2.10; 3.2.13; 3.2.17; 3.3.18 3.3.20 Function 20: Purpose Call-up parameter Result Setting of the segment speed Setting of a new segment speed ax = 20 function number bx:cx path speed dx undefined al error code bx, cx, dx undefined Comments: With this function you can define a new segment speed of the tool. As long as this function has not been called up after the loading or after a resetting of the driver the tool speed will be the standard speed that you have set with the PARKON.EXE configuration program (see the manual for this). The new segment speed that you want to transfer to the driver is stored in bx:cx (see illustration 3.26). Illustration 3.26: The new segment speed in bx:cx You can call up this function during the traversing of a movement segment. However, the new value of the speed will only apply to the traversing of the next movement segment. The driver interprets the number in bx:cx as a whole two-digit complementary number. Depending on the structure of the equipment the unit of the path speed is either micrometer/second [µm/s] or arc second/second [''/s]. Feasibility during the movement: Yes; the new value is only taken over for the traversing of the next movement segment Possible error codes: 0; 2; 3; 7; 8; 9; 15; 17; 19; 22 See also section: 3.2.9; 3.2.10; 3.2.13; 3.2.17; 3.3.19; 3.3.32 123 Driver functions 3.3.21 Function 21: Purpose Call-up parameter Result Setting of the change factor of the tool speed Änderung der momentanen Werkzeuggeschwindigkeit ax = 21 function number bx change factor of the path speed cx, dx undefined al error code bx, cx, dx undefined Comments: During the processing and or during a rapid mode the interpolation algorithm normally uses the processing speed or the rapid speed directly for its internal calculations in the co-ordination of the axis movement (the processing speed is either the segment speed or the path speed). That would mean that the tool speed is the same as the processing speed or the rapid speed. However, in order to be able to change the tool speed we have introduced a so-called change factor Kv. For its calculations the interpolation algorithm does not use the processing speed or the rapid speed directly, but a product of Kv and the processing or rapid speed. By calling up this function you can change Kv and thus also the tool speed. An exception is the Teach-In mode. In this mode the tool speed is always the same as the Teach-In speed, that is, the change factor Kv does not have any effect in the Teach-In mode. You cannot call up this function in this mode. The value of Kv that you have stored in bx is interpreted by the driver as a whole two-digit complementary number. This value is the percentage of the processing or rapid speed. To illustrate this, we have calculated a few examples for you. Processing or Value of Kv Calculation Tool speed after the rapid speed in bx calling-up of the function ------------------------------------------------------------------------------------------------------------0 [µm/s] 70,000 [µm/s] 0 70,000 * 0 % 20,000 [µm/s] 50 20,000 * 50 % 10,000 [µm/s] 50,000 [µm/s] 100 50,000 * 100 % 50,000 [µm/s] 30,000 [µm/s] 140 30,000 * 140 % 42,000 [µm/s] It should be noted that this function does not change the processing or rapid speed. If, for example, the processing speed is 10,000 µm/s, then the tool speed is 5,000 µm/s after you have called up this function with bx = 50. The next time this function is called up with for e.g. bx = 20, you will obtain the value of 2,000 µm/s (= 10,000 µm/s * 20 %) for the tool speed and not the value of 1,000 µm/s (= 5,000 µm/s * 20 %). After the loading or after a reset Kv will be equal to100 as a standard feature. This means: Tool speed 124 = = Processing speed * 100 % Processing speed or Driver functions Tool speed = = Rapid speed * 100 % Rapid speed The value of Kv applies not only to the traversing of a single segment, but remains valid until this function is called up again or until the resetting of the driver. Kv can only have a value between 0 and 140, that is, you can vary the tool speed between 0 % and 140 % of the processing or rapid speed. If the value in bx is greater than 140 then Kv is set to 140. If this value is smaller than 0 then Kv assumes the value of 0. Feasibility during the movement: Yes Possible error codes: 0; 2; 3; 7; 8; 9; 12; 15; 19; 22 See also section: 3.2.10; 3.2.13; 3.2.17; 3.3.18; 3.3.20; 3.3.32 3.3.22 Function 22: Purpose Call-up parameter Result Setting of the Teach-In speed Setting of a new Teach-In speed ax = 22 function number bx:cx Teach-In speed dx undefined al error code bx, cx, dx undefined Comments: In the Teach-In mode the interpolation algorithm uses the Teach-In speed directly for its internal calculations. The speed change factor Kv has no effect in this mode. In this way we want to ensure that you are able to carry out the Teach-In movements under any circumstances. This function enables you to define a new Teach-In speed. Before the callingup of this function you must store the new value of the Teach-In speed in bx:cx. The driver interprets this value as a two-digit complementary number (see illustration 3.27). Depending on the structure of the equipment the unit of the speed is either micrometer/second [µm/s] or arc second/second [''/s]. Illustration 3.27: The new Teach-In speed in bx:cx 125 Driver functions You can call up this function during the movement but the new value will only be accepted by the driver for the traversing of the next movement segment in the Teach-In mode. Therefore, this function has no effect on the current movement segment. After the loading or a resetting of the driver the Teach-In speed will have the standard value that you have set using the PARKON.EXE configuration program (see manual for this). Feasibility during the movement: Yes, the new value is only taken over for the traversing of the next movement segment. Possible error codes: 0; 2; 3; 7; 8; 9; 15; 16; 19; 22 See also section: 3.2.9; 3.2.10; 3.2.13; 3.2.17; 3.3.9 3.3.23 Function 23: Purpose Call-up parameter Result Setting of the rapid speed Setting of a new rapid speed ax = 23 function number bx:cx Rapid speed dx undefined al error code bx, cx, dx undefined Comments: During the rapid mode (see sections 3.3.26 and 3.3.27) the interpolation algorithm uses the product of the change factor Kv and the rapid speed for its internal calculations. This function enables you to define a new rapid speed. Before calling up this function you must store the new value in bx:cx. The driver interprets the value in bx:cx as a whole two-digit complementary number (see illustration 3.28). The unit of the speed depends on the structure of the equipment and is either micrometer/second [µm/s] or arc second/second [‘‘/s]. Illustration 3.28: The new rapid speed in bx:cx The change factor KV continues to be active during the rapid mode as during a normal processing phase (see section 3.3.20), that is, it still has its increasing or decreasing effect on the tool speed. 126 Driver functions After loading or resetting the driver the rapid speed will have its standard value, which can be set with the PARKON.EXE configuration program (see the manual for this). This function can be called up during a movement. However, the new value of the rapid speed will only be accepted for the traversing of the next movement segment in the rapid mode. Feasibility during the movement: Yes, the new value will only be taken over for the traversing of the next movement segment. Possible error codes: 0; 2; 3; 7; 8; 9; 15; 17; 19; 22 See also section: 3.2.9; 3.2.10; 3.2.13; 3.2.17; 3.3.21; 3.3.32 3.3.24 Function 24: Purpose Call-up parameter Result Relative linear normal movement Carrying out of a relative linear movement with the segment speed ax = 24 function number bx segment address of the end position cx offset address of the end position dx undefined al error code bx, cx, dx undefined Comments: This function enables you to realize a linear interpolation for up to 4 axes. You must transfer a FAR address to the driver via the register bx:cx. This address is the starting address of a memory range that is reserved by you in your user program, where you have stored the end positions of the 4 axes before the calling-up of this function. The unit of the position value is either micrometer [µm] or arc second ["]. Which unit is used depends on the structure of your equipment (see section 3.2.9). The word "relative" in the name of the function has to do with the reference point of the end positions that are to be transferred (see section 3.2.1). The reference point for these end positions is the point at which the tool stands immediately before the calling-up of the function. If several segments are traversed one after the other, the reference point is the ending point of the last segment and at the same time the starting point of the segment to be traversed (see section 3.2.1). The word "normal" in the name of this function is connected with the desired tool speed, which is the product of the change factor Kv and the path speed, as long as the Teach-In mode is not active. Using function 21 you can change the factor Kv and thus also the tool speed during the movement. In the TeachIn mode the desired tool speed is always equal to the Teach-In speed. The change factor Kv has therefore no effect in this mode. 127 Driver functions After the loading or after a resetting of the driver the segment speed, the path speed and the Teach-In speed have the standard values that have been set with the configuration program (see manual for the PARKON.EXE configuration program). Function 20 or 22 allows you to change these speeds. In the following we will explain how the end positions have to be stored in the memory range (see illustration 3.29). Illustration 3.29: Allocation of the memory range for a relative linear movement Each position value occupies 4 consecutive bytes in the memory range. In the first place is the value for the X-axis. This is followed by the values for the Y-axis, Z-axis and A-axis. The driver interprets the position values as whole twodigit complementary numbers. You should note that it is useful for your future applications to reserve 16 bytes of memory for the data exchange when calling up this function. However, that is not absolutely necessary; if for example, your equipment has only 3 axes, you only need to reserve 12 bytes in the memory for the 3 axes X, Y and Z. During the processing of the movement segment transferred by this function in the background you can switch on the Teach-In mode after the Stop function has been called up. Other movement segments can then be traversed in the Teach-In mode. In this way, the Teach-In movements can be realized. You can easily call up this function in the Teach-In mode. After the Teach-In mode has been switched off the remainder of the segment can be processed normally (see section 3.3.9). If you call up the Abort subfunction during the movement the equipment is stopped exactly like in the Stop sub function. However, in the case of the Abort subfunction, any remainder of the segment will be irretrievably lost. This is irrespective of whether the Teach-In mode is active or not (see section 3.3.10). If your equipment has a TTT structure, a linear interpolation is carried out, that is, the tool really moves along a straight line in space and on a plane. If this structure does not exist then the driver will realize a synchronous PTP control for you when this function is called up (see section 1.2 and 3.2.1). Feasibility during the movement: Yes, but only after the Teach-In mode has been switched on, otherwise No. Possible error codes im Normalbetrieb: 0; 2; 3; 4; 7; 8; 9; 15; 19; 22 Possible error codes im Teach-In-Modus: 0; 2; 4; 9 See also section: 3.2.1; 3.2.2; 3.2.6; 3.2.9; 3.2.13; 3.3.10; 3.2.17; 3.3.9 128 Driver functions 3.3.25 Function 25: Purpose Call-up parameter Result Absolute linear normal movement Carrying out of an absolute linear movement with the segment speed ax = 25 function number bx segment address of the end position cx offset address of the end position dx undefined al error code bx, cx, dx undefined Comments: This function enables you to carry out a linear interpolation for up to 4 axes. Apart from the fact that the end positions transferred via bx:cx are absolute positions, this function is identical to function 24 with regard to the functionality as well as the data transfer format. In section 3.2.1 we have already explained that you must always use the work piece zero point as the reference point for the calculation of the absolute positions. As in function 24 you must write the end positions into the memory range reserved by you in your user program. The starting address of this memory range is then stored in bx:cx. Every position value again occupies 4 bytes in this memory range (see illustration 3.29). The unit of the position value is either micrometer [µm] or arc second ["]. Which unit is used depends on the structure of your equipment (see section 3.2.9). For this function the desired speed for the tool is calculated in the same way as for function 24. Here, too, a distinction is made between the normal operation and the Teach-In mode. Here, you can also realize Teach-In movements easily after the Teach-In mode has been switched on. This function can be called up in the Teach-In mode as usual. If your equipment has a TTT structure a linear interpolation is carried out, that is, the tool really moves along a straight line in space or on a plane. If this structure does not exist the driver will realize a synchronous PTP control for you when this function is called up (see section 1.2 and 3.2.1). Feasibility during the movement: Yes, but only after the Teach-In mode has been switched on, otherwise No. Possible error codes im Normalbetrieb: 0; 2; 3; 4; 7; 8; 9; 15; 19; 22 Possible error codes im Teach-In-Modus: 0; 2; 4; 9 See also section: 3.2.1; 3.2.2; 3.2.6; 3.2.9; 3.2.13; 3.2.15; 3.3.9; 3.3.10; 3.3.24 129 Driver functions 3.3.26 Function 26: Purpose Call-up parameter Result Relative linear rapid movement Carrying out of a relative linear movement with the rapid speed ax = 26 function number bx segment address of the end position cx offset address of the end position dx undefined al error code bx, cx, dx undefined Comments: Using this function you can realize a linear interpolation for up to 4 axes. Before calling it up you must store the end positions of the movement segment to be traversed in the memory range reserved by you in your user program. The starting address of this memory range is transferred to the driver via bx:cx (see illustration 3.29). This function is absolutely identical to function 24 with the exception that the rapid speed replaces the path speed. After the loading or after a resetting of the driver the rapid speed has the standard value that you have set using the supplied configuration program. You can change this speed by calling up function 23. A distinction is made between the normal operation and the Teach-In mode. In the normal operation you can change the change factor Kv and thus also the tool speed during the movement by using function 21. In Teach-In mode the desired tool speed is always equal to the Teach-In speed. In this mode the Kv factor has no effect. You cannot call up this function in the Teach-In mode. This function is particularly useful if you want to realize a rapid mode (in other words: a rapid movement) in order to for e. g. set up your equipment, or to change the tool during operation, or to fetch a tool etc. The end positions that you store in the memory range prior to the calling-up of the function are relative coordinates, that is, the reference point for these end positions is the point at which the tool stands immediately before the calling-up of the function. When several segments are traversed one after another, the reference point is the ending point of the last segment and at the same time the starting point of the segment to be traversed (see section 3.2.1). The unit of the position value is either micrometer [µm] or arc second ["]. Which unit is used depends on the structure of your equipment (see section 3.2.9). If your equipment has a TTT structure a linear interpolation is carried out, that is, the tool really moves along a straight line in space or on a plane. If this structure does not exist the driver will realize a synchronous PTP control for you when this function is called up (see section 1.2 and 3.2.1). Feasibility during the movement: No Possible error codes: 0; 2; 3; 4; 7; 8; 9; 12; 15; 19; 22 130 Driver functions See also section: 3.2.1; 3.2.2; 3.2.6; 3.2.9; 3.2.13; 3.2.17; 3.3.9; 3.3.24 3.3.27 Function 27: Purpose Call-up parameter Result Absolute linear rapid movement Carrying out of an absolute linear movement with the rapid speed ax = 27 function number bx segment adress of the end position cx offset adress of the end position dx undefined al error code bx, cx, dx undefined Comments: With this function you can carry out a linear interpolation for up to 4 axes. This function is meant for the realization of rapid movements. Apart from the fact that the end positions transferred via bx:cx are absolute positions, this function is identical to function 26 with regard to the functionality as well as the data transfer format (see illustration 3.29). The work piece zero point serves as the reference point for the calculation of the absolute positions. For the calculation of the desired speed for the tool, the rapid speed instead of the path speed is used if the Teach-In mode is not switched on. By changing the change factor Kv, you can change the tool speed during normal operation. This is, of course, not possible in the Teach-In mode because the desired speed for the tool is always the same as the Teach-In speed. The factor Kv, as always, has no effect in this case. You cannot call up this function in the TeachIn mode. The unit of the position value is either micrometer [µm] or arc second ["]. Which unit is used depends on the structure of your equipment (see section 3.2.9). If your equipment has a TTT structure a linear interpolation is carried out, that is, the tool really moves along a straight line in space or on a plane. If this structure does not exist the driver will realize a synchronous PTP control for you when this function is called up (see section 1.2 und 3.2.1). Feasibility during the movement: No Possible error codes: 0; 2; 3; 4; 7; 8; 9; 12; 15; 19; 22 See also section: 3.2.1; 3.2.2; 3.2.6; 3.2.9; 3.2.13; 3.2.17; 3.3.9; 3.3.24; 3.3.26 131 Driver functions 3.3.28 Function 28: Relative circular movement Purpose Call-up parameter Result Carrying out of a relative circular movement with the segment speed ax = 28 function number bx segment adress of the circle parameters cx Offset address of the circle parameters dx undefined al error code bx, cx, dx undefined Comments: This function enables you to carry out a circular interpolation on one of the planes, XY, YZ, ZX. In contrast to a linear movement you have here in bx:cx the starting address of a memory range that contains not only the end positions but also information on the circular plane, the centre point of the circle and the movement direction. Illustration 3.30 shows you how the information is stored in the memory range. Starting address of the memory range in bx:cx LSB MSB LSB MSB LSB MSB LSB MSB Byte 1 Byte 2 Byte 3 Byte 4 Byte 1 Byte 2 Byte 3 Byte 4 Byte 1 Byte 2 Byte 3 Byte 4 Byte 1 Byte 2 Byte 3 Byte 4 Circular plane LSB MSB Movement direction LSB MSB Position 1 Position 2 of the centre pt. of the circle of the centre pt. of the circle LSB MSB LSB MSB Byte 1 Byte 2 Byte 3 Byte 4 Byte 1 Byte 2 Byte 3 Byte 4 Byte 1 Byte 2 Byte 3 Byte 4 Byte 1 Byte 2 Byte 3 Byte 4 End position of the X-axis End position of the Y-axis End position of the Z-axis End position of the A-axis LSB = Last Significant Byte MSB = Most Significant Byte Illustration 3.30: Allocation of the memory range for a circular movement The memory range that is reserved by you in your user program has a size of 32 bytes (due to the paper format, this memory range is divided into two parts in illustration 3.30. In reality these two ranges belong together). The Position 1 and the Position 2 are the positions of the centre of the circle. Depending on the circular plane, these are the positions of the X- or Y- or Z-axis. With the value that is stored in the first 4 bytes of the memory range you can then determine on which plane the circular interpolation is to take place. The allocation of this value to the other variables is as follows: 132 Driver functions Value 0 1 2 (otherwise) Circular plane XY-plane XZ-plane YZ-plane YZ-plane Position-1 X-axis X-axis Y-axis Y-axis Position-2 Y-axis Z-axis Z-axis Z-axis However, we have to point out here that you can only generate a circle if the coordinates of the axes that are not part of the circular plane are 0. Otherwise you will get a spiral with the base circle on the corresponding plane. In that case you would have a so-called helix interpolation (see sections 3.3.30 und 3.3.31). For the circular interpolation the movement direction is also important. You can set the value that defines the movement direction in the next 4 bytes directly after the value for the circular plane. The allocation of this value to the movement direction is as follows: Value 0 1 (otherwise) Movement direction Clockwise direction Anti-clockwise direction Anti-clockwise direction As you would certainly have noticed we have reserved 4 bytes for each circle parameter in the memory range. There is no need for 4 bytes here (especially for the circular plane and for the movement direction) but through this, we achieve a uniform description for all parameters. All circle parameters are interpreted by the driver as whole two-digit complementary numbers. You should note that it is useful for your future applications to reserve an extra 16 bytes at the end of the memory range for the end positions when calling up this function. However, this is not absolutely necessary; if your equipment has, for example, only 3 axes you will only need to reserve 12 bytes at the end of the memory range for the end positions of the 3 axes, X, Y and Z. The unit of the centre point positions, Position 1 and Position 2, as well as the ending point positions of the axis is either micrometer [µm] or arc second [‘‘]. Which unit is used depends on the structure of your equipment (see section 3.2.9). The word ‘Relative‘ in the name of the function has something to do with the reference point of the positions to be transferred (both for the centre point of the circle as well as for the ending point) (see section 3.2.1). The reference point for these end positions is the point at which the tool stands directly before the calling up of the function. When several segments are traversed one after the other, the reference point is ending point of the last segment and at the same time the starting point of the next segment to be traversed (see section 3.2.1). 133 Driver functions In contrast to a linear segment, for which the interpolation algorithm uses either the segment speed (see section 3.3.20) or the rapid speed (see section 3.3.23) for its internal calculations depending on the driver function called up (functions 24, 25 or functions 26, 27) a circular segment can only be interpolated with the segment speed (see section 3.3.20). Another distinction from a linear segment is that the circular interpolation is only possible in an equipment with a TTT structure (see section 1.2). As in the case of a linear segment you can switch on the Teach-In mode during the traversing of a circular segment, after the Stop subfunction has been called up (see section 3.3.9) In the Teach-In mode you can then easily call up one of the functions 24 or 25 to realize Teach-In movements. After the switching-off of the Teach-In mode any remainder of the circular segment can be processed as normal (see section 3.3.9). If you call up the Abort subfunction during the movement, the equipment is stopped just as in the Stop subfunction. But any remainder of the segment will be lost. No error flag will be set (see section 3.3.9). You cannot use the circle functions in the Teach-In mode. During the traversing of a circular segment you can change the factor Kv and thus the tool speed by calling up the function 21. Feasibility during the movement: No Possible error codes: 0; 2; 3; 4; 7; 8; 9; 12; 13; 15; 19; 22 See also section: 3.2.1; 3.2.2; 3.2.6; 3.2.9; 3.2.13; 3.2.17; 3.3.9; 3.3.10; 3.3.30; 3.3.31 3.3.29 Function 29: Purpose Call-up parameter Result Absolute circular movement Carrying out of an absolute circular movement with the segment speed ax = 29 function number bx segment address of the circle parameters cx offset address of the circle dx undefined al error code bx, cx, dx undefined Comments: This function enables you to carry out a circular interpolation on one of the planes, XY, YZ, ZX. Apart from the fact that the positions of the centre point of the circle and the ending point of the segment that are transferred via bx:cx are absolute positions, this function is absolutely identical to function 28 (see illustration 3.30) with regard to the functionality as well as to the data transfer format. For the calculation of the absolute positions, the work piece zero point as usual serves as reference point (see section 3.2.1). Depending on the 134 Driver functions structure of the equipment, the unit of the positions is either micrometer [µm] or arc second [“] (see section 3.2.9). You cannot call up this function in the Teach-In mode. Feasibility during the movement: No Possible error codes: 0; 2; 3; 4; 7; 8; 9; 12; 13; 15; 19; 22 See also section: 3.2.1; 3.2.2; 3.2.6; 3.2.9; 3.2.13; 3.2.17; 3.3.10; 3.3.28; 3.3.30; 3.3.31 3.3.30 Function 30: Purpose Call-up parameter Result Relative helix movement Carrying out of a relative helix movement with the segment speed ax = 30 function number bx Segment address of the helix parameters cx offset address of the helix parameters dx undefined al error code bx, cx, dx undefined Comments: This function enables you to carry out a helix interpolation. Strictly speaking, the circular interpolation (functions 28 and 29) is a special case of the helix interpolation (see section 1.2). But due to the specification of the ending point of the circle through the Cartesian coordinates, it is not possible to move more than one rotation on the circular plane in the case of the circular interpolation. This limitation is lifted by the helix interpolation (functions 30 and 31). As in the case of the circular movement you have here in bx:cx the starting address of a memory range in which the parameters for the helix movement are stored. Illustration 3.31 shows how the information is stored in this memory range. Starting address of the memory range in bx:cx LSB MSB LSB MSB LSB MSB LSB MSB LSB MSB Byte 1 Byte 2 Byte 3 Byte 4 Byte 1 Byte 2 Byte 3 Byte 4 Byte 1 Byte 2 Byte 3 Byte 4 Byte 1 Byte 2 Byte 3 Byte 4 Byte 1 Byte 2 Byte 3 Byte 4 Circular plane LSB MSB Movement direction LSB MSB Movement angle LSB MSB Position 1 of the centre pt. of the circle LSB Position 2 of the centre pt. of the circle MSB Byte 1 Byte 2 Byte 3 Byte 4 Byte 1 Byte 2 Byte 3 Byte 4 Byte 1 Byte 2 Byte 3 Byte 4 Byte 1 Byte 2 Byte 3 Byte 4 End position X-axis End position Y-axis End position Z-axis End position A-axis LSB = Last Significant Byte MSB = Most Significant Byte Illustration 3.31: Allocation of the memory range for a helix movement 135 Driver functions The memory range which is reserved by you in your user program and which contains the helix information has a size of 36 bytes (due to the paper format, this memory range is shown in illustration 3.31 in two parts. In reality these two parts belong together). With the value that is stored in the first 4 bytes for the circular plane you can determine on which plane the base circle for the helix interpolation should be. Position 1 and Position 2 are the positions of the centre point of the circle. Value 0 1 2 (otherwise) Circular plane XY-plane XZ-plane YZ-plane YZ-plane Position-1 X-axis X-axis Y-axis Y-axis Position-2 Y-axis Z-axis Z-axis Z-axis The movement direction for the helix interpolation is defined by the value in the next 4 bytes directly after the value for the circular plane. Here, the same applies as for a circular interpolation: Value 0 1 (otherwise) Movement direction Clockwise direction Anti-clockwise direction Anti-clockwise direction As you know, for the helix interpolation the tool moves on a circular segment in the circular plane. Using the value for the movement angle, you can define yourself how big the circular segment on the circular plane is to be (see illustration 3.32). Axis 2 Base circle for a helix segment The base circle lies on the circular plane Movement angle Position 2 Centre point of the circle Ending point Starting point Position 1 Axis 1 Illustration 3.32: Movement angle for a helix segment In principle, the movement angle is the circle angle between the starting point of the segment projected onto the circular plane (that is, the ending point of the 136 Driver functions last segment) and the ending point of the segment that is also projected onto the circular plane. The unit of the movement angle is arc second (see section 3.2.9). The movement angle can have any value between 0 ... (231 - 1) arc seconds. However, as it is possible to define the movement direction separately the movement angle should therefore not be a negative value. The conversion results in the following value ranges for the movement angle: 0 ... 2,147,483,647 0 ... 35,791,394.11667 0 ... 596,523.2352778 0 ... 1,657.008986883 0 ... 10,411.29452025 Angular second Angular minute Degree Rotations Radian ["] or ['] or [°] or or The last 16 bytes of the memory range that is reserved in the user program are meant for the transfer of the ending point positions. The position values of the two axes that form the circle plane are simply ignored by the driver as the driver calculates the positions for these two axes from the movement angle itself. Theoretically you can transfer any value for these axes. But it is recommended that you transfer the value of 0 for these axes. It should be explicitly pointed out here that you should not leave out the transfer for these two axes, even though the transferred values are not evaluated by the driver. The sequence for the transfer of the axis coordinates is similar to that for the circular interpolation, that is, first the coordinate for the X-axis and lastly the coordinate for the A-axis. You should note that it is useful for your future applications to reserve an extra 16 bytes at the end of the memory range for the end positions when calling up this function. However, this is not a must; if, for example, your equipment has only 3 axes then you only need to reserve 12 bytes at the end of the memory range for the end positions of the 3 axes, X, Y and Z. The unit of the centre point positions, Position 1 and Position 2, as well as the ending point positions of the two axes that form the circular plane is micrometer [µm]. The unit of the end positions of the two other axes is either micrometer [µm] or arc second [“]. Which unit is used depends on whether the axis is a linear axis or a rotation axis (see section 3.2.9). The word "Relative" in the name of the function has something to do with the reference point of the positions to be transferred (both for the centre point of the base circle as well as for the ending point) (see section 3.2.1). The reference point for these positions is the point at which the tool stands directly before the calling-up of the function. When several segments are traversed one after another, the reference point is ending point of the last segment and at the same time the starting point of the next segment to be traversed (see section 3.2.1). 137 Driver functions In contrast to a linear segment, for which the interpolation algorithm uses either the segment speed (see section 3.3.20) or the rapid speed (see section 3.3.23) for its internal calculations depending on the driver function called up (functions 24, 25 or functions 26, 27), a helix segment, as in the case of a circular segment, can only be interpolated with the segment speed (see section 3.3.20). Another difference from a linear segment is that the helix interpolation is only possible in an equipment with XY-TTT or an XYZ-TTT structure. As for a linear segment you can switch on the Teach-In mode during the traversing of a helix segment after the Stop function has been called up (see section 3.3.9) In the Teach-In mode you can then easily call up one of the functions 24 or 25 to realize Teach-In movements. After the switching-off the Teach-In mode, any remainder of the helix segment can be processed normally (see section 3.3.9). If you call up the Abort subfunction during the movement the equipment is stopped just as for the Stop function. But any remainder of the segment will be lost. No error flag will be set (see section 3.3.10). You cannot call up the helix functions in the Teach-In mode. During the traversing of a helix segment you can change the factor Kv and thus the tool speed by calling up the function 21. Feasibility during the movement: No Possible error codes: 0; 2; 3; 4; 7; 8; 9; 12; 15; 18; 19; 22 See also section: 3.2.1; 3.2.2; 3.2.3; 3.2.6; 3.2.13; 3.2.17; 3.3.9; 3.3.10; 3.3.28; 3.3.29 3.3.31 Function 31: Purpose Call-up parameter Result Absolute helix movement Carrying out of an absolute helix movement with the segment speed ax = 31 function number bx segment address of the circle parameters cx offset address of the circle parameter dx undefined al error code bx, cx, dx undefined Comments: This function enables you to carry out a helix interpolation with the base circle on one of the planes, XY, YZ, ZX. Apart from the fact that the positions of the centre point of the circle and of the ending point of the segment that are transferred via bx:cx are absolute positions this function is absolutely identical to function 30 (see illustration 3.31) with regard to functionality as well as to the data transfer format. 138 Driver functions For the calculation of the absolute positions, the work piece zero point serves as usual as reference point (see section 3.2.1). Depending on the type of axis (linear or rotation axis) the unit of the positions is either micro- meter (µm) or arc second [“] (see section 3.2.9). The movement angle is, as in a relative helix segment, the circle angle between the starting point of the segment (that is, the ending point of the last segment) that is projected onto the circular plane and the ending point of the segment that is also projected onto the circular plane. The unit of the movement angle is arc second (see section 3.2.9). You cannot call up this function in the Teach-In mode. Feasibility during the movement: No Possible error codes: 0; 2; 3; 4; 7; 8; 9; 12; 15; 18; 19; 22 See also section: 3.2.1; 3.2.2; 3.2.6; 3.2.9; 3.2.13; 3.2.17; 3.3.9; 3.3.10; 3.3.28; 3.3.29 3.3.32 Function 32: Purpose Call-up parameter Result Setting of the path speed Setting of a new path speed ax = 32 function number bx:cx path speed dx undefined al error code bx, cx, dx undefined Comments: With this function you can define a new speed for the tool for the path traversing (see section 3.3.33). As long as you have not called up this function after the loading or a resetting of the driver, the tool speed assumes the standard value set by you with the PARKON.EXE configuration program (see the manual for this) during the path traversing. The new path speed, that you want to transfer to the driver, is stored in bx:cx (see illustration 3.33). Illustration 3.33: The new path speed in bx:cx 139 Driver functions You can call up this function during the path traversing. However, the new value of the path speed does not apply to the present path but to the next path that might be traversed. The driver interprets the number in bx:cx as a whole two-digit complementary number. But a negative number will not be accepted. The unit of the path speed is micrometer/second [µm/s]. Feasibility during the movement: Yes, the new value is only assumed for the traversing of the next path Possible error codes: 0; 2; 3; 7; 8; 9; 15; 17; 19; 22 See also section: 3.2.3; 3.2.4; 3.2.5; 3.2.9; 3.2.10; 3.2.17; 3.3.19; 3.3.20; 3.3.22. 3.3.33 Function 33: Purpose Call-up parameter Result Path movement Carrying out of a path movement with the path speed ax = 33 function number bx oegment address of the memory range cx offset address of the memory range dx undefined al error code bx, cx, dx undefined Comments: This function enables you to generate a profile with the path processing. This function is the most complex function offered by the driver. In the sections 3.2.4 and 3.2.5 you have already got to know the principles of the path processing. It has already been explained there how the speed profile can be calculated and how the path data are stored in a file. With the help of this function you must transfer these path data to the driver in order to facilitate the path traversing. Through the register bx:cx you transfer to the driver the starting address of a memory range that is reserved in the user program, which itself contains the starting addresses of two memory ranges that are reserved in the user program (see illustration 3.34). 140 Driver functions Starting address of the memory range in bx:cx LSB MSB LSB MSB LSB MSB LSB MSB Byte 1 Byte 2 Byte 1 Byte 2 Byte 1 Byte 2 Byte 1 Byte 2 Offset Segment Offset Segment Range 1_Starting address Range 2_Starting address Status byte . . . Range_1 . . . Range_2 LSB = Last Significant Byte MSB = Most Significant Byte Illustration 3.34: Organization of the memory areas for the transfer of the path data The user program transfers the necessary path data to the driver via the two memory ranges, Range_1 and Range_2. The first byte of each range is the status byte that indicates whether the range is filled with path data or is empty. The allocation of the value in the status byte to the state of the ranges is as follows: Status byte State 0 empty 1 full (otherwise) full The path data should be stored in the memory range only from the second byte onwards. Before this function is called up the user program must read the path data from the data file that was generated with the help of the PathDataGenerator() and write these path data unchanged into the two memory ranges. It is known that several path-controlled profiles can exist in one data file. Each path-controlled profile starts with the command PATH and ends with the command PATHEND. On the line immediately after the command PATH is the number of the profile segments. 141 Driver functions This information is not part of the actual path data. It is rather a piece of auxiliary information that the PathDataGenerator() function makes available to the user program. Therefore, this line should not be transferred to the driver. The actual path data start only from the following line. This line contains the local number of the first segment. The path data for each segment is exactly 140 bytes and is divided into 3 lines. The user program has to read the path data segment by segment, that is, the path data for a segment should not be separated. The result of this is that the number of data bytes in the memory ranges, Range_1 and Range_2, is always a multiple of 140 bytes. After the two ranges have been filled with data, the status bytes must be set to 1 to indicate that the ranges are full (it is, of course, possible that the profile has so few segments that the user program needs only the first memory range, Range_1). The calling-up of this function activates the driver. From this point of time onwards the driver works independently in the background. The user program has again the control over the computer. Through the register bx:cx the driver first of all determines the starting addresses of the two memory ranges, Range_1 and Range_2. With the help of these starting addresses the driver is now in a position to read the path data from the memory ranges and to generate the path traversing. It must be noted that the driver always starts with the data in the first memory range, Range_1. When all data in this range have been processed, the driver switches over to the second range. During the time that the driver processes the data from the second range, the user program can read other path data and fill up the first range parallel to this. When the second range becomes empty at some stage, the driver switches over to the first range. This switching between the two ranges continues until the path data are finished. In the following, we will explain how this process looks in detail. The path data in the memory range in question is read by the driver one after the other. When switching over to a new range, the driver always checks first of all the pertaining status byte. There are two cases that have to be distinguished. a) If the status byte shows that the memory range is empty the driver interprets this state as a path data reloading error (error code 19). The movement is interrupted immediately. The driver de-activates itself. The function is thus ended. b) If the status byte shows that the memory range is full the driver starts to read the path data segment-by-segment and to process them. For each segment the driver reads first of all only the local segment number. The read value is then decisive for the continuation. 142 Driver functions - If the local segment number is greater than 0 the driver will read the path data that belong to this segment. The segment is processed with the help of these path data. When this segment is finished the driver again reads the local segment number of the next segment. This is repeated until the range is empty. - A local segment number that is equal to -1 is interpreted by the driver as the end of the path. The driver de-activates itself. This means that the path traversing is completed without error. - A local segment number that is equal to 0 means that this memory range is finished. The status byte of the memory range that is active at the moment is loaded with a 0, in order to inform the user program that the memory range is again empty. The driver changes the memory range. The first thing that the driver does in the new memory range is to check the status byte. This process is repeated until the path is finished. During the path traversing the user program has full control over the computer. The driver carries out its task in the background. During the path traversing the user program must ensure that the two memory ranges are always fully loaded with path data. This can be done with the user program constantly checking on the two status bytes. When one of the ranges is empty the user program must read the data from the file and write it into the empty range. After this, the status byte of this memory range is set to 1 in order to be able to inform the driver that the range is once again filled. To mark the end of the path data in this memory range, the user program has to set the local segment number to 0 directly after the path data just stored. If the path-controlled profile is finished, the local segment number must be equal to -1 here. If the user program fails to carry out its task or does not carry it out correctly, the path data reloading error (error code 19) occurs immediately. The local segment number, which, besides the status bytes, has a decisive role in the process, is written in ASCII_Clear_Text_format. It is a string of characters that has exactly 12 characters, including the CARRIAGE RETURN and LINEFEED characters. However, as long as you are only reading the path data from the file and writing it into the memory ranges, you do not need to worry about the format of the local segment number, as the local segment number has already been written in the appropriate format. But if you want to mark the end of the path-controlled profile or the end of the memory range, then you must observe the format. The character string for the local segment number -1 (end of the path-controlled profile) is “-000000001\r\n”. The character string for the local segment number 0 (end of the memory range) is "0000000000\r\n". Here, the characters \r and \n are CARRIAGE RETURN and LINEFEED. 143 Driver functions In Illustration 3.35 we will explain to you in more detail how these character strings must be stored in the memory ranges. Starting address area Status byte Starting address area Status byte The first byte of the path data in this memory range Path data Path data . . . 48 48 48 48 48 48 48 48 48 48 13 The first byte of the path data in this memory range . . . The last byte of the path data in this memory range 45 48 The last byte of the path data in this memory range 48 48 Character string "0000000000\r\n” means the end of the path data in this memory range 48 48 48 48 48 49 Character string "-00000000\r\n” means the end of the path data in this memory range 13 10 10 Possibly unused bytes of the memory range Possibly unused bytes of the memory range Illustration 3.35: End of a memory range and end of the path-controlled profile The user program itself must reserve the two memory ranges, Range_1 and Range_2. These ranges must be sufficiently large. Then the user program will have enough time to read the path data from the file and to fill the empty memory range while the driver is working with the other memory range. If the memory ranges are too small the path data reloading error (error code 19) will occur very easily. We have had quite good results with memory ranges of 28 012 bytes each (corresponds to 200 segments). The larger the memory ranges, the better it will be. Apart from the constant reloading of the path data from a file, the path traversing behaves towards the user program exactly in the same manner as the segment traversing, that is, during the path traversing, the user program can monitor the actual positions or the actual speed without any problems (see sections 3.3.18 and 3.3.19). The path speed can easily be changed with function 21. Even the Teach-In mode is still possible during the path processing after a calling up of a Stop subfunction (see section 3.3.9 and 3.3.10). After the switching-off of the Teach-In mode the remainder of the path can be processed without problems. Just as in the case of the segment processing a calling-up of the Abort subfunction leads to a ramp stopping of the equipment. Any existing remainder of the path is lost. No error flag will be set (see section 3.3.10). All hardware and software limit switches are still monitored by the driver in the background. In short, you are able to use all the possibilities that are available 144 Driver functions to you during the segment traversing during the path traversing as well. The same also applies to the limitations. This path function cannot be called up in the Teach-In mode. Feasibility during the movement: No Possible error codes: 0; 2; 3; 4; 7; 8; 9; 12; 15; 19; 22 See also section: 3.2.3; 3.2.4; 3.2.5; 3.2.6; 3.2.17; 3.3.9; 3.3.10; 3.3.32; 3.3.34 3.3.34 Function 34: Purpose Call-up parameter Result Requesting for the path parameters Requesting for the current local segment number and the absolute positions of the current segment with regard to the reference point of the equipment ax = 34 function number bx segment adress of the memory range cx offset adress of the memory range dx undefined al error code bx, cx, dx undefined Comments: During the path traversing, the segments of the profiles are processed one after the other. Before the driver starts to process a segment the local number of this segment is stored. At the same time the starting coordinates of this segment are calculated in relationship to the reference point of the equipment and then stored by the driver as well. By using this function you can call up this information of the segment being processed at the moment at any time during the path traversing. If the path traversing has been finished without error this information is deleted. The reason for this function is on one hand, to enable the user program to check on the state of the processing at any time. On the other hand, this function provides valuable help in the case of a malfunction . If the path movement is interrupted in the case of an error or fault (milling cutter broken or path data reloading error or hardware limit switch error, etc.) this information is retained. The user program can call up this information easily. Thus, it is possible to continue with the path processing from the point where the path processing had been interrupted, after the fault or error has been rectified. This information is deleted in the case of a reset (see section 3.3.2). It should be noted that the absolute positions, that are obtained by calling up this function, do not have the usual current work piece zero point but the reference point as the point of reference. This is because a further processing in the case of an error is only possible after a reset. However, the reset deletes the last work piece zero point that was defined. This means that the information 145 Driver functions on the absolute coordinates of the starting point of the segment will become useless if the work piece zero point is the reference point. Before the calling-up of this function you must reserve a memory range in your user program. The starting address of this memory range is transferred to the driver via the register bx:cx. The desired information is stored by the driver into this memory range (see illustration 3.36). Starting address of the memory range in bx:cx LSB MSB LSB MSB LSB MSB LSB MSB Byte 1 Byte 2 Byte 3 Byte 4 Byte 1 Byte 2 Byte 3 Byte 4 Byte 1 Byte 2 Byte 3 Byte 4 Byte 1 Byte 2 Byte 3 Byte 4 Current local segment number Absolute position X Absolute position Y of the starting of the segment of the starting of the segment Absolute position Z of the starting of the segment LSB = Last Significant Byte MSB = Most Significant Byte Illustration 3.36: Allocation of the memory range for the requesting of the path information After the reference run, you can call up this function at any time. When the state of the driver is error-free and it is not during the path traversing you will always get zero values. Feasibility during the movement: Yes Possible error codes: 0; 2; 3; 4; 7; 8; 9; 12; 15; 18; 19; 22 See also section: 3.2.1; 3.2.4; 3.2.5; 3.2.17; 3.3.2; 3.3.11; 3.3.12; 3.3.33 3.3.35 Function 35: Purpose Call-up parameter Result Changing of the ramp parameters Changing of the ramp parameters of an axis ax = 35 function number bx segment dress of the ramp parameters cx offset adress of the ramp parameters dx undefined al error code bx, cx, dx undefined Comments: In many application cases there is the wish that the ramp parameters of the axes could be changed according to the situation. We are thinking mainly of tasks in the area of handling where the weight to be moved changes constantly. It is therefore necessary to adjust the dynamic characteristics of the equipment by changing the ramp parameters. 146 Driver functions Before calling up this function the user program must reserve a memory range into which the desired parameter changes are stored. The starting address of this memory range is transferred to the driver via the register bx:cx. Illustration 3.37 shows how the allocation in this memory range must look like. Starting address of the memory range in bx:cx LSB MSB LSB MSB LSB MSB Byte 1 Byte 2 Byte 3 Byte 4 Byte 1 Byte 2 Byte 3 Byte 4 Byte 1 Byte 2 Byte 3 Byte 4 Axis number Acceleration factor Speed factor LSB = Last Significant Byte MSB = Most Significant Byte Illustration 3.37: Allocation of the memory for the ramp parameter change The Axis number field indicates to the driver for which axis the change has to be made. For each time you call up the function, you can only change the ramp parameters for one axis. The allocation of the value in these 4 bytes to the axis of the equipment is as follows: Axis number 1 2 3 4 Axis of the equipment X-axis Y-axis Z-axis A-axis During its installation the driver reads, among other things, the values of the maximum axis acceleration and the maximum axis speed from the initialization file. These values are stored internally in the driver. When this function is called up, the driver interprets the acceleration factor and the speed factor as percentages of these internally stored values. With the help of these percentages the new values for the maximum axis acceleration and the maximum axis speed are calculated. In order to illustrate this we have calculated a few examples of the acceleration: Maximum axis Acceleration Calculation Maximum axis acceleration from factor acceleration after the initialization the calling-up of file the function -----------------------------------------------------------------------------------------------------------75,000 [µm/s/s] 1,500,000 [µm/s/s] 5 1,500,000 * 5 % 200,000 [µm/s/s] 25 200,000 * 25 % 40,000 [µm/s/s] 4,000,000 [µm/s/s] 100 4,000,000 * 100 % 4,000,000 [µm/s/s] 147 Driver functions 148 Driver functions The same calculation method also applies to the axis speed: Maximum axis Speed Calculation Maximum axis speed from factor speed after the initialization the calling-up of file the function -------------------------------------------------------------------------------------------------------50,000 [µm/s] 1,000,000 [µm/s] 5 1,000,000 * 5 % 500,000 [µm/s] 40 500,000 * 40 % 200,000 [µm/s] 2,000,000 [µm/s] 100 2,000,000 * 100 % 2,000,000 [µm/s] It must be noted that this function uses the values of the maximum axis acceleration and the maximum axis speed that it takes from the initialization file only as the basis for the calculation and does not change these values. If, for example, the maximum axis acceleration taken from the initialization file is 1,000,000 µm/s/s, the maximum axis acceleration will be 300,000 µm/s/s after you have called up this function with for e.g. an acceleration value of 30. For the next calling-up of this function with for e.g. an acceleration value of 50, the maximum axis acceleration will have the value of 500,000 µm/s/s (= 1,000,000 µm/s/s * 50 %) but not the value of 150,000 µm/s/s (= 300,000 µm/s/s * 50 %). After the loading or a resetting of the driver all axes of the equipment will have the values that have been read from the initialization file as their maximum axis acceleration or maximum axis speed. The acceleration factor as well as the speed factor can have a value of between 5 ... 100, that is, you can vary the maximum acceleration as well as the maximum speed of the axis between 5 % and 100 %. A percentage value of smaller than 5 % is automatically set to 5 % without any error message. A percentage value of greater than 100 % is also automatically reduced to 100 % by the driver without any error message. Thus, you should store the maximum possible acceleration as well as speed values in the initialization file as you can only use this function to reduce the acceleration as well as the speed in comparison to the values read from the initialization file. During the movement, in the Teach-In mode and in the Manual mode, you cannot call up this function. Feasibility during the movement: No Possible error codes: 0; 2; 3; 4; 7; 8; 9; 10; 12; 15; 19; 22 See also section: 3.2.2; 3.2.17 149 Driver functions 3.3.36 Function 36: Purpose Call-up parameter Result Reading of a bit of a predefined input port Reading of a bit of a predefined input port with the help of the logical channel number ax = 36 function number bx channel number cx, dx undefined al error code bx contents of the input bit cx, dx undefined Comments: You can allocate logical numbers for up to 4 input ports by using the PARKON.EXE configuration program (see manual for this). The driver manages these input ports bitwise as well as bytewise. The reading in of each of these predefined input ports is carried out through the corresponding logical port number (0 to 3). The reading in of each bit of these predefined input ports is done through the corresponding logical channel numbers (0 to 31). The allocation of the logical port numbers to the logical channel numbers is as follows: Port number 0 1 2 3 Channel number 7 to 0 15 to 8 23 to 16 31 to 24 The following applies to each port: the higher the channel number, the higher will be the value of the allocated bit. The decisive advantage of the access via a logical number lies in the separation of a user program from the hardware. This function enables you to read any bit of the predefined input ports via the corresponding channel number. When this function is called up, the channel number is listed in the register bx. As a result you will get the value of the desired bit in the register bx. A possible error of this function is the channel error (error code 23). This error indicates that either the channel number lies outside the range of 0 to 31 or that although the channel number does belong to a predefined input port, this input port has not been released for use. Defining and releasing of an input port is done solely with the PARKON.EXE configuration program (see the manual for this). Feasibility during the movement: Yes Possible error codes: 0; 2; 23 See also section: 3.2.17; 3.3.16; 3.3.36; 3.3.37 150 Driver functions 3.3.37 Function 37: Purpose Call-up parameter Result Reading of a predefined input port Reading of a byte of a predefined input port with the help of the logical port number ax = 37 function number bx port number cx, dx undefined al error code bx contents of the input port cx, dx undefined Comments: The predefined input ports are numbered from 0 to 3 (see section 3.3.36). This function enables you to read, at one time, all 8 channels of the desired port in the form of a byte. In this way you can reduce your work in comparison to function 36 if you want to work with bytes. When this function is called up, the port number is listed in register bx. As a result you will obtain the input value of the desired port in the register bx. One of the possible errors of this function is the port error (error code 24). This error indicates that either the port number lies outside the range of 0 to 3 or that although the port number belongs to a predefined input port, this input port has not been released for use. The defining and releasing of an input port is done solely with the PARKON.EXE configuration program (see the manual for this). Feasibility during the movement: Yes Possible error codes: 0; 2; 24 See also section: 3.2.17; 3.3.16; 3.3.36 3.3.38 Function 38: Purpose Call-up parameter Result Output of a bit at a predefined output port Output of a bit at a predefined output port with the help of the logical channel number ax = 38 function number bx channel number cx output value dx undefined al error code bx, cx, dx undefined Comments: As for the input ports you can define up to 4 output ports with the help of the PARKON.EXE configuration program. These output ports can be accessed bitwise via the channel number and bytewise via the port number (see the manual for this). You can read about the details on the channel and the port numbers in section 3.3.36. Here, the same applies as for the input ports. Besides the advantage that there is a separation between the user programs and the hardware, the use of the logical numbers has another advantage which we are going to explain in the following. 151 Driver functions As the output to a port can only be done bytewise, the bitwise output to an output port always poses a problem if the output ports are not buffered, because such output ports cannot be read back. For this reason the driver reserves a byte internally for each of the 4 predefined output ports. This byte acts as an intermediate buffer of the respective output port. The value for each output is stored in this buffer. In this way, it is no longer a problem for the driver to realize bit-wise outputs. This is irrespective of whether the output ports can be read back or not. During a new start or during the calling-up of function 42 the buffers and the output ports are initialized with the starting values that can be defined with the configuration program. However, it should be noted that the values of the output ports and their buffers are not changed in the case of a reset. With this function you can output a value at any bit of the predefined output ports via the corresponding logical channel number within the range of 0 to 31. When this function is called up, the logical channel number is listed in the register bx and the register cx contains the output value. With regard to the output value, it applies that an output value that is not equal to zero is treated by the driver as an output value that is equal to 1. One of the possible errors of this function is the channel error (error code 23). This error indicates that either the channel number lies outside the range of 0 to 31 or that although the channel number does belong to a predefined output port, this output port has not been released for use. The defining and releasing of an output port is done solely with the PARKON.EXE configuration program (see the manual for this). Feasibility during the movement: Yes Possible error codes: 0; 2; 23 See also section: 3.2.17; 3.3.17; 3.3.36; 3.3.39; 3.3.40; 3.3.41; 3.3.42 3.3.39 Function 39: Purpose Call-up parameter Result Output to a predefined output port Output to a predefined output port with the help of the logical port number ax = 39 function number bx port number cx output value dx undefined al error code bx, cx, dx undefined Comments: The predefined output ports are numbered from 0 to 3 (see section 3.3.36). This function enables you to output a byte, at one time, at all 8 channels of the desired output port. In this way, you can reduce your work in comparison to function 38 if you want to work with bytes. When this function is called up, the port number is stored in register bx and the output value in register cx. 152 Driver functions One of the possible errors of this function is the port error (error code 24). This error indicates that either the port number lies outside the range of 0 to 3 or that although the port number does belong to a predefined output port, this output port has not been released for use. The defining and releasing of an output port is done solely with the PARKON.EXE configuration program (see the manual for this). Feasibility during the movement: Yes Possible error codes: 0; 2; 24 See also section: 3.2.17; 3.3.17, 3.3.36; 3.3.38, 3.3.40; 3.3.41; 3.3.42 3.3.40 Function 40: Purpose Call-up parameter Result Reading of a bit of a predefined output port Reading of a bit of a predefined output port with the help of the logical channel number ax = 40 function number bx channel number cx, dx undefined al error code bx contents of the output bit cx, dx undefined Comments: Because the driver reserves a buffer internally for each predefined output port and because the value in the buffer is updated with each output, there is absolutely no problem to call up the value of each individual bit at any time. This function enables you to do just that. When this function is called up, the channel number is stored in the register bx. As a result you will obtain the value of the desired bit in the register bx. One of the possible errors of this function is the channel error (error code 23). This error indicates that either the channel number lies outside the range of 0 to 31 or that although the channel number does belong to a predefined output port, this output port has not been released for use. The defining and releasing of an output port is done solely with the PARKON.EXE configuration program (see the manual for this). Feasibility during the movement: Yes Possible error codes: 0; 2; 23 See also section: 3.2.17; 3.3.36; 3.3.38; 3.3.41 153 Driver functions 3.3.41 Function 41: Purpose Call-up parameter Result Reading of a predefined output port Reading of a byte of a predefined output port with the help of the logical port number ax = 41 function number bx port number cx, dx undefined al error code bx contents of the output port cx, dx undefined Comments: Using this function you can read back the value at any predefined output port at any time. When this function is called up, the port number is listed in the register bx. As a result you will obtain the output value at the desired ports in the register bx. A possible error of this function is the port error (error code 24). This error indicates that either the port number lies outside the range of 0 to 3 or that although the port number does belong to a predefined output port, this output port has not been released for use. The defining and releasing of an output port is done solely with the PARKON.EXE configuration program (see the manual for this). Feasibility during the movement: Yes Possible error codes: 0; 24 See also section: 3.2.17; 3.3.36; 3.3.38; 3.3.40 3.3.42 Function 42: Purpose Call-up parameter Result Initialization of all predefined output ports Initialization of all output ports that can be accessed through logical numbers ax = 42 function number bx, cx, dx undefined al error code bx, cx, dx undefined Comments: All predefined output ports have their starting values that can be defined with the PARKON.EXE configuration program (see the manual for this). During the loading of the driver these starting values are output to the corresponding output ports, if these ports have been released for use. The internal buffers of these output ports are also loaded with these starting values. In the case of a reset, neither the output values nor the buffer values are changed. If you wish, for some reason, to reset all predefined output ports to their starting values, then this function is exactly the right tool for this. Except for the function number in the register ax this function does not need any other parameters. After a calling-up of this function, the starting values are output to the corresponding output ports, if they have been released. The respective 154 Driver functions buffers are also loaded with the starting values, that is, it is exactly the same as during the loading of the driver. Feasibility during the movement: Yes Possible error codes: 0; 2 See also section: 3.2.17; 3.3.17, 3.3.36; 3.3.38; 3.3.39; 3.3.40; 3.3.41 3.3.43 Function 43: Switching on and off of the speed-dependent output at a predefined output port Purpose Call-up parameter Result Switching on and off of the speed-dependent output ax = 43 function number bx sub functions cx, dx undefined al error code bx, cx, dx undefined Comments: If the output of a speed-dependent value at an output port that is defined by the user is allowed via the PARKON.EXE configuration program you can use this function to release or block the output in connection with the value in the register bx (see section 3.2.8). The meaning of the value in the register bx is as follows: bx 0 1 otherwise sub functions releasing of the output blocking of the output blocking of the output After the loading of the driver as well as after a reset, the output is blocked. Once the output has been released, the speed-dependent output is automatically done for each movement, unless the Teach-In mode is active (see section 3.3.9). During a movement you cannot call up this function for the release of the output. But you can activate the blocking of the output at any time. During the blocking the minimum value defined by you is automatically output. You cannot call up this function if you have already expressly defined, with the help of the PARKON.EXE configuration program, that the speeddependent output will not be used (see the manual for this). Feasibility during the movement: Yes, but only for the blocking of the output Possible error codes: 0; 2; 25 See also section: 3.2.8; 3.2.17 155 Driver functions 3.3.44 Function 44: Purpose Call-up parameter Result Reserving or releasing of a data byte Reserving or releasing of a user-defined data byte ax = 44 function number bx secret code cx sub function dx undefined al error code bx, cx, dx undefined Comments: Normally all runtime information is lost when a user program is terminated. However, there are many applications, for which it is necessary to store the runtime information. This information can then be used by other user programs or by the same program that has stored the information during the next call-up. The storing of the information is normally carried out using such storage media as for e.g. hard disks, diskettes, etc. This is often rather cumbersome. Therefore, the driver offers the user the possibility to reserve up to 8 data bytes for his own use internally in the driver. The reserving of a data byte is done with the help of this function and the user-defined secret code in the register bx. The secret code is necessary in order to avoid confusion between the various user programs. A data byte that has been reserved with a certain secret code can only be activated with this secret code for the reading, writing and the release. The secret code is any value between 1 ... 255. If the user program does not need the reserved byte any more at some time in the future, this byte should also be released with the help of this function, but again, only through the secret code. The value in the register cx decides whether a data byte is to be reserved or released. The meaning of the value in the register cx is as follows: bx 0 1 otherwise sub functions releasing of a reserved byte reserving of a byte reserving of a byte It is to be noted that even a reset cannot change the states of the user-defined bytes. During a new starting of the driver as well as directly after the release, the byte in question has the value of 0. Feasibility during the movement: Yes Possible error codes: 0; 2; 26 See also section: 3.2.17; 3.3.45; 3.3.46 156 Driver functions 3.3.45 Function 45: Purpose Call-up parameter Result Reading of a reserved data byte Reading of a reserved data byte ax = 45 function number bx secret code cx, dx undefined al error code bx Contents of the reserved byte cx, dx undefined Comments: With the help of this function you can read the contents of a byte that is reserved by you. The reading of a reserved byte is done only through the secret code in the register bx. In the case when the driver cannot identify the secret code, the user program will get back the error code 26. Feasibility during the movement: Yes Possible error codes: 0; 2; 26 See also section: 3.2.17; 3.3.44; 3.3.46 3.3.46 Function 46: Purpose Call-up parameter Result Writing of a reserved data byte Writing of a reserved data byte ax = 46 function number bx secret code cx value dx undefined al error code bx, cx, dx undefined Comments: With the help of this function you can write in any byte (value range: 0 ... 255) into a byte reserved by you. Through the secret code in the register bx the driver can identify the byte that was reserved by you. And, using this secret code you can then read this byte again at any time with the help of function 45. Feasibility during the movement: Yes Possible error codes: 0; 2; 26 See also section: 3.2.17; 3.3.44; 3.3.45 3.3.47 Function 47: Purpose Call-up parameter Result Switching-on or switching-off of Sleep Mode Switching-on or switching-off of the Sleep Mode of the equipment ax = 47 function number bx, cx, dx undefined al error code bx, cx, dx undefined 157 Driver functions Comments: This function is only introduced for reasons of compatibility to the step motor controls of the company iselautomation. A calling-up of this function does not have any effect on the driver or the servo controller. Normally the error code 0 “Error-free” will be returned. Feasibility during the movement: Yes Possible error codes: 0; 2 See also section: 3.2.17 3.3.48 Function 48: Purpose Call-up parameter Result Activation/Deactivation of the safety circuit Switching-on or switching-off of the safety circuit of servo controllers ax = 48 function number bx sub functions cx, dx undefined al error code bx, cx, dx undefined Comments: Using this function you can output a defined value at PIN 43 of the RIBBON connector. If the hardware of your servo controller does not allow anything else you should use this opto-insulated signal to bridge the safety circuit of your servo controllers during the reference run or during the moving out from an active hardware limit switch (see Sections 2.5 and 2.7). The bridging of the safety circuit prevents the switching-off of the servo controller in the case of an active hardware limit switch. In connection with the value in bx, the safety circuit of the servo controller is activated or deactivated. The meaning of the value in the register bx is: bx sub functions value at PIN 43 of the RIBBON connector 0 meaning 0 activation of the safety circuit 1 deactivation of the safety circuit 1 safety circuit bridged other- deactivation of the wise safety circuit 1 safety circuit bridged safety circuit not bridged You have to set up your servo controller in such a way that a LOW value at PIN 43 activates the safety circuit and a HIGH value at PIN 43 deactivates the safety circuit. On the starting of the driver, the safety circuit is always activated. That means that a LOW value is at PIN 43. Internally the driver uses a flag to indicate whether the safety circuit is activated or deactivated. 158 Driver functions The reset function does not have any effect on this flag. You can only set or reset this flag with this function. It is possible to check the state of this flag at any time using Function 5. Please note that many driver functions are blocked if the safety circuit is bridged. For safety reasons you should reactivate the safety circuit as soon as possible. In our opinion you should use this function for the reference run and for a Teach-In movement, that is, immediately before the reference run as well as before the switching-on of the Teach-In mode, you should use this function to bridge the safety circuit. After the reference run as well as after the switching-off of the Teach-In mode, the safety circuit should be reactivated immediately. The calling-up of this function is prohibited while a movement segment is active in the background. Feasibility during the movement: No Possible error codes: 0; 2; 4 See also section: 2.5; 2.7; 2.8; 3.2.15; 3.2.17; 3.3.6; 3.3.9 3.3.49 Function 49: Purpose Call-up parameter Result Checking of the control byte Checking of the individual hardware error signals of the control byte ax = 49 function number bx, cx, dx undefined al error code bx control byte status cx, dx undefined Comments: When this function is called up a value in bx is returned, whereby the highervalue byte of bx, the register bh, is always equal to zero. The lower-value byte in bl shows the error status of the control byte, an input port that is defined by you. Up to 8 hardware error signals can be returned to the driver via the control byte. The control byte is read regularly at intervals of less than 10 ms. The read value is compared with a value that you have defined as error-free. If an error signal is active the corresponding bit in the control byte is set to 1. The value zero means that it is error-free. Using the PARKON program not only allows you to define the address of the control byte and the error-free value but also which bit of the control byte is used. Every unused bit returns a value that is equal to zero, that is, if the bit is not used it is always error-free. Please note that the returned value of this function is not the real value of the input port that is defined as control byte. This value is only a logical value. If all hardware error signals are error-free all bits of the register bx are zero. 159 Driver functions If an error signal is active the corresponding bit is set to 1. An internal flag is set and remains set until the reset function is called up. You can check the state of this flag at any time using Function 5. The value of bit 0 of the register bh is the state of the flag. In contrast to this flag, Bit 7 of the register bl, when called up with Function 5, shows if at least one of the hardware error signals is active at the moment or not. If there is a hardware fault, then the calling-up of this function is the only possibility to locate the source of the fault. The greatest application of this control byte lies in the monitoring of certain hardware faults such as for e.g. power failures, breaking of the encoder cable, etc. If a hardware fault exists, any active movement segment or a reference run is interrupted immediately. Thus no uncontrolled movement can result. Feasibility during the movement: Yes Possible error codes: 0; 2 See also section: 3.2.15; 3.2.17; 3.3.5 3.3.50 Function 50: Requesting for the desired positions of the axes with reference to the work piece zero point Purpose Call-up parameter Result Checking of the current desired positions of the axes with reference to the work piece zero point ax = 50 function number bx segment address of the desired positions cx offset adress of the desired positions dx undefined al error code bx, cx, dx undefined Comments: As the servo motors work in a closed control circuit, there is often a certain difference between the actual and the desired position. The actual positions are checked with Function 18. This function allows you to check the desired positions of the axes with reference to the current work piece zero point. In order to be able to use this function you must first of all reserve a memory range in your user program. The starting address of this memory range should be defined in bx:cx when this function is called up. Using this starting address, the driver writes the desired positions of the axes into the memory range reserved by you (see illustration 3.38). For each axis the driver needs 4 bytes. The value in these 4 bytes must be interpreted as a whole two’s-complement number. 160 Driver functions Please note that it would be useful for your future applications to reserve 16 bytes of memory for the data exchange when calling up this function. However, it is not compulsory. For example, if your equipment has only 3 axes, you will only need to reserve 12 bytes in the memory for the 3 axes X, Y and Z. Starting address of the memory range in bx:cx LSB MSB LSB MSB LSB MSB LSB MSB Byte 1 Byte 2 Byte 3 Byte 4 Byte 1 Byte 2 Byte 3 Byte 4 Byte 1 Byte 2 Byte 3 Byte 4 Byte 1 Byte 2 Byte 3 Byte 4 desired position of the X-axis desired position of the Y-axis desired position of the Z-axis desired position of the A-axis LSB = Last Significant Byte MSB = Most Significant Byte Illustration 3.38: Allocation of the memory to the current desired positions of the axes Depending on the structure of the equipment, the unit of the desired positions is either micrometer [µm] or arc second [‘‘]. Feasibility during the movement: Yes Possible error codes: 0; 2; 9 See also section: 3.2.9; 3.2.13; 3.2.15; 3.2.17; 3.3.51 3.3.51 Function 51: Requesting for the desired positions of the axes with reference to the reference point Purpose Call-up parameter Result Checking of the current desired positions of the axes with reference to the reference point ax = 51 function number bx segment address of the desired positions cx Offset address of the desired positions dx undefined al error code bx, cx, dx undefined Comments: Just as in Function 50, you can check here the desired positions of the axes. Only the reference points of the desired positions are different. Using this function you can check the desired positions with reference to the reference point. If you do not define a work piece zero point then the reference point and work piece zero point are identical, that is, in this case, the two functions 50 and 51 will give the same result. 161 Driver functions The procedure for the calling-up of this function is the same as for Function 50, that is, first of all, you have to reserve a memory range in your user program. The starting address of this memory range should be defined in bx:cx when this function is called up. Using this starting address the driver then writes the desired position of the axes into the memory range reserved by you (see illustration 3.38). Depending on the structure of the equipment the unit for the desired positions is either micrometer [µm] or arc second [‘‘]. Feasibility during the movement: Yes Possible error codes: 0; 2; 9 See also section: 3.2.9; 3.2.13; 3.2.15; 3.2.17; 3.3.50 3.3.52 Function 52: Purpose Call-up parameter Result Requesting for the running time of the driver Checking of the running time of the driver ax = 52 function number bx, cx, dx undefined al error code bx:cx Running time of the driver in milliseconds dx undefined Comments: Internally the driver stores the time which has elapsed since its installation. When this function is called up, you will obtain the time elapsed in milliseconds. The exactness of the time given lies within the microseconds range. Thus you are in the position to realize a very exact time base. The time elapsed is returned in bx:cx (see illustration 3.39). llustration 3.39: The running time of the driver in bx:cx You must interpret the value in bx:cx as a whole two’s-complement number. Feasibility during the movement: Yes Possible error codes: 0; 2 See also section: 3.2.9; 3.2.13; 3.3.7; 3.2.15; 3.3.16 162 Driver functions 3.3.53 Function 53: Purpose Call-up parameter Result Reading of the monitoring input ports Reading of the two input ports for the monitoring ax = 53 function number bx, cx, dx undefined al error code bx Contents of the monitoring input ports cx, dx undefined Comments: The input and output ports are for the controlling of peripherals, such as tool changers, coolant pump, covers, etc. It happens quite often that the users install additional peripherals in the machine. In order to achieve a clear separation between the peripherals of the machine and those of the user, we have introduced two input and two output ports. These are the ports for the monitoring of the machines. These ports should only be used by the user program. These monitoring ports are operated with Functions 53 to 56. The channel input and output ports that can be used with Functions 36 to 42 should be reserved for the users. This clear separation prevents the user from mistakenly operating the peripherals of the machine. This function allows you to read the two input ports for the monitoring. You can define the addresses of these two ports with the PARKON program. Through the corresponding mask bytes, you can even define the use of the individual bits. The bits that are not used here can be used for the channel input ports. The value that is returned when this function is called up lies in the register bx, whereby the value in the register bl corresponds to the first input port and the value in the register bh corresponds to the second input port (see illustration 3.40). Illustration 3.40: Contents of the input ports for the monitoring It should be noted that the returned values are logical values. You can use the PARKON program to define for each individual bit whether the LOW value or the HIGH value is active. The HIGH value is returned for a bit if the value that is defined by you as active is at the bit. In reverse, you will get the LOW value. For a bit that is defined by you as not in use, you will also always get the LOW value. The following example will illustrate what this means: 163 Driver functions Mask Activ value Real value Contents of bx Port 1 00000000 11101101 00001111 00000000 (bh) Port 0 11110000 11001010 01101111 01010000 (bl) The second port is not used because all mask bits are 0. The returned value in bh is always 0. The first 4 bits of Port 0 are not used. Therefore, the first 4 bits of bl are also 0. Bit 4 has an active value of 0 as well as a real value (the actual level at the bit) of 0. The active value and the real value of bit 6 are 1. That is why in bl you get the value 1 in the corresponding bits. For bit 5 and bit 7 the active and the real value are different. Therefore the corresponding bits in bl are 0. Feasibility during the movement: Yes Possible error codes: 0; 2 See also section: 3.2.15; 3.2.17 3.3.54 Function 54: Purpose Call-up parameter Result Output at the monitoring output ports Description of the two output ports for the monitoring ax = 54 function number bx output value cx, dx undefined al error code bx, cx, dx undefined Comments: Like for the input ports, you can also define the mask bytes and the active values for the two output ports for the monitoring. During the call-up of this function, the values to be output are stored in register bx, whereby the register bl is allocated for the first port and the register bh for the second port (see illustration 3.41). Illustration 3.41: Values to be output for the monitoring output ports The values to be output in bx are logical values, that is, prior to the actual output, these values are first of all combined with the mask bytes and the active 164 Driver functions values. A bit value of 1 is output if the active value and the value of the corresponding bit stored in bx are the same. It does not matter whether both are 0 or 1. Otherwise the value 0 is output to the corresponding bit. A bit of the mask byte that is equal to 0 means that the corresponding bit of the output ports is not in use. In general, the initialization values defined by you are output at unused bits, whereby the initialization values are again only logical values. For the output at unused bits, the following exceptions apply: - If all bits of an output port are defined as unused by the corresponding mask byte, then this port is not even addressed by the driver, that is, there is no output at this port. - If the bits of a monitoring output port that are defined as unused are used in “mixed operations” in the channel output ports (Functions 38 to 42), the values determined by Functions 38, 39 and 42 are output at these bits. Thus, the common use of an output port is possible for a “Channel” as well as for the monitoring. Please note that the use by the monitoring always has a higher priority. We are going to illustrate the above using the following example. Mask Initialization value Activ value Contents of bx Port 1 00000000 00001111 11101101 00000000 (bh) Port 0 11110000 11110001 11001011 01010101 (bl) Real value ------------- 01100101 No output is made at the second port because all bits of the mask byte are 0, that is, none of the bits are used. The lower-value 4 bits of the first port are not used. Therefore the initialization values are output here. The initialization values, too, are only logical values. Therefore they are first of all combined with the corresponding active values before the output. For the higher-value 4 bits, the bits of bl are also combined with the corresponding bits of the active value. This results in the real value to be output. Feasibility during the movement: Yes Possible error codes: 0; 2 See also section: 3.2.15; 3.2.17; 3.3.2 165 Driver functions 3.3.55 Function 55: Purpose Call-up parameter Result Reading of the monitoring output ports Reading of the values at the monitoring output ports ax = 55 function number bx, cx, dx undefined al error code bx contents of the output ports cx, dx undefined Comments: Using this function you can read the contents of the output ports that are meant for the monitoring at any time. The result is returned to you in register bx, whereby the contents of the first port are in bl and that of the second in bh. The read values are logical values. Before the return, the actual values at the output ports are combined with the active values and the mask bytes. A bit value of 1 is returned if the active value and the value of the corresponding bit in bx are the same. This is regardless of whether they are 0 or 1. Otherwise the value 0 is output to the corresponding bit. A bit of the mask byte that is equal to 0 means that the corresponding bit of the output ports is unused. Generally the initialization values defined by you are returned at unused bits, that is, if all bits are defined as unused, the complete initialization values will be returned to you in bx. There is no error message to say that the monitoring ports are not defined. Feasibility during the movement: Yes Possible error codes: 0; 2 See also section: 3.2.15; 3.2.17 3.3.56 Function 56: Purpose Call-up parameter Result Initialization of the monitoring output ports Initialization of the monitoring output ports ax = 56 function number bx, cx, dx undefined al error code bx, cx, dx undefined Comments: For the monitoring ports, you can define the appropriate initialization values using the PARKON program. During the starting of the driver and when this function is called up, these starting values are output at the monitoring ports. Please also note that the initialization values defined by you are also only logical values. If you use the Function 54 with the initialization values as call-up parameters in the register bx, the same result as with the calling-up of this function is achieved. 166 Driver functions This function is also useful for resetting the monitoring ports to the starting values. You cannot use the reset function for this as it has no effect on the monitoring ports. Feasibility during the movement: Yes Possible error codes: 0; 2 See also section: 3.2.15; 3.2.17; 3.3.2 3.3.57 Function 57: Purpose Call-up parameter Result Switching of the axes Software-based changing of the axes ax = 57 function number bx segment adress of the Axis-switching parameters cx offsetadresse der Axis-switching parameters dx undefined al error code bx, cx, dx undefined Comments: With our driver software, you can only realize the interpolation operation (linear/circular interpolation) within the 3 axes X, Y and Z. Apart from the helix interpolation, where all 4 axes are required, the A-axis is actually only controlled or dragged along synchronously. The allocation between the PC card and the mechanical axes is determined by physics, that is, an interpolation between any of the mechanical axes is normally not possible. In order to overcome this disadvantage, we have introduced this function. With this function, you can change the naming of the axes using the software. A hardware intervention is not necessary. In this way, it is very easy to realize the interpolation between the various axes. In order to use this function, you must first of all reserve a memory range in your user program. The parameters in this memory range inform the driver which axes are to be changed and what the structure of the equipment is after the switching action (see illustration 42). Starting address of the memory range in bx:cx LSB MSB LSB MSB LSB MSB Byte 1 Byte 2 Byte 3 Byte 4 Byte 1 Byte 2 Byte 3 Byte 4 Byte 1 Byte 2 Byte 3 Byte 4 Axis number of axis 1 Axis number of axis 2 Equipment structure LSB = Last Significant Byte MSB = Most Significant Byte Illustration 3.42: Parameters for the switching of the axes 167 Driver functions You define the starting address of this memory range in bx:cx during the calling-up of the function. From the first 4 bytes and second 4 bytes, the driver knows which axes are to be switched. The allocation of the axis numbers to the axes of the equipment are as follows: Axis number 1 2 3 4 Equipment axis X-axis Y-axis Z-axis A-axis. You can use the last 4 bytes to inform the driver of the new equipment structure after the axes have been changed. The allocation of the value in this byte to the equipment structure is as follows: Value 1 2 3 4 Equipment structure X-TTT-structure XY-TTT-structure XYZ-TTT-structure not-TTT-structure The following example will illustrate the above. If you call up this function with the parameters: Axis number for axis 1 Axis number for axis 2 Equipment structure =1 =4 =2 the X-axis and the A-axis are interchanged, that is, from this moment onwards, the physical A-axis is treated as X-axis and vice versa. Every access of the physical X-axis from the interface is redirected by the driver to the physical A-axis and vice versa. Among other things, this results in the driver executing an interpolation with the axes X, Y and Z as an interpolation with the physical axes A, Y and Z. A reference run of the X-axis is carried out on the physical A-axis. All requests, such as positions, limit switch status, etc., are also interchanged accordingly. For the internal management in the driver, the statement of the equipment structure is absolutely necessary. This information should correspond exactly to the actual equipment structure. However, please note that it is no longer the allocation of the physical axes X, Y and Z but the allocation of the physical axes A, Y and Z that is decisive for the structure of the equipment. 168 Driver functions If you call up this function once more with the parameters Axis number for axis 1 Axis number for axis 2 Equipment structure =3 =1 =3 then the axis Z (axis number 3, physical Z-axis) and the axis X (axis number 1, physical A-axis after the first switching of the axes) are switched. The new structure of the equipment is the XYZ-TTT structure. Directly after the starting of the driver or after a reset, the axes names are again allocated correctly to the physical axes. This is regardless of how often you have called up this function in the meantime. Feasibility during the movement: No Possible error codes: 0; 2; 4; 9; 14; 29 See also section: 3.2.5; 3.2.15; 3.2.17 3.3.58 Function 58: Setting of the radius for the working on a cylinder surface Purpose Call-up parameter Result Defining the cylinder radius ax = 58 function number bx segment address of the cylinder parameters cx offset address of the cylinder parameters dx undefined al error code bx, cx, dx undefined Comments: In practice, the working on a cylinder surface occurs very often. Up to a certain depth, the working on a cylinder surface is identical to the working on a plane. Illustration 3.43 shows this with an example of a cylinder, the rotary axis of which is the X-axis. Y Y Developed view X R X 2 * 3.14 * R (Length of the cylinder surface in X-direction) Illustration 3.43: Developed view of a cylinder surface 169 Driver functions The movement in the direction of the X-axis on the cylinder surface is created by a rotating movement and depends on the radius of the cylinder. In accordance with the radius R, the rotation speed must also be changed correspondingly, if you want to have a constant working speed and a definite linear scale. The management expenses for the various radii is not small if you want to do everything yourself. For this reason, we have introduced this function. In order to be able to use this function, you must first of all reserve a memory range in your user program. The necessary parameters are stored in this memory range (see illustration 3.44). Starting address of the memory range in bx:cx LSB MSB LSB MSB LSB MSB Byte 1 Byte 2 Byte 3 Byte 4 Byte 1 Byte 2 Byte 3 Byte 4 Byte 1 Byte 2 Byte 3 Byte 4 Axis number Axis number Equipment structure LSB = Last Significant Byte MSB = Most Significant Byte Illustration 3.44: Allocation of the memory with the parameters for the working on a cylinder surface On the calling-up of this function, the starting address of this memory range is stored in bx:cx. The first 4 bytes tell the driver which axis of your equipment this call-up applies to. The allocation of the axis number to the axis is as follows: Axis number 1 2 3 4 Equipment axis X-axis Y-axis Z-axis A-axis. The next 4 bytes define the cylinder radius. The driver interprets the value in these bytes as a whole two’s-complement number with the unit micrometer. With the last 4 bytes, you can inform the driver of the new equipment structure. We will explain later why you have to define a new equipment structure. The allocation of the value in these bytes to the equipment structure is: Value 1 2 3 4 170 Equipment structure X-TTT-structure XY-TTT-structure XYZ-TTT-structure KEIN-TTT-structure Driver functions In the example of a cylinder with the rotary axis as X-axis, we will explain this function to you (see illustration 3.43). The axis number must logically be 1. Once the driver knows the radius, it takes over the entire management work. You as the user will not have to do anything. For you, the movement in the X-direction is a linear movement. In accordance with the radius, the driver changes the rotating speed in such a way that the working on the cylinder surface is exactly as working on a plane, with regard to speed as well as to the linear scale. For a movement in the X-direction, you transmit to the driver a movement length on the cylinder surface with the unit micrometer. As the driver knows the cylinder radius, the rotating angle for the X-axis is calculated automatically. You do not have to think about it at all. If you request for the position of the X-axis, you will not get an angle of rotation as answer. What is returned is the movement length on the cylinder surface. All movement functions, such as the linear or circular movement functions, can be used without restrictions. Even the path processing is possible. After a successful calling-up of this function, the rotary axis is a linear axis as far as you are concerned, that is, we have here a sort of changing of axis. That is why the new equipment structure has to be stated (see illustration 3.44). In order to reconvert the linear X-axis that is created by this call-up back into the rotary X-axis, you can also use this function. Please note that you have to set the cylinder radius to zero. A negative value of the cylinder radius is not accepted. The reset function is another possibility to reset the axis. When the reset function is called up, all converted axes are reset. In this example, we have chosen the rotary axis as X-axis. However, the rotary axis could also be the Y-axis or the Z-axis or the A-axis. Using Function 57 for the switching of the axes, you can also rename the axes at any time. You can use this function for any rotary axis and as often as you like. The application of this function to a linear axis is not allowed. Please also note that the processing is only possible if the rotary axis of the cylinder together with two other axes form an exact cartesian system of coordinates. Another allocation is not possible with the driver at the moment. Feasibility during the movement: No Possible error codes: 0; 2; 3; 4; 7; 8; 9; 14; 15; 19; 21; 22; 29; 30 See also section: 3.2.5; 3.2.15; 3.2.17 3.3.59 Function 59: Use last axis in Spindle mode Call parameters ax = 59 bx cx, dx Function number Subfunction Not defined 171 Driver functions Result al bx, cx, dx Error code Not defined Comment: This function can be used to disconnect the last axis from the axis grouping or to add it to the axis grouping again. You can thus operate one of the axes separately, e.g. as a spindle. The assignment between the value in the register bx and the individual subfunctions is as follows: bx 0 1 Otherwise Subfunction The disconnected axis is added again to the grouping. The last axis is disconnected from the axis grouping. The last axis is disconnected from the axis grouping. The number of axes in the system is defined in the PARKON program. After start or reset, the last axis is defined as follows: Number of axes 1 2 3 4 Axes X X, Y X, Y, Z X, Y, Z, A Last axis X Y Z A It is still possible to change the axes using function 57. After the axes have been changed, the physical axes and the logical axes are no longer identical. Please note that the axis numbering always refers to the logical axes. To illustrate that, we would like to explain this using an example. The plant has three axes (X, Y and Z). After start or reset, the Z axis will be the last axis (both physically and logically). You can use this function to disconnect the physical Z axis from the axis grouping. If X and Z axes have been changed using function 57, the physical Z axis will be the logical Z axis and the physical X axis the logical Z axis. You can use this function to disconnect the logical Z axis (i.e. the physical X axis) from the axis grouping. After the last axis has been disconnected from the axis grouping, the number of axes will automatically be reduced by 1. From this moment, the last axis is no longer visible for most of the functions. Using the functions 60 ... 66, you can operate this axis as an independent axis which is in no way connected with any other axes. Please note that the function 57 may no longer be called as long as the axis disconnection is active, and axis disconnection is only possible with plants that have at least 2 axes. Any axis disconnection can be cancelled either by calling this function with the value 0 in bx or by calling the reset function. Executability during the movement: no Possible error codes: 0; 2; 3; 4; 7; 8; 14; 15; 19; 21; 22; 32 See also: Sections 3.3.60 ... 3.3.66 172 Driver functions 3.3.60 Function 60: Define the location of use of the spindle axis Call parameters Result ax = 60 bx cx, dx al bx, cx, dx Function number Subfunction Not defined Error code Not defined Comment: You can use this function to define that the spindle axis is used when traversing along the path. Within a path, you can use an appropriate command to change the spindle speed without the need to call the function 62 separately (see Appendix B). Now, it is no longer possible to call the functions 62, 63 and 64 separately. If you have once defined that the spindle axis will not be used along the path, it is always possible to use the functions 62, 63 and 64. This is possible irrespective of whether or not the path is active. A command used along the path to change the spindle speed will simply be skipped when processing the path, i.e. there is no error message. Please note that you can always use the function 61 to change the spindle speed, irrespective of whether or not the spindle axis is used in the path. The assignment between the value in register bx and the individual subfunctions is as follows: bx 0 1 Otherwise Subfunction The spindle is not used when traversing along the path. The spindle is used when traversing along the path. The spindle is used when traversing along the path. After the driver has been started or after the reset function has been called, the spindle axis can no longer be used along the axis. If you want to use the spindle axis when traversing along the path, it is essential to call this function using value 1 in register bx. Executability during the movement: no Possible error codes: 0; 2; 3; 4; 7; 8; 14; 15; 19; 21; 22; 31; 32; 34 See also: Sections 3.3.59; 3.3.61 ... 3.3.66; Appendix B 3.3.61 Function 61: Set the spindle speed change factor Call parameters Result ax = 61 bx cx, dx al bx, cx, dx Function number Change factor of the spindle speed Not defined Error code Not defined 173 Driver functions Comment: The speed of a spindle axis is the product of the set speed set using function 62 and of the change factor which can be redefined at any time using this function. Using the change factor, you can also change the spindle speed without the need to use function 62. If you have defined with function 60 that the spindle speed may only be used along the path, this function will be the only possibility to change the spindle speed. The way how to handle this factor internally in the driver and how you can use this function, is similar to the change factor of the tool speed (see function 21). Executability during the movement: yes Possible error codes: 0; 2; 3; 4; 7; 8; 31 See also: Sections 3.3.21; 3.3.62 3.3.62 Function 62: Set a new spindle speed Call parameters Result ax = 62 bx:cx dx al bx, cx, dx Function number Spindle speed Not defined Error code Not defined Comment: You can use this function to set the spindle axis to the state of endless movement if the spindle axis velocity is unequal to zero. After the driver has been started or the reset function has been called, the spindle speed is always equal to zero. The real set speed of the spindle axis is always equal to the product of the speed set here and equal to the change factor, which can be changed using function 61. Please note that the spindle axis can be operated either in the Speed mode or in the Position mode. The Position mode is called using function 63. In Position mode, the spindle axis will move to the desired target position irrespectively of all the other axes. If this target position is not yet reached, this function must not be called, i.e. switching to the Speed mode is not permitted. You are also not allowed to use this function if the spindle axis has been defined for use along the path using function 60 or if the spindle axis is in Manual mode. If the spindle axis has been defined for use along the path, the spindle speed can be changed either by calling function 61 or by an appropriate command in the path file (see Appendix B). The new spindle speed you want to transfer to the driver is to be found in bx:cx (see Fig. 3.45). 174 Driver functions Fig. 3.45: The new spindle speed in bx:cx A successful call of this function will change the spindle speed immediately. The driver will interpret the number contained in bx:cx as an integer number with the complement on two. Depending on whether the spindle axis has been defined as a linear axis or as a rotary axis, the unit of the path velocity will be either micrometers/second [µm/s] or arc seconds/second [''/s]. In contrast to function 20, with which you can define a new segment velocity, the spindle speed can have either a positive value or a negative value. As a result, the spindle axis will move either in the negative or in the positive direction. If the spindle axis is operated in Speed mode and when it is moving, you can stop it immediately either by calling the reset function or this function with setting the spindle speed to zero. With regard to the reference run, please note the following: If you disconnect the last axis from the axis grouping, the status of the reference flag will not change as long as the spindle does not yet move in Speed mode at a speed unequal to zero. If you will call this function anytime with a speed unequal to zero, the reference flag of this spindle axis will be reset, i.e. if you cancel the axis disconnection any time later, you must reference this axis again. If the spindle axis only moves in the Position mode, the status of the reference flag of this axis will not change. Executability during the movement: yes, the new value will be accepted immediately. Possible error codes: 0; 2; 3; 4; 7; 8; 31; 32; 33; 34; See also: Sections 3.3.21; 3.3.61; Appendix B 175 Driver functions 3.3.63 Function 63: Position the spindle axis Call parameters ax = 63 bx cx Result dx al bx, cx, dx Function number Segment address of the movement parameters Offset address of the movement parameters Not defined Error code Not defined Comment: You can use this function to move the spindle axis to a new target position. If the reference point approach ("reference run") of the spindle axis has not yet been carried out, the current position after the driver start will be assumed as zero, i.e. you can always move the spindle axis, without the need to approach the axis to the reference point. If the spindle axis is moving in the Speed mode or is in Manual mode or is intended for use along the path, it is not allowed to call function 63. If the spindle axis is moving in the Position mode, it is not allowed to call function 62. Please note that the absolute position of the spindle axis is unknown if the spindle axis is once in the Speed mode. But you can poll the absolute position at any time using function 66. Because the internal position register of chip LM628 is a 32-bit register, it can very often occur in the Speed mode, that the position register is overflown, i.e. the position value returned with the function 66 need not always be equal to the travel traversed in the Speed mode. In order to be able to use this function, you must reserve free memory in your program. For the allocation of the memory area, please refer to Fig. 3.46. The first 4 bytes contain the movement speed at which the spindle axis is to be moved to the set position. The set position is programmed in the last 4 bytes. When calling this function, you will have to assign the initial address of the memory area to bx:cx. Fig. 3.46: Movement parameters for positioning the spindle axis The driver will interpret the transferred values as an integer number with the complement on two. Depending on whether the spindle axis has been defined 176 Driver functions as a linear axis or as a rotary axis, the unit of the position will be either micrometers/second [µm/s] or arc seconds/second [''/s]. Please note that the movement speed must be positive. Otherwise, error code 17 will occur. Executability during the movement: yes Possible error codes: 0; 2; 3; 4; 7; 8; 31; 32; 33; 34; See also: Sections 3.3.60; 3.3.62; 3.3.64; 3.3.65; 3.3.66 3.3.64 Function 64: Enable/disable Manual mode of the spindle axis Call parameters Result ax = 64 bx cx, dx al bx, cx, dx Function number Subfunction Not defined Error code Not defined Comment: In practice, the spindle axis is often required to be moved manually. This function can be used to enable or disable the Manual mode of the spindle axis. If the Manual mode is enabled, the position controller of the spindle axis is disabled. 0 volt is output to the power output stage even if the position of the spindle axis is continued to be monitored. The spindle axis can only be moved by hand, however, if you also disable the power output stage for the spindle axis via an output port. But setting of the power output stage to the disabled status must be done by yourself. As long as Manual mode is active, you cannot use the functions 62 and 63. The assignment between the value in the register bx and the individual subfunctions is as follows: bx 0 1 Otherwise Subfunction Disable the Manual mode of the spindle axis Enable the Manual mode of the spindle axis Enable the Manual mode of the spindle axis Do not mix up this function with function 8. Using this function, you can only enable or disable the Manual mode of the spindle axis, and, vice versa, the Manual mode of the spindle axis cannot be changed using function 8. Executability during the movement: yes Possible error codes: 31; 32; 33 See also: Sections 3.3.8; 3.3.62; 3.3.63; 3.3.65 177 Driver functions 3.3.65 Function 65: Poll the status of the spindle axis Call parameters Result ax = 65 bx, cx, dx al ah bx, cx, dx Function number Not defined Error code Status of the spindle axis Not defined Comment: You can use this function to poll the status of the spindle axis. The result of your poll will be found in register ah. The numbering of the bits of register ah is indicated in Fig. 3.19. The meaning of the individual bits is described in the following. Register ah: Bit 0: Status of use of the Spindle mode =0 The last axis is not in the Spindle mode. =1 The last axis is in the Spindle mode. Bit 1: =0 =1 Bit 2,3: Bit 2 = 0 Bit 3 = 0 Submodes of the spindle axis The spindle axis has stopped in the Speed mode with a speed equal to zero, i.e. the spindle axis does not move. Bit 4 is equal to 0. Bit 2 = 1 Bit 3 = 0 The spindle axis has stopped in the Speed mode with a speed unequal to zero, i.e. the spindle axis is currently moving endlessly. Bit 4 is equal to 1. The spindle axis has stopped in the Position mode, i.e. the spindle axis has last been ordered by function 63 to move to an absolute target position. Bit 4 indicates whether or not the movement is currently active (bit 4 = 1) (bit 4 = 0). If the movement is not active, this means that the target position is already reached. Bit 2 = 0 Bit 3 = 1 Bit 4: =0 =1 Movement status of the spindle axis The spindle axis is not moving. The spindle axis is moving. =0 =1 Manual mode status The Manual mode of the spindle axis is not active. The Manual mode of the spindle axis is active. Bit 5: 178 Location of use of the spindle axis The spindle axis is not intended for use along the path. The spindle axis is intended for use along the path. Driver functions Bit 6: =0 =1 Bit 7: Spindle continuous mode status The driver has not been started with the option switch /DSM. The driver has been started with the option switch /DSM. Reserved bits Executability during the movement: yes Possible error codes: 0; 2 See also: Sections 3.3.5; 3.3.59 ... 3.3.64 3.3.66 Function 66: Poll the movement parameters of the spindle axis Call parameters ax = 66 bx cx Result dx al bx, cx, dx Function number Segment address of the movement parameters Offset address of the movement parameters Not defined Error code Not defined Comment: You can use this function to poll the movement parameters of the spindle axis. These are actual speed, actual position and set position of the spindle axis. The set position is the position calculated and output by chip LM628 as a result of the ramp generation. The actual position is the current position that, logically, follows the set position. To be able to use this function, you must reserve free memory area in your application program first. The initial address of the memory area will be defined when calling this function in bx:cx. The driver will use this initial address to write the movement parameters of the spindle axes into the memory area that you have reserved (see Fig. 3.47). The driver needs 4 bytes of memory for each parameter. You must interpret the value contained in these 4 bytes as an integer number with the complement on two. Fig. 3.47: Memory assignment with the movement parameters of the spindle axis 179 Driver functions The positions returned are absolute positions with the reference point used as the reference. Depending on whether the spindle axis is a linear axis or a rotary axis, the actual speed will have either the unit micrometers/second [µm/s] or arc seconds/second [''/s], and the position will have either the unit micrometers [µm] or arc seconds ['']. Executability during the movement: yes Possible error codes: 0; 2; 31 See also: 3.3.61; 3.3.62; 3.3.63 3.3.67 Function 67: Enable or disable the Handwheel mode Call parameters Result ax = 67 bx cx, dx al bx, cx, dx Function number Subfunctions Not defined Error code Not defined Comment: To move the axes manually, the handwheel is very often used in practice. This is also the reason why we have introduced this function in order to facilitate the integration of the handwheel into the control system. Out of the movement functions 24 ... 31 and 33, you can only use the relative movement functions 24 or 26 if the Manual mode is active. As far as the movement behaviour is concerned, there is no difference which function you use. In this mode, the axes are not interpolated, but moved independently of each other. Each axis will try independently to reach its specified position as fast as possible. The handwheel is integrated as follows: When turning, the handwheel with the installed electronics permanently provides pulses simulating the movement. You must count these pulses, e.g. using a counter card. You must poll the number of pulses at regular intervals, convert them into an equivalent movement length and send them to the driver. The axes will try to follow the positions sent off at regular intervals. This will result in a simulation of the handwheel movement on the axes. Please note that the positions sent to the driver using the functions 24 and 26 are relative positions and that you can move more than one axis in Manual mode simultaneously. In addition, you should take into account that you can transmit new relative positions permanently without waiting for the previous movement completed. This is the large difference to a normal call of function 24 or 26, at which the Handwheel mode is not active. Here you have to wait until the previous movement is completed. 180 Driver functions The assignment between the value in the register bx and the individual subfunctions is as follows: bx 0 1 Otherwise Subfunction Disable the Handwheel mode Enable the Handwheel mode Enable the Handwheel mode After the driver has been started or after the reset function has been called, the Handwheel mode is not active. Handwheel mode and Manual mode may not be active at the same time. Do not disable the Handwheel mode if a movement is still active, i.e. you have to wait until the movement is completed, or use function 68 to stop the movement. Executability during the movement: no Possible error codes: 0; 2; 4; 10; 36 See also: Sections 3.3.8; 3.3.24; 3.3.26; 3.3.68; 3.3.69 181 Driver functions 3.3.68 Function 68: Stop a Handwheel movement Call parameters Result ax = 68 bx, cx, dx al bx, cx, dx Function number Not defined Error code Not defined Comment: You can use this function to immediately interrupt a movement started in the Handwheel mode using function 24 or 26. You cannot call this function if the Handwheel mode is not active. Executability during the movement: yes, but only if the Handwheel mode is active Possible error codes: 0; 2; 35 See also: Sections 3.3.24; 3.3.26; 3.3.67; 3.3.69 3.3.69 Function 69: Poll the parameters for the Handwheel mode Call parameters Result ax = 69 bx, cx, dx al ah bx, cx, dx Function number Not defined Error code Parameter for the Handwheel mode Not defined Comment: You can use this function to poll the status of the Handwheel mode. You will find the polling result in register ah. For the bit numbering in the register ah, please refer to Fig. 3.19. The meaning of the individual bits is described in the following. Register ah: Bit 0: Status of the Handwheel mode =0 The Handwheel mode is not active. =1 The Handwheel mode is active. Bit 1: =0 =1 Bit 2 ... 7: Status of the handwheel movement No movement is active in the Handwheel mode. A movement is active in the Handwheel mode. Reserved bits Executability during the movement: yes Possible error codes: 0; 2 See also: Sections 3.3.67; 3.3.68 182 Circuit diagram Appendix A: Encoder allocation of the isel servo motor control card UPMV 4/12 183 Command overview Appendix B: Overview of the isel intermediate format for controlling the isel machines NCP file mark IMF_PBLxxxxxxxxxx Marks a file as a file in the isel intermediate format. This mark stands in the beginning of the first line of the file and is required by the path generator utility program for DC servo motor machines. Capitalization/ small letters There is no distinction between the use of small or capital letters. Axis identifiers X Y Z A B C Axis identifiers are X, Y and Z and, moreover, A for the 4th axis, B for the 5th axis and so on. Comment ; Starts a comment. The comment includes all characters up to the end of the current line. Line number Nxxxxxx Declaration of a line number of the current NC command. The line numbers may be included for reasons of readability but is not required for the processing with a microstep controller. For the later use of the path data genarator of a servo motor control the line numbers are necessary. Seperator Separators between commands and parameters could be whitespaces like blanks or tab signs. Reference run REF X (Y Z A ...) Carries out a reference run of the given axes. The reference run is carried out in the order Z Y X A <other axes> ... If you like to carry out the reference run in another order, simply insert a whitespace character between the different axis identifiers. Example REF X ;carries out a reference run X REF XYZ ;reference run in the order Z Y X REF X Y Z ;reference run in the order X Y Z REF X YZA ;at first reference run X, then in the order Z Y A SW limit switch* ) LIMIT Xneg,pos Yneg,pos Zneg,pos Aneg,pos Definition of software limit switches for the following movements. After the axe identifiere folows the negative and the positive value for the software limit switch. The unit of the target position values is micrometer [µm] for linear axes and angular seconds for rotational axes. 184 Command overview Normal speed VEL xxx Sets a normal speet to the value xxx. The normal speed is the segment travel speed when executing one of the commands MOVEABS, MOVEREL, FASTABS, FASTREL, CWABS, CWREL, CCWABS, CCWREL, CWHLXABS, CWHLXREL, CCWHLXABS oder CCWHLXREL benutzt wird. The unit of the speed is micrometer per second [µm/s]. ;sets the normal speed to 5 mm/s Example VEL 5000 Rapid speed FASTVEL xxx Sets a rapid speed to the value xxx. The fast speed is the segment travel speed when executing one of the commands FASTABS or FASTREL. The unit of the speed is micrometer per second [µm/s]. ;sets the rapid speed to 50 mm/s Example FASTVEL 50 00 Absolute linear normal movement MOVEABS X... Y... Z... A... This function carries out an interpolation for up to 4 axes. The axes X, Y and Z carry out a linear interpolation, the axis A executes a synchronized motion. The target position is given as an absolute position relating to the current set workpiece zero point, the parameters X, Y, Z... assign the position values to the corresponding axis. The travel speed is the normal speed set by the command VEL. The declaration of the target position for each axis is modal, that means, if there is no target position given for an axis, the axis keeps the current position. The unit of the target position values is micrometer [µm] for linear axes and angular seconds [’’] for rotational axes (1° = 60‘ = 3600’’). Example VEL 10000 ;speed 10 mm/s MOVEABS X20000 Y15000 Z-5000 ;axis XYZ to new position MOVEABS Y15000 ;only axis Y to new position other axes keeps the position Absolute linear rapid movement FASTABS X... Y... Z... A... This function carries out a movement with rapid speed. The target position is given as an absolute position relating to the current set workpiece zero point, the parameters X, Y, Z... assign the position values to the corresponding axis. The travel speed is the rapid speed set by the command FASTVEL. The declaration of the target position for each axis is modal, that means if there is no target position given for an axis, the axis keeps the current position. The unit of the target position values is micrometer for linear axes and angular seconds for rotational axes. 185 Command overview Relative linear normal movement MOVEREL X... Y... Z... A... This function carries out a movement with normal speed. The behaviour of the axes and the meaning of the parameters is the same as in the command MOVEABS. The target position is given as a position relative to the current position of each axis. The travel speed is the normal speed set by the command VEL. The declaration of the target position for each axis is modal, that means if there is no target position given for an axis, the axis keeps the current position. The unit of the target position values is micrometer [µm] for linear axes and angular seconds [’’] for rotational axes (1° = 60‘ = 3600’’). Example VEL 5000 ;speed 5 mm/s MOVEREL X20000 Y15000 Z-5000 ;move of 3 axes MOVEREL Z-5000 ;only axis Z 5 mm downwards Relative linear rapid movement FASTREL X... Y... Z... A... This function carries out a movement with rapid speed. The behaviour of the axes and the meaning of the parameters is the same as in the command MOVEABS. The target position is given as a position relative to the current position of each axis. The travel speed is the rapid speed set by the command FASTVEL. The declaration of the target position for each axis is modal, that means if there is no target position given for an axis, the axis keeps the current position. The unit of the target position values is micrometer for linear axes and angular seconds for rotational axes. Example VEL 5000 ;normal speed 5 mm/s FASTVEL 35000 ;rapid speed 35 mm/s MOVEREL Z5000 ;axis Z 5 mm upwards FASTREL X100000 Y100000 ;positioning in XY Circle plane PLANE XY (XZ, YZ) This command is used to set the working plane for the circular interpolation by using the commands CWABS, CCWABS, CWREL or CCWREL. It cannot be used to set the working plane for any other kind of movement, e. g. to set the working plane for linear interpolation. The behaviour of this command is modal. If the working plane is set once, it is valid until the next call up of the function PLANE. Example PLANE XY ;for circular interpolation the axes ;X and Y are used CWREL I20000 J0 X0 Y0 Z0 A0 ;circular interpolation 186 Command overview PLANE YZ ;Y and Z axes are used CWREL I20000 J0 X0 Y0 Z0 A0 ;with the same commande ;Y and Z carry out the circle Absolute circular movement CWABS / CCWABS I... J... X... Y... Z... A... This function carries out a circular interpolation on one of the working planes XY, YZ or ZX by using absolute coordinates, that means all declared positions must refer to the set workpiece zero point. The direction is declared by using the according command (CWABS for movement in clockwise direction, CCWABS for movement in counter clockwise direction). The central point is given with the parameters I and J depending on the current selected working plane (command PLANE). Working plane Meaning of I, J XY I corresponds to a X-, J to a Y-Coordinate XZ I corresponds to a X-, J to a Z- Coordinate YZ I corresponds to a Y-, J to a Z- Coordinate The parameters X, Y, Z, A, ... are used to declare the end position for each axis. They also refer to the set workpiece zero point. If the new target position of an axis is the current position, the declaration of an end position is unnecessary (e. g. when ececuting a full circle). If you declare an end position for an axis not used during the circular interpolation, the parameter will be ignored. The unit of the center position and the target position is [µm] micrometer. The travel speed for the circular interpolation is the normal speed (set by the command VEL). Example PLANE XY ;set the interpolation plane MOVEABS X50000 Y50000 Z-2500 ;move to start point CWABS I75000 J50000 X50000 Y50000 Z-2500 ;circle r = 25 mm MOVEABS X50000 Y50000 Z-2500 ;this command causes CWABS I75000 ;the same movement, but ;only with the absolutly necessary parameters Relative circular movement CWREL / CCWREL I... J... X... Y... Z... A... This function carries out a circular interpolation by using relative coordinates, that means all declared positions refer to the current tool position. The use of this circle parameter is analogue to the command CWABS with the exception of the use of relative positions. The declaration of the parameter is modal, that is, if a relativ end position is 0, this parameter is redundant. If you declare an end position for an axis not used during the circular interpolation, the parameter will be ignored. 187 Command overview Example PLANE XY MOVEABS X50000 Y50000 Z-2500 CWREL I20000 J0 X0 Y0 Z0 A0 MOVEABS X50000 Y50000 Z-2500 CWREL I20000 ;set the interpolation plane ;move to start point ;circle r = 20 mm ;this command causes ;the same movement, but ;without the redundant ;parameters Time delay WAIT xxxx This function carries out a time delay during the processing of a NC file. The declaration of the delay time is done in milliseconds [ms]. During the processing of WAIT the time delay can be skiped or stoped, depending on the used controlling program. ;2 seconds delay before continuing Example WAIT 2000 Set workpiece zero point WPZERO The point, at which the tools stands at the moment, is defined as the new workpiece zero point. The old workpiece zero point is deleted. This new workpiece zero point will remain the reference point for all subsequent absolute coordinate data until a new workpiece zero point is defined. There are no parameters to be passed. Example REF XYZ ;reference run MOVEABS X30000 Y25000 ;move to an absolut position and WPZERO ;set this position as the new WPZERO Set an absolute workpiece zero point WPZEROABS X.... Y.... Z.... A.... This function sets a new workpiece zero point immediately. The passed coordinates are absolute values and relate to the machine zero point (the zero point which is normally determined by a reference run). The old workpiece zero point is deleted. This new workpiece zero point will remain the reference point for all subsequent absolute coordinate data until a new workpiece zero point is defined. If the workpiece zero point for one or more axis(es) shall remain unchanged, just leave out the corresponding parameters. Example REF XYZ ;reference run XYZ WPZEROABS X5000 Y5000 Z-5000 ;WPZERO set to (X5000, ;Y5000, Z-5000) WPZEROABS X35000 Y20000 ;now set to position ;(X35000, Y20000, Z-5000) 188 Command overview Clear workpiece zero point WPCLEAR Deletes the current workpiece zero point. The machine zero point (the zero point which is normally determined by a reference run) serves as new workpiece zero point. This new workpiece zero point will remain the reference point for all subsequent absolute coordinate data until a new workpiece zero point is defined. There are no parameters to be passed. Example WPCLEAR ;delete workpiece sero point Load workpiece zero point WPREGn X.... Y.... Z.... A.... Loads a workpiece zero point into the workpiece zero point register (for later use). The parameter ‘n’ is the index of the register. The passed coordinates are absolute values and relate to the machine zero point (the zero point which is normally determined by a reference run). The diferent workpiece zero points can be activated with WPREGnACT. Depending on the used software program you can manage two or more workpiece zero points. n = 2 for using PRO-PAL oder PRO-DIN n = 8 for using REMOTE (servo motor and stepper motor machines) Example WPREG1 X100000 Y50000 Z-50000 ;register 1 with pos. load WPREG2 X100000 Y100000 Z-50000 ;register 2 with pos. load WPREG1ACT ;aktivate register 1 MOVEABS X0 Y0 Z0 ;move to position (0,0,0) WPREG2ACT ;aktivate register 2 MOVEABS X0 Y0 Z0 ;move to position (0,0,0), ;position Y is shifted for 50 mm Activate workpiece zero point register WPREGnACT This funktion aktivates the workpiece zero point, which was loaded in the register ‘n’. The parameter ‘n’ is the index of the desired register. ‘n’ is a part of the command, so there must not be any spaces in front or behind it. Example see command WPREGn Teach workpiece zero point WPTEACH During the processing a teachbox is opened where you can teach a new workpiece zero point. OK accepts the current position as the new workpiece zero point; ESC keeps the old workpiece zero point. This command is only available in the REMOTE program (for servo motor and for stepper motor machines). 189 Command overview Example WPCLEAR MOVEABS X0 Y0 Z-0 ;delete current workpiece zero point ;at this position an new workpiece ;zero point is required WPTEACH ;opening of the teachbox MOVEABS X10000 Y20000 ;processing goes on MOVEABS Z-15000 Set an output port SETPORT An=v The allocation of a physical IO address to a logical address is done in the setup program of the NC driver. The setup of the output channels is necessary for the use of this function. The parameter ‘n’ (digit between 1 and 4) indicates the logical address of the output port. The parameter ‘v’ indicates the value to be set. The format of the output value depends upon the appendix of the parameter. Example SETPORT A1=100101B ;set binary value 00100101 SETPORT A1=42D ;set decimal value 42 SETPORT A1=F2H ;set hexadecimal value F2 Set a single bit of an output port SETBIT An.b The allocation of a physical IO address to a logical address is done in the setup program of the NC driver. The setup of the output channels is necessary for the use of this function. Set a 1-bit output port to the logical value ‘1’. The parameter ‘n’ (digit between 1 and 4), indicates the logical address of the output port. The parameter ‘b’ (value between 1 and 8) indicates the number of the bit to be set. Example SETBIT A1.4 ;set bit number 4 of output port 1 to ‘1’ SETBIT A2.1 ;set bit number 1 of output port 2 to ‘1’ Clear a single bit of an output port RESBIT An.b The allocation of a physical IO address to a logical address is done in the setup program of the NC driver. The setup of the output channels is necessary for the use of this function. Set a 1-bit output port to the logical value ‘0’. The parameter ‘n’ (digit between 1 and 4), indicates the logical address of the output port. The parameter b (a value between 1 and 8) indicates the number of the bit to be cleared. Example RESBIT A1.4 ;set bit number 4 of output port 2 to ‘0’ RESBIT A2.1 ;set bit number 1 of output port 1 to ‘0’ 190 Command overview Wait for bit value WAITBIT Ep.n==v Wait for a bit value. The allocation of a physical IO address to a logical address is done in the setup program of the NC driver. The setup of the output channels is necessary for the use of this function. The program stops the processing and waits until the defined bit value occurs at the given input port. The parameter ‘E’ indicates the logical address (digit between 1 and 4) and the bit number (digit between 1 and 8) of the input port to be checked. The parameter ‘v’ behind ‘==’ is the logical level to be waited for. For test or controll purpose it is possible to skip or to stof this funktion. Example MOVEABS X0 Y0 ;processing ... WAITBIT E1.4==1 ;wait for Bit 4 at port 1 ‘high’ MOVEABS X20000 Y5000 ;processing goes on ... Wait for bit tamplate WAITPORT Ep==v Wait for a bit template at a input port. The allocation of a physical IO address to a logical address is done in the setup program of the NC driver. The setup of the output channels is necessary for the use of this function. The program stops the processing and waits until the defined bit template occurs at the given input port. The parameter ‘E’ indicates the logical address (digit between 1 and 4). The parameter ‘v’ behind ‘==’ is the 8 bit value to be waited for. For test or controll purpose it is possible to skip or to stof this funktion. Example MOVEABS Z0 ;processing ... MOVEABS X0 Y0 ;processing ... WAITPORT E1==00100101B ;wait for binary value 00100101 or WAITPORT E1==37D ;wait for decimal value 37 or WAITPORT E1==25D ;wait for hexadecimal value 25 MOVEABS X20000 Y5000 ;processing goes on ... Begin path processing PATH Starts the processing of a path data field. Starting and ending the processing of a path data field are internally used functions for a special work mode of the control program. A path data field or a file with a path data field is generated by a special utility program of iselautomation, it is the so called path data generator. You should certainly not generate own path data fields. 191 Command overview End path processing PATHEND Marks the end of a path data field. Starting and ending the processing of a path data field are internally used functions for a special work mode of the control program. A path data field or a file with a path data field is generated by a special utility program of iselautomation, it is the so called path data generator. You should certainly not generate own path data fields. Tool change GETTOOL x This function executes the utility program for automatic tool change. The parameter x specifies the number of the new tool. Note: Before using this command it is necessary to specify a tool change control program in the setup function of the control program. In addition, the setup of the tool change utility program (for the assignment of changing positions, travel speeds, changing options and so on) has to be executed before using the tool change utility program. Example MOVEABS Z5000 ;processing ... FASTABS X5000 Y5000 ;processing ... COOLANT OFF ;cooling pump off SPINDLE OFF ;spindle off GETTOOL 3 ;get new tool 3 SPINDLE ON ;spindle on MOVEABS Z10000 ;security hight FASTABS X150000 Y200000 ;positioning ... COOLANT ON ;cooling pump on Definition drill cycle DRILLDEF C<1> P<2> D<3> T<4> V<5> F<6> O<7> I<8> R<9> L<10> S<11> A drill cycle is defined without executing the drilling. This command is used for setting all parameters for the following command DRILL. The declaration of the drilling parameters is modal, that means, if a parameter is set it will remain until the next call up. The declaration of the drilling parameters can be done in one or more lines, e. g. to defin general settings in the beginning of the NC-file and changeable settings before calling up the command DRILL. 192 Command overview parameter used in cycle C default value meaning 1 Declaration of the drilling cycle: 1 simple drilling 2 peck drilling 3 deburring P 1,2,3 0 Reference plain, on which refer all parameter of the drilling cycle. The reference plain refer to the workpiece zero point, the value of the Z-coordinate quotes the distance to it. The unit is micrometer [µm]. Sign: positive, if Z-position is above workpiece zero point D 1,2,3 0 Depth of the borehole in [mm], relative to reference plain. Sign: positive, if movement downwards. T 1,2,3 0 Time delay for back-off at the end of the hole The unit is milliseconds [ms]. V 1,2,3 1000 Drilling feed rate, the unit is [mm/s]. The rapid speed is given by the command FASTVEL or by the default rapid speed of the setting program F 2,3 0 First incremental feed rate for drilling and deburring, the unit is [mm]. Sign: positive, if movement downwards. O 2,3 0 All other incremental feed rates for drilling and deburring, the unit is [mm]. Sign: positive, if movement downwards. I 2,3 0 Decrease of the incremental feed rate per each cycle. Sign: positive, if incremental feed rate is reduced. R 3 0 Incremental backtrack for deburring or difference hight for a new run of the last bore depth with rapid speed when peck drilling. The unit is [mm]. Sign: positive, because backtrack value is given. L 1,2,3 0 Backtrack hight refer to the definied reference plane after the drilling cycle. The unit is [mm]. Sign: positive, if Z-position above the workpiece zero point. S 1,2,3 0 Relative safety hight, which is defined after the drilling cycle relative to the reference plane. The unit is [mm]. Sign: positive, if Z-position above the workpiece zero point. Example see command DRILL 193 Command overview Bore DRILL X... Y... Boreing at the position (X, Y). All parameters of the drilling cycle have to be set with DRILLDEF before. The parameters X and Y defines the bore position, the unit is micrometer [µm]. Example DRILLDEF P2000 ;reference plane 2 mm above the defined ;workpiece zero point Z DRILLDEF D20000 ;depth 20 mm relative to reference plane DRILLDEF T1000 ;time delay at the bottom of the hole 1 second DRILLDEF V10000 ;feed speed for drilling 10 mm/s DRILLDEF F7000 ;first drill feed rate is 7 mm DRILLDEF O5000 ;all other feed rates are 5 mm and DRILLDEF I1000 ;decrease every cycle for 1 mm DRILLDEF R1000 ;the incremental backtrack is 1 mm DRILLDEF L1000 ;backtrack hight relative to ref. plane DRILLDEF S3000 ;safety hight relative to reference plane DRILLDEF C1 ;aktivate drilling cycle 1, simply drilling DRILL X10000 Y30000 ;drill at position X = 10 mm, Y = 30 mm DRILLDEF C2 ;aktivate drilling cycle 2, peck drilling DRILL X30000 Y30000 ;drill at position X = 30 mm, Y = 30 mm DRILLDEF C3 ;aktivate drilling cycle 3, deburring DRILL X50000 Y30000 ;drill at position X = 50 mm, Y = 30 mm Cylinder radius CYL X(Y,Z,A)radius X(Y,Z,A) Declaration of the cylinder radius in a turning axis. If you need a intermediate format file for the processing of a cylindrical turning body, you ca use this command. The driver converts the linear velocities on the cylindrical surface into turning velocities. The first parameter indicates the machine axis (turning axis). In follows the radius of the cylinder. The unit is millimeter. The second parameter indicates the kartesian axis X, Y oder Z which is replaced from the turning axis. Note: A circle- or helix-interpolation ist not possible on a cylindrical surface. To return to the original configuration please input the radius ‘0’, e. g.: CYL A0. Example CYL A5000 A ;cylinder radius 5 mm, A is turning axis 194 Command overview Interrupt HALT Stops the current processing and switches to the mode „single step“. After your intervention, the processing can go on stepwise or continuously. You can insert a comment in the NC-file, to note all necessary interventions. Example SPINDLE OFF ;spindle off MOVEABS Z5000 ;processing ... FASTABS X5000 Y5000 ;processing ... ;comment with instructions for ;the user e. g. HALT turn the ;workpiece 90° to the left and ;then continue processing MOVEABS Z10000 ;safety hight FASTABS X15000 Y20000 ;position ... SPINDLE ON TIME2000 ;spindle on Ramps ACCEL X.... Y... Z.... A.... Adjust the acceleration values of the axes. The unit of the acceleration is percent. The value can be in the range of 5 % ... 100 %. The maximum acceleration (100 %) is set in the initialisation file. SPINDLE ON/OFF SPINDLE CW/CCW RPMxxx RPSxxx TIMExxx This command switches the spindle drive on or off. The parameter CW or CCW declares the turn direction of the spindle. The spindle can be switched on with their default speed by using the parameter ON. The use of the parameter OFF sets the new spindle speed 0. To specify a spindle speed by the NC programme it is necessary to use one of the parameters RPM (the speed is given in rounds per minute) or RPS (the speed is given in rounds per second). You may use either the parameter RPM or the parameter RPS. The start up delay to accelerate the spindle to the required speed is defined by using the parameter TIME, where xxx is the delay time in milliseconds. Before using this command it is necessary to specify a spindle control program in the spindle setup function of the control program. Switch the coolant pump on or off COOLANT ON/OFF Before using this command it is necessary to assign a output channel in the coolant pump setup function of the control program. 195 Command overview Define tool TOOLDEF Tx Ly Rz Announce the used respectively the equiped tools. (For later use) Init tool change INITTOOL Initialisation of the tool change and of the tool change software. Carry out the tool change initialisation, find out the current configuration, reference runs etc. (For later use) End of the NC file PROGEND Stops the processing of the NC file. Depending on the settings made in the control program, the interpreter waits to be restartet or closes the output window automatically and returns to the main input mask of the control program. Example SPINDLE OFF ;switch spindle off COOLANT OFF ;switch coolant pump off REF XYZ ;move axes to definied positions PROGEND ;mark end of the program Spindle mode SEPAXIS ON/OFF of last axis ON/OFF This function will switch off/switch on the Spindle mode for the last axis. This means that the last axis is either disconnected from or added to the axis grouping. Change of SPINDELVEL xxx speed This function will set the speed of the last axis in Spindle of the last axis mode during the path processing. in the Spindle mode Set bit during path processing Reset bit during path processing 196 PATHSETBIT x This function is used to set an output bit with the value 1. The PARKON program can be used to define 4 logical output ports. This will result in 32 logical output channels numbered from 0 ... 31. The number after the command is the channel number (see Fig. 3.3.36 and 3.3.38). PATHRESBIT x This function is used to set an output bit with the value 0. The PARKON program can be used to define 4 logical output ports. This will result in 32 logical output channels numbered from 0 ... 31. The number after the command is the channel number (see Fig. 3.3.36 and 3.3.38). Command overview Example for a file in isel intermediate format This sample file was created with an isel HP/Gl converter and shows the milling of a shape. N000001 IMF_PBL_V1.0 - HPREMOTE V1.32 - PP FILE N000002 ;*********************************************** N000003 ; 3RECTS.NCP Fri Mar 01 12:04:29 1996 N000004 ;*********************************************** N000005 VEL 5000 N000006 FASTVEL 50000 N000007 MOVEABS Z-3000 N000008 VEL 8000 N000009 FASTVEL 50000 N000010 FASTABS X53375 Y0 Z-3000 N000011 MOVEABS Z5000 N000012 VEL 12000 N000013 MOVEREL Y69625 N000014 MOVEREL X67625 N000015 MOVEREL Y-69625 N000016 MOVEREL X-67625 N000017 VEL 10000 N000018 MOVEABS Z-3000 N000019 VEL 5000 N000020 FASTVEL 50000 N000021 FASTABS X30625 Y54000 Z-3000 N000022 MOVEABS Z7000 N000023 VEL 12000 N000024 MOVEREL Y76250 N000025 MOVEREL X72875 N000026 MOVEREL Y-76250 N000027 MOVEREL X-72875 N000028 VEL 10000 N000029 MOVEABS Z-3000 N000030 VEL 5000 N000031 FASTVEL 50000 N000032 FASTABS X0 Y16875 Z-3000 N000033 MOVEABS Z1000 N000034 MOVEREL Y65875 N000035 MOVEREL X61250 N000036 MOVEREL Y-65875 N000037 MOVEREL X-61250 N000038 MOVEABS Z-3000 N000039 PROGEND 197 PARKON PARKON 1 Introduction Using the supplied configuration program PARKON.EXE you can generate a so-called initialization file and enter all system-specific parameters of your equipment into this file. The initialization file is read by the driver during its startup. For security reasons the initialization file is write-protected. That means, that it is almost impossible to change the file inadvertently. Generally you should use the configuration program to make any changes to the parameters as the initialization file has its own internal format. Even a small change to the internal file format can mean that the driver can no longer read the file during the start-up. During the starting of the configuration program you are informed that you must first of all enter the structure of your equipment in order to free blocked input fields. This procedure is necessary because the structure of the equipment (TTT_Structure or not, number of axes, etc.) determines what measurement units are used for the position, speed as well as acceleration, and which input fields are available and which are blocked. The operation of the configuration program is very simple not only because of the SAA Standard (System Application Architecture) but also because of the on-line help. The status windows shows you at a glance which file you are working on at that time. In the following paragraphs we will explain the individual menus and submenus in detail. 2 The FILE main menu In this main menu you can create, open, convert, save and print an initialization file. The configuration program is also terminated in this main menu. New submenu: You can use this submenu to create a new initialization file. All initialization files have the extension ‘INI‘ attached to their names. After the selection of this submenu the program will ask you whether you want to save an existing file if this old file has been changed. A part of the Hardware main menu and the entire Software main menu are blocked. You must first of all enter the structure of your equipment in order to release these menus. Open submenu: An already existing initialization file is opened. If this file has the wrong format a format error is shown. A file name error is shown if you try to open a file with a file name extension other than ‘INI‘. Before a file is opened, the configuration 198 PARKON program will ask you to save the file that you are working on if you previously changed this file. After the file has been successfully opened, the file name and directory path as well as the last date of change for the file are shown in the status window. A description entered by you for the identification of the file is also shown in the status window (see Description submenu in the Hardware main menu). Convert submenu: This function converts an initialization file of version 3.0 into an initialization file of the current version. Some parameters of the old version are left out and many new setting possibilities are added. Therefore, it is necessary to complete the converted file using the appropriate menus. If you do not do this, standard values will be used all the time. The differences between version 3.00 and version 3.10 are listed below: - The ’WatchDog’ field no longer exists in the submenu Ref._Switch of the main menu Hardware of version 3.10. The bridging of the limit switches during the reference run is no longer executed by the Watch-Dog signal but by a separate driver function in version 3.10. (see isel Servo Control Card UPMV 4/12 manual). - Instead of the ’WatchDog’ field you can use the ‘KeyCode’ field to define a keyboard key for the interruption of the reference run. - In the earlier version of the driver the key switch serves for the bridging of the hardware limit switches. This allows the switching-on of the power output modules in the case of faults in the hardware limit switches and the moving of the axes out of the limit switches. In the new version of the driver the bridging of the hardware limit switches is realized by a separate driver function. (see isel Servo Control Card UPMV 4/12 manual). - The function of the key switch is no longer supported. Therefore the submenu ‘Key Switch’ no longer exists. During the conversion process the parameters of the key switch are simply left out. - The submenu Monitoring Port in the main menu Hardware as well as the submenu V_Axis Factor in the main menu Software are completely new additions. All setting parameters in these two menus have to be newly set if you do not wish to use the standard values. - During the conversion of the initialization file the reduction factors for circular and path movements are generally set to 1. Due to the introduction of the V-axis amplification factors it is necessary to set the reduction factors to the standard values 1. Afterwards you still can change the reduction factors if you think it is necessary. 199 PARKON - In the submenu Controller of the main menu Software of version 3.10 you can define whether the position controllers of your equipment should be switched off automatically in the case of a run-out error or not. These measures are important for the limiting of the current. Save submenu: The file that is currently being worked on is saved under its old name. If it is a new file you must first of all select the directory and enter the file name. After that the file name and the directory as well as the current date are shown in the status window. If the file name entered by you does not have the extension ‘INI’ then a file name error is indicated. Save As submenu: The initialization file that is currently being worked on is saved under a new name. Naturally you must first of all select the directory and enter the new file name. A file name with an extension other than ‘INI’ is not accepted and a file name error will be indicated. After the file has been successfully saved, the new file name and the directory as well as the current date will appear in the status window. Print submenu: The file that is currently being worked on is printed. You can easily check all the input data on the print list with comments and parameter names. Any printing error is indicated immediately. Terminate submenu: With this submenu you can terminate the configuration program. The configuration program will request you to save the file that you are working on if this file has been changed. 3 The Hardware main menu All parameters that concern the hardware or the mechanics can be entered in this main menu. Description submenu: You can enter up to 30 ASCII characters here. This description appears immediately in the status window. It is also stored internally in the file. Every time you open this file it is displayed in the status window together with the name of the file and the last date of change. By entering your own string of characters it will be easier for you to distinguish the various initialization files from one another. 200 PARKON Resources submenu: You can define here what percentage of the computing power of your PC may be used by the driver. During the start-up the driver itself will check whether it will have sufficient computing time or not. If not the following error messages will be displayed: > Computer is too slow. The driver was not installed. < or > Warning: Computer is slow. Installation of the driver with the J key. < You will then have to increase the percentage. However, the limit value of 75 % should not be exceeded because your application program itself needs computing time as well. If it still does not work then you will have to install a co-processor in your computer. In most cases the lack of a co-processor is the reason for this error message. Interrupt submenu: Here you can define the software interrupt and the hardware interrupt. You can communicate with the driver through the software interrupt. The input of the software interrupt must be done in hexadecimal numbers. You have to be extremely careful when selecting the number for the software interrupt. The interrupt should not be used by any other program. Of course it is not possible for us to tell you which interrupt is still available in your computer at present because this depends on the actual configuration of the computer. In order to determine which interrupts are still available you should check the interrupt table of your computer. The interrupt table is located at the memory area 0000:0000 to 0000:03FF. There are 100h interrupt numbers. Each interrupt number occupies a 4 byte jump address in the table. The number 0 occupies the memory area 0000:0000 to 0000:0003 and the number 100h occupies the area 0000:03FC to 0000:03FF. If the memory area of an interrupt is loaded with only 00h, then this interrupt is still available. Most of the interrupts are reserved for the operation system. The remaining ones are available to all application programs. According to our experience the interrupts 60h .... 66h as well as 78h .... 7Fh are generally available. The utilization of an interrupt in these ranges is recommended. There are of course some programs that analyze the interrupt table for you and display the interrupt numbers that are free, for e. g. the very popular program NORTON COMMANDER from Symantec or the program PC Tools from Central Point. Internally, the driver needs a hardware interrupt. You have a choice between the hardware interrupt IRQ10 and the hardware interrupt IRQ11. The interrupts IRQ10 and IRQ11 are normally reserved for the serial interfaces COM3 and COM4. Most PCs, however, use only the serial interfaces COM1 and COM2, that is, IRQ10 and IRQ11 are still available in most cases. But if these two interrupts are already taken up in your PC you will have to make one of them available before you can use the driver. 201 PARKON The definition of the hardware interrupt must correspond to the hardware setting of the interrupt of the corresponding jumper on the PC card (see the manual for the isel servo control card UPMV 4A) as otherwise nothing will work. After you have finished with all the settings for the hardware interrupt you do not have to concern yourself with it anymore. From here on this is an internal matter for the driver. For you, only the above-mentioned software interrupt is still of interest. Base Address submenu: Here you enter the base address that you have set on the corresponding jumpers of the PC card (see the manual for the isel servo control card UPMV 4/12). You have to enter the address in hexadecimal numbers. From this base address the driver calculates all the addresses that it needs, such as for e. g. the addresses of the axis controllers. If the address entered here and the address set with the hardware are not the same the following error message will appear on the monitor: > No or defective PC card or wrong configuration < The driver is then not installed. Structure submenu: In this menu you define the number of axes, the type of the individual axes and the structure of your equipment. Only after you have entered these parameters will the menus that are blocked at the start-up of the program become accessible to you. The parameters entered here determine what measurement units will be used for the position, the speed as well as the acceleration and which parameters are necessary for the driver and which are not. The corresponding menus are blocked or released. This shows how important the correct input of the parameters required in this menu is. The number of axes does not have to be further explained. What is to be observed is the relationship between the number of axes and the allocation of the individual axes. If the number of axes is 1 the driver activates only the X-axis. If the number of axes is 2 that means that your equipment has an X- and Y-axis. If the number of axes is 3, that means that your equipment has an X-, Yand Z-axis. The fourth axis, that is, the A-axis, is only active if you have defined the number of axes as 4. All input fields of the axes that are not activated by the driver are blocked by the configuration program. For each of the axes used, you have to state whether this axis is a linear or a rotation axis. For a linear axis the length unit micrometer [µm] is used. For a rotation axis the angle unit arc second [“] is used. The number of axes, the type of the individual axes as well as the allocation of the axes determine the structure of your equipment. 202 PARKON - Your equipment has an XYZ_TTT structure if your equipment has at least 3 axes. These are the X-, Y- and the Z-axis. These axes must be linear axes. At the same time they must form a Cartesian system of coordinates. The A-axis is not relevant here. - An XY_TTT structure exists if your equipment has at least two axes. These two axes are the X- and the Y-axis. They have to be linear axes and form a Cartesian system of coordinates in the XY plane. The other two axes, Z and A have no effect here. - An X_TTT structure exists if your equipment has at least one axis. This is the X-axis. This axis must be a linear axis. All the other three axes are not relevant here. - Any other structure that is not one of the three described above belongs to the category ‘NOT_TTT_Structure‘. An XY_TTT or XYZ_TTT structure is a necessary condition for the circular and helix interpolation. You can only request these types of interpolation from the driver if your equipment has one of the two aforementioned structures and if you have entered this information into the driver via this menu. Direction submenu: The positive and the negative direction for each axis has already been defined by the PC card. In this menu you can define whether these predefined directions are to be retained or are to be changed. The predefined directions are retained if the standard setting is selected. If the standard setting is not selected then the positive and negative directions are reversed. The setting in this menu appears as follows: [X] Standard [ ] Standard ---> ---> Standard setting No standard setting After you have defined the directions of the axes only these new directions are of interest to you. All data that relate to the directions of the axes relate then to the directions newly defined by you. This means mainly the input of the positive or negative positions of an axis, the definition of the positive or negative hardware or software limit switches or the reference switches which may lie on the positive or the negative side of the axes. Switch Active submenu: The reference as well as the hardware limit switches are connected to the driver via the respective input ports. From the signal level (high or low) that is at these ports, the driver knows whether the switch or switches have been approached at that moment or not. 203 PARKON In this menu you define whether the high or the low level is to be the active level. The active level is the level at the input port in question when the switch has been approached. Here you have the choice between the low level and the high level. The defined active level then applies to all reference switches and to all hardware limit switches of your equipment. Limit Switch submenu: In this menu you define the port addresses and the bit numbers to which the limit switches of your equipment are connected. All addresses are to be stated as hexadecimal numbers. The numbering of the bits in a byte starts at 0. The bit with the highest value has the number 7. For each axis you can define up to two hardware limit switches. For each switch you have the additional possibility to have it blocked if you do not need this limit switch in your equipment. The blocking and the releasing appear as follows: [X] On/Off [ ] On/Off ---> ---> Use of limit switch Limit switch not used The positive or the negative hardware limit switches lie on the positive or on the negative direction of the axis. You should not forget that you yourself have defined the positive or the negative direction in the Direction submenu. Reference Switch submenu: As in the hardware limit switches you define here the port addresses and the bit numbers to which the reference switches are connected. We have defined two modes for the reference run. They are the Standard and the Non-standard modes (see manual for the isel servo control card UPMV 4/12). Normally the Standard mode is used. The Non-standard mode is used in the case of a continuous rotation axis with a magnetic switch as reference switch. The selection of the reference mode appears as follows: [X] Mode [ ] Mode ---> ---> Standard mode of the reference run Non-standard mode of the reference run Furthermore you have to indicate whether the reference switches lie on the positive or the negative side of the axis in question. As a standard feature the reference switches always lie on the negative side. This means that the axes move in the positive direction when moving out of the switch. You may, of course, install the reference switch on the positive side of the axes. But in that case you have to enter in this menu that you have done something that was not standard. The input looks like this: [X] Direction [ ] Direction 204 ---> ---> Reference switch on the negative side Reference switch on the positive side PARKON As in the hardware limit switches you should note that you yourself have defined the positive or the negative direction in the Direction submenu. The directions that are defined by the PC card for each of the axes are not important here. In the Standard mode the axis moves first of all up to the reference switch with a constant speed until this switch is triggered. At a considerably lower speed the axis moves out of the switch again. The point at which the switch changes its level is generally defined as the reference point or the machine zero point. In cases when you use one of the hardware limit switches as reference switch an unwanted hardware limit switch fault might occur during the zero point run due to the overshooting. Therefore we have introduced the option ‘Reference Distance‘. Using this option you have the possibility to move the reference point away from the switch by the predefined distance. This option has no effect in the reference run mode Non-standard mode. You can define a hardware limit switch as reference switch by defining port adress and bit number of the hardware limit switch as the port adress and bit number of the reference switch. If, for safety reasons, it is necessary to switch off the power output stages when there are faults in the hardware limit switches then you have to use the Watch Dog option (driver version 3.00) in order to be able to carry out the reference run (see manual for the isel servo control card UPMV 4/12). From the version 3.10 this option is not available any more. To prevent the switch-off of the servo amplifiers during the reference run, a special function has to be used. A reference run usually takes a lot of time. If you wish to break the reference run, you can hit the key defined before. To define this key, you have to put the scan-code of the key in array „KeyCode“. Please, use the start-up-program PAREIN.EXE to find out the scancode of the key you wish to use. We usally take the ESC-key with to break the reference run (scan-code equal 01). The difference between the reference switch and the hardware limit switches of an axis is that every axis used has only one reference switch. You cannot switch the use of the reference switches on or off as you like. That is not possible because every axis needs a reference point to which all positioning data can refer. V_Control submenu: Here you enter whether there are speed controls for controlling the axis or not. Every axis of your equipment has a position control that is realized by the chip LM628 or LM629. The speed controls are optional. By using them considerably greater dynamics of the equipment can be achieved. 205 PARKON Monitoring Port submenu: An input port can be defined in the category ’Control Byte’. Via this input port you can return up to eight hardware signals to the driver. Thus you can inform the driver of up to eight external malfunction sources, such as for e. g. power failure, broken cable, encoder defect, etc. In the case of a malfunction the current movement is interrupted immediately. The driver executes appropriate safety measures in order to avoid possible danger. The use of the individual bits of this control byte input port is determined in the ‘Mask’ field. A bit value of 0 in this field means that the corresponding bit of the control byte input port is not used and that means it is not evaluated by the driver. If a bit of the control byte input port is to be used, the corresponding bit in the mask has to be set to 1. In the ’Value’ field you can then define the error-free values for the corresponding bits of the control byte input port. The control byte input port is regularly read by the driver. An input value that is not the same as the error-free value defined by you is interpreted as a malfunction by the driver. Obviously the driver will not evaluate the bits that are defined as unused via the mask. The most important application for the control byte input port is the monitoring of power failures. A corresponding bit of this input port informs the driver whether the current is available or not. We, here at isel as well, use this facility to monitor the current. However, due to the hardware of our equipment we are not able to differentiate clearly between an actual power failure and an active manual mode (currentless state of the power output modules). In both these cases the corresponding hardware signal is active. Due to an internal flag the driver knows when the manual mode is active. In this case the driver interprets the active signal not as a malfunction, not even if the power has actually failed. During the deactivation of the manual mode the controller requires some time until power is restored due to the inertia of the relays. You have to inform the driver of the delay time of the relays so that in such a case (the deactivation of the manual mode), the driver does not interpret the active hardware signal during the delay time as a power failure. All these special features are included in the category ‘Manual Mode’. In the ‘Bit’ field you have to enter the bit number of the control byte input port that is responsible for the monitoring of power failures. Please note that the bits are numbered from 0 to 7. The delay time of the relays is defined in the ‘Time’ field. If you are constructing your own controller and if your hardware is able to differentiate between the manual mode and a power failure you have to inform the driver via the ‘On/Off’ field that you do not want the aforementioned special treatment for the manual mode. When using the isel controllers, the special 206 PARKON treatment is a must for the manual mode. The input in this field appears as follows: On/Off [X] On/Off [ ] Special treatment during manual mode No special treatment during manual mode The input and output ports are required for the controlling of the peripherals. In order to have a clear separation between the peripherals of the machine itself, such as tool changers, covers, coolant pump, etc, and the additional peripherals that are installed by the user, we have divided the input and output ports into two types. The first type concerns the input and output ports for the monitoring. These ports are used for the peripherals of the machine itself and are configured in this submenu. The second type concerns the input and output ports that can be defined in the submenu Input/Output Port. In the category ‘Input’ you can define up to two input ports for the monitoring. The port addresses are entered into the ‘Port’ field in the hexadecimal format. Via the ‘Mask’ field, the use of the individual bits can be switched on or off. A bit value of 1 in the mask means that the corresponding bit of the input ports is being used. If you do not want to use a particular bit of the input port you have to set the corresponding bit in the mask to 0. If all bits of the mask are 0 then the input ports are not checked at all by the driver. The active levels for the individual bits of the input ports are defined via the ‘Active’ field. Thus, you can work with your user program on the logical level (see isel Servo Control Card UPMV 4/12 manual). When calling up the respective driver functions you will get the bit value 1 if the actual bit value and the bit value that has been defined as active are identical. In all other cases you will get the bit value 0. Just like in the category ‘Input’ you can also define up to two output ports for the monitoring in the category ‘Output’. The port addresses are shown in the ‘Port’ field. The bit by bit utilization of the output ports can be defined via the ‘Mask’ field. If you do not want to use the output ports you have to set all bits in the ‘Mask’ field to 0. These ports are then no longer addressed by the driver. You can define the active level in the ‘Active’ field in order to be able to work on the logical level. The initialization values that the driver outputs to the respective ports during the start-up are to be entered in the ‘Init’ field. Please note that the initialization values are also logical values (see isel Servo Control Card UPMV 4/12 manual). The bit by bit utilization of the input and output ports allows you to carry out a mixed operation of the input and output ports. A port whose bits are only partially used for monitoring tasks can also be addressed via the channel input and channel output ports (see submenu Input/Output Port). 207 PARKON Input/Output Port submenu: You can define up to 4 input and 4 output ports in this menu. The bit by bit or byte by byte activating of these ports is carried out through logical numbers. You can read about the advantages of the activating of the ports through logical numbers in the manual for the isel servo control card UPMV 4/12. The input ports are given the numbers E0, E1, E2 and E3. The output ports are numbered with the numbers A0, A1, A2 and A3. For the output ports you must also define the starting values of the ports. During the start-up of the driver the output ports are initialized with these starting values. The use of the input and output ports is optional. The definition of the use of each individual port looks like this: On/Off [X] ---> used [ ] ---> not used Movement Output Port submenu: In this menu you can define a port through which a speed-dependent output takes place during the processing movement. The output range is limited by the specification of the minimum and maximum values. These values are to be entered in hexadecimal numbers. Through the delay time it is possible to adjust the output to take into consideration the run-out time of the connected peripheral (see manual for the isel servo control card UPMV 4/12). The use of these driver options is optional. You therefore have to state expressly if you want to make use of this option. Encoder Line submenu: This menu is used for the input of the number of lines of the encoder used by the respective axis. The number of lines of an encoder is defined as the number of increments supplied by this encoder per rotation. It should be noted that the internal quadrupling by the axis controller is not relevant here, that is, if the encoder supplies 1,000 pulses per rotation, you are really inputting 1,000 and not 4,000 (4 * 1,000). The driver uses this information together with the conversion factor of the axis in question (see below) to calculate an internal conversion factor. Conversion submenu: The driver uses the information on the number of lines of the encoder together with the information entered by you in this menu in order to calculate internal conversion factors. In the case of a linear axis the axis conversion factor is defined as the movement length in micrometer per motor rotation. In the case of a rotation axis, it is defined as the rotation angle in arc seconds per rotation of the motor. 208 PARKON 4 The Software main menu In this main menu you can enter the parameters that are directly connected with the movement and that are limit values or standard values as well as the control parameters. You must pay special attention to the measurement units of the parameters that are shown in the respective input fields. These measurement units are defined by the configuration program in accordance with your selection in the Structure submenu. Therefore this menu is blocked until you have entered the parameters in the Structure submenu. A_Max submenu: In this menu you enter the maximum accelerations of the axes. These acceleration values are used by the driver in the generation of ramps for the individual axes. If the values entered by you are greater than the values that can be produced by the respective motors you will create an unbalanced movement behaviour of the axes. The smaller the values that are entered, the smoother and slower the movements of the axes will be. When dimensioning the acceleration values entered here, you must note that the motors need a portion of their accelerating power to overcome the load during the processing, that is, you have to select values according to the processing load that are smaller than the maximum values that the motors can produce in the no-load operation. A_Reference submenu: Here you enter for each axis a reduction factor of the acceleration. The reference run is carried out with a slower acceleration than in a normal movement. In the case of a reduction factor of 10, for example, the acceleration during the reference run is 1/10 of the acceleration during a normal movement, that means, the movement during the reference run is considerably smoother. That means less mechanical wearing of the reference switches. Submenu A_Saturation: The servo amplifiers need a certain voltage to generate the neccessary motor currents. Due to the coil induction the motors produce a voltage (called EMK). The faster the motors run, the higher the EMKs are. Thereby the avaiable voltage for generating of the motor-current reduces. Because the voltage is limited, the avaiable acceleration is smaller if the motor runs fast. With this saturation-value the driver can reduce the acceleration in the high velocity area. The standard value is 10. If you are not sure, taking this standard value is the best way for you. V_Max submenu: The maximum speeds of the individual axes are entered here. The values entered here are very important limit values for the interpolation. If the values entered here are greater than the actual maximum speeds of the axes, this can result in the interpolation not functioning properly. 209 PARKON V_Segment submenu: Here you enter the standard value of the speed during the vectorial processing. This value is taken up by the driver directly after its start-up or after a reset as the desired processing speed until a new value is set by calling up the appropriate function. In the manual for the isel servo control card UPMV 4/12 we have shown you how the tool speed can be calculated from the axes speeds (and vice versa). V_Path submenu: Here you enter the standard value of the speed during the 3D path processing. This value is taken up by the driver directly after its start-up or after a reset as the desired path processing speed until a new value is set by calling up the appropriate function. V_Teach-In submenu: This submenu facilitates the input of the standard value of the Teach-In speed. This value is taken up by the driver directly after its start-up or after a reset as the desired Teach-In speed until a new value is set by calling up the appropriate function. The different speeds and how they can be calculated are described in the manual for the isel servo control card UPMV 4/12. V_Rapid submenu: Here the standard value for the rapid speed is entered. The standard value is taken up by the driver after its start-up or a reset until a new value is set by calling up the appropriate function. You can read up on how to calculate this speed in the manual for the isel servo control card UPMV 4/12. V_Reference submenu: Here you can define the starting speed with which the axis moves to the reference switch during the reference run and the ending speed with which the axis moves out of the reference switch during the reference run. In order to facilitate a fast reference run and a high degree of repetitive accuracy the starting speed must be considerably higher than the ending speed. V_Axis Factor submenu: The V-amplification factor is the dynamic characteristic value of an axis. The larger this value the better is the dynamic performance of the axis. On one hand, the dynamic performance of the axis depends on the hardware and the mechanics, on the other hand you can influence the dynamic performance of an axis through the appropriate setting of the control parameters. The V-amplification factor is determined by trial and error using the PAREIN.EXE program. Because of the symmetry of the equipment, which has a great influence on the processing accuracy, it is desirable that all axes of the equipment have the same V-amplification factors. 210 PARKON V_Reduction submenu: Via the reduction factor field you enter an equipment-specific factor, which takes into consideration influences that cannot be expressed mathematically, such as friction, play, etc. Such influences have a negative effect on the path accuracy. In order to account for these negative influences we have introduced the reduction factor. By using this factor you can vary the transition speed between two consecutive movement elements. Please note that the transition speed is not directly proportional to the reduction factor. The reduction factor is to be determined by trial and error for each individual equipment. In the path operation the following applies: The greater the reduction factor the lower the speed during the transition between two segments. This leads to a higher accuracy. In the circular movement operation the following applies: The greater the reduction factor the lower the processing speed. In general you should set the reduction factors to 1. That is the standard value. Depending on your requirements you may increase or decrease the factors. During the conversion of an initialization file of Version 3.00 to the current version the reduction factors are generally set to 1. Dead Time submenu: It is natural that every axis of an equipment has a dead time that is not equal to zero. The dead time is nothing other than the delay time of the axes. Internally the driver uses the dead times of the axes and the tolerance entered by you to check on the run-out error of the equipment while it is moving. A tolerance of 200 % is sensible. You can read in the manual for the isel servo control card UPMV 4/12 on how the run-out error of the equipment is calculated internally in the driver. Limit Switch submenu: Here you define the standard values of the software limit switches with reference to the reference point. These standard values are taken up by the driver after its start or a reset, although the software limit switches are only activated after a calling-up of the appropriate function. The changing of the software limit switches while the driver is running is carried out separately by another function. Control submenu: In this menu you define the parameters for the PID controls of the axis controllers. These are the standard values that the driver transmits to the axis controllers after its start-up or after a reset. A changing of these parameters is possible via the respective function. Here you can also define whether the controllers are to be switched off during a run-out error. 211 PARKON This measure is very useful if your power output modules are not able to limit the current via the hardware. In such cases the switching-off of the controllers will result in the current being limited by the driver through the software in the case of a run-out error, that is, a run-out error, during which the current may exceed the permissible limit because of the great deviation, does not pose a real danger due to this measure. However, the hardware-based limitation of the current directly in the power output modules is still the best method. Further information can be found in the manual for the isel servo control card UPMV 4/12. 5 The Info main menu You cannot input anything here but can only see which driver version you must have if you want to use this configuration program to create the initialization files for the driver. In addition you can obtain our address from this menu. This can be useful to you in many situations. 6 Possible Errors during the Configuration of the Parameters During the creation of the initialization file for the driver, you should definitely use our PARKON.EXE programme. By using this programme, you can on one hand configure the file very easily and clearly, and on the other hand the programme checks your data for discrepancies to the best possible degree. Erroneous data are reported immediately. In this paragraph we will list the typical errors and their causes. File write error This error only occurs when saving the initialisation file. The reason is either a fault on the disk or it‘s full or it‘s write-protected. File name error This error occurs when opening or saving of a initialisation file. The names of the initialisation files are named according to the DOS-convention. All letters from ‘a‘ to ‚z‘ are accepted in the names. There are no differences between lower case and upper case. The numbers from ‘0‘ to ‘9‘ and the character ‘-‚ and ‘_‘ are accepted. Beyond this the file name needs the ending ‘ini‘. File format error This error occurs when you try to open a file which is no initialisation file or which has a wrong version number. 212 PARKON Plotter error This error only occurs when you try to print the initialisation file. When the printer is not ready or when there ist no connection to the printer you will see this error. Address conflict: Via the submenus Monitoring Port, Input/Output Port and Bew_Output Port you can define various input and output ports for the driver. For every input all port addresses, the newly entered ones as well as the addresses that have already been defined via the other submenus, are compared with one another. If two different ports have the same address you will see this error message. However, there is one exception. A port that you have defined in the submenu Monitoring Port can also be entered in the submenu Input/Output Port, if not all bits of this port have been marked as being in use. The addresses of the output ports are not only compared with each other but are also compared with the address range of our PC card. An output port in this address range is strictly forbidden. You shouldn’t even be there. The addresses of our PC card lie in the range (base address + 00h) … (base address + 0Fh). The base address is defined in the submenu Base Address. Erroneous structure information: This error only occurs in the submenu Structure. It is connected to the statement of the equipment structure. An XYZ_TTT structure has to have at least 3 axes and the X-, Y- and Z-axis must be linear axes. An XY_TTT structure requires at least 2 axes and the X- and Y-axis have to be linear axes. For an X_TTT structure, you have at least one axis and the X-axis is a linear axis. All other arrangements result in a NON_TTT structure. For this structure you have to make sure that the X-axis is a rotary axis. Otherwise you have at least an X_TTT structure before you. Erroneous reference mode: For a rotary axis you can define either the Reference Run Standard Mode or the Reference Run Non-standard Mode. However, for a linear axis only the Reference Run Standard Mode is allowed. If you insist on trying something else for a linear axis you will get this error message. 213 PAREIN - Introduction 1 Introduction PAREIN The starting-up of a servo equipment is very complicated and is certainly not everyone's cup of tea. Before the AHA effect is felt many problems must be overcome. To make life easier for you we have developed a so-called start-up program with the name PAREIN.EXE. The start-up program should help you in the starting-up of your equipment with our PC card UPMV 4/12. With this program you are in the position to check whether the encoder as well as its connection to the PC card are in order or not. It helps you in the setting of the offset voltages on the PC card as well as at the output stage. In addition you can easily check whether the limit as well as the reference switches of your equipment are in working order and are correctly configured. Any faults can be quickly detected and eliminated. Axis conversion factors whose determination is very complicated in many equipment can be ascertained very quickly with our program. Furthermore the start-up program helps you to dimension the PID positioning control on the PC card as well as any existing speed controls quickly and easily. From the user's point of view it is naturally desirable that all steps of the start-up operation are carried out automatically. Although this objective is worth striving for, it is difficult to realize because of the different hardware platforms. The start-up program is a part of the software package which we are offering to the customers and which is used by us in our factory to control servo motors. This software package also includes the resident software driver ISELDRV.EXE for the MS DOS operation system and the PARKON.EXE configuration program. With this software package and the PC card UPMV 4/12 it is possible to control up to 4 servo axes at the moment. Amongst other things the 4-axes linear interpolation and the circular as well as the helix interpolation are the main features of our servo control system. The start-up program works independently and is axis-orientated, that means, you do not need to install the driver ISELDRV.EXE before the starting of the start-up program. The axes of your equipment are put into operation one after the other. The order is determined by you yourself. During the start-up the program will point out to you that you must first of all select an initialization file in order to be able to open the remaining menus of the work field. These initialization files can be created with the above-mentioned PARKON.EXE configuration program. Because of the SAA Standard (System Application Architecture) and the on-line Help, the operation of the start-up program is very simple. We will explain clearly in the following paragraphs how you can use the individual menus and submenus. 214 PAREIN - Fil main menu 2 The File main menu In this main menu you can open, save or print an initialization file. The start-up program can be terminated in this main menu. 2.1 The Open submenu For its start-up the ISELDRV.EXE driver needs an initialization file which contains all the necessary parameters for it. The creation of the initialization file is solely the job of the PARKON.EXE configuration program. The start-up program can change an initialization file that already exists but it cannot create a new one. In this menu you can open an initialization file. On doing so all set parameters of this file are taken over by the start-up program. There are some parameters which have to be absolutely correct if you want to work with the start-up program. These are the base address of the PC card, the structure of your equipment (number of axes, linear or rotation axis) and the encoder line (number of increments supplied per motor revolution). All these parameters were entered into the initialization file with the help of the configuration program and determine the further running of the program. Only after the opening of an initialization file are the remaining submenus of this menu, the Axis menu and the Equipment menu released. In the status window at the bottom part of the screen you can see immediately which file is currently being worked on. 2.2 The Save submenu The initialization file that is currently being worked on is saved under the old name. 2.3 The Save As ... submenu The initialization file that is currently being worked on is saved under a new name. Naturally, you must first of all select the directory and the enter new file name. A file name with an extension other than "INI" is not accepted and a file name error will be indicated. After the file has been successfully saved, the new file name and the directory as well as the current date will appear in the status window. 2.4 The Print submenu The file that is currently being worked on will be printed. You can easily check all input data on the print list with comments and parameter names. Any printing error is indicated immediately. 215 PAREIN - Equipment main menu 2.5 The Terminate submenu With this you can terminate the start-up program. The start-up program requests you to save the file that is currently being worked on if this file has been changed. 3 The Equipment main menu In this main menu the PC card and all other functions that are not directly related to an axis can be checked for the functioning. 3.1 The Card submenu If this submenu is selected, the functioning of the PC card is checked. It is first of all checked whether the base address is correct and whether the timer as well as the axis controllers are in order. It is also tested whether the hardware interrupt number (IRQ10 or IRQ11) that is selected by you is available. If the PC card is not in order, a corresponding error message is fed back (see section 6). All the other submenus in the Equipment main menu are released only if the PC card is working properly. 3.2 The Monitoring submenu The control byte input port, all information with regard to the Manual Mode as well as the input and output ports for the monitoring can be checked and modified in this submenu. The work menu is shown in Illstration 3.1. Illustration 3.1: Work menu for the monitoring ports The control byte input port can be freely selected, that is, any input port can be defined as the control byte input port. As a standard feature, the input port with the address (Base address + 0Ch) on the PC card is used by us. 216 PAREIN - Equipment main menu Only Bit 4 of this port is available. This bit is used in our equipment to monitor the current of the servo controller. In this case the Number 4 has to be entered into the ‘Bit‘ field of the category ‘Manual Mode‘ (see PARKON.EXE manual). The ‘Mask‘ field can be used to define which bits of the control byte input port are to be used. The error-free bit values are to be entered into the ‘Value‘ field. The contents of the control byte input port is read constantly and is displayed on-line bit by bit in the ‘Byte‘ field. However, the bits that are not used are not shown here. The category ‘Manual Mode‘ and the category ‘Activate/Deactivate Manual Mode‘ are actually only meant for isel equipment. When the manual mode is activated, the current of the power output modules are switched off and when the manual mode is deactivated, the current is switched on again. When changing between ‘Activate‘ and ‘Deactivate, the delay time of the relays is automatically determined and entered into the ‘Time‘ field. The determination of the delay time is actually fairly simple. The switching between ‘Activate‘ and ‘Deactive‘ triggers the process for the measuring of the time. This measuring process is only stopped if the state of Bit 4 of the control byte input port changes or if the measured time exceeds the maximum value that has been entered in the ‘Limit Value‘ field. In the latter case the error message “Limit value time reached. To continue press any key“ is shown on the monitor screen. This error occurs if you forget to switch on the servo controller or if the limit value time entered is too small. If you are not using the isel servo controller and do not require the special features of the manual mode, you have to switch off the use via the ‘On/Off‘ field. The specification looks like this: [X] ---> On, [ ] ---> Off. You can re-enter the addresses of the two input ports for the monitoring in the category ‘Input‘” at any time and modify the user mask as well as the active values. The port contents are read constantly and combined with the active values. The logical values of the port contents are displayed on-line (see PARKON.EXE manual). Bits that are defined as not being in use are not shown. In contrast to the input ports, you cannot change the addresses of the output ports. The change is only possible through the PARKON.EXE program. The user masks as well as the active values of the output ports can be defined easily via the ‘Mask‘ field and the ‘Active‘ field. Via the ‘Byte‘ field you enter the values that are immediately combined with the active values and then output at the respective ports. In this way you can easily and quickly check the functioning of the ports. 217 PAREIN - Equipment main menu Please note that, like for the input ports, you are working with logical values here (see PARKON.EXE manual). The correct setting in this submenu plays a great role in the starting-up of the operation of the individual axes. Therefore the Axis main menu is only released after the configuration in this submenu. 3.3 The Ref._Key submenu This submenu supports you in the determination of the scan code, the key that is responsible for the interruption of the reference run. All this is automatic. You only have to press the desired key. The scan code is ascertained for you. Please note that there are different types of keyboards. Different types of keyboards have different scan codes. If the keyboard is changed, the scan code has to be determined again. 3.4 The Input/Output Port submenu The driver allows you to define up to 4 input and 4 output ports. The activating of these ports is not carried out via physical addresses but through logical numbers. Parallel to this, it is possible to realize a speed-dependent output via an 8-bit port during the processing movement. You can check all these input and output ports for their functionability here in this menu. Illustration 3.2 shows the work menu for the checking of input and output ports. Illustration 3.2: Work menu for the checking of input and output ports. First of all, you must indicate whether you want to use the respective input and output port or not. The indication is as follows: On/Off [X] --> Port is used. [ ] --> Port is not used. In the case of the port for the output during the processing movement, the indication is done with the clear text Yes or No. 218 PAREIN - Axis main menu All physical port addresses can be newly entered or changed at any time. It is different for the output ports. Here, you cannot change the addresses. The reason for this is simple. In order to test the output ports, the values that can be changed by you are constantly read in the ‘Byte‘ field and output to the corresponding ports. If you had the opportunity to change the port addresses at will, this could lead to the output operations being executed at port addresses that belong to other hardware. This could be very dangerous. Therefore, we have not allowed the changing of the output port addresses. If you want to change the addresses of the output ports, you have to use the PARKON.EXE configuration program. For input ports that are marked as used, the values at the ports are constantly read in and shown on-line. Thus, you have the possibility to check these input ports very quickly and easily for their functionability. For the output ports, you can change the output values in the Byte input field at any time. For the ports that are marked as used, the values that are just entered are output immediately at the respective ports. Thus you can check the respective output ports easily for their functionality. As opposed to the monitoring ports, which you can test in the submenu Monitoring, here you do not work with the logical but with the real contents of the ports, that is, the values which are read from the input ports and are shown on-line are the real contents of the respective ports. At the output ports the values, which you entered, are output directly to the respective port without any change. 4 The Axis main menu The main work for the start-up of an axis takes place in this menu. This main manu is only allowed to open after working off the submenu Monitoring in the main menu Equipment thoroughly. You can set the offset of the card as well as the power output stage here. The encoder as well as the limit and reference switches can be checked for their functionability. Other options, such as for e. g. key switches, Watch Dog, Enable/Disable of the power output stages etc. can also be checked here. Furthermore you will obtain in this menu the help to determine the axis conversion factor, the parameters for the optional speed control and the PID positioning control as well as the movement ramps. We stress here that the dimensioning of the controls and the determination of the movement ramps should take place under the real conditions. If the axis for e. g. is to be loaded with up to 50 kg during the processing then you should also load the axis with 50 kg during the start-up process. Although there is always a certain tolerance range (the technical term for it is: ruggedness), the closer the conditions are to that in practical operation during the start-up process the better will be the regulating quality afterwards. 219 PAREIN - Axis main menu You should be aware that the servo motor could be destroyed if the motor current exceeds the limit value stipulated by the motor manufacturer for an extended period of time. However, due to the control, the motor current can exceed its limit value very quickly if, for e. g. the axis moves to a stop and is not moved back in time. For this reason, we have taken the approach that the controller chip LM628 of the axis is loaded with a controller parameter set which is defined by us and which limits the motor current generally 2 seconds after each Teach-In movement. After the new controller parameter set is active, you will notice that the axis no longer has any power. However, that is no reason to worry. In spite of this, you should, on your part, never move an axis all way to the stop and leave it there. You should move the axis out of the stopper as quickly as possible. For reasons of the safety of the equipment, the current is generally switched off in isel servo controllers if one of the limit switches is active. In this case you have to use the key switch for the driver version 3.0 in order to be able to switch on the current again. You can move the axis only if the current is flowing again. For the driver version 3.1, the key switch option no longer exists. In order to bridge the limit switches, Bit 5 of the output port (base address + 0Ch) has to be set. The setting of this bit is very simple as we provide the respective option in every work menu. However, the bridging of the limit switches constitutes a certain danger. Therefore the blinking warning ‘HWE Bridging‘ at the bottom right-hand corner of the screen will remind you that the limit switches are bridged. The switching off and on of the current when the limit switches are active is a feature of the isel servo controllers. If you are using our PC card with servo controllers from other manufacturers, it is likely that you do not have to worry about all this at all. The above-mentioned is then of no importance to you. 4.1 The Selection submenu Here you have the possibility to select one of the axes which you want to put into operation. If the axis selection is successful, the Sequence submenu is released. 4.2 The Sequence submenu Here you decide on the operation mode of the Axis main menu. In the operation mode After One Another the submenus are released one after another from top to bottom. A submenu only becomes active when the work in the preceding submenu could be successfully completed. This operation mode is meant for the first time you want to put the axis into operation. The axis of the equipment is a drive system made up of various parts. 220 PAREIN - Axis main menu The functioning of one part of the system is the necessary prerequisite for the starting-up of another part of the system. For example you cannot dimension a control if the encoder is not running. With the operation mode After One Another we want to prevent you from making grave mistakes during the start-up. In the operation mode Any all submenus are released at the same time. You can use any submenu at any time. This operation mode is meant for touching-up work on an axis. For example, it is very useful in cases when you want to make changes on an axis that has already been put into operation. In the operation mode Any you can skip unnecessary steps and get to the desired submenu directly in order to carry out the touching-up. 4.3 The Axis fixing submenu During the starting-up of operation of an axis, all other axes are normally without power. In some equipment configurations, this might result in a shifted movement of the axes during the strong acceleration and braking of the selected axis. Using this menu you can fix one or all of the unselected axes at certain positions during the start-up of operation of the selected axis. 4.4 The V_Control submenu This submenu is only released if your equipment has a speed control (see manual for the PARKON.EXE configuration program). Although the use of a speed control is optional you should be aware that with a speed control, which is normally part of a high-quality drive system, you will be able to achieve significantly higher dynamics, a better synchronization, greater ruggedness etc. In most cases the speed control is directly integrated into the power output stage. Therefore you have to follow the instructions of the manufactuer exactly in order to set the control. However, we are providing you with the relevant help so that you can assess whether the control is set optimally. The basis for this is the evaluation of the jump response (see section 4.7.2). After the selection of this menu you have the possibility to set the offset of the power output stage. Here the axis controller (chip LM628) ouputs 0 volt. You should first of all set the offset on the PC card. For this purpose there are potentiometers for each axis on the PC card (see manual for the isel servo control card UPMV 4/12). By measuring the voltage at the respective output you can determine whether the offset is well set or not. The offset voltage on the PC card should be 0 volt. Generally you can assume that we have already set the offset of the respective axis correctly at our factory. After you have finished with the setting of the offset of the PC card you can move on to the offset of the power output stage. You will have to read the manufacturer's manual on how you can set the offset for 221 PAREIN - Axis main menu this. But in most cases the offset of the power output stage is also set by turning the respective potentiometers. In order to be able to evaluate the jump response the start-up program simulates a simple oscillograph on the screen (see illustration 4.1). The PID positioning control in the LM628 chip is switched off. SPEED CONTROL 200 % X_axis V Voltage [mV] + U = [2 000] - U = [2 000] Speed [Incr./s] V = [200 000] 100 % Time basis [ms] Tb = [2 000] F7 : HWEBridging [---- No ----] 0% 100 % Tb 50 % F1 + direction F2 - direction Terminate with ESC key … Illustration 4.1: The work menu for the setting of the speed control If you press and hold the function key F1 the start-up program will generate for you a voltage jump function with the positive jump height which you can input with the variable +U on the left side of the screen (The use of the input fields is described in section 3.7.2). If you press and hold the function key F2, you will obtain a voltage jump function with the negative jump height which you have defined with the variable - U. You should note that the unit of the voltage values of + U and - U is millivolt. The voltage jump function generated in this way is output at the output of the selected axis. When the key is released, the voltage is immediately set back to 0. This voltage jump function leads to a jump response of the axis. The jump response of the axis is nothing else but the actual speed graph that is displayed on-line on the screen. Using the variables V and Tb on the left-hand side of the screen you can define the scale of the graphical presentation. For an isel servo controller you can bridge the limit switches at any time by presssing the F7 key in order to be able to switch on the controller when the limit switches are active. After you have pressed this key the word ‘Yes‘ appears instead of the word ‘No‘. At the same time there is a blinking warning ‘HWE Bridging‘ at the bottom right-hand corner of the screen. 222 PAREIN - Axis main menu Using the drawn graph you can then establish whether the speed controller has already been optimally adjusted or not. As we want to achieve a greater dynamic performance with the speed controller and as the speed controller is meant to eliminate high-frequency interferences you should set it in such a way that the jump response has an overshoot amplitude of approx. 60 % of the jump height (see illustration 4.2). 60 % jump height Jump height Illustration 4.2: Jump response of the axis with the optimally set speed control Using the ESC key you can close the work menu for the setting of the speed control at any time. 4.5 The Offset submenu 0 volt is output here by the axis controller (Chip LM628). You should first of all set the offset on the PC card. (If you have alreadly set this offset in the V_Control submenu you do not need to do it here). For this purpose the PC card is equipped with the respective potentiometers for each axis (see manual for the isel servo control card UPMV 4/12). By measuring the voltage at the respective outputs you can determine whether the offset is well set or not. The offset voltage on the PC card should be 0 volt. Generally, you can assume that we have already set the offset of each axis on the PC card correctly at our factory. After you have finished with the setting of the offset of the PC card you can move on to the offset of the power output stage. You will have to read the manufacturer's manual on how you can set the offset for this. But in most cases the offset of the power output stage is also set by the turning of the respective potentiometers. Here the offset should be set in such a way that the axis can stop at any position and that you can move the axis in both directions by hand without any trouble. 223 PAREIN - Axis main menu 4.6 The Encoder submenu The functionability of the encoder is an absolutely necessary precondition for the satisfactory functioning of the axis in a control loop. In this menu you can check whether there is a connection between the PC card and the encoder and whether the encoder signal lines are correctly connected or not. You should note that the start-up program is not in the position to detect and indicate interferences on the encoder signal lines. This is not possible because interferences and the elimination of them is a highly complicated matter. However you should pay special attention to the screening of the signal lines, the various earth circuits, the reference potential as well as the signal decouplings. In order to check if there is a connection between the PC card and the encoder the axis must be moved to and fro by hand. With the actual position indication on the screen you will know immediately if the connection is there or not. If the actual position does not change then the connection obviously does not exist. In this case there is nothing else you can do except to terminate the start-up program and to rectify the hardware fault. An existing connection between the PC card and the encoder far from indicates that everything is in order. In this case it can happen that the encoder signal lines are connected wrongly. You have for e. g. connected the encoder signal line A or A_Negation with the signal input B or B_Negation of the axis controller and the encoder signal line B or B_Negation with the signal input A or A_Negation of the axis controller. In the case of such hardware faults it can happen that when the power output stage is switched on, the axis moves with full force against a stopper. Mechanical damages are pre-programd. For this reason we are offering you here a test possibility to detect this fault. For this test you must first of all define a movement length. A movement length of 0 increment is automatically converted internally into a movement length of +1 increment. After the movement length is confirmed, the test will begin. When the test is completed, the desired position and the actual position are shown. If the algebraic signs of the desired position and of the actual position are different, then there is a connection fault. In this case you must terminate the start-up program and rectify the hardware fault. An actual position of 0 or a few increments indicates in most cases that the axis is on a stopper at the moment or that you have forgotten to switch on the power output stage. Naturally it can also be that the power output stage is defective or that the connection between the PC card and the power output stage is not in order. You should rectify the hardware fault and start the test again. If the desired position and the actual position have the same algebraic sign then the connection between the PC card and the encoder is in order. In spite of this you should carry out the test a couple of times both with positive as well as with negative movement lengths. 224 PAREIN - Axis main menu 4.7 The Position Control submenu 4.7.1 General Remarks Servo motors can only be operated in closed loops. The quality of a servo drive system depends very much on the control structures used and on the dimensioning of the control parameters. There are different control structures, such as for e. g. multi-variable controls, adaptive controls, state controls, conventional controls, etc. The list is almost endless. Apart from some structures that have never functioned properly in practice, such as for e. g. Dead Beat Controls, every control structure has its own application field in materials processing, in the drive technology, in automative engineering, etc. In the drive technology the conventional PID control can be easily used with various modifications. As this conventional control structure has already proven itself for a long time, we are offering you an axis controller (Chip LM628) that has a PID control for each axis. Therefore, you need not think about which control structure you should take. This is already defined. You "only" have the problem of finding out how the parameters of this control must be dimensioned. The dimensioning of the control parameters is not a simple thing. There are various dimensioning methods, such as for e. g. the symmetry-optimum method, the amount-optimum method, the root locus method, the phase and gain margin method, etc. Although such dimensioning methods have a high theoretical value, they are hardly useful in the practice of the drive technology because they require a lot of experience and great knowledge of control technology on the part of the user. Moreover, the amplitude and phase response of the drive system must be known in order to use this method. Although there is the theoretical possibility to determine the parameters of a drive system, its phase and gain margin as well as its structure through a program with an appropriate identification method, it is very difficult to arrive at usuable results using an identification program because of interferences that can never be determined mathematically as well as the dead time that always exists in a real drive system and also because of the great variety of drive systems used in practice. For this reason we have developed an experimental adjustment process which will be explained in the next two sections. By using this process you are in the position to determine very quickly the necessary parameters for the PID control. Unfortunately we are unable to delve into possible questions on how and why here as it would be beyond the scope of this description. 225 PAREIN - Axis main menu 4.7.2 The work menu for the dimensioning of the PID control The basic idea in our adjustment process for the dimensioning of the PID controls is the evaluation of the jump response of the actual speed. The control parameters are Kp, Ki, Kd, Td and II (see manual for the isel servo control card UPMV 4/12). Your task is to set these parameters in such a way that the jump response of the actual speed on this axis is at its optimum. To facilitate this work the start-up program simulates for you a simple oscillograph on the screen. Because of the graphic presentation on the screen the video card in your PC must be capable of displaying graphics. If this is not the case the message: ‘Your computer cannot display graphics‘ will appear on you screen. That means you cannot use this submenu. In the positive case the simulated oscillograph together with the input possibilities will appear on the screen (see illustration 4.3). POSITION CONTROL X_axis 200 % V Control parameters: Kd = [ _] Kp Ki II Td =[ =[ =[ =[ ] ] ] ] Speed [Incr./s]: 100 % V=[ ] Time basis [ms]: Tb = [ ] F7 : HWEÜberbrücken 0% 50 % F1 +direction F10 Reset 100 % Tb [----No----] F2 -direction Terminate with ESC key … Illustration 4.3: The work menu for the dimensioning of the PID control On the left side you have the input fields for the control parameters Kd, Kp, Ki, II, Td. The starting values in these input fields are taken over by the opened initialization file. You can use the variable V to define the desired speed with which the axis should move during the Teach-In-movement when the function keys F1 and F2 are pressed. The unit of V is increment/second. The desired speed V is the scale of the Y-axis. A speed in the range of 0 % ... 200 % of V is shown on this axis. 226 PAREIN - Axis main menu The variable Tb is the time scale on the X-axis. The unit of Tb is milliseconds. A time in the range of 0 % ... 100 % of Tb is shown on this axis. You can go from one input field to another by using the two cursor keys CURSOR_UP and CURSOR_DOWN. The input field that is active at the moment is indicated by the small cursor. You can enter any number without an algebraic sign into any input field as long as this number does not exceed the respective limit. The entry can be deleted with the cursor keys CURSOR_LEFT or BACKSPACE. The entered values are saved by pressing one of the function keys F1, ..., F10 or the ENTER key or the cursor keys CURSOR_UP and CURSOR_DOWN. By pressing one of the two function keys F1, F2 you can make the axis carry out a Teach-In movement with the last entered control parameters and the last entered desired speed V. When the key is released the movement is interrupted immediately. This safety measure is necessary in order to prevent mechanical damages caused by a wrong operation. During the Teach-In movement the graph of the actual speed is shown on the screen. The plotted graph is the jump response of the actual speed with the last entered control parameters. It serves as the basis for the evaluation of the quality of the control. To avoid the effects of the width of backlash you should press the F1 or F2 key briefly before the actual speed graph is to be plotted. If the control parameters are not well set, it can happen that the axis vibrates too much during the start-up. This can lead to mechanical damages. For this reason we have introduced the reset function with the function key F10. When this key is pressed, the PID control is loaded with an internally defined set of values. The PID control with these parameters guarantees a vibration-free axis. For an isel servo controller you can bridge the limit switches at any time by presssing the F7 key in order to be able to switch on the controller when the limit switches are active. After you have pressed this key, the word ‘Yes‘ appears instead of the word ‘No‘. At the same time, there is a blinking warning ‘HWE Bridging‘ at the bottom right-hand corner of the screen. The setting process can be terminated with the ESC key. The start-up program demands the input of the overshoot amplitude and the rise time to calculate the speed factor and the damping ratio of this axis for the just determined controller parameter set. The controller parameter, the speed factor and the damping ration are shown. If you accept this values, these determined parameters are taken over in the initialisation file automatically except the damping ratio. The damping ratio is only a temporary value which is not necessary for the driver and which is also not saved in the initialisation file. By means of this damping ratio and the determined controller parameter set you can evaluate the oscillation behaviour of this axis. 227 PAREIN - Axis main menu 4.7.3 The dimensioning of the PID-Filter For the success of the setting process it is very important that you follow the steps described below exactly in the given sequence. Step 1: Defining the desired speed V You should set the desired speed V to at least 10 000 increments/second during the setting of the control parameters. After the setting of these parameters you can still vary the desired speed in order to be able to fine-tune. Step 2: Defining the time basis Tb The time basis Tb is the scale for the graphic presentation of the actual speed. If the time basis is small you can better observe the transition of the actual speed from 0 up to the desired speed. A large time basis is suitable for the observation of the long-term behaviour of the actual speed. At the beginning you can take the standard value Tb = 1 000 ms. You can change Tb any time during the setting process to adjust it to your requirements. Step 3: Setting of Kd You must set Ki and Td to 0. Kp should be equal to 10 or 20. In this step the parameters Kp, Ki, Td, II remain unchanged during the setting process for Kd. Kd must be increased step-by-step. The starting value for Kd can be 200. An increase of 200 per step is adequate. After each new input of Kd you must move the axis with the F1 or F2 function key. The actual speed graph will appear on the screen. Illustration 4.4 shows a typical actual speed graph during this phase. Illustration 4.4: Typical actual speed graph during the setting process for Kd During the setting of Kd the actual speed graph plays only a subordinate role. Much more important is the noise which you can hear during the axis movement carried out with F1 or F2. You must increase Kd step-by-step until you can hear the noise clearly during the movement. After that you must reduce Kd step-by-step until the movement noise disappears. Now the parameter Kd is set. From now on you can still vary the movement speed V to fine-tune Kd. Illustration 3.5 shows a typical actual speed graph after the setting of Kd. 228 PAREIN - Axis main menu Illustration 4.5: Typical actual speed graph after the setting of Kd Step 4: Setting of Kp You have to set Ki and Td to 0. Kd has the value that you have set in step 3. You must increase Kp step-by-step. The starting value of Kp should be 10 or 20. An increase of 10 per step is adequate. After each new input of Kp you should move the axis with F1 or F2 in order to plot the actual speed graph. The bigger Kp, the better. But if the Kp value is too big it will lead to the following occurrences: - During the movement the actual speed oscillates around the desired value (see illustration 4.6). - The oscillation of the actual speed around the desired value causes a movement noise that is clearly audible during the movement of the axis. - During standstill the axis is prone to small oscillations around its actual position. That can be established very easily by gently pushing the axis. If the Kp value is too big the axis will start to oscillate around its position. These small continuous oscillations again cause a distinct oscillation noise that can be heard clearly. Because of these occurrences, you can easily determine whether Kp is too big or not. Illustration 4.6: Typical actual speed graph for a Kp value that is too big You must increase Kp step-by-step until the above occurrences take place. After that Kp is decreased step-by-step until these occurrences are no longer noticeable. Now the parameter Kp is set. From now on you can still vary the 229 PAREIN - Axis main menu movement speed V to fine-tune Kp. Illustration 4.7 shows a typical actual speed graph after the setting of Kd and Kp. Illustration 4.7: Typical actual speed graph after the setting of Kd and Kp Step 5: Setting of Ki The Ki value different from 0 is necessary to regulate the lasting difference between the demand and the real value, that is, you got a control deviation equal to 0. But a Ki different from 0 always yields unavoidable to an overshoot. To handle? this discrepancy it is necessary to use a speed controller with intergration part. The intergration portion of the speed controller is resposible for the elimination of the lasting control deviation. In this case there is no need to configure Ki. Set Ki only equal to 0. In some cases you can set Ki to a very small value but normally it is not necessary. So the axis has neither overshooting nor control deviation. If there are no speed controller you had to configure Ki. In the following we want to explain how to do it. You must set Td to 0. The integral limit II should not be equal to 0. We have always set II to 2048. This standard value should also be used by you for your equipment. Kd and Kp have the values that you have set in steps 3 and 4. In this step you must increase Ki step-by-step. The starting value of Ki should be 2 or 3. An increase of 10 per step is adequate. After each new input of Ki you must move the axis by pressing F1 or F2 in order to plot the actual speed graph. The bigger Ki, the better. But if the value of Ki is too big it will lead to the following occurrences: - During the movement the actual speed oscillates around the desired values (see illustration 4.8). - If the value of Ki is very big you can again hear a distinct movement noise that is caused by the oscillation of the actual speed around the desired value. - During standstill the axis is prone to continuous oscillations around its position. A gentle push at the axis will immediately cause small continuous oscillations. These continuous oscillations are again to be detected by a distinct oscillation noise. 230 PAREIN - Axis main menu Illustration 4.8: Typical actual speed graph for a Ki value that is too big You must increase Ki step-by-step until the above-mentioned occurrences take place. After that Ki is decreased step-by-step until these occurrences are no longer noticeable. Now the setting of Ki is finished. A variation of V can be very useful in the tine-tuning of Ki. Illustration 4.9 shows a typical actual speed graph after the setting of Kd, Kp and Ki. Illustration 4.9: Typical actual speed graph after the setting of Kd, Kp and Ki Step 6: Setting of Td The parameters Kd, Kp, Ki and II have the values that you have set in the last steps. Td had up till now the value of 0. In this step you must increase Td by 1 step-by-step. You should note that you must half Kd each time you increase Td by 1. After each new input you should move the axis with F1 or F2 in order to plot the actual speed graph. With an increase of Td you will notice that the movement noise is distinctly reduced. A too big value of Td leads to an oscillation of the actual speed around the desired value (see illustration 4.10). Therefore you should only continue increasing Td if you do not notice any deterioration of the actual speed graph. An improvement of the control behaviour through the increasing of Td can normally only be achieved with slow axes. A highly dynamic axis is easily prone to a continuous oscillation when you increase Td. In our equipment Td lies mostly in the range of 0 ... 2. 231 PAREIN - Axis main menu Illustration 4.10: Typical actual speed graph for a value of Td that is too big During the setting of the control parameters it is recommended that you move the axis in both directions so that the actual speed graphs can be plotted and evaluated for both directions. Illustration 4.11 shows the actual speed graph for optimally set control parameters. Illustration 4.11: Typical actual speed graph for optimally set control parameters Step 7: Determination of the rise time and the overshoot amplitude You cannot set the rise time and the overshoot amplitude but only determine them based on the jump response. These two parameters are characteristic values of the controlled axis and depend greatly on the set controller parameters. Before closing the controller setting menu with ESC you have to ascertain these two characteristic values because the next work menu requires these two values in order to calculate the speed factor and the damping ratio. The overshoot amplitude is the difference between the peak of the first overshoot of the jump response and the desired value. In the case of an overshoot amplitude that is greater than 0, the rise time is the time between the point of time 0 and the point of time at which the jump response reaches the desired value for the first time. In Illustration 4.12, we will illustrate how you can deterrmine these two characteristic values based on the jump response: 232 PAREIN - Axis main menu 200 % V overshoot amplitude > 0 100 % desired value 50 % 0% 100 % Tb rise time Illustration 4.12: Determination of the rise time and the overshoot amplitude in the case of an overshoot amplitude that is greater than 0 The jump response in illustration 4.12 is somewhat exaggerated in order to make clearer the determination of the overshoot amplitude. In many cases there is no overshoot amplitude (see illustration 4.13), that is, the value of the overshoot amplitude equals 0. Here, the rise time is the time between the instant 0 and the instant at which the jump response could reach the desired value, if the jump response would maintain its intial rise. 200 % V overshoot amplitude = 0 % 100 % desired value 0% 50 % 100 % Tb rise time Illustration 4.13: Determination of the rise time and the overshoot amplitude in the case of an overshoot amplitude that is equal to 0 In order to make the reading of the rise time and the overshoot amplitude easier you should reduce the time base Tb. The rise time is read in percentage of the time base Tb and the overshoot amplitude in percentage of the desired value. Illustration 4.12 for example shows a rise time of 7 (% Tb) and an overshoot amplitude of 42 (% desired value). Illustration 4.13 shows a rise time 233 PAREIN - Axis main menu of 4 (% Tb) and an overshoot amplitude of 0 (% desired value). You have to note the value of the rise time and the value of the overshoot amplitude for the next work menu. The work menu that comes after the pressing of the ESC key for the termination of the controller setting menu requires the input of the rise time and the overshoot amplitude in order to calculate the speed gain factor and the damping ratio of the axis. The speed gain factor is the dynamic characteristic value of the axis which the driver needs for the internal calculation. Therefore this factor is taken over into the initialization file. The larger this factor, the better the dynamic performance of the axis. Due to the symmetry of the equipment it is often desirable that all axes of an equipment have approximately the same dynamic performance, that is, you should set the controller parameters in such a way that the speed gain factors of the axes are approx. the same. In practice it is often arranged that the controller parameters of the axes are first of all set in such a way that all axes have the maximum possible dynamic performance. The axis with the worst dynamic performance is used as reference axis. The controller parameters of the other axes are adjusted in such a way that these axes have approximately the same dynamic performance as the reference axis. When varying the controller parameters it generally applies that large values of Kd and Kp lead to a large speed gain factor and vice versa. In order to make the comparison of the dynamic performance of the axes easier for you, the speed gain factors of all axes are shown in the last work menu. The damping ratio is a characteristic value for the oscillation tendency of the axis. The value of the damping lies in the range 0 ... 1. The larger the damping ratio, the smaller will be the oscillation tendency and the better the behaviour of the axis. A damping ratio greater than or equal to 0.7 is desirable. 4.8 The Conversion submenu In many equipment it is not easy to determine the conversion factor of the axes. Here we are thinking of for e. g. axes with toothed belts. In this submenu you have the possibility to determine the axis conversion factor by experiment. First of all the old conversion factor is obtained from the initialization file and displayed. You can decide whether you want to set a new conversion factor or not. If the answer is positive then the next work menu is opened. In this work menu you can carry out the Teach-In movements with the F1 or F2 key. By pressing the F10 key you can define the actual point as the zero point of the axis at any time. 234 PAREIN - Axis main menu You can define the Teach-In speed via the V_Teach-In input field. During the Teach-In movement, the number of increments covered are displayed on-line. To determine the conversion factor of the axis, proceed as follows: - First of all the axis is moved up to one end. Mark the starting point on the axis here. At the same time define the starting point as the zero point of the axis by pressing the F10 key. This zero point of the axis serves as the reference point for the counting of the increments covered. - After that move the axis to the other end. Mark the ending point on the axis here. By pressing the ENTER key you will get to the next work menu in which the number of the increments covered between the starting point and the ending point is taken over from the last work menu. The movement length has still to be determined by you and entered here. For a linear axis the movement length is the length distance between the marked starting point and the marked ending point. The length unit is micrometer. For a rotation axis the movement length to be entered is the angle of rotation between the starting point and the ending point. The angle unit is angular second. From the movement length entered, the number of increments covered and the number of encoder lines the setting program calculates automatically for you the axis conversion factor. You also have the possibility to edit the calculated values. After the pressing of the ENTER key the new value is automatically saved into the initialization file. With a new conversion factor it is necessary to adjust the ramp parameters of the axis (maximum axis speed and maximum axis acceleration) to the new conversion factor (see section 4.9). You can decide here whether the ramp parameters are to be updated or not. If you want it to be done then the updating is carried out automatically. With the following examples we will explain to you how the setting program calculates the axis conversion factor internally. Example 1: Conversion factor of a rotation axis The number of encoder lines is 1,000. The number of increments covered is 25 455. The distance between the starting point and the ending point is 74 degrees. From these data we have the conversion factor: 74 * 3,600 angular seconds * (4 * 1,000 incr./1 motor revolution) / 25,455 incr. = 41,862 angular seconds/motor revolution The factor 4 in the above formula is required because the chip LM628 quadruples the encoder pulses internally. 235 PAREIN - Axis main menu Example 2: Conversion factor of a linear axis The number of encoder lines is 500. The number of increments covered is 34,789. The distance between the starting point and the ending point is 89 mm. From these data, we have the conversion factor: 89,000 µm * (4 * 500 incr./1 motor revolution)/34,784 incr. = 5,117 µm/motor revolution As in the first example, the factor 4 is required here because the chip LM628 quadruples the encoder pulses internally. 4.9 The Ramp submenu The dynamic performance of an axis is expressed by its maximum acceleration and its maximum speed. These two ramp parameters can be determined by experiment using the actual speed graphs. In this submenu we offer you the auxiliary means for the plotting of the actual speed graph of an axis. 4.9.1 The experimental plotting of the maximum ramp The work menu for the plotting of the actual speed graphs is shown in Illustration 4.14. ACCELERATION OF THE AXIS 200 % V X_axis Distance [Inkr.]: S_ti = [150 920 ] ] P1 = [0 P2 = [150 920] Speed [Inkr./s]: V_ti = [20 000 ] V = [200 000] 100 % Time basis [ms]: Tb = [500 ] F7 : HWEbridging [-----No-----] 0% 50 % F1 + Direction F10 Zero point F2 - Direction 100 % Tb F4 P1 F8 Start F5 P2 Terminate with ESC key … Illustration 4.14: Work menu for the determination of the maximum acceleration At the first position on the left-hand side you have the variable S_ti. Here, the number of the traversed increments is shown on-line during the Teach-In 236 PAREIN - Axis main menu movement. The speed for the Teach-In movement is entered via the variable V_ti. Using the variable V you can define the scale for the Y-axis. At the same time the maximum speed during the plotting of the actual speed graphs is limited to the value of this variable. The unit for the speed is increments/second. You can define the scale for the X-axis with the time base Tb. The unit of Tb is millisecond. Using the F7 key, it is possible to bridge the limit switches at any time. You can read more about the operation of the input fields in Section 4.7.2. In order to determine the maximum acceleration of the axis, proceed as follows: Move the axis to one of its ends with the function key F1 or F2. Here, you use the F4 key to define Point 1. After this, the axis is moved to the other end. Here, you define Point 2 using the F5 key. The coordinates of these two points are displayed via the variables P1 and P2 and are stored internally by the setting program. Every time you use the F10 key to re-define the zero point of the axis, these two coordinates are corrected accordingly. At the beginning these coordinates are equal to zero. After Point 1 and Point 2 have been defined, the setting program determines which point is farthest from the current position every time the F8 key is pressed. After that the axis is accelerated with a maximum possible acceleration value, if possible up to the speed defined in the variable V. The limitation of the moving speed through the variable V is useful in cases where a high movement speed is not desired, e. g. due to the danger to people and machine. When the farthest point has been reached, the movement is stopped. During the movement the actual speed graph is displayed on-line. With the help of the plotted speed graph you can determine two figures: First of all, what percentage of the value that is defined in the variable V is attained by the final speed, and secondly, what percentage of the time base defined in the variable Tb is needed for the acceleration of the axis to the final speed. You should note down both percentages so that you can enter them again in the next work menu. Due to the asymmetry of the axes, it is generally recommended that you record the ramp in the positive as well as in the negative direction. From this, the appropriate percentages for the maximum speed and the acceleration time are read. The smaller percentage of the maximum speed and the greater percentage of the acceleration time then serve as the basis for the calculation of the maximum acceleration. For safety reasons we realized this in the plotting of the ramp in such a way that the movement is only continued as long as you hold down the F8 key. Upon releasing the key, the movement is interrupted immediately. 237 PAREIN - Axis main menu The work menu for the plotting of the actual speed graphs is closed by pressing the ESC key. The next work menu requires the input of the determined maximum axis speed and the acceleration time. Due to load fluctuations during the processing, each axis must always have a certain reserve for the acceleration. This reserve is taken into consideration by the acceleration factor to be entered by you. With this acceleration factor you inform the setting program what percentage of the maximum acceleration value available you want to define as the maximum acceleration of the axis. In our equipment we normally enter a value of approx. 80 % for the acceleration factor. You should also consider that the axis works more smoothly if the acceleration value is smaller. After all input values have been confirmed by pressing the ENTER key, the setting program will automatically calculate the maximum acceleration. These values are then displayed and you can then decide whether these values are to be taken over into the intialization file or not. In order to give you a better understanding, we will use the example in Illustration 4.14 to explain how the setting program calculates the maximum acceleration for an acceleration factor of 80 % from the input data. The following applies to the final speed: V_end = 91 % * 200,000 incr./s = 182,000 incr./s In order to reach this final speed, the axis requires an acceleration time of 10 % * Tb. Thus: A_max = 80 % * (V_end/(10 % * 500 ms)) = 80 % * (182,000 incr./s/0.05 s) = 2,912,000 incr./s² Based on the number of encoder lines and the conversion factor of the axis the unit increment is converted into the unit micrometer (for a linear axis) or arc second (for a rotary axis). We will use a linear axis as example. The same calculation method applies to a rotary axis as well. Let us assume that the axis has an encoder with 1,000 lines and a conversion factor of 4,000 µm/motor revolution. Do not forget that the controller chip LM628 quadruples the number of encoder lines. Thus: A_max = 2,912,000 incr./s² * 4,000 µm/motor revolution/ (4 * 1,000 incr./motor revolution) = 2,912,000 µm/s² 238 PAREIN - Axis main menu 4.9.2 Determination of the maximum speed As in the determination of the maximum axis acceleration, the maximum axis speed is also determined experimentally with the use of actual speed graphs. Illustration 4.15 shows the work menu for the plotting of the actual speed graphs. VELOCITY OF THE AXIS 200 % V X_axis Distance [Inkr.]: S_ti = [150 920 ] ] P1 = [0 P2 = [150 920] Speed [Inkr./s]: V_ti = [20 000 ] 100 % V = [150000 ] Acceleration [% A_max]: A_pro = [50 ] Time basis [ms]: Tb = [750 ] F7 : HWE- bridging [-----No-----] 0% 100 % Tb 50 % F1 + Direction F10 Zero point F2 - Direction F4 P1 F8 Start F5 P2 Terminate with ESC key … Illustration 4.15: Work menu for the determination of the maximum speed In section 4.9.1 we have already explained how you can plot actual speed graphs. However, there are two particular points here that you have to note. The first concerns the variable V that is shown on the left-hand side. Here, a speed value is entered with the unit increment/second. This value is the scale of the Y-axis. In the determination of the acceleration, this value constitutes at the same time the upper limit for the final speed of the movement (see illustration 4.14). However, here this value does not have any influence on the final speed of the ramp. After all, we want to determine the maximum speed of the axis. The second point concerns the variable A_pro. We do not have this variable on the work menu for the acceleration. By using this variable you can enter a certain percentage value. The value can range between 1 and 100. Based on this percentage value and the maximum acceleration that was determined by you in the last work menu, the setting program calculates the acceleration value with which the axis is accelerated to the maximum speed, that is, you can use the variable A-pro to make the ramp flatter or steeper. However, this variable does not have any influence on the final speed of the ramp. 239 PAREIN - Axis main menu As a standard feature, the variable A_pro has the value 100, that is, the ramp is executed with the maximum acceleration. If you want to minimize the wear and tear of the mechanical system during the setting process, you should set a lower value for the variable A_pro, in order to achieve a smoother progress of the ramp. In this work menu the axis is accelerated to the maximum possible speed. The ramp is shown on-line. Using the plotted actual speed graph, you can determine the final ramp speed as a percentage of the value that is defined in the variable V. You should note down this percentage value because you will need it for the next work menu. After having ended the experimental process by pressing the ESC key, the next menu appears. The percentage value for the maximum speed that you have determined during the experimental process has to be entered here. Like for the acceleration you can also define how many percent of the maximum speed value available the maximum speed of the axis should be using the so-called speed factor. But it is not as critical here as it is for the acceleration. For the speed factor you can enter a value of 100 % without worry. In our equipment, we generally use a value of 90 %. After all input has been confirmed by pressing the ENTER key, the setting program will automatically calculate the maximum speed for you. This value is displayed. You can then decide whether this value is to be taken over into the initialization file or not. Even though all calculations are carried out by the setting program, for a better understanding, we are going to explain in illustration 4.15 how the maximum speed is calculated internally. The maximum speed of the axis is 110 % of V. For a speed factor of 90 %, we have: V_max = 90 % * (110 % * 150,000 incr./s) = 148,500 incr./s For an encoder with 1,000 lines and a conversion factor of 4,000 µm/motor revolution, the following applies: V_max = 148,500 incr./s * 4,000 µm/motor revolution/ (4 * 1,000 incr./motor revolution) = 148,500 µm/s 240 PAREIN - Axis main menu 4.10 The Switch submenu After the selection of this submenu, the work menu will appear on the screen (see illustration 4.16). Illustration 4.16: An example of the work menu on the selection of the Switch submenu The start-up program takes over all information on the limit and reference switches as well as on the axis direction from the initialization file and displays it in the work menu. As in the configuration program, you can enter here all information for the positive or the negative hardware limit switch of the axes. You can release or block the respective hardware limit switch. The blocking and the releasing appear as follows: On/Off [X] ---> The respective limit switch is used. [ ] ---> The respective limit switch is not used. For every limit switch used you must also state to which port and to which bit the limit switch is connected. Each axis must have a reference switch. As in the limit switches, you must also state here the port address and the bit number. In addition, you must also state whether the reference switch is on the negative side or on the positive side. The defining of the reference switch direction appears as follows: Direction [X] Standard ---> The reference switch lies on the negative side [ ] Standard ---> The reference switch lies on the positive side The positive and the negative direction is already been defined by the card for each axis. However, in spite of this, you still have the possibility to retain or to change these predefined directions. The retaining of the predefined directions is done with the selection of the standard setting. If the standard setting is not selected then the positive and the negative direction are reversed. The setting appears as follows: 241 PAREIN - Axis main menu Axis direction [X] Standard ---> Retaining of the predefined directions [ ] Standard ---> Changing of the predefined direction In this menu you also have the possibility to define the active level of the reference or of the hardware limit switches. The active level (High or Low) is at an input port if the respective reference or hardware limit switch has been approached. It should be noted that the defined active level applies to all reference switches and to all hardware limit switches of your equipment. Using the function keys F1 or F2 you can carry out a Teach-In movement with the axis. The Teach-In speed can be freely defined via the input field V_Teach-In. In order to check the correctness of the port address and the bit number of the respective switch as well as of the active level, you must move the axis in the respective direction with F1 or F2. The contents of each defined port is displayed bit by bit on-line. When the switch is operated, the corresponding bit must be set or reset. With this display you can easily establish whether the port address and the bit number of the switch as well as the active level are correct or not. It should be noted that a positive Teach-In movement that has been carried out with F1 must operate the positive limit switch as well as the reference switch if the positive switch exists and if the reference switch is on the positive side (the position of the reference switch on the positive side is called ‘non-standard‘). A negative Teach-In movement carried out with F2 operates the negative limit switch as well as the reference switch if the negative limit switch exists and if the reference switch is on the negative side (the position of the reference switch on the negative side is called ‘standard‘). The Teach-In movements with F1 and F2 are very useful for the selection of the direction of the axis. It should be noted that the operating of the keys F1 or F2 always produces a positive or a negative movement. A changing of the direction selection leads immediately to a change in the movement direction. When the axis direction is changed, the port address, the bit numbers of all switches as well as the direction of the reference switch must be changed accordingly. The input is confirmed by pressing the ENTER key. The new configuration is automatically taken over into the initialization file. 242 PAREIN - Axis main menu 4.11 The Bridging submenu The physical working range of your equipment is limited by the hardware limit switches. It is recommended that the hardware limit switches be integrated into the safety circuit. In order to protect the motors as well as the mechanical system, the power modules of isel servo controllers are switched off immediately in the case of a hardware limit switch fault. However, this means that the axis or axes can no longer be moved out of the hardware limit switches without taking special measures. For this reason, we are using in our servo controller the Bit 5 of the output port with the address (Base address+0Ch) on the PC card to bridge the safety circuit. After that, the power output modules can be switched back on. If you are realizing the safety circuit of your controller in another way, you do not need to read this section. Illustration 4.17 shows the work menu for the controlling of the switch bridging. Illustration 4.17: Work menu for the selection of the Switch Bridging submenu The controlling of the switch bridging is a very simple process. Using the function keys F1 and F2, you move the axis to the limit switch in question. - If there is no fault, the power output modules have to be switched off if you have selected the option NO in the ’Switch Bridging’ field. - If the option YES is activated, the power output modules remain on. - If the controller does anything else, then there is a fault. In order to make life easier for you, the states of all limit switches and that of the reference switch are constantly read and displayed on-line. The Teach-In speed can be freely defined. 243 PAREIN - Axis main menu 4.12 The Enable/Disable submenu It is often desirable to operate the motors without current so that it is possible for the user to move the axes by hand. The switching-on and switching-off of motor currents is done with the output of the respective values at an output (see manual for the isel servo control card UPMV 4/12). In our servo controller this output signal is connected with the Enable/Disable inputs of the power output stages. If you have done something else to your control electronics to solve this problem then you do need to conttinue reading this section. You can continue working with the next section. Illustration 4.18 shows the work menu for the checking of Enable/Disable. Illustration 4.18: Work menu for the checking of Enable/Disable The checking of the Enable/Disable is very simple. Using the function keys F1 and F2 you can move the axis in both directions. The key switch as well as the hardware limit switch should be inactive. First of all, select Enable. If there is no fault you will be able to continue moving the axis with the function keys. After that, select Disable. If there is no fault you will no longer be able to move the axis now. 4.13 The Dead Time submenu Internally the driver needs the dead time of the individual axes to monitor the run-out error. In this submenu you can determine the dead time of the axes very quickly and simply. Illustration 4.19 shows the work menu for the determination of the dead time. 244 PAREIN - Info main menu Illustration 4.19: Work menu for the determination of the dead time You can move the axis with the function keys F1 and F2. At the start of every movement, the dead time is automatically calculated and displayed. It should be noted that only the start of the movement is important for the calculation of the dead time. Because of the asymmetry of each axis, the dead time should be calculated for both directions. You then still have the possibility to edit the dead time. You should input the larger value of the dead times calculated. 5 The INFO main menu You can see here which driver version you must have if you want to work with this setting program. In addition you can obtain our address from this menu. This can be useful to you in many situations. 6 Possible errors when setting the parameters During the starting-up of operations, various errors can occur. In this section, we will list these errors and their causes. File write error This error only occurs when saving the initialisation file. The reason is either a fault on the disk or it‘s full or it‘s write-protected. File name error This error occurs when opening or saving of a initialisation file. The names of the initialisation files are named according to the DOS-convention. All letters from ‘a‘ to ‚z‘ are accepted in the names. There are no differences between lower case and upper case. The numbers from ‘0‘ to ‘9‘ and the character ‘-‚ and ‘_‘ are accepted. Beyond this the file name needs the ending ‘ini‘. 245 PAREIN – Possible errors File format error This error occurs when you try to open a file which is no initialisation file or which has a wrong version number. Plotter error This error only occurs when you try to print the initialisation file. When the printer is not ready or when there ist no connection to the printer you will see this error. The computer is not able to handle graphics This error can only occur if you want to use one of the submenus V_Controller, Posi._Controller or Ramp. In this instance the setting program has to use the graphics mode of the video card in your computer in order to plot the actual speed graphs. If the video card does not support a graphics mode you will get this error. Normally, this error should not occur because all common video cards in the market support graphics. The cause of this error is mostly that you have installed the wrong driver for the video card. Wrong base address or defective timer This error only occurs during the selection of the Card submenu. In most cases, this error message indicates a wrong base address. You have to enter the correct base address with the PARKON configuration program. Very rarely is this error message triggered by a defective timer on the PC card. In that case, you would have to replace the timer component (Manufacturer: INTEL). Defective axis controller This error message can only appear when the Card submenu is selected. The axis with the defective axis controller is displayed. In this case, the axis controller either is not there or is defective. In most cases, this error message is triggered by the entering of the wrong number of axes. If, for example, you enter 4 as the number of axes even though the PC card is only equipped with 3 axis controllers for 3 axes, this error message will be displayed. Wrong IRQ number Our driver software for the PC card requires internally a hardware interrupt. You can choose either IRQ10 or IRQ11. The selection must match the jumper setting on the PC card and the selected interrupt has to be available (see manual for isel servo control card UPMV 4/12) otherwise you will get this error message. 246 Licence agreement Important note! Please, read thoroughly the terms of the license agreement overleaf before opening the wrapping. If you do not agree to the license agreement or parts of the license agreement, return the product in unopened state for a refund of the purchase price you paid to iselautomation GmbH & Co.KG. By opening the sealed package you are agreeing to become bound by the terms of the license agreement. 247 Licence agreement License agreement 1 Granting a License iselautomation GmbH & Co.KG grants to you the right to use copies of the enclosed program and/or of the software package (the “software”) on one or several computers - as long as the use occurs in intrinsic use. Software is used if it is installed in temporary memory (RAM) or in a non-volatile memory (fixed disk, streamer, floppy disk, CD-ROM ...). 2 Expanding the License In case the software is a language product (e. g. interpreter for free programming) you have the right to duplicate and to distribute the run-time modules of the software required for the operation of the NC control files under the following conditions: a) You only distribute the run-time modules as a part of your software product and as a part of the same. b) While marketing your product you neither use the name nor the LOGO nor others signs of iselautomation GmbH & Co.KG. c) You display the iselautomation copyright note for the software as an integral part of your initial product display. You may not remove or modify the copyright note if you use run-time modules of iselautomation GmbH & Co.KG. d) You agreed to keep iselautomation GmbH & Co.KG free of all claims or all litigations resulting out of the use or the distribution of your product and to protect iselautomation GmbH & Co.KG against such claims. Run-time modules are the files of the software that are expressly specified in the written documents as being required for: - the operation of the hardware - the running of your NC controller program Run-time modules are limited to memory-resident controller programs (drivers) for the machine control, the object files for path data generation and interpreter modules for NC source files whose use and passing-on is expressly permitted. 3 Copyright The software is the property of iselautomation GmbH & Co.KG and protected by copyright laws and national legal regulations against copying. For intrinsic use and saving and archiving purposes, you may create copies of software. Neither the software nor the manuals or parts of it may be copied or duplicated in any form and passed onto third parties or made amenable to third parties in any form. Reverse engineering, de-compiling and disassembling of software by you or by third parties is not permitted. 4 Limiting of the liability and claims of the customer iselautomation GmbH & Co.KG is not liable for any direct, indirect, consequential, or incidental damages (including damages for loss of business profits, business interruption or other financial losses) arising out of the use of faulty use of the software. The liability of iselautomation GmbH & Co.KG is always limited to the amount that you paid for software to iselautomation GmbH & Co.KG. The entire liability of iselautomation GmbH & Co.KG and your exclusive remedy at iselautomation´s option is either the return of the purchase price or the repair or the replacement of software or the hardware. This does not apply if the loss of software is to be traced back to erroneous an application or an accident. 248


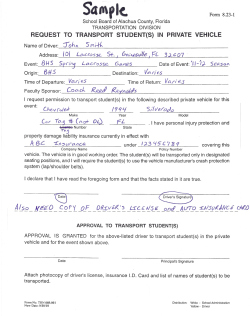


© Copyright 2026