
Classic recipes and top tips to help you Get Baking Sandwich, Scones,
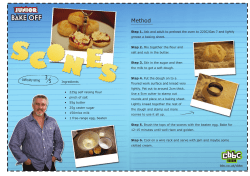
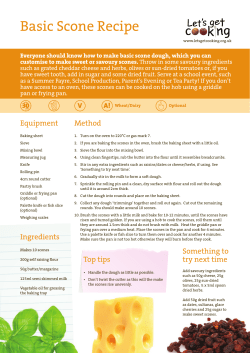
Classic recipes and top tips
to help you Get Baking
Recipes for Victoria
Sandwich, Scones,
Cob Bread, Lemon Soufflés
and Cornish Pasties
Baking is a great British tradition – it is relaxing,
rewarding and great fun. When we were making
the BBC Two series The Great British Bake Off,
we tasted cake, bread and biscuits from all over
the UK and were delighted to find that baking
is more popular than ever.
Paul Hollywood
and Mary Berry
Nothing beats the taste of something that’s been baked
at home, and it’s really not difficult. With a good recipe and
some practice you’ll be amazed at what you can create.
This guide will help you get started with five classic recipes
and step-by-step advice. Learn how to make the perfect
Victoria Sandwich, tasty Scones, a crusty Cob Loaf, hot
Lemon Soufflés, or delicious Cornish Pasties. The recipes
here were attempted by contestants on The Great British
Bake Off and they’re the perfect introduction to baking.
Find out about the essential elements of great baking and
learn how to get brilliant results with some of our top baking
tips. And if you’re a complete beginner, go online and let us
show you how it’s done.
Once you’ve built your confidence, we hope you’ll use
your new baking skills to raise money for BBC Children in
Need. Whether you hold a cake stall or a cake auction, you
can help make a difference for children across the UK.
So if you’re crazy for cake, can’t resist a biscuit, have a soft
spot for bread, a passion for puddings or can’t get enough
pies, there are no excuses – Get Baking!
Get Baking for BBC Children in Need
bbc.co.uk/food
Contents
Victoria Sandwich
Scones Cob Loaf Lemon Soufflés Cornish Pasties Ask the Experts
Bake it Better
3
7
11
15
19
22
24
All the recipes in this guide have step-by-step
advice to help you bake beautifully.
Remember the three golden rules:
1. Read the recipe through before you start.
2. Weigh and measure your ingredients carefully.
3. Don’t open the oven door while you’re baking.
And for extra help, go online to watch Mary and
Paul demonstrating the recipes and techniques:
bbc.co.uk/food
Before you start, it’s worth checking that you
have some basic baking equipment:
• Scales
• Big and small mixing bowls
• Wooden spoon
• Tablespoon
• Teaspoon
• Whisk
• Rolling pin
• Oven gloves or thick
tea towel
• Spatula
• Sieve
1
Ovens
All ovens vary and the number on the dial
isn’t always the true temperature – so cooking
times can only be used as a guide. An oven
thermometer is a good tool.
Conventional and gas ovens are hottest at the
top, so it’s best to bake on the middle shelf to
avoid burning things before they’re cooked
through. If your cakes start to brown too quickly,
you can reduce the oven temperature by 10°C
or, towards the end of the cooking time, you
can cover them loosely with aluminium foil.
Fan ovens provide a fiercer heat than
conventional ovens, so reduce the temperature
by 20°C – check your oven instruction booklet.
Don't be tempted to open the oven door until
at least two thirds through a cake’s cooking time
– the structure of the batter won’t be 'set' before
this stage and the sudden change in temperature
can cause it to collapse. If you need to look after
this point, open the door a crack and shut it as
gently as possible to minimise any change in
temperature or blasts of cold air.
2
Butter, Spreads and
packet Margarine
Fats like butter, spreads and packet margarine
incorporate air bubbles in cake batters to
make them rise, give a crumbly or flaky
texture to pastry, and increase the lightness
of a loaf. They also give taste, adding richness
and moistness to the finished recipe.
Butter is made from animal fat (milk), while
margarine, baking spread and vegetable spreads
are made from blends of animal and vegetable
oils, or just vegetable oils.
Vegetable spreads are lower in saturated fats.
Always check on the pack that a vegetable
spread is suitable for baking because many
of the lighter or cholesterol-lowering versions
won't work as well.
Baking spread gives excellent results in cakes –
choose a spread with a minimum 58% fat. If you
prefer to use butter or packet margarine, it’s
important that it’s at the right consistency –
it should be soft and squishy but not oily.
Mary Berry’s Perfect Victoria Sandwich
The traditional Victoria Sandwich is a baking classic and a
tasty teatime treat. This ‘all-in-one’ method is quick and easy.
Very Easy
Preparation
Preparation time: about 30 minutes
Cooking time:
about 25 minutes
Makes: 12 slices
Ingredients
•4 large free-range eggs
•225g/8oz caster sugar, plus a
little extra for the finished cake
•225g/8oz self-raising flour
•2 level tsp baking powder
•225g/8oz baking spread or soft
butter at room temperature, plus
a little extra to grease the tins
•Good-quality strawberry
or raspberry jam
•Whipped cream (optional)
EQuipment
•Scales
•2 x 20cm or 8in round tins
•Baking parchment or
greaseproof paper
•Large mixing bowl
•Electric hand mixer or
wooden spoon
•Damp cloth
•Spatula
•Palette knife or flat knife
•Clean tea towel
•Cooling rack
4
Method
Stage one
1. Weigh out the ingredients.
2. Preheat the oven to 180°C (160°C fan assisted)/
350F/Gas 4.
3. Grease and line the sandwich tins – use a piece of baking
parchment or greaseproof paper to rub a little baking
spread or butter around the inside of the tins until the
sides and base are lightly coated. Line the bottom of
the tins with a circle of baking parchment or greaseproof
paper (draw around the base of the tin onto the
parchment and cut out a circle to fit).
4. Break the eggs into a large mixing bowl, then add the
sugar, flour, baking powder and baking spread. Make sure
the teaspoons of baking powder are level, not heaped,
as too much baking powder can make the cake sink.
5. Mix everything together until well combined. The easiest
way to do this is with an electric hand mixer, but you can
use a wooden spoon. Put a damp cloth under your bowl
when you’re mixing to stop it moving around. Be careful
not to over-mix.
6. Divide the mixture evenly between the tins – this doesn’t
need to be exact, but you can weigh the filled tins if you
want to check. Use the spatula to remove all of the mixture
from the bowl and gently smooth the surface of the cakes.
7. Place the tins on the middle shelf of the oven and bake
for about 25 minutes. Don’t be tempted to open the door
while they’re cooking, but after 20 minutes look through
the door to check them.
TOP TIP
The finished cake mixture should be a soft ‘dropping’
consistency and should fall off a spoon easily. Be careful
not to over-mix – as soon as everything is blended you
should stop.
Stage two
8. The cakes are done when they’re pale golden-brown and
coming away from the edge of the tins. Press them lightly
with a finger to check – they should spring back. Remove
them from the oven and set aside to cool in their tins for
5 to 10 minutes. Then run a palette or flat knife around
the edge of the tin and carefully tip the cakes out onto
a cooling rack. To take your cakes out of the tins without
leaving a wire rack mark, put a clean tea towel over the
tin, put your hand onto the tea towel and tip the tin upside
down. The cake should come out onto your hand and the
tea towel – then you can turn it from your hand onto the
wire rack.
9. Set aside to cool completely.
Stage three
10.To assemble the cake, place one cake upside down onto a
plate and spread it with plenty of jam. If you want to, you
can add whipped cream too.
11. Top with the second cake, top side up. Sprinkle over the
caster sugar.
5
Raising Agents
Milk
Baking powder and bicarbonate of soda are
chemical raising agents (as opposed to yeast,
which is a fungus). They give sponges, scones,
muffins and some biscuits their light texture.
Milk and cream are added to slacken the
consistency, give a lighter result and add
protein and fat. Milk is also used in bread to
add a richness and a slight sweetness, but it
should be scalded (almost boiled) and cooled
beforehand to prevent the bread having a
heavy crumb.
Active raising agents give off bubbles of
carbon dioxide, which help batter or dough
rise. Once they reach a certain temperature in
the oven they stop working and the batter or
dough sets. It's important not to open the oven
door too early during cake baking – the batter
needs to set around the air bubbles first or the
cake will collapse.
Bicarbonate of soda is alkaline and needs an
acid to get it working. Yoghurt, buttermilk and
cream of tartar are commonly used to do this.
Baking powder is a ready mix of bicarbonate of
soda and an acid. It’s inactive as long as it’s dry
and starts working when it comes into contact
with liquids.
Once opened, raising agents have a limited
shelf life. To test if they're still active, add a
teaspoon of raising agent to a small bowl
of water – if it doesn’t bubble and fizz, throw
it away.
6
Full-fat cow's milk is normally used in recipes,
but semi-skimmed will work, although the result
will be less creamy. Avoid using skimmed milk as
it’s too watery for baking. Part or all of the milk
can be replaced with cream for a richer result –
this works particularly well in scones.
Goat's milk, sheep's milk and non-dairy
alternatives such as soya or rice milk can be
substituted in most recipes, but check the label
as some brands may be unsuitable for baking.
Whipped cream is used as a filling or topping.
Always use double or whipping cream as these
have a higher fat content. Single cream won't
whip. When whipping cream, stop as soon as soft
peaks form – if you whip for too long, the cream
will turn to butter.
Paul Hollywood’s Scones
This simple recipe will give you soft and fluffy scones –
perfect with jam and plenty of clotted cream.
Easy
Preparation
Preparation time:
about 30 minutes
Cooking time: 10–15 minutes
Makes: about 8 large scones
Ingredients
•500g/1lb 1oz strong bread flour,
plus a little extra for rolling out
•80g/3oz softened butter, plus
a little extra to grease the
baking tray
•80g/3oz caster sugar
•2 eggs
•25g/5 level tsp baking powder
•250ml/81/2fl oz milk
•1 free-range egg, beaten with a
little salt (for glazing)
•Butter
•Good-quality strawberry or
raspberry jam
•Clotted cream
EQuipment
• Scales
• Flat baking tray
• Wooden spoon
•Baking parchment or
silicone paper (not greaseproof)
• Round pastry cutter
(about 7.5cm/3in wide)
• Rolling pin
• Pastry brush
• Cooling rack
8
Method
1. Weigh out the ingredients.
2. Preheat the oven to 220°C (200°C fan assisted)/
425F/Gas 7.
3. Lightly butter and line a baking tray with baking
parchment or silicone paper.
4. Put 450g/151/2oz of the flour into a large bowl and add the
butter. Rub the flour and butter together with your fingers
to create a crumble/breadcrumb-like mixture.
5. Add the sugar, eggs and baking powder and use a
wooden spoon to turn the mixture gently. Make sure you
mix all the way down to the bottom and incorporate all of
the ingredients.
6. Now add half of the milk and keep turning the mixture
gently with the spoon to combine. Then add the
remaining milk a little at a time and bring everything
together into a very soft, wet dough. You may not need
to add all of the milk.
7. Put most of the remaining flour onto a clean work surface.
Tip the soft dough onto the flour and sprinkle the rest of
the flour on top. The mixture will be wet and sticky.
8. Lightly chaff the mixture – use your hands to fold the
dough in half, and then turn the dough a quarter turn and
repeat. By folding and turning the mixture in this way, you
incorporate the last of the flour and add air. Do this a few
times until you’ve formed a smooth dough. If the mixture
is too sticky use some extra flour to coat your hands or the
mixture to make it more manageable. Be careful not to
overwork your dough.
TOP TIP
Dip the edge of the pastry cutter in flour to make it
easier to cut out the scones without them sticking. Don’t
twist the cutter – this makes the scones rise unevenly –
just press firmly, then lift up and push the dough out.
9. Next roll the dough out – sprinkle flour onto the work
surface and the top of the dough. Use the rolling pin to
roll up from the middle and then down from the middle.
Turn the dough a quarter turn and repeat until it’s about
2.5cm/1in thick. Relax the dough slightly by lifting the
edges and allowing the dough to spring back.
10.Using a pastry cutter, stamp out rounds and place them
onto the baking tray. Once you’ve cut 4 or 5 rounds you
can re-work and re-roll the dough to make it easier to cut
out the remaining rounds. Any left-over dough can be
worked and rolled again, but the resulting scones won’t
be as fluffy.
11. Place the scones on the baking tray and leave them to rest
for a few minutes to let the baking powder work. Then use
a pastry brush (or your finger if you don’t have a brush)
to glaze them with the beaten egg and salt mixture. Be
careful to keep the glaze on the top of the scones. If it
runs down the sides it will stop them rising evenly.
12.Bake in the middle of the oven for 15 minutes, or until the
scones are risen and golden.
13.Leave the scones to cool, then split in half and
add butter, jam and clotted cream to serve.
9
Flour
Yeast
It's important to choose the right flour for your
recipe. Bread needs a strong flour with a high
gluten content. Gluten is the protein that is
stretched during kneading to give a soft, elastic
dough and a well-risen loaf with a soft texture.
Yeast is a single-cell fungus that is used to
make bread rise. When yeast is given air and
food (sugar and flour) in a warm environment
(a standard kitchen as opposed to the fridge),
the yeast will grow quickly and produce lots
of carbon dioxide. It's this carbon dioxide that
causes bread to rise. Yeast dies at 60°C, so
once it’s done its job and the bread has risen,
it’s killed off in the oven.
A softer flour, lower in gluten and finely milled,
is used to make cakes and pastry light and fluffy.
Using a flour with a high gluten content makes
cakes tough or rubbery. Softer flours are usually
sold as plain flour or self-raising flour. Cake
recipes that use plain flour will usually ask for the
addition of baking powder or bicarbonate of
soda. Self-raising flour is plain flour ready-mixed
with raising agents.
Wholemeal flour can be substituted for white
flour, but will give a heavier result – try
experimenting with half and half first.
10
Yeast flourishes at warm temperatures, around
35°C, so warm water should be used in dough to
activate the yeast. If it's too hot it will kill the yeast.
Yeast is also killed by direct contact with salt,
which is why bread recipes normally say to mix
the salt into the flour first to 'dilute' it, or to add
the salt and yeast to opposite sides of the bowl.
Yeast can be bought fresh or dried. Fresh yeast
may be available in bakeries or at the bread
counter in supermarkets. Dried yeast is sold
as 'dried active yeast', which needs to be
reactivated in warm water before using, or as
'quick' or 'instant' yeast, which can be added
directly to flour in its dry form.
Paul Hollywood’s Crusty Cob Loaf
Making bread takes time, but it’s not difficult.
Try Paul’s recipe for a delicious crusty loaf.
Easy
Preparation
Preparation time: 2–3 hours
Cooking time: 30 minutes
Makes: 1 loaf
Ingredients
•500g/1lb 1oz strong white
bread flour, plus a little extra
flour for finishing
•40g/11/2oz soft butter
•12g/2 sachets fast action
dried yeast
•10g/2 tsp salt
•About 300ml tepid water
(warm not cold – about
body temperature)
•A little olive or sunflower oil
•Additional cold water, for
creating steam in the oven
Equipment
•Large mixing bowl
•Flat baking tray
•Old roasting tin
•Clean tea towel
•Baking parchment or
silicone paper (not greaseproof)
12
Method
Stage one
1. Weigh out the ingredients.
2. Put the flour into a large mixing bowl and add the butter.
Add the yeast to one side of the bowl and add the salt
to the other – the salt will kill the yeast if they come
into direct contact. Stir all the ingredients with a spoon
to combine.
3. Add half of the water and turn the mixture round with
your fingers. Continue to add water a little at a time,
combining well, until you’ve picked up all of the flour from
the sides of the bowl. You may not need to add all of the
water, or you may need to add a little more – you want
a dough that is well combined and soft, but not sticky
or soggy. Mix with your fingers to make sure all of the
ingredients are combined and use the mixture to clean
the inside of the bowl. Keep going until the mixture forms
a rough dough.
4. Use about a teaspoon of oil to lightly grease a clean work
surface – using oil instead of flour will keep the texture of
the dough consistent. Put your dough onto the greased
work surface. Make sure you have plenty of space.
5. Fold the far edge of the dough into the middle, then turn
the dough by a quarter turn and repeat. Do this several
times until the dough is very lightly coated in olive oil.
6. Now use your hands to knead the dough. Push the dough
out in one direction with the heel of your hand, then fold
it back on itself, turn the dough a quarter turn and repeat.
Kneading in this way stretches the gluten and makes the
dough elastic. Do this for about 4 or 5 minutes until the
dough is smooth and stretchy. Work quickly so that the
mixture doesn’t stick to your hands – if it does get too
sticky you can add a little flour to your hands.
7. Clean and lightly oil your mixing bowl and put the dough
back into it. Cover with a damp tea towel or lightly oiled
cling film and leave it on one side to prove. This gives
the yeast time to work and the dough will double in size.
This should take about an hour, but will vary depending
on the temperature of your room.
TOP TIP
Leave the dough to prove in a warm, but not hot place.
In hot temperatures the yeast will work too quickly and
your bread won’t have as much flavour.
Stage two
8. Line a baking tray with baking parchment or silicone paper.
9. Once the dough has doubled in size you can scrape it
out of the bowl to shape it. The texture should be bouncy
and shiny. Put it onto a lightly floured surface and knock
it back – use your hand to roll the dough up, then turn by
a quarter turn and roll it up again. Repeat several times.
Then use your hands to gently turn and smooth it into a
round loaf shape.
10.Place onto the lined baking tray, cover with a tea towel
or lightly oiled cling film and leave to prove again until it’s
doubled in size. This will take about an hour, but may be
quicker or slower depending on how warm your kitchen is.
11. Preheat the oven to 220°C (200°C fan assisted)/425F/
Gas 7. Put an old, empty roasting tin into the bottom of
the oven.
Stage three
12.After an hour the loaf should have risen again. Sprinkle
some flour on top and very gently rub it in. Use a large,
sharp knife to make shallow cuts about 1cm deep across
the top of the loaf to create a diamond pattern.
13.Put the loaf on the baking tray into the middle of the
oven. Pour cold water into the empty roasting tray at the
bottom of the oven just before you shut the door – this
creates steam which helps the loaf develop a crisp and
shiny crust.
14.Bake the loaf for about 30 minutes.
15.The loaf is cooked when it’s risen and golden. To check,
take it out of the oven and tap it gently underneath – it
should sound hollow. Turn onto a wire rack to cool.
13
Eggs
Sugar
Eggs play different roles in baking. In cakes
the whole eggs are used to bind ingredients
together and make the cake rise. In a soufflé
the yolks and whites are separated – the yolks
are used to thicken a custard base and the
whites are whisked to make the soufflé light.
As well as providing sweetness in cakes and
biscuits, sugar also encourages dough and
batter to brown when they’re baked, giving a
lovely golden colour and caramelised flavour.
In bread a small amount of sugar will 'feed'
the yeast and increase fermentation, but
large quantities of sugar will slow down
fermentation, which is why sweet bread
can take a long time to rise. Too much sugar
in a cake or biscuit can cause it to burn before
it's cooked through.
When whisked vigorously by hand, or with
electric beaters, egg whites increase in volume
to form soft, then stiff peaks. These whisked
whites can be mixed with sugar to make
meringues, or folded into a flour-based sauce
to make soufflés. It's important to fold in whisked
egg whites gently so that you don't knock out the
air – this air is what gives the light and airy texture.
Any speck of fat or yolk can prevent the whites
from whisking to full volume, so it's important to
use a clean whisk and bowl and avoid breaking
any yolk into the whites. For this reason, it's a
good idea to separate each egg into two small
bowls, so that you can add the whites to a large
mixing bowl, one at a time. Always use the size of eggs given by the recipe.
14
Refined sugars are sold as granulated (coarse),
caster sugar (fine) and icing sugar (a fine powder).
Caster sugar is best for most baking recipes and
either white or golden can be used. Unrefined
sugars have more flavour and range from dark
muscovado sugar to light brown sugars.
Icing sugar is used for dusting cakes, biscuits
and soufflés, sweetening pastry or mixing with
liquids or fats to make icing.
Mary Berry’s Hot Lemon Soufflés
Soufflés can be fiddly to make, but if you follow the recipe
carefully you’ll get great results and a real sense of achievement.
Intermediate
Preparation
Preparation time:
about 30 minutes
Cooking time:
about 14 minutes
Makes: 4 soufflés
Ingredients
•Melted butter for greasing
•2 lemons, juice and zest
•2 free-range egg yolks, plus
4 free-range egg whites
•6 rounded tbsp caster sugar,
plus extra for the ramekins
•3 rounded tsp cornflour
•1 rounded tbsp plain flour
•90ml/31/4fl oz double cream
•110ml/4fl oz full-fat milk
•Icing sugar for dusting (optional)
Equipment
•Scales
•4 medium-sized ramekins
(150ml capacity)
•Fine grater
•Lemon squeezer
•Baking tray
•Large saucepan
•One large, one medium
and one small bowl
•Wooden spoon
•Hand whisk
•Large metal spoon
•Spatula or palette knife
•Electric hand mixer
16
Method
Stage one
1. Measure out the ingredients and remove the eggs from
the fridge.
2. Brush the insides of four ramekins with butter. Add a small
amount of sugar to each and turn them to coat the sides
and bottom, shaking out any excess. Set aside to chill in
the fridge.
3. Use a fine grater to zest the lemons – grate the yellow
outer skin, but be careful not to grate the white pith
underneath (the pith will make the soufflés bitter). Cut the
lemons in half and squeeze the juice. Add the zest to the
juice and put to one side.
4. Separate the eggs – crack each egg in half and tip the
contents between the two shells, allowing the whites to
slide through into the bowl beneath, while the yolks stay
in the shells.
5. Put four egg whites into a large bowl and two of the yolks
into a separate small bowl (the left-over egg yolks can be
saved for scrambled eggs or custard). Add 6 tablespoons
of sugar to the small bowl with the egg yolks.
6. Preheat the oven to 180°C (160°C fan assisted)/350F/
Gas 4. Put the baking tray into the middle of the oven.
Stage two
7. Put the cream, flour and cornflour into a medium-sized
bowl and whisk to a smooth paste.
8. Warm the milk in a large saucepan over a medium heat
until just boiling. Remove from the heat.
9. Mix the hot milk into the cream, flour and cornflour
mixture with the whisk – add a little to start with and mix
well until the mixture is smooth like really thick cream.
Press any lumps to the side to break them up. Then add
the rest of the milk.
10.Pour the mixture back into the saucepan and put it over
a gentle heat. Beat vigorously with a hand whisk until
it’s thickened. It’s important to keep whisking all the time
so that the mixture doesn’t stick.
TOP TIP
Fold in the egg whites very gently – the aim is to fold in the
air bubbles without breaking them up. Use a metal spoon
or spatula to go round the outside of the bowl and cut
through the middle.
11. When you feel it thickening, remove the pan from the heat
and whisk in the lemon juice and zest a little at a time.
The heat of the pan will continue to cook the mixture.
12.Use a wooden spoon to beat the egg yolks and caster sugar
together in the small bowl. Beat them into a thick paste.
13.Add this paste to the mixture in the saucepan and mix well
until smooth. Put the saucepan back on the hob to thicken
again. Whisk until it begins to bubble and then take it off
the heat – the mixture should look like custard. Put it to
one side to cool before adding the egg whites.
Stage three
14.Make sure the bowl and whisk are completely clean and
grease-free, and make sure there’s no yolk with the egg
whites. Whisk the egg whites in a large bowl using an
electric hand mixer, until soft peaks begin to form – the
egg whites should look like clouds.
15.Check the temperature of the mixture in the saucepan
before you add the egg whites – it should be body
temperature or cooler. Add one large spoonful of the
egg whites to the saucepan and beat well with the whisk
to make the mixture less stiff. Now use a large metal
spoon or spatula to gently fold in the remaining egg
whites. Continue until it’s a pale yellow mixture with
no streaks of egg white.
16.Fill the ramekins to the brim with the mixture and level
off with a spatula or palette knife. Run a thumb nail around
the inside rim of the ramekins (this helps the soufflés rise
evenly without catching on the sides).
17. Place the ramekins on the baking tray in the middle of the
oven for about 14 minutes until risen and turning golden.
Don’t open the oven during cooking. Time and watch
the soufflés carefully – take them out as soon as they’ve
risen and are starting to go golden. If you’re using smaller
ramekins you’ll need to reduce the cooking time by a few
minutes (5 or 6 smaller soufflés will need about 10 minutes).
18.Dust with icing sugar and serve immediately.
17
Shortening, Lard
and Suet
Shortening is a general term for fats used in
baking, but is normally used to refer to lard,
made from pig fat. The vegetable equivalent
is sold as vegetable shortening, white spread
or vegetable fat and can be substituted for
lard. They all have a high fat content of
90g–100g per 100g.
Shortening is mostly used in pastry, and in some
biscuits and cakes, to create a crumbly, 'melt-inthe-mouth' texture by breaking up gluten in the
dough. It adds richness, but doesn’t have much
flavour. To compensate for this, butter or
margarine is often added.
Suet, the fat taken from around the kidneys and
loins in beef, is used in suet pastry, puddings and
dumplings, savoury and sweet. The suet gives a
moist texture that is light and dense. Vegetable
suet is available and can be substituted for beef
suet in all recipes.
18
Salt
A pinch of salt is used in savoury baking to
improve the flavour – it’s also sometimes used
in sweet baking to enhance the sweetness.
Salt is almost always added to bread made in
the UK and any cook who forgets to add it to
a basic loaf will notice as soon as they take a
bite – it will be bland and won’t taste of bread
as we know it.
Too much salt inhibits yeast and leads to a flat,
heavy loaf, so always follow a bread recipe
carefully when it comes to salt quantities. Make
sure the salt doesn’t come into direct contact
with the yeast.
When a recipe includes butter it's best to use
an unsalted butter. Salted butters can vary in
saltiness, and it’s easier to control the quantity
by adding salt separately.
Classic Cornish Pasties
An all-in-one meal that’s portable and delicious. One of the
advantages of this recipe is that you don’t need to cook the filling
in advance – the meat and vegetables cook inside the pastry.
Intermediate
Preparation
Preparation time: 2 hours
Cooking time: 45 minutes
Makes: 4 good-sized pasties
Ingredients
For the pastry
•500g/1lb 1oz strong bread flour
•120g/4oz white shortening
•5g/1 tsp salt
•25g/1oz margarine or butter
•175ml/6fl oz cold water
•1 free-range egg, beaten with
a little salt
For the filling
•350g/12oz good quality beef
skirt, rump steak or braising steak
•350g/12oz waxy potato
•200g/7oz swede
•175g/6oz onion
•Salt and freshly ground
black pepper
•Knob of butter or margarine
Equipment
•Scales
•Large mixing bowl
•Cling film
•Baking tray
•Spoon
•Baking parchment or silicone
paper (not greaseproof)
•Rolling pin
•Fork
•Pastry brush
20
Method
Stage one
1. Weigh out the ingredients.
2. Tip the flour into the bowl and add the shortening, the
salt, the margarine or butter and all of the water.
3. Use a spoon to gently combine the ingredients. Then use
your hands to crush everything together, bringing the
ingredients into a dry dough.
4. Put the dough onto a clean work surface.
5. Work the dough to combine the ingredients properly.
Use the heel of your hand to stretch and roll the dough.
Roll it up – then turn it, stretch and roll it up again. Repeat
this process for about 5 minutes. The dough will start to
become smooth as the shortening breaks down. If the
dough feels grainy, keep working until it’s smooth and
glossy. Don’t be afraid to be rough – you’ll need to use lots
of pressure and work the dough vigorously to get the
best results.
6. When the dough is smooth, wrap it in cling film and put it
in the fridge to rest for 30–60 minutes.
Stage two
7. While the dough is resting, peel and cut the potato,
swede and onion into cubes about 1cm square. Cut the
beef into similar sized chunks. Put all four ingredients into
a bowl and mix. Season well with salt and some freshly
ground black pepper, then put the filling to one side until
the dough is ready.
8. Lightly grease and line a baking tray with baking
parchment or silicone paper.
9. Preheat the oven to 170°C (150°C fan assisted)/
325F/Gas 3.
TOP TIP
This recipe gives a tight rather than a sticky dough,
so there’s no need to put flour or oil onto the surface
when you roll it out.
Stage three
10.Once the dough has had time to relax, take it out of the
fridge. The margarine or butter will have chilled, giving
you a tight dough. Cut the dough into four equal-sized
pieces. Shape each piece into a ball and use a rolling pin to
roll each ball into a disk roughly 25cm/10in wide (roughly
the same size as a dinner plate).
11. Spoon a quarter of the filling onto each disk. Put the filling
on one half, leaving the other half clear. Put a knob of
butter or margarine on top of the filling.
12.Carefully fold the pastry over, join the edges and push
with your fingers to seal. Crimp the edge to make sure the
filling is held inside – either by using a fork, or by making
small twists along the sealed edge. When you’ve crimped
along the edge, fold the end corners underneath.
13.Put the pasties onto the baking tray and brush the top
of each pasty with the egg and salt mixture. Bake on the
middle shelf of the oven for about 45 minutes or until the
pasties are golden brown. If your pasties aren’t browning,
you can increase the oven temperature by 10°C for the
last 10 minutes of cooking time.
With thanks to the Cornish Pasty Association
21
Q: Does it matter what size cake
tins I use?
A: Cake baking requires precision and this
includes the size of the tins. Too big and
your cake will be thin and cook too quickly,
too small and your mixture will overflow
as it rises. So always use the size of tin
specified in the recipe. You can get away
with a difference of about 1cm, but any
more than that and you’ll need to adjust
the baking time.
A square tin will have a greater capacity
than a round tin, so if you want to use
a square tin, go down a size, e.g. an 18cm/
7in square tin would be comparable
to a 20cm/8in round tin.
Q: Why is my cake heavy?
A: Under-beating or over-beating the mixture
can make a heavy cake. If your mixture is
under-mixed there will be streaks of fat,
an uneven colour and possibly some lumps.
You need to beat a little more until it’s
smooth. It’s hard to tell when a mixture
is over-beaten, so stop as soon as it looks
smooth, otherwise you can overwork the
gluten in the flour, which will result in a
tough, rubbery cake. Not enough raising
agent can also make a cake heavy, but
don’t be tempted to add more than the
recipe says.
22
Q: Why has my cake sunk
in the middle?
A: Did you open the oven door before the
cake was cooked? Never open the door
until at least two thirds of the cooking time
has passed and the mixture has set. Too
much raising agent can also cause a cake to
‘over-rise’ then collapse on itself, so follow
the recipe closely.
Q: Why are my scones hard and dry?
A: The most common reason is overworking
the dough. You should chaff or fold rather
than knead, to avoid stretching the gluten
in the flour. Other reasons could be not
adding enough liquid, using a raising
agent that is too old and ineffective,
or overcooking your scones.
Q: Why hasn’t my soufflé risen?
A: The whisked egg whites need to be beaten
until stiff and folded in very gently otherwise
the air gets knocked out and the soufflé
won’t rise. Always put them into the
pre-heated oven as quickly as possible and
don’t open the oven door during cooking or
they’ll collapse. If they’re not cooked properly
when you take them out, they may sink.
Paul Hollywood
and Mary Berry
Q: Why is my dough too sticky?
A: You’ve probably added too much liquid.
Gradually add just enough flour to make
your dough manageable, but not too much
or it will become dry. Dough can be stickier
on hot days, so lightly coat your hands with
flour or oil during kneading. Also check that
you haven't forgotten to add the salt, as this
can affect the consistency of your dough.
Q: How long should I leave my bread
to prove?
A: The best way to tell if the dough has fully
proved is to judge when it has almost
doubled in size. When it has proved, it
should be light to the touch and bounce
back when you gently push it with your
finger.
Let your dough double in size, but don’t let
it expand any further. If you let your bread
rise too far, the structure can become weak
and may collapse during baking. If you can’t
bake it straight away, transfer it to the
fridge where it can be left overnight.
On the second proving, if the dough starts
creasing on the sides it's a sign the dough
has over-proved. If this happens you can
knock back the dough and re-shape it
(knocking back a second time actually
improves the flavour).
Q: Why is my bread heavy
and stodgy?
A: The answer is in your kneading. Kneading
combines the ingredients, activates the
yeast and develops the gluten which holds
the loaf together. If you don’t knead
enough the dough won’t hold pockets of
air and will collapse, making bread heavy
and dense.
Another possibility is that it didn’t rise for
long enough. Under-proved dough splits
and has an uneven texture. If it’s tight,
stodgy or doughy at the bottom it’s a sign
that your dough hasn’t proved for long
enough. When you’re proving, the dough
should double in size then be knocked back
(using your hands to punch out the air)
and then allowed to double in size again
before baking.
Another reason could be that it needed
longer in the oven. When cooked, bread
sounds hollow if tapped underneath.
Q: Why hasn’t my bread got
a crusty top?
A: Normally this is because the oven isn’t hot
enough. Make sure you pre-heat your oven
according to the recipe. Put a shallow tin
of water in the bottom of the oven to create
steam and help form a crisp crust.
Recipe times are just a guideline as dough
will prove at different speeds depending
on the warmth of the room and the
consistency of the dough.
23
Baking is a combination of ingredients
and skills – the more you practise those
skills, the better your baking will be.
There are lots of short technique videos online
to help you at bbc.co.uk/food
Chaffing – mixing dough to incorporate air without
over-working the gluten in the flour.
Kneading
Folding in – slowly incorporating flour or whisked
egg whites into a mixture.
Glazing – lightly coating pastry or dough with beaten
egg or milk to give it a golden colour in the oven.
Kneading – working dough to stretch the gluten and
activate the yeast. The key to successful bread.
Knocking back – knocking the air out of dough
after it’s proved.
Proving – leaving dough in a warm place to give the
yeast time to work.
Separating eggs
Rubbing in – mixing flour and fat together with your
fingers until it looks like breadcrumbs.
Separating eggs – separating egg yolks from egg
whites. This can be fiddly, but it’s useful in lots of recipes.
Zesting and juicing – extracting the zest and juice
of citrus fruit to add flavour to baking.
Folding in
24
Bake it to the
next level
The five recipes in this booklet are just the start.
Whether you want to celebrate a birthday, help
raise money, or keep the kids entertained, there
are lots of ways to make the most of your
baking skills.
You could start by adapting some of the recipes in this
guide. Try adding sultanas to your scones, sprinkle seeds on
your loaf, or turn your Victoria Sandwich into a birthday cake.
For lots more baking recipes visit: bbc.co.uk/food
Raising hundreds
and thousands
Baking is a great way to raise money for
BBC Children in Need, so put your apron on for
Pudsey and help make a difference for children
across the UK.
Go online for BBC Children in Need posters, fun bunting
designs, and fundraising ideas: bbc.co.uk/food/getbaking
Donating money to BBC Children in Need is very easy –
find out how at: bbc.co.uk/pudsey
Anyone can learn to bake – this guide will
help you get started with five classic recipes
and expert advice from Mary Berry and
Paul Hollywood.
bbc.co.uk/food
With thanks to Mary Berry, Paul Hollywood,
and Love Productions.
Free downloadable versions of this guide
are available in English and Welsh at:
bbc.co.uk/food
Published by BBC Learning
Room MC4 A3
BBC Media Centre
201 Wood Lane
London W12 7TQ
© BBC 2010
Design: red-stone.com
Home economist: Louisa Carter
Recipe photography: Toby Scott
Printed on 75% recycled paper


© Copyright 2026