
the aircraft manual here
Wings of POWER III “P-51”
© 2012 A2A Simulations Inc. All rights reserved.
Published by A2A Simulations Inc.
Attention!
Wings of Power, including sounds, aircraft, and all content is under strict,
and enforceable copyright law. If you suspect anyone has pirated any
part of Wings of Power, please contact [email protected]
Risks & Side Effects
Ergonomic Advice
• Always maintain a distance of at least 45 cm to
the screen to avoid straining your eyes.
• Sit upright and adjust the height of your chair so that
your legs are at a right angle. The angle between your
upper and forearm should be larger than 90º.
• The top edge of your screen should be at eye level or
below, and the monitor should be tilted slightly backwards, to prevent strains to your cervical spine.
• Reduce your screen’s brightness to lower the contrast and use a flicker-free, low-radiation monitor.
• Make sure the room you play in is well lit.
• Avoid playing when tired or worn out and take
a break (every hour), even if it’s hard…
Epilepsy Warning
Some people experience epileptic seizures when viewing
flashing lights or patterns in our daily environment. Consult
your doctor before playing computer games if you, or
someone of your family, have an epileptic condition.
Immediately stop the game, should you experience any of the
following symptoms during play: dizziness, altered vision, eye or
muscle twitching, mental confusion, loss of awareness of your
surroundings, involuntary movements and/or convulsions.
2
“We put you in the cockpit of some of the worlds most exciting aircraft.”
3
Contents
Foreward
6
History of the North American P-51 Mustang . . . . . . . . . . . . . . . . . . 7
DESIGNER’S NOTES: . . . . . . . . . . . . . . . . . . . . . . . . . . . . . . . . . . . . . . 13
Introduction
13
Wings of Power 3: P-51 Mustang Features . . . . . . . . . . . . . . . . . . . . 14
Wings of Power Overview . . . . . . . . . . . . . . . . . . . . . . . . . . . . . . . . . 15
General Operational Information and Guidelines . . . . . . . . . . . . . . . . . . 15
Flight simulation that goes beyond maximum performance figures . . . 15
FULL POWER does not mean FULL THROTTLE . . . . . . . . . . . . . . . . . 16
How long does it take to get airborne? . . . . . . . . . . . . . . . . . . . . . . . . . . 16
The climb is a carefully executed process . . . . . . . . . . . . . . . . . . . . . . . 16
An engine can run out of breath . . . . . . . . . . . . . . . . . . . . . . . . . . . . . . . 16
Flaps improve slow flight characteristics . . . . . . . . . . . . . . . . . . . . . . . . 16
Mustang – A short history . . . . . . . . . . . . . . . . . . . . . . . . . . . . . . . . . 17
Quick Start Guide
18
System Requirements . . . . . . . . . . . . . . . . . . . . . . . . . . . . . . . . . . . . . . . 18
Installation . . . . . . . . . . . . . . . . . . . . . . . . . . . . . . . . . . . . . . . . . . . . . 19
IMPORTANT: . . . . . . . . . . . . . . . . . . . . . . . . . . . . . . . . . . . . . . . . . . . . . . 19
Realism Settings . . . . . . . . . . . . . . . . . . . . . . . . . . . . . . . . . . . . . . . . 20
FLIGHT MODEL . . . . . . . . . . . . . . . . . . . . . . . . . . . . . . . . . . . . . . . . . . . . 20
INSTRUMENTS AND LIGHTS . . . . . . . . . . . . . . . . . . . . . . . . . . . . . . . . . 20
ENGINES . . . . . . . . . . . . . . . . . . . . . . . . . . . . . . . . . . . . . . . . . . . . . . . . . 20
FLIGHT CONTROLS . . . . . . . . . . . . . . . . . . . . . . . . . . . . . . . . . . . . . . . . . 20
ENGINE STRESS DAMAGES ENGINE . . . . . . . . . . . . . . . . . . . . . . . . . . . 20
Quick Flying Tips . . . . . . . . . . . . . . . . . . . . . . . . . . . . . . . . . . . . . . . . 21
P-51 Mustang Variants
2D Panels
29
PILOT’S NOTES (SHIFT-2) . . . . . . . . . . . . . . . . . . . . . . . . . . . . . . . . . 29
CONTROLS (SHIFT-3) . . . . . . . . . . . . . . . . . . . . . . . . . . . . . . . . . . . . . 30
PAYLOAD AND FUEL MANAGER (SHIFT-4) . . . . . . . . . . . . . . . . . . . . 31
PILOT’S MAP (SHIFT-5) . . . . . . . . . . . . . . . . . . . . . . . . . . . . . . . . . . . 32
RADIO SELECTOR (SHIFT-6) . . . . . . . . . . . . . . . . . . . . . . . . . . . . . . . 33
MAINTENANCE HANGAR (SHIFT-7) . . . . . . . . . . . . . . . . . . . . . . . . . . 34
Color Codes . . . . . . . . . . . . . . . . . . . . . . . . . . . . . . . . . . . . . . . . . . . . . . . 35
Joystick Mapping Utility . . . . . . . . . . . . . . . . . . . . . . . . . . . . . . . . . . . 37
Systems
38
Supercharger . . . . . . . . . . . . . . . . . . . . . . . . . . . . . . . . . . . . . . . . . . . . . . 38
Carburetor . . . . . . . . . . . . . . . . . . . . . . . . . . . . . . . . . . . . . . . . . . . . . . . . 39
War Emergency Power . . . . . . . . . . . . . . . . . . . . . . . . . . . . . . . . . . . . . . 39
Throttle Quadrant . . . . . . . . . . . . . . . . . . . . . . . . . . . . . . . . . . . . . . . . . . 40
Propeller . . . . . . . . . . . . . . . . . . . . . . . . . . . . . . . . . . . . . . . . . . . . . . . . . 40
Landing Gear . . . . . . . . . . . . . . . . . . . . . . . . . . . . . . . . . . . . . . . . . . . . . . 41
Brakes . . . . . . . . . . . . . . . . . . . . . . . . . . . . . . . . . . . . . . . . . . . . . . . . . . . 42
Hydraulic System . . . . . . . . . . . . . . . . . . . . . . . . . . . . . . . . . . . . . . . . . . 42
Electrical System . . . . . . . . . . . . . . . . . . . . . . . . . . . . . . . . . . . . . . . . . . .42
Fuel System . . . . . . . . . . . . . . . . . . . . . . . . . . . . . . . . . . . . . . . . . . . . . . . 43
Oil System . . . . . . . . . . . . . . . . . . . . . . . . . . . . . . . . . . . . . . . . . . . . . . . . 43
Cooling System . . . . . . . . . . . . . . . . . . . . . . . . . . . . . . . . . . . . . . . . . . . . 44
The Canopy . . . . . . . . . . . . . . . . . . . . . . . . . . . . . . . . . . . . . . . . . . . . . . . 45
Cockpit . . . . . . . . . . . . . . . . . . . . . . . . . . . . . . . . . . . . . . . . . . . . . . . . . . 45
Oxygen System . . . . . . . . . . . . . . . . . . . . . . . . . . . . . . . . . . . . . . . . . . . . 46
Emergency control. . . . . . . . . . . . . . . . . . . . . . . . . . . . . . . . . . . . . . . . . 46
Recognition Lights . . . . . . . . . . . . . . . . . . . . . . . . . . . . . . . . . . . . . . . . . 46
22
P-51D-25 44-72854, 457th FS/506 FG, ‘KWITCHERBITCHIN’ . . . . . 22
F-51D 44-73064 . . . . . . . . . . . . . . . . . . . . . . . . . . . . . . . . . . . . . . . . . 23
P-51D-25 44-73304, ‘Blondie’ . . . . . . . . . . . . . . . . . . . . . . . . . . . . . . 23
Specifications
24
Model P-51D Mustang Specifications . . . . . . . . . . . . . . . . . . . . . . . .
Airframe External . . . . . . . . . . . . . . . . . . . . . . . . . . . . . . . . . . . . . . . .
Cockpit Diagrams: Front . . . . . . . . . . . . . . . . . . . . . . . . . . . . . . . . . .
Cockpit Diagrams: Left Side . . . . . . . . . . . . . . . . . . . . . . . . . . . . . . .
Cockpit Diagrams: Right Side . . . . . . . . . . . . . . . . . . . . . . . . . . . . . .
24
25
26
27
28
Flying the P-51
47
Preliminary Check . . . . . . . . . . . . . . . . . . . . . . . . . . . . . . . . . . . . . . .
Enter Cockpit . . . . . . . . . . . . . . . . . . . . . . . . . . . . . . . . . . . . . . . . . . . .
Starting & Warm-Up . . . . . . . . . . . . . . . . . . . . . . . . . . . . . . . . . . . . . .
Taxiing Instructions . . . . . . . . . . . . . . . . . . . . . . . . . . . . . . . . . . . . . .
Before Take-Off (Run-Up) . . . . . . . . . . . . . . . . . . . . . . . . . . . . . . . . . .
Takeoff . . . . . . . . . . . . . . . . . . . . . . . . . . . . . . . . . . . . . . . . . . . . . . . .
Use Of Power . . . . . . . . . . . . . . . . . . . . . . . . . . . . . . . . . . . . . . . . . . .
Before Landing . . . . . . . . . . . . . . . . . . . . . . . . . . . . . . . . . . . . . . . . . .
After Landing . . . . . . . . . . . . . . . . . . . . . . . . . . . . . . . . . . . . . . . . . . .
47
48
48
49
49
50
50
50
50
4
Emergency Wing Flap Operation . . . . . . . . . . . . . . . . . . . . . . . . . . . . 51
Emergency Landing Gear Extension Procedure . . . . . . . . . . . . . . . . 51
Alternate Procedure for Operating Oil & Coolant Shutters . . . . . . . . 51
Emergency Exit . . . . . . . . . . . . . . . . . . . . . . . . . . . . . . . . . . . . . . . . . . 51
Drop Tanks . . . . . . . . . . . . . . . . . . . . . . . . . . . . . . . . . . . . . . . . . . . . . 51
Go Around Procedure . . . . . . . . . . . . . . . . . . . . . . . . . . . . . . . . . . . . . 52
Flight Characteristics . . . . . . . . . . . . . . . . . . . . . . . . . . . . . . . . . . . . . 53
Full Fuselage Tank . . . . . . . . . . . . . . . . . . . . . . . . . . . . . . . . . . . . . . . . . . 53
Reversibility . . . . . . . . . . . . . . . . . . . . . . . . . . . . . . . . . . . . . . . . . . . . . . 53
With Extra Wing Tanks . . . . . . . . . . . . . . . . . . . . . . . . . . . . . . . . . . . . . . 54
Low Level Flight . . . . . . . . . . . . . . . . . . . . . . . . . . . . . . . . . . . . . . . . . . . 54
High-Altitude Characteristics . . . . . . . . . . . . . . . . . . . . . . . . . . . . . . . . . 54
High Speed Diving . . . . . . . . . . . . . . . . . . . . . . . . . . . . . . . . . . . . . . . . . . 55
Dive Recovery Procedure . . . . . . . . . . . . . . . . . . . . . . . . . . . . . . . . . . . . 56
Maximum Allowable IAS . . . . . . . . . . . . . . . . . . . . . . . . . . . . . . . . . . . . . 57
Compressibility . . . . . . . . . . . . . . . . . . . . . . . . . . . . . . . . . . . . . . . . . . . . 58
Mach Number . . . . . . . . . . . . . . . . . . . . . . . . . . . . . . . . . . . . . . . . . . . . . 59
Uncontrolled Dive . . . . . . . . . . . . . . . . . . . . . . . . . . . . . . . . . . . . . . . . . . 60
Elevator Modification . . . . . . . . . . . . . . . . . . . . . . . . . . . . . . . . . . . . . . . 61
Compressibility Recovery Procedure . . . . . . . . . . . . . . . . . . . . . . . . . . . 61
Gliding . . . . . . . . . . . . . . . . . . . . . . . . . . . . . . . . . . . . . . . . . . . . . . . . . . . 62
Stalls . . . . . . . . . . . . . . . . . . . . . . . . . . . . . . . . . . . . . . . . . . . . . . . . . . . . 62
Spins . . . . . . . . . . . . . . . . . . . . . . . . . . . . . . . . . . . . . . . . . . . . . . . . . . . . 63
Acrobatics . . . . . . . . . . . . . . . . . . . . . . . . . . . . . . . . . . . . . . . . . . . . . . . . 64
Emergency Procedures . . . . . . . . . . . . . . . . . . . . . . . . . . . . . . . . . . . 65
Forced Landings on Takeoff . . . . . . . . . . . . . . . . . . . . . . . . . . . . . . . . . . 65
Engine Overheating . . . . . . . . . . . . . . . . . . . . . . . . . . . . . . . . . . . . . . . . . 65
Brake Failure . . . . . . . . . . . . . . . . . . . . . . . . . . . . . . . . . . . . . . . . . . . . . . 65
Hydraulic System . . . . . . . . . . . . . . . . . . . . . . . . . . . . . . . . . . . . . . . . . . 66
Appendix A: Radar
67
Appendix B: K-14 Gunsight
69
CREDITS
76
5
Emotion in Metal
Foreword
Few planes in history when their names are
spoken provide the listener with a mind’s
eye image of the aircraft. Even fewer evoke
emotion. An even smaller percentage of this
prestigious crowd is a true testament to
the nations that developed them. If someone was asked to name the most widely
known aircraft developed for each nation
during hostilities in World War II, a short
but concise list could be drawn. For Japan,
the highly maneuverable wonder plane, the
Mitsubishi A6M Zero would undoubtedly
be picked. Britain’s aircraft would likely
be one of the most beautiful, elegant and
efficient aircraft designs in the world, the
Supermarine Spitfire. For Germany, one
has to look no further than the menacing
and highly coveted Messerschmitt Bf 109.
For the United States of America the aircraft that manages to capture the American
spirit with its polished aluminum skin and
sweeping silhouette is the North American
Aviation P-51 Mustang.
As a young child my parents would sometimes take me to the local air show and I
would watch in amazement and awe as
these aircraft would perform their daring
feats. The crowd would gasp as they would
perform stunts so hair raising that you
undoubtedly believed the pilots were moments away from crashing. Unfortunately
I can only remember a few of those stunts,
but generally speaking, none of the aircraft that performed them. There was one
notable exception. My six year old self was
standing against the fence as a group of aircraft performed a simulated ground attack
with which pyrotechnics were used. As the
planes flew low approaches over the runway,
large mushrooms of fire erupted from the
grass close enough that I could feel the heat
kissing my face. Through one such pass,
6
a plane flew close enough to the explosion
that the prop caused the resulting cloud of
thick black smoke to swirl around the prop
and dance about against the blue backdrop
of sky. Then the absolute unthinkable happened. As I stood pressed up against the
fence, the pilot locked eyes with me, waving
in a low pass. For a moment I was absolutely
sure this pilot was performing this show
solely for myself and the sound of the audience seemed to disappear to where I could
only hear the sound of that engine growling
intensely enough to be felt inside my heart.
I had never seen such a plane in my entire young life! It was a beautiful, highly
reflective metal aircraft with bright colors
draped across it in shapes and patterns
which caught the eye of this young man. It
was complete magic and I was pressing so
hard against the fence as to cause a ground
crew member to snap me back to reality by
asking me to step back. I looked at my parents with large eyes and a gaping mouth
and excitedly asked them what the aircraft
was. They did not know, but told me that
they would take me to see it later during a
break. I can’t seem to recall much happen-
ing in the air beyond that point, but not for
lack of aerobatic displays. Simply put, I was
so engrossed in that plane and the pilot I
saw that nothing quite lived up to that experience.
My parents made good on their word
and eventually some time later we walked
through the crowd to the aircraft displays.
I was halfway across the field when I saw
that beautiful colored nose and polished
aluminum frame when I bolted from besides
my parents, much to their chagrin. I must
have looked like a lunatic as I ran up to the
aircraft and stood in front of the pilot as my
parents frantically ran trying to catch up
to me screaming my middle name. I didn’t
say anything, but the pilot smiled down
upon me and asked if those were my parents. I nodded, still keeping my eyes fixated
on that pilot and mouth probably still half
open. He told me that the aircraft was the
“Mustang,” although I don’t recall what else
he said. When my parents finally caught up
to me my mother grabbed me by the ear and
sternly warned me about the virtues of staying close to them in large crowds. The pilot, probably amused by the whole situation
did the second thing I will never forget as
he asked me if I would like to stand on the
plane and look into the cockpit. Of course
I did, and I looked over every inch of that
aircraft and its cockpit as my parents stood
on, clearly bored but amused that for a moment they could keep me in one place without alarms going off or expensive things being broke. The pilot spoke to my parents but
kept an eye on me.
I began my fascination with what I believe was the most beautiful aircraft ever
built when I was six years old. Today, whenever I see the Mustang I am transported to
that day of innocence and I feel young again,
with that plane representative of a deep
seated love I now have in warbirds. While
some may disagree with my personal taste,
my story is not unlike tens of thousands of
other young kids who first fell in love with
the venerable P-51 Mustang. This was the
first aircraft I knew by name and sight.
Much like your first true love, the first car
you own or one of those special bonding moments when your father takes you fishing,
this plane to me holds a special love that is
timeless and emotionally charged.
Self was sent to the United States with its
objective to purchase military aircraft as
Britain began to gear up for the impending
war with Germany. Although America was
invested heavily in isolationism and neutrality in regards to other nation’s affairs, at
the time there were no laws barring the sale
of military equipment to nations that were
not at war. Among the purchases made, the
British Purchasing Commission bought the
T-6 Texan (known as the Harvard in the
British Commonwealth air forces). This
helped solidify North American Aviation’s
position as one of the primary military aircraft builders in the United States.
During 1939 when Britain officially involved in war with Germany, an embargo
was placed on the exportation of military
History of the North
American P-51 Mustang
The P-51 is truly a testament to American
ingenuity, drive and engineering with additional strokes of good luck. In some ways it’s
a bit of a Cinderella story in that the success it finally earned was not fully expected,
nor designed to be so upon the outset of its
inception. The story of the Mustang actually goes back to 1938 when the British
Purchasing Commission led by Sir Henry
7
equipment. An act passed by Congress allowed the British to continue receiving the
equipment however if they were shipped in
their own merchant vessels allowing the
acquisition of such equipment to continue.
While going slightly beyond the scope of this
article, it should be known that during this
period North American Aviation was punctual and highly efficient when providing
Britain and her allies with the goods needed
to continue the war effort, hence why the
British Purchasing Commission approached
them to produce the Curtiss P-40 Warhawk
(known in the RAF as the Tomahawk). The
Curtis P-40 was suitable for ground attack
missions and the Allison 1710 engine which
powered it was reliable and well built, although it was not supercharged which significantly reduces the aircrafts effectiveness
at higher altitudes. The Commission knew
full well the limitations of the P-40 but proceeded forward regardless and ordered over
1,700 aircraft for use by British and French
forces.
North American Aviation saw an opportunity in a stroke of keen business acumen
and proposed to build a whole new plane
which was designed to outperform the P-40.
John Kindelberger (the President of NAA)
and James Atwood (former Chief Engineer
and current Vice President of NAA) gave
their proposal to Colonel William Cave
and Air Commodore G B A Baker of the
Commission, to which it was well received.
James Atwood was then summarily sent
to meet with Sir Henry Self and signed a
draft contract for 320 NA-73 (then the aircraft’s designation) fighter aircraft. There
was a caveat however and that was time.
Self’s decision had a significant amount of
faith placed behind it considering the aircraft had not yet been designed. On April
24th the engineers at Inglewood (North
American Aviation’s facility) began drawing up designs. Overnight plans were made
by Edgar Schmued (Chief Designer) and
Raymond Rice (Chief Engineer) and were
sent to Atwood. He then presented them to
the Commission who approved the contract
for 320 aircraft on May 29th 1940.
The biggest stipulations for the order was
that the prototype aircraft was to be available by the time it would have taken North
American Aviation to tool up for production
of the P-40 (120 days) and the cost was to
not exceed $50,000 per unit. In a Herculean
effort North American Aviation went to
work and the wheels of industry began turning. Originally the Allison 1710 was going
to be the engine utilized for production, and
efforts to create as low a drag airframe as
possible were made. Even a relatively new
wing structure was going to be used which
was known as the laminar flow section
wing designed by NACA (National Advisory
Committee for Aeronautics).
Up to that point it was common for wing
designs to have maximum chord thickness
near the edge (front) of the wing structure.
The laminar flow wing however placed this
well aft of conventional wings thus allowing
the laminar flow to be maintained longer before turbulence was created, further maintaining the boundary layer and reducing
drag. Original designs did not call for the
NA-73 aircraft to be married to the laminar
flow wing, but Ed Horkey and his team produced convincing studies, thus it was adopted. Unfortunately initial scale wind tunnel
tests proved to be disastrous as the stalling
behavior was unsatisfactory. When further
tests were conducted in a much larger wind
tunnel in Seattle, Washington the results
proved that initial observations regarding
wingtip turbulence had in fact been misleading.
North American Aviation was abuzz with
energy. Everyone was bustling to meet the
initial 120 day deadline and things were
happening fast. Castings were created for
mass production methods and mockups of
the assemblies were created. On August
30th, 1940 the first prototype was wheeled
off the production floor (without its engine
as Allison was suffering from production
delays), and it was done so in 117 days.
So impressed with the design the British
Purchasing Commission purchased an additional 300 aircraft.
At the hands of Chief Test Pilot Vance
Breeze, NA-73X with serial number NX
19998 lifted off the ground at Mines Field.
With only a few heating issues, the reports
were quite satisfactory for the initial flights.
On the fifth flight however test pilot Paul
Balfour crashed the aircraft onto its back
but escaped uninjured. The problem was
found to be an error during the switching
of fuel tanks, and the forced landing that
occurred found the plane touching down on
soft ground which caused it to overturn.
The accident however did not stop the forward progress that was being made and production started on the 620 machines that
the Commission had ordered. She was also
given a name, the Mustang, which is appropriate considering the American ancestry
and performance. The first Mustang (serial
AG 346) to arrive in Britain fell under the
then Lend-Lease Bill and were unloaded on
October 24th 1941 at Liverpool, assembled
then flown in November. The first production
Mustang (serial AG 345) however stayed in
the United States for testing.
British testing showed that the Mustang
I was a very pleasant aircraft which was
8
a mix of high speed (375MPH at 15,000
feet) and maneuverability. At the time, the
Mustang outpaced even the outstanding
Spitfire design by a clear 35 MPH at the
same altitude, but the Spitfire had higher
rate of climb and the Mustangs performance
dropped off drastically at altitudes higher
than 12,000 feet with speeds of roughly 350
MPH at 21,000 feet. This caused concern
naturally for pilots flying against the superior altitude fighter the Messerschmitt Bf
109. In plain terms, the Mustang performed
best at lower altitudes, and thus it was given
to Army Co-operation Command for use in
close air support and photographic intelligence, an area to which the Mustang was
well suited.
Several variants of these early Mustangs
were produced. In Britain it was known as
the Mustang I and Mustang IA respectively. A strictly fighter version was produced
and ordered for the United States Army
Air Corp and was designated the P-51A.
55 Mustang IAs were repossessed and fitted with American built cameras (of British
design) and were used in North Africa in
March 1943 carrying the Stars and Stripes
on their tails. A version was even built as
a dive bomber and designated the A-36A
Apache, first flying in September 1942.
These early Mustangs proved valuable in
their role, being fast and maneuverable at
lower altitudes. Beyond this role however
the Mustang struggled to find a home, but
the seeds of excellence were already planted
and the plane was proving itself to be exceptional, if not yet fully understood.
In April 1942 a test pilot by the name of
Ronald Harker flew a Mustang I while evaluating various plane types of the allies and
enemy. He was so impressed by the plane’s
handling that he suggested to the Chief
Aerodynamic Engineer at Rolls-Royce, W
Challier that if the new Merlin 61 (which
was powering the prototype Spitfire IX)
were married to the Mustang that its performance would be significantly increased.
Challier estimated the aircraft and engine
could achieve 441MPH at 25,600 feet. It’s
potential became blatantly obvious and excited the American Assistant Air Attaché
Lieutenant Colonel Thomas Hitchcock, to
which details were supplied to the USAAF’s
General Hap Arnold. Included were recommendations from senior RAF officers including Air Chief Marshal Sir Trafford LeighMallory.
Rolls-Royce immediately began the conversion in June 1942 of four Mustangs. The
four Mustang serial numbers were AM 203,
AM 208, AL 963 and AL 975. AL 975 became the first converted but rather than
using the Merlin 61, Rolls-Royce opted to
utilize a Merlin 65 with a two-stage supercharger. On October 13th 1942 the newly
converted AL 975 took to the air at the controls of Rolls-Royce Chief Test Pilot Ronald
Shepard. Tests proved the concept and
gradual changes were made to the airframe,
propeller, intercooler exhaust, etc. until in
November, 413 MPH was achieved. The test
pilots noted significant differences the new
engine made to the aircraft. Some found
the earlier Allison equipped Mustangs to
be more enjoyable to fly as they were more
directionally stable and didn’t stall quite as
violently. As tests continued into 1943 the
performance of the new marriage improved
time to 20,000 feet to just over an outstanding six minutes, compared to over nine minutes for the Mustang I.
Back in the United States changes were
being made to the assembly lines to introduce the new Packard Merlin V-1650-3
(the American designation for a U.S. built
Merlin). Upon delivery to Britain tests were
quickly conducted which satisfied General
Hap Arnold and production of the P-51B
commenced. Eventually in August 1943 a
second North American Plant was opened
in Dallas Texas and aircraft being produced
in the facility were labeled as the P-51C-NT
(whereas aircraft built at Inglewood in Los
Angeles were labeled P-51B-NA. History
had been born, and soon the Allies would
be equipped with the aircraft to which they
could take the fight directly to the Nazis.
Throughout early 1943 the various Air
Forces were suffering incredible losses in
bombing raids. Many American commanders were stout in their belief that B-17
Flying Fortress and B-24 Liberator bombers
could fight their way in and out of Germany
unassisted. Whether they wished to fly unassisted or not however didn’t matter, as the
range of the current escort fighters simply
did not provide the bombers with the necessary air cover when flying long missions
deep into Germany. Aircraft such as the
stubby but rugged P-47 could not provide
the range necessary to escort the bombers
to and from the target, and often had to be
scheduled to intercept the bomber formations on their return trip. The Luftwaffe
took advantage of these moments without
fighter cover to devastating effect. During
one raid on a German ball-bearing factory
on September 27th, 1943 of the 291 B-17s
designated for the mission, 60 were shot
down with an additional 138 damaged. The
P-38, the only aircraft with enough range to
assist the bombers unfortunately suffered
from numerous problems in the European
theater that did not exist in the Pacific.
Poor speed performance compared to the
Axis fighters, easy recognition, poor engine
9
performance all lead to the aircraft eventually being withdrawn from such missions.
Clearly a new aircraft was needed that
could fight all the way into Germany and
had the speed and maneuverability to protect their bigger brothers. The P-51B/C was
clearly the answer but the demands of the
8th Air Force were not met until November
1943 when the first Group arrived.
While other aircraft could fly faster, higher or further than the P-51, the Mustang
was able to accomplish all three in combination to a degree that no other plane could.
With two 75 U.S. gallon drop tanks the
range of the P-51B/C was an outstanding
1,800 miles. With the addition of the 85 U.S.
gallon internal self-sealing fuselage tank
(which sat behind the pilot), internal range
without drop tanks was increased to a staggering 1,350 miles at 10,000 feet. Further,
the P-51B/C models could achieve 440 MPH
at 30,000 feet. The allies had found their
plane to escort the heavy bombers, and the
results were immediate. Losses among 8th
Air Force bombers dropped dramatically
as their little brothers hovered above their
formations and dropped down upon their
unsuspecting enemies spouting flames from
their .50 caliber Browning machine guns.
In Italy the P-51s assigned to the 332nd
Fighter Group helped earn their reputation
as some of the finest airmen of the war. The
332nd FG consisted of volunteer AfricanAmerican airmen and was notably known
as the Tuskegee Airmen or “Red Tails” as
they were often referred. Massive amounts
of enemy aircraft were destroyed by the
American units fighting in Italy flying the
P-51 Mustang, and on one day of operations
alone the 52nd FG destroyed over 150 enemy machines while strafing and passing
time and again over the Luftwaffe airfield
at Reghin in Romania.
In the Pacific, China and Burma the
American Volunteer Group or “Flying
Tigers” transitioned to the United States
Army Air Force and their command. This
was officially formed as the 14th Air Force
and was part of the Chinese-American
Composite Wing. In late 1944 this group
turned over their aircraft and began receiving P-51 Mustangs. Several famous members of the AVG such as Tex Hill and Robert
T. Smith eventually flew Mustangs as well,
although not as part of the 14th FG. The
P-51 was often tasked with escort missions
on the newly developed B-29 bomber, but
further participated in notable battles such
as that of Iwo Jima and the defense of the
Philippines.
Although the P-51B/C variants were
highly successful, it was realized that
there were issues that were starting to
creep up. One of the first and major noticeable modifications of the newly designed D
model Mustang was the redesigned canopy.
Several B/C model Mustangs were being
equipped with “bubble” canopies in the form
of the Malcom Hood to help improve visibility. This however was not substantial
enough and a further solution was needed.
A new plexiglass canopy was designed by
North American Aviation based upon new
manufacturing techniques and technologies
found while creating plexiglass windows for
bombers. With the addition of this new bubble canopy, the aft fuselage was redesigned
to give better visibility.
The wings of the new Mustang were
slightly redesigned due to changes made to
the landing gear up-locks and door retracting mechanism which changed the wing
area. New positional lights were fitted and
a new retractable landing light was fitted in
the wheel wells. Two additional Browning
M2 .50 caliber machine guns were fitted,
bringing the total to six. Although the B/C
models were eventually fitted with 85 U.S.
gallon fuel tanks, the new design of the aft
fuselage on the P-51D exacerbated the poor
handling characteristics when this tank
was installed and full. Due to this a dorsal
fin was added to help stabilize the aircraft,
being introduced towards the end of P-51D-5
production and being worked into manufacturing from that point forward. The cockpit
layout was also significantly redesigned
eventually from that of the original B/C and
early D-5 models.
While the P-51 continued to be produced
in various other forms, such as the faster
lightweight P-51H and eventually the F-82
Twin Mustang, the D model Mustangs were
produced in higher numbers than any other block or variant and mark the height of
Mustang production at 8,102 aircraft built.
The P-51D also served with the United
States Air Force as the F-51 in Korea and
throughout the world in reserve or National
Guard units, COIN operations and other
various roles well into the late 20th century
which is a testament to its excellent performance.
One point of particular interest is that
many of the aircraft in the Wings of Power
III lineup have played important roles in
the history of the P-51 Mustang. If it wasn’t
for the Curtis P-40 Warhawk, the British
Purchasing Commission would have never approached North American Aviation
which is a strong testament to the original
design that Curtis made. As the P-51 was
being tested an engine already installed
in Britain’s superior Spitfire was selected
to improve the Mustang’s performance.
As this performance was proven the P-51
10
began escorting the vulnerable B-17 formations into Germany and increasingly
swapped roles with the P-47 from ground
attack to escort. Even the designs of these
aircraft play increasingly important roles in
the P-51 Mustang. The P-51D uses a more
sophisticated version of the constant RPM
governor of the P-40. Also the design of the
intake directly under the fuselage was efficient because of the increased airflow from
the prop, versus the almost adequate cooling system of the early Spitfires. It also benefits greatly from the well built Rolls-Royce
Merlin engines that go hand in hand with
the Spitfire’s reputation. The aircraft had a
manifold pressure regulator system which
resembles those used on the B-17. Lastly,
the P-51 Mustang utilizes a two stage turbocharger and automated cooling doors
which bear some resemblance to those of the
P-47D, if only more simplified.
The P-51 Mustang is indeed a pilot’s
plane, but it has some nuances that are utterly unforgiving if not properly trained.
Many of the systems on the P-51 are automated, allowing the pilot to focus on flying the aircraft versus managing its systems. She carries a lot of speed but in turn
can be troublesome to slow down. She has
more than enough power to get anyone out
of trouble but enough to get you in trouble
at the most inappropriate times. She also
has significant vertical authority but has
a nasty stall and spin should you push her
beyond her limits, especially with fuel in
the fuselage tank. She is well harmonized
in all directions however and with proper
trimming you can fly the P-51 with your fingertips while cruising. She can be a beauty
and a beast all in one and was known to bite
those who didn’t understand her capabilities thoroughly, but in the right hands was
more than a match for her most formidable
enemies.
Some sources indicate that the P-51 destroyed over 5,900 enemy aircraft with a kill
ratio of 11:1 in all theaters, making it easily the highest scoring American aircraft of
the war above the extremely well built F6F
Hellcat. It is also said that when Herman
Goering (Reich Minister of Aviation and
head of Luftwaffe) learned of the P-51s flying escort for the American bombers over
Berlin that he told some of his staff, “The
war is over.” Truly, the North American
Aviation P-51 Mustang is an American
icon and deserves a spot as one of the most
beautiful, highest performing and efficient
aircraft developed during World War II and
in some circles arguably the best fighter aircraft ever produced.
Cody Bergland
11
12
DESIGNER’S NOTES:
The Mustang is a runner, and can fly high and fast. It is also arguably the finest fighter of
World War II, not because of any single attribute, but rather the sum of all of it’s qualities.
Perhaps, most importantly, was it’s long range which allowed it to escort allied bombers all
the way to Berlin and back.
If you own either our Accu-Sim Spitfire or P-40 Warhawk, you are now stepping ahead
to a late war design aircraft, with many systems that help relieve the pilot from performing many tasks you are probably already quite familiar with. The engine cooling flaps
automatically adjust to changing conditions and the throttle holds the power based on your
throttle position.
We made three separate trips to Mustangs flying today to capture first-hand data, take
high resolution photos and videos, capture sounds, and record system behavior. We then
use this hard data against research and documented flight tests available to the public. The
end result, is an aircraft that flies the way it should based on both well known, and our own
first-hand information.
The result, we hope, is the very finest reproduction possible in a flight simulator.
If you enjoy this aircraft and would like to elevate it to another level of authenticity, we
encourage you to check out the Accu-Sim expansion pack for this airplane. Accu-Sim opens
up a brand new world, taking you beyond what is possible with Microsoft FSX. It places
you inside the most believable cockpit imaginable as it recreates every sound, nuance and
characteristic of the airplane.
However, if you just like to step in, fire up the engine, throw the throttle forward and fly
away while admiring a beautiful airplane, then Wings of Power is for you. We spent many
many days and nights, making this aircraft look as great as we could make it.
The Air to Air Simulations Team
13
1
Introduction
Wings of Power 3: P-51 Mustang Features
• The world’s most iconic WWII fighter aircraft
• Oil pressure system models oil viscosity (oil thickness).
• As with every A2A aircraft, it is gorgeously
constructed, inside and out, down to the last rivet.
• Authentically modeled pneumatic system.
• In cockpit pilot’s map for handy in-flight navigation.
• Designed and built to be flown “By The Book”.
• Custom Cockpit Systems and Gauges.
• Visual Real-Time Load Manager, with the
ability to load fuel and stores in real-time.
• Naturally animated pilot.
• 3D Lights ‘M’ (built directly into the model) with underwing landing light that can be turned on, deployed,
and retracted and fully functional recognition lights.
• Pure3D Instrumentation now with natural 3D
appearance with exceptional performance.
• Auto-Mixture that actually performs as intended.
Aircraft fuel-to-air ratio will be automatically
determined and set by the carburetor based
upon various factors, such as altitude.
• Dual speed, dual stage Supercharger
modeled with accurate behavior.
• Fuel delivery system simulated.
• All models include A2A specialized
materials with authentic metal.
• Pilot’s Notes pop-up 2D panel keeps
important information easily available.
• Sound engineered by A2A sound professionals.
14
Wings of Power Overview
General Operational Information and Guidelines
The following information is provided to help pilots become familiar with the Wings of Power series of aircraft for Microsoft Flight
Simulator X. These aircraft are materially different in terms of the
flight modeling than what is commonly available. Be aware that
what is generally accepted as standard performance or aircraft behavior, in many cases will not apply to these aircraft.
Why? Because Wings of Power aircraft are flight tested and
tuned until they reflect the proper results throughout their entire
performance envelope.
Flight simulation that goes beyond maximum
performance figures
Many times, an aircraft is considered to fly accurately if it reproduces a handful of specific performance figures (top speed, max climb
rate, stall speeds, etc.). These figures really only represent how an
aircraft is performing at a single point in time. We push through
these numbers and authentically simulate all flight through an almost unlimited amount of conditions.
As the pilot in command, you can take a Wings of Power aircraft
to any given altitude, choose your own power setting (adjust the
throttle and watch the manifold pressure / boost gauge), adjust your
prop speed and witness your aircraft climb and cruise exactly as it
did in real life. You will even experience accurate fuel consumption
rates, engine temps, and stall characteristics. You can plan realistic
and even historic flights based on your aircraft weight, and calculate cruise speeds, distances traveled, and even authentic figures
like “distance-to-altitude” shown in the manuals. These figures are
not just estimated, they are finely tuned and put through a rigorous
and exhaustive testing process by pilots.
Every Wings of Power aircraft is test flown by the book with
hand-drawn charts and passes a rigorous testing procedure before
it is released to our beta testers. Among our testers are highly experienced real-world pilots who continue to push the aircraft through
its paces. We encourage people to go out and buy the actual pilot
training manuals for these aircraft and use them. When it comes
to unique stall characteristics and other aspects not documented in
the manuals, we refer to actual pilot flight-test reports and our own
pilot interviews. The end result comes from a hard-working team
effort. The bottom line is, for the first time ever, you can experience
these thoroughbred aircraft today like it truly was and still is.
15
FULL POWER does not mean FULL THROTTLE
It is common in the flight simulation industry to accept that the
maximum throttle setting (100 percent throttle) should reflect the
published takeoff power of piston-engined aircraft. For example, the
published takeoff power setting for the B-24D Liberator is 49” of
manifold pressure and 2700 RPM. A standard FSX model of the
B-24 would expect the pilot to simply shove the throttles and propeller controls to the stop and head for the wild blue yonder. This is
just not the way things are in real life or with Wings of Power.
In reality, a real pilot would never under any circumstances shove
the throttle all the way to the stop unless war emergency power was
required and even in this case it would almost never mean throwing
both boost and throttle to the extreme forward position. On takeoff,
a pilot “walks” the throttle carefully but briskly forward until the
proper takeoff power setting is reached. This setting is read on the
manifold pressure gauges. Use the boost lever with extreme care,
especially at low altitudes.
How long does it take to get airborne?
The takeoff distances are tested and compared against the performance tables for that airplane’s respective pilot’s training manual.
However, to achieve these figures, the airplane must be flown exactly according to the procedure in the checklist. Using full throttle,
incorrect flap positions, incorrect takeoff weights, erroneous trim
settings, or improper liftoff technique will materially affect the
takeoff distance.
The distances provided are the distances it takes to clear a 50’
obstacle, which is a common pilot training procedure. These can be
reduced by about 1/3 by using full war emergency power and up to
1/2 flaps on most airplanes. See the aircraft’s checklist for details.
The climb is a carefully executed process
The rate of climb for piston aircraft is normally greatest at sea level
and falls steadily as the aircraft gains altitude. The weight of the
aircraft, the power setting, and the climbing speed are absolutely
critical in obtaining proper and accurate climb performance and if
any of these parameters change, the time and distance to climb will
also change. For most aircraft, there are two climb power settings:
rated power and desired climbing power. The lower power setting
is usually reserved for lower aircraft weights and in some cases the
higher power settings are not desirable due to fuel economy or en-
gine cooling reasons. It can easily be seen that a simple figure published in a book cannot begin to accurately indicate an aircraft’s
actual ability to climb.
An engine can run out of breath
Engines, like people, need air to breathe. The higher the altitude,
the thinner the air. The solution is supercharging or turbocharging, which is basically a fan in the induction system that forces more
air into the engine when needed, so it can get the air it needs to
breathe.
Superchargers are geared directly to the engine crankshaft,
moving as one with the engine. Higher RPM = Higher boost.
Turbochargers do essentially the same thing as superchargers with
the primary difference being the turbocharger is powered by exhaust air pressure and not by internal, direct gearing.
The critical altitude, for supercharged or turbocharged aircraft,
is the altitude at which maximum power can no longer be maintained. For example, if your maximum power is achieved at 50”
manifold pressure, then the altitude at which you can no longer
achieve 50” manifold pressure is called your critical altitude.
Flaps improve slow flight characteristics
It is common that simulated aircraft are built with drastically exaggerated flap drag values, including the stock aircraft. Therefore,
many virtual pilots habitually fly the landing approach far too high
and have a much greater rate of descent than is actually specified
for a particular aircraft. These very high flap drag values allow pilots to get away with unrealistically steep, high approaches. This is
not the case with Wings of Power aircraft.
This can easily be demonstrated by setting the aircraft up on
a simulated final approach at a specified landing weight. Thrust,
drag and weight are in the proper equilibrium as specified. The
same is true for all Wings of Power aircraft, which can be tested in
the same way. The bottom line is that flaps are not air brakes; these
aircraft need to be flown at the proper speeds and power settings or
landings are going to be very challenging!
To obtain ultimate realism, fly the Wings of Power aircraft by
the numbers using the information given in each aircraft’s checklist. Even better, go out and buy a copy of the aircraft’s actual flight
manual and use that to fly the plane. That’s what we did.
16
Mustang – A short history
In April, 1940, when World War II was, for Britain at least, in a
kind of holding pattern and waiting to burst forth into the savage fury that would soon engulf the entire world, the British Air
Purchasing Commission (BAPC) requested that North American
Aviation, Inc. (NAA) build 300 Curtiss P-40s for the R.A.F. Had
“Dutch” Kindelberger, NAA’s President agreed to this, what is generally considered to be the greatest piston engine fighter aeroplane
ever built would have never been created.
Instead, NAA counter offered that they could produce a superior
aeroplane to the P-40 and agreed to do it in 120 days. 102 days later
the first Mustang airframe was completed, and 47 days after that
the first Mustang flew. It went on to serve in every theatre of the
War and in every Allied air force. A total of 16,766 were built, making it the most numerous American fighter aircraft.
Because of the great care and attention to aerodynamic detail
that went into its brilliant design, the Mustang was, from its inception, one of the fastest single-engine piston aeroplanes of the W.W. II
era. The Mustang was originally conceived in large part as a low altitude fighter-bomber; and, accordingly its Allison V-1719-39, 1120
h.p., liquid cooled engine with its single stage supercharger, capable
of producing full power only up to 11,300’ was initially sufficient.
However, as the War quickly progressed, tactical requirements for
higher altitude fighters greatly increased.
It was not, however, until the Curtiss P-40F was fitted with a
Packard built V-1650 Rolls-Royce Merlin engine with its two-stage
supercharger in late 1941, which greatly raised its formerly insufficient critical altitude that NAA and Rolls-Royce engineers got the
idea of doing the same for the P-51. On 30 November, 1942 the first
Packard-built V-1650-3 Merlin powered XP-51B Mustang flew; and
after that the already very fast P-51 came into its own, the B model
attaining a true airspeed of 439 m.p.h. at 25, 000’. This capability,
along with its large internal fuel capacity of 269 U.S. gallons in the
two wing tanks and one fuselage tank aft of the pilot’s seat, plus the
Mustang’s ability to carry a total of 419 gallons (B/C models) and
489 gallons (D/K models) with drop tanks, gave it the extraordinary
range of 1,900 miles (B/C models) and 2,055 miles (D/K models)
respectively.
Unlike previous USAAF escort fighters, P-47 and P-38, the
P-51 could escort bombers from their bases in England, deep into
Germany, and back home again. Better still, once the P-51s engaged
Luftwaffe interceptors, they were fully capable of dogfighting with,
and destroying them. Then, usually with plenty of fuel remaining,
they were specifically assigned to go on ground-attack hunts, destroying aircraft, locomotives and other strategic military targets
before returning home. It was said that the Mustang could do for
eight hours what the Spitfire could do for only two.
In 1943 the terrible and unacceptable attrition rate of the largely unescorted USAAF bombers over Europe, culminated in the
Schweinfurt/Regensburg missions of August 17, 1943 (of 376 B-17s,
60 were lost and as many as 95 heavily damaged) and again at
Schweinfurt on October 14, 1943 (of 291 B-17s, 77 were lost and 121
heavily damaged). This caused the USAAF to curtail deep penetration daylight bombing for five months and almost ended the daylight
bombing program for good. It was the advent of the Mustang with its
ability to stay with the bombers all the way and back again which
saved this crucial program from cancellation. Once the Mustang
was there to protect the bombers, the Luftwaffe was never again
able to inflict such terrible losses. The Mustang’s positive effect on
the successful outcome of the War and upon human history itself is,
accordingly, tremendous and incalculable.
Because they were so needed in the European Theatre, the P-51
came late to the Pacific. The first groups of P-51As were based in
India in May, 1944 and were used mostly for the ground attack missions for which they were originally designed. Whilst more and more
P-51s trickled to the Pacific with the winding down of air combat in
European skies, it was not until the capture of the airfields on Iwo
Jima on 26 March, 1945 that large groups of P-51s began to escort
the B-29s in earnest. To no one’s surprise, the P-51 was particularly
suited to Pacific Theatre operations due to its extreme range. While
it could not out-turn or dogfight with most of the Japanese fighters (no other Allied fighter could, either), the Mustang’s speed and
firepower soon made wreckage of those fighters which they opposed.
Giving good service at the opening of the Korean Conflict until
relieved by the nascent jet- powered fighters of those days, the venerable Mustang has since then had a spectacular career as a racing
and airshow aeroplane which is surely destined to continue well into
the future.
Reckoned by many to be the best single-engine piston fighter of
all time, the Mustang in all of its incarnations is indeed, as it has
been called, “The Cadillac of the Skies”.
17
Chances are, if you are reading this manual, you have properly installed the A2A Wings of
Power P-51 Mustang. However, in the interest of customer support, here is a brief description of the setup process, system requirements, and a quick start guide to get you up quickly
and efficiently in your new aircraft.
System Requirements
The A2A Simulations Wings of Power P-51 Mustang requires the following to run:
• REQUIRES LICENSED COPY OF MICROSOFT FLIGHT SIMULATOR X
• SERVICE PACK 2 (SP2) REQUIRED
Note: While the A2A Wings of Power P-51 Mustang may work with SP1 or
earlier, many of the features may not work correctly, if at all. We cannot attest to the accuracy of the flight model or aircraft systems under such conditions, as it was built using the SP2 SDK. Only Service Pack 2 is required. The
Acceleration expansion pack is fully supported but is NOT REQUIRED.
2
Quick Start
Guide
OPERATING SYSTEM:
• Windows XP SP2
• Windows Vista
• Windows 7
PROCESSOR:
• 2.0 GHz single core processor (3.0GHz and/or multiple
core processor or better recommended)
HARD DRIVE:
• 250MB of hard drive space or better
VIDEO CARD:
• DirectX 9 compliant video card with at least 128 MB
video ram (512 MB or more recommended)
OTHER:
• DirectX 9 hardware compatibility and audio card
with speakers and/or headphones
18
Installation
Included in your downloaded zipped (.zip)
file, which you should have been given a link
to download after purchase, is an executable
(.exe) file which, when accessed, contains
the automatic installer for the software.
To install, double click on the executable and follow the steps provided in the installer software. Once complete, you will be
prompted that installation is finished.
IMPORTANT:
If you have Microsoft Security Essentials
installed, be sure to make an exception for
Microsoft Flight Simulator X as follows:
19
Realism Settings
The A2A Simulations Wings of Power P-51
Mustang was built to a very high degree of
realism and accuracy. Because of this, it was
developed using the highest realism settings
available in Microsoft Flight Simulator X.
The following settings are recommended
to provide the most accurate depiction of the
flight model. Without these settings, certain features may not work correctly and
the flight model will not perform accurately.
The figure below depicts the recommended
realism settings for the A2A Wings of Power
P-51 Mustang.
FLIGHT MODEL
To achieve the highest degree of realism,
move all sliders to the right. The model was
developed in this manner, thus we cannot
attest to the accuracy of the model if these
sliders are not set as shown above. The only
exception would be “Crash tolerance.”
INSTRUMENTS AND LIGHTS
Enable “Pilot controls aircraft lights” as the
name implies for proper control of lighting.
Check “Enable gyro drift” to provide realistic inaccuracies which occur in gyro compasses over time.
“Display indicated airspeed” should be
checked to provide a more realistic simulation of the airspeed instruments.
ENGINES
Ensure “Enable auto mixture” is NOT
checked. The Mustang has a fully working
automatic mixture control and this will interfere with our extensively documented
and modeled mixture system.
FLIGHT CONTROLS
It is recommended you have “Auto-rudder”
turned off if you have a means of controlling
the rudder input, either via side swivel/twist
on your specific joystick or rudder pedals.
ENGINE STRESS DAMAGES ENGINE
(Acceleration Only). It is recommended you
have this UNCHECKED.
20
Quick Flying Tips
• To Change Views Press A or SHIFT + A.
• Be careful with high-speed dives, as you can lose control
of your aircraft if you exceed the max allowable speed.
• Click and hold the electric primer to use.
• In hot weather, get airborne fast. Plan your flight, start
your engine, do a quick run-up, and get off the ground.
• Keep the engine at or above 800 RPM. Failure to
do so may cause spark plug fouling. If your plugs do
foul (the engine will sound rough), try running the
engine at a higher RPM. You have a good chance of
blowing them clear within a few seconds by doing so.
If that doesn’t work, you may have to shut down and
visit the maintenance hangar. (Accu-sim required)
• REDUCE POWER after takeoff. This is standard
procedure with high performance aircraft.
• The aircraft does not have AUTO-RICH or AUTOLEAN mixture, but rather a single RUN setting.
• For landings, take the time to line up and plan your
approach. Don’t use the landing gear or flaps as
brakes. Keep your eye on the speed at all times.
• Using a Simulation Rate higher than 4X
may cause odd system behavior.
• Keep throttle above 1/3 when flying at high RPM
to avoid fouling plugs. (Accu-sim required)
• A quick way to warm your engines is to reload your aircraft while running.
• The Mustang’s maneuvering speed is 270mph
indicated. Above this speed, hard maneuvers can
over-stress the airframe. Below this speed, hard
maneuvers can induce an accelerated stall.
• DO NOT lower gear when going over 170mph IAS.
• On landing, if coming in too fast, raise your
flaps once you touch down to settle the aircraft,
pull back on the stick for additional elevator
braking while you use your wheel brakes.
21
3
P-51 Mustang
Variants
P-51D-25 44-72854, 457th FS/506 FG, ‘KWITCHERBITCHIN’
Flown by Captains William B Lawrence Jr and Alan J Kinvig. Based at Airfield No 3, Iwo
Jima, Summer 1945. The victory flag is Captain Lawrence’s, representing the unidentified
single engined aircraft he shot down on the 16th July 1945. The blank victory flag probably
represents the Ki-44 Tojo he damaged on the 10th June 1945.
22
P-51D-25 44-73304, ‘Blondie’
Flown by Lt. Marvin Arthur of the 334th
Fighter Squadron, 1945. QP-U 44-73304
was assigned to Lt. Marvin Arthur and he
had a picture of his wife painted on the nose.
‘Blondie’ and Lt Marvin Arthur scored 1.5
kills before the end of hostilities in Europe.
F-51D 44-73064
Flown by Lt. Jake Armstrong of the 67th
Fighter Bomber Squadron, Korea, 1952.
23
4
Model P-51D Mustang Specifications
Wing Span
Length
Height
Powerplant
Weights
Service Ceiling
Top Speed
Climb
Fuel
Takeoff Run
Combat Range
37 feet, 5/16 inches
32 feet, 3 5/16 inches
12 feet, 2 2/5 inches
1,700 hp Rolls Royce Packard Merlin
12-cyl, V-1650-7 liquid-cooled engine
7,635 lbs empty weight
41,900 feet
437 mph @ 25,000 feet
7.3 min to 20,000 feet
269 gal (485 gal total with drop tanks)
367 yards
395 miles
Specifications
24
Airframe External
25
Cockpit Diagrams: Front
2
3
1
9
8
7
6
5
4
11
10
12
17
13
14
18
19
16
15
20
22
24
21
1. Selector Dimmer Controls
2. Remote Indicator Compass
3. Clock
4. Suction Gauge
5. Manifold Pressure Gauge
6. Airspeed Indicator
7. Directional Gyro
8. Artificial Horizon
9. Carburetor Air Temperature
10. Coolant Temperature
11. Tachometer
12. Altimeter
13. Bank-and-Turn Indicator
14. Rate-of-Climb Indicator
15. Acceleration
16. Oil Temperature, Fuel and
Oil Pressure Gauge
17. Engine Control Panel
18. Landing Gear Warning Lights
19. Parking Brake
20. Oxygen Flow Blinker
21. Oxygen Pressure Gauge
22. Ignition Switch
23. Fuel Shut-off Valve
24. Fuel Selector Valve
25. Emergency Hydraulic Release
25
23
26
Cockpit Diagrams: Left Side
8
9
6
1
2
3
4
7
5
11
14
13
12
10
1. Coolant Radiator Air Control Switch
2. Oil Radiator Air Control Switch
3. Landing Light Switch
4. Left Fluorescent light Switch
5. Mixture Control
6. Propeller Control
7. Throttle Quadrant Locks
8. Throttle
9. Microphone Button
10. Flap Control Handle
11. Carburetor Air Controls
12. Rudder Trim Tab Control
13. Aileron Trim Tab Control
14. Bomb Salvo Releases
15. Elevator Trim Tab Control
16. Landing Gear Control
15
16
27
Cockpit Diagrams: Right Side
2
1
4
3
5
7
8
9
6
10
11
1.
2.
3.
4.
Oxygen Regulator
Emergency Canopy Release
Recognition Light Key
Canopy Crank and Lock
5.
6.
7.
8.
Right Fluorescent Light Switch
Electrical Control Panel
Rear Warning Radar Control Panel
Radio
9. IFF Control Panel
10. Detonator Buttons
11. Detrola Control Box
28
5
PILOT’S NOTES (SHIFT-2)
Important information is readily available
with the Pilot’s Notes screen.
• Outside Temp is the temperature
of the air outside
• Cabin Temperature is shown
below in terms of how the
cabin temperature feels
• Ground Speed is the actual
speed your aircraft is moving
over the ground surface.
• Endurance is the amount of time
your aircraft can fly at the current
rate of fuel consumption. Take
into account, as you are climbing
to your cruise altitude, this
estimated endurance will be less
than once you level off, throttle
back, and settle into a cruise.
• Range is the distance your aircraft
will fly at the current speed
and rate of fuel consumption.
Again, take into account this
will change based on climb,
cruise, and descent operations.
• Fuel Economy is the current
rate of fuel consumption in
gallons per hour (gph).
• High Temp Warning will display
if your engine temperatures
get close to maximum allowed.
This becomes vital information
if you install the Accu-Sim
P-51 Mustang Expansion
Pack as high temperatures
can damage your engine.
• Power Settings represent your
clipboard showing you important
info to quickly establish a proper
takeoff, climb, and cruise.
2D Panels
• Notes appear below along with
abbreviated checklists for
takeoffs, landings, etc. Click the
arrows at the bottom to browse
through the available pages.
29
CONTROLS (SHIFT-3)
This control panel was initially created to
allow you to operate and watch systems like
lights and engine flaps while in the external view. It soon became a nice little place
where we could put anything we wanted to
have quick access to.
You can:
• Attach your GPU (ground power
unit) for easier startups
• Put on your oxygen mask
• Set wheel chocks
• Jack up the aircraft
• Remove the pilot
• Adjust various switches
and levers including your
radiator flap, lights, etc.
• Set the aircraft to a
cold-start state
• Set aircraft to automatically
start in a cold start state
• Set throttle gate to match
your joystick detent
Additionally, Accu-Sim users can:
• Enable or disable
damage modeling
• Adjust the volume of the
Accu-Sim sound system
• Use headphones
30
PAYLOAD AND FUEL
MANAGER (SHIFT-4)
This real-time payload and fuel manager allows you to visually click and load your aircraft. You can service:
•
•
•
•
•
•
•
•
•
•
Fuel
Ammunition
Oxygen
Coolant fluid
Engine oil
Hydraulic fluid
Aftercoolant fluid
Remove fuselage tank
Change fuel grade
Change oil grade
The aircraft initially is prepared for a standard flight with ammunition loaded.
31
PILOT’S MAP (SHIFT-5)
The pilot’s map gives full access to similar
information that may be found on real maps
and allows this information to be easily accessed rather than have to use the default
map from the upper menus. This is a period
aircraft, so we tried to create this in the true
light of a pilot needing to still use visualization or VOR to know precisely where the
aircraft is over the map, hence, we did not
include the little aircraft icon in the middle.
You can access this map by clicking on the
map box in the lower left area of the cockpit.
32
RADIO SELECTOR (SHIFT-6)
The 2D radio selector panel allows you to
set the frequency of the radio. Moving the
lever at the bottom of the cockpit radio also
adjusts this frequency.
33
MAINTENANCE HANGAR (SHIFT-7)
Note: While the maintenance hangar
is accessible for non-Accu-Sim installations, engine damage, wear, and
advanced systems modeling is part
of the Accu-Sim expansion pack.
The Maintenance Hangar is where you can
get a review of how your aircraft engine and
major systems are functioning.
You can both see and read your crew
chief’s report stating:
• A summary of your airframe,
engine, and propeller installed
• Hours on airframe and engine
since last major overhaul
• General condition of the engine
• Notes
You can also perform a COMPLETE
OVERHAUL by clicking on the OVERHAUL
button. This overhauls the engine and replaces any parts that show any wear with
new or re-conditioned ones.
In the above example, your crew chief has
reported some hydraulic leaks were found
along with some moderate wear on your left
brake. To repair each one, simply click on
the yellow highlighted area over your aircraft.
You also notice your mechanic has mentioned that some engine accessories need
repairs. To look further into the engine condition, click on the CHECK ENGINE on the
lower left.
Clicking on the CHECK ENGINE button
pulls up a detailed cutaway of your engine.
34
Color Codes
Green
Yellow
Red
OK
Watch
Must fix or replace
In the example here, our engine appears
to be in pretty good shape with the exception
of a worn hydraulic pump and clogged fuel
filter. Your mechanic’s inspection picked up
this wear, and it is shown here. A yellow
condition means it is recommended that you
replace or repair this item, but it is not mandatory. You can choose to keep a close eye
on this part and continue flying.
Heavy wear or failure would highlight
the part in red.
35
At the lower right is a “Compression
Test” button, which tells your mechanic to
run a high-pressure air test on the engine
cylinders, checking for leaks past the cylinder rings. A civilian may choose to replace
a cylinder that is only showing modest wear,
perhaps in the 50-60psi range, whereas the
military could allow a plane to fly with a cylinder as low as 30 psi.
Low compression on a cylinder isn’t necessarily a terrible thing, because as the engine picks up in speed, the worn cylinder
becomes productive. It is mostly noticed at
lower R.P.M.’s where the cylinder may have
trouble firing, and also a marked increase in
oil consumption may also occur (sometimes
with an accompanying blue smoke out of
that cylinder during flight).
However, note that this is a reading of
the general condition of the cylinders, and
lower condition does bring additional risks
of failure, or even engine fires.
Also note, after performing a compression test, your mechanic writes down the
exact numbers in his notes.
The engine pictured here has a completely failed #3 cylinder and poor #5 cylinder.
#5 will fire with higher RPM, but #3 may
never fire properly.
36
Joystick Mapping Utility
The Input Configurator is a small utility that allows users to assign keyboard or
joystick mappings to many custom functions that can’t be found in FSX controls
assignments menu. It can be found in the
A2A/P-51/Tools folder inside your FSX installation directory.
The upper table is the axis assignment
menu. From the drop down list, select joystick and axis you want to assign to each
function and verify its operation in the ‘preview’ column. Mark the ‘invert’ check box if
needed.
The lower table is the shortcuts menu.
Hover over function name to bring up a
tooltip with additional information. To make
a new shortcut, double click on a selected
row to bring up the assignment window.
Then press keyboard key or joystick button
you want to assign to this function. For keyboard it’s also possible to use modifier keys
(Ctrl, Shift, Alt).
When done with the assignments, press
“Save and update FSX” button. This will
instantly update shortcuts for the Mustang.
There is no need to restart FSX or even reset flight for the changes to take effect, you
can adjust shortcuts on the fly.
37
Supercharger
The engine has a two-speed, two-stage supercharger which cuts into high blower automatically. The -3 engine cuts in at 19,000
feet, the -7 engine at from 14,500 to 19,500
feet, depending on the amount of ram air.
The supercharger increases the blower-toengine ratio from a low of about 6 to 1 to a
high of about 8 to l.
You can also control the supercharger
manually by a switch on the instrument
panel. The switch has three positionsAUTOMATIC, LOW and HIGH.
For all normal operations, keep the
switch in AUTOMATIC. In this position the
supercharger is controlled by an aneroidtype pressure switch, which automatically
cuts the unit into high or low blower as re-
quired. This switch is so adjusted that it
cuts the unit back into low blower approximately 1500 feet under the altitude at which
it cuts into high blower. This prevents the
high blower from going on and off repeatedly with slight changes in altitude at about
the point where the high blower cuts in.
If the aneroid switch fails, the supercharger automatically returns to low blower.
The LOW position on the manual switch
on the instrument panel makes it possible
to operate the supercharger in low blower at
high altitudes. This gives you better range
at high altitudes- which, of course, is important on long range flights.
The HIGH position on the manual switch
makes it possible to test the high blower on
the ground or to use High Blower in case of
an aneroid failure if necessary.
An amber jewel indicator light next to
the manual switch on the instrument panel
goes on when the supercharger is in high
blower.
38
6
Systems
Carburetor
The engine has an injection-type carburetor
and an automatic manifold pressure regulator. With this automatic regulator, you
don’t have to jockey the throttle to maintain
a constant manifold pressure in the highspeed range as you climb or let down. All you
have to do is select the desired pressure by
setting the throttle lever, and the pressure
regulator does the rest. It compensates automatically for the difference in air density
at different altitudes by gradually opening
the carburetor butterfly valve as you climb
and smoothly closing it as you decend.
On later airplanes, the automatic regulator covers practically your entire operating range, going into action whenever you
use more than 20” of manifold pressure.
Airplanes equipped with this type of regulator can be distinguished by the START
War Emergency Power
position plate on the throttle quadrant. In
earlier airplanes the manifold pressure regulator is effective only at pressures in excess
of 41”.
Carburetor air comes through a long carburetor air scoop directly under the engine.
The plane’s motion forces the air at high
speed (or rams it) directly into the carburetor. This is called ram air.
If the scoop becomes obstructed by ice or
foreign matter, a door in the air duct opens
automatically to admit hot air from the engine compartment to the carburetor.
Ordinarily you will always use ram air,
but, in the event of extreme icing or dust
conditions, the carburetor air controls on
the left cockpit pedestal allow you to select
either un-rammed filtered or, in later airplanes, un-rammed hot air for operation. In
order to obtain hot air, the hot air control
must be at HOT and the cold air control at
UNRAMMED FILTERED AIR. If the cold
air control is in RAM AIR position, the hot
air control will be ineffective.
Don’t use hot air above 12,000 feet. At
high altitudes its use will disturb the carburetor’s altitude compensation, and may
cause too lean a mixture.
In order to give your engine an extra burst
of power should you get into an extremely
tight situation, move the throttle full forward past the gate stop by the quadrant,
breaking the safety wire. The engine will
then be opened up to its absolute limit, and
will give you about 6” of manifold pressure
in excess of the normal full throttle setting
of 61” (with mixture control at RUN and
prop set for 3000 rpm).
This throttle reserve is called war emergency power, and should be used only in
extreme situations. If you use it for more
than 5 minutes at a time you’ll risk damaging vital parts of the engine. In training,
therefore, the throttle must never be moved
beyond the gate stop.
Whenever you do use war emergency
power, you should report the time to the
crew chief or engineering officer so that a
record can be kept and the engine inspected
before the airplane is flown again. The engine must be removed for a complete knockdown inspection after 5 hours.
Note: We record this time in
the maintenance hangar.
39
Throttle Quadrant
Late model Mustangs are equipped with
a single-position carburetor. The mixture
control has the following settings: IDLE
CUT-OFF, RUN, and EMERGENCY FULL
RICH. These carburetors are fully automatic and the normal operating position is
RUN. The EMERGENCY FULL RICH position is for use in case the carburetor fails to
function properly in RUN.
The quadrants have two friction-lock adjusting knobs. One adjusts the friction of
the propeller and mixture control levers, the
other the throttle control lever.
Propeller
The P-51D propeller is a Hamilton Standard,
four-blade, hydraulic, constant-speed prop
with a diameter of 11 feet 2 inches and a
blade angle range of 42°. As is the case with
all single engine aircraft, the prop cannot be
feathered. You control propeller rpm manually by a single lever on the throttle quadrant.
40
Landing Gear
The main gear and tailwheel are fully retractable, and are controlled hydraulically
by a single lever on the left pedestal. Do not
raise the control lever when the airplane is
on the ground. There is no safety downlock
on a P-51D, and the gear will retract as soon
as you start taxiing.
The tailwheel is both steerable and full
swiveling. It is steerable 6° right or left with
the rudder. The tailwheel lock is different
from that of most other planes-it is operated by the control stick. When the stick is
in neutral position or pulled back, the tailwheel is locked and steerable. When you
push the stick full forward, the tailwheel is
unlocked and full swiveling.
The tailwheel drops almost instantly
when you push the landing gear lever to the
DOWN position. The main gear takes 10 to
15 seconds to move into position. You can
definitely feel the gear lock into place when
it is lowered.
You can release the landing gear in an
emergency by means of a red handle just
above the hydraulic pressure gauge. Pulling
this red handle releases the pressure in the
hydraulic lines. This allows the gear to drop
of its own weight when the landing gear lever is in the DOWN position. The landing
gear lever must be in the DOWN position-all
the way down-or the mechanical locks which
hold the gear in place are not unlocked.
Note that the red handle releases the
pressure in the hydraulic lines. Therefore,
if you want to operate the flaps or the fairing doors after you have dropped the gear
by means of the red handle, you must push
the handle back to its original position. If
you leave it out-all or even part way out-you
won’t have any hydraulic pressure to operate the flaps.
If the gear is not down and locked when
you come in for a landing, you’ll be warned
by a combination of red and green warning
lights below the instrument panel and a
horn aft of the seat. The horn sounds only
when the landing gear is up and locked,
while the throttle is retarded below the
minimum cruise condition, and may be silenced by the cut-out switch on the front
switch panel. This switch automatically resets when the throttle is advanced.
41
Brakes
Electrical System
The brakes are hydraulic, of the disc type.
The usual toe action on the rudder pedals
controls each brake individually.
The electrical system is a 24-volt, directcurrent system which provides power for operating the booster pumps, starter, radios,
guns, the various electric lights, the bomb
racks, and the coolant and oil radiator controls.
The electrical system runs off the battery
until the engine reaches 1500-1700 rpm,
when the generator is cut in by the voltage
regulator. Power for the electrical system
then is supplied by the generator. To prevent
any damage to the electrical system from
overload, circuit breakers are used. These
eliminate the use of fuses and allow you to
re-set broken circuits while still in flight.
The circuit breaker re-set buttons are on
the right switch panel. On late models all
the buttons can be re-set at once by means
of one bar plate across the switches. All you
have to do is simply bump this plate to restore the circuits.
An ammeter is on the same panel as the
circuit breaker switches. This ammeter
shows you how much current is flowing from
the generator and also shows whether or not
the generator has cut in at 1500-1700 rpm
as it should.
The battery is just behind the pilot’s armor plate in the radio compartment. The
battery and generator disconnect switches
are on the panel with the circuit breaker
switches.
The lights of the electrical system include
cockpit and gunsight lights, one powerful
sealed-beam landing light in the left wheel
well, recognition lights, and standard navigation lights on the wingtips and on the rudder.
Hydraulic System
The hydraulic system is extremely simple
and almost foolproof in its operation. It has
two separate parts. One part of the system
operates under pressure from a pump which
is driven directly off the engine. This part
operates the landing gear and the wing
flaps. This “power” part of the system operates at a pressure of 1000 pounds per square
inch (psi) while the engine is running.
The second part of the system works the
brakes only. It is operated by the foot pressure of the pilot. The only connection between the two parts of the system is that
they both receive their supply of fluid from
the same tank. However, the tank is so designed that even if all the hydraulic fluid
from the power part of the system is lost,
there still is enough fluid to operate the
brakes. So even if you lose the hydraulic
pressure in your landing gear and flaps, you
still can operate your brakes.
The parking brake handle is just below
the center of the instrument panel. You operate the parking brakes in the conventional manner:
• Hold the brakes;
• Pull the parking brake handle out;
• Release the pressure on the brake;
• Then release the parking
brake handle.
To release the parking brakes, simply push
down on the foot pedals.
Except for the booster coil, which is used
only in starting, the ignition system is completely independent of the electrical system,
and will continue to function normally in
case of electrical system failure. Ignition
power is supplied by the magnetos; the
switch is on the front switch panel.
42
Fuel System
The Mustang has two main fuel tanks, one
in each wing. They are self-sealing, and have
a capacity of 92 gallons each. An auxiliary
85-gallon self-sealing tank is installed in
the fuselage, aft of the cockpit. There is also
provision for carrying two droppable combat
tanks on the bomb racks. These are available in 75-gallon and 110-gallon sizes; normally you’ll use only drop tanks of 75-gallon
capacity, since the extra weight of the larger
tanks imposes near-limit loads on the wings
and bomb racks. Droppable tanks are not
self-sealing. Making them so would add unnecessary weight, for it has been found that
shot-up external tanks will not remain afire
when the airplane is in flight.
Total fuel capacity of the airplane, with
110- gallon droppable tanks, is 489 gallons.
To cruise the Mustang scientifically, plan
your flight in accordance with the Flight
Operation Instruction Charts included at
the end of this manual.
Fuel is forced to the carburetor by an
engine driven pump at a normal operating
pressure of 16-19 psi. In addition, there is an
electrically powered booster pump in each
internal tank.
In case of engine driven pump failure,
the booster pumps will provide enough fuel
to the carburetor for normal engine operation.
The fuel selector control is on the floor of
the cockpit, just in front of the stick. As you
rotate the valve handle you’ll notice a definite snap as each tank position is reached.
Be sure you feel this snap. It’s your guarantee that the valve is properly set.
Oil System
The electric primer installed on later airplanes is controlled by a momentary toggle
switch next to the starter switch. Earlier series planes have a hand primer on the right
side of the instrument panel. One second’s
operation of the electric primer is about
equivalent to one stroke of the hand primer.
Caution: When changing tanks, don’t
stop the selector valve at an empty
tank position, or at a droppable tank
position if you have no droppable
tank. If you should accidentally do
this, or if you run a tank completely
dry, your engine will fail, and you
must act immediately as follows:
• Turn the fuel selector
to a full tank;
• Make sure that the booster
pump switch is ON;
• As your engine takes hold, adjust
the throttle setting as required.
The oil system includes a tank, located just
forward of the firewall, and a radiator in the
air scoop under the fuselage.
The tank is a hopper type- that is, it is designed with hoppers or compartments which
facilitate quick warm-up and also make it
possible to fly the airplane in abnormal positions, with little oil in the system.
With this tank you can fly the P -51 in
any altitude when the tank is full. Or you
can put it into a vertical climb or dive when
the tank is only ¼ full and still get proper
lubrication.
However, when the plane is in inverted
flight, the oil pressure falls off because no
oil reaches the scavenger pump. For that
reason you must limit inverted flying to 10
seconds-which is plenty of time for any normal or combat maneuvers.
An outlet door on the bottom of the air
scoop controls the oil temperature. Under
ordinary circumstances this door operates
automatically.
However, if you want to operate it manually when you’re running your engine on the
ground, for example, or in case the automatic regulator fails in the air- you can do so by
means of an electrical switch on the left side
of the cockpit.
This switch has three positions:
AUTOMATIC, OPEN, and CLOSE. You can
stop the door at any position by holding the
toggle switch in the OPEN or CLOSE position for the necessary length of time, then
returning the switch to neutral.
43
Cooling System
The oil system has standard AAF oil dilution equipment. This allows you to thin
the oil with gasoline to make the engine
easier to start in temperatures below 40 °F.
With the radiators located in the big
airscoop aft of the cockpit under the fuselage, the cooling cools the engine proper.
The engine coolant system is a high-pressure system (30 psi) and its capacity is 16
1/2 gallons.
The coolant used is a mixture of ethylene
glycol and water.
An air outlet door at the rear of the air
scoop controls the temperature of the coolant. This door operates similarly to that of
the oil cooler.
Normally, it works automatically, but you
can control it manually by means of a switch
on the left side of the cockpit, next to the oil
cooler door control switch. Both switches are
on the radiator air control panel.
INVERTED FlYING LIMITED TO 10 SECONDS
Operation of the oil dilution equipment
is simple. Allow the engine to idle, coolant
flaps open, until the oil temperature drops
to 50 °C or less. Then, before stopping the
engine, use the dilution switch on the pilot’s
switch panel.
This dilutes the oil until you are ready
to start the engine again. Once the engine
warms up, the gasoline in the oil is quickly
evaporated.
If the engine temperature is high, stop
the engine and allow it to cool to an oil temperature of about 40°C. Then start it again,
and immediately dilute the oil as explained
above.
Two minutes of oil dilution is sufficient
for any temperature down to 10°F. When
starting in temperatures lower than that,
heat is sometimes applied to the engine and
oil system. Therefore, no fixed oil dilution
time can be given in this manual; you’ll be
specially instructed in accordance with local
operating conditions.
Total capacity of the oil system is 21 gallons.
44
The Canopy
Cockpit
The cockpit enclosure is of the half-teardrop
type; it consists of an armor glass windshield and a sliding canopy formed from a
single piece of transparent plastic. The canopy is designed to give you the best possible
vision in all directions, since obstructions
above, at the sides, and to the rear have
been eliminated.
You get into the cockpit from the left
side. To help you up on the wing, there is a
handhold in the left side of the fuselage. You
can step on the fairing in getting up on the
wing, but be careful that you don’t step on
the flaps.
To open the canopy from the outside,
push in on the spring-loaded button at the
right forward side of the canopy, and slide
the canopy aft.
You control the canopy from within by
means of a hand crank. Depressing the
latch control on the crank handle unlocks
the canopy, after which you can turn the
crank to slide the canopy open or closed.
Releasing the latch control locks the canopy
in any position.
To warn you against taking off without
having the canopy properly secured to the
airplane, there are two red indicator pins,
one at each side of the canopy. If these pins
are visible the canopy isn’t properly locked.
Never take off if you can see the pins. If
you do, your canopy will blow off.
The emergency release for the canopy is
the long red handle on your right, above the
oxygen controls. When you pull this handle,
the entire canopy flies off. The handle is
safetied with light safety wire.
The cockpits of fighter-type airplanes are
generally pretty cramped, and that of the
Mustang is no exception. Concentration of
numerous instruments and controls into a
small space is unavoidable. In the case of
the P-51D, the controls are simplified, and
their grouping has been planned to give you
the greatest possible efficiency. As fighter
airplanes go, the cockpit is comparatively
comfortable.
The cockpit can be both heated and ventilated. Cold air is fed into the cockpit through
a small scoop located between the fuselage
and the big air scoop. Warm air is fed into
the cockpit from inside the scoop just back
of the radiator.
Warm air from this source also serves to
defrost the windshield. The controls for regulating cold and warm air and the defroster
are on the floor of the cockpit, around the
seat, as shown in the accompanying illustration.
The pilot’s seat is designed to accommodate either a seat-type or a back-pack parachute.
The back cushion is kapok-filled and can
be used as a life preserver. The seat is adjustable vertically; you’ll find the lock on
your right. No fore-and-aft adjustment is
possible.
Your comfort on long flights will be increased by a small, folding arm rest on the
left side of the cockpit.
A standard safety belt and shoulder harness are provided. There is a lever on the
left side of the seat for relaxing the tension
on the shoulder harness. This permits you
to lean forward whenever necessary-for example, to look out of the canopy in taxiing.
45
Oxygen System
Emergency control.
Recognition Lights
The oxygen system in the P-51 is the same
as that used in all modern army fighter
planes.
It is a low-pressure demand-type system,
that is you don’t have to control the oxygen
manually as you change altitudes. A regulator furnishes the right amount of oxygen
required at any altitude. It does this automatically- all you have to do is inhale in
your mask.
Controls and gauges for the oxygen system are in the right front section of the cockpit.
These include:
• the automatic mixture regulator,
• a pressure gauge, and
• a blinker indicator which
indicates the flow of oxygen. The
blinker opens when you inhale
and closes when you exhale.
Notice in the illustration that there are two
controls on the automatic mixture regulator.
The lever on the right turns the automatic mixing device on and off. For all normal operations it should be in the NORMAL
OXYGEN position. Turn it to the 100%
OXYGEN position if you want pure oxygen
on demand. In this position the air intake
is shut off and you breathe pure oxygen on
demand at an altitude.
By turning this knob to the open position
you bypass the regulator and receive a continuous flow of pure oxygen. If the tanks
are full, you get a flow of oxygen for about
8 minutes.
Your oxygen supply is carried in four
tanks, which are installed just aft of the fuselage fuel tank. There are two D-2 and two
F-2 tanks (which have twice the capacity of
the D-2’s), for a total volume of 3000 cubic
inches. A filler valve, accessible through a
small door in the left side of the fuselage,
permits refilling the oxygen tanks without
removing them from the airplane. Normal
full pressure of the system is 400 psi.
Three colored recognition lights (red, green,
and amber) are located on the underside of
the right wing, near the tip. By means of
three position toggle switches on the electrical switch panel at your right, these lights
can be used in any combination. You can
burn them steadily, or flash code signals
with them.
When these switches are in the down position, the lights burn steadily. When in the
center position, they are off.
When in the up position, you can operate
the light intermittently, in code signals, by
means of the key on top of the small box just
above the switches.
46
7
Flying the
P-51
Preliminary Check
•
•
•
•
Obtain flight clearance.
Check outside of airplane carefully. Remove pitot cover.
Check service of ship and status of it on Form 1A carefully.
Make sure chocks are in place.
47
Enter Cockpit
•
•
•
•
•
•
•
•
•
•
•
•
•
•
•
Adjust seat and rudders for height and length.
Check ignition switch OFF.
Set parking brake.
Check bomb and gun safety switches are OFF.
See that landing gear control handle is in the DOWN position. On the P-51D, there is NO ARENS control to prevent accidental raising of gear on the ground.
Unlock controls and check for freedom of movement. Control
lock is located at the base and just forward of the stick. Pull
the plunger on the left side of the lock to unlock controls.
Fasten safety belt and shoulder straps.
Set altimeter to correct barometric pressure.
Oil and coolant shutters to full OPEN position as soon as battery cart is plugged in.
Set trim tabs. Rudder 5° Right, Elevator 2° to 3° Nose UP
(with 25 gallons or less in fuselage tank). Elevator 1° to 3°
Nose DOWN (fuselage tank full). Aileron 0° for Take-Off.
Release hydraulic pressure with wing flaps
and flap handle to UP position.
Close canopy (bubble) as follows:
Push in on axle of crank on right side of cockpit to engage clutch.
Disengage pin on crank handle from the holes on the face of
the clutch housing by pulling crank knob inboard gently.
Turn crank counterclockwise, holding knob inboard to close canopy.
Warning - If red indicators show through openings on
each side of the forward end of the enclosure, the emergency release is unlocked and unsafe for flight.
Starting & Warm-Up
• Ignition switch OFF.
• Have prop pulled through if it has been idle more than 2 hours.
• Generator and battery switch ON, unless battery cart is being used, then battery switch OFF.
• Throttle 1 inch open.
• Mixture control in IDLE CUT-OFF.
• Propeller control in INCREASED RPM.
• Supercharger switch in AUTOMATIC.
• Carburetor air control in RAM AIR.
• Turn ignition switch to BOTH.
• Fuel shut-off valve ON and fuel selector valve to Fuselage tank
(if full), or Left Main tank if Fuselage tank not serviced.
• Fuel booster pump on NORMAL and check
for 8-12 pounds of fuel pressure.
• Prime engine 3 to 4 shots when cold. 1 to 2 when warm.
• See that prop is clear.
• Lift guard on starter switch on pilot’s switch panel and press
switch to START. Caution in use of starter not to overheat.
• As engine starts, move mixture control to RUN. If engine
does not fire, after several turns, continue priming.
Warning: When engine is not firing, mixture control should be in IDLE CUT-OFF.
• Warm engine at approximately 1300 RPM. Check for
constant oil pressure. If no oil pressure or low pressure after 30 seconds, shut off engine.
• Check all instruments for proper readings.
• Check hydraulic system operation by lowering and raising flaps.
Loading 800-850 pounds and unloading at 1050-1100 pounds.
• Check communication equipment for proper operation.
• Uncage all gyro instruments.
• Check both LEFT and RIGHT MAIN and FUSELAGE fuel systems by rotating fuel selector valve with booster pump switch
in EMERGENCY. Check for 14-19 lbs/sq. in. If drop tanks are
installed, check fuel flow by rotating fuel selector control.
48
Taxiing Instructions
•
•
•
•
Check wing flaps UP.
Have wheel chocks pulled.
Steer a zigzag course.
Taxi with stick slightly aft of neutral. This will lock the tail
wheel. In the locked position the tail wheel may be turned 6º to
the right or left by use of the rudder pedals. For sharp turns,
push stick forward of the neutral position to allow the tail
wheel full swiveling action. Use brakes as little as possible.
• Always taxi with the WING FLAPS UP and the OIL
AND COOLANT SHUTTERS in the open position.
Before Take-Off (Run-Up)
• At 2000 RPM, check the following:
Suction:
Hydraulic Pressure:
Ammeter:
3.75 to 4.25 inches HG.
800-1100 lbs/sq. inch.
not to exceed 50 amps.
• Check the instruments for the following limitations:
Oil Pressure
Oil Temperature
Coolant Temp
Fuel Pressure
Desired
70-80 lbs/sq. in.
70º C - 80 º C
100º C - 110 º C
12-16 lbs/sq. in.
Maximum
90 lbs/sq. in.
90º C
121º C
19 lbs/sq. in.
• Check mags at 2300 RPM. Maximum drop 100 RPM.
• At 2300 check propeller - 300 RPM maximum
drop - and return to full INCREASE RPM.
• Oil and coolant shutters AUTOMATIC.
• Wing flaps 20° if desired.
• Mixture RUN.
• Propeller in full INCREASE RPM.
• Fuel booster pump ON, check for 14-19 lbs/sq. in.
• Generator switch ON.
49
Takeoff
Before Landing
After you have pulled out and lined up on the runway,
make sure that the steerable tailwheel is locked-it
must be locked with the stick back for takeoff.
Then advance the throttle, gradually and
smoothly, to 61” of manifold and 3000 rpm.
Don’t hoist the tail up by pushing forward on the stick until you
have sufficient airspeed to give you effective rudder control.
This is important to watch in the takeoff, since the P-51, like
all single-engine planes, has a tendency to turn left because of
torque. If you force the tail off the ground too quickly with the
elevators, better be ready to use right rudder promptly.
Keep the airplane in a 3-point attitude until you have
plenty of airspeed. In a normal takeoff, the rudder trim tab
is sufficient to make the torque almost unnoticeable.
Use Of Power
Take-off
Climb
Cruise
Manifold Pressure
61” Hg
46” Hg
30”-43” Hg
• Mixture RUN.
• Oil and coolant shutters AUTOMATIC.
• Fuel selector to fullest tank. NOTE: Never
land on droppable wing tanks.
• Booster pump switch to ON.
• RPM increased to 2600.
• Normal gear procedure:
• Retard throttle to check landing gear warning light (17”-22” M.P.).
• IAS 170 or below. Put landing gear handle in DOWN position.
• Allow time for gear to extend.
• Retard throttle to check warning lights. If light
does NOT come ON at previously noted position of throttle, gear is DOWN and LOCKED.
• Lower flaps as desired. Full flap speed 165 or below.
After Landing
RPM
3000 RPM
2700 RPM
1800-2500 RPM
Mixture Control
RUN
RUN
RUN
•
•
•
•
•
•
•
•
Raise flaps.
Booster pump OFF.
Oil and coolant shutters OPEN.
Run engine to 1500 RPM, set mixture control to
IDLE CUT-OFF and move throttle fully open.
Turn ignition switch OFF after propeller stops turning.
Fuel shut-off valve OFF.
Turn all switches OFF.
Lock controls.
50
Emergency Wing Flap Operation
There is NO emergency wing flap operation provided on the
P-51D as the hand pump has been eliminated. On all earlier
models of the P-51, emergency operation is as follows:
• Put flap selector to desired position and operate the
hand pump until it siezes. Flaps will be in desired position and will stay there until another selection is made.
Emergency Landing Gear Extension Procedure
• If normal extension fails, recheck landing gear warning light by
retarding throttle until landing gear warning light comes on.
• At an IAS of 170, put gear handle in down position and yaw plane. Recheck landing gear warning light by retarding throttle blow 20” M.P.
• If the landing gear warning light is still ON, indicating
gear not down and locked, pull fairing door emergency release knob and yaw the plane again to lock gear.
• Then again retard throttle to check warning light.
Note: The warning light does NOT indicate the position of
the tail wheel. If there is any doubt as to whether or not the
tail wheel is down, dive the airplane a short distance and
pull out with enough acceleration to force down the tail
wheel. REMEMBER - THE ONLY CHECK AVAILABLE FOR
THE MAIN GEAR IS THE WARNING LIGHT. USE IT!
Alternate Procedure for Operating Oil & Coolant Shutters
on the P-51D
• If AUTOMATIC operation of oil and coolant shutters fail
due to thermostat or AUTOMATIC circuit failure,
• Check circuit breaker. If it has popped out, push
it back in. If it won’t stay in, hold it in and
• Hold switch in manual OPEN (or CLOSED) long enough to
open (or close) shutters, (approximately 15-20 seconds).
Warning: do not hold circuit breaker in too
long as it may start an electrical fire.
The above is an ALTERNATE procedure ONLY. If the electric
motors are burned out, there is NO EMERGENCY PROCEDURE.
Emergency Exit
• The cockpit enclosure may be released as a unit in an emergency. The Emergency Release handle is located on the
right forward side of the cockpit. To release the canopy,
pull the handle all the way back. Remember: Duck your
head as you pull the handle to avoid a head injury.
• To bail out, either of two procedures may be followed:
• Release canopy, roll airplane over on its back and drop out.
• Release canopy, climb out of cockpit, lower yourself onto the wing and roll off.
Drop Tanks
• When the drop tanks are installed, the gear may not retract or
extend properly due to aerodynamic forces causing a suction between the drop tanks and the fairings on the landing gear; to break
this suction it is necessary to yaw the airplane from side to side.
51
Go Around Procedure
Don’t hesitate to go around if there is any possibility
of getting into trouble while landing.
It’s done in the best of families. The
recommended go-around procedure is:
• Advance the throttle quickly but smoothly to a
manifold pressure of 46” at 2700 rpm.
• At the same time, counteract left torque by using right rudder and right trim tab.
• Then trim the airplane to relieve the elevator pressure.
• Raise the landing gear.
• After your IAS reaches 120 mph, and you have attained an altitude
of 500 feet, raise the flaps. Bring them up gradually, about 10°
at a time. Watch the change of attitude as the flaps are raised.
Remember: Don’t jerk or jam on the throttle. Use all controls
smoothly, and pull up gradually to avoid risking a stall.
If you have rolled the elevator trim tab back for the intended
landing, it may take considerable forward stick pressure to
keep the nose down until you can re-trim the plane.
Most important of all in going around, continue on a straight
course. Don’t attempt any turns until your flaps are up.
52
Flight Characteristics
The P-51 is one of the sweetest-flying fighter
planes ever built. It is very light on all controls and stable at all normal loadings.
Although light on the controls, it is not so
sensitive that you would call it jerky. Light,
steady pressures are all you need to execute
any routine maneuver.
At various speeds in level flight or in
climbing or diving, the control pressures you
have to hold are slight and can be taken care
of by slight adjustments on the trim tabs.
However, the trim tab controls are sensitive;
use them carefully. The rudder and the elevator trim change slightly as the speed or
power output of the engine changes.
The airplane is entirely normal in its flying characteristics. If you’ve trimmed for
normal cruising speed; the airplane will
become nose heavy when you raise the nose
and decrease airspeed.
Under the same normal cruise conditions, when you lower the nose and increase
speed, the airplane becomes tail heavy in
direct proportion to the speed.
When you lower the flaps, the airplane
becomes nose heavy. When you raise the
flaps, the airplane becomes tail heavy.
When you retract the landing gear, the
airplane becomes tail heavy. When you lower the landing gear, the airplane becomes
nose heavy.
Limitations for the airplane are given in
the illustration above. These limitations are
for all normal flying.
For your convenience, maximums and
minimums for the engine are given in the
airplane on a placard on the right side of the
cockpit.
Flight limitations for the airplane are
also given on this placard.
The P-51 does not hold a sustained sideslip. The aileron control is not sufficient to
hold the airplane in a side-slipping angle.
However, you can sideslip it long enough to
avoid enemy fire in combat. When any sideslipping is attempted, be sure to recover
completely above 200 feet.
Full Fuselage Tank
Be especially careful in handling the stick
when the fuselage tank contains more than
25 gallons of gas. In this case the flying
characteristics of the airplane change considerably-increasingly so as the amount of
fuel in the tank is increased.
When you are carrying more than 40 gallons of fuel in your fuselage tank, do not attempt any acrobatics. The weight of this fuel
shifts the center of gravity back so the airplane is unstable for anything but straight
and level flight.
Be sure you are accustomed to the
changed flying characteristics of the airplane before engaging in any maneuvers
with a full fuselage tank. You need at least
one or two hours of flying with the plane in
this condition to accustom yourself to it.
The same thing happens in a dive. The
airplane tends to pull out too sharply, and
you have to change from holding back on the
stick to pushing forward on it to keep the
airplane in a proper pullout.
This is called reversibility. You’ll encounter it in the P-51 only when the fuselage
tank has a considerable quantity of gas in
it. Be prepared in this situation. It is easily handled; just don’t be surprised when it
happens.
The stability of the airplane improves
rapidly as you use up the gas in the fuselage tank. By the time the tank is half
empty, only a slight tendency to tighten up
is noticeable. It still is impossible to trim for
hands-off level flight at this time, but this
condition rapidly disappears as the fuel in
the tank drops below the half-full level.
The P-51D’s reversibility characteristics
have been improved by the addition of a
20-pound bobweight to the elevator control
system bellcrank.
This weight reduces the amount of forward pressure you’ll have to exert to overcome the reversibility tendency.
Reversibility
With the fuselage tank full, the center of
gravity of the airplane moves back so far
that it is almost impossible to trim the airplane for hands-off level flight. Also, as soon
as you enter a tight turn or attempt a pullout, the stick forces reverse.
For example, in a turn you naturally
start out by holding back on the stick. But
soon you find the airplane wanting to tighten up, and you have to push forward on the
stick to prevent this.
53
With Extra Wing Tanks
When the airplane is carrying droppable
fuel tanks, only normal flying attitudes are
permitted.
Don’t try anything but normal climbing
turns and decents when you’re carrying extra wing tanks.
Low Level Flight
When you’re flying on the deck, trim the
plane for a slightly tail-heavy condition. By
doing so you’ll avoid the risk of flying into
the treetops if your attention is momentarily distracted from the controls.
High-Altitude Characteristics
The high-altitude characteristics of the P-51
are equal to those of any other fighter plane,
and in many respects are superior. With the
2-stage, 2-speed supercharger in operation,
there is plenty of power up to well above
35,000 feet.
As in any airplane, the higher you go, the
farther you have to move the controls to get
the same results. To make a turn at 35,000
feet, for example, you have to move the controls considerably farther than to make the
same turn at 10,000 feet, if your true airspeed is the same in both cases. The air up
there is so thin that it takes a lot more of
it to exert an equal pressure on the control
surfaces.
The supercharger blower will automatically shift into high speed at between 14,500
and 19,500 feet. This change will be accompanied by a momentary power surge and increase in manifold pressure, until the manifold pressure regulator catches up.
There is no noticeable effect when the supercharger shifts back on decent. Therefore,
below 12,000 feet notice the amber light
next to the supercharger switch. If the light
isn’t out below that altitude, raise the cover
and turn the switch to LOW.
When the supercharger is in high blower,
be especially careful to handle the throttle
smoothly. Any rough handling causes the
engine to surge. And any surging of power
above 35,000 feet greatly decreases the efficiency of the airplane and increases the effort that you have to make in controlling it.
54
High Speed Diving
The diving characteristics of the P-51 are
outstanding. Because of its clean-lined design, laminar- flow wing, exceptional aerodynamic characteristics, and small frontal
area made possible by the single in-line engine, the P-51 outdives just about any airplane built.
It is capable of developing terrific speeds
which makes it no toy to be played with. Yet
its handling, even in high-speed dives, is not
difficult if you know what you’re doing.
In making a high-speed dive the most important thing is to take it easy.
Since the dive, from beginning to end, is
over in a matter of seconds, you don’t have
much time to think things out. So know exactly what you’re going to do, and then do it
carefully and cautiously. Above all, don’t get
excited.
As the ground comes up toward you terrifically fast, allow yourself plenty of altitude for the recovery. Don’t dive too close to
the ground.
Note the accompanying table which
shows the minimum safe altitude required
for pullout from dives of various degrees.
These figures are based on a constant 4G acceleration, which is about what the average
pilot can withstand without blacking out.
55
Dive Recovery Procedure
The recommended procedure for recovering
from a high-speed dive is:
• Reduce the power. Don’t attempt
to pull out of a dive with the power
on. With power on, the airplane
continues to pick up speed.
• Maintain a straight course by
use of the rudder. The airplane
has a tendency to yaw slightly
to the right in a dive so you
have to counteract this with
slight use of left rudder. Don’t
allow the airplane to yaw, and
never attempt to slow down your
airplane by deliberately yawing it.
• Ease the stick back. Don’t jerk
the stick or otherwise overcontrol at this time. Be sure
you don’t pull out abruptly.
Note that in this recommended dive recovery, you don’t use the trim tabs. It isn’t
necessary to use the tabs, and since they
are extremely sensitive, it is recommended
that you don’t use them. With the airplane
trimmed for normal cruise, you can control
the airplane in a high-speed dive with only
the stick and rudder pedals.
In extremely high-speed dives, you can
use the trim tabs intentionally, if you desire,
but use them carefully. If you use the tabs,
the following procedure is recommended:
• Trim the airplane for
normal cruising.
• About halfway through the dive,
use slight elevator and rudder
trim, but be careful not to trim
the airplane nose heavy.
• As the airplane continues to
accelerate, it again becomes tail
heavy- increasingly heavy as
speed increases. However, make
no further adjustment of the
tabs. After having made this one
adjustment, you can control the
airplane easily with the stick
and rudder. The ailerons become
increasingly heavy as the speed
of the airplane increases.
56
Maximum Allowable IAS
The maximum airspeeds for the P-51 at different altitudes are given in the accompanying graph. Note that the figures given are
IAS (indicated airspeed) figures.
Notice that at altitudes above 5000 feet
the figures are less than 505 IAS (the redline figure on the airspeed indicator of the
airplane).
At 40,000 feet, for example, the maximum safe speed is 260 IAS.
In other words, the red-line figure for the
P-51 is not a fixed figure but a variable figure-variable with altitude. The higher you
go, the lower the maximum allowable IAS.
This is true of all ultra-fast, high-altitude
fighter planes used for high-speed diving.
The usual red-line speed for an airplane
(the one marked on the airspeed indicator) is
the speed at which the airload on the wings
and other structural members reaches the
maximum that these members are designed
to carry. Above this speed, the wings and
other structural members, cannot safely
carry the extreme airloads that develop.
In the case of high-speed fighter planes,
however, a new factor enters the picture
which makes diving unsafe at high altitudes long before the usual red-line speed is
reached. This new factor is compressibility.
It is the reason - and a good one-for the variable red-line speed above 5000 feet.
57
Compressibility
Since extremely high airplane speeds have
been developed oniy in recent years, the
phenomenon of compressibility is still pretty
much of a mystery. Scientists and engineers
know comparatively little about it.
About all that is known for certain is
this: Just as soon as an airplane approaches the speed of sound, it loses its efficiency.
Compression waves or shock waves develop
over the wings and other surfaces of the airplane. And the air, instead of following the
contour of the airfoil, seems to split apart. It
shoots off at a tangent on both the upper and
lower surfaces.
Although there is a great deal of question
as to exactly what happens when compressibility is reached, and why, there is no question as to the result, so far as the pilot is
concerned.
The lift characteristics of the airplane
are largely destroyed, and intense drag develops. The stability, control, and trim characteristics of the airplane are all affected.
The tail buffets, or the controls stiffen, or
the airplane develops uncontrollable pitch-
ing and porpoising, or uncontrollable rolling
and yawing, or any combination of these effects. Each type of high-speed fighter plane
has its own individual compressibility characteristics.
If the speed of the airplane isn’t checked
and the pilot doesn’t regain control of it,
either the terrific vibrations of the shock
waves cause structural failure or the airplane crashes while still in the compressibility dive.
In your P-51, the first effect of compressibility that you feel is a “nibbling” at
the stick. The stick will occasionally jump
slightly in your hand. If you don’t check the
airspeed, this will develop into a definite
“walking” stick-the stick will “walk” back
and forth and you won’t be able to control
it. At this stage the airplane is beginning
to porpoise-that is, to pitch up and down
in a violent rhythm like a porpoise. As the
airplane accelerates further, the porpoising
will become increasingly violent.
Once the airplane begins to porpoise,
you won’t be able to anticipate its porpoising movements by any counter-movements
of the stick.
Anything you do in this regard merely
makes the situation worse. Or you may develop an aggravated case of reversibility-the
control forces reverse, as they do when your
fuselage tank is full and you have to. push
forward on the stick in a dive to keep the
airplane from pulling out too abruptly.
It is possible to come out of compressibility safely if you don’t go into it too far. But
before discussing the recovery procedure,
here are some additional facts about compressibility.
58
Mach Number
An airplane goes into compressibility before actually reaching the speed of sound.
Some airplanes go into it when they reach
65% of the speed of sound; some when they
reach 70% of the speed of sound. It all depends on the design of the airplane.
The percentage figure at which any particular airplane goes into compressibility is
known technically as its critical Mach number (named after the man who discovered
this relationship between true airspeed and
speed of sound).
The P-51 has one of the highest critical
Mach numbers of any airplane now in combat. It can be dived to beyond 75% of the
speed of sound before going into compressibility.
One of the most important factors to remember about compressibility is that the
speed of sound varies with altitude. Note
these approximate figures:
At sea level, sound travels 760 mph.
At 30,000 feet, sound travels 680 mph.
The higher you are, therefore, the sooner
you approach the speed of sound. And, the
higher you are, the lower your safe IAS
When you get above 5,000 feet in the
P-51, the maximum safe IAS is less than the
505 IAS red line of the airplane. Above that
altitude, you go into compressibility before
you reach the red line on your airspeed indicator. That’s the reason for the variable red
line speed as given in the graph.
The accompanying illustration shows the
maximum allowable safe speeds in terms of
TAS as well as IAS. Notice how much these
two figures differ. At 35,000 feet, for example, an IAS of 290 mph means you’re actually traveling 500 mph (TAS)!
Many a pilot fails to realize this great
difference between IAS and TAS at high altitudes.
Don’t be fooled-study these figures carefully.
59
Uncontrolled Dive
As noted earlier, it is possible to come out of
compressibility safely if you don’t go into it
too far. The most important thing to remember about this is that while in compressibility you have virtually no control over your
airplane.
While in compressibility you can aggravate your situation, you can make it a lot
worse. But outside of cutting off the power (if
it isn’t already off) and holding the stick as
steady as possible, there’s nothing you can
do to help the situation.
All you can do is ride it through until
you decelerate enough and lose altitude to
the point where your speed is below the red
line speed as given in the table. This usually
means an uncontrolled dive of between 8000
and 12,000 feet, depending upon circumstances. The exact distance you drop and
the length of time you are in compressibility
depend to a great extent upon the angle of
dive in which you encountered compressibility.
Only after you have lost enough speed
and altitude, do you come out of compressibility and regain control of your airplane.
At that point-with the airplane again completely under your control-you can begin to
come out of your dive.
Note that last sentence carefully. You can
begin to come out of your dive-that’s after
losing 8000 to 12,000 ft. If at that point you
still have sufficient altitude for a controlled
dive recovery, you will be okay. If not,...?
60
Elevator Modification
Latest P-51D’s and K’s come from the factory with metal covered elevators and with
decreased angle of incidence of the horizontal stabilizer. Existing airplanes will be
modified in the field so that ultimately the
changeover will affect every airplane of the
P-51D and K series. Be sure you know the
status of your plane because this modification changes some of the flight characteristics, at high Mach numbers, from those described on the preceding pages. Porpoising
has been eliminated up to Mach number of
at least .80. However, the elevator stick force
characteristics are not as good.
When diving a modified airplane you will
find that as you get close to a Mach number
of .74, less and less forward pressure on the
stick is required to maintain the angle of
dive. As your speed exceeds .74 Mach number, you will have to start pulling on the
stick to keep the nose from dropping. This
pull will continue to increase with Mach
number. As an example, in a dive test performed by the Flight Section of ATSC it was
found that at .775 Mach number a pull of 10
pounds was required to maintain a straight
Compressibility Recovery Procedure
forward flight path. This stick force was an
increase from 0 stick force at a Mach number of 0.746. Also, a greater additional force
is required to start recovery from a dive at
high Mach number than from a dive at low
Mach number.
The placard Mach number limit for the
modified airplane is the same as for the others-.75.
So long as you don’t exceed it you’ll be
all right, but you are sticking your neck out
when you do. You won’t feel serious compressibility effects if you keep your diving
speed below .75
Mach number, and recovery can be made
without difficulty. Exceeding that Mach
number will bring on vibration of the stick,
vibration of the airplane, and a wallowing
motion caused by low directional stability.
This means that you must start a smooth
recovery. Do not wait or try to ride the dive
to a lower altitude because that technique is
not necessary with this airplane; smooth recovery is possible at any altitude sufficiently
high.
If you ever get into compressibility in a highspeed dive, don’t get excited.
Keep calm, and follow this recommended
recovery procedure:
• Cut the power immediately.
To get out of compressibility
you’ve got to lose airspeed,
so cut your throttle back.
• Release a slight amount of
the forward pressure you’re
holding on the stick.
• Don’t allow the airplane to
yaw. Never deliberately yaw it
to slow the airplane down.
• Hold the stick as steady as you
possibly can. Don’t attempt
to anticipate the porpoising
movement by countermovements of the stick.
• As the airplane slowly but
steadily decelerates with power
off, and you get into the lower
altitudes where the speed of
sound is greater, the porpoising
stops and you regain complete
control of the airplane.
• Pull out of the dive in a
normal recovery. Don’t pull
out abruptly. Take it as
easy as altitude permits.
Notice in the above procedure that you don’t
use the elevator trim tab. It isn’t needed.
61
Gliding
You can glide the P-51 safely at any speed
down to 25% above stalling speed. Under average load, this is about 125 mph IAS at any
level, the speed increasing with the weight
of the airplane.
Although the minimum safe gliding
speed increases with altitude in terms of
TAS, it remains approximately the same in
terms of IAS.
When the landing gear and the flaps are
up, the glide is fairly flat. In this condition,
however, with the nose extremely high, forward visibility is poor.
Lowering either the flaps, the landing
gear, or both, reduces slightly the minimum
safe gliding speed, greatly steepens the gliding angle, and increases the rate of descent.
Stalls
A stall in the P -51 is comparatively mild.
The airplane does not whip at the stall, but
rolls rather slowly and has very little tendency to drop into a spin. When a complete
stall is reached, a wing drops. After that, if
you continue to pull back on the stick, the
airplane falls off into a steep spiral.
When you release the stick and rudder,
the nose drops sharply and the airplane recovers from the stall almost instantly.
You’ll generally be warned of an approaching stall by a buffeting at the elevators. In a power-off stall the buffeting is
slight, becoming noticeable at 3 or 4 mph
above stalling speed.
Violence of the elevator buffet increases
with the speed of the stall.
The speeds at which stalling occurs
vary widely, depending on the gross weight
and the external loading of the airplane.
Lowering the flaps and landing gear, of
course, reduces stalling speed considerably.
A power stall either with wheels and flaps
up or with wheels and flaps down is much
more violent than a power-off stall.
Notice that while in a stalling attitude
the rudder remains sensitive well after the
ailerons have lost their efficiency. You can
see, therefore, why a sudden application of
power in making a landing will aggravate a
wing-low condition.
Recovery from any stall is entirely normal. Apply opposite rudder to pick up the
dropping wing and release the back pressure on the stick.
62
Spins
Power-off spins in the P-51D are safe enough
if you have plenty of altitude for recovery.
However, you’ll find them quite uncomfortable because of heavy oscillations.
When you apply controls to start a spin,
the airplane snaps ½ turn in the direction
of spin as the nose drops to near vertical.
After one turn, the nose rises to or above the
horizon and the spin slows down. The airplane then snaps again, and the process is
repeated.
Spins to the left will occasionally dampen out and become stable after about three
turns, but in right spins the oscillations are
continuous, neither increasing nor decreasing as the spin progresses.
Power-on spins are extremely dangerous
and must never be performed intentionally
under any circumstances. The nose remains
at from 10º to 20º above the horizon, the spin
tends to tighten, and there is a rapid loss of
altitude.
Recovery control will have no effect on
the airplane until the throttle has been completely cut back.
The spin recovery procedure recommended is the standard N.A.C.A. procedure, and
is the same for both left and right spins.
N.A.C.A. Spin Recovery
• Pull the stick back and use
full rudder with the spin.
• Cut the throttle.
• Apply full opposite rudder
to slow and stop the spin.
• Move the stick quickly forward
to pick up flying speed.
As soon as you apply opposite rudder the
nose drops slightly and the spin speeds up
rapidly for about 1¼ turns and then stops.
The rudder force at first is light but then becomes heavy for about a second or so in the
first half turn. The rudder force then drops
to zero as the spin stops.
During the spin you feel a slight rudder
buffeting. If you attempt to recover from the
dive too soon after the spin stops, you also
feel rather heavy buffeting in both the elevator and the rudder. The remedy for this condition is to release some of the pressure you
have applied on the stick.
If you should ever get into a power spin,
cut the throttle immediately and follow the
normal recovery procedure. Be sure to hold
the controls in the recovery position until
you have recovered completely. It may take
up to six turns to recover from a two to five
turn power spin. In this situation you may
lose as much as 9000 feet of altitude.
Remember these tips on spin recovery:
• Don’t get excited.
• Don’t be impatient. Leave
the controls on long enough
for them to take effect.
• Fix in your mind the altitude
at which to bail out, and bail
out before it is too late.
• Never make an intentional
power-on spin
• In making an intentional poweroff spin, start it with plenty
of altitude. Be sure you can
recover above 10,000 feet.
Important: If the normal recovery
procedure doesn’t bring you out
of the spin, let the controls go.
63
Acrobatics
The P-51D has really exceptional acrobatic
qualities; stick and rudder pressures are
light and the aileron control is excellent at
all speeds.
Be sure of one thing before entering any
acrobatic maneuver-have plenty of altitude.
You can do chandelles, wingovers, slow
rolls, loops, Immelmans, and split-S turns
with ease. However, remember that you
must limit inverted flying to 10 seconds because of loss of oil pressure and failure of
the scavenger pump to operate in inverted
position.
In a loop you have to pull the airplane
over the top, as the nose won’t want to fall
through by itself. If you don’t fly the airplane on over the top of the loop, it has a
tendency to climb on its back.
The aerodynamic characteristics of the
P-51D are such that snap rolls can not be
satisfactorily performed. This has been
proved by a long series of test flights. So
don’t try any snap rolls in an attempt to
show that you’re the guy who can do them.
You’ll invariably wind up in a power spinand that’s bad.
Caution: Acrobatics must not be attempted unless the fuselage tank contains less
than 40 gallons of fuel.
64
Emergency Procedures
Forced Landings on Takeoff
If your engine fails on takeoff, immediately
nose the airplane down to retain airspeed.
If you have sufficient runway, simply make
a normal 3-point landing straight ahead.
If you don’t have sufficient runway, make a
belly landing.
One of the most important things to remember if your engine fails on takeoff, is
to land straight ahead-or only slightly to
the right or left depending on obstructions.
Never attempt to turn back into the field.
There is only a slim chance that you can
make it. Steep turns near the ground are
hazardous even with power on; with a dead
engine they are suicidal.
In making a forced landing on takeoff
when the runway is behind you, nose the
plane down and maintain a glide of about
110 mph. If you are carrying droppable fuel
tanks or bombs, maintain a glide of about
120 mph and salvo the auxiliary load immediately.
Engine Overheating
If your engine overheats in flight, the trouble
is probably caused by one of the following:
• You’ve been climbing the
airplane at high power and below
recommended airspeed. In other
words, you aren’t getting a great
enough blast of air through
the airscoop. To remedy this
difficulty, all you have to do is
level out for a while - increase
airspeed but reduce power.
Brake Failure
• The automatic shutter controls
are not functioning properly. In
this case, operate the shutters
manually by means of the
toggle switch control, and watch
the instruments to see if the
condition has been remedied.
• The oil supply is depleted.
You discover this situation in
checking the oil pressure. The
engine continues to overheat
even after the shutters are
opened all the way. There isn’t
much you can do in this situation
except keep the rpm and power
settings at the minimum, and
land as soon as possible.
• The coolant supply is depleted.
Here again, the engine continues
to overheat even after the shutters
are opened all the way. There isn’t
much you can do in this situation,
either, except keep rpm and power
settings at the minimum, and
land as soon as possible. In most
cases you won’t have more than 10
minutes before the engine freezes.
• You’ve been exceeding the
operational limits of the engine.
Make sure that the carburetor air
control is at RAM AIR, depending
upon the type of equipment.
Then check the mixture control
to see that it is in RUN.
It is extremely unlikely that both brakes
will fail at the same time. When one brake
fails it is almost always possible to use the
other in stopping the airplane. If one brake
goes out while taxiing, use the other (good)
brake, and also the lockable tailwheel.
Immediately chop the throttle and cut
the switch. If you’re going too fast to stop
the airplane in this manner, lock the good
brake, and groundloop until the airplane
stops.
If a brake goes out while checking the
magnetos, immediately cut the throttle back
and hold the plane in a groundloop with the
good brake.
If, in coming in for a landing, you know
that your brakes are shot-or even if you suspect such a condition- approach the field and
land as slow as safety permits. Use full flaps
and use your best technique in making a
3-point landing.
Stop your engine completely by cutting
the mixture control as soon as your plane
is on the ground. The dead prop creates additional braking action to help make your
landing as short as possible.
65
Hydraulic System
Rock It to Lock It
Failure
If your hydraulic system ever fails, remember that you can lower the landing gear by
pulling the emergency knob. The procedure
is simple:
Landing Gear Down
• Put the landing gear control
handle in the DOWN position.
This releases the mechanical locks
which hold the gear in place.
• Pull the red emergency knob. This
releases the hydraulic pressure
in the lines and allows the gear
to drop of its own weight.
It is possible that the gear may not fall
with sufficient force to lock itself in place.
Therefore, while still pulling out on the red
emergency knob, rock the airplane until you
feel the gear catch in the locked position.
The tailwheel usually locks without any
difficulty. If it doesn’t, speed up the airplane
to force the partially extended wheel into
position by means of greater air pressure
on it. Or dive the airplane a short distance
and then pull out with enough acceleration
to force down the tailwheel.
66
Radio Set AN/APS-13
Radio Set AN/APS-13 is a lightweight radar set which gives you a visible and audible warning that another airplane is behind or approaching from the rear.
The usable range of this set is from 200 to 800 yards and within an area extending up to
30° on both sides of the airplane and from 45° above it to 45° below it. The set doesn’t work
below 3000 feet. Ground reflections determine the lower limit.
The main units include the antenna, transmitter-receiver, indicator light, warning bell,
ON-OFF switch and test switch. The set operates on 27.5 volts, which is the primary aircraft power supply. The antenna is mounted on the vertical stabilizer. The red jewel indicator light is mounted on the left side of the instrument cowl, the bell is to the left of the seat.
Control switches are provided on the panel at your right.
Appendix A:
Radar
Operation
• Turn the power switch ON.
• Wait at least 30 seconds for the tubes to warm up, then hold
the test switch up. If the indicator lights and the warning
bell rings, the equipment is operating properly.
Note: there is no volume control for the warning bell. The volume knob
on the AN/APS-13 panel is used to control volume for the radio set.
67
68
The K-14 is a single-gyro sight designed to compute automatically the correct lead to hit an airborne target with fixed guns
from your aircraft. This sight is really two sights in one. One
is a computing sight and the other is a noncomputing, or
fixed, sight. The only difference between the fixed sight of
the K-14 and the earlier fixed sights is a large cross in the
centre that replaced the pipper (dot). The fixed sight provides a means of harmonization and maintenance checks and
is also used for attacking ground targets. It may be used as a
standby if the computing sight is inoperative. The operational
range of the computing sight is 600 to 2,400 feet.
The pilot views the area directly ahead of his aircraft
through the combining glass of the sight head as he is tracking the target. The movable and fixed reticle images seen in
the combining glass are focused at infinity by means of the
collimating lenses. Because the lenses are focused very accurately, parallax is reduced to a minimum to allow motion
of the pilot’s head without any apparent shift between the
position of the target and the position of the reticle image.
By closing the right eye and looking at the reflector plate
with the left, the gunner sees the fixed ring. Reversing the
process and looking only with the right eye, he sees the
six diamond-shaped dots. Using both eyes, he sees the
two images superimposed as shown in the illustration.
Appendix B:
K-14 Gunsight
69
Fixed reticle
The fixed reticle image of the left sighting system is formed by a
single fixed reticle perforated to form a 71.12-mil circle, and a small
centrally located cross. This is commonly called the 70-mil reticle.
The reticle image also includes diagonal and horizontal lines and a
small dot which lies below the cross. A mask with a small hole in its
center is provided to blank out all of the fixed reticle pattern with
the exception of the cross. The mask is operated by a lever on the
left side of sight unit.
To determine the distance or range to a target of known size at
an unknown distance this formula can be applied:
Where:
D – distance to target
S – known target size
mil – target size in mil-dots as seen through the sight.
Movable reticles
Two superimposed reticle disks form the reticle image of the right
sighting system. The front reticle design consists of a central round
perforation and six radial strait perforations. The rear reticle design consists of a central round perforation and six radial curved
perforations. The intersection of the straight and curved perforations forms the reticle image for the right eye –a circle of diamondshaped dots. The circle can be varied in diameter by rotating either
element. The front disk is rotated by operating the span control
knob, located on the front of the sight unit. This sets the position
of the front disk to give in feet a circle diameter proportional to the
known wingspan of the target aircraft. The rear disk is geared to
the range drum on the left side of the housing, which is connected
to the rotating throttle grip. A range drive-cable system enables the
pilot to rotate the rear reticle disk and thus to adjust the diameter
of the reticle image to frame the target and automatically set the
range into the sight.
For example, if a targeted airplane has a wingspan of 70 feet and
when viewed through a sight it has the same size as the 70-mil reticle, it is 1000 feet away.
70
Principles of operation
The image of the movable reticle is not fixed in space as is the fixedsight image. Its position is controlled by the action of the gyroscope,
which computes the necessary lead. The range is determined by
setting in the wingspan of the target and adjusting the size of the
imaginary circle formed by the inner points of the six diamondshaped dots to frame the target. When this is done, the reticle image
is shifted the proper amount to provide the correct lead.
In operation, the gyroscope unit, together with the sight and as-
sociated equipment, makes the necessary correction so that the angle between the axis of the gun bore and the line of sight equals the
correct lead. The position of the movable retile image is gyroscopically and electrically determined by the gyroscope unit as follows:
The gyroscope assembly is spun by the small, direct-current motor at high rpm. The assembly, which includes the mirror, stem, and
dome, is mounted on the universal joint and has the characteristics
of a gyroscope. The assembly is shown in the illustration.
71
When the aircraft turns, as in tracing a target, the gyroscope
(mirror, stem, and dome operate as one) tends to maintain a fixed
plane of rotation, and the angle between the axis of the gyroscope
and the flight path changes accordingly. This change of angle is restrained electrically by means of the coils in the coil housing.
The electrical force is used to control the position of the gyroscope
mirror and thus determine the position of the movable reticle image.
The gyroscope dome is located so that it spins between the range
coils and cuts the magnetic field created by the two coils. Small currents, known as eddy currents, flow in the spinning dome in such a
way as to produce an induced magnetic field which opposes the original magnetic field produced by the range coils. The field produced
by the currents flowing in the spinning dome tends to oppose the
displacement of the gyroscope axis from center. When the aircraft
is in straight-and-level flight, the drag forces hold the gyroscope in
its neutral position and the movable reticle image remains centered
with respect to the fixed reticle image.
There are two main factors
which determine the angle
by which the gunbore axis
leads the sight line. They are
the range of the target and
the angular tracking rate.
Angular tracking rate is proportional to target speed, attacking speed, and velocity.
When the target is framed,
the amount of current that
flows in the range coils for the
particular range determines
the strength of the magnetic
field produced by the range
coils. When the aircraft is
turned to follow the target,
the gyroscope assembly, including the gyroscope mirror,
tends to remain fixed in space
while the aircraft and sight
housing rotate about the gyroscope. The range coils, which are secured to the sight housing,
also shift their position relative to the spinning dome. The forces
set up by the magnetic field of the range coils are no longer central
with respect to the dome. Therefore, the dome immediately tends to
precess toward the new location of the magnetic center where the
forces are again equal.
If the aircraft continues to turn, however, drag forces set up in
the spinning dome cannot precess the gyroscope assembly to the
central position. Consequently, the gyroscope assembly assumes a
h respect to the flight path of the aircraft. This angular position
remains constant as long as the rate of turn of the aircraft and the
rate at which the gyroscope is being precessed toward the magnetic
center are equal. The angular displacement of the gyroscope mirror
relative to the flight path of the aircraft determines the position of
the movable reticle image with respect to the central position, and
this determines the angle that the gun-bore axis assumes with relation to the line of sight.
72
Flight tests
Test one:
1. After the sight has warmed up, set the selector at FIXED
AND GYRO, move the fixed reticle mask lever up, and set
the range at 2,400 feet (the smallest reticle diameter).
2. Establish a steady turn at a rate which will
deflect the pipper of the moving reticle to the
circumference of the fixed reticle ring. That is a
35-mil deflection, as shown in the illustration.
The correct amount of time to complete the turn should be 130
degrees plus or minus 10 degrees.
Test two:
1. After the sight has warmed up, set the selector
at FIXED AND GYRO, move the fixed reticle
mask lever up, and set the range at 1,000 feet.
2. Establish a steady turn at a rate which will
deflect the pipper of the moving reticle to the
circumference of the fixed reticle ring. That is a
35-mil deflection, as shown in the illustration.
3. Holding this rate of turn constant, note the time
indicated by the second hand of the clock when the pipper
passes through some prominent point on the horizon.
4. Maintain a constant rate of turn by keeping the
pipper on the ring with a 35-mil deflection until
the pipper has again passed through the same
point, indicating a 360 degree turn and check the
time at the instant it passes through the point.
The correct amount of time to complete the turn should be 60
seconds, plus or minus 5 seconds.
3. Holding this rate of turn constant, note the time
indicated by the second hand of the clock when
the directional gyro passes 0 degrees mark.
4. Maintain a constant rate of turn by keeping the pipper
on the ring with a 35-mil deflection for 60 seconds.
5. Note the position of the directional gyro
after 60 seconds have elapsed.
73
Operating Instructions
Before starting the engine set the gunsight gyro power switch to
ON. Do not turn the gyro off until the aircraft is landed and the
engine is turned off. The reason for this is that engine vibration
and landing shocks may damage gyroscope pivots if the unit is not
operating.
The selector-dimmer and should be set as needed.
In normal conditions the fixed reticle mask is set, so that only
small cross is visible as reference. The full, unmasked fixed sight is
used as a backup or for attacking ground targets.
Set the gun switch at CAMERA AND SIGHT or GUN, CAMERA
AND SIGHT to power up the sight.
Set the selector switch at FIXED AND GYRO or GYRO to display the movable reticle.
SPAN SETTING
Keep the SPAN SETTING knob set at the wing spread of the aircraft most likely to be encountered. As soon as the aircraft is recognized, check the setting and alter if necessary. If exact recognition
is not possible, but the number of engines is known, set the span
knob at 35 feet for a single-engined aircraft, 60 feet for a two engined aircraft and 110 feet for a four engined aircraft.
TRACKING
When tracking a target, it is necessary to smoothly maneuver
the ship so that the center dot will be on the target at all times.
Accuracy requires that the target be tracked for a minimum of 1
second before firing.
RANGING
The correct range is electrically transmitted into the sight when
the span setting knob is correctly set, and the twist grip is adjusted
until the moving reticle properly frames the target. In normal combat, range is changing all the time and the reticle must be made to
frame the target continuously. Some judgment is required to fit the
reticle to the target plane when neither its wings nor its fuselage
are at right angles to the line of sight. In these cases, the imaginary
circle of the reticles must be made larger than the target.
PICKING UP AIM
When picking up a target or when shifting from one target to another, it may be necessary to execute violent maneuvers. While doing
this the twist grip should be turned clockwise to minimum range
(200 yards) until the aiming bead is near the target, you can then
turn the twist grip to properly frame the target. This method reduces overranging, permits the pilot to place the center aiming dot
more quickly on the target and prevents overcorrection and tumbling gyro.
74
75
Microsoft
Creators of Microsoft Flight Simulator X
Visual Effects and Audio
Scott Gentile
Project Management
Scott Gentile
Public Relations, Web Design
Lewis Bloomfield
Lead Artist (3D modeling, texturing, gauges)
Robert Rogalski
Manual Design
Mark Kee
Additional Modeling
Michal Puto
Manual Foreword
Cody Bergland
Aircraft Painting
Martin Catney
P-51 History
Mitchell Glickman
Programming
Robert Rogalski, Michal Krawczyk
Manual Editing and Proofreading
The Beta Team
CREDITS
Flight Dynamics
Ken Newnham
Quality Control Beta Team: The world’s most effective and knowledgeable flight simulation beta team, including Cody Bergland, Forest “FAC257” Crooke, Glenn Cummings
(GlennC), Ryan “Hog Driver” Gann, Mitchell Glicksman, Captain Jakey, Erwin Schultze
(dutch506), Guenter Steiner, Paul “Gypsy Baron” Strogen, Oskar “lonewulf47” Wagner
and Matt “Mattgn” Newton.
Special Thanks to: Dudley Henriques for his extensive large piston engine flying experience and support; Vlado Lenoch for allowing full access to his flyable (and beautiful)
“Moonbeam McSwine”, Chris Baranaskas for allowing full access to his flyable (and also
beautiful) “Glamorous Gal”, Glenn Wegman (P-51 crew chief) for his continued support
with access to various Mustang’s he maintains, and Rich Palmer (crew chief for “Bald
Eagle”) for answering many difficult questions in detail.
Very Special Thanks to our friends and families who
stuck by us and worked hard to support our efforts.
76
77


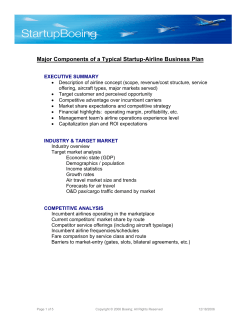


© Copyright 2026