
INSTRUCTION MANUAL MINI CUPCAKE AND MINI MUFFIN MAKER MCM-1 SMART PLANET
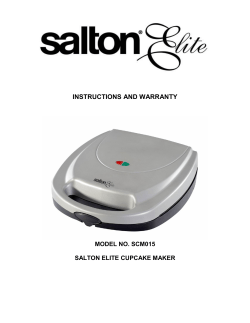
INSTRUCTION MANUAL
MINI CUPCAKE AND MINI MUFFIN MAKER
MCM-1
SMART PLANET
PLEASE READ THESE INSTRUCTIONS CAREFULLY
AND RETAIN FOR FUTURE REFERENCE.
IMPORTANT SAFEGUARDS
• Read all instructions before using the Mini Cupcake Maker.
• Do not touch hot surfaces. Always use a plastic handle on
lid. Do not touch cover when hot.
• To protect against fire, electric shock and injury, do not
immerse cord, plug or the Mini Cupcake Maker in water
or other liquids.
• Close supervision is necessary when any appliance is used
by or near children.
• Before use, unwind the power cord completely and keep the
cord away from the hot parts of the appliance.
• Do not let the power cord hang over edge of the table or
counter or touch hot surfaces.
• Do not place on or near hot gas or electric burner, or in a
heated oven.
• Only operate the Mini Cupcake Maker on a dry, flat non-slip
surface.
• Do not use the Mini Cupcake Maker outdoors.
• Do not operate the Mini Cupcake Maker with a damaged cord
or plug. If this product malfunctions, or has been damaged
in any manner, return it to the Mini Cupcake Service Center
for examination, repair or adjustment.
• The use of accessory attachments not recommended by
Smart Planet may result in fire, electric shock or injury.
• Always unplug the Mini Cupcake Maker from the electrical
outlet when not in use and before cleaning to avoid
accidental electrical shock. Allow it to cool before cleaning.
• As long as the appliance is hot, even if unplugged, there is the
danger of getting burned. Do not touch and do not put it
into storage while hot.
• Do not use the Mini Cupcake Maker for other than intended use.
• For use only on 120V, 60HZ power. Use an outlet with a good
ground connection. Do not use three to two-way adapter on
the three prong power cord provided.
• For interior household use only.
1
PARTS DESCRIPTION
A. Power light
B. Ready light
C. Front base
D. Top baking plate
E. Bottom baking plate
F. Bottom shell
G. Top shell
BEFORE INITIAL USE
• Remove all packaging.
• Clean the toasting surfaces with a soft damp cloth
and then dry it.
• Unwind the electric cable completely.
OPERATING INSTRUCTIONS
• Before first use, wash cooking surfaces with hot, sudsy
water and a soft sponge.
NEVER IMMERSE COOKING SURFACES IN WATER.
2
OPERATING INSTRUCTIONS
•
•
•
•
•
•
•
•
•
•
•
•
•
•
•
•
3
Brush vegetable oil or a cooking spray on cooking surfaces.
Close the muffin maker.
Plug cord in 120 volt wall outlet.
Keep unit closed and preheat until hot or ready light turns on.
The power light will illuminate as the heating surface pre-heats.
The appliance must be pre-heated before using.
As soon as the appliance is pre-heated, the ready
light will turn on.
You can now begin using the appliance.
Open the appliance using the front handle only.
Add enough batter so each well is filled just below the top of
the surface level as the cupcake will rise when baking.
Usually that will be 2/3 full though some prefer slightly
more batter.
When closing the appliance, make sure the latch is engaged.
Caution: if there is too much batter, it will not be
possible to close the appliance. To remedy this, remove
some of the filling. Never force this appliance to close
when over filled.
During baking process the temperature regulating
thermostat switches off and on again depending on
heating levels.
After completion of the baking process (approx. 5 to 8 minutes),
carefully open the unit and remove the baked item with
the help of a flat wooden or plastic spatula.
Never use a sharp or metal object (e.g. knives, metal spatulas, etc.)
as this will damage the non-stick coating.
The cupcakes are done when they are golden brown on the
bottom and light tan on the top.
If cupcakes do not lift out easily, close the cover
and bake a few minutes longer.
• To bake more cupcakes, re-brush cooking surface
with oil, close the appliance again and wait until the
heating surfaces have reheated sufficiently.
• When the ready light illuminates again you can repeat
the baking process as described above.
• When done, disconnect the electric plug immediately.
Keep the appliance open to allow it to cool down.
• Caution: The heating surfaces as well as the sides and
top of the appliance may get very hot. Avoid contact with
these hot areas by only using the handles.
• The appliance must always be positioned horizontally
during use.
CLEANING AND CARE
• Unplug cord from the wall outlet.
• Only clean this appliance when it has completely cooled down.
• Clean the housing surface and the baking surfaces of this
unit with a soft, damp cloth.
• Be certain to wipe off any baked on oil residue. When the
non-stick cooking surfaces are thoroughly cleaned, the
releasing capabilities of the coating will be retained.
• It is easiest to remove crumbs or left over batter with a
very soft brush.
• Never use abrasive cleaning agents or sharp objects
(e.g. scrubbing brush or knife) when cleaning.
• Caution: Do not immerse this appliance in water or other
liquids as it could lead to electric shock.
• DO NOT WASH IN DISHWASHER
TECHNICAL DATA
• Operating voltage: 120V~ 60Hz
• Power: 1000W
4
HELPFUL HINTS
1. During first time use of this unit, there may be a
slight odor once the unit has warmed up. That is
caused by the normal breaking in period and is
nothing to be concerned about.
2. To use mini sized paper cups, it is not necessary
to brush vegetable oil or spray the cooking surface.
3. Should the top of your cupcakes or muffins be light
and not brown, try adding a little more batter to
each cavity.
4. If the bottom of your cupcake or muffins are too
light, try using less batter and/or try pre-heating longer.
5. Use smooth-edged plastic utensils. DO NOT use
sharp-edged cooking tools such as knives, forks,
spoons etc. as the scratching will affect the non-stick
performance.
This warranty also excludes damages caused by shipping,
mishandling or unit being dropped. To obtain service under
this warranty, return this unit to the Mini Cupcake Service
Center location. Please make sure to include a copy of the
original receipt along with your name, address and phone
number. Please include a description of the defect along
with the date you purchased the product.
Please note: returns without receipt will not be accepted.
Canoga Park, CA 91304
[email protected]
90 DAY LIMITED WARRANTY
If there are any defects in material or workmanship during
the first 90 days of purchase, we will repair/replace the
product at our option. This warranty excludes any damages
to the product resulting from accident or misuse.
Please read instructions carefully.
5
6
Beat for 1 minute on medium speed. Scrape the side of the
bowl with with a spatula. Add eggs to the mixture. Beat for 1
minute on medium speed. Scrape bowl again. Beat on high
speed for a minute and 30 seconds until well mixed. Spoon the
cupcake batter into paper cups until
full. Bake for
5-8 minutes or until toothpick inserted in center comes out
clean, remove and allow to cool. Once the cupcakes are
completely cooled, frost with your favorite frosting recipe
or decorate as you desire.
CHOCOLATE AND PEANUT BUTTER CUPCAKES
The easiest way to make cupcakes is to use a favorite packaged
cake mix. Read the labels as some work better than others
for cupcakes. If you want to make your own cupcakes here are
some fun recipes to enjoy.
EASY CUPCAKE RECIPE
• 2 1/4 cups all purpose flour
• 1 1/3 cups sugar
• 3 teaspoons baking powder
• 1/2 teaspoon salt
• 1/2 cup shortening
• 1 cup milk
• 1 teaspoon vanilla
• 2 large eggs
Preheat Mini Cupcake Maker until ready light turns on. Line
cupcake wells with paper cups or use a non-stick spray.
Combine flour, sugar, baking powder, and salt in a large
mixing bowl. Add shortening, milk, and vanilla.
7
• 2 1/4 cups all purpose flour
• 1 1/2 cups sugar
• 1/2 cup creamy peanut butter
• 3 1/2 teaspoon baking powder
• 1 teaspoon salt
• 1/8 teaspoon baking soda
• 3 tablespoons baking cocoa
• 1 1/4 cups 2% milk
• 1 teaspoon vanilla
• 3 large eggs
Preheat Mini Cupcake Maker until ready light turns on. Line
cupcake wells with paper cups or use a non-stick spray.
Combine all ingredients in a large mixing bowl. Mix at low
speed for 30 seconds while scraping bowl. Mix at high speed
for 3 minutes, scraping bowl every minute. Spoon cupcake
batter into paper cups or directly onto greased wells until
they are 1/2 to 2/3 full. Bake for 5-8 minutes or until toothpick
inserted in center comes out clean, remove and allow to cool.
Frost your peanut butter and chocolate cupcakes any way
you want. You could even try just spreading extra peanut
butter as your frosting.
8
CHOCOLATE CHIP MUFFINS
RED VELVET CUPCAKES
•
•
•
•
•
•
•
•
•
• 2 1/2 cups all purpose flour
• 2 cups sugar
• 1/2 cup baking cocoa (powdered)
• 1 teaspoon baking powder
• 1/4 teaspoon salt
• 1 teaspoon baking soda
• 2 sticks butter at room temperature
• 5 large eggs
• 1 cup buttermilk (see note at bottom)
• 1 teaspoon vanilla
• 1 teaspoon red food coloring
3/4 lb chocolate chips
1/3 lb of soft butter
4 medium eggs
2 1/2 cups of flour
1 cup of sugar
1/4 cup of milk
1 tablespoon of baking powder
1/2 teaspoon of vanilla extract
1/2 teaspoon of salt
Preheat Mini Cupcake Maker until ready light turns on. Line
cupcake wells with paper cups or use a non-stick spray.
Beat the butter and the vanilla extract together to form a
light, airy mixture. One at a time, add the eggs, and beat
gently. Add ¼ cup of the sugar after each egg and mix
thorougly. Put the baking powder and salt in the milk, then
add to the mixture. Fold in the flour and the chocolate chips.
Pour the mix into the greased muffin wells, filling each
cup two-thirds full. Bake for 5-8 minutes or until muffins
turn golden brown, remove and allow to cool. Once the
cupcakes are completely cooled, frost with your favorite
frosting recipe or decorate as you desire.
9
Preheat Mini Cupcake Maker until ready light turns on. Line
cupcake wells with paper cups or use a non-stick spray.
Combine flour, cocoa, baking powder, baking soda and
salt in a mixing bowl. Sift dry ingredients three times.
Cream together butter and sugar until light and fluffy.
Add eggs one at a time, making sure to beat well after each
egg. Add 1/4 of dry ingredients to creamed mixture then
approximately 1/4 of buttermilk alternating until mixed
well. Mix in vanilla and food coloring. Bake for 5-8 minutes
or until muffins turn golden brown, remove and allow to
cool. Once the cupcakes are completely cooled, frost
with your favorite frosting recipe or decorate as you desire.
10


© Copyright 2026