ABC
docz
Explore
Log in
Create new account
Download
Report
business and industrial
energy
oil
Melt and Pour Instructions
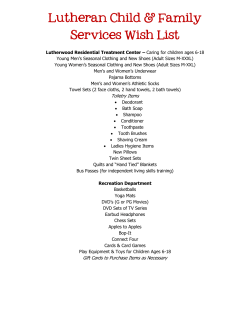
Lutheran Child & Family Services Wish List
Our Goat Milk Soaps
Recipe: Melt & Pour Lemon Sugar Soap
August 2, 2012 Deborah Gottschalk, 240-672-1179 FOR IMMEDIATE RELEASE
Natural Cosmetics Workbook By Laura Carpenter MNIMH
All Natural Goats Milk Soap
Document 80638
To Gel or Not to Gel
How To Start Your Own Soap Business
Bath Bomb Making Instructions The Soap School
How to make… soap & bubble bath craft FREE
HANDMADE e•Magazine OATMEAL STOUT CP BEER SOAP
© Copyright 2026
About abcdocz
DMCA / GDPR
Report