
Document 85477
Table of Contents
Acknowledgments
Introduction
Chapter 1: The Kneadlessly Simple
Method: Nine Easy Steps to Great
Bread
Chapter 2: Getting Started: Basic
Know-How, Ingredients, and
Troubleshooting
Chapter 3: Easiest Ever Yeast Breads
Easy White Bread Loaves
Crusty White Peasant-Style Pot
Bread
All-Purpose Light Wheat Bread
Crusty Portuguese-American
Yeasted Cornbread
Easy Oat Bread
Everyday Oatmeal Honey-Raisin
Bread
Great Granola Breakfast Bread
English Muffin Loaves
Crusty Seeded Pale Ale Pot Boule
Easy Four-Grain Pot Boule
Hearty Caraway Beer Bread
Double Chocolate-Honey Bread
Simple Enriched White Rolls
Chapter 4: American Favorites
County Fair White Bread
Pull-Apart Butter-Top Rolls
Cinnamon Pinwheel Raisin Bread
San Francisco-Style Sourdough
Bread
Easy Cultured "Sourdough"Starter
(with Commercial Yeast)
Sonoma-Style Multigrain Crunch
Bread
Crusty Yeasted Cornbread with
Coarse Salt
Easy Buttermilk Pot Bread with
Coarse Salt
Cheddar and Chiles Bread
Farmhouse Potato Bread with Dill
and Chives
Anadama Bread
Cronshi's Challah
Easy Cinnamon Sticky Buns
Good and Easy Pecan Sticky Buns
(or Saucy Maple-Butter Sticky
Buns)
Chapter 5: Old-World Classics
Pain Ordinaire (Everyday French
Baguettes or Batards)
Fougasse (or Black Olive
Fougasse)
Brioche
French Walnut Bread (Pain aux
Noix)
Yeasted Pain d'Epice
Rosemary Focaccia with Coarse
Salt
Ciabatta
Neapolitan-Style Pizza Dough
Tomato Sauce and Mozzarella
Pizza
Herbed Cooked Tomato Pizza
Sauce
Crispy Roasted Garlic and
Parmesan Pot Bread
Rustic Cyprus-Style Herbed Olive
Bread
Swedish Limpa Bread (Swedish
Rye Bread with Caraway and
Anise Seeds)
Scottish Oatmeal Bread
Chapter 6: Healthful, Whole-Grain,
Multigrain, and Gluten-Free Breads
Crusty Seeded Cracked Wheat
Pot Boule
100 Percent Whole Wheat-Honey
Bread
Four Grain-Honey Bread
Rustic Rye Pot Bread
Raisin Pumpernickel
Super Seeded Almond Butter
Health Bread
Crunchy-Munchy Pumpkin,
Sunflower, and Flax Seed Boule
Hearty Multigrain Boule with
Molasses
Brown and Wild Rice Crunch
Bread
Gluten-Free Light Sandwich Bread
Gluten-Free Faux Rye Bread
Chapter 7: Sweet Breads and Gift
Breads
Mardi Gras King's Cake
Panettone
All-Purpose Enriched Sweet Dough
Simple Streusel Coffeecake
Cornish Saffron Bread
Spiced Cranberry Bundt-Style
Coffeecake
Holiday Cranberry-Apple Coffee
Ring
Apple-Cream Cheese Pinwheel
Pastries
Yeasted Banana Bundt-Style
Coffee Ring
Cherry and Chocolate Coffee Ring
with Kirsch
Chocolate—Chocolate Chip
Bread Kit: Mix Recipe
Chocolate-Chocolate Chip Bread
Recipe (Using Mix)
Going with the Grain Bread Kit Mix
Recipe
Going with the Grain Bread Recipe
(Using Mix)
Chapter 8: Toppings, Sauces, Glazes,
Drizzles, and Finishing Touches
Cornstarch Glaze
Transparent Powdered Sugar
Glaze
Powdered Sugar-Lemon Drizzle
Glossy Chocolate Drizzle
Chocolate Ganache Glaze
Caramel Sticky Bun Sauce
Maple-Butter Sticky Bun Sauce
Make-Ahead Streusel
Chapter 9: Kneadlessly Simple Recipe
Makeover Guide: How to Convert
Traditional Yeast Recipes to the KS
Method
kneadlessly simple
Fabulous, Fuss-Free, No-Knead
Breads
Nancy Baggett
JOHN WILEY & SONS, INC.
This book is printed on acid-free paper.
Copyright © 2009 by Nancy Baggett. All rights
reserved.
Photography copyright © 2009 by Alexandra
Grablewski. All rights reserved.
Published by John Wiley & Sons, Inc., Hoboken, New
Jersey
Published simultaneously in Canada
No part of this publication may be reproduced, stored
in a retrieval system, or transmitted in any form or by
any means, electronic, mechanical, photocopying,
recording, scanning, or otherwise, except as permitted
under Section 107 or 108 of the 1976 United States
Copyright Act, without either the prior written
permission of the Publisher, or authorization through
payment of the appropriate per-copy fee to the
Copyright Clearance Center, Inc., 222 Rosewood
Drive, Danvers, MA 01923, (978) 750–8400, fax (978)
646–8600, or on the web at www.copyright.com.
Requests to the Publisher for permission should be
addressed to the Permissions Department, John
Wiley & Sons, Inc., 111 River Street, Hoboken, NJ
07030, (201) 748–6011, fax (201) 748–6008, or
online at http://www.wiley.com/go/permissions.
Limit of Liability/Disclaimer of Warranty: While the
publisher and author have used their best efforts in
preparing this book, they make no representations or
warranties with respect to the accuracy or
completeness of the contents of this book and
specifically disclaim any implied warranties of
merchantability or fitness for a particular purpose. No
warranty may be created or extended by sales
representatives or written sales materials. The advice
and strategies contained herein may not be suitable
for your situation. You should consult with a
professional where appropriate. Neither the publisher
nor author shall be liable for any loss of profit or any
other commercial damages, including but not limited to
special, incidental, consequential, or other damages.
For general information on our other products and
services or for technical support, please contact our
Customer Care Department within the United States at
(800) 762–2974, outside the United States at (317)
572–3993 or fax (317) 572–4002.
Wiley also publishes its books in a variety of electronic
formats. Some content that appears in print may not
be available in electronic books. For more information
about Wiley products, visit our web site at
www.wiley.com.
Library of Congress Cataloging-in-Publication Data
Baggett, Nancy, 1943Kneadlessly simple: fabulous, fuss-free, no-knead
breads / Nancy Baggett.
p. cm.
Includes index.
ISBN 978–0–470–39986–6 (cloth: alk. paper) 1.
Bread. I. Title.
TX769.B1745 2009
641.8’15—dc22
2008036192
Printed in the United States of America
10 9 8 7 6 5 4
Book design and typography by Ralph Fowler /
rlfdesign
Acknowledgments
Many people played a part in making this book a reality. I'm
grateful to every one of them.
First, a big thank-you to Justin Schwartz, my editor, and the
whole Wiley team, for enthusiastically supporting this
project and working diligently to ensure that it moved along
smoothly and efficiently. I also greatly appreciate the efforts
of publicist Gypsy Lovett, book designer Ralph Fowler, and
cover designer Jeff Faust. And I'm grateful to photographer
Alexandra Grablewski and food stylist Brian PrestonCampbell, who created the enticing images for the book.
Thanks also to Judith Riven, my agent, for her enthusiasm,
very professional representation, and wise counsel along
the way.
Many thanks to my recipe testers: My kitchen assistants
Linda Kirschner and Judy Silver Weisberg helped test so
many hundreds of recipes they probably dreamed about
bread at night. Connie Hay also spent a number of days in
my kitchen deep in dough! Home testers Sally Churgai,
Erica Horting, and Dollene Targen provided valuable
insights on what techniques and tips work best for the
home baker and on how to make the recipes as clear and
reliable as possible.
Another thank-you goes to Joe Yonan and Bonnie Benwick
of the Washington Post Food Section, and to the staff at
Eating Well, whose keen interest in my work on accessible
no-knead bread recipes helped spawn the idea for this
book.
Finally, thanks to the dozens of fine professionals whose
expertise in all aspects of bread baking underpins the
Kneadlessly Simple approach. It seems ironic that making
things simple involved so much background research, but I
needed to understand the chemistry and myriad practical
applications of yeast baking to simplify and streamline
without negatively affecting bread quality.
I am particularly indebted to gifted baker and teacher Nick
Malgieri for offering some valuable suggestions for
improving my manuscript. Another thank-you goes to Dr. R.
Carl Hoseney for helping me understand some of the
complicated chemical processes that occur during yeast
baking. Here, in alphabetical order, are the other experts
whose observations, theories, methods, tips, treatises,
experiments, and bits of wisdom have expanded my
knowledge and influenced my thinking, recipes, and
method. Some of these folks I know well, others a little,
others only from their work: Rose Levy Berenbaum, Emily
Buelher, Bernard Clayton, Raymond Cavel, Shirley
Corriher, Elizabeth David, Rosada Didier, Carol Field,
Maggie Gleser, Philippe Gosselin, George Greenstein,
Jeffrey Hamelman, Jim Lahey, Daniel Leader, Joe Ortiz,
Beatrice Ojakangas, Craig Ponsford, Peter Reinhart,
Nancy Silverton, Monica Spiller, and Daniel Wing. Besides
these individuals, I must thank the dedicated people behind
two wonderful Web sites, thefreshloaf.com and
theartisan.net, who provide a wealth of accurate,
completely free information on a whole array of yeast
baking topics.
Introduction
I've loved making homemade yeast bread since my mother
first let me "help" prepare her cinnamon buns when I was
five. I was lulled by the peaceful, calming nature of the
process and amazed and proud of what wondrously good
food—fresh, warm, irresistible bread—we could create
from such ordinary kitchen supplies. Until I was a teenager,
my mother was a stay-at-home mom, so she gave me the
gift of many leisurely hours of baking by her side. My
memories of those quiet times in our farmhouse kitchen are
still vivid.
Once I was grown and had my own home, I carried on my
mother's baking traditions, loving the feeling of tranquility
and connectedness with my past, and the extraordinary
sensory experience and satisfaction of serving my family
bread that came straight from our oven. Ironically, after I
started writing food articles and cookbooks and honed my
baking skills in professional pastry school, it was harder
and harder to find the stretches of personal time my
mother's old-fashioned yeast recipes required—even
though I was usually working in my own kitchen! I realized
that for people who spent most of their waking hours away
from home, it was much more difficult to squeeze yeast
baking into their lives.
Convinced that those who couldn't enjoy baking their own
bread were missing out, I began experimenting with the
new fast-rising yeasts that were introduced to the market in
the 1980s. These launched with the claim that they needed
no proofing, and that breads could now be turned out in half
the usual time. By accelerating the process with lots of
yeast and fast, warm rises, I found that it was indeed
possible to have homemade yeast bread on the table in
less than two hours—I even created a book full of recipes to
prove it! But, sad to say, the hurried rises yielded loaves
that were more fluff than flavor, and the off-putting muss and
fuss of bread baking still remained.
For nearly two decades I set aside my yearning to make
yeast baking more accessible to busy home cooks,
spending most of the interim producing stories and recipes
on other baking and sweets topics, as well as writing
several well-received cookbooks on cookies, chocolate,
and, most recently, American desserts. Like so many other
people who have to snatch a few minutes here and there for
bread baking, I gravitated more and more to quick breads.
Yeast baking didn't seem to fit the increasingly hectic pace
of life.
Then, early in 2006, the editors at Eating Well asked me to
create a yeast bread to go with a soup story. They wanted it
easy as well as healthful, they said, because their readers
were usually pressed for time. They, their readership, and I
were all very pleased with my streamlined, no-knead
recipe, although it was completely counter to a growing
trend toward more complicated, multi-step artisan-style
loaves.
Since the late 1980s, a passionate group of professional
artisan bakers and earnest hobbyists had been switching
away from the typical American "direct method" formulas
(mixing commercial yeast, water, and all the flour together
and letting the dough rise) to long, slow rises and more
complex and time-consuming sponge and sourdough
techniques popular in Europe. (Actually, these methods
were also widely used in America until the twentieth
century: Nineteenth-century cookbook authors routinely
directed their readers to "set a sponge," the day before
they made bread. And so many prospectors during the
California Gold Rush baked sourdough bread that they
came to be called "sourdoughs" themselves.)
As a result of the artisan movement, the quality of bread in
this country was getting better and better. But it bothered
me that the recipes being published almost invariably
demanded multiple days and mixtures and effectively shut
out all but the most dedicated home hobbyists from
America's bread revolution.
I began thinking about some of the techniques the artisan
bakers had newly introduced or rediscovered these past
decades, with an eye toward simplifications that would
make them more accessible to the legions of busy and
inexperienced home cooks. Baker Jim Lahey's clever noknead, slow-rise French bread recipe in an October 2006
New York Times article by Mark Bittman definitely headed
in that direction. It reminded me of a minimal-knead,
refrigerator-rise technique that I (and others) had
experimented with in the early 1980s, but Lahey's approach
was better: It included a much longer countertop rise, which
encouraged fuller gluten and flavor development. For his
crusty bread he also revived—with fantastic results!—the
old custom of baking in a covered Dutch oven, a technique
commonplace when most Americans had to cook at a
fireplace or campfire, but largely forgotten (except by diehard campers) today.
I wanted to see if all kinds of quality breads—from the
currently popular crusty boules and focaccias to the soft,
comfy home-style loaves of my childhood and everything in
between—could be adapted to an even less demanding
and more flexible no-knead, slow-rise approach. I also
wanted to eliminate or minimize hand shaping. This often
intimidates the inexperienced baker, plus it involves time,
kitchen mess, and cleanup that discourage the busy cook.
And I wanted to incorporate a recently developed yeastretarding, cold-rise technique that arguably delivers the
absolute best bread flavor. Finally, I aimed for a process so
flexible that those who have to be away from the house for
long periods can adjust the timing of all the usual yeast
bread stages—mixing and first rise; second rise and
shaping; and baking—to fit neatly into their own schedules.
The results of my initial experimentation led to a story and
recipes that appeared in the Washington Post in the fall of
2007. Almost immediately, readers blitzed the Post food
section staff and me personally with enthusiastic feedback.
The story generated lots of Internet buzz, too. Even more
amazing than the sheer number of e-mails I received was
the wide variety of people who wrote them: novices who
had been afraid to try yeast bread before; veteran bakers
who liked my easier, fuss-free approach; and time-pressed
cooks excited that they could finally fit yeast baking into
their schedules again. I even received several e-mails
containing traditional recipes, with fervent requests for
advice on how to convert them to my no-knead method.
(These requests led to the last chapter in this book—
Chapter 8, the Kneadlessly Simple Recipe Makeover
Guide.)
The enormous positive reaction proved not only the obvious
—that people love, love, love good, fresh-from-the-oven
yeast bread—but that when provided with a method that
truly is simple and convenient, they are eager to join
America's bread revolution. Which brings me to
Kneadlessly Simple: Fabulous, Fuss-Free, No-Knead
Breads. As the title indicates, the recipes require no
kneading at all! Nor do I merely dodge kneading by
manipulating the dough in a mixer or food processor: It
actually kneads itself during a long, slow, cool rise.
I'm excited to say that my Kneadlessly Simple recipes
eliminate all the obstacles that used to deter folks from
enjoying one of life's ultimate pleasures, breathtakingly
fresh, wholesome home-baked bread. Anyone—absolutely
anyone—can make all sorts of flavorful, fine-textured yeast
breads easily, economically, conveniently, without fancy
equipment, and, so long as the date on yeast packet
indicates it's fresh, very reliably. If you can stir, measure,
and read, you can make these breads! Best of all, unlike
some of the baked goods produced using shortcut
methods of the past, these will routinely have superior
texture, aroma, and taste. In fact, unless you are lucky
enough to have a world-class bakery right down the street,
these may be the best breads you have ever eaten. (And
they will certainly be more affordable.)
A Word of Thanks to America's
Artisan Bakers
I owe a debt of gratitude to America's artisan bakers: They
paved the way and contributed greatly to the knowledge
base underpinning the Kneadlessly Simple method.
Thanks to them, it's an exciting time to be eating—and
making—bread in this country. From the late 1980s on,
ground-breaking professional bakers like Craig Ponsford
and other members of the Bread Bakers Guild of America
have been dedicated to exploring and spreading the word
on how to bake the best-tasting, best-quality, most
interesting breads. These individuals have so raised the
level of American baking that the United States now
competes successfully in the Coupe du Monde de la
Boulangerie, the world cup of baking: American teams
overtook the previously dominant French to win gold
medals in 1999 and 2005 and a silver medal in 2002.
Additionally, their enthusiasm and generous sharing of
knowledge through workshops and "camps," lectures, and
books have energized a whole cadre of sophisticated
hobbyists. For home bakers who get hooked on the habit of
fresh bread from their oven and want to move beyond the
simple, streamlined approach offered in Kneadlessly
Simple, the necessary information is readily at hand.
Dozens of fine books and Internet bread bakers' chat
rooms and Web sites provide sage discussions of bigas,
preferments, levains, and such, and abound with photos
and descriptions of loaves produced with artisanal attention
to detail so aficionados around the country can now
obsessively pursue the "ultimate loaf." Particularly if you are
interested in learning more about the innovative technique
of employing a mash to produce a sweeter-tasting, moister
loaf (the method used in my 100 Percent Whole Wheat—
Honey Bread), check out Peter Reinhart's Whole Grain
Breads.
My hope is that Kneadlessly Simple will entice casual
home bakers who lack the time or inclination for such a
serious commitment to join today's vibrant bread baking
community. As I discovered long ago, the act of gathering
together good flour, yeast, and a few other quality
ingredients and turning out a simple, honest loaf is
profoundly gratifying. It's an experience everyone should
have. It doesn't require a fancy kitchen or huge amounts of
expertise, and is amazingly easy on the budget. With
Kneadlessly Simple, it doesn't even take much effort,
because the recipes conveniently build in the time and right
conditions for nature (or, more accurately, bread chemistry)
to take its course and do the work for you.
Occasionally I'm asked if I ever miss making bread the oldfashioned way. I do sometimes miss the leisurely puttering
and smooth, soothing feel of dough in my hands, but I'm
happy to give up the kitchen mess. I'm also delighted to be
able mix my ingredients in literally five minutes, and then to
come back much later with the dough fully kneaded and
ready for its second rise. The biggest advantage of the
Kneadlessly Simple approach is that it provides me a
trouble-free way to give my family the priceless yet
inexpensive gift of memorable homemade bread as often
as I like. It can enable you to do the same.
Chapter 1: The
Kneadlessly Simple
Method: Nine Easy Steps
to Great Bread
The Kneadlessly Simple method involves nine
remarkably easy steps, all based on certain principles of
yeast bread chemistry. First, I'll run through the steps. Then
I'll briefly explain the chemistry, so you'll understand why
some seemingly unimportant directions matter, and how
(and why) the method really works.
1. Stir together the basic dry ingredients like the flour,
yeast, and salt in a bowl large enough for the mixture
to triple in size. (If the recipe calls for a little sugar, it goes
in, too. But if there's more than 2 tablespoons per cup of
flour, the excess sugar is added later.)
2. Stir a heaping cup of ice cubes into the water called
for in the recipe; this reduces its temperature to
around 50°F. Don't worry—you don't need to check the
temperature, and the ice water won't kill the yeast (I
promise!). If the recipe calls for honey, molasses, or a
flavorless vegetable oil like corn or canola oil, you mix them
into the ice water now. (If it calls for olive oil or butter, these
are added separately, as they solidify in ice water.)
3. Stir or mix the ice water mixture into the dry
ingredients just until thoroughly blended. Do this with
a spoon, or, if desired, with a heavy-duty mixer. Just
remember that while the procedure does develop some
gluten, it is not designed to substitute for kneading—its
primary function is simply to thoroughly mix the ingredients
together. Once the dough is mixed, olive oil or butter is
sometimes incorporated.
4. For the absolute best flavor (or for convenience),
refrigerate the dough (covered, in its mixing bowl) for
at least 3 and up to 10 hours. The cooling period can be
a little shorter or longer if necessary, and this step is
optional, but it does have significant chemical benefits and
is often a very convenient way to hold the dough overnight
or to easily shorten or lengthen the total rise time to better
fit your time awake and at home.
5. Set the dough (covered, in its mixing bowl) out on
the counter or in any cool spot and let it slowly rise
for 12 to> 18 hours, or in some cases 18 to 24 hours.
This step requires no attention whatsoever, but it cannot be
skipped. So long as the room is cool, the rising period can
extend up to 24 hours, if that's convenient, but don't shorten
it much, as this is when the bubbling action of fermentation
actually fully kneads the dough. (This step is the reason you
can skip all the kneading.) If you don't have a cool (ideally
67° to 70°F) spot, lower the dough temperature by
refrigerating it for 3 to 4 hours before beginning the
countertop rise, then let it stand out for a maximum of 18
hours. In an extremely warm room, cut the rise time to 15
hours at most.
6. Mix in (using a spoon or sturdy stand mixer) any
remaining ingredients. These include perishables such
as dairy products; certain yeast-inhibiting spices and
herbs; dried fruits, extra sugar, and other dehydrating
items; and, finally, enough more flour to obtain the
consistency specified in the recipe. Most (but not all)
Kneadlessly Simple recipes call for the dough to be
stiffened until it's hard to stir before the second rise begins,
and it's important to follow this instruction.
7. Briefly stir the dough as directed, and, unless handshaping is required, invert it into the baking container
for the second rise. Many Kneadlessly Simple breads—
including some rustically handsome boules and fancy
dessert breads—are shaped entirely or mostly by their
baking container. Breads such as French baguettes, Italian
ciabattas, cinnamon pinwheel loaves, and finger rolls
obviously need some hand-shaping, but this step is often
completed on baking parchment to minimize sticking and
handling problems as well as kitchen counter cleanup. In
many recipes the last stirring actually involves folding the
edges of the dough into the center of its bowl using a
rubber spatula; this is another small, but important, step.
8. Complete the second rise using the rising option
that best suits your schedule. In place of a traditional
1½- to 3-hour rise, you can choose an easy "accelerated"
rise and cut normal rising time almost by half. (Speeding up
the second rise won't shortchange flavor because it's
already there.) Or, if you need or want to put off baking until
much later, simply place the shaped dough in the
refrigerator and hold it as long as the recipe permits
(usually 24 hours) before completing a regular rise.
9. Bake as directed; let the loaf cool; and enjoy your
bread! Because the Kneadlessly Simple method
produces "stirrable" doughs, they are likely to be slightly
moister and require longer baking than normal to ensure
the center is baked through. That's why the recipes routinely
suggest a few extra minutes in the oven after loaves appear
to be done. If in doubt, remember that with Kneadlessly
Simple, breads are moist enough that they almost never
dry out and actually benefit from what may seem to be
overbaking.
The Chemistry Behind the
Steps
Experts almost universally agree that yeast breads benefit
from a long, slow, cool or cold first rise. Developing the rich,
soul-satisfying taste and aroma that make good bread one
of nature's greatest foods just can't be rushed. And rushing
won't save enough time to make yeast baking noticeably
more convenient, anyway. On the other hand, slowing the
process makes it easy to adjust the risings to the demands
of daily life.
Even more important, dramatically slowing down the first
rise by mixing the dry ingredients (including a rather
modest amount of yeast) with ice water (yes, ice-cold
water!) and then refrigerating the dough for a while has
some remarkably positive chemical effects. While high
temperatures can kill yeast organisms, icy temperatures
just temporarily knock 'em cold (so to speak!) and put them
in a sluggish state. With the yeast out of commission, some
enzymes in the flour go to work breaking down damaged
starch into sugars. Normally the yeast organisms would rev
up activity in the presence of this banquet, but instead they
remain available to significantly improve bread taste, crust
color, and appearance. Other enzymes are also busy
softening and smoothing the crumb and strengthening the
gluten.
Known as "delayed first fermentation," this recently
introduced technique is beginning to catch on with
professional bakers, and, fortunately, it's an effortless way
for home bakers to improve their bread, too. Peter
Reinhart, who learned the basic method from a French
baker and discussed it in his award-winning 2001 work,
The Bread Baker's Apprentice, commented that it had
tremendous implications for both professional and home
bakers; he was absolutely right! I call for a 3- to 10-hour
delayed fermentation because I've found that all the most
noticeable improvements—richer dough flavor, smoother
texture, and more attractive browning—occur in that period.
(The time frame can be adjusted a bit to fit your typical
work/sleep schedules although it does take a minimum of 3
hours for the benefits to accrue.)
The next, equally effortless step—setting the dough out in a
67° to 70°F room to slowly rise for up to 18 hours or even
24 hours—is at the heart of the Kneadlessly Simple
process. As the dough warms and the yeast comes back to
life, the long, slow fermentation produces even more flavor
enhancers. If you don't have a suitably cool room, place the
dough close to an air-conditioning vent or unit, or lacking
that, refrigerate it for at least 3 hours first. This slows down
the yeast organisms so they won't become too active from
the heat and over-ferment the dough.
Fermentation also produces carbon dioxide gas bubbles
that cause the mixture to expand, sometimes three- or fourfold, and have a holey, sponge-like appearance. (This, of
course, is why bakers often call the bubby, airy dough
mixture a "sponge.") To the naked eye, the bubbling action
of the sponge may not seem significant, but, over time, it
accomplishes on the molecular level exactly what kneading
does faster and more obviously: It jostles and bounces
around molecules called gliadin and glutenin so they hook
up and form the strong, elastic gluten strands needed for
good bread structure. The process, which I've dubbed
"micro-kneading," isn't visible, but its effects are:
Thoroughly micro-kneaded doughs are extremely elastic
and springy and will stretch out so thin you can see the light
through them. (Bakers call this "passing the windowpane
test.")
Aside from its ease, a big advantage of micro-kneading is
that certain flavorful carotenoid compounds in unbleached
flour that are normally lost through oxidation during vigorous
kneading are preserved. Another advantage is that the
long, slow fermentation actually boosts the digestibility of
bits of grain and seeds.
Bread chemists have known for several decades that
doughs, especially ones moist enough to permit lots of
bubbling, will eventually and very effectively knead
themselves. But except for a few minimal-knead,
refrigerator-rise recipes for home cooks that appeared in
the 1980s, recipes don't seem to have capitalized on this
phenomenon until recently. Perhaps professional bakers
didn't take an interest because they already have powerful,
efficient kneading equipment to do the job. But for home
bakers who don't have the time, skill, desire, or equipment
to knead, the value is enormous.
After the first rise, most recipes call for stirring the dough.
This is done to deflate it and to incorporate any dairy or
other perishable products that can't safely stand at room
temperature for long periods. Sugar and dried fruit also
inhibit yeast organisms by binding up water vital for their
growth, so they are often added after the first rise, too.
Certain herbs and spices contain chemicals that hinder
yeast growth as well. (In my experience, garlic, onion,
oregano, thyme, mustard, cinnamon, cloves, cardamom,
and ginger have particularly strong retarding effects. So,
don't toss in larger quantities than my testing has shown the
yeast will tolerate!)
Once these ingredients are incorporated, it's important to
add in enough flour to stiffen the dough as directed in the
recipe. While super-hydration facilitates the bubbling that
develops the gluten in the first rise, in the second rise too
much water can be a liability. It can lead to doughiness in
the final product, and can weaken the gluten and add
weight to the point where the loaf sinks in the center during
baking.
The final step before putting the dough in its baking
container is often to fold it in to the center all the way around
using a rubber spatula. This particular folding action,
followed by inverting the dough into its baking pan, helps
organize the gluten strands properly and substitutes for
"rounding," a hand-shaping technique some professional
bakers use.
So now you know that the Kneadlessly Simple method isn't
magic. Instead, it's easy because it takes clever advantage
of a whole array of chemical processes that naturally
happen when water, yeast, and flour co-mingle under
controlled conditions. Let's make bread!
Chapter 2: Getting
Started: Basic Know-How,
Ingredients, and
Troubleshooting
Getting Started with
Kneadlessly Simple Recipes:
Read This First
Each Kneadlessly Simple recipe provides an ingredient
list and directions, but this chapter provides some
additional details and background information to help you
carry out the instructions correctly. It covers everything from
how to measure flour and ready the ice water properly to
adjusting dough consistency to deciding on a rising
method, and how to judge loaf doneness. To ensure
smooth sailing on your bread baking journey, read through
this section before you try any recipes.
Choosing a Bowl—During the first rise, some
doughs triple or even quadruple in bulk, so, following
the recipe, use a large bowl (one that holds at least 4
quarts) or a very large bowl (one that holds at least 6
quarts) to avoid any chance of overflows. Stainless
steel bowls are lightweight, durable, readily available,
and economical, but ceramic or even plastic will do.
Plastic holds odors and flavors, so be sure plastic
containers are squeaky clean.
Measuring Flour—Flour is the key ingredient in
bread, so accurate measurements are very important.
Professional bakers always weigh their flour, and,
though not essential, this is the more accurate method
for the home baker, too. If you have a kitchen scale,
use the flour weights that are noted in parentheses
after the cup measurements in each recipe. Otherwise,
using a set of cups designed for measuring dry
ingredients, dip the appropriate cup into the flour sack
or canister, overfilling the dry measure slightly, then
sweep across its top with a long-bladed spatula or
straight-edged knife to even the surface. Don't tap or
shake the cup or try to compact the flour. Don't try to
fluff it up either.
Even careful measuring with the right cups will not yield
the same quantity of flour every time because the
volume of flour is affected by many factors, including
the amount of settling during production and shipping
—and even whether you're scooping the flour straight
from the bag or from a canister. So, it's not uncommon
when filling a 1-cup dry measure by dipping and
sweeping to yield 4.7 ounces one time, 5 ounces
another, and 5.2 ounces the next. Kneadlessly Simple
recipes always compensate for this variability by
specifying what consistency the dough should be at
key points. Be sure to add more flour or water as
necessary to achieve the dough consistency indicated.
Readying Ice Water—A l l Kneadlessly Simple
recipes initially call for ice water—that is, water chilled
to around 50°F by adding ice cubes; this doesn't have
to be exact. To obtain the correct temperature, fill a
large measure designed for liquids with the amount of
water specified; then add a heaping cup of ice cubes
and stir vigorously for 30 seconds. Finally, measure
out the exact amount of water needed (first discard the
cubes) and incorporate it into the dry ingredients as
directed. Recipes occasionally call for tablespoons or
half-tablespoons of water and other ingredients. If you
don't have a ½ tablespoon measure, note that 1½
teaspoons equals ½ tablespoon. In most cases, tap
water is perfectly satisfactory, but if yours is heavily
chlorinated or otherwise unpleasant-tasting, try bottled
water and see if your breads improve.
Mixing by Hand or Mixer—Remember that mixing,
whether by hand or electric mixer, is not done to take
the place of kneading, but simply to mix together the
ingredients. The first key step is thoroughly stirring
together the dry ingredients so that the salt and yeast
are evenly distributed. For recipes that call for all
ingredients to be incorporated before the first rise, the
next step is to add the liquid ingredients into the dry
ones. Simply stirring vigorously with a large spoon for
a minute or two is often the easiest approach. If you
prefer to use a mixer, it should be a heavy-duty model
fitted with the paddle beater; the dough hook normally
works best after the gluten develops. (Most lightweight
mixers aren't powerful enough to mix bread doughs.)
When adding ingredients after the first rise, note that
the dough will be rubbery (due to the gluten
development), so it will take a bit more effort to stir in
the eggs, milk powder, additional flour, etc. A heavyduty mixer fitted with its dough hook will make
incorporating the second batch of ingredients easier,
though this can be done by hand, too.
Correcting Dough Consistency—Often, directions
call for adding enough flour to yield a stiff, or hard-tostir (but not dry) consistency, but occasionally, a softer
dough is needed. For best results, carefully follow the
specific instructions for each bread. In many cases,
correcting the consistency to create a stiffer dough
before the second rise is especially important, as
overly wet doughs can come out gummy or sink during
baking. Incidentally, due to the fermentation process,
it's common for a dough that was very stiff when first
mixed to be moister after the first rise, requiring the
addition of more flour before its second rise. Doughs
containing an abundance of seeds and dried fruits, in
contrast, tend to end up stiffer and drier, as these
ingredients absorb a lot of excess moisture.
Spritzing (or Brushing), Slashing, and Covering
the Dough—Recipes always call for brushing or
spritzing doughs with oil (or perhaps butter) to prevent
the surface from drying out during the long rising
period. The easiest method is to use nonstick spray;
be sure to use a high-quality brand containing corn oil
or other neutral-flavored oil. Or, if you prefer, simply
brush the dough surface evenly with a little corn oil
using a pastry brush, rubber scraper, or your fingertips.
When a recipe calls for slashing a loaf or cutting dough
into portions, do this with a well-oiled serrated knife or,
even better, with oiled kitchen shears, as these doughs
are usually too rubbery and soft for a plain knife to
work well. To further prevent surface drying, cover the
bowl tightly with plastic wrap. As a precaution against
the dough rising more than expected and sticking to
the plastic, you may want to spray the plastic with
nonstick cooking spray before the first rise. Recipes
routinely call for coating the plastic wrap with nonstick
spray before the second rise to prevent any chance of
the plastic sticking to the loaf top and marring its
appearance.
Estimating Rising Times and Choosing a Rising
Method—The yeast are living organisms, so their
growth rate depends greatly on the temperature of the
dough and the room. As a result, the rising time ranges
given in recipes must be considered rough guidelines
only. In fact, one portion of a dough set out in a 75°F
kitchen will likely rise in half the time it takes another
portion of it placed in a 65°F spot. If your room is
warmer than normal, simply anticipate that the yeast
will grow rapidly and check the dough sooner than is
indicated; if the environment is colder, expect that they
will grow slowly and the dough will rise more slowly
than is indicated. If you happen to live at high altitude,
take that into consideration too; the lower atmospheric
pressure allows bread to rise 25 to 50 percent faster
than normally.
Since the first rise really needs to be cool and
unhurried for optimum bread flavor and texture, in
warm weather try to find the coolest spot in the house,
for example, a table near an air-conditioning vent or
unit, or in a shaded, ground floor area. It's fine to
speed up or slow down the second rise to suit your
schedule by selecting either an "accelerated" rise that
provides an extra-warm environment or an "extended"
refrigerator rise that provides a very chilly one.
For an accelerated rise (which can reduce second rise
time by a third to a half), bring a 1-cup glass measure
of tap water to a boil in a microwave oven. Let the cup
stand for a minute or two to avoid any chance of being
burned by an eruption of steam, then set it in one
corner of the microwave. Set the dough (in its baking
pan and covered) inside on the other side of the
microwave, close the door, and let the yeast thrive in
the comfy, draft-free environment. This rising method is
particularly handy in a cold house, when a recipe
indicates the dough is normally very slow-rising, or
when, for whatever reason, you want your bread done
as soon as possible. In a few recipes in which the
dough rises particularly slowly, it's suggested that after
an hour or so in the microwave, the dough should be
temporarily removed and the water brought to a boil
again to provide a second burst of warmth for the
yeast.
Another convenience option, the extended
(refrigerator) rise method lets you put off baking for up
to 24 hours for many doughs and up to two days for a
few. The cold temperature causes the yeast
fermentation and dough rising to slow dramatically. To
"restart" the rise, let the dough stand on the counter
until it returns to room temperature (usually 1½ to 2½
hours), then proceed with a regular or accelerated rise.
Note that holding a dough longer than the number of
hours specified in the recipe can debilitate the yeast,
resulting in a denser baked good.
All recipes suggest how high doughs should rise in
their pans before baking. Follow this instruction
carefully, as some doughs spring up and do much of
their rising after they're in the oven, and others rise
very little during baking. If you aren't sure whether a
dough is raised enough, test it by pressing a finger into
the surface: If the indention stays instead of gradually
filling up again, the dough is sufficiently raised and
ready for baking. When a loaf inadvertently rises more
than it should, it's best to stir it down, return it to the
pan, and let it rise again, as over-raised doughs have
a tendency to sink or collapse during baking.
Selecting the Right Baking Pan or Dutch Oven
—To keep things simple, this book calls for two basic
loaf pan sizes: a 9 x 5-inch pan or an 8½ x 4½-inch
pan. But in fact, pans with similar dimensions, say 8¾
x 5¼ inches or 8¼ x 4¾ inches, will work just as well.
The critical factor is how much each pan holds, so the
finished bread fills the pan attractively but doesn't hang
over the sides. The larger pan should have a volume of
about 8 cups (2 quarts), and the smaller one should
hold about 6 cups (1½ quarts). To determine the
volume, simply add enough water to fill the pan to the
rim, then measure out the amount of water used.
Occasionally, flat 9 x 13-inch baking pans or 10 x 15inch rimmed baking sheets are also called for. Here
again, pans with similar dimensions will work fine.
Bundt-style and similar decorative pans, plain pans
with a center tube, and soufflé dishes used for some of
these breads come in a confusing assortment of
metric and customary measurement sizes, so simply
choose a pan with the volume specified by the recipe
and with the shape you'd like for the finished loaf. Both
for decorative metal pans and plain loaf pans, a sturdy
construction and medium-colored finish will yield the
best results. Flimsy pans don't hold or distribute the
heat evenly and can result in burning on the bottom or
sides. Very dark or black pan finishes can cause overbrowning and shiny, aluminum foil—colored surfaces
can lead to under-browning. Most nonstick and regular
metal finishes (either is fine) are in the medium gray to
brown range, which is ideal. Ovenproof glass and
ceramic bake-ware are other acceptable options,
though be aware that they sometimes shorten baking
times or require a slightly lower oven temperature than
metal pans.
For the breads baked in a covered Dutch oven,
casserole, or very large ovenproof saucepan or pot,
the volume of the container must be at least large
enough to allow the loaf to fully expand during baking.
The pot should also be straight-sided or flared at the
top; as I discovered, if it narrows at the top, the loaf
can't be removed in one piece! For most of the large,
rustic pot boules in this book, a heavy, 3½- to 4-quart
flat-bottomed pot is the optimum size. A 3-quart pot
can be used if it has a domed rather than flat lid, as
this allows space for the dough to rise slightly above
the pot rim during baking.
A container holding more than 4 quarts will do if that's
what you have, but the dough will spread out in the
space, producing a flat-looking loaf. (It will still taste
fine, of course!) While pricey imported enamel-coated
Dutch ovens are a good choice for the pot breads,
plain, seasoned cast iron or other nonreactive metal or
enameled pots, such as those sold by American
manufacturers (or handed down by Grandma!), are
equally serviceable.
Adjusting Oven Racks and Preheating the Oven
—Every recipe indicates not only the thermostat
setting, but where to place the loaf in the oven. In the
majority of ovens, the rack position just below the one
in the center (but not the lowest one) is the best for
baking the breads in the book; the bottom and interior
will bake through and the top won't become overdone.
For an oven with an unusual rack configuration, just try
to place loaves so their bottoms are about 4 inches
from the bottom heating element. Of course, both
baking and browning vary from oven to oven, so if you
find that breads are burning on the bottom, just place
them a little further up from the heat source the next
time you bake. Any time the tops of loaves are overbrowning, simply cover them with a sheet of aluminum
foil.
Many breads benefit from a strong initial blast of heat,
so be sure to preheat the oven as directed. Each time
the oven door opens, the temperature drops 25° to
50°F, which is why directions sometimes call for
selecting one temperature, then immediately lowering
it once the loaf is in the oven.
Testing for Doneness—Perhaps the trickiest part of
making Kneadlessly Simple breads is telling when
they are completely done. Due to the ample water
required for the "micro-kneading," doughs are moister
than in conventional recipes and routinely take longer
to bake through. When in doubt, always err on the side
of over-baking. These doughs are moist enough that
they won't dry out from a few extra minutes in the oven,
and the extra time will help eliminate any chance of
sogginess in the middle. Plus, deeper browning of the
crust also deepens flavor.
Just rapping a loaf on top or observing crust color is
never sufficient for judging doneness: The most
foolproof way is use an instant-read, or probe,
thermometer and bake to the degree specified in the
recipe. To test, insert the probe deep into the thickest
part of the loaf, but for an accurate reading be careful
not to touch the pan. Or, if you don't wish to invest in a
thermometer, insert a skewer, cake tester, or thin knife
deep into the loaf center, then withdraw it and check
the crumbs on the tip. If the particles look wet or gooey,
continue baking until they look dry and slightly crumbly.
Then, always bake for an extra 5 to 10 minutes to be
sure the center is fully done. (If the outside begins to
over-brown, cover it with foil.)
Storing Breads—Due to their moistness
Kneadlessly Simple loaves keep better than most
homemade breads, but still gradually lose their
freshness and appeal in a few days. Always start by
putting freshly baked breads on a rack and cooling
them thoroughly before packing for storage.
Otherwise, moisture that condenses can be trapped
and lead to deterioration and molding.
The particular storage instructions provided in each
recipe depend on whether the bread needs to stay
crisp or soft. Soft breads are packed airtight in a
plastic bag or container, or in foil, to prevent them from
drying out. To retain their crispness, crusty breads
need some air circulation, so they should be placed in
a paper or cloth bag, or wrapped a clean kitchen
towel. Once packed as specified, loaves will keep in a
cool, dry spot (not in the refrigerator) for up to three
days.
While it might seem like a good idea to refrigerate
breads, this actually speeds staling by causing rapid
retrogradation, a process that crystallizes the starch
molecules. To keep a bread longer than three days,
freeze it in a heavy, airtight plastic freezer bag for up to
two months. Some retrogradation will slowly occur, but
it can be mostly reversed by wrapping the thawed
bread loosely in foil and reheating it at 400°F for 15 to
20 minutes. Refresh individual slices or rolls by
wrapping them in a tea towel and microwaving them
on 50 percent power for around 15 to 20 seconds; use
immediately.
Ingredients
Since the emphasis in Kneadlessly Simple is on keeping
things simple, you don't need a lot of ingredients or to go to
much expense to get started baking bread. Here's a
rundown of the basics:
Wheat Flour Products—Because it has greater
gluten-developing potential than any other grain, wheat
flour is the foundation flour in yeast baking. Much like a
balloon, the stretchy protein formed during the initial
stirring and subsequent "micro-kneading" traps the
carbon dioxide gas released during yeast fermentation
and gradually expands, in the process leavening the
bread. Which is why all but the small sample of glutenfree breads in the book include at least some wheat
flour and many loaves are made entirely of it.
Three wheat flours, widely available in supermarkets,
are called for in the book: all-purpose unbleached
white flour, white unbleached bread flour, and whole
wheat flour. Both the all-purpose white flour and bread
flour are produced from the starchy part (the
endosperm) of the wheat kernel. These flours are
much lighter in color, milder, and finer-textured than
whole wheat flour because the coarse, fiber-rich "shell"
of the kernel (the bran) and the oily, nutrient-rich heart
(the germ) are omitted. The two differ primarily in their
amount of gluten—all-purpose white flour usually has
between 7.5 and 9.5 percent gluten and white bread
flour has between 11.5 and 13 percent. The extra
gluten in the bread flour gives it more gas-trapping
power and ultimately results in airier loaves, so keep
this in mind in recipes that give you a choice between
all-purpose or bread flour.
Although some brands of all-purpose white flour and
bread flour are bleached, seek out and use
unbleached flours whenever possible. Unbleached
flour retains carotenoid components that hold the
natural grain flavor. Bleaching agents not only
introduce unnecessary chemicals and may leave a
faint aftertaste, but they also remove certain flavor
components and the creamy color that help give bread
its appeal. It's also worth sticking with top-quality
brands of flour to ensure consistency from batch to
batch, freshness, and grain carefully grown, harvested,
stored, and milled using the best practices.
Considering that flour is the most fundamental
ingredient in bread, this is not the place to skimp or
settle for second-rate.
As its name suggests, whole wheat flour is made from
the whole kernel. The bran and germ provide
beneficial fiber and nutrients, but also lend a slightly
bitter, "wheaty" flavor and brown color, and, due to
their weight, produce a more compact loaf. If you want
to increase whole-grain consumption but find these
characteristics distracting or unpleasant, consider
trying white whole wheat flour, a whole wheat flour
made from a relatively new strain of wheat that has a
milder taste and lighter color (but the same nutritional
benefits). The King Arthur brand is the most widely
available.
Several recipes in the book not only call for whole
wheat flour but also cracked wheat (broken-up wheat
kernels, also called "berries") and/or additions of
wheat bran and wheat germ. Because the highly
perishable oily germ particles remain in whole wheat
flour, cracked wheat, and germ, store these in the
refrigerator, or discard after three months. White wheat
flours can be kept airtight in a cool, dry spot for up to a
year.
Other Flours and Grain Products—A variety of
other flours and grain products, including cornmeal,
corn grits (coarsely ground dried corn), and cornstarch;
rolled oats; rye flour; and white and brown rice flours
and cooked rice grains, contribute their distinct flavor,
texture, color, and unique set of nutrients to certain
Kneadlessly Simple breads. If you are counting on
these ingredients to boost nutrition, be sure to check
labels before you buy. Sometimes, the germ is
removed from cornmeal or grits to increase the shelf
life, so look for the words "whole-grain" or "undegerminated" on the packaging. Whole-grain
cornmeal and grits, as well as all the other whole-grain
products—rolled oats, brown rice, and rye flour—stale
rapidly, so store them airtight in the refrigerator. Most
of these items are stocked in supermarkets,
sometimes in a "whole grains" section, sometimes
with the baking supplies or cereals.
Bread Yeast—Yeast is called for in modest quantities
i n Kneadlessly Simple but, like wheat flour, it's an
essential ingredient. The yeast amounts needed are
smaller than in old-fashioned recipes because the
long, cool first rise allows ample time for the yeast
organisms to become active and do their work.
Adding extra yeast is not only unnecessary—it can
cause overly rapid fermentation of the dough, which in
turn can produce unpleasantly strong- or sour-tasting
bread. Since the quantities used are small, the usual
¼-ounce commercial yeast packets contain enough for
several batches of bread. Measure out the amount
called for, then, to keep the remainder fresh, close the
packet and place it in an airtight plastic baggie or
small jar. Note the date when the packet was opened
and refrigerate the container; use the yeast within 3
months. If you bake bread often, the 4-ounce jars of
yeast sold in some markets will be more convenient
and economical. These can be kept (refrigerated) for 6
months after opening.
All the recipes in this book have been tested with
"highly active," fast-rising dry yeast (sometimes also
labeled as instant or bread machine yeast). Ironically,
though, this yeast isn't used to hasten rising. I call for
this type because it's fuss-free and virtually foolproof
when stored and handled properly: The particles are
finer than those of regular active dry yeast, so it can be
combined directly with the dry ingredients without
preliminary proofing in warm water. (Skipping the
proofing completely eliminates any chance of
damaging the yeast due to overheating.) Regular
active dry yeast works better when hydrated in warm
water first, so is not as convenient or well suited to the
Kneadlessly Simple cool rise approach. Oldfashioned compressed or cake yeast isn't suitable for
these recipes either.
Salt—Salt is indispensable partly because bread
tastes bland and dull without it. But salt slightly inhibits
yeast, preventing it from growing too fast and overfermenting the dough. Equally important, salt tightens
and strengthens gluten strands, making the dough
better able to trap carbon dioxide and puff up well.
Every recipe calls for table salt, as it is economical
and,
when
used in dough, tastes virtually
indistinguishable from sea salt or other more
expensive options. Just in case you prefer to use a
coarse crystal salt, be aware that table salt is more
compact, so 1 teaspoon roughly equals 1½ to 2
teaspoons of the coarse crystals. A few recipes that
use salt as a garnish call for sea salt or other coarse
salt to add visual and textural interest and flavor; here,
regular table salt won't deliver satisfactory results.
Water—The role of water is vital in yeast breads: The
yeast can't grow and the gliadin and glutenin
molecules in flour can't join together to form gluten
without it. Water, in the form of steam, also promotes
crust crisping and browning by encouraging enzyme
activity that breaks down surface starches into sugarlike compounds during the first 12 to 15 minutes in the
oven. Steam also initially keeps the crust soft enough
to allow the loaf to expand early in the baking period.
(This is why it's important to follow instructions to brush
a loaf with water and/or create steam in the oven just
prior to beginning the baking. The steam no longer
serves a useful purpose and actually hinders crisping
once the first stage of baking is completed, so there's
no need to replenish it later on.)
Unless your tap water is unpleasant-tasting, it is fine
for making bread, although bottled spring or distilled
water can be substituted; some bakers insist upon
spring water. (A side-by-side comparison of a recipe
made using tap and bottled water should indicate
whether the latter makes a difference with your
breads.) If the off taste of your water is due to heavy
chlorination, letting it stand for 24 hours will allow the
chlorine to dissipate.
Fats—Corn oil (or other nearly flavorless vegetable
oil), olive oil, and unsalted butter are the types of fat
called for in Kneadlessly Simple recipes. All three
increase crust tenderness, promote browning, and add
a pleasant smoothness, or mouthfeel, to the crumb,
and in doing so help give various breads their
distinctive character. The crust and crumb tenderizing
properties increase as the amount of fat increases,
which is why fat-laden breads such as brioche have a
velvety, cake-like consistency. Olive oil and particularly
butter also contribute flavor and aroma, although since
all fats are flavor carriers, corn oil heightens the taste
of the other ingredients, too. Remember that besides
having markedly different flavors, these fats solidify at
different temperatures, necessitating completely
different methods of incorporation into recipes: Corn
oil will stay fluid when added directly to ice water. Olive
oil and butter will solidify, so must instead be
separately added to dry ingredients or doughs.
Unsalted butter is the best choice for baking bread
because the total salt content of the dough is easier to
control and because assessing the quality and
freshness of butter is easier when it lacks salt. Extravirgin olive oil also lends a fruitier taste than "regular"
olive oil, though either can be used. Due the tendency
of all fats to become rancid during storage and their
ability to pick up and carry flavors, for good-tasting
bread, be scrupulous about using only very fresh butter
and oils.
Sweeteners—Granulated and brown sugar, honey,
and molasses (and in one recipe, maple syrup) have
the obvious effect of adding sweetness and flavor to
yeast breads, and they also promote tenderness and
browning. But there are other equally important (though
less obvious) consequences to adding sweeteners,
and these make it risky to casually increase or
decrease amounts or ignore instructions on when and
how to add them. In small quantities, the granular
sweeteners (white and brown sugar) encourage yeast
growth by providing a readily fermentable source of
food. But too much granular sugar hinders yeast
organisms, because as it dissolves it draws up water
they need. Increasing or decreasing liquid sweeteners
also dramatically alters the dough by changing the
proportion of water, which may necessitate an
adjustment in the amount of flour. For best results, use
clover honey, "regular" (never blackstrap) molasses,
and medium amber maple syrup; these impart flavor
without overpowering the other taste and aroma
components of bread. Several recipes have been
designed so that either honey or molasses can be
used; either will work well, though honey delivers more
sweetness, and the molasses more color and robust
flavor.
Dairy Products—Milk products, including instant
nonfat dry milk powder, buttermilk powder, and yogurt,
and eggs are the dairy enrichments occasionally used
in Kneadlessly Simple. These increase the food value
of bread by increasing the protein, fat, sugar, and
vitamins and minerals, of course, but are equally
important for heightening and deepening flavor,
increasing crumb softness and tenderness, and
promoting crust browning and sheen. In fact, eggs
enhance crust appearance so effectively that they are
often used as a finishing wash or glaze that is brushed
on loaves. Be sure to use only "drinking quality" namebrand instant nonfat milk; the particles are finer
(facilitating easier incorporation into doughs) and the
taste is much cleaner and more appealing than that of
discount or generic brands.
Seeds, Nuts, and Dried Fruits—While these
additions boost fiber and nutrients, they are even more
important in lending character to certain breads by
giving them a uniquely appealing appearance, taste,
and texture. Sometimes dried fruits and seeds are
added during the first rise so they will have plenty of
time to plump and soften (or perhaps become chewy),
as well as become more digestible. However, where
crunchiness is desired, seeds and nuts are added
later, either before or after the second rise. In general,
when raisins and other dried fruits are added before
the first rise, directions call for partially hydrating them
by rinsing them under hot water first. This helps ensure
that they won't absorb too much moisture and
discourage the fermentation and gluten-developing
process. This initial partial hydration is often skipped
when they are added later, as their gradual plumping
during the second rise helps stiffen the dough and
ready it for shaping and baking.
Freshness is vital for all these additions: Seeds and
nuts are rich in fat, so must be fresh to taste good. And
leathery, dried-out raisins, dried cranberries, and such
will be tough and tasteless and can even dry out
doughs. All these items are usually most economical
when purchased in bulk; health food and baking supply
stores also turn over their supplies of seeds, nuts, and
dried fruits rapidly, which helps to ensure their
freshness. Store your purchases airtight and
refrigerated.
Troubleshooting Kneadlessly
Simple Breads
Possible Problems, Causes,
And Remedies
The Kneadlessly Simple method is simple and builds in
many safeguards, so that most of the problems listed below
are very unlikely to occur. But just in case, here are some
problems, possible causes, and suggested remedies.
No Visible Bubbling or Dough Rising and
No Yeasty Aroma during the First Rise
Yeast was omitted.
Correct the oversight by combining the yeast with ¼
cup flour, sprinkling it over the dough, then stirring
vigorously to incorporate.
Yeast wasn't viable (due to improper or overly long
storage or use of "expired" yeast).
Correct the problem by adding yeast from a different,
fresher package using the method above.
Dense, Heavy Loaf or Insufficient or
Extremely Slow Rising
Yeast near or past its expiration date.
Yeast organisms gradually lose potency and eventually
die. Even "unexpired" but improperly stored yeast may
no longer be fully active and potent, so don't take a
chance on it. (Once a yeast packet has been opened,
it should be placed in an airtight container,
refrigerated, and used within 3 months.)
Insufficient amount of yeast was added by mistake.
Be sure you use the right measure from your set of
measuring spoons. Measure out the yeast by
overfilling the appropriate spoon (or spoons) and
sweeping across the top until the quantity is level.
Excessive quantities of yeast-inhibiting ingredients
were incorporated into dough.
Even relatively small quantities of certain spices,
herbs, salt, and other ingredients can hinder yeast
activity, so resist the impulse to change amounts of
recipe seasonings.
Unexpectedly large amounts of whole grains, fat,
sugar, and/or salt were incorporated.
Kneadlessly Simple recipes call for the right amount
of yeast to accommodate these yeast-inhibiting
ingredients, but if substitutions are made, proportions
can be off and cause poor rising.
Rising took place at a very chilly room temperature
and/or the dough contained colder than normal
ingredients.
If the room or ingredients are unusually cold, factor this
in, then simply allow extra time for the dough to rise. It
needs to reach the height specified in the recipe.
Loaf was baked before the dough had enough time to
rise fully.
Some doughs rise a lot in the oven, others (particularly
those with a high percentage of whole grains) don't.
Follow recipes on how much doughs should rise
before going in the oven.
Too much sugar was added.
Excess sugar makes the dough look more fluid, but in
fact it actually draws up water, robbing the yeast of the
amount needed for vigorous growth. Use only the
amount of sugar called for in the recipe.
Dough was left too long during an extended rise in
the refrigerator.
Depending on the recipe, loaves should be held in the
refrigerator for a maximum of 24 to 48 hours; longer
storage reduces yeast potency.
Dough Overflows the Pan During
Second Rise or Baking
Dough rose too long or in an overly warm room,
causing over-fermentation
If the room is overly warm, always compensate by
cutting back on the rising time.
Too much yeast was added by mistake.
The amount of yeast specified in recipes is calculated
to produce the right amount of fermentation and rising.
Measure carefully when adding yeast.
The pan used was too small.
When dough is put in a pan, at least ¾ inch should
remain at the top to accommodate rising. If the dough
nearly fills the pan before any rising, the remaining
space is insufficient to handle the normal volume
increase and the excess dough may hang over the
sides. Switch to a bigger pan.
Dough was too moist and soft.
Doughs with too much liquid or insufficient flour to
stiffen them can run over the rim as they rise. Be sure
to stiffen doughs with more flour before the second rise
if this is specified in the directions.
Loaf Sinks in the Center or Completely
Collapses
Dough was over-raised before being put in the oven.
Loaves inadvertently allowed to rise too high may not
support themselves. If possible, stir down over-risen
dough and let it rise the proper amount before baking.
Dough was too wet, which "diluted" the gluten and
weighed down the loaf.
Be sure to add in enough flour before the second rise,
as directed in the recipe.
Loaf was removed from the oven before interior was
baked through.
Carefully check for doneness with a skewer inserted in
the thickest part, or, better yet, with an instant-read
thermometer as directed in the recipe.
Bread Gummy, Doughy, or Wet-Looking
in the Middle or on the Bottom
Loaf was under-baked.
Due to the relative moistness of Kneadlessly Simple
loaves, they need to be more thoroughly baked than
conventional recipes. Check for doneness with a
skewer or, if possible, an instant-read thermometer.
When the interior seems done, always bake for an
extra 5 to 10 minutes to be sure. (If the top is already
very brown, cover it with foil first.) An instant-read
thermometer is the best insurance against underbaking.
Ingredient proportions were off due to inaccurate
measuring.
Adding too much water or fat and too little flour can
throw the chemistry out of balance; measure carefully.
If you bake often, consider investing in kitchen scales
to ensure accurate measuring.
Oven thermostat was off.
Many home ovens run too hot or too cold. If baking
times are routinely long and loaves don't brown well or
bake thoroughly, check temperatures with an oven
thermometer.
Loaf was cut while still hot.
The pressure from the cutting can squash and
compact a loaf before it has time to set up and
become firm. It's hard to wait, but try to!
Loaf Crust Burns or Browns Excessively
Before the Inside Is Done
Loaf was baked on the wrong oven rack.
Most loaves bake best in the lower third of the oven; in
most ovens, this means the rack placement slot just
below the middle one. When recipes call for baking on
the lowest rack, choose the rack slot closest to the
oven floor.
Oven thermostat was out of whack or temperature was
set too high.
Breads containing a lot of dairy products, chocolate, or
sweeteners tend to over-brown in a hot (over 375°F)
oven. Be sure the thermostat is operating correctly.
A very dark metal pan was used.
Dark pans absorb heat so efficiently that they
sometimes over-brown baked goods, especially when
loaves contain eggs, fat, sugar, and other enrichments.
Switch to a lighter-colored pan.
Loaf was not covered with foil as directed in the
recipe.
Enriched doughs naturally brown rapidly and many
need to be covered part of the way through baking to
prevent over-browning It's a good idea to occasionally
check browning progress during baking, as not all
ovens brown at the same rate.
Crust Looks Pale or Under-Browned
Oven thermostat was off, temperature was set too low,
or preheating time was too short.
Lean doughs (those lacking fat, sugar, milk, and eggs)
need a high temperature (over 375°F) for good
browning, especially during the first 15 minutes of
baking.
Required wash, glaze, or spritz of water was omitted.
Some lean doughs call for an egg wash, glaze, or
spritz of water to encourage crust browning. If it is
omitted, they will look pale.
A very light metal baking pan was used.
Very shiny, light-colored pans are often too reflective
and divert heat away from the loaf. Switch to a different
pan.
Bread Lacks Flavor
Salt was omitted or too small an amount was added.
Kneadlessly Simple breads normally have plenty of
flavor due to the use of a long first rise, but if salt is
omitted, they can taste flat.
Loaf Tastes too Sour or Yeasty, or Has
Off Flavors
Too much yeast was added.
Excessive amounts of yeast can cause overfermentation, producing excess acid and alcohol that
give breads strong aromas and flavors.
Stale ingredients were used.
Old flour, fat, nuts, or seeds, etc., will not be improved
or masked by baking; start with fresh, good-quality
ingredients.
Dough over-rose.
This can occur if the dough rising period is much
longer than recommended; or the rising takes place in
an overly warm room; or the dough is held longer than
recommended in the refrigerator. All of these can lead
to over-fermentation and an off taste.
Bread Is Dry and Crumbly
Overly dry additions such as stale, hard dried fruit, or
dried-out cornmeal, oats, or seeds were added.
These can draw too much moisture from the dough, so
always use fresh products.
Instructions to rehydrate certain ingredients were
skipped.
Heed the directions to pre-soak dried fruits, seeds,
etc., as they will otherwise hydrate using moisture in
the dough.
Wrong flour was used.
When bread flour is called for, it is needed to provide
proper structure and in some cases to prevent a
crumbly texture.
Measurements were off, proportion of white wheat
flour or bread flour was too low.
Wheat flours develop the gluten that keeps breads
from being crumbly, so don't arbitrarily substitute other
kinds of flour.
Loaf Is Misshapen
Loaf was not slashed as directed.
Not all breads require slashing, but for some it's very
important: This step encourages the loaf to expand
fully and the crust to split attractively, rather than in an
unpredictable "blow-out" fashion.
Wrong size pan was used.
A too-small pan can cause the loaf to hang over the
sides or look lopsided. A too-large pan can yield a flat
or skimpy- looking loaf.
Chapter 3: Easiest Ever
Yeast Breads
The recipes in this chapter are so easy I could have
called them beginner breads. I didn't, though, because I
don't want experienced bakers to skip them or dismiss
them as unsophisticated or beneath consideration. They
are neither! As the results that come from your oven will
unequivocally prove, a few uncomplicated, hassle-free
steps can produce breads with superb flavor and texture
and plenty of eye appeal.
How is it possible to eliminate all the traditional fussing and
fiddling from yeast baking without sacrificing quality? The
Kneadlessly Simple method just builds in time for the
naturally occurring chemical processes that we now know
develop both flavor and gluten in yeast dough to proceed
uninterrupted. In other words, this approach just lets nature
take its course and do the kneading and flavor enhancing
for us.
Since none of the recipes in this book require kneading,
there are other things that earn the ones in this chapter the
"Easiest Ever" designation:
They require no hand-shaping and involve no timeconsuming or tricky steps.
They call for few ingredients—usually only a couple
beyond the essential flour, water, yeast, and salt.
They are especially convenient: All or most ingredients
are added before the first rise.
Easy White Bread Loaves
KS Quotient
Super Easy: A minimum of fuss-free, easily mixed
ingredients. No hand-shaping.
If you love fresh, homemade yeast bread, but think of it as
complicated or labor-intensive to prepare, please go to
your kitchen and try this recipe! You'll create light, attractive,
traditional-style white bread with excellent flavor, while
skipping all the traditional usual work—no yeast proofing,
kneading, hand-shaping, or muss and fuss. And, like all the
other recipes in Kneadlessly Simple, this one requires no
bread machine, heavy-duty mixer, food processor, or other
special equipment.
Simply stir the ingredients together in a big bowl and slip it
into the refrigerator to chill for a couple hours. Then, leave it
on the counter to rise all day or all night. This long, slow rise
is key: It develops superior flavor and "micro-kneads" the
dough so you can skip this formerly essential step. Last,
simply stir the dough again; turn it out into two loaf pans; let
rise, and bake.
Your reward? Two large, fine-textured loaves perfect for
sandwiches, toast, or eating plain. Or, if you prefer, use half
of this versatile dough for an everyday white loaf, and
quickly turn the second half into a dozen large, lusciously
decadent yet easy sticky buns (see Easy Cinnamon Sticky
Buns and Good and Easy Pecan Sticky Buns (or Saucy
Maple-Butter Sticky Buns)).
Yield: 2 medium loaves, 12 to 14 slices each
6½ cups (32.5 ounces) unbleached white bread flour,
plus more as needed
3½ tablespoons granulated sugar
1 tablespoon table salt
1 teaspoon instant, fast-rising, or bread machine yeast
1/3 cup corn oil, canola oil, or other flavorless
vegetable oil, plus extra for coating dough tops and
baking pans
2¾ cups ice water, plus more if needed
First Rise In a very large bowl, thoroughly stir together
the flour, sugar, salt, and yeast. In a medium bowl or
measuring cup, whisk the oil into the water. Thoroughly
stir the mixture into the bowl with the flour, scraping
down the sides until thoroughly blended. If the mixture
is too dry to incorporate all the flour, a bit at a time, stir
in just enough more water to blend the ingredients;
don't over-moisten, as the dough should be stiff. If
necessary, stir in enough more flour to stiffen it. Brush
or spray the top with oil. Cover the bowl with plastic
wrap. If desired, for best flavor or for convenience, you
can refrigerate the dough for 3 to 10 hours. Then let
rise at cool room temperature (about 70°F) for 15 to
20 hours. If convenient, stir the dough about halfway
through the rise.
Second Rise Vigorously stir the dough, adding more
flour if necessary to yield very stiff consistency. Using
well-oiled kitchen shears or a serrated knife, cut it in
half, placing the portions in 2 well-greased 8½ x 4½inch loaf pans. Smooth and press the dough into the
pans using a well-oiled rubber spatula or your
fingertips. Evenly brush or spray the dough tops with
oil. Make a ½-inch deep slash lengthwise down the
center of each loaf. Tightly cover the pans with nonstick
spray—coated plastic wrap.
Let Rise Using Any of These Methods For a 1½- to
2½-hour regular rise, let stand at warm room
temperature; for a 1- to 2-hour accelerated rise, let
stand in a turned-off microwave along with 1 cup of
boiling-hot water; or for an extended rise, refrigerate,
covered, for 4 to 24 hours, then set out at room
temperature. Continue the rise until the dough nears
the plastic. Remove the plastic and continue until the
dough reaches ½ inch above the pan rims. Dust each
loaf evenly with 1 tablespoon flour.
Baking Preliminaries 15 minutes before baking time,
place a rack in the lower third of the oven and preheat
to 425°F.
Baking Reduce the oven temperature to 400°F. Bake
for 35 to 45 minutes, until the tops are nicely browned.
If necessary to prevent over-browning, cover the tops
with foil. Bake for 15 to 25 minutes longer, until the
tops are well browned and a skewer inserted in the
thickest part comes out with just a few crumbs on the
tip (or until the center registers 208° to 210°F on an
instant-read thermometer). Then bake for 5 to 10
minutes longer to ensure the centers are baked
through. Cool in the pans on a wire rack for 10
minutes, then turn out the loaves onto racks and cool
thoroughly.
Serving and Storing
Cool thoroughly before slicing or storing. Store airtight
in plastic bags or wrapped in aluminum foil. The bread
will keep at room temperature for 2 to 3 days, and may
be frozen, airtight, for up to 2 months.
Crusty White Peasant-Style Pot
Bread
KS Quotient
Super Easy: Fuss-free ingredients, added all at once.
No hand-shaping.
Pot boules—round, peasant-style breads simply popped in
a sturdy, lidded pot and baked—are about the easiest
loaves possible, but among the most gratifying. They puff
up well, brown beautifully, and always come out crusty, due
to the moisture trapped inside the pot during the first few
minutes in the oven. (In fact, the pot actually serves as a
mini-oven.) As an added bonus, the loaves need no handshaping because the dough just conforms to the container
shape as it expands.
Like the basic black dress, this basic white loaf is always
appropriate and in favor. The interplay of light mild crumb,
crunchy golden crust, and deep sweet yeast taste and
aroma (coaxed out by long, slow rising) is downright
amazing. In fact, eating this bread is a far more complex
and exciting sensory experience than one might expect
from the simple ingredients.
Should you ever want a change of pace from the basic loaf,
it's an easy matter to add a few accents for a rather
different effect. See the rosemary— black olive variation at
the end of the recipe.
Yield: 1 large loaf, 12 to 14 slices
4 cups (20 ounces) unbleached all-purpose white flour
or unbleached white bread flour, plus more as needed
1 teaspoon granulated sugar
2 teaspoons table salt
¾ teaspoon instant, fast-rising, or bread machine
yeast
2 cups ice water, plus more if needed
Corn oil, canola oil, or other flavorless vegetable oil or
oil spray for coating dough
First Rise In a large bowl, thoroughly stir together the
flour, sugar, salt, and yeast. Vigorously stir the water
into the bowl, scraping down the sides and mixing until
the ingredients are thoroughly blended. If the mixture is
too dry to incorporate all the flour, a bit at a time, stir in
just enough more water to blend the ingredients; don't
over-moisten, as the dough should be very stiff. If
necessary, stir in enough more flour to yield a hard-tostir dough. Brush or spray the top with oil. Cover the
bowl with plastic wrap. If desired, for best flavor or for
convenience, you can refrigerate the dough for 3 to 10
hours. Then let rise at cool room temperature for 18 to
24 hours. If convenient, vigorously stir the dough once
about halfway through the rise.
Second Rise Using an oiled rubber spatula, gently lift
and fold the dough in towards the center all the way
around until mostly deflated; don't stir. Brush or spray
the surface with oil. Re-cover with nonstick spray—
coated plastic wrap.
Let Rise Using Any of These Methods For a 1½- to
2½-hour regular rise, let stand at warm room
temperature; for a 1- to 2-hour accelerated rise, let
stand in a turned-off microwave along with 1 cup of
boiling-hot water; or for an extended rise, refrigerate,
covered, for 4 to 24 hours, then set out at room
temperature. Continue the rise until the dough doubles
from the deflated size; remove the plastic if the dough
nears it.
Baking Preliminaries 20 minutes before baking time,
put a rack in the lower third of the oven; preheat to
450°F. Heat a 3 ½- to 4-quart (or larger) heavy metal
pot in the oven until sizzling hot (check with a few drops
of water), then remove it, using heavy mitts. Taking
care not to deflate the dough (or burn yourself), loosen
it from the bowl sides with an oiled rubber spatula and
gently invert it into the pot. Don't worry if it's lopsided
and ragged-looking; it will even out during baking.
Generously spritz or brush the top with water.
Immediately top with the lid. Shake the pot back and
forth to center the dough.
Baking Reduce the heat to 425°F. Bake on the lower
rack for 55 minutes. Remove the lid. Bake for 15 to 20
minutes longer, or until the top is well browned and a
skewer inserted in the thickest part comes out with just
a few crumbs on the tip (or until center registers 209°
to 212°F on an instant-read thermometer). When it
seems done, bake for 5 minutes longer to ensure the
center is baked through. Cool in the pan on a wire rack
for 10 to 15 minutes. Remove the loaf to the rack and
cool thoroughly.
Choosing the Right Pot:
While expensive enamel-coated cast iron Dutch ovens
make great bread bakers, there are lots of more
economical containers that work just as well. I've
successfully used several anodized aluminum stew
and sauce pots; plain cast iron Dutch ovens and deep-
sided skillets and fryers; enamel-coated carbon steel
pots; and even a heavy 4-quart stainless steel—clad
aluminum saucepan (with a domed oven-safe lid and
metal handle). The shape and size of the container will
greatly impact how the finished loaf will look, of course,
but so long as they are sturdy and have a snug-fitting
lid, all sorts of pots will yield the crusty-crackly breads
that are otherwise difficult to produce in a home oven.
The pot size, shape, and composition will also affect
baking time. For example, in a 10- or 11-inch diameter
deep-sided skillet or Dutch oven the dough will spread
out and yield a low, gently domed loaf that will bake
through in the center sooner than a taller, high-domed
loaf produced in 9-inch diameter pan. For more
information on suitable baking pots, see chapter
Getting Started.
Serving and Storing
Cut or tear the loaf into portions; it tastes good warm
but will cut much better when cool. Cool completely
before storing. To maintain the crisp crust, store
draped with a clean tea towel or in a heavy paper bag.
Or store airtight in a plastic bag or wrapped in foil: The
crust will soften, but can be crisped by heating the loaf,
uncovered, in a 400°F oven for a few minutes. The
bread will keep at room temperature for 3 days, and
may be frozen, airtight, for up to 2 months.
Variation
Crusty Rosemary and Olive Pot Bread
Stir 1 cup pitted, coarsely chopped black Kalamata olives
(well drained) and 3 tablespoons finely chopped fresh (not
dried) rosemary needles (discard the stems) into the dough
along with the water. Proceed exactly as directed in the
original recipe.
All-Purpose Light Wheat Bread
KS Quotient
Super Easy: Short ingredient list, readily available
ingredients. No hand-shaping.
A large, versatile, no-fuss loaf, this has a firm, springy
interior, crusty exterior, and wonderfully light, pleasing
wheat taste and aroma. It's a fine all-around bread, suitable
for eating "as is," for toasting, and for making sandwiches.
For a slightly "wheatier" and more nutritious bread, see the
variation at right.
Yield: 1 large loaf, 12 to 15 slices
3 cups (15 ounces) unbleached all-purpose white flour,
plus more as needed
1 cup (5 ounces) whole wheat flour, plus 1 tablespoon
for garnishing loaf top
3 tablespoons granulated sugar
Generous 1¾ teaspoons table salt
¾ teaspoon instant, fast-rising, or bread machine
yeast
3 tablespoons corn oil, plus extra for coating dough top
and baking pan
2 cups plus 1 tablespoon ice water, plus more if
needed
First Rise In a large bowl, thoroughly stir together the
white flour, whole wheat flour, sugar, salt, and yeast. In
another bowl or measuring cup, whisk the oil into the
water. Then vigorously stir the mixture into the bowl
with the flour, scraping down the sides and mixing until
thoroughly blended. If too dry to mix together, add just
enough more water to facilitate mixing, but don't overmoisten, as the dough should be stiff. If necessary, stir
in enough more white flour to stiffen it. Brush or spray
the top with oil. Tightly cover the bowl with plastic wrap.
If desired, for best flavor or for convenience, you can
refrigerate the dough for 3 to 10 hours. Then let rise at
cool room temperature for 12 to 18 hours; if
convenient, vigorously stir once during the rise.
Second Rise Vigorously stir the dough. If it is not stiff,
stir in enough more white flour to yield a hard-to-stir
dough. Using an oiled rubber spatula, gently lift and
fold the dough in towards the center all the way around
(this organizes the gluten for shaping the dough into a
loaf). Invert it into a very well-greased 9 x 5-inch loaf
pan. Using an oiled rubber spatula or fingertips,
smooth out the top and press the dough out into the
pan. Brush or spray the dough top with oil. Evenly
sprinkle the top with 1 tablespoon whole wheat flour.
Using a well-oiled serrated knife or kitchen shears,
make 3 to 4 evenly spaced diagonal ½-inch-deep
slashes down the loaf. Cover the pan with nonstick
spray—coated plastic wrap.
Let Rise Using Any of These Methods For a 1½- to
2½-hour regular rise, let stand at warm room
temperature; for a 1- to 1½-hour accelerated rise, let
stand in a turned-off microwave along with 1 cup of
boiling-hot water; or for an extended rise, refrigerate,
covered, for 4 to 24 hours, then set out at room
temperature. When the dough nears the plastic,
remove it and continue the rise until the dough extends
1/8 inch above the pan rim or doubles from its deflated
size.
Baking Preliminaries 15 minutes before baking time,
place a rack in the lower third of the oven; preheat to
375°F.
Baking Bake on the lower rack for 50 to 60 minutes, or
until the loaf is well browned and crisp on top; as
necessary cover with foil to prevent over-browning.
Bake for 10 to 20 minutes more, until a skewer
inserted in the thickest part comes out with just a few
particles on the end (or until the center registers 208°
to 210°F on an instant-read thermometer). Then bake
for 5 minutes longer to make sure the center is done.
Cool in the pan on a wire rack for 10 minutes. Turn the
loaf onto a rack and cool thoroughly.
Serving and Storing
Serve warm, cool, or toasted; the bread slices best
when cool. Cool thoroughly before storing in plastic or
foil. Keeps at room temperature for 2 to 3 days. May
be frozen, airtight, for up to 2 months.
Variation
All-Purpose Whole Wheat Bread
Use 2 cups white flour and 2 cups whole wheat flour. If
desired, add 1 tablespoon more sugar to balance the
wheat flavor. Proceed exactly as directed in the original
recipe.
Crusty Portuguese-American
Yeasted Cornbread
KS Quotient
Easy: A minimum of easily mixed ingredients. No
hand-shaping.
This is my version of pao de milho, a peasant-style
yeasted cornbread popular in the Portuguese-American
communities in Massachusetts and Rhode Island. The
locals like to make it with a special cornmeal called white
cap flint, which, unfortunately, isn't available anywhere else.
I've substituted a good-quality stone-ground white cornmeal
from my mid-Atlantic region with excellent results.
The large, homespun loaf has a mild, go-with-anything
flavor and a delightful crusty-chewy top. It has a finer,
moister crumb than most cornbreads, the result of the
cornmeal being combined with boiling water and turned
into a mush first. This simple, seemingly unimportant step
makes a big difference in taste, too: Due to chemical
changes that occur as the cornmeal begins to cook, the
bread is noticeably mellow and sweet, even though no
sugar is added. (For more on the chemistry behind the
technique, see The Chemistry Behind the Steps.)
Pao de milho is doubtless a derivative of broa, a staple
cornbread in the poorer regions of Portugal. Corn was
introduced into Portugal and Spain from the New World,
probably by whalers or fishermen sailing from the New
England coast. The Portuguese immigrants who settled in
Massachusetts and Rhode Island eventually returned the
favor, introducing this very enticing yeast bread back here.
Serve it with meals, along with butter, toast it, or grill it and
use in all sorts of hearty meat, cheese, and roasted
vegetable sandwiches.
Yield: 1 large loaf, 12 to 14 portions or slices
1 1/3 cups boiling water
1¼ cups cornmeal, preferably white stone-ground, plus
1 tablespoon for garnish
3 cups (15 ounces) unbleached white bread flour, plus
more as needed
2 teaspoons table salt
¾ teaspoon instant, fast-rising, or bread machine
yeast
1¼ cups ice water, plus more if needed
Corn oil, canola oil, or other flavorless vegetable oil or
oil spray for loaf top
First Rise In a medium bowl, gradually stir the boiling
water into the cornmeal until smoothly incorporated.
Let cool thoroughly. In a large bowl, thoroughly stir
together the flour, salt, and yeast. Gradually but
vigorously stir the ice water into the cooled cornmeal
until very smoothly blended. Then vigorously stir the
cornmeal mixture into the bowl with the flour, scraping
down the sides until the ingredients are thoroughly
blended. If too dry to mix completely, a bit at a time, stir
in just enough more ice water to blend the ingredients;
don't over-moisten, as the dough should be stiff. If the
dough is soft, vigorously stir in enough more flour to
stiffen it. Brush or spray the top with vegetable oil.
Cover the bowl with plastic wrap. If desired, for best
flavor or for convenience, you can refrigerate the
dough for 3 to 10 hours. Then let rise at cool room
temperature for 12 to 18 hours.
Second Rise Vigorously stir the dough, adding more
flour if needed to yield a hard-to-stir dough. Using an
oiled rubber spatula, fold the dough in towards the
center all the way around. Brush or spray the top with
oil. Re-cover with nonstick spray—coated plastic wrap.
Let Rise Using Any of These Methods For a 1½- to
2½-hour regular rise, let stand at warm room
temperature; for a 1- to 2-hour accelerated rise, let
stand in a turned-off microwave along with 1 cup of
boiling-hot water; or for an extended rise, refrigerate,
covered, for 4 to 12 hours, then set out at room
temperature. Continue the rise until the dough doubles
from the deflated size, removing the plastic if the
dough nears it.
Baking Preliminaries 20 minutes before baking time,
put a rack in the lower third of the oven; preheat to
450°F. Heat a 3 ½- to 4-quart (or larger) heavy metal
pot in the oven until sizzling hot (check with a few drops
of water), then remove it, using heavy mitts. Taking
care not to deflate the dough, loosen it from the bowl
sides with an oiled rubber spatula and gently invert it
into the pot. Don't worry if it's lopsided and raggedlooking; it will even out during baking. Generously
spray or brush the top with water, then sprinkle over a
tablespoon of cornmeal. Immediately top with the lid.
Shake the pot back and forth to center the dough.
Baking Reduce the heat to 425°F. Bake on the lower
rack for 50 minutes. Remove the lid. Reduce the heat
to 400°F. Bake for 15 to 25 minutes longer, until the
top is well browned and a skewer inserted in the
thickest part comes out with just a few crumbs on the
tip (or until the center registers 210° to 212°F on an
instant-read thermometer). Then bake for 5 minutes
longer to ensure the center is baked through. Cool in
the pan on a wire rack for 10 to 15 minutes. Remove
the loaf to the rack. Cool thoroughly.
Serving and Storing
This tastes good warm but will cut better when cool.
Cool completely before storing. To maintain the crisp
crust, store in a large bowl draped with a clean tea
towel or in a heavy paper bag. Or store airtight in a
plastic bag or foil: The crust will soften, but can be
crisped by heating the loaf, uncovered, in a 400°F
oven for a few minutes. The bread will keep at room
temperature for 3 days, and may be frozen, airtight, for
up to 2 months.
Easy Oat Bread
KS Quotient
Super Easy: A minimum of fuss-free, easily mixed
ingredients. No hand-shaping.
Oats always seem to have a comforting, low-key flavor, and
this bread does, too. The straightforward, easy recipe can
be made with either honey or molasses and produces two
homey, nice-to-have-on-hand loaves. (I always stash one in
the freezer for later use.)
The honey version is slightly sweeter and lighter in color;
the molasses version, tastes—surprise!—of molasses,
though it doesn't come on strong. Attractively flecked with
bits of oats, the loaves are slightly soft and make excellent
toast and sandwich bread.
Yield: 2 medium loaves, about 12 slices each
5½ cups (27.5 ounces) unbleached all-purpose white
flour or unbleached white bread flour, plus more as
needed
1 cup old-fashioned rolled oats or quick-cooking (not
instant) oats, plus 4 tablespoons for garnish
3 tablespoons granulated sugar
Scant 2¾ teaspoons table salt
1 teaspoon instant, fast-rising, or bread machine yeast
¼ cup clover honey or light (mild) molasses
¼ cup corn oil or other flavorless vegetable oil, plus
extra for coating dough top and baking pans
2¼ cups plus 2 tablespoons ice water, plus more if
needed
First Rise In a very large bowl, thoroughly stir together
the flour, oats, sugar, salt, and yeast. In a medium bowl
or measuring cup, thoroughly whisk the honey (or
molasses) and oil into the water. Thoroughly stir the
water mixture into the larger bowl, scraping down the
sides until the ingredients are thoroughly blended. If the
mixture is too dry to incorporate all the flour, a bit at a
time, stir in just enough more water to blend the
ingredients; don't over-moisten, as the dough should
be stiff. Brush or spray the top with oil. Cover the bowl
with plastic wrap. For best flavor or convenience, you
can refrigerate the dough for 3 to 10 hours. Then let
rise at cool room temperature for 12 to 18 hours; if
convenient, vigorously stir once during the rise.
Second Rise Vigorously stir the dough. If necessary,
stir in enough more flour to yield a hard-to-stir
consistency. Generously oil two 8½ x 4½-inch loaf
pans. Sprinkle a tablespoon of oats in each; tip the
pans back and forth to spread the oats over the bottom
and sides. Use well oiled kitchen shears or a serrated
knife to cut the dough into 2 equal portions. Put the
portions in the pans. Brush or spray the tops with oil.
Press and smooth the dough evenly into the pans with
an oiled rubber spatula or fingertips. Sprinkle a
tablespoon of oats over each loaf; press down to
imbed. Make a ½-inch-deep slash lengthwise down
the center of each loaf using oiled kitchen shears or a
serrated knife. Tightly cover the pans with nonstick
spray—coated plastic wrap.
Let Rise Using Any of These Methods For a 2- to 3hour regular rise, let stand at warm room temperature;
for a 45-minute to 2-hour accelerated rise, let stand in
a turned-off microwave along with 1 cup of boiling-hot
water; or for an extended rise, refrigerate, covered, for
4 to 24 hours, then set out at room temperature.
Continue the rise until the dough nears the plastic.
Remove it and continue until the dough extends ½ inch
above the pan rims.
Baking Preliminaries 15 minutes before baking time,
place a rack in the lower third of the oven; preheat to
375°F.
Baking Bake on the lower rack for 50 to 60 minutes,
until the tops are well browned. Cover the tops with foil.
Then bake for 10 to 15 minutes more, until a skewer
inserted in the thickest part comes out with just a few
particles clinging to the bottom portion (or until the
center registers 208° to 210°F on an instant-read
thermometer). Bake for 5 minutes longer to be sure the
centers are done. Let cool in the pans on a wire rack
for 15 minutes. Turn out the loaves onto racks and cool
thoroughly.
Serving and Storing
Cool thoroughly before slicing or storing. Best served
toasted. Store airtight in plastic or aluminum foil. The
bread will keep at room temperature for 3 days, and
may be frozen, airtight, for up to 2 months.
Everyday Oatmeal HoneyRaisin Bread
KS Quotient
Super Easy: Easily mixed, readily available
ingredients. No hand-shaping.
This homey, fairly compact loaf looks unremarkable but
makes excellent toast, and is also nice for snacking or
making a slightly unusual but pleasing peanut butter
sandwich. I think of it as a good everyday bread, because it
can be mixed together quickly and calls for ingredients
normally on hand. I also like the fact that the loaf is not
overloaded with sugar and doesn't contain a lot of fat. Plus,
the oats add not only body and flavor, but also fiber and
nutrients. For a slightly more nutritious bread, I often
incorporate whole wheat flour into the dough; see the end of
the recipe. (Note that this variation will rise a little more
slowly and will be slightly denser than the original.)
Because this dough includes cinnamon, which contains a
yeast-inhibiting chemical, the recipe calls for slightly more
yeast than normal.
Yield: 1 large loaf, 12 to 15 slices
2¾ cups (13.75 ounces) unbleached white bread flour,
plus more as needed
1 cup old-fashioned rolled oats or quick-cooking (not
instant) oats
1¼ teaspoons ground cinnamon
1½ teaspoons table salt
1¼ teaspoons instant, fast-rising, or bread machine
yeast
½ cup clover honey or other mild honey
2 tablespoons corn oil or canola oil, plus extra for
coating dough top and baking pan
1½ cups plus 1 tablespoon ice water, plus more if
needed
1 cup dark raisins, rinsed under warm water, then
drained well and patted dry
1 teaspoon ground cinnamon mixed with 1 tablespoon
granulated sugar for garnish
First Rise In a large bowl, thoroughly stir together the
flour, oats, cinnamon, salt, and yeast. In another bowl
or measuring cup, thoroughly whisk the honey and oil
into the water. Thoroughly stir the mixture into the bowl
with the flour, scraping down the sides and mixing to
blend well. If the dough is stiff, stir in enough more ice
water to soften it slightly; the dough should not be dry
or overly stiff, as the oats draw up moisture. Brush or
spray the top with oil. Cover the bowl with plastic wrap.
If desired, for best flavor or for convenience, you can
refrigerate the dough for 3 to 10 hours. Let rise at cool
room temperature (about 70°F) for 12 to 18 hours.
Second Rise Stir the dough vigorously, adding in the
raisins until evenly incorporated. Stir in enough more
flour to yield a hard-to-stir consistency. Using an oiled
rubber spatula, fold the dough in towards the center all
the way around; this organizes the gluten for shaping
the dough into a loaf. Invert the dough into a generously
greased 9 x 5-inch loaf pan. Brush or spray the top
with oil, then using an oiled rubber spatula or
fingertips, smooth out the surface and press the dough
evenly into the pan. Using a well-oiled serrated knife or
kitchen shears, make a ½-inch-deep slash lengthwise
down the loaf. Cover the pan with nonstick spray—
coated plastic wrap.
Let Rise Using Any of These Methods For a 1 ½- to
3-hour regular rise, let stand at warm room
temperature; for a 1- to 2-hour accelerated rise, let
stand in a turned-off microwave along with 1 cup of
boiling-hot water; or for an extended rise, refrigerate,
covered, for 4 to 24 hours, then set out at room
temperature. When the dough nears the plastic,
remove it and continue the rise until the dough extends
¼ inch above the pan rim. Sprinkle the cinnamonsugar garnish over the top.
Baking Preliminaries 15 minutes before baking time,
place a rack in the lower third of the oven; preheat to
375°F.
Baking Bake on the lower rack for 35 to 40 minutes, or
until the loaf is well browned. Cover with foil, and
continue baking for another 30 to 40 minutes more.
Begin testing occasionally with a skewer inserted in
the thickest part, until it comes out with slightly moist
particles clinging to the end (or until the center
registers 208° to 210°F on an instant-read
thermometer). Bake for 5 to 10 minutes longer to
ensure the center is baked through. Cool on a wire
rack for 15 minutes. Turn the loaf out onto a rack; cool
thoroughly.
Tip
If you are in a hurry to get the loaf in the oven, after the
cup of hot water initially placed in the microwave cools,
replace it with more boiling water halfway through to
keep the interior a very "yeast-friendly" 80-plus°F for
the entire rising period.
Serving and Storing
Serve cool, or toasted; the bread doesn't slice well
until completely cooled. Cool thoroughly before storing
in plastic or foil. Keeps at room temperature for 3
days. May be frozen, airtight, for up to 2 months.
Variation
Oat—Whole Wheat Honey-Raisin Bread
Instead of 2¾ cups white bread flour, use 1¾ cups white
bread flour (plus more if needed) and 1 cup whole wheat
flour.
Great Granola Breakfast Bread
KS Quotient
Easy: Easily assembled ingredients and easy
preparation. No hand-shaping.
Enriched with both granola and milk, this large, slightly
sweet loaf is great for breakfast on the go. It's also good for
toasting and makes a fine French toast or brunch bread.
The loaf has a handsome, nubby-crusty top and light crumb
accented with pleasing little patches and bursts of granola
flavor. It always receives compliments and is a favorite with
my family and friends.
Almost any purchased or homemade granola you like will
do for this recipe; I'm partial to honey-oat with almonds.
Whatever your choice, if it's coarse and chunky, crush it into
fine (1/8-inch) bits before using. The easiest way is to put it
into a sturdy plastic bag and either squeeze and press it
with your hands, or, if it's hard and crunchy, go over it with a
rolling pin (or a wine bottle if that's handier!).
Yield: 1 large loaf, 12 to 14 slices
3 cups (15 ounces) unbleached all-purpose white flour,
plus more as needed
3 tablespoons granulated sugar, plus 1 tablespoon for
garnish
1¼ teaspoons table salt
¾ teaspoon instant, fast-rising, or bread machine
yeast
1¼ cups plus 2 tablespoons ice water, plus more if
needed
3 tablespoons corn oil, canola oil or other flavorless
vegetable oil, plus more for dough top and pan
1 1/3 cups plain, raisin, honey-oat, mixed fruit and nut,
or other fine-textured granola, plus 4 tablespoons for
garnish
1/3 cup top-quality instant nonfat powdered milk (don't
use a generic brand)
First Rise In a large bowl, thoroughly stir together the
flour, sugar, salt, and yeast. In another bowl or
measuring cup, whisk together the water and oil.
Vigorously stir the mixture into the bowl with the flour,
scraping down the sides until the ingredients are
thoroughly blended. If the mixture is too dry to
incorporate all the flour, a bit at a time, stir in just
enough more ice water to blend the ingredients; don't
over-moisten, as the dough should be stiff. Brush or
spray the top with oil. Cover the bowl with plastic wrap.
If desired, for best flavor or for convenience, you can
refrigerate the dough for 3 to 10 hours. Then let rise at
cool room temperature for 12 to 18 hours.
Second Rise Vigorously stir the dough, gradually
sprinkling over the 1 1/3 cups granola and the milk
powder; continue stirring until evenly distributed
throughout the dough. Very generously oil a 9 x 5-inch
loaf pan. Sprinkle with 2 tablespoons of the granola
and tip the pan back and forth to distribute it over the
bottom and sides. Turn out the dough into the pan.
Brush or spray the loaf top with oil. Using an oiled
rubber spatula or your fingertips, smooth and press the
dough evenly into the pan. Sprinkle the top with the
remaining 2 tablespoons granola, pressing down
lightly. Cover the bowl with nonstick spray—coated
plastic wrap.
Let Rise Using Any of These Methods For a 2- to 3hour regular rise, let stand at warm room temperature;
for a 1- to 2-hour accelerated rise, let stand in a
turned-off microwave along with 1 cup of boiling-hot
water; or for an extended rise, refrigerate, covered, for
4 to 48 hours, then set out at room temperature.
Continue the rise until the dough nears the plastic.
Remove it and continue until the dough extends ¼ inch
above the pan rim.
Baking Preliminaries 15 minutes before baking time,
place a rack in the lower third of the oven; preheat to
375°F. Sprinkle the loaf with the 1 tablespoon sugar.
Baking Bake on the lower rack for 40 to 50 minutes,
until the top is nicely browned. Cover with foil and
continue baking for 25 to 30 minutes, until a skewer
inserted in the thickest part comes out with just a few
crumbs on the tip (or until center registers 205° to
208°F on an instant-read thermometer). When the loaf
seems done, bake for 5 minutes longer to ensure the
center is baked through. Cool in the pan on a wire rack
for 10 to 15 minutes. Remove the loaf to the rack. Cool
thoroughly.
Serving and Storing
The loaf slices best when cool, but tastes good warm.
Cool completely before storing airtight in plastic or foil.
It will keep at room temperature for 2 to 3 days, and
may be frozen, airtight, for up to 2 months.
English Muffin Loaves
KS Quotient
Super Easy: A minimum of fuss-free, easily mixed
ingredients. No hand-shaping.
Nothing could be simpler than these highly "toastable"
breakfast or brunch loaves. They are crispy on the outside,
light and airy inside, and, as the name suggests, have a
flavor reminiscent of English muffins. But, in contrast to
English muffins, these are quite economical and easily slip
in and out of the toaster slots! (For a raisin-wheat variation,
see the end of the recipe.)
Yield: 2 medium loaves, about 12 slices each
5 cups (25 ounces) unbleached all-purpose white flour,
plus more as needed
1 tablespoon granulated sugar
2 teaspoons table salt
1 teaspoon instant, fast-rising, or bread machine yeast
2½ tablespoons corn oil or other flavorless vegetable
oil, plus extra for coating dough top and baking pans
2 2/3 cups ice water, plus more if needed
1/3 cup top-quality instant nonfat powdered milk (don't
use a generic brand)
About 2 tablespoons cornmeal for coating pans
(substitute flour if unavailable)
First Rise In a very large bowl, thoroughly stir together
the flour, sugar, salt, and yeast. In another bowl or
measuring cup, whisk together the oil and ice water.
Vigorously stir the ice-water mixture into the dry
ingredients, scraping down the bowl sides completely
and mixing until the dough is thoroughly blended. If it is
too dry to mix together, gradually stir in just enough
more ice water to blend the ingredients; don't overmoisten, as the dough should be fairly stiff. If
necessary, stir in more flour to stiffen it. Brush or spray
the dough top with oil. Tightly cover the bowl with
plastic wrap. If desired, for best flavor or for
convenience, you can refrigerate the dough for 3 to 10
hours. Then let rise at cool room temperature for 12 to
18 hours; if convenient, vigorously stir once during the
rise.
Second Rise Vigorously stir the powdered milk into
the dough. Then vigorously stir in enough more flour to
yield a very stiff dough. Generously grease two 8 ½ x
4½-inch loaf pans. Sprinkle them with the cornmeal,
then tip the pans back and forth to coat evenly. Using
well-oiled kitchen shears or a serrated knife, cut the
dough in half and place the portions in the pans. Brush
or spray the tops with oil, then using an oiled rubber
spatula or fingertips, smooth out the surface and press
the dough evenly into the pans. Tightly cover the pans
with nonstick spray—coated plastic wrap.
Let Rise Using Any of These Methods For a 1½- to
2½-hour regular rise, let stand at warm room
temperature; for a 1- to 2-hour accelerated rise, let
stand in a turned-off microwave along with 1 cup of
boiling-hot water; or for an extended rise, refrigerate,
covered, for 4 to 24 hours, then set out at room
temperature. Continue the rise until the dough nears
the plastic. Remove it and continue until the dough just
reaches the pan rims.
Baking Preliminaries 15 minutes before baking time,
place a rack in the lower third of the oven; preheat to
400°F. Spritz or brush the loaf tops with water.
Baking Reduce the oven temperature to 375°F. Bake
on the lower rack for 30 to 40 minutes, or until the tops
are well browned. Cover the loaves with foil and
continue baking for 10 to 20 minutes, until a skewer
inserted in the thickest part comes out with just a few
crumbs on the tip (or until the centers register 208° to
210°F on an instant-read thermometer). Then bake for
5 to10 minutes longer to ensure the centers are baked
through. Cool in the pans on a wire rack for 10 to 15
minutes. Remove the loaves to the rack. Cool
thoroughly.
Serving and Storing
Cool thoroughly before slicing or storing. Serve
toasted. Store in plastic or aluminum foil. The bread
will keep at room temperature for 3 days, and may be
frozen, airtight, for up to 2 months.
Variation
Raisin-Wheat English Muffin Bread
Use 4 cups white flour and 1 cup whole wheat flour.
Increase the sugar to 3½ tablespoons. Add ¾ cup dark
raisins when the powdered milk is incorporated.
Crusty Seeded Pale Ale Pot
Boule
KS Quotient
Super Easy: Fuss-free ingredients, all except garnish
added at once. No hand-shaping.
Due to the hops and malt in the ale, this homespun, seedencrusted pot boule has a hearty flavor, faint bitterness, and
the same light yeasty aroma that always seems to hover in
brewpubs. The interior is somewhat holey, with a pretty
pale, well, ale color. If you use sesame seeds (my
preference though a multi-seed blend is nice, too) for
garnishing the loaf, they will turn golden and give the bread
a slight nuttiness and crunch. The pleasantly springy crumb
makes it suitable for toast and sandwiches. Or, cut it into
generous slabs and serve along with a hearty soup or stew.
As is true of many of the peasant-style pot breads in the
book, this one is simply popped into a pot, topped with a
lid, and baked. New York Times columnist Mark Bittman
created a stir when he re-introduced the idea of pot breads
in a story featuring baker Jim Lahey and his French-style
loaf baked in a Dutch oven. But baking bread in a heavy
pot is not new in America; it was commonplace before
kitchens came outfitted with ranges and ovens. (Dutch oven
baking has long been popular with campfire cooks.)
In her 1833 work, The American Frugal Housewife, Lydia
Maria Child mentions buttering a "bake-kettle," which the
homemaker was instructed to fill with bread and then hang
over the fire to bake. Large, cast metal pots with legs,
variously called posnets, creepers, or spiders (presumably
because they resembled big, creepy spiders), were
standard hearth equipment when cooks still had to bake
over fireplace coals.
Yield: 1 large loaf, 12 to 14 portions or slices
4½ cups (22.5 ounces) unbleached all-purpose white
flour or unbleached white bread flour, plus more as
needed
3 tablespoons granulated sugar
Scant 2 teaspoons table salt
¾ teaspoon instant, fast-rising, or bread machine
yeast
1 bottle (12 ounces) well-chilled pale ale or beer
2/3 cup ice water, plus more if needed
Vegetable oil or oil spray for coating dough top
3 tablespoons sesame seeds or poppy seeds, or 1
tablespoon each sesame, poppy, and flax seeds
blended together, for garnish
First Rise In a large bowl, thoroughly stir together the
flour, sugar, salt, and yeast. Vigorously stir in the ale
and ice water, scraping down the bowl sides
completely and mixing until the bubbling subsides and
the dough is thoroughly blended. If it is too dry to mix
together, gradually stir in just enough more ice water to
blend the ingredients; don't over-moisten, as the dough
should be stiff. If necessary, stir in enough more flour to
yield a hard-to-stir dough. Brush or spray the top with
oil. Tightly cover the bowl with plastic wrap. If desired,
for best flavor or for convenience, you can refrigerate
the dough for 3 to 10 hours. Then let rise at cool room
temperature for 12 to 18 hours; if convenient,
vigorously stir once during the rise.
Second Rise Using an oiled rubber spatula, lift and
fold the dough in towards the center all the way around
until mostly deflated; don't stir. Brush or spray the
dough surface with oil. Re-cover the bowl with nonstick
spray—coated plastic wrap.
Let Rise Using Any of These Methods For a 1½- to
2½-hour regular rise, let stand at warm room
temperature; for a 45-minute to 2-hour accelerated
rise, let stand in a turned-off microwave along with 1
cup of boiling-hot water; or for an extended rise,
refrigerate, covered, for 4 to 24 hours, then set out at
room temperature. Continue the rise until the dough
doubles from the deflated size, removing the plastic if
the dough nears it.
Baking Preliminaries 20 minutes before baking time,
put a rack in the lower third of the oven; preheat to
450°F. Heat a 3½- to 4-quart (or larger) heavy metal
pot or Dutch oven or a deep, 4-quart, heavy ovenproof
saucepan in the oven until sizzling hot (check with a
few drops of water), then remove it, using heavy mitts.
Taking care not to deflate the dough, loosen it from the
bowl sides with an oiled rubber spatula and gently
invert it into the pot. Don't worry if it's lopsided and
ragged-looking; it will even out during baking. Very
generously spritz or brush the top with water, then
sprinkle over the seeds. Immediately top with the lid.
Shake the pot back and forth to center the dough.
Baking Reduce the heat to 425°F. Bake on the lower
rack for 55 minutes. Remove the lid. Reduce the heat
to 400°F. Bake for 10 to 15 minutes longer, or until the
top is well browned and a skewer inserted in the
thickest part comes out with just a few crumbs on the
tip (or until the center registers 208° to 210°F on an
instant-read thermometer).Then bake for 5 minutes
longer to ensure the center is baked through. Cool in
the pan on a wire rack for 10 to 15 minutes. Remove
the loaf to the rack. Cool thoroughly.
Serving and Storing
Cut or tear the loaf into portions; it tastes good warm
but still better cool. Cool completely before storing. To
maintain the crisp crust, store in a large bowl draped
with a clean tea towel or in a heavy paper bag. Or
store airtight in a plastic bag or foil: The crust will
soften, but can be crisped by heating the loaf,
uncovered, in a 400°F oven for a few minutes. The
bread will keep at room temperature for 3 days, and
may be frozen, airtight, for up to 2 months.
Easy Four-Grain Pot Boule
KS Quotient
Super Easy: Fuss-free
ingredients, added all at once. No hand-shaping.
In the process of using up some packages and tidying my
baking supplies, I tossed a little cornmeal, rolled oats, and
rye flour into a white bread dough and discovered I'd
created a combination worth repeating. The serendipitous
blend lends this homey, crisp-crusted pot bread a light
color and subtle, indefinable, grain taste that whispers
rather than shouts its mixed grain heritage. It's a loaf that
goes with most anything and often gets compliments. It's
one of my favorites.
Yield: 1 large loaf, 12 to 14 portions or slices
3¼ cups (16.25 ounces) unbleached all-purpose white
flour or unbleached bread flour, plus more as needed
½ cup yellow or white cornmeal, plus 1 tablespoon for
garnish
½ cup old-fashioned rolled oats or quick cooking (not
instant) oats
¼ cup light or dark rye flour (if unavailable, substitute 2
tablespoons each more cornmeal and oats)
1 tablespoon granulated sugar
Generous 2 teaspoons table salt
¾ teaspoon instant, fast-rising, or bread machine
yeast
2 cups ice water, plus more if needed
Corn oil, canola oil, or other flavorless vegetable oil or
oil spray for coating dough
First Rise In a large bowl, thoroughly stir together the
flour, cornmeal, oats, rye flour, sugar, salt, and yeast.
Thoroughly stir the water into the bowl, scraping down
the sides until the ingredients are thoroughly blended. If
the mixture is too dry to incorporate all the flour, a bit at
a time, stir in just enough more ice water to blend the
ingredients; don't over-moisten, as the dough should
be fairly stiff. If necessary, stir in enough more flour to
stiffen it slightly. Brush or spray the top with oil. Cover
the bowl with plastic wrap. If desired, for best flavor or
for convenience, you can refrigerate the dough for 3 to
10 hours. Then let rise at cool room temperature for 12
to 18 hours; if convenient, vigorously stir once partway
through the rise.
Second Rise Using an oiled rubber spatula, gently lift
and fold the dough in towards the center all the way
around until mostly deflated; don't stir. Brush or spray
with oil. Re-cover with plastic wrap.
Let Rise Using Any of These Methods For a 1½- to
2½-hour regular rise, let stand at warm room
temperature; for a 1- to 2-hour accelerated rise, let
stand in a turned-off microwave along with 1 cup of
boiling-hot water; or for an extended rise, refrigerate,
covered, for 4 to 24 hours, then set out at room
temperature. Continue the rise until the dough doubles
from the deflated size, removing the plastic if the
dough nears it.
Baking Preliminaries 20 minutes before baking time,
put a rack in the lower third of the oven; preheat to
450°F. Heat a 3½- to 4-quart (or larger) heavy metal
pot in the oven until sizzling hot (check with a few drops
of water), then remove it using heavy mitts. Taking
care not to deflate the dough, loosen it from the bowl
sides with an oiled rubber spatula and gently invert it
into the pot. Don't worry if it's lopsided and raggedlooking; it will even out during baking. Generously
spritz or brush the top with water, then sprinkle over a
tablespoon of cornmeal. Using a well-oiled serrated
knife or kitchen shears, cut a ½-inch-deep, 4-inch
diameter circle in the loaf center. Immediately top with
the lid. Shake the pot back and forth to center the
dough.
Baking Reduce the heat to 425°F. Bake on the lower
rack for 50 minutes. Remove the lid. Reduce the heat
to 400°F. Bake for 15 to 20 minutes longer, until the
top is well browned and a skewer inserted in the
thickest part comes out with just a few crumbs on the
tip (or until center registers 210° to 212°F on an
instant-read thermometer). Then bake for 5 minutes
longer to ensure the center is baked through. Cool in
the pan on a wire rack for 10 to 15 minutes. Remove
the loaf to the rack. Cool thoroughly.
Serving and Storing
Cut or tear the loaf into portions; it tastes good warm
but will cut better when cool. Cool completely before
storing. To maintain the crisp crust, store in a large
bowl draped with a clean tea towel or in a heavy paper
bag. Or store airtight in a plastic bag or foil: The crust
will soften, but can be crisped by heating the loaf,
uncovered, in a 400°F oven for a few minutes. The
bread will keep at room temperature for 3 days, and
may be frozen, airtight, for up to 2 months.
Hearty Caraway Beer Bread
KS Quotient
Easy: Fuss-free ingredients, all added before the first
rise. No hand-shaping.
Excellent served along with many cheeses, smoked meats,
and hearty stews, this full-bodied yet light-textured loaf
tastes much like traditional caraway-seeded rye breads.
However, since rye flour is often hard to find, whole wheat
may be used in its place; most people won't notice the
substitution. They are not likely to notice the beer in the
recipe either. It simply adds a little extra yeasty-malty
aroma and flavor.
Note that you can ready this bread in a large loaf pan or, for
a round loaf, in a 9- to 10-inch ovenproof pot or casserole.
The oblong loaf is easier to cut for sandwiches; the round
has a more homespun look. Since the cocoa powder is
added mainly to darken the bread color, it can be omitted,
if desired.
Yield: 1 large round or rectangular loaf, 12 to 14
slices
3 cups (15 ounces) unbleached all-purpose white flour,
plus more as needed
1 cup (5 ounces) rye flour or whole wheat flour
1 tablespoon caraway seeds, plus ½ tablespoon for
garnish
1 tablespoon unsweetened cocoa powder, preferably
Dutch-process, sifted after measuring, optional
Scant 2 teaspoons table salt
¾ teaspoon instant, fast-rising, or bread machine
yeast
2/3 cup minus 1 tablespoon ice water, plus more if
needed
2½ tablespoons molasses
1 tablespoon corn oil, canola oil, or other flavorless
vegetable oil, plus more for coating dough top
1 bottle (12 ounces) beer, well chilled
First Rise In a large bowl, thoroughly stir together the
white flour, rye (or whole wheat) flour, 1 tablespoon
caraway seeds, cocoa powder (if using), salt, and
yeast. In another bowl or measuring cup, thoroughly
whisk the water with the molasses and oil. Add the
mixture and the beer to the bowl with the flour,
vigorously stirring and scraping down the sides until
the ingredients are thoroughly blended and the
foaming subsides. If the mixture is too dry to
incorporate all the flour, a bit at a time, stir in just
enough more ice water to blend the ingredients; don't
over-moisten, as the dough should be fairly stiff. If
necessary, stir in enough more white flour to stiffen it
slightly. Brush or spray the top with oil. Cover the bowl
with plastic wrap. If desired, for best flavor or for
convenience, you can refrigerate the dough for 3 to 10
hours. Then let rise at cool room temperature for 12 to
18 hours; if convenient, vigorously stir the dough about
halfway through.
Second Rise Vigorously stir the dough. If necessary,
stir in enough more white flour to yield a very stiff
consistency. Using an oiled rubber spatula, fold the
dough in towards the center all the way around to bowl;
this organizes the gluten for shaping the dough into a
loaf. Invert the dough into an oiled 9 x 5-inch loaf pan or
a 9- or 10-inch diameter (or similar) heavy ovenproof
pot or flat-bottomed casserole. Brush or spray the top
with oil. Smooth and press the dough into the pan
using a well-oiled rubber spatula or your fingertips.
Sprinkle the top with the remaining ½ tablespoon of
caraway seeds. Press down to imbed. Cover the pan
with nonstick spray—coated plastic wrap.
Let Rise Using Any of These Methods For a 1½- to
2½-hour regular rise, let stand at warm room
temperature; for a 1- to 2-hour accelerated rise, let
stand in a turned-off microwave along with 1 cup of
boiling-hot water; or for an extended rise, refrigerate,
covered, for 4 to 24 hours, then set out at room
temperature. Continue the rise until the dough nears
the plastic. Remove it and continue until the dough
doubles from the deflated size or extends just above
the pan rim.
Baking Preliminaries 20 minutes before baking time,
put a rack in the lower third of the oven; preheat to
400°F. Using well-oiled kitchen shears or a serrated
knife, cut a large x in the center top of the round loaf or
a 5-inch long ¼-inch-deep slash down the center of the
rectangular loaf.
Baking Reduce the heat to 375°F. Bake on the lower
rack for 45 to 50 minutes, or until the top is well
browned. Cover the top with foil. Bake for 20 to 25
minutes longer, until a skewer inserted in the thickest
part comes out with just a few crumbs on the tip (or
until the center registers 204° to 207°F on an instantread thermometer). When the loaf seems done, bake
for 5 minutes longer to ensure the center is baked
through. Cool in the pan on a wire rack for 10 to 15
minutes. Remove the loaf to the rack. Cool thoroughly.
Serving and Storing
The loaf slices best when cool. Cool completely before
storing airtight in plastic or foil. The bread will keep at
room temperature for 2 to 3 days, and may be frozen,
airtight, for up to 2 months.
Double Chocolate-Honey
Bread
KS Quotient
Super Easy: Easily mixed, readily available
ingredients, added all at once. No hand-shaping.
Studded with chocolate morsels and boldly flavored with
cocoa powder, this bread is dark, moist, and full of
chocolate-honey goodness. It also has an irresistible
crunchy sugar crust. It's great as a snack with coffee, tea, or
milk and makes a pleasing light dessert, especially if
topped with the Glossy Chocolate Drizzle . For a more
sophisticated taste, try either the lightly spiced or orangehazelnut versions at the end of this recipe.
Yield: 1 large loaf, 12 to 15 slices
3¼ cups (16.25 ounces) unbleached all-purpose white
flour, plus more as needed
1/3 cup unsweetened cocoa powder, preferably Dutchprocess, sifted after measuring
2½ tablespoons granulated sugar, plus 1 tablespoon
for garnish
Generous 1¼ teaspoons table salt
¾ teaspoon instant, fast-rising, or bread machine
yeast
½ cup clover honey or other mild honey
¼ cup corn oil, canola oil, or other flavorless vegetable
oil, plus extra for coating dough top and baking pan
1¾ cups ice water, plus more if needed
1 cup (6 ounces) semisweet chocolate morsels
Glossy Chocolate Drizzle for garnish, optional
First Rise In a large bowl, thoroughly stir together the
flour, cocoa, 2½ tablespoons sugar, salt, and yeast. In
another bowl or measuring cup, whisk the honey and
oil into the water. Thoroughly stir the mixture and
chocolate morsels into the bowl with the flour, scraping
down the sides and mixing until well blended. If too dry
to mix together, add just enough more water to
facilitate mixing, but don't over-moisten, as the dough
should be stiff. If necessary, stir in enough more flour to
stiffen it. Brush or spray the top with oil. Cover the bowl
tightly with plastic wrap. If desired, for best flavor or for
convenience, you can refrigerate the dough for 3 to 10
hours. Then let rise at cool room temperature for 12 to
18 hours.
Second Rise Vigorously stir the dough. Using an oiled
rubber spatula, fold the dough in towards the center all
the way around (this organizes the gluten for shaping
the dough into a loaf). Invert it out into a very wellgreased 9 x 5-inch loaf pan. Evenly brush or spray the
top with oil. Smooth out the dough and evenly press
into the pan with an oiled rubber spatula or fingertips.
Cover the pan with nonstick spray—coated plastic
wrap.
Let Rise Using Any of These Methods For a 1- to 2hour regular rise, let stand at warm room temperature;
for a ½- to 1½-hour accelerated rise, let stand in a
turned-off microwave along with 1 cup of boiling-hot
water; or for an extended rise, refrigerate, covered, for
4 to 48 hours, then set out at room temperature. When
the dough nears the plastic, remove it and continue the
rise until the dough reaches the pan rim or doubles
from its deflated size.
Baking Preliminaries 15 minutes before baking time,
place a rack in the lower third of the oven; preheat to
350°F.
Baking Sprinkle the loaf top evenly with the remaining
1 tablespoon sugar. Bake on the lower rack for 40
minutes, or until the loaf is well browned. Cover the top
with foil and continue baking for 25 to 30 minutes,
occasionally testing with a skewer inserted in the
thickest part. When it comes out with just slightly moist
particles clinging to the bottom portion (or until the
center registers 204° to 206°F on an instant-read
thermometer), bake for 5 minutes more to ensure the
center is done. Let cool in the pan on a wire rack for
15 minutes. Loosen the loaf with a knife, then place on
the rack. Cool thoroughly. Garnish the cooled loaf with
Glossy Chocolate Drizzle, if desired.
Serving and Storing
Serve warm, or cool, or toasted; the bread slices best
when cool. Cool thoroughly before storing in plastic or
foil. Keeps at room temperature for 3 days. May be
frozen, airtight, for up to 2 months.
Variations
Nutmeg Chocolate Bread
Prepare as directed, except add ¾ teaspoon ground
nutmeg along with the salt and increase the yeast to 1
teaspoon (the nutmeg inhibits yeast growth a bit).
Orange-Hazelnut Chocolate Bread
Prepare as directed, except add 1½ teaspoons finely
grated orange zest along with the water mixture and ½ cup
hulled, chopped, and lightly toasted hazelnuts along with the
chocolate morsels.
Simple Enriched White Rolls
KS Quotient
Easy: Fuss-free, easily mixed ingredients. No handshaping.
These rolls are tender, rich, and aromatic, due to an ample
addition of butter and a very long first rise that develops a
fine yeast flavor and fragrance. They taste like the classic
home-style butter rolls my mother sometimes baked, but
I've eliminated the hand-shaping, which makes these much
easier to prepare. I simply plop portions of dough into
muffin tins, butter the tops, then set them aside to rise. Yes,
sidestepping the traditional shaping means that the rolls
come out looking like plain muffins, but since the dough is
moister and is manipulated less, they are even more
succulent and tender than hand-shaped ones.
To bake all the rolls at once, you'll need 18 standard-size
muffin tin cups (about 2¾ inches across at the top), or 12
jumbo muffin tin cups (3½ to 3¾ inches across at the top). If
you don't have enough muffin cups, use what's on hand to
bake an initial batch of rolls. Keep the unused dough
refrigerated for up to 24 hours, then stir well. Place in the
tins and rise and bake as for the first batch.
Yield: 12 large or 18 medium muffin-shaped rolls
2½ cups (12.5 ounces) unbleached all-purpose white
flour, plus ½ cup (2.5 ounces), plus more as needed
5 tablespoons granulated sugar, divided
1 1/8 teaspoons table salt
½ teaspoon instant, fast-rising, or bread machine
yeast
1½ cups ice water, plus more if needed
¼ cup unsalted butter, melted and cooled slightly, plus
1½ tablespoons more for brushing over rolls
1/3 cup top-quality instant nonfat dry milk powder (don't
use a generic brand)
First Rise In a large bowl, thoroughly stir together 2½
cups flour, 3 tablespoons of the sugar, the salt, and
yeast. Stir in the water, scraping down the sides just
until the ingredients are thoroughly blended. The
mixture should be the consistency of very thick
pancake batter; if necessary, stir in just enough more
water, a bit at a time, to thin it, or more flour to thicken
it slightly. Cover the bowl with plastic wrap. If desired,
for best flavor or for convenience, you can refrigerate
the dough for 3 to 10 hours. Then let rise at cool room
temperature for 15 to 20 hours.
Second Rise Vigorously stir ¼ cup butter, the milk
powder, and remaining 2 tablespoons of sugar into the
dough until very well blended. Stirring vigorously and
scraping down the bowl as needed, gradually add ½
cup flour or enough more flour to yield a dough slightly
thicker than thick pancake batter.
Generously grease or spray 12 giant-size muffin cups
or 18 regular-size muffin cups with nonstick spray. For
large muffin cups, use a well-greased ¼-cup measure
and scoop up scant cupfuls of dough; for small muffin
cups, use a 1/8 -cup measure (or coffee scoop) and
scoop up generous cupfuls of dough. Put the portions
in the cups, then divide any leftover dough evenly
among them. Drizzle 1½ tablespoons butter over the
roll tops, dividing it among them. With fingertips,
spread out the butter and smooth each top until the
dough surface looks completely smooth. Tent the
muffin tins with nonstick spray—coated foil.
Let Rise Using Any of These Methods For a 1½- to
2½-hour regular rise, let stand at warm room
temperature; for a 1- to 2-hour accelerated rise, let
stand in a turned-off microwave along with 1 cup of
boiling-hot water; or for an extended rise, refrigerate,
covered, for 4 to 48 hours, then set out at room
temperature. Continue the rise until the dough nears
the foil. Remove it and continue until the dough
doubles from its deflated size. Sift a little flour over the
roll tops for garnish.
Baking Preliminaries 15 minutes before baking time,
place a rack in the lower third of the oven; preheat to
375°F.
Baking Bake on the lower rack for 18 to 23 minutes,
until the tops are nicely browned. Tent the pans with foil
and continue baking for 5 to 10 minutes more, until a
skewer inserted in the thickest part of a center roll
comes out with just a few particles clinging to the
bottom (or until the center registers 205° to 208°F on
an instant-read thermometer), to be sure the centers
are done. Cool in the pan on wire racks for 10 minutes.
Sift a little more flour over the rolls if desired. Transfer
the rolls to a bread basket for serving.
Serving and Storing
Best served warm. Reheat, wrapped in foil in a 350°F
oven for 5 to 10 minutes, or wrapped in paper towels
in a microwave oven on medium power for 15 seconds
per roll. Store airtight in plastic at room temperature for
2 to 3 days, or freeze, airtight, for up to 2 months. Thaw
before reheating.
Chapter 4: American
Favorites
When people think of American breads, they usually
think "comfort food," and with good reason. There could
hardly be more comforting fare than well-made loaves of
puffy, fragrant, home-style white bread, or cinnamon-raisin
pinwheel bread, or ooey-gooey sticky buns. But some of
America's best-loved breads have a different character:
San Francisco sourdough is as crusty as any of Europe's
rustic loaves and gets a kick from a pungent starter.
Another popular savory loaf is cheese bread; the one in this
chapter is zippy with sharp cheese and green chiles.
Of course, due to the artisan bread movement in this
country, interesting new breads more in the style of those in
Europe are coming on the scene here all the time: The
Sonoma-Style Multigrain Crunch Bread is an adaptation of
a terrific crackly-crusted boule from northern California's
Artisan Bakers. My Crunchy Yeasted Cornbread with
Coarse Salt and my updated Easy Buttermilk Pot Bread
with Coarse Salt are also simple crispy-topped peasantstyle boules.
County Fair White Bread
KS Quotient
Fairly Easy: Easily assembled ingredients; two-stage
mixing. No hand-shaping required.
Unlike the fluffy-stuff loaves lining supermarket shelves, this
traditional enriched white bread has substance and texture
and a buttery, yeasty smell. A bit more voluptuous, softer,
and more fine-grained than the Easy White Bread Loaves,
this is reminiscent of the loaves that often won the white
bread category at the local county fairs when I was a child.
True, it's not the sort of loaf that cutting-edge shops are
selling these days, but when you want comfort food, or
maybe a taste of home, this is it.
This same dough can easily be turned into Pull-Apart
Butter-Top Rolls and Cinnamon Pinwheel Raisin Bread.
Yield: 1 large loaf, 12 to 14 slices
3 cups (15 ounces) unbleached white bread flour, plus
2/3 cup (3.33 ounces) or as needed
2½ tablespoons granulated sugar
1½ teaspoons table salt
¾ teaspoon instant, fast-rising, or bread machine
yeast
1¾ cups ice water, plus more if needed
3 tablespoons unsalted butter, melted and slightly
cooled, plus extra for coating dough top and baking
pan
¼ cup good-quality instant nonfat dry milk (don't use a
generic brand)
1 large egg, at room temperature and beaten with a
fork
First Rise In a large bowl, thoroughly stir together 3
cups of the flour, the sugar, salt, and yeast. Thoroughly
stir the water into the bowl, scraping down the sides
and mixing just until the ingredients are thoroughly
blended. If the mixture is too dry to incorporate all the
flour, a bit at a time, stir in enough more water to blend
the ingredients and produce a fairly soft dough. Brush
the top with butter. Cover the bowl with plastic wrap. If
desired, for best flavor or for convenience, you can
refrigerate the dough for 3 to 10 hours. Then, let rise at
cool room temperature for 16 to 20 hours; if
convenient, vigorously stir the dough about halfway
through the rise.
Second Rise In a medium bowl, stir together the
butter, milk powder, and 2 tablespoons of the beaten
egg until thoroughly blended; reserve the remaining
egg for glazing the loaf top. Vigorously stir (or beat on
low speed with a heavy-duty mixer with a dough hook)
the butter mixture into the dough until smoothly and
evenly incorporated; this may take several minutes.
Gradually mix in 2/3 cup or enough more flour to yield a
very hard-to-stir dough. Using a well-oiled rubber
spatula, fold the dough in towards the center, working
all the way around the bowl; this helps organize the
gluten for shaping into a loaf.
Invert the dough into a well-greased 9 x 5-inch loaf pan.
Smooth out the top and press evenly into the pan using
a well-buttered rubber spatula or fingertips. Evenly
brush the loaf top with the reserved beaten egg; don't
allow the egg to pool around the pan edges, as it will
cause sticking. Using well-buttered kitchen shears or a
serrated knife, make a ½-inch-deep slash lengthwise
down the center of the loaf. Cover the pan with
nonstick spray—coated plastic wrap.
Let Rise Using Any of These Methods For a 1½- to
2½-hour regular rise, let stand at warm room
temperature; for a 1- to 2-hour accelerated rise, let
stand in a turned-off microwave along with 1 cup of
boiling-hot water; or for an extended rise, refrigerate
for 4 to 48 hours, then set out at room temperature.
Continue the rise until the dough nears the plastic.
Remove it and continue until the dough extends slightly
above the pan rim.
Baking Preliminaries 15 minutes before baking time,
place a rack in the lower third of the oven; preheat to
375°F.
Baking Bake on the lower rack for 40 to 50 minutes, or
until the top is nicely browned. Cover the top with foil
and continue baking for 10 to 15 minutes longer, until a
skewer inserted in the thickest part comes out with just
a few particles clinging to the bottom (or until the
center registers 208° to 210°F on an instant-read
thermometer). Then bake for 5 to 10 minutes more to
be sure the center is done. Cool in the pan on a wire
rack for 10 minutes. Turn out the loaf onto the rack;
cool thoroughly.
Serving and Storing
Cool thoroughly before slicing or storing. Store airtight
in plastic or aluminum foil. The bread will keep at room
temperature for 2 to 3 days, and may be frozen,
airtight, for up to 2 months.
Pull-Apart Butter-Top Rolls
KS Quotient
Fairly Easy: Easily assembled ingredients; two-stage
mixing. Simple hand-shaping required.
The mild aroma, mellow taste, and melting texture of these
home-style rolls remind me of ones that were the pride of
the gray-haired ladies who baked for the frequent fundraising church suppers my family attended during my
childhood. Neatly aproned and hair-netted, they would
stand in the back of the parish kitchen deftly turning out
dozens of sheet pans of rolls, which were whisked straight
from the ovens and devoured by eager tables of diners. For
me (and probably for many other patrons) the highlight was
not the featured ham or oysters or turkey, but those
amazing all-you-could-eat butter rolls!
These rolls are made using the same dough as the County
Fair White Bread. The very easy shortcut shaping method
is one I borrowed from the church supper roll bakers, who
used it because they had to produce huge quantities very
quickly. It involves merely forming portions of dough into
long logs and then cutting them crosswise into plump
rectangles, so it's handy for inexperienced or very busy
cooks as well. The rolls always expand and join together
again during rising and baking, but, as their name
suggests, they neatly pull apart when served.
Prepare the County Fair White Bread recipe up to the point
it would normally be put into a loaf pan for the second rise;
be sure to add the butter, milk powder, and egg as directed
before proceeding with the following steps. (Note that the 1
tablespoon of egg reserved to glaze the loaf is not needed
for the rolls.)
Yield: 24 finger rolls
1 recipe County Fair White Bread dough, ready for the
second rise
Unbleached white bread flour or all-purpose white flour
for dusting
2 tablespoons unsalted butter, melted and slightly
cooled
Second Rise Coat a 9 x 13-inch baking dish or pan
with nonstick spray. Coat a large sheet of baking
parchment with nonstick spray, then dust with flour.
Coat a very large cutting board with nonstick spray,
then generously dust with flour.
Working in the bowl, generously dust the dough with
flour, turning it until lightly coated all over. Smooth and
press the flour into the dough until it is less sticky and
easier to handle. Using well-oiled kitchen shears,
divide the dough into thirds, placing each portion cutside down and well separated on the parchment.
Working on the cutting board, press and pat one
portion out into about a 5 x 10-inch rectangle, dusting
with flour as needed to prevent stickiness. If the dough
is resistant and springs back, let it rest for a few
minutes, then continue. Tightly roll up the rectangle
from the 10-inch side, forming a log. Pinch the seam
tightly closed along the length of the log. Dust with
more flour, then turn seam-side down. Stretch the log
out from the middle until evenly thick and about 12
inches long, then flatten the log until it's about 2½
inches wide.
Using well-oil kitchen shears or a large serrated knife,
cut the log crosswise into 8 equal slices. Pat the row of
rolls back into the log shape, then use a wide spatula
to transfer them to the baking pan, placing the row
lengthwise in the pan. Pull the rolls apart slightly so
they fill the 13-inch length. Repeat the shaping and
cutting process, laying the second and third log of rolls
so they completely cover the pan; the rows will come
together and fill it as they rise and bake. Brush the roll
tops with half the butter. Tent the pan with nonstick
spray—coated foil.
Let Rise Using Any of These Methods For a 1½- to
2½-hour regular rise, let stand at warm room
temperature; for a 1- to 2-hour accelerated rise, let
stand in a turned-off microwave along with 1 cup of
boiling-hot water; or for an extended rise, refrigerate
for 4 to 48 hours, then set out at room temperature.
Continue the rise until the rolls double from their
original size, removing the foil if the dough nears it.
Baking Preliminaries 15 minutes before baking time,
place a rack in the lower third of the oven; preheat to
350°F.
Baking Bake on the lower rack for 20 to 25 minutes,
until the roll tops are nicely browned. Then cover with
foil and bake for 3 to 5 minutes more or until a skewer
inserted in the thickest part comes out with just a few
particles clinging to the bottom (or until a center roll
registers 204° to 206°F on an instant-read
thermometer), to be sure the center is done. Brush the
rolls with the remaining butter. Cool on a wire rack for
10 minutes. Lift the rolls from the pan and serve
immediately.
Serving and Storing
Best served warm; reheat wrapped in foil in a
preheated 350°F oven if desired. Cool thoroughly
before storing. Store airtight in plastic or aluminum foil.
The rolls will keep at room temperature for 2 to 3 days,
and may be frozen, airtight, for up to 2 months.
Cinnamon Pinwheel Raisin
Bread
KS Quotient
Easy: Fuss-free ingredients; two-stage mixing for
dough. Easy hand-shaping required.
Cinnamon raisin is one of America's most popular breads,
and no wonder. The touch of sweetness is always
welcome, and the aroma and taste of the classic cinnamonraisin combo is completely irresistible. This large, light,
fine-textured loaf is excellent for toast, but is also tasty
eaten plain for a snack.
The starting point for this loaf is a batch of the County Fair
White Bread dough. Prepare it exactly as directed in the
original recipe up to the point it is to go into a loaf pan to
rise. Don't forget to add the butter, milk powder, and egg as
instructed before proceeding with the directions below.
Yield: 1 large loaf, 12 to 15 slices
1 recipe County Fair White Bread dough, ready for the
second rise
¾ to 1 cup dark raisins, rinsed under hot water,
drained well, and patted dry
Corn oil or other flavorless vegetable oil or oil spray for
coating dough top and baking pan
Unbleached white bread flour or all-purpose white flour
for dusting
1 large egg, at room temperature and beaten with a
fork
Generous 1/3 cup granulated sugar combined with 1
tablespoon ground cinnamon, divided
1 tablespoon cool and firm unsalted butter, cut into fine
bits
Second Rise Once all the second rise ingredients
have been added to the dough as directed in the
recipe for County Fair White Bread, vigorously stir in
the raisins until fully and evenly incorporated. Instead of
turning out the dough into a baking pan as directed in
the original recipe, set it in the refrigerator to rest for
10 minutes.
Coat a 16-inch-long sheet of baking parchment with
nonstick spray. Generously dust the parchment with
flour. Turn out the dough onto the center of the
parchment. Evenly dust with flour, then shape it into a
rough rectangle with flour-dusted fingertips. Dusting
with more flour as needed to prevent sticking, press
out the dough into a 9 x 14-inch evenly thick rectangle.
Brush some of the beaten egg evenly over the dough
to within 1/8 inch of the edge all around. (Reserve the
remaining egg for garnishing the loaf.) Sprinkle all but
½ tablespoon of the cinnamon-sugar mixture evenly
over the dough to within ¼ inch of the edge all around;
reserve the ½ tablespoon cinnamon-sugar for garnish.
Sprinkle the bits of butter over the sugar.
Tightly roll up the dough from a 9-inch-wide side to
form a pinwheel log, using flour-dusted hands and
lifting up the parchment to assist the rolling as you
work. Pinch the seam together tightly all along the
length of the log, then lay seam-side down. Firmly tuck
the ends of the log underneath. Transfer the loaf,
seam-side down, to a well-greased 9 x 5-inch baking
pan. Brush or spray the top with oil. Cover the pan with
nonstick spray—coated plastic wrap.
Let Rise Using Any of These Methods For a 1½- to
2½-hour regular rise, let stand at warm room
temperature; for a 1- to 2-hour accelerated rise, let
stand in a turned-off microwave along with 1 cup of
boiling-hot water; or for an extended rise, refrigerate
for 4 to 48 hours, then set out at room temperature.
Continue the rise until the dough nears the plastic.
Remove it and continue until the dough rises ½ inch
above the pan rim.
Baking Preliminaries 15 minutes before baking time,
place a rack in the lower third of the oven; preheat to
350°F. Evenly brush the dough top with the reserved
beaten egg. Wipe away any egg that pools around the
pan edges, as it will cause the dough to stick to the
pan. Evenly sprinkle the remaining ½ tablespoon of
cinnamon-sugar over top.
Baking Bake on the lower rack for 25 to 30 minutes, or
until the loaf is nicely browned. Cover with foil and
continue baking for 25 to 35 minutes longer,
occasionally testing until a skewer inserted in the
thickest part comes out with just a few particles on the
end (or until the center registers 207° to 209°F on an
instant-read thermometer). Then, bake for 10 to 15
minutes more to make sure the center is done. Cool in
the pan on a wire rack for 10 minutes. Turn the loaf
onto the rack; cool thoroughly.
Serving and Storing
Serve warm, or cool, or toasted; the bread slices best
when cool. Cool thoroughly before storing in plastic or
foil. Keeps at room temperature for 2 to 3 days. May
be frozen, airtight, for up to 2 months.
San Francisco-Style
Sourdough Bread
KS Quotient
Easy: Fuss-free ingredients added all at once. Easy
hand-shaping.
This golden, crackly-crusted round is reminiscent of the
bread so many tourists take a fancy to and tote home from
San Francisco: The texture is noticeably, pleasingly chewy,
the aroma pungently enticing, and, as the name suggests,
the loaf strikes a deliciously sour note. Like the classic loaf
that the Boudin Bakery has been turning out since 1849, it
is a straightforward, unenriched bread, incorporating no
eggs, sugar, or flavor enhancers other than salt and a
suitably sour starter.
As purists will immediately note, my recipe does veer off
the traditional path in incorporating a little commercial
baking yeast. (Some sourdough devotees consider this a
capital offense.) I haven't found that it affects the desired
sour flavor, and it's a sensible, convenient fail-safe that
guarantees success even if your starter doesn't happen to
be lively enough to fully lift the bread on its own. (In fact, the
practice of boosting starters by adding some commercial
yeast to dough before baking it is fairly common in
Germany, and even the esteemed French expert on bread,
the late Raymond Calvel, noted that a small amount of a
commercial strain could be used in a proper sourdough, or
pain au levain, without affecting its taste.)
Unlike most of the sourdough bread recipes circulating
today, this one calls for baking the bread in a heavy lidded
pot. Yes, it better approximates the method of the original
California prospectors cooking over open fires, but it also
comes much, much closer to producing the crackly, wellcolored loaves turned out by the steam-jetted commercial
bakery ovens of today. Due to its leanness, classic
sourdough bread requires a very moist environment during
the first stage of baking for good browning and crisping,
and a heavy pot automatically traps the necessary steam
inside.
As purists will rightly point out, for an absolutely authentic,
City-by-the-Bay boule, you need the local wild yeast starter.
However, I've found that using any purchased or
homemade tangy sourdough starter in this recipe will yield
loaves that roughly approximate the typical San Francisco
versions. Additionally, I've experimented with a simplified,
much more predictable shortcut cultured starter inoculated
with a small amount of commercial "instant" baking yeast
(see Easy Cultured "Sourdough"Starter (with Commercial
Yeast) for the recipe). Though it tastes tamer than starter
produced by its wild cousins, once it matures (this takes 10
days or so), it delivers enough tang for a satisfying
sourdough-style loaf. Whatever the starter, read Easy
Cultured "Sourdough"Starter (with Commercial Yeast) on
getting it ready to bake bread.
Another even more convenient, "cheater's" alternative
(which yields a delicious—though less sour-tasting—bread)
is to replace the starter with some plain yogurt (be sure it
includes "active cultures") mixed with cider vinegar. This
combo instantly introduces a little of the same lactic and
acetic acids that account for the zip of typical yeast starters,
though the bread is, of course, not a real sourdough.
Yield: 1 large loaf, 12 to 14 slices
3½ cups (17.5 ounces) unbleached white bread flour
or unbleached all-purpose white flour, plus more as
needed
1¾ teaspoons table salt
¼ to ¾ teaspoon instant, fast-rising, or bread machine
yeast (use the larger amount if substituting yogurt and
vinegar for sourdough starter)
1 tablespoon corn oil, canola oil, or other flavorless
vegetable oil, plus more for coating dough top and pan
2/3 cup wild yeast sourdough starter or Easy Cultured
"Sourdough"Starter (with Commercial Yeast) (or
substitute ½ cup chilled plain "active culture" yogurt
and 2½ tablespoons apple cider vinegar)
1½ cups ice water, plus more if needed
First Rise In a large bowl, thoroughly stir together the
flour, salt, and yeast. In another bowl or measuring cup,
whisk the oil and starter (or yogurt and vinegar) into the
water. Vigorously stir the mixture into the bowl with the
flour, scraping down the sides and mixing just until the
ingredients are thoroughly blended. If the mixture is too
dry to incorporate all the flour, a bit at a time, stir in just
enough more ice water to blend the ingredients; don't
over-moisten, as the dough should be very stiff. If
necessary, stir in enough more flour to stiffen it. Brush
or spray the top with oil. Cover the bowl with plastic
wrap. If desired, for best flavor or for convenience, you
can refrigerate the dough for 3 to 10 hours. Then let
rise at cool room temperature for 18 to 24 hours. If
convenient, vigorously stir the dough once partway
through the rise.
Second Rise Vigorously stir the dough, adding more
flour as needed to yield a very stiff and hard-to-stir
dough. Then, using a well-oiled rubber spatula, fold the
dough in towards the center, working your way all the
way around the bowl; this helps organizes the gluten
for shaping a loaf. Let the dough rest for 10 minutes.
Invert the dough so the underside is up. Sprinkle evenly
with 3 to 4 tablespoons of flour. Working in the bowl,
shape the dough into a ball; roll it in the flour until
coated all over; then work in the flour until it holds its
shape. Lightly dusting with flour as needed, form the
dough into an evenly shaped high-domed 6-inch
diameter round by firmly tucking the edges under all
the way around; work gently, as the dough is tender
and prone to tearing.
Gently transfer the loaf to an oiled 3½- to 4-quart Dutch
oven or similar heavy ovenproof pot. Dust the loaf top
with more flour, smoothing out evenly. Using a welloiled serrated knife, make 3 or 4 parallel shallow
slashes across the loaf top. Then, working on a
diagonal, slash 3 or 4 more lines diagonally across the
first set to create a diamond pattern. Brush or spray
the dough with oil. Cover the pot with its lid.
Let rise until the dough doubles from its deflated size
using any of these methods: Stand at warm room
temperature for a 1½- to 2½-hour regular rise; or in a
turned-off microwave along with a cup of boiling-hot
water for a 1- to 2½-hour accelerated rise. Or, for an
extended rise, refrigerate for 4 to 24 hours, then set
out at room temperature. Continue the rise until the
dough doubles in size.
Baking Preliminaries 15 minutes before baking time,
put a rack in the lower third of the oven; preheat to
450°F. Generously sprinkle or spray the loaf with
water.
Baking Reduce the heat to 425°F. Bake on the lower
rack, covered, for 55 to 60 minutes, or until the loaf is
lightly browned and crusty. Uncover and continue
baking for 10 to 15 minutes more, until a skewer
inserted in the thickest part comes out with just a few
particles on the end (or until the center registers 207°
to 209°F on an instant-read thermometer). Then bake
for 5 minutes longer to ensure the center is done. Cool
on a wire rack for 10 minutes. Turn the loaf onto the
rack; cool thoroughly.
A Tangy Taste of History:
The California sourdough culture, of course, dates
back to the Gold Rush, when so many prospectors
leavened their crude camp breads and biscuits with a
tangy yeast starter that they came to be called
"sourdoughs" themselves. The miners relied on the
primitive leavening mostly because, unlike other
leavening agents, it was easily renewed and
maintained in the rugged frontier conditions.
Serving and Storing
Cut or tear the loaf into portions; it tastes good warm,
but will cut much better when cool. Cool completely
before storing. To maintain the crisp crust, store
draped with a clean tea towel or in a heavy paper bag.
Or, to prevent the loaf from drying out, store airtight in a
plastic bag or wrapped in foil: The crust will soften, but
can be crisped by heating the loaf, uncovered, in a
400°F oven for a few minutes. The bread will keep at
room temperature for 3 days, and may be frozen,
airtight, for up to 2 months.
Variation
Whole Wheat Sourdough Bread
Proceed exactly as for San Francisco—Style Sourdough
Bread, except reduce the white bread flour to 2½ cups
(12.5 ounces) and add 1 cup (5 ounces) whole wheat flour.
Easy Cultured
"Sourdough"Starter (with
Commercial Yeast)
KS Quotient
Easy: Minimal ingredients. Super-reliable.
The easiest way to get started with a wild yeast sourdough
starter is to beg or borrow a little from somebody who has
already a good one bubbling away. For those lacking a
necessary personal contact, the King Arthur Flour
Company in Vermont is a reliable source for a vigorous,
tangy starter that needs only a couple of feedings of water
and flour to be ready for use. I've found that it makes an
excellent San Francisco—style sourdough loaf, even
though the company doesn't claim its starter has a West
Coast pedigree! If you feel you must have an actual San
Francisco starter, check out www.sourdoughbreads.com or
other Internet vendors whose sourdough contains the
Candida milleri yeast and Lactobacillus sanfrancisco
bacteria.
If you choose to make your own starter, there are two basic
ways to go: The purist's approach followed by professional
bakers involves setting out a flour-water mixture and hoping
that it has the right strains of wild yeast and lactic acid
bacteria. The easier, virtually foolproof (some would say
cheater's) approach involves seeding your water-flour
mixture with a little commercial instant yeast, which is a
"domesticated" cousin of the wild organisms. Since
creating a wild yeast, or "spontaneous" starter, is a hit-ormiss proposition, and producing what is technically referred
to as a "cultured" starter is quite easy and reliable, it seems
appropriate to go the second route in 4Kneadlessly
Simple.
There's no trick to this recipe other than to use bottled
spring water or any other pleasant-tasting water, goodquality unbleached all-purpose flour, and a very clean glass
bowl, crock, or other container that doesn't react with acid.
The mixing, feeding, and maintenance directions below are
fairly specific, but in truth they don't have to be followed
exactly for success.
It usually takes 10 days from the initial mixing for the
cultured starter to yield a noticeably sour loaf. I've made the
San Francisco—Style Sourdough Bread with a young (5day-old) homemade starter, and though the bread was
delicious, it wasn't really sour. For a very tangy loaf, give the
starter a full 14 days.
½ cup (2.5 ounces) unbleached all-purpose white flour,
plus more for daily and maintenance "feedings"
1/8 teaspoon instant, fast-rising, or bread machine
yeast
About 1/3 cup room temperature bottled spring water
or other chlorine-free water, plus more for daily and
maintenance "feedings"
To start the starter In a medium glass bowl or large,
wide-mouth jar, thoroughly stir together the flour and
yeast. Stir in 1/3 cup water or enough water to yield a
gravy-like consistency. Loosely drape a clean tea
towel over the top. If possible, stir the mixture with a
clean spoon once in a while; aeration causes more
rapid development. You'll probably see bubbling
whenever you stir. Let the mixture stand overnight at
room temperature.
To feed the starter For the next 3 or 4 days, stir in
another 1/3 cup of flour and ¼ to 1/3 cup more spring
water daily, stirring once in a while if possible. If the
mixture seems to be getting thicker, add the larger
amount of water at the feeding. If it's becoming thin,
add the smaller amount of water to maintain a gravylike consistency. The mixture will gradually become
more sour tasting and smelling, and may have the
aroma of alcohol, too. This means it's maturing.
On the fourth or fifth day pour off and discard about a
third of the mixture before feeding the starter with the
usual amount of flour and water. Then continue to feed
the same way as before, every day for 4 or 5 more
days, allowing the quantity of starter to build up again.
At this point there will be plenty to bake with and a
sufficient maintenance amount left over to store.
To liven and refresh the starter for Baking Pour off a
third of the mixture, then stir in 1 cup flour and ½ to 2/3
cup water. Let the starter stand for at least 4 hours until
very bubbly before using it. Then stir it down and
measure out the amount you need.
To maintain the starter Replenish the remaining
starter by stirring in the usual ½ cup flour and ¼ cup
water or enough to maintain a pancake batter
consistency. It's a good idea at this point to transfer the
mixture to a large, clean container. Loosely cover it;
don't use a tight lid. Once it is bubbly again, transfer it
to the refrigerator.
After about a week, stir; then pour off about a third of
the mixture; then feed the remainder by stirring in the
usual 1/3 cup flour and ¼ cup water. Return it to the
refrigerator for another week, and repeat this
maintenance feeding weekly.
To revive a refrigerated starter If left unfed for a long
time, the refrigerated starter can become very sour
and separate into layers. (You may also find that your
sourdough loaves actually come out too sour.) Pour off
most of the liquid on top, then give it a feeding (adding
extra water if necessary), stir well, and set it out at
room temperature. If it doesn't bubble at all, also add a
tiny pinch of commercial yeast. Repeat the feedings
each day for several days, pouring off some of the
buildup, until it is bubbly and less sour again. The
revived starter can go back in the refrigerator and kept
indefinitely on its weekly maintenance feeding
schedule. Pour off some of the old amount every time
you feed so the quantity doesn't become too large. It's
very rare for a starter to spoil even over years, but if it
smells very unpleasant or moldy or has an orange
color, it's time to discard it and start fresh.
Sonoma-Style Multigrain
Crunch Bread
KS Quotient
Fairly Easy: Fairly long ingredient list, but easily mixed.
Some hand-shaping.
This loaf was adapted (and greatly simplified) from a terrific
bread recipe shared with me by Craig Ponsford, one of
America's world-class bakers and founder of Artisan
Bakers of Sonoma, California. Craig brought some of his
beautiful multigrain loaves to a baking conference in nearby
Napa, and, even though I'm not a great fan of multigrain
breads, I was bowled over by the unique flavor and texture
and handsome look of his version. The secret is the
particular combination of nine different whole and ground
grains and seeds, which adds a wonderful graininess and
crunch, yet doesn't hurt the teeth and completely avoids that
earnest "it's good for you, so eat it," character of some
multigrain breads.
The longish list of ingredient makes the recipe a bit timeconsuming to assemble, though once everything is on
hand, it comes together quickly. The reward for the effort is
two generous, seed-studded boules with delightfully crisp
crusts. (After cooling the loaves thoroughly, stash one loaf
in the freezer for great bread with no effort whatsoever.)
Yield: 2 large round loaves
4½ cups (22.5 ounces) unbleached white bread flour,
plus more as needed
1½ cups (7.5 ounces) whole wheat flour
½ cup old-fashioned or quick-cooking (not instant)
rolled oats
3 tablespoons yellow cornmeal, polenta, or corn grits
3 tablespoons bulgur wheat or cracked wheat, optional
2 tablespoons wheat bran
Scant 1 tablespoon table salt
1¼ teaspoons instant, fast-rising, or bread machine
yeast
3 tablespoons millet seeds
3 tablespoons flax seeds
3 tablespoons sesame seeds
3 tablespoon poppy seeds
2 2/3 cups ice water, plus more if needed
3 tablespoons clover honey or other mild honey
1½ tablespoons corn oil, canola oil, or other flavorless
oil, plus extra for coating dough tops
2 tablespoons Cornstarch Glaze, or 2 tablespoons
liquid egg substitute, for finishing the loaves
First Rise In a very large bowl, thoroughly mix together
the bread flour, whole wheat flour, oats, cornmeal,
bulgur, wheat bran, salt, and yeast until blended. In a
small bowl, combine the millet, flax, sesame, and
poppy seeds. Reserve 4 tablespoons of the seed
mixture for garnish, then stir the remainder into the flour
mixture. In another bowl or measuring cup, whisk
together the water, honey, and oil until well blended.
Vigorously stir the mixture into the bowl with the flour,
scraping down the bowl and mixing until very well
blended. If the dough is dry and hard to blend, stir in
enough more ice water to yield a moist, yet slightly stiff
dough. (The seeds will absorb moisture, stiffening the
dough further.) Cover the bowl tightly with nonstick
spray—coated foil. If desired, for best flavor or for
convenience, you can refrigerate the dough for 3 to 10
hours. Then let rise at cool room temperature for 12 to
18 hours.
Second Rise Vigorously stir the dough for 1 minute; it
should be very stiff. If not, thoroughly stir in enough
more bread flour to make it hard to stir. Generously oil
two 9-inch deep-dish pie plates, or similar-sized deepsized ovenproof skillets, or Dutch ovens. Sprinkle 1
tablespoon of the remaining seeds in each plate.
Using an oiled serrated knife or kitchen shears, cut the
dough in half, then put each half in a plate. Evenly
sprinkle each portion with 2 to 3 tablespoons of flour.
Working in the plate, shape each portion into a ball
and smooth the flour into the surface all over. Lightly
dusting with flour as needed, shape each portion into a
high-domed 6-inch round, smoothing and tucking the
edges underneath all the way around. Generously and
evenly brush each loaf with the Cornstarch Glaze (or
liquid egg substitute). Immediately sprinkle the
remaining seeds over the loaves. Tent them with
nonstick spray—coated foil.
Let Rise Using Any of These Methods For a 1½- to
2½-hour regular rise, let stand at warm room
temperature; for a 1- to 2-hour accelerated rise, let
stand in a turned-off microwave along with 1 cup of
boiling-hot water; or for an extended rise, refrigerate
for 4 to 24 hours, then set out at room temperature.
Continue the rise until the dough doubles from its
deflated size.
Baking Preliminaries 15 minutes before baking time,
place a rack in the lower third of the oven; preheat to
450°F. Place a broiler pan on the oven floor.
Baking Reduce the temperature to 425°F. Immediately
add a cup of water to the broiler pan—be careful of
splattering and steam. Bake, uncovered, on the lower
rack for 30 minutes, until the loaves are browned and
firm. Remove the loaves from their pie plates, and
transfer them to a baking sheet. Cover the tops with
foil (leave the sides uncovered) and continue baking
for 20 to 25 minutes, occasionally testing with a
skewer inserted in the thickest part until it comes out
with just slightly moist particles clinging to the bottom
portion (or until the center registers 208° to 210°F on
an instant-read thermometer). Then bake for 5 to 10
minutes more to be sure the centers are done. Let cool
on wire racks for 10 minutes. Transfer the loaves to
wire racks; let cool completely.
Serving and Storing
The loaves slice best when cool, but the bread is good
served warm, at room temperature, or toasted. Cool
completely before storing. To maintain the crisp crust,
store draped with a clean kitchen towel; or to prevent
the loaf from drying out, store airtight in plastic or foil.
(Loaves can be re-crisped in a preheated 375°F oven
for a few minutes, if desired.) Store at room
temperature for 2 to 3 days; freeze, airtight, for up to 2
months, then thaw, unwrapped, at room temperature.
When thawed, re-crisp the crust in a 375°F oven for a
few minutes.
Crusty Yeasted Cornbread
with Coarse Salt
KS Quotient
Easy: Fuss-free ingredients, added before the first
rise. Some hand-shaping required.
This very corny, sweet-smelling 2-pound round loaf is crusty
and golden on the outside, and owing to the corn grits,
slightly crunchy-chewy on the inside. It is in the style of
artisan loaves, but takes none of the special skill. It is great
served with a pot of chili, hearty soup, or stew. It is best
when very fresh, as the crunch gradually diminishes in time.
Yield: 1 large loaf, 12 to 14 portions or slices
1/3 cup corn grits (or substitute very coarse uncooked
polenta)
1/3 cup boiling water
2¾ cups (13.75 ounces) unbleached white bread flour,
plus more as needed
1 cup cornmeal, preferably yellow, plus about 6
tablespoons for dusting the dough and pie plate
2 tablespoons granulated sugar
Scant 1¾ teaspoons table salt
¾ teaspoon instant, fast-rising, or bread machine
yeast
1 2/3 cups ice water, plus more if needed
1½ tablespoons corn oil or other flavorless vegetable
oil, plus more for brushing dough top and pie plate
¼ to ½ teaspoon coarse salt for garnish
First Rise In a medium bowl, stir together the corn grits
and boiling water until lump-free. Let stand until cooled.
In a large bowl, thoroughly stir together the flour,
cornmeal, sugar, table salt, and yeast. Whisk the ice
water and oil into the corn grits mixture, then vigorously
stir the mixture into the bowl with the flour, scraping
down the sides and mixing until thoroughly blended. If
too dry to mix together, add just enough more water to
facilitate mixing, but don't over-moisten, as the dough
should be fairly stiff. If necessary, add in enough more
flour to stiffen it slightly. Brush the top with oil. Tightly
cover the bowl with plastic wrap. If desired, for best
flavor or for convenience, you can refrigerate the
dough for 3 to 10 hours. Then let rise at cool room
temperature for 12 to 18 hours; vigorously stir once
partway through the rise, if convenient.
Second Rise Using an oiled rubber spatula, lift and
fold the dough in towards the center all the way around
but don't deflate it completely; don't stir. Oil a 9- to 9½inch deep-sided pie plate. Sprinkle 2 tablespoons of
the cornmeal in the plate, then tip back and forth to
spread the cornmeal on the bottom and sides. Loosen
the dough from the bowl sides with an oiled rubber
spatula and gently invert it into the plate. Sprinkle the
dough with more cornmeal. Pat and press it into the
dough with your fingertips. Then firmly tuck the sides of
the loaf underneath all the way around to form a
smooth, round, high domed loaf, about 7 inches in
diameter. Using well-oiled kitchen shears or a serrated
knife, cut 5 or 6 2-inch curved shallow slashes
radiating from the center of the dome to create a
pinwheel effect. Tent with nonstick spray—coated foil.
Let Rise Using Any of These Methods For a 1½- to
2½-hour regular rise, let stand at warm room
temperature; for a 1- to 2-hour accelerated rise, let
stand in a turned-off microwave along with 1 cup of
boiling-hot water; or for an extended rise, refrigerate
for 4 to 24 hours, then set out at room temperature.
Continue the rise until the dough doubles from its
deflated size, removing the foil if the dough reaches it.
Baking Preliminaries 20 minutes before baking time,
put a rack in the lower third of the oven; preheat to
450°F. Set a broiler pan on the oven floor. Generously
sprinkle the loaf top with water. Immediately sprinkle
the top with the coarse salt.
Baking Put 1 cup ice water in the broiler pan; watch
out for steam. Reduce the heat to 425°F. Bake,
uncovered, on the lower rack for 25 to 30 minutes, until
the top is nicely browned and the loaf is firm. Transfer
the loaf from the pie plate to a baking sheet. Cover the
top loosely with a square of foil; the sides of the loaf
should remain uncovered. Bake for 30 to 35 minutes
more, until a skewer inserted in the thickest part
comes out with just a few particles clinging to the
bottom portion (or until the center registers 208° to
210°F on an instant-read thermometer). Then bake for
5 to 10 minutes more to be sure the center is done.
Cool in the pan on a wire rack for 15 minutes. Remove
the loaf to the rack; let cool completely.
Serving and Storing
Serve the bread warm, or cooled, cut into wedges or
crosswise into slices. To maintain the crisp crust, store
wrapped in a clean tea towel or heavy paper bag. If
desired, re-warm, uncovered, on a baking sheet in a
400°F oven for a few minutes. The bread will keep at
room temperature for 2 days, and may be frozen,
airtight, for up to 1 month.
Easy Buttermilk Pot Bread
with Coarse Salt
KS Quotient
Easy: Fuss-free ingredients; two-stage mixing. No
hand-shaping.
Puffy, and crusty, and faintly tangy, this big, craggy-topped
loaf is such good eating it may become a standard in your
repertoire. Since the dough is baked in a lidded Dutch
oven, it usually springs up a lot and is light and airy. The
acid in the buttermilk also makes the crumb moist and
tender. Sprinkling the top with coarse salt is a
contemporary touch that I think adds to the appeal, but feel
free to omit it if you prefer a more old-fashioned loaf.
Buttermilk breads have been popular with American home
bakers for decades, not only because these loaves are
tasty and fuss-free, but also because in the past they used
up leftover buttermilk. When families still churned their own
butter, buttermilk was the butter-flecked liquid remaining
after the fat separated out from the cream and formed
butter.
Yield: 1 large loaf, 12 to 14 wedges or slices
4 cups (20 ounces) unbleached white bread flour or
unbleached all-purpose white flour, plus ½ cup (2.5
ounces), plus more as needed
2 tablespoons granulated sugar
Scant 1¾ teaspoons table salt (increase to 2
teaspoons if coarse salt garnish is omitted)
¾ teaspoon instant, fast-rising, or bread machine
yeast
Corn oil, canola oil, or other flavorless vegetable oil for
coating dough
1¾ cups plus 2 tablespoons ice water, plus more if
needed
1/3 cup dried buttermilk powder
2 tablespoons unsalted butter, melted and cooled
slightly
¾ teaspoon coarse crystal salt for garnish, optional
First Rise In a large bowl, thoroughly stir together 4
cups of the flour, the sugar, salt, and yeast. Thoroughly
stir the water into the bowl, scraping down the sides
until the ingredients are thoroughly blended. If the
mixture is too dry to incorporate all the flour, a bit at a
time, stir in just enough more ice water to blend the
ingredients; don't over-moisten, as the dough should
be slightly stiff. If it is very soft, stir in enough flour to
firm it slightly. Brush or spray the top with oil. Cover the
bowl with plastic wrap. If desired, for best flavor or for
convenience, you can refrigerate the dough for 3 to 10
hours. Then let rise at cool room temperature for 12 to
18 hours.
Second Rise Vigorously stir the buttermilk powder and
butter into the dough until evenly and thoroughly
incorporated. (Or use a dough hook and heavy-duty
mixer on low speed, if desired.) Then, thoroughly
incorporate the remaining ½ cup flour, plus enough
more to make the dough very stiff. Scrape down the
bowl sides thoroughly. Using an oiled rubber spatula,
lift and fold the dough in towards the center all the way
around. Evenly brush or spray the dough top with oil.
Cover the bowl with nonstick spray—coated plastic
wrap.
Let Rise Using Any of These Methods For a 1½- to
2½-hour regular rise, let stand at warm room
temperature; for a 1- to 2-hour accelerated rise, let
stand in a turned-off microwave along with 1 cup of
boiling-hot water; or for an extended rise, refrigerate
for 4 to 24 hours, then set out at room temperature.
Continue the rise until the dough doubles from its
original size, removing the plastic if the dough nears it.
Baking Preliminaries 20 minutes before baking time,
put a rack in the lower third of the oven; preheat to
450°F. Heat a 4-quart Dutch oven or similar heavy
metal pot in the oven until sizzling hot (check with a few
drops of water), then remove it, using heavy mitts.
Taking care not to deflate the dough (or burn yourself),
loosen it from the bowl sides with an oiled rubber
spatula and gently invert it into the pot. Don't worry if
it's lopsided and ragged-looking; it will even out during
baking. Lightly spritz or brush the dough top with water.
Then evenly sprinkle over the coarse salt. Slash a
large, ¼-inch-deep x in the dough top with well-oiled
kitchen shears. Immediately top the pot with the lid.
Shake the pot back and forth to center the dough.
Baking Lower the heat to 425°F. Bake on the lower
rack for 50 to 55 minutes or until puffed and firm on
top. If the loaf is nicely browned, continue baking with
the lid on; if the loaf looks pale, remove the lid. Bake
for 10 to 15 minutes longer, until the top is well
browned and crusty and a skewer inserted in the
thickest part comes out with just a few crumbs on the
tip (or until center registers 205° to 207°F on an
instant-read thermometer). Then, bake for 5 to 10
minutes longer to ensure the center is baked through.
Cool in the pan on a wire rack for 10 to 15 minutes.
Remove the loaf to the rack. Cool thoroughly.
Serving and Storing
Cut the loaf into wedges or crosswise slices; it tastes
good warm, but will cut much better when cool. Cool
completely before storing. To maintain the crisp crust,
store draped with a clean tea towel or in a heavy paper
bag. Or store airtight in a plastic bag or wrapped in
foil: The crust will soften, but can be crisped by heating
the loaf, uncovered, in a 400°F oven for a few minutes.
The bread will keep at room temperature for 3 days,
and may be frozen, airtight, for up to 2 months.
Cheddar and Chiles Bread
KS Quotient
Super-Easy: A minimum of fuss-free, easily mixed
ingredients. No hand-shaping.
The Hispanic influence on American culture over the past
decades has been pervasive and shows up not only in the
popularity of Mexican and Tex-Mex fare, but also in the
widespread availability of ingredients like assorted chiles.
Once found only in ethnic communities and markets, green
chiles turn up in everything from soups and quiches to corn
casseroles and both quick and yeast breads. (If you aren't
familiar with green chiles, note that they are just slightly
piquant; they are not the same as jalapeños.)
This is a delightfuly savory bread, particularly if a top-quality
white cheddar is used. The loaf is shot through with cheese
and bits of green chiles, and the crust is golden brown. It is
great with chili, hearty, full-bodied soups, and bean dishes;
it also makes an unusual but very appealing sandwich
bread.
For a different look and milder taste, prepare the equally
easy cheddar and pimiento variation provided at the end of
the recipe.
Yield: 1 large loaf, 12 to 14 slices each
3½ cups (17.5 ounces) unbleached white bread flour,
plus more as needed
1 tablespoon granulated sugar
1½ teaspoons table salt
1 teaspoon instant, fast-rising, or bread machine yeast
2 tablespoons corn oil, canola oil, or other flavorless
vegetable oil, plus extra for coating dough top and
baking pan
1 2/3 cups ice water, plus more if needed
8 ounces (3 lightly packed cups) coarsely grated very
sharp cheddar cheese, preferably white cheddar
½ cup very well-drained and patted dry chopped
canned green chiles
First Rise In a large bowl, thoroughly stir together the
flour, sugar, salt, and yeast. In another bowl or
measuring cup, whisk the oil into the water. Thoroughly
stir the mixture into the bowl with the flour, scraping
down the sides until the ingredients are thoroughly
blended. If the mixture is too dry to incorporate all the
flour, a bit at a time, stir in just enough more ice water
to blend the ingredients; don't over-moisten, as the
dough should be stiff. If necessary, stir in enough more
flour to stiffen it. Brush or spray the top with oil. Cover
the bowl with plastic wrap. If desired, for best flavor or
for convenience, you can refrigerate the dough for 3 to
10 hours. Then let rise at cool room temperature for 15
to 20 hours. If convenient, stir the dough once partway
through the rise.
Second Rise Vigorously stir the dough, gradually
sprinkling over and incorporating the cheese and
chiles. Fold them in very thoroughly to ensure they are
evenly distributed . If necessary, thoroughly stir in
enough more flour to yield a very stiff dough. Using a
well-oiled rubber spatula, fold the dough in towards the
center, working all the way around the bowl. Invert the
dough into a well-greased 9 x 5-inch loaf pan. Evenly
brush or spray the dough top with oil. Using well-oiled
kitchen shears or a serrated knife, make a ¼-inchdeep slash lengthwise down the center of the loaf.
Cover the pan with nonstick spray—coated plastic
wrap.
Let Rise Using Any of These Methods For a 1½- to
2½-hour regular rise, let stand at warm room
temperature; for a 1- to 2-hour accelerated rise, let
stand in a turned-off microwave along with 1 cup of
boiling-hot water; or for an extended rise, refrigerate
for 4 to 24 hours, then set out at room temperature.
Continue the rise until the dough nears the plastic.
Remove it and continue until the dough reaches ½ inch
above the pan rim.
Baking Preliminaries 15 minutes before baking time,
place a rack in the lower third of the oven; preheat to
425°F.
Baking Reduce the heat to 400°F. Bake for 30 to 40
minutes, until the top is nicely browned; cover the top
with foil as needed. Continue baking for 20 to 30
minutes longer, or until a skewer inserted in the
thickest part comes out with just a few particles
clinging to the bottom (or until the center registers 204°
to 206°F on an instant-read thermometer). Then bake
for 5 minutes more to be sure the center is done. Cool
in the pan on a wire rack for 10 minutes. Turn out the
loaf onto the rack; cool thoroughly.
Serving and Storing
Cool thoroughly before slicing or storing. Store airtight
in plastic or aluminum foil. The bread will keep at room
temperature for 2 to 3 days, and may be frozen,
airtight, for up to 2 months.
Variation
Cheddar and Pimiento Bread
Omit the green chiles and substitute an equal amount of
well-drained and patted dry chopped jarred pimientos.
Otherwise proceed exactly as directed.
Farmhouse Potato Bread with
Dill and Chives
KS Quotient
Easy: Easily mixed ingredients; prepping the herbs
takes a little time. No hand-shaping.
Dill, chives, and yogurt are all wonderful companions for
potatoes, and they are absolute dynamite in this homey,
savory bread. The herbal aroma given off during baking is
so tantalizing that I find myself pacing around the oven,
repeatedly checking to see if the loaf is done. It's difficult to
slice while hot and tastes better once it's cooled, but I
usually saw off an end and scarf it down anyway.
The exterior of the loaf is nicely crispy; its interior is tendermoist and stays that way, due to the touch of yogurt. (Some
older versions of this bread call for cottage cheese instead,
but it has to be pureed first and doesn't taste nearly as
good.) This bread seems tailor-made for serving along with
roast chicken, baked fish, or steaming bowls of tomato
soup.
Yield: 1 large loaf, 12 to 14 slices
2 cups (10 ounces) unbleached white bread flour, plus
1 cup (5 ounces), plus more as needed
1½ tablespoons granulated sugar
1½ teaspoons table salt
¾ teaspoon instant, fast-rising, or bread machine
yeast
2 tablespoons corn oil, canola oil, or other flavorless
vegetable oil, plus extra for coating dough top and
baking pan
1 cup plus 2 tablespoons ice water, plus more if
needed
1/3 cup leftover mashed potatoes, preferably at room
temperature
1/3 cup plain low-fat or nonfat yogurt, drained of any
liquid, preferably at room temperature
¼ cup finely chopped fresh dillweed
¼ cup finely chopped fresh chives
1 teaspoon dill seeds, plus ½ teaspoon for garnish,
optional
First Rise In a large bowl, thoroughly stir together 2
cups of the flour, the sugar, salt, and yeast. In another
bowl or measuring cup, whisk the oil into the water.
Thoroughly stir the mixture into the bowl with the flour,
scraping down the sides and mixing to form a smooth,
well-blended dough; it should be slightly moist and
fairly easy to stir. Brush the top with oil. Cover the bowl
tightly with plastic wrap. If desired, for best flavor or for
convenience, you can refrigerate the dough for 3 to 10
hours. Then let rise at cool room temperature for 12 to
18 hours.
Second Rise In a medium bowl, stir together the
mashed potatoes, yogurt, dill, chives, and 1 teaspoon
of the dill seeds (if using) until the potato is free of
lumps. Vigorously stir the mixture into the dough until
completely blended. (If desired, use a dough hook and
heavy-duty mixer on low speed.) Scraping down the
sides as you work, thoroughly mix in the remaining 1
cup of flour, plus enough more flour to yield a hard-tostir dough.
Using an oiled rubber spatula, lift and fold the dough in
towards the center all the way around the bowl. Invert
into a 9 x 5-inch loaf pan. Brush or spray the top with
oil. Smooth out the dough top with the spatula or oiled
fingertips. If using dill seeds, sprinkle ½ teaspoon over
the loaf top, pressing down to imbed. Cover the pan
with nonstick spray—coated plastic wrap.
Let Rise Using Any of These Methods For a 2- to 2½hour regular rise, let stand at warm room temperature;
for a 1- to 1½-hour accelerated rise, let stand in a
turned-off microwave along with 1 cup of boiling-hot
water; or for an extended rise, refrigerate for 4 to 24
hours, then set out at room temperature. When the
dough nears the plastic, remove it and continue the
rise until the dough just reaches the pan rim.
Baking Preliminaries 15 minutes before baking time,
place a rack in the lower third of the oven; preheat to
375°F. Using well-oiled kitchen shears, cut a ¼-inchdeep slash lengthwise down the loaf center.
Baking Bake on the lower rack for 50 to 55 minutes, or
until the loaf is golden brown. Cover the top with foil to
prevent over-browning and continue baking for 15 to
20 minutes longer, until a skewer inserted in the
thickest part comes out with just a few particles
clinging to the bottom (or until the center registers 208°
to 210 °F on an instant-read thermometer). Bake for 5
minutes longer to be sure the center is done. Cool in
the pan on a wire rack for 10 minutes. Turn out onto the
rack; cool thoroughly.
Tip
Don't use dried dillweed or chives, as they will
contribute nothing but flecks of color. If you lack fresh
herbs, make the plain potato bread variation below.
And don't use extra herbs, as they can retard rising.
Serving and Storing
Serve warm, or cool, or toasted; the bread slices best
when cool. Cool thoroughly before storing in plastic or
foil. Keeps at room temperature for 2 to 3 days. May
be frozen, airtight, for up to 2 months.
Variation
Farmhouse Potato Bread
Increase the sugar to 3 tablespoons. Omit the dillweed,
chives, and dill seeds from the recipe but otherwise
proceed exactly as directed.
Anadama Bread
KS Quotient
Easy: Fuss-free ingredients; two-stage mixing. No
hand-shaping.
Anadama breads have been around since at least the midnineteenth century, and most often appear in old-fashioned
New England cookbooks. This is not surprising, since
cornmeal and molasses often teamed up in dishes in the
region in Colonial times; Indian pudding, Boston brown
bread, and anadama bread are just several of the many
heritage recipes still being prepared that take great
advantage of this twosome.
The combination is particularly pleasant in anadama bread.
Both the touch of molasses and the cornmeal add gentle
fragrance and flavor. And because the cornmeal absorbs a
lot of moisture and becomes mush-like when boiling water
is poured over it, it helps keep the loaf very moist. A
comfort food of the highest order, this bread goes well with
white chowders, mild soups, and other gently seasoned
dishes. I also like it for toast.
Yield: 1 large loaf, about 12 to 15 slices each
½ cup boiling water
½ cup stone-ground yellow cornmeal
3 tablespoons light or dark molasses
2¾ cups (13.75 ounces) unbleached all-purpose white
flour, plus ½ cup (2.5 ounces), plus more as needed
Generous 1½ teaspoons table salt
¾ teaspoon instant, fast-rising, or bread machine
yeast
1 cup plus 2 tablespoons ice water, plus more if
needed
Corn oil, canola oil, or other flavorless vegetable oil or
oil spray for loaf top
1 large egg, at room temperature and beaten with a
fork
2 tablespoons unsalted butter, melted and cooled
slightly
First Rise In a medium bowl, gradually stir the boiling
water into the cornmeal until smoothly incorporated.
Let cool to warm, then stir in the molasses until evenly
incorporated. In a large bowl, thoroughly stir together
2¾ cups of the flour, the salt, and yeast. Vigorously stir
the ice water into the cooled cornmeal until very
smoothly blended. Then vigorously stir the cornmeal
mixture into the bowl with the flour, scraping down the
sides until the ingredients are thoroughly blended. If
too dry to mix completely, a bit at a time, stir in just
enough more ice water to blend the ingredients; don't
over-moisten, as the dough should be fairly stiff. Brush
or spray the top with vegetable oil. Cover the bowl with
plastic wrap. If desired, for best flavor or for
convenience, you can refrigerate the dough for 3 to 10
hours. Then let rise at cool room temperature for 12 to
18 hours.
Second Rise Vigorously stir the beaten egg, butter,
and remaining ½ cup of flour into the dough. (If
desired, use a dough hook and heavy-duty mixer on
low speed.) Then vigorously stir in enough more flour
to yield a hard-to-stir dough. Using an oiled rubber
spatula, lift and fold the dough in towards the center all
the way around; this organizes the gluten for forming a
loaf. Invert the dough into a generously greased 9 x 5inch loaf pan. Brush or spray the top with oil. Using the
spatula, smooth out the surface and press the dough
evenly into the pan. Cover the pan with nonstick spray
—coated plastic.
Let Rise Using Any of These Methods For a 1½- to
2½-hour regular rise, let stand at warm room
temperature; for a 1- to 2-hour accelerated rise, let
stand in a turned-off microwave along with 1 cup of
boiling-hot water; or for an extended rise, refrigerate
for 4 to 24 hours, then set out at room temperature.
Continue the rise until the dough nears the plastic.
Remove it and continue until the dough extends ½ inch
above the pan rim.
Baking Preliminaries 15 minutes before baking time,
place a rack in the lower third of the oven; preheat to
375°F.
Baking Bake for 50 to 60 minutes, covering the top
with foil for the last few minutes if necessary to prevent
over-browning. Continue baking for 10 to 15 minutes
more or until a skewer inserted in the thickest part
comes out with just a few particles on the end (or until
the center registers 207° to 209°F on an instant-read
thermometer). Bake for 5 minutes longer to be sure the
center is done. Cool in the pan on a wire rack for 10
minutes. Turn out onto the rack; cool thoroughly.
Serving and Storing
Serve warm, or cool, or toasted; the bread slices best
when cool. Cool thoroughly before storing in plastic or
foil. Keeps at room temperature for up to 3 days. May
be frozen, airtight, for up to 2 months.
Cronshi's Challah
KS Quotient
Easy: Fuss-free ingredients; two-stage mixing. Handshaping required.
My friend Cronshi makes challah regularly, and says she
has used the traditional version of this recipe more than
100 times. When she heard about my Kneadlessly Simple
method she asked me to rework her recipe to reduce her
time spent baking each week. Now, except for the shaping
and braiding, her bread takes only a few minutes of effort
here and there. She likes to made four-strand loaves, and
even if you've never braided bread before, this dough is so
easy to handle you can do it, too. (I have also included
instructions for a three-strand braid, in case you're more
comfortable starting with that instead.)
This is a nice, middle-of-the-road challah with a pleasant
but not overpowering egg and honey taste and a handsome
golden crust. Challah originally referred to a sacred bread
offering that was given to the priests, but has come to mean
an enriched one special enough to serve on the Sabbath.
Challah originated in eastern Europe, but is now a staple in
many Jewish-American homes.
Yield: 2 large braided loaves
5 1/3 cups (26.66 ounces) unbleached all-purpose
white flour, plus 1 1/3 cups (6.66 ounces), plus more
as needed
2¼ teaspoons table salt
1¼ teaspoons instant, fast-rising, or bread machine
yeast
1/3 cup clover honey or other mild honey
¼ cup corn oil, canola oil, or other flavorless vegetable
oil, plus extra for coating dough top and baking pan
2¼ cups ice water, plus more if needed
2 large eggs plus 1 large egg yolk, at room
temperature and beaten with a fork
1 egg beaten with 2 teaspoons water for egg wash
garnish
2 to 3 tablespoons poppy seeds or sesame seeds for
garnish, optional
First Rise In a very large bowl, thoroughly stir together
5 1/3 cups of the flour, the salt, and yeast. In another
bowl or measuring cup, thoroughly whisk the honey
and oil into the water. Then vigorously stir the mixture
into the bowl with the flour, scraping down the sides
and mixing until thoroughly blended. If too dry to blend
together, add just enough more water to facilitate
mixing, but don't over-moisten, as the dough should be
stiff. If necessary, stir in enough more flour to stiffen it.
Brush or spray the top with oil. Cover the bowl with
plastic wrap. If desired, for best flavor or for
convenience, you can refrigerate the dough for 3 to 10
hours. Then let rise at cool room temperature for 12 to
18 hours.
Second Rise A little at a time, vigorously stir the
beaten egg-yolk mixture into the dough. (Or use a
dough hook and heavy-duty stand mixer on low
speed.) Then vigorously stir in the remaining 1 1/3
cups of flour, plus enough more flour to yield a hard-tostir consistency. Let rest for 10 minutes. Spray two 15inch-long sheets of baking parchment with nonstick
spray, then dust each generously with flour. With welloiled kitchen shears, cut the dough in half; each half
will form a loaf. Then divide one of the halves into 3 or
4 equal pieces, placing them separated on a wellfloured work surface. One at a time, dust the pieces all
over with flour, smoothing it in until the dough is easy to
handle. Working on a clean, flour-dusted work surface
and using your palms, roll the 3 or 4 pieces into 12inch-long strands, dusting with flour as needed to
prevent sticking. Taper the strands so they are 2½ to 3
inches thick in the middle and about 1 inch thick at the
ends. Lay the strands side by side on the parchment.
Form a braid as follows:
For a 3-strand braid: Starting in the center of the
strands and working to one end, lift the left strand over
the center one, so the left one is in the center position.
Lift the right strand over the center one, so the right
one is in the center position. Repeat the process,
lifting the leftmost strand, then the rightmost, until the
end is reached. Then, start in the center again and
braid the second half out to the end. Tuck and press
the ends underneath.
For a 4-strand braid: Starting from the center and
working outward, lift the far left strand over the next one
to its right, then under the next one to its right, then over
the far right strand. Working from the strand now at the
far left, lift it over the one to its right, then under the next
one, then over the far right strand. Repeat the pattern,
always working from the left to the right until the end is
reached. Then, start in the center of the strands again
and braid the second half out to the end, working from
left to right as before. Tuck and press the ends
underneath.
Transfer the braid to a well-oiled baking sheet. Spray
or brush the dough top with oil. Tent the pan with
nonstick spray—coated foil. Repeat the preparations
for the second 3- or 4-strand loaf.
Let Rise Using Any of These Methods For a 1½- to
2½-hour regular rise, let stand at warm room
temperature; for a 1- to 1½-hour accelerated rise, let
stand in a turned-off microwave along with 1 cup of
boiling-hot water; or for an extended rise, refrigerate
for 4 to 48 hours, then set out at room temperature. Let
rise until the loaves double from their original size,
removing the foil as the dough reaches it.
Baking Preliminaries 15 minutes before baking time,
place a rack in the lower third of the oven; preheat to
375°F. Brush each loaf evenly with the egg wash; be
sure to reach the nooks and crannies of the braid,
wiping up any egg from the baking sheet. Immediately
evenly sprinkle the loaves with poppy (or sesame)
seeds, if desired.
Baking Bake on the lower rack for 25 to 35 minutes, or
until the tops are well browned. Then cover with foil and
continue baking for 25 to 30 minutes longer, until a
skewer inserted in the thickest part comes out with just
a few particles on the end (or until the center registers
201° to 203°F on an instant-read thermometer). Then
bake for 5 to 10 minutes more to make sure the
centers are done. Cool on the pan on a wire rack for
10 minutes. Set the loaves on the rack; cool
thoroughly.
Serving and Storing
Serve warm, or cool, or toasted; the bread slices best
when cool. Cool thoroughly before storing in plastic or
foil. Keeps at room temperature for 3 days. May be
frozen, airtight, for up to 2 months.
Easy Cinnamon Sticky Buns
KS Quotient
Easy: Fuss-free ingredients, added all at once. No
hand-shaping required.
Most sticky buns are formed by rolling dough around a
cinnamon-sugar mixture and fashioning pinwheel rolls, but
these deliver the same luscious taste while skipping the
fussy shaping. The dough is simply studded with little
pockets and swirls of a buttery, cinnamon-sugar streusel
and bathed in a gooey brown sugar sauce that forms on the
bottom during baking. The buns are simultaneously shaped
and baked in jumbo-size muffin cups (ones with a volume of
about 1 cup each), then served inverted. So, the "tops" stay
soft and the succulent sauce flows down the bun sides—
yummy!
These are best eaten right out of the oven, so the
refrigerator rise option, which lets you hold the buns for up
to two days until ready for them, is particularly convenient.
About 2½ to 3 hours before baking, allow them to warm up
and finish rising on the counter, then pop them into the
oven, bake, sample, and swoon!
The following buns are made from a half batch of the Easy
White Bread Loaves . Use the other half to prepare a loaf
of bread as directed in the original recipe.
Yield: 12 large buns
½ batch dough for Easy White Bread Loaves, stirred
and ready for the second rise
¾ cup plus 2 tablespoons packed light brown sugar
2/3 cup (3.33 ounces) unbleached white bread flour or
all-purpose white flour, plus more as needed
1 tablespoon ground cinnamon
½ cup (1 stick) cool, firm unsalted butter, cut into 1/3inch pieces, plus 1/3 cup more, melted, for muffin cups
½ cup dark raisins, rinsed under hot water, thoroughly
drained, and patted dry, or ½ cup chopped walnuts,
optional
18 tablespoons (1 cup plus 2 tablespoons) dark corn
syrup
Second Rise Have on hand half a batch of Easy White
Bread dough, ready for the second rise. Prepare the
sticky bun streusel by briefly processing together the
brown sugar, 2/3 cup flour, and cinnamon in a food
processor. Add the butter pieces. Pulse the processor
on and off until the mixture looks like coarse crumbs.
(Alternatively, combine the dry ingredients in a bowl
and cut in the butter using forks or a pastry blender.)
Vigorously stir ½ cup of crumb mixture and the raisins
or nuts (if using) into the dough until fairly evenly
distributed; it's all right if some patches of crumbs
remain. Evenly coat 12 jumbo-size muffin cups with
melted butter. Put 1 teaspoon melted butter, 1½
tablespoons corn syrup, then 1 tablespoon of the
crumb mixture in each cup. Cut the dough in half with
well-oiled kitchen shears, then divide each half equally
among 6 cups; dust the dough with a little flour for ease
of handling, if desired. Sprinkle the remaining crumb
mixture over the dough portions, dividing it equally
among them. Press down firmly on each with wellgreased fingertips to imbed the crumbs. Drizzle any
remaining butter over the tops. Tent the muffin tins with
nonstick spray—coated foil.
Let Rise Using Any of These Methods For a 1½- to
2½-hour regular rise, let stand at warm room
temperature; for a 45-minute to 1½-hour accelerated
rise, let stand in a turned-off microwave along with 1
cup of boiling-hot water; or for an extended rise,
refrigerate for 4 to 48 hours, then set out at room
temperature. When the dough nears the foil, remove it
and continue the rise until the dough doubles from the
original size or extends about two-thirds of the way up
the cup sides.
Baking Preliminaries 15 minutes before baking time,
place a rack in the lower third of the oven; preheat to
350°F. Set the muffin tins on a large rimmed baking
sheet (to catch any boil-overs of the sauce).
Baking Bake on the lower rack until nicely browned on
top, 20 to 25 minutes, or until a skewer inserted in the
thickest part comes out with only a few particles at the
bottom (or the centers register 200° to 202°F on an
instant-read thermometer). Remove to a wire rack and
immediately run a knife around the buns to loosen.
Place a heat-proof cutting board flat against the muffin
tin, then invert the tin and shake to remove the buns;
the bottoms will become the tops. Transfer the buns to
a serving plate. Scrape any sauce clinging to the cups
out onto the buns; serve immediately.
Serving and Storing
These are best served hot and fresh. They will keep at
cool room temperature for up to 2 days. Freeze,
airtight, for longer storage. Reheat, wrapped in foil, in
a low oven (or under a plastic cover at low power in the
microwave for about 20 seconds) before serving.
Good and Easy Pecan Sticky
Buns (or Saucy Maple-Butter
Sticky Buns)
KS Quotient
Easy: Fuss-free ingredients, added all at once. No
hand-shaping required.
Though remarkably easy, these, as the Keebler elf might
say, are uncommonly good. You may never want to bother
with the fussier traditional versions of this all-American
favorite again.
Unlike most sticky buns, these require no hand-shaping, so
they are perfect for people lacking the time or expertise to
fiddle with that task. The dough—half a batch of the Easy
White Bread recipe—is quickly divided up and shaped as
it bakes in muffin pans. The sticky bun sauce can be
readied well ahead (as can the dough), making the
preparations before the second rise very simple. For
convenience, the second rise can take place in the
refrigerator, so you can hold the rolls up to 48 hours before
baking.
The following buns require only a half-batch of the dough
recipe; use the other half to ready a loaf of bread as
directed in the original recipe. For the dozen buns, you'll
need two 6-cup muffin tins with "jumbo," or "Texas-size"
cups—that is, cups measuring 3½ to 3¾ inches across and
with a volume of about 1 cup each.
Yield: 12 large sticky buns
½ batch dough for Easy White Bread Loaves, stirred
and ready for the second rise
½ cup dark raisins, rinsed under hot water, thoroughly
drained, and patted dry, optional
6 tablespoons (¾ stick) unsalted butter, melted and
slightly cooled
1½ cups chopped pecans
1 recipe Caramel Sticky Bun Sauce or Maple-Butter
Sticky Bun Sauce, at room temperature
Unbleached white bread flour or all-purpose white flour
if needed for dusting
Second Rise Have on hand half a batch of Easy White
Bread dough, ready for the second rise. Vigorously stir
the raisins into the dough until evenly distributed, if
using.
Brush the 12 muffin cups generously with butter, then
add a scant ½ tablespoon butter to each cup. Sprinkle
½ tablespoon nuts in each cup, followed by 1
tablespoon sticky bun sauce. Divide the dough in half,
dusting with a little flour if needed for easier handling.
Using well-oiled kitchen shears and fingertips, cut
each half into 6 equal portions, placing them in the
muffin cups as you work. Drizzle the dough tops with
another ½ tablespoon sauce, then sprinkle each with
½ tablespoon more nuts. Sprinkle any remaining nuts
over the dough tops. Drizzle the cups with the
remaining butter. Press down firmly on each top to
imbed the nuts. Tent the muffin tins with nonstick spray
—coated foil. Set the remaining sauce aside to brush
the dough during baking.
Let Rise Using Any of These Methods For a 1½- to
2½-hour regular rise, let stand at warm room
temperature; for a 45-minute to 1½-hour accelerated
rise, let stand in a turned-off microwave along with 1
cup of boiling-hot water; or for an extended rise,
refrigerate for 4 to 48 hours, then set out at room
temperature. When the dough nears the foil, remove it
and continue the rise until the dough doubles in bulk or
extends two-thirds of the way up the cup sides.
Baking Preliminaries 15 minutes before baking time,
place a rack in the lower third of the oven; preheat to
375°F. Set the muffin tins on a large rimmed baking
sheet (to catch any boil-overs of the sauce).
Baking Bake on the lower rack until nicely browned on
top, 18 to 22 minutes, or until a skewer inserted in the
thickest part comes out with only a few particles at the
bottom end (or the centers register to 200° to 203 °F
on an instant-read thermometer). Brush each top with
the remaining sticky bun sauce, dividing it equally
among them. Return to the oven and bake until the
sauce begins to bubble, about 3 minutes longer.
Remove the pans to a wire rack for 5 minutes.
Immediately run a knife around the buns to loosen.
Place a heat-proof cutting board flat against the muffin
tin, then invert the tin and shake to remove the buns;
the bottoms will become the tops. Transfer to a serving
plate. Scrape any sauce and nuts clinging to the cups
out onto the buns; serve immediately.
Serving and Storing
These are best served warm. They will keep at cool
room temperature for up to 2 days. Freeze, airtight, for
longer storage. Reheat, wrapped in foil, in a low oven
(or under a microwave-safe cover on low power in the
microwave) before serving.
Chapter 5: Old-World
Classics
A number of today's favorite artisan-style breads
—from the French fougasse and baguette to the Italian
flatbread trio: ciabatta, focaccia, and pizza—are in this
chapter. Considering the enormous appeal of all of these,
it's amazing how few ingredients they require. The secret is
in the slow rising, which deepens the yeasty flavor and
aroma. It's also in the details like dough consistency,
shaping, and oven temperature, which yield the
characteristic crackly, chewy, or crunchy-crisp texture
desired.
Of course, not all European breads are of the crusty sort.
For example, pain d'epice and pain aux noix (spice bread
and walnut bread) and brioche are all soft-textured French
breads, suitable for spreading with cream cheese or butter.
And both Swedish limpa (a rye loaf with a subtle, intriguing
taste) and Scottish oatmeal bread are superior toasting
and snacking breads.
Pain Ordinaire (Everyday
French Baguettes or Batards)
KS Quotient
Fairly Easy: Fuss-free ingredients, added all at once.
Hand-shaping required.
It seems ironic that the most magnificent of French breads,
the baguette, is called pain ordinaire, meaning ordinary, or
everyday, bread. True, the ingredients are few in number
and completely ordinary, but good baguettes are a thing of
beauty, combining a shatteringly, breathtakingly crisp crust;
soft, moist, yeasty interior; and a simple, balanced shape
brilliantly designed for breaking, not sawing, a loaf into
portions.
The Kneadlessly Simple method is well-suited to making
fine-tasting baguettes because the long, slow, retarded rise
coaxes out as much flavor as possible from the flour and
yeast, which are, of course, all you've got to work with
besides the salt. (Some bakers feel that using sea salt and
spring water can add a flavor dimension, but in my blind
tastings, almost nobody—including me—noticed any
difference.) The "micro-kneading" that naturally occurs
during the lengthy rise also ensures thorough gluten
development, an essential for the good loaf structure. And,
the more fully hydrated Kneadlessly Simple dough keeps
the interior of the loaves soft longer than is normal for
French bread—for up to three or four days!
The only "gotcha" is the shaping, which is really just a
matter of practice. Plus, the loaves will taste wonderful and
seem impressive even if they don't look quite as perfect as
those from a French bakery. Moreover, you've also got a
convenient fallback position: If your baguettes come out
looking a little stubby, just say you were aiming for the
slightly shorter loaves called bâtards! (Or that longer loaves
wouldn't fit in your oven!)
This recipe requires a two-loaf baguette tray, but not to
worry—if you don't have one on hand it's easy to fashion
homemade trays from heavy-duty aluminum foil; see To
Make a Baguette Tray for instructions. This dough can also
be used to make another attractively shaped loaf called a
fougasse (see Fougasse (or Black Olive Fougasse) for
instructions).
Yield: Two 14-inch baguettes (or 10-inch bâtards)
3¼ cups (16.25 ounces) unbleached all-purpose white
flour or white bread flour, plus more as needed
1½ teaspoons table salt
¾ teaspoon instant, fast-rising, or bread machine
yeast
1½ cups ice water, plus more if needed
Corn oil, canola oil, or other flavorless vegetable oil for
coating dough and pan
First Rise In a large bowl, thoroughly stir together the
flour, salt, and yeast. Vigorously stir the water into the
bowl, scraping down the sides and mixing until the
ingredients are thoroughly blended. If the mixture is too
dry to incorporate all the flour, a bit at a time, stir in just
enough more water to blend the ingredients. The
dough should be very stiff; if necessary, add in enough
more flour to stiffen it. Brush or spray the top with oil.
Tightly cover the bowl with plastic wrap. If desired, for
best flavor or for convenience, you can refrigerate the
dough for 3 to 10 hours. Then let rise at cool room
temperature for 20 to 24 hours. If convenient,
vigorously stir the dough partway through the rise.
Second Rise If the dough is sticky, working in the
bowl, lift and turn it while dusting with and smoothing in
more flour until stiffened and easy to handle; don't
worry if it is not completely deflated. Divide the dough
in half (preferably with oiled kitchen shears), placing
each portion on a flour-dusted work surface. Let rest
for 10 minutes.
Dusting with flour as needed to facilitate handling,
shape one portion into a rough log, then press out the
dough into a 7 x 11-inch evenly thick rectangle.
Working from a 7-inch side, lift up and fold the
rectangle into thirds as if folding a business letter.
Again press out into a rectangle; then working from an
11-inch side, roll up tightly into a log. Carefully press
and pinch the seam tightly closed all along the length of
the log. Dusting with flour as needed, roll the log back
and forth on the surface, stretching and smoothing it
out from the center until evenly thick and about 13½ to
14½ inches long. (For a bâtard, roll and stretch out until
about 10 inches.) Transfer to an oiled metal baguette
tray (or to a well-oiled, homemade foil tray set on a
baking sheet—see To Make a Baguette Tray ). Repeat
the shaping with the second portion. Using a singleedged razor blade if possible, or well-oiled serrated
knife or kitchen shears, make four or five 3-inch-long,
¼-inch-deep, evenly spaced slashes on a slight
diagonally along each loaf. Brush or spray the tops
with oil. Tent the pan (or homemade tray) with nonstick
spray—coated foil.
Let Rise Using Either of These Methods The
extended rise will produce the absolute best flavor: for
a 45- to 75-minute regular rise, let stand at warm room
temperature; for an extended rise, refrigerate for 4 to
24 hours, then set out at room temperature. Continue
the rise until the dough doubles from the deflated size,
removing the foil if the dough nears it.
Baking Preliminaries 20 minutes before baking time,
put a rack in the lower third of the oven; preheat to
500°F. Place a broiler pan on the oven bottom. Have
ready a large rimless or low-rimmed baking sheet
lined with baking parchment.
Baking Reduce the temperature to 475°F. Immediately
add a cup of ice water to the broiler pan, being careful
of splattering and steam. Generously spritz or brush
the loaves with water. Bake on the lower rack for 8 to
10 minutes, or until the loaves are just firm enough to
hold their shape. Roll them out onto the parchmentlined baking sheet, and continue baking for 20 to 25
minutes, turning once or twice for all-over browning,
until the loaves are well browned and their crusts very
crisp. Test with a skewer inserted in the thickest part
until it comes out with just slightly moist particles
clinging to the bottom portion (or until the center
registers 210° to 212°F on an instant-read
thermometer). Then bake for 5 minutes more to be
sure the centers are done. Transfer to a wire rack; let
cool thoroughly.
To Make a Baguette Tray
Tear off two 20-inch-long sheets from a large (18-inchwide) roll of heavy-duty foil. Lay one sheet on top of the
other, shiny sides facing. (The dull side promotes
browning better than the shiny side.) Working from an
18-inch side, fold the two layers in half, producing a
long, sturdy 10-inch-wide strip. Still working from the
18-inch side, fold the strip in half, then pinch and press
together along the fold line to produce a sturdy 2-inchhigh center pleat. Next, working just below the pleat,
open the two foil layers out away from the pleat on
each side and bend them to create two parallel,
connected U-shaped troughs. Lay the tray on a large
rimmed baking sheet.
Serving and Storing
Tear or cut the loaves into portions; the bread tastes
good warm but the texture will be better when it cools.
Cool completely before storing. To maintain the crisp
crust, store draped with a clean tea towel or in a heavy
paper bag. Or store wrapped in foil: The crust will
soften, but can be crisped by heating the loaf,
uncovered, in a 400°F oven for a few minutes. The
baguettes keep at room temperature for up to 3 days,
and may be frozen, airtight, for up to 1 month.
Fougasse (or Black Olive
Fougasse)
KS Quotient
Fairly Easy: Fuss-free ingredients, added all at once.
Hand-shaping required.
Fougasse, which means "ladder," was originally a hearth
bread and is related to focaccia. A tradition in Provence,
fougasses are often flavored with black olives, anchovy
paste, pork cracklings, or Gruyère cheese. Slightly sweet
versions are also readied for holidays.
Like focaccia, fougasses are fairly thin, flat, and crisp, but,
as their name suggests, their appearance is entirely
different: The most prominent feature is usually deep
slashes, or "ladders," that cut through and open up
decorative slits in the dough; the effect is somewhat like
that of the cutwork patterns in some fine table and bed
linens. Besides adding visual drama, the ladders yield
especially crusty loaves by increasing the surface area
directly exposed to the heat.
One of the most artful and popular fougasse loaf shapes,
which I love and call for here, is the "tree of life" form: One
elongated slot is slashed down the center of a gently
rounded pine tree shape (think rounded triangle or
teardrop) and four or so perpendicular side openings fan
out from the center slit on each side to suggest its
branches. Don't worry, it's easier than it sounds; even an
inexpert rendering looks enticing.
Traditional Provençal bakers also create much more
elaborate shapes of intertwined double or even triple trees,
as well as assorted round and other (usually symmetrical)
fantasy forms. Sometimes fougasses include several
dozen "ladders," and are almost too pretty to eat.
To make fougasses, prepare the Pain Ordinaire (Everyday
French Baguettes or Bâtards) dough and complete the first
rise as directed. Then use the following recipe to prepare a
"plain" or black olive version. The olives are a nice addition
but hardly necessary: The "plain" fougasses have a
remarkable chewiness that complements the already
enticing French bread flavor.
Yield: four 9- to 10-inch-long fougasses
½ cup well-drained, chopped (pitted) Niçoise olives,
optional
1 batch Pain Ordinaire (Everyday French Baguettes or
Bâtards) dough, ready for its second rise
Unbleached all-purpose white flour or bread flour for
dusting
White or yellow cornmeal for dusting
Second Rise If adding olives, pat them dry on paper
towels, then evenly fold into the dough. If it is sticky,
working in the bowl, lift and turn it while dusting with
and smoothing in more flour until stiffened and easy to
handle. Spray four 10-inch-long sheets of baking
parchment with nonstick spray. Generously dust them
with flour.
Divide the dough in quarters (oiled kitchen shears
work best), placing each portion on a sheet. Let rest
for 10 minutes. Dusting the dough with flour as
needed, pat and press one portion out into an 8- to 9inch-long tree of life (rounded triangle) shape. Using
well-oiled kitchen shears or a pizza wheel, cut a 5- to
6-inch-long center slash that goes completely through
the dough and opens up a gash down its length, but
stops about an inch short of the point and bottom
edge. Cut three or four 1- to 1½-inch-long slashes that
fan out and form slots on each side of the center one;
be sure that the slashes don't cut into one another or
through the edge of the dough. With flour-dusted
fingertips, stretch and pull the dough out from the top,
bottom, and sides so the cuts open up as much as
possible; otherwise they may close up as the dough
rises. Tent the fougasses with nonstick spray—coated
foil.
Let Rise Using Either of These Methods For a 30- to
60-minute regular rise, let stand at warm room
temperature; for an extended rise, refrigerate for 4 to
24 hours, then let stand, covered, until warmed up. For
loaves that have a well-defined shape, large holes, and
more chew, let rise for the minimum time; for loaves
with a softer, plumper look and lighter crumb, let rise
longer.
Baking Preliminaries 20 minutes before baking time,
put a rack in the lowest position in the oven; preheat to
500°F. Place a broiler pan on the oven bottom. Place
a very large rimmed baking sheet upside down on the
lowest rack. Generously spritz or brush the loaves with
water, then generously dust them with cornmeal.
Baking Reduce the temperature to 475°F. Immediately
add a cup of ice water to the broiler pan, being careful
of splattering and steam. Remove the heated upsidedown baking sheet and arrange two fougasses (with
parchment) on it. Return the baking sheet to the lowest
rack and bake for 12 to 16 minutes, or until the loaves
are well browned and their crusts very crisp. Test with
a skewer inserted in the thickest part until it comes out
with just slightly moist particles clinging to the bottom
portion (or until the center registers 205° to 207°F on
an instant-read thermometer). Then bake for about 3
minutes more, just to be sure the centers are done.
Transfer to a wire rack and let cool. Repeat the baking
with the remaining two fougasses.
Serving and Storing
Tear or cut the fougasses into portions; eat warm or
cool. Cool completely before storing. To maintain the
crisp crust, store draped with a clean tea towel or in a
heavy paper bag. Or store wrapped in foil: The crusts
will soften, but can be crisped by heating the loaf,
uncovered, in a 400°F oven for 5 minutes. The
fougasses keep at room temperature for up to 3 days,
and may be frozen, airtight, for up to 1 month.
Brioche
KS Quotient
Fairly Easy: Two-stage mixing. No hand-shaping.
Brioche is one of the richest and most finely textured yeast
doughs; individual slices almost look as soft and golden as
pound cake, though they are almost never more than faintly
sweet. Brioche is lovely eaten both as is and in fancy
French toast, and is sometimes called for in very elegant
bread puddings. (I personally can't bear to use brioche for
this purpose; it seems too contrary to the traditional notion
of bread puddings as economizers designed to salvage
pieces of unwanted everyday bread.)
The most elaborate brioche is brioche á tête, or "brioche
with a head," which is baked in a special fluted pan and
has a perky topknot rising in the center. Because the
Kneadlessly Simple dough tends to be soft, and since I
recall my fellow pastry school students and I producing
many lopsided and sunken topknots while learning to work
with brioche dough, I have opted for an easier, but equally
delicious, "headless" version here. Bake it in a large loaf
pan, or for a beautiful, foolproof decorative look, in a
kugelhopf, Bundt, or similar fluted tube pan. (For a very
sophisticated coffee cake, fold in chocolate shards and top
the brioche with chocolate ganache glaze as directed in the
variation at the end of the recipe.)
This recipe calls for beating in a lot of butter and eggs
before the second rise, so, while this can be done by hand,
it's easiest to use a heavy-duty stand mixer fitted with a
paddle.
Yield: 1 brioche, 14 to 16 slices
2½ cups (12.5 ounces) unbleached all-purpose white
flour, plus ¾ cup (3.75 ounces), plus more as needed
5½ tablespoons granulated sugar, divided
1¼ teaspoons table salt
1 teaspoon instant, fast-rising, or bread machine yeast
1¼ cups plus 2 tablespoons ice water, plus more if
needed
10 tablespoons unsalted butter, soft but not melted, cut
into ½-inch pieces, plus more for brushing dough top
and brioche pan
1/3 cup good-quality instant nonfat dry milk powder
(don't use a generic brand)
2 large eggs plus 1 egg yolk, at room temperature,
plus 1 egg for egg wash (if using loaf pan)
First Rise In a large bowl, thoroughly stir together 2½
cups of the flour, 3 tablespoons sugar, the salt, and
yeast. Vigorously stir in the ice water, scraping down
the bowl and mixing until the dough is thoroughly
blended. If the mixture is too dry to blend together, stir
in just enough more ice water to facilitate mixing and
yield a slightly firm dough. If the mixture is soft, stir in
enough more flour to make it barely firm. Evenly brush
the top lightly with butter. Cover the bowl with plastic
wrap. If desired, for best flavor or for convenience, you
can refrigerate the dough for 3 to 10 hours. Then let
rise at cool room temperature for 12 to 18 hours.
Second Rise In a medium bowl, whisk together the
remaining 2½ tablespoons sugar and the milk powder,
then thoroughly whisk in the 2 eggs plus egg yolk until
well blended. Gradually add the egg mixture, then ¾
cup of the flour into the dough and mix vigorously to
incorporate; use a paddle and heavy-duty mixer on low
if available. Add the butter a tablespoon or two at a
time, mixing after each addition until smoothly
incorporated. If dough still seems very moist and soft,
mix in a few tablespoons more flour until slightly thicker
than thick pancake batter. Turn out into a well-greased
8- to 10-cup Bundt or kugelhopf pan, or a 9 x 5-inch
loaf pan. Cover with nonstick spray—coated plastic
wrap and refrigerate for 1 hour to firm up the butter.
Let Rise Using Either of These Methods For a 2½- to
3½-hour regular rise, let stand at cool room
temperature; or for an extended rise, refrigerate for 4
to 48 hours, then set out at room temperature. Let rise
until the dough reaches the pan rim if using an 8-cup
tube pan or loaf pan or to 1 inch below the rim if using
a 10-cup pan. Remove the plastic wrap as the dough
nears it.
Baking Preliminaries 15 minutes before baking time,
place a rack in the lower third of the oven; preheat to
350°F.
Baking If baking in the loaf pan, mix the remaining egg
for the egg wash with 2 teaspoons water. Evenly brush
over the dough top. Omit the glaze if the brioche will be
baked in a fluted pan and served inverted. Bake on the
lower rack for 35 to 45 minutes, covering the surface
with foil partway through to prevent over-browning if
necessary. Continue baking for 15 to 25 minutes
more, until a skewer inserted in the thickest part
comes out with just a few particles clinging to the
bottom (or until the center registers 201° to 203°F on
an instant-read thermometer); the baking time will be
longer in the loaf pan. When the brioche seems done,
bake for 5 minutes longer to ensure the center is
baked through. Cool in the pan on a wire rack for 10
minutes. Run a knife around the brioche to loosen it
from the pan and transfer to the rack; let cool
completely.
Tip
The accelerated rise is not offered for this bread, as
the extra warmth might cause the butter in the dough to
soften too much.
Serving and Storing
The loaf tastes and slices best fresh and at room
temperature. Cool completely before storing airtight in
plastic or foil. The bread will keep at room temperature
for up 3 days, and may be frozen, airtight, for up to 2
months.
Variation
Brioche with Chocolate Shards
Shave or chop 8 to 10 ounces of fine-quality bittersweet or
semisweet chocolate into shards. Thoroughly fold into the
dough right after the butter and extra flour have been
incorporated (before the second rise). Proceed as for the
original. Top the finished brioche with Chocolate Ganache
Glaze while still warm, if desired.
French Walnut Bread (Pain aux
Noix)
KS Quotient
Super Easy: Short ingredient list; one-stage mixing.
No hand-shaping.
This earthy, nutty-tasting bread is a French favorite,
especially in the Dordogne region. It is wonderful topped
with a creamy cheese or fine butter. Some pain aux noix
recipes are hand-shaped and fairly elaborate; others are
fairly simple, like this one. The only remotely fussy step is
toasting the walnuts, which I don't skip because it really
intensifies and mellows their flavor. I don't skimp on their
quality either—they must be very fresh and nutty-sweet.
My 3 ½-quart French enameled cast iron Dutch oven works
well for baking this bread, but any similar 3- to 4-quart
heavy pot will do. (If you don't have a Dutch oven, see
Choosing the Right Pot: for other options.)
Yield: 1 large loaf, 12 to 14 portions or slices
2 cups (10 ounces) whole wheat flour, plus extra as
needed
2 cups (10 ounces) unbleached all-purpose white flour
or white bread flour
1 teaspoon granulated sugar
2 teaspoons table salt
¾ teaspoon instant, fast-rising, or bread machine
yeast
2 cups ice water, plus more if needed
Walnut oil or flavorless vegetable oil for coating dough
top and baking pot
1½ cups fresh, fine-quality walnut halves
First Rise In a large bowl, thoroughly stir together the
whole wheat and white flour, sugar, salt, and yeast.
Vigorously stir in the water, scraping down the bowl
and mixing until the dough is well blended and smooth.
If the mixture is too dry to incorporate all the flour, a bit
at a time, stir in just enough more water to blend the
ingredients; don't over-moisten, as the dough should
be very stiff. Brush or spray the top with oil. Tightly
cover the bowl with plastic wrap. If desired, for best
flavor or for convenience, you can refrigerate the
dough for 3 to 10 hours. Then let rise at cool room
temperature for 12 to 18 hours.
Meanwhile, reserve 4 perfect walnut halves for garnish.
Spread the remainder on a baking sheet and lightly
toast, stirring several times, in a preheated 325°F
oven for 10 to 15 minutes, or until fragrant and just
lightly browned. Let cool. Chop finely (in a food
processor, if desired).
Second Rise Vigorously stir the cooled walnuts into
the dough. If it is not stiff, stir in enough more whole
wheat flour to make it hard to stir. Using an oiled
rubber spatula, lift and fold the dough in towards the
center, working all the way around the bowl. Invert it
into a well-oiled, then flour-dusted, 3-quart (or larger)
heavy metal pot (or use a flat-bottomed round
casserole with a lid). Brush or spray the top with oil,
then smooth out the surface with an oiled rubber
spatula or fingertips. Cut ½-inch-deep slashes to form
an x in the center top; well-oiled kitchen shears work
best. Put the 4 untoasted walnut halves in the angles of
the x for garnish; press down very firmly to imbed them.
Cover the pot with its lid.
Let Rise Using Any of These Methods For a 1½- to
2½-hour regular rise, let stand at warm room
temperature; for a 1- to 2-hour accelerated rise, let
stand in a turned-off microwave along with 1 cup of
boiling-hot water; or for an extended rise, refrigerate
for 4 to 24 hours, then set out at room temperature.
Continue until the dough doubles from its deflated size.
Baking Preliminaries 15 minutes before baking time,
place a rack in the lower third of the oven; preheat to
400°F. Lightly dust the dough top with whole wheat
flour.
Baking Bake on the lower rack, covered, for 45
minutes. Remove the lid and continue baking for 20 to
30 minutes, or until the top is well browned and a
skewer inserted in the thickest part comes out with just
a few particles clinging to the bottom (or until the
center registers 207° to 210°F on an instant-read
thermometer). Then bake for 5 minutes more to ensure
the center is done. Cool in the pan on a wire rack for
10 minutes. Remove the loaf to the rack, running a
knife around the edges to loosen it, if necessary.
Serving and Storing
The loaf tastes and slices best at room temperature.
Cool completely before storing airtight in plastic or foil.
The bread will keep at room temperature for up to 3
days, and may be frozen, airtight, for up to 2 months.
Yeasted Pain d'Epice
KS Quotient
Easy: Fairly lengthy ingredient list, but easy one-stage
mixing. No hand-shaping.
This aromatic, flavorful, fruit-and-spice loaf is a French
favorite, particularly in the farthest eastern region of Alsace.
The French name notwithstanding, it is reminiscent of some
traditional German honey cakes and gingerbreads called
Lebkuchen—no great surprise considering that this
territory lies across the Rhine river from Germany and has
been under German rule on and off over the centuries.
Like many old-fashioned Lebkuchen, this recipe relies
solely (and successfully) on honey for it sweetness and
moistness. And, though it's enriched with dried fruits and
spices, it contains no butter or eggs. These latter two were
probably omitted because early church fasting rules
prohibited rich fare during the pre-Christmas season of
Advent, as well as during Lent.
The anise seeds, crystallized ginger, orange zest, and
careful blend of ground spices give this admittedly plainlooking loaf a compelling, complex flavor that keeps calling
you back. It's a fine change of pace from cinnamon-raisin
toast—and quite spectacular spread with cream cheese or
almond butter. Although popular during the holidays, it is not
overly sweet. It isn't normally iced in France, but the
Powdered Sugar—Lemon Drizzle is a nice way to dress it
up.
Yield: 1 large loaf, 12 to 14 slices
½ cup each dark raisins and golden raisins
2¼ cups (11.25 ounces) unbleached white bread flour
or unbleached all-purpose white flour, plus more as
needed
1 cup (5 ounces) medium rye flour or whole wheat flour
2 teaspoons anise seeds
1½ teaspoons instant, fast-rising, or bread machine
yeast
1¼ teaspoon table salt
¼ teaspoon ground ginger
¼ teaspoon ground cinnamon
¼ teaspoon ground cloves
¼ teaspoon ground allspice
½ cup clover honey or other mild honey
1½ teaspoons finely grated orange zest
1½ cups ice water, plus more if needed
¼ cup diced (1/8 -inch pieces) crystallized ginger
Flavorless oil for coating dough top
2 teaspoons clover honey or other mild honey, blended
with 2 teaspoons water for wash
First Rise Soak the raisins in hot water for 10 minutes,
then drain well and let cool thoroughly. In a large bowl,
thoroughly stir together the white and rye flours, anise
seeds, yeast, salt, ginger, cinnamon, cloves, and
allspice. In another bowl or measuring cup, thoroughly
whisk the honey and orange zest into the water.
Vigorously stir the mixture along with the crystallized
ginger and raisins into the bowl with the flours,
scraping down the bowl sides and mixing just until the
dough is thoroughly blended. If the dough is too dry to
mix together, gradually add in just enough more ice
water to facilitate mixing, as the dough should be stiff.
If necessary, add in more white flour to stiffen it. Brush
or spray the top with oil. Tightly cover the bowl with
plastic wrap. If desired, for best flavor or for
convenience, you can refrigerate the dough for 3 to 10
hours. Then let rise at cool room temperature for 8 to
12 hours.
Second Rise Vigorously stir the dough, adding
enough more flour to yield a very stiff consistency. Turn
it out into a well-oiled 9 x 5-inch loaf pan. Brush or
spray the top with oil. Smooth out and press the dough
evenly into the pan with oiled fingertips or a rubber
spatula. Cover with nonstick spray—coated plastic
wrap.
Let Rise Using Any of These Methods For a 1½- to
2½-hour regular rise, let stand at warm room
temperature; for a 1- to 2-hour accelerated rise, let
stand in a turned-off microwave along with 1 cup of
boiling-hot water; or for an extended rise, refrigerate
for 4 to 24 hours, then set out at room temperature.
Remove the plastic wrap when the dough nears it, then
continue the rise until dough extends ½ inch above the
pan rim.
Baking Preliminaries 15 minutes before baking time,
put a rack in the lower third of the oven; preheat to
350°F. Evenly brush the top with the honey wash.
Baking Bake on the lower rack for 50 to 60 minutes, or
until the loaf is well browned, covering with foil as
needed. Continue baking for 15 to 20 minutes more,
until a skewer inserted in the thickest part comes out
with just a few particles on the end (or until the center
registers 200° to 202°F on an instant-read
thermometer). Bake for 5 to 10 minutes longer to
ensure the center is done. Cool in the pan on a wire
rack for 10 minutes. Turn the loaf onto the rack; cool
thoroughly.
If desired, decoratively top the loaf with the Powdered
Sugar—Lemon Drizzle, allowing it drip attractively
down the sides. Let the loaf stand a few minutes until
the icing sets before serving.
Serving and Storing
The loaf slices best when thoroughly cooled and tastes
best after being allowed to ripen for a few hours. Store
airtight wrapped in plastic. The bread will keep at
room temperature for up to 3 days, and may be frozen,
airtight, for up to 2 months.
Rosemary Focaccia with
Coarse Salt
KS Quotient
Easy: Few ingredients, easily mixed. Minimal handshaping.
The name focaccia comes from the Latin focus, meaning
"hearth," and this amazingly crusty flatbread was prepared
long before modern-day ovens came on the scene.
Especially in Italy, some versions are still baked on flat
stones or tiles placed on coals, but for those without a
hearth, a sheet pan set near the bottom of a hot, hot oven
will do very well.
Puffy with hundreds of air pockets, crispy-chewy, and
amazingly fragrant, focaccia makes the absolute most of
simple ingredients like a little olive oil, coarse salt, and
fresh rosemary. Don't even consider using the dried herb:
Not only would its coarse, stick-like texture be intrusive, but
during rehydration, it would draw too much moisture from
the dough and discourage the formation of the gas bubbles
essential for its enticing texture. This focaccia is so
addictive, my husband and I often devour half a pan even
before it has had time to cool. (I tell myself it's okay
because we're eating mostly air!)
Yield: 12 to 15 servings
2¾ cups (13.75 ounces) unbleached all-purpose white
flour, plus more as needed
2 tablespoons fresh rosemary needles (remove the
stems), chopped fairly fine
¾ teaspoon table salt
1 teaspoon instant, fast-rising, or bread machine yeast
1 1/3 cups plus ½ teaspoon ice water, plus more as
needed
2 tablespoons olive oil, divided, plus more as needed
¾ teaspoon sea salt or other coarse crystal salt
First Rise In a large bowl, thoroughly stir together the
flour, rosemary, table salt, and yeast. Vigorously stir in
the water, scraping down the bowl and mixing until the
dough is thoroughly blended. Vigorously stir in 1
tablespoon of the olive oil. If the mixture is too dry to
blend together, stir in just enough more ice water to
facilitate mixing, but don't over-moisten, as the dough
should be slightly stiff. If too wet, stir in enough more
flour to firm it slightly. Evenly brush the top lightly with
oil. Cover the bowl with plastic wrap. If desired, for
best flavor or for convenience, you can refrigerate the
dough for 3 to 10 hours. Then let rise at cool room
temperature for 12 to 18 hours. If convenient,
vigorously stir the dough partway through the rise.
Second Rise Brush a 15 x 10 x 1-inch (or similar)
baking pan with olive oil, then line the pan with baking
parchment. Brush the parchment with olive oil. Using a
well-oiled rubber spatula, turn the dough out onto the
pan; try not to deflate it any more than necessary.
Drizzle the dough with 1 tablespoon of olive oil. With
well-oiled hands, lightly pat and press out the dough
until it is evenly thick and extends to within 1 inch of the
edges all around. Tent the pan with nonstick spray—
coated plastic wrap.
Let Rise Using Either of These Methods For a 2 ½- to
3½-hour regular rise, let stand at warm room
temperature; or for an extended rise, refrigerate for 4
to 24 hours, then set out at room temperature.
Continue the rise until the dough has almost doubled
from the deflated size. (If the pan has a 1-inch rim, the
dough should be ¼ inch below it.) Just before baking,
with oiled fingertips, make deep indentations, or
dimples, all over the dough. Sprinkle evenly with
coarse salt.
Baking Preliminaries 20 minutes before baking time,
place a rack in lowest position in the oven; preheat to
500°F. Place the broiler pan on the oven floor.
Baking Reduce the temperature to 475°F. Add a cup
of ice water to the broiler pan, being careful of
splattering and steam. Bake on the lowest rack for 20
to 30 minutes, until golden brown, turning the pan from
front to back for even browning about halfway through.
Bake for 5 to 10 minutes more (or until the center
registers 209° to 212°F on an instant-read
thermometer) to be sure the center is done. Cool in the
pan on a wire rack for 10 minutes. Using wide
spatulas, lift the bread from the pan onto the rack to
cool, or onto a cutting board to cut into servings.
Tip
If you don't have fresh rosemary, try the fennel seed
and oregano or thyme focaccia variation below. Don't
add any more dried oregano or thyme than called for,
because these herbs both have yeast-inhibiting
chemicals that, in quantity, can discourage rising.
Serving and Storing
Focaccia is best when fresh. Cut into rectangles and
serve warm or at room temperature. Drizzle with
additional olive oil or provide more as a dipping
sauce, if desired. To maintain crispness, keep, draped
with a tea towel, at cool room temperature for 2 to 3
days. It may be frozen, airtight, for up to 2 months, but
should be crisped in a preheated 400°F oven before
serving.
Variation
Fennel Seed and Oregano (or Thyme) Focaccia with
Salt
Prepare the dough exactly as for the rosemary version
except omit the rosemary. When garnishing with the sea
salt just before baking, also sprinkle the dough evenly with
½ teaspoon fennel seeds and ½ teaspoon dried oregano
leaves or dried thyme leaves.
Ciabatta
KS Quotient
Easy: Few ingredients, easily mixed. Minimal handshaping.
Ciabatta means "slipper," and, if you put your imagination
to work, these airy, open-crumbed loaves do vaguely
resemble big, floppy slippers or soft shoes. If you don't use
your imagination, they may simply look like blobs in the
shape of Mr. Peanut (minus his top hat!). A tidy shape is
not all that important, though, because the defining
characteristic of the loaf is a noticeably holey, puffy interior,
which requires a slightly softer than normal dough.
Basically, you form the breads by dumping the dough
portions onto flour-dusted sheets of baking parchment,
patting each into an oblong, then gently pushing them in at
the "waist" to create a vaguely slipper- or shoe-like form.
The loaves are wonderfully crusty on the outside and soft on
the inside, and, so long as the dough isn't over-floured or
over-manipulated, full of holes. If these are absent, console
yourself that you're really only missing out on extra air!
Yield: 2 ciabatta loaves
3 cups (15 ounces) unbleached all-purpose white flour,
plus more as needed
Scant 1½ teaspoons table salt
¾ teaspoon instant, fast-rising, or bread machine
yeast
1½ cups ice water, plus more if needed
1 tablespoon olive oil, plus extra for brushing loaf top
First Rise In a large bowl, thoroughly stir together the
flour, salt, and yeast. Vigorously stir in the water,
scraping down the bowl and mixing until the dough is
thoroughly blended. Vigorously stir in the olive oil. If the
mixture is too stiff to incorporate all the flour, stir in just
a little more ice water, but don't over-moisten, as it
should be slightly stiff. If too wet, stir in enough more
flour to firm it slightly. Evenly brush the top lightly with
more olive oil. Cover the bowl with plastic wrap. If
desired, for best flavor or for convenience, you can
refrigerate the dough for 3 to 10 hours. Then let rise at
cool room temperature for 12 to 15 hours.
Second Rise Spray two 9 x 12-inch sheets of baking
parchment with nonstick spray, then dust each with ¼
cup flour, mounding it just slightly in the center. Line a
very large rimless baking sheet (or the back of a
rimmed sheet) with a new sheet of baking parchment;
dust the parchment with flour.
Using a well-oiled rubber spatula, gently loosen the
dough from the bowl sides all the way around, trying
not to deflate it any more than necessary. Using welloiled kitchen shears and working so as to deflate the
dough as little as possible, cut it in half, then turn out
each portion onto the prepared parchment sheets.
Dust the dough tops with flour. With well-oiled
fingertips, very gently push and pat each portion out
into an oblong, or "slipper," about 9 x 5½ inches; don't
worry about being exact. Then push in the sides so the
middle of each "slipper" is narrower than its heel and
toe. Gently run a flour-dusted wide-bladed spatula
under the slippers to loosen them from the parchment.
One at a time, lift up the loaves and invert them,
spaced as far apart as possible, onto the parchmentlined baking sheet; the crinkled, floured look is
traditional, so don't brush off all the excess flour.
Readjust the dough to re-form the slipper shapes, if
necessary. Press deep indentations, or dimples, in the
slippers all over with flour-dusted fingertips. Tent the
baking sheet with nonstick spray—coated foil.
Let Rise Using Either of These Methods For a 1½- to
2½-hour regular rise, let stand at warm room
temperature; or for an extended rise, refrigerate for 4
to 24 hours, then set out at room temperature.
Continue the rise until the dough has doubled from the
deflated size, removing the foil as the dough nears it.
Baking Preliminaries 20 minutes before baking time,
place a rack in lowest position in the oven; preheat to
500°F. Set a broiler pan on the oven floor.
Baking Add a cup of ice water to the broiler pan, being
careful of splattering and steam. Reduce the
temperature to 475°F and bake on the lowest rack for
15 to 20 minutes, until the loaves are golden and
crusty. Bake for 5 to 10 minutes more, until a skewer
inserted in the thickest part comes out with just a few
crumbs on the tip (or until the center registers 208° to
210°F on an instant-read thermometer) to be sure the
centers are done. Then place the pan on the floor of
the oven for 2 to 4 minutes to brown the bottoms of the
loaves; lift them up to check. Let stand for 10 minutes
on the pan. Transfer the loaves to a wire rack, and let
stand until cooled.
Serving and Storing
Slices best when completely cooled. Serve sliced
horizontally for sandwich bread or grilling or vertically
for snacking. Keeps, draped with a tea towel, at cool
room temperature for 2 to 3 days. It may be frozen,
airtight, for up to 2 months, but should be crisped in a
preheated 400°F oven before serving.
Neapolitan-Style Pizza Dough
KS Quotient
Super-Easy: A minimum of ingredients, mixed all at
once. Easy hand-shaping.
This is a simple, easy to handle, and virtually foolproof
pizza dough calling for the most basic and economical
supplies—yeast, salt, olive oil, and all-purpose flour. Some
recipes call for a high-gluten flour, but I like regular flour
better. The flat, thin layer doesn't need the extra gluten for
support and the dough is more tender and much easier to
stretch and shape without it. Because relatively little gluten
development is necessary, the dough also requires less
"micro-kneading" time than usual. After 4 to 12 hours on the
countertop, it is ready to use, refrigerate, or freeze until
needed.
The recipe makes enough dough for two 11- to 12-inch
pizzas. If desired, freeze one or both dough portions for up
to a month. Use each dough portion for one traditional
Tomato Sauce and Mozzarella Pizza, or for another pizza
of your own choosing. For your convenience, I've also
provided my pizza sauce recipe, although you can, of
course, substitute any tomato-based sauce desired.
Yield: 2 11-12 inch pizza
3 cups (15 ounces) unbleached all-purpose white flour,
plus more as needed
Generous 1¼ teaspoons table salt
½ teaspoon instant, fast-rising, or bread machine
yeast
Scant 1½ cups ice water, plus more if needed
1 tablespoon olive oil, plus more for brushing over
dough and pans
First Rise In a large bowl, thoroughly stir together the
flour, salt, and yeast. Vigorously stir in the water,
scraping down the sides, just until thoroughly blended.
Stir in the olive oil until evenly incorporated. If the
mixture is too dry to mix, add in just enough water to
facilitate mixing, as the dough should be firm. If the
dough is soft, stir in enough more flour to firm it. Brush
the top with olive oil. Cover the bowl with plastic wrap.
If desired, for best flavor or for convenience, you can
refrigerate the dough for 3 to 10 hours. Then let rise at
cool room temperature for 4 to 12 hours.
Second Rise Stir the dough to deflate it. Divide it in
half using oiled kitchen shears. The dough portions
can be used immediately; or refrigerated for up to 12
hours and then used; or frozen, wrapped airtight, for up
to 1 month. Use each half to prepare one pizza,
following the recipe for Tomato Sauce and Mozzarella
Pizza or another recipe of your choosing.
Tomato Sauce and Mozzarella
Pizza
KS Quotient
Super-Easy: Quick; simple hand-shaping required.
Traditionalists insist that only a little cooked tomato sauce
and soft, fresh mozzarella should top the classic version
called Pizza Margherita. Since I really like to add some
black olives, too, I'll just say that my version is an almost but
not quite authentic Pizza Margherita. If you feel you'll miss
the meatiness of typical American pies, I won't tell if you
replace the olives with thinly sliced pepperoni or hard
sausage as well. Just don't overload on extras or your pizza
won't crisp as it should. Also, if at all possible, use fresh
mozzarella; it will instantly raise the quality of your pie to
gourmet.
Note that the recipe is designed so you can ready your
pizza on a 12-inch pizza pan or a sheet of baking
parchment. The dough, along with its pan or parchment, is
then slipped onto a preheated baking sheet set on the
lowest rack of the oven. This crisps the crust and eliminates
any chance of sogginess, yet obviates the need for a pizza
stone or baking tiles. (It's fine to use them if you have them,
of course.) Once the dough is puffed and partly baked, add
the toppings, then slip the pie back into the oven for its final
turn. The result will assure your reputation as a first-rate
pizza maker.
Yield: One 11½- to 12-inch pizza
½ recipe Neapolitan-Style Pizza Dough, ready for the
second rise
1/3 recipe Herbed Cooked Tomato Pizza Sauce , or ¾
cup homemade or store-bought tomato-based pizza
sauce, at room temperature
¼ cup coarsely sliced (pitted) black Kalamata,
Niçoise, or other flavorful brined black olives, optional
4 to 6 ounces fresh mozzarella cheese, thinly sliced
Second Rise Place the dough portion on a 12-inch
lightly oiled pizza pan or a large sheet of nonstick
spray—coated baking parchment. Drizzle lightly with
olive oil, then press and stretch the dough into an 11½to 12-inch round with oiled fingertips; if it is resistant
and springs back, let it rest for a few minutes before
continuing. The shape doesn't have to be perfect, but
be sure to push the dough outward to slightly build up
and thicken the edges (which would burn if too thin).
Set aside to rise, tented with nonstick spray—coated
foil, for 25 to 45 minutes, depending on whether you
prefer a thin, slightly dense crust, or a lighter, mediumthick one.
Baking Preliminaries 20 minutes before baking time,
place a rack in the lowest slot of the oven; preheat to
500°F. Place a rimless baking sheet (or place a
rimmed sheet upside down) on the lowest rack.
Baking Place the pizza pan with the dough (or the
dough on the parchment) on the preheated baking
sheet. Bake for 7 to 10 minutes, or until the dough
begins to firm and puff up. Remove from the oven and
spread the sauce to within 1/3 inch of the edge all
around. Add the olives, if using, and the mozzarella
slices evenly over the top. Return to the oven and bake
until the top is bubbly and the edge is puffy and nicely
browned, about 10 minutes longer. Transfer the pan to
a wire rack and cool for 5 minutes before serving.
Serving and Storing
Serve hot; cut into wedges with kitchen shears or a
pizza wheel. Reheat, wrapped in foil, in a 350°F oven
for 5 to 10 minutes or under a microwave-safe plastic
cover on medium power for a minute or so. Store
airtight and refrigerated for 2 to 3 days, or frozen,
airtight, for up to a week. Thaw before reheating.
Herbed Cooked Tomato Pizza
Sauce
KS Quotient
Easy: Simple ingredients, easily prepared. Make
ahead, if desired.
The simplest Italian pizza sauces feature fresh, full-flavored,
uncooked tomatoes, but when genuine, garden-ripened
tomatoes can't be had, a homemade cooked sauce made
from good-quality canned tomatoes is the best alternative.
It is so much better than bought, yet is easy and
inexpensive and for convenience can be readied far ahead.
This recipe makes enough for three 11- to 12-inch pizzas,
so I like to divide it into three ready-to-use, freezable
portions. Let frozen portions of sauce thaw overnight in the
refrigerator or on the countertop for 2 to 4 hours. For the
crispest crust, be sure the sauce is at room temperature
before topping the dough with it.
Yield: Enough to top three 11- to 12-inch pizzas
1 tablespoon good-quality olive oil
½ teaspoon finely minced fresh garlic, or 1 tablespoon
finely chopped onion
1 can (28 ounces) fine-quality crushed tomatoes,
preferably imported Italian
2 teaspoons each dried oregano and dried thyme
leaves
½ teaspoon good-quality balsamic vinegar, optional
1/8 to ¼ teaspoon each salt and freshly ground black
pepper, or to taste
Combine the oil and garlic or onion in a heavy,
medium saucepan over medium-high heat and cook,
stirring, for 1 minute for garlic or 2 minutes for onion.
Add the tomatoes, oregano, and thyme. Adjust the
heat so the mixture boils gently and cook, stirring
frequently to prevent sticking, until the sauce is cooked
down and thickened, 10 to 15 minutes. Stir in the
balsamic vinegar, if using, and salt and pepper. Use
immediately, or refrigerate for later use.
Storage
Keeps in the refrigerator for up to 4 days and in the
freezer for up to 2 months.
Crispy Roasted Garlic and
Parmesan Pot Bread
KS Quotient
Easy: Few ingredients, added all at once. No shaping
required.
Infused with fresh, roasted garlic and punched up with a
little Parmesan, this is a whole different animal from the
typical commercial loaf peppered with garlic salt. The flavor
of the roasted herb is much more subtle, earthy, and
appetizing. And the cheese gives the bread a beautiful
golden hue, crisp crust, and characteristic Parmesan
aroma. Be sure that both the garlic and cheese are fresh
and of good quality, as they are what makes (or breaks)
this bread. Even if you love garlic, curb the impulse to add
extra; too much of it can inhibit the yeast growth.
If you're a fan of pesto, you can add a couple tablespoons
to the dough for a handsome, basil-flecked bread; see the
variation at the end. Homemade pesto is best, but a highquality commercial pesto will suffice.
The bread is lovely cut into thick slices and served with a
bowl of minestrone, spaghetti, or any other Mediterraneanstyle dish or meal. The slices are also good grilled or
toasted and used for crostini. Top with an eggplant or olive
spread for a memorable munchie even vegetarians can
enjoy.
Yield: 1 large loaf, 12 to 14 portions or slices
1 large head (knob) garlic
1 tablespoon good-quality olive oil, plus more for
brushing dough
¼ cup freshly grated Parmesan cheese, plus 2
tablespoons for garnish
4 cups (20 ounces) unbleached all-purpose white flour
or white bread flour, plus more as needed
Scant 2 teaspoons table salt
1¼ teaspoons instant, fast-rising, or bread machine
yeast
2 cups plus 2 tablespoons ice water, plus more if
needed
Preliminaries Peel off and discard the papery outer
skin from the garlic but do not separate or pull off the
cloves. Cut across the pointed tops of the cloves to
expose the flesh inside; discard the cut-off portion. Put
1 tablespoon of olive oil in a small ovenproof custard
cup or small bowl. Dip the cut side of the garlic into the
oil to coat the cloves, then turn the head cut-side up
and set in the cup. Cover the cup with foil. Bake in a
preheated 350°F oven for 35 to 45 minutes, or until the
garlic is very soft and fragrant. Let cool, then squeeze
or scrape out the garlic from the cloves into a medium
bowl. Add ¼ cup of Parmesan and thoroughly mash
with a fork until the mixture forms a paste. The paste
may be made several days ahead and refrigerated; let
warm up slightly and stir before using.
First Rise In a large bowl, thoroughly stir together the
flour, salt, and yeast. Vigorously stir the water and the
garlic mixture into the bowl, scraping down the sides
and mixing until the ingredients are thoroughly
blended. If the mixture is too dry to incorporate all the
flour, a bit at a time, stir in just enough more water to
blend the ingredients; don't over-moisten, as the dough
should be very stiff. If necessary, stir in enough more
flour to stiffen it. Brush or spray the top with olive oil.
Cover the bowl with plastic wrap. If desired, for best
flavor or for convenience, you can refrigerate the
dough for 3 to 10 hours. Then let rise at cool room
temperature for 12 to 18 hours. If convenient,
vigorously stir the dough once partway through the rise.
Second Rise Using an oiled rubber spatula, lift and
fold the dough in towards the center, working all the
way around, avoiding deflating as much as possible.
Brush or spray with olive oil. Re-cover with nonstick
spray— coated plastic wrap.
Let Rise Using Any of These Methods For a 1½- to
2½-hour regular rise, let stand at warm room
temperature; for a 1- to 2-hour accelerated rise, let
stand in a turned-off microwave along with 1 cup of
boiling-hot water; or for an extended rise, refrigerate
for 4 to 24 hours, then set out at room temperature.
Continue the rise until the dough doubles from the
deflated size, removing the plastic if the dough nears
it.
Baking Preliminaries 20 minutes before baking time,
put a rack in the lower third of the oven; preheat to
450°F. Oil the inside of a 3- to 4-quart (or slightly
larger) Dutch oven or heavy metal pot. Heat it in the
oven until it just starts to smoke, then remove it (use
oven mitts). Taking care not to deflate the dough,
loosen it from the bowl sides with an oiled rubber
spatula and gently invert it into the pot. Don't worry if
it's lopsided and ragged-looking; it will even out during
baking. Spritz or brush the top with water, then sprinkle
over 2 tablespoons of Parmesan. Immediately top with
the lid. Shake the pot back and forth to center and
even out the dough.
Baking Reduce the heat to 425°F. Bake on the lower
rack for 45 to 50 minutes. If the loaf is golden brown,
continue baking, covered, for 10 to 15 minutes longer,
until the top is well browned and a skewer inserted in
the thickest part comes out with just a few crumbs on
the tip (or until the center registers 207° to 208°F on an
instant-read thermometer.) If the loaf top looks pale
after the initial 45 to 50 minutes, uncover and continue
baking for 10 to 15 minutes until golden brown. Then
bake for 5 to 10 minutes longer to ensure the center is
baked through. Cool in the pot on a wire rack for 10 to
15 minutes. Run a table knife around the loaf to loosen
it. Transfer it to the rack; cool thoroughly.
Tip
Most pot breads won't stick to their baking containers,
but cheese breads sometimes do. That's why this
recipe calls for oiling the pot before preheating it.
Serving and Storing
The loaf tastes good warm but will cut much better
when cool. Cool completely before storing. To
maintain the crisp crust, store draped with a clean tea
towel or in a heavy paper bag. Or store airtight in a
plastic bag or wrapped in foil: The crust will soften, but
can be crisped by heating the loaf, uncovered, in a
400°F oven for a few minutes. The bread will keep at
room temperature for up to 3 days, and may be frozen,
airtight, for up to 2 months.
Variation
Crispy Roasted Garlic—Pesto Pot Bread
After mashing the garlic and the Parmesan into a paste,
mix in 3 tablespoons homemade or commercial pesto until
well blended. Proceed exactly as for the original bread.
Rustic Cyprus-Style Herbed
Olive Bread
KS Quotient
Easy: All ingredients added at once. No hand-shaping.
Herbed olive breads often feature rosemary, and
sometimes oregano or thyme, but this unusual, wonderfully
savory Cypriot version goes in a deliciously different
direction with chopped fresh cilantro, mint, and chives. The
bread surface is crackly crisp, but the olive-studded inside
is tender and almost soft, due to the ample addition of olive
oil. The loaf is a large, shaggy-looking round with a slightly
open texture. Wedges or chunks are pretty irresistible
"plain," and sumptuous dunked in olive oil.
You'll need a Dutch oven or similar heavy pot or deep, flatbottomed casserole for baking this bread. See chapter
Getting Started: Basic Know How, Ingredients, and
Troubleshooting if you aren't sure what to use.
Yield: 1 large loaf, 14 to 15 wedges or slices
4¼ cups (21.25 ounces) unbleached all-purpose white
flour, preferably unbleached, plus more as needed
1¾ teaspoons table salt
¾ teaspoon instant, fast-rising, or bread machine
yeast
2 cups ice water, plus more if needed
3 tablespoons chopped fresh cilantro leaves
2 tablespoons chopped fresh mint leaves
2 tablespoons chopped fresh chives or finely chopped
scallion tops
¼ cup good-quality olive oil, plus more for brushing
dough top
1 cup thoroughly drained, chopped (pitted) Kalamata
olives
About 3 tablespoons cornmeal for dusting baking pot
First Rise In a large bowl, thoroughly stir together the
flour, salt, and yeast. In another bowl or measuring cup,
vigorously whisk together the water, cilantro, mint, and
chives. Stir the mixture into the bowl with the flour until
the dough is just lightly mixed. Then add the olive oil,
scraping down the bowl sides and mixing until
thoroughly blended. The dough should be very stiff; if
necessary, add in enough more flour to stiffen it. Gently
stir in the olives until evenly distributed throughout.
Brush the top with oil. Tightly cover the bowl with
plastic wrap. If desired, for best flavor or for
convenience, you can refrigerate the dough for 3 to 10
hours. Then let rise at cool room temperature for 12 to
18 hours.
Second Rise Using an oiled rubber spatula, lift and
fold the dough in towards the center all the way around
until thoroughly loosened from the bowl; don't deflate
any more than necessary. Evenly brush the inside of a
3½- to 4-quart Dutch oven or other heavy pot or large,
deep, flat-bottomed ovenproof casserole with olive oil.
Add the cornmeal, then tip the pot back and forth to
distribute it on the sides. Invert the dough into the pot;
don't worry if it's ragged-looking or lopsided. Shake
the pot to center the dough. Brush the surface with
olive oil. Top the pot with its lid.
Let Rise Using Any of These Methods For a 1½- to
2½-hour regular rise, let stand at warm room
temperature; for a 1- to 1½-hour accelerated rise, let
stand in a turned-off microwave along with 1 cup of
boiling-hot water; or for an extended rise, refrigerate
for 4 to 24 hours, then set out at room temperature. Let
rise until the dough has doubled from its deflated size.
Baking Preliminaries 20 minutes before baking time,
place a rack in the lower third of the oven; preheat to
475°F.
Baking Reduce the oven temperature to 425°F. Bake
on the lower rack, covered, for 55 to 60 minutes or until
crisp and lightly browned. Brush the loaf with olive oil
and continue to bake, uncovered, testing until the top is
well browned and a skewer inserted in the thickest part
comes out with just a few crumbs on the tip (or until the
center registers 207° to 208°F on an instant-read
thermometer), 12 to 15 minutes longer. Bake for 5 to
10 minutes more to ensure that the center is done.
Cool in the pot on a wire rack for 15 minutes. Run a
knife around the loaf and remove it to the rack; let cool
completely.
Serving and Storing
This loaf tastes good warm, but will cut better when
cool. Cool completely before storing. To maintain the
crisp crust, store draped with a clean tea towel or in a
heavy paper bag. Or store airtight in a plastic bag or
foil: The crust will soften, but can be crisped by heating
the loaf, uncovered, in a 400°F oven for a few minutes.
The bread will keep at room temperature for up to 3
days, and may be frozen, airtight, for up to 2 months.
Swedish Limpa Bread
(Swedish Rye Bread with
Caraway and Anise Seeds)
KS Quotient
Fairly Easy: Two-stage mixing. No hand-shaping
required.
This began as a traditional recipe e-mailed to me by a
reader of a story I wrote for the Washington Post on noknead breads. The writer, Suzy Hubbell, wondered if I could
make over a family favorite, her grandmother Anna
Danielson's Swedish limpa bread, to fit the knead-free
method. Several other people wanted to their recipes
converted, too, which eventually led me to provide
suggestions on how to go about it in a bonus chapter in the
book (see chapter Kneadlessly Simple Recipe Makeover
Guide: How to Convert Traditional Yeast Recipes to the KS
Method).
Making over this slightly sweet bread was well worth the
effort. The caraway and anise seeds in combination with
molasses, brown sugar, and rye flour give it a mild yet
enticing flavor that even those who don't care for rye bread
usually like. I find it truly addictive, especially toasted and
topped with butter.
Yield: 2 medium loaves, 12 to 14 slices each
3½ cups (17.5 ounces) unbleached all-purpose white
flour
2 cups (10 ounces) rye flour, plus ½ cup (2.5 ounces),
plus more as needed
2¾ teaspoons table salt
1¼ teaspoons caraway seeds
1¼ teaspoons anise seeds
1¼ teaspoons instant, fast-rising, or bread machine
yeast
2/3 cup light or dark molasses (not blackstrap)
¼ cup corn oil, canola oil, or other flavorless vegetable
oil
2 cups ice water, plus more if needed
1/3 cup good-quality instant nonfat dry milk (don't use a
generic brand)
1/3 cup packed light brown sugar
3½ tablespoons unsalted butter, melted, divided
First Rise In a very large bowl, thoroughly stir together
the white flour, 2 cups of the rye flour, the salt, caraway
seeds, anise seeds, and yeast. In another bowl or
measuring cup, whisk the molasses and the oil into the
water until well blended. Vigorously stir the mixture into
the bowl with the flours, scraping down the bowl sides
and mixing until the dough is well blended and smooth.
If too dry to mix completely, a bit at a time, add in
enough more ice water to blend the ingredients and
yield a firm but not hard-to-stir dough. Brush or evenly
spray the top with oil. Tightly cover the bowl with plastic
wrap. If desired, for best flavor or for convenience, you
can refrigerate the dough for 3 to 10 hours. Then let
rise at cool room temperature for 12 to 18 hours.
Second Rise In a small, deep bowl, stir together the
dry milk, brown sugar, and 2 tablespoons of the butter
with 1½ tablespoons hot water until well blended.
Gradually stir the milk mixture, then ½ cup of the rye
flour, into the dough until well blended and no streaks
remain; the mixture will be hard to stir, so you may
prefer to work in the flour with well-oiled fingertips (or
use a dough hook and heavy-duty mixer on low). If
necessary, working in the bowl, lift and turn it while
dusting with and smoothing in more rye flour, as the
dough should be very stiff. Cut the dough in half with
well-oiled kitchen shears. Put the dough portions in two
8½ x 4½-inch well-oiled loaf pans. Lightly brush the
tops with some of the remaining melted butter. Smooth
and press the dough evenly into the pans, tucking it
under at the ends. Brush with more butter. Cover the
tops with nonstick spray—coated plastic wrap.
Let Rise Using Any of These Methods For a 1½- to
2½-hour regular rise, let stand at warm room
temperature; for a 1- to 1½-hour accelerated rise, let
stand in a turned-off microwave along with 1 cup of
boiling-hot water; or, for an extended rise, refrigerate
for 4 to 48 hours, then set out at room temperature.
When the dough nears the plastic, remove it and
continue the rise until the dough extends ½ inch above
the pan rims.
Baking Preliminaries 15 minutes before baking time,
place a rack in the lower third of the oven; preheat to
350°F.
Baking Reduce the oven temperature to 325°F. Bake
on the lower rack for 55 to 60 minutes, or until the
loaves are very well browned. Cover the tops with foil
and continue baking for 15 to 20 minutes longer, until a
skewer inserted in the thickest part comes out with
slightly moist crumbs on the tip (or until the center
registers 202° to 204°F on an instant-read
thermometer). Bake for about 10 minutes longer to
ensure the centers are done. Brush the loaf tops evenly
with the remaining melted butter. Cool in the pans on a
wire rack for 10 to 15 minutes. Run a knife around the
loaves to loosen, then turn out onto the racks. Let cool
thoroughly.
Serving and Storing
Serve warm, or cool, or toasted; the bread slices best
when cool. Cool thoroughly before storing in plastic or
foil. Keeps at room temperature for up to 3 days. May
be frozen, airtight, for up to 2 months.
Scottish Oatmeal Bread
KS Quotient
Easy: Two-stage mixing. No hand-shaping.
The Scots are known for eating a lot of oats, in the form of
breakfast porridge, or oatmeal; as a component of various
baked goods; and in their beloved haggis, which, since it
involves assorted peculiar animal parts, I prefer not to dwell
on here. Sometimes, Scottish recipes call for incorporating
leftover oatmeal, which not only saves time and avoids
waste, but in the case of yeast bread, results in an
exceptional loaf. The consistency and taste are different
from bread made just by tossing some uncooked rolled
oats in with the flour: the texture is much moister and
smoother than normal and the flavor and aroma slightly
sweeter and more "oaty." (For this recipe I assume that you
don't have leftover oatmeal sitting around, so it calls for
preparing the right amount of partially cooked and
sweetened oatmeal.)
This loaf is mild and homey, with a slightly chewy-crisp
crust. Like many old-fashioned British breads, it calls for a
bit of spice and dried currants. I like it for toast, or in thick,
warm-from-the-oven slices spread with butter and smidge
of jam and accompanied by a freshly brewed pot of tea.
This is the simple, sublime way I first ate it back in the
1980s, at a bed and breakfast on a cold, damp summer
afternoon in the Scottish Highlands.
Yield: 1 large loaf, 13 to 14 portions or slices
2½ cups (12.5 ounces) unbleached white bread flour,
plus ¾ cup (3.75 ounces), plus more as needed
Scant 1¾ teaspoons table salt
¾ teaspoon instant, fast-rising, or bread machine
yeast
¾ teaspoon ground allspice
1/8 teaspoon ground nutmeg
1¼ cups plus 2 tablespoons ice water, plus more if
needed
½ teaspoon finely grated orange zest
2 tablespoons unsalted butter, at room temperature,
plus more for greasing pan and loaf top
¾ cup old-fashioned rolled oats, plus 4 tablespoons for
garnish
2/3 cup boiling water
6 tablespoons packed light or dark brown sugar
2/3 cup dried currants, rinsed under hot water, then
thoroughly drained and patted dry
First Rise In a large bowl, thoroughly stir together 2½
cups of the flour, the salt, yeast, allspice, and nutmeg.
Vigorously stir the ice water and orange zest into the
flour mixture, scraping down the sides just until the
ingredients are thoroughly blended. If too dry to mix, a
bit at a time, stir in just enough more ice water to blend
the ingredients, but don't over-moisten, as the dough
should be fairly stiff. Stir in more flour to stiffen it if
necessary. Brush the top with softened butter. Cover
the bowl with plastic wrap. If desired, for best flavor or
for convenience, you can refrigerate the dough for 3 to
10 hours. Then let rise at cool room temperature for 12
to 18 hours.
Second Rise In a medium bowl, gradually stir the oats
into the boiling water until well blended. Let stand for 5
minutes to partially cook. Stir in the butter and sugar
until the sugar dissolves and let cool thoroughly.
Vigorously stir the cooled oatmeal mixture into the
dough until thoroughly incorporated. Add in ¾ cup of
the flour and the currants until evenly distributed
throughout, then, as needed, enough more flour to yield
a very stiff dough, scraping down the bowl thoroughly.
Using an oiled rubber spatula and working all the way
around the bowl, fold the dough in towards the center.
Generously butter a 9 x 5-inch loaf pan. Add 2
tablespoons of oats to the pan; tip it back and forth to
evenly distribute them. Invert the dough into the pan.
Smooth out the top and press the dough evenly into the
pan. Brush the loaf top with melted butter. Sprinkle the
remaining 2 tablespoon oats over the top, pressing
down to imbed them. Using an oiled serrated knife or
kitchen shears, cut a 6-inch-long, ½-inch-deep slash
down the loaf center. Cover the pan with nonstick
spray—coated plastic wrap.
Let Rise Using Either of These Methods For a 1¾- to
2½-hour regular rise, let stand at warm room
temperature; for a 1- to 2-hour accelerated rise, let
stand in a turned-off microwave along with 1 cup of
boiling-hot water. Continue the rise until the dough
nears the plastic. Remove it and continue until the
dough extends just to the pan rim (it will rise a lot in the
oven).
Baking Preliminaries 20 minutes before baking time,
put a rack in the lower third of the oven; preheat to
375°F.
Baking Bake on the lower rack for 65 to 75 minutes,
until the top is nicely browned and a skewer inserted in
the thickest part comes out with moist crumbs on the
tip (or until the center registers 204° to 206°F on an
instant-read thermometer). (As necessary to prevent
over-browning, cover the top with foil.) Then bake for 5
to 10 minutes longer to ensure the center is baked
through. Cool in the pan on a wire rack for 10 to 15
minutes. Remove the loaf to the rack; cool thoroughly.
Serving and Storing
This tastes good warm, but will cut much better when
cool. Cool completely before storing. The bread will
keep at cool room temperature for 3 to 4 days, and
may be frozen, airtight, for up to 2 months.
Tip
The extended rise option normally offered in
Kneadlessly Simple recipes can't be used for this
bread. Once the oatmeal is added to the dough, the
same chemical processes that make the finished loaf
exceptionally moisture retentive and sweet-tasting also
begin to break down the wheat gluten needed for good
loaf structure. Since the gluten breakdown continues
even during refrigeration, it's best to use an
accelerated or regular second rise so the dough
doesn't stand too long. The high moisture retention
means that this loaf needs a slightly longer than normal
baking time, too.
Chapter 6: Healthful,
Whole-Grain, Multigrain,
and Gluten-Free Breads
This chapter celebrates a wide variety of grains and
seeds, all of which can enhance the flavor, texture, visual
interest, and nutritional value of bread. For the fine flavor
that is the hallmark of good homemade bread, always be
sure seeds, whole grains, and whole-grain flours are
impeccably fresh. The high fat content of nuts and of the
germ portion of grains makes them stale rapidly, so use
what you buy promptly, or refrigerate or freeze (wrapped
airtight) to preserve good flavor.
Whole-grain breads are well suited to the Kneadlessly
Simple method. Bits of grain and seeds added during the
long first rise have plenty of time to soften, plus the
extended soaking encourages chemical processes that
make them more digestible. The bubbling action of the
"micro-kneading" is also advantageous because it gently
jiggles rather than manhandles the dough. Regular
kneading causes the coarse grain particles to cut some of
the gluten strands, which reduces their ability to trap gas
and puff the bread.
Nevertheless, because whole grains contain bits of bran
and germ, which are heavier than the starchy parts of
kernels, breads calling for large proportions of whole grains
often rise more slowly and come out more compact than
those made entirely with all white wheat flour. White bread
flour has extra gluten that can help lift the extra weight, so it
is often called for in these recipes instead of all-purpose
white flour. To further lighten the whole-grain load, some
recipes call for a slightly higher proportion of yeast than
most of the recipes in the book.
Crusty Seeded Cracked Wheat
Pot Boule
KS Quotient
Easy: All ingredients added before the first rise. Handshaping required.
This big (2½ pounds), handsome, hearty, seed-studded
boule boasts a wonderful, chewy-crispy crust and springy,
surprisingly light crumb. The cracked wheat, wheat germ,
and combination of flax, sesame, and poppy seeds boost
the fiber and nutrients, as well as lend texture and a
delectable earthy flavor. The light-colored, or "golden,"
variety of flax seeds have a particularly rich, nutty taste and
aroma that contributes to the aura of the whole-grain
goodness, but brown flax seeds will do perfectly well, too.
Like the other "pot" breads in this book, this one is baked
in a heavy lidded Dutch oven or similar container. (See
Choosing the Right Pot: for more details on suitable pots.)
When the lid is finally removed, it's always fun to see that
the spiral pattern cut into the loaf top has opened up and
exposed the interior, which dramatically contrasts the areas
with seeds.
Use this hearty, all-purpose loaf for toast or sandwiches, or
cut it into generous portions and serve warm with a hearty
soup or stew.
Yield: 1 large loaf, 12 to 14 portions or slices
3 tablespoons cracked wheat (or chopped wheat
berries; see Tip)
2½ tablespoons flax seeds, preferably golden
2/3 cup boiling water
2½ cups (12.5 ounces) whole wheat flour, plus more
as needed
2 cups (10 ounces) unbleached white bread flour
2 tablespoons wheat germ
2 tablespoons poppy seeds
2 tablespoons sesame seeds
Generous 2¼ teaspoons table salt
1¼ teaspoons instant, fast-rising, or bread machine
yeast
2½ tablespoons clover honey or other mild honey
2¼ cups ice water, plus more if needed
Corn oil, canola oil, or other flavorless vegetable oil for
coating dough top and pot
2 tablespoons liquid egg substitute or egg white for
glaze
1½ tablespoons each flax seeds, poppy seeds, and
sesame seeds mixed together for garnish
First Rise Combine the cracked wheat and flax seeds
with the boiling water and let stand until cooled
thoroughly. In a large bowl, thoroughly stir together the
whole wheat and bread flours, wheat germ, poppy
seeds, sesame seeds, salt, and yeast. In another bowl
or measuring cup, thoroughly whisk the honey into the
ice water. Vigorously stir the mixture and the cracked
wheat—flax mixture into the bowl with the flours,
scraping down the bowl sides completely and mixing
just until the dough is thoroughly blended. If the
ingredients are too dry to mix together, gradually add
in just enough more ice water to form a fairly stiff
dough. (The seeds will absorb moisture, stiffening the
dough further during the rise.) If the dough is soft, add
more whole wheat flour until it is firmed up but not stiff.
Brush or spray the top with oil. Tightly cover the bowl
with plastic wrap. If desired, for best flavor or for
convenience, refrigerate for 3 to 10 hours. Then let rise
at cool room temperature for 12 to 18 hours; if
convenient, vigorously stir once partway through the
rise.
Second Rise Thoroughly stir the dough. Using a welloiled rubber spatula, fold the dough in towards the
center, working your way around the bowl. Oil a 3½- to
4-quart Dutch oven or similar ovenproof pot. Sprinkle 2
tablespoons of whole wheat flour into the pot, then tip
back and forth to coat the bottom and sides. Invert the
dough into the pot.
Sprinkle 2 to 3 tablespoons more whole wheat flour
over the dough. Pat and smooth it into the dough
surface with your fingertips. Then smooth and tuck the
sides of the loaf underneath all the way around so it
forms a smooth, round, high dome, about 7 inches in
diameter. Brush away any excess flour, then brush the
loaf all over with the liquid egg substitute. Immediately
sprinkle the mixed seed garnish over the loaf (it will be
heavily coated). Using well-oiled kitchen shears or a
serrated knife, cut a 1/8 -inch-deep spiral slash in the
loaf top. Cover with the lid.
Let Rise Using Any of These Methods For a 2- to 4hour regular rise, let stand at warm room temperature;
for a 1½- to 2½-hour accelerated rise, let stand in a
turned-off microwave along with 1 cup of boiling-hot
water; or, for an extended rise, refrigerate for 4 to 24
hours, then let stand at room temperature. Continue
the rise until the dough doubles from its original size.
Baking Preliminaries 20 minutes before baking time,
put a rack in the lower third of the oven; preheat to
475°F.
Baking Reduce the heat to 425°F. Bake, covered, on
the lower rack for 55 to 60 minutes, until the top is
lightly browned and firm. Bake, uncovered, for 10 to 15
minutes longer, until well browned, occasionally testing
with a skewer inserted in the thickest part (or until the
center registers 205° to 207°F on an instant-read
thermometer). Then bake for 5 to 10 minutes more to
be sure the center is done. Cool the loaf in the pot on a
wire rack for at least 15 minutes before serving.
Remove the loaf to the rack; cool thoroughly.
Serving and Storing
Cut the loaf into portions; it tastes good warm but cuts
much better when cool. Cool completely before
storing. To maintain the crisp crust, store in a large
bowl draped with a clean tea towel or in a heavy paper
bag. Or, to prevent drying, store airtight in a plastic
bag or foil: The crust will soften, but can be crisped by
heating the loaf, uncovered, in a 400°F oven for a few
minutes. The bread will keep at room temperature for
up to 3 days, and may be frozen, airtight, for up to 2
months.
Tip
If you happen to have wheat berries, which are, in fact,
just uncooked whole wheat kernels, you can turn them
into cracked wheat using a food processor, coffee
grinder, or blender. It will take 2 or 3 minutes in a
processor but only 30 to 60 seconds in a coffee
grinder or blender to chop the wheat berries to the
cracked wheat stage.
100 Percent Whole WheatHoney Bread
KS Quotient
Fairly Easy: Two simple separate sets of ingredients
are mixed, then combined before the second rise. No
hand-shaping.
Creating a 100 percent whole wheat bread would seem a
simple task, but producing one that has good texture and
tastes mellow instead of slightly bitter can be a challenge.
The traditional tack of adding honey to balance the bitter
edge of whole wheat flour works to a point, but another little
known method introduced in Peter Reinhart's Whole Grain
Breads also helps a lot. Based on brewers' techniques for
making grain mash, this innovative technique involves
partially cooking part of the whole wheat flour by pouring
over some boiling water, then keeping the mixture barely
hot by occasionally reheating it.
Yes, this requires an extra step or two, but it greatly
improves the taste and texture of the finished loaf. The hot
water instantly tames the harshness and creates a mixture
reminiscent of very sweet, smooth cream of wheat. (The
change is caused by enzymes that convert starches into
sugars and cause molecules to gelatinize and hold water.)
When added to the rest of the dough, the mush begins to
act on the whole amount, lending the loaf an exceptionally
mellow taste and moist, creamy texture.
The only catch is that the same chemical processes that
sweeten and moisten also break down the gluten. So, for a
loaf that holds its shape and has good structure,
incorporate the mash just before the second rise, and bake
the dough as soon as it is raised. Don't try to use the
extended rise option, as this will result in a sunken (though
very tasty!) loaf.
Wholesome yet truly good-tasting, this bread is excellent for
sandwiches, toasting, and eating as is. For a loaf with a
slightly lighter color, use white whole wheat flour, a recently
introduced product made from a milder, lighter-colored—
but still healthful—variety of wheat.
Yield: 1 large loaf, 12 to 14 slices
1 cup plus 2 tablespoons boiling water
1/3 cup clover honey or other mild honey
3½ cups (17.5 ounces) whole wheat flour or white
whole wheat flour, divided, plus more as needed
1½ teaspoons table salt
1¼ teaspoons instant, fast-rising, or bread machine
yeast
¾ cup plus 2 tablespoons ice water, plus more if
needed
2½ tablespoons corn oil, canola oil, or other flavorless
vegetable oil, plus more for coating dough top and pan
First Rise In a 2-quart microwave-safe bowl, make a
mash by vigorously stirring the boiling water and honey
into 1 cup (5 ounces) of the whole wheat flour until well
blended and smooth. Cover with microwave-safe
plastic and place in the microwave oven. Set a cup of
boiling-hot water in the oven to help keep it warm. After
15 minutes, reheat the mash and hot water by
microwaving on high power for 1 minute. Thirty minutes
later, again reheat by microwaving on high power for 1
minute. Then let the mash stand, covered, in the
microwave, until completely cooled. Set aside at room
temperature for up to 18 hours.
In a large bowl, thoroughly stir together 2 cups (10
ounces) of the flour, the salt, and the yeast. In another
bowl or measuring cup, whisk together the ice water
and oil, then stir the mixture into the bowl with the flour
until smooth and well blended. If the mixture is dry, add
just enough more water to facilitate blending and
produce a firm but not stiff dough. Brush or spray the
top with oil. Tightly cover the bowl with plastic wrap. If
desired, for best flavor or for convenience, refrigerate
for 3 to 10 hours. Then let rise at cool room
temperature for 12 to 18 hours.
Second Rise Thoroughly stir the cooled mash mixture,
then ½ cup (2.5 ounces) of the flour, into the dough,
vigorously mixing until very thoroughly blended; if
desired, use a dough hook and heavy-duty mixer on
low, as this is tiring to do by hand. If necessary, using
flour-dusted fingertips or the mixer, sprinkle over and
work in enough more flour to yield a very stiff dough.
Coat a 9 x 5-inch loaf pan with nonstick spray, then
add 1 tablespoon flour, tipping the pan back and forth
to evenly coat the interior.
Using a well-oiled rubber spatula, fold the dough in
towards the center, working your way around the bowl.
Invert the dough into the pan. Brush or spray the dough
with oil. Smooth out the top and evenly press the
dough into the pan with oiled fingertips; for best
appearance, tuck the dough evenly underneath at the
ends. Evenly dust the loaf with ½ tablespoon whole
wheat flour; smooth it evenly over the loaf top. Cover
the pan with nonstick spray—coated plastic wrap.
Let the dough rise using either of these methods For
a 2- to 4-hour regular rise, let stand at warm room
temperature; for a 1½- to 2½-hour accelerated rise, let
stand in a turned-off microwave along with 1 cup of
boiling-hot water. Remove the plastic when the dough
nears it, then continue the rise until dough extends ¾
inch above the pan rim.
Baking Preliminaries 15 minutes before baking time,
put a rack in the lower third of the oven; preheat to
375°F.
Baking Bake on the lower rack for 50 to 55 minutes, or
until the loaf is well browned and firm on top; if the top
begins to over-brown, tent with foil. Bake for about 10
minutes longer, until a skewer inserted in the thickest
part comes out with just a few particles clinging to the
end (or until the center registers 206° to 208°F on an
instant-read thermometer). Then bake for 5 to 10
minutes more to ensure the center is done. Cool in the
pan on a wire rack for 10 minutes. Turn the loaf onto
the rack; cool thoroughly.
Serving and Storing
The loaf slices best when cool. Cool completely before
storing airtight in plastic or foil. The bread will keep at
room temperature for 3 days, and may be frozen,
airtight, for up to 2 months.
Four Grain-Honey Bread
KS Quotient
Easy: All ingredients added before the first rise. No
hand-shaping.
This recipe is a perfect place to start if you're trying to woo
white bread fans away from cottony loaves and down the
whole-grain path. Even before it's out of the oven, the
handsome, homespun look and gentle fragrance of this
bread attract a waiting crowd. And, owing to a mild,
soothing flavor combo of cornmeal, oats, brown rice, wheat
flour, and honey, it delivers on its promise. This is a fine
bread for toasting, making sandwiches, and, as my family
can attest, devouring straight from the oven.
Yield: 1 large loaf
2 cups (10 ounces) unbleached white bread flour, plus
more as needed
1 cup (5 ounces) whole wheat flour
½ cup white or yellow cornmeal, preferably stoneground, plus more for garnish
1/3 cup rolled oats, plus more for garnish
1/3 cup cooked and cooled brown rice
Generous 1½ teaspoons salt
¾ teaspoon instant, fast-rising, or bread machine
yeast
½ cup clover honey or other mild honey
1¼ cups ice water, plus more if needed
Corn oil or other flavorless vegetable oil for coating
dough top and baking pan
First Rise In a large bowl, thoroughly stir together the
bread flour, whole wheat flour, cornmeal, oats, brown
rice, salt, and yeast. In another bowl or measuring cup,
thoroughly whisk the honey into the ice water.
Vigorously stir the mixture into the bowl with the flours,
scraping down the bowl sides and mixing just until the
dough is thoroughly blended. If the ingredients are too
dry to mix together, gradually add in just enough more
ice water to facilitate mixing; don't over-moisten, as the
dough should be stiff. If necessary, mix in more bread
flour to stiffen it. Brush or spray the top with oil. Tightly
cover the bowl with plastic wrap. If desired, for best
flavor or for convenience, refrigerate for 3 to 10 hours.
Then let rise at cool room temperature for 12 to 18
hours; if convenient, stir once during the rise.
Second Rise Vigorously stir the dough. Using a welloiled rubber spatula, fold the dough in towards the
center, all the way around the bowl. Dust an oiled 9 x 5inch loaf pan with 1 tablespoon each cornmeal and
rolled oats, tipping it back and forth to coat the pan
sides. Turn out the dough into the pan. Brush or spray
the top with oil. Smooth out the top and press the
dough into the pan with oiled fingertips or a rubber
spatula. Sprinkle ½ tablespoon each cornmeal and
rolled oats over the top. Press down to imbed. Cut four
or five 3-inch-long, ¼-inch-deep evenly spaced
slashes diagonally across the loaf top. Cover the pan
with nonstick spray—coated plastic wrap.
Let Rise Using Any of These Methods For a 2- to 4hour regular rise, let stand at warm room temperature;
for a 1½- to 2½-hour accelerated rise, let stand in a
turned-off microwave oven along with 1 cup of boilinghot water. Or, for an extended rise, refrigerate for 4 to
24 hours, then let stand at room temperature. Remove
the plastic when the dough nears it, then continue the
rise until the dough extends ½ inch above the pan rim.
Baking Preliminaries 15 minutes before baking time,
put a rack in the lower third of the oven; preheat to
350°F.
Baking Bake on the lower rack for 50 to 60 minutes, or
until the loaf is well browned and firm on top; cover with
foil if necessary to prevent over-browning. Continue
baking for 10 to 15 minutes longer, testing until a
skewer inserted in the thickest part comes out with just
a few particles on the end (or until the center registers
207° to 209°F on an instant-read thermometer). Bake
for 5 to 10 minutes more to ensure the center is done.
Cool in the pan on a wire rack for 10 minutes. Turn the
loaf onto the rack; cool thoroughly.
Serving and Storing
Cool thoroughly before slicing or storing in a plastic
bag or foil. The bread will keep at room temperature
for 2 to 3 days, and may be frozen, airtight, for up to 2
months.
Rustic Rye Pot Bread
KS Quotient
Easy: A few fuss-free ingredients, most added all at
once. Some hand-shaping.
Made without molasses, brown sugar, cocoa powder,
coffee, or any of the other ingredients often used to deepen
rye bread color and gussy up its flavor, this hearty, but not
heavy, loaf has an entirely different character from some of
its darker-hued cousins. Here the distinctive, earthy flavor
of the grain takes center stage, and, since the dough is not
sweet, the pleasing slight bitterness of the rye comes
through.
As is true in most deli or Jewish rye recipes, the rye taste in
this version is heightened (just slightly) with a sour
component, though not the usual hard-to-come-by yeast
starter. Instead, the recipe calls for a longer-than-normal
first rise to boost the acid (a by-product of fermentation),
and then after the first rise, the pH is lowered even further
with some vinegar or dill pickle juice. A combination of
caraway, fennel, and dill seeds lends the best flavor to the
bread, but just caraway seeds will do in a pinch.
Though this bread is baked in a pot, the method is a little
different from most pot breads in the book. Instead of
simply being turned out into or shaped in the baking
container, it is set on parchment, which is then used as a
sling to slip the dough in and out of the baking pot.
Particularly if the pot has a smallish diameter (less than 10
inches), the parchment will crinkle and fold up around the
loaf edges, giving it an interesting uneven ruffled shape. It
almost looks as if it were baked in a classic fluted brioche
pan that crumpled from the heat! While this rough-hewn
appearance wouldn't suit many loaves, it seems
appropriate for this homespun, craggy bread.
Yield: 1 large loaf, 12 to 14 portions or slices
2 cups (10 ounces) rye flour, preferably dark, plus
more for garnish
2 cups (10 ounces) unbleached white bread flour, plus
more as needed
1½ tablespoons granulated sugar
2 teaspoons table salt
1 tablespoon assorted seeds, preferably 1 teaspoon
each caraway, fennel, and dill seeds mixed together
(or substitute 1 tablespoon caraway seeds), divided
¾ teaspoon instant, fast-rising, or bread machine
yeast
2¼ cups ice water, plus more if needed
2 tablespoons apple cider vinegar or dill pickle juice
Corn oil, canola oil, or other flavorless vegetable oil or
oil spray for coating dough
First Rise In a large bowl, thoroughly stir together the
rye flour, white flour, sugar, salt, 2 teaspoons of the
seeds, and the yeast. In another bowl or measuring
cup, stir together the water and vinegar, then
vigorously stir into the bowl with the flour, scraping
down the sides until the ingredients are thoroughly
blended. If the mixture is dry, add in just enough more
ice water to facilitate mixing; don't over-moisten, as the
dough should be stiff. If necessary, stir in enough more
white flour to stiffen it. Brush or spray the top with oil.
Cover the bowl with plastic wrap. If desired, for best
flavor or for convenience, refrigerate for 3 to 10 hours.
Then let rise at cool room temperature for 16 to 20
hours.
Second Rise Vigorously stir the dough, adding more
rye flour until very stiff, if necessary. Thoroughly scrape
down the bowl sides. Using a well-oiled rubber
spatula, fold the dough in towards the center, working
all the way around the bowl. Set out a 15-inch square
of baking parchment. Spray it with nonstick spray, then
very generously dust it with rye flour. Invert the dough
into the center of the parchment. Generously dust the
dough with more rye flour. Smooth out and round the
surface and firmly tuck the dough edges underneath all
around to form an evenly shaped, domed loaf; it will be
sticky, so flour your hands, and sprinkle more flour over
the top as needed. Using the parchment as a sling,
transfer the loaf to a deep bowl just slightly smaller in
diameter than the baking pot to be used. Tent the bowl
with nonstick spray—coated foil.
Let Rise Using Any of These Methods For a 1½- to
2½-hour regular rise, let stand at warm room
temperature; for a 1- to 2-hour accelerated rise, let
stand in a turned-off microwave along with 1 cup of
boiling-hot water; or for an extended rise, refrigerate
for 4 to 24 hours, then set out at room temperature.
Continue the rise until the dough doubles from the
deflated size.
Baking Preliminaries 20 minutes before baking time,
put a rack in the lower third of the oven; preheat to
450°F. Heat a 3½- to 4-quart heavy metal pot or Dutch
oven (preferably with 10-inch maximum diameter) or a
deep 4-quart heavy ovenproof saucepan in the oven
until sizzling hot (check with a few drops of water), then
remove it (use oven mitts). Sprinkle or spray the dough
top generously with water. Sprinkle over the remaining
seeds, patting down to embed slightly. Using well-oiled
kitchen shears or a serrated knife, cut a ½-inch-deep,
3-inch diameter circular slash in the dough center.
Using the parchment as a sling, carefully lift the dough
into the pot; take care not to touch the hot pot.
Immediately top the pot with its lid.
Baking Reduce the heat to 425°F. Bake on the lower
rack for 45 minutes. Remove the lid. Using the
parchment, lift the loaf from the pot and place on a
baking sheet. Pull the parchment away from the loaf
sides so they are exposed. (If the top is well browned,
cover it with foil.) Bake for 15 to 25 minutes longer,
until a skewer inserted in the thickest part comes out
with just a few crumbs on the tip (or until the center
registers 210° to 212°F on an instant-read
thermometer). Then bake for 5 minutes longer to
ensure the center is baked through. Cool in the pan on
a wire rack for 10 to 15 minutes. Remove the loaf to
the rack; cool thoroughly.
Serving and Storing
Cool before slicing and storing. The flavor improves
after several hours of storage. To maintain the crisp
crust, store in a large bowl draped with a clean tea
towel or in a heavy paper bag. Or store airtight in a
plastic bag or foil: The crust will soften, but can be
crisped by heating the loaf, uncovered, in a 400°F
oven for a few minutes. The bread will keep at room
temperature for 3 days, and may be frozen, airtight, for
up to 2 months.
Raisin Pumpernickel
KS Quotient
Fairly Easy: Two-stage mixing. No hand-shaping
required.
The mixing method for this bread is a little different than for
most recipes in the book, but reminiscent of the one used
for the 100 Percent Whole Wheat—Honey Bread. The
raisins and some of the rye flour are hydrated with boiling
water, then set aside at the same time the rest of the dough
is separately set aside to rise. The boiling water plumps the
raisins and activates enzymes in the rye flour, which give it
a sweet, rich taste and cause it to absorb an unusually
large amount of water. Once this mixture, or mash, is
incorporated into the rest of the dough, the enzymes
continue to work, producing a pumpernickel that is
particularly mellow and moist.
Yield: 2 medium loaves, 12 to 14 portions or
slices
3 cups (15 ounces) medium or dark rye flour, divided,
plus ½ cup (2.5 ounces), or as needed
1½ cups dark raisins, rinsed under hot water and
drained
1¼ cups plus 1 to 3 tablespoons boiling water
2 cups (10 ounces) unbleached white bread flour
2 tablespoons unsweetened cocoa powder, sifted
after measuring
2¼ teaspoons table salt
1¼ teaspoons instant, fast-rising, or bread machine
yeast, divided
3 tablespoons light or dark molasses (not blackstrap)
2 tablespoon corn oil, canola oil, or other flavorless
vegetable oil
1¾ cups ice water, plus more if needed
2 tablespoons apple cider vinegar
1 large egg white beaten with 1 teaspoon water for
glaze, or 2 to 3 tablespoons liquid egg substitute for
glaze
First Rise In a medium bowl, stir 1 cup (5 ounces) of
the rye flour and the raisins with the boiling water to
form a thin sour cream consistency; add a little more
water or rye flour as necessary. Cover and set aside at
room temperature for 20 to 24 hours. In a large bowl,
thoroughly stir together 2 cups (10 ounces) of the rye
flour, the bread flour, cocoa, salt, and yeast. In another
bowl or measuring cup, thoroughly whisk the molasses
and oil into the ice water. Vigorously stir it into the bowl
with the flours, scraping down the bowl sides and
mixing until the dough is thoroughly blended. If too dry
to mix, gradually mix in just enough more ice water to
facilitate mixing; don't over-moisten, as the dough
should be firm. If necessary, add in enough more rye
flour to firm it. Brush or spray the top with oil. Tightly
cover the bowl with plastic wrap. If desired, for best
flavor or for convenience, refrigerate for 3 to 10 hours.
Then let rise at cool room temperature for 20 to 24
hours; if convenient, vigorously stir once partway
through the rise.
Second Rise Stir the vinegar into the raisin mixture.
Vigorously and thoroughly stir the raisin mixture, then
½ cup of the rye flour, into the dough until very well
blended. If necessary, thoroughly stir in (or work in with
flour-dusted fingertips) enough more rye flour to yield a
very stiff dough.
Generously dust 2 well-oiled 8½ x 4½-inch loaf pans
with rye flour. Divide the dough in half using oiled
kitchen shears or a serrated knife. Turn each half into a
pan. Brush or spray the tops with oil. Using well-oiled
fingertips, pat and smooth the dough out into the pans.
Then smooth and firmly tuck the ends underneath to
form evenly shaped loaves. Brush the loaf tops evenly
with egg white (or liquid egg substitute). Cover the
pans with nonstick spray—coated plastic wrap.
Let Rise Using Any of These Methods For a 1½- to
2½-hour regular rise, let stand at warm room
temperature; for a 1- to 2-hour accelerated rise, let
stand in a turned-off microwave along with 1 cup of
boiling-hot water; or for an extended rise, refrigerate
for 4 to 24 hours, then set out at room temperature.
Continue the rise until the dough almost reaches the
plastic. Remove it and continue until the loaves extend
¼ inch above the rims.
Baking Preliminaries 20 minutes before baking time,
put a rack in the lower third of the oven; preheat to
400°F.
Baking Bake the loaves on the lower rack for 25 to 35
minutes, or until the tops are nicely browned. Tent the
tops with foil and continue baking for 20 to 30 minutes
longer, until a skewer inserted in the thickest part
comes out with just a few particles clinging to the
bottom portion (or until the center registers 208° to
210°F on an instant-read thermometer). Then bake for
5 to 10 minutes more to be sure the centers are done.
Cool the loaves in the pans for 10 minutes. Then turn
them out onto a wire rack and cool at least 1 hour
before serving.
Serving and Storing
Serve cut into thin slices. The bread will keep at room
temperature for 3 to 4 days, and may be frozen,
airtight, for up to 2 months.
Super Seeded Almond Butter
Health Bread
KS Quotient
Fairly Easy: Lots of ingredients, but easily mixed. No
hand-shaping.
Loaded with four kinds of seeds, four kinds of grain,
almond butter, and honey, this high-fiber, protein-rich bread
is one of the few in the book that may warrant a trip to the
health food store. Not only are the seeds called for usually
sold in bulk, which is most economical, but they are usually
in demand and turn over rapidly there, which means they
are likely to be very fresh.
The recipe also calls for unsalted toasted almond butter,
which looks a bit like peanut butter, but is made with ground
almonds. It boosts the protein and provides fat that helps
keep the loaves moist and soft, while also lending a subtle
nutty taste. Most health food stores (and some
supermarkets) carry both raw and roasted almond butters,
some salted, some not; choose unsalted butter that's made
from roasted almonds for the most distinct flavor. (It usually
has a darker color, but check the label to be sure.)
The two generous loaves are slightly sweet and moist from
honey, compact, nubby from the seeds, and full-bodied
enough that a slice or two makes a filling snack or
substantial addition to a light meal.
Yield: 2 large loaves
4½ cups (22.5 ounces) unbleached white bread flour,
plus more as needed
½ cup roasted, salted sunflower seeds
1/3 cup old-fashioned or quick-cooking (not instant)
rolled oats
1/3 cup cooked (cooled) brown rice
¼ cup white or yellow cornmeal, preferably stoneground
¼ cup millet seeds, plus 1 tablespoon for garnish
¼ cup sesame seeds, plus 1 tablespoon for garnish
2 tablespoons flax seeds, preferably golden
2½ teaspoons table salt
1¼ teaspoons instant, fast-rising, or bread machine
yeast
2¼ cups ice water, plus more if needed
2/3 cup clover honey or other mild honey
½ cup unsweetened, unsalted toasted almond butter,
stirred well before measuring if separated
Corn oil, canola oil, or other flavorless oil for coating
dough tops
2 tablespoons Cornstarch Glaze, or 2 tablespoons
liquid egg substitute for finishing loaf tops
First Rise In a very large bowl, thoroughly stir together
the bread flour, sunflower seeds, oats, rice, cornmeal,
¼ cup each millet and sesame seeds, flax seeds, salt,
and yeast until blended. In another bowl, stir together
the water, honey, and almond butter until very well
blended. Vigorously stir the mixture into the bowl with
the flour, scraping down the sides and mixing just until
very well blended. If the mixture is too dry to blend, add
in just enough more ice water to facilitate mixing; don't
over-moisten, as the dough should be fairly stiff. Brush
or spray the top with oil. Tightly cover the bowl with
plastic wrap. If desired, for best flavor or for
convenience, refrigerate for 3 to 10 hours. Then let rise
at cool room temperature for 12 to 18 hours.
Second Rise Vigorously stir the dough, incorporating
more flour to yield a hard-to-stir consistency if
necessary. Cut the dough in half with well-oiled kitchen
shears or a serrated knife, placing each portion in an
oiled 9 x 5-inch loaf pan. Brush or spray the loaf tops
with oil. Using an oiled rubber spatula or your
fingertips, smooth out the tops and press the dough
evenly into the pans. Generously and evenly brush
each top with Cornstarch Glaze (or liquid egg
substitute); immediately sprinkle ½ tablespoon of the
sesame, then millet seeds, over each loaf. Using oiled
kitchen shears or a serrated knife, cut a ½-inch-deep
slash lengthwise down the loaf centers. Cover the pans
with nonstick spray—coated plastic wrap.
Let Rise Using Any of These Methods For a 1½- to
2½-hour regular rise, let stand at warm room
temperature; for a 1- to 2-hour accelerated rise, let
stand in a turned-off microwave along with 1 cup of
boiling-hot water; or for an extended rise, refrigerate
for 4 to 48 hours, then set out at room temperature.
Continue the rise until the dough extends ½ inch above
the pan rims.
Baking Preliminaries 15 minutes before baking time,
place a rack in the lower third of the oven; preheat to
375°F.
Baking Reduce the temperature to 350°F. Bake on the
lower rack for 45 to 50 minutes, until the loaves are
well browned and firm on top. Cover the tops with foil
and continue baking for 15 to 25 minutes, occasionally
testing with a skewer inserted in the thickest part until it
comes out with just slightly moist particles clinging to
the bottom (or the center registers 208° to 210°F on an
instant-read thermometer). Bake for 5 to 10 minutes
more to ensure the centers are baked through. Let
cool on wire racks for 15 minutes. Remove the loaves
to cooling racks; let cool completely.
Serving and Storing
The loaves slice best when cool, but the bread is good
served warm, at room temperature, or toasted. Cool
completely before storing. Store airtight in plastic or
foil. Store at room temperature for 2 to 3 days; freeze,
airtight, for up to 2 months, then thaw, unwrapped, at
room temperature.
Crunchy-Munchy Pumpkin,
Sunflower, and Flax Seed
Boule
KS Quotient
Fairly Easy: All ingredients added before the first rise.
Easy hand-shaping required.
I often find the seeds in breads a distraction, but in this
case they make the loaf. The generous quantity of roasted
pumpkin, sunflower, and flax seeds lends a delicious and
very distinctive nuttiness—not to mention crunchy texture,
eye appeal, and protein. The bread is baked in a covered
pot for most of its time in the oven, which crisps the crust
and the seeds on it, but also prevents them from burning.
Be sure to use very fresh, appealing-tasting seeds for this
recipe. If you can only find raw, unsalted sunflower and
pumpkin seeds, toss them with ¼ teaspoon corn oil or
canola oil and 1/8 teaspoon of salt and roast at 325°F,
stirring occasionally, until lightly toasted, 7 to 9 minutes.
Yield: 1 large loaf, 12 to 14 slices
1½ cups (7.5 ounces) whole wheat flour, plus more as
needed
1½ cups (7.5 ounces) unbleached white bread flour
¼ cup flax seeds, preferably golden
1¼ teaspoons table salt
1 teaspoon instant, fast-rising, or bread machine yeast
3 tablespoons clover honey or other mild honey
1½ tablespoons corn oil, canola oil, or other flavorless
vegetable oil, plus more for coating dough top and pan
1 1/3 cups plus 1 tablespoon ice water, plus more if
needed
1/3 cup roasted, salted pumpkin seeds, plus 2
tablespoons for garnish
1/3 cup roasted, salted sunflower seeds, plus 2
tablespoons for garnish
½ to 1 teaspoon sea salt or other coarse crystal salt,
optional
Cornstarch Glaze, or 1 egg white, beaten, or 2
tablespoons liquid egg substitute
First Rise In a large bowl, thoroughly stir together the
whole wheat flour, bread flour, flax seeds, salt, and
yeast. In another bowl or measuring cup, thoroughly
whisk the honey and oil into the water. Vigorously stir
the mixture into the bowl with the flours, scraping down
the sides and mixing just until the dough is thoroughly
blended. If the ingredients are too dry to mix together,
gradually add in just enough more ice water to
facilitate mixing, as the dough should be slightly stiff. If
necessary, stir in enough more whole wheat flour to
stiffen it. Brush or spray the top with oil. Tightly cover
the bowl with plastic wrap. If desired, for best flavor or
for convenience, refrigerate for 3 to 10 hours. Then let
rise at cool room temperature for 12 to 18 hours.
Second Rise Working in the bowl and turning the
dough as you work, sprinkle about half the pumpkin
and sunflower seeds over the surface. With lightly oiled
hands, work in the seeds and fold the dough over to
fully incorporate them. Continue working in the
remaining seeds, folding over the dough until all the
seeds are incorporated and fairly evenly distributed
throughout. Sprinkle the dough with a little whole wheat
flour. Press and smooth it into the dough, shaping it
into a ball as you work.
Oil a 3½- to 4-quart Dutch oven or similar round,
ovenproof pot. Transfer the ball to the pot. Dusting the
dough with more flour as needed to prevent stickiness,
tuck the edges under firmly all the way around, forming
a smooth, high-domed round loaf about 6½ inches in
diameter. Brush off excess flour, then brush all over
with Cornstarch Glaze (or egg white wash), then
immediately sprinkle the surface with the remaining
pumpkin and sunflower seeds for garnish. Using welloiled kitchen shears or a serrated knife, cut a 2½-inch
diameter, ½-inch-deep circle in the top. Cover the pot
with its lid.
Let Rise Using Any of These Methods For a 2- to 4hour regular rise, let stand at warm room temperature;
for a 1½- to 2½-hour accelerated rise, let stand in a
turned-off microwave with 1 cup of boiling-hot water; or
for an extended rise, refrigerate for 4 to 24 hours, then
let stand at room temperature. Continue the rise until
the dough doubles from its deflated size.
Baking Preliminaries 15 minutes before baking time,
put a rack in the lower third of the oven; preheat to
450°F. Generously brush or spray the loaf with water.
Baking Lower the heat to 425°F. Bake on the lower
rack, covered, for 55 to 60 minutes, or until the loaf is
lightly browned. Uncover, and continue baking for 10 to
15 minutes more, until a skewer inserted in the thickest
part comes out with just a few particles on the end (or
the center registers 208° to 210°F on an instant-read
thermometer). Then bake for 5 minutes longer to
ensure the center is done. Cool in the pot on a wire
rack for 10 minutes. Turn the loaf onto the rack; cool
thoroughly.
Serving and Storing
Tastes good warm but will cut much better when cool.
Cool completely before storing. To maintain the crisp
crust, store draped with a clean tea towel or in a heavy
paper bag. Or to prevent the loaf from drying out, store
airtight in a plastic bag or wrapped in foil: The crust will
soften, but can be crisped by heating the loaf,
uncovered, in a 400°F oven for a few minutes. The
bread will keep at room temperature for 3 days, and
may be frozen, airtight, for up to 2 months.
Hearty Multigrain Boule with
Molasses
KS Quotient
Easy: All ingredients added before the first rise.
Simple hand-shaping required.
I love this bread. (Others partial to the pungent appeal of
molasses invariably like it, too.) I created it years ago in
desperation, after the Alexandria, Virginia, bakery that had
satisfied my hankering whenever I was willing to make the
trip from my Maryland home to buy it suddenly went out of
business. Guided by the ingredient label on a loaf I found
buried in the freezer, I was eventually able to approximate
the compact, but not dense, texture and hearty, addictive
flavor.
The ample amount of molasses, in concert with the whole
wheat, wheat germ and bran, rye, and small amount of oats,
gives the large loaf a robust yet sweet taste and aroma
vaguely reminiscent of good, "bran-y" bran muffins or
perhaps dark Boston brown bread. The crumb is mediumfine and the crust springy. Smoothed with a little butter or a
mild cheese, served warm or at room temperature, this
bread is heaven. I also like it with seafood salad.
Yield: 1 very large round loaf, 14 to 16 slices
2 cups (10 ounces) unbleached all-purpose white flour
or unbleached white bread flour
1 1/3 cups (6.66 ounces) whole wheat flour, plus more
as needed
1 cup (5 ounces) medium or dark rye flour
1 cup 100 percent bran cereal, finely crushed (in a
small baggie) after measuring
½ cup old-fashioned rolled oats
¼ cup wheat germ
2¼ teaspoons table salt
1¼ teaspoons instant, fast-rising, or bread machine
yeast
½ cup light or dark molasses (not blackstrap)
2 tablespoon corn oil, canola oil, or other flavorless
vegetable oil, plus extra for coating dough top and pie
plate
2 1/3 cups ice water, plus more if needed
First Rise In a large bowl, thoroughly stir together the
white flour, whole wheat flour, rye flour, bran cereal,
oats, wheat germ, salt, and yeast. In another bowl,
thoroughly whisk the molasses and oil into the water.
Thoroughly stir the mixture into the bowl with the flours,
scraping down the sides and mixing just until well
blended. If too dry to mix together, add just enough
more water to facilitate mixing; don't over-moisten, as
the dough should be stiff. If necessary, stir in enough
more whole wheat flour to stiffen it. Brush or spray the
top with oil. Tightly cover the bowl with plastic wrap. If
desired, for best flavor or for convenience, refrigerate
for 3 to 10 hours. Then set aside at cool room
temperature for 12 to 18 hours. Stir once partway
through the rise, if convenient.
Second Rise Vigorously stir the dough, adding more
whole wheat flour if needed to yield a very stiff
consistency; then scrape down the sides. Using a welloiled rubber spatula, fold the dough in towards the
center, working all the way around the bowl. Oil a 9- to
9½-inch deep-sided pie plate or similar round 2- to 3inch-deep pan. Sprinkle 2 tablespoons whole wheat
flour in the plate, then tip back and forth to spread the
flour on the bottom and sides. Invert the dough out into
the plate. Sprinkle with more whole wheat flour. Pat
and press it into the dough with your fingertips,
shaping the dough into a ball as you work. Then press
and firmly tuck the sides of the loaf underneath all the
way around so it forms a smooth, round, high-domed
loaf, about 6 inches in diameter; add more flour as
needed to reduce stickiness. Evenly garnish with 1
more tablespoon whole wheat flour. Using well-oiled
kitchen shears or a serrated knife, cut a ½-inch-deep,
3-inch square in the center top. Tent the top with
nonstick spray— coated foil.
Let Rise Using Any of These Methods For a 1½- to 3hour regular rise, let stand at warm room temperature;
for a 1- to 2-hour accelerated rise, let stand in a
turned-off microwave along with 1 cup of boiling-hot
water; or for an extended rise, refrigerate for 4 to 48
hours, then set out at room temperature. Continue the
rise until the dough doubles from its deflated size,
removing the plastic wrap as the dough nears it.
Baking Preliminaries 15 minutes before baking time,
place a rack in the lower third of the oven; preheat to
375°F. Place a broiler pan on the oven bottom.
Baking Add a cup of ice water to the broiler pan, being
careful of spattering and steam. Bake on the lower
rack for 40 to 50 minutes until the top is nicely
browned, then cover with foil as needed to prevent
over-browning. Bake for 15 to 20 minutes longer, until
a skewer inserted in the thickest part comes out with
just a few moist particles clinging to the bottom portion
(or until the center registers 208° to 210°F on an
instant-read thermometer). Then bake for 5 to 10
minutes more to ensure the center is done. Let cool in
the pan on a wire rack for 15 minutes. Slide the loaf
onto the rack; cool thoroughly before storing.
Serving and Storing
Serve warm, or cool, or toasted; the bread slices best
when cool. Cool thoroughly before storing in plastic or
foil. Keeps at room temperature for up to 3 days. May
be frozen, airtight, for up to 2 months.
Brown and Wild Rice Crunch
Bread
KS Quotient
Super-Easy: A minimum of ingredients, all added
before the first rise. No hand-shaping.
Breads featuring either raw brown rice or wild rice are rare,
but as part of a personal campaign to incorporate more
whole grains into my family's diet, I decided to grind up and
add the last of a box of unseasoned brown and wild rice
pilaf blend into a wheat bread recipe. The experiment was
a huge success: The resulting loaf had such a lovely,
distinctive, sweet grain flavor and appealing crunch that it
won over even the tasters normally hostile to the slightest
hint of whole grain.
I've since tried this recipe with just brown rice, and the loaf
comes out a tad lighter and less crunchy, but tasting more
or less the same, so the wild rice can be considered nonessential. The nutritional profile of wild rice, which is in fact
a seed, not a grain, does dovetail nicely with that of the
brown rice, though.
Note that because the brown rice is used uncooked, it must
be ground into a flour for this recipe. Either a blender or
(clean) coffee or spice grinder will work; a food processor
blade isn't thin enough for the job. The mixture should end
up mostly powdery, but for a little crunch, leave some
particles the size of corn grits. (Larger bits will be too hard
on the teeth.) Due to its popcorn-like aroma and flavor,
brown basmati rice is especially appealing in this bread,
but any variety of long-grain brown rice will do.
I like to serve this loaf warm and sliced thick with soups and
stews. Once cooled and cut thinner, it's good for toast and
sandwiches.
Yield: 1 medium loaf, 12 to 14 slices
1¼ cups (6.25 ounces) whole wheat flour, plus more
as needed
1¼ cups (6.25 ounces) unbleached white bread flour
½ cup uncooked, unseasoned long-grain brown rice
and wild rice blend (or just brown rice), ground fairly
fine after measuring
1 tablespoon granulated sugar
Generous 1 teaspoon table salt
¾ teaspoon instant, fast-rising, or bread machine
yeast
1 tablespoon corn oil, canola oil, or other flavorless
vegetable oil, plus more for coating dough top and pan
1 1/3 cups ice water, plus more if needed
First Rise In a large bowl, thoroughly stir together the
whole wheat and bread flour, ground rice, sugar, salt,
and yeast. In another bowl, whisk the oil into the water.
Vigorously stir the mixture into the bowl with the flours,
scraping down the sides and mixing until well blended
and smooth. If the ingredients are too dry to mix
together, gradually add in just enough more ice water
to facilitate mixing; don't over-moisten, as the dough
should be stiff. If necessary, add in more whole wheat
flour to stiffen it. Brush or spray the top with oil. Tightly
cover the bowl with plastic wrap. If desired, for best
flavor or for convenience, refrigerate for 3 to 10 hours.
Then let rise at cool room temperature for 18 to 24
hours.
Second Rise Vigorously stir the dough, adding more
whole wheat flour if needed to stiffen it, then carefully
scrape down the sides. Using a well-oiled rubber
spatula, fold the dough in towards the center, working
all the way around the bowl. Invert the dough into a
generously oiled 8½ x 4½-inch loaf pan. Brush or spray
the dough top with oil. Smooth and press out the
dough with well-oiled fingertips so it evenly fills the pan
and is smooth on top. Using a well-oiled serrated
knife, make 5 or 6 evenly spaced ¼-inch-deep
crosswise slashes along the loaf top. Cover the pan
with nonstick spray—coated plastic wrap.
Let Rise Using Any of These Methods For a 2- to 3hour regular rise, let stand at warm room temperature;
for a 1½- to 2½-hour accelerated rise, let stand in a
turned-off microwave along with 1 cup of boiling water;
or for an extended rise, refrigerate for 4 to 24 hours,
then set out at room temperature. Continue the rise
until the dough nears the plastic, then remove it and let
the dough rise until 1 inch above the pan rim.
Baking Preliminaries 15 minutes before baking time,
put a rack in the lower third of the oven; preheat to
400°F.
Baking Bake on the lower rack for 35 to 45 minutes, or
until the top is well browned. Continue baking for 15 to
20 minutes more, covering to prevent over-browning,
until a skewer inserted in the thickest part comes out
with just a few particles clinging to the bottom portion
(or until the center registers 206° to 208°F on an
instant-read thermometer). Then bake for 5 to 10
minutes more to be sure the center is done. Cool the
pan on a wire rack for 10 minutes. Then turn out the
loaf onto the rack and cool for at least 15 minutes
before serving.
Serving and Storing
The loaf slices best when cool, but the bread is good
served warm or at room temperature. Cool completely
before storing airtight in plastic or foil. Keeps at room
temperature for 3 days, and may be frozen, airtight, for
up to 2 months.
Gluten-Free Light Sandwich
Bread
KS Quotient
Fairly Easy: Easy once the gluten-free ingredients are
assembled. No hand-shaping.
Gluten, a rubbery protein abundant in wheat doughs, is
normally the component that both holds yeast breads
together and raises them by trapping the gas produced
during fermentation. Which means that turning out yeasted
baked goods without gluten is always challenging and that
the results rarely stand up (so to speak) to breads made
the usual wheat way.
Still, for the legions of gluten allergy sufferers with a
desperate, abiding craving for bread, ersatz loaves are an
acceptable alternative to never eating a sandwich, or toast,
or a simple buttered slice again. According to several of my
gluten-free friends who have tried many of the available
commercial gluten-free products, they are better than
nothing, but, often, just barely. Fresh, homemade, glutenfree breads, on the other hand, occasionally taste enough
like the real thing to get them highly excited.
I am pleased to say that the following all-purpose yeasted
sandwich bread recipe is one that did. Upon taking her first
bite, a gluten-free friend declared this the best bread she'd
eaten since forsaking gluten three years ago—so good,
she said, it almost made her cry! She then carefully
wrapped up her gift, took it home, and froze it so she could
stretch out the pleasure over the next several weeks. She
also insisted that I share this recipe with her immediately.
Admittedly, this bread isn't as springy and the taste isn't as
wheaty as the usual wheat-based loaf, but a combination of
carefully-chosen gluten-free flours and meals creates a light
tan bread with a mild, pleasant multigrain taste and enough
cohesiveness that this loaf works just fine for sandwiches. It
is good for toast and eating as is, too. (For heartier, darker,
seeded bread, see the variation at the end of the recipe.)
Yeast might not seem to serve a purpose in gluten-free
doughs, but it does: First, it contributes the same sweet,
earthy flavors and aromas that have always made people
love yeast bread. Plus, there are a number of gluten
substitutes (found in the gluten-free baking sections of
health food stores) like tapioca starch, flax seed meal, and
xanthan gum that help make the dough cohesive enough to
trap at least some of the gas produced during fermentation.
Baking powder provides the rest of the leavening.
Yield: 1 large loaf, 13 to 14 slices
1 2/3 cups white rice flour, divided, plus more as
needed
2/3 cup old-fashioned or quick-cooking (not instant)
gluten-free rolled oats
½ cup cornstarch
1/3 cup tapioca flour
1/3 cup flax seed meal or golden flax seed meal
Generous 1¼ teaspoons table salt
1 teaspoon instant, fast-rising, or bread machine yeast
1 1/3 cups ice water, plus more if needed
1/3 cup corn oil or canola oil, plus more for coating pan
3 tablespoons clover honey or other mild honey
1 large egg, at room temperature
¼ cup plain low-fat or regular yogurt, drained of excess
liquid
2½ teaspoons baking powder
First Rise In a large bowl, thoroughly stir together 1 1/3
cups of the rice flour, the oats, cornstarch, tapioca
flour, flax seed meal, salt, and yeast. In another bowl or
measuring cup, thoroughly whisk together the water,
oil, and honey, then stir them into the bowl with the flour
and oats, scraping down the bowl sides and mixing
until well blended. If the mixture is too stiff to blend
together, stir in enough more water to facilitate mixing
and yield a barely firm dough. (It will stiffen as it
stands.) Tightly cover the bowl with plastic wrap. If
desired, for best flavor or for convenience, refrigerate
for 3 to 10 hours. Then let stand at cool room
temperature for 12 to 18 hours. It's all right if the dough
doesn't rise a lot.
Second Rise Whisk the egg, then set aside 1
tablespoon to brush on the loaf top. Stir the yogurt,
baking powder, and 1/3 cup of the rice flour into the
remaining egg. Vigorously stir the mixture into the
dough until well blended. If it is soft, stir in enough more
white rice flour to yield a fairly stiff dough. Turn it out
into a very well-greased 9 x 5-inch loaf pan. Evenly
brush the top with oil. Smooth the surface with an oiled
rubber spatula or fingertips. Brush the reserved egg
over the surface. Using a well-oiled serrated knife or
kitchen shears, make a ½-inch-deep cut lengthwise
down the loaf. Cover the pan with nonstick spray—
coated plastic wrap.
Let Rise Using Either of These Methods For a 2½- to
4-hour regular rise, let stand at warm room
temperature; for a 1½- to 3-hour accelerated rise, let
stand in a turned-off microwave along with 1 cup of
boiling-hot water. When the dough nears the plastic
wrap, remove it and continue the rise until the dough
extends 1/8 inch above the pan rim.
Baking Preliminaries 15 minutes before baking time,
place a rack in the lower third of the oven; preheat to
375°F.
Baking Bake on the lower rack for 55 to 60 minutes,
until the top is nicely browned; if necessary, cover with
foil to prevent over-browning. Continue baking for 10 to
15 minutes, until a skewer inserted in the thickest part
comes out with only a few crumbs clinging to the
bottom (or until the center registers 206° to 208°F on
an instant-read thermometer). Then bake for another 5
to 10 minutes to ensure that the center is done. Cool in
the pan on a wire rack for 15 minutes. Remove the loaf
to the rack; cool thoroughly.
Serving and Storing
The loaf slices best when cool, but the bread is good
served warm or at room temperature. Cool completely
before storing airtight in plastic or foil. The bread will
keep at room temperature for 3 days, and may be
frozen, airtight, for up to 2 months.
Variation
Hearty Seeded Gluten-Free Bread
Proceed exactly as for Gluten-Free Light Sandwich Bread
except: Substitute ¼ cup molasses for the honey.
Substitute ½ cup cornmeal or ½ cup brown rice flour for the
rolled oats. Stir together 1 tablespoon each millet, poppy
seeds, sesame seeds, and flax seeds. Stir all but 1
tablespoon of the mixture into the dough before the first
rise. Sprinkle the remaining 1 tablespoon over the loaf after
brushing the loaf top with the egg before starting the
second rise.
Gluten-Free Faux Rye Bread
KS Quotient
Fairly Easy: Surprisingly well-textured, moist, and
flavorful. No hand-shaping.
To put it kindly, some gluten-free breads have an "unusual"
flavor and consistency. But this moist, springy loaf seems
so normal and appealing that many tasters won't even
realize it's gluten-free. It goes well with cheeses and
smoked meats and is excellent for both sandwiches and
toast. Though completely "ryeless," it has a pleasant sour
rye taste, owing to the caraway seeds, molasses, and
yogurt. The yeast also lends flavor and some lift. Baking
powder leavens some, too.
This loaf is fairly simple to make once the various glutenfree ingredients are on hand. All are readily obtainable in
the gluten-free sections of health food stores as well as in
some large supermarkets.
Yield: 1 large loaf, 12 to 14 slices
1 2/3 cups white rice flour, divided, plus more as
needed
¾ cup brown rice flour
1/3 cup cornstarch
1/3 cup tapioca flour
1/3 cup flax seed meal or golden flax seed meal
2 tablespoons caraway seeds, divided
2 teaspoons xanthan gum
1¼ teaspoons table salt
1 teaspoon instant, fast-rising, or bread machine yeast
1½ cups ice water
1/3 cup corn oil or canola oil, plus more for coating pan
1/3 cup molasses
1 large egg, at room temperature
1/3 cup plain low-fat or regular yogurt, drained of
excess liquid
2½ teaspoons baking powder
First Rise In a large bowl, thoroughly stir together 1
cup of the rice flour, the brown rice flour, cornstarch,
tapioca flour, flax seed meal, 1½ tablespoons of the
caraway seeds, the xanthan gum, salt, and yeast. In
another bowl or measuring cup, whisk together the
water, oil, and molasses, then vigorously stir into the
bowl with the flours, scraping down the bowl sides and
mixing until well blended. If the dough is too stiff to
blend together, stir in just enough water to facilitate
mixing, but don't over-moisten, as it should be fairly
firm. If necessary, add more rice flour to firm it. Tightly
cover the bowl with plastic wrap. If desired, for best
flavor or for convenience, refrigerate for 3 to 10 hours.
Then let stand at cool room temperature for 12 to 18
hours. It's all right if this dough doesn't rise much.
Second Rise In a small deep bowl, whisk the egg until
smooth. Set aside 1 tablespoon for glazing the dough
top. Stir the yogurt, baking powder, and 2/3 cup of
white rice flour into the remaining egg. Vigorously stir
the mixture into the dough until very well blended. If it is
soft, stir in enough more white rice flour to yield a fairly
stiff dough, scraping down the bowl. Turn the dough out
into a well-greased 9 x 5-inch loaf pan. Brush the top
with oil, then smooth out the surface with an oiled
rubber spatula. Evenly brush on the reserved egg.
Sprinkle with the remaining caraway seeds. Using
well-oiled kitchen shears, make a ½-inch-deep slash
lengthwise down the loaf. Cover the pan with nonstick
spray—coated plastic wrap.
Let Rise Using Either of These Methods For a 2½- to
4-hour regular rise, let stand at warm room
temperature; for a 1½- to 3-hour accelerated rise, let
stand in a turned-off microwave along with 1 cup of
boiling-hot water. When the dough nears the plastic
wrap, remove it and continue until the dough reaches
the pan rim.
Baking Preliminaries 15 minutes before baking time,
place a rack in the lower third of the oven; preheat to
375°F.
Baking Bake on the lower rack for 55 to 60 minutes, or
until the top is nicely browned; cover with foil if needed
to prevent over-browning. Continue baking for 15 to 20
minutes longer or until a skewer inserted in the thickest
part comes out with only a few crumbs clinging to the
bottom (or until the center registers 206° to 208°F on
an instant-read thermometer). Then bake for 5 to 10
minutes longer to ensure the center is baked through.
Cool in the pan on a wire rack for 15 minutes. Turn the
loaf out onto the rack; cool thoroughly.
Serving and Storing
The loaf slices best when cool, but the bread is good
served warm or at room temperature. Cool completely
before storing airtight in plastic or foil. The bread will
keep at room temperature for 3 days, and may be
frozen, airtight, for up to 2 months.
Variations
Swedish-Style Gluten-Free Faux Rye Bread
Proceed exactly as directed for Gluten-Free Faux Rye
Bread, except reduce the caraway seeds added to the
dough to 1 teaspoon and add in 1 teaspoon anise seeds
and 1 teaspoon finely grated orange zest. Garnish the loaf
top with ½ teaspoon each caraway seeds and anise
seeds.
Gluten-Free Faux Dark Rye Bread with Raisins
Proceed exactly as directed for Gluten-Free Faux Rye
Bread, except add 1 tablespoon unsweetened cocoa
powder (sifted after measuring) to the flour mixture. Add 1
tablespoon packed dark brown sugar and 1 cup dark,
seedless raisins (rinsed and well drained) with the watermolasses mixture.
Chapter 7: Sweet Breads
and Gift Breads
When most people think of yeast breads, peasant
rounds and sandwich loaves come to mind first, but
enticing coffeecakes and festive sweet breads can be
made with yeast, too. In fact, some of the most traditional
holiday cakes—panettone and Mardi Gras King's cake—
are actually rich yeasted breads.
Besides being aerated with yeast, the cakes and
coffeecakes here differ from chemically leavened cakes in
that the doughs tend to be less sweet. Yeast organisms
don't grow well in the presence of a lot of sugar because as
the sugar dissolves, it draws up water the yeast organisms
need. More than about 2 tablespoons of sugar per cup of
flour can cause yeast dehydration, even though the dough
may still look very moist. So, don't be tempted to just toss in
extra sugar, and follow the directions for incorporating it
carefully.
It is possible to increase the level of sweetness by adding
honey to a dough, or by tucking a sweet filling inside it.
Another easy approach is to top the finished bread or cake
with a sweet icing or glaze.
In addition to a nice selection of coffeecakes and yeasted
cakes, check out the gift bread recipes at the end of the
chapter. These feature easy, ready-to-use bread mixes that
are attractively layered in clear jars. The recipients of these
gift kits simply add water and oil and stir to create a
delectable loaf of homemade bread.
Mardi Gras King's Cake
KS Quotient
Fairly Easy: Two-stage mixing. Some hand-shaping
required.
Shaped like a large, oval doughnut and gaudily decorated
with alternating sections of Carnival colors (purple, green,
and yellow), the yeast bread known as King's Cake is one
of New Orleans' many popular Mardi Gras traditions. The
"cake" is an indulgence traditionally enjoyed on the Twelfth
Night (the eve of Epiphany, which begins the twelfth day
after Christmas) and up until Ash Wednesday, the
beginning of Lent. The name references the custom of
tucking a coin, miniature china doll, nut meat, or other small
tidbit in the cake before baking and declaring whoever
happens upon it the king of the next Mardi Gras ball. The
King's Cake, sometimes also called Twelfth Night cake,
actually dates to the Carnival celebrations of medieval
Europe, where the notion of serendipitously becoming
nobility was even more entertaining than it is today.
Both home and commercial bakers now prepare the
Gateau du Roi, and many are shipped around the country
for those wishing to participate in Mardi Gras from afar.
Good-quality versions feature a light, not too sweet brioche,
often flavored with citrus zest and spice. Some bakers go
all out with the toppings, adding not only the traditional
bands of icing or colored sugars, but bits of candied
cherries or bright nonpareils for a jewel-studded look. (My
grandchildren are always in favor of the heavy décor.)
Since this is a Carnival-time treat, it's really impossible to
be too fanciful or go too far over the top! Incidentally, both
the loaf shaping and decorating are much easier than you
might think.
Yield: 12 to 15, 2- to 2½-inch servings
2½ cups (12.5 ounces) unbleached all-purpose white
flour, plus 1 cup (5 ounces), plus more as needed
7 tablespoons granulated sugar, divided
1¼ teaspoons table salt
1 teaspoon instant, fast-rising, or bread machine yeast
1 1/3 cups ice water, plus more if needed
Corn oil or canola oil, for coating dough top
2 large eggs plus 1 large egg yolk, at room
temperature
1/3 cup good-quality instant nonfat dry milk (don't use a
generic brand)
1/3 cup unsalted butter, melted and cooled just slightly
Grated zest (yellow part of the skin) of 1 large lemon
¾ teaspoon ground nutmeg
1 pecan half (or other small edible gift to insert in the
cake)
1 tablespoon whole or reduced-fat milk
2 cups confectioners' sugar, sifted after measuring
2 tablespoons lemon juice
1 to 2 tablespoons water, as needed
¼ cup each purchased yellow, green, and purple
decorating sugar (or prepare your own using the
sidebar recipe )
Candied cherries, candy dots, or nonpareils, optional
First Rise In a large bowl, thoroughly stir together 2½
cups of the flour, 3 tablespoons of the sugar, the salt,
and yeast. Vigorously stir in the water, scraping down
the bowl sides and mixing until the dough is thoroughly
blended. If the mixture is too dry to blend together, stir
in just enough more ice water to facilitate mixing, but
don't over-moisten, as it should be firm. If the mixture is
soft, stir in enough more flour to make it firm, but not
hard to stir. Evenly brush or spray the top lightly with oil.
Tightly cover the bowl with plastic wrap. If desired, for
best flavor or for convenience, refrigerate for 3 to 10
hours. Then let rise at cool room temperature for 12 to
18 hours.
Second Rise In a medium bowl, thoroughly whisk the
eggs and yolk together. Remove 2 tablespoons and
set aside in a small cup, covered, for garnish. Lightly
whisk the remaining 4 tablespoons sugar, dry milk,
butter, lemon zest, and nutmeg into the egg mixture.
Vigorously stir the egg mixture into the dough until
thoroughly and evenly incorporated. (If preferred, use a
dough hook and heavy stand mixer on low speed.) Stir
or beat in the remaining 1 cup of flour until completely
smooth; this will take several minutes. The dough
should be stiff; if necessary, add in enough more flour
to yield a hard-to-stir dough, then scrape down the
bowl sides carefully.
Line a large baking sheet with baking parchment. Coat
the parchment with nonstick spray, then dust with flour.
Turn out the dough onto the center of the parchment,
then dust with more flour and shape into a round. Push
the pecan half (or other tidbit) down into the dough,
carefully covering it up; it will be discovered by a lucky
eater. With a well-oiled spatula or fingertips, form a
hole in the center of the dough and work it outward until
the dough forms a 15 x 12 x 3-inch oval doughnut with
a 4-inch-wide center opening. Use the spatula or
fingertips to work the inner circle of the dough to create
a smooth, attractive edge and dust the dough with flour
as needed to reduce stickiness. Brush or spray the top
with oil and tent with nonstick spray—coated foil.
Let Rise Using Any of These Methods For a 1½- to
2½-hour regular rise, let stand at warm room
temperature; for a 1- to 2-hour accelerated rise, let
stand in a turned-off microwave along with 1 cup of
boiling-hot water; or for an extended rise, refrigerate
for 4 to 24 hours, then set out at room temperature.
Continue the rise until the dough nearly doubles from
the deflated size. Carefully remove the foil.
Baking Preliminaries 20 minutes before baking time,
put a rack in the lower third of the oven; preheat to
375°F. Whisk the reserved egg mixture together with
the milk. Brush the dough surface evenly with the egg
wash, wiping up any drips.
Baking Bake on the lower rack for 25 to 30 minutes, or
until the top is nicely browned. Cover with foil and
continue baking for 15 to 20 minutes, or until a skewer
inserted in the thickest part comes out with just a few
particles on the end (or until the center registers 206°
to 207°F on an -instant-read thermometer). Let cool in
the pan on a wire rack.
Meanwhile, prepare the icing: In a small bowl, stir
together the powdered sugar, lemon juice, and 1½
tablespoons water until smooth and well blended.
Gradually add more water or more sifted powdered
sugar to obtain a pourable but not runny consistency.
Working in sections, pour the icing over the cool cake
top, quickly spreading it over the surface and then
sprinkling with colored sugar; work quickly so the icing
doesn't dry before the sugar is added. Add the sugars
in alternating yellow, purple, and green bands (using
each color four or five times conveniently divides the
cake into 12 or 15 servings). If desired, add small
nonpareils by sprinkling over the top; add cherries or
candy dots by lightly dipping them in the icing and then
pressing into place on the cake.
Serving and Storing
Serve warm or at room temperature. Cool completely
before storing airtight in a cake keeper or plastic
container. Keeps at room temperature for up to 3
days, and may be frozen, airtight, for up to 2 months.
To Make Colored Sugars
For each color, put ¼ cup granulated sugar in a small
resealable plastic bag; add two drops of liquid food
color, seal, and squeeze until thoroughly blended. For
purple, combine a drop of red and blue first, then mix
with the sugar. Let the sugars stand to dry out slightly
before using if they seem wet.
Panettone
KS Quotient
Fairly Easy: Two stage mixing. No hand-shaping
required.
Panettone is a much-loved holiday bread throughout Italy
and Sicily. According to legend, "Toni's bread" originated
in Milan around 1490, when a young man created it to
impress his sweetheart's father, a baker. (Some stories
say that Toni was the name of the baker, some say it was
the name of the suitor.) Since the bread is enriched with
eggs and butter and studded with candied and dried fruits,
it was once a luxury of the wealthy, but it is now enjoyed in
even modest homes at Christmastime.
Modern recipes often call for Fiori di Sicilia (Flowers of
Sicily), a potent, deliciously complex extract boasting notes
of citrus, vanilla, and almond. Until recently it was hard to
find in the United States, but now gourmet shops
occasionally carry it, and it can also be ordered from the
King Arthur Flour Company (www.bakerscatalog.com). If
necessary, a combination of almond, vanilla, and orange
extracts can be successfully substituted, as indicated
below.
Panettone loaves are traditionally baked in a fairly tall
cylindrical pan, but if you don't have one, a soufflé dish
makes a satisfactory substitute. While it is not customary to
add an icing, I like the festive look and zing of the
Powdered Sugar—Lemon Drizzle over the top.
Yield: 1 large round loaf
2¼ cups (11.25 ounces) unbleached all-purpose white
flour, plus ¾ cup (3.75 ounces), plus more as needed
1¼ teaspoons table salt
1 teaspoon instant, fast-rising, or bread machine yeast
1 cup plus 2 tablespoons ice water, plus more if
needed
Corn oil or canola oil for dough top and baking dish
½ cup granulated sugar
1/3 cup good-quality instant nonfat dry milk (do not use
a generic brand)
7 tablespoons unsalted butter, melted and cooled just
slightly
2 large eggs, at room temperature
1 tablespoon finely grated orange zest (orange part of
the skin)
Generous ½ teaspoon Fiori di Sicilia (Flowers of
Sicily) extract (if unavailable, substitute ½ teaspoon
almond extract, 1 teaspoon vanilla extract, and 1
teaspoon orange or lemon extract)
1/3 cup plump dark raisins
1/3 cup plump golden raisins
¼ cup diced candied orange peel
Powdered Sugar—Lemon Drizzle, optional
First Rise In a large bowl, thoroughly stir together 2¼
cups of the flour, the salt, and yeast. Vigorously stir in
the water, scraping down the bowl sides and mixing
until the dough is thoroughly blended. If the mixture is
too dry to blend together, stir in just enough more water
to facilitate mixing; don't over-moisten. If the mixture is
soft, stir in enough more flour to make it firm, but not
hard to stir. Evenly brush or spray the top lightly with
vegetable oil. Tightly cover the bowl with plastic wrap. If
desired, for best flavor or for convenience, refrigerate
for 3 to 10 hours. Then let rise at cool room
temperature for 12 to 18 hours.
Second Rise In a medium bowl, lightly whisk together
the sugar, dry milk, and butter, then thoroughly whisk in
the eggs, orange zest, and extract(s) until well blended.
Stir in the raisins and candied orange. Vigorously stir
the mixture into the dough until fully and evenly
incorporated; this will take several minutes. (If desired,
mix using a dough hook and heavy-duty stand mixer on
low.) Stir in the ¾ cup flour until completely smooth.
The dough should not be batter-like; if necessary,
vigorously stir in enough more flour to yield a firm
dough, thoroughly scraping down the bowl. Turn out the
dough into a well-oiled 8-cup soufflé dish. Spray with
nonstick cooking spray and cover with nonstick spray
—coated plastic wrap.
Let Rise Using Any of These Methods For a 1½- to
2½-hour regular rise, let stand at warm room
temperature; for a 1- to 2-hour accelerated rise, let
stand in a turned-off microwave along with 1 cup of
boiling-hot water; or for an extended rise, refrigerate
for 4 to 48 hours, then set out at room temperature.
Continue the rise until the dough nears the plastic.
Remove it and continue until the dough reaches ½ inch
above the pan rim.
Baking Preliminaries 15 minutes before baking time,
place a rack in the lower third of the oven; preheat to
375°F.
Baking Bake on the lower rack for 25 to 30 minutes or
until the top is nicely browned. Cover with foil and
continue baking for 15 to 20 minutes, or until a skewer
inserted in the thickest part comes out with only a few
particles at the bottom (or the center registers 205° to
207°F on an instant-read thermometer). Then bake for
another 5 to 10 minutes to ensure the loaf is baked
through. Cool in the pan on a wire rack for 15 minutes.
Run a knife around the sides to loosen the loaf, then
transfer it to the rack and let cool at least to barely
warm before cutting.
If desired, decoratively top the cooled panettone with
the Powdered Sugar—Lemon Drizzle, allowing it to
drip attractively down the sides. Let the cake stand for
a few minutes until it sets.
Serving and Storing
The loaf slices best when cool. It is good at room
temperature or toasted. Cool completely before
storing airtight in plastic or in a cake keeper. The
bread will keep at room temperature for 2 to 3 days,
and may be frozen, airtight, for up to 2 months.
All-Purpose Enriched Sweet
Dough
KS Quotient
Fairly Easy: Two-stage mixing. Very versatile.
This is a versatile, slightly sweet dough suitable for making
coffeecakes, various enriched loaves, and dessert breads.
For a very easy yet festive loaf, simply stir in ¾ cup of diced
mixed candied fruit and 1 teaspoon anise seeds into this
dough before the second rise. (Follow the baking
instructions for Cornish Saffron Bread.) Then top the loaf
with the Powdered Sugar—Lemon Drizzle).
This dough is used in the Simple Streusel Coffeecake,
Cornish Saffron Bread, Spiced Cranberry Bundt-Style
Coffeecake, Holiday Cranberry-Apple Coffee Ring, and
Apple—Cream Cheese Pinwheel Pastries recipes.
Since the dough can be put to different purposes, you can
adjust the amount of sugar slightly to suit your taste.
However, for proper gluten development and yeast growth,
be sure to add the sugar in two stages, as directed, and
don't add more than the maximum called for.
Yield: Enough dough for 1 generous loaf or
coffeecake or batch of pastries
2 1/3 cups (11.66 ounces) unbleached all-purpose
white flour, plus 2/3 cup (3.33 ounces) plus more as
needed
5 to 7 tablespoons granulated sugar, to taste, divided
1¼ teaspoons table salt
1 teaspoon instant, fast-rising, or bread machine yeast
1¼ cups ice water, plus more if needed
Flavorless vegetable oil for brushing
1/3 cup good-quality instant nonfat dry milk (do not use
a generic brand)
6 tablespoons unsalted butter, melted and cooled just
slightly
2 large eggs, at room temperature, beaten
First Rise In a large bowl, thoroughly stir together 2 1/3
cups of the flour, 2 tablespoons of the sugar, the salt,
and yeast. Vigorously stir in the water, scraping down
the bowl and mixing until the dough is thoroughly
blended. If the mixture is too dry to incorporate the
flour, a bit at a time, mix in just enough more water to
blend the ingredients. If the mixture is soft, stir in
enough more flour to make it firm, but not hard to stir.
Evenly brush the top lightly with vegetable oil. Tightly
cover the bowl with plastic wrap. If desired, for best
flavor or for convenience, refrigerate for 3 to 4 hours.
Then let rise at cool room temperature for 12 to 18
hours.
Second Rise In a medium bowl, stir together the
remaining 3 to 5 tablespoons of sugar, the milk
powder, and butter, then mix in the eggs until well
blended. Gradually add the egg mixture, then 2/3 cup
flour, to the dough, mixing until evenly incorporated;
this will take several minutes so it's best to use a
dough hook and heavy-duty mixer on low, if possible. If
necessary, add in enough more flour to yield a hard-tostir dough, scraping down the bowl sides carefully.
Proceed with the dough as directed in the individual
recipes.
Simple Streusel Coffeecake
KS Quotient
Fairly Easy: Simple ingredients; easy mixing; makeahead option. No hand-shaping.
This coffeecake truly is simplicity itself, yet it has a lovely
buttery taste and texture that will ensure your reputation as
a talented baker. The outside is wonderfully crisp-tender
and strewn with a crunchy, nut-accented sugar-cinnamon
streusel. The inside is moist, soft, and studded with more
little nuggets of streusel. It is great warm from the oven,
especially for breakfast, brunch, or a coffee klatch. The
coffeecake can be baked and served in a flat 9 x 15-inch
baking pan, or, for a fancier presentation, baked in an
angel food pan, then lifted off and plated attractively.
The recipe is super-convenient because the streusel can
be made well in advance and used to jazz up a coffeecake
as needed. Better yet, the coffeecake can be completely
assembled and refrigerated for up to 36 hours. By planning
ahead, you can remove it from the refrigerator to warm up
and rise (allow for a 4½- to 5-hour regular rise, or a 3- to
3½-hour accelerated rise) and time the baking to have a
fresh, warm coffeecake coming from the oven just when you
need it.
Don't forget that this recipe starts with a batch of AllPurpose Enriched Sweet Dough. All the first- and second-
stage ingredients should be already incorporated into the
dough when the following preparations begin.
Yield: 1 large coffeecake,12 to 15 portions or
slices
1 batch Make-Ahead Streusel, prepared as directed
(if just made, it should be refrigerated until firmed up
slightly; if made ahead, it should be set out until
warmed up just slightly but still firm)
1 batch All-Purpose Enriched Sweet Dough, prepared
as directed (adding the eggs, butter, etc., and
maximum amount of sugar called for, then proceeding
with preparing the coffeecake as follows)
Second Rise Stir a generous half of the streusel into
the batch of dough. For a shaped, round coffeecake,
turn out the dough into a well-oiled or nonstick spray—
coated 8- to 12-quart angel food pan. For a
rectangular coffeecake, turn out the dough in a welloiled 9 x 13-inch flat baking dish. Spread the dough
out evenly using an oiled rubber spatula. Sprinkle the
remaining streusel evenly over the dough. Cover the
pan or baking dish with nonstick spray—coated plastic
wrap.
Let Rise Using Any of These Methods For a 2- to 3hour regular rise, let stand at warm room temperature;
for a 1½- to 2½-hour accelerated rise, let stand in a
turned-off microwave along with 1 cup of boiling-hot
water; or for an extended rise, refrigerate for 4 to 36
hours, then set out at room temperature. If the dough
nears the plastic wrap, remove it and continue the rise
until the dough has doubled from its deflated size.
Baking Preliminaries 15 minutes before baking time,
place a rack in the lower third of the oven; preheat to
350°F.
Baking Bake on the lower rack for 30 to 40 minutes for
the rectangular coffeecake or 40 to 50 minutes for the
ring-shaped coffeecake, until the top is nicely browned
and a skewer inserted in the thickest part comes out
with only a few particles at the bottom end (or the
center registers 205° to 207°F on an instant-read
thermometer). If necessary, cover with foil for the last
15 to 20 minutes to prevent over-browning. Then bake
for another 5 to 10 minutes to ensure the center is
done. Cool in the pan on a wire rack for 15 minutes. If
baked in an angel food pan, run a knife around the
center tube and sides to loosen the loaf, then lift it up
and onto the rack.
Serving and Storing
Serve the rectangular cake from its pan; serve the
round version on a cake plate. The coffeecake slices
best when cool, but is delicious warm. Cool completely
before storing airtight in plastic or foil; or store the
round coffeecake in a cake keeper. Keeps at room
temperature for up to 3 days, and may be frozen,
airtight, for up to 2 months.
Cornish Saffron Bread
KS Quotient
Fairly Easy: Two-stage mixing. No hand-shaping.
This is my reworking of an old English bread that has been
popular in various similar forms since the 1700s. An 1810
recipe featured in Elizabeth David's classic work, English
Bread and Yeast Cookery, was titled "To Make the
Famous Saffron Cake." It is not a cake as we use the term
today, but rather, a highly aromatic, slightly sweet bread.
The saffron gives the loaf a beautiful golden yellow color,
and here and there small flecks of it, as well as golden
raisins, brighten the soft crumb even more. Some versions
of this bread call for other spices as well, but saffron has
such a heady, complex aroma and taste I think it's better
solo. On the other hand, I do think lemon zest is a worthy
addition because it actually intensifies the taste of the spice
and adds a subtle, enticing zing.
It's fine to bake this in a loaf pan, but since saffron is rare
and pricey, I like to show the bread off by using a Bundt,
kugelhopf, or other decorative tube pan. Note that due to
the open area provided by the tube, the loaf will be done a
little sooner.
Remember to have a batch of All-Purpose Enriched Sweet
Dough with the eggs, butter, and milk powder incorporated
as indicated in the original directions and ready for its final
rise when beginning this recipe.
Yield: 1 large loaf, 12 to 14 portions or slices
1 tablespoon granulated sugar
1/8 to ¼ teaspoon saffron threads, to taste
2 teaspoons finely grated lemon zest
1 recipe All-Purpose Enriched Sweet Dough, ready for
the second rise
1 cup golden raisins, rinsed under hot water, drained
well, and patted dry
About 1/3 cup (1.66 ounces) unbleached all-purpose
white flour, or as needed
Second Rise Grind the sugar and saffron together
using a mortar and pestle (or using a coffee mill
dedicated to grinding spices) until the saffron is mostly
powdery, but has some fine bits remaining.
(Alternatively, mash the mixture with the back of a
spoon, or grind in a food processor until the saffron is
fairly fine but not completely powdery.) Vigorously stir
the saffron mixture and lemon zest into the dough until
thoroughly and evenly incorporated. Fold in the raisins
and enough flour to yield a stiff, but still stirrable,
dough.
Turn out the dough into a well-oiled 9 x 5-inch or similar
large loaf pan or in an 8- to 10-cup Bundt-style pan.
Evenly brush or spray the top lightly with oil. Spread the
dough out and pat down evenly using an oiled rubber
spatula. Cover the pan with nonstick spray—coated
plastic wrap.
Let Rise Using Any of These Methods For a 1½- to 3hour regular rise, let stand at warm room temperature;
for a 1- to 2½-hour accelerated rise, let stand in a
turned-off microwave along with 1 cup of boiling-hot
water; or for an extended rise, refrigerate for 4 to 48
hours, then set out at room temperature. If the dough
nears the plastic wrap, remove it and continue the rise
until the dough extends 1/8 inch above the rim if using
a loaf pan or 8-cup tube pan, and ¾ inch below the rim
if using a10-cup Bundt- style pan.
Baking Preliminaries 15 minutes before baking time,
place a rack in the lower third of the oven; preheat to
350°F.
Baking Bake on the lower rack for 30 to 40 minutes,
until the top is nicely browned. Cover with foil and bake
for 10 to 20 minutes longer or until a skewer inserted in
the thickest part comes out with only a few particles at
the end (or the thickest part registers 205° to 207°F on
an instant-read thermometer). Then bake for another 5
to 10 minutes to ensure the center is baked through.
Cool in the pan on a wire rack for 15 minutes. Remove
the loaf to the rack; cool thoroughly.
Serving and Storing
The loaf slices best when cool. It is good at room
temperature or toasted. Cool completely before
storing airtight in plastic; or store the round loaf in a
cake keeper if desired. The bread will keep at room
temperature for up to 3 days, and may be frozen,
airtight, for up to 2 months.
Spiced Cranberry Bundt-Style
Coffeecake
KS Quotient
Fairly Easy: Starts with a batch of All-Purpose
Enriched Sweet Dough . No hand-shaping.
Cardamom, coriander, and orange zest give this festive
bread a wonderful and distinctive aroma and flavor. The
cranberries, of course, contribute color, but since they are
fully plumped, they also add succulence. I like the loaf best
topped with a little powdered sugar drizzle, but a simple
dusting of powdered sugar will work fine if time is short.
This makes a spectacular holiday breakfast, brunch, or
coffee-klatch treat. By choosing the extended rise option,
you can do most of the preparation up to 2 days ahead,
then bake the coffeecake on the day it will be served.
Have ready one batch of All-Purpose Enriched Sweet
Dough prepared using the maximum or nearly the
maximum amount of sugar called for in the recipe. Be sure
that the eggs, butter, and milk powder are already
incorporated and the dough is ready for the second rise
before proceeding with the instructions given here.
Yield: 1 large round coffeecake, 12 to 14 portions
or slices
1½ cups dried sweetened cranberries, soaked in hot
water for 10 minutes, then well drained
1 tablespoon grated orange zest
½ cup chopped walnuts or pecans, optional
1 batch All-Purpose Enriched Sweet Dough, ready for
the second rise
¼ cup (1.25 ounces) unbleached all-purpose white
flour
1 teaspoon ground cardamom
1 teaspoon ground coriander
Powdered Sugar—Lemon Drizzle
Second Rise Vigorously stir the cranberries and
orange zest (and nuts, if using) into the dough until
thoroughly incorporated. In a small bowl, stir together
the flour, cardamom, and coriander until well blended,
then stir into the dough until thoroughly incorporated.
Stir in more flour if needed to yield a fairly stiff dough.
Turn it out into a well-oiled or nonstick spray— coated
8- to 10-cup Bundt pan (or similar decorative tube pan)
or angel food pan. Brush or spray the top with oil.
Spread the dough and smooth out using an oiled
rubber spatula. Tent the pan with nonstick spray—
coated foil.
Let Rise Using Any of These Methods For a 2- to 3hour regular rise, let stand at warm room temperature;
for a 1½- to 2½-hour accelerated rise, let stand in a
turned-off microwave along with 1 cup of boiling-hot
water; or for an extended rise, refrigerate for 4 to 48
hours, then set out at room temperature. If the dough
nears the foil, remove it and continue the rise until the
dough has doubled from its deflated size.
Baking Preliminaries 15 minutes before baking time,
place a rack in the lower third of the oven; preheat to
350°F.
Baking Bake on the lower rack for 45 to 55 minutes,
until the top is nicely browned; cover with foil partway
through, if needed, to prevent over-browning. Continue
baking for 5 to 10 minutes more, or until a skewer
inserted in the thickest part comes out with only a few
particles on the end (or the thickest part registers 205°
to 207°F on an instant-read thermometer). Then bake
for another 5 minutes to ensure the bottom of the loaf
is done. Cool in the pan on a wire rack for 15 minutes.
Run a knife around the center tube and sides to loosen
the coffeecake, then invert it onto the rack. Let cool,
then brush off any crumbs from the surface. Transfer to
a serving plate. Sift powdered sugar over the top just
before serving, or top the cooled coffeecake with the
Powdered Sugar—Lemon Drizzle, allowing it drip
attractively down the sides. Let the coffeecake stand
for a few minutes until the icing sets.
Serving and Storing
The coffeecake slices best when cool, but is good
warm, at room temperature, or toasted. Cool
completely before storing airtight in a plastic container
or cake keeper. Keeps at room temperature for 2 to 3
days, and may be frozen, airtight, for up to 2 months.
Tip
A Bundt pan, angel food pan, or a kugelhopf mold with
a dull finish is the best choice for baking this bread. A
shiny aluminum surface hinders browning.
Holiday Cranberry-Apple
Coffee Ring
KS Quotient
Fairly Easy: Two-stage mixing. Hand-shaping
required.
This eye-catching and delectable coffeecake is one of my
favorites. Pinwheel swirls of crimson-colored filling stand
out against the light--colored dough and an icing drizzle
accents the top. The cranberry-apple-raisin medley adds a
sweet-tart taste and helps keep the ring moist and
succulent. This is perfect for a holiday breakfast, brunch, or
buffet. The filling may be made up to 4 or 5 days ahead and
refrigerated if desired. Bring it back to room temperature
before using.
Don't forget that the eggs, butter, and milk powder need to
be added to the All-Purpose Enriched Sweet Dough called
for before it is ready for the second rise and can be used
here.
Yield: 1 large coffee ring, 12 to 14 servings
Generous ¾ cup light brown sugar, packed
2 tablespoons cornstarch
¼ teaspoon ground cinnamon
1¾ cups fresh (or frozen) thawed cranberries, coarsely
chopped
1 cup peeled and chopped (¼-inch) Granny Smith or
similar tart apples
½ teaspoon freshly grated orange zest
2/3 cup dark or golden raisins or a combination
1 recipe All-Purpose Enriched Sweet Dough, ready for
the second rise
Unbleached all-purpose white flour for dusting
1 large egg beaten with 1 teaspoon water for wash
Transparent Powdered Sugar Glaze
Sugar—Lemon Drizzle, optional
or Powdered
Ready the filling In a medium heavy saucepan,
thoroughly stir together the sugar, cornstarch, and
cinnamon. Stir in the cranberries, apples, and orange
zest. Cook, stirring, over low heat until the fruits begin
to release their juice. Raise the heat slightly and cook,
stirring, until the mixture thickens and the apples soften
a bit, about 5 minutes. Stir in the raisins. Set aside
until cooled.
Second Rise Dust the batch of All-Purpose Enriched
Sweet Dough all over with flour, turning to coat it
evenly. Let it rest for 10 minutes. Coat an 18-inch-long
sheet of baking parchment (or wax paper) with
nonstick spray and generously dust with flour. Turn out
the dough onto the center of the parchment. Dusting
the dough with flour to prevent stickiness as needed,
pat and press it into a rough 9-inch-long rectangle with
flour-dusted fingertips. Dust with more flour, then press
or roll out the dough into a 10 x 16-inch evenly thick
rectangle. Evenly spread the room temperature fruit
filling over the dough to within ¼ inch of the edge all
around.
Tightly roll up the dough from a 16-inch-wide side to
form a long pinwheel log; use flour-dusted hands and
lift up the parchment to assist the rolling and pinch the
seam tightly closed as you work. Roll the log onto a
parchment-lined baking sheet, placing seam-side
down. Stretch the log out from the center until evenly
thick along the length. Bring the ends together to form
a ring, pressing and smoothing and pulling away from
the center so the ring is evenly thick and smooth and
the center opening is at least 3 inches in diameter. If
an ovenproof custard cup or small ramekin is
available, coat the outside with nonstick spray, then set
it in the center of the ring so it will stay open during
baking. Using well-oiled kitchen shears, make 1½inch-deep cuts into the ring sides at about 2-inch intervals so the filling is exposed, then turn the cut
portions on a slight diagonal so the pinwheel design
shows. Brush the ring evenly with the egg wash. Tent it
with nonstick spray—coated foil.
Let Rise Using Any of These Methods For a 1½- to
2½-hour regular rise, let stand at warm room
temperature; or for an extended rise, refrigerate for 4
to 48 hours, then set out at room temperature.
Continue the rise until the ring has doubled from the
deflated size.
Baking Preliminaries 15 minutes before baking time,
place a rack in the lower third of the oven; preheat to
375°F.
Baking Bake on the lower rack for 40 to 50 minutes,
until the top is well browned; cover the top with foil
partway through as necessary to prevent overbrowning. Carefully loosen, then remove the cup from
the ring center. Bake for 5 to 10 minutes more, until a
skewer inserted in the thickest part comes out with
only a few particles on the end (or until the thick- est
part registers 204° to 205°F on an instant-read
thermometer) to ensure the ring is done. Let the pan
cool on a wire rack until the ring has cooled for 15
minutes. Brush the ring with Transparent Powdered
Sugar Glaze, or drizzle with the Powdered Sugar—
Lemon Drizzle. Then slide the ring onto a serving
platter and serve.
Serving and Storing
Cool thoroughly before storing. Store airtight in a cake
keeper or plastic container. The coffee ring will keep at
room temperature for 2 to 3 days, and may be frozen,
airtight, for up to 2 months.
Apple-Cream Cheese Pinwheel
Pastries
KS Quotient
Fairly Simple: Very decorative looking. Hand-shaping
required.
These are reminiscent of cream cheese—apple Danish
pastries, but the dough is easier to prepare. The fresh
spiced apple and cream cheese fillings contribute greatly
to the fine flavor, yet come together quickly. And, if desired,
they can be readied well ahead.
It's easiest to bake the pastries on parchment set on two
large baking sheets, but feel free to substitute whatever flat
baking sheets or pans you have. Or bake the pastries in
batches: Hold some on parchment on a tray in the
refrigerator, then slip the completed first batch off onto a
wire rack, and reuse the pan for a second batch. (Let the
pan cool before reusing it.)
Before beginning the pastries, make sure that the eggs,
butter, and milk powder are incorporated into the AllPurpose Enriched Sweet Dough , so it is completely ready
for the second rise.
Yield: Sixteen 4½-inch pastries
1 batch All-Purpose Enriched Sweet Dough, ready for
the second rise
Unbleached all-purpose white flour as needed
Apple Filling
2/3 cup granulated sugar
3 tablespoons unbleached all-purpose white flour
1¼ teaspoons ground cinnamon
1 tablespoon cold unsalted butter, cut into bits
2¾ cups peeled and diced (¼-inch pieces) Granny
Smith, Winesap, or other tart cooking apples
Cream Cheese Filling
One 8-ounce package cream cheese, at room
temperature
3½ tablespoons granulated sugar
1 large egg yolk, at room temperature
½ teaspoon vanilla extract
¼ teaspoon finely grated lemon zest ,or 1/8 teaspoon
almond extract or vanilla extract
Powdered Sugar—Lemon Drizzle for garnish
Second Rise Thoroughly stir the dough, adding more
flour if necessary to yield a very stiff consistency. Dust
the dough all over with flour, then work it into the
surface with flour-dusted fingertips. Let the dough rest,
covered with plastic wrap, for 10 to 15 minutes. Line
several very large baking sheets with baking
parchment.
Prepare the Apple Filling In a heavy medium
saucepan, thoroughly stir together the sugar, flour, and
cinnamon. Stir in the butter and apples. Cook, stirring,
over low heat until the apples begin to release their
juice, about 5 minutes. Raise the heat slightly and
cook, stirring, until the mixture thickens and the apples
soften a bit, about 5 minutes longer. Set aside until
cool. (May be made up to 4 days ahead. Cover and
refrigerate; bring back to room temperature before
using.)
Prepare the Cream Cheese Filling In a small deep
bowl, vigorously stir or beat together the cream
cheese, sugar, egg yolk, vanilla, and lemon zest until
completely smooth and well blended. Cover tightly.
(May be made up to 2 days ahead. Cover and
refrigerate; bring back to room temperature before
using.)
Coat an 18-inch-long sheet of baking parchment with
nonstick spray, then generously dust it with flour. Turn
out the dough onto the center of the parchment. Evenly
dust the dough with flour, then pat it into a rectangle
with flour-dusted fingertips. Dusting with more flour as
needed to prevent sticking, stretch and press out the
dough into an 7 x 16-inch evenly thick rectangle; lift it
several times and dust the parchment to ensure
against sticking. Spread the surface evenly with the
cooled apple filling to within ¼ inch of the edge all
around.
Tightly roll up the dough from a 16-inch side to form a
long pinwheel log; use flour-dusted hands, dust with
more flour as needed, and lift up the parchment to
assist the rolling as you work. Pinch the seam tightly
closed all along the log length to prevent it from
unrolling and leaking, then turn seam-side down.
Stretch the log out from the center until evenly thick
along its length and about 18 inches long. Using welloiled kitchen shears or a large, sharp, oiled serrated
knife, cut off and discard the uneven ends. Cut the log
in half, then cut each half into 8 equal slices; they will
be somewhat soft. Using an oiled wide-bladed
spatula, transfer the slices to the parchment-lined
baking sheets, spacing about 3 inches apart. Pat each
slice down to flatten, then press down in the center to
form a deep, 1¼-inch diameter well in each. Divide the
cream cheese filling among the pastry wells. Tent the
pans with nonstick spray—coated foil.
Let Rise Using Either of These Methods For a 1½- to
2½-hour regular rise, let stand at warm room
temperature; or for an extended rise, refrigerate for 4
to 48 hours, then set out at room temperature.
Continue the rise until the pastries have doubled in
size and are about 3½ inches in -diameter.
Baking Preliminaries 15 minutes before baking time,
place a rack in the lower third of the oven; preheat to
350°F.
Baking Bake on the lower rack for 15 to 20 minutes, or
until the pastries are well browned. Then cover the
pans with foil to prevent further browning and bake for
5 to 7 minutes more (or until the center registers 204°
to 205°F on an instant-read thermometer) to ensure
the centers are done. Cool the pastries on a wire rack
set over a baking sheet for at least 5 minutes. Then
garnish by drizzling the Powdered Sugar—Lemon
Drizzle back and forth over the pastry tops. Let cool
slightly, then serve.
Serving and Storing
Cool thoroughly before storing so the drizzle can set.
Store airtight in a single layer in a plastic container.
The pastries will keep at room temperature for 2 to 3
days, and may be frozen, airtight, for up to 2 months.
Reheat, tented with foil, in a 350°F preheated oven
before serving.
Yeasted Banana Bundt-Style
Coffee Ring
KS Quotient
Easy: Most ingredients added before the first rise. No
hand-shaping.
Banana quick breads are always popular, and now that a
rather simple yeasted, chocolate chip—studded version
can be made without kneading, I hope it will catch on, too.
The combination of banana and chocolate is spectacular,
and, since the ring is shaped as it bakes in a Bundt or other
decorative tube pan, it also looks terrific.
For a milder, sweeter flavor, accent the coffeecake with the
Glossy Chocolate Drizzle; for a significant bittersweet
presence suited to serious chocolate fans, cover the entire
top with Chocolate Ganache Glaze.
Yield: 1 large Bundt-style loaf
3½ cups (17.5 ounces) unbleached white bread flour,
plus more as needed
1 teaspoon table salt
¾ teaspoon instant, fast-rising, or bread machine
yeast
1 1/3 cups thoroughly mashed overripe banana (about
3 bananas)
6½ tablespoons clover honey or other mild honey
2 tablespoons corn oil or canola oil, plus extra for
coating dough top and baking pan
1½ teaspoons finely grated orange zest
¾ cup plus 2 tablespoons ice water, plus more if
needed
2 tablespoons unsalted butter, melted and cooled
slightly, plus more for brushing dough top
1½ cups (9 ounces) semisweet chocolate morsels
¾ cup chopped walnuts, plus 1 tablespoon more for
garnish, optional
Glossy Chocolate Drizzle
Glaze, optional
or Chocolate Ganache
First Rise In a large bowl, thoroughly stir together the
flour, salt, and yeast. Place the bananas in a medium
bowl, then whisk in the honey, oil, and orange zest.
Then whisk in the water until well blended. Vigorously
stir the mixture into the bowl with the flour, scraping
down the bowl sides and mixing until the dough is well
blended; it will be rubbery. Vigorously stir in the butter.
If the dough is not stiff, add enough more flour to make
it hard to stir. Lightly brush the top with butter. Cover
the bowl with plastic wrap. If desired, for best flavor or
for convenience, refrigerate for 3 to 10 hours. Let rise
at cool room temperature for 12 to 18 hours.
Second Rise Vigorously stir the dough; add enough
more flour to make it very stiff. Then gradually fold in
the chocolate morsels and nuts (if using) until evenly
distributed throughout. Turn out the dough into a 10- to
12-cup well-oiled Bundt pan or similar tube pan. Evenly
brush the dough top with melted butter. Using a
greased rubber spatula or fingertips, press down and
smooth out to even the surface all over. Tent the pan
with nonstick spray—coated foil.
Let Rise Using Any of These Methods For a 1½- to
2½-hour regular rise, let stand at warm room
temperature; for a 1- to 1½-hour accelerated rise, let
stand in a turned-off microwave along with 1 cup of
boiling-hot water; or for an extended rise, refrigerate
for 4 to 48 hours, then set out at room temperature.
When the dough nears the foil, remove it and continue
the rise until the dough doubles in bulk.
Baking Preliminaries 15 minutes before baking time,
place a rack in the lower third of the oven; preheat to
375°F.
Baking Bake on the lower rack for 25 to 30 minutes or
until the top is nicely browned. Cover with foil and
continue baking for 15 to 20 minutes, or until a skewer
inserted in the thickest part comes out with only a few
particles at the bottom end (or the center registers
208° to 210°F on an instant-read thermometer). Then,
bake for another 5 to 10 minutes to ensure the interior
is baked through. Cool in the pan on a wire rack for 15
minutes. Run a knife around the coffeecake to loosen,
then remove it to the rack and let cool.
If garnishing with the Glossy Chocolate Drizzle or
Chocolate Ganache Glaze, drizzle or spread over the
coffeecake after it has cooled completely. If desired,
sprinkle with a tablespoon of chopped walnuts; add
before the glaze or drizzle has time to set.
Serving and Storing
Serve at room temperature. Cool completely before
storing airtight in a cake keeper or plastic container.
The coffee ring keeps at room temperature for 2 to 3
days, and may be frozen, airtight, for up to 2 months.
Cherry and Chocolate Coffee
Ring with Kirsch
KS Quotient
Fairly Easy: Two-stage mixing. Sophisticated look, yet
requires no hand-shaping.
Attractively yet effortlessly shaped in a Bundt, kugelhopf, or
angel cake pan or large ovenproof ring mold, this
delectable sweet bread makes a festive holiday brunch,
teatime, or coffee-klatch treat. I took my cue from the
inspired German custom of pairing cherries with kirsch (a
heady cherry brandy) and chocolate. It's all right to skip the
kirsch if you don't have it on hand or prefer to avoid spirits,
but it does highlight the cherry flavor and lends a heavenly
fragrance. The aroma that fills the kitchen during baking is
almost enough reason to make this bread.
Garnish this coffeecake with Transparent Powdered Sugar
Glaze or Glossy Chocolate Drizzle, or both.
Yield: 1 large loaf, 12 to 14 portions or slices
2¼ cups (11.25 ounces) unbleached all-purpose white
flour, plus 2/3 cup (3.33 ounces), plus more as needed
¾ teaspoon table salt
1 teaspoon instant, fast-rising, or bread machine yeast
1 cup ice water
3½ tablespoons kirsch (clear cherry brandy), or orange
juice if preferred
1¼ cups dried sweetened cherries (avoid dried-out,
hard ones), rinsed under hot water and drained well
Flavorless vegetable oil for brushing
6½ tablespoons granulated sugar
5 tablespoons unsalted butter, melted and cooled
slightly
1 large egg, at room temperature
1 cup (6 ounces) chopped (chocolate mini-morsel
size) bittersweet or semisweet chocolate
Transparent Powdered Sugar Glaze for brushing over
top, or Glossy Chocolate Drizzle for drizzling over top,
or both
First Rise In a large bowl, thoroughly stir together 2¼
cups of the flour, the salt, and yeast. Vigorously stir in
the water and kirsch (or orange juice), scraping down
the bowl sides and mixing until the dough is thoroughly
mixed. If necessary to facilitate mixing, stir in enough
more water to yield a firm, but not hard-to-stir, dough.
Evenly fold in the cherries. Brush or spray the top lightly
with vegetable oil. Tightly cover the bowl with plastic
wrap. If desired, for best flavor or for convenience,
refrigerate the dough for 3 to 8 hours. Then let the
dough rise at cool room temperature for 12 to 18
hours.
Second Rise Stir together the sugar and butter, then
stir in the egg until smooth. Vigorously stir the mixture
and the chocolate into the dough until evenly
distributed. (If preferred, use a dough hook and heavyduty stand mixer on low.) Add in 2/3 cup of the flour,
then, if necessary, enough more to yield a very firm
dough, scraping down the sides carefully. Turn out the
dough out into a well-oiled or nonstick spray—coated
Bundt pan, angel food pan, or other 10- to 12-cup tube
pan. Smooth and even out the -surface with a welloiled rubber spatula. Cover the bowl with nonstick
spray—coated plastic wrap.
Let Rise Using Any of These Methods For a 2- to 3hour regular rise, let stand at warm room temperature;
for a 1½- to 2½-hour accelerated rise, let stand in a
turned-off microwave along with 1 cup of boiling-hot
water; or for an extended rise, refrigerate for 4 to 48
hours, then set out at room temperature. If the dough
nears the plastic wrap, remove it and continue the rise
until the dough has increased about a quarter over its
deflated size. (Don't worry if the dough doesn't expand
much during the rise; it will rise a lot in the oven.)
Baking Preliminaries 15 minutes before baking time,
place a rack in the lower third of the oven; preheat to
375°F.
Baking Bake on the lower rack for 30 to 35 minutes,
until the top is nicely browned. Cover the top with foil
and continue baking for 20 to 25 minutes, until a
skewer inserted in the thickest part comes out with
only a few particles at the bottom end (or an instantread thermometer inserted in the thickest part
registers 205° to 207°F). Then bake for another 5 to
10 minutes to ensure the interior is baked through.
Cool on a wire rack for 15 minutes. Run a knife around
the center tube and sides to loosen the loaf, then invert
it onto the rack. Add the transparent glaze while the
coffeecake is still warm and the chocolate drizzle when
cooled.
Serving and Storing
Slices best when cool, but is good slightly warm or at
room temperature. Cool completely before storing
airtight in plastic or foil. Keeps at room temperature for
2 days, and may be frozen, airtight, for up to 2 months.
Tip
Any 10- to 12-cup ovenproof pan with a center tube will
do, so long as the surface is not too reflective. Most
metal surfaces work fine, but those that are as shiny as
aluminum foil will prevent the bread from browning well.
Chocolate—Chocolate Chip
Bread Kit: Mix Recipe
KS Quotient
Easy: Easy mix, readied with few ingredients. Makes a
great gift.
This appealing bread mix looks like the layered sand art
creations of the 1970s and is reminiscent of the bars-in-jars
cookie mixes found in some gourmet shops. It makes a
great gift from the kitchen, especially for bread fans who
also love chocolate.
Yield: 1 quart of mix, yielding 1 large loaf
2½ cups (12.5 ounces) unbleached white bread flour
or all-purpose white flour, divided
¼ cup granulated sugar, plus 1 tablespoon for garnish
3½ tablespoons unsweetened cocoa powder
1 teaspoon table salt
1½ cups (about 9 ounces) semisweet chocolate
morsels, divided
1 packet instant, fast-rising, or bread machine yeast
Set out a completely dry clear glass or transparent
plastic 1-quart or 1-liter jar, along with its lid. Set out a
square of heavy-duty aluminum foil to use as a funnel.
(Or use a funnel, if you have one.)
Place 2¼ cups (11.25 ounces) of the flour on the foil,
then use it as a funnel to add the flour to the jar. Rap
the jar on the counter to even the layer. In a food
processor, combine the remaining ¼ cup flour (1.25
ounces), ¼ cup of the sugar, the cocoa powder, salt,
and ½ cup chocolate morsels. Process until the
chocolate morsels are ground to a powder, about 2
minutes. Turn out onto the foil and add to the jar. Rap
the jar to even the layer. Add the remaining 1 cup
chocolate morsels to the jar in an even layer. Put the
remaining 1 tablespoon sugar in a small plastic bag
and close tightly. Push the bag of sugar and the yeast
packet into the neck of the jar. If it will be shipped, stuff
any empty space in the top with crumpled wax paper.
Attach a sheet or card with the instructions for making
the bread to the jar.
Storage
The unopened mix will keep for up to 1½ months
unrefrigerated, 3 months refrigerated.
Don't forget to give the following recipe along with your
gift
Chocolate-Chocolate Chip
Bread Recipe (Using Mix)
Just mix together this kit following the easy instructions. The
reward is a moist, chewy-crusty loaf studded with chocolate
chips and bursting with chocolate flavor.
Yield: 1 large loaf, 12 to 14 slices
1 small bag granulated sugar (from the kit)
1 teaspoon yeast (measure it out from the kit packet)
1 jar Chocolate—Chocolate Chip Mix
Scant 1¼ cups ice water (add ice cubes to cold water
and stir for 30 seconds before measuring), plus more
if needed
3 tablespoons corn oil, canola oil, or safflower oil, plus
more for coating pan and dough top
First Rise Remove the bag of garnishing sugar and
the yeast packet from the jar; set aside. Turn out the jar
of dry mix into a large bowl. Measure out and
thoroughly stir in 1 teaspoon yeast. In a medium bowl,
measure out a scant 1¼ cups ice cold water and whisk
the oil into it. Vigorously stir the water mixture into the
dry ingredients, scrape down the bowl sides, and
continue stirring until thoroughly blended and smooth. If
the mixture is too dry to incorporate all the flour, a bit at
a time, stir in just enough more ice water to blend the
ingredients; don't over-moisten, as the dough should
be very stiff. Brush the top with a little oil. Tightly cover
the bowl with plastic wrap. If desired, for best flavor or
for convenience, refrigerate the dough for 3 to 8 hours.
Then let rise at cool room temperature (about 70°F) for
12 to 18 hours.
Second Rise Turn out the dough into a well-oiled 9 x 5inch loaf pan. Brush the top lightly with oil, then smooth
and press out evenly in the pan with an oiled rubber
spatula (or fingertips). Cut a ½-inch-deep slash down
the dough center using oiled kitchen shears or a
serrated knife. Cover with nonstick spray—coated
plastic wrap.
Let Rise Using Either of These Methods For a 2½- to
4-hour regular rise, let stand at warm (74° to 75°F)
room temperature; for a 1½- to 2½-hour accelerated
rise, let stand in a turned-off microwave along with 1
cup of boiling-hot water. Let rise until the dough
doubles from its deflated size or nears the pan rim,
then remove the plastic and continue until the dough
extends just above the rim. Sprinkle over the sugar
from the plastic bag.
Baking Preliminaries 15 minutes before baking time,
place a rack in the lower third of the oven; preheat to
350°F.
Baking Bake on the lower rack for 50 to 60 minutes, or
until the top is puffed and well browned and a skewer
inserted in the thickest part comes out with only a few
moist particles at the end. Then bake for 10 to 15
minutes more to ensure that the center is done. If the
top browns too rapidly, cover it with foil. Cool in the
pan on a wire rack for 10 minutes. Remove the loaf to
the rack and cool completely.
Serving and Storing The loaf slices best when cool,
but the bread is good served warm or at room
temperature. Cool completely before storing. To
maintain the crisp crust, store draped with a clean
kitchen towel; or to prevent the loaf from drying out,
store airtight in plastic or foil. Store at room
temperature for 2 to 3 days; freeze, airtight, for up to 2
months, then thaw, unwrapped, at room temperature.
When thawed, re-crisp the crust in a 375°F oven for a
few minutes.
Going with the Grain Bread Kit
Mix Recipe
KS Quotient
Easy: Easy mix, few ingredients. Makes a great gift.
No hand-shaping required.
This recipe enables you to prepare an appealing jar of
bread mix to give a friend, relative, or anyone on your gift
list. (I like to make up an extra jar, so I can easily treat
myself once in a while.) Even a novice baker can turn out
this crusty, attractive loaf without muss or fuss and no
ingredients other than water and a little vegetable oil. The
big, rustic, versatile loaf has a mild yet addictive grain flavor
and a light, springy, slightly holey crumb. It smells and
tastes like an artisan bread, yet requires no artisan skills.
The flavor comes from the subtle blending of four grains,
including some brown rice flour, and three seeds, including
flax seed. These ingredients are not likely to be on hand in
your cupboard, but are usually stocked in the gluten-free
baking sections of health food stores, as well as in some
large supermarkets.
Alternatively, prepare your own brown rice flour by grinding
uncooked brown rice to a powder using a blender or clean
coffee mill. (Measure out the ¼ cup after the flour is
ground.) Regular long-grain brown rice will do, but if you
can find it, brown basmati rice delivers the sweetest flavor.
In a pinch, omit the flax seed from the recipe and add an
extra 2 teaspoons each of the sesame and poppy seeds.
The bread flavor will not be quite as irresistible, but will still
be very good.
Yield: 1 quart of mix, yielding 1 large loaf
3 cups (15 ounces) unbleached white bread flour
¼ cup (1.25 ounces) whole wheat flour
¼ cup brown rice flour
2 tablespoons rolled oats or quick-cooking (not
instant) oats
2½ tablespoons granulated sugar
1½ teaspoons table salt
1½ tablespoons each sesame seeds, poppy seeds,
and flax seed, mixed together
2 tablespoons cornmeal, preferably yellow
1 packet instant, fast-rising, or bread machine yeast
Set out a completely dry clear glass or transparent
plastic 1-quart or 1-liter jar, along with its lid. Set out a
square of heavy-duty aluminum foil to use as a funnel.
(Or use a funnel, if you have one.)
Place the white flour on the foil, then use the foil as a
funnel to add the flour to the jar. Rap the jar on the
counter to even and compact the layer. Thoroughly stir
together the whole wheat flour, brown rice flour, oats,
sugar, salt, and all but 1½ tablespoons of the seed
mixture on the foil. Add to the jar; rap it again to even
the layer. Put the remaining seeds and the cornmeal in
a small plastic bag; close tightly. Push the bag and the
yeast packet into the neck of the jar. If it will be
shipped, push crumpled wax paper into any extra
space at the top. Attach a sheet or card with the
instructions for making the bread to the jar.
Storage
The unopened mix will keep for up to 1½ months
unrefrigerated, 3 months refrigerated.
Don't forget to give the following recipe along with your
gift
Going with the Grain Bread
Recipe (Using Mix)
Along with ice water and vegetable oil, this kit makes a
crusty-topped artisan-style loaf with a slight crunch and
light, enticing flavor and aroma of grain. Great for eating
warm or cooled, slathered with butter, for toasting, and for
making sandwiches.
Yield: 1 large loaf, 12 to 14 slices
1 teaspoon yeast (measured out from enclosed
packet)
Cornmeal-seed mixture for garnish (from the enclosed
bag)
1 jar Going with the Grain Mix
Scant 2 cups ice water (add ice cubes to cold water
and stir for 30 seconds before measuring), plus more
if needed
About 1½ tablespoons corn oil, canola oil, or other
flavorless oil for coating pan and dough top
First Rise Remove the yeast packet and cornmealseed package (used for garnish) from the jar. In a
large bowl, thoroughly stir together the jar of mix and 1
teaspoon of the yeast. Vigorously stir the ice water into
the dry mix, scraping down the bowl sides and stirring
until completely blended. If the dough is too dry to mix,
gradually stir in just enough more ice water to blend the
mixture; the dough should be stiff. Brush the top with a
little oil. Tightly cover the bowl with plastic wrap. If
desired, for best flavor or for convenience, refrigerate
for 3 to 10 hours. Then let rise at cool room
temperature (about 70°F) for 12 to 18 hours.
Second Rise Generously oil a 9 by 5-inch loaf pan.
Sprinkle half the cornmeal-seed mixture into the pan.
Stir the dough briefly. With an oiled rubber spatula,
scrape the dough in towards the center, working all the
way around the bowl. Invert the dough into the pan.
Brush the top lightly with oil, then smooth out and press
into the pan with oiled fingertips. Brush the top
generously with water, and immediately sprinkle the
remaining cornmeal-seed mixture over the top. Cut a
½-inch-deep slash down the dough center using oiled
kitchen shears or serrated knife. Cover the pan with
nonstick spray—coated plastic wrap.
Let Rise Using Either of These Methods For a 2- to
4-hour regular rise, let stand at warm (74° to 75°F)
room temperature; or, for a 45-minute to 2-hour
accelerated rise, let stand in a turned-off microwave
along with 1 cup of boiling-hot water. When the dough
nears the plastic, remove it and continue the rise until
the dough extends ½ inch above the pan rim.
Baking Preliminaries 15 minutes before baking time,
put a rack in the lower third of the oven; preheat to
450°F. Set the broiler pan on the oven floor.
Baking Reduce the heat to 425°F. Add a cup of water
to the broiler pan, being careful of splattering and
steam; don't refill if it boils dry. Bake on the lower rack
for 35 to 45 minutes, or until the loaf is nicely browned.
Cover the top with foil and continue baking for 20 to 25
minutes, until a skewer inserted in the thickest part
comes out with just slightly moist particles clinging to
the bottom portion (or until the center registers 204° to
207°F on an instant-read thermometer). Bake for 5
minutes more to ensure the center is fully done.
Remove the loaf to the rack and cool completely.
Serving and Storing The loaf slices best when cool,
but is good served warm or at room temperature. Cool
completely before storing. To maintain the crisp crust,
store wrapped in a clean kitchen towel. Or store
airtight in a plastic bag or wrapped in foil; this will
prevent the loaf from drying out, but will cause the crust
to soften. Store at room temperature for 3 days;
freeze, airtight, for up to 2 months, then thaw,
unwrapped, at room temperature. When thawed, recrisp in a 375°F oven for a few minutes, if desired.
Chapter 8: Toppings,
Sauces, Glazes, Drizzles,
and Finishing Touches
Here are the extras and additions to the breads in
Kneadlessly Simple—the sauces, glazes, drizzles, and
other toppings used throughout the book. They can add a
little something extra—even give breads a professional
look—yet are quick and easy to make.
Cornstarch Glaze
KS Quotient
Super-Easy: Minimal ingredients, easy preparation.
Can be made ahead.
A light coating of cornstarch glaze is a simple way to give a
crust a shiny, lacquered look. While still wet, the glaze also
provides a tacky surface great for capturing and holding
seeds or other garnishes sprinkled over the top. It is a good
substitute for an egg glaze when breads will be eaten by
vegans or those allergic to egg products, or when you're out
of eggs.
Yield: Enough to glaze 2 or 3 loaves
2 teaspoons cornstarch
Scant 2/3 cup cold water, divided
1 pinch salt
In a small saucepan, whisk together the cornstarch and
about half the water until the cornstarch is smooth. Stir
in the remaining water and the salt. Bring the mixture to
a boil over medium heat, whisking constantly. Reduce
the heat until the mixture simmers gently and continue
cooking, whisking occasionally, until it thickens slightly
and becomes translucent, about 2 minutes. Let cool to
room temperature before using; the glaze will thicken
as it stands. Use immediately, brushing it lightly but
evenly over the loaf top using a pastry brush (or
dabbing it on with a paper towel). Or cover and
refrigerate for up to 1 week. Let warm to room
temperature, then, if necessary, thin with a little warm
water before using.
Transparent Powdered Sugar
Glaze
KS Quotient
Super-Easy: A simple, versatile finish for many sweet
breads.
This thin glaze is a nice, subtle finishing touch, adding a
light sheen, seductive flavor, and hint of sweetness. It
gradually disappears into the dough, infusing the interior
with flavor and moistness. Taking a cue from pastry chefs, I
sometimes top this glaze with the Powdered Sugar—
Lemon Drizzle; the two go together very well. The basic
recipe can be tailored to enhance different breads by
changing the particular brandy or other type of spirits used.
As a general rule, kirsch pairs particularly well with cherry
and cranberry; Calvados with apple; and orange juice with
citrus and spice breads.
Yield: Enough to lightly glaze1 large loaf
½ cup powdered sugar, sifted after measuring if lumpy
3 tablespoons kirsch, Calvados, peach schnapps,
apricot brandy, or orange juice
1 tablespoon water
1/8 teaspoon almond extract, or ¼ teaspoon vanilla
extract, or 4 to 5 drops Fiori di Sicilia (Flowers of
Sicily) extract, or ¼ teaspoon finely grated lemon zest
In a small saucepan, whisk together the sugar and
spirits (or juice) until smooth. Stir in the water. Bring
the mixture just to a full boil over medium heat.
Remove from the heat. Stir in the extract (or zest).
Immediately brush the glaze evenly over slightly warm
bread or coffeecake using a pastry brush (or dab on
with a damp paper towel).
Powdered Sugar-Lemon
Drizzle
KS Quotient
Super-Easy: Few ingredients. Easy preparation.
For a touch of sweetness and a quick, light icing that sets
up and stays firm, use this recipe. The bit of lemon juice
keeps it from being too sweet. The recipe makes enough
for attractively drizzling back and forth, but can be doubled
if you wish to completely cover the top and sides of a large
coffeecake.
Yield: Enough to accent 1 large coffeecake, loaf,
or recipe of buns or pastries
1 cup powdered sugar, sifted after measuring if lumpy,
plus more if needed
1½ teaspoons fresh lemon juice
2 teaspoons water, plus more if needed
3 to 4 drops vanilla, almond, or lemon extract
In a small bowl, stir together the powdered sugar,
lemon juice, water, and extract until blended and
smooth. The glaze should be fluid enough to drizzle, so
adjust the consistency by adding a little more
powdered sugar or water if necessary. Immediately
drizzle the glaze over the cooled loaf top. For a Bundtstyle coffeecake or other tall loaf, let the icing drip
attractively down the sides. The glaze will set up firm in
about an hour.
Glossy Chocolate Drizzle
KS Quotient
Easy: Modest list of ingredients. Easy preparation.
As its name suggests, this glaze has a beautiful sheen and
looks wonderfully appetizing. Drizzle over any coffeecake
or sweet bread that can benefit from a pleasantly chocolaty
accent.
Yield: Enough to accent 1 large coffeecake
½ cup powdered sugar, plus more if needed
1½ tablespoons good-quality unsweetened cocoa
powder
3 tablespoons hot water or fresh hot coffee
1 tablespoon light corn syrup
1 ounce (about 3 ½ tablespoons) finely chopped
unsweetened chocolate or ultra-bittersweet chocolate
Sift the powdered sugar and cocoa powder into a
small, heavy saucepan. Stir in the water and corn syrup
and bring to a boil over medium heat, stirring
constantly. Boil for 1 minute; immediately remove from
the heat. Place the chocolate in a small, deep bowl
and pour the cocoa mixture over it; don't stir. Let the
mixture stand for 3 to 4 minutes, until the heat melts the
chocolate. Stir until completely smooth, then let cool to
warm; it will gradually thicken and develop a drizzling
consistency as it stands.
If it stiffens too much, thoroughly stir in a little warm
water. Drizzle the warm mixture decoratively over the
coffeecake or bread. Then let stand until completely
cooled. The glaze will set up glossy and will firm up in
about an hour.
Chocolate Ganache Glaze
KS Quotient
Easy: Easy preparation. Adds a gourmet touch.
Use this glaze when you want a big, bold chocolate
presence, not just a decorative squiggle here and there. Be
sure to choose a good-quality chocolate with a flavor and
degree of sweetness you like, as it will predominate and no
sugar is added. (Sugar sometimes makes the consistency
gritty. To add a touch of sweetness, incorporate a little
honey.) Don't use an ultra-bittersweet chocolate or one with
a cacao percentage over 70 percent; these can be difficult
to blend in and may stiffen too much when cool. Don't
substitute chocolate morsels either, or the glaze may not
stiffen enough or have a bold chocolate flavor.
Yield: Enough to fully glaze1 large coffeecake
1 cup (6 ounces) coarsely chopped top-quality
semisweet or bittersweet chocolate (not ultrabittersweet or any chocolate with over 70 percent
cacao)
¼ cup heavy (whipping) cream
2 teaspoons light corn syrup
1/8 teaspoon vanilla extract
1 tablespoon clover honey or other mild honey,
optional
In a small, deep bowl, microwave the chocolate on 50
percent power for 1 minute. Stir well, then microwave
for 1 minute longer on 50 percent power. Microwave
the cream in another bowl or measuring cup on high
power for about 1 minute, or until it comes to a boil and
just begins to bubble up the sides. Immediately pour it
over the chocolate, but do not stir. Let the mixture
stand for 3 minutes so the chocolate can further melt
from the heat.
Vigorously stir until the chocolate and cream blend
together and are completely smooth. Stir in the corn
syrup and vanilla until evenly incorporated. Set the
glaze aside until cooled and thickened to spreading
consistency, usually 15 to 20 minutes; if it thickens too
much to spread easily, thin it with a teaspoon or two of
warm water. Spread over the top and sides of a bread
or coffeecake with a long-bladed spatula or spreader.
The glaze will firm up as it stands.
Caramel Sticky Bun Sauce
KS Quotient
Easy: Modest list of ingredients. Easy preparation;
make ahead, if desired.
Easy, but amazing, the combination of brown and
granulated sugar, dark corn syrup, and heavy cream makes
a very gooey, rich-tasting caramel sauce for sticky buns.
And for convenience, it can be made well ahead and
refrigerated until needed.
Yield: Enough for 12 large sticky buns
1/3 cup granulated sugar
1/3 cup packed light brown sugar
1/3 cup dark corn syrup
½ cup heavy (whipping) cream
1/8 teaspoon salt
½ teaspoon vanilla extract
In a heavy 2-quart saucepan or pot, thoroughly stir
together the granulated and brown sugars, corn syrup,
cream, and salt. Bring to a boil over medium-high heat,
stirring constantly. Adjust the heat so the mixture boils
briskly. Carefully wipe any sugar from the pan sides
using a pastry brush dipped in warm water (or use a
damp paper towel). Briskly boil, gently stirring and
scraping the pan bottom, for 3 minutes. Immediately
remove the pan from the heat. Gently stir in the vanilla
just until evenly incorporated. Set aside until cool and
slightly thickened before using. Or, cover and
refrigerate for up to 1 week. Bring back to room
temperature before using; thin with a teaspoon of
warm water if very thick.
Maple-Butter Sticky Bun Sauce
KS Quotient
Easy: Few ingredients; simple preparation.
This is a pleasant change of pace from caramel-flavored
sticky bun sauce, particularly for those who love the taste of
maple syrup. Note that syrup labeled "medium amber" or
"dark amber" will have a more intense maple taste than the
"fancy" or lighter-colored and is a better choice in this
recipe.
Yield: Enough for 12 large sticky buns
1/3 cup granulated sugar
¼ cup light corn syrup
¼ cup (½ stick) unsalted butter, softened
1/8 teaspoon salt
2/3 cup pure maple syrup, preferably medium or dark
amber
½ teaspoon vanilla extract
In a heavy 2-quart saucepan or pot, thoroughly stir
together the sugar, corn syrup, butter, and salt, stirring
and heating over low heat until the butter melts. Bring
to a boil over medium-high heat, stirring constantly with
a long-handled wooden spoon. Carefully wipe any
sugar from the pan sides using a pastry brush dipped
in warm water or a damp paper towel. Adjust the heat
so the mixture boils briskly. Briskly boil, occasionally
gently stirring and scraping the pan bottom, for 2
minutes. Gently stir in the maple syrup and boil for 1
minute longer. Immediately remove the pan from the
heat. Gently stir in the vanilla just until evenly
incorporated. Cool to warm before using. Set aside at
room temperature for up to several hours; re-warm just
slightly before using if the sauce stiffens during
standing.
Make-Ahead Streusel
KS Quotient
Easy: Modest list of ingredients. Easy preparation;
may be made ahead.
This is a simple, cinnamon-and-butter streusel mixture that
can be stashed in the refrigerator and tossed together with
a dough to create a great coffeecake almost instantly (see
the Simple Streusel Coffeecake recipe).
Yield: Enough for 1 large coffeecake
1 cup packed light brown sugar
¾ cup unbleached all-purpose white flour
2 teaspoons ground cinnamon
¼ teaspoon salt
½ cup (1 stick) unsalted butter, melted
2/3 cup chopped walnuts or pecans
In a medium bowl, thoroughly stir together the brown
sugar, flour, cinnamon, and salt, breaking up any lumps
of sugar as you work. Stir in the butter until evenly
incorporated and the mixture forms small clumps. Stir
in the nuts. Refrigerate until firmed up, about an hour.
Just before using, break up any large clumps with
fingertips or a pastry cutter. Use as directed in the
coffeecake recipe. If not using immediately,
refrigerate, airtight, for up to 3 weeks. Let warm up
slightly before using.
Chapter 9: Kneadlessly
Simple Recipe Makeover
Guide: How to Convert
Traditional Yeast Recipes
to the KS Method
Many people have asked me if it's possible to take their
old-fashioned conventionally proofed and kneaded yeast
recipes and turn them into Kneadlessly Simple breads.
The answer is absolutely! Even first attempts usually yield
breads that are quite good, and, if you take what you've
learned from the first try and make the necessary
adjustments, second efforts often produce bread
comparable to or even better than the original. And with a
lot less work!
Revamping does involve a little bread science, so it's best
to read the section on the chemistry behind the
Kneadlessly Simple method called The Chemistry Behind
the Steps before jumping in.
The Kneadlessly Simple method aims to accomplish two
major goals:
1. To eliminate the traditional risk and work of yeast
proofing and kneading; and
2. To streamline all the other traditional bread-making
steps (without sacrificing quality) as much as possible.
To get a feel for how to proceed with a makeover, start by
making a few recipes in the book. Choose at least one
that's similar to the revamping candidate. For example, if
your bread is an old-fashioned white loaf, prepare or at
least carefully examine a simple white bread recipe in the
book (see Easy White Bread Loaves). If your recipe is a
butter-and-egg laden coffeecake, check out a coffeecake
that's along the same lines (see Simple Streusel
Coffeecake). While the list of basic ingredients in the two
recipes will usually be similar, you'll likely see that the order
of incorporation and method of handling are very different.
Using the Kneadlessly Simple version as a guide, jot down
your recipe's ingredients in the revised order. Next,
compare the amount of water and yeast in the two. As a
rule, Kneadlessly Simple recipes will require less yeast
because it has more time to become very active. But they
need more water, or other liquid, partly so doughs can be
stirred rather than kneaded, of course, but also because
the moistness helps promote "micro-kneading." (See the
"Yeast" and "Water" sections that follow for more on the
"whys.") Always replace the warm water with ice water, and
let the dough stand for a 12- to 18-hour slow first rise
instead of the shorter rise originally called for. Use the
same options as those given in Kneadlessly Simple for the
second rise.
Normally, follow the lead of the appropriate Kneadlessly
Simple recipe on the amount of yeast. Or, use this rule of
thumb: Add a scant ¼ teaspoon of yeast per cup of flour in
lean breads containing mostly white flour, little fat, and little
sugar. Add a generous ¼ teaspoon of yeast per cup of flour
in rich breads: very sweet breads; those containing lots of
whole grains; and those containing cinnamon, cloves,
nutmeg, cardamom, garlic, or onions (more on these
ingredients under "Additions" later).
Trial and error is the best way to determine the amount of
water needed for the makeover, though if there are no other
liquid ingredients (including honey or molasses) in the
recipe, a scant ½ cup water per 1 cup of flour is a good
place to start. After mixing together the yeast and other dry
ingredients following the selected Kneadlessly Simple
recipe model, just stir in enough ice water to make a slightly
stiff, but stirrable dough. Immediately note the amount
required on your revised recipe. If you overdo it and the
mixture looks more like pancake batter than bread dough,
fix it simply by adding more flour until the mixture is just
slightly stiff; the finished bread will still be perfectly good.
(Too much water yields a doughy bread that will be prone to
collapsing during baking.) Be sure to note how much extra
flour was used. Then, next time around, either decrease the
water or increase the flour, following your notes.
In taking stock of the Kneadlessly Simple recipes, you may
wonder why some conveniently incorporate all the
ingredients before the first rise, while others require a twostep approach, or why certain ingredients turn up more or
less often here than in traditional recipes. Bread chemistry
and food safety issues are usually the reason, as explained
here:
Yeast—To shield the yeast from the shock of ice
water, in Kneadlessly Simple, the dry granules are
always stirred together with the flour before the water
is added. Usually ¾ to 1 teaspoon of yeast is plenty for
a recipe calling for 3 to 4 cups of flour. As already
mentioned, for breads containing significant amounts
of whole-grain flours, increase the amount of yeast
slightly to compensate for the coarseness and weight
of the whole-grain particles. Also, boost the yeast in
doughs containing even ¼ teaspoon of cinnamon per
cup, as cinnamon contains a chemical that inhibits
yeast growth. Ground cloves, allspice, nutmeg,
mustard, oregano, thyme, garlic, and onion also inhibit
yeast growth, but to a lesser extent. For recipes calling
for large amounts of these, to ensure vigorous yeast
growth, it is best to use extra yeast and, if convenient,
to hold off adding the retarding ingredients until just
before the second rise, which will then proceed more
slowly than normally.
Water—Revamped recipes need somewhat more
water than conventional recipes during the first rise,
because the slightly wetter dough facilitates more
"micro-kneading." This is what I call the process in
which key protein molecules bounce around during
fermentation and hook up to form gluten. Revamped
doughs should be moist enough that they can be
mixed by vigorous stirring, but in most cases, they
should seem slightly stiff, not batter-like; some soft,
buttery rolls (see Pull-Apart Butter-Top Rolls ) are an
exception. During the second rise it is important to
incorporate enough more flour to yield a stiff dough.
While extra water facilitates plenty of the "microkneading" that develops gluten, during the second rise
too much water "dilutes" the gluten and weakens the
bread structure.
Sweeteners—For recipes with quite a bit of sugar
(more than 1 tablespoon per 1 cup flour), don't add the
full amount before the first rise. Although doughs
appear to be wetter after sugar is incorporated, the
sugar actually draws up moisture and dehydrates the
dough. This deprives the yeast organisms of vital
water and retards their activity. If it's convenient, add
up to 1 tablespoon sugar per cup of flour initially, then
add the rest before the second rise. Note that honey
and molasses don't rob the yeast of moisture, as they
are already in liquid form. They can be conveniently
combined with water and incorporated before the first
rise, a procedure that's commonplace in this book.
Dairy Products—Highly perishable items such as
eggs and milk, etc., shouldn't be added until just before
the second rise, as they can't safely be left
unrefrigerated for the long countertop first rise called
for in Kneadlessly Simple recipes. So, it's usually
necessary to replace the milk or buttermilk that would
have been added initially in a conventional recipe with
water and then compensate by adding the appropriate
quantity of instant nonfat dry milk or buttermilk powder
before the second rise. To adjust for the lower butterfat
in nonfat dry milk, you can stir in 1 to 2 teaspoons of
melted butter along with the nonfat dry milk. To ensure
good flavor and smooth incorporation, be sure to use
top-quality brands of instant dry milk and buttermilk
powder.
Eggs are likewise perishable and must be added after
the initial rise. They need to be beaten with a fork first.
And because their water content will make the dough
wetter than it should be for a second rise, some more
flour will need to be incorporated to stiffen the dough.
Salt—For most recipes, salt should be added at the
same time as the yeast and in the same quantities as
in the original version.
Fats—Fats can't all be handled the same way or
randomly substituted for one another in the
Kneadlessly Simple method because they solidify at
different temperatures. Corn oil and canola oil (often
called for in Kneadlessly Simple) do not solidify at
very cold temperatures, so they can be simply whisked
together with ice water and incorporated during the
first mixing. But olive oil and butter will both harden in
ice water, so they must be either stirred in separately
from the water or added before the second rise.
Additions—Besides the spices and herbs containing
chemicals that retard yeast growth, dried fruits inhibit
yeast growth by robbing the dough of water as they
rehydrate. If it's convenient, add raisins and dried
cherries before the first rise. But be sure they are fresh
and plump and are rinsed or soaked, which partially
rehydrates them, first. Note that dried fruits added
during the second rise don't always have to be rinsed
under water first, as they will absorb some of the
excess water in the dough that is no longer needed for
"micro-kneading."
It's fine to add seeds and bits of grain that need to
soften at the initial mixing. Just remember that a dough
that starts out fairly moist will be stiff by the time
raisins, seeds, wheat berries, grits, and various other
kernels of grains have absorbed the moisture they
need. Flavorings including vanilla and other extracts
and citrus zests may all be added during the first
mixing, if desired.
Baking—A major consequence of creating wetterthan-normal doughs is that baking times will increase.
Sometimes baking temperatures must be lowered
slightly as well, so the outside doesn't burn before the
inside is done. Because these doughs are already
moist, it's harder to tell when Kneadlessly Simple
doughs are baked through in the center. Inserting a
skewer in the thickest part until it comes out with just
slightly moist, but not gummy, particles attached is one
way to check. Using an instant-read thermometer and
baking until the center of the loaf reaches 207° to
210°F (be sure the tip doesn't touch the pan bottom) is
an alternative and more foolproof approach. Since
there is little danger of drying out these supersaturated
doughs, if a thermometer isn't available, bake them for
an extra 5 to 10 minutes after they seem done, which
helps avoid the chance of under-baking. To prevent
over-browning, simply cover the top with foil.
Table of Contents
Acknowledgments
Introduction
Chapter 1: The Kneadlessly Simple Method: Nine Easy
Steps to Great Bread
Chapter 2: Getting Started: Basic Know-How, Ingredients,
and Troubleshooting
Chapter 3: Easiest Ever Yeast Breads
Easy White Bread Loaves
Crusty White Peasant-Style Pot Bread
All-Purpose Light Wheat Bread
Crusty Portuguese-American Yeasted Cornbread
Easy Oat Bread
Everyday Oatmeal Honey-Raisin Bread
Great Granola Breakfast Bread
English Muffin Loaves
Crusty Seeded Pale Ale Pot Boule
Easy Four-Grain Pot Boule
Hearty Caraway Beer Bread
Double Chocolate-Honey Bread
Simple Enriched White Rolls
Chapter 4: American Favorites
County Fair White Bread
Pull-Apart Butter-Top Rolls
Cinnamon Pinwheel Raisin Bread
San Francisco-Style Sourdough Bread
Easy Cultured "Sourdough"Starter (with Commercial
Yeast)
Sonoma-Style Multigrain Crunch Bread
Crusty Yeasted Cornbread with Coarse Salt
Easy Buttermilk Pot Bread with Coarse Salt
Cheddar and Chiles Bread
Farmhouse Potato Bread with Dill and Chives
Anadama Bread
Cronshi's Challah
Easy Cinnamon Sticky Buns
Good and Easy Pecan Sticky Buns (or Saucy Maple-Butter
Sticky Buns)
Chapter 5: Old-World Classics
Pain Ordinaire (Everyday French Baguettes or Batards)
Fougasse (or Black Olive Fougasse)
Brioche
French Walnut Bread (Pain aux Noix)
Yeasted Pain d'Epice
Rosemary Focaccia with Coarse Salt
Ciabatta
Neapolitan-Style Pizza Dough
Tomato Sauce and Mozzarella Pizza
Herbed Cooked Tomato Pizza Sauce
Crispy Roasted Garlic and Parmesan Pot Bread
Rustic Cyprus-Style Herbed Olive Bread
Swedish Limpa Bread (Swedish Rye Bread with Caraway
and Anise Seeds)
Scottish Oatmeal Bread
Chapter 6: Healthful, Whole-Grain, Multigrain, and GlutenFree Breads
Crusty Seeded Cracked Wheat Pot Boule
100 Percent Whole Wheat-Honey Bread
Four Grain-Honey Bread
Rustic Rye Pot Bread
Raisin Pumpernickel
Super Seeded Almond Butter Health Bread
Crunchy-Munchy Pumpkin, Sunflower, and Flax Seed Boule
Hearty Multigrain Boule with Molasses
Brown and Wild Rice Crunch Bread
Gluten-Free Light Sandwich Bread
Gluten-Free Faux Rye Bread
Chapter 7: Sweet Breads and Gift Breads
Mardi Gras King's Cake
Panettone
All-Purpose Enriched Sweet Dough
Simple Streusel Coffeecake
Cornish Saffron Bread
Spiced Cranberry Bundt-Style Coffeecake
Holiday Cranberry-Apple Coffee Ring
Apple-Cream Cheese Pinwheel Pastries
Yeasted Banana Bundt-Style Coffee Ring
Cherry and Chocolate Coffee Ring with Kirsch
Chocolate—Chocolate Chip Bread Kit: Mix Recipe
Chocolate-Chocolate Chip Bread Recipe (Using Mix)
Going with the Grain Bread Kit Mix Recipe
Going with the Grain Bread Recipe (Using Mix)
Chapter 8: Toppings, Sauces, Glazes, Drizzles, and
Finishing Touches
Cornstarch Glaze
Transparent Powdered Sugar Glaze
Powdered Sugar-Lemon Drizzle
Glossy Chocolate Drizzle
Chocolate Ganache Glaze
Caramel Sticky Bun Sauce
Maple-Butter Sticky Bun Sauce
Make-Ahead Streusel
Chapter 9: Kneadlessly Simple Recipe Makeover Guide:
How to Convert Traditional Yeast Recipes to the KS
Method
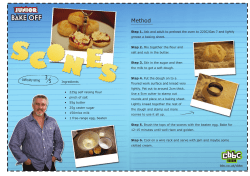
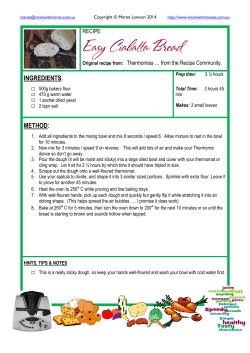
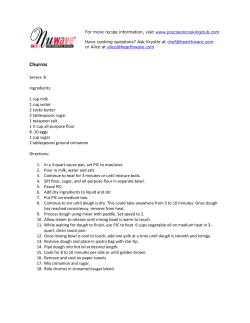

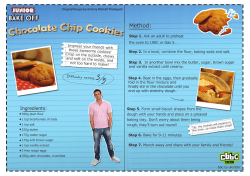
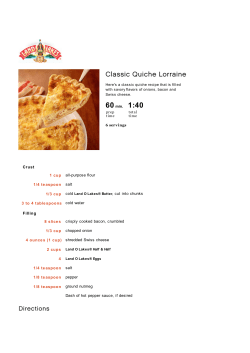
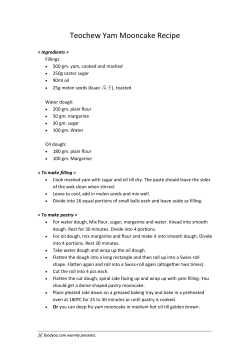
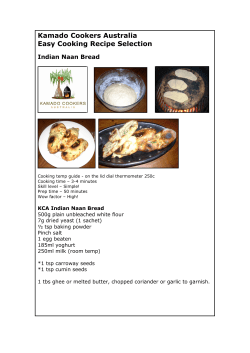

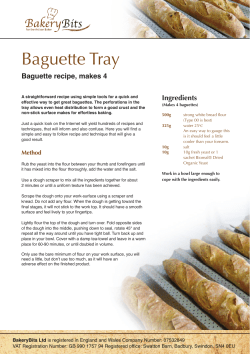
© Copyright 2026