
Canning Foods $5 PB724
$5
PB724
Canning Foods
Fruits Vegetables Pickles Jellies
Canning Foods
Fruits
Vegetables
Pickles
Jellies
Reba K. Hendren, Professor Emeritus
Revised by Janie Burney, Associate Professor
Family and Consumer Science
William C. Morris, Professor
Food Sciences and Technology
CONTENTS
Introduction. . . . . . . . . . . . . . . . . . . . . . . . . . . . . . . . . . . . . . . . . . . . . . . . . . . . . . . . . . . . . . . . 3
Canning Fruits and Vegetables
Canning . . . . . . . . . . . . . . . . . . . . . . . . . . . . . . . . . . . . . . . . . . . . . . . . . . . . . . . . . . . . . . . . . . . . . . . 5
Procedure for Canning Fruits. . . . . . . . . . . . . . . . . . . . . . . . . . . . . . . . . . . . . . . . . . . . . . . . . . . . 7
Altitude Table – Water Bath. . . . . . . . . . . . . . . . . . . . . . . . . . . . . . . . . . . . . . . . . . . . . . . . . . . . . 8
Fruit and Tomato Recipes. . . . . . . . . . . . . . . . . . . . . . . . . . . . . . . . . . . . . . . . . . . . . . . . . . . . . . . 9
Timetable for Fruits and Tomatoes. . . . . . . . . . . . . . . . . . . . . . . . . . . . . . . . . . . . . . . . . . . . . . 13
Scorecard for Fruits and Tomatoes. . . . . . . . . . . . . . . . . . . . . . . . . . . . . . . . . . . . . . . . . . . . . . 14
Procedure for Canning Vegetables . . . . . . . . . . . . . . . . . . . . . . . . . . . . . . . . . . . . . . . . . . . . . . 15
Operation of Pressure Canner. . . . . . . . . . . . . . . . . . . . . . . . . . . . . . . . . . . . . . . . . . . . . . . . . . 15
Altitude Table – Pressure Canning. . . . . . . . . . . . . . . . . . . . . . . . . . . . . . . . . . . . . . . . . . . . . . 16
Vegetable Recipes . . . . . . . . . . . . . . . . . . . . . . . . . . . . . . . . . . . . . . . . . . . . . . . . . . . . . . . . . . . . . 18
Timetable for Canning Vegetables . . . . . . . . . . . . . . . . . . . . . . . . . . . . . . . . . . . . . . . . . . . . . . 23
Scorecard for Vegetables . . . . . . . . . . . . . . . . . . . . . . . . . . . . . . . . . . . . . . . . . . . . . . . . . . . . . . . 24
Questions and Answers. . . . . . . . . . . . . . . . . . . . . . . . . . . . . . . . . . . . . . . . . . . . . . . . . . . . . . . . 25
Pickles and Relishes
Introduction . . . . . . . . . . . . . . . . . . . . . . . . . . . . . . . . . . . . . . . . . . . . . . . . . . . . . . . . . . . . . . . . . .
Types of Pickles and Relishes. . . . . . . . . . . . . . . . . . . . . . . . . . . . . . . . . . . . . . . . . . . . . . . . . . .
Ingredients. . . . . . . . . . . . . . . . . . . . . . . . . . . . . . . . . . . . . . . . . . . . . . . . . . . . . . . . . . . . . . . . . . . .
Equipment. . . . . . . . . . . . . . . . . . . . . . . . . . . . . . . . . . . . . . . . . . . . . . . . . . . . . . . . . . . . . . . . . . . .
Procedures for Safe Pickling. . . . . . . . . . . . . . . . . . . . . . . . . . . . . . . . . . . . . . . . . . . . . . . . . . . .
Pickle and Relish Recipes . . . . . . . . . . . . . . . . . . . . . . . . . . . . . . . . . . . . . . . . . . . . . . . . . . . . . .
Scorecard for Pickles and Relishes . . . . . . . . . . . . . . . . . . . . . . . . . . . . . . . . . . . . . . . . . . . . . .
Pickle Troubles and What Causes Them. . . . . . . . . . . . . . . . . . . . . . . . . . . . . . . . . . . . . . . . .
26
26
26
27
27
28
36
37
Jams, Jellies and Preserves
Introduction . . . . . . . . . . . . . . . . . . . . . . . . . . . . . . . . . . . . . . . . . . . . . . . . . . . . . . . . . . . . . . . . . .
Ingredients. . . . . . . . . . . . . . . . . . . . . . . . . . . . . . . . . . . . . . . . . . . . . . . . . . . . . . . . . . . . . . . . . . . .
Equipment. . . . . . . . . . . . . . . . . . . . . . . . . . . . . . . . . . . . . . . . . . . . . . . . . . . . . . . . . . . . . . . . . . . .
Procedure for Making Jams, Jellies and Preserves. . . . . . . . . . . . . . . . . . . . . . . . . . . . . . . . .
Jelly Recipes . . . . . . . . . . . . . . . . . . . . . . . . . . . . . . . . . . . . . . . . . . . . . . . . . . . . . . . . . . . . . . . . . .
Jam Recipes. . . . . . . . . . . . . . . . . . . . . . . . . . . . . . . . . . . . . . . . . . . . . . . . . . . . . . . . . . . . . . . . . . .
Preserves Recipes. . . . . . . . . . . . . . . . . . . . . . . . . . . . . . . . . . . . . . . . . . . . . . . . . . . . . . . . . . . . . .
Fruit Butter Recipes . . . . . . . . . . . . . . . . . . . . . . . . . . . . . . . . . . . . . . . . . . . . . . . . . . . . . . . . . . .
Scorecard for Jam, Jelly and Preserves. . . . . . . . . . . . . . . . . . . . . . . . . . . . . . . . . . . . . . . . . . .
Common Problems with Jam, Jelly and Preserves. . . . . . . . . . . . . . . . . . . . . . . . . . . . . . . .
Metric Chart. . . . . . . . . . . . . . . . . . . . . . . . . . . . . . . . . . . . . . . . . . . . . . . . . . . . . . . . . . . . . . . . . .
Definition of Preservation Terms . . . . . . . . . . . . . . . . . . . . . . . . . . . . . . . . . . . . . . . . . . . . . . .
38
38
38
39
39
40
41
42
43
44
44
45
Index . . . . . . . . . . . . . . . . . . . . . . . . . . . . . . . . . . . . . . . . . . . . . . . . . . . . . . . . . . . . . . . . . . . . . . . . 46
Canning Foods
INTRODUCTION
P
reserving food is more than an art; it is a science. Scientists and home economists
have established that certain procedures are essential for a given food to make it safe, as
well as retain its color, flavor, texture and nutrients. Standard recipes are designed with these
research findings in mind and, when carefully followed, insure both a high-quality and a
safe product.
Food is preserved by using methods that destroy or hinder the growth of microorganisms, such as molds, yeast and bacteria. These organisms may be present in the soil, on the
food, in the air, on equipment or on work surfaces.
Yeasts, molds and bacteria must be destroyed during processing to prevent the food from
spoiling. The correct amount of time to process varies with the kind of food. Sufficient heat
for a specified length of time kills microorganisms and insures a safe product. Processing
also helps to secure an airtight seal when using closures containing sealing compound.
Preventing enzymatic changes in food is another concern when preserving food.
Enzymes are chemical substances found in all animals and plants. These enzymes aid in
the maturing and ripening processes. If not destroyed or inactivated, enzymes cause changes
in color, flavor and texture. In the canning process, enzymes are destroyed by heat.
3
4
Canning Foods
Temperature of Food*
For Control of Bacteria
Degrees F
250
Canning temperatures for low-acid vegetables, meat and poultry in pressure canner.
240
Canning temperature for fruits, tomatoes and pickles in water-bath canner.
212
Cooking temperatures destroy most bacteria. Time required to kill bacteria decreases
as temperature is increased.
165
Warming temperatures prevent growth but allow survival of some bacteria.
140
Some bacterial growth may occur. Many bacteria survive.
125
Danger Zone. Temperatures in this zone allow rapid growth of bacteria and
production of toxins by some bacteria. (Do not hold foods in this temperature zone
for more than 2 or 3 hours.)
60
Some growth of food-poisoning bacteria may occur.
40
Cold temperatures permit slow growth of some bacteria that cause spoilage.**
32
Freezing temperatures stop growth of bacteria, but may allow bacteria to survive.
(Do not store food above 10 degrees F for more than a few weeks.)
0
Recommended temperature for frozen foods.
*USDA Keeping Food Safe to Eat, Home & Garden Bulletin, #182.
**Do not store raw meats for more than 5 days or poultry, fish or ground meat for more
than 2 days in the refrigerator.
Canning Foods
CANNING
Canning is the process of sterilizing and sealing foods in airtight containers to preserve them.
To retain nutrients and optimum quality, preserve fruits and vegetables when at their peak of
freshness. Clean the food thoroughly before processing. Salt and/or sugar may be added to
canned fruits and vegetables but these ingredients are not essential for a safe product.
Selecting Equipment
For Canning
Jars: Select standard canning
jars. These jars should have the word
“Mason™” printed somewhere on the
jar. In the past, mayonnaise, peanut
butter and pickle jars have been
designed for commercial use (one-time
use only) and may not have been heattreated. Unless jars are strong enough
to withstand high temperatures, they
may break when used for canning.
However, some commercial companies
are now using jars that are acceptable
for home canning. Just be sure to look
for the word “Mason™” on the jar.
Check the mouth of jars for nicks
or cracks; defects prevent airtight seals.
This is especially important since the
sealing compound of the flat metal lid
must stick to the rim of the jar to make
the seal.
Lids: Select the two-piece metal
lid (self-sealing lid). The two-piece lid
consists of a screwband with a flat metal
lid; the flat metal lid contains the sealing
compound. The closure is screwed on
the jar mouth firmly by hand.
When the metal screwband is tight,
this lid has enough “give” to let air
escape during the processing. When
taken from the canner, the two-piece
lid needs no further tightening.
Sometimes the bands on the twopiece metal lids are loose when the hot
jar is removed from the canner. Do not
attempt to tighten. Often the lid has
started to seal and further tightening
will break the partial seal. After a hot
jar is removed from the canner, some
time may elapse before a “popping”
sound is heard. This sound indicates
the jar has sealed.
Follow directions given by the
manufacturer concerning the heating
of flat metal lids. Sealing compounds
may vary in composition and require
different heat treatments.
Canners: A boiling waterbath
canner is used for fruits, tomatoes
and pickled vegetables. These acidcontaining foods may be processed
safely in boiling water for a specified
length of time, depending on altitude.
A pressure canner is used for all meats
and vegetables. To safely process these
low-acid foods, temperatures higher
than boiling are needed: 240 degrees F
(116 degrees C). Use pounds pressure
as given in the altitude table.
5
6
Canning Foods
Canning Foods
Waterbath Canner: Waterbath
canners may be purchased on the
market, or any large container meeting
the requirements of a waterbath canner
may be used. The container must be
deep enough to hold jars placed on a
rack and allow 2 to 4 inches of water
above jar tops. A rack with dividers will
hold jars in place and prevent them
from touching each other or the sides
of the canner during processing. The
container must also have a cover.
If it is deep enough, a pressure canner may be used as a waterbath. Cover
but do not fasten. Leave the petcock or
vent wide open so that steam escapes
and no pressure is built up inside the
canner.
Pressure Canner: Pressure canners are available in different designs,
materials and sizes. Directions for use
should accompany each canner. Follow
these directions carefully.
Methods of Filling Jars
Some foods may be placed in containers raw, or they may be preheated
then packed into the jars hot. Both
methods have their advantages.
Hot Pack: Heat food in syrup,
juice or water before filling jars. Keep
food at or near boiling temperature
and pack fairly loosely into jars.
Raw Pack*: Fill jars with raw food
and cover with boiling hot syrup, juice
or water. Pack raw fruits and vegetables
tightly, because they tend to shrink
during processing. Pack raw corn, lima
beans and peas loosely, because they
expand.
* "Raw pack" is the term now used in
place of cold pack.
Canning Fruits
Fruits, tomatoes and pickled vegetables are acid foods and are canned in the
boiling waterbath canner.
Selecting Fruit
For best flavor and texture, select fresh, firm, ripe fruit and process as soon as
possible. If fruit must be held a short time before canning, keep in a cool place.
Preparing Fruit for Canning.
Wash, peel and core fruit. To prevent darkening of light-colored fruits during
preparation, drop pieces into a water solution containing 3000 milligrams of ascorbic
acid (vitamin C)* per gallon. Drain or lift from solution and proceed as directed
under hot or raw pack methods to fill jars. Avoid leaving food in water solution longer
than 20-25 minutes to prevent loss of food value and water-soaking of food.
Yield of Canned Fruits from Fresh
Fruits
Fresh
Canned
Apples
1 bu. (48 lbs.)
2½ -3 lbs.
11 qts.
1 qt.
Apricots
1 bu. (50 lbs.)
2-2½ lbs.
18-22 qts.
1 qt.
Berries (except
strawberries)
1 crate (24 qts.)
1½ -2 lbs. (1-2 qts.)
12-18 qts.
1 qt.
Cherries (canned,
unpitted)
1 bu. (56 lbs.)
2-2 ½ lbs.
22-32 qts.
1 qt.
Peaches
1 bu. (48 lbs.)
2-3 lbs.
18-24 qts.
1 qt.
Pears
1 bu. (50 lbs.)
2-3 lbs.
20-25 qts.
1 qt.
Plums
1 bu. (56 lbs.)
1½ -2½ lbs.
22-30 qts.
1 qt.
Strawberries
1 crate (24 qts.)
1½ -3 lbs.
12-16 qts.
1 qt.
Tomatoes
1 bu. (53 lbs.)
2½ -3½ lbs.
15-20 qts.
1 qt.
*or use commercial mixture according to manufacturer’s instructions.
7
8
Canning Foods
Can fruit with or without sweetening. Sugar helps cooked fruit to retain
its shape, color and texture. For most
fruits, sugar is combined with liquid
(water or juice extracted from fruit) to
form a syrup. The syrup may be thin,
medium or heavy, depending on the
sweetness of the fruit and personal
preference.
Sweeteners
Light-colored corn syrup or mildflavored honey may be used to replace
half of the sugar for canning fruit. Do
not use dark sugar or strong-flavored
syrups, as they may darken or change
the flavor of the fruit.
Artificial Sweeteners: For
correct amount, substitute sweetener
for sugar as directed on label. Process
artificially sweetened fruit the same as
for sweetened.
Without Sugar
Sugar is not an essential ingredient
in the canning of fruit; so it may be
omitted. Fruit may be satisfactorily
canned in its own juice or in water to
result in a product lower in calories and
cost than the sweetened fruit. Process
unsweetened fruit the same as the
sweetened fruit.
To prepare the syrup, select from the following table:
Type of syrup
Amount of
water or juice
(cups)
Amount of
sugar (cups)
Yield
(cups)
4
4
4
1
13/4
2
43/4
5
51/3
Light
Medium
Heavy
Boil sugar and liquid for one minute.
Boiling Waterbath
(See below)
For raw pack, place the filled jar
in hot (not boiling) water; bring to
boiling. Allow water to cover jars at
least 2 inches.
For hot pack, place filled jars in
boiling water.
Add additional boiling water to
cover if necessary to bring water level
2 inches over the top of jars. Place
lid on waterbath container and bring
quickly to a rolling boil. Start counting
processing time when and not before
water returns to boiling. Adjust heat
to maintain a steady boil. When time
is completed, carefully raise the lid
away from the body to allow steam to
escape and prevent burns. Immediately
remove jars from the canner. Let jars
cool naturally (avoid drafts) on a
rack. Do not cover. When jars are at
room temperature, label with name of
product and date. Store canned foods
in a cool, dry place.
Water
level 2"
above top
of jars
Top of
jars
Head Space
Leave space between the packed
food and the jar lid. This allows for the
expansion of food during processing.
At Altitudes:
Processing Time for Fruits, Tomatoes and Pickles
Boiling Waterbath
Processing Time Depends on Altitude
0-1000 ft.
1001-3000 ft.
3001-6000 ft.
Above 6000 ft.
Use time given for specific
recipe in this publication
(see recipes)
Add 5 minutes to time
given for specific recipes.
Add 10 minutes to time
given for specific recipes.
Add 15 minutes to time
given for specific recipes.
Canning Foods
Recipes for Fruits and Tomatoes
Processing times recommended in this publication are correct for much of
the state except in the high elevations. For these high areas, add processing time
according to the table on page 8. Learn the altitude in your area. Consult with your
Extension agent or local district soil conservationist.
Preparing and Canning Fruits
Processing times as given in these recipes are for altitudes of 1,000 feet or less. If
you live at a higher altitude, add times as given in altitude table on page 8. Consult
your Extension agent or local district conservationist with soil conservation service
for altitude where you live.
Processing time in boiling waterbath at 212 degrees F (100 degrees C) in minutes
Fruit
Head Space
Pint
Quart
APPLES
Pare, core and cut into slices. Drop slices in a solution
containing 3000 mg ascorbic acid (vitamin C)* per
gallon of water to prevent darkening. Drain.
Hot Pack: Boil apple slices 5 minutes in thin syrup or
water. (Refer to syrup chart on page 8.) Adjust jar
lids. Process.
½ inch
20
20
APPLESAUCE
Select apples that mash easily when cooked. Pare,
quarter and core. Add only enough water to prevent
apples from scorching and simmer until fruit is tender.
Mash or put fruit through a sieve. Reheat sauce. Pack
hot. Adjust lids. Process.
¼ inch
15
20
½ inch
15
15
½ inch
15
20
APRICOTS
Follow method for peaches. Procedure is given on
page 10.
BERRIES (except strawberries)
Wash berries; lift out of water and drain.
Hot Pack: Add ½ cup of sugar to each quart of fruit. Put
in covered pan and heat to boiling. Pack hot fruit in jars.
Raw Pack: Fill jar with fruit. To insure a full pack, shake
jar while filling. Cover fruit with boiling syrup. (Refer to
syrup chart on page 8.)
*or use commercial mixture according to manufacturer’s instructions.
9
10
Canning Foods
Preparing and Canning Fruits (continued)
For altitudes higher than 1000 feet, adjust for altitude (see page 8).
Processing time in boiling waterbath at 212 degrees F (100 degrees C) in minutes
Fruit
CHERRIES
Wash cherries. Remove pits, if desired.
Hot Pack: Add ½ cup sugar per quart of fruit. Add ½
cup water per quart of fruit to unpitted cherries. Cover
pan. Bring to boil. Pack hot. Adjust lids. Process.
Raw Pack: Fill jar with fruit. To insure a full pack, shake
jar while filling. Cover with boiling syrup. (Refer to syrup
chart on page 8.) Adjust lids. Process.
PEACHES
Wash peaches and remove skins. Skins may be removed
by peeling, but an easier method is to dip fruit into boiling
water for about one minute, or until skin slips. Cool
immediately in cold water. Drain and remove skins. Drop
fruit pieces into a solution containing 2 tablespoons each of
salt and vinegar per gallon of water. Drain before packing.
Hot Pack: Heat peaches through in hot syrup. (A very
juicy fruit may be heated with sugar only.) Pack hot.
Cover with boiling syrup. Adjust lids. Process.
Raw Pack: Fill jar with raw fruit. Cover with boiling syrup.
(Refer to syrup chart on page 8.) Adjust lids. Process.
PEARS
Wash and peel. Cut in halves and core. Follow directions
for hot pack as recommended for peaches, except boil 5
minutes in syrup before filling jars.
PLUMS
Wash fruit. Freestone varieties may be halved and pitted.
When canning whole plums, prick skins to prevent
bursting of fruit.
Hot Pack: Heat plums in syrup or juice to boiling. (A
very juicy fruit may be heated with sugar only.) Pack hot.
Cover with boiling liquid. Adjust lids. Process.
Raw Pack: Fill jar with raw fruit. Cover with boiling syrup.
(Refer to syrup chart on page 8.) Adjust lids. Process.
RHUBARB
Wash and trim. Cut into ½-inch pieces. Add ½ cup sugar
to each quart of fruit. Let stand three to four hours to
draw out juice. Heat to boiling. Pack hot. Cover with
boiling juice. Adjust lids. Process.
Head Space
Pint
Quart
½ inch
15
20
½ inch
25
25
½ inch
20
25
½ inch
25
30
½ inch
20
25
½ inch
20
25
½ inch
20
25
½ inch
15
15
Canning Foods
Preparing and Canning Fruits (continued)
For altitudes higher than 1000 feet, adjust for altitude (see page 8)
Processing time in boiling waterbath at 212 degrees F (100 degrees C) in minutes
Fruit
Head Space
Pint
Quart
STRAWBERRIES
Select firm, ripe strawberries. Wash; lift out of water and
drain. Hull (cap) berries and measure.
Hot Pack: Carefully mix ½ to 3/4 cup sugar to each quart
of berries. Let stand in a cool place for approximately five
hours. Heat at low temperature until berries are hot. Pack
hot. Adjust lids. Process.
½ inch
15
15
TOMATOES – CRUSHED (with no added liquid)
Wash tomatoes and dip in boiling water for 30 to 60
seconds or until skins split. Then dip in cold water,
slip off skins and remove cores. Trim off any bruised
or discolored portions and quarter. Heat one-sixth of
the quarters quickly in a large pot, crushing them with
a spoon as they are added to the pot. This will exude
juice. Continue heating the tomatoes, stirring to prevent
burning. Once the tomatoes are boiling, gradually add
remaining quartered tomatoes, stirring constantly. These
remaining tomatoes do not need to be crushed. They
will soften with heating and stirring. Continue until all
tomatoes are added. Then boil gently five minutes. Add 2
tablespoons bottled lemon juice or ½ teaspoon citric acid
to each quart jar. Add 1 teaspoon of salt per quart to the
jars, if desired. Fill jars immediately with hot tomatoes,
leaving ½ inch headspace. Adjust lids and process in a
boiling waterbath – pints 35 minutes; quarts 45 minutes.
½ inch
35
45
½ inch
85
85
½ inch
85
85
TOMATOES, WHOLE OR HALVES
Canning tomatoes, whole or halves, select tomatoes that
are neither overly ripe or green. Wash gently to avoid
bruising. Remove stem ends and trim. Dip in boiling
water for 30 to 60 seconds, then quickly dip in cold water.
Slip off skins and remove core. Leave whole or cut in half.
Add 2 tablespoons of bottled lemon juice or ½ teaspoon
of citric acid to each quart jar. One teaspoon of salt may
also be added if desired. Heat some quartered tomatoes
to obtain juice.
Hot Pack: Put whole or halves of tomatoes in a saucepan,
completely cover them with tomato juice and boil gently
for five minutes. Fill jars with tomatoes, leaving ½ inch
headspace. Adjust lids. Process.
Raw Pack: Add 2 tablespoons of bottled lemon juice or
½ teaspoon citric acid to each quart jar. One teaspoon
salt may also be added if desired. Fill jars with raw
tomatoes. Cover tomatoes with hot juice, leaving ½-inch
headspace. Adjust lids. Process.
Note: To pressure can tomatoes, see page 22.
11
12
Canning Foods
Preparing and Canning Fruits (continued)
For altitudes higher than 1000 feet, adjust for altitude (see page 8).
Processing time in boiling waterbath at 212 degrees F (100 degrees C) in minutes
Fruit
Head Space
Pint
Quart
TOMATO JUICE
Select firm ripe tomatoes. Do not use tomatoes from dead
or frost-killed vines. Wash, remove stem ends and trim
away bruised or decayed spots. Work fast – juice is less
likely to separate if you heat tomatoes immediately after
cutting. To prevent juice from separating, quarter three or
four tomatoes and place in a large kettle. Heat tomatoes
to boiling while stirring and crushing them. Keep heat
high under the kettle while adding tomatoes at a rate slow
enough to sustain a boiling temperature. Stir and crush
tomatoes at frequent intervals. Boil five minutes after all
tomatoes have been added; remove kettle from heat. Put
tomatoes through sieve or food mill. (If juice separation is
not a concern, simply slice or quarter tomatoes in a large
saucepan. Crush, heat and simmer five minutes before
juicing.) Add 2 tablespoons bottled lemon juice or ½
teaspoon citric acid to each quart jar. Heat juice again
to boiling. Fill hot jars with hot juice, leaving ½-inch
headspace. Adjust lids. Process.
½ inch
35
40
TOMATO SAUCE
Wash and trim firm, ripe tomatoes. Cut into pieces.
Simmer, stirring frequently until softened. Press through
a sieve. Cook pulp until reduced by one-half. Add 2
tablespoons bottled lemon juice or ½ teaspoon citric acid
to each quart jar. Add ¼ teaspoon salt to each cup. Pour
hot sauce into jars. Adjust lids. Process.
½ inch
35
FRUIT JUICES
Wash, stem, remove pits and crush fruit. Slowly heat to
simmering. Strain through cloth. Add 1 to 2 cups of sugar
to each gallon of juice. Adjust lids. Process in boiling
waterbath.
½ inch
10
10
GRAPE JUICE
Wash, remove stems and crush grapes. Add water to
cover and heat to boiling. Reduce heat and simmer for 10
minutes. Strain through cloth and let stand in refrigerator
for 24 hours. ( Juice is allowed to stand at refrigerator
temperature for 24 hours and strained to remove tartrate
crystals. The crystals are formed from natural substances
in the grapes.) Strain juice again. Add 1 to 2 cups sugar
to each gallon of juice. Heat juice to boiling. Fill jars with
hot juice. Adjust lids. Process in boiling waterbath.
¼ inch
10
10
40
Canning Foods
Time Table for Canning Fruits and Tomatoes
Processing time in boiling waterbath at 212 degrees F (100 degrees C) in minutes
Fruit & Tomatoes
Type Pack
Pints
Quarts
Apples
Hot pack
20
20
Applesauce
Hot pack
15
20
Apricots
Hot pack
Raw pack
20
25
25
30
Berries (except strawberries)
Hot pack
Raw pack
15
15
15
20
Cherries
Hot pack
Raw pack
20
25
25
30
Peaches
Hot pack
Raw pack
20
25
25
30
Pears
Hot pack
20
25
Plums
Hot pack
Raw pack
20
20
25
25
Strawberries
Hot pack
15
15
Tomatoes (whole or halves)
Hot pack
Raw pack
85
85
85
85
Tomatoes – Crushed
Hot pack
35
45
Tomato Juice
Hot pack
35
40
Tomato Sauce
Hot pack
35
40
13
Canning Foods
Scorecard for Judging Canned Fruit
Product
Uniformly well-ripened, uniform and appropriate size,
no defects, shape well-preserved, fills without crowding
container, evenly distributed in jar.
Color
Natural, clear, bright, no artificial coloring or
preservative used.
Texture
Tender, plump, firm, neither overcooked, mushy or
uncooked in appearance.
Syrup
Excellent
Clear, bright, natural color of fruit, no sediment or
foreign matter.
Container
14
Standard canning jar, clear glass, clean, neatly labeled.
Good
Fair
Poor
Canning Foods
CANNING
VEGETABLES
Selecting Vegetables
for Canning
Most varieties of vegetables grown
and harvested for eating purposes are
suitable for canning. Some varieties are
selected because they grow well in a
particular area and are family favorites.
Only fresh, properly matured
vegetables should be canned. A good
rule to follow is to can them when they
are just right for table use. For uniform
products, it is wise to sort some
vegetables according to size and degree
of maturity.
Preparing Vegetables
for Canning
Regardless of which vegetable is
canned, a good rule to follow is “from
garden to the canner as quickly as
possible.” If the vegetable must be kept
longer, store in the refrigerator or in
the coolest place available.
Wash small amounts of vegetables
quickly under running water, or
through several changes of water. Lift
food out of water each time so dirt will
not collect on food again.
Methods of Filling Jars
Hot Pack Methods: Preheat
vegetables in water or steam. Heat
small amounts, two or three quarts, at a
time. Use liquid from vegetables to fill
jars after packing to conserve nutrients.
Add boiling water when there is not
enough cooking liquid.
Raw Pack Methods: Pack cold,
raw vegetables into containers and
cover with boiling water. Pack corn,
lima beans and peas loosely because
they expand.
Headspace
Leave space between the packed
food and the jar lid. This space allows
for the expansion of the food during
processing.
Pressure
Canner
Process all vegetables except tomatoes
and pickled vegetables
in a pressure canner.
Canners are made
with different types of
gauges. Carefully follow the manufacturer’s
directions for use of a
specific canner.
*if weighted gauge is used, allow steam to escape from vent for 10 minutes.
1. When preparing a pressure canner
for processing, add 2 to 3 inches
of boiling water. The amount of
water to use depends on the shape
and size of the canner.
2. Put the rack in the bottom of
canner; place canner on the
range to heat.
3. As each jar is filled and lid is
adjusted, place the jar on the rack
in the canner.
4. Leave space between each jar to
allow for the circulation of steam
around the jars.
5. Adjust the pressure canner lid
according to the design. For
canners with petcocks, make sure
the petcock is open. Allow steam
to escape from the petcock for at
least 10 minutes. This allows air
to be pushed from the canner. Air
left in the canner may interfere
with a true pressure reading.*
6. For a dial gauge canner, close petcock and allow pressure to rise to
11 pounds 240 degrees F (116
degrees C). Increase pounds
pressure for elevations over 1000
feet. For weighted gauges, use
a 10-pound weight and let the
steam build until it escapes from
the gauge.
7. For a dial gauge canner, adjust
the range unit so the gauge will
remain on 11 pounds. If pressure
is allowed to fluctuate during
processing, there may be a loss of
liquid from the jar. For weighted
gauges, the gauge should move
and make noise. Adjust heat so
that gauge begins to jiggle or rock
as the manufacturer describes.
15
16
Canning Foods
8. Start counting time. Consult
pages 18-21 for length of time
recommended for the vegetables.
9. When the required time is up,
turn off the range unit and slide
the canner off. Let the canner
cool slowly. Do not hasten the
cooling in any way.
10. After the gauge has been at 0
degrees F for about five minutes,
slowly open the petcock. Usually
there will be some steam escaping from the petcock.
11. Carefully raise the lid away from
body to prevent getting a burn
from the escaping steam.
12. Remove each hot jar with
canning tongs. If tongs are not
available, get a heavy towel and
place over jar. Lift out and place
the hot jar on a rack or on clean
paper, thickly folded, away from
drafts to cool. After all jars are
removed from the pressure canner, pour out the water remaining
in the canner.
13. Wash the inside of the canner
and rack with soapy water; rinse
and dry.
14. Wipe the lid with a soapy cloth,
then with a rinsed cloth; dry.
15. After the jars have cooled for
a day, store them in a cool, dry
place away from bright light.
Protect the jars from excessive
cold, since food may freeze and
break the jar.
*If weighted gauge is used, allow steam
to escape from vent for 10 minutes.
Altitude Table for Vegetables
Pressure Canner (240 degrees F)
Pressure Depends on Altitude
Weighted-Gauge Pressure Canner
Weight to Use
Sea level to 1,000 feet
10-pound
Above 1,000 feet
15-pound
Dial-Gauge Pressure Canner
Pressure on Dial
Sea level to 2,000 feet
11 pounds
2,001 to 4,000 feet
12 pounds
4,001 to 6,000 feet
13 pounds
6,001 to 8,000 feet
14 pounds
Note: For a weighted-gauge canner, use 15 pounds pressure if you live at an
altitude above 1,000 feet.
Guard Against Spoilage
Process all vegetables, except
tomatoes and pickled vegetables, in a
pressure canner. When canning is done
in a waterbath canner, the temperature
must reach a boiling point (212 degrees F, 100 degrees C at elevations of
1000 feet or less), which is suitable for
acid-containing foods such as fruit and
tomatoes. Low-acid vegetables require
a higher temperature (240 degrees F,
116 degrees C) to destroy spores of
Clostridium botulinum.
Clostridium botulinum spores are
found in soil, air and on raw foods. In
this condition they are not dangerous
if eaten, as these spores do not grow
or produce a toxin in the presence of
air. A high-acid medium also hinders
their growth. But spores of Clostridium
botulinum, if not destroyed, grow well
without air in sealed jars of lowacid foods. As these spores grow,
they produce a very poisonous
toxin. This is the toxin responsible for the food-borne illness
known as botulism.
Food inside a pressure canner
can be heated to high enough
temperatures to destroy the spores of
Clostridium botulinum.
Boil all home-canned, low-acid
food for 15 minutes before tasting. Boil
corn and spinach 20 minutes. Bring
food to a rolling boil and then count
time. This destroys the toxin if any
should be present.
Do not use an oven for canning.
Oven canning is dangerous, due to
the possibility of the jars bursting.
Also, the temperature of the food in
jars does not reach the 240 degrees F
(116 degrees C) necessary to destroy
the spores of Clostridium botulinum.
The temperature registered on the
oven regulator is not the same as the
temperature inside the jar of food.
Keep in Mind the
Following Steps When
Canning Vegetables
1. Select mature, yet tender
vegetables.
2. Bring from the garden to the
canner as soon as possible.
3. Wash and prepare vegetables.
4. Preheat vegetables if hot-pack
method is used.
Canning Foods
5. Pack in standard canning jars;
cover with liquid.
6. Wipe jar mouth and seal according to lid directions.
7. Place jar on rack in pressure canner
with 2 to 3 inches of boiling water.
8. Adjust pressure canner lid.
9. Let steam escape 10 minutes from
petcock,* then close.
10. Start counting time when
pressure gauge registers the
recommended pounds pressure
for altitude.
11. Use recommended timetable.
12. When time is up, slide canner
from range unit; let cool.
13. About five minutes after gauge
has returned to zero, open
petcock slowly. For weighted
gauges, remove the weight from
the vent part.
14. Open lid from opposite side of
the canner first, then all the way.
15. Take out hot jars, one at a time.
16. Place on rack to cool – out of
a draft.
17. The next day, store canned food in
a cool, dark, dry place.
* For canners that do not have a
petcock, allow steam to escape from
vent for 10 minutes.
Although the altitude for much of
Tennessee is 1,000 feet or less, many
areas are in the higher elevations.
Check with your Extension agent or
your local district conservationist or
with the Soil Conservation Service for
the altitude where you live.
Yield of Canned Vegetables from Fresh
Vegetable
Fresh
Canned
Asparagus
1 bu. (45 lbs.)
4 lbs.
11 qts.
1 qt.
Beans- Lima, in
Pods
1 bu. (32 lbs.)
4 - 5 lbs.
6 - 8 qts.
1 qt
Beans – Snap
1 bu. (30 lbs)
1½ - 2 lbs.
15 - 20 qts.
1 qt.
Beets, without tops
1 bu. (52 lbs)
2½ - 3 lbs.
17 - 20 qts.
1 qt.
Carrots, without
tops
1 bu. (50 lbs)
2½ - 3 lbs.
16 - 20 qts.
1 qt.
Corn - Sweet, in
husks
1 bu. (35 lbs)
6-16 ears
8 - 9 qts.
1 qt.
Okra
1 bu. (26 lbs.)
1½ lbs.
17 qts.
1 qt.
Peas – Green, in pod
1 bu. (30 lbs.)
2 - 2½ lbs.
12 - 15 pts.
1 pt.
Pumpkin
50 lbs.
3 lbs.
15 qts.
1 qt.
Spinach
1 bu. (18 lbs.)
2 - 3 lbs.
6 - 9 qts.
1 qt.
Squash – Summer
1 bu. (40 lbs)
2 - 2½ lbs.
16 - 20 qts.
1 qt.
Sweet Potatoes
1 bu. (55 lbs.)
2½ - 3 lbs.
18 - 22 qts.
1 qt.
Tomatoes
1 bu. (53 lbs.)
2½ - 3 lbs.
15 - 20 qts.
1 qt.
17
18
Canning Foods
Preparing and Canning Vegetables
Processing times given in these recipes are for 1,000 feet or less. If you live at a higher altitude, increase pressure as given in
Altitude Table on page 8. Learn the altitude in your area. Check with your Extension agent or your local district conservationist
with the Soil Conservation Service.
Note: For a weighted-gauge canner, use 15 pounds pressure if you live at an altitude above 1,000 feet.*
Processing time (min.) pressure canner at 240 degrees F (116 degrees C)
10 pounds pressure for weighted gauge; 11 pounds pressure for dial gauge
Vegetable
ASPARAGUS
Wash, trim scales and tough ends. Wash again and
cut into 1-inch pieces.
Hot Pack: Cover asparagus with boiling water.
Boil 2-3 minutes. Pack hot, filling jars loosely. Add
½ teaspoon salt to pints; 1 teaspoon salt to quarts.
Cover with boiling liquid. Adjust lids. Process.
Raw Pack: Pack raw asparagus tightly in jars
(do not crush). Add ½ teaspoon salt to pints;
1 teaspoon to quarts. Cover with boiling water.
Adjust lids. Process.
BEANS, Fresh Lima
Select young tender beans, shell and wash.
Hot Pack: Cover beans with boiling water.
Bring to boil. Pack hot, filling jars loosely. Add ½
teaspoon salt to pints; 1 teaspoon to quarts. Cover
with boiling water. Adjust lids. Process.
Raw Pack: Pack raw beans into jars. Leave 1 inch
headspace for pints; 1½ inch for quarts. Do not
press or shake beans down. Add ½ teaspoon salt
to pints; 1 teaspoon to quarts. Cover with boiling
water. Adjust lids. Process.
BEANS, Snap
Select tender crisp pods. Wash beans, trim ends
and break or cut into 1-inch pieces.
Hot Pack: Cover beans with boiling water. Boil
5 minutes. Pack hot, filling jars loosely. Add ½
teaspoon salt to pints; 1 teaspoon to quarts. Cover
with boiling cooking liquid. Adjust lids. Process.
Raw Pack: Pack raw beans tightly in jar. Add ½
teaspoon salt to pints; 1 teaspoon to quarts. Cover
with boiling water. Adjust lids. Process.
BEANS, Soy
Use green soybeans. Follow directions for lima
beans except increase processing time.
Head Space
Pint
Quart
1 inch
30
40
1 inch
30
40
1 inch
40
50
Refer to recipe
40
50
1 inch
20
25
1 inch
20
25
1 inch
55
65
* Check with your county Extension agent or your local district conservationist with the Soil Conservation Service for altitude
where you live.
Canning Foods
Preparing and Canning Vegetables (continued)
Processing time (min.) pressure canner at 240 degrees F (116 degrees C)
10 pounds pressure for weighted gauge; 11 pounds pressure for dial gauge
Vegetable
Head Space
Pint
Quart
BEETS
Sort for size. Cut off tops, leaving 1 inch of
stem. Leave roots attached. Cover with boiling
water and boil until the skins slip easily (15-25
minutes). Skin and trim. Leave small beets
whole. Cut medium and large beets into ½-inch
cubes or slices; or halve or quarter.
Hot Pack: Pack hot. Add ½ teaspoon salt to
pints; 1 teaspoon to quarts. Cover with boiling
water. Adjust lids. Process.
1 inch
30
35
CARROTS
Wash and scrape. Slice or dice carrots.
Hot Pack: Cover carrots with boiling water.
Bring to boil and simmer for five minutes. Pack
hot. Add ½ teaspoon salt to pints; 1 teaspoon
to quarts. Cover with boiling cooking liquid.
Adjust lids. Process.
Raw Pack: Pack raw carrots tightly into jars.
Leave 1 inch headspace. Add ½ teaspoon salt to
pints; 1 teaspoon to quarts. Cover with boiling
water to ½ inch from top. Adjust lids. Process.
1 inch
25
30
Refer to recipe
25
30
CORN, Cream Style
Select tender ears of corn. Husk, remove silk
and wash. Cut corn from cob at center of kernel,
then scrape cob. Use pint jars only.
Hot Pack: To each quart of corn, add 2 cups
of boiling water. Bring to boil. Pack hot. Add ½
teaspoon salt to each jar. Adjust lids. Process.
Raw Pack: Not Recommended
1 inch
85
Not recommended
1 inch
55
85
Refer to recipe
55
85
CORN, Whole Kernel
Select tender ears of corn. Husk, remove silk
and wash. Cut corn from cob at 2/3 the depth of
the kernel. Caution: Do not scrape.
Hot Pack: To each quart of corn, add 2 cups
boiling water. Bring to boil and simmer 5
minutes. Pack hot. Cover with boiling cooking
liquid, leaving 1 inch headspace, or fill jars to 1
inch from top with mixture of corn and liquid.
Add ½ teaspoon salt to pints; 1 teaspoon to
quarts. Adjust lids. Process.
Raw Pack: Pack raw corn into jars. Leave
1-inch headspace. Do not shake or press down.
Add ½ teaspoon salt to pints; 1 teaspoon to
quarts. Cover with boiling water to ½ inch from
top. Adjust lids. Process.
19
20
Canning Foods
Preparing and Canning Vegetables (continued)
Processing time (min.) pressure canner at 240 degrees F (116 degrees C)
10 pounds pressure for weighted gauge; 11 pounds pressure for dial gauge
Vegetable
Head Space
Pint
Quart
OKRA
Select tender pods. Wash and trim. Leave pods
whole or cut into 1-inch pieces. Cover with hot
water and boil for 2 minutes. Fill jars with okra and
cooking liquid. Add ½ teaspoon salt to pints; 1
teaspoon to quarts. Adjust lids. Process.
1 inch
25
40
Refer to recipe
40
50
Refer to recipe
40
50
PEAS, Fresh Green
Shell and wash peas.
Hot Pack: Cover peas with boiling water. Bring to
boil and boil for 2 minutes. Pack hot peas loosely
in jars. Add ½ teaspoon salt to pints; 1 teaspoon to
quarts. Cover with boiling cooking liquid. Adjust
lids. Process.
1 inch
40
40
POTATOES, Cubed or Whole
Wash, pare and cut into ½-inch cubes or choose
small potatoes 1 to 2 inches in diameter. To
prevent darkening, dip potatoes in brine
(1 teaspoon salt to 1 quart water). Drain. Or use
an ascorbic acid solution and drain. Cover with
water and bring to boil. Boil cubes 2 minutes; boil
whole potatoes 10 minutes; drain.
Hot Pack: Pack hot. Add ½ teaspoon salt to
pints; 1 teaspoon to quarts. Cover with fresh
boiling water. Adjust lids. Process.
1 inch
35
40
PEAS, Fresh Blackeye
Shell and wash peas.
Hot Pack: Cover peas with boiling water and bring
to a rolling boil. Drain. Pack hot. Leave 1¼-inch
headspace in pints; 1½ inches in quarts. Do not
shake or press peas down. Add ½ teaspoon salt
to pints; 1 teaspoon to quarts. Cover with boiling
water to ½ inch from top. Adjust lids. Process.
Raw Pack: Pack raw peas in jars. Leave 1½-inch
headspace in pints; 2 inches in quarts. Do not
shake or press peas down. Add ½ teaspoon salt
to pints; 1 teaspoon to quarts. Cover with boiling
water to ½ inch from top. Adjust lids. Process.
Canning Foods
Preparing and Canning Vegetables (continued)
Processing time (min.) pressure canner at 240 degrees F (116 degrees C)
0 pounds pressure for weighted gauge; 11 pounds pressure for dial gauge
Vegetable
Head Space
Pint
Quart
PUMPKIN, Cubed (do not mash)
Wash and cut into sections. Peel, remove seeds and
cut into 1-inch cubes. Add water to cover and bring
to boil. Boil 2 minutes. Pack hot cubes to ½ inch
from top. Caution: Do not mash or puree. Add ½
teaspoon salt to pints; 1 teaspoon to quarts.
Hot Pack: Cover with hot cooking liquid, leaving
½-inch space at top of jar. Adjust lids. Process.
Refer to recipe
55
90
Refer to recipe
75
90
1 inch
70
90
MIXED VEGETABLES or SOUP MIX
Yield: about 7 quarts
6 cups sliced carrots
6 cups, whole kernel sweet corn
6 cups cut green beans
6 cups shelled lima beans
4 cups whole or crushed tomatoes
4 cups diced zucchini
Wash and peel carrots, wash again and slice or
dice. Husk corn, remove silk and wash. Cut corn
from cob at 2/3 the depth of the kernel. Wash and
trim green beans. Snap or cut into 1-inch pieces.
Shell young, tender lima beans and wash. Trim,
and slice or cube zucchini. Combine all vegetables
including tomatoes in a large kettle and add
enough water to cover pieces. Add 1 teaspoon salt
per quart to the jar, if desired. Boil with hot pieces
and liquid, leaving 1-inch headspace. Adjust lids
and process.
Note: For other vegetable combinations, process the
length of time needed for vegetables requiring the
longest processing time.
SPINACH AND OTHER GREENS
Select fresh tender greens. Pick over and wash
thoroughly, lifting greens out of wash water each
time. Remove tough stems.
Hot Pack: Cover greens with hot water and
simmer in an uncovered pot for about 5 minutes
or until greens are wilted. (Or, place 2½ pounds
of greens in a cheesecloth bag and steam about
10 minutes or until well wilted.) Pack hot greens
loosely into jars. Add ¼ teaspoon salt to pints; ½
teaspoon to quarts. Cover with fresh boiling water.
Adjust lids. Process.
21
22
Canning Foods
Preparing and Canning Vegetables (continued)
Processing time (min.) pressure canner at 240 degrees F (116 degrees C)
10 pounds pressure for weighted gauge; 11 pounds pressure for dial gauge
Vegetable
Head Space
SQUASH, Winter
(Acorn, Banana, Buttercup, Butternut, Golden
Delicious or Hubbard)
Pint
Quart
Follow the preparation procedures for cubed pumpkin
SWEET POTATOES
Sort for size and wash. Boil or steam until partially
soft (15-20 minutes). Skin and cut into uniform
pieces. Caution: Do not mash or puree. Fill jars
with hot potatoes. Add ½ teaspoon salt to pints;
1 teaspoon salt to quarts. Cover with fresh boiling
water or medium syrup. Adjust lids. Process.
1 inch
65
90
TOMATOES (No added liquid)
Tomatoes (whole or half) may be canned under
pressure. Follow directions for preparation on
page 11. Process.
½ inch
25
25
TOMATOES, CRUSHED
Follow directions for preparation on page 11.
½ inch
15
15
TOMATO JUICE
Follow directions for preparation on page 12.
½ inch
15
15
Reprocessing
Unsealed Jars
If a lid fails to seal on a jar, remove
the lid and check the jar-sealing surface
for tiny nicks. If necessary, change the
jar; add a new, properly prepared lid;
and reprocess within 24 hours using
the same processing time. Headspace
in unsealed jars may be adjusted to 1½
inches and jars can be frozen instead of
reprocessed. Foods in single unsealed
jars can be refrigerated and consumed
within three days.
Storing Canned Foods
Press the center of the lid to be sure
the lid is “down,” indicating a tight
vacuum seal. Remove screw bands
from cooled jars; wash the lid and jar
to remove food residue. Label and date
the jars and store them in a clean, cool,
dark, dry place. Do not store jars above
95 degrees F or near hot pipes, a range,
a furnace, in an uninsulated attic or in
direct sunlight. Under these conditions, food will lose quality and may
spoil. Dampness may corrode metal
lids, break seals and allow recontamination and spoilage. Accidental freezing
of canned foods will not cause spoilage
unless jars become unsealed. If jars
must be stored where they may freeze,
wrap them in newspapers, place them
in heavy cartons and cover with more
newspapers and blankets.
Canning Foods
Time Table for Canning Vegetables
For altitudes higher than 1000 feet, adjust for altitude (see page 16).
Processing time (min.) pressure canner at 240° F (116° C)
10 pounds pressure for weighted gauge; 11 pounds pressure for dial gauge
Vegetable (Low-Acid)
Type Pack
Pint
Quart
Asparagus
Hot pack
Raw pack
30
30
40
40
Beans, Lima
Hot pack
Raw pack
40
40
50
50
Beans, Snap
Hot pack
Raw pack
20
20
25
25
Beets
Hot pack
30
35
Carrots
Hot pack
Raw pack
25
25
30
30
Corn, Cream Style
Hot pack
Raw pack
85
95
Not recommended
Not recommended
Corn, Whole Kernel
Hot pack
Raw pack
55
55
85
85
Okra
Hot pack
25
40
Peas, Fresh, Blackeye
Hot pack
Raw pack
40
40
50
50
Peas, Fresh, Green
Hot pack
40
40
Pumpkin, Cubed
Hot pack
55
Mixed Vegetables
or Soup Mix
Hot pack
Spinach & Other Greens
Hot pack
70
90
Squash, Winter
Hot pack
55
90
Sweet Potatoes
Hot pack
65
90
Tomatoes, Whole or Half
Hot pack
Raw pack
25
25
25
25
Tomatoes, Crushed
Hot pack
15
15
Tomato Juice
Hot pack
15
15
90
Length of time needed for vegetable
requiring longest processing
23
Canning Foods
Scorecard for Judging Canned Vegetables
Product
Uniform size, proper degree of maturity, no defects, shape
well-preserved, container filled but not crowded, evenly
distributed in jar, but not artistically arranged.
Color
Natural uniform color, no dark spots.
Texture
Tender, plump, firm – not overcooked.
Liquid
Excellent
Clear, covers product, not cloudy, no bubbles, no
sediment or foreign matter.
Container
24
Standard canning jar, clear glass, clean, neatly labeled.
Good
Fair
Poor
Canning Foods
Questions & Answers
Q. Is it safe to can vegetables without
using salt?
A. Yes, salt is not a necessary part of
the canning process.
Q. What is the meaning of the
term “process?”
A. In canning, “processing” is the
method used in cooking the food
to preserve it. For vegetables, this is
done in a pressure canner. In other
words, vegetables are put into jars
and processed in a pressure canner.
Q. What causes white sediment in the
bottom of jars of vegetables?
A. The white sediment may be due to
minerals in the water, starch in the
food or it may indicate spoilage.
If food is soft or liquid is dark and
murky, do not use.
Q. What is meant by blanching?
A. Food is dipped or plunged into boiling water or steam for a given length
of time.
Q. What is meant by pre-cooking?
A. Food is cooked in a small amount of
water before it is put into jars.
Q. Should all vegetables be blanched or
precooked before processing?
A. No, but blanching or pre-cooking
serves to set color and shrink
certain products.
Q. Should the water in which foods are
pre-cooked be used in packing?
A. Yes, if vitamins and minerals are to
be retained.
Q. Why do beets lose their color?
A. When cut, the red juice bleeds from
the beet. To prevent this color loss
when canning, pre-cook beets with
part of the stem and all of the roots
left on.
Q. Why do foods darken in the top
of jars?
A. Liquid did not cover food or food
was not processed long enough to
destroy enzymes.
Q. Does it damage vegetables to overprocess them?
A. Over-processing may alter the
texture and flavor of a product,
but this will not affect its safety. If
there is any doubt about timing,
it is better to over-process than to
under-process. Vegetables must be
processed long enough to destroy
spoilage organisms.
Q. How long should vegetables stand after gathering before they are canned?
A. The shortest time possible. If vegetables are to be held over for a time
before canning, store them in a cool,
well-ventilated place. Spread them
out carefully or store in refrigerator.
Q. Why is there sometimes a loss of
liquid during processing?
A. Loss of liquid may be due to
fluctuating pressure in the pressure
canner, food packed too tightly in
jars or lowering pressure too suddenly. Constant pressure should be
maintained during processing time.
At the end of processing time, allow
pressure to drop to zero naturally
and wait two to five minutes before
opening the lid.
Q. Can fruits be canned without heating if aspirin is used?
A. No. Aspirin cannot be relied on to
prevent spoilage or to give satisfactory products. Adequate heat
treatment is the only safe procedure.
Q. Is it safe to process food in the oven?
A. No, oven canning is dangerous. Jars
may explode. The temperature of the
food in jars during oven processing
may not get high enough to insure
destruction of spoilage bacteria.
Q. What causes fruit to float in jars?
A. Fruit is lighter than the syrup. Pack
fruit tightly in jar, but do not crush
it. Use a light syrup.
Q. Is canned food safe to use when the
liquid is cloudy?
A. Cloudy liquid may be a sign of
spoilage. Also, it may be caused by
starch from over-ripe vegetables or
from minerals in the water. If liquid
is cloudy, boil the food. Do not taste
or use any that foams during heating
or has an odd odor.
Q. When canned fruits are bought in
large containers, is it safe to can
them in smaller containers?
A. Canned fruit may be heated through,
packed and processed the same
length of time as recommended for
hot packs. Food canned in this way
may be lower quality than if fruit had
been canned when fresh.
25
26
Canning Foods
Canning Pickles
And Relishes
Pickles, crisp and spicy, stimulate
the sense of taste and enhance the
flavor of bland foods.
Pickles and relishes contain small
amounts of nutrients, depending on
ingredients used in making them. Most
pickle products are low in calories,
except for the sweet varieties.
Pickling is the process of preserving
foods in brine or vinegar or a combination of the two.
Brine is made by combining salt
with water in proportions to make
either a weak, medium or strong
solution. In some instances, salt is add
directly to the food in the dry form and
the brine is formed as juices are drawn
out of the food.
Vinegar, an acid, acts as a preservative and contributes flavor different
from the flavor produced by lactic acid
fermentation that occurs during the
brining process.
The method using both salt and
vinegar calls for a short brining period
before the vinegar is added.
Kinds of pickles and
relishes are varied and
numerous. Processing
methods for each should
be selected in keeping with
the food to be processed
and the desired product.
Types of Pickles
And Relishes
Brined pickles go
through a fermenting
process for about three to
five weeks. Dilled cucumbers and sauerkraut are
in this group. During this
curing process, color of the
cucumber changes from a
bright green to an olive or yellow green.
The interior of the cucumber becomes
uniformly translucent and the pickle
develops a desirable flavor. When
properly cured, the skin and interior of
pickles are firm and tender. To prevent
sour, salty, hard, rubbery, shriveled or
mushy pickles, carefully follow recommended fermentation procedures.
Quick Process Pickles
This method includes:
Pickles that are brined for several
hours, drained and then combined
with boiling hot vinegar or heated with
vinegar and processed.
Pickles that are combined with boiling hot vinegar or heated with vinegar
to boiling temperature and processed
without a previous brining period.
Fruit Pickles: These pickles are
usually made from small whole
fruits or fruit chunks and simmered
in a spicy, sweet-sour syrup.
Relishes: Relishes are
mixtures of chopped
fruits or vegetables. They
may be mild in flavor or
hot and spicy.
Chutney: A mixture of
fruits with dates and/or
raisins seasoned with
spices.
Selection
Use only goodquality fruits and
vegetables. Select tender
vegetables and fruit.
Pears and peaches may
be slightly underripe for
pickling. Wax-coated cucumbers (bought from a vegetable
counter) are not suitable for pickling
whole because wax interferes with penetration of brine. Sort for uniformity of
size and select the size best suited for
the recipe being followed.
Use foods soon after gathering or
purchasing when possible. If fruits and
vegetables can not be used immediately, store in the refrigerator or in a
well-ventilated, cool place. Discard
fruits and vegetables that show any
evidence of mold.
Ingredients
Salt: Pure, granulated salt is best.
This is often sold as pickling or canning
salt. It is sometimes called meatcuring salt. The non-caking material
added to iodized and non-iodized
table salt may make the brine cloudy.
The iodine in iodized table salt may
cause pickles to darken.
Vinegar: Use either cider or
white distilled vinegar of 5 to 6 percent
acidity (50 to 60 grain strength).
Cider vinegar, used in most recipes,
has a good flavor and aroma, but may
discolor light foods. Distilled (white)
vinegar is often used for onions and
cauliflower where clearness of color is
desirable.
Spices: Spices add flavor and aroma
to pickles and both whole and ground
spices are used in making them. For best
flavor, always use fresh spices and store
amounts that are not used immediately
in air-tight containers.
Canning Foods
Sugar: Use either granulated or
brown sugar, depending on recipe.
Water: If hard water is used in
brining, it may interfere with the
formation of acid and prevent pickles
from curing properly. Boil hard water
for 15 minutes and remove from heat.
Cover and let stand for 24 hours.
Remove any scum that might have
formed. Slowly pour water from
containers so that sediment will not be
disturbed. Discard sediment. Water is
now ready to use.
Ingredients Found in
Older Recipes
The following ingredients are still
used in some of the older pickling recipes. These substances are not essential
for making crisp, colorful pickles if
up-to-date methods and good-quality
ingredients are used in making them.
Lime: Lime is not essential for
making crisp, firm pickles if good-quality ingredients are used and up-to-date
methods are followed in making them.
If recipe calls for lime, use food-grade
pickling lime from the grocery store.
Do not use agricultural or burnt lime.
Alum: Alum is not needed to make
pickles crisp and firm if good-quality
ingredients are used and up-to-date
methods are followed in making them.
It is better not to use alum, but if alum
is used, be sure to measure it accurately. This ingredient can be purchased
from the grocery store.
Equipment
Utensils: For brining, use a clean
crock or stone jar, unchipped enamellined utensils or a large glass container.
To cover vegetables while they are in
brine, use a heavy plate or large glass
lid that fits inside the container. Use
a filled jar of water to hold the cover
down so the vegetables are kept below
the surface of the brine. A more recent
method is to use a water-filled plastic
bag, the kind intended for use with
food. The bag covers the container,
keeping contents at a correct level so
that a plate is not needed. For heating pickling liquids, use
unchipped enamelware,
aluminum, stainless steel
or glass. Do not use brass,
copper, galvanized or
iron utensils. Containers
of these metals may
react with acids or salts
and form undesirable
compounds or cause color
changes in the pickles. Use
large wooden or stainless
steel spoons for stirring
pickles.
Jars: Use standard canning jars
with the word “Mason™” on them.
Some food processors are now using
“Mason™” jars. However, most jars from
commercially canned food have not
been heat-treated and may break when
subject to home-canning methods.
Pack pickles or relish in jars and
cover with liquid. Wipe the jar mouth
with a clean, damp cloth or paper
towel. Adjust the lid according to the
manufacturer’s directions.
Lids: Use the two-piece closure,
which has a metal screw band and a
metal lid with sealing compound. The
metal screw bands may be re-used, but
metal lids containing sealing compound may be used only once.
Waterbath Canner: Waterbath
canners may be purchased on the
market, or any large container meeting
the requirements of a waterbath canner
may be used. The container should be
deep enough to hold jars placed on
a rack and allow for 2 to 4 inches of
water above jar tops. A rack with dividers will hold jars in place and prevent
them from touching each other or
sides of canner during processing. The
container must also have a cover.
Procedures for Safe
Pickling
To insure a safe and quality product,
use fresh fruits and vegetables following standardized recipes and process
as recommended for the
product.
Filling Jars: Fill jars,
leaving headspace at the top
of the jar after brine or syrup
has covered the pickles.
Avoid over-packing jars
so there will be enough
headspace. Wipe the rim and
threads of jars thoroughly.
Small food particles left
on the rim may prevent an
airtight seal.
Adjusting Caps (Lids): Select
the two-piece metal lid (a screw band
with a flat metal lid; the flat metal lid
contains the sealing compound). The
closure is screwed on the jar mouth
firmly by hand.
When metal screwband is tight, this
lid has enough “give” to let air escape
during processing. When taken from
the canner, the two-piece lid needs no
further tightening.
Sometimes the bands on the
two-piece metal lids are loose when the
hot jars are removed from the canner.
DO NOT ATTEMPT TO TIGHTEN.
Often the lid has started to seal and
further tightening will break the partial
seal. After a hot jar is removed from the
canner, some time may elapse before a
“popping” sound is heard. This sound
indicates the jar has sealed. Follow
directions of the manufacturer concerning the heating of the flat metal lids.
Heat Treatment: Heating is
needed to destroy microorganisms
that cause spoilage and to inactivate
enzymes that may affect flavor, color
and texture. Processing jars of pickles
in a boiling waterbath is considered to
be the best way to achieve adequate
heat treatment.
27
28
Canning Foods
The U.S. Department of Agriculture
recommends the processing of all
pickle products in a boiling waterbath.
An open-kettle method is not recommended, since there is always danger of
spoilage from microorganisms entering
the food when it is transferred from
kettle to jar.
For safe pickle products made from
low-acid vegetables, always use vinegar
of 5 percent acidity. Certain bacterial
spores that are present in air, soil and
raw foods grow well in sealed, air-tight
jars of low-acid foods. As these spores
(Clostridium botulinum) grow, they
produce a poisonous toxin. The use of
strong vinegar in combination with the
heat treatment prevents the growth of
these organisms.
Pickles and Relish
Recipes
Processing times as given in these
recipes are for altitudes of 1,000 feet
or less. If you live at a higher altitude,
add times as given in Altitude Table on
page 8.
As recommended by the United
States Department of Agriculture,
processing times in a waterbath canner are given for all pickle recipes in
this publication.
Brined Cucumbers
1. Wash cucumbers carefully in
cold water to remove soil. Cut
1/16-inch slice from bottom end
and discard. Leave 1/4 inch of stem
attached.
2. Fill crock or jar with cucumbers
to within 3 or 4 inches of the top.
3. Cover cucumbers with a 10
percent brine made by using ½
cup salt to each quart water.
4. Place a heavy china or glass plate
inside the fermentation container. Plate should be slightly
less than the container opening.
Use a weight to hold the plate
5.
6.
7.
8.
9.
down and keep the cucumbers
at least 1-2 inches under the
brine. A glass jar filled with water
makes a good weight (do not use
brick or cement block). A more
desirable method of covering
cucumbers during fermentation
consists of placing a polyethylene
bag filled with 3 quarts of water
and 4½ tablespoons of salt on
top of them. The water-filled bag
seals the surface from exposure
to air, and prevents the growth of
yeast or molds. It also serves as a
weight. For extra protection, the
bag with water in it can be placed
inside another polyethylene
bag. Any bag used should be of
heavyweight, water-tight material
intended for use with foods. The
amount of water in the bag may
be adjusted to give just enough
pressure to keep the fermenting
food covered with brine.
The next day, in order to
maintain a 10 percent brine solution, add 2 cups salt for each 10
pounds of cucumbers. Place salt
on a plate or a cloth to prevent its
sinking and forming too strong
a brine on the bottom of the
container.
At the end of the week and each
succeeding week until cured,
place on the plate or cloth ½ cup
salt for 10 pounds of cucumbers.
Remove scum daily as it forms. If
scum is left on, it will destroy the
acidity of the brine. The acidity is
necessary to prevent spoilage.
During fermentation, keep
pickles in a moderately cool place
with temperature preferably
between 60 to 70 degrees F. At
lower temperatures, the fermentation proceeds slowly. Above
70 degrees F, the fermentation
tends to be souring, without
gas production and poor flavor
development.
Fermentation is completed when
bubbles stop coming to the top.
Test bubbles by tapping container on the side with your hand.
As a second test, cut a cucumber
in half; if it is the same color
throughout and has no noticeable
rings, fermentation is completed.
10. If the cucumbers are to be kept
for some time, place 1 cup salt
on the plate and at intervals,
continue to add a cup of salt
until the solution will no longer
dissolve the new salt. A total of
about six cups may be needed.
Keep the container covered.
11. To use these fermented pickles in
recipes, they will generally need
to be soaked in water to remove
the salt. Several changes of water
during a 24-hour period is usually
adequate. Use three or four parts
of water to one part fermented
cucumbers for each soaking.
Sweet Cucumber Pickles
Yield: about 4 pints.
½ gallon cucumbers (about 3 pounds)
6 cups of vinegar
3 cups of sugar
1 tablespoon pickling spices*
*Use 1 tablespoon cloves and 1
tablespoon ginger root in place of pickling
spices, if desired.
Remove cucumbers from brine
and soak in water to remove salt as
described above. Leave small pickling
size cucumbers whole; larger ones may
be cut into pieces.
Combine vinegar, sugar and spices
(tied loosely in a cheesecloth bag).
Bring mixture to boiling point, add
drained cucumbers and boil 2 to 3
minutes.
Remove spice bag and pour into
container. Allow to stand for three
days. Each day, pour off liquid, bring to
boiling point and pour over cucumbers.
Pack pickles in hot jars. Bring the
same vinegar solution to boiling point
and pour over pickles, leaving ½-inch
Canning Foods
headspace; adjust lids and process
in boiling waterbath at 212
degrees F for 15 minutes.
Sour Cucumber Pickles
Use recipe for Sweet
Cucumber Pickles above
except omit most or all of sugar.
Sweet Pickle Sticks
Yield: 7 to 9 pints.
8 pounds of 3- to 4-inch pickling cucumbers
1/3 cup canning or pickling salt
4½ cups sugar
3½ cups vinegar (5 percent)
2 teaspoons celery seed
1 tablespoon whole allspice
2 tablespoons mustard seed
These pickles may be canned as
either strips or slices.
Wash cucumber and cut off 1/16 of
blossomed end. Slice or cut into strips.
Sprinkle with the a cup of salt. Cover
with 2 inches of crushed or cubed ice.
Refrigerate 3 to 4 hours. Add more ice
as needed. Drain well.
Combine sugar, vinegar, celery seed,
allspice and mustard seed in a 6-quart
kettle. Heat to boiling.
Hot Pack: Add cucumbers and
heat slowly until vinegar solution
returns to boil. Stir occasionally to
make sure mixture heats evenly. Fill
sterile jars with cucumbers and cover
with vinegar solution leaving ½-inch
headspace. Adjust lids. Process in
boiling waterbath canner, either pints
or quarts, for 5 minutes.
Raw Pack: Fill jars, leaving ½-inch
headspace. Add hot vinegar solution,
leaving ½-inch headspace. Adjust lids
and process in a boiling waterbath, pints
for 10 minutes; quarts for 15 minutes.
Store jars of processed pickles four
to five weeks to develop ideal flavor.
Fermented Dill Pickles
4 pounds pickling cucumbers, 3½ to 4
inches in length
2 teaspoons whole mixed pickling
spices
4 to 5 heads fresh or dry dill weed or 2
tablespoons dill seed
¼ cup vinegar (5 percent)
½ cup pure granulated salt
8 cups water
Cover cucumbers with cold water.
Wash thoroughly, using a vegetable
brush, handling gently to avoid bruising.
Take care to remove 1/16 inch off blossom end. Drain on rack or wipe dry.
Place half the pickle spices and a
layer of dill in a 5-gallon crock or stone
jar. Fill with cucumbers to 3 to 4 inches
from top of crock. Place a layer of dill
and remaining spices over the top of
cucumbers. (Garlic may be added, if
desired.) Thoroughly mix the vinegar,
salt and water and pour over the
cucumbers.
Cover with a heavy china or glass
plate or lid that fits inside the crock.
Use a weight to hold the plate
down and keep the cucumbers under
the brine. A glass jar filled with water
makes a good weight.* Cover loosely
with a clean cloth. Keep pickles at
room temperature and remove scum
daily when formed. Scum may start
forming in three to five days. Do not
stir pickles, but be sure they are completely covered with brine. If necessary,
make additional brine, using original
proportions specified in recipe.
*Processing times
given in these recipes
are for altitudes of
1,000 feet or less. If
you live at a higher
altitude, add times
given in Altitude
Table on page 8.
In about three weeks the cucumbers
will have become an olive-green color
and should have a desirable flavor.
Any white spots inside the fermented
cucumbers will disappear in processing. Discard if soft or slimy.
The original brine is usually cloudy
as a result of bacteria and yeast development during the fermentation period.
If this cloudiness is objectionable,
fresh brine may be used to cover the
pickles when packing them into jars. In
making fresh brine, use ½ cup salt and
4 cups vinegar to 1 gallon of water. The
fermentation brine is generally preferred
for its added flavor. Strain brine, heat to
boiling and simmer 5 minutes.
Pack the pickles, along with some of
the dill, into clean, hot quart jars; add
garlic if desired. Avoid too tight a pack.
Cover with boiling brine to ½ inch
from the top of the jar. Adjust jar lids.
Process in boiling waterbath canner
for 15 minutes. Remove jars and set
jars upright, several inches apart, on a
wire rack to cool.
*A food quality polyethylene bag
filled with 3 quarts of water and 4½
tablespoons of salt also makes a desirable
covering. See step 4 on page 28.
Quick Dill Pickles
Yield: 7 to 9 pints.
8 pounds fresh cucumbers, 3 to 5
inches in length
1¼ cups canning salt (divided)
2 gallons water
6 cups vinegar (1½ quarts)
¼ cup sugar
8 cups water (2 quarts)
3 tablespoons whole mustard seed (1 teaspoon per pint)
2 tablespoons mixed pickling spices
1½ teaspoons dill seed per pint*
* 1½ head of dill per pint may be
substituted for dill seed.
29
30
Canning Foods
Wash and drain cucumbers. Cut off
1/16 inch of blossom end and discard.
Make a brine of ¾ cup salt and the
2 gallons of water and pour over
cucumbers. Let stand 12 hours. Drain.
Combine vinegar and remaining ½
cup of salt, ½ cup sugar, 2 quarts water
and pickling spices (tied in thin white
cloth).
Heat mixture to boiling. Pack
cucumbers into clean hot jars; add
mustard and dill seed to each jar. Cover
with boiling vinegar solution to within
½ inch of top of jar. Adjust jar lids.
Process in boiling waterbath – pints 10
minutes; quarts 15 minutes.
Dilled Green Beans
4 pounds green beans, whole (about
4 quarts)
Hot red pepper, crushed (¼ teaspoon
per pint jar)
Whole mustard seed (½ teaspoon per
pint jar)
Dill seed (½ teaspoon per pint jar)
Garlic (1 clove per pint jar)
5 cups vinegar
5 cups water
½ cup salt
Wash beans thoroughly; drain and
cut into lengths to fill pint jars. Pack
beans into clean, hot jars; add pepper,
mustard seed, dill seed and garlic.
Combine vinegar, water and salt;
heat to boiling. Pour boiling liquid over
beans, filling to ½ inch from top of jar.
Adjust lids.
Process in boiling water for 5
minutes (start to count processing
time as soon as water in canner returns
to boiling). Remove jars and set jars
upright, several inches apart, on a wire
rack to cool.
Cauliflower Pickles
Yield: 5 pints
3 quarts cauliflower florets (about 3
medium heads)
2 cups sliced onion
1 cup sweet red pepper strips
¼ cup salt
2 quarts ice cubes (2 trays)
1 quart white vinegar
2 cups sugar
1 tablespoon mustard seed
1 tablespoon celery seed
1 teaspoon turmeric
1 hot red pepper pod
Wash cauliflower; divide into
florets. Combine cauliflower, sliced
onion and red pepper strips; add salt.
Cover with ice and let stand 3 to 4
hours. Drain well.
Combine remaining ingredients.
Bring to a boil. Add vegetables; boil 10
minutes or until vegetables are tendercrisp.
Remove hot red pepper from
vegetable mixture. Pour hot vegetables
into hot pint jars. Cover with boiling
vinegar mixture to ½ inch from jar top.
Cut hot red pepper into five pieces and
add one piece to each jar. Adjust lids.
Process in boiling water for 10
minutes. Remove jars. Set jars upright
on a wire rack or folded towel to cool,
placing them several inches apart.
Bread and Butter Pickles
Yield: 8 pints.
4 quarts cucumber, medium size
(about 6 pounds), sliced
8 cups onions, thinly sliced (about
3 pounds)
2 large garlic cloves
½ cup canning or pickling salt
1-2 quarts (2 trays), ice, crushed or
cubes
4½ cups sugar
1½ teaspoons turmeric
1½ teaspoons celery seed
2 tablespoons mustard seed
4 cups vinegar (5 percent)
Wash cucumbers thoroughly, using
a vegetable brush; drain on rack. Slice
unpeeled cucumbers into 3/16 inch
slices. Add onions and garlic. Add
salt and mix thoroughly. Cover with
crushed ice or ice cubes; refrigerate for
3 hours, adding more ice as needed.
Drain and remove garlic.
Combine sugar, spices and vinegar;
heat to boiling and boil 10 minutes.
Add cucumbers and onion slices
and heat to boiling. Fill hot jars with
slices and cooking syrup. Adjust lids.
Process in boiling waterbath canner
(212 degrees F) for 10 minutes. Start
to count processing time as soon as the
water in canner returns to boiling.
Pickled Beets
Yield: 6 pints
3 quarts beets, sliced (about 7 pounds
without tops)
1 tablespoon allspice, whole
2 cinnamon sticks
2 cups sugar
1½ teaspoons salt
3½ cups vinegar
1½ cups water
Wash beets. Leave 2-inch stem and
taproots. Cover with boiling water and
cook whole until tender.
Drain; peel and slice.
Loosely tie allspice and cinnamon
sticks in a clean, thin, white cloth.
Combine sugar, salt, vinegar and
water, add spice bag. Bring to a boil.
Add beets, bring to a boil and boil 5
minutes.
*Processing times given
in these recipes are for
altitudes of 1,000 feet
or less. If you live at a
higher altitude, add
times given in Altitude
Table on page 8.
Canning Foods
Remove spice bag. Pack beets into
hot pint jars. Cover with hot cooking
liquid, filling to ½ inch from top.
Adjust jar lids. Process pints or quarts
in boiling waterbath for 30 minutes.
Set jars upright on a wire rack or folded
towel to cool, placing them several
inches apart.
Pearl Onion Pickles
Yield: 7 pints.
4 quarts small onions
1 cup salt
2 cups sugar
2 tablespoons prepared horseradish*
3-4 tablespoons mustard seeds
2 quarts vinegar (white vinegar will
help to retain white color)
7 small hot, red peppers
7 small bay leaves
* 3½ tablespoons of mixed pickling spices
may be substituted for the horseradish
and mustard seed.
Select fresh tender onions, cover
with boiling water and let stand for 2
minutes. Drain; dip at once into cold
water and peel. Sprinkle onions with
salt and add cold water to cover (about
2 quarts water to 1 cup salt). Let stand
at least 12 hours or overnight. Drain off
salt water; rinse and drain thoroughly.
Combine sugar, horseradish, mustard
seed and vinegar. Simmer 15 minutes.
Pack onions into jars, leaving
¼-inch headspace. To each jar, add 1
bay leaf and 1 pepper. Pour boiling hot
vinegar mixture over onions; adjust
lids according to manufacturer’s directions. Process pints for 10 minutes in
boiling waterbath.
Pickled Okra
3 pounds small tender okra
½ cup plain salt
4 cups vinegar (5 percent)
1 tablespoon mustard seed
1 cup water
6 pods hot pepper
6 garlic buds
Wash okra, pack in hot clean pint
jars. Add 1 pepper and 1 garlic bud to
each jar. Heat salt, vinegar, mustard
seed and water to boiling. Cover okra
with hot mixture. Adjust lids. Process
in boiling waterbath (212 degrees
F) for 10 minutes. Remove jars from
canner.
Pickled Peaches
Yield: 5 quarts.
5 quarts peeled peaches
6½ cups sugar
1 quart cider vinegar
1¼ teaspoon mixed pickling spices
10 cloves
5 small pieces stick cinnamon
Use firm, ripe peaches such as
Hiland, Cardinal, Dixie Red and
Cornet. Make a syrup of 6½ cups of
sugar and 1 quart of cider vinegar. Heat
and add peeled peaches. Let fruit and
syrup simmer for 10 minutes. To each
jar add: ¼ teaspoon of mixed pickling
spices, 2 cloves and 1 small piece of
stick cinnamon. Add hot fruit to jar,
cover with hot syrup, adjust the lid.
Process in boiling waterbath for 25
minutes. Let peaches “season” at least
one week; for best flavor, wait 6 weeks.
Pickled Pears
4 quarts pears
2 quarts sugar
1 pint water
1 quart cider vinegar
2½ sticks cinnamon
2 tablespoons whole allspice
Wash pears, peel, cut in half or
quarters and core. Boil pears in a
covered vessel in 1 pint of water for 10
minutes. Tie spices loosely in a thin
cloth bag. Combine water that the
pears were cooked in, sugar, vinegar
and spices and heat to boiling. Pour
over pears and let stand overnight in
a covered vessel. Drain and boil syrup
until thick. Add pears and cook until
tender. Do not stir, but keep pears
under syrup. Pack into hot jars and
cover with syrup. Process in a boiling
waterbath canner (212 degrees F) for
10 minutes. Yield: about 8 pints. If
Kieffer pears are to be used, best results
are obtained if pears are gathered about
2/3 or 3/4 mature. The best stage appears
to be when the green in immature fruit
gradually fades and the fruit becomes
lighter or slightly yellow. Spread out
in a cool (about 60-65 degrees F),
dry place for about 2 weeks. The pear
will have a better flavor and texture.
Proceed as the recipe directs.
Quick Party Pickles
1 quart commercial dill pickles
1 quart commercial sour pickles
Drain pickles and slice (or you may
buy the hamburger dills). Put in 2½
quart jar and add alternate layers of
pickles and the following mixture:
4 cups of sugar
2 tablespoons whole allspice
2 or more cloves of garlic, sliced
These pickles will make their own
syrup. Store in refrigerator.
31
32
Canning Foods
Pickled Peppers
Yield: about 8 pints.
4 quarts pepper, Banana, Hungarian or
other
10 cups vinegar
2 cups water
Cut two small slits in each pepper and cover with a salt brine (1½
cups salt in 1 gallon water). Let stand
overnight in a cool place. Drain; rinse
and drain. Combine 10 cups of vinegar
with the 2 cups water; bring to boiling
temperature and boil gently for 10 to
15 minutes. Pack peppers into hot jars,
leaving ½-inch headspace. Cover with
the hot pickling solution. Adjust lids
and process in boiling waterbath – half
pints 10 minutes; pints 10 minutes.
Variations: Add to Pickled
Peppers recipe one or more of the
following:
•1 to 2 tablespoons prepared
horseradish
•1 head of dill
•1 to 2 cloves of garlic (remove
before packing into jars)
•2 to 3 tablespoons sugar
Green Tomato Pickles
Yield: about 9 pints.
1 gallon (16 cups) sliced tomatoes
2 cups sliced onions
¼ cup canning or pickling salt
4 cups vinegar (5 percent)
3 cups brown sugar
1 tablespoon whole cloves
1 tablespoon allspice
1 tablespoon celery seed
1 tablespoon mustard seed
Slice tomatoes and onions thin.
Sprinkle with ¼ cup salt and let stand
4 to 6 hours. Drain; heat and stir sugar
into vinegar until dissolved. Tie cloves,
allspice, celery and mustard seed in
a cheesecloth or spice bag. Add to
vinegar with tomatoes and onions.
Bring to boil, reduce heat and simmer 30 minutes, stirring as needed to
prevent scorching. Tomatoes should be
tender and transparent when properly
cooked. Remove spice bag. Fill jars
and cover with vinegar solution. Leave
½-inch headspace. Adjust lids and
cover with vinegar solution. Adjust
lids and process in boiling waterbath
canner – pints 10 minutes; quarts 15
minutes.
Corn Relish
Yield: about 9 pints.
10 cups fresh whole kernel corn (16
to 20 medium-size ears) or six
10-ounce packages of frozen whole
kernel corn
2½ cups diced sweet red pepper (4 to
5 medium)
2½ cups diced sweet green pepper (4 to
5 medium)
2½ cups chopped celery
1¼ cups diced onions (8 to 10 small)
1¾ cups sugar
5 cups vinegar
2½ tablespoons canning or pickling salt
2 teaspoons dry mustard
1 teaspoon turmeric
Fresh corn: Remove husks and
silks. Cook ears of corn in boiling water
for 5 minutes; remove and plunge into
cold water. Drain; cut corn from cob.
Do not scrape cob.
Frozen corn: Defrost overnight
in refrigerator.
Combine peppers, celery, onions,
sugar, vinegar, salt and celery seed.
Cover pan until mixture starts to boil,
then boil uncovered for 5 minutes,
stirring occasionally. Mix dry mustard
and turmeric and blend with liquid
from boiling mixture; add, with corn,
to boiling mixture. Return to
boiling and cook for 5 minutes, stirring occasionally.
Fill jars loosely with
mixture while boiling hot into
clean, hot half pint or pint
jars, filling to ½ inch from
top. Adjust lids. Process in
hot waterbath for 15 minutes
(start to count processing
time as soon as water in canner
returns to boiling). Remove jars
and set jars upright, several inches
apart, on a wire rack to cool.
Piccalilli or Chow Chow
Yield: 3 pints.
1 quart chopped green tomatoes
1 cup chopped red sweet pepper
1 cup chopped green pepper
1 ½ cup chopped onion
5 cups (about 2 pounds) chopped
cabbage
1/3 cup salt
3 cups vinegar
2 cups brown sugar, packed
2 tablespoons whole mixed pickling
spice
Combine vegetables, mix with salt
and let stand overnight. Drain and
press in a clean, thin, white cloth to
remove all liquid possible.
Combine vinegar and sugar. Place
spices loosely in a clean cloth; tie with
a string. Add to vinegar mixture. Bring
to boil.
Add vegetables, bring to boil, and
boil gently about 30 minutes, or until
mixture is reduced one-half in volume.
Remove spice bag. Pack hot relish
into clean, hot pint jars.
Fill jars to ½ inch from top.
Adjust lids.
Process in boiling waterbath for 5
minutes.* Remove jars. Set jars upright
on wire rack or folded towel to cool,
placing them several inches apart.
Canning Foods
Tomato Apple Chutney
3 quarts tomatoes, pared and chopped
3 quarts apples, pared and chopped
2 cups raisins, seedless, white
2 cups chopped onions
1 cup chopped green pepper (2 medium)
2 pounds brown sugar
1 quart white vinegar
4 teaspoons salt
1 teaspoon ground ginger
¼ cup whole pickling spices
Combine all ingredients except the
whole spices. Tie spices loosely in a
clean cloth and add to tomato apple
mixture. Bring to a boil; cook slowly,
stirring frequently until mixture is
thickened (about 1 hour). Remove
spice bag. Pack the boiling hot mixture
into hot pint jars to within ½ inch from
top of jars. Adjust lids and process in
boiling waterbath for 5 minutes.* Start
counting processing time when water
in canner returns to boiling.
Sauerkraut
Yield: about 9 quarts.
25 pounds of cabbage
¾ cup salt, pure granulated (canning salt)
When making kraut in smaller
quantities, allow 2 pounds of shredded
cabbage and 4 level teaspoons of salt
for each quart.
Remove the outer leaves and any
undesirable portions from the firm, mature heads of cabbage; wash and drain.
Cut into halves or quarters; remove the
core. Use a shredder or sharp knife to
cut the cabbage into thin shreds, about
the thickness of a quarter.
In a large container, thoroughly
mix 3 tablespoons salt with 5 pounds
shredded cabbage. Let the salted cabbage stand for several minutes to wilt
slightly. This allows packing without
excessive breaking or bruising of the
shreds.
Pack the salted cabbage firmly and
evenly into a large clean crock or jar.
Using a wooden spoon or tamper, press
down firmly until the juice comes to the
surface. Repeat the shredding, salting
and packing of cabbage until the crock
is filled within 3 to 4 inches of the top.
Juice should cover cabbage. Add boiled
and cooled brine if needed (2 tablespoons salt to one quart of water).
Cover cabbage with a clean, thin,
white cloth (such as muslin) and tuck
the edges down against the side of the
container. Cover with a plate or round
paraffined board that just fits inside
the container so the cabbage is not
exposed to the air. Put a weight on top
of the cover so the brine comes to the
cover but not over it. A glass jar filled
with water makes a good weight.
A newer method of covering cabbage during fermentation consists of
placing a plastic bag filled with brine
(4½ tablespoons of salt to 3 quarts
of water) on top of the fermenting
cabbage. The brine-filled bag seals
the surface from exposure to air, and
prevents the growth of film yeast or
molds. It also serves as a weight. For
extra protection, the bag with the
water in it can be placed inside another
plastic bag.
Any bag used should be of
heavy-weight, water-tight plastic and
intended for use with foods.
The amount of water in the plastic
bag can be adjusted to give just enough
pressure to keep the fermenting cabbage covered with brine.
*Processing times given
in these recipes are for
altitudes of 1,000 feet
or less. If you live at a
higher altitude, add
times given in Altitude
Table on page 8.
Formation of gas bubbles indicates
fermentation is taking place. If jars
are used as weights, check kraut 2 or
3 times each week to remove scum if
it forms. A room temperature of 68
to 72 degrees F is best for fermenting cabbage. Fermentation is usually
completed in 4 to 6 weeks.
Hot Pack: Heat kraut and liquid
slowly to a boil in a large kettle. Pack
hot sauerkraut into clean, hot jars and
cover with hot juice to ½ inch from top
of jar. Adjust jar lids. Process in boiling
waterbath – 10 minutes for pints and
15 minutes for quarts.
Remove jars. Cool upright.
Two-piece lids do not need further
tightening.
Watermelon Pickles
Yield: 4 to 5 pints.
3 quarts watermelon rind
3/4 cup salt
3 quarts water
2 trays ice cubes
9 cups sugar
3 cups vinegar, white
3 cups water
1 tablespoon whole cloves
6 1-inch pieces stick cinnamon
1 lemon, thinly sliced, with seed removed
Pare rind and all pink edges; cut
into 1-inch pieces. Cover with brine
made by mixing the salt with 3 quarts
of water. Add ice cubes. Let stand 5 or 6
hours.
Drain; rinse in cold water. Cover
with cold water and cook until
fork-tender, about 10 minutes (do not
overcook). Drain.
Combine sugar, vinegar, 3 cups
water and spices (tied in thin white
cloth); boil 5 minutes and pour over
rind with spices; add lemon slices. Let
stand overnight.
Heat rind in syrup to boiling and
cook until translucent (about 10
minutes). Pack hot pickles loosely into
clean, hot pint jars. Add 1 stick cinnamon from spice bag to each jar; cover
33
34
Canning Foods
with boiling syrup to ½ inch from top
of jar. Adjust lids. Process in boiling
waterbath 5 minutes.*
Chili Sauce
Yield: 5 pints.
2 gallons large ripe tomatoes
6 green peppers
1½ pints vinegar
2 tablespoons cinnamon
1 tablespoon mustard
6 large onions
1 cup brown sugar
2½ tablespoons salt
1 tablespoon ginger
2-3 teaspoons nutmeg
Peel, core and slice tomatoes. Chop
the onions and peppers. Put into a large
kettle. Add other ingredients. Cook on
top of the range, stirring frequently,
until sauce reaches the consistency of
ketchup (about 4 hours). Fill pint jars
with hot sauce. Leave ½-inch headspace. Process in a boiling waterbath
canner for 15 minutes.
Tomato Catsup
Yield: 3 pints.
1 gallon chopped ripe tomatoes,
(peeled)
2 medium onions, chopped
1 cup chopped red peppers
2 tablespoons salt
4 tablespoons sugar
1 tablespoon mustard, powdered
1 teaspoon whole allspice
1 teaspoon whole cloves
3 2-inch sticks cinnamon
2 cups vinegar
Cooked chopped vegetables until
tender; about 30 minutes. Press through
a fine sieve. Add spice, tied in a bag, to
the pulp and heat slowly.
Cook 1½ hours, or until slightly
thick. Remove spice bag. Add vinegar
and cook until desired thickness. Pour
into hot pint jars. Leave ½-inch headspace. Process in a boiling waterbath
canner (212 degrees F) for 15 minutes.
Onion Pepper Relish
6-8 large onions, finely chopped
(1 quart)
4-5 medium sweet red peppers, finely
chopped (1 pint)
4-5 medium green peppers, finely
chopped (1 pint)
1 cup sugar
1 quart vinegar
4 teaspoon salt
Combine all ingredients and bring
to a boil. Cook until thickened and reduced about one-half in volume (about
45 minutes), stirring occasionally.
Pack the boiling hot relish into
clean, hot pint jars to ½ inch from top
of jar, adjust lids. Process in boiling
waterbath for 10 minutes (start to
count processing time when water in
canner returns to boiling).*
Remove jars and set upright, several
inches apart, on a wire rack to cool.
Bread and Butter Pickled
Squash
Yield: about 7 pints.
1 gallon (4¼ pounds) sliced squash
(yellow) or zucchini
2 green bell peppers, diced
5 medium onions, diced
½ cup salt
5 cups vinegar
4½ cups sugar
1 teaspoon ground mustard
1½ teaspoons turmeric
1 teaspoon celery seed
20 whole cloves
*Processing times given
in these recipes are for
altitudes of 1,000 feet
or less. If you live at a
higher altitude, add
times given in Altitude
Table on page 8.
Cut squash into ¼-inch slices and
combine with peppers and onions.
Cover with ½ cup salt; let stand 3
hours. Drain.
Mix vinegar with sugar and spices;
heat mixture to boiling temperature.
Fill pint jars with squash and cover
with boiling vinegar solution. Leave
½-inch headspace.
Adjust lids; place in boiling
waterbath and hold 10 minutes.* Begin
counting time as soon as all jars are in
boiling waterbath.
Hot Squash Relish
Yield: about 7 pints.
4 pounds (7 quarts) diced squash
2 cups diced green bell peppers
1 large bunch celery (1 quart) diced
1 cup diced onion
1½ cups sugar
4 cups vinegar
2 tablespoons salt
2 teaspoons celery seed
3 hot peppers, medium size*
2 tablespoons powdered mustard
1 teaspoon turmeric
*One-fourth to one-half teaspoon crushed
red peppers to each pint of vegetables may
be substituted for hot peppers. Start with
one-fourth teaspoon and add as desired.
Prepare vegetables, discarding
leaves from celery.
Combine peppers, celery and onion
with vinegar, sugar, salt, celery seed and
3 pods of hot pepper.** Heat mixture
to boiling and boil 5 minutes. Stir in
squash, mustard and turmeric. Return
Canning Foods
to boiling and boil 5 minutes.
Spoon into clean pint jars; adjust
lids. Place jars in boiling water to cover,
boil 15 minutes. Begin counting time as
soon as all jars are in boiling waterbath.
**Add 2 pods of hot pepper, heat mixture,
taste for hotness and add the third pod of
pepper if desired.
Sweet Squash Relish
Follow recipe for making hot relish,
but decrease amount of hot pepper.
Use about ½ to 1 pod of hot pepper, or
just enough to give desired flavor.
Fresh Pack Pickle Squash
Yield: about 6 pints.
5 pounds (11/8 gallon) squash
1/3 cup salt
1 cup water
4 cups vinegar
Cut squash into ¼-inch slices;
combine with salt. Let stand for 1
hour; drain. Pack drained squash into
jars. Mix vinegar with water; heat to
boiling temperature. Cover squash
with the boiling vinegar solution.
Adjust lids; process pint jars in
boiling waterbath for 5 minutes.
Start to count processing time as
soon as the water in canner returns to
boiling temperature.
Variation: To vinegar and water
solution, add 2 cups sugar and heat
to boiling temperature. Proceed as
given above.
No-Sugar-Added
Pickled Products
No-Sugar-Added Sweet
Cucumber Slices
Yield: about 4 or 5 pint jars.
31/2 pounds of pickling cucumbers
boiling water to cover sliced
cucumbers
4 cups cider vinegar (5 percent)
3 cups Splenda®
1 tablespoon canning salt
1 cup water
1 tablespoon mustard seed
1 tablespoon allspice
1 tablespoon celery seed
4 one-inch cinnamon sticks
Wash and rinse pint canning jars;
keep hot until ready to use. Prepare lids
according to manufacturer's directions.
Wash cucumbers. Slice 1/16 inch off
the blossom ends and discard. Slice
cucumbers into 1/4 inch thick slices. Pour
boiling water over the cucumber slices
and let stand 5 to 10 minutes. Drain
off the hot water and pour cold water
over the cucumbers. Let cold water
run continuously over the cucumber
slices, or change water frequently until
cucumbers are cooled. Drain slices well.
Mix vinegar, 1 cup water, Splenda®
and all spices in a 10-quart Dutch
oven or stockpot. Bring to a boil. Add
drained cucumber slices carefully to
the boiling liquid. Return to a boil.
Place one cinnamon stick in each
jar, if desired. With a slotted spoon, fill
hot pickle slices into clean, hot pint
jars, leaving 1/2 inch at top to allow for
headspace. Cover with boiling hot
pickling brine with 1/2 inch headspace.
Remove air bubbles and adjust headspace if needed. Wipe rims of jars with
a dampened clean paper towel; apply
two-piece metal canning lids. Process in
a boiling water canner for 10 minutes.
35
Canning Foods
Scorecard for Judging Pickles, Catsup, Chow-Chow and Relish
Catsup
Color
Natural except
for spices – no
artificial color
Deep tomato
red
Natural except
for spice – no
artificial color
Flavor
Pleasing – in
keeping with
ingredients
used
Pleasing – in
keeping with
ingredients used
Pleasing – in
keeping with
ingredients used
Texture
Chow-Chow
and Relish
Pickles
Crisp and
tender
Smooth and
thick
Vegetables cut
fine and fairly
uniform
Standard
Mason™ jar –
clean and neatly
labeled
Standard
Mason™ jar –
clean and neatly
labeled
Standard
Mason™ jar –
clean and neatly
labeled
Container
36
Excellent
Good
Fair
Needs
Improving
Canning Foods
Pickle Troubles and What Causes Them
Problem
Cause
Soft slippery pickles
•failure to remove 1/16 inch of blossom
•cucumbers exposed above the brine
•vinegar or brine too weak
•precooked at too high temperature (overcooked)
Shriveled pickles
•salt solution too strong
•too much sugar
•vinegar solution too strong
Hollow pickles
•faulty development of the cucumber
•excessive delay in placing cucumbers in brine
Effect of scum
•spoilage from top layer of cucumbers or cabbage will occur unless the scum (yeasts, molds and
bacteria) is frequently removed
•scum may also weaken the acidity of the brine and cause spoilage
Black spots
•iodine in the salt
•iron in the water
Darkened pickles
•use of hard water
•using ground spices
•leaving spices in the jar
•storing pickles in a light place – especially peaches
37
38
Canning Foods
JAMS, JELLIES AND
PRESERVES
Jams, jellies and preserves are
similar in that they all contain sugar
and fruit or fruit juice.
Jam is made from crushed fruit and
is less firm than jelly.
Jelly is a clear, tender gel made
from fruit juice, yet firm enough to
hold its shape when cut.
Preserves are small whole fruit or
large pieces of fruit in a thick syrup.
Ingredients
To make a jellied fruit product, four
basic ingredients are needed:
Fruit furnishes flavor, color and part
or all of the acid and pectin necessary
for successful gels. Apples, crab apples,
blackberries, grapes and plums, when
slightly underripe, contain enough
pectin, acid and flavor for successful
jelly making. These fruits may be combined with fruits that contain smaller
amounts of pectin and acid.
Pectin occurs naturally in fruit; some
fruits have enough to make high-quality
products. Other fruits require added
pectin for making jellies. Commercial
fruit pectins made from apples or citrus
fruits are available in liquid or powder
form and may be used with any fruit.
The use of commercial pectin* shortens
the cooking time, permits use of fully
ripe fruit and insures a greater yield
from a given amount of fruit.
Acid is higher in underripe than
in fully ripe fruits and is necessary for
flavor and for gel formation. Lemon
juice is frequently added to fruits that
are low in acid.
Sugar helps in forming a gel, aids in
firming fruit, acts as a preservative and
gives flavor. Use either bean or cane sugar
unless the recipe specifies other kinds.
Equipment
Select a large kettle, allow enough
space for fruit or juice to bubble when
boiling. Use standard measuring cups
and spoons.
When making jelly, a cheesecloth or
jelly bag will be needed to strain juice.
Other equipment should include a
long-handled spoon, ladle, paring knife,
jelly or candy thermometer and bowls.
Containers
Use standard canning jars as containers for jams, jellies and preserves.
Seal only with lids.
Wash glasses, jars and lids in
warm soapy water and rinse. Sterilize
jelly containers in boiling water for
10 minutes. To seal with lids, follow
manufacturer’s instructions for preparing the flat metal lid that is held in place
by a screw band.
Processing Jams, Jellies
and Preserves in a
Waterbath
*To make jams, jellies or preserves using commercial pectin, follow the recipes
that are included with the pectin.
To prevent mold growth and to
make a firm seal, process all jams, jellies
and preserves in a boiling waterbath.
Follow directions for use of canner on
pages 7 and 8.
Remaking Soft Jelly
Paraffin
To remake soft jellies without
added pectin, add 2 tablespoons
bottled lemon juice for each quart of
jelly. Heat to boiling and boil for 3 to
4 minutes.
Recipes
Recipes in this publication
contain proportions of ingredients
suitable for making jams, jellies and
preserves without the addition of
commercial pectin.
Sealing with paraffin is no longer
recommended.
Selecting Fruit
for Jelly Making
Select about one-fourth underripe
fruit and three-fourths ripe fruit. When
all fruit is fully ripe, for best results,
use a commercial pectin and follow
manufacturer’s directions.
Canning Foods
Extracting Juice
Wash fruits in cold water, lifting
them out of water after each washing.
Do not leave fruit standing in water.
Discard damaged parts; remove stems
and blossom ends. Cut large fruits into
pieces. Crush berries and grapes.
Pour hot fruit into a damp jelly
bag or one made from unbleached
muslin, or two layers of closely woven
cheesecloth. For clear jelly, allow juice
to drip through without pressing, but
for a greater yield, press or twist bag
to extract juice. Straining the juice
extracted by pressing or twisting will
help to clarify it. Strain through muslin
or cheesecloth.
Fruits Ranked as to Acid
and/or Pectin Content
High Acid – High Pectin
Fruits: Fruits containing sufficient
acid and pectin for making jellied
products include:
•Apples, tart varieties
•Gooseberries
•Blackberries, tart or underripe
•Grapefruit
•Crab apples
•Lemons
•Cranberries
•Plums, sour varieties
•Currants
•Grapes, sour varieties
High Pectin – Low Acid
Fruits: Fruits containing sufficient
pectin but low in acid:
•Apples, sweet varieties
•Quinces
High Acid – Low Pectin
Fruits: Fruit containing sufficient
acid but low in pectin:
•Apricots
•Strawberries
•Peaches, sour
•Rhubarb
Jellies
General Directions for
Making Jelly
1. Measure juice and sugar into a
large container, large enough to
prevent jelly from boiling over.
Better results will be obtained if
jelly is made in small quantities –
about 3 to 4 cups of juice.
2. Place on hot unit and quickly
bring to a rolling boil.
3. Test doneness. If a thermometer is used, bulb of the candy
thermometer should be covered
with the jelly mixture but must
not touch bottom of the kettle.
Gel stage is reached at about 8
degrees F (4 degrees C) above
the boiling point of water. In
most areas of Tennessee, this
would be 220 degrees F (104
degrees C).*
If a spoon or sheet test is used, dip
spoon into the boiling jelly mixture.
Raise spoon 10 to 12 inches above the
kettle and turn spoon until syrup runs
off the side. If two drops form and drip
off the spoon, syrup is near gel state.
When the two drops flow together and
fall off spoon as one sheet, the jelly
should be done.
Another suitable home method
is to pour a small amount of boiling
jelly syrup on a cold dish and put into
the refrigerator for a few minutes. If
mixture gels, jelly should be done.
At higher elevations, gel stage may
be reached at a lower temperature
than 220 degrees F (212 degrees F + 8
degrees F), since moisture evaporates
at boiling temperature even if boiling temperatures are lower than 212
degrees F. For example, at an altitude
of 2000 feet, gel stage may be reached
at 216 degrees F, and at 3000 feet, 214
degrees F.
*The boiling point of water in most areas of Tennessee is 212 degrees F (100 degrees C).
Apple Jelly
(without added pectin)
Yield: 3 to 4 half pints.
4 cups apple juice (about 3 pounds
apples and 3 cups of water)
2 tablespoons strained lemon juice, if
desired
3 cups sugar
To prepare juice: Select about onefourth underripe and three-fourths
fully ripe tart apples. Sort, wash and
remove stem and blossom ends. Do
not pare or core. Cut apples into small
pieces. Add water, cover and bring to
boil on high heat. Reduce heat and
simmer for 20 to 25 minutes, or until
apples are soft. Extract juice.
To make jelly: Measure apple juice
into a kettle. Add lemon juice and
sugar; stir well. Boil over high heat to
8 degrees F (4 degrees C) above
boiling point* of water or until jelly
mixture sheets from a spoon.
Remove from heat; skim off foam
quickly. Pour jelly immediately into
hot containers. Adjust lids. Process in
boiling waterbath for 5 minutes.
Blackberry Jelly
(without added pectin)
Yield: 3 to 4 pints.
4 cups blackberry juice
(about 2½ quarts blackberries, ¾
cup water)
3 cups sugar
To prepare juice: select about onefourth underripe and three-fourths
ripe berries. Sort and wash; remove
any stems or caps. Crush berries, add
water, cover and bring to a boil on high
heat. Reduce heat and simmer for 5
minutes. Extract juice.
To make jelly: Measure juice
into a kettle. Add sugar and stir well.
Boil over high heat to 8 degrees F (4
degrees C) above boiling point* of
water or until jelly mixture sheets from
a spoon.
39
40
Canning Foods
Remove from heat; skim off foam
quickly. Pour jelly immediately into
containers. Adjust lids and process in
boiling waterbath for 5 minutes.
Dewberry Jelly
Follow directions for making
blackberry jelly.
Crab Apple Jelly
Yield: 5 half pints.
4 cups crab apple juice (about 3
pounds crab apples, 3 cups water)
4 cups sugar
To prepare juice: Select firm, crisp
crab apples, about one-fourth underripe, the rest fully ripe. Sort, wash and
remove stem and blossom ends; do
not pare or core. Cut apples into small
pieces. Add water, cover and bring to
boil on high heat. Reduce heat and
simmer for 20 to 25 minutes, or until
crab apples are soft. Extract juice.
To make jelly: Measure juice into a
kettle. Add sugar and stir well. Boil over
high heat to 8 degrees F (4 degrees C)
above boiling point* of water or until
jelly mixture sheets from a spoon.
Remove from heat; skim off foam
quickly. Pour jelly immediately into hot
containers. Adjust lids and process in
boiling waterbath for 5 minutes.
Grape Jelly
Yield: 3 to 4 half pints.
4 cups grape juice (about 3½ pounds
Concord grapes, ½ cup water)
3 cups sugar
To prepare juice: Select about
one-fourth underripe and three-fourths
fully ripe grapes. Sort, wash and remove grapes from stems. Crush grapes,
add water, cover and bring to boil on
high heat. Reduce heat and simmer for
10 minutes. Extract juice.
To prevent formation of tartrate
crystals in the jelly, let juice stand in
a cool place overnight, then strain
through two thicknesses of damp
cheesecloth to remove crystals that
have formed.
To make jelly: Measure juice into a
kettle. Add sugar and stir well. Boil over
high heat to 8 degrees F (4 degrees C)
above boiling point* of water or until
jelly mixture sheets from a spoon.
Remove from heat; skim off foam
quickly. Pour jelly immediately into hot
containers. Adjust lids and process in
boiling waterbath for 5 minutes.
Plum Jelly
Yield: 3 to 4 pints.
4 cups plum juice (about 3½ pounds
plums and 1½ cups water)
3 cups sugar
To prepare juice: Select about
one-fourth underripe and three-fourths
fully ripe plums. Sort, wash and cut
into pieces; do not peel or pit. Crush
the fruit, add water, cover and bring to
a boil on high heat. Reduce heat and
simmer for 15 to 20 minutes, or until
fruit is soft. Extract juice.
To make jelly: Measure juice into a
kettle. Add sugar and stir well. Boil over
high heat to 8 degrees F (4 degrees C)
above boiling point of water or until
mixture sheets from a spoon. Remove
from heat, skim off foam quickly. Pour
jelly immediately into hot containers.
Adjust lids and process in boiling
waterbath for 5 minutes.
*The boiling point
of water in most
areas of Tennessee
is 212 degrees F
(100 degrees C).
Jams
To distribute fruit through syrup
in the finished product, stir mixture
gently at frequent intervals, often
removing it from the heat. This helps
prevent fruit from rising to the top.
In testing jams for doneness, cook
mixture to a temperature of 9 degrees F
(4 degrees C) above the boiling point*
of water. Or, use the refrigerator test
suggested for jelly on page 38. When
jam has partially thickened, allow for
additional thickening as it cools.
Blackberry Jam
4 cups crushed blackberries
4 cups of sugar
To prepare fruit: Sort and wash berries; remove any stems and caps. Crush
berries.
To make jam: Measure crushed
blackberries into a kettle. Add sugar
and stir well. Boil rapidly, stirring constantly or until mixture thickens.
Remove from heat; skim and stir
alternately for 5 minutes. Pour into
hot jars; adjust lids. Process in boiling
waterbath 5 minutes. Yield: 4 to 5 halfpint jars.
Peach Jam
Yield: 4 to 5 half-pint jars.
4 cups crushed peaches (tart variety)
3¼ cups sugar
Combine crushed fruit and sugar.
Heat slowly in a heavy saucepan until
boiling. Boil rapidly until thickened,
about 15 minutes. Stir frequently during cooking to prevent sticking. Pour
hot jam into hot jars; adjust lids and
process into boiling waterbath – pints:
10 minutes; quarts:10 minutes.
Canning Foods
Plum Peach Jam
(without added pectin)
Yield: 9 half-pint jars.
5 cups red plums (about 3 pounds)
4 cups peaches (about 3 pounds)
8 cups sugar
1 lemon (sliced very thin)
To prepare fruit: sort and wash
fruit. Peel and pit peaches; pit plums.
Cut fruit into small pieces.
To make jam: Measure the prepared
fruit into a kettle. Add sugar and sliced
lemon; stir well. Boil rapidly, stirring
constantly, until mixture thickens.
Remove from heat; skim and stir
alternately for 5 minutes. Fill hot jars.
Adjust lids and process in boiling
waterbath for 5 minutes.
Strawberry Jam
Yield: 4 to 5 half-pint jars.
4 cups crushed strawberries (about
2 quarts)
4 cups sugar
To prepare fruit: Sort and wash
strawberries; remove stems and caps.
Crush the berries.
To make jam: Measure crushed
strawberries into a kettle. Add sugar
and stir well. Boil rapidly, stirring
constantly, or until mixture thickens.
Remove from heat; skim and stir
alternately for 5 minutes. Pour into hot
jars. Adjust lids and process in boiling
waterbath 5 minutes.
*If you live at an
altitude above 1,000
feet, processing times
for these recipes are
given in the Altitude
Table on page 8.
Preserves
Select firm ripe fruit of uniform
size and shape. Or, cut large fruit into
uniform pieces. During cooking, stir
fruit mixture gently and constantly to
prevent sticking to pan.
In testing preserves for doneness, use the
same methods given for jams, page 40.
Cherry Preserves
Yield: 6 half-pint jars.
1½ quarts pitted cherries
5½ cups sugar
1 cup water
To prepare fruit: Wash, sort and pit
cherries.
To make preserves: Dissolve the
sugar in water; bring to boil. Add cherries and boil, stirring gently until fruit
is translucent and syrup is thick.
Remove from heat. Fill hot jars;
adjust lids and process in boiling
waterbath for 5 minutes.
Peach or Pear Preserves
Prepare fruit, cutting into uniform
pieces. Use 1 pound of prepared fruit
to ¾ pound sugar. Combine sugar with
enough water to make a thin syrup.
Add 1 lemon, thinly sliced, to fruit
mixture if desired. Follow directions
for making strawberry preserves.
Damson Plum Preserves
Yield: 6 half-pint jars.
1½ quarts prepared Damson plums
(about 3 pounds)
5½ cups sugar
1 cup water
To prepare fruit: Sort and wash
plums; remove pits with pitting spoon,
leaving plums whole.
To make preserves: Dissolve the
sugar in the water and bring to boiling.
Add plums and boil, stirring gently
until the fruit is translucent and the
syrup is thick.
Remove preserves from the heat
and pour at once into hot jars. Adjust
lids and process in boiling waterbath
for 5 minutes.
Strawberry Preserves
Yield: 4 half-pint jars.
6 cups prepared strawberries (about 2
quarts berries)
4½ cups sugar
To prepare fruit: Select large, firm,
tart strawberries. Wash and drain;
remove caps.
To make preserves: Combine
prepared fruit and sugar in alternate
layers and let stand for 8 to 10 hours,
or overnight, in the refrigerator or
other cool place.
Heat the fruit mixture to boiling,
stirring gently. Boil rapidly, stirring as
needed to prevent sticking. Cook until
the syrup is somewhat thick (about 15
or 20 minutes).
Removes preserves from heat and
skim. Pour into hot jars; adjust lids and
process in boiling waterbath for
5 minutes.
41
42
Canning Foods
Processing Times for Jams, Jellies and Preserves
Boiling Water Bath
Processing Time Depends on Altitude
Processing times recommended in this publication are correct for much of the
state except in high elevations. For these high areas, add processing time given in the
Altitude Table below. Learn the altitude in your area. Consult with your Extension
agent or local district soil conservationist.
At Altitudes:
0-1000 ft.
1001-6000 ft.
Above 6000
Use time given for
specific recipe in this
publication
(see recipes)
Add 5 minutes
to time given for
specific recipes.
Add 10 minutes
to time given for
specific recipes.
Uncooked Jams
Blackberry or Strawberry
Jam – Uncooked
Yield: 5 to 6 half-pint jars.
2 cups crushed strawberries or
blackberries
4 cups sugar
1 package powdered pectin
1 cup water
Sort, wash and drain berries.
Remove caps and crush.
Mix sugar and berries in a large
bowl; let stand for 20 minutes. Stir
occasionally.
Dissolve pectin in water and bring
to a rolling boil. Boil 1 minute. Add hot
solution to berry and sugar mixture;
stir until thoroughly mixed.
Pour jam into freezer containers or
jars to ½ inch from top of container.
Cover and let stand at room temperature for 24 hours. Store in refrigerator or
freezer. If jam separates, stir to blend. If
jam is too soft, heat to boiling temperature. Jam will thicken on cooling.
Uncooked jam may be held in the
refrigerator for 3 weeks and in the
freezer for a year.
Uncooked jam held at room
temperature will become moldy or
ferment.
Fruit Butters
Fruit butters are made by cooking
the pulp of fruit, usually with sugar and
spices, until thick and smooth but soft
enough to spread.
Apple Butter
Wash fruit, remove stems and
blossom ends and cut in quarters. Add
one third to one half as much water*
as fruit. Cook apples until soft. Put
through a colander, food mill or sieve.
Combine pulp with sugar, using 2
cups pulp to 1 cup sugar. Add spices as
desired. Cook mixture slowly, stirring
frequently until thick – about 1 to 1½
hours.
Pour hot butter into hot jars, leaving ½-inch headspace. Adjust caps and
process in boiling waterbath – pints 10
minutes; quarts 10 minutes. If you live
at an altitude above 1,000 feet, check
the Altitude Table above.
Peach Butter
Wash peaches, scald, peel, pit and
slice. Cook in own juice or add just
enough water to prevent sticking.
Follow recipe for making apple
butter, but cook mixture for about 30
minutes or until thick.
Pear Butter
Follow recipe for preparing apple
butter.
*Sweet cider
may be used in
place of water if
desired.
Canning Foods
Scorecard for Judging Jellies, Jams, Preserves & Fruit Butters
Jams
Preserves
Butters
Color
Clear,
translucent,
natural color
of fruit juice
Natural
color of
fruit –
somewhat
darker than
preserves
Translucent
jelly with
whole or
large pieces
of fruit –
natural color
Natural
color of
fruit except
spices
Flavor
Natural for
product
delicate
flavor
Rich flavor
natural for
product
Rich flavor
natural for
product
Natural for
product and
spices
Texture
Tender, cuts
easily, holds
shape – not
tough or
sticky
Tender,
thick
consistency, fruit
uniformly
distributed
Tender,
thick
consistency; fruit
uniformly
distributed
Container
Jellies
Jelly glasses
or canning
jars, clean
and neatly
labeled
Standard
Mason™
jar – clean
and neatly
labeled
Standard
Mason™
jar – clean
and neatly
labeled
Smooth,
medium
thick
Standard
Mason™
jar – clean
and neatly
labeled
Excellent
Good
Fair
Needs
Improving
43
44
Canning Foods
Common Problems with Jam, Jelly and Preserves
Problem
Cause
Jelly soft, does not hold shape
•too much juice in proportion to sugar
•juice low in acid
•insufficient cooking time
Weeping of jelly (syneresis)
•juice mixture contains too much acid
•storage place too warm
Fermentation of jelly (syneresis)
•not enough sugar in proportion to ice
•improper seal (not airtight)
Jelly too firm
•too much pectin
•overcooking
Tough jelly
•not enough sugar in proportion to juice resulting in overcooking
Mold on jam or jelly
•improper seal allows mold to enter container
Crystals in jelly
•too much sugar for amount of juice
•too little cooking after adding sugar
•jelly exposed to air – causing formation of crystals on top due to evaporation of liquid
•crystals on grape jelly may be tartrate crystals (see page 40)
Cloudy jelly
•improper extraction of juice – pressing juice from fruit instead of letting it drip
•using green fruit (underripe) in preparing juice
Excessive shrinking of preserves
•syrup too heavy for fruit used – juice drawn out of fruit much faster than syrup
enters fruit
to change:
Metric Conversion Table
to:
multiply by:
ounces (oz.)
pounds (lbs.)
teaspoons
tablespoons
fluid ounces
cups
pints (pt.)
quarts (qt.)
gallons (gal.)
grams (g)
kilograms (kg)
milliliters (ml)
milliliters (ml)
milliliters (ml)
liters (1)
liters (1)
liters (1)
liters (1)
28
0.45
5
15
30
0.24
0.47
0.95
3.8
Temperature
Fahrenheit
temperature (F)
Celsius
temperature (C)
5/9 after
subtracting 32
Canning Foods
Definition of Preservation Terms
Bacteria
Microorganisms (invisible to naked eye) are always present in the air, soil and water.
Blanching
Heating a food in boiling water or steam a given length of time.
Brining
A curing process using salt. For pickles or kraut, salt is combined with the raw food
and cured (fermented) for about three to five weeks.
Clostridium botulinum
A spore-forming bacterium that is capable of producing a poisonous toxin under
certain conditions if the spore is not destroyed. These bacteria do not grow in
air. High acid content of foods also deters their growth. But these bacteria, if not
destroyed, grow well in closed jars of low-acid foods.
Enzymes
Enzymes are chemical substances found in all animals and plants. Enzymes in foods
help them grow and mature. After maturity, continued activity of enzymes cause loss
of flavor and color if they are not destroyed or inactivated.
Fermentation
See brining.
Microorganisms
Organisms invisible without the use of a microscope.
Molds
A microorganism – fungi that form filaments and if not controlled, cause food
spoilage.
Pickling
1. Fermenting food in a salt brine. An acid (lactic acid) is formed during the fermenting or brining process.
2. Using vinegar, (acetic acid) to make food high in acid.
Pressure canner
A large kettle with a lid designed to hold steam in the kettle. The lid is also equipped
with a gauge for controlling pounds of pressure. All low-acid foods such as meat and
vegetables are processed in a pressure canner.
Processing
The heating of food to destroy spoilage organisms.
Waterbath canner
Any large metal container may be used if it is deep enough for water to cover the
tops of jars as much as 2 to 4 inches and boil freely. A rack is needed to hold jars off
the bottom of the canner to allow water to circulate under them. The canner must
also have a cover or lid. All acid foods such as fruits and pickles are processed in a
waterbath canner.
Yeast
A microorganism – a very small plant that if not controlled may cause food spoilage.
45
46
Canning Foods
Index
ACID FOODS 4, 7
ALTITUDE TABLES 8, 16
ALUM 27
ANSWERS TO CANNING
QUESTIONS
Fruits and Tomatoes 7
Jams, Jellies, Preserves 44
Pickles 37
Vegetables 17
APPLES
Apple Butter 42
Apple Jelly 39
Applesauce 9
Crab Apple Jelly 40
BLACKBERRIES
Canned 7, 9, 13
Jam 40
Jelly 39
Uncooked Jam 42
CHERRIES
Canned 10, 13
Preserves 41
BLANCHING 25, 45
CHOW-CHOW (PICCALILLI) 32
BLUEBERRIES
Canned 7, 9, 13
CHUTNEY
Tomato Apple 33
BOILING
WATERBATH 5, 7, 8, 27, 38, 45
CLOSTRIDIUM BOTULINUM 16,
28, 45
BOTULISM 16, 28, 45
CORN
Cream Style, Canned 19, 23
Relish 32
Whole Kernel, Canned 19, 23
BREAD AND BUTTER
PICKLED CUCUMBERS 30
APRICOTS
Canned 9
BREAD AND BUTTER
PICKLED SQUASH 34
ASPARAGUS
Canned 18
CANNING JARS 5, 27, 36
BACTERIA
Definition 45
Clostridium botulinum 16, 28, 45
BEANS
Dilled Green Beans 30
Limas, Canned 18
Snap, Canned 18
Soy 18
BEETS
Canned 19
Pickled 30
BERRIES
Canned 7, 9, 13
Jam 40-42
Jelly 39, 40
Preserves 41
CANNING
Altitude Changes 8, 16
Fruit and Tomatoes 9-12
General Instructions 5, 7
Methods 7
Vegetables 15
With Artificial Sweeteners 8
With Salt 18-22
Without Salt 25
With Sugar 8
Without Sugar 8
CHILI SAUCE 26, 34
CRAB APPLE JELLY 40
CUCUMBER PICKLES 26-37
DEWBERRIES
Canned 7, 9, 13
Jelly 40
DILL PICKLES 29, 30
ENZYMES 3, 45
EQUIPMENT AND UTENSILS 5,
7, 27, 38
FERMENTATION 28, 33, 45
CANNING TIME CHARTS
Fruits and Tomatoes 13
Vegetables 23
FRUIT JARS 5
CARROTS
Canned 19
FRUITS
Approximate Yields 7
Canned 7-13
Pickled 31
Scorecard 14
CATSUP AND SAUCES 34
FRUIT JUICES 12
Canning Foods
GRAPE
Juice 12
Jelly 40
GREENS
Canned 17,21, 23
GREEN TOMATO PICKLES 32
HONEY (as a sweetener) 8
HOT PACK 7
JAMS 40-42
ONIONS
Pickled 31
PEACHES
Butter 42
Canned 12
Jam 40, 41
Pickled 31
Preserves 41
PEARS
Butter 42
Canned 10
Pickled 31
Preserves 41
PROCESSING TIME CHARTS
Fruit 13
Vegetables 23
PUMPKIN
Canned 21, 23
QUICK DILL PICKLE 29
QUICK PARTY PICKLE 31
RASPBERRIES
Canned 7, 9, 13
JELLIES 38-40
Remaking Soft Jelly 38
PEAS
Blackeye, canned 20
Fresh, green, canned 20
RELISHES
Corn 32
Hot Onion Pepper 34
Scorecard 36
Squash 34
JUICE EXTRACTION 38
PECTIN 38, 39
REPROCESSING 22
KALE (Spinach and Other Greens)
17, 21, 23
PEPPERS
Pickled 32
In Relish 32, 34
RHUBARB 10
PICKLES AND RELISHES 26
Scorecard 36
SAUERKRAUT 33
JAR LIDS 5
KETCHUP (see also CATSUP) 34
LIME 27
LOW-ACID FOODS 4, 5, 16
MELONS
Watermelon Pickles 33
METHODS OF CANNING 7
METRIC CONVERSION TABLE 44
MOLDS 3, 38, 45
MUSTARD GREENS (Spinach and
Other Greens) 17, 21, 23
NO-SUGAR ADDED PICKLED
PRODUCTS
No-Sugar Added Sweet Cucumber
Slices 35
OKRA
Pickled 31
PICKLE TROUBLES AND WHAT
CAUSES THEM 37
PLUMS
Canned 7, 10, 13
Damson Preserves 41
Jelly 40
Jam 41
SALT 25, 26
SEALING JARS 5, 27
SYRUPS FOR CANNING FRUIT 8
SOUPS 21
SPINACH 17, 21, 23
POTATOES
Sweet, Canned 22, 23
White or Irish, Canned 20
SQUASH
Canned 22
Bread and Butter Pickled 34
Fresh Pack Pickled 35
Relish 34
PREPARING FOOD FOR
CANNING 9, 15
STEAM PRESSURE CANNER 3, 15,
16, 45
PRESERVES 41
STORING 17, 22
PROCESSING EQUIPMENT
Boiling Waterbath Canner 5, 7, 8, 27, 38, 45
Pressure Canner 5, 7, 15, 25, 45
STRAWBERRIES
Canned 11
Jam 41
Preserves 41
Uncooked Jam 42
47
48
Canning Foods
SUGAR
Canning Without 8
In Pickle and Relish recipes 27
SWEET PICKLE STICKS 29
TABLES
Altitude Charts 8, 16
Yield from Fresh Fruit 7
Yield from Fresh Vegetables 17
Syrup for Canning 8
SCORECARDS
Fruits 14
Pickles and Relishes 36
Jams, Jellies and Preserves 43
Vegetables 24
TERMS 45
TESTS
For jelly 39
TOMATOES
Canned 8, 11, 22, 23
Catsup 34
Chili Sauce 34
Green Tomato Pickles 32
Juice 12, 13, 22, 23
Sauce 12
TURNIP GREENS (Spinach and
other greens) 17, 21, 23
VEGETABLES
Approximate Yields 17
Canned 15-23
Pickled 26
VINEGAR 26
WATERBATH CANNER 5, 7, 8, 27,
38, 45
WATERMELON
Pickled Rind 33
YEASTS 3, 45
Acknowledgements
The author wishes to express appreciation to the following persons
for their contribution in preparing this publication:
Ivon E. McCarty, Professor Emeritus
Food Science and Technology
Marjorie P. Penfield, Professor
Food Science and Technology
Janie L. Burney, Professor, Family and Consumer Sciences,
is the current contact person for this publication.
Visit the UT Extension Web site at
http://www.utextension.utk.edu/
and the Family and Consumer Sciences Web site at
http://www.utextension.utk.edu/fcs/
PB 724-5M-6/08 E12-5315-00-031-08
Programs in agriculture and natural resources, 4-H youth development, family and consumer sciences, and resource development.
University of Tennessee Institute of Agriculture, U.S. Department of Agriculture and county governments cooperating.
UT Extension provides equal opportunities in programs and employment.


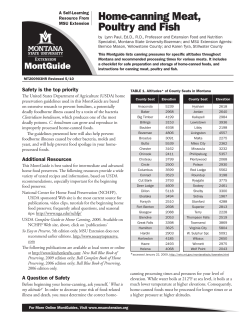


© Copyright 2026