
Canning Green Chile CAUTION SELECTING AND PREPARING CHILES
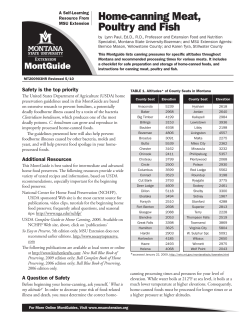
Canning Green Chile
Guide E-308
Reviewed by Nancy Flores, Extension Food Technology Specialist
Cooperative Extension Service • College of Agriculture and Home Economics
This publication is scheduled to be updated and reissued 5/13.
CAUTION
Because chiles are naturally low in acid, canning them
requires special precautions that differ from those
followed when canning high-acid fruits. Growth of
micro-organisms particularly must be avoided. Some
bacteria cause food spoilage, while others produce
toxins that cause illness or death. For example,
Clostridium botulinum is a harmless bacteria in air.
In little or no acid, an air-free canning jar, and
temperatures between 40°F and 120°F, this bacteria
grows and produces a deadly toxin that can cause
serious damage to the central nervous system or
death when eaten in even minute amounts.
Pressure processing is the only safe way to can
chiles and other non-acid foods. Boiling water
produces steam. Steam under pressure raises the
temperature much higher than it normally would
be without pressure. To prevent botulism, the internal
temperature of canned chiles and other non-acid
foods must reach 240°F. This guide provides the
correct processing times and canner pressures for
canning chiles safely in New Mexico.
To prevent the risk of botulism, chiles and other
low-acid and tomato foods not canned according to
the 1994 USDA recommendations in this guide should
be boiled even if no signs of spoilage are detected. Boil
food for a full 10 minutes at altitudes below 1,000
feet. Add an additional minute of boiling time for each
1,000 feet of elevation. Boiling destroys botulism toxin.
If in doubt, always boil foods before tasting.
At Altitude
(ft)
2,000–2,999
3,000–3,999
4,000–4,999
5,000–5,999
6,000–6,999
7,000–7,999
8,000–8,999
9,000–9,999
Boil Foods
(minutes)
12
13
14
15
16
17
18
19
SELECTING AND PREPARING CHILES
Selecting Chiles
Select chiles that are mature, heavy for their size,
smooth and symmetrical, bright green in color, fresh,
and crisp. Avoid misshapen pods, shriveled skin, mold,
soft spots, and bruises. Approximately 9 pounds of
chiles will make 9 pints of canned chiles.
Blistering
The tough outer skin must be removed from chiles.
Blistering the skin by one of the following methods
makes removal easy.
Handling pungent chiles can burn hands and
eyes. Protect hands with a thin layer of solid fat or
wear rubber gloves. Keep hands away from eyes while
working with chiles. Wash hands before and after
going to the bathroom and before touching other
people, such as picking up a baby.
Wash and dry chiles. With a knife, make a small
slit in the side to allow steam to escape. Be sure heat
source is very hot. Turn chiles frequently to prevent
scorching and ensure even blistering. Remove from
heat and spread chiles on a flat surface in a single layer
to cool before peeling. For easier peeling, place in a
pan and cover with a damp towel for a few minutes.
The following are three heat-source methods for
blistering chiles:
Oven or broiler method. Place chiles in a hot oven or
broiler 400–450°F for 6–8 minutes until skin blisters
so that it can be pulled away form the flesh.
Range top method. Place chiles on a hot electric or
gas burner after covering burner with a layer of heavy
wire mesh.
Outdoor grill method. Place chiles on a charcoal grill
about 5–6 inches above glowing coals.
If chiles are not processed within two hours after
blistering, place them in shallow containers in the
To find more resources for your business, home, or family, visit the College of Agriculture and Home Economics on the
World Wide Web at www.cahe.nmsu.edu
refrigerator to prevent spoiling. This applies both to
purchased, roasted chiles as well as to those roasted
at home.
SALT
If desired, add 1/4 teaspoon of salt per half-pint, or
1/2 teaspoon salt per pint. Salt may be omitted, as it
is used only for flavor. For best results, do not use salt
substitutes for canning because heat causes some
substitutes to become bitter or develop a metallic
taste. Instead, add salt substitutes just before serving.
GENERAL CANNING PROCEDURES
Use regular and wide-mouth Mason jars with
self-sealing lids held in place by screw-on metal bands.
The bands hold the lids in place during the processing
and cooling periods.
Mason jars are made from tempered glass to resist
high temperatures. Only half-pint and pint jars should
be used for canning green chiles.
Inspect jars carefully for cracks or chips; discard
faulty ones. Wash jars in hot, soapy water and rinse
thoroughly or in the dishwasher. Keep jars hot in the
dishwasher, a sink of hot water, or a warm oven until
they are filled.
Check metal screw bands for signs of rust or dents.
Discard badly corroded or dented bands. Use only
new lids and follow manufacturer’s directions for
preparing lids for canning.
Remove peels, stems, and seeds from chiles.
Chiles can be cut in pieces or left whole. Pack chiles
loosely and add boiling water. Leave a 1-inch headspace. Using a rubber or plastic spatula or knife that
won’t nick or scratch the jar, slice between the chiles
and the jar to ease out trapped air bubbles.
Use a clean, damp cloth or paper towel to wipe the
rim and threads of each jar. Put on a new lid with a
screw-on metal band to hold it in place; tighten
comfortably. Process using a pressure canner.
dial pressure gauge
weighted gauge
safety valve
FOLLOW THESE STEPS
FOR PRESSURE CANNING
1. Put 2–3 inches of hot water in the canner. Place
filled jars on the rack using a jar lifter. Fasten canner
lid securely.
2. Leave weight off vent port, or open the petcock.
Heat at the highest setting until steam flows from
the vent port or petcock.
3. Maintain high heat setting, exhaust steam 10 min-
utes, and then place weight on vent port or close
petcock. The canner will pressurize during the
next 3–5 minutes.
4. Start timing the process when the pressure reading
on the dial gauge indicates that the recommended
pressure has been reached, or when the weighted
gauge begins to jiggle or rock.
5. Regulate heat under the canner to maintain a steady pressure at or slightly above the correct gauge pres-
sure. Quick and large pressure variations during pro-
cessing may cause unnecessary liquid losses from jars. Weighted gauges on Mirro canners should jiggle about 2 or 3 times per minute. Gauges on Presto canners should rock slowly throughout the process.
6. When the timed process is completed, turn off the
heat, remove the canner from heat if possible, and
let the canner depressurize. Do not force-cool the
canner. Force cooling may result in food spoilage.
Cooling the canner with cold running water or
opening the vent port before the canner is fully
depressurized will cause loss of liquid from jars
and seal failures. Force-cooling also can warp the
canner lid of older model canners, causing steam
leaks. Depressurization of older models should be
timed. Standard-size heavy-walled canners require
about 30 minutes when loaded with pints. Newer
thin-walled canners cool more rapidly and are
pressure regulator
safety
valve
cover
pressure regulator
on air vent
vent
safety valve
vent
dial gauge
water
Guide E-308 • Page 2
equipped with vent locks. These canners are depres-
surized when their vent lock piston drops to a
normal position.
7. After the canner is depressurized, remove the
weight from the vent port or open the petcock.
Wait 2 minutes, unfasten the lid, and remove it
carefully. Lift the lid away from you so the steam
does not burn your face.
Processing Times for Chiles
Pounds of pressure for altitude of
Jar size
Processing time
(minutes)
2,001–
4,000 ft
4,001–
6,000 ft
6,001–
8,000 ft
Clean the outsides of sealed, cooled jars. Label
with date and contents and store in a cool (50–70°F),
dark, dry place away from sun, light, or dampness.
Canned chiles are best if eaten within one year.
ACCIDENTAL FREEZING
8. Remove jars with a lifter, and place on towel or
cooling rack, if desired.
Dial gauges on pressure canners should be checked
annually to make sure they are accurate.
STORING CANNED FOOD
8,001–
10,000 ft
————————(lb)————————
Half-pint
35
12
13
14
15
Pint
35
12
13
14
15
Note: The above instructions are for dial gauge pressure canners. When using
a pressure canner with a weighted gauge in New Mexico, use the 15-pound
weight and the time periods given.
Freezing can cause food in jars to spoil if the jars
become unsealed. Freezing and thawing cause food
to soften and lose eating quality. Protect jars from
freezing by wrapping with layers of newspapers.
IF CANNED FOOD SPOILS
Examine jars carefully before tasting chiles. Check
lids for a vacuum seal. NEVER taste food from an
unsealed jar.
Signs of food spoilage are streaks and dried food at
the top of the jar, swollen lids, broken jar seals, rising
air bubbles, and any unnatural color. Other indicators
include bad or unnatural odor; spurting liquid; white,
blue, green, or black mold; and foaming.
Dispose of any food you suspect of being spoiled.
For safety, spoiled canned food and containers may
need to be detoxified before disposal. Contact your
county Extension office for detoxification instructions.
TEST FOR JAR SEALS
Remove screw bands when jars have cooled
(12–24 hours) and test for vacuum seals by these
methods:
ALTITUDE ADJUSTMENTS
• Press the lid center with finger. If the lid springs up
when released, it is not sealed.
• Tap the lid with a teaspoon. A sealed jar lid will
make a ringing sound.
• Hold the jar at eye level and look across the lid. A
sealed jar lid curves down slightly in the center.
All communities in New Mexico are above sea
level, varying from 3,000 to 10,000 feet, with
differences even within a county.
Use the chart on the next page to determine the
elevation of your community. Then select safe
processing times for canning your chile. The boiling
temperature of liquids is lower at higher elevations, so
food must be processed longer or at a higher pressure
at high altitudes.
REPROCESSING UNSEALED JARS
Remove lids from unsealed jars and discard. Check
sealing surface of jar for tiny nicks or cracks. If the
jar has defects, discard it and replace with another jar.
If not, add a new lid and process for the same amount
of time within 24 hours. Unsealed jars can be kept in
the refrigerator and the food used within 3–4 days, or
remove about an inch of the contents and freeze.
Guide E-308 • Page 3
Elevations of Cities and Towns in New Mexico
City/Town
Alamogordo
Albuquerque
Artesia
Aztec
Bayard
Belen
Bernalillo
Bosque Farms
Carlsbad
Carrizozo
Chama
Cimarron
Clayton
Cloudcroft
Clovis
Columbus
Corona
Corrales
Cuba
Deming
Dexter
Eagle Nest
Elida
Española
Estancia
Farmington
Fort Sumner
Gallup
Grants
Hobbs
Hurley
Jemez Springs
Las Cruces
Elevation
(ft)
4,350
5,000
3,350
5,650
5,800
4,800
5,050
4,864
3,100
5,450
7,900
6,450
5,050
8,650
4,300
4,020
6,664
5,005
7,000
4,300
3,500
8,250
4,345
5,600
6,100
5,400
4,050
6,500
6,450
3,650
5,700
6,200
3,900
City/Town
Elevation
(ft)
Las Vegas
Logan
Lordsburg
Los Alamos
Los Ranchos de Albuquerque
Lovington
Magdalena
Melrose
Mora
Mosquero
Mountainair
Portales
Raton
Reserve
Rio Rancho
Roswell
Roy
Ruidoso
San Jon
Santa Fe
Santa Rita
Santa Rosa
Silver City
Socorro
Springer
Taos
Texico
Tierra Amarilla
Truth or Consequences
Tucumcari
Tularosa
Vaughn
Wagon Mound
6,450
3,830
4,250
7,400
4,950
3,900
6,556
4,599
7,200
5,550
6,500
4,010
6,650
5,749
5,290
3,600
5,900
7,000
4,200
7,000
6,300
4,600
5,900
4,600
5,800
7,000
4,150
7,460
4,250
4,100
4,500
5,950
6,200
This publication is intended for use by individuals with a basic understanding of canning
procedures. For more detailed information consult the USDA Complete Guide to Home
Canning, which is available through your local county Extension office.
Original author: Mae Martha Johnson, former Extension Nutrition Specialist.
Content previosly reviewed/revised by Alice Jane Hendley, former Food and
Nutrition Specialist.
New Mexico State University is an equal opportunity/affirmative action employer and educator. NMSU and the U.S. Department
of Agriculture cooperating.
Revised May 2008
Las Cruces, NM
Guide E-308 • Page 4


© Copyright 2026