
HERRINGBONE 36 18X
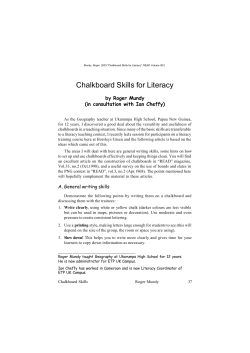
HERRINGBONE
18X36
HERRINGBONE
5
2
6
1
7
chalk line 1
4
9
8
3
chalk line 3
chalk line 2
INSTALLATION DIRECTIONS:
place an additional chalk line 18” from the base chalk line
Begin the installation by following Shaw’s Installation Guidelines for Site Conditions and proper Floor Preparation.
➊ The starting point in a modular installation must be as near to the center of the room as possible
and must
be positioned
to utilize
the largest
cut module
size.
dry install
a portion
of 18x36
to perimeter
understand
the pattern
layout
➋ Snap a chalk line parallel to one major wall bisecting the starting point. It may be necessary to
prior to installation
offset the center chalk line to assure perimeter modules will be at least half size.
➌ A second chalk line must be snapped from the starting point at 90° to the first line and a third
chalkbeginning
line must bein
snapped
at 18" apartplacing
from thethe
second
line. herringbone
one quadrant
tileschalk
in the
➍ Test method
a dry-install
one section for
layout andabove
placement.
asofillustrated
bypattern
the numbers
➎ Starting in one quadrant, place tiles in the herringbone pattern illustrated by the numbers above.
➏ Flow into the opposite quadrant, continuing the herringbone pattern.
flow into the opposite quadrant continuing the herringbone pattern
Directional arrows are featured on the back of the tile. Numbers within the
arrows are for manufacturing purposes and are not related to installation.
directional arrows are featured on the back of the tile - the number featured within
the arrow are for manufacturing purposes and are not related to installation
For more information on installing 18X36 including an instructional video visit shawcontractgroup.com or call 877.502.SHAW


© Copyright 2026