
W NATIONAL FISH CARVERS GUILD April 2012 JOURNAL by: Dan Patterson
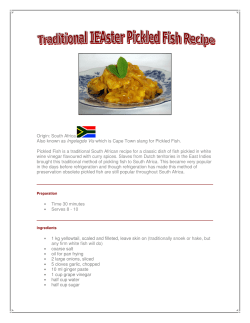
NATIONAL FISH CARVERS GUILD April 2012 JOURNAL
Making your own fish carving patterns by: Dan Patterson
W
elcome to the NFCG Journal section of the web site. This new 2012 Journal will explain how to make
your own carving patterns from the actual fish. The methods used here were learned during my years as a
fish taxidermist and have not changed much when used for carving patterns. In taxidermy when carving your
own manikins for fish skin mounts from foam, you carve the body only. For carving fish we need to take into
consideration the Head and Fins along with the body. For this reason there are more measurements that are
taken when developing a carving pattern. Either way,
length, girth and thickness measurements at specific
points along the fish body are mandatory to achieve an
accurate pattern. Remember, carving a manikin for a skin
Sharpie marker
mounted taxidermy fish requires the same attention to detail because the skin must fit over the carved manikin
properly to look natural. Therefore, whether developing a
pattern for a taxidermy mount or a fish carving accurate
measurements need to be taken.
Flexible waterproof Tape
TOOLS YOU WILL NEED
Deceased specimen
or Reproduction
CALIPERS
RULER
Scissors
Paper Towels
Plastic coated Freezer Paper
Photographs
At first, the reasoning for taxidermists to carve their own
manikins was to save money and speed things up. I think
the taxidermist quickly realized other benefits such as the
freedom to put the fish in any pose their customer desired.
Gradually commercial fish manikins became available in
more poses and they became quicker and easier for the
taxidermist. Of course the cost of the manikin was passed
onto the customer. Today the sales of commercial fish
manikins must be lucrative as there are hundreds offered
in the taxidermy trade catalogs.
Fish carving patterns can be developed in a few ways.
You can take the information from the actual fish/
reproduction, or you can take the information from photographs as long as you know the measurements. An actual
fresh specimen is the best and most accurate way to take a
pattern with a fiberglass reproduction being almost as
good. Photos have a lot of information in them if you can
find the right angles at which the photos were taken.
T
he basic tools needed are few and not specialized at all. For this example our specimen is the Arctic Char. Most important is Plastic coated
freezer paper that the damp specimen will lay upon while being traced. A sharpie marker or a black grease pencil is used for tracing. A pair of
calipers and a flat rigid ruler are used to read measurements taken by the calipers. The flexible waterproof measuring tape is used to take girth measurements of the fish specimen. Paper towels for drying the fish and keeping things clean, photographs for reference an scissors to cut out the completed pattern.
1.
Preparation: Make sure your specimen is thawed enough to be able to move into the positions you would like. It will be slimy and you will want
to eliminate that problem immediately. There are several methods and commercial products that remove the slime coat. Cold water fish are the
worst when it comes to slime. Some of the methods are soaking in 1 cup white vinegar to 1 1/2 gal. water, soaking in Dawn dish soap, or applying Borax then scrubbing with a soft brush front to back so as not to go against the scales and dislodge them. Commercially there is a product
sold by WASCO called Slime-Off which is nothing more than Aluminum Sulfate. The fish is soaked in this for a specified time. Your other
option is not to worry and just work your way through the slime, cleaning as you go.
2.
After the fish is de-slimed or not, dry it as much as possible with paper towels. I like to wrap it in paper towels and let it sit for ten minutes or so.
Cut a piece of freezer paper that the fish will fit on and lay it plastic side facing up. Lay the fish on the paper and pose it the way you want.
Now we are ready to make the initial tracing and we will do this with the permanent marker.
3.
Try having the work area low enough so that you will be able to work directly over the fish. With the marker held 90 degrees of the paper, and
looking straight down upon your subject, trace around the body of the fish to include the Tail, Ventral and Dorsal fins. The paired fins, Pectorals
and Pelvics will be cut from the fish later then placed on the paper and traced. Don’t worry about the thickness of the marker making the body
slightly larger than it is. This extra will disappear during the pattern making and carving process and you can always remove material but you
can’t add any. Once the fish is traced be careful not to move it out of position until the following reference marks are completed. Notice in the
diagram below that the fish has been traced and all reference marks are completed. The red dots and green dots are strategic points that are
strongly considered when a pattern is taken.
4.
Refer to diagram below. During the body tracing, put tic-marks where the fins attach to the body, where they start and end. Start with the head
and draw reference marks for all the strategic red dot points. Just pick a point and center the ruler or straight edge directly on that point then
draw a mark on the paper at both ends of the ruler. It is important that after you place the first mark, you do not move your body or head until
the second mark is made otherwise you will always be off slightly. Now rotate the ruler 40 to 90 degrees on the same mark and make a second
set of marks. Where these two sets of marks intersect will be the reference point you just marked. Be sure to label each mark so that later you
will be able to connect the proper marks. You can use your calipers to measure from the tip of the lower jaw straight back to locate and record
other points. See green dots. Measure the eye with the calipers. The other place to make some reference points is the tail or Caudal Peduncle
area. The four points here are where the scales end and the fin rays start. See diagram. There are three sets of marks made here that will outline
the area where the scales end and the tail starts. See diagram.
5.
Next, remove the specimen from the freezer paper and set aside or back into the freezer temporarily. Wipe any moisture or blood from the paper that
will interfere with more of our marking pen operations. Refer to the diagram below and notice the next step is to connect the marks to determine the
locations of points. Draw a dot where the two lines corresponding to the labels intersect then go to the next point and repeat this until all your points
are located and marked. At this point if you wish you can cut off the paired fins, position them on the freezer paper and trace accordingly.
6.
You will notice that you now have strategic points located that will enable you to almost connect the dots in drawing in the detail on the head. The eye
and nostrils or Naries are centered and you can draw in their location. You know where the pre-Opercle and Opercle start at the top and how far back
the curve extends. The correct base of the pectoral fin and throat latch area is also located. Also where the scales end and muscle structure on the tail
is now very clear. The points I have shown you are the minimum number to get you started for the correct locations of the detail of the fish. You have
the option to make and mark as many points as you like to be as accurate as you like. This is also the time to put any other anatomy notes onto the
pattern that you think will help. Notice the pattern example below that I marked in around the body what shape was at that location, square, peaked,
round etc. With the locations marked and using the specimen as reference, draw in the detail with your marker. See diagram below.
Photo example of a carving pattern taken from a 23.5 inch Steelhead trout
7.
Now turn your attention to the specimen. The following measurements are not mandatory but they help when drawing your top
profile of the pattern and you can double check yourself during the carving process. Using the calipers ruler and tape measure, take
measurements at different locations. Refer to diagram below. You will take height, girth and thickness measurements at certain
locations along the body. Use the tape for the girth measurements and the calipers and ruler for the height and thickness. I like to
draw boxes and circles to keep from mixing up my height and girth measurements. The girth is recorded in the circles and the
height or profile measurements in the boxes. The thickness is recorded down the center on the lateral line. Keep in mind to try not
distorting the fish specimen when taking these measurements in such a way as to make them inaccurate. For example, when taking
thickness measurements lift the fish up by the tail or suspend it fully and take the measurement. Just laying it on it’s belly will distort the thickness somewhat. ——- Another suggestion I would make if your confidence is lacking, is to take photos of your specimen , capturing the anatomy at different angles. Store these photos with the pattern for reference when carving. When finished
you may go ahead and cut out your side profile pattern.
8.
To draw the top profile use the thickness measurements you have taken. First determine the swimming pose you want and draw the
centerline of that pose on paper keeping in mind the length of the fish. Using your already completed profile pattern, transfer the
thickness locations onto the centerline with tick-marks. See A. below.
9.
Now take the thickness measurements and write them at the corresponding locations on the centerline. Using your ruler, center it
90 degrees off the centerline and draw the line in to match the exact measurement. See B. below.
10. Draw the top profile following the lines drawn in with the ruler. Now that you have the top profile you can transfer other things
like dorsal location eye location or anything you might think is pertinent. See C. below.
T
he side and top profiles are now completed with a score of information that you can use when carving your fish. So in around ten
not so difficult steps you have a custom fish carving pattern that you can have confidence and self pride in and you know it is as accurate as you can possibly get.
I hope this short and informative Journal on making your own patterns helps you all out in your fish carving endeavors.


© Copyright 2026