
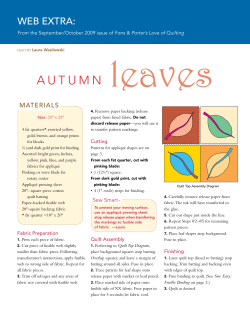
Online Quilt Magazine BONUS PROJECT Fabric
Online Quilt Magazine – Vol. 1 No. 7
Online Quilt Magazine
.com
How To Properly
Hang A Quilt
BONUS PROJECT
Fabric
Christmas Trees
Crazy Patchwork
Bag Embellishment
Check out How to (Mostly)
Machine Sew a Cathedral
© Online Quilt Magazine.com All Rights Reserved
Windows Wallhanging
Page |1
Vol.1 No.7 – December 2010
Online Quilt Magazine – Vol. 1 No. 7
Online Quilt Magazine Table of Contents
How to Properly Hang a Quilt....................................................……………………………………………………..…Page 4
A Quilt Dress For Christmas.....................................................................................................................Page 7
BONUS PROJECT – Fabric Christmas Trees..............................................................................................Page 10
BONUS PROJECT – Cathedral Windows Quilted Wallhanging.................................................................Page 14
Breast Cancer Bags Thank-You's..............................................................................................................Page 19
What's New From The Fat Quarter Shop.................................................................................................Page 21
Crazy Patchwork Bag Embellishment.......................................................................................................Page 25
Christmas Quilting Find-A-Word Puzzle...................................................................................................Page 33
BLOCK OF THE MONTH – Snowball Variation Block.................................................................................Page 34
Quilters' Horoscope.................................................................................................................................Page 36
YES – We Want to Hear From You...........................................................................................................Page 37
Cover Photo: "Australian Christmas Place Setting" from www.QuiltBlockoftheMonthClub.com
© Online Quilt Magazine.com All Rights Reserved P a g e | 2
Online Quilt Magazine – Vol. 1 No. 7
Letter from the Editor
Jody Anderson
Hi!
Welcome to our Christmas Issue of our Free Monthly Online Quilt Magazine. Now that they're
counting the shopping days left until Christmas, I think it's fair to say that we're well into the "silly
season", and it's time to give in gracefully and embrace the festive spirit.
This issue we have a lovely quick project to make your own fabric Christmas Tree ornaments – make
some for ornaments, and maybe applique others to placemats or a table runner to colour-coordinate
your Christmas table this year. (They would even make great gift tags!)
We have still more projects to try out this month too – we hope you manage to take some time for
yourself and have a play with some new projects, tips and techniques.
Most of all, We Wish You a Very Happy, Safe and Healthy Christmas, and we look forward to sharing
more great 'Quilt-y' tips, articles and projects with you in the New Year.
Enjoy!
Jody
© Online Quilt Magazine.com All Rights Reserved P a g e | 3
Online Quilt Magazine – Vol. 1 No. 7
How to Properly Hang a Quilt
By Carol Mcguire
A hand-stitched quilt is an attractive artwork and
a unique wall decor that is infused with the
personality of whomever created it. Each section
of fabric is carefully chosen, cut by hand, and
stitched into place to form a beautiful cover or
wall hanging. It is important to properly hang the
finished piece, not only to highlight the design in
the best way possible, but also to keep it from
becoming damaged. Consider the the following
steps before hanging a new quilt or one that was
stitched years ago. Once you have hung the quilt,
it will be impressive-looking for many years to
come.
Location is Important
It is important to pick out a good location prior to
hanging the quilt. Avoid locations that receive
direct sunlight or even potentially damaging
artificial light. Even from just several inches away,
light bulbs can become extremely hot and cause
damage to the material. In addition, do not hang
a quilt over a source of heat or in an area with
high humidity. As a rule, if the temperature and
humidity level feels comfortable, it is more than
likely an ideal location to hang fabric items.
Temperature, sunlight, and humidity are not the
only conditions requiring constant control. If
small children are present, do not hang a quilt or
tapestries within reach. Little hands can soil the
fabric and cause permanent staining. Hang it out
of reach of children and pets, and select a
desirable location to keep it in superior condition
and looking as good as the day it was completed.
© Online Quilt Magazine.com All Rights Reserved P a g e | 4
Online Quilt Magazine – Vol. 1 No. 7
Decide on a Frame or a Simpler Method
Unlike a pair of decorative wall candle sconces
that need a simple nail or screw to be successfully
mounted on the wall, hanging a quilt takes
greater consideration and planning.
One of the best ways to hang a quilt involves
framing the finished piece. Work with a
professional framer, and insist on archival foam
core that is covered with a backing of fabric. The
framer will squarely stitch the fabric to the board
and finish the job with an attractive wooden
frame. The stitching will not be visible when you
hang the framed work of art, and it will look as
lovely as ever. Albeit not the least expensive way
to display heavy fabric, this is, yet, one of the best
ways. Safe and attractive methods exist, and they
can be undertaken without help from an expert.
Think about sewing a durable sleeve to the back
edge of the quilt, and then display it on a drapery
rod. To keep the heavy fabric stable, a sleeve can
also be sewn to the opposite end, and a drapery
rod can be used to secure it along the bottom.
The sleeves will not be visible from the front, and
if sewn straight it will look as nice as professional
framing.
Quilts can also be hung using Velcro strips. Attach
the rough looped side of the Velcro to the top
and bottom edge of the back of the quilt. Use a
yardstick, a level, and a pencil to create a
horizontal line on the wall. Attach the soft side of
the Velcro along the edge of the line and the quilt
will look straight when displayed. Attach another
Velcro strip to the bottom of the quilt, and follow
the same method of application. Take your time
and attach the Velcro carefully and the quilt will
hang straight and look outstanding.
Choose an Attractive Rod for Hanging
If you choose a sleeve to hang the quilt with, it
will be necessary to choose one or two drapery
rods. Consider the style of the quilt when
© Online Quilt Magazine.com All Rights Reserved P a g e | 5
Online Quilt Magazine – Vol. 1 No. 7
selecting a rod to hang it on. A drapery rod with
elegantly crafted finials is perfect for hanging an
elegant quilt. A hanging rod with wrought iron
finials is ideal for antique or old fashioned quilts.
The options for drapery rods are endless, and the
rod style you choose greatly depends on the look
you want to achieve.
If you have decided to hang the quilt with drapery
rods, once all of the brackets are in place, lay the
quilt on a clean surface such as a bed or a table,
and carefully thread the top rod through the
sleeve. With a little assistance from an extra pair
of hands, hang the quilt. It will be easy to thread
the second rod through the bottom sleeve and
hang it on the brackets.
Mounting the Hardware
After selecting drapery rods, the next step is
mounting the hardware. Locate a wall stud
before mounting the first bracket, and use wall
anchors to secure the other. Also, mark the
locations for the brackets using a pencil, a tape
measure, and a level. This will ensure the quilt
will hang straight and with the right amount of
space between brackets. Follow the same process
when securing bottom brackets before preparing
to hang the quilt.
Hanging Tips
Although a quilt looks lovely when displayed on a
bed, hanging the quilt on the wall allows the
design to be easily seen. Centering a quilt on a
bare wall, no matter the method of hanging, is a
great way to enjoy the beauty of the design and
the talent that went into making a finely stitched
work of art. Once you hang a quilt on a wall you
will always want to have one on display.
About the Author:
Article by Carol Mcguire of "Wall Decor and Home
Accents". Check out our wide selection of wall decor
and grapes wall decor online.
http://www.articlesbase.com/interior-designarticles/how-to-properly-hang-a-quilt-2640757.html
© Online Quilt Magazine.com All Rights Reserved P a g e | 6
Online Quilt Magazine – Vol. 1 No. 7
A Quilt Dress For Christmas
By Penny Halgren from www.How-To-Quilt.com
As quilting daughter, Stephanie, and engineering
son, Bubba, were growing up, each year for
Christmas they got some handmade gifts - at
least two.
She chose the pattern and then couldn't decide
which fabric she wanted for the dress.
Her final suggestion - "use them all."
One was a pair of pajamas to wear the night
before Christmas (so we would have great
Christmas morning pictures) and the other was a
special Christmas outfit.
And what a fun suggestion it turned out to be.
Fortunately there were several Christmas prints
in my stash leftover from the Christmas tree skirt
I had made (and, well, other Christmas projects as
well).
For Bubba, it usually meant a vest or shirt (I
wasn't too excited about making pants), and for
Stephanie, it was a dress.
As she got a little older, she became involved in
choosing the fabric and design for the dress. And
then one year, she surprised me.
So, I took the assortment of fabric, cut 2 1/2 inch
strips and started sewing the strips together.
Looking at the dress patterns, I created "fabric"
that was large enough to cut each of the patterns
out.
© Online Quilt Magazine.com All Rights Reserved P a g e | 7
Online Quilt Magazine – Vol. 1 No. 7
Then I sewed it together, just as you would sew a
dress.
Once it was almost finished, I realized that it was
mighty busy for darling daughter, Stephanie. And
we decided to add a large white collar and apron.
No attempt was made to match the fabric at the
seams, making it somewhat easier to sew
together.
This was one of my favorite Christmas outfits
(sorry, Bubba!) and one of Stephanie's teachers
asked if she could borrow the dress for her
daughter a couple of years later.
It always seems kind of too bad when dresses can
only be worn one year (or less) as kids grow up,
so I was most happy to have someone else enjoy
the dress.
And who knows, maybe someday I'll see a
granddaughter wearing the dress! (It's a few
years off, though.)
About the Author
Penny, a quilter for more than 28 years, enjoys
exploring all aspects of quilting and sharing her
knowledge with all quilters. Aside from her
www.How-To_Quilt.com website, a new
endeavor is http://www.QuiltBlockLibrary.com
which provides hundreds of traditional patchwork
quilt block patterns.
© Online Quilt Magazine.com All Rights Reserved P a g e | 8
Online Quilt Magazine – Vol. 1 No. 7
Go To www.Quilts-n-Bags.com to reserve your copy today.
© Online Quilt Magazine.com All Rights Reserved P a g e | 9
Online Quilt Magazine – Vol. 1 No. 7
Fabric Christmas Trees
A Quick Easy and Fun Tutorial from Gerry & Jane at
www.QuiltersWorld.com.au
© Online Quilt Magazine.com All Rights Reserved P a g e | 10
Online Quilt Magazine – Vol. 1 No. 7
1. Cut two squares from two different fabrics. The size
will depend on what size you want your circles.
2. Place two squares right sides together and pin the
two layers to help hold them while you sew.
3. Draw a circle (5" diameter is a good size) on the
wrong side of your fabric. You can use a compass or
whatever round shape you find in your cupboard.
4. At the sewing machine, sew around the line, leaving a
small gap. Sewing around a curve is easier if you
keep your stitch length small – try 1.5 or 2. We
closed off our stitching by using a reverse stitch when
we started or stopped.
5. Trim excess fabric from around your circle. Leave a
bit of extra fabric near the gap to tuck inside.
© Online Quilt Magazine.com All Rights Reserved P a g e | 11
Online Quilt Magazine – Vol. 1 No. 7
6. Work the fabric through the opening until you have
your circle turned right sides out.
7. You can tuck the fabric inside the gap and hand stitch
it closed.
8. Now the tricky bit – Fold into a Christmas Tree shape
following our pictures below.
9. Don't forget to sew or glue some ribbon, ric rac or
fancy string on before the last fold to use for hanging
your tree.
10. Tack the final fold down with a few stitches.
© Online Quilt Magazine.com All Rights Reserved P a g e | 12
Online Quilt Magazine – Vol. 1 No. 7
About the Author
Pauline Rogers has taught patchwork &
quilting for close to 28 years. She travels
extensively throughout Australia helping
others learn and perfect the techniques
of quilt making. Pauline's Schoolhouse
programme is a popular way for quilt
groups to share in her tool expertise.
Visit Quilters World online at
www.quiltersworld.com.au
© Online Quilt Magazine.com All Rights Reserved P a g e | 13
Online Quilt Magazine – Vol. 1 No. 7
Cathedral Windows Quilted Wallhanging
By Rose Smith from www.ludlowquiltandsew.co.uk
I had always thought of Cathedral Windows quilts as totally
handmade - something to work on during the train journey or when
curled up by the fire. So I was really surprised when I found out that
Cathedral Windows quilts can be partly machine sewn. I'm amazed at
how much more quickly I can now sew my Cathedral Windows quilts.
In order to introduce the basics of Cathedral Windows quilts I have made a simple quilted wall hanging
using only four quilt squares. For each of these I began with a 14" fabric square. The size was chosen that
I could get three squares from one width of fabric with minimal waste.
To make the quilted wall hanging you will need:
four black 14" squares
four coloured 4" squares (the two blues in the photo)
eight red 4" squares for the triangular edges
© Online Quilt Magazine.com All Rights Reserved P a g e | 14
Online Quilt Magazine – Vol. 1 No. 7
Fold the 14" square in half with right sides together
and sew up each side to make a pouch. I've used a
different fabric here for illustration because it's
impossible to tell right side from wrong side with
the black fabric.
Bring the two seams together at the open end of
the pouch and smooth the two pieces of fabric
together across the top of the pouch.
Sew across the top of the pouch, leaving a gap of
at least 2" for turning the pouch right side out. I
know it makes it more fiddly to sew, but it is best
to leave the gap half way across one of the sides
rather than at either end.
© Online Quilt Magazine.com All Rights Reserved P a g e | 15
Online Quilt Magazine – Vol. 1 No. 7
Turn the pouch right side out, gently pressing out
the corners from the inside. Press.
Fold each corner in to the middle and press to mark
the folds - watch out for scorched fingers at this
stage! This is the basic Cathedral Windows quilt
block. The contrasting fabric for the 'glass' part of
the window cannot be added until you have several
Cathedral Windows blocks joined together.
Joining them together is simple but requires care.
Place two blocks together with the flat sides facing,
folded sides facing out. Unfold the flap on the edge
that you wish to join of each square. Match the
two folds exactly and sew along the fold line to join
the two flaps together.
© Online Quilt Magazine.com All Rights Reserved P a g e | 16
Online Quilt Magazine – Vol. 1 No. 7
For this Cathedral Windows quilted wall hanging I needed
only four quilt blocks so I joined them together in pairs and
then joined the pairs together to make a four blocksquare.
At this stage you can fold all the flaps back in to the middle
and slipstich them in place. You will see how a square has
formed across the join between two squares. This is where
you will place your contrasting fabric.
Measure the length of the side of this square. The books
say to use this measurement to cut the contrasting fabric,
but I find it easier to use a square 1/8" smaller all the way
round. That means cutting a square 1/4" smaller than the
size of the square you are matching.
Place the contrasting fabric in the middle of the square.
Beginning in one corner, roll down the edge of the black
background square over the contrasting fabric and
slipstitch in place.
© Online Quilt Magazine.com All Rights Reserved P a g e | 17
Online Quilt Magazine – Vol. 1 No. 7
To fill in the triangles at the edges and create a border, fold
the eight 4" red squares in half along the diagonal and press.
Place each triangle with the folded edge along the bottom.
Roll back the background black fabric over the edge of the
triangle and slipstitch in place.
As this is for a wall hanging, I haven't stitched across the
bottom of the triangle, but if I was making a cathedral
windows quilt I would stitch the triangle bases to secure them.
About the Author:
Rose Smith was born and brought up in
Zambia in Africa. She moved to the UK when
she was 18 and now lives in Shropshire,
indulging her passion for quilting and sewing.
She has sewn all her life - ‘anything that
stood still long enough’ in the words of her
children - but now finds that patchwork and
quilting have taken over her life. She
indulges this passion by posting patterns and
tutorials on her website
www.ludlowquiltandsew.co.uk
for all to share.
LUDLOW QUILT AND SEW
Discover new and exciting projects to quilt
and sew each month with clear and easy to
follow instructions.
Visit the website and subscribe to Ludlow
Quilt and Sew’s free monthly newsletter now.
www.ludlowquiltandsew.co.uk
© Online Quilt Magazine.com All Rights Reserved P a g e | 18
Online Quilt Magazine – Vol. 1 No. 7
Breast Cancer Bags Thank-You's
By Jody Anderson - www.Quilts-n-Bags.com
are "absolutely blown away" by the wonderful
bags they've received.
We wanted to take this chance to send out a big
"Thank You" again to all the wonderful 'bag
ladies' who have contributed to our Breast
Cancer Bags Appeal.
Our ultimate aim for this Appeal is to have local
volunteers / Groups look after their own local
hospitals, so that there can always be a local
supply of Breast Cancer Drain Bags for local
patients.
We do appreciate your parcels of handmade
bags, and the nurses we're passing them on to
are thrilled with the quality and obvious care
that's gone into making these bags for those
fighting Breast Cancer.
We especially need to thank a few dedicated
women who have volunteered to look after
certain areas and States for us – Jenny in South
Australia, Kelly in Brisbane, and Kathy in Western
Australia.
Kathy asked us to pass on her thanks to those in
the West, and reports that the nurses over there
If you are interested in volunteering to manage
your local area in Australia (or New Zealand),
please contact Annette on 02 6662 8467 or email
her at [email protected] and she can
run through the details and/or areas with you.
(Following is a letter received from Westmead in
Sydney, Australia.)
© Online Quilt Magazine.com All Rights Reserved P a g e | 19
Online Quilt Magazine – Vol. 1 No. 7
© Online Quilt Magazine.com All Rights Reserved P a g e | 20
Online Quilt Magazine – Vol. 1 No. 7
What's New from The Fat Quarter Shop
by Kimberly Jolly from www.FatQuarterShop.com
We're pleased to be able to bring you a selection
each month of the Newest Fabric Releases and
the new season fabric "must haves".
Go back to the old French schoolhouses with the
newest collection, La Petite Ecole, from French
General. La Petite Ecole is based on a collection
of old fabric prints that might have covered
children’s school books in the 19th century.
Alphabets, pictures and small prints appear in
shades of French blues, old reds and hemp that
feel as if they are right out of an old French
schoolhouse. This wonderful collection is
available in Fat Quarter Bundles, Fat Eighth
Bundles, Jelly Rolls, Charm Packs, Layer Cakes and
yardage. Create a timeless treasure with the La
Petite Ecole Moda Quilt Kit.
For more information on this range go to:
La Petite Ecole, from French General for Moda
http://www.fatquartershop.com/La-Petite-EcoleFrench-General-Moda-Fabrics.asp
© Online Quilt Magazine.com All Rights Reserved P a g e | 21
Online Quilt Magazine – Vol. 1 No. 7
yardage and the Annabelle's Alphabet Quilt
Kit.
For more information on this range go to:
http://www.fatquartershop.com/A-is-forAnnabelle-RJR-Fabrics-Tasha-Tudor.asp
A is for Annabelle collection by Tasha Tudor for RJR
Fabrics
Have your little ones learn their ABCs with the A
is for Annabelle collection by Tasha Tudor for RJR
Fabrics. This delightfully pastel collection brings
together delicate stripes, soft tonals and vintageinspired vignettes.
The collection centers around a quilt panels
available in a soft pink and baby blue. A is for
Annabelle is available in Fat Quarter Bundles,
Willow by Anna Griffin
Willow by Anna Griffin beautifully combines
decorative 17th century French toile with the
© Online Quilt Magazine.com All Rights Reserved P a g e | 22
Online Quilt Magazine – Vol. 1 No. 7
Asian influences of antique Chinese export
porcelain.
Willow translates classic motifs into modern
patterns with its bold monochromatic palette of
blue, black and red. With a formal aesthetic, the
collection flawlessly blends ikat, damask, and
medallion prints.
Ideal for bedding, pillows or quilts, the Willow
Collection adds elegance and sophistication to
your home. This classic collection is available in
Fat Quarter Bundles and yardage.
Delilah, from Tanya Whelan for Free Spirit
Fabrics
Check out this range at:
http://www.fatquartershop.com/nl.asp?p=0&c=2
587
Brighten your day with the newest collection,
Delilah, from Tanya Whelan for Free Spirit
Fabrics.
This collection has a vintage feel with its largescale rose motifs. Stripes, diamond plaid and
polka dots in blues, greens, reds and pinks help
round out the collection. This bright and fun
© Online Quilt Magazine.com All Rights Reserved P a g e | 23
Online Quilt Magazine – Vol. 1 No. 7
collection is available in two colorway Fat Quarter
Bundles and yardage.
View this Range at:
http://www.fatquartershop.com/Delilah-TanyaWhelan-Free-Spirit-Fabrics.asp
Give Me 10 Minutes and I will Show You How to Make
Your Holiday Greeting So Memorable that Your Family
and Friends will be Talking about it (and your talents)
For Years
In less than an hour you can create this heartfelt and
fun fabric postcard using your favorite photo - whether
it is a holiday photo, vacation photo or just a
photograph of a friend.
Learn all of the tips, tricks and shortcuts of transferring
photos onto fabric and strip piecing this fun border in
this easy-to-read guide.
http://www.how-to-quilt.com/quilt-postcard.php
© Online Quilt Magazine.com All Rights Reserved P a g e | 24
Online Quilt Magazine – Vol. 1 No. 7
Crazy Patchwork Bag Embellishment
Part 2: Flip & Stitch Method
By Margot Rylah
very beginner. There are many articles available
~ this one covers some tips and tricks to avoid
much of the nuisance factor that can cause
severe irritation during construction of even a
simple project!
The first article of this series in the November
issue of Online Quilt Magazine covered the finer
points of chenilling as an embellishment for Bag
Making.
This issue describes another handy and very
simple option for creating a “one-of-a-kind”
fabricated bag. Both these techniques can be
widely used for all kinds of projects, but lend
themselves wonderfully to tote bags or handbags.
Crazy Patchwork is a wonderful medium for using
very different textures and fibres such as silk,
satin, velvet, brocades, lamés, lace and wool, as
well as linens and cottons, depending on item to
be created. Washability will determine what to
use.
The third article in the series will show how to
pull both these options together, for a truly
special and unique culmination of your own
creative ideas.
It’s a great embellishment option to use up
scraps, or “don’t know what to use it for” pieces
out of your stash!
Today’s embellishment is Crazy Patchwork – the
flip and stitch method. It’s so simple, even for a
This technique might be new to you, and you’d
like to practice before working on our Unique Bag
in the next issue. It will be a great post-Christmas
© Online Quilt Magazine.com All Rights Reserved P a g e | 25
Online Quilt Magazine – Vol. 1 No. 7
project to get on with in January! If you’re a
typical crafter, you won’t want to waste your
time, efforts or materials putting together a
“sample” that won’t have a specific “life’s
purpose”.
So you might like to put these techniques into
practice for some Crazy Patchwork table mats for
your Christmas table setting! Or as a special gift
for someone else’s Christmas table! Using 4-5
different prints, try combinations of red and
green, or red and gold, or white and gold, with
maybe a white or other solid colour as a
surround.
Most important in every final outcome is the
colour value of the fabrics selected. This is the
dark, medium or light “depth” of colour in any
piece. For either the bag project or the Christmas
mats, I would keep pretty much to the same,
medium, colour value, using maybe one of the
pieces in a different value for interest. Vary the
shades and the prints of your patches, not so
much the colour value.
For either bag or table mats, or any other project
requiring washing, the best fabric choice is good
quality 100% cotton.
© Online Quilt Magazine.com All Rights Reserved P a g e | 26
Online Quilt Magazine – Vol. 1 No. 7
For this presentation, I’ve used some of the fabrics that will
be used in the Unique Bag. From my stash I discarded 2
pieces that were too strong for the others, ending up with 4
pieces for the Crazy panels, plus the main piece for the body
of the bag.
The shades of these pieces need to at least co-ordinate and
harmonise (not necessarily match) with the main fabric of
the chenilling. (Now I’ve really got some of you wondering
about the main project!!)
Prepare by washing your chosen fabric pieces, using the detergent you’ll be using to launder the finished
article and rinsing carefully. Squeeze or spin them out and, being 100% cotton, they can be ironed dry.
1. Cut a piece of (washed) calico or muslin for backing. The bag panel to be Crazy Patched will be cut
to 9.5” x 14.5” which includes ¼” larger all around in case of shrinkage from the stitching.
© Online Quilt Magazine.com All Rights Reserved P a g e | 27
Online Quilt Magazine – Vol. 1 No. 7
2. Cut 1 piece of scrap fabric (piece A) into an irregularly shaped 4 or 5 sided piece and place slightly
off centre onto the muslin, right side up.
Step 2.
Step 3.
Step 5.
3. Place another piece of scrap (piece B) right sides together, on top of piece A with a raw edge of
each together.
4. Stitch seam using ¼” guide foot (see Tips 1-4 below)
5. Flip piece B to right side and press (Tip 5)
6. Pin several pins along where you’d like piece B to finish. Turn
the muslin piece over to wrong side up, to check if the new
piece needs trimming along the edge of the muslin. Turn back
to right side and trim the last piece to the desired shape
indicated by the pins. NOW turn your pins at right angles to the
seam, so you don’t run over them with the next line of
stitching!
© Online Quilt Magazine.com All Rights Reserved P a g e | 28
Online Quilt Magazine – Vol. 1 No. 7
7. Now just keep the process on the go
o Select the next print
o Place raw edge face down on
raw edge
o Stitch, flip, press and pin!
8. Once the muslin piece is completely covered with patches, including just several cut out of the
main bag piece, give it a final press. Trim edges straight.
9. If you’re making table mats and want to add a border to the front, do so now, using strips of
desired width. Stitch strips across top and bottom, trim and press. Then add longer strips to each
side to finish.
10. Iron a piece of fusible pellon to the underside, ¼” smaller all around than the patchworked piece.
11. Cut a piece of cotton fabric for lining, place wrong sides together and stitch ¼” seam all around,
leaving about 3” gap through which to turn the panel. Trim corners, turn and press, tucking in the
open section. Carefully topstitch or handstitch the opening.
12. Now for the quilting: for the bag panel I’ve quilted with straight rows of stitching “in the ditch” of
all the Crazy pieces. (See variation below, Tip for more decorative option)
© Online Quilt Magazine.com All Rights Reserved P a g e | 29
Online Quilt Magazine – Vol. 1 No. 7
Tips and Tricks
1. Don’t pre-cut any of the patches apart from the first. Simply take your whole scrap (or cut a manageable
piece of each) to place face down on the former patch. After you’ve stitched and flipped you can decide
on the shape of that second piece! That’s the fun of the creation - you have no idea how they’ll turn out!
2. If you don’t have a ¼” guide foot, place a piece of tape on your machine bed, ¼” to the right of the needle.
Line up your raw edge to the guide or to the edge of the tape and keep your eye on this edge while
sewing, giving an accurate seam.
3. Bring the bobbin thread tail up through the fabric by winding the
needle manually down and up. Once the needle thread pulls up the
bobbin thread, tuck a long pin, a toothpick or the point of your seamripper into the loop and draw both the needle and bobbin thread
tails to the back of the presser foot. Don’t be tempted to skip this
step!! Most of your Crazy stitching rows will start in the middle of
your piece of muslin, not at the edge where you would usually start.
This will avoid tangles and knots on the underside of your piece, not
to mention the nervous stress when the knots occur!!
4. Forward and backstitch 2-3 stitches at beginning and end of each row of stitching, and cut the thread tails
close to the work once finishing the row. Reduces tangles, time and stress!
5. If you have one, use the “needle down” position on your machine, until each row is finished. Makes for
easy manouvering of pieces.
6. Be extra careful if you find you’re stitching the cross grain of a patch to the cross grain of the muslin! Just
let the fabric feed itself under the machine presser foot, no problem if you happen to have a walking or
even-feed foot! Any stretching at this point is sure to distort.
© Online Quilt Magazine.com All Rights Reserved P a g e | 30
Online Quilt Magazine – Vol. 1 No. 7
7. Press EVERY seam with iron before crossing that seam with another row of stitching. PRESS - don’t iron - so
that any cross-grain of muslin OR patches is not stretched. This will avoid puckering. Always use a good
steam iron when using cotton fabrics.
8. Don’t worry about perfect placement edge to edge, but make sure the underneath raw edge is showing a
little, to ensure both pieces are well anchored.
9. If you want a really random “crazy” pattern, keep checking your pieces before pinning the cutting line. It’s
amazing how they seem to want to line up more organized than random if left alone!
10. Before you stitch an odd-shaped patch pin it in place and do a check “flip” to see how it will look.
11. It's ideal to keep covering the exposed raw edges one by one with a
new patch, pin, stitch and flip. But you’ll soon come to a piece
whose raw edge you can’t cover with a “flipped” scrap. Start the row
of stitching ¼” from where you’ve been placing the others, to allow
for ¼” turn under of the raw edge. A short row or edge (top)
stitching will anchor these.
12. For more decorative options: Depending on the purpose of your Crazy Patched item, you may want to
embellish further with embroidery or other texturing. The process discussed above is laundry-friendly, with
all raw edges enclosed. But you may choose to “seal” some of your special fabric pieces with interfacing,
whisperweft or Fusible Web. If so, once all your patches have been placed and stitched or fused, you can
cover each edge of each piece with decorative machine or hand stitching. Carefully decide on iron
temperature for each fabric involved. For instance, velvets or other “pile” fabrics should not be “pressed”
but the iron is held above the fabric for a burst of steam to lift the pile.
© Online Quilt Magazine.com All Rights Reserved P a g e | 31
Online Quilt Magazine – Vol. 1 No. 7
13. If making the Christmas table mats, you might like to edge around some of the patches with a metallic
thread. The border could also be quilted/embellished with free-motion stitching.
THE OPTIONS FOR THE OUTCOME ARE LIMITED
LIMITED ONLY BY OUR
IMAGINATION!
~~~~~~~~~~~~~~~~~~~~~
~~~~~~~~~~~~~~~~~~~~~
About the Author:
Margot hails from the Gold Coast, Queensland,
and works full-time as a Registered Nurse. When
aged 10, her mother sat her down at an old
Singer machine, with a McCall’s pattern for some
shorts and said, “make those and you’ll make
anything!” Sewing in many forms has been her
recreation since she ceased making clothing for
her now adult family of 2 daughters. Active in
dance, and theatre, including amateur musical
comedy, she was enticed into costume design
and creation for several decades! With 24 years
owning an industrial screen-printing business,
and now having returned to nursing, quilting and
fabric embellishment of many varieties have
become her sanity. 2.8 small grandchildren are
now the objects of her craft creations,
particularly knitting and quilting. She would love
to pass on her acquired skills more, helping
women to find joy in developing their creative
passions.
© Online Quilt Magazine.com All Rights Reserved P a g e | 32
Online Quilt Magazine – Vol. 1 No. 7
Christmas Quilting Find-a-Word Puzzle
S
S
A
M
T
S
I
R
H
C
H
X
Z
A
Y
N
E
W
Y
E
A
R
S
E
V
E
N
S
T
O
C
K
I
N
G
S
W
Z
C
T
D
U
O
J
C
V
L
S
I
Q
U
Z
A
R
S
H
K
H
X
H
N
I
G
Y
K
advent calendar
brandy custard
christmas
christmas eve
family
festive
P
A
Y
N
T
R
T
Y
A
C
W
L
V
B
T
X
T
R
I
A
C
D
Z
N
L
Q
J
S
L
F
I
S
B
T
V
P
P
O
B
B
U
V
A
K
T
L
I
E
A
L
H
T
V
C
W
M
S
M
E
M
N
V
U
L
C
G
Y
L
I
E
A
T
E
T
L
M
L
F
S
D
V
L
E
S
O
T
C
O
P
V
E
food
gifts
holly
napkins
new years eve
pavlova
plum pudding
T
N
U
Y
R
E
P
O
A
V
U
H
S
F
A
I
K
T
V
P
Q
L
A
D
S
T
I
R
W
K
K
E
E
U
E
U
D
T
I
G
B
I
X
P
Q
R
I
N
B
I
Z
V
P
R
P
Y
C
A
T
L
D
Z
N
Z
E
M
X
W
A
B
E
N
T
A
L
G
P
C
I
J
T
U
R
K
E
Y
R
J
S
B
G
F
Y
D
O
O
F
Z
N
V
R
Q
X
G
santa
stockings
table topper
time to quilt
tree skirt
turkey
© Online Quilt Magazine.com All Rights Reserved P a g e | 33
Online Quilt Magazine – Vol. 1 No. 7
Block of the Month
This month's block is a simple classic block based
on the 9 patch block. As a kind of "Christmassy"
themed block, you could have a play with this for
a holiday quilting project this month.
To make this 9 inch block as shown, you will need
two different fabrics and once you have rotary
cut the pieces according to the Cutting Diagram,
you can piece them together as shown below.
© Online Quilt Magazine.com All Rights Reserved P a g e | 34
Online Quilt Magazine – Vol. 1 No. 7
Today's tips:
•
When making miniatures, do not wash
new fabric. The sizing will make piecing
easier.
•
Consider making your quilt's hanging
sleeve from all the fabrics you used to
make your quilt. Then, if future
generations need to make a repair, they
will have the original fabrics to use.
© Online Quilt Magazine.com All Rights Reserved P a g e | 35
Online Quilt Magazine – Vol. 1 No. 7
Quilters' Horoscope
By Pauline Rogers from www.QuiltersWorld.com.au
A humourous compilation of character traits of quilters according to their zodiac signs. Compiled by a
quilting tutor with over twenty years experience teaching patchwork and quilting but zero years writing
horoscopes.
Sagittarius - November 23 to December 21
Sagittarians love challenges of all kinds and will pick the most difficult
quilt design to pursue. Ever optimistic they will not be deterred by
complex patterns even as beginners. Their ability to tackle
complicated projects with ease sometimes leads them to be tactless
when faced with what they view as a simple project. However, people
tend to admire Sagittarians and thus forgive their indiscretions.
As it is extremely important to a Sagittarian to complete everything
they start, the only unfinished project they will have is the one they
are currently working on. They prefer to quilt with friends and family
as a shared activity rather then as a solitary pastime.
Sagittarius design from the "Quilting With The Stars" quilt from the Quilt Block of the Month Club.com
© Online Quilt Magazine.com All Rights Reserved P a g e | 36
Online Quilt Magazine – Vol. 1 No. 7
YES, We Want to Hear From
You!
"Quilt-y"
Sayings…
As our Online Magazine continues to grow each
month, we need your feedback in order for us to
continue to improve our publication for you.
* A family is a
patchwork of LOVE
•
We want to know how you liked it.
•
We want to know the topics you're
interested in.
•
We want to know if you have any
suggestions, Hints or Tips of your own that
you'd like included, or if you know anyone
we should include a story on!
Please send me an email with your Testimonial,
Suggestion or Enhancement – I'd love to hear
from you!
* A fat quarter has
fewer calories than a
hot fudge sundae!
If you'd like to submit an Article, or a Project
for Publication, or take advantage of our Very
Very Reasonable Advertising Rates, please
email details or queries to Jody at
[email protected] .
Send all emails to:
[email protected]
© Online Quilt Magazine.com All Rights Reserved P a g e | 37


© Copyright 2026