
CAMPING SKILLS SUPPLEMENT Girl Scouts of Eastern Massachusetts
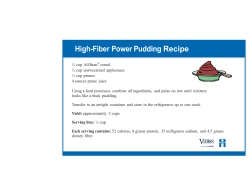
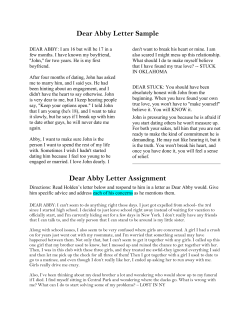
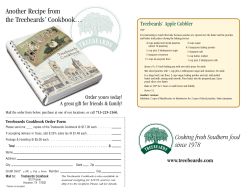
CAMPING SKILLS SUPPLEMENT Girl Scouts of Eastern Massachusetts 95 Berkeley Street, Boston, MA 02116 · 617-492-1708 www.girlscoutseasternmass.org TABLE OF CONTENTS RECIPES……………………………………………………………………………………………3 Camp Meals Foods for Hiking Edible Campfires OUTDOOR SKILLS…………………………………………………………………………….12 Knots Jackknives Navigation CAMP TOOLS AND EQUIPMENT…………………….…………………………………….21 Saws Improvised Camp Equipment Box Oven OUTDOOR FUN………………………..….……………………………………………………25 Hikes Rainy Days Nighttime Campfires OUTDOOR CEREMONIES……………………………………………………………………31 Outdoor Flag Ceremonies Scouts’ Own 2 RECIPES Camp Meals Foods for Hiking Edible Campfires 3 RECIPES One-Pot Meals TETRAZINI Serves 10 2 9.5 oz. cans turkey, tuna, or chicken 2 10 oz. cans cream of mushroom soup 2 10 oz. cans water 4 pkg. Ramen noodles (or substitute onion soup mix) Heat soup and water, stirring until blended. Bring to a boil and add noodles, stirring continuously to separate (about 3 minutes). Add 2 of the 4 flavor packets and the canned meat. Heat until warm. PASTA PRIMAVERA Serves 8-10 1 lb. pre-cooked pasta 1 cup heavy cream 1 pkg. frozen vegetable mix ½ lb. butter or margarine 1 cup grated parmesan cheese salt & pepper Boil a small amount of water in the bottom of the pot and cook frozen vegetables until tender (about 5 minutes). Add pre-cooked pasta and cook until warm. Drain excess water. Add warmed butter or margarine and cream. Sprinkle cheese all over, using full cup. CHICKEN, RICE & BROCCOLI Serves 10 6-8 cubed and pre-washed chicken breasts (pre-cook chicken to reduce cooking time) 4 cups rice 1 pkg. onion soup mix 2 10 oz. cans cream of mushroom soup 2 10 oz. cans water 1 pkg. frozen broccoli (diced) Brown chicken. Add soup and water and bring to a boil. Add rice and cook for 10 minutes. Add broccoli to the top of the rice mixture, and steam for a few minutes. Then stir into mix. Cook until rice is done. VEGGIE PASTA 3 lbs. macaroni 2 onions 2 lbs. carrots 2 lbs. zucchini olive or vegetable oil Serves about 20 2 peppers 2 lbs. mushrooms 3 20 ounce cans of diced tomatoes 6 cups water Have girls choose vegetables they like. Wash, peel, and thinly slice vegetables. Sauté vegetables in oil, add canned tomatoes. Add water and bring to a boil. Add macaroni and cook until tender. Stir more often as water is absorbed. To reduce cooking time, pre-cook macaroni and reduce water. 4 CAMPFIRE STEW Serves 12 2 lbs. hamburger 1 onion, chopped 4 cans vegetable soup 2 cans water seasonings Optional – 2 cups elbow macaroni (increase water to 4 cans). Or use 6 cups of already–cooked macaroni – use judgment on amount of extra water. Optional – Add canned or frozen vegetables. Cook hamburger and onion. Add soup and water. Bring to boil. (Optional – Add macaroni.) Boil one minute, then simmer. (If using uncooked macaroni about 20 minutes until macaroni is tender, and stew thick). MINESTRONE SOUP 2 tbsp. olive oil 2 cups chopped onion 5 med. cloves garlic 1½ cups dry pasta 1 pkg. chopped spinach 1 diced green pepper 1 med. diced carrot Serves 8-10 1 29 oz. can tomato puree 1 19 oz. can kidney beans 6-8 cups water 1 tsp. basil 1 tsp. oregano 2 tsp. salt pepper to taste Brown onion and minced garlic in olive oil. Add remaining ingredients. Bring to a boil, and simmer until pasta is cooked. Stick Cooking MARSHMALLOWS Soak sticks in water 1-2 hours prior to using. Use to make S’mores sandwiches: 2 squares from a Hershey chocolate bar (each bar makes 4 S’mores) and 2 toasted marshmallows. Break a graham cracker in half and place chocolate and marshmallow between 2 halves. KEBOBS Soaks sticks in water 1-2 hours prior to using. Place meat, veggies, fruit on thin stick and cook over hot coals. DOUGH BOYS Soak sticks in water 1-2 hours prior to using. Use refrigerator dough rolls, shape each roll into a snake, cover end of stick with aluminum foil and coil snake of dough around it. You may wish to wrap dough on stick in foil, it sometimes aids in cooking. Cook slowly over coals or embers. Remove outer foil then carefully remove cooked dough “tube” from stick. Embellish in a number of ways. Spread with butter and sprinkle with cinnamon and sugar Éclair: pipe vanilla pudding into dough tube (make instant pudding in a zippy bag, snip small corner of bag to pipe into dough). Frost with canned chocolate frosting. Pipe a favorite jelly into tube for a jelly roll. 5 Tin Foil Cooking CHICKEN AND VEGGIES Line bottom center of foil with sliced onion. Place boneless chicken breast, (Fillet of fish may be substituted), then layer sliced onion and carrot, 2 tbsp. butter, seasoning, BBQ sauce. Wrap tightly and place at edge of coals, cook 25 min. Variation: Use pepper, onion, and chunk pineapple in place of BBQ sauce. QUESADILLA Grease one piece of foil. Place one flour tortilla on foil. Fill with desired filling (cooked chicken chunks, salsa, grated cheese, etc.). Cover with second tortilla. Place second piece of greased foil on top, greased side down. Wrap tightly around edges. Place on edge of coals, 5 min / side. BAKED APPLE Core one apple. Place pat of butter, 1 tsp. cinnamon, 1 tbsp. sugar in hole in apple. Wrap tightly in foil. Cook on edge of hot coals approx. 20 min. rotating apple at times to expose all sides to heat. BANANA BOAT Slice through 1 banana lengthwise leaving bottom skin intact. Spread banana apart slightly. Fill void with chocolate bits, marshmallows, brown sugar, etc. Wrap tightly in foil. Bake approx. 15 min. at edge of coals. Box Oven ENGLISH MUFFIN PIZZA Place muffin halves on ungreased baking sheet. Top each with 2 tablespoons pizza sauce, grated cheese (pizza variety bags work well), and anything else you like (sliced onion, pepperoni, kielbasa, pepper, etc.). Cook in 400 oven for 15 min. or until cheese is melted. Variation: use French bread in place of English muffins. BISCUITS Use pre-made biscuit dough. Place biscuits on lightly greased baking sheet. Place in 350 preheated oven. Cook 8-10 min. or until lightly browned. CALZONES On a wax paper plate, flatten ¼ lb. prepared bread dough to ¼ in. thick. Layer desired cold cuts and onions, peppers, etc. in center of dough leaving 1½ to 2 inch border of dough all around. Pull dough edges to top and press together to seal. Place on well greased baking sheet. Cook in 450 oven for 20 min. or until dough is golden. BROWNIES Follow directions on box. 6 Dutch Oven PILGRIM CHICKEN 350 degrees 1-2 boneless skinless chicken breasts per person 1-2 green peppers, chopped 1 clove minced garlic 2 cans whole cranberry sauce 2 cups bisquick 1 cup milk 2 cups apple juice ¼ cup corn meal Brown chicken, add peppers, onion and garlic, sauté 2-3 minutes. Add salt and pepper to taste. Stir in cranberry sauce and apple juice. Bring to boil. Mix bisquick and corn meal together, add mild and stir well. Drop dumplings into boiling liquid in large spoonfuls. Cook 10 minutes uncovered then 12 minutes covered. DUTCH OVEN LASAGNA red meat sauce sour cream (optional) lasagna noodles grated cheeses 350 degrees Coat bottom of oven with ½ in. of sauce, top with single layer of uncooked noodles, top with more sauce, then layer of cheese and sour cream. Continue to layer until within 1” of top of oven. Bake for 1 hr. with coals on top and bottom of oven. BE SURE SAUCE IS ON BOTH SIDES OF NOODLES. MACARONI & CHEESE 1 -7 oz. box macaroni ½ lb. cheddar cheese 2 cups milk salt & pepper 350 degrees Bring 2 cups water to boil in Dutch oven. Add macaroni and let come to a boil again. Stir macaroni 2-3 times while water gets to ½ in. in oven. Be sure oven is only moderately hot and add cheese on top that has been cut into slices. Pour in milk and salt and pepper to taste. Dinner is done when milk has cooked down and cheese melted through. QUICHE 350 degrees 4 slices bread 2 med tomatoes cubed 1 cup grated Swiss cheese 1 cup skim milk ½ cup egg substitute ½ tsp salt dash pepper 1 tsp. prepared mustard pinch cayenne pepper Cut bread into cubes and arrange on sprayed bottom of oven. Place tomatoes over bread and sprinkle with cheese. Mix egg, milk, salt, pepper, mustard and cayenne and pour over mixture. Bake 30 – 40 min. until done and serve at once. Substitutes: low fat cheeses, ham, mushrooms, onions, garlic, broccoli, etc. 7 FOODS FOR HIKING PEMMICAN Originated as an Indian food. Through its evolution it has become a highly nutritious, compact and tasty trail food; nonperishable and ideal for emergency foods. Combine food groups for your own taste. ½ cup fruit (pitted prunes, raisins, moist-pack peaches, apples, apricots, dates, currants) ½ cup cereal (wheat germ, graham crackers) ½ cup seeds (pumpkin seeds, shelled sunflower seeds, walnuts, peanuts, cashews) ½ cup dried milk ¼ cup honey 2 tsp lemon juice Combine ingredients: Yields: 16 rolls Choose at least one food from each of the categories. Grind fruit, cereal, seeds and nuts through a good grinder set as “coarse.” Mix thoroughly. Combine dried milk, lemon juice and honey. Stir into ground mixture. Add more cereal if gooey. Shape into thumb-sized rolls. Wrap individually in foil or plastic wrap. GORP Gorp is a nutritious, high-energy food, which is easily carried on the trail. Raisins and peanuts are the mainstay, and chocolate, which provides quick energy, is generally included. Recipes vary among people. 2 2 2 2 4 cups cups cups cups cups salted peanuts of raisins dried apricots (chopped) candy coated chocolate bite-size shredded wheat or rice cereal Combine ingredients: REMEMBER SOME GIRLS/ADULTS MIGHT HAVE FOOD ALLERGIES TO NUTS. SUBSTITUTE AS NEEDED. Yields: 12 cups Variations: almonds, salted soy nuts, cashews, chopped dates, carob nuts, dried coconut, walnuts, dried prunes, pinion nuts, banana flakes, granola, dried apple slices, wheat germ, pumpkin seeds, shelled sunflower seeds. FRUIT LEATHER Leather is a fruit cut and finely pureed in a blender or a food processor, spread on a flat surface and dried. You can use berries, apples, apricots, plums, peaches or nectarines. Wash fruit and remove seeds, stem and core. Cut into cubes. Puree fruit, 1 cup at a time. Five cups of puree will fill a pan 12 x 15, ¼ inch thick. Note: if necessary, add a tablespoon of water to begin puree action in blender. Line a cookie sheet with plastic wrap, taping edges of wrap to prevent curling. Spread fruit puree evenly on cookie sheet. Put in oven at 200 degrees. The leather is ready when it can be pulled from plastic wrap. Cut in 1 inch strips; roll and wrap in plastic. Yields: 15 strips from 5 cups of puree 8 GRANOLA 2 cups rolled oats 1 cup wheat germ 1 cup shredded coconut ¾ cup sesame seeds ½ cup bran ¾ cup chopped nuts 1 cup shelled sunflower or pumpkin seeds 1 cup dried milk powder ¾ cup toasted soybeans ½ cup raisins ⅓ cup of oil ⅓ cup honey 1 tsp. vanilla Combine oats, wheat germ, coconut, bran, sesame seeds, nuts, seeds, dried milk and soybeans. Combine oil, honey and vanilla and mix with cereal mixture. Spread on two 9 x 12 cookie sheets and bake at 350 degrees F, stirring every 5 minutes until brown. Add raisins after baking. Yields: 16½ cups 9 EDIBLE CAMPFIRES Edible Campfires are a great way to teach your girls basic fire safety and fire-building principles. CANDY AND PRETZELS Things You Will Need: Clear space Fire ring Tinder Kindling Matches Fire Fuel Fire starters Fire bucket Shovel Fire poker Paper napkin Jelly beans or M&M’s Coconut Pretzel sticks Potato sticks Red hots or candy corn Pretzel logs, licorice Twizzlers, or Tootsie Rolls Mini-marshmallows Cup of juice, water Spoon Straws or popsicle stick As you help your girls put the fire together, explain what they are doing and how it relates to a real campfire. Directions: 1. First, clear an area of debris at least eight to ten feet around where the fire will be built. Make sure there are no overhanging branches. (Open up and spread out the napkin. Move any clutter back.) 2. Lay your fire ring. (Arrange jelly beans or M&M’s on the napkin in a wide circle at least 5” in diameter.) 3. Fill your fire bucket and place a critter stick in it. Put you fire poker in the water. (Put water or juice in the cup; put a stirrer or stick in it. Put the spoon nearby.) 4. Lay the A-frame using kindling. The opening (the bottom of the A) needs to be facing you and your back needs to be to the wind. (Lay down three pretzel sticks so that they form a capital “A” with the crosspiece on top of the two legs.) 5. Place the fire starters in the center of the A-frame, with two or three under the crosspiece. (Distribute about six mini-marshmallows in the A-frame.) 6. Now add tinder. (Sprinkle coconut throughout the center of the A-frame.) 7. Hold a match under the crosspiece of the A-frame and light the fire starters. (If the fire has been built correctly, the instructor then adds the red hots [or candy corn] to show that the fire has been lit.) 8. Add kindling. (Add more pretzel sticks.) 9. When the kindling is burning well, add fuel. (Add pretzel logs, Twizzlers, or Tootsie Rolls.) 10 EDIBLE CAMPFIRES Edible Campfires are a great way to teach your girls basic fire safety and fire-building principles. VEGETABLE SALAD Non food items needed: plates knives peelers Dixie (small) cups Food items: Lettuce Carrots Celery Cucumbers Croutons Tomatoes Shredded Cheese Salad Dressings(s) Before starting, shred the lettuce, slice carrots, celery, and cucumbers into “sticks” or “logs,” and dice the tomatoes. When putting together this dish, the diners should observe all “fire safety” rules including (but not limited to): pull back long hair, remove all dangling jewelry, and tuck in all loose clothing, For each serving of Edible Fire, place a Dixie cup of preferred salad dressing on the side of a plate (this is the ”water bucket”). Place a ring of croutons around the edge of the plate (this is the “fire ring”). Using appropriate sized “sticks” (could be cucumbers, celery, or carrots), assemble an A-frame for the fire. Add kindling (shredded lettuce) and fire starters (tomatoes). The flames are represented by the cheese. Add fuel to the fire with larger logs of cucumbers, celery, or carrots. Since some girls do not like all the ingredients, we’re flexible as to the types of “wood” they use on their salad. Douse the “fire” with the dressing, and enjoy. 11 OUTDOOR SKILLS Knots Jackknives Navigation 12 KNOT TYING GAMES A fun way to practice knots once girls get comfortable making them is to play knot games. Here are a few to try out. Knot Relay: Decide on a knot to use for this game. Divide into teams of equal size and count off. Each team sits or stands in a circle with the number one player holding a piece of rope. At a given signal, the number one player runs around the circle and returns to her place. She then must tie the knot correctly (if the clove hitch was chosen, she also should have a short stick to tie the knot around). She passes the rope to the player on her left, who must un-tie the knot before starting around the circle. Each player takes a turn until the rope has come back to the number one player, and she has untied the knot. Cat’s Tails: Prepare 20 to 30 pieces of heavy string, each piece six inches in length. Hide all but three or four pieces of string. Divide the troop into three or four teams of equal size. Each team chooses a “cat” that is given one of the extra pieces of string. At a given signal, all players, except the “cats” scatter to find the hidden strings. As a girl finds one, she takes it to her “cat” and ties it with a square knot to the last piece of string the “cat” holds. The team that makes the longest tail of string wins. Blindfold Test: See how fast you can tie a certain knot when you are blindfolded or keep your eyes shut. Knotting Baseball: Same teams as baseball, but no bat or ball. Pitcher and batter each have a piece of rope. Pitcher calls name of know and throws his rope to anyone in the field. If batter reaches first with knot tied correctly, he is safe. If knot tied (correctly) by fielder, reaches first before batter, he is out. If batter cannot tie knot called, he is out. If fielder cannot tie knot called, batting side scores one run whatever else happens. Fielders can then return ropes to second, third or home to “force” base runners. Make sure pitcher throws rope to all fielders and not too frequently to first base. 13 Use a tautline hitch to make a loop that is adjustable for a dining fly or a tent rope. Use a square knot to put two pieces of equal thickness together: tie bundles, fasten a sling, mend a broken string, rope or cord, to tie up a boat or bedroll. SQUARE KNOT TAUTLINE HITCH TWIST LEFT-HAND ROPE END OVER, BEHIND, UNDER RIGHT-HAND ROPE PASS ROPE THROUGH RING. CARRY ROPE END AROUND STANDING PART TWICE AND THROUGH LOOP, THUS FORMED. AGAIN TWIST SAME END AS BEFORE ¼ OVER, BEHIND, UNDER. LEFT OVER RIGHT. RIGHT OVER LEFT. REPEAT PROCESS ONCE AND PULL TIGHT. 14 Use a clove hitch to tie a rope to a pole or tree. Use a bowline for rescue or lifeline. The loop will not slide. BOWLINE CLOVE HITCH BRING ROPE END AROUND POLE, LAY IT OVER THE ROPE ITSELF. HOLDING ROPE WITH FINGERS ON TOP PLACE END ON STANDING PART TWIST YOUR HAND, CARRYING END AROUND TO FORM LOOP BRING END ONCE MORE AROUND POLE. CARRY END UNDER THE ROPE ITSELF. BRING END AROUND ROPE DOWN THROUGH THE LOOP 15 THE CAMPER’S TOOL – THE JACKKNIFE A jackknife has many practical uses at camp; whittling a toggle, cutting a rope, scraping a carrot, or trimming a branch. It is a tool, not a toy and should be handled with care. Before teaching girls how to use a jackknife, you should be proficient in its safe use and care. Consider taking a volunteer enrichment session that prepares you how to teach the girls about using and caring for jackknives while camping. Remember to use progression when introducing the use of jackknives. Jackknife Progression: Brownies: Learn pocket knife safety with paper knife: Open, close, hold, cut away Juniors: Pocket Knife: Use, clean, pass, sharpen, whittle a point and safely use Cadettes and up: Review skills, whittle and use for other practical camp uses, like cutting rope and trimming a branch. 4. Cleaning the Jackknife Keep your knife clean and dry. Hold the cleaning cloth at the back of the blade, away from the cutting edge. Wipe carefully across the whole blade. Oil the hinge with machine oil. Never clean the blade by rubbing it in dirt or sand. This dulls the blade and makes the knife hard to open and close. 1. Opening the Jackknife Put your thumbnail in the slot of the blade. Keep your finger away from the cutting edge. Pull the blade out all the way. 2. Using the Jackknife Hold the handle with your whole hand like this. Always cut away from you. Keep at least an arm’s length away from anyone else. 5. Closing the Jackknife Hold the handle of the jackknife in one hand with the sharp cutting side of the knife upward. With the fingers of your other hand, push the blade. The knife will snap shut. Always be sure your fingers are away from the cutting edge. 3. Whittling a Point Shape the stick by cutting off little chips of wood, one at a time. Do not try to cut off big pieces. Cut slowly so your knife will not slip. 16 WOODEN JACKKNIFE You will need 3 jumbo craft sticks and 2 – ¾” paper fasteners. Fasten the two outside sticks together using the remaining paper fastener. Turn under the sharp edges of the paper fasteners on the back. The pointed stick should swing free. Cut a sharp “knife” edge on one end of one stick (use scissors). Drill small holes (use hand drill) on the uncut end of one stick and both ends of the remaining 2 sticks, being careful not to split the wood. Fasten all three sticks together at the bottom using one paper fastener. Make sure the pointed stick is in the middle. You may want to decorate the knife using paint pens or markers. Add a silver blade and your troop number. For teaching knife safety put red lipstick on the edge of the “knife” and if a girl gets lipstick on her while using the knife she was “cut” and didn’t handle it safely. 17 Care of a Jackknife Sharpening the Jackknife A sharp knife is safe and more useful than a dull one. Learn how to keep your jackknife sharp with a sharpening stone (called a corborundom stone.) Hold the stone in one hand and the open jackknife in the other. Keep your fingers below the top edge of the sharpening stone. Lay the flat side of the knife blade on the flat surface of the stone. Keep the knife blade flat. Move the blade over the sharpening stone in a circle. Turn the blade over and sharpen the other side. Passing the Jackknife If you are using a jackknife, close it before you pass it. If you are using other knives such as paring knives, grasp the blade along the dull edge and pass the handle to the other person. In this way you have control of the sharp edge of the knife. Keep you knife in your pocket when you are not using it, or make a lanyard and hang your knife from your belt. Don’t Be an Initial Carver! It is not good outdoor manners to mark up anything with a knife. You will use other tools when you are in camp. Be Responsible and Safe Using any sharp-edged tool is a responsibility. Teach the girls to be responsible and safe. Start by practicing with a paper or wooden jackknife. Making Your Own Paper Knives Make paper knives to use when practicing. Decorate you knife any way you like. A good way to remember which is the sharp side of the blade is to put dark red lipstick on the sharp side of the blade. If you’re improperly handling your knife the lipstick will come off on your hands. For both knives: Copy this page onto paper or card stock. Cut out the patterns. Use your paper pattern to trace patterns onto poster board. For Jackknife: Cut out and punch holes where indicated. Put the knife blade between the two casings and insert a brass fastener through each hole. You can use a bread twist tie if you do not have a fastener. Patterns 18 NAVIGATION Finding directions using the sun and stars The sun can indicate general directions. In the morning, the sun rises in the east. To locate approximate north, turn the right shoulder toward the early morning sun and you are facing north. In the late afternoon, the sun is in the western sky. To locate approximate north, turn the left shoulder toward the sun. You are now facing north. Compass Use A compass determines direction through use of a steel needle attracted by the magnetism of the earth. When at rest, the compass needle points to the north end of this giant magnet. Magnetic north is different from the geographic or map-north indicated on most maps. How to Hold Your Compass The red part of the needle always points to magnetic north. Hold your compass flat (parallel to the ground) with the direction of travel arrow pointing away from you. Also, be careful that you are not holding it next to a belt buckle or other piece of metal as they can interfere with the functioning of a magnetic compass. Degrees The numbers on a compass are called degrees or bearings. A compass has 360 degrees. The reading 90 degrees is the same as east, 180 is south, 270 is west. Reading and Using Maps A map is a two-dimensional drawing that represents an area of the earth’s surface. There are many types of maps, including rough sketch, highway, topographical, orienteering and engineering. Become familiar with maps by studying a local road or topographical map. A topographical map provides additional information about the contours and surface features of an area. Most topographical maps are drawn by the U.S. Geological Survey/Department of the Interior. To learn more about compasses, The Girl Scout Council of Southeastern MA has a Compass and Orienteering Program you can borrow. The Compass Game Give one set of directions to each group—do not indicate what the shape is supposed to be—and have them follow the directions, using the compass to make a geometric shape. When done, let them know what the shape was supposed to be to see if they followed the compass directions. Directions for shape number one which is a SQUARE Place Marker go 6 steps @ 360 degrees Place Marker go 6 steps @ 270 degrees Place Marker go 6 steps @ 180 degrees Place Marker go 6 steps @ 90 degrees Directions for shape number two which is an OCTAGON Place Marker go 5 steps @ 45 degrees Place Marker go 5 steps @ 90 degrees Place Marker go 5 steps @ 135 degrees Place Marker go 5 steps @ 180 degrees Place Marker go 5 steps @ 225 degrees Place Marker go 5 steps @ 270 degrees Place Marker go 5 steps @ 315 degrees Place Marker go 5 steps @ 360 degrees 19 TRAIL SIGNS When you want to tell another patrol which way to go in the woods or fields, you can leave a message for that person. You can use sticks, stones, yarn, or tags to tell them where to go next. Stone or Stick Messages are easy to make and will not blow away. Keep Going Split your group. Half go left Go This Way Go 10 steps this way Danger Camp is this way Turn around and go back End of the trail Wait for next directions STOP. Take the other fork Tags or Pieces of Yarn make good trail markers. Tie the yarn or tags to trees, to bunches of grass, to rocks. Place each trail marker within sight of the next one. The last person on the trail collects all the markers. Do not use nails or tacks. You can lay a trail with notes. A note might say, “Follow the creek till you come to the fallen tree. Look in the hollow end of the tree.” The note found in the hollow end of the tree tells where to go next. Compass Directions. Instead of saying go left or right or straight ahead, you can use compass directions to lay a trail. You can also make up a wide game using compass directions. 20 CAMP TOOLS AND EQUIPMENT Saws Improvised Camp Equipment Box Oven 21 USE OF A SAW Saws come in a variety of forms, from a tiny wire pocket saw; a Sven saw which folds into its own handle; a one-person saw; to a two-person bow saw. There are three important factors when sawing: 1. Make certain there is nothing in the saw’s way before starting. 2. Stabilize or brace the piece of wood being cut. 3. The end being sawed should hang free so the down pressure does not bind the blade. (This can be done by leaning the wood against a larger log.) Bow saw use: 1. It is best if a third person stabilizes the wood being cut. 2. PULL, don’t push, your side of the Bow saw for a smooth, easy cutting action. TYPES OF SAWS Two Person Saw Wire Pocket Saw One Person Saw Sven Saw 22 IMPROVISED USEFUL CAMP EQUIPMENT WATERPROOF MATCHES – Need for damp or humid weather. Equipment needed: Melt paraffin. Dip match head & coat Wax or paraffin with wax. Let dry. Keep in metal Can to melt wax in pan of boiling container. Attach sandpaper for striking. water Wooden matches Metal can Sandpaper TRENCH CANDLES – Fire starters to use in wet weather or in starting charcoal. Equipment needed: Melt wax. Roll newspaper tightly. Tie at Newspapers 2” intervals. Saw or cut in between Paraffin or old candles string. Dip or soak section String in melted paraffin. Can to melt wax in pan of boiling Dry on wax paper. water NUGGETS – Alternate fire starter method. Equipment needed: Fill egg carton with sawdust. Melt wax Paper egg carton and pour into sections. Let harden. Sawdust, wood chips, or dryer lint Break apart and use the same way as (cottons) trench candles. DUNK BAGS—Used to sanitize dishes. Equipment needed: Old sheer curtain or net fabric Show string or other string Cut curtain into 17” square for patrol size, 12” for personal size. Fold, sew up bottom and side seams. Form 1” casing at top. Run string and pull. SIT-UPON – Waterproof cushion for sitting on the ground. Equipment needed: Form several layers of newspaper or 1 piece of waterproof material 15” foam so that form 14” square and slight x 36” (old shower curtain, heavy cushion. Tape together so they will not plastic) separate. Cut length of rope according Newspaper or foam to size of waist plus enough to tie. Fold Gimp or string plastic over. Punch holes along open Paper punch edges. Place rope on inside next to fold. Masking tape Insert newspaper and lace shut. Tie Rope (clothesline weight) around waist and you’re ready for hiking. 23 BOX OVEN YOU NEED Sturdy box (imported liquor boxes are often the best) Heavy duty aluminum foil Duck Tape Empty cans Instructions Cut the box so one side can open like a door. You may need to tape the box closed then re-cut depending on how it was originally opened. Cover the whole box, inside & out, with 2 layers of aluminum foil, shiny side towards the inside of the box. If you need to tape foil in place, only use tape on the outside of the box. To cook in a box oven, get charcoal briquettes hot. (Refer to Camp Tools and charcoal starter.) Position empty cans near the inside corners of the box. Place briquettes in a foil pan in the center of the box. Place your food in pan on top of the cans. Close door and let cook. No peeking!! 24 OUTDOOR FUN Hikes Rainy Days Nighttime Campfires 25 Nature Hikes and Activities Hikes ABC Hike: Unit divides into groups which attempt to find natural objects beginning with each letter of the alphabet. The group finding the most wins. Color Swatches: Cut small squares of construction paper and hook them together. Give each girl a set of color swatches to use during a walk. They should try to find something in nature to match the colors. After the walk, talk about what each person found for the different colors. Scenes Hike: Observe nature with all your senses. Encourage girls along the hike to stop the group by saying, “I see something, I hear something or I smell something.” Feel different textures in nature as well. Shape Hike: Learn the shapes like star, crescent, oval, triangle, octagon, hexagon, oblong, rectangle, spiral, etc. and see how man you can find. Inchers Hike: Look for treasures less than one-inch tall/long. Make inch rulers out of card stock before the hike. Animal Home Hike: Look for animal homes including bird and insect homes as well. Crayon Hike: Have each girl select 3 or more crayons from a box. Take a hike and try to find as many things that match the color of the crayons as possible. Drippy Walk: Take a walk during a rain and explore different smells and colors. Look for animals that like the rain and places where soil is eroding. Discuss with the girls ideas on how to prevent soil from eroding. Sketching Walk: You will need crayons and paper for each girl. Decide on a destination and upon arrival pass out paper and crayons and let girls draw what they see. When you get back, have an art exhibit. Nature Activity Ideas Tree Identification: Pick one leaf from different types of trees and try to get the girls to identify the type of tree. Do leaf embossing: Place a leaf under a piece of paper (veins up) and with the side of a crayon, rub the crayon over the paper. The leaf shape will appear on the paper. Have the girls make a scrap book of different leaf embossing. Make plaster casts of animal tracks: Study different types so when you see them you’ll be able to identify them. Look for different birds’ nests: Try to identify the kind of bird that made each nest. (Do this on a drizzly day!) Make a weather chart or calendar Learn the Morse Code: Have the girls write “secret” messages to each other. Do a service project for the camp. Practice First Aid techniques: Have the camp nurse or certified First Aider teach some basic emergency procedures to your unit. Work on badge activities 26 RAINY DAY FUN Rain can be beautiful. But, “is that rain I hear?” can strike terror in the heart of a camp leader; rain, soggy clothes, sneezes, mud puddles, homesickness…the whirl of nightmarish thoughts begin. Relax! A rainy day in camp can be a delightful experience if you plan it that way. Check your own attitude. First, be positive. “Hooray, it’s raining!” Be excited and even enthusiastic. Maybe it will settle the dust on the trails or break the hot, muggy spell. In addition, probably the land needs it, so be thankful. The rain is going to lower the forest fire danger. Though you may stick to your schedule if there’s only a light drizzle, you may want to introduce some exciting innovations when faced with a monsoon. Here are some points to remember. Plan for Rainy Days Begin in pre-camp planning. Brainstorm rainy day ideas. Make elaborate plans and preparations for rainy days. Save surprises and special events to be used ONLY for rainy days. Check Out Facilities What alternate uses can be made of the building? What talents do adults have? Keep Plans Flexible You may need to shift plans if a warm rain becomes a nor’easter or the weather clears. Plan for Individual Girl Needs Be sensitive to girls and adults needs. Weather affects people differently. One may be bursting with energy while another needs to go slowly that day. This means that you may need a variety of active and calm activities. Plan for Maximum Involvement Girls learn in direct proportion to their involvements (and so do you). This means that you may need some all-camp activities, group activities, and individual activities. Some Activities Best Done in the Rain Save these and use them only when it rains. Games and Activities Dramatic Activity Ideas Storytelling: Read a story, act a story out or make up your own tales. Paper Bag Skits: Put about eight items (a stick, a stone, a hat, button) in a bag and have the girls make a skit using all the items in the bag. Dramatize a Song: “put actions to words.” Plan a Special Ceremony: Flag ceremony, Scouts’ Own, Closing Day ceremony. 27 Pantomimes: Have Scout actors interpret feelings and ideas without using words. A girl arranging a vase of flowers A child learning to knit A baby spilling a glass of milk Choral Readings: Pick a story or poem to read together as a group. Plan some of these elements in you choral reading. Light voices (high pitched voices) Dark voices (deeper voices) Solo voices Duet (2) voices Small group voices Impromptu or Informal Dramatics: These are short skits or scenes with not long rehearsals. Create costumes from coats, newspapers, etc. Puppet Show: Pick a story and make puppets. Hand puppets – paper bag puppets, sock puppets Shadow puppets – use a shadow screen Marionette puppets – make a puppet on strings Rod puppets – use a dowel to hold puppets Shadowgraph Screen – A light source (several flashlights) is place behind a white sheet (screen) while the girls act out a story or particular action they want the audience to guess. For example: A person rowing a boat Swimming Riding a horse Play – Make scenery and costumes. Have a producer, actors, and stage crew. Music Activity Ideas Song Fest – Begin with some songs the group already knows. Choose short rounds, or folk songs. Divide group in two and have one group try to out-sing the other group. For example: One group sings a song, and then second group sings a song. Once a song has been sung once, it cannot be used again. Create an Action Song – Make up actions to a favorite song. Compose a Song – Make up your own song (words and music) about what you’re doing at camp. 28 NIGHTTIME ACTIVITIES Night Eyes Purpose: To learn about nocturnal animals and insects whose eyes reflect light. Go on a night hike and a “mystery eyes” search. Activity: First tell girls that many animals that are active at night have eyes that reflect light. For example, a wolf spider’s eyes reflect brilliant, tiny specks of greenish white light, some bullfrogs’ eyes reflect a bright green, and certain moths’ eyes appear orange. In mammals, a deer’s eyes are amber in a flashlight beam, a black bear’s are red, and a fox’s are greenish white. Second, organize a hike whose purpose is to look for eyes. Give each patrol (or team of two) a good flashlight, notebook, and pencil. On their paper, they should have three columns. Title them “Color of Eyes,” “Name of Animal,” and “Where Seen.” Allow the girls to quietly search the area and write down what they see. To begin, the leader can find some eyes (insects’ are easiest) and have girls fill in data on notepaper; then allow the girls to work individually, saving some time at the end of the hike to share their discoveries. Lead this discussion of “Dark Secrets” with questions like, “What animals did you find most often?” “What other lights in the night did you find?” (fireflies, glowworms, tin cans, animals in creeks and ponds are possibilities). Hide and Go Beep Purpose: To learn to use your sense of hearing better after dark. Activity: Hide and Go Beep is a variation of the very familiar game Hide and Go Seek. Girls learn to locate each other by using their ears instead of their eyes. One player becomes “it.” Other players hide in the dark. “It” locates other players by listening for their beeps. Players, who are hiding, go “beep” every 30 seconds (count silently to 30 between beeps). Reference: Girl Scouts of the USA, “Pondering Values Around the Campfire”. 9/77 Night Drawings Purpose: To think about how you use your sense of sight. Activity: Outside, in the dark, give each girl a large, blank index card and peeled crayon. Have the girls write their names on the card, and the color they believe their crayon to be. They will likely complain they can’t see the color. Tell them you know that, and don’t worry about it! Next, have them turn the card over and follow your instructions as accurately as they can: In the middle of the card, draw a square, about 2 inches on each side. In the upper right corner, draw a circle. Next, go back to the square and put a triangle on top of it. This is a house. Go back to the circle and put rays coming out of it. This is the sun. Now, go back to the house and put in a front door, and some windows. Put some clouds in the sky. Add some birds. Put a chimney on the house and then draw some smoke coming out of the chimney. If you like, add a fence in front of the house. When they are finished, collect the cards which will be handed back to their creators when you return inside. Be prepared for squeals of glee and embarrassment when they get them back! Make Someone’s Head Disappear Purpose: To learn how your sense of sight is affected by the dark. Activity: In a very dark spot, bring your group together in a tight circle. Have each person stare intently at the head of the person across from them. Within a few seconds, that person’s head will seem to disappear!! This is because you are using the center of your eye (the cone cells) when you stare directly at something. The cone cells are largely inactive in the dark, and will therefore not see very well. 29 Campfire Fun The campfire is, perhaps, one of the most memorable occasions of a camp. Time and care should be taken to plan the program. The key factor to a good campfire is leadership. Leadership literally makes or breaks a campfire. The Leader of the campfire should carefully plan the campfire program with the people who will be taking part in the program. A good rule of thumb may be the old stage adage, “Always leave them asking for more.” The campfire need not be long. The length will depend upon the occasion and the group participating. The program should include fun, songs, skits, etc. If the campfire is the culmination of a project or a time spent together at camp, you may want to include awards. PHYSICAL ARRANGEMENTS: The site must be safe in terms of overhead clearance and circumference around the fire. Refer to Safety-Wise, p. 17. Be sure everyone is aware of the safety precautions. Seating of the group should also be considered. Is your campfire in a natural area, is the seating already provided, or does each girl need to bring her sit-upon? A campfire has several parts that may be planned by patrols once the theme has been decided. Laying the fire. The fire should be carefully laid, with plenty of dry kindling so it will light immediately. Cover the fire in case of a shower before the fire is burned. Lighting the fire. This may be a ceremony and if so should be done in an impressive manner. Frequently the fire is lit with group singing a song such as “Rise Up O Flame.” Introduction of the theme. This is done briefly by a song poem, or the introduction of a speaker. The introduction must catch the attention and interest of the group. The program. You can develop the program in any number of ways around the theme. Now is the time for games, songs, stories, dramatizations, demonstrations, skits, etc. Ending. The ending is a brief summarizing of the theme. The ending will set the final impressions of the campfire in the minds of the group. The program usually ends with “Taps.” The group leaves quietly. Campfire Activity Ideas Ask the Girls: They’re a valuable resource of yours. They may come up with ideas for games like: Telephone or Gossip: Start with a phrase that has words with common sounds. Whisper it to your neighbor and see what arrives at the end. Spelling Bee: In my Grandmother’s trunk I found a ________. First girl names something that begins with the letter “A,” like Arrow. Second girl says “In my Grandmother’s trunk I found an arrow and a “B” black board. Continue with the rest of the alphabet. 30 OUTDOOR CEREMONIES Flag Ceremony Scouts’ Own 31 AN OUTDOOR FLAG CEREMONY COLOR BEARER COLOR GUARD FORMATION SILENCE CEREMONY SALUTE RAISING OR LOWERING FOLDING PLACING Red sash is over right shoulder and tied with a square knot under left arm. Red sashes are tied around the waist on the left side. There are generally four color guards, but there may be two, six or eight. The group proceeds in double file and divides to form a horseshoe around the flagpole. Bearer and guards then advance to position in front of the flagpole. They remain facing the pole for the entire event. After ceremony, color guard retires first. There is absolute silence from the time the camp moves forward until it returns to the starting point. The Color Guard is the official guardian of the flag for the entire period they are wearing the red sashes. They do not sing or speak. The ceremony takes place after the flag has been raised or before it is lowered. The ceremony itself varies but often consists of the Pledge of Allegiance, patriotic poetry, and songs. The Color Guard salutes at Colors, immediately after they have raised the flag and returned to position. At retreat, they salute the flag after taking their position and before lowering the flag. At Colors and Retreat, the Color Bearer steps forward first and the first two Color Guards follow, taking their positions on the right and left of the flagpole. They are responsible for seeing that the flag flies free and for catching the flag as it is lowered so that it does not touch the ground. At colors, one member may hold the flag as the Flag Bearer attaches it to the flag rope. The flag is held by the Color Guard and folded lengthwise in half then again lengthwise in half. The blue field is folded down underneath toward the outside and is nearest the flagpole. The last couple (those farthest away from the pole) begins folding the flag in a triangle. They fold until they can pass it on to another member of the Color Guard to continue—or the flag is in a triangle. The Color Guard resumes its original position. One member of the first pair steps up in front of the Color Bearer, places the flag, point forward, in her outstretched hands and returns to her position. A SIMPLE COLOR GUARD FOR INDOOR OR OUTSIDE The caller is usually a girl or leader in charge of the ceremony. She stands front right as you look into the horseshoe. Caller: “Girl Scouts Attention” (Girl Scouts, leaders and guests form horseshoe.) Caller: “Color Guard Advance” (Only the color guard moves.) When guard and flags are in place… Caller: “Girl Scouts – the flag of your country – salute. I pledge Allegiance…” Color Guard does not move, sing, or speak! Caller: “Please (or Join me in) say(ing) the Girl Scout Promise (and Law)” Caller: “Please (or Join me in) sing(ing) (select a patriotic or Girl Scout song)” Caller: “Color Guard – post (or retire) the flags” When the flags have been put where-ever, the Color Guard stands until… Caller: “Color Guard dismissed” (The Color Guard comes back to the horseshoe.) 32 33 MAKE EVERY CEREMONY A SCOUTS’ OWN By Myra Nagel Ceremonies are as much a part of Girl Scouting as camping, singing, and earning badges. Being invested, receiving awards, bridging – these are high points of a girl’s adventure in Girl Scouting. Such occasions offer an opportunity to help girls focus on values, to see how their week-to-week activities reach toward wider Girl Scout goals. A ceremony should say something—something that matters. And the best way girls can make a ceremony say something that matters to them is to create it themselves. Every ceremony should be the Scouts’ Own! A Scout’s Own, of course, is a special kind of ceremony that expresses the spirit of Girl Scouting. Nevertheless, can’t investitures, flag ceremonies, and fly-ups be the Scouts’ Own too? Any troop can create a ceremony, not just for a Scout’s Own, but also for every occasion. When girls insist that they do not have ideas, do not believe it! They do have ideas, but often they are afraid to say them aloud. They are afraid someone will laugh or criticize. Creativity can only happen in a atmosphere that is free from the threat of criticism. Why not post a sign that reads, “Judge each person’s ideas as you would a seed—not for what is, bur for what it might become.” Accept every thought as a possible beginning. Creativity is not beating down bad ideas; it’s gathering a whole pile of assorted ideas and then picking out those few that are just right—it’s really a process of selection. Once you have a creative atmosphere, you and the girls, thinking together in equal partnership, can create a ceremony. Just follow these six simple steps: (1) understand the purpose, (2) choose a theme, (3) explore the symbolic possibilities of the theme, (4) decide on a central thought, (5) find ways to express it, and (6) communicate! Since small groups can “rap” better than big ones, let a committee make the general plans, outlining ways the rest of the troop will participate. Let us see how it works. 1. Understand the purpose. “Why are we having this ceremony?” you ask. Girls’ first answers may be hasty ones: “We have a flag ceremony to open a meeting… we have a Court of Awards to receive badges.” With gentle probing from you, hasty answers change to deeper ones: “We have a flag ceremony to honor our country and its flag… we have a Court of Awards to note our progress toward the wider goal of living the Girl Scout Promise.” 2. Choose a theme. Usually the theme is determined by the ceremony. The theme of a flag ceremony might by “My Country.” The theme for an investiture, bridging, or Court of Awards might be “The Girl Scout Promise.” One type of ceremony does not determine the theme, but instead allows girls to choose any theme that expresses their ideals. This ceremony is the Scouts’ Own. Its theme may involve things girls are doing and seeing. A North Carolina troop laid a nature trail in a park and then did a Scouts’ Own on the theme of “Our Earth Tomorrow.” A troop in the Philippines (Troops on Foreign Soil) hiked the 50-mile route of a World War II death march and then had a Scouts’ Own on “My Country—Let’s Make It Worthy of the Sacrifices Others have Made for It.” Many troops like to plan a Scouts’ Own at camp, taking some part of the outdoor setting as their theme: such as trees, the river, the fire. 3. Explore the symbolic possibilities of the theme. A symbol is something that stands for something else. It is a way to portray an abstract idea in terms that are simple and familiar. Life might be symbolized as a trail, and Girl Scout ideals as markers along the way. Or life 34 might be symbolized as an ocean, and the Promise and Law as the compass guiding us over stormy seas. If the theme is friendship or conservation, you can probably think of many different symbols to represent it. If your theme is not an abstract idea, perhaps it could be the symbol. Suppose your committee has chosen the campfire as its theme. “The fire reminds me of something,” you say, “Something that’s like a fire in some ways. Can you guess what it is?” “Warmth,” replies Chris. “Friendship,” suggests Barb. “It could be the fire on our World Association pin that stands for the love of mankind,” says Beth. Without mentioning the word symbol, you have led the girls to the discovery that a campfire can stand for a larger idea. 4. Decide on a central thought. Each person has many different ideas about such complex subjects as love or the Girl Scout Promise, but an effective ceremony has just one central thought. If you decide that the ceremony’s central thought will be “The campfire reminds us of the flame of the love of mankind,” stick to ideas about the fire as a symbol of friendship and love, and rule out such unrelated thoughts as learning to build a fire or practicing fire safety. Save those unused ideas for another day. 5. Find ways to express the central thought. By the time you have explored the symbolic possibilities of your theme and chosen a central thought, the girls should be ready to discuss their ideas for expressing that thought. Poems, pictures, stories and intriguing questions will spark imaginations. A few small books, magazines, notebooks or even scraps of paper will bring better results than a stack of poetry volumes. Too many books—especially thick ones— can boggle the imagination! Use your resources as a mental stimulus, and let the real creativity come from the girls’ minds. Often the best ideas won’t fit a category. “Let’s each draw a girl’s name,” suggests Jennifer. “We’ll read it aloud and make a secret, happy wish for her. Then we’ll drop it into the flame of the love of mankind.” 6. Communicate! Remember that communication is a two-way process that involves not only expressing ideas, but having those ideas heard and understood. Is your ceremony loud enough to be heard? Is it simple enough to be understood? Is it interesting enough to hold attention? Does it touch the emotions and make everyone a participant? In evaluating the girls’ success, sincerity is more important than showmanship; originality is more important than perfection. Did the girls create a ceremony that mattered? Was it truly the Scouts’ Own? You’ll find the answer in a Junior’s smile, a tear in the eyes of a new Senior and a deep satisfaction in your own heart. Origins of a Scouts’ Own “A voluntary uplifting of their hearts…, in thanksgiving for the joys of life.” In these words, Lord Baden-Powell described those periodic moments set aside by Scouts for quiet and reverent communication together known as “Scouts’ Own.” I say God walk across the hills tonight. I saw Him lift his hand to arrange A misplaced star. I saw Him rub away The tarnish from the moon. 35 I saw Him stroke The tired evening’s brow and wept To see Him gently touch the jagged stump Of an old oak tree that lightening Had struck down. Florence Putnam A Scout’s Own occupies a unique place in Scouting because it is a unique kind of program. It is a ceremony where Girl Scouts can reaffirm their ideals. It embodies the Girl Scout code – the Promise and Law – and is a meeting where the individual gains inspiration and dignity of spirit. Scouts’ Own should be carefully prepared, but never elaborately rehearsed. The outdoor setting provides an ideal surrounding to find a special spot. In judging a Scouts’ Own, a group should ask itself these questions: 1. Is there continuity? Do the mechanics run smoothly? 2. Is it given in surroundings conducive to calm and peace? 3. Do all participants feel satisfied? Do they leave with a feeling of having been lifted outside of themselves and with the determination to lead lives more in keeping with the spirit of the Girl Scout movement as expected by its Law? A Scouts’ Own is a way of expressing the meaning of the Promise and Law. A individual girl’s duty to God (or other spiritual force) is a part of that Promise and is expressed in many Scouts’ Own ceremonies. When this duty is a part of the theme of a Scouts’ Own, the program is reverent, but it is never a substitute for a religious service even if it is held on a Sunday. “Quiet Point” – It is a Girl Scout custom to walk quietly from a designated point to the place where the Scouts’ Own is held and to leave quietly after it is over. 36


© Copyright 2026