
Manual - Bodega Surplus Depot
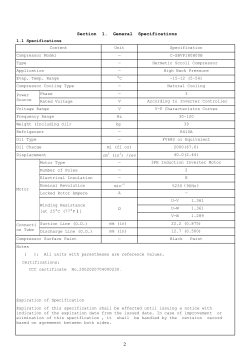
2.5HP 40 Litre
Air Compressor
Instruction Manual
Index
Introduction
Environmental Responsibilities
General Safety Instructions
Electrical Safety
Use of Extension Cords
Additional Safety Instructions
The Compressor & Its Components
Assembly & Operating Instructions
Automatic On/Off Switch
Overload Protection / Reset Procedure
Pressure Gauges
Pressure Regulator
Safety Valve
Compressor Set-Up
Shutting Down Your Compressor
Maintenance
Trouble Shooting
Exploded Diagram
Parts Listing
Warranty Details
If You Have a Problem
Supplier Contact Details
2
3
3
3
4
4
4-5
5
6-7
7
7
8
8
8
8
9
9
9
10
10
11
12
12
Introduction.
Project Air Compressors have been manufactured under stringent Quality Standards to meet the
performance criteria set by Spear & Jackson.
After familiarization you will find this compressor both easy and safe to operate.
Read the instruction manual completely before using your new Project Air Compressor.
Project Air compressors have many features which will make your DIY projects faster and easier.
Environmental Responsibilities.
Please ensure all waste and unwanted products and are disposed of in a safe and
environmentally friendly manner.
General Safety Instructions
When using this product, basic safety precautions should always be followed:
DO NOT OPERATE A COMPRESSOR WHEN UNDER THE INFLUENCE OF ALCOHOL OR DRUGS.
1.
2.
3.
4.
5.
6.
7.
8.
9.
10.
11.
12.
Read all instructions prior to using the product.
To reduce the risk of injury, close supervision is necessary when the compressor is in use
near children or infirm persons.
Know how to stop the compressor and be able to reduce the pressure immediately.
Be completely familiar with all the controls.
Please secure or cover any long hair, clothing or jewelry prior to using this compressor.
Do not reach over machines with moving parts when in operation.
Please ensure that any potential trip or slip hazard is removed prior to operating this
compressor.
Do not use the compressor if the power cord shows any signs of damage or wear. Repair or
replace the damaged cord before use.
Do not pull forcefully on the cord to disconnect it from the power point.
Keep the cord away from heat sources, oil and sharp edges.
NEVER move the unit by pulling on the air hose. Use the handle provided at the front and on
the rear of the tank.
Please ensure that the work area is well lit, ventilated and clean and tidy.
3
Electrical Safety Instructions
This product should only ever be connected to a properly manufactured, fitted and earthed power
outlet that complies with National and regional electrical authority regulations and requirements.
Extension cables are not to be used with this product, as it may cause damage to the Compressor,
Power Outlet and Home wiring. Such actions will void the warranty. Please use a longer Air
Hose.
Warning !
To reduce the risk of electrocution keep all connections dry and off the ground. Do not use if wet or in a
wet environment.
3
Additional Safety Instructions
1. Always wear ear and eye protection when using any compressor, air tool or power tool, or
are in the vicinity of the product when it is use.
2. Do not use the compressor in areas near combustible materials, combustible fumes or dust.
3. Always use a respirator or mask when spray painting or whenever there is a possibility
vapors may be inhaled.
4. DO NOT ALLOW CHILDREN TO OPERATE THE COMPRESSOR AT ANY TIME.
5. DO NOT MAKE ANY MODIFICATIONS OR ADJUSTMENTS TO THE UNIT OR ANY OF ITS
COMPONENTS.
7. UNITS WITH BROKEN OR MISSING PARTS OR WITHOUT THE PROTECTIVE HOUSING
OR COVERS SHOULD NEVER BE OPERATED.
8. Do not leave the compressor unattended while the pressure switch is in the “I” (on)
position.
9. Do not add or change oil while the compressor is in operation.
10. Use only the supplied or recommended lubricating oil for the compressor. Spear & Jackson
Compressor Oil is available from Bunnings Stores (Product Code CA-CAP721-04).
Recommended viscosity ISO 0046.
11. This compressor is fitted with a pressure activated “On/Off” switch. When the switch is in the
“on” position, the compressor may start operating at any time when the pressure in the tank
falls below the preset level of the pressure switch.
12. When not in use, we recommend that all tools and hoses be disconnected and the tanks
drained of air and moisture. We also recommend that you leave the tank drain open when
the compressor is not in use.
13.To reduce the risk of fire or explosion, never spray flammable liquids in a confined area.
4
Additional Safety Instructions
14.Do not ever directly inhale compressed air. Serious injury could occur.
15.Do not use the air from the compressor for any re-breathing apparatus.
16.Never apply the outlet air of this compressor directly on to any part of a person’s body. Do not
attempt to block the air outlet with your finger or any part of your body. Severe injury may
occur.
17.Do not weld anything to the air tank of the compressor. This could result in tank failure and will
void the warranty.
18. Do not operate the compressor with the shield, cowling or cover removed.
18.Before transporting the compressor it is recommended that the tank be drained of pressurized
air.
19.This air compressor is a duty cycle tool. It is not designed to run 100% of the time. If it is run
on a continuous basis this may result in overheating or activation of the thermal cut out.
Continual use of this type will void the warranty.
20.The manufacturer will not be responsible for any damage or injury resulting from cases of
misuse or negligence.
21.The manufacturer will not be liable for any changes made to the compressor nor for any
damage resulting from such changes.
Warning !
In the event that an air line is cut or broken, the air supply must be turned off at the
compressor.
The Compressor and Its Parts
5
Assembly & Operating Instructions
1. Remove all parts from the carton and layout in a clear, level and dust free space.
2. Attach wheels and axle assemblies using Bolts, washers and nuts supplied.
Wheel Assembly
3. The handle on the 2.5hp compressor is Bolted to the tank and comes with a rubber grip.
4. Attach rubber feet with hardware supplied .
Rubber Foot Assembly
5. Attach Air filter supplied (as shown) to air inlet on the side of the pump.
No Air Filter Fitted
Air Filter
Air Filter Fitted
6. Ensure oil is added from the bottle supplied until the marker in the sight glass is level with the
red indicator line. Additional oil can be purchased from Bunnings if required
(Spear
& Jackson Compressor Oil CA-CAP721-04).
Sight Glass
Empty
Sight Glass
Over full
Sight Glass
Correct Level
Sight Glass
Located Here
7. When the correct amount of oil has been added, screw the BREATHER PLUG SUPPLIED back
into position as shown below. DO NOT OVERTIGHTEN .
Correct Position of Breather Plug
8. Before connecting the compressor to the power outlet, check for broken components
and any damage to the power cord.
6
Assembly & Operating Instructions
9. Make sure the pressure switch is in the “O” or OFF position.
10. Plug the unit into a properly fitted and earthed power outlet.
11. Attach the desired tool to the end of the air hose.
12. Switch the compressor on by pushing the lever to the horizontal position.
When Lever is Horizontal compressor is ON
Automatic On / Off
The compressor is equipped with a pressure activated on/off switch. The compressor will only
run when the switch is in the “I” or ON position (as per previous page).
Once the tank has reached the maximum preset pressure (115 PSI), the pump will
automatically shut off.
The pump will automatically restart once the pressure in the tank drops below the minimum
preset pressure (85 PSI).
The maximum and minimum pressures are set at the factory. Any attempt by the
operator to change them will void the warranty of the product.
Overload Protection /
1.
2.
3.
4.
5.
Reset Procedure
Switch “On/Off” Switch to “Off” Position.
Disconnect compressor from Power source.
Press the reset button located on the pump, next to the cylinder head beneath the edge
of the protective cowl. (as shown in image below)
Reset switch located here
Reconnect to power source.
Re activate compressor using the “On/Off” Switch.
Possible causes of motor overload are as follows 1.
Inadequate power supply.
2.
Use of extension leads.
3.
Overheating.
4.
Lack of lubricating oil.
5.
Use outside the standard operating parameters for this compressor.
7
Pressure Gauges
The Tank Pressure Gauge supplies the reading of the air pressure inside the tank.
Pressure Regulator
This compressor is fitted with an Air Pressure Regulator. It allows regulation of the output air
pressure.
Some air tools require a higher operating pressure than others. Please refer to the air pressure
requirements of your tools for the proper settings for the regulator.
NOTE. If you do not allow the air to discharge whilst you are setting the regulator, the pressure
as indicated on the regulated outlet gauge will be incorrect.
This gauge ONLY indicates the correct pressure while air is being discharged from the
outlet.
Safety Valve
The compressor is equipped with a safety valve that will engage when the pressure in the
tank exceeds the maximum pressure setting, releasing any excess built up.
DO NOT REMOVE OR ATTEMPT TO ADJUST THE SAFETY VALVE.
Safety Switch
Compressor Set Up
8
Shutting Down Your Compressor
When you have finished using your compressor, follow these steps:1.
2.
3.
4.
5.
6.
7.
Close the air outlet taps.
Switch off the compressor.
Disconnect unit from power outlet (power point).
Disconnect tools and / or Accessories from the air hose.
Disconnect the Air Hose.
Locate the drain valve on the underside of the tank.
Open the drain valve to release remaining pressurized air from within the tank. Moisture build
up in the tank is normal with air compressors, so a small amount of water may come out
while draining. (Draining the tank is vital for the longevity and safety of your air
compressor).
8. Store the compressor in a cool, dry place.
Maintenance
1. The tank will require accumulated moisture to be drained from it on a regular basis. It is
recommended that the tank be drained of moisture after every 5 Hours of use. The drain
valve is located on the underside of the tank.
2. Check Oil level before each use.
3. Wash air filter insert in a mild soapy solution after 50 hours use. Operation in extreme
conditions e.g., dust, paint residue etc, may require more frequent cleaning.
4. Check handle is attached properly prior to use.
6. Check power cord for signs of wear and tear before each use.
7. Never use caustic agents to clean any part of the compressor.
8. Remove dust and dirt regularly. Wipe down compressor with a damp rag. Do not use alcohol,
petrol or other cleaning agent as this presents a fire hazard.
Trouble Shooting
Problem
Probable Cause
Not connected to power supply
Power supply not switched on
Compressor will not start
Tank full of air
On/Off switch in Off position
Problem
Probable Cause
Power Fault or supply voltage too low
Motor will not run
Motor Running too slow
Power cord too long or too thin
Motor becoming excessively
Lack of lubricating oil
hot
Compressor running non stop.
Problem
Probable Cause
Loose Part
Excessive vibration or noise
Wheel or mounting feet loose
Problem
Probable Cause
Dirty air filter
Inability to maintain required
Air Leaking
operating pressure
Air consumption beyond capability of the unit
Problem
Probable Cause
Oil Level too high
Oil Consumption too high
Oil filler hole blocked
Incorrect grade of oil used
9
Possible Solution
Check Connection
Check switched On
Motor will restart when pressure drops below preset minimum
set switch to "on" position
Possible Solution
Check the Power supply
Do not use extension leads
Check oil level and adjust as necessary
Reduce air consumption and allow compressor to cool.
Possible Solution
Tighten Component
Tighten Component
Possible Solution
Clean air filter
Return to point of purchase for assessment
Reduce air consumption.
Possible Solution
Maintain the oil at the correct level
Check and clean
Use recommended oil only
Exploded Diagram
Parts Listing
1
Crankcase
14 Piston pin
27 elbow exhaust
40 bearing
53 bolt
66 mounting bracket
2
Crank shaft
15 Piston
28 cylinder head
41 totator
54 wheel
67 bolt
3
Gasket
16 Piston ring
29 spring
42 bearing
55 bolt
68 bolt
4
Crank case cover
17 Piston ring
30 bolt
43 oil bearing
56 ferrule
69 support
5
Bolt
18 Gasket
31 ail filter
44 handle
57 washer
70 air cock
6
Gasket
19 cylinder
32 capacitance
45 hand
58 nut
71 regulator
7
Oil glass
20 Spring
33 spring
46 pressure switch
59 unloading pipe
72 safety valle
8
Bolt
21 bolt
34 bolt
47 tank
60 unloading nut
73 elbow exhaust
9
Spring
22 gasket
35 cover
48 nut
61 exhaust pipe
74 pressure gauge
23 valve
36 bolt
49 spring
62 exhaust nut
75 pipe
76 electrical wire
10 Breath
11 Bolt
24 valve slice
37 fan
50 washer
63 check valve
12 Connecting rod
25 valve gasket
38 rear bearing crank
51 cushion foot
64 bolt
77 plug
13 Circlip
26 gasket
39 stator
52 washer
65 pannel
78 overload protector
10
Warranty
Compressors:
One Year Home Use Warranty
Warranty providor:
Spear & Jackson PTY Ltd
PO Box 4400
Dandenong South
Victoria Australia
3164
Telephone: 1300 731 818
Facsimile: 1300 735 858
What Products are Covered By this Warranty:
Project Air Branded air compressor.
What is covered under this Warranty:
Substantial defects due to material and workmanship.
What is not covered under this warranty:
1.
2.
3.
4.
5.
6.
7.
8.
9.
10.
11.
12.
13.
If this compressor is used for commercial, industrial or rental purposes, the warranty will be
void.
Any failure that results from an accident, purchaser’s abuse, neglect or failure to operate
products in accordance with instructions provided in the owner’s manual(s) supplied with
compressor.
Pre-delivery service, i.e. assembly, oil or lubricants, and adjustment.
Items or service that are normally required to maintain the product, i.e. lubricants, filters and
gaskets, etc.
Any failure caused by installing or operating unit under conditions not in accordance with
installation and operation guidelines or damaged by contact with surroundings.
Pump or valve failure caused by rain, excessive humidity, corrosive environments or other
contaminants.
Cosmetic defects that do not interfere with compressor functionality.
Damage due to incorrect voltage or improper wiring to which the compressor is connected.
Other items not listed but considered general wear parts.
Pressure switches, air governors and safety valves modified from factory settings.
Damage caused by use of incorrect oil.
Pump wear or valve damage caused by any oil contamination.
Damage from inadequate filter maintenance.
Responsibilities of the Warranty provider under this warranty:
To repair or replace, at manufacturers option, compressor or component which is defective, has
malfunctioned and/or failed to conform within duration of the warranty period.
Responsibilities of the Purchaser under this warranty:
Provide dated proof of purchase and maintenance records.
Use reasonable care in the operation and maintenance of the products as described in the
owner’s manual (s).
11
If You Have a Problem
Before returning this product for a Warranty Claim or any other reason Please Call
1300 731 818 (Australia)
0800 652 652 (New Zealand)
When you make your call, please have the following information at hand:
• Product Type
• Product Code
• Place of Purchase
• Date of Purchase
•Concise description of the problem
A Spear & Jackson Customer Service Officer will take your call and, in most cases, will be able to
solve your problem over the phone.
With continuing product development changes may have occurred which render the product
received slightly different to that shown in this instruction manual. The manufacturer reserves the
right to change specifications without notice.
Note: Specifications may differ from country to country.
The Helpline operates from 8am to 8pm, 5 days a week (EST). This allows you to contact Spear &
Jackson directly with any queries and technical questions you have regarding our products.
Spear & Jackson Contact Details
P.O Box 4400
Dandenong South,
Victoria
3164
Customer Service Contact Details
Tel
:- 1300 731 818
Fax :- 1300 735 858
Email :- [email protected]
Due to continuous product development and improvement, Spear & Jackson reserves the
right to modify product design and materials without prior notice.
12


© Copyright 2026