
Rachel Handbag Pattern • Page 1 • ©2009 Crystelle Boutique
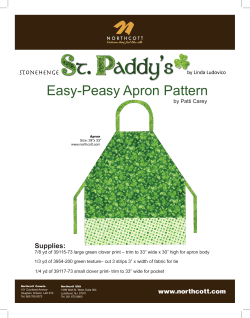
Rachel Handbag Pattern • Page 1 • ©2009 Crystelle Boutique
Rachel Sewing Instructions
As seen in Haute Handbags—Fall 2009
© 2009 Crystelle Boutique, Marijke Mill, designer
The included templates are for ease with choosing your
fabrics and cutting piecing them together properly. The top illustration shows the
famous Rachel PotatoPurse version as featured in Haute Handbags, Fall 2009.
If you prefer to use fabrics of your own choosing, the bottom “blank” template is
there for you to fill in which fabrics go where. I find using this little tool quite
helpful.
If you choose to use the potato sack fabric, please make sure to cut the potato
sack fabric slightly larger. Also cut an additional piece of tan fabric to serve as a
lining (facing) behind each loosely woven burlap piece.
Potato sacks are a fun novelty item. Remember, however, that they are not as
sturdy as other fabrics and will have to be treated with care. I have included
some instructions to increase its durability.
Fabrics:
Fabric A—1/2 yard—fun print fabric (such as a potato sack; it will also be used
on the back)
Fabric B—3/8 yard—coordinated colors
Fabric C—3/8 yard—coordinated colors
Fabric D—1/2 yard (soft-textured for comfort)
Fabric E—3/4 yard (lining; stay clear from dark colors so as to avoid the “blackout” effect)
Other:
Trim 9-14 inches (depending on how far up you want it to go; covering the two
pockets, or all the way up)
2 Rings
Magnetic snap
Zipper, 9 inch (optional—for zippered pocket)
6-8 inch ribbon for zipper-pull
Plastic canvas
Coordinating thread
Rachel Pattern
*If using light-weight fabric, remember to first apply interfacing to the wrong side.
ALL SEAMS ARE ½ INCH UNLESS OTHERWISE NOTED
Rachel Handbag Pattern • Page 2 • ©2009 Crystelle Boutique
1. Cut out all fabric pieces. Press.
(Follow separate potato sack prep instructions for preparing those pieces)
Zippered Pocket (optional—steps 2-11)
2. Place pocket rectangle wrong side up (10” width, 12” height) Mark midcenter for reference. 1” from the top draw a horizontal rectangle that is 8” x
½”
3. Mark mid-center of the interior lining. Place pocket on top of lining,
right sides together, about 2” from top. Pin in place.
4. Stitch using a tiny stitch length, right on top of the lines you just drew.
5. Cut down the center. Stop at ½ from the ends. Then carefully cut to the
corners
6. Turn the pocket through the hole. Press till it looks nice and flat and
smooth.
7. Flip the sides of the pocket over, so the little cut triangle shows.
Rachel Handbag Pattern • Page 3 • ©2009 Crystelle Boutique
8. Stitch across triangle.
9. Center the zipper under the rectangle.
Use zipper-foot to stitch around it.
10. Attach ribbon for zipper-pull. Put a drop of fray-check at the end of the
ribbon.
11. On the wrong side, fold the pocket horizontally. Pin and stitch around
open sides.
Patch Pocket
12. Fold the patch pocket in half right sides together. Stitch around, leaving
an opening for turning. Trim the corners.
13. Turn. Press.
14. About 3” from top, pin, then sew in place, stitching close to the edge.
Rachel Handbag Pattern • Page 4 • ©2009 Crystelle Boutique
15. On one side, add a 2” divider for pens and pencils.
Interior Bag
16. Sew the two interior side/bottom pieces together at the wide part.
(Optional) attach magnetic snap according to the directions on the
blog at www. CrystelleHandbags.com
17. Pin to interior front, starting at mid-bottom. Stitch in place. Use a seam
that is slightly larger than ½ inch, for a better fit inside the exterior bag.
18. Repeat with interior back piece, leaving a 6-8 Inch opening for turning.
Exterior Bag
1st pocket
19. Sew first pocket to lining at top, right sides together.
20. Fold over, wrong sides together. Press (finger-press if you’ve used
glue). Top-stitch at ¼ inch.
2nd pocket
21. Fold 2nd pocket in half, wrong sides together. Press.
Rachel Handbag Pattern • Page 5 • ©2009 Crystelle Boutique
22. Topstitch at ¼ inch.
23. Baste the two pockets to the front panel at the sides.
24. Pin the trim in place in the center. It can go all the way up to the top, or
stop at the 2nd pocket.
25. If you choose to stop at the 2nd pocket, make sure to fold the trim under
about an inch.
26. Stitch in place, going through all layers. This will divide the front
pockets. I stitch on both left and right sides of the trim, but you may choose
to just go once down the center.
27. Sew exterior side/bottom panels together at the wide part.
28. Open up and pin to the front panel, lining up seam to mid-bottom.
Sides will extend beyond the top.
29. Repeat with back panel.
Rachel Handbag Pattern • Page 6 • ©2009 Crystelle Boutique
30. The side pieces that extend are the tabs. Fold sides in and topstitch at ¼
inch.
Finishing Touches
31. Cut plastic canvas to size. Trim the corners ever so slightly.
32. Hand stitch in place on the wrong side at the bottom of the exterior bag.
33. Insert interior bag into exterior bag, right sides together. Pin around the
top. Sew front and back panel, but NOT sides…!
34. Turn. Slipstitch opening shut.
35. Insert interior bag into exterior bag. Press top (finger press if you used
glue to prepare potato sack).
36. Insert rings into tabs, fold over, and pin in place. Topstitch all the way
around the opening at the top at ¼ inch.
37. Line up short handle pieces, wrong sides together. Pin, then sew
around, leaving an opening for turning.
38. Fold the ends in of the opening. Top-stitch at ¼ inch all the way
around.
Rachel Handbag Pattern • Page 7 • ©2009 Crystelle Boutique
39. Fold ends around the rings. Stitch in place. Tie a knot.
All done! Time for a party!
Rachel Handbag Pattern • Page 8 • ©2009 Crystelle Boutique
First glue or tape the pattern
pieces together, matching up
dots by starred numbers (see
picture). Then cut out.
Rachel Handbag Pattern • Page 9 • ©2009 Crystelle Boutique
Rachel Handbag Pattern • Page 10 • ©2009 Crystelle Boutique
Rachel Handbag Pattern • Page 11 • ©2009 Crystelle Boutique
Rachel Handbag Pattern • Page 12 • ©2009 Crystelle Boutique
Rachel Handbag Pattern • Page 13 • ©2009 Crystelle Boutique
Rachel Handbag Pattern • Page 14 • ©2009 Crystelle Boutique
Rachel Handbag Pattern • Page 15 • ©2009 Crystelle Boutique
Rachel Handbag Pattern • Page 16 • ©2009 Crystelle Boutique
©2009 Crystelle Boutique,
Marijke Mill, designer
Rachel Handbag Pattern • Page 17 • ©2009 Crystelle Boutique
Rachel Handbag Pattern • Page 18 • ©2009 Crystelle Boutique


© Copyright 2026