
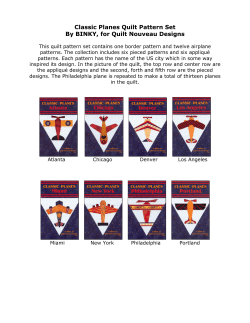
TruStitch Monkey Wrench Quilt
TruStitch Monkey Wrench Quilt
Give this traditional quilt pattern a new spin with unique fabrics and your own
free-motion quilting. Use the Baby Lock TruStitch™ Stitch Regulator for
added stippling confidence. You’ll achieve evenly spaced, consistent stitches.
Skill Level: Intermediate
Created by: Pieced by Linda Hagemann, Graphic Designer, written and quilted
by Diane Kron, Software and Embroidery Project Manager
{Designer’s Gallery} TruStitch Monkey Wrench Quilt
Page 1
Supplies:
Baby Lock® Ellisimo Gold sewing and embroidery machine
Baby Lock® TruStitch™ Stitch Regulator (BLTS-BLSOG)
Ellisimo Gold Extension Table (BLSO-ET)
TruGlide Overlay (BLTS-O)
1½ yards background fabric
Color A 1½ yards of cotton fabric
Color B 1½ yards of cotton fabric
Batting
Madeira embroidery thread
Rotary cutter and mat
Instructions:
Finished size: 39” x 48”
Piecing:
1. This quilt was pieced together using the monkey wrench quilt
pattern. To cut the needed sections follow the next set of steps:
Background fabric
Cut four 3½” wide strips for the nine patch
Cut two 3⅞” strips for half-square triangles
Subcut the 3⅞” strips into 12 3⅞” squares
Color A
Cut five 3½” strips for the nine patch
Cut one 3½” strip for monkey wrench center
Cut three 3⅞” strips for half-square triangles
Subcut the 3⅞” strips into 12 3⅞” squares
Color B
Cut five 3½” strips for monkey wrench sections
Cut four 2½” strips for inner border
2. To make Set A, sew a 3½” Color A nine patch strip to a 3½”
background strip. To the Color A nine patch strip, sew another
background strip. Make one set.
Set A
Background fabric
Nine patch fabric
Background fabric
{Designer’s Gallery} TruStitch Monkey Wrench Quilt
Page 2
Subcut into six 3½” wide sections (as shown above with the
red broken line).
3. To make Set B strips, sew a 3½” wide Color A strip to a 3½”
wide background strip. To the background strip sew another 3½”
wide Color A strip. Make two sets.
Set B
Color a nine patch fabric
Background fabric
Color a nine patch fabric
4. Subcut into 12 3½” wide sections as shown in the above
illustration with the red broken line.
5. Piece Set A to two of the Set B sections (as shown below). Make
six blocks. Set them aside for now.
6. Using the 3⅞” background squares draw a diagonal line on the
wrong side. Place the right side of a background square and the
Color A squares together. Stitch ¼” on each side of the
diagonally drawn line. Cut on the drawn line to make two pieces.
Press the seam open towards the darker fabric. Make 24
squares.
7. Using two of the 3½” Color B wide strips and one 3½” Color A
wide strip, sew together with the Color A strip in the middle (as
shown in the above diagram).
{Designer’s Gallery} TruStitch Monkey Wrench Quilt
Page 3
8. Subcut the strip into six 3½” wide sections (as shown above in
the illustration with the red line).
9. Cut the remaining 3½” wide Color B strips into 12 3½” squares.
10. Assemble six monkey wrench blocks using the half-square
triangles, the section for the center and the 3½” Color B squares
(as shown in the diagram below).
11.Follow the following illustration to assemble the rows together.
{Designer’s Gallery} TruStitch Monkey Wrench Quilt
Page 4
12.Refer to the next set of illustration to sew the rows together.
13.See the following illustration to show the finished pieced quilt top.
Quilting:
1. Sandwich the batting between the pieced top section and the
back section for the quilt.
2. Follow the manufacturer’s directions to set up the TruStitch
Stitch Regulator. Plug in the cables and charge the
Controller. When the blue light disappears the Controller is
fully charged.
3. Attach the Ellisimo Gold Extension table to the machine.
Place the TruGlide Overlay over the extension table so that
{Designer’s Gallery} TruStitch Monkey Wrench Quilt
Page 5
the small opening is placed under the needle area. Smooth
the TruGlide section with your hand to remove any air
bubbles.
4. Set the machine up for quilting by lowering the feed dogs
and attaching the “O” Quilting Foot.
5. After the Controller unit has been fully charged, remove the
charging cable from the unit. Safety Tip: Never quilt with the
Controller Charging Cable attached.
6. Place the Controller under the sandwich so that one of the clover
sections is positioned under the needle. Place the Magnet on the
top of the quilt top over the Controller to hold in place.
7. Place the Free Motion Grip that came with the extension table,
around the needle but over the quilt.
8. Set the Receiver to Regulated mode. Change the Stitch/Inch to
14 and set the Cruise to 50. The Cruise speed can be adjusted,
but based on the quilt pattern that will be used for this project we
will set it at a faster speed. The Cruise speed is based on the
type of pattern that will be used. Tip: If this is the first time you
have used the TruStitch Stitch Regulator, make a sandwich with
test fabric and do a test sew to get a feel for the system. Make
any additional changes to the Stitch Length or Cruise speed at
this time.
9. Stippling Tip: on a blank piece of paper, with a pencil in hand,
doodle on the paper creating a stippled effect. Try to maintain an
even and consistent distance from any other stippled lines and
make the stippled lines as smooth as possible. Quilting on the
machine is very similar to drawing with a pencil in its application.
Repeat until it becomes very easy.
10. As you finish the area within the Free Motion Grip area, move
the grip to the next area that will be quilted.
11. When you get close to the sides on the quilt and find that you
cannot easily connect or place the Controller, attach the Coaster
to the edge and place the Controller in the coaster (as an
example see the following illustration).
{Designer’s Gallery} TruStitch Monkey Wrench Quilt
Page 6
12.To finish quilting, use the straight edge ruler and the rotary cutter
to remove the batting and the backing so that they are even with
the quilt top on all four edges of the quilt.
13.To create the binding for the quilt, cut three 2½” wide strips from
the binding fabric. Piece the sections together to make one long
continuous strip that will fit around the outer edge of the quilt.
14.With wrong sides together fold and press the strip lengthwise.
15.Pin the binding 4” down from the corner. Using a ¼” seam
allowance and starting 4” down from the end of the binding strip,
sew the binding in place. Stop ¼” from the corner.
16.Fold the bias strip up with the edge of the binding even with the
edge on the quilt top.
17.Fold the bias strip down so that the binding is placed over the
second quilted edge. Start to sew at the corner and continue
down the second side of the quilt. Stop again ¼” from the corner
and cut the thread. Repeat these steps for the remaining two
corners.
18.After turning the last corner, trim the binding strip and tuck the
end into the starting point on the binding.
{Designer’s Gallery} TruStitch Monkey Wrench Quilt
Page 7
19.Press the binding to the back side of the quilt and hand sew the
binding to secure.
For other exciting projects like this one, visit our website
www.designersgallerysoftware.com
Designs may be freely used by individuals for non-commercial purposes. You may
embroider them on items or garments for your own use or for gifts. Baby Lock or
Designer’s Gallery must be acknowledged as the source of the designs and project
instructions.
Designs or images may be downloaded but not distributed to others without permission.
Designs or images may not be sold, shared or copied under any circumstances.
Project instructions may not be sold.
{Designer’s Gallery} TruStitch Monkey Wrench Quilt
Page 8


© Copyright 2026