
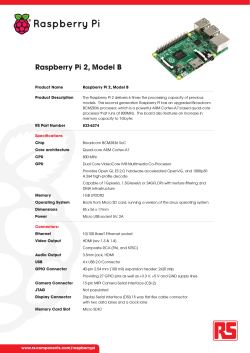
Quickstart and Recovery Guide Quickstart and Recovery Guide
Quickstart and
Recovery Guide
Congratulations and thank you for purchasing
your PowerSpec computer.
Follow these easy step-by-step instructions for
quick installation or recovery of your PC.
w w w.powerspec.com
Read First
Do not attempt to install any additional hardware into your new system until your system has been turned on for the first time and
the setup process has been completed.
Do
1. Prepare your work space
• Keep all air vents clear. Leave four to six inches between the vents of your
computer and walls. Computers can be put on a table or floor, careful not
to block ventilation holes.
• Don’t place your computer by a sunlit window. Excessive heat will shorten
the life of a computer.
• Don’t use your computer in dusty areas or areas of extreme humidity
and temperature.
• Set-up the keyboard directly in front of you and at an appropriate height
(your forearms should be parallel to the floor when typing).
• Place your monitor directly in front of your workspace.
2. Connect the monitor, keyboard & mouse
VGA Monitor
Connector
DVI
Connector
-OR-
USB Mouse
Connector
USB Keyboard
Connector
• Plug the monitor signal cable into the VGA Connector on the back of the
computer. Tighten the screws. Plug the monitor power cord into the back
of your monitor.
• Save this Quickstart
Guide, all manuals and
Recovery discs and any
other software discs for
future reference. Save
the carton and the packing materials in case you
ever have to store or ship
your system.
• Use a quality, surge
protected power strip
to guard against power
surges.
Don’t
• Don’t supply power
to system until all cords
are connected.
• Don’t use the autoinstallation described
in your software manuals for software that is
included with your
system, this software
has been pre-installed
at the factory.
• Plug the keyboard and mouse into their respective ports, ensure they are
correctly aligned.
• Don’t use a non-grounded 2-hole power outlet.
3. Connect the network & printer (if applicable)
• Don’t place any liquids
near your computer.
• (A) If you have a home network,
connect an Ethernet cable to
the Network Port.
• Don’t turn off computer
unless using Windows
shutdown.
• ( B) Connect the printer to the
USB Printer Connector on the
back of your computer. Read the
Printer instructions prior to plugging in the Printer cable, most
USB printers require the driver to
be installed prior to connecting
the printer.
Network
Port
(A)
USB Printer
Connector
(B)
4. Connect the speakers (if applicable)
• Connect the speakers as directed in
the documentation included with
the speakers. Plug the speaker cable
into the Line Out/Speaker Port.
Note: Your speaker setup will vary
as your system may have multiple
speaker ports. Connect all that apply.
Line Out/
Speaker Port
Icon Key
USB Ports
Microphone
Port
5. Connect the power cord, plug into a surge
protector & power up
Line In
• Plug the system power cord
into the Power Cord Connector
at the back of your computer.
Line Out
Port
• Plug all power cords into a quality,
surge protector and then plug the
surge protector into a grounded
3-hole power outlet.
Power Cord
Connector
• PC
• Monitor
• Speakers
• Recheck cable connections.
• Turn the power switch on the
monitor and speakers to the
ON position. Press the power
button to turn on the computer.
Network
Port
Surge Protector
6. Finding help resources
For help with any questions about
Windows, refer to the Help and
Support Center within Windows.
WARNING
Windows 7 Help screen
Windows XP Help screen
Using the Help and Support Center
Obtaining access to the Help and Support Center is just a key press or mouse click
away. From the Windows desktop, press the [F1] key in order to bring up the Help
and Support Center. Alternatively you can click once on the Start menu and then
select Help and Support. Once activated, the Help and Support Center window
will open up as depicted above.
Additional assistance can be found at:
VGA Monitor or
DVI Connector
www.powerspec.com
Tech Support: 1-800-207-3434
M-F 10am-9pm, Sat 10am-6pm
Your PowerSpec computer has been designed to
be expandable. There are
a number of components
that can be installed by
the user. However, before
opening the case you
should be aware that you
can injure yourself and
damage your computer
if you do not perform the
operations correctly. If
you are not comfortable
with upgrading components on your own, you
should have a Service
Technician perform
upgrades for you.
Read the Read First section at the top of the page.
Windows XP & Windows 7 Reinstallation Instructions
This computer comes with a Windows XP disc and a Windows 7 disc to reinstall
Windows should corrupted software or a problem with the hard disk drive occur.
These discs will not recover any programs or data files installed by the end user.
Please perform a backup o f all personal data prior to performing these procedures.
Installing/Reinstalling Windows XP
Installing/Reinstalling Windows 7
1. Insert the Windows XP disc into the
optical drive and restart the computer.
1.Insert the Windows 7 disc into the optical
drive and restart the computer.
2. Press any key on the keyboard when
prompted to boot from CD. The
Windows XP setup may take a several
minutes to load.
2.Press any key on the keyboard when
prompted to boot from CD or DVD. The
Windows 7 setup may take a several
minutes to load.
3. Use the up and down arrow keys to
select the install destination and then
press Enter.
3.Click Next on the first Setup screen using
the default options for language, time/
currency and input type.
a. Select “C: Partition 1” if a Windows
installation is already on the hard
drive.
b.Select “Unpartitioned space” if the
hard drive is new.
Note: If prompted to format the hard drive,
use the up and down arrow keys on the
keyboard to select the option that reads,
“Format the partition using the NTFS file
system (Quick)” and then press Enter.
4.Click “Install Now.”
5.After reading the license agreement, check
the box that says, “I accept the license
terms” and click Next to continue.
6.Click on “Custom (advanced)” for the type
of installation.
7.Select the install destination and then
press Enter.
4. Setup will copy files to the hard drive
for several minutes and then reboot.
a. Select “Disk 0 Partition 1” if a
Windows XP installation is already on
the hard drive.
5. After reading the license agreement,
select “I accept this agreement” and
click Next to continue.
b.Select “Disk 0 Partition 2” if a Windows 7
installation is already on the hard drive.
6. On the “Personalize Your Software”
screen, enter a name and/or
organization for the computer’s
registration and then click Next.
7. Setup will finish the installation and
then reboot.
8. Follow the on-screen instructions to
set up the desired user preferences for
this computer.
Version 1.0 10-09
c. Select “Disk 0 Unallocated Space” if the
hard drive is new.
8.Setup will continue and may reboot several
times before finishing the installation.
9.Follow the on-screen instructions to set
up the desired user preferences for this
computer.
© 2009. PowerSpec and PowerSpecPC are registered trademarks of Micro
Electronics, Inc. All trademarks or registered trademarks are property of
their respective corporations.
Printed in China
IPSG
Hilliard, OH


© Copyright 2026