
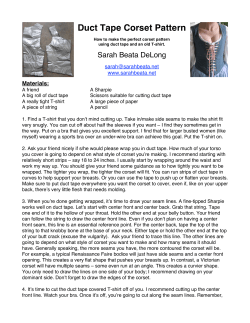
Viking Boats & Gear
Viking Boats & Gear
(c) 2012 Weekly Earth Based Spiritual Studies ( WEBSS)
Rayne Storm / www.theMagickal Cauldron.com (TMC)
Viking Boats ....
You’ll Need: (per boat)
• pattern for viking ship (see end pages of this file)
• 1 empty cereal box (use the pattern to check the box
size) -AND- a piece of printer paper
• sissors, white school glue, clothspins, duck tape
• two bendable straws, paints, paint brushes
Now, from the outer edge of the narrow side... cut up to
and remove the Yellow triangle - on both ends. (The triangle goes in one inch). Fold on the orange line (it runs down
the center of the narrow side). Cut off a BLUE tab from
the sides of the viking ship. When you are done it should
look like image ( 2 ).
Instructions: Read through instructions before beginning.
Image numbers are in ( ) and correspond with instructions. First, Print off and cut out the viking pattern page.
2
1
( 1 ) First things first, you need to open your cereal box
and lay it flat. Open it at the side and bottom - unsealing
the glued edges that hold it together. Cut off the one narrow side of the box and set it aside (see image - reddish
area to the left hand side). Glue /tape the two halves of
the viking ship together. Then trace the pattern onto the
cardboard box, as represented in GREEN in the image.
The bottom of the ship should run along the edge of the remaining narrow side of the box - make sure to flip the pattern over to trace the other side of the boat so that the
heads are both in the same direction. That narrow side will
be the bottom of the boat. Cut out your viking ship BUT DO
NOT CUT ON THE NARROW SIDE (at least not yet).
( 3 ) Bring the sides of the boat up - with the inside of
the box facing outwards. The fold (the on the narrow edge
should come up into the inside of the boat). Fold the tabs
inward and apply duct tape on the inside. Then add glue to
the crack/opening that shows on the outside edge - hold it
in place with clothspins until it dries. Repeat on other side
of boat. Apply glue to the back side of the head of the boat
and the tail of boat and once again hold again in place with
clothspins. Allow to dry for a few hours before removing
clothspins. If edges don’t stay closed/together... apply
more glue and clothspin again ... or you can staple it closed
but that leaves sharp edges if you have small kids. When
you are done it should look like ( 3 ). Now is the time to
paint the outside of your viking ship.
3
(c) 2012 Weekly Earth Based Spiritual Studies ( WEBSS)
Rayne Storm / www.theMagickal Cauldron.com (TMC)
Viking Boats and Gear
........ page 2
4
( 4 ) Put the mast together. With the narrow side you cut
off and set aside cut off two sections at 4” each. Fold in
each end by 1” . Poke a hole in the center of both sections.
Add your bendable straw through one of those pieces bend the section of the straw and lay it flat against the
bottom - secure it in place with tape. Stack the other 4”
piece on top of the other one - Secure the stack together
with tape on the sides.
6
mark... and then make another mark 1/2” each from there.
With a depth of 1/4 inch make two little rectangles. Cut
out rectangles. Unfold paper and paint your sail. Allow to
dry before attaching to mast.
( 7 ) Fold Paper Sail over mast. Slide each end of the
straws through the holes and center the sail onto the
straw mast. Glue the two lower corners of the sail and
if necessary use the clothspins again to secure it until it
dries. Now, Place your mast (as shown in image 4) - into
the ship. Center it and Secure it into place with glue and /
or tape.
5
( 5 ) Cut the other straw to 6” - cutting off the bendable
section. Center it ontop of the other straw and secure
with tape.
( 6 ) Create the Sail. From the sheet of printer paper
- cut out a rectangle to the size of 9” by 6”. Fold paper
in half (see image). Go over 1” from each end and make a
7
Viking Boats and Gear
........ page 3
Rayne Storm / www.theMagickal Cauldron.com (TMC)
Now, cut out the round circles / the shields from the pattern page. Trace onto scrap pieces of the cereal box - 3 to
4 shields per side of the boat. Paint your shields before
glueing them into place on the side of the boat.
8
(c) 2012 Weekly Earth Based Spiritual Studies ( WEBSS)
( 8 ) ** Your viking ship is now complete!! **
Viking SHIELD & SWORD ....
you use the duct tape to hold down the straps keep
the tape to the back side of the shield... any that over
hangs can be cut off afterwards.
• As for the sword - the blade is about 2” across and
the length will vary depending on your preference
(just note the longer, the sword the more flexible and
bendy it becomes) ... the one shown is about 17” from
end to end. Mark it out on the cardboard and cut out.
• Use the duct tape and/or paint your sword.
You’ll Need: (per set)
• cardboard, duct tape and paint
SIMPLE VIKING HELMET
Instructions:
• Using a large pot lid (or the pencil and string trick)
make a large circle about 12-13 inches in diamater
onto a piece of cardboard. Cut out.
• Paint the circle on one side or both.
• On the unpainted side or back side of your shield
add your arm straps. (see image for the suggested
placement of straps). Make the straps by sticking
two long pieces of duct tape together - sticky side
to sticky side. The length will need to be longer then
the diameter of the circle, plus inches to allow for
the childs arm to slip through and about an inch or so
more to attach down the strap to the circle. When
You’ll Need: (per helmet)
• cardboard and duct tape (silver duct tape is best)
Viking Boats and Gear
(c) 2012 Weekly Earth Based Spiritual Studies ( WEBSS)
Rayne Storm / www.theMagickal Cauldron.com (TMC)
........ page 4
Instructions:
• Using a pencil mark out strips of carboard
in a width that is 1/4” less than the width
of your duct tape. Using 2 - 3 strips,
make a band that fits nicely around your
childs head. Use the duct tape to secure
the ends together.
• With the band on your childs head measure from the bottom of the band - up over
the top of their head - to the bottom edge
of the other side of the band. You will
need two more pieces of cardboard in the
same width as before, only this time you
will need the two strips in the length you
just measured. Cover both sides of those
strips with duct tape.
• Trace out the pattern for the HORNS onto
cardboard and cut out. You will need 2 for
each helmet - a left and a right). Cover
both sides of the horns also with duct
tape. Cut off the excess duct tape.
• Add one horn to one side of the band. Attach with duct tape on the front and back
side of the horn. Find the exact opposite
point on the other side of the band to attach the other horn.
• On the inside of the band attach your first
strap - on the inside location of where you
attached the horns. Secure in place with
duct tape.
• Find the two points in between the horns
to attach the other strap. (should line up
with the center of their forehead). Secure
in place with duct tape.
• Do a fitting to make sure their helmet fits
comfortably.
• Now cover the inside and outside of the
band with duct tape - going around the
horns.
** Your viking GEAR is now complete!! **
HORN pattern for VIKING HELMET
TAB
Rayne Storm / www.theMagickal Cauldron.com (TMC)
(c) 2012 Weekly Earth Based Spiritual Studies ( WEBSS)
HEAD of VIKING SHIP
TAIL of VIKING SHIP
(c) 2012 Weekly Earth Based Spiritual Studies ( WEBSS)
(c) 2012 Weekly Earth Based Spiritual Studies ( WEBSS)
SHIELD pattern
for Viking Ship
TAB


© Copyright 2026