
BRUSHES IN PHOTOSHOP
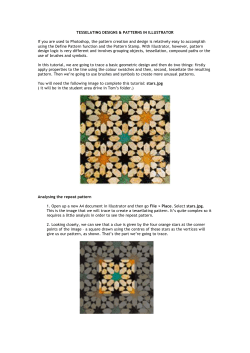
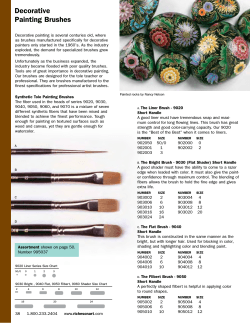
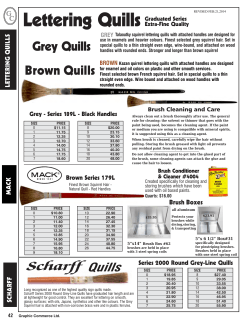
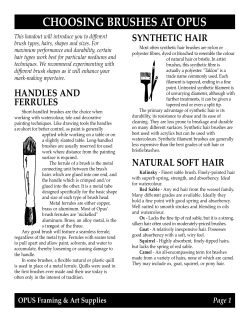
BRUSHES IN PHOTOSHOP
Lee Urmy - January 2011
PREFERENCES:
First thing that needs to be set is Cursors in Preferences which is found under Edit and is the last item listed
in the Edit menu. Click on Cursors and in the upper middle is a panel named Painting Cursors. For accurate
painting I have set my painting cursor to show exact size and to show a cross hair in the center of the brush,
this shows me the limits of the brush as well as the center. The center is where most of the action will take
place depending on the softness of the brush. Under other cursors I use Precise, because I want to know
exactly what I am
selecting or painting. You don’t
have to use these
settings, but I think
this combination
gives me the best
results, and that is
what we are all
trying to achieve.
Preferences-Cursors
BRUSH:
Brushes are activated when you select a tool that uses brushes to paint, color, hide or reveal items on a layer.
The Brush Tool is found in the Tools Panel, or can be activated by pressing the
‘B’ key on your keyboard. Clicking on the Brush Tool (the icon that looks like a
paint brush) will bring up the Brush Menu across the top of the page. By clicking on the little black triangle will bring up other options to use in the Paint
Brush Mode. The four options are Paint Brush, Pencil, Color Replacement Tool
and Mixer Brush Tool. I will be concentrating on just the Paint Brush Tool.
SIZES:
Brush sizes vary from brush to brush and come in wide variety of shapes and
styles. To adjust the size of a brush is done in a number of different ways. The
easiest to use is the left ([) and right (]) bracket keys. Pressing the right bracket
key will make the brush larger and pressing the left bracket key will make the
brush size smaller. You can change the size of the brush by clicking on the
Brush Menu in the upper left of the menu bar which will open a small dialog
box. In this box you can change the type of brush, the size and the hardness or
softness of the brush. Another way to change brush sizes is by going to Window in the menu bar and clicking on Brush, this will open the Brush Panel and
give you more options to change your brush, shown at the right.
The Brush Panel gives you complete control of your brushes with a mouse or a
tablet. It also shows all the brushes available and the shape of each brush.
You can also adjust the size, flip the horizontal and vertical axis, the angel, the
roundness and the spacing. These are the basics that allow a great deal of
flexibility when using a brush. In the upper left are more controls that allow
even more flexibility, but I am just covering the basics here.
Size is controlled by the slider just below the brush samples and the size is
shown. Just below size control is the X—Y flip controls, just click on box to flip
the direction of the .
Brush Panel
1
of the brush. The next item is the angle, you can change the angle of the
brush to get into tight spots or paint in a paint with a shape other than horizontal or vertical. Just rotate the arrow in the icon to the angle you want or
type in an angle.
Roundness, this controls the round shape of the brush. You can change the
percentage of roundness by typing in a number or you can change the roundness by putting your cursor on one of the dots on the circle and moving it up
or down. Doing this will change the circular brush shape into an ellipse
shape.
The last basic control is Spacing. By default most brushes are set to create a
solid line when you make a stroke across a layer or image. By changing the spacing Roundness-Angle-Spacing
you can set the brush to just make one image or stroke at a time. This can be very
useful when you are trying to add an accent or a highlight. As you can see in the image at the right, I have
change the angle of the brush the roundness and the spacing. If you painted on an image with this brush you
would find that a single stroke would have the shape and the paint/pixels would be spread apart. By doing
this and using the other controls you can change your brush to fit your needs at any time.
The red arrow is indicating another way of viewing your brush collection in a separate dialog box. This dialog
box will allow you to remove or add brushes as you need. I have 230 brush types on my laptop but have
many more on my desktop where I do the majority of my work.
TIP: As a matter of practicality, you may wish to create a folder on your hard drive and name it ‘Photoshop
Brushes’. The reason is that when you go online to find and download brushes you can very easily drop them
into this folder. It makes it easier to load brushes too. The most important reason is that when you upgrade
to another computer or get an upgrade to the latest Photoshop you can easily reload all your brushes without
having to re-down load them or hunt for the source where you got them.
BRUSH MENU:
On the Palettes Menu you will find two palettes related
to brushes, Brush Presets and Brush. Brush Presets
only displays the brushes that are currently loaded in
Photoshop. You can scroll up and down to find the
brush you need. If you look at the Brush palette the
brushes are a little small and it can be hard to determine what the brush actually looks like. In the Brush
Presets you can make the brush thumbnails large and
easier to identify by going to the up left (see red arrow) and clicking on the menu icon. Clicking Palettes Menu
on it will bring up a host of options, one of which is Large Thumbnail as shown in Palettes
Menu (it is in the third group down and the third item down). The example shows a butterfly brush and four
lightning brushes, the shapes lightning brushes are very hard to see when in the Small Thumbnail mode. In
the example above you see small numbers below each brush. The numbers indicate how large the brush will
be when you select it. You will need to resize the brush to fit the needs of the image you are modifying.
USING BRUSHES:
While using a brush to modify an image you will make a mistake and need to undo it. The Undo command
(Cntl+Z PC) or (Command+Z Mac) works very well for undo the last thing you did. But what if it is further
back, for that I recommend using History and sliding the guide up to where the mistake disappears, this is
very convenient. The default is set to 20 history states, which is probably good for most users. However, if
you do a lot of work on an image I would recommend going to Edit>Preferences>Performance>History and
Cache>History States and making the number history states to a higher number, I have mine set at 35. You
will need to change this setting to match your work. The number of History States that you need will become
evident the more you work with Photoshop. Remember this is a variable and can be changed at any time.
Before you start adding or deleting objects in your image I would recommend you work on either a new layer
2
Before you start adding or deleting objects in your image I would recommend you work on either a new layer
or a duplicate layer. If you make a really bad mistake you can either delete the layer or just turn off the visibility of the layer if you need it for reference.
COLOR(S):
Unless you are an artist, you probably won’t need many colors. That said, the colors available are almost infinite. For my personal work I use white, black and grays with a variety of opacities depending on the need. I
don’t try to create colors that match as it is almost impossible. If you need to match a specific color use the
Color Sample Tool to pick a the color you need. The Color Swatch Tool is available too, but I almost never
use it and I have it turn off most of the time.
APPLICATION:
This is really dependent on what you are trying to do. Are you adding a highlight to an eye? Reducing the
brightness of an object or area? Are you trying to change the color of an object? The point is you have a
problem and you need it corrected.
When using brushes in this fashion I almost always create a New Layer to work on. A new layer allows huge
flexibility while you are working, especially if you make a mistake. And as your work progresses you will want
to save the work you have completed frequently. Don’t be afraid to create another new layer or two or more
as you work, again this provides flexibility and prevents you from having to do some work again if a mistake
happens. I am probably alone in the world, because I do make mistakes in Photoshop, more often than I care
to admit. Don’t be afraid to use as many layers as you need.
TIP: Always label your layers. It make working on an image much easier if the layers are labeled. This is especially true if you work on an image and then get interrupted and have to return to it at a later time. It does
not have to be long, but it should be descriptive of what you did on that layer.
Lets add a highlight to an eye of a person or animal. First you need to have all the other changes and corrections completed. Then create a new layer, this is done in a couple of ways, first is the New Layer icon at the
bottom of the Layers Palette (second from the right next to the Trash Can), second is to use the keyboard,
Cntl+Shift+N, and third you can go to Layer>New in the menu bar. If you use the last one you can name your
layer right then (ex. Eye-Hi-light) and then click OK and your layer is named. You can do the same with the
other two methods, but you must double click on the text in the layer box and then do your renaming.
Notice that the new layer does not have any color, in fact it has a checker board pattern (unless you have
changed the setting in preferences). This means the layer is clear, it contains no information or color, it is a
blank or clear layer. This is now the Current Layer and is highlight. Go to the Tool Bar and select the Brush
Tool, then go to the Brush Preset and pick a soft round brush (soft brushes have a soft gray halo, hard edged
brushes have a very distinct edge) and adjust the size to be small, 10 pixels to start. Next zoom in on the
eye, but before you do make a mental note of where the sun is coming from, this is important to make the image look natural. A highlight is very small compared to the size of the eye (roughly 10% of the size of eye itself). Make sure on the Tool Bar that the Foreground color is white. Then take the cursor and move it over
the eye and remembering where the sun is coming from click once with the mouse or stylus if you have a tablet. You have a highlight in the eye. If you zoom out a little you can check the position and size to make sure
it works in the image. If not, do an undo a couple a times and try again. If it is to small, make the brush bigger, if it is to large make the brush smaller. If it seems to bright, lower the opacity of the layer until it is correct.
If you have an image of a person or animal with red eye, due to use of a flash, you would use the same procedure as above, except you would use black as the color and paint in the entire red area. Again, a true
black may not work and you will have to sample a black from the other eye (if visible) or use a dark gray. You
have just remove the red eye effect. Remember, that nothing is final until you decide that it is final. If you totally messed up and are frustrated, delete the layer! Then try it again, you will learn from your mistakes.
Once you have done it three or four times it will almost be natural and you will wonder why you made it so
difficult when it really wasn’t. It seems we all try to make things harder than they really are.
3
You could use the same method to remove highlights. Or say you wanted to create a highlight that looks like
a square reflector. The solution is to use a square brush, using white as the foreground color and may be going to the Brush Panel and rotating the brush 45° to make it a diamond shape. This would probably have a
hard edge. But experiment, try selecting the highlight and then adding a small amount of Gaussian Blur from
the Filters menu.
Another example, lets say you where on a field trip to an old cemetery that had old grave
stones with some spooky trees and it happened to be cloudy and it was near dark when you
snapped the shutter. You get home and are looking through you images and you really like
this one image, it has all the elements, seem to lack something. Create a New Layer, and
make sure the foreground color is white. Now go to the Brush Presets and select one of the
lightning brushes. They are large so you may have to make it smaller to fit the image. With
your mouse place the lightning stroke where you want it and click the mouse, careful don’t
move the mouse yet, take a look, maybe another click of the mouse there the stroke is just right. But your not
satisfied, so you select different lightning stroke and place the starting point of it on one the branches of the
first stroke and click. WOW, it is amazing. Now create another layer. This time the you need to change the
foreground color to a very light gray. Now with a very soft round brush and the layer opacity set to 50% start
painting in some fog along the ground. Not everywhere, but here and there and maybe paint over one area
again to make it a little heavier. You see what is happening. You are creating what you saw in your minds
eye. Since the fog is on it’s own layer you can take the Blur tool in the Tool Bar and slightly blur the edges of
the fog to make it more realistic. My point is have fun and let your imagination run away with you.
SOURCES:
www.obsidiandawn.com the brushes at this website are free to download and for non-commercial use. They
have a huge collection, my favorite site for brushes.
www.abduzeedo.com/1000-great-ps-free-brushes-paulw weird and odd brushes, but pretty neat too.
www.brusheezy.com
www.myphotoshopbrushes.com
www.brushking.com
www.getbrushes.com
www.photoshop-free-brushes.com
www.qbrushes.net
www.fbrushes.com
www.psbrushes.net
www.deviantart.com (search for Photoshop brushes when you reach the site). This is a cool site for textures
and patterns too.
Books:
Adobe Photoshop CS5 for Photographers
Martin Evening
$34.62 from Amazon (also available for Kindle).
Photoshop’s Layers (2nd Edition, Nov. 2010)
Matt Kloskowki
$29.69 from Amazon
$26.99 from NAPP (National Asociation Photoshop Professionals, you must be a member to purchase here).
4


© Copyright 2026