
Learn to master one of Elements’ most Feature
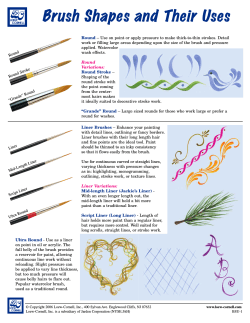
Feature
©ISTOCKPHOTO/ROBYNMAC
THE BRUSH TOOL
Learn to master one of Elements’ most
useful tools and unleash your inner artist
By Diana Day | Many newcomers to Photoshop Elements
shy away from the Brush tool, thinking they either don’t
have the skill or the need for such “artistic” touches. That’s
a shame because brushes happen to be one of the most
useful tools in your image-editing arsenal. In Elements,
you use brushes not only for drawing, but also to create
borders, stamp decorative elements, build textures,
selectively sharpen or blur parts of an image, edit layer
masks, and much more. In fact, any time you selectively
edit the pixels on your canvas, you’ll most likely be using
a brush to do it.
By understanding the basics of how brushes work in
Elements, you’ll improve not just your freehand design skills,
but you’ll also better understand many of Elements’ other
tools that are based on brushes—including the Eraser tool,
Dodge and Burn tools, the Selection Brush,
and many more. Best of all, you don’t need
to have an MFA from a prestigious art school
to get the most from these brushes. You just
need the right settings. In fact, some brushes
do their job with a single click.
You’ll find the Brush tool nested with
three other tools: the Impressionist Brush,
Color Replacement tool, and Pencil. I’ll
show you how to take advantage of the
Brush tool’s wealth of options and offer
some helpful hints for using brushes more
effectively. Once you understand the basics,
you’ll be able to use many of the same tricks
and shortcuts for other brush-based tools.
Click and hold the Brush tool
icon to select it from the subset, or press the B key to cycle
through the brush options.
JULY/AUGUST 2010 9
Additional Brush
Libraries
The first decision you’ll need to make is what type of brush to
use. Elements comes packed with an amazing assortment of
pre-built brushes. Open the Brush Picker in the Options Bar
to take a tour. The Default library alone contains 65 options,
including everything from basic round brushes to charcoal
to scattered stars. And if you don’t find what you want there,
you have 13 additional brush libraries to choose from. Feeling
overwhelmed? Here’s how to take control of all those options.
Types of Brushes
The Default library offers a sample of many different categories of brushes, and includes some of the most useful ones.
As you gain familiarity with brushes, their dynamics, and the
various ways they can be used, you’ll develop an intuition for
choosing the right brush—and even find unconventional uses
for some of them. Here are a few of the most useful categories:
Brush Picker
Round Brushes The hard and soft round brushes are undeniably the most-used brushes. You’ll find a good selection
of these in both the Default and Basic brush sets. The hard
round brush is solid all the way to the sharp edge, while the
At a Glance: The Brush Tool Options Bar
A
C
B
With the Brush tool selected, take a look at the Options Bar
at the top of the workspace. This is where you’ll define the
shape, color, size, and other settings for your brush.
A.Reset Menu If your brushes start misbehaving or you
want to quickly undo your changes, use this pull-down
menu to reset the brush options back to their default
settings.
B.Brush Picker This thumbnail displays your current
brush selection. Click on the drop-down arrow to the
right to open the Brush Picker, where you can select a
new brush shape from the active library or switch to
another library of brushes. This thumbnail also reflects
any changes in the Brush Dynamics pane (H).
C.Brush Size You may type a value into the input box,
use the pop-out slider to adjust the brush size, or
just scrub your mouse cursor across the word Size to
change the pixel size of the selected brush.
10 ADOBE PHOTOSHOP ELEMENTS TECHNIQUES
G
E
D
F
H
D.Mode Menu Use this drop-down menu to control how the
brush strokes you make interact with the colors of the existing image (for more, see “Blend Colors” on page 16).
E. Opacity You can adjust how opaque or transparent
the color of the brush stroke will be by entering a
value or using the pop-out slider.
F. Airbrush With this option turned on, the longer you
hold your brush in one spot—while pressing the mouse
button or a digital pen—the more color will be applied,
similar to the way a real airbrush works.
G.Tablet Support This drop-down arrow lets you access
options for using a pressure-sensitive tablet (for more,
see “Ditch the Mouse” on page 14).
H.Brush Dynamics Click this icon to customize your
brush settings. These options, including Spacing, Fade,
and Hardness, can help you simulate real-world brush
strokes (for more on this menu, see page 13).
Feature
THE BRUSH TOOL
soft round brush has a feathered edge, making it look fuzzy
and out-of-focus. It’s not important to choose these brushes
according to their size, as you can resize them easily in the
Options Bar.
Object Brushes Not all brushes feature a traditional stroke.
Elements offers several that use shapes and objects—including
stars, flowers, leaves, grass, and even planets—which work well
as a single stamp or painted on as a cluster. You’ll find a few
of these in the Default set, and more under Assorted Brushes
and Special Effects Brushes. There’s also many interesting
options available for download from third-party websites.
Natural Media Brushes The Default brush set offers 18
brushes simulating real art media, such as charcoal, chalk,
hard pastel, oil, dry brush, watercolor, wet sponge, and rough
round bristle brushes. You’ll also find more options in the
Dry Media, Wet Media, Natural Brushes, and similar libraries.
These are mainly useful for digital drawing and painting, but
also can be helpful when adding artistic effects to photos,
such as borders or textures.
Changing Brushes
When the Brush Picker pane is open, you can use the arrow
keys to move up and down through the brushes in the set, or
use the scrollbar. If the Brush Picker is closed, you can use the
comma (,) and period (.) keys to quickly move up and down
through the brushes without opening the pane. The number
listed under a brush’s thumbnail represents its default size.
To switch to a different brush library, click the pull-down menu
at the top of the pane. Here you’ll find pre-installed categories—
such as Basic, Dry Media, Special Effects—as well as any custom
or third-party brushes that you’ve installed.
Hard Round
Soft Round
Scattered Leaves
Butterfly
Hard Pastel On Canvas
Rough Round Bristle
tip Save a Trip You can
change brushes without
making a trip to the Options
Bar. Simply right-click on the
document with any tool that
uses a brush to reveal a floating Brush Picker pane.
Managing Your Brushes
At first glance, the Brush Picker seems like a fairly basic pane,
but there’s a surprising number of controls hidden in here.
Click on the chevron arrow at the upper right of the pane to
access options for managing your brush libraries.
Save Brush If you’ve customized your brush, and want to be
able to quickly access it again, you can use the Save Brush
option at the top of the menu to temporarily add it to the current
set. The next time you change brush libraries, Elements will
ask if you want to permanently save any new brushes; choosing
yes will give you the option of saving the entire set as a new
library. (Choosing Save Brushes at the bottom of the menu
accomplishes the same task.) You can also choose to rename
or delete the current brush.
Click on the double arrows to
open additional brush options
JULY/AUGUST 2010 11
Text Only
Customize the Brush Display You have several
choices for how brushes are displayed in the Brush
Picker, including Text Only, Thumbnail, List (which
combines a thumbnail with the brush name) and
Stroke Thumbnail. The last option is a good choice
if you’re having trouble envisioning how a brush will
look when dragged across the screen. To see more
brushes at once, simply drag on the lower-right corner
of the Brush Picker to resize it.
Load Brushes If you’ve saved custom brushes or
downloaded brushes from the Web, use the Load
Brushes option to locate the brush files that aren’t
currently installed in the Brushes Preset folder.
List
Reset Brushes This option restores the
default library, if another brush set is active.
Thumbnail
You can reorganize
a brush library from
the Preset Manager by
dragging thumbnails
to a new location.
Preset Manager In this dialog box, you
can manage your brush libraries by loading,
saving, renaming, deleting, re-ordering,
and even combining brushes from different
sets. (For instruction on merging brushes
from different libraries, see “Combine
Brushes” online.) If you tend to use the
same brushes over and over again, this is a
great way to keep them all in one place.
Stroke Thumbnail
Create Your Own Brush
You can turn anything in your document into a brush—including text, doodles, and
photos. Simply draw a selection around the graphic (skip this step if you’re using the
whole image), and choose Edit>Define Brush. (If the option is grayed out, it means
your selection is too big. Brushes can be no larger than 2500 pixels on the longest
side.) When the Brush Name dialog pops up, enter a name, and click OK. Your brush
will appear at the end of the active brush set.
At this point, the brush is only temporary; it’ll disappear the next time you change
brush libraries. To prevent this, you’ll need to save the brush. Choose Edit>Preset
Manager. Select Brushes from the Preset Type pull-down menu, and then select your
newly defined brush. Now click the Save Set button, give your brush set a name, and
navigate to the destination folder. You can save brushes anywhere; however, if you
want them to always appear in the brushes drop-down menu, you’ll need to save it to
the location shown below. (After saving, restart Elements to see your new brush set.)
You can turn any single-color
graphic into a brush.
For Windows: C:\Program Files\Adobe\your version of Photoshop Elements\Presets\Brushes
For Mac: Applications/your version of Adobe Photoshop Elements/Presets/Brushes
If you use a lot of custom or third-party brushes, you may want to save your brushes to a different location
so you can load them as needed (thus keeping your brush libraries tidy). For instructions on loading a brush,
go to the Magazine section online for the July/August 2010 issue.
12 ADOBE PHOTOSHOP ELEMENTS TECHNIQUES
Feature
THE BRUSH TOOL
If your brush doesn’t behave exactly as you’d like,
you can change some of its settings. With the Brush
Dynamics pane, you can control how solid the
stroke is, how quickly it fades, how many colors it
uses, its angle, and more—letting you create
something entirely unique.
Brush Dynamics
As you change the dynamics for a brush, the thumbnail in the far left of the Options Bar will change to
reflect the new settings. Here’s a look at what each
of the settings does.
The Brush Dynamics Pane
Fade This determines how quickly the paint flow fades
to nothing when making a stroke. A lower setting fades
the stroke more quickly than a higher setting.
Hue Jitter This sets the rate at which the color of the
stroke switches between the foreground, background,
and random colors in between. A higher setting
causes more frequent changes than a lower setting.
Scatter This setting determines how far away the
“paint” lands from the line of your stroke. A low
value produces a denser stroke; a high value results
in a large scattering.
Spacing This controls the distance between the individual brush marks in a stroke. Increasing the spacing
makes the brush skip. Spacing is described as a
percentage of the brush diameter. So, for example,
to create a dotted line, you’d simply set the Spacing
for a hard round brush to more than 100 percent.
Hardness This adjusts the size of the brush’s hard
center, and affects how sharp or feathered the edge of
the brush is. Not all brushes support this setting.
Angle The Angle adjustment lets you rotate the
brush. Changing the angle of a round brush will have
no effect; however the ability to rotate other types
of brushes—for example, a corner embellishment—
is invaluable. To adjust the angle of a brush, either
type in a new angle (in degrees), or click and drag
the circle and arrow graphic clockwise or counterclockwise. Angled brushes create a chiseled stroke,
similar to a calligraphy pen.
0 Fade
25% Hue Jitter
125 Fade
100% Hue Jitter
Foreground
75 Fade
Background
0% Scatter
1% Spacing
25% Scatter
100% Spacing
150% Spacing
50% Scatter
0% Hardness
0º Angle
50% Hardness
45º Angle
100% Hardness
180º Angle
JULY/AUGUST 2010 13
Ditch the Mouse
If you find it difficult to paint with your mouse, you might want
to consider upgrading to a digital pen and tablet. Elements is
compatible with most pressure-sensitive tablets, including the
popular—and relatively affordable—Wacom Bamboo tablets
(www.wacom.com/bamboo).
To set up your tablet for use with brushes in Elements,
open the Brush tool’s Options Bar and click on the drop-down
arrow next to the Airbrush button. (For the pressure-sensitive
brushes to work, your tablet driver must be installed.)
The options in this dialog box let you control how brushes
react when you vary the pen’s pressure. For example, by turning on the Size and Opacity options, you can set brushes to
become thicker and darker as you press down—something the
mouse can’t do. You can select any combination of settings.
Using these settings gives you precise control over your
brush’s dynamics, size, and opacity, and lets you change brush
attributes on the fly without making a trip to the Options Bar.
This makes painting much more intuitive.
One note: If you’re using a digital tablet and you find
one of the pressure-sensitive settings doesn’t appear to
be working—for example, you turn on Hue Jitter settings
but your brush remains the same color—double check the
Brush Dynamics pane in the Options Bar. If that setting is
zero, your tablet won’t use it.
Size
Opacity
Hue Jitter
Scatter
Roundness
Tablet Options
100% Roundness
50% Roundness
25% Roundness
I applied more pressure at
the end of these strokes.
Roundness Adjusting Roundness affects the shape of the
brush tip—that is, how round, thin, or thick the brush is. To
adjust it, enter a percentage (the ratio of height to width),
or drag one of the dots at the edge of the circle graphic
away from or toward the arrow. With a round brush, a value
of 100 percent indicates a circular brush; a value of 0 percent indicates a linear brush.
Keep These Settings for all Brushes If this box is unchecked,
any changes you make to a brush stroke will be lost when you
switch to another brush. If you wish to maintain the brush
dynamics between brushes, check the box.
Putting It All Together
Hue Jitter: 70 Scatter: 55 Spacing: 30”
Scatter: 0 Hue/Jitter: 100 Spacing: 125
14 ADOBE PHOTOSHOP ELEMENTS TECHNIQUES
Often you’ll need to use a combination of dynamics settings
to get a desired effect.
For example, if you take a plain rectangular-shaped brush,
add Hue/Jitter, Scatter, and Spacing values, you can make
colorful confetti.
Likewise, you can tame the Flowing Stars brush (which typically
creates a chaotic scattering of single-hued stars) into an evenly
spaced line perfect for borders by altering its built-in dynamics.
Feature
THE BRUSH TOOL
Now that you know how to build your brushes, applying
them to the page is a simple matter of clicking and dragging
with your mouse or digital pen. (With some brushes, you don’t
even need to do that much; a single click will do the trick.)
Here are some helpful pointers to keep in mind as you build
your masterpiece.
Use a Blank Layer
I recommend always painting or stamping brushes on a new
blank layer. Having your brush stroke on its own layer has several
advantages: you can easily erase a portion of the stroke without
affecting underlying colors or patterns; you can resize and rotate
it by selecting the Move tool and dragging the bounding box
handles; you can recolor it; you can apply various effects, such as a
layer style, or Gaussian Blur filter; and best of all, you can drag the
whole layer to the trash bin if you decide you don’t like it at all.
Stamp It
With the basic round brushes and artistic brushes, you’ll
typically stroke the cursor to apply streaks of color to the
page. But that’s not the only way to use brushes. Most object
brushes—such as swirls or flowers—are designed to act as
stamps. To stamp a brush, position the brush cursor on your
image, and then click once. The brush stamp leaves a single
imprint on your image. (To learn how to create a watermarking brush, turn to page 25.)
There’s no hard and fast rule about whether you should
stroke or stamp with a particular brush. You certainly can stamp
with the round brushes or art brushes to make a repeating pattern. And you can set brush dynamics, such as Spacing and/or
Scatter, to stroke a border with an object brush.
Create a Straight Line
To use a brush to make a straight line, press the Shift key as
you drag the cursor. To make a straight line between two
points, click once at the starting point, and then hold the
Shift key and click once at the ending point.
Quickly Change Brush Size and Opacity
There’s no need to return to the Options Bar every time you
need to change your brush parameters. Use the bracket keys
[ and ] to reduce and increase your brush size in increments
of 10 pixels. To quickly adjust the brush opacity, simply type
in the appropriate percentage: 1 for 10 percent, 25 for 25
percent, 0 for 100 percent.
Apply brushes to a new blank
layer for maximum flexibility.
Get More Brushes!
Don’t limit yourself to the onboard
brushes. You’ll be amazed by the
variety of brushes available on the
Web. (See “Brush Resources” online
for some of my favorite sites for
downloading brushes.)
If the description indicates a brush
is for Photoshop, generally it will
function in Elements. If you’ll be
printing your images, look for highresolution brushes. In the brush previews, the number under the individual brush tips is the size of the brush,
in pixels. The larger the pixel size the
better. You can downsize a brush and
use it successfully, but if you enlarge a
low-resolution brush, it may become
pixelated with jagged edges. I usually
look for brushes in the range of 500
to 2500 pixels.
These brushes,
by gvalkyrie,
are available at
deviantart.com
JULY/AUGUST 2010 15
Blend Colors
These modes behave like the blend
modes in the Layers palette, except
instead of affecting the whole layer, they
affect only the underlying pixels.
tip Soften Your Brush Another
quick way to adjust a brush’s
hardness without opening the
Brush Dynamics pane, is to use
the keyboard shortcuts Shift-[ and
Shift-] to soften and harden the
brush edge, respectively.
In the real world, when you apply wet paint over an existing
color on your canvas, the resulting stroke will differ depending
on the color of the paint you’re applying, the thickness of the
stroke, and whether the existing layer is wet or dry. Elements
doesn’t offer options for blending paint in the traditional way,
but it does give you a tool for combining colors to create
interesting effects. The secret lies in the Mode menu, which
offers 25 blending modes, each using a different mathematical
formula to determine how the two colors interact.
When working with blend modes, think of the color
already on your canvas as the base color and the color you
are applying as the blend color. The two colors interact to
give you a third color depending on which mode you’re
using. I encourage you to experiment with all of them to
see the types of effects that are possible.
That said, I admit that I seldom use blend modes when
painting with the Brush tool. Because you have to paint
directly on your image to achieve the blending effect, it’s
harder to modify or delete your strokes later if you change
your mind. Instead, I prefer to paint on a blank layer above my
image, and then apply the blend mode to the entire layer
using the Layers palette. If you do use the Brush tool’s blend
modes to paint on your image, I suggest using a duplicate
layer so you don’t alter your original.
Beyond the Brush Tool
When we talk about using brushes in Elements, we’re not just talking about the Brush tool. A
surprising number of other tools use the built-in brush libraries, including the Selection Brush,
Spot Healing Brush, Eraser tool, Clone Stamp, Smudge tool, Dodge and Burn tools, and many
more. Just as brushes determine the shape you paint or stamp with the Brush tool, they also
determine the shape, or drawing edge, of these tools. And you can take advantage of many of
the same keyboard shortcuts for switching and modifying brushes.
By using unconventional brushes with
some of these tools, you can obtain
interesting and creative effects. For
instance, by using a grungy design brush
with the Eraser tool (E), you can create a
decorative edge around a photo.
16 ADOBE PHOTOSHOP ELEMENTS TECHNIQUES
Likewise, you can combine brushes with the
Smudge tool (R) to alter the pixels already in
your image. Here, I started with the Smudge
tool, selected the Chalk brush from the Options
Bar, and set the Opacity to 33 percent. I then
stroked the photo to create this painterly image.
Feature
THE BRUSH TOOL
Match Your Colors
Here’s a quick way to change the brush’s foreground color to any color
currently visible on your computer screen. With the Brush tool active,
press the Alt key (Mac: Option key), which will temporarily activate the
Eyedropper tool. While holding the mouse button down, drag the cursor
over any part of your screen and watch as the foreground color changes
to reflect whatever color is under the Eyedropper—this includes other
colors in your document, a photo in the Photo Bin, or the Color Swatch
panel (if you have it open). If you have your Elements window resized so
your desktop is visible, you can even sample from an open website or
desktop image. When you see a color you like, release the Alt/Option key
and the mouse button to apply it to your foreground color.
Standard Cursor
Precise Cursor
Normal Cursor
Find a Hidden Cursor
If you’re having trouble seeing the cursor, there are a few things you
can do to locate it:
Switch to the Hand The problem may be that you’re using a very small
brush size, such as 1 or 2 pixels. To quickly locate it, press and hold the
spacebar. This will temporarily turn the cursor into the Hand tool, which
is easier to see. When you release the spacebar, the tool returns to the
Brush tool.
Full Size Cursor
Crosshair In Brush
Tip Cursor
Check Your Caps Lock If this gets turned on accidentally, the brush
cursor will appear as small crosshairs rather than your selected brush.
Toggling the caps lock to the off position should return the brush cursor
to its usual shape.
Change Your Preferences If you run into this problem often, consider
changing your cursor preferences to make the cursor easier to see. From
Windows, select, Edit>Preferences>Display & Cursors. From a Mac,
select Photoshop Elements>Preferences>Display & Cursors. Make a new
selection from the Painting Cursors section.
The Standard option displays the cursor as the toolbox icon of the
active tool, which in the case of the Brush tool is a small paintbrush. It’s
easier to see, but can be a little distracting. The Precise option displays
the cursor as crosshairs, which some find difficult to see. The Normal
Brush Tip and Full Size Brush Tip options display the cursor as a circle
that is 50 percent or 100 percent of the size of your brush, respectively.
For the best of both worlds, you can turn on the Show Crosshair In
Brush Tip option to display cross-hairs inside the normal or full-size
brush tip circle. ■
Diana Day, retired H.R. Manager and self-taught Elements user, hosts a PSE Users
Group where she teaches Elements to members of her community. She also puts
her skills with Elements to practical use administering her church’s Web page
and public relations projects.
EXTRAS: GET MORE ONLINE!
Go online to the Magazine section
for the July/August 2010 issue for
additional tips, links to download
fabulous brushes, and tutorials.
PhotoshopElementsUser.com
JULY/AUGUST 2010 17


© Copyright 2026