
Adobe Illustrator CS3 Tutorial Illustrator Art Brushes
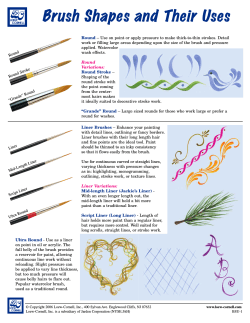
Adobe Illustrator CS3 Tutorial
Illustrator Art Brushes
During this tutorial we are going to create and use different brush strokes to give a
character life in Adobe Illustrator. Specifically creating art brushes and applying them
in different colors and thicknesses.
01. First of all
we’re going to need
something to work
from. This can either
be a photograph or a
sketch. I find it easier
to have something to
reference as a guide
as it gives you some
perspective and you
can always play
around with it later.
04. Lock layer 1
and create a new layer. Double
click on it and call it artwork.
This sketch was
especially drawn by
Deviant Art member
Pysch.
07. Now we are going to
create some brush strokes.
Create a new layer and call it
strokes. Select the ellipse tool
and draw a thin 100% black
filled ellipse.
NOTE: It has to be 100% as when
you add colours to your strokes
later you want it to be the exact
colour as in the color palette.
05. Using the pen tool
02. Once you have
your reference open Adobe
Illustrator and load a new blank
document.
start tracing over your artwork.
Using the convert anchor
point tool
to get them into
position. This can take some
time so be patient. Try to use as
few points as possible as these
can show up when we apply
the brush strokes.
08. Using the convert
Anchor Point tool
click on
both outer edges of the ellipse
to create corners and definitive
points to the strokes.
06. Once you’ve created a
03. Place your reference
in the document and change
the opacity in the transparency
palette to around 50%. This is so
you can easily see your black
strokes against the outline of
your original image.
Page 1
few strokes group them together
by what colour you want them
to be. In this case of a girl. I’ve
grouped each of her eyebrows
and the hair. Grouping them as
you go along will make it easier
to colour them and add the
strokes.
09. Drag the ellipse over to
the brushes palette to create a
new art brush.
http://andart.deviantart.com/gallery/#Tutorials
Adobe Illustrator CS3 Tutorial
Illustrator Art Brushes
13. To create some variation
10. Call it outline and set the
colorization method to tints. This
allows you to change the colour
of the stroke to anything you like
later on.
11. Hide the strokes layer by
clicking on the eye
in the
layers palette. Select the groups
you created earlier and click on
your new brush to apply it to the
strokes.
in the brush strokes. Go back to
your ellipse you made to create
the brush and move the top
and bottom anchor points to
make one end thicker than the
other. Repeat steps 9 and 10 to
add it to the brushes palette.
14. Add colour to the
strokes as you would normally.
Use different shades to create
highlights and shadows.
15. Remember to save your
file so you don’t lose all the hard
work you’ve been doing!
17. Use these techniques
12. By selecting
the direct selection
tool
you can then start to
experiment with stroke widths.
If your not happy with the result
just repeat step 5 until you get
the stroke looking the right
shape.
Page 2
16. After you have the
outlines completed. You can
then use the pen tool
to go
round your strokes again with a
filled colour.
to complete the rest of the
illustration. I have used a
calligraphy brush for the
clothing to create some
differences between the girl
and what shes wearing. I have
finished it off with a simple
contrasting background.
http://andart.deviantart.com/gallery/#Tutorials


© Copyright 2026