
The Absa Guarantee Hub: Bond Attorney
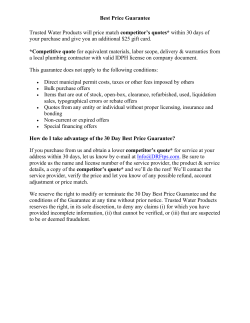
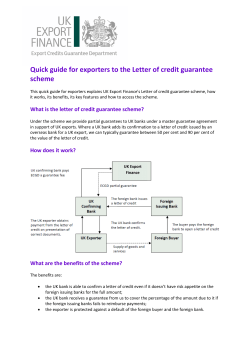
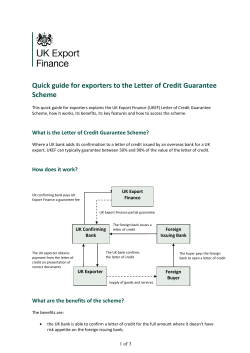
The Absa Guarantee Hub: Bond Attorney
LEARNING OUTCOMES
The purpose of this presentation is to introduce you to the Absa Guarantee Hub and to familiarise new users with the basic
process for handling electronic guarantees. This presentation consists of the following:
•
Introduction
•
Accessing the Absa Guarantee Hub
•
Viewing Requests
•
Using the Comments Functionality to Communicate with the Requesting Attorney
•
Capturing Payments
•
Issuing Guarantees
•
Searching and Navigation
•
Sharing Issued Guarantees
•
Submitting Payment Corrections
•
Cancelling Guarantees
•
Customer Support
PLEASE NOTE:
This guide gives a very general overview of the functionality available on the website. You will probably find it easier to use the
Absa Guarantee Hub via a conveyancing software package integrated to the Absa Guarantee Hub.
If you are using such a package, your software vendor may have more specific and detailed training material.
INTRODUCTION
The Absa Guarantee Hub is a system that automates and manages the process for requesting and issuing
guarantees for Absa Home Loans. The electronic process is modelled on the existing practice of:
•
Requesting guarantee requirements
•
Capturing the required payments
•
Generating the required guarantees and having these issued by an authorised signatory
•
Distributing the guarantees to the requesting party
DIFFERENCES
The primary differences between the existing paper-based process and the Absa Guarantee Hub are the
following:
•
An authorised signatory will login to the Absa Guarantee Hub website to issue electronic guarantees using a
digital certificate, instead of placing an inked signature on a printed document. This process is much the
same as in internet banking, where an authorised person is required to login to a secure website to release
(authorise) payments.
•
All guarantees issued against registration of an Absa bond will be issued on the Guarantee Hub. The
objective of this is to give the Bank complete oversight of the guarantee issuing process from the initial
instruction through to registration.
MANUAL VS DIGITAL
The following diagram is an illustration of how the existing manual system of issuing guarantees, compares with
the Absa Guarantee Hub:
LOGGING IN TO THE ABSA GUARANTEE HUB
1.
Login to the Absa Guarantee Hub at
2.
https://absaguaranteehub.korbitec.com, using your
Enter your username and password, and click
Login.
digital certificate.
1
2
Your certificate is
automatically detected
when you navigate to the
web address.
BONDS SCREEN
Once logged in, you can filter your
list of bond matters using:
1.
The Contains text field to
1
search by bond account
number or Attorney name.
2.
The Bond status drop-down
to view only matters with a
specific status.
3.
The Payment status dropdown to view only matters
with a specific payment
status.
After entering one or more filter
values, click Search to apply the
values to your matter list.
2
3
VIEWING A GUARANTEE REQUEST
On the Bonds screen:
•
Requests will be created by the
Requesting Attorney, e.g. the
Transfer Attorney.
•
New messages or requests for
payments will be indicated by a blue
message icon next to the matter.
On the Bond details screen:
•
Upon opening the matter, you will
see all guarantee requests in the
Requests menu.
•
Click on a request to open it and
view the details and corresponding
documentation.
REQUEST DETAILS
•
Once the request is open, you will
see all documentation and
messages uploaded by the
Requesting Attorney.
•
The Add Attachment button
allows you to digitally attach and
send necessary documentation to
the Requesting Attorney.
•
The Leave a reply box allows you
to quickly and securely
communicate with the Requesting
Attorney.
ADDING A PAYMENT
Payments can be added at any time, but usually after receiving the necessary information from the Transfer
Attorney in their request.
To add a payment:
1. Select and open the bond in
your list by clicking it.
1
2. On the Bond details screen,
click Add Payment.
2
PAYMENT DETAILS SCREEN
•
Complete all the required
information. Mandatory
fields are indicated by an
asterisk (*).
•
In the top right-hand corner
of the Payment details
screen, you have the option
to navigate to the All Bonds
page, the All Payments
page or the This Bond page.
ADDING INTEREST
1.
The Interest field will default
to None. From the drop-down
menu, select Plus or Minus.
2.
1
2
From the Interest Type dropdown menu, select Simple or
Compound.
3.
Complete the details of the
interest to be added.
4.
3
Click the Refresh button to
generate the appropriate
wording for the interest
calculation.
NOTE: Clicking the Amend button
allows you to customise the interest
clause in a text editor.
4
ADDING INTEREST
5.
Should you wish to add another
interest, click Add Interest and
repeat Steps 1 to 4.
6.
Click Add Payment once you
have completed all the payment
details and any interest
required.
5
6
NOTIFYING SIGNATORIES
After a payment has been added, the authorising signatories must be notified.
On the Bond details screen:
•
click Notify
The Email notification confirmation screen will open.
NOTIFYING SIGNATORIES
On the Email notification
confirmation screen:
•
From the Recipient dropdown, select the authorising
signatory you wish to notify.
•
The Email subject and
Message fields will be prepopulated with the signatory
and payment details. The
message will include a
hyperlink to the authorising
page, so the signatory can
link directly to the payment.
•
Click Send.
SIGNING GUARANTEES
As the authorised signatory, when notified that a guarantee is ready to be authorised/issued, you will need to
login to the Absa Guarantee Hub as the authoriser/issuer. To do this, click the link in the notification email to
open the Sign guarantees screen, or go to https://absaguaranteehub.korbitec.com and navigate to the Sign
guarantees screen in the following manner:
1.
Once you have the guarantee requirements, login
to the Guarantee Hub using your digital certificate.
2.
Enter your username and password, and click
Login.
2
1
Your certificate is
automatically detected
when you navigate to the
web address.
SIGNING GUARANTEES
•
On the Bonds screen, select
the bond by clicking it.
•
On the Bond details screen,
click the Sign Guarantees
button.
SIGN GUARANTEES SCREEN
The Sign guarantees screen presents a summary of the bond details and payments.
•
Guarantees that are in order to be issued will be highlighted in green.
•
Alterations from the original instruction, or factors preventing the issuing of the guarantee, will be
highlighted in yellow, e.g. if the Firm’s signing limit has been exceeded.
The icons appearing next to each guarantee state will indicate a warning
an event that will prevent the issuing of the guarantee
guarantee is otherwise in order to be issued
.
, or that the
, or
ESCALATING A BOND
1.
If a guarantee is not in order (e.g. the Firm’s signing limit has been exceeded) the authorised signatory may
escalate it to the Attorney Consultant by authorising the guarantee and clicking the Escalate button.
2.
If the Firm has more than one signatory, the second signatory can be notified that the guarantee has been
authorised and may now be issued, by clicking the Notify button on this screen. This will generate an email
notification, which can be sent to the second signatory (see Slide 15 of this presentation).
1
2
AUTHORISING AND ISSUING GUARANTEES
If you are satisfied that the guarantees are in order, you may proceed to authorise/issue them, as required.
For Firms requiring 2 signatories,
the second signatory will need to
login to the Absa Guarantee Hub
to issue the guarantee once
he/she has received the email
notification which contains a link
directly to the required matter.
1.
The first signatory to login,
authorises the guarantee.
Click on SIGN once satisfied
that the guarantee is in order.
2.
The second signatory to
1
2
login, issues the guarantee.
Click on SIGN, to issue the
guarantee.
Click the preview
icons to view the
guarantees.
SHARING ISSUED GUARANTEES
Once a guarantee has been issued,
you may wish to share it with the
Requesting Attorney.
•
The issued guarantee is
available on the Bond details
screen with the status: Issued.
Click the green Guarantee
button to download the digital
guarantee.
•
If you have not yet done so,
you will need to associate the
guarantee with the request.
Click the payment to open it.
•
In the Payment details
screen, click Associate
Request.
ASSOCIATING A REQUEST WITH A PAYMENT
1.
From the Select request
drop-down menu, select the
guarantee request that
corresponds to your
guarantee, then click
1
Confirm.
2.
You will be notified of
successful association. You
are now able to share the
guarantee with the
Requesting Attorney.
2
SHARING A GUARANTEE
•
From the Bond details
screen, click the request that
matches the guarantee you
wish to share.
•
On the Request details
screen, below the
Attachments section, click
Share.
•
After you have followed the
confirmation prompts, the
guarantee will be shared with
the Requesting Attorney.
•
You can undo this by clicking
the Unshare button at any
time.
VERIFYING AUTHENTICITY OF A DIGITAL SIGNATURE
The guarantees will reflect the digital signature by the Absa Guarantee Hub in the blue signature panel of the
PDF document and will display the details of the authorised signatories who issued the guarantee in the red grid
at the foot of the guarantee.
NOTE: These guarantees must be shared electronically rather than in printed format.
For more information on identifying a legitimate digitally signed guarantee, please refer to the Resources
section on the Absa Guarantee Hub homepage (https://absaguaranteehub.korbitec.com), or click the following
link: How to identify a legitimate guarantee.
Example
SUBMITTING A PAYMENT CORRECTION
In the event that a payment needs to be
modified but the guarantee does not need to
be cancelled and re-issued, a Payment
Correction can be performed.
•
From the Bond details screen, click
Submit Payment Correction.
•
Only the Payment reference and
Amount fields are editable. Make the
changes as desired.
•
If a payment had an interest calculation,
it will be converted to a Straight
payment.
SUBMITTING A PAYMENT CORRECTION
After a new amount is captured, the Total
value of corrected amounts will be updated.
The sum of payments is still limited to the
amount available.
•
You will need to confirm that the
updated values are correct, in terms of
the provisions of the signed Loans Debit
Authority and the issued guarantee(s).
•
Select the checkbox to confirm and click
Submit.
•
The Bond History of the matter will
reflect that the payment has been
amended and that an ATP Correction
has been sent.
CANCELLING A GUARANTEE
Unlike paper guarantees, electronically signed
guarantees are impossible to destroy.
Provision has been made for the cancellation
of an issued guarantee in Paragraph 3 of the
guarantee document, by providing the
requestor with written notice of the
cancellation.
To cancel a guarantee and generate the
required Cancellation Letter:
1
1. On the Bond details screen in the Status
column, select the guarantee to be
cancelled. The status of the guarantee
must be Issued.
2. On the Payment details screen, click the
Cancel button.
2
CANCELLING A GUARANTEE
3. On the Cancel guarantee confirmation
screen, capture a reason for the
cancellation in the Reason field and click
the Confirm button once you have done
3
this.
4. On the Success screen, click the OK
button.
5. On the Payment details screen, the
status of the guarantee will change to
Cancelled. Click the View Cancelled
button to generate a Cancellation Letter.
4
5
CANCELLATION LETTER
The cancellation letter will open as a PDF
document and it will be digitally signed by the
Absa Guarantee Hub.
The cancellation reason
that was captured on the
Cancel guarantee
confirmation screen, will
appear on the letter.
NOTE: A new guarantee may only be issued
once the requestor has acknowledged receipt
of the cancellation.
ISSUING A REPLACEMENT GUARANTEE
If the transaction is proceeding and the guarantee has been cancelled for a different reason, it will need to be
replaced. to cancel and replace the guarantee:
•
Cancel the existing guarantee on the Absa Guarantee Hub.
•
Create a new payment and notify the signatories as described in the preceding slides.
CUSTOMER SUPPORT
Please contact the Korbitec Support Team during office hours, should you require assistance.
The Korbitec Support Team is contactable telephonically on 0861 567 248, or via email at [email protected].
Thank You


© Copyright 2026