
Module 3 - Lab Exercises
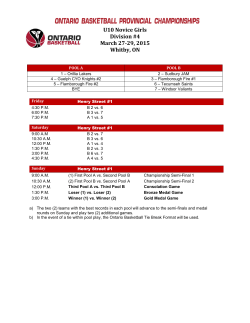
XenServer Fundamentals Training Module 3: Resource Pools and Manual Workload Balancing Hands-on lab exercise guide Worldwide Support Readiness April, 2015 Page 1 Table of Contents Table of Contents ..................................................................................................................................................... 2 Overview .....................................................................................................................................................................4 Exercise 1: [Module 2] Installing XenServer ............................................ Error! Bookmark not defined. Exercise 2: [Module 2] Upgrading XenCenter ......................................... Error! Bookmark not defined. Exercise 3: [Module 2] Licensing XenServer ............................................ Error! Bookmark not defined. Exercise 4: [Module 2] Managing XenServer Users ................................ Error! Bookmark not defined. Exercise 5: [Module 2] Creating a Virtual Machine ................................ Error! Bookmark not defined. Exercise 6: [Module 2] Converting a Virtual Machine into a TemplateError! Bookmark not defined. Exercise 7: [Module 2] Modifying Virtual Machine Properties ............ Error! Bookmark not defined. Exercise 8: [Module 2] Creating a vApp .................................................... Error! Bookmark not defined. Exercise 9: [Module 3] Creating a Resource Pool ............................................................................................. 6 Exercise 10: [Module 3] Managing Virtual Machines .................................................................................... 12 Exercise 11: [Module 3] Configuring High Availability ................................................................................ 18 Exercise 12: [Module 3] Collecting and Reviewing the Pool/Host Database ......................................... 21 [Module 4] Exercise 1: Creating an NFS Storage Repository ............... Error! Bookmark not defined. [Module 4] Exercise 2: Probing an iSCSI Storage Repository .............. Error! Bookmark not defined. [Module 4] Exercise 3: Detach and Reattach a Storage Repository .... Error! Bookmark not defined. [Module 4] Exercise 4: Forget and Introduce a Storage Repository ... Error! Bookmark not defined. [Module 4] Exercise 5: Configure a Dedicated Storage Network InterfaceError! Bookmark not defined. [Module 4] Exercise 6: Configure Multipathing ...................................... Error! Bookmark not defined. [Module 4] Exercise 7: Review volumes and virtual disks ..................... Error! Bookmark not defined. [Module 4] Exercise 8: Migrate a virtual disk (VDI) ............................... Error! Bookmark not defined. [Module 4] Exercise 9: Create and Resize a Virtual Disk ...................... Error! Bookmark not defined. [Module 5] Exercise 1: Create External and Internal Networks .......... Error! Bookmark not defined. Page 2 [Module 5] Exercise 2: Add a Virtual Network Interface to Virtual Machines .. Error! Bookmark not defined. [Module 5] Exercise 3: Manage and Review Networks and Network Interfaces via the CLI....... Error! Bookmark not defined. [Module 5] Exercise 4: Configure a Bonded Interface ........................... Error! Bookmark not defined. [Module 5] Exercise 5: Configure OpenvSwitch and DVSC (Distributed Virtual Switch Controller)Error! Bookmark not defined. [Module 5] Exercise 6: Capture a Network Trace ................................... Error! Bookmark not defined. [Module 5] Exercise 7: Initiate Emergency Network Reset .................. Error! Bookmark not defined. Exercise X: [Module 6] Exploring XenServer Internals ........................ Error! Bookmark not defined. Exercise X+1: [Module 6] Workload Balancing ...................................... Error! Bookmark not defined. Exercise X+2: [Module 6] Upgrading and Installing Updates ............. Error! Bookmark not defined. Exercise X+3: [Module 6] Backing up and Restoring XenServer ....... Error! Bookmark not defined. Exercise X+4: [Module 7] Collecting and examining a status report for troubleshootingError! Bookmark not defined. Exercise X+5: [Module 7] Force Generating a XenServer Dump ...... Error! Bookmark not defined. Exercise X+6: [Module 7] Monitoring XenServer using CLI commandsError! Bookmark not defined. Exercise X+7: [Module 7] Optional Exercise .......................................... Error! Bookmark not defined. Page 3 Overview Hands-on Training Module This training module has the following details: Objective Provide hands on experience with common tasks in XenServer Audience Primary: Citrix Technical Support new hires Lab Environment Details In the lab environment, a single XenServer host that can be accessed across the Internet is assigned to each student. The XenServer host runs various virtual machines including virtualized XenServer hosts to create a complete lab environment for all the exercises. Machine XenServer Virtual Machines Router (hidden) StudentDesktop (hidden) AD.training.lab IP Address Will be provided after you login to the lab portal site 192.168.10.1 192.168.10.10 OS XenServer 6.2 Details Hosts virtual machines Vyatta Windows 7 Lab Router Landing desktop 192.168.10.11 Windows 2012 R2 CentOS 6.6 Debian 6.0.2 CentOS 5.10 Domain Controller/DNS Server XenServer 6.1 XenServer 6.1 XenServer 6.1 Virtualized XenServer host vStorage DVSC Workload Balancing Server vXS01 192.168.10.12 192.168.10.13 192.168.10.14 vXS02 192.168.10.22 vXS03 192.168.10.23 192.168.10.21 NFS/iSCSI target DVSC 6.5 WLB 6.5 Virtualized XenServer host Virtualized XenServer host Page 4 Required Lab Credentials The login credentials required to connect to the workshop system and complete the lab exercises are as follows: Machine XAStudent AD.training.lab DVSC vStorage WLB vXS01 vXS02 vXS03 Username administrator training\administrator root root root root root root Password Citrix123 Citrix123 Citrix123 Citrix123 Citrix123 Citrix123 Citrix123 Citrix123 Page 5 Exercise 1: Creating a Resource Pool Overview In this exercise, you will first create a Resource Pool and then add a Shared Storage to verify shared configurations are automatically reflected across the pool. You will also promote a secondary host to master, and remove a host from a pool. Step-by-step guidance Estimated time to complete this lab: [20 minutes] Step 1. 2. 3. 4. 5. 6. 7. 8. 9. 10. Action Adding a XenServer host to XenCenter Click Add New Server on the toolbar in XenCenter. Type the following information in the Add New Server window: IP address of the server: 192.168.10.21 Username: root Password: Citrix123 Click Add. Creating a Resource Pool Click New Pool on the toolbar. Type XenServer Pool in the name field and click Create Pool. Adding a Remote Storage Select XenServer Pool in XenCenter and click New Storage in the toolbar. Select Software iSCSI under Virtual disk storage and click Next. Accept the default and click Next. Type 192.168.10.12 in the Target Host. Select Use CHAP and enter the root\Citrix123 account. Click Scan Target Host and select the target IQN starting with iqn. Page 6 Step 11. Action Click Discover LUNs and select LUN 1. 12. Click Finish. If you get the following warning message, click Format. 13. You see the disk is attached to the host in the left pane. Adding More Hosts to the Resource Pool Click Add New Server on the toolbar in XenCenter. Type the below information in the Add New Server window: IP address of the server 192.168.10.22 Username root Password Citrix123 Click Add. Repeat the above steps and add one another server: IP address of the server 192.168.10.23 Username root Password Citrix123 Right-click XenServer Pool and click Add Server >vXS02. Click Yes. Confirm that the iSCSI storage is now attached to vXS02. 1. Click vXS02. 2. Select the Storage tab. 3. Confirm that the iSCSI storage is listed in the pane. 14. 15. 16. 17. 18. 19. 20. Page 7 Step 21. 22. 23. 24. 25. 26. 27. Action Right-click XenServer Pool and click Add Server >vXS03. Click Yes. Import a Virtual Machine to vXS01 Open Explorer and browse to \\ad\software Use the administrator/Citrix123 credentials to access this share. Hold down the Shift key and right-click XenServer-6.1-dlvm.xva and select Copy as path. Note: XenServer-6.1-dlvm.xva is a Demo Linux virtual appliance and is downloadable from citrix.com. Right-click vXS01 in XenCenter. Select Import. Paste the path in the Filename field and click Next. Be sure to remove double-quotations from the path. 28. 29. Select the vXS01 XenServer host and click Next. Select the Local storage on vXS01 and click Import. 30. 31. Click Next on the Networking configuration screen. Ensure Start VM(s) after import is selected and click Finish. A virtual machine appears in the resource pane. Wait for the VM to boot. 32. Page 8 Step 33. 34. 35. 36. 37. 38. Action Go to each console of the imported VM and set Citrix123 as the root password. Promote a Secondary Server to Pool Master Click the vXS02 XenServer host and click the Console tab. Press Enter to login. Run the following command to show the UUID of vXS02: # xe host-list name-label=vXS02 Run the following command to designate vXS02 as new master: # xe pool-designate-new-master host-uuid=<UUID of vXS02> You can type the first few characters of thevXS02 UUID and hit Tab to complete the UUID. Note: This operation is not available with XenCenter. XenServer CLI usage will be covered in later module. Wait for vXS02 to run as the new master and XenPool is reconnected to XenCenter. Note: vXS02 is now located at the top of the XenPool tree view after the reconnect. Removing a Host from the Resource Pool Page 9 Step 39. Action Right-click the vXS01 host and select Enter Maintenance Mode. Commented [MH1]: The capture needs to be updated. 40. Click Suspend the VM. After the VM is suspended, click Enter Maintenance Mode. 41. Observe that the server icon is changed to a blue one. Commented [MH2]: The capture needs to be updated. 42. 43. Right-click the vXS01 host again and click Remove Server from Pool. After vXS01 is removed from the Pool, reconnect to vXS01 and verify that the VM on the local storage does not exist anymore and the host is in a reinitialized state. Commented [MH3]: The capture needs to be updated. 44. Add vXS01 to XenServer Pool again, and make vXS01 as the pool master using the commands in step 38 and 39. Page 10 Step 45. Action Right-click Citrix Demonstration Linux Virtual Machine and select Delete VM. Summary Key Takeaways The key takeaways for this exercise are: Discovering how to create a XenServer Resource Pool using XenCenter New pool members automatically inherit the shared configuration settings, such as VM metadata, Storage and Networking settings. You can designate a new pool master using the XenServer CLIs. NOTES Page 11 Exercise 2: Managing Virtual Machines Overview In this exercise, you will import/export/copy/migrate/delete virtual machine. You will also take snapshots of virtual machines and perform available operations for VM snapshots. These operations allow backing up virtual machines and performing server maintenance. Step-by-step guidance Estimated time to complete this lab: [25 minutes] Step Action 10. Import Linux Demo virtual appliances to shared storage Open Explorer and browse to \\ad\software\ Use the administrator/Citrix123 credentials to access this share. Hold down the Shift key, right-click the XenServer-6.1-dlvm.xva and select Copy as path. Note: XenServer-6.1-dlvm.xva is a Demo Linux virtual appliance and is available on citrix.com. Right-click XenServer Pool in XenCenter. Select Import. Paste the path in the Filename field and click Next. You need to remove double quotation marks from the path. Select XenServer Pool and click Next. Select the iSCSI virtual disk storage and click Import. Click Next on the Networking configuration screen. Ensure Start VM(s) after import is selected and click Finish. A virtual machine appears in the resource pane. Go to the console of the VM and set the root password as Citrix123. 11. Right-click the VM and select Properties. 1. 2. 3. 4. 5. 6. 7. 8. 9. Page 12 Step 12. 13. 14. Action Name the VM as Demo Linux 1, and click OK. Repeat steps 3 – 12 and import one more virtual machine named Demo Linux 2. Taking Virtual Machine Snapshots Right-click one of the imported Virtual Machines and click Take Snapshot. 15. Enter Initial Status in the Name field and type Status after a fresh install in the description field. Confirm that Snapshot the virtual machine’s disks is selected as Snapshot mode. 16. Click Take Snapshot. Page 13 Step 17. Action Click the Snapshots tab of the virtual machine and confirm that the snapshot is created. Commented [MH4]: The capture needs to be updated. 18. 19. Go to the console of the virtual machine and login using the root/Citrix123 account. Run the following commands and create an empty file under /tmp: # cd /tmp # touch emptyfile 20. Go to the Snapshots tab of the virtual machine and take another snapshot as below: 1. Click Take Snapshot 2. Type EmptyFile Created in the Name field. 3. Confirm Snapshot the virtual machine’s disks is selected. 4. Click Take Snapshot The newly created snapshot appears in the Snapshots tab. Select the Initial Status snapshot and click the Revert To/Actions/Delete buttons to browse the available operations within the Snapshots tab. Click No or Cancel to close popups. 21. Page 14 Step 22. 23. 24. Action Select the Initial Status snapshot and right-click. Click Revert To Snapshot. De-select “Take a snapshot of the VM’s current state and then revert” and click Yes. 25. Click the Console tab. Verify that the emptyfile does not exist in /tmp. 26. 27. 28. 29. 30. 31. 32. Copying a Virtual Machine to Another Storage Repository Right-click the virtual machine you took snapshots of. Confirm the Copy VM operation is not available. Note: You need to shut down a VM before copying the VM. Click Shut Down. Wait for the machine to be powered off. Right-click the powered off virtual machine, and click Copy VM. Select Full copy as copy mode and select Local Storage on vXS01 as the target storage repository. Click Copy. The copied VM appears in the left pane. Page 15 Step 33. Action Click the Storage tab of the copied VM. Confirm that the Virtual Disk is created on the local SR of vXS01. Commented [MH5]: The capture needs to be updated. 34. 35. 36. Go to the Snapshots tab of the copied VM. Confirm that the snapshots are not copied. Migrating a Virtual Machine to Other Hosts in the Pool Click one of the VMs reside on the iSCSI SR. Right-click the virtual machine and click Migrate to Server. Select one of the available hosts in the pool. 37. 38. 39. Exporting a Virtual Machine Right-click the copied virtual machine, and select Export. Click Browse, browse to the desktop. Select VDA File (*.xva) as export format. 40. 41. Confirm that the copied virtual machine is selected and click Next. Click Finish. Page 16 Step 42. Action Click Notifications -> Events in XenCenter, and observe that the exporting task is in progress. 43. 44. Wait for the task to complete. Confirm that the xva file is saved on the desktop of the landing machine. 45. 46. Deleting a Virtual Machine Right-click the copied virtual machine, and click Delete VM. Confirm that the attached virtual disk is selected and click Delete. Summary Key Takeaways The key takeaways for this exercise are: Discovering how to import/export/copy/migrate/delete virtual machines You can use the snapshot function to create a record of a virtual machine at a point in time. The virtual machine does not need to be shut down when taking snapshots. NOTES You can save a snapshot as a template as you find by exploring within the Snapshots tab. A template created by the snapshot function is similar to a normal virtual machine template but contains all the storage and configuration information for the original virtual machine, including networking information. Page 17 Exercise 3: Configuring High Availability Overview In this exercise, you will configure High Availability and observe how it works when a server failure occurs. Step-by-step guidance Estimated time to complete this lab: [20 minutes] Step 1. 2. 3. Action Configuring HA Open XenCenter, select XenServer Pool in the resource pane and click the HA tab. Click Configure HA. Follow the instructions on the configuration wizard with the following settings: Heartbeat storage: iSCSI virtual disk storage HA plan: VM HA restart priority Demo Linux 1 Do not restart Demo Linux 2 Restart Note: The max value presented next to Failures allowed is the maximum number of servers that can fail before there are insufficient resources to run all the protected VMs in the pool. This value is calculated by XenServer by taking account of the restart priorities of the VMs in the pool, and the pool configuration (the number of servers and their CPU and memory capacity). The server failure limit is configured by users and needs to be lower than the maximum failure capacity. Verifying Automatic Pool Recovery with HA Page 18 Step 4. 5. 6. 7. 8. 9. 10. 11. 12. 13. 14. 15. 16. 17. 18. 19. Action Migrate the virtual machine to vXS01 by right-clicking the running VM and clicking Migrate to Server > vVS01. Start the powered off VM on vXS01 by right-clicking the VM and select Start on Server -> vXS01. Launch Putty by double-clicking the shortcut on the desktop. Enter 192.168.10.21 in the Host Name field. Verify that the SSH protocol is selected, and click Open. Click Yes in the security alert. Log in to the pool master using the root/Citrix123 credentials. Enter the following commands to cause an instant non-graceful reboot to the XenServer host: # echo 1 > /proc/sys/kernel/sysrq # echo b > /proc/sysrq-trigger You will not receive a prompt back once the second command is entered. Observe how HA works to recover XenServer Pool. Wait until one of the secondary servers promotes as master and the pool is recovered. It will take a couple of minutes. Reconnect to XenServer Pool from XenCenter. Which host is designated as the new master? Is vXS01 available after HA occurs? Are both VMs recovered? Why? Close the Putty window if it is still opened. Select XenServer Pool in the resource pane, and click the HA tab. Click Disable HA. Go to the Console tab of the pool master. Run the following command to show the UUID of vXS01: # xe host-list name-label=vXS01 Run the following command to designate vXS01 as master again: # xe pool-designate-new-master host-uuid=<UUID of vXS01> Note: This operation is not available when HA is configured. Reconnect to XenServer Pool again. Page 19 Summary Key Takeaways The key takeaways for this exercise are: Discovering how to configure HA vm XenServer HA is a feature that: Detects host failure Elects pool master in the event of a master server failure Restarts failed VMs based on the computed failure plan In a nutshell, XenServer HA minimizes VM downtime. Page 20 Exercise 4: Collecting and Reviewing the Pool/Host Database Overview In this exercise, you will locate the pool/host database and review the information stored within it. The database is named as state.db and is in XML format. This database holds the pool/host configuration information which is critical the functionality of the environment. Step-by-step guidance Estimated time to complete this lab: [15 minutes] Step 1. 2. 3. 4. Action Locating the file via the CLI Launch Putty on the landing machine. Connect to the pool master (192.168.10.21) using the root/Citrix123 credentials: 1. Enter 192.168.10.21 in the Host Name field. 2. Verify that the SSH protocol is selected, and click Open. 3. Click Yes in the security alert. 4. Log in to the pool master using the root/Citrix123 credentials. Navigate to the folder location containing the database: # cd /var/xapi List the contents of the /var/xapi folder: # ls Page 21 Step 5. 6. 7. Action Confirm the presence of the state.db file Note: Running the xe pool-dump-database command is the same as copying the state.db to another location. This command is covered in another exercise. Close Putty. Collecting a copy of state.db with WinSCP Launch WinSCP from the landing machine and connect to 192.168.10.21 by click New and entering the IP Address and the root/Citrix123 credentials. Page 22 Step 8. 9. Action Navigate to the /var/xapi folder location using WinSCP. Drag and drop a copy of the state.db file to the desktop of your landing machine. 10. Disconnect the session and close WinSCP. Reviewing the contents of the state.db file Page 23 Step Action 11. Launch XML Marker on your landing machine. 12. Open the state.db file located on the desktop with XML Marker. Note: Ensure you select All Files from the Files of Type dropdown menu. Page 24 Step Action 13. Click the Database object in the left column. Note: Double clicking a database object in the bottom right panel (Tree Selection) will display the table/object rows and their description. Page 25 Step Action 14. In the right Tree Selection Browser pane click the table icon entry. associated with the host_cpu 15. Click the plus (+) sign for the highlighted table object and select the first row. Page 26 Step Action 16. Review the CPU flag information contained in the database Note: This table contains the CPU information detected by the Control Domain (dom0). The flags section contains the CPU features/functions detected. Warning: Do not edit a live database (/var/xapi/state.db) as this can corrupt the configuration and affect your environment. 17. Feel free to explore the database further to view the content contained within it. 18. Close the XMLMarker application. Page 27 Summary Key Takeaways The key takeaways for this exercise are: NOTES The master server synchronizes the database with other hosts in the pool, and a host joining the pool inherits settings from the pool. The XenServer pool/host database state.db is located under /var/xapi/ and data is stored in XML format. You can open a copied state.db file with XenCenter. We will have an exercise opening state.db with XenCenter and reviewing pool/host configuration. Page 28 Revision History Revisio n 1.0 Change Description Updated By Original Version Miho Hoshino, Dian Kotze Date 4/23/2015 Page 29


© Copyright 2026