
Employee User Guide Table of Contents
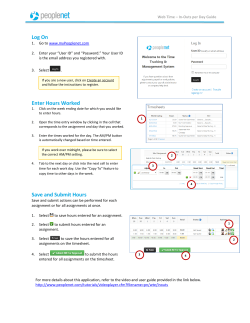
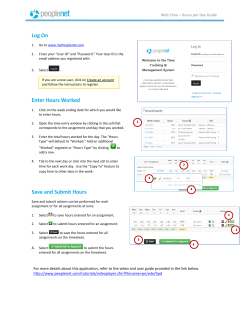
it.engineering.illinois.edu Employee User Guide Table of Contents Introduction ............................................................................................................................................................................................. 2 Logging In to TimeTracker .............................................................................................................................................................. 2 Logging Hours ....................................................................................................................................................................................... 3 Editing and Deleting an Entry ........................................................................................................................................................ 6 Copying an Entry ................................................................................................................................................................................. 6 Submitting a Timesheet for Approval ........................................................................................................................................ 7 Viewing Timesheet History ............................................................................................................................................................. 8 Correcting Errors Made on Submitted Timesheets ............................................................................................................ 9 Payroll Schedule .................................................................................................................................................................................. 9 Timesheet Status Key .................................................................................................................................................................... 10 Timesheet Archive ........................................................................................................................................................................... 10 2 Introduction TimeTracker is an application that allows employees to document working hours, and for employers to confirm or reject these hours submitted by employees. The purpose of TimeTracker is to provide an easy and convenient way for employees to document their working hours. Logging In to TimeTracker Go to https://my.engr.illinois.edu/timetracker and log in with your NetID and AD Password. *If not an employee of engineering, change “engr” with your portal . After logging in, you will be redirected to the “My Timesheets” screen, which displays your active position(s) and current timesheet. 3 Logging Hours To log hours, find the appropriate date and click “Add Time”, shown below. Once you choose “Add Time”, a screen will pop up with space for details of the specific job, date, start and end time, and space for an optional description of the work completed. Once a job and date are selected, you must enter the hours in “Start Time” and “End Time”. This can be done by manually typing, for example, 12:00 PM and 3:00 PM in the Start Time and End Time bars, or by clicking on the clock icon on the right of the box (shown above). By choosing the clock icon, the employee can use the up or down arrows to add or decrease time. If either the start or end time are not filled out, the box will appear in red and time will not be submitted until these fields are completely and correctly filled out. 4 The duration of the shift will automatically be calculated under “Duration” next to the Start Time and End Time boxes. If the hours seemed to be logged in error (for example, if it seems there is a mistake in selecting AM or PM, the shift may seem excessively long), the duration will be highlighted in RED instead of blue. This shift can still be submitted, but it becomes red to indicate there could be a mistake and the employee should double check to make sure it is correct. Figure 1 Figure 1 displays the shift duration highlighted in blue, to indicate there are no errors. Figure2 Figure 2 displays the shift duration highlighted in red, to indicating there may be an error in the time entry. After entering the hours for the shift, there will be a space to select a project and/or task. Some employees may have multiple jobs that have multiple projects and tasks, others may have just one project/task, and some employees may have none. Once you have entered the hours, choose a project from the Project drop down menu. If prompted, choose a task from the task drop down menu. The employee should choose the project and/or task that best defines the work that was completed during the shift. Note: certain projects have expiration dates set up by the supervisor. The project list is dependent upon your job and the date ranges. Some employees may not have any options to choose with projects or tasks. This only pertains to those employees whose supervisor provides options for project(s) and task(s). 5 Lastly, you have the option to write a description of the work that was done during the shift. Supervisors may request this be filled out by their employees, or employees may want to include a short description for either their own records. Once all the fields are completely filled out, choose “Add Time”. Double check the duration to ensure your timesheet is error-free. If this was completed in error or the employee would like to delete this entry, choose “Cancel”. Once the form is completed and time is added, it should appear on the weekly calendar (see below). If there is a note icon on a time entry, a supervisor has edited your time. You can view the content of the note by clicking on the icon (see right). 6 Editing and Deleting an Entry To edit an entry, click on the timesheet entry and choose “Edit”. To delete an entry, click on an entry and choose “Delete”. Copying an Entry If an employee works the same shifts daily, copying an entry will make entering timesheets easier. To copy an entry, select “copy”, and you will be redirected to a screen titled “Copy Time”. Select a date in the pay period using the check boxes. After you have selected the day(s) for which you want to copy time, choose “Add Time” and the previously copied time will be pasted into the selected dates. 7 Submitting a Timesheet for Approval At the bottom of the screen, under “Actions”, there will be an option to select & submit timesheets: If an employee only has one job and one timesheet, select the one job and choose “Submit Selected”. If the employee has multiple jobs, the employee must select any timesheets that need to be submitted and “submit selected”. If you do not submit each individual timesheet you will receive email notifications to complete and submit outstanding timesheets. If an employee only wants to submit one or multiple timesheets but not all, only select those timesheets and choose “Submit Selected”; timesheets can be submitted at a later time and do not need to all be submitted at once. Note: All prior timesheets must be submitted in order of the date of the pay periods before submitting current timesheets. You may go back and submit past timesheets at any point, unless your appointment has ended over 45 days ago, at which you would need to contact your HR department. If you have a previous timesheet that has not yet been submitted, a note will appear when you attempt to submit a more recent timesheet (shown below). 8 Viewing Timesheet History At the top of the page, you can search timesheets by year, pay period, and job. You can also view the most current status of the submitted timesheet. There is also an option to print the timesheet opened. If the timesheet has not yet been submitted, the status will specify “Timesheet Open” (right). Other status options include: processed, rejected, requested, and returned. For any timesheet, open or submitted, you can choose the menu button in the status box (outlined in blue) and you can see when the timesheet was initiated. If the timesheet was submitted, you can view both when it was initiated and when it was submitted. 9 Correcting Errors Made on Submitted Timesheets If you have submitted your timesheet for approval, and realize there was an error (forgot to log certain hours, logged incorrect hours, etc.) you can request to have your timesheet returned to you. Select the job for the timesheet you are wanting to request. Provide a short reason for the request, and choose “Request Selected. The timesheet cannot be requested after it has been processed. Payroll Schedule The Payroll Schedule will show you the start and end dates of the specific payroll schedule, when the timesheet is due for that specific payroll schedule, and the pay date for that specific payroll schedule. 10 Timesheet Status Key Below is a key that defines the different statuses your timesheet will go through before ultimately being processed by your supervisor and HR. Status Description Submitted Employee timesheets that have been submitted by the employee for supervisor approval. Requested Timesheets that an employee has requested to be returned back to them for editing. Reviewed Employee timesheets that a supervisor has approved or declined, but the supervisor still needs to confirm, using the process button. Approved Timesheets that have been approved by supervisor, but still require processing by HR. Rejected Timesheets that have been rejected by supervisor and will be returned to the employee. Timesheet Archive “Timesheet Archive” allows you to view/print timesheets from previous pay periods. You can “Print All Displayed” or print individual timesheets. You may also save to PDF rather than printing the timesheet(s).


© Copyright 2026