
Taylor Digital Cooking Thermometer/Timer Manual
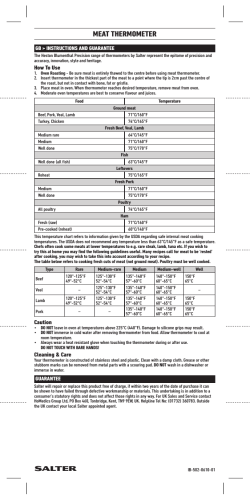
Facing up cover panel
(continued)
Care and Precautions
Care and Precautions
1. Always read instructions thoroughly to ensure that you
have the full benefit of all the unit's features.
2. Keep out of reach of children.
3. Sterilize thermometer probe each time before use.
4. Use caution while handling the thermometer. Always
wear a heat resistant glove when touching the
thermometer or probe during or just after use. DO NOT
TOUCH THERMOMETER OR PROBE WITH BARE HANDS!
5. When running the probe cable into an oven be sure to
gently close the door to avoid crimping or severing the
cable.
6. The thermometer and probe units are NOT
WATERPROOF. DO NOT immerse the thermometer unit
in liquid, or pour liquid directly on the thermometer
unit, as doing so will cause damage to internal
components and void the warranty. If you spill liquid
on it, dry it immediately with a soft, lint-free cloth. Do
not expose probe plug or plug-in hole to any liquid, as
this will result in a bad connection and faulty reading.
7. DO NOT wash in a dishwasher. The thermometer and
probe units are not dishwasher safe. Damage will void
warranty. Wipe clean with a damp cloth. Grease or
other hard-to remove soil can be removed with a
scouring pad. Be sure to rinse and dry the units
thoroughly before storing. DO NOT clean the units with
abrasive or corrosive materials. This may scratch the
plastic parts and corrode the electronic circuits.
8. DO NOT place the thermometer display unit into an
oven.
9. DO NOT use this thermometer in a microwave oven
10. DO NOT tamper with the unit's internal components.
Doing so will invalidate the warranty on this unit and
may cause damage. Other than replacing the
battery, the unit contains no user-serviceable parts.
11. DO NOT subject the unit to excessive force, shock,
dust, temperature or humidity. This may result in
malfunction, shorter electronic life span, damaged
battery and distorted parts.
12. Do not expose the probe or the wire directly to flames.
Do not expose the probe or wire to oven temperatures
exceeding 482ºF (250ºC).
13. Do not expose the thermometer unit to: water, direct
heat, a hot surface or direct sunlight. This may cause
damage to the plastic casing or the electric circuits
and components inside.
14. Do not dispose of batteries in fire. Batteries may
explode or leak. Remove the battery if the
thermometer will not be used for a long period of time.
Remove the metal probe from the food with heat
resistant gloves. DO NOT TOUCH THE PROBE OR
CORD WITH YOUR BARE HANDS!
When running the probe cable into an oven be
sure to gently close the door to avoid crimping
or severing the cable.
CAUTION: Moisture inside the plug-in opening of the
thermometer will result in an incorrect temperature
reading. Dry the sensor plug with a cloth every time
before plugging it into the thermometer.
Your digital cooking thermometer has 6 convenient preset
temperature settings for : Poultry, Beef Well, Veal/Pork, Beef
Medium, Ham, and Beef Rare/Fish. These temperatures
may be manually changed if desired. Press“s/HR” to
increase or “t/MIN” to decrease the temperature by 1
degree. The chart below lists the USDA recommended
minimum INTERNAL temperatures that food must reach to
be considered safe to eat, no matter how you prepare
them. We recommend the following guide lines but
personal taste temperatures may differ.
specific foods
! 23-hour, 59-minute countdown timer
! Stainless steel temperature probe with steel mesh cable
! Temperature range of probe*: 32ºF to 482ºF (0ºC to
250ºC)
! Temperature accuracy of internal food reading**:
+/-1.8ºF (+/-1.0ºC)
! Temperature readings in ºF or ºC
! Flip-out countertop stand and magnet
! Uses one AAA battery (included)
Battery Replacement
• There is a static cling label over the LCD screen.
Please remove before use.
If readings grow dim or irregular, the battery may
need to be replaced. To replace the battery:
1. Open the battery compartment door on the back
of the thermometer.
2. Insert one (1) AAA battery according to the
polarity markings inside the battery compartment.
3. Replace the battery compartment door.
4. When the cooking thermometer is not in use,
move the Mode switch on the back of the
thermometer to the off (“O”) position to conserve
battery power.
To Set up the Cooking Thermometer
Cooking Position
°F/°C Slide
Switch
ºC
Mode Switch
ºF
Off
Position
Magnet
Battery
Compartment
EM
TT
SE
MO
P
EM
T
ER
TH
Front
M
HA
MIN
HR
M
ME
S/S
Made to our exact specifications in China.
Getting Started
Timer Position
Leading the Wa y in Accuracy ®
© 2011 Taylor Precision Products and its affiliated
companies, all rights reserved. Taylor® and Leading
the Way in Accuracy® are registered trademarks of
Taylor Precision Products and its affiliated companies.
All rights reserved.
*The USDA does NOT recommend RARE 140ºF as a safe eating temperature.
NOTE: This unit is designed to remotely monitor
cooking progress. Do not remove the probe
during cooking. The internal temperature will be
displayed on the remote unit outside of the oven.
Digital Cooking
Thermometer/Timer
There are no express warranties except as listed
above. This warranty gives you specific legal rights,
and you may have other rights which vary from state
to state.
* The probe is not designed to perform as an oven
thermometer. If probe is not inserted into food, the
temperature reading of oven heat above 200ºF (93ºC) will be
accurate to within 1.5ºF to 10.5ºF (0.83ºC to 5.83ºC).
**The internal food reading temperature range is: 0ºF to 185ºF
(63ºC to 85ºC).
• There is a plastic strip under the battery cover to
prevent battery drain in shipping. Please remove
the strip before continuing with these instructions
(you may need to remove the battery
compartment cover to avoid breaking the strip).
1487
P
! Programmable alert with preset temperatures for
• This thermometer operates on 1 AAA alkaline
battery (included).
One Year Limited Warranty
Taylor® warrants this product to be free from defects in
material or workmanship (excluding batteries) for one
(1) year for the original purchaser from date of original
purchase. It does not cover damages or wear resulting
from accident, misuse, abuse, commercial use, or
unauthorized adjustment and/or repair.
If service is required, do not return to retailer. Should
this product require service (or replacement at our
option), please pack the item carefully and return it
prepaid, along with store receipt showing the date of
purchase and a note explaining reason for return to:
TAYLOR Precision Products
2220 Entrada Del Sol, Suite A
Las Cruces, New Mexico
88001
USA
Features and Specifications
Product Diagram
Thank you for purchasing the Taylor® Digital Cooking
Thermometer/Timer. Your Thermometer/Timer is an
example of superior design and craftsmanship. This
product helps to eliminate over-cooking or undercooking foods. Presetting to the recommended
cooking temperatures and/or cooking time is simple
and ensures that food will be cooked to your
preferred taste. Please read this instruction manual
carefully before use. Keep these instructions handy
for future reference.
Minimum Internal Cooking Temperatures
as Recommended by the USDA*
1. Clean the stainless temperature probe with hot
water and soap and rinse clean. Do not
submerge the sensor probe and cable into
water. The probe/cable connection is NOT
waterproof.
2. Plug the sensor probe into the socket on the
right side of the main unit. Make sure the probe
cable is free of knots.
3. Select Fahrenheit or Celsius temperature
readings by moving the ºC/ºF slide switch on the
back of the thermometer.
4. Move the mode switch on the back of the
thermometer to the cooking position “ ”. Two
temperatures appear on the LCD readout. The
left side shows actual temperature reading as
measured by the temperature probe. The right
side shows the target temperature. The default
reading is 212ºF (100º'C).
www.taylorusa.com
Instruction Manual
CP1487 11.11R3
To Program the Temperature
To Use the Cooking Thermometer
Your digital cooking thermometer is programmed
with preset temperatures for various cooking levels.
To use the preset temperature settings:
1. Be sure the thermometer is set to cooking mode “ “.
2. Press the “MEM / S/S” button.
3. Press the “s/HR” or “t/MIN” button to scroll to
your food type.
4. Press “MEM / S/S” to confirm the food type. NOTE:
You may change the temperature manually by
pressing the “s/HR” or “t/MIN” button. Press and
hold the button to advance the digits quickly.
5. To set the temperature manually, press the “s/HR”
or “t/MIN” button until the desired cooking
temperature appears.
6. An alarm will sound when the cooking reaches the
target temperature. To stop the alarm, move the Mode
switch to the “O” (off) position.
7. FOR MEDIUM RARE PORK ONLY: The USDA recommends
an internal temperature of 145°F plus a resting time of 3
minutes. The MED RARE PORK - REST setting will sound an
alarm when the pork reaches 145°F. The unit will begin a
3 minute countdown and REST will flash. The alarm will
sound again when the 3 minutes expire.
To Use the Cooking Thermometer
1. Preheat the oven to desired cooking temperature.
Program the thermometer as instructed above.
2. Insert the metal probe into the thickest part of the food
to be cooked. Do not come in contact with bone, fat
or gristle, as these areas will not provide accurate
temperature readings.
3. Place the food into the oven. The digital thermometer
unit must be placed outside of the oven (DO NOT
place thermometer unit into oven). Be careful not to
crimp the probe cord with the oven door. To prevent
damage to the base unit, do not place it on a hot
surface.
4. Make sure the sensor plug on the other end of the
cord is plugged into the thermometer. (A “---” display
indicates the probe is not correctly plugged into the
thermometer unit.)
5. The left side of the LCD screen displays the current
internal temperature of the food. The right side displays
the target temperature.
(continued)
Timer Instructions
Your cooking thermometer is also equipped with a
convenient countdown timer. To operate the timer:
1. Move the mode switch on the back of the
thermometer to the timer position “ ”. The timer
digits appear (“0:00”).
2. Press “s/HR” to set the hours. Press “t/MIN” to set
the minutes.
3. Press “MEM / S/S” (start/stop) to start the timer. The
colon between the hour and minute digits will flash.
Press “MEM / S/S” to pause timing (the colon stops
flashing). Press “MEM / S/S” to resume timing. Press
“s/HR” and “t/MIN” at the same time while timer is
paused to reset to zero.
4. When the timer reaches zero, an alarm will sound.
Press “MEM / S/S” to stop the alarm. The timer will
recall the last set time. Press “s/HR” and “t/MIN” at
the same time to reset timer to zero.
5. The timer and thermometer functions can operate at
the same time. To view to the thermometer display,
move the mode switch on the back of the
thermometer to the “ ” position. To view the timer
display again, move the switch to the “ ” position.
6. The timer will count up to 23 hours, 59 minutes.
Back


© Copyright 2026