
DUAL PROBE MEAT THERMOMETER & TIMER GB > INSTRUCTIONS AND GUARANTEE
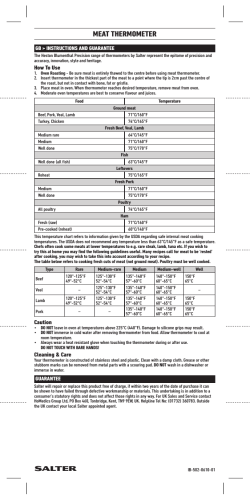
DUAL PROBE MEAT THERMOMETER & TIMER
GB > INSTRUCTIONS AND GUARANTEE
The Heston Blumenthal Precision range of thermometers by Salter represent the epitome of precision and
accuracy, innovation, style and heritage.
Please read this instruction manual before use. Keep these instructions for future reference.
Batteries:
2 AAA batteries (included). Remove battery isolator tab before first use. To replace batteries, remove cover
on the reverse of the unit. Ensure +/- terminals are the correct way round. Replace cover.
Care and Precautions:
• We recommend that the thermometer stem is sterilised before each use e.g. insert the stem only in boiling water for a few minutes.
• Always wear a heat resistant glove when handling the thermometer probes or cords during or just after use. WARNING HOT SURFACE!
• Do not immerse the base thermometer unit in liquid, or splash any liquid onto this part. The internal components could become damaged if they come into contact with water.
• The thermometer is NOT suitable for use in a microwave oven.
• DO NOT place thermometer unit inside oven or grill. Only the probes and cords are designed for use inside the oven.
• Do NOT place display unit on hot surfaces (max 200°F/100°C)
• Do NOT insert probes into food to exceed internal cooking temperatures of 150°C/302°F.
• DO NOT USE THE PROBES OR CORDS FOR OVEN TEMPERATURES HIGHER THAN 200°C/392°F
• CAUTION: when using the probe cables inside the oven, close the oven door carefully to avoid damage to the cable.
• CAUTION: the sensor plug must be dry before connecting to the thermometer display unit otherwise an incorrect reading may occur.
• CAUTION: During use the probes and cables will become hot. Take care not to tangle the probes. If only one probe is required for use, we recommend disconnecting the other cable.
Thermometer operation:
The dual probe thermometer allows you to accurately control the results of your cooking by constantly
monitoring the internal temperature of the food as it cooks and alerting you when the target temperature
has been reached. It features eight preset temperatures for different types of meat and fish and one user
programmable temperature setting that can be adjusted as desired.
To Use:
• Preheat the oven according to your recipe
• Insert a sterilised probe into the thickest part of the food to be cooked. Ensure the probe is not in contact with bone, fat or gristle as this will affect the validity of the reading. If required, repeat step for second probe.
• Carefully place food(s) with probe(s) in place inside preheated oven. Attach the cord(s) to the display unit.
• The display unit MUST NOT be placed in the oven.
• To switch the unit on, move the switch at the rear to either °C (Celsius) or °F (Fahrenheit) as preferred
• The display will turn on and it will show the current temp of the food at the top of the display and the target temperature at the bottom. It will also show an arrow at the side according to which probe (A or B) is currently being displayed.
• Press A/B to switch between the two probes as required.
• To alter the target temperature; check the correct probe (A or B) is selected, then press Ent/SS once and the icon at the bottom of the screen will flash. Press +/M or -/S to scroll through icons for the different preset and user options. (See Table 1 for details). Select the appropriate option and press
Ent/SS to confirm.
• If USER is selected, the target temperature display will flash. Press +/M or -/S to set the target temp of your choice (between 35°C and 140°C or 95°F and 284°F). Press Ent/SS to confirm.
• If using both probes, set the target temperature for the second probe in the same way.
• When the internal temperature of the food reaches the target temperature, the alarm will start to sound and the display will flash. (NB. If both probes are in use, the display will automatically switch to show the one that has reached its target first).
• The alarm will continue to sound at 3 sec intervals for the next 10mins or until switched off by pressing Ent/SS.
• Using heat resistant gloves, remove the food from the oven and remove the probe from the food. CAUTION HOT SURFACE: USE HEAT RESISTANT GLOVES TO HANDLE THE PROBES.
• If continuing cooking with the second probe it is recommended to unplug the first probe from the unit after use so the loose cord does not cause a hazard.
• Switch the unit off after use by moving the switch at the rear of the unit to the OFF position.
Thermometer presets
°C
°F
USER
35 to 140
95 to 284
Beef
63
145
Chicken/turkey
74
165
Lamb
63
145
Fish
63
145
Pork/ham
63
145
Minced beef/lamb/pork
71
160
Minced chicken/turkey
74
165
Reheat
74
165
IMPORTANT NOTE: After reaching the above temperatures, for both safety and quality, all meats should be
rested for at least 3 minutes before carving /serving. Please note that most roast meats will benefit from
being rested for 20 minutes or longer.
The preset temperatures & minimum resting times above are intended to provide safe and repeatable
cooking results for a variety of different food types and also for when reheating food, as recommended by
the USDA. For certain food types, particularly beef and lamb, you may prefer to use the USER setting option
to get a more precise result or doneness level (see below).
USER setting option
The USER setting option can be used to set a target temperature recommended by your favourite recipes
or your own cooking preferences. For example, when cooking whole cuts of beef or lamb, a rare or medium
rare result may be preferred. Please see Table 2 below for guidelines:
Internal Temperature Guidelines for Whole Cuts of Beef or Lamb
Rare
Medium Rare
Medium
Well
50�C
55�C
60�C
70�C
NOTE: The lower temperatures in these guidelines are only suitable for whole cuts of meat. For rolled joints
or for minced meats please be sure to use the thermometer presets in Table 1 to ensure safe results.
Timer Operation:
This thermometer features two timer functions which can operate independently or in conjunction with the
thermometer functions.
To operate:
• Press DT/Timer button on the back of the thermometer to switch to timer mode. Both top and bottom displays will show ’00:00’. If the thermometer is in use the top digits refer to probe A and the bottom digits, probe B.
• Press A/B to select Timer A (top) or B (bottom). The digits for the selected timer will begin to flash.
N.B each timer can only be set, started or stopped when activated (indicated by flashing digits).
• To set the count-down timer, with the required timer activated press +/M to set the minutes and -/S to set the seconds. To advance quickly, press and hold. To reset the timer to ’00:00’ press +/M and -/S simultaneously.
• Press A/B to select the other timer and repeat the process above to set, if required.
• To start the countdown, press A/B until the desired timer is activated with the digits flashing.
Press Ent/SS to start the countdown.
• N.B The timer digits will stop flashing after 3 seconds. To re-activate press A/B until the digits flash – it is now possible to pause/stop the timer.
• When the time is up the alarm will sound and the digits will flash. (If it is set to display the thermometer reading, the display will automatically change to show the timer when the countdown finishes). The timer will begin to count up.
• Press Ent/SS to stop the alarm. Otherwise the alarm will continue: for 1 minute at 3 sec intervals for 30 secs then a 30 sec pause, followed for the next 5 mins by 3 sec intervals for 15 seconds then a
30 sec pause.
• To use the count-up timer, with the required timer activated, press Ent/SS. The timer will begin counting up. After 5 seconds the digits will stop flashing, the time will continue to count-up. To stop, press A/B to reactivate then press Ent/SS to stop the timer.
• The timer and thermometer can be used at the same time. To revert back to the thermometer display press DT/Timer, and again to return to the timer.
Cleaning and care:
To clean wipe with a damp cloth. Do not use chemical or abrasive cleaning agents. Do not immerse the
thermometer head in water. Do NOT place in a dishwasher. After washing the probes, ensure the cable
connectors are completely dry before connecting to the main unit.
WEEE EXPLANATION
This marking indicates that this product should not be disposed with other household wastes
throughout the EU. To prevent possible harm to the environment or human health from uncontrolled
waste disposal, recycle it responsibly to promote the sustainable reuse of material resources. To
return your used device, please use the return and collection systems or contact the retailer where the
product was purchased. They can take this product for environmental safe recycling.
BATTERY DIRECTIVE
This symbol indicates that batteries must not be disposed of in the domestic waste as they contain
substances which can be damaging to the environment and health. Please dispose of batteries in
designated collection points.
GUARANTEE
Salter will repair or replace this product free of charge, if within two years of the date of purchase it can
be shown to have failed through defective workmanship or materials. This undertaking is in addition to a
consumer’s statutory rights and does not affect those rights in any way. For UK Sales and Service contact
HoMedics Group Ltd, PO Box 460, Tonbridge, Kent, TN9 9EW, UK. Helpline Tel No: (01732) 360783. Outside
the UK contact your local Salter appointed agent.
IB-522-1012-05


© Copyright 2026