
Administrating Concordance Evolution
Concordance Evolution
Administrator's Guide
Concordance® Evolution, version 3.3
• Security
• Managing Licenses
• Managing Users
• System Management
• Organizations
• Folders
• Matters
• Datasets
• Importing
• Working with LAW PreDiscovery Cases
• Binders
• Review Sets
• Tags
• Productions
• Exporting
• Bulk Printing
• Dataset Logs
• Deduplication
• Near-Deduplication
• Knowledge Management
• Searching - Admin
• Search Settings
• Reporting
Concordance Evolution Administrator's Guide
No part of this work may be reproduced or transmitted in any form or by any means, electronic or mechanical,
including photocopying, recording, or by any information storage or retrieval system, without permission.
While the information contained herein is believed to be accurate, this work is provided "as is," without warranty of
any kind. The information contained in this work does not constitute, and is not intended as, legal advice.
LexisNexis and the Knowledge Burst logo are registered trademarks of Reed Elsevier Properties Inc., used under
license. Concordance is a registered trademark of LexisNexis a division of Reed Elsevier Inc. Other products or
services may be trademarks or registered trademarks of their respective companies.
© 2015 LexisNexis. All rights reserved.
Concordance® Evolution
Version: 3.3
Release Date: April 17, 2015
Contents
3
Table of Contents
8
Chapter 1 About Concordance Evolution
Chapter 2 About the discovery process
10
Chapter 3 Concordance Evolution vs Concordance
14
Chapter 4 What's new in Concordance Evolution
18
Chapter 5 Administrating Concordance Evolution
22
...................................................................................................................................
22
1 Navigating
Concordance Evolution
................................................................................................................................... 26
2 Security
..........................................................................................................................................................
26
About Concordance
Evolution security
..........................................................................................................................................................
27
About Security Policies
..........................................................................................................................................................
31
Creating user groups
..........................................................................................................................................................
33
Creating security roles
..........................................................................................................................................................
34
Customizing security policies
..........................................................................................................................................................
35
Assigning user group and roles
...................................................................................................................................
39
3 Managing
Licenses
.......................................................................................................................................................... 39
Importing Licenses
..........................................................................................................................................................
40
Assigning user
licenses
...................................................................................................................................
41
4 Managing
Users
.......................................................................................................................................................... 41
Creating users
.......................................................................................................................................................... 43
Importing users
..........................................................................................................................................................
44
Using Microsoft
Active Directory
Using Microsoft
.........................................................................................................................................................
Active Directory
44
Adding Active
.........................................................................................................................................................
Directory domains
45
Adding Active
.........................................................................................................................................................
Directory servers
46
Deleting Active
.........................................................................................................................................................
Directory domains
47
Deleting Active
.........................................................................................................................................................
Directory servers
48
.......................................................................................................................................................... 49
Modifying users
.......................................................................................................................................................... 51
Exporting users
...................................................................................................................................
52
5 System
Management
.......................................................................................................................................................... 52
Preference Management
About preferences
......................................................................................................................................................... 52
Customizing
.........................................................................................................................................................
admin preferences
57
.......................................................................................................................................................... 62
Server Management
About server
.........................................................................................................................................................
management
62
Maintaining.........................................................................................................................................................
server services
62
.......................................................................................................................................................... 64
Printers
Managing Printers
......................................................................................................................................................... 64
.......................................................................................................................................................... 64
Session Management
Managing user
.........................................................................................................................................................
sessions
64
.......................................................................................................................................................... 65
Job Management
About jobs......................................................................................................................................................... 65
© 2015 LexisNexis. All rights reserved.
4
Concordance Evolution
View ing jobs
......................................................................................................................................................... 65
Reprocessing
.........................................................................................................................................................
jobs
67
..........................................................................................................................................................
73
Shares
About shares
......................................................................................................................................................... 73
Creating shares
......................................................................................................................................................... 74
Modifying shares
......................................................................................................................................................... 75
..........................................................................................................................................................
76
Notifications and Alerts
About notifications
.........................................................................................................................................................
and alerts
76
Creating notifications
......................................................................................................................................................... 77
View ing notifications
......................................................................................................................................................... 79
Deleting notifications
......................................................................................................................................................... 80
Creating search
.........................................................................................................................................................
alerts
80
View ing search
.........................................................................................................................................................
alerts
84
Editing search
.........................................................................................................................................................
alerts
85
Deleting search
.........................................................................................................................................................
alerts
85
..........................................................................................................................................................
86
Audit Logs
About audit.........................................................................................................................................................
logs
86
View ing the
.........................................................................................................................................................
system audit log
86
View ing the
.........................................................................................................................................................
matter audit log
88
Exporting an
.........................................................................................................................................................
audit log
89
Archiving system
.........................................................................................................................................................
events
90
................................................................................................................................... 91
6 Organizations
.......................................................................................................................................................... 91
About organizations
.......................................................................................................................................................... 91
Creating organizations
.......................................................................................................................................................... 92
Managing organizations
.......................................................................................................................................................... 92
Editing organizations
.......................................................................................................................................................... 93
Deleting organizations
................................................................................................................................... 94
7 Folders
About folders.......................................................................................................................................................... 94
.......................................................................................................................................................... 94
Creating folders
.......................................................................................................................................................... 96
Editing folders
.......................................................................................................................................................... 97
Deleting folders
................................................................................................................................... 98
8 Matters
.......................................................................................................................................................... 98
About matters
.......................................................................................................................................................... 99
Creating matters
.......................................................................................................................................................... 100
Editing matters
.......................................................................................................................................................... 101
Deleting matters
.......................................................................................................................................................... 101
Managing Matters
................................................................................................................................... 103
9 Datasets
.......................................................................................................................................................... 103
About datasets
.......................................................................................................................................................... 105
Creating datasets
.......................................................................................................................................................... 109
Editing datasets
.......................................................................................................................................................... 110
Deleting datasets
..........................................................................................................................................................
111
About dataset
fields
117
Adding fields..........................................................................................................................................................
to datasets
..........................................................................................................................................................
131
Editing dataset
fields
..........................................................................................................................................................
133
Managing field-level
security
..........................................................................................................................................................
135
Deleting fields
from a dataset
..........................................................................................................................................................
135
Using CaseMap
with Concordance Evolution
..........................................................................................................................................................
138
Using Equivio
with Concordance Evolution
................................................................................................................................... 139
10 Importing
..........................................................................................................................................................
139
About importing
files
© 2015 LexisNexis. All rights reserved.
Contents
5
..........................................................................................................................................................
139
About delimiter
characters
..........................................................................................................................................................
141
Importing delimited text files
..........................................................................................................................................................
151
Importing LAW PreDiscovery cases
..........................................................................................................................................................
157
Importing subsequent data loads and overlays
..........................................................................................................................................................
164
Viewing dataset documents
...................................................................................................................................
164
11 Working
with LAW PreDiscovery Cases
..........................................................................................................................................................
164
About LAW PreDiscovery
and Concordance Evolution
..........................................................................................................................................................
166
Importing LAW
PreDiscovery cases
..........................................................................................................................................................
171
Synchronizing
data with LAW PreDiscovery
................................................................................................................................... 175
12 Binders
.......................................................................................................................................................... 175
About binders
.......................................................................................................................................................... 176
Creating binders
.......................................................................................................................................................... 177
Managing binders
...................................................................................................................................
178
13 Review
Sets
178
About review..........................................................................................................................................................
sets
..........................................................................................................................................................
179
Creating review
sets
.......................................................................................................................................................... 182
Assigning reviewers
..........................................................................................................................................................
183
Managing review
sets
..........................................................................................................................................................
191
Exporting review
sets
..........................................................................................................................................................
192
Deleting review
sets
................................................................................................................................... 193
14 Tags
About tags .......................................................................................................................................................... 193
.......................................................................................................................................................... 195
Creating tags
..........................................................................................................................................................
200
Managing tag
security
Editing tags .......................................................................................................................................................... 201
.......................................................................................................................................................... 204
Reordering tags
Deleting tags.......................................................................................................................................................... 205
..........................................................................................................................................................
206
Monitoring tags
statistics
................................................................................................................................... 206
15 Productions
.......................................................................................................................................................... 206
About productions
..........................................................................................................................................................
208
Creating production
sets
................................................................................................................................... 217
16 Exporting
..........................................................................................................................................................
217
About exporting
files
.......................................................................................................................................................... 218
Exporting files
..........................................................................................................................................................
227
Synchronizing
data with LAW PreDiscovery
231
17 Bulk...................................................................................................................................
Printing
.......................................................................................................................................................... 231
About bulk printing
..........................................................................................................................................................
232
Creating bulk
print jobs
...................................................................................................................................
233
18 Dataset
Logs
..........................................................................................................................................................
233
About dataset
logs
..........................................................................................................................................................
234
Creating dataset logs
................................................................................................................................... 238
19 Deduplication
.......................................................................................................................................................... 238
About deduplication
..........................................................................................................................................................
238
Creating deduplication
jobs
................................................................................................................................... 240
20 Near-Deduplication
.......................................................................................................................................................... 240
About Near-Deduplication
..........................................................................................................................................................
240
Creating near-deduplication
jobs
...................................................................................................................................
242
21 Knowledge
Management
..........................................................................................................................................................
242
Managing the
knowledge base
..........................................................................................................................................................
243
Managing spelling
variations
© 2015 LexisNexis. All rights reserved.
6
Concordance Evolution
..........................................................................................................................................................
246
Managing the
thesaurus
..........................................................................................................................................................
250
Managing stop words
..........................................................................................................................................................
253
Managing reasons for redaction
...................................................................................................................................
257
22 Searching
- Admin
..........................................................................................................................................................
257
Running admin
dashboard searches
...................................................................................................................................
258
23 Search
Settings
..........................................................................................................................................................
258
Defining dataset
search settings
..........................................................................................................................................................
259
Managing saved
search results
..........................................................................................................................................................
261
Managing Persistent
Highlight
................................................................................................................................... 265
24 Reporting
Audit Logs .......................................................................................................................................................... 265
About audit
.........................................................................................................................................................
logs
265
View ing the
.........................................................................................................................................................
system audit log
265
View ing the
.........................................................................................................................................................
matter audit log
266
Exporting.........................................................................................................................................................
an audit log
268
Archiving.........................................................................................................................................................
system events
269
.......................................................................................................................................................... 269
Billing Reports
Creating billing
.........................................................................................................................................................
reports
269
.......................................................................................................................................................... 271
Matter reports
View ing matter
.........................................................................................................................................................
reports
271
Creating custom
.........................................................................................................................................................
matter reports
274
Deleting matter
.........................................................................................................................................................
reports
277
Exporting.........................................................................................................................................................
matter reports
277
Chapter 6 Reference Information
280
...................................................................................................................................
280
1 Unicode
support
................................................................................................................................... 280
2 Glossary
Index
© 2015 LexisNexis. All rights reserved.
287
Administrating Concordance Evolution
User Guide
About Concordance Evolution
Chapter
1
8
Concordance Evolution
About Concordance Evolution
LexisNexis ® Concordance ® Evolution is a discovery enterprise solution that provides your team
with a central location to manage all the electronically stored information that is generated.
Concordance Evolution is designed to handle large-scale, complex litigation cases and helps
your team search, review, organize, produce and share information during the discovery
process. It offers the speed you demand with exceptional product management and support.
You now can have the latest in modern discovery technology without the costly enterprise
investment or overhead.
Concordance® Ev olution features include:
Scalable Microsoft® SQL Server back-end
Concept searching from Vivisimo ® Velocity
Integration with LAW PreDiscovery®
Document family grouping
Near-duplicates identification and comparisons
Advanced searching
Redactions and Annotation tools from IGC™ Brava!
Find and redact
Enhanced tagging
File type icons in the Table view
Privilege Log reason codes and descriptions
LexisNexis now offers an electronic discovery and litigation document management solution
that is a good fit for any size case.
Use Concordance Evolution for large-scale litigation cases, while our established Concordance
discovery review management software is well-suited for small- to mid-sized litigation cases.
© 2015 LexisNexis. All rights reserved.
Administrating Concordance Evolution
User Guide
About the discovery process
Chapter
2
10
Concordance Evolution
About the discovery process
Discovery has been around for a long time. In the past, it involved primarily paper documents
that had to be searched through manually for privileged information or evidence. Today,
discovery largely involves “electronically stored information” (ESI), which is simply data that
exists in electronic format, stored in computers primarily as documents and e-mail. The question
of how to search and review ESI for evidence comes down to two options: print it out and
review it manually (slow and tedious) or put it into a database and review it on a computer
(fast and effective). That’s where Concordance Evolution comes in—it’s an e-discovery review
tool designed specifically for reviewing documents electronically, a process made faster and
easier by its robust search and review features.
Electronic discovery (e-discovery) starts with data being identified and collected. When all
known discoverable data is collected, it needs to be “processed”. In this step, documents get
scanned, electronic files get converted and/or extracted, and the process of data filtering is
completed (which can reduce thousands of documents down to a few hundred). An
administrator can then assign documents through reviewsets, where it gets reviewed and
analyzed and, finally, produced for opposing counsel and/or the defense team.
Discoverable Data
Discoverable data is data that has been identified, preserved, and collected for a case that
© 2015 LexisNexis. All rights reserved.
About the discovery process
11
becomes (after many hours of review and analysis) the facts and issues that you either have
to turn over to opposing counsel or use as evidence to defend a client. There are three
types of discoverable data that Concordance Evolution works with:
Paper documents
Electronic documents
E-mail
Electronic Documents
Concordance Evolution loads most electronic documents with ease, whether converted to
tagged image file format (TIFF) or in their native form (created by popular software programs
such as Microsoft® Word, Adobe ® Acrobat®, etc.). All electronic documents contain metadata
that has been captured by the native application. However, additional metadata can still be
added manually, if necessary.
Native review can be done, using the Near Native view in Concordance Evolution. Near
Native review has the following benefits:
Review documents and images regardless of whether or not you have the native
application
An intuitive user interface for navigating and reviewing documents
Advanced markup tools to review and annotate documents and images
Find and Redact feature to redact only specific text within a document
Original document format persisted
E-mail
Concordance Evolution makes it easy to import Microsoft® Outlook® e-mail messages (those
with .PST file extensions). Other types of e-mail, such as those from Lotus Notes, must be
converted before being loaded into Concordance Evolution.
Paper Documents
Even in this electronic age, people still use paper to write notes, capture diagrams, and so
on. Additionally, letters, spreadsheets, reports and other documents created with computer
programs are often printed out and the original electronic document lost or destroyed. In
order for paper documents to be usable in Concordance, they must be scanned, to capture
both text and an image (picture) of the document, and coded, to capture additional
information such as author, document type, date created, and so on. This can be done using
the scanning and optical character recognition (OCR) feature in a tool such as LAW
PreDiscovery®.
Scanning
Paper is typically scanned into tagged image file format (TIFF) or portable document format
(PDF). For each TIFF or PDF, you’ll have a corresponding file in the review tool, with matching
document numbers. A TIFF can be a single page or multiple pages, just as a single document
© 2015 LexisNexis. All rights reserved.
12
Concordance Evolution
can be one or several pages in length similar to a PDF file. So, not only will you be able to
view the documents in Concordance Evolution, you’ll be able to read the text of the
document also (as a result of optical character recognition software, such as LAW
PreDiscovery®).
Coding / Metadata
Electronic documents contain additional information about them, referred to as metadata,
which is data that is captured automatically by the software program, such as date created,
author, and so on. This data is searchable and of great value to you during document
review. However, because paper documents are scanned and lack this automatic coding,
they must be coded manually (although there are now software tools that can help speed
up this process).
© 2015 LexisNexis. All rights reserved.
Administrating Concordance Evolution
User Guide
Concordance Evolution vs Concordance
Chapter
3
14
Concordance Evolution
Concordance Evolution vs Concordance
Specifications Concordance ®
Concordance ® Evolution
Case Size
Small to midsize cases
Large, complex or multi-district litigation
cases
Database
Capacity
Hundreds of registered databases,
12 megabytes of data per field and
over 33 million records per
database
Hundreds of registered databases with
software and network scalability to
serve multiple reviewers and
administrative tasks running
concurrently
Speed
Dependent on firm, company, or
agency's local computer and
network environment
Dependent on firm, company, or
agency's local computer and network
environment
Installation
Server or workstation
Minimum of four servers (including SQL
Server)
Data Location
Case data resides on firm, company Case data resides on firm, company or
or agency internal network
agency internal network
Data Access
Via firm, company or agency's
internal network only.
Via internal secure IP address
No desktop installation required.
Desktop installation required
Data Security
Upgrades
Firm, company, or agency's network Firm, company, or agency's network
security settings.
security settings.
Data resides behind the firewall of
the organization.
Data resides behind the firewall of the
organization.
Internal litigation/IT team installs.
Initial setup and upgrades performed by
Concordance Evolution Field Services
team.
Current subscription required.
Internal litigation/IT team assumes
responsibility after training.
Current subscription required.
Features
Concordance ®
Concordance ®
Evolution
Reviewer
Search Alerts
X
Search Highlights in Native Viewer
X
Concept Search
X
Heavy Bulk Tagging
X
Multiple User Bulk Tagging
X
Tag Families and Threads
X
© 2015 LexisNexis. All rights reserved.
Concordance Evolution vs Concordance
Features
Concordance ®
Concordance ®
Evolution
Find And Redact in Native Viewer
X
Undo and Redo Functions in Native Viewer
X
OCR On the Fly in Native Viewer
X
Global Replace
X
15
X
Administrator
LAW PreDiscovery Integration ®
X
Security, Permissions, and Roles settings
X
Concordance Programming Language
(CPL)
X
Unicode Support
X
Capture and Create Fields from .DAT file
X
Index and Reindex
X
Persistent Hit Highlighting
X
X
X
Tag Behavior settings
X
Run Parallel Jobs in the Background
X
Reporting
X
Binders & Review Sets
X
Native file conversion reprocessing
X
© 2015 LexisNexis. All rights reserved.
Administrating Concordance Evolution
User Guide
What's new in Concordance Evolution
Chapter
4
18
Concordance Evolution
What's new in Concordance Evolution
Concordance Evolution introduces the following features and product enhancements:
Version 3.3
New Sticky Zoom and Sticky Rotate features for maintaining zoom and page rotation
while navigating records during a review. For more information, see Adjusting document
size.
New server configuration option to remove blank pages when importing and converting
files. For more information, see About importing files.
Version 3.2
Concordance Evolution is now compatible with Microsoft® Windows® 8 and 8.1.
New user interface for creating and exporting billing Reports from the System dashboard.
For more information, see Creating billing reports.
Improved performance when navigating between organizations, folders, matters, and
datasets from the Admin dashboard.
Version 3.1
Persistent Highlight
Persistent Highlight for the Document Data view, when enabled, accesses a table of
search terms assigned to a dataset and highlights those terms. For more information,
see Using Persistent Highlight.
Search History
Search History is now retained after a user logs out of the system making it easy to rerun
previous search queries when the user logs back in. For more information, see Viewing
search history.
Tags panel improvement
Reviewers can set their preference for the Tags panel to be docked to the left or right
side for reviewing documents. For more information, see Customizing personal
preferences.
Version 3.0
Improved reporting user interface
Generate audit log reports for system and matter events using the new audit log
reporting user interface. New matter charting features allow you to track user activity on
a daily, weekly, monthly, and yearly basis. For more information, see About audit logs
and Viewing matter reports.
Unicode Support
In Concordance Evolution version 3.0, the Unicode Standard is supported in Arabic,
Chinese, English, Hebrew, Japanese, Korean, Russian, and other languages. For more
information, see Unicode support.
© 2015 LexisNexis. All rights reserved.
What's new in Concordance Evolution
19
Synchronize data with LAW PreDiscovery
Once a LAW case is imported and reviewed, Concordance Evolution's synchronization
feature uses the project.ini file to sync those changes back to the LAW PreDiscovery case
for further processing. For more information, see About LAW PreDiscovery and
Concordance Evolution or Synchronizing data with LAW PreDiscovery.
Improved exporting options
New auto-increment image file numbering, native file export, field naming for files, and
recreating family grouping options. For more information, see Exporting files.
Version 2.2.3 or earlier
Built-in Near-Deduplication analysis
Identify documents based on text percentage likeness allowing reviewers to compare
differences and increase reviewing efficiency. For more information, see About NearDeduplication.
Binder workflow for review organization
Organize dataset review workflows using binders and review sets. For more information,
see About Binders and About review sets.
Automated tagging when checking in documents
After a reviewer has finished a review, the reviewer has the option to select the Complete
option and have Concordance Evolution automatically tag all the documents in the review
set with the Reviewed tag. For more information, see About review sets.
Import LAW PreDiscovery Cases
Import LAW PreDiscovery cases without the use of a load file. Import field names and
data, including Near Duplicate information. For more information, see Importing Law
PreDiscovery Cases and About dataset fields.
Improved production and load file export user interface
New user interface for creating production sets and exporting load file from Concordance
Evolution. For more information, see Creating production sets and Exporting to load files.
Near-native conversion priority processing for import and production jobs
When scheduling import and production jobs, the order the jobs are processed can be set
to low, medium, or high priority allowing higher priority jobs to be processed first. For
more information, see About importing files and Creating production sets.
Recreate family groupings
When exporting load files, the Recreate Family Group option uses a selected Family ID
field to identify all the documents and corresponding attachments within a family group
and export the family grouping information to the specified load file. For more
information, see About exporting files
© 2015 LexisNexis. All rights reserved.
20
Concordance Evolution
Share saved searches
Create, save, and share search queries with other reviewers that are within the same
Concordance Evolution organization. For more information, see Saving search queries.
Auto assign user licenses
Administrators can set the Auto Assign option so that when a user logs into Concordance
Evolution for the first time, the system automatically validates the user and assigns the
user a license. The license count is then automatically updated on the License
Management dashboard. For more information, see Assigning user licenses.
© 2015 LexisNexis. All rights reserved.
Administrating Concordance Evolution
User Guide
Administrating Concordance Evolution
Chapter
5
22
Concordance Evolution
Administrating Concordance Evolution
Navigating Concordance Evolution
The Concordance Evolution user interface consists of two main dashboards:
Admin
Review
The dashboards available are dependent on the user group an individual is assigned. See,
About Concordance Evolution security.
The dashboards are accessible using the tabs at the top of the Concordance Evolution site. The
Admin and Review tabs navigate to a dashboard specifically designed with the tools and
information updates needed to perform administrative and review tasks. The Reports tab
displays a list of reports that can be run for datasets or administrative needs.
You can change the dashboard you want to use as your Home page by clicking the Preferences
link on the Concordance Evolution bar. However, your Concordance Evolution permissions are
set up by your system administrator and those permissions determine which dashboards you
can view and access in Concordance Evolution.
We recommend that you use the Concordance Evolution navigation tools to access
different dashboards of the software as opposed to using your Internet browser's
navigation tools, such as the Back button.
Learn more about the Admin Dashboard:
The Admin dashboard contains the tools you need to perform your administrative tasks
quickly and efficiently.
© 2015 LexisNexis. All rights reserved.
Administrating Concordance Evolution
23
Most reviewers do not have access to the Admin dashboard unless permission has been
granted by the system administrator.
Admin Search bar
The Admin Search bar is located on each page of the Admin dashboard. Use the Admin
Search bar to locate information or areas of the application. See the Review dashboard
for details on searching case/matter documents.
Search results provide a navigation link that takes you to the applicable page in the
Concordance Evolution. For example, if you type license in the Search field, the search
results display a link to the License Management dashboard.
For more information about searching, see Running Admin searches.
System pane
The System pane on the left side of the screen displays the hierarchical structure of
organizations, folders, matters, and datasets. You can create multiple organizations,
folders, matters, and datasets under the System folder, but there is only one System in
Concordance Evolution.
You can navigate to a specific organization, folder, matter, or dataset by clicking the
corresponding organization, folder, matter, or dataset in the System pane. When you click
an organization, folder, matter, or dataset, the dashboard for the selected organization,
folder, matter, or dataset is displayed. The name of the element you select in the System
pane displays above the dashboard toolbar. If you click System in the System pane, the
© 2015 LexisNexis. All rights reserved.
24
Concordance Evolution
Admin dashboard is displayed.
The System pane contains an Admin search field so you can locate a folder, matter, or
dataset in the tree quickly. Your search term is highlighted in yellow so you can easily see
it when scrolling within the pane.
To show and hide the System pane, do one of the following:
To hide the System pane, click the arrow button next to the pane.
To show the System pane, click the green Arrow button on the left side of the
dashboard.
System information
In the lower section of the Admin dashboard, the Concordance Evolution system status is
displayed.
The System status displays the following:
Users displays the details of the number of reviewers (users) currently logged into
the software and provides a link so that you can quickly email all logged in users from
the Send Notifications dashboard. Click the User Management link to open the User
Management dashboard and oversee all user accounts.
Matters and Datasets displays the total number of datasets created in Concordance
Evolution and the number of matters they are associated with. Click the Matters and
Dataset link to open the Folders Matters and Datasets page where you can view a
complete listing of all folders, matters, and datasets as well as the size of the
datasets, the number of documents within it, and the percentage it has been
reviewed to-date.
Jobs provides a instant glance at the total number of scheduled and completed jobs
today. Click the Jobs link to open the Job Management dashboard. The Job
Management dashboard allows you to view job scheduling tasks, including the job
type, job name, and scheduled run date and time.
Servers displays current server(s) and services running within the Concordance
Evolution environment.
Learn more about the Review Dashboard:
The Reviewer dashboard is the Home page for reviewers in Concordance Evolution. Here you
will find the current status of your work assignments and it is where you can access review
sets you are assigned.
The Review dashboard task panes include:
Review Binders pane
The Review Binders pane displays a list of datasets and their associated binder(s)
containing review sets that are assigned to for review. When you select a binder from
the Review Binders pane, the Review Sets table is displayed in the center pane listing all
the available review sets for the selected binder.
Use the expand (+) and collapse (-) button to show/hide the binders and review sets.
When a binder is selected, the Review Sets table displays in the center of the Review
dashboard and lists the following information for each review set assigned to the
selected binder:
© 2015 LexisNexis. All rights reserved.
Administrating Concordance Evolution
25
Name - the name of the review set
Due - the date review set is due to be completed
Checked Out To - the name of the reviewer who has the review set checked out
# Docs - the total number of documents within the review set
Reviewed - the number of documents that are tagged as Reviewed. To view the
tagged documents, click the number in the column.
Not Reviewed - the number of documents that are tagged as Not Reviewed. To view
the tagged documents, click the number in the column.
Actions - contains three links for checking in/out the review set, checking the review
set in as completed, or releasing the review set without checking the documents in so
that another reviewer can view them.
Messages
The messages table displays any recent notifications you may have received.
To view a message:
1. In the Notification column of the Messages table, click the message link for the
message you want to view.
The Notification Details dashboard opens and displays the message.
2. When finished, do one of the following:
To open the Notification Management dashboard to see additional messages, on
the Notification Details dashboard toolbar, click the Return to Notifications button.
To return to the Review dashboard, click the Review tab.
Quick Tools pane
The Quick Tools pane contains links to quickly access areas of the application that you will
use most: Search, Messages, and History.
Search displays links to the Saved Searches, Saved Search Results, and Search
Alerts dashboards.
Messages links to the Notification Management dashboard that contains tabs for
Notifications and Background Tasks.
History links to the Search History dashboard that contains tabs for Search History,
Saved Searches, Saved Search Results, and Search Alerts.
Access review set documents:
The Review Sets table in the center of the Review dashboard, displays the review sets
assigned to the selected binder and contain the documents that are assigned to you for
review. There can be more than one review set with a binder. A review set may contain
various documents and files that are part of the case's overall record collection. For more
information about review sets, see About review sets.
© 2015 LexisNexis. All rights reserved.
26
Concordance Evolution
Assignments are listed by Binder, then review set. Click a binder to view the current
status of each review set assigned to the binder, including whether the review set is
checked in or out, the user it was checked out to, the number of documents in the review
set, and the number of documents reviewed and not reviewed.
You can view the documents in a review set without checking them out or you can check
out the documents. When a review set is checked out, it locks the review set so no other
users can access the documents. If your Concordance Evolution system administrator set
up the Binder with Secure Check Out Enabled option, when a review set is checked out it
locks the review set so that others cannot check them out or view the documents. If the
Secure Check Out Enabled option is not selected, when a review set is checked out the
Reviewed and Not Reviewed tags for the review set are not available for other users.
For more information about review sets, see About review sets.
Navigate with links and breadcrumbs:
Both the Admin and Review dashboards provide numerous links to help you navigate quickly
within the application to perform your daily tasks.
For the Admin dashboard, you can also follow the breadcrumb trail located at the top of each
dashboard. Breadcrumbs can be referenced to help you locate where you are in the
application, with the current dashboard displaying in black. Or you can click a breadcrumb
link that is highlighted in blue to navigate to that particular application dashboard.
Security
About Concordance Evolution security
Concordance Evolution manages security using security policy settings. Security policies provide
the permission settings for field, tag, and function in Concordance Evolution. Security policies
are defined per user group at the system, organization, folder, matter, and/or dataset level. An
individual user's permissions are defined by the user group the user is assigned to. You cannot
modify security policy settings at the individual user level.
Field-level and tag-level security are based on the security policy settings for a user group at
the dataset level, but field and tag security settings are defined at the individual field and tag
levels within each dataset. For more information about field security, see Managing field
security. For more information about tag security, see Managing tag security. When you modify
security policy settings, the changes are applied the next time the user logs on to
Concordance Evolution.
The Active User check box on the Add User and Edit User dashboards and a current license
determine whether a user can access Concordance Evolution. When the Active User check box
is selected and the user is provided a license, the user can log on to Concordance Evolution.
© 2015 LexisNexis. All rights reserved.
Administrating Concordance Evolution
27
To set up user security in Concordance Evolution:
1. Create an Organization
2. Creating user groups
3. Create security roles, if needed
4. Assign security roles to user groups
5. Customize user group security policies, if needed
6. Create users and assign to user group(s)
7. Assign user licenses
About Security Policies
Security policies are used to approve and deny access to features within Concordance
Evolution. Each policy within the system is enforced and automatically applied based on the
default settings for the selected user role. Each policy can be set to Allowed or Deny by the
Super Admin or the Concordance Evolution System Administrator.
The following is a list of the default access security policy settings:
Common Policies
Policy
Description
Lim ited
Review er Review er OrgReview er
Lead
Level
Adm in
Super/
System
Adm in
C anViewFolderMatter View folder, matters, and
Dataset
datasets
C anViewReviewerda Enable/disable Reviewer
shboard
dashboard tab
C an Manage
NearNativeViewer
Access the Near Native
view, and associated
image, including zoom
features
C anManageDocumen Access Document Data
tDataViewer
view
C anViewSnippetView Access the Snippet view
C anViewTableView
Access the Table view
C anViewThreadView View family & threads in
the Near Native and
Document data views
C anSendToC aseMap Send document,
documents and text to
C aseMap from the
© 2015 LexisNexis. All rights reserved.
28
Concordance Evolution
Policy
Description
Lim ited
Review er Review er OrgReview er
Lead
Level
Adm in
Super/
System
Adm in
Lim ited
Review er Review er OrgReview er
Lead
Level
Adm in
Super/
System
Adm in
Snippet, Table, Near
Native and Document
Data views
C anPerformReviewe Run any simple or
rSearch
advanced search from
the Reviewer dashboard
C anManageGroupBy Access to GroupBy
Fields
features
C anLaunchDualView
Access to Dual view
features for single and
multiple browsers
C anEmailDocuments Email documents
C anPrintDocuments
Print single or multiple
documents
C anViewField
View and reorder fields
C anSetC onceptSear
ch
Execute concept
searches
C anManageSystemFi View system fields from
elds
the Reviewer dashboard
C anViewJobs
View jobs
C anViewNotification
View and delete
notifications
Enhanced security policies
Policy
Description
C anManageADDomai Add, edit, remove, and
n
view AD Domain
C anManageAuditing
View, clean up, and
export the audit log on
the Admin side
C anManageBinder
C reate, edit, and delete
binders
C anManageFolder
C reate, edit, and delete
folders
C anManageMatter
C reate, edit, and delete
matters
C anManageDataset
C reate, edit, and delete
dataset
Full access to dataset for
specific dataset
© 2015 LexisNexis. All rights reserved.
Administrating Concordance Evolution
Policy
Description
C anManageTags
C reate, edit, and delete
tags
C anManageImport
View, create, edit, and
cancel import (Load File,
Edoc, DC B) jobs
Lim ited
Review er Review er OrgReview er
Lead
Level
Adm in
29
Super/
System
Adm in
C reate and edit import
templates
C anManageExport
C reate, view and cancel
export job
C reate an export
template
C anManageProductio View, create, and edit
n
productions and
production templates
C anManageBulkPrint Execute a bulk print job
from the Admin side
C anManagePrivilege
Log
View, create, and edit
privilege log jobs
C reate, use, delete and
edit privilege log job
templates
C anManageDeduplic
ation
View, create and cancel
deduplication job
C anManageSystemS Edit system settings, set
ettings
password complexity and
set system settings
C anManageServers
Add, edit, and remove
servers
Set Vivisimo settings and
map printers
C anManageJobs
View jobs, job summary
and Log files
C anManageKnowled
geBase
C ustomize knowledge
base, noise or stop
words, reasons for
redactions, spelling
variations, and thesaurus
Turn knowledge base on
or off
C anManageNotificati View and full access to
on
Notification, Alerts and
Send Notification settings
from the Admin
dashboard
C anManageUserGrou View user management
© 2015 LexisNexis. All rights reserved.
30
Concordance Evolution
Policy
Description
p
C anManageRolesAnd C reate, edit, and delete
Policies
custom roles and policies
C anManageUser
C reate, edit, export,
import, and remove
users
Kill a user session
C anManageReviewS
ets
C reate, edit, and delete
review sets
C anManageSystemR Run system audit log and
eports
billing report
C anManageMatterRe Run all reports for
ports
assigned matters
C anPerformMarkup
Perform markups
C anDeleteDocument Delete documents in the
s
reviewer interface
C anManageC ommen View, create, edit, and
ts
delete document- and
text-level comments
C anForcePolicies
Force polices
C anEditField
Edit field
C anViewTags
View tags
C anManageTagSettin C reate and edit tags
gs
C anOverrideTag
Override tags
C anC hangeTagState C hange tag state (bulk,
family & threads)
C anDeleteTag
Delete tags
C anManagePreferen
ces
View and edit
preferences
C anManageAdminSe Perform admin search
arch
C anSetPreviewSize
Set number of records
can be viewed in Snippet
View
C anManageShares
C reate, edit, and delete
shares
C anManageOrganiza C reate, edit, and delete
tion
an organization
Org Admin ViewOnly
View imports and server
information
© 2015 LexisNexis. All rights reserved.
Lim ited
Review er Review er OrgReview er
Lead
Level
Adm in
Super/
System
Adm in
Administrating Concordance Evolution
Policy
Description
Lim ited
Review er Review er OrgReview er
Lead
Level
Adm in
31
Super/
System
Adm in
Reviewer Lead View- View some application
Only
features
C anViewRecentActivi Enable/disable viewing
ty
Recent Activity option
C anViewAdmindashb Enable/disable Admin
oard
dashboard tab
Creating user groups
A user group contains a collection of users and security policies that are assigned to
organizations. User groups allows you to use pre-defined security policy settings when you
create a new user to help speed up the user creation process. For example, if you want to
control access to datasets for reviewers, you can create a different user group or each case.
You can also create user groups for your most commonly used roles, such as attorney,
paralegal, and reviewer, and assign the user group each time you create a user ID. Users can
belong to more than one user group and the security roles and policies can be set differently
for each user or user group per organization, folder, matter, or dataset.
There are two ways to add user groups to Concordance Evolution:
Manually add user groups within Concordance Evolution.
Microsoft® Active Directory®
All users in an Active Directory domain are automatically added to the users list in
Concordance Evolution when the Active Directory domain is added to Concordance
Evolution. Updates to the users and user groups in the Active Directory domain, including
user names and passwords, are automatically updated in Concordance Evolution. Active
Directory users are not editable in Concordance Evolution, but you can assign Concordance
Evolution security policies to the domain user groups in Concordance Evolution.
For more information about adding Active Directory domains, see Adding Active Directory
domains.
When a user group is created within Concordance Evolution, it is called a local user group.
When a user group is added to Concordance Evolution using Active Directory, is called an
AD user group.
To create a local user group:
1. Do one of the following:
Point to the Admin tab, and then click User Groups.
Click the Admin tab to open the Admin dashboard, click the Security button, and then
click Roles.
© 2015 LexisNexis. All rights reserved.
32
Concordance Evolution
By default the Local User Group list is displayed.
2. On the User Group dashboard toolbar, click the Add a User Group button.
3. In the Name field, type the user group name.
4. (Optional) In the Description field, type the user group description.
5. To assign users to the user group, click the Assign button.
6. In the Choose User(s) dialog box, do one of the following:
To add users from an Active Directory domain, select the Active Directory option
(Default).
To add users from a Local Directory, select the Local Directory option.
7. Select the check box next to the user(s) to include in the user group, and then click
Save.
If you have not created any users yet, you can add the users to the user group when
you are creating the users on the Create User dashboard, or add the users to the user
group on the Edit User dashboard after the users are added to Concordance Evolution.
8. From the Organization list, select an organization to assign the user group.
9. When finished, click Save to return to the User Group Management dashboard.
The new user group is displayed in the Local User Groups list.
After creating a user group, you can further assign a security role, users, and/or
customize user group preferences.
For more information about assigning security roles to user groups, see Assigning roles
to user groups.
© 2015 LexisNexis. All rights reserved.
Administrating Concordance Evolution
33
Creating security roles
In Concordance Evolution, a security role is a group of security policy settings. Security roles
are assigned to user groups, and can be used as security profiles to define user groups by the
jobs they perform. Concordance Evolution comes with some predefined system security roles
that you can assign to user groups or use as templates for creating new custom user roles. On
the Role Management dashboard, the predefined security roles are displayed in the System
Roles list, and custom security roles are displayed in the Custom Roles list. Custom security
roles are added using the Create Role dashboard.
Security policies are assigned to security roles. When you assign a security role to a user
group, the user group inherits the security policy settings for the security role.
The following are the predefined Concordance Ev olution security roles:
Org-level Admin - Full control of all functions within select sub-folders of the System folder.
This role includes limited Admin rights to the Admin and Review tabs.
Reviewer Lead - Limited rights to the System folder to Create Users and Edit User
preferences; Limited rights to the Dataset level for View/Modify/Delete Reviewsets, Assign
Reviewsets, Execute Dataset level jobs, and View/Modify/Delete Dataset settings. This role
also includes limited rights to functions with the Admin and Review tabs,
Reviewer - Full control of all functions within a Reviewset.
Limited Reviewer - Limited rights to a Reviewset.
System Security Roles cannot be changed.
To create a custom security role:
1. Do one of the following:
Point to the Admin tab, and then click Roles
Click the Admin tab to open the Admin dashboard, on the Admin dashboard toolbar
click the Security button, and then click Roles.
2. On the Roles Management dashboard, click the Add Role button to open the Create
Role dashboard.
3. In the Role Name field, type the security role name.
4. (Optional) In the Description field, type the security role description.
When you are creating a security role you can assign a new set of security policies to a
security role or copy the security policy settings of another security role to the new role,
and then customize the security policy settings for the new role.
5. To define security policies for the role, do one of the following:
To define a new set of security policies for the security role, select the Set New
Policies option.
© 2015 LexisNexis. All rights reserved.
34
Concordance Evolution
To use the security policy settings from another role, select the Policies From option
and then click the role containing the security policies settings you want to use for the
security role.
6. Click the Continue button.
Clicking Continue displays the Allowed Policies and the Denied Policies for the security
role.
When you click the Set New Policies option, by default, no security policies are applied to
the security role. When you click the Policies From option, the security policy settings for
the security role you selected from the Policies From list are displayed in the Allowed
Policies and Denied Policies lists.
7. To view the security policies for a function, click the right arrow, , to expand a security
policies list. To collapse a security policies list, click the down arrow,
.
8. Do any of the following:
To allow a security policy, expand the Denied Policies list and locate the security policy
you want to add, and then click Allow.
To deny a security policy, expand the Allowed Policies list and locate the security
policy you want to remove, and then click Deny.
The security policies you selected the Allow option for are displayed in the Policies list in
the Allowed Policies box. The security policies you selected the Deny option for are
displayed in the Policies list on the Denied Policies box.
9. When finished, click the Create button to return to the Roles Management dashboard.
The new security role is displayed in the Custom Roles section of the Roles Management
dashboard.
Customizing security policies
Custom security policy settings can be assigned to user groups at the system, organization,
folder, matter, and/or dataset level. You can choose to customize the security policy settings at
each individual level, or assign them at the parent level.
When you apply custom security policy settings at the parent level, the settings are
automatically inherited and applied at the child levels. If you want to lock security policy
settings so that they cannot be edited by users, you can select the Forced check box for a
policy on the Edit User Group Policy dashboard at the applicable level. When the Forced check
box is selected, the security policy cannot be edited at the level you selected the check box, or
at any of its child levels.
If you select the Forced check box for a security policy at the parent level, and there is already
a custom security policy setting for the policy at the child level for the user group, the parentlevel custom security policy setting takes precedence over the child-level setting for the user
group.
© 2015 LexisNexis. All rights reserved.
Administrating Concordance Evolution
35
To customize security policies:
1. Do one of the following:
Point to the Admin tab, and then click Roles.
Click the Admin tab to open the Admin dashboard, click the Security button, and then
click Roles.
Both System and Custom Roles are list on the dashboard. System Roles cannot be
changed.
2. Do any of the following:
To allow a security policy, expand the Denied Policies list and locate the security policy
you want to add, and then click Allow.
To deny a security policy, expand the Allowed Policies list and locate the security
policy you want to remove, and then click Deny.
The security policies you selected the Allow option for are displayed in the Policies list in
the Allowed Policies box. The security policies you selected the Deny option for are
displayed in the Policies list on the Denied Policies box.
3. When finished, click the Save button.
Assigning user group and roles
After creating the user group and security roles, the user group can be assigned to an
organization, folder, matter, and dataset level. When you assign a security role to a user
group, the user group inherits the security policy settings of the security role. You can assign
multiple roles or specific policies to a user group at the folder, matter, and dataset level.
If a security role is applied at the parent level, then the security role and policy settings are
automatically applied to the child levels. Security roles applied at the folder, matter, and
dataset level can be further customized.
Security Hierarchy (from top to bottom):
System
Organization (folders created under the System)
Folder (folders created under an organization)
Matter
Folder (folders created under a matter)
Dataset
© 2015 LexisNexis. All rights reserved.
36
Concordance Evolution
To assign user groups and security roles at the organization level:
1. Click the Admin tab to open the Admin dashboard.
2. In the System pane on the left, click the organization to assign security roles to a user
group.
3. On the organization's dashboard toolbar, click Grant Permissions.
4. In the Organization/Folders/Matters/Datasets section, click the organization
checkbox.
5. Click the Assign Group button, and then in the Select User Group(s) dialog box, select
the check box for each user group to assign to the organization, and then click the Save
button.
6. In the User Groups for Selected Folder section in the Actions list, select the role from
the list to apply to the user group.
7. When finished, click the Apply Permissions button.
The user group and assigned role are displayed in the Authorized Users table on the
organization's dashboard.
To edit permissions at the organization level:
1. Click the Admin tab to open the Admin dashboard.
2. In the System pane on the left, click the organization level to make changes to
permissions.
3. On the organization's dashboard toolbar, click the Manage Permissions button.
4. Do any of the following:
To change the permissions for an assigned group, click the Permissions link, make any
necessary changes, and then click Save.
To remove the permissions for an assigned group, click the Remove link, and then
when prompted to confirm the deletion click OK.
To add additional user group, click the Add Group button, and select the group(s) from
the Select User Group(s) dialog box, and then click Save.
5. When finished, click the Back button to return to the organization's dashboard.
To assign user groups and security roles at the folder level:
1. Click the Admin tab to open the Admin dashboard.
2. In the System pane on the left, click the folder to assign security roles to a user group.
3. On the folder's dashboard toolbar, click the Manage Permissions button.
4. To add a user group, click the Add Group button.
© 2015 LexisNexis. All rights reserved.
Administrating Concordance Evolution
37
5. In the Select User Group(s) dialog box, select the check box for each user group to assign
to the folder.
6. To edit/assign security policies, for a user group, click the user group's Permissions link.
7. In the Permissions for User Group [user group name] section, do any of the following:
To assign a role, click the Assign Roles button, in the Assign Roles dialog box, select
the check box for each role you want to apply to the folder, and then click OK.
To assign specific policies to a user group, click the Assign Policies button, in the Edit
User Group Policy dialog box, select the Allow or Deny option for each policy, and
then click OK.
To lock a policy for all folders, matters and datasets under the selected folder, click the
Assign Policies button, in the Edit User Group Policy dialog box, select the Forced
check box for each policy you want to lock, and then click OK.
8. To export the permissions to a comma-separated (.csv) formatted file, click the Export
button, and then when prompted do any of the following:
Click Open to view the file, in the Download Complete dialog box, click Open to open
the file in your default spreadsheet application.
Click Save to save the file, in the Save As dialog box, navigate to where you want to
save the file, and then in the File Name field, type the file name and click Save.
9. When finished, on the Folder Permissions toolbar, click the Save button.
The user group and assigned role are displayed in the Authorized Users table on the
organization's dashboard.
To assign user groups and security roles at the matter level:
1. Click the Admin tab to open the Admin dashboard.
2. In the System pane on the left, click the matter to assign security roles to a user group.
3. On the matter's dashboard toolbar, click the Manage Permissions button.
4. To add a user group, click the Add Group button.
5. In the Select User Group(s) dialog box, select the check box for each user group to
assign to the matter.
6. To edit/assign security policies, for a user group, click the user group's Permissions link.
7. In the Permissions for User Group [user group name] section, do any of the following:
To assign a role, click the Assign Roles button, in the Assign Roles dialog box, select
the check box for each role you want to apply to the folder, and then click OK.
To assign specific policies to a user group, click the Assign Policies button, in the Edit
User Group Policy dialog box, select the Allow or Deny option for each policy, and
then click OK.
To lock a policy for all folders, matters and datasets under the selected folder, click the
Assign Policies button, in the Edit User Group Policy dialog box, select the Forced
© 2015 LexisNexis. All rights reserved.
38
Concordance Evolution
check box for each policy you want to lock, and then click OK.
8. To export the permissions to a comma-separated (.csv) formatted file, click the Export
button, and then when prompted do any of the following:
Click Open to view the file, in the Download Complete dialog box, click Open to open
the file in your default spreadsheet application.
Click Save to save the file, in the Save As dialog box, navigate to where you want to
save the file, and then in the File Name field, type the file name and click Save.
9. When finished, on the Matter Permissions toolbar, click the Save button.
The user group and assigned role are displayed in the Authorized Users table on the
organization's dashboard.
To assign user groups and security roles at the dataset level:
1. Click the Admin tab to open the Admin dashboard.
2. In the System pane on the left, click the dataset to assign security roles to a user group.
3. On the dataset's dashboard toolbar, click the Manage Permissions button.
4. To add a user group, click the Add Group button.
5. In the Select User Group(s) dialog box, select the check box for each user group to assign
to the dataset.
6. To edit/assign security policies for a user group, click the user group's Permissions link.
7. In the Permissions for User Group [user group name] section, do any of the following:
To assign a role, click the Assign Roles button, in the Assign Roles dialog box, select
the check box for each role you want to apply to the dataset, and then click OK.
To assign specific policies to a user group, click the Assign Policies button, in the Edit
User Group Policy dialog box, select the Allow or Deny option for each policy, and
then click OK.
To lock a policy, click the Assign Policies button, in the Edit User Group Policy dialog
box, select the Forced check box for each policy you want to lock, and then click OK.
8. To export the permissions to a comma-separated (.csv) formatted file, click the Export
button, and then when prompted do any of the following:
Click Open to view the file, in the Download Complete dialog box, click Open to open
the file in your default spreadsheet application.
Click Save to save the file, in the Save As dialog box, navigate to where you want to
save the file, and then in the File Name field, type the file name and click Save.
8. When finished, on the Folder Permissions toolbar, click the Save button.
The user group and assigned role are displayed in the Authorized Users table on the
organization's dashboard.
© 2015 LexisNexis. All rights reserved.
Administrating Concordance Evolution
39
M anaging Licenses
Importing Licenses
Use the License Management dashboard to add, remove, and manage your Concordance
Evolution licenses. Concordance Evolution comes with one System Admin license. Additional
licenses may be purchased from Concordance Evolution Sales and added to Concordance
Evolution.
When the license seats are activated, the Concordance Evolution license count on the License
Management dashboard is updated. Seats are valid during the date range specified and are
listed in the order of expiration.
If the Auto assign license is enabled, when valid users login for the first time, they are
automatically given a license and the license count is updated.
To add a new Concordance Evolution license key:
1. Contact Concordance Sales at [email protected] or phone at 1-800-4218398 to request a Concordance Evolution license.
In the license request, please include the following:
MAC address of the Server where the Director Service is running (possible the
Application Server)
Number of seats needed
Length of time needed
When your license request is approved, LexisNexis will send an e-mail containing the
license key.
2. Once you receive the license keys, open Concordance Evolution.
3. Do one of the following:
Point to the Admin tab, and then click Licensing.
Click the Admin tab to open the Admin dashboard, click the Config button, and then
click Licensing.
4. On License Management dashboard toolbar, click the Add License button.
5. In the Add New License dialog box, in the License Key field, copy and paste the license
number from the email you received.
6. In the Description field, type a description for the license.
7. Click the Add button to activate this license.
When the seats are activated, the license count is updated and the license key is added
to the license key list on the License Management dashboard. Seats are valid during the
© 2015 LexisNexis. All rights reserved.
40
Concordance Evolution
date range you specified in the e-mail.
When you enter the license key, make sure that there are no extra spaces at the front
or end of the entry, otherwise you will receive an error stating that it is a duplicate
license and that you need to contact the sales department.
To delete a license:
1. Do one of the following:
Point to the Admin tab, and then click Licensing.
Click the Admin tab to open the Admin dashboard, click the Config button, and then
click Licensing.
2. On the License Management dashboard, from the list of licenses, click the Remove link
for the license you want to remove.
3. When prompted, click Yes to delete the file.
Assigning user licenses
When the licenses are activated, the Concordance Evolution license count on the License
Management dashboard is updated. Seats are valid during the date range specified.
If the Auto Assign License is enabled in the System Configuration Service settings, when valid
users login for the first time, they are automatically given a license and the license count is
updated. For more information, see
To assign users to licenses:
1. Do one of the following:
Point to the Admin tab, and then click Licensing.
Click the Admin tab to open the Admin dashboard, click the Config button, and then
click Licensing.
2. On the License Management dashboard toolbar, from the list of licenses, click the Users
link to assign a license.
3. On the Assign User(s) dashboard, click the Assign button.
4. Do one of the following:
To add users from an Active Directory domain, select the Active Directory option.
To add users from the local directory, select the Local Directory option.
© 2015 LexisNexis. All rights reserved.
Administrating Concordance Evolution
41
The list of users is automatically generated based on the option selected.
5. In the Select User(s) dialog box, select the check box for each user you want to assign
a license.
To quickly find a user, type the username in the filter field and then click Filter. To clear
the filter field, click Reset.
6. When finished, click Save.
Each user that is assigned to the selected license is displayed in the list of assigned
users along with the number of seats available.
7. When finished, click the Save button.
To remove users from licenses:
1. Do one of the following:
Point to the Admin tab, and then click Licensing.
Click the Admin tab to open the Admin dashboard, click the Config button, and then
click Licensing.
2. On the License Management dashboard, from the list of licenses, click the Users link for
the license you want to edit.
3. On the Assign User(s) dashboard, from the assigned users list, select the user(s) you
want to remove, and then click the Unassign button.
4. When finished, click the Save button.
M anaging Users
Creating users
There are three ways to add users to Concordance Evolution:
Manually add users: Users can be added manually from the Add User(s) dashboard.
Importing users: Users can be imported into Concordance Evolution from CSV (commaseparated values) files. For more information about importing users, see Importing users.
Microsoft® Active Directory®: All users in an Active Directory domain are automatically
added to the users list in Concordance Evolution when the Active Directory domain is added
to Concordance Evolution. Updates to the users and user groups in the Active Directory
domain, including user names and passwords, are automatically updated in Concordance
Evolution. Active Directory users are not editable in Concordance Evolution, but you can
assign Concordance Evolution security policies to the domain user groups in Concordance
Evolution. For more information about adding Active Directory domains, see Adding Active
Directory domains.
© 2015 LexisNexis. All rights reserved.
42
Concordance Evolution
When a user is created within Concordance Evolution manually or by import, it is called a
local user. When a user is added to Concordance Evolution using Active Directory, it is
called an AD user.
To manually add local a user:
1. Do one of the following:
Point to the Admin tab, and then click Users.
Click the Admin tab to open the Admin dashboard, click the Security button, and then
click Users.
2. On the Users dashboard toolbar, click the Add User button to open the Add User
dashboard.
3. On the Details tab, in the User Name field, type the user's user name for logging on to
Concordance Evolution.
Concordance Evolution user names must be unique.
The following special characters are not allowed in Concordance Evolution or Microsoft
Active Directory user names:
/\;:|=,+* ? <>@"
4. In the First Name field, type the user's first name.
5. In the Last Name field, type the user's last name.
6. In the Password and Retype Password fields, type the user's Concordance Evolution
password.
Passwords require the following:
Does not contain the user name or user's full name
Contains characters from three of the following five categories:
o English uppercase characters (A through Z)
o English lowercase characters (a through z)
o Base 10 digits (0 through 9)
o Non-alphabetic characters (for example, !, $, #, %)
o A catch-all category of any Unicode character that does not fall under the previous
four categories. This fifth category can be regionally specific.
7. To make sure the user changes their password after the account is setup, select the
Change password on next login check box.
8. In the Email field, type the user's e-mail address.
9. Select the Active check box to activate the user.
The Active User check box needs to be selected for the user to log on to Concordance
Evolution.
© 2015 LexisNexis. All rights reserved.
Administrating Concordance Evolution
43
When you create a user, you can assign the user to a user group. A user group is a
collection of users and pre-defined security policy settings you can use to help speed up
the user creation process. You can assign a user to a user group on the Create User,
Add User Group or Edit User Group dashboards.
For more information about security policies, see Assigning roles to user groups.
10. For Privilege, the Super Admin check box is not selected by default. When the Super
Admin check box is selected, all Concordance Evolution security policies, regardless of
the user group the user is assigned to, are set to Allow for the user. Only users
designated as a Super Admin can access the Super Admin check box for other users on
the Create User and Edit User dashboard.
It is best practice to create at least two super admin users.
11. To add the user to a user group, in the Membership section, click the Assign button.
If the user is assigned the Super Admin access, the user does not have to be assigned
to any user groups as they have full access to the Concordance Evolution environment.
12. In the Select User Group(s) dialog box, select the check box for each user group you
want to assign the user, and then click Save.
13. (Optional) Click the Contact Information tab and fill out the users contact information.
14. When finished, click the Create button to save the user and add it to the list on the
Users dashboard.
After creating a user, you can customize the user's preferences at the bottom of the Edit
User dashboard.
For more information about user preferences, see Customizing admin preferences.
Importing users
If you have a large number of users to add to Concordance Evolution, you can quickly add them
at one time by importing users from a comma-separated value (.csv) file into Concordance
Evolution.
Only local users can be imported into Concordance Evolution. The user import only supports
CSV (comma-separated values) files. Active Directory users cannot be imported into
Concordance Evolution, see Using Microsoft Active Directory
The following special characters are not allowed in Concordance Evolution or Microsoft
Active Directory user names:
/\;:|=,+*?<>@"
You can import user data for the following Concordance Evolution fields:
© 2015 LexisNexis. All rights reserved.
44
Concordance Evolution
UserName
FirstName
LastName
EmailID
When you import users, Concordance Evolution assigns a generic password, [username]$1, to
each user created during the import.
To import users:
1. Do one of the following:
Point to the Admin tab, and then click Users.
Click the Admin tab to open the Admin dashboard, click the Security button, and then
click Users.
2. On the Users dashboard toolbar, click the Import Users button, and then click Browse.
3. In the Choose File to Upload dialog box, navigate to and then click the .csv file you want
to import, and then click Open.
Clicking Open adds the file name and location to the Import Users box.
4. Click the Import button.
The import results are displayed on the Import Results dashboard.
5. Click the Close button.
The users' user name, first name, last name, and email address are added to
Concordance Evolution, and the users are displayed in the Users list on the Users
dashboard.
6. To activate, add additional information, and/or define preferences for an imported user,
in the Users list, click the edit button next to the user's name to open the Edit User
dashboard.
7. Make the applicable edits and then click the Update button to return to the Users
dashboard.
Using Microsoft Active Directory
Using Microsoft Active Directory
Microsoft® Active Directory® is most commonly used for external authentication. One of the
benefits of using Active Directory is not just to implement user names and passwords, but to
also take advantage of the organization features offered for managing users.
When using Concordance Evolution with Microsoft® Active Directory® to authenticate users, a
© 2015 LexisNexis. All rights reserved.
Administrating Concordance Evolution
45
two-fold verification takes place. The user is first authenticated with Active Directory. If the
person is a valid user, they are then authenticated in Concordance Evolution and will have
permissions based on the security policies applied to the user group to which the user is
assigned in Concordance Evolution .
Any users and user groups in an Active Directory domain are automatically added to the users
list and user groups list in Concordance Evolution when the Active Directory domain is added to
Concordance Evolution. Updates to the users and user groups in the Active Directory domain,
including user names and passwords, are automatically updated in Concordance Evolution.
Active Directory users and user groups are not editable in Concordance Evolution, but you can
assign Concordance Evolution security policies to the domain user groups in Concordance
Evolution.
To use Active Directory for external authentication in Concordance Evolution:
1. Set up users and user groups in Active directory.
2. Add the Active Directory domain to Concordance Evolution.
3. Add the Active Directory server information for the domain.
4. Assign Concordance Evolution security policies to the applicable domain users groups.
Adding Active Directory domains
When you add an Active Directory domain to Concordance Evolution, any users and user
groups in an Active Directory domain are automatically added to the users list and users groups
list in Concordance Evolution. Updates to the users and user groups in the Active Directory
domain, including user names and passwords, are automatically updated in Concordance
Evolution. Active Directory users are not editable in Concordance Evolution, but you can assign
Concordance Evolution security policies to the domain user groups in Concordance Evolution.
An Active Directory domain cannot be added on the Add Active Directory Domain dashboard
if a domain with the same name was previously deleted from Concordance Evolution. For
more information, see Deleting Active Directory domains.
To add an Active Directory domain:
1. Do one of the following:
Point to the Admin tab, and then click AD Domains.
Click the Admin tab to open the Admin dashboard, click the Security button, and then
click AD Domains.
2. On the AD Domain Management dashboard, click the Add a domain link to open the Add
Active Directory Domain dashboard.
© 2015 LexisNexis. All rights reserved.
46
Concordance Evolution
3. In the Name field, type the Active Directory domain name.
4. (Optional) In the Description field, type the Active Directory description.
5. In the LDAP Root for User field, type the Lightweight Directory Access Protocol (LDAP)
root for the Active Directory domain's users.
The Add AD Server link is disabled when you add a domain to Concordance Evolution.
After adding a domain, the Active Directory server information is added for the domain
using the Add AD Server link on the Edit Active Directory Domain dashboard. For more
information, see Adding Active Directory servers.
6. In the User Name field, type the domain administrator's user name.
7. In the Password field, type the domain administrator's password.
8. When finished, click the Add button to return to the AD Domain Management
dashboard.
The new domain is displayed in the domain list.
Adding Active Directory servers
When you are using Microsoft® Active Directory® for external authentication, you will need a
Microsoft Active Directory compatible credentials server. The Active Directory user credentials
are verified by the server. If a user name or password is not recognized by the domain
controller, then the user is refused access by Concordance Evolution. If the user is verified by
the domain controller, then the user is given access to Concordance Evolution. The security
policies assigned to the user group associated with the user in Concordance Evolution,
determine the features and functions the user can access within Concordance Evolution.
If you enter an IP address and the server's IP address changes, Concordance Evolution will not
be able to communicate with the credential server until the address is manually updated in
Concordance Evolution.
Firewall ports that need to be open for Active Directory include: 389 (LDAP), 636 (secure LDAP),
and NetBIOS ports for the change password feature.
To add an Active Directory server:
1. Do one of the following:
Point to the Admin tab, and then click AD Domains.
Click the Admin tab to open the Admin dashboard, click the Security button, and then
click AD Domains.
2. On the AD Domain Management dashboard, from the Domain list, click the edit link for
the domain you want to add the server.
© 2015 LexisNexis. All rights reserved.
Administrating Concordance Evolution
47
3. On the Edit Active Directory Domain dashboard, click the Add AD Server link to open
the Add AD Server dashboard.
4. In the Host field, type the server's IP address.
5. In the Port field, type the applicable firewall port.
make sure that the firewall port is open.
6. Click the Test Connection button to test the connection between the server and
Concordance Evolution.
If the connection is good, the Test Connection Success message is displayed below the
Port field.
7. Click the Add button to return to the Edit Active Directory Domain dashboard.
The new server is displayed in the Servers list. To add additional servers, click the Add
AD Server link again, and repeat the steps for adding a server.
8. When finished, click the Update button to return to the Admin dashboard.
Deleting Active Directory domains
When an Active Directory domain is deleted from the Edit Active Directory Domain dashboard,
the Active Directory domain is removed from the Active Directory domain list on the AD Domain
Management dashboard, but remains in the system. An Active Directory domain cannot be
added on the Add Active Directory Domain dashboard if a domain with the same name was
previously deleted from Concordance Evolution.
If an Active Directory domain needs to be permanently deleted from Concordance Evolution, the
Active Directory domain needs to be deleted from the Edit Active Directory Domain dashboard,
all Active Directory users that belong to the deleted domain need to be manually deleted, and
the domain entry needs to be physically deleted from the database. Once done, an Active
Directory domain can be added on the Add Active Directory Domain dashboard with the same
name.
To delete an Active Directory domain from the domain list:
1. Do one of the following:
Point to the Admin tab, and then click AD Domains.
Click the Admin tab to open the Admin dashboard, click the Security button, and then
click AD Domains.
2. On the AD Domain Management dashboard, from the Domain list, locate the domain you
want to delete, and then do one of the following:
Click the delete link.
© 2015 LexisNexis. All rights reserved.
48
Concordance Evolution
Click the edit link, and then on the Edit Active Directory Domain toolbar, click the
Delete button.
3. When prompted, click Yes to confirm the deletion.
Clicking Yes deletes the Active Directory domain from the domain list on the AD Domain
Management dashboard.
Deleting Active Directory servers
If you need to delete a Microsoft Active Directory server associated with an Active Directory
domain in Concordance Evolution, you can delete the server from domain's server list in
Concordance Evolution on the Edit AD Server dashboard.
To delete an Active Directory server from a domain's server list:
1. Do one of the following:
Point to the Admin tab, and then click AD Domains.
Click the Admin tab to open the Admin dashboard, click the Security button, and then
click AD Domains.
2. On the AD Domain Management dashboard, from the Domain list, click the edit link for
the domain you want to add the server.
3. Servers list displays the servers currently associated with the domain.
4. From the Servers section, in the Host column, click the link for the server you want to
delete.
5. Clicking the server link opens the Edit AD Server dashboard.
6. Click the Remove button.
7. When prompted, click Yes to confirm the deletion.
Clicking Yes deletes the Active Directory server from the domain's server list on the Edit
Active Directory Domain dashboard.
8. Click the Update button to save your changes to the domain and return to the AD
Domain Management dashboard.
© 2015 LexisNexis. All rights reserved.
Administrating Concordance Evolution
49
Modifying users
Only local users can be modified or deleted in Concordance Evolution. Active Directory users,
including user passwords, cannot be modified or deleted in Concordance Evolution, but you can
assign Concordance Evolution security policies to the domain user groups in Concordance
Evolution.
To modify a user:
1. Do one of the following:
Point to the Admin tab, and then click Users.
Click the Admin tab to open the Admin dashboard, click the Security button, and then
click Users.
2. From the list of users on the Users dashboard, locate the user you want to modify, and
then in the Actions column click the Edit link.
3. Make the applicable edits.
The following special characters are not allowed in Concordance Evolution or Microsoft
Active Directory user names:
/\;:|=,+* ? <>@"
4. Click the Update button.
When you modify a user, the changes are applied the next time the user logs on to
Concordance Evolution.
To change a user's password:
1. Do one of the following:
Point to the Admin tab, and then click Users.
Click the Admin tab to open the Admin dashboard, click the Security button, and then
click Users.
2. From the list of users on the Users dashboard, locate the user you want to change the
password for, and then in the Actions column click the Edit link.
3. In the Password and Re-Type Password fields, type the user's new Concordance
Evolution password.
4. Click the Update button.
When you modify a user's password, the changes are applied the next time the user
logs on to Concordance Evolution.
To activate or deactivate a user:
© 2015 LexisNexis. All rights reserved.
50
Concordance Evolution
1. Do one of the following:
Point to the Admin tab, and then click Users.
Click the Admin tab to open the Admin dashboard, click the Security button, and then
click Users.
2. From the list of users on the Users dashboard, locate the user you want to change the
status for, and then in the Actions column click the Edit link.
3. Do one of the following:
To deactivate the user, clear the Active User check box.
To activate the user, select the Active User check box.
4. Click the Update button.
When you deactivate or activate a user, the changes are applied the next time the user
logs on to Concordance Evolution. If you deactivate a user, the user will not be able to
log on to Concordance Evolution. If you need to deactivate and log off a user that is
currently logged on to Concordance Evolution, you can deactivate the user and then
disconnect the user's session on the the User Session Management dashboard.
For more information about disconnecting user sessions, see Managing user sessions.
To delete a user:
1. Do one of the following:
Point to the Admin tab, and then click Users.
Click the Admin tab to open the Admin dashboard, click the Security button, and then
click Users.
2. From the list of users on the Users dashboard, locate the user you want to delete, and
then do one of the following:
In the Actions column click the Edit link, and then click the Remove button.
In the Actions column click the Delete link.
3. When prompted, click OK to confirm the deletion.
If you delete a user that is currently logged on to Concordance Evolution, the user's
session is immediately disconnected when the user is deleted.
If a user is deleted and then recreated, the user's name is shown as a duplicate in the
Filter performed by list of the Audit Log.
To unlock a user:
If a user is attempting to log on to Concordance Evolution, and they exceeds the number of
© 2015 LexisNexis. All rights reserved.
Administrating Concordance Evolution
51
login attempts allowed by Concordance Evolution, the user's account is locked, and the
Locked check box on the Edit User dashboard is selected by the system.
To unlock a user:
1. Do one of the following:
Point to the Admin tab, and then click Users.
Click the Admin tab to open the Admin dashboard, click the Security button, and then
click Users.
2. From the list of users on the Users dashboard, locate the user you want to change the
status for, and then in the Actions column click the Edit link.
3. Click the Contact Information tab, and then clear the Locked check box.
4. When finished, click the Update button.
Exporting users
Both Active Directory users and local Concordance Evolution users can be exported from
Concordance Evolution. When you click the Export Selected Users button on the User
Management dashboard, the users are exported to a CSV (comma-separated values) file.
The export exports user data from the following fields:
UserName
FirstName
LastName
DomainName (for Active Directory users only)
EmailID
To export users:
1. Do one of the following:
Point to the Admin tab, and then click Users.
Click the Admin tab to open the Admin dashboard, click the Security button, and then
click Users.
2. On the Users, from the Show Users list, select Local Users or AD Users.
Only local users or Active Directory users can be exported at one time. You cannot export
both types of users for the same export.
© 2015 LexisNexis. All rights reserved.
52
Concordance Evolution
3. In the Users list, select the check box for the each user to include in the export.
4. Click the Export Users button.
5. In the File Download dialog box, click Save.
6. In the Save As dialog box, navigate to where you want to save the .csv file.
7. In the File name field, type the file name.
The Save as type field defaults to Microsoft Office Excel Comma Separated Value.
Concordance Evolution only supports CSV files for importing users. If you are planning
on importing the exported users list into Concordance Evolution, be sure to save the file
as a CSV file.
8. Click Save to close the dialog box and return to the Users dashboard.
System M anagement
Preference Management
About preferences
There are two types of preference settings in Concordance Evolution:
Admin preference settings are defined in the Admin dashboard. Admin preferences include
password settings, number of items to display in lists, default view for search results, tag
format settings, and so on.
For more information, see Customizing admin preferences.
Personal preference settings are defined on the My Preference dashboard. In Concordance
Evolution the administrator can customize the default preference settings for users, user
groups, folders, matters, but as long as a preference setting is not locked by the
administrator, a user can customize the preference settings for themselves on the My
Preference dashboard.
For example, the administrator can define the default tag format settings, but allow users
to customize the tag format preference settings for themselves on the My Preference
dashboard.
You can access the My Preference dashboard by clicking the Preferences link next to the
Help link at the top of the page anywhere in the Admin, Review, and Report dashboards.
For more information, see Customizing personal preferences.
Preferences Available in Concordance Evolution
© 2015 LexisNexis. All rights reserved.
Administrating Concordance Evolution
53
Concordance Evolution Preferences
Function
Name
Description
AD domains per page
Default number of items per page for the
AD Domain Management dashboard
AD domains sort order
Preference for sorting domains in
ascending or descending order on AD
Domain Management dashboard
Audit items per page
Default number of items per page for
Audit Management dashboard
Enable send document
links to CaseMap
Determines whether the Send Document
Links to CaseMap feature is enabled
AD Managem ent
Audit Managem ent
CaseMap
For more information about CaseMap
preferences, see Using CaseMap with
Concordance Evolution.
Maximum number of
document links
Maximum number of document links a
user can export at one time to the
CaseMap.cmbulk file in the Review
dashboard
Font color for comments
Default font color for comment text
Font name for comments
Default font for comment text
Font size for comments
Default font size for comment text
Sorting order for
comments
Default sorting for comments in
ascending or descending order
Document control number
text
How the DCN (document control number)
field name is displayed in the Review
dashboard
Com m ents
DCN
Deduplication
© 2015 LexisNexis. All rights reserved.
54
Concordance Evolution
Concordance Evolution Preferences
Comparison method
Default deduplication comparison
method. Original Document or Fields
Deduplication items per
page
Default number of items per page for the
Deduplication dashboard
Maximum email size in MB
Maximum combined document size in
megabytes (MB) allowed for sending an
email
Maximum number of
documents to email
Maximum number of documents allowed
to be sent in an email
Maximum number of
documents to print
Maximum number of documents allowed
for a print job
Default document viewer
Default view for viewing documents in
Review dashboard
Document zoom level
Zoom level for viewing documents
Enable hit highlight in
document data viewer
Determines whether search hit
highlighting is enabled in the Document
Data view
Enable hit highlight in
near native viewer
Determines whether search hit
highlighting is enabled in the Near Native
view
Deliv ery Options
Docum ent Viewer
Em ail Conv ersation Threading
Maximum Thread Depth to
Display
Maximum number of threads to show in
the Thread view
Export items per page
Default number of items per page for
export jobs on the Export dashboard
Import items per page
Default number of items per page for
import jobs on the Import dashboard
Export
Im port
Knowledge Management
© 2015 LexisNexis. All rights reserved.
Administrating Concordance Evolution
55
Concordance Evolution Preferences
Preview size
Default setting in kilobytes (KB) for
Preview Size field on Reviewer Search
Settings dashboard
Spelling variations sort
order
Preference for sorting spelling variations
in ascending or descending order
Stop words sort order
Preference for sorting step words in
ascending or descending order
Thesaurus sort order
Preference for sorting thesaurus entries
in ascending or descending order
Landing page
Default page to be displayed when users
log on to Concordance Evolution.
Reviewer dashboard or Admin
dashboard
Notification items per
page
Default number of items per page for the
Notifications tab on Notification
Management dashboard
Type of notification
Preference for type of notification to
send to users. Online, Email, or Both.
Default view for explore
documents
Default view for selecting documents
when you click the Go to document
explorer link on Create Review Set
dashboard
Explore document items
per page
Default number of items per page for
search results in Document Explorer
Tag window
Default location for the Tag pane when
reviewing documents
Saved Search items per
page
Default number of items per page for the
Saved Searches tab on Saved Search
dashboard
Landing Page
Notification
Rev iew Set
Sav ed Search
Search Alert
© 2015 LexisNexis. All rights reserved.
56
Concordance Evolution
Concordance Evolution Preferences
Search alert items per
page
Default number of items per page for the
Search Alerts tab on Search Alert
dashboard
Search history item count
Maximum number of searches saved on
the Search History tab for the current
session
Search history items per
page
Default number of items per page for the
Search History tab on Search History
dashboard
Default view for search
results
Default view for viewing search results in
Review dashboard
Search results per page
Default number of items per page for the
Search Results dashboard
Search History
Search Results
Session Managem ent
Session management
items per page
Default number of items per page for the
User Session Management dashboard
Tag font
Default font for tag text in Tags pane
Tag font color
Default font color for tag text in Tags
pane
Tag font size
Default font size for tag text in Tags
pane
Tag highlight color
Default highlight color for tagging.
Default color setting for Tag Color field
on Create a Tag and Edit Tag
dashboards.
Alert user to change
password
Number of days before user needs to
change password that you want to alert
user to change password
Number of users per page
Default number of items per page for the
User Management dashboard
Tagging
User Managem ent
© 2015 LexisNexis. All rights reserved.
Administrating Concordance Evolution
57
Concordance Evolution Preferences
Password expiry in days
Password expiration in days
Sort order for user group
management
Preference for sorting users in ascending
or descending order for User Group
Management
User list sort order
Preference for sorting users in ascending
or descending order
Customizing admin preferences
Some preferences are assigned by system, user group, or user at the system, organization,
folder, or matter level. Preferences include password settings, number of items to display in
lists, default view for search results, tag format settings, and so on.
Preferences for the system, user groups, and users can all be defined on the Preference
Management dashboard. You can also define user group admin preferences on the Edit User
Group dashboard and user admin preferences on the Edit User dashboard.
You can lock a preference setting at the system, organization, folder, or matter level for the
entire system or a specific user group or user with the Force Down check box. When the Force
Down check box is selected on the Preference Management dashboard, the preference setting
is applied to the child levels and cannot be modified at any of the levels below the parent level
and a lock icon,
, is displayed next to the preference name.
When the default preference setting has been changed, the preference text in the preference
list is bolded. When a preference is currently set to the preference default setting, the
preference text in the preference list is not bolded.
In the Review dashboard, users can also define their personal preferences on the My
Preference dashboard. For more information about defining user preferences in the Review
dashboard, see Customizing personal preferences.
Preference Precedence Information
Preference precedence flows from System > User Group > User. However, you can
customize the preferences in the User Group Preferences section of the Edit User Group
dashboard, or the User Preferences section on the Edit User dashboard.
Preference Parent/Child Hierarchy (from top to bottom):
System
User Group
User
© 2015 LexisNexis. All rights reserved.
58
Concordance Evolution
System Parent/Child Hierarchy (from top to bottom):
System
Organization created under the system
Folder created under the organization
Matter
Folder created under a matter
Dataset
If you customize a user preference setting on the Edit User dashboard, the preference
setting flows from User > User Group > System. The setting applies to the user at all
levels (user group(s) the user is assigned to, dataset, folder/matter, folder, organization
and system levels). If a user belongs to multiple user groups, the preferences of the user
group with the highest priority, will take precedence over the other preference settings.
If you customize a user group preference setting on the Edit User Group dashboard, the
preference setting flows from the User Group > Users assigned to the User Group >
System. The setting applies to the user group at all levels (users assigned to the user
group, dataset, folder/matter, folder, and system).
If a preference setting is customized for a user, and the same preference setting is
customized for the user group the user is assigned to but the user and user group have
a different value for the preference, the user preference setting takes precedence over
the user group preference setting unless the preference setting is locked (the Force
Down check box is selected) at the user group level.
The preference setting for a function or page in the application will only apply to the user
and/or user group, if the user and/or user group has access to the function or page.
Otherwise, if the user does not have access, the preference setting does not affect
anything.
To customize preferences at the system level:
1. Do one of the following:
Point to the Admin tab, and then click Preferences.
Click the Admin tab to open the Admin dashboard, click the Config button, and then
click Preferences.
2. On the Preference Management dashboard, click the Select System Preference option.
3. On the Preference Management dashboard, preferences are organized by Concordance
Evolution function. To view the preferences for a function, click the right arrow, , next
to the function to expand the preferences list. To close a preferences list, click the down
arrow,
, next to the function. You can also click the Expand All button or Collapse All
button at the bottom of the dashboard to view all the preference lists.
6. To view a preference, in the Preference Name column click the preference's name link.
Clicking the preference's name link opens the Edit Preference dashboard. Only the Value
field and Force Down check box can be edited.
© 2015 LexisNexis. All rights reserved.
Administrating Concordance Evolution
59
7. In the Value field, modify the default setting to customize the preference setting.
8. If you want the preference setting to apply to all users and users groups, and all
organizations, folders, matters, and datasets under the system, select the Force Down
check box. When the Force Down check box is selected, the preference settings is only
editable at the system level and is not editable at the child levels.
9. Click the Update button to save the preference setting.
Any preference settings that you customize will be displayed in bold text in the
preferences list.
10. When finished, click the System link in the breadcrumbs to return to the Admin
dashboard.
When modifying preference settings, the changes are applied the next time the user
logs on to Concordance Evolution.
To customize a preference at the organization level:
1. Click the Admin tab to open the Admin dashboard.
2. In the System pane, locate and click the organization to change preferences.
3. In the Assigned Users table of the organization's dashboard, click the link for the user
group to edit.
4. In the User Group Preferences section, the preferences are organized by Concordance
Evolution function. To view the preferences for a function, click the right arrow, , next
to the function to expand the preferences list. To close a preferences list, click the down
arrow,
, next to the function. You can also click the Expand All button or Collapse All
button at the bottom of the page to expand or collapse all the preference lists on the
page.
5. To view a preference, click the preference's name link in the Preference Name column.
Clicking the preference's name link opens the Edit Preference dashboard. Only the Value
field and Force Down check box can be edited.
6. In the Value field, modify the default setting to customize the preference setting.
7. If you want the preference setting to apply to all users and users groups, and all folders,
matters, and datasets under the folder, select the Force Down check box. When the
Force Down check box is selected, the preference settings is only editable at the
organization level, and is not editable at the child levels.
8. Click the Update button to save the preference setting.
Any preference settings that you customize will be displayed in bold text in the
preferences list on the Preference Management dashboard.
9. When finished, click the System link in the breadcrumbs to return to the Admin
dashboard.
When modifying preference settings, the changes are applied the next time the user
logs on to Concordance Evolution.
© 2015 LexisNexis. All rights reserved.
60
Concordance Evolution
To customize a system preference at the folder level:
1. Click the Admin tab to open the Admin dashboard.
2. In the System pane, locate and click the folder to change preferences.
3. In the Assigned Users table of the folder's dashboard, click the link for the user group to
edit.
4. In the User Group Preferences section, the preferences are organized by Concordance
Evolution function. To view the preferences for a function, click the right arrow, , next
to the function to expand the preferences list. To close a preferences list, click the down
arrow,
, next to the function. You can also click the Expand All button or Collapse All
button at the bottom of the page to expand or collapse all the preference.
5. To view a preference, click the preference's name link in the Preference Name column.
Clicking the preference's name link opens the Edit Preference dashboard. Only the Value
field and Force Down check box can be edited.
6. In the Value field, modify the default setting to customize the preference setting.
7. If you want the preference setting to apply to all users and users groups, and all folders,
matters, and datasets under the folder, select the Force Down check box. When the
Force Down check box is selected, the preference settings is only editable at the folder
level, and is not editable at the child levels.
8. Click the Save button to save the preference setting.
Any preference settings that you customize will be displayed in bold text in the
preferences list on the Preference Management dashboard.
To customize a system preference at the matter level:
1. Click the Admin tab to open the Admin dashboard.
2. In the System pane, locate and click the matter to change preferences.
3. In the Assigned Users table of the matter's dashboard, click the link for the user group
to edit.
4. In the User Group Preferences section, the preferences are organized by Concordance
Evolution function. To view the preferences for a function, click the right arrow, , next
to the function to expand the preferences list. To close a preferences list, click the down
arrow,
, next to the function. You can also click the Expand All button or Collapse All
button at the bottom of the page to expand or collapse all the preference lists.
5. To view a preference, click the preference's name link in the Preference Name column.
Clicking the preference's name link opens the Edit Preference dashboard. Only the Value
field and Force Down check box can be edited.
© 2015 LexisNexis. All rights reserved.
Administrating Concordance Evolution
61
6. In the Value field, modify the default setting to customize the preference setting.
7. If you want the preference setting to apply to all users and users groups, and all
datasets under the matter, select the Force Down check box. When the Force Down
check box is selected, the preference settings is only editable at the folder level, and is
not editable at the child levels.
8. Click the Save button to save the preference setting.
Any preference settings that you customize will be displayed in bold text in the
preferences list on the Preference Management dashboard.
When modifying preference settings, the changes are applied the next time the user
logs on to Concordance Evolution.
To customize a user preference on the Edit User dashboard:
1. Do one of the following:
Point to the Admin tab, and then click Users.
Click the Admin tab to open the Admin dashboard, click the Security button, and then
click Users.
2. From the list of users on the Users dashboard, locate the user you want to modify, and
then in the Actions column click the Edit link.
3. On the Edit User dashboard in the User Preferences section, preferences are organized
by Concordance Evolution function. To view the preferences for a function, click the right
arrow, , next to the function to expand the preferences list. To close a preferences list,
click the down arrow,
, next to the function. You can also click the Expand All button
or Collapse All button at the bottom of the page to expand or collapse all the preference
lists on the page.
4. To view a preference, click the preference's name link in the Preference Name column.
Clicking the preference's name link opens the Edit Preference dashboard. Only the Value
field and Force Down check box can be edited on the Edit Preference dashboard.
5. In the Value field, modify the default setting to customize the preference setting.
6. If you want the preference setting to apply to the user at all levels under the system,
select the Force Down check box. When the Force Down check box is selected, the
preference settings is only editable for the user on the Edit User dashboard, and is not
editable at the user group or system level.
7. Click the Update button to save the preference setting.
Any preference settings that you customize will be displayed in bold text in the
preferences list on the Preference Management dashboard.
8. When you are done customizing preferences, click the Update button to save the
preference settings and return to the User Management dashboard.
When modifying preference settings, the changes are applied the next time the user
logs on to Concordance Evolution..
© 2015 LexisNexis. All rights reserved.
62
Concordance Evolution
Server Management
About server management
In Concordance Evolution you can view the current server settings, add or remove servers, and
set the default servers for the SMTP (Simple Mail Transfer Protocol), SQL Server, and search
servers used by Concordance Evolution. You can also add the printers used by Concordance
Evolution.
There can only be one default server for each of the servers used by Concordance Evolution, so
you can add multiple servers to the server list, but only one of each type of server can be the
default server for the server type.
Maintaining server services
The Servers dashboard provides information about each server, the server's status, and
services that are running on each server in the Concordance Evolution environment. All services
are installed on all machines; however, most services are in a "stopped" state after installation. After the
installation, the System Administrator must login to the Servers dashboard and start the appropriate
services on each server.
The following table provides a list of recommended services that should be running on each server:
Server
Services
SQL Server
(primary database)
System Configuration Service
UI Server
(Web Services Server)
System Configuration Service
Vault Service
Web Reviewer Service
Web Admin Service
Search Server
(Velocity Server)
System Configuration Service
Application Server
(Queue Server)
Printer Service
Search Service
System Configuration Service
Application Jobs Service
System Jobs Service
Imaging Job Processor Service
Application Director Service
© 2015 LexisNexis. All rights reserved.
Administrating Concordance Evolution
Conversion Server
63
System Configuration Service
Imaging Queue Service
Imaging Job Processor Service
To add additional servers to the Concordance Evolution environment, you will need to run
the Concordance Evolution Installation Wizard.
To view server information:
1. Do one of the following:
Point to the Admin tab, and then click Servers.
Click the Admin tab to open the Admin dashboard, in the System Details pane, click the
Servers link.
2. To access a list of services running on a particular server, in the Server column, click the
server link.
The Services dashboard for the selected server is displayed showing the services status.
To start and stop services for a server:
1. Do one of the following:
Point to the Admin tab, and then click Servers.
Click the Admin tab to open the Admin dashboard, in the System Details pane, click
the Servers link.
2. In the Server column, click the server link.
3. In the Action column, do one of the following:
To start a service, click the Start link.
To stop a service, click the Stop link.
4. When finished, click the Back button to return to the Servers dashboard.
To modify server services configurations:
1. Do one of the following:
Point to the Admin tab, and then click Servers.
Click the Admin tab to open the Admin dashboard, in the System Details pane, click
the Servers link.
2. In the Server column, click the server link.
3. In the Services column, select the services link to modify.
4. In Service Configuration dashboard, make any necessary changes for the available
settings.
Only the service settings for the selected server are available for modification. All other
© 2015 LexisNexis. All rights reserved.
64
Concordance Evolution
settings appear shaded.
5. When finished, click the Save button.
Printers
Managing Printers
The Manage Printers dashboard provides all the tools you need to add and remove network
printers. to create print jobs, see About bulk printing.
To add a printer:
To edit printer settings:
To remove a printer:
Session Management
Managing user sessions
In Concordance Evolution, if a user does not respond to a broadcast message requesting users
to exit the application or you have an emergent need for users to exit the application
immediately, you can manually disconnect the user's session on the User Session Management
dashboard.
If you do not need to disconnect user sessions immediately, it is best practice to send a
notification to the users you need to exit the application before manually disconnecting their
session. This gives users time to save their work and exit the application on their own.
For more information about sending notifications, see Creating notifications.
When you disconnect a user session on the User Session Management dashboard,
Concordance Evolution immediately logs off the selected users, performing a hard kill.
Performing a hard kill does not guarantee that the users’ session data is saved.
To disconnect a user session:
© 2015 LexisNexis. All rights reserved.
Administrating Concordance Evolution
65
1. Do one of the following:
Point to the Admin tab, and then click Sessions.
Click the Admin tab to open the Admin dashboard, click the Config button, and then
click Sessions.
2. On the Session Management dashboard, in the user list, select the check box for each
user to log off.
To log off all users currently logged on to Concordance Evolution, select the check box to
the left of the User Name header to select all the users' check boxes.
3. In the Notification field, type the notification you want to send to the users you are
logging off.
4. Click the Log Out button.
5. When prompted, click Yes to confirm the disconnect.
When you click Yes, the selected users are logged off and the notification is displayed for
the user.
Job Management
About jobs
In Concordance Evolution, certain tasks, such as running imports, exports, print jobs,
productions, or creating review sets are performed using jobs. The Job Management dashboard
displays a list of jobs created in the system. The list includes each job’s name, type, status,
hierarchy level, and the last run date and time.
By default, jobs are processed in the order they were created if the Now option was selected
when scheduling the job, or by the date and time the job is scheduled to run.
Viewing jobs
On the Job Management dashboard you can view the list of jobs created in the system. You can
view a job's details and history on the Job Summary dashboard. If a job fails, you can open the
Error Log to view additional information about the problems encountered.
Jobs are also listed on the dashboard for each dataset in the Recent Jobs section at the bottom
of the dashboard. For more information, see About dataset job logs
© 2015 LexisNexis. All rights reserved.
66
Concordance Evolution
To view jobs:
1. Do one of the following:
Point to the Admin tab, and then click Jobs.
Click the Admin tab to open the Admin dashboard, click the Config button, and then
click Jobs.
The jobs list on the Manage Jobs dashboard includes each job’s type, dataset, created
by, start date, end date, Near Native conversion status, and job status.
2. To refine the listed jobs, do any of the following:
To display the results for a specified past number of days, from the Filter by Last
Modified list, and then select the time frame.
To display the results for a specific matter(s), from the Filter by Matter list, select the
check box for each matter.
To display the results for a specific dataset(s), from the Filter by Dataset list, select
the check box for each dataset.
3. To view a job, do any of the following:
To view the information about a specific job, in the Name column, click the job name
link.
To view the log file for a specific job, locate the job you want to view, and then in the
Actions column, click the job log link.
3.
Clicking the job name link opens the Job Summary dashboard for the selected job. The
Job Summary dashboard displays the Job Name, Description, Status, when the job was
run, and the Job History.
To view an error log:
1. To view the Error Log, in the Job History table, locate the log you want to view and then
click the Error Log link.
2. To export the job information, in the upper right corner, click the Export CSV.
3. In the File Download dialog box, do one of the following:
Click Open to view the file, in the Download Complete dialog box, click Open to open
the file in your default spreadsheet application.
Click Save to save the file, in the Save As dialog box, navigate to where you want to
save the file, and then in the File Name field, type the file name and click Save.
4. When finished, click the Close button to close the Log dialog box, and return to the
Manage Jobs page.
© 2015 LexisNexis. All rights reserved.
Administrating Concordance Evolution
67
Reprocessing jobs
Import and Production Jobs containing documents that did not complete the Near Native
conversion successfully, can be reprocessed without having to re-import or reproduce the files.
Reprocessing can be executed at the system level or the dataset level. If reprocessing at the
system level, the Manage Jobs dashboard displays all the jobs for all the organizations. If
reprocessing at the dataset level, only the jobs for the selected dataset are shown in the
Recent Jobs section of the Dataset Managment dashboard. When a job contains files that did
not complete the Near Native conversion, the reprocess files link is enabled in the Actions
column.
If a job has files that need reprocessing, when the link is clicked, the Manage Conversions
dashboard is opened. The Manage Conversions dashboard displays a table of all image and
native documents and their status. You can filter the table to display only the documents that
need to be reprocessed. You can export a list of documents for a job to a CSV file, save it to
your local machine, and then use the CSV file to reprocess the documents at a later time. Or if
you have a list of document control numbers (.txt), you can use this list to reprocess only those
documents in the file.
The Manage Conversions dashboard toolbar also provides the ability to tag the documents that
are reprocessed making it easier to find them later.
The Manage Conversions dashboard table displays the following information:
Column
Description
DCN
Document Control Number
Cross Ref ID
(FieldName)
Field data used for cross-referencing files to corresponding Native document.
All Production, DCB import, eDoc and LAW PreDiscovery import display as N/A
as the Cross Ref ID is not populated from the import jobs.
Status
Current processing status for the job: Completed or Failed
CategoryReason
Error reason for Failed jobs
Last Modified
Date record modified for reprocessing
File Size (KB)
Document file size
MIME Type
Document type for documents imported from Native file sets
Document set
Dataset name for Import jobs or redactable set for Production jobs
File Path
Location for imported file
To reprocess files at the system level:
1. Do one of the following:
Point to the Admin tab, and then click Jobs.
Click the Admin tab to open the Admin dashboard, click the Config button, and then
click Jobs.
All the documents that were processed for the job are displayed in the Manage
Conversions table.
© 2015 LexisNexis. All rights reserved.
68
Concordance Evolution
2. To refine the list of documents, select any of the following from the filtering options:
Filter By
Last
Modified
Option
Last Hour
Today
Yesterday
Last Week
Last Month
Reason
Dependent upon the
Category - Reason section
Size
Empty (0 KB)
Tiny (0 KB - 10 KB)
Small (10 KB - 100 KB)
Medium (100 KB - 1 MB)
Large (1 MB - 16 MB)
Huge (16 MB - 128 MB)
Gigantic ( > 128 MB)
The documents that meet the specified criteria are displayed in the Manage Conversions
table.
To reset the filter to their default state, click the Clear link to the right of the filter lists.
By default only 5 documents are shown per page. To change the number of documents
displayed, select the maximum number to display from the Items per page list.
3. To select the documents to reprocess, do any of the following:
To select all the documents on the page, select the check box in the far left corner of
the table.
To select individual documents, select the check box for each document to reprocess.
4. To track the documents selected for reprocessing using a tag, on the Manage
Conversions dashboard toolbar, click the Tag Selected button, select a tag from the list,
and then click the Tag button.
5. When finished, on the Manage Conversions dashboard toolbar, click the Reprocess
Selected button.
6. In the Reprocess Selected dialog box, review the Original Details section to ensure the
job information is accurate.
7. In the Reprocessing Options section, set the Near Native Conversion Priority
processing:
Low
Medium
High
© 2015 LexisNexis. All rights reserved.
Administrating Concordance Evolution
69
All production jobs that are assigned a priority are processed in order of first-in, firstprocessed. High priority jobs take precedence over Low and Medium priority.
9. In the Scheduling section of the Summary tab, select one of the following:
To run the import job immediately, select the Run immediately option.
To schedule the import to run at a later time, select the Run at a specified time
option, and then type the date and time or click the Calendar button to select the
date, and time you want to run the import.
10. When ready, click OK.
To reprocess files at the dataset level:
1. Click the Admin tab to open the Admin dashboard.
2. In the System pane on the left, click the dataset that contains the files you want to
reprocess.
3. In the Recent Jobs section, locate the job that contains the files for reprocessing.
4. In the Actions column, click the reprocess files link.
5. To refine the list of documents, select any of the following from the filtering options:
Filter By
Last
Modified
Option
Last Hour
Today
Yesterday
Last Week
Last Month
Reason
Dependent upon the
Category - Reason section
Size
Empty (0 KB)
Tiny (0 KB - 10 KB)
Small (10 KB - 100 KB)
Medium (100 KB - 1 MB)
Large (1 MB - 16 MB)
Huge (16 MB - 128 MB)
Gigantic ( > 128 MB)
The documents that meet the specified criteria are displayed in the Manage Conversions
table.
To reset the filter to their default state, click the Clear link to the right of the filter lists.
By default only 5 documents are shown per page. To change the number of documents
displayed, select the maximum number to display from the Items per page list.
© 2015 LexisNexis. All rights reserved.
70
Concordance Evolution
6. To select the documents to reprocess, do any of the following:
To select all the documents on the page, select the check box in the far left corner of
the table.
To select individual documents, select the check box for each document to reprocess.
7. To track the documents selected for reprocessing using a tag, on the Manage
Conversions dashboard toolbar, click the Tag Selected button, select a tag from the list,
and then click the Tag button.
8. When finished, on the Manage Conversions dashboard toolbar, click the Reprocess
Selected button.
9. In the Reprocess Selected dialog box, review the Original Details section to ensure the
job information is accurate.
10. In the Reprocessing Options section, set the Near Native Conversion Priority
processing:
Low
Medium
High
All production jobs that are assigned a priority are processed in order of first-in, firstprocessed. High priority jobs take precedence over Low and Medium priority.
11. In the Scheduling section of the Summary tab, select one of the following:
To run the import job immediately, select the Run immediately option.
To schedule the import to run at a later time, select the Run at a specified time
option, and then type the date and time or click the Calendar button to select the
date, and time you want to run the import.
12. When ready, click OK.
To reprocess a document using an import list:
1. Do one of the following:
Point to the Admin tab, and then click Jobs.
Click the Admin tab to open the Admin dashboard, click the Config button, and then
click Jobs.
2. On the Manage Jobs dashboard, in the Actions column, click the reprocess files link for
the job to reprocess.
All the documents that were processed for the job are displayed in the Manage
Conversions table.
3. To refine the list of documents, select any of the following from the filtering options:
Filter By
Last
Modified
Option
Last Hour
Today
© 2015 LexisNexis. All rights reserved.
Administrating Concordance Evolution
71
Yesterday
Last Week
Last Month
Reason
Dependent upon the
Category - Reason section
Size
Empty (0 KB)
Tiny (0 KB - 10 KB)
Small (10 KB - 100 KB)
Medium (100 KB - 1 MB)
Large (1 MB - 16 MB)
Huge (16 MB - 128 MB)
Gigantic ( > 128 MB)
The documents that meet the specified criteria are displayed in the Manage Conversions
table.
To reset the filter to their default state, click the Clear link to the right of the filter lists.
By default only 5 documents are shown per page. To change the number of documents
displayed, select the maximum number to display from the Items per page list.
4. Review the list of documents.
5. When finished, on the Manage Conversions dashboard toolbar, click the Reprocess File
button.
6. In the Reprocess File dialog box, review the Original Details section to ensure the job
information is accurate.
7. In the Reprocessing Options section, click the Browse button, locate the Exported
Details (.csv) or Cross-Reference ID List (.txt) file, and then click OK.
The header row of the Exported Details (.csv) file must contain all the required columns
and the subsequent rows must have the required number of comma separators.
The Cross-Reference ID list (.txt) file must be a plain text file and cannot contain comma
separators.
8. To set the Near Native Conversion Priority processing, select one of the following
options:
Low
Medium
High
All production jobs that are assigned a priority are processed in order of first-in, firstprocessed. High priority jobs take precedence over Low and Medium priority.
9. In the Scheduling section of the Summary tab, select one of the following:
© 2015 LexisNexis. All rights reserved.
72
Concordance Evolution
To run the import job immediately, select the Run immediately option.
To schedule the import to run at a later time, select the Run at a specified time
option, and then type the date and time or click the Calendar button to select the
date, and time you want to run the import.
10. When ready, click OK.
To export a list of documents:
1. Do one of the following:
Point to the Admin tab, and then click Jobs.
Click the Admin tab to open the Admin dashboard, click the Config button, and then
click Jobs.
2. On the Manage Jobs dashboard, in the Actions column, click the reprocess files link for
the job to reprocess.
All the documents that were processed for the job are displayed in the Manage
Conversions table.
3. To refine the list of documents, select any of the following from the filtering options:
Filter By
Last
Modified
Option
Last Hour
Today
Yesterday
Last Week
Last Month
Reason
Dependent upon the
Category - Reason section
Size
Empty (0 KB)
Tiny (0 KB - 10 KB)
Small (10 KB - 100 KB)
Medium (100 KB - 1 MB)
Large (1 MB - 16 MB)
Huge (16 MB - 128 MB)
Gigantic ( > 128 MB)
The documents that meet the specified criteria are displayed in the Manage Conversions
table.
To reset the filter to their default state, click the Clear link to the right of the filter lists.
By default only 5 documents are shown per page. To change the number of documents
displayed, select the maximum number to display from the Items per page list.
4. To select the documents to export, do any of the following:
To select all the documents on the page, select the check box in the far left corner of
© 2015 LexisNexis. All rights reserved.
Administrating Concordance Evolution
73
the table.
To select individual documents, select the check box for each document you want to
export.
5. When finished, on the Manage Conversions dashboard toolbar, click the Export Selected
button.
6. When prompted, do one of the following:
Open and view the Concordance Evolution ConversionLog.csv file.
Save the Concordance Evolution ConversionLog.csv file to a specified location on the
local computer.
7. When ready, click OK.
Shares
About shares
A share is a file repository for storing Concordance Evolution data files. Before a dataset can be
created in Concordance Evolution, shares need to be added on the Shares dashboard at the
organization level. When users are creating datasets, one or more shares are selected in the
Share path on the Create Dataset dashboard. Multiple shares can be added to Concordance
Evolution for a dataset to help improve performance and organization.
Exam ple shares to set up:
Exports to store exported files
Extracted Files to store extracted archived files
Import Sources to store files for import
Privilege Logs to store log files
Production Sets to store production files
Related Topics
Creating shares
Modifying shares
Creating datasets
About productions
© 2015 LexisNexis. All rights reserved.
74
Concordance Evolution
Creating shares
Shares are added to Concordance Evolution at the organization level on the Shares dashboard.
Once a share is added, it will be available for selection when creating a dataset in the in the
Share path on the Create Dataset dashboard. Multiple shares can be used for a dataset to
help improve production performance for a dataset. When a production set is created, the files
are saved to the selected share(s).
Exam ple shares to create:
Exports to store exported files
Extracted Files to store extracted archived files
Import Sources to store files for import
Privilege Logs to store log files
Production Sets to store production files
To add a share:
1. Click the Admin tab to open the Admin dashboard.
2. In the System tree, click the organization you want to add a share.
3. On the organization's toolbar, click Shares.
4. On the Shares toolbar, click the Add Shares button.
5. On the Add Share dashboard, in the Friendly Name field, type the share name.
6. In the Root Path field, enter the directory where you want to save dataset production
files generated during productions.
7. Click the Test Path button to validate the directory entered in the Root Path field.
Valid path is displayed next to the Test Path button for valid directories. Invalid path is
displayed for invalid directories.
8. To update the available and used disk space values for the directory entered in the Root
Path field, click the Refresh button.
9. When finished, click Save.
Clicking Save closes the Add Share dashboard and adds the share to the Shares list on
the Shares dashboard. The share is now available for selection in the Share path on the
Create Dataset dashboard.
Related Topics
© 2015 LexisNexis. All rights reserved.
Administrating Concordance Evolution
75
About shares
Modifying shares
Creating datasets
About productions
Modifying shares
Shares can be edited and deleted from the Edit Share dashboard. Shares can only be deleted if
there are no files in the share directory.
To modify a share:
1. Click the Admin tab to open the Admin dashboard.
2. In the System tree, click the organization you want to change a share.
3. On the organization's toolbar, click Shares.
4. Locate the share you want to modify in the list of shares and then click the edit link.
5. Make the applicable edits.
6. To update the available and used disk space values for the directory entered in the Root
Path field, click the Refresh button.
7. Click Save.
To delete a share:
A share can only be deleted if there are no files in the manage share.
1. Click the Admin tab to open the Admin dashboard.
2. In the System tree, click the organization you want to delete the share from.
3. On the organization's toolbar, click Shares.
4. Locate the share you want to delete in the list of shares and then do one of the
following:
Click the delete link.
© 2015 LexisNexis. All rights reserved.
76
Concordance Evolution
Click the edit link, and then on the Edit Share toolbar, click the Delete button.
5. When prompted, click OK to confirm the deletion.
Clicking OK deletes the manage share from the Shares list. The share is also deleted
from the shares list in the Share path for production field on the Create Dataset
dashboard.
Related Topics
About manage shares
Creating manage shares
Creating datasets
About productions
Notifications and Alerts
About notifications and alerts
Notifications are messages sent by the system or administrator to Concordance Evolution
users. They can be used to request users to log out of Concordance Evolution, to notify users
when a job, such as an import or export job, is completed, or to share other information with
users. There is also a notification called a search alert that can be set up to alert users when
the search results for a saved search query change. Both administrators and users can create
search alerts.
The administrator can send notifications to all users currently logged on to Concordance
Evolution, individual users, or all users in a user group. Search alerts are system generated
notifications that are sent to the users selected when the search alert was created.
For more information about search alerts, see Creating search alerts.
Receiving Notifications
The Notification Type preference under Notification on the Preference Management dashboard
determines whether users receive notifications and search alerts online, by email, or both. If
the Super Admin allows users to set this preference for themselves from the Admin or Review
dashboards.
© 2015 LexisNexis. All rights reserved.
Administrating Concordance Evolution
77
If notifications and search alerts are sent using email, the notifications and search alerts are
sent to the email address entered for the user on the Add User or Edit User dashboard in the
Admin dashboard.
For more information about preferences, see Customizing admin preferences.
Viewing Notifications
Users can view notifications sent to them on the Reviewer dashboard in the My Status box
under My Messages and using the Notifications link in the Quick Tools pane. If the notification
type preference for a user is set to Online or Both, when a notification is first sent, the
message appears when the user accesses Concordance Evolution.
For more information about viewing notifications, see Viewing notifications.
Creating notifications
Notifications can be created and sent from the Notifications and Alerts dashboard and the Send
Notification dashboard in the Admin dashboard. Notifications can also be created on
dashboards for specific tasks in Concordance Evolution, such as the Create Import Job
dashboard, Create a Production Job (Settings) dashboard, and Create Deduplication Job
dashboard.
The Notification Type preference under Notification on the Preference Management dashboard
determines whether users receive notifications online, by email, or both online and by email. If
the administrator allows users to set this preference for themselves, users can set this
preference on the My Preference dashboard in the Admin, Review, or Reports dashboard.
Administrators and users can also create search alert notifications. In the Admin dashboard,
Search alert notifications are created on the Create Alert dashboard. For more information, see
Creating search alerts.
For more information about viewing notifications in Concordance Evolution, see Viewing
notifications.
To create a notification on the Notifications and Alerts dashboard:
1. Do one of the following:
Point to the Admin tab, and then click Notifications.
Click the Admin tab to open the Admin dashboard, click the Messages button, and
then click Notifications.
2. Click the Send New Notification button, and then do one of the following:
To send the notification to specific users and/or user groups, click the Send to specific
users/groups option, click the Assign button, select the check box for the user groups
and/or individual users to which you want to send the notification, and then click
Save.
© 2015 LexisNexis. All rights reserved.
78
Concordance Evolution
To send the notification to all users currently logged on to Concordance Evolution, click
the Send to logged in users option.
3. In the Notification field, type the notification text.
4. When finished, click the Send button.
When you create and send a notification from the Notifications and Alerts dashboard, the
notification is sent after you click the Send button.
To resend a notification:
After a notification is created and sent, you can resend the notification if you need to from
the Notification Details dashboard.
For example, if a notification indicating users should be logged out of Concordance Evolution
over the weekend for server maintenance was sent out on Monday, and you want to send
the notification out again later in the week, you can resend the same notification.
1. Do one of the following:
Point to the Admin tab, and then click Notifications.
Click the Admin tab to open the Admin dashboard, click the Messages button, and
then click Notifications.
The five more recently sent notifications are displayed on the Notifications and Alerts
dashboard.
2. Click the View All Notifications link to open the View All Notifications dashboard.
3. In the Notifications column, click the notification name link.
Clicking the notification name link opens the notification on the Notification Details
dashboard.
4. Click the Resend button.
5. To modify the notification recipients, in the Send Notification section, do one of the
following:
To send the notification to specific users and/or user groups, click the Send to specific
users/groups option, click the Assign button, select the check box for the user groups
and/or individual users to which you want to send the notification, and then click Save.
To send the notification to all users currently logged on to Concordance Evolution, click
the Send to logged in users option.
6. To modify the notification text, in the Notification field, edit the notification text.
7. When finished, click the Send button to send the notification and return to the
Notifications and Alerts dashboard.
© 2015 LexisNexis. All rights reserved.
Administrating Concordance Evolution
79
Viewing notifications
In the Admin dashboard you can view all notifications sent to all users on the View All
Notifications dashboard. On the View All Notifications dashboard, you can organize the
notifications by notification name, recipient, or date and time sent.
You can view all notifications sent to you on the Notifications dashboard on the Notification
Management dashboard.
To view all notifications:
1. Do one of the following:
Point to the Admin tab, and then click Notifications.
Click the Admin tab to open the Admin dashboard, click the Messages button, and
then click Notifications.
The five most recently sent notifications are displayed on the Notifications and Alerts
dashboard.
2. Click the View All Notifications link to open the View All Notifications dashboard.
By default, the notifications are listed in order of date and time sent, from newest to
oldest.
3. To view the details of a notification, click the notification name link in the Notifications
column.
Clicking the notification name link opens the notification on the Notification Details
dashboard.
The History section displays all the search alert run dates and times. If you only want to
view the search alert runs where a change occurred in the query search results, select
the Only show when change has occurred check box. By default, the Only show when
change has occurred check box is not selected.
4. After reviewing the notification details, click Back to return to the View All Notifications
dashboard.
To view notifications sent to you:
Do any of the following:
From the Review dashboard, in the Quick Tools pane, under Messages, click the
Notifications link.
On the Admin dashboard, click the Messages button, and then click Notifications.
In the upper right corner of Concordance Evolution, click the arrow next to your user
name, and then click Notification.
All notifications sent to you, including search alert notifications, are listed on the
© 2015 LexisNexis. All rights reserved.
80
Concordance Evolution
Notifications tab. By default, the notifications are listed in order of date and time sent,
from newest to oldest.
Deleting notifications
In the Admin dashboard you can delete notifications sent to all users on the View All
Notifications dashboard.
You can also delete notifications sent to you from the Notifications tab on the Notification
Management dashboard.
To delete notifications on the View All Notifications dashboard:
1. Do one of the following:
Point to the Admin tab, and then click Notifications.
Click the Admin tab to open the Admin dashboard, click the Messages button, and
then click Notifications.
2. Click the View All Notifications link to open the View All Notifications dashboard.
3. Do any of the following:
To select individual notifications, select the check boxes next to those you want to
delete.
To select all notifications, click the Select All link.
To select all notifications on the current page, click the Select Page link.
4. Click the Delete button.
5. When prompted, click Yes to confirm the deletion.
Creating search alerts
Search alerts are set up to alert users when the search results for a saved search query
change. Both administrators and users can create search alerts for generating search alert
notifications.
Administrators can create search alerts for themselves and other users on the Create Alert
dashboard in the Admin dashboard. Users can create their own search alerts on the Create
Alert dashboard in the Review dashboard.
For more information about creating search alerts in the Review dashboard, see Creating
© 2015 LexisNexis. All rights reserved.
Administrating Concordance Evolution
81
search alerts.
To create a search alert in the Admin module:
1. Do one of the following:
Point to the Admin tab, and then click Alerts.
Click the Admin tab to open the Admin dashboard, click the Messages button, and
then click Alerts.
Clicking Alerts opens the View Alerts dashboard.
2. Click the New button to open the Create Alert dashboard.
3. In the Name field, type the search alert name.
4. Click the folder button, next to the Dataset field, navigate to and click the dataset
associated with the search query.
When you click the dataset, the dataset name is automatically added to the Dataset
field.
5. Click the Assign button, below the Owner field, click the owner of the search alert, and
then click Save.
If you are creating the search alert for another user, click the user you are creating the
search alert for. If you are creating the search alert for yourself, click your user name.
The users in the Users list are organized by Local Directory and Active Directory. By
default, the Local Directory users are displayed in the Users list. To view the Active
Directory users, click the Active Directory option at the top of the Users list.
6. To send the search alert notification to specific users and/or user groups, click the Send
to specific users/groups option,
7. Click the Assign button, below the Alert Recipients(s) field, select the check boxes next
to the users you want to receive the search alert, and then click Save.
The users in the Users list are organized by Local Directory and Active Directory. By
default, the Local Directory users are displayed in the Users list. To view the Active
Directory users, click the Active Directory option at the top of the Users list.
8. In the Search field, type the search query to use to generate the search alert.
To add a search query to the Search field you can either type the search query in the
field, add the query from your saved searches, or combine the search query you
manually enter in the Search field with a saved search query. If you want to combine
search queries, first type the search query in the Search field, and then add the query
from your saved searches.
To add a query from your saved searches:
1. On the Create Alert dashboard, click the My Saved Searches link under the
Search field.
Clicking the My Saved Searches link opens the My Saved Searches dialog box. If
© 2015 LexisNexis. All rights reserved.
82
Concordance Evolution
you manually entered a search query in the Search field, the query is displayed in
the Existing Search field.
2. Select the check box for the search query you want to use for the search alert.
You can add multiple saved search queries to the search alert.
3. If you are combining search queries, click the Combine with Existing Search
button.
When you click the Combine with Existing Search button, the combined search
query is displayed in the Existing Search field. If you need to undo the
combination, click the Reset button. Clicking the Reset button resets the Existing
Search field back to the original search query.
4. Click Save to add the search query to the Search field on the Create Alert
dashboard.
9. To test the search query, click the Test Query button.
Clicking the Test Query button runs the search query against the selected dataset and
indicates the number of documents containing the search query.
© 2015 LexisNexis. All rights reserved.
Administrating Concordance Evolution
83
10. Schedule the search alert notification.
To schedule a search alert:
1. On the Create Alert dashboard, click one of the following options to indicate when
you want the search alert to run:
Daily
Hourly
If you click the Hourly option, in the Hourly list click the hourly interval. For
example, if you want the search alert to run every 2 hours, click 2Hours.
Weekly
If you click the Weekly option, in the Weekly list, click the day of the week you
want the search alert to run.
Monthly
If you click the Monthly option, in the Monthly lists, click the month and day of the
month you want the search alert to run.
When you select any of these options, the Start Date field is automatically
populated with the current date and time.
2. To change the start date and/or time, click the Calendar button to change the
start date, and then click the Clock button to change the start time.
3. Click one of the following options to indicate how many times you want to run the
search alert:
No end date
The search alert will run on an ongoing basis
End After [#] Occurrence
The search alert will only run the number of times you enter in this field
End By [date and time]
The search alert will only run until the date and time you specified. Click the
Calendar button to add the end date, and then click the Clock button to add the
end time.
When you schedule a search alert, Concordance Evolution will run the search query
associated with the search alert at the scheduled date and/or time. If there is a change
in the number of documents returned for the search query, Concordance Evolution will
automatically generate and send a search alert notification to the users selected in the
Alert Recipient(s) field. The search alert notification will indicate the number of documents
found for the search query.
11. Click the Create button.
When you click the Create button, the search alert is added to the search alerts list on
© 2015 LexisNexis. All rights reserved.
84
Concordance Evolution
the View Alerts dashboard in the Admin dashboard, and in the Review dashboard, the
search alert is displayed for the owner of the search alert on the Search Alerts tab on
the Search Alert dashboard.
Viewing search alerts
In the Admin dashboard you can view all existing search alerts on the View Alerts dashboard.
On the View Alerts dashboard, you can organize the search alerts by search alert name,
dataset, elapsed time, or next run date.
In the Review dashboard, you can view your own search alerts on the Search Alerts tab on the
Search Alert dashboard.
If you are designated as a search alert's owner, the search alert is displayed for you in the
Review dashboard. If you created a search alert for a user and are not designated as the
search alert's owner, the search alert will not be displayed for you in the Review
dashboard.
Viewing a search alert is different from viewing a search alert notification. A search alert
notification is generated from a search alert and is viewed like all other notifications in
Concordance Evolution. For more information about viewing search alert notifications, see
Viewing notifications.
To view search alerts:
1. Do one of the following:
Point to the Admin tab, and then click Alerts.
Click the Admin tab to open the Admin dashboard, click the Messages button, and
then click Alerts.
Clicking Alerts opens the View Alerts dashboard.
By default, the search alerts are listed from newest to oldest.
2. To view the details of a search alert, click the search alert name link in the Alert Name
column.
Clicking the search alert name link opens the search alert on the Alert Details dashboard.
3. After reviewing the notification details, click Done to return to the View Alerts
dashboard.
© 2015 LexisNexis. All rights reserved.
Administrating Concordance Evolution
85
Editing search alerts
Administrators can edit any search alert on the Edit Alert dashboard in the Admin dashboard,
and search alert owners can edit their own search alerts on the Create Alert dashboard in the
Review dashboard.
For more information about editing search alerts in the Review dashboard, see Editing search
alerts.
To edit a search alert in the Admin module:
1. Do one of the following:
Point to the Admin tab, and then click Alerts.
Click the Admin tab to open the Admin dashboard, click the Messages button, and
then click Alerts.
Clicking Alerts opens the View Alerts dashboard.
2. In the Alert Name column, click the search alert name link you want to edit.
Clicking the search alert name link opens the search alert on the Alert Details dashboard.
3. On the Alert Details toolbar, click the Edit button.
Clicking the Edit button opens the Edit Alert dashboard.
4. Make the applicable edits, and then click the Done button to save your changes and
return to the View Alerts dashboard.
Deleting search alerts
Administrators can delete any search alert on the View Alerts dashboard in the Admin
dashboard, and search alert owners can delete their own search alerts in the Search Alerts on
the Review dashboard.
For more information about deleting search alerts in the Review dashboard, see Deleting
search alerts.
To delete a search alert:
1. Do one of the following:
© 2015 LexisNexis. All rights reserved.
86
Concordance Evolution
Point to the Admin tab, and then click Alerts.
Click the Admin tab to open the Admin dashboard, click the Messages button, and
then click Alerts.
Clicking Alerts opens the View Alerts dashboard.
2. In the Alert Name column, select the check box next to the search alert you want to
delete.
4. Click the Remove button at the bottom of the page.
5. When prompted, click Yes to confirm the deletion.
Clicking Yes permanently deletes the search alert from the system.
Audit Logs
About audit logs
Audit Logs provide an account of events in Concordance Evolution both at the system and
matter level. Events are records of user actions throughout the application, such as user access
and data modification. The System Audit Log helps administrators track the system actions
users performed during a session. The Matter Audit Log records the events of user's actions for
a given matter such as searching, tagging and documents viewed.
Related Topics
Viewing the System Audit Log
Viewing the Matter Audit Log
Exporting Audit Logs
Archiving System events
Viewing the system audit log
The System Audit Log is displayed on the Audit Management dashboard and provides a list of
all events created in the system. The Audit Management dashboard displays the Event Date/
Time, Event Type, Event Name, Performed By, and Description.
The System Audit Log displays information for each of the following event types:
© 2015 LexisNexis. All rights reserved.
Administrating Concordance Evolution
Event type
Description
AD Domain
An Active Directory Domain was added or
modified
Auditing
An audit log was exported
Folder
A folder was created, deleted, or modified
Licensing
A seat license was added, removed, assigned
or unassigned
Login Logout
A user session created, failed, or ended
Matter
A matter was created, deleted or modified
Notifications
A notification was sent
Organization
An organization was created, deleted, or
modified
Security
A security role was created, deleted, or
modified
User
A user was created, deleted, or modified
User Group
A user group was created, deleted, or
modified
87
The events shown on the Audit Management page can be exported to a comma-separated
(.csv) formatted file. For more information, see Exporting Audit Logs.
To view events in the Audit Log:
1. Do one of the following:
Point to the Admin tab, and then click System Audit Log.
Click the Admin tab to open the Admin dashboard, and then on the Admin toolbar click
the System Audit Log button.
The Audit Management dashboard opens. By default, the Audit Management dashboard
displays the 10 most recent events. To change the number of events displayed, in the
lower right corner, from the Items Per Page list, select the number of events to display.
2. To refine the results, do any of the following:
To view events by date, from the Filter By Last Modified list, select the days to
display.
To view events by type, from the Filter By Event Type list, select the check box for
one or more event types to display.
To view events by the user(s) who executed the event, from the Filter Performed By
list, select the check box for one or more users to display.
3. To locate a specific event or events, type a value in the field below a column header and
then press Enter to search for events that match the value specified.
Only one value is allowed in each column header field.
© 2015 LexisNexis. All rights reserved.
88
Concordance Evolution
4. To reset the event list back to the original list, do one of the following:
Delete the field value and press Enter.
Click the Clear link.
Viewing the matter audit log
The Matter Audit Log is displayed on the Audit Management dashboard and provides a list of all
events created in the matter. The Audit Management dashboard displays the Event Date/Time,
Event Type, Event Name, Performed By, and Description.
The Matter Audit Log displays information for each of the following event types:
Event type
Description
Binder
A binder was created, deleted, or modified
CaseMap
A fact, document, link or text was sent to
CaseMap
Dataset
A dataset was created, deleted or modified
Document
A document was viewed (Near Native or
Document Data views), added, deleted,
modified, downloaded, emailed, exported,
produced tagged, untagged, or printed
Markup
A markup was created, deleted, or modified
Review Set
A review set was created, deleted, or modified
Search
A search was executed and saved search
results were created, deleted, or modified
Search Administration
A search was executed using the quick search
bar on the Admin dashboard
Tagging
A tag was created, deleted, modified, queried,
or the tag was applied or removed
The events shown on the Audit Management page can be exported to a comma-separated
(.csv) formatted file. For more information, see Exporting Audit Logs.
To view events in the Matter Audit Log:
1. In the System pane, locate and open the matter you want to view audit events.
2. On the Matter's dashboard toolbar, click the Audit Log button.
The Audit Management dashboard opens.
© 2015 LexisNexis. All rights reserved.
Administrating Concordance Evolution
89
The Audit Management dashboard opens. By default, the Audit Management dashboard
displays the 25 most recent events. To change the number of events shown in the
table, in the lower right corner, from the Items Per Page list, select the number of events
to display.
3. To refine the results, do any of the following:
To view events by date, from the Filter By Last Modified list, select the days to
display.
To view events by type, from the Filter By Event Type list, select the check box for
one or more event types to display.
To view events by the user(s) who executed the event, from the Filter Performed By
list, select the check box for one or more users to display.
4. To locate a specific event or events, type a value in the field below a column header and
then press Enter to search for events that match the value specified.
Only one value is allowed in each column header field.
5. To reset the event list back to the original list, do one of the following:
Delete the field value and press Enter.
Click the Clear link.
Exporting an audit log
The Audit Log can be exported to a comma-separated (.csv) formatted file. You can export the
entire table of events or you can select specific events.
To export audit log events:
1. To export the event of an audit log, do one of the following:
To export the System Audit Log events, on the Admin dashboard, and then on the
Admin toolbar click the System Audit Log button.
To export the Matter Audit Log events, from the System pane, locate and open the
matter to export events, and then on the matter's dashboard toolbar click the Audit
Log button.
2. Do any of the following to refine the results:
To view events by date, from the Filter By Last Modified list, select the number of
days to display.
To view events by type, from the Filter By Event Type list, select the check box for
one or more event types to display.
To view events by the user(s) who executed the event, from the Filter Performed By
list, select the check box for one or more users to display.
3. From the results, do one of the following:
To select all the events to export, select the check box in the upper left corner of the
Events table or in the bottom left corner, click the Select All link.
To one or more events to export, select the check box for each event.
© 2015 LexisNexis. All rights reserved.
90
Concordance Evolution
4. On the Audit Management toolbar, click the Export Audit Log Events.
5. In the File Download dialog box, do one of the following:
Click Open to view the file, in the Download Complete dialog box, click Open to open
the file in your default spreadsheet application.
Click Save to save the file, in the Save As dialog box, navigate to where you want to
save the file, and then in the File Name field, type the file name and click Save.
6. In the Download Complete dialog box, click Open to view the file or click Close to close
the dialog box.
Archiving system events
To prevent the server where the audit events are stored from getting bogged down with an
endless amount of audit events, Concordance Evolution automatically archives the audit events
and then deletes the events from the server. When Concordance Evolution servers are set up,
the archive folder location and the maximum number of days to store system events on the
server are specified. When the number of days is reached, Concordance Evolution exports the
events as a comma-separated (.csv) formatted file and stores the file in the specified location.
The exported .csv file is dated and saved using the following naming format:
<Archive Date-Archive Time>_System_Audit_Log.csv
For example, 20140325-09.33.38_EVMaster_SystemAuditLog.csv
All archive audit file names are time stamped using Greenwich Mean Time (GMT).
The default location on the SQL Server for the archive folder is: C:\ConcordanceEV
\EV_AgentJobLogs\SystemAuditLogArchive and the default number of days is 90. These
settings can be edited to meet your organization's needs.
To edit the system audit archive settings:
1. From the Admin tab, click Servers.
2. Locate the SQL Server and click the server name link.
3. In the Services column, click the System Configuration Service link.
4. On the System Configuration Service tab, do any of the following:
To change the number of days the audit events are stored on the server, in the
System audit log archival days field, type the number of days.
To change the location of the archive folder, in the System audit log archival location
field, type the path for the archive folder.
5. When finished, on the Configure Services dashboard toolbar, click Save.
© 2015 LexisNexis. All rights reserved.
Administrating Concordance Evolution
91
Organizations
About organizations
In Concordance Evolution you can create organizations to help you manage your clients, cases,
and case documents. Organizations form a hierarchy with a single top-level organization that
contains a collection of folders, sub-folders matters and datasets below it.
A single organization can be used to represent a client, such as Morrison Foerster. Folders can
be used to represent the type of law practice, such as Family Law or Corporate Litigation.
Matters can be used to represent the client case, such as Joe v Jane, and datasets created
under matters can be used to organize the documents for the client case, such as
Production_1.
At the organization level, you can add folders and matters, apply advanced permissions and
user groups, manage the organization's shares, and view an audit log of events for the
matters assigned to the organization.
To set Admin preferences for the organization, including password settings, number of items to
display in lists, default view for search results, tag format settings, and so on, see About
preferences and Customizing admin preferences.
To assign security roles and policies to user groups at the organization level, see Assigning
roles to user groups and Customizing user group security policies.
Creating organizations
Organizations can be added from the System pane or the Admin dashboard toolbar.
To create an organization:
1. Click the Admin tab to open the Admin dashboard.
2. Do one of the following:
In the System pane on the left, right-click the System link, and then click Add
Organization.
On the Admin dashboard toolbar, click the Add Organization button.
3. In the Folder Name field, type the folder name.
The organization name must be unique from other organizations. Organization names
can include alphanumeric characters, and the following special characters: !@##$%
^&*()_-+
© 2015 LexisNexis. All rights reserved.
92
Concordance Evolution
4. In the Folder Description field, type the folder description.
5. Click the Save button to add the organization and open the Organization's dashboard.
Managing organizations
From an organization's dashboard, you can directly edit or delete any folders, matters and
datasets associated with the organization. You can make changes to advanced permissions
and user groups for folders, manage the organization's shares, and view an audit log of events
for the matters assigned to the organization.
To set Admin preferences for the organization, including password settings, number of items to
display in lists, default view for search results, tag format settings, and so on, see About
preferences and Customizing admin preferences.
To assign security roles and policies to user groups at the organization level, see Assigning
roles to user groups and Customizing user group security policies.
Before deleting an organization, all user groups associated with the organization must be
deleted first.
Editing organizations
You can edit an organizations name, description, and permissions from the organization's
dashboard.
To edit an organization:
1. Click the Admin tab to open the Admin dashboard.
2. In the System pane on the left, locate and click the organization to edit.
3. To edit a organization's name or description, do one of the following:
On the folder's dashboard toolbar, click the Edit button.
From the Actions column of the organization list, click the edit link.
4. In the Edit Folder dialog box, make any necessary changes to the folder properties.
5. When finished, click Save.
© 2015 LexisNexis. All rights reserved.
Administrating Concordance Evolution
93
To edit the permissions for a folder:
1. Click the Admin tab to open the Admin dashboard.
2. In the System pane on the left, locate and click the organization to edit.
3. On the folder's dashboard toolbar, click the Manage Permissions button.
The User Groups assigned to the folder are displayed.
4. To add a User Group, on the Folder Permissions toolbar, click the Add Group button,
select the group(s) you want to add and then click Ok.
5. To change the permissions for a user group, click the Permissions link for the group you
want to change.
6. Click the right arrow,
change.
, for the group to expand the role for the policies you want to
7. To change a policy, click the Allow or Deny link.
6. When finished, click Save.
Deleting organizations
You can delete organizations from the System pane and the organization's dashboard.
If you are deleting a organization that contains other folders, matters, and/or datasets,
you must archive or delete the folders, matters, and/or datasets under the organization
before you can delete.
To delete an organization from the System pane:
1. Click the Admin tab to open the Admin dashboard.
2. In the System pane on the left, locate and right-click the organization to delete, and
then click Delete Folder.
If you are deleting a folder containing other folders, matters, and/or datasets, you must
archive or delete the folders, matters, and/or datasets under the folder before you can
delete the folder.
3. When prompted, on the dashboard toolbar, click the Delete button to confirm the
deletion.
© 2015 LexisNexis. All rights reserved.
94
Concordance Evolution
To delete a organization from the organization's dashboard:
1. Click the Admin tab to open the Admin dashboard.
2. In the System pane on the left, locate and click the organization to delete.
3. In the Actions column of the organization list, click the delete link.
If you are deleting a folder containing other folders, matters, and/or datasets, you must
archive or delete the folders, matters, and/or datasets under the folder before you can
delete the folder.
4. When prompted, click Ok to confirm the deletion.
Folders
About folders
In Concordance Evolution you can create organizations, folders, matters, and datasets to help
you manage your clients, cases, and case documents. While you can create folders directly
under the organization to represent clients, you can create additional folders under other
folders and matters to help you further organize your clients and client cases.
At the folder level, you can assign admin preferences. Admin preferences include password
settings, number of items to display in lists, default view for search results, tag format settings,
and so on. You can also assign security roles and policies to user groups at the folder level.
For more information about preferences, see About preferences and Customizing admin
preferences.
For more information about assigning security roles and policies, see Assigning roles to user
groups and Customizing user group security policies.
Creating folders
In the Admin dashboard, folders can be created from the System pane, the Organization
dashboard, Folder dashboard, and Matter dashboard.
To create a folder from the System pane:
1. Click the Admin tab to open the Admin dashboard.
2. In the System pane on the left, locate and right-click the organization, folder or matter
link, and then click Create Folder.
© 2015 LexisNexis. All rights reserved.
Administrating Concordance Evolution
95
3. In the Create Folder dialog box, in the Folder Name field, type the folder name.
The folder name must be unique from other folders at the same level. Folder names can
include alphanumeric characters, and the following special characters: !@##$%^&*()_-+
4. (Optional) In the Folder Description field, type the folder description.
The Parent list defaults to the system, folder, or matter you selected.
5. To change the folder parent, click the folder button
, next to the Parent list, click the
organization, folder, or matter under which you want to create the folder, and then click
OK.
6. When finished, click the Save button to add the folder and open the folder's dashboard.
To create a folder from an organization dashboard:
1. Click the Admin tab to open the Admin dashboard.
2. In the System pane on the left, locate and click the organization you want to add a
folder.
3. On the organization's dashboard toolbar, click the Add button, and then click Add Folder.
4. In the Create Folder dialog box, in the Folder Name field, type the folder name.
The folder name must be unique from other folders at the same level. Folder names can
include alphanumeric characters, and the following special characters: !@##$%^&*()_-+
5. (Optional) In the Folder Description field, type the folder description.
The Parent list defaults to the selected organization.
6. To change the folder parent, click the folder button
, next to the Parent list, click the
organization, folder, or matter under which you want to create the folder, and then click
OK.
7. When finished, click the Save button to add the folder and open the folder's dashboard.
To create a folder from a folder dashboard:
1. Click the Admin tab to open the Admin dashboard.
2. In the System pane on the left, locate and click the folder you want to add a folder.
3. On the folder's dashboard toolbar, click the Add button, and then click Add Folder.
4. In the Create Folder dialog box, in the Folder Name field, type the folder name.
The folder name must be unique from other folders at the same level. Folder names can
include alphanumeric characters, and the following special characters: !@##$%^&*()_-+
5. (Optional) In the Folder Description field, type the folder description.
© 2015 LexisNexis. All rights reserved.
96
Concordance Evolution
The Parent list defaults to the selected organization.
6. To change the folder parent, click the folder button
, next to the Parent list, click the
organization, folder, or matter under which you want to create the folder, and then click
OK.
1. When finished, click the Save button to add the folder and open the folder's dashboard.
To create a folder from a matter dashboard:
1. Click the Admin tab to open the Admin dashboard.
2. In the System pane on the left, locate and click the matter you want to add a folder.
3. On the matter's dashboard toolbar, click the Add button, and then click Add Folder.
4. In the Folder Name field, type the folder name.
The folder name must be unique from other folders at the same level. Folder names can
include alphanumeric characters, and the following special characters: !@##$%^&*()_-+
5. (Optional) In the Folder Description field, type the folder description.
The Parent list defaults to the selected matter.
6. To change the folder parent, click the folder button
, next to the Parent list, click the
organization, folder, or matter under which you want to create the folder, and then click
OK.
7. When finished, click the Save button to add the folder and open the folder's dashboard.
Editing folders
You can edit a folder's name, description, and permissions from the folder's dashboard.
To edit a folder:
1. Click the Admin tab to open the Admin dashboard.
2. In the System pane on the left, locate and click the folder to edit.
3. To edit a folder's name or description, do one of the following:
On the folder's dashboard toolbar, click the Edit button.
From the Actions column of the folder list, click the edit link.
© 2015 LexisNexis. All rights reserved.
Administrating Concordance Evolution
97
4. In the Edit Folder dialog box, make any necessary changes to the folder properties.
5. When finished, click Save.
To edit the permissions for a folder:
1. Click the Admin tab to open the Admin dashboard.
2. In the System pane on the left, locate and click the folder to edit.
3. On the folder's dashboard toolbar, click the Permissions button.
The User Groups assigned to the folder are displayed.
4. To add a User Group, on the Folder Permissions toolbar, click the Add Group button,
select the group(s) you want to add and then click Ok.
5. To change the permissions for a user group, click the Permissions link for the group you
want to change.
6. Expand the role for the policies you want to change.
7. To change a policy, click the Allow or Deny link.
8. When finished, click Save.
Deleting folders
You can delete folders from the System pane and the Edit Folder dashboard.
If you are deleting a folder that contains other folders, matters, and/or datasets, you
must archive or delete the folders, matters, and/or datasets under the organization
before you can delete.
To delete a folder from the System pane:
1. Click the Admin tab to open the Admin dashboard.
2. In the System pane on the left, locate and right-click the folder you want to delete, and
then click Delete Folder.
If you are deleting a folder containing other folders, matters, and/or datasets, you must
archive or delete the folders, matters, and/or datasets under the folder before you can
delete the folder.
© 2015 LexisNexis. All rights reserved.
98
Concordance Evolution
Clicking the Delete button opens the Warning: Are you sure you want to delete this folder?
message.
3. Click the Delete button.
To delete a folder from the folder's dashboard:
1. Click the Admin tab to open the Admin dashboard.
2. In the System pane on the left, locate and click the folder you want to delete.
3. In the Actions column of the folder list, click the delete link.
4. When prompted, click OK to confirm the deletion.
M atters
About matters
Matters created under client folders can be used to represent your client cases, and datasets
created under matters can be used to organize the documents for your client cases. The matter
dashboard displays the matter name, associated datasets and binders assigned to the matter,
and a list of authorized user groups and users.
Assigning matters to different Velocity search servers can improve the searching speed
performance in the Review dashboard. Velocity search servers create a search collection
for every matter created and assigned to the server, so assigning matters to multiple
Velocity search servers can help spread the searching load across the different servers.
Using the matter dashboard tools you can assign admin preferences, including password
settings, number of items to display in lists, default view for search results, tag format settings,
and security roles and policies to user groups. You can also view and access matter-level
reports for tracking reviewer activity and a matter level audit log.
For more information about preferences, see About preferences and Customizing admin
preferences.
For more information about assigning security roles and policies, see Assigning roles to user
groups and Customizing user group security policies.
For more information about matter-level reports and audit log, see Viewing matter reports and
About audit logs.
© 2015 LexisNexis. All rights reserved.
Administrating Concordance Evolution
99
Creating matters
In the Admin dashboard, matters can be created from the System pane and the Folder
dashboard. You can only create a matter from a folder above a matter. You cannot create
matters from a folder that is a child of a matter.
To create a matter from the System pane:
1. Click the Admin tab to open the Admin dashboard.
2. In the System pane on the left, locate and right-click an organization or folder, and then
click Create Matter.
The folder cannot be a child of a matter.
3. On the Create Matter dashboard, in the Matter Name field, type the matter name.
The matter name must be unique from other matters at the same level. Matter names
can include alphanumeric characters, and the following special characters: !@##$%
^&*()_-+
4. In the Description field, type the matter description.
The default SQL Server database server for Concordance Evolution databases is
displayed in the Database Server list. The default SQL Server database server is
determined by the Is Default Server check box on the Add SQL Server and Edit SQL
Server dashboards. You can add additional SQL Server database servers to
Concordance Evolution on the Add SQL Server dashboard.
5. To point to a different SQL Server database server, in the Database Server list, click the
database server you want to use for the matter and its dataset(s).
The default search server is displayed in the Search Server list. The default search server
is determined by the Is Default Server check box on the Add Search Server and Edit
Search Server dashboards. You can add additional servers to Concordance Evolution on
the Add Search Server dashboard.
6. To use a different search server for the matter and its dataset(s), in the Search Server
list, click the search server you want to use for the matter and its dataset(s).
Assigning matters to different Velocity search servers can improve the searching speed
performance in the Review dashboard. Velocity search servers create a search collection
for every matter created and assigned to the server, so assigning matters to multiple
Velocity search servers can help spread the searching load across the different servers.
7. Click the Save button to add the matter and open the matter's dashboard.
To create a matter from the Folder dashboard:
1. Click the Admin tab to open the Admin dashboard.
2. In the System pane on the left, locate and click the folder to create the matter.
© 2015 LexisNexis. All rights reserved.
100
Concordance Evolution
Clicking a folder in the System pane, opens the folder's dashboard.
3. From the folder's dashboard toolbar, click the Add button, and then click Add Matter.
4. On the Create Matter dashboard, in the Matter Name field, type the matter name.
The matter name must be unique from other matters at the same level. Matter names
can include alphanumeric characters, and the following special characters: !@##$%
^&*()_-+
5. In the Description field, type the matter description.
The default SQL Server database server for Concordance Evolution databases is
displayed in the Database Server list. The default SQL Server database server is
determined by the Is Default Server check box on the Add SQL Server and Edit SQL
Server dashboards. You can add additional SQL Server database servers to
Concordance Evolution on the Add SQL Server dashboard.
6. To point to a different SQL Server database server, in the Database Server list, click the
database server you want to use for the matter and its dataset(s).
The default search server is displayed in the Search Server list. The default search server
is determined by the Is Default Server check box on the Add Search Server and Edit
Search Server dashboards. You can add additional servers to Concordance Evolution on
the Add Search Server dashboard.
7. To use a different search server for the matter and its dataset(s), in the Search Server
list, click the search server you want to use for the matter and its dataset(s).
8. Click the Create button to add the matter and open the matter's dashboard.
Editing matters
You can edit a matter's name and description on the Edit Matter dashboard.
If you want to change the security policy settings for a matter, see Customizing user group
security policies.
To edit a matter:
1. Click the Admin tab to open the Admin dashboard.
2. In the System pane on the left, locate and click the matter to edit.
3. Do one of the following:
From the matter's dashboard toolbar, click the Config button, and then click Edit
Matter.
From the Actions column, click the edit link.
© 2015 LexisNexis. All rights reserved.
Administrating Concordance Evolution
101
4. On the Edit Matter dashboard, make the applicable changes.
5. When finished, click the Save button to save your changes and return to the matter's
dashboard.
Deleting matters
You can delete matters from the Edit Matter dashboard. If you are deleting a matter containing
folders and/or datasets, you must archive or delete the folders and/or datasets under the
matter before you can delete the matter.
To delete a matter:
1. Click the Admin tab to open the Admin dashboard.
2. In the System pane on the left, locate and click the matter you want to delete.
3. Do one of the following:
From the matter's dashboard toolbar, click the Config button, click Edit Matter, and
then click the Delete button.
From the Actions column, click the delete link.
If you are deleting a matter containing folders and/or datasets, you must archive or
delete the folders and/or datasets under the matter before you can delete the matter.
4. When prompted, click OK to confirm the deletion.
Managing Matters
It is recommended that you plan a maintenance schedule for matters that are necessary for
your organization or client needs.
Typical m atter m aintenance includes:
Backup - creates a backup of the matter and associated datasets, binders, and review sets
Restore - restores the matter from a selected point in time
Reindex - updates the matter's index and dictionary for searching
The backup, restore, and reindex processes require all users to be logged out of the
© 2015 LexisNexis. All rights reserved.
102
Concordance Evolution
matter before executing the process. If users are not logged out, when the Freeze check
box is selected, all users for the selected matter will be kicked out of Concordance
Evolution.
Before performing a backup or restore process is executed, make sure that no other jobs
are running for the matter.
To backup a matter:
1. Click the Admin tab to open the Admin ashboard.
2. In the System pane on the left, locate and click the matter to edit.
3. Do one of the following:
From the matter's dashboard toolbar, click the Config button, and then click Edit
Matter.
From the Actions column, click the edit link.
4. On the Edit Matter dashboard, select the Freeze check box, and then click Save.
5. From the matter's dashboard toolbar, click the Config button, and then click Backup.
6. When prompted, click OK to confirm the backup.
7. When prompted, click OK to confirm no other jobs are running for the matter and to
proceed with the backup of the matter.
8. When the process is finished and you have received the notice that the backup job has
completed successfully, do one of the following:
From the matter's dashboard toolbar, click the Config button, and then click Edit
Matter.
From the Actions column, click the edit link.
9. On the Edit Matter dashboard, clear the Freeze check box, and then click Save.
To restore a matter:
1. Click the Admin tab to open the Admin ashboard.
2. In the System pane on the left, locate and click the matter to edit.
3. Do one of the following:
From the matter's dashboard toolbar, click the Config button, and then click Edit
Matter.
From the Actions column, click the edit link.
4. On the Edit Matter dashboard, select the Freeze check box, and then click Save.
5. From the matter's dashboard toolbar, click the Config button, and then click Backup.
6. When prompted, click OK to confirm the restore of the matter.
7. When prompted, click OK to confirm no other jobs are running for the matter and to
proceed with the restore of the matter.
© 2015 LexisNexis. All rights reserved.
Administrating Concordance Evolution
103
8. When the process is finished and you have received the notice that the restore job has
completed successfully, do one of the following:
From the matter's dashboard toolbar, click the Config button, and then click Edit
Matter.
From the Actions column, click the edit link.
9. On the Edit Matter dashboard, clear the Freeze check box, and then click Save.
To reindex a matter:
1. Click the Admin tab to open the Admin ashboard.
2. In the System pane on the left, locate and click the matter to edit.
3. Do one of the following:
From the matter's dashboard toolbar, click the Config button, and then click Edit
Matter.
From the Actions column, click the edit link.
4. On the Edit Matter dashboard, select the Freeze check box, and then click Save.
5. From the matter's dashboard toolbar, click the Config button, and then click Reindex.
6. When prompted, click OK to confirm the reindex of the matter.
7. When the process is finished and you have received the notice that the reindex job has
completed successfully, do one of the following:
From the matter's dashboard toolbar, click the Config button, and then click Edit
Matter.
From the Actions column, click the edit link.
8. On the Edit Matter dashboard, clear the Freeze check box, and then click Save.
Datasets
About datasets
When you import documents for a case into Concordance Evolution, documents are imported
directly into the dataset(s) associated with the case.
The Concordance Evolution dataset system fields are automatically added to a dataset when
you create a dataset. After the dataset is created, you can add any custom fields, tag families,
tag groups, and/or tags to the dataset that your organization wants to use.
For more information about dataset fields and tags, see About dataset fields and About tags.
At the dataset level, you can assign admin preferences. Admin preferences include number of
items to display in lists, default view for search results, tag format settings, and so on. You can
© 2015 LexisNexis. All rights reserved.
104
Concordance Evolution
also assign security roles and policies to user groups at the dataset level.
For more information about preferences, see About preferences and Customizing admin
preferences.
For more information about assigning security roles and policies, see Assigning roles to user
groups and Customizing user group security policies.
Dataset Creation Process:
1. Create a dataset.
2. Add fields to the dataset.
3. Define field security for the dataset's fields.
4. Import documents into the dataset.
5. Verify the imported documents.
6. Create and assign document review sets.
7. Customize user group security at the dataset level.
8. Define the spelling variations.
9. Define the thesaurus.
10. Define the stop words.
11. Define the redaction reasons.
12. Define the dataset search settings.
13. Create tags for the dataset.
14. Define tag security.
Dataset Checklist
Checklist: Dataset
Data Review
Do you know how many documents or gigabytes (GB) of data have been received?
Are your files converted to types that are recognized by Concordance Evolution?
Do you understand Concordance Evolution dataset field structures and how it
affects importing data?
© 2015 LexisNexis. All rights reserved.
Administrating Concordance Evolution
105
Checklist: Dataset
Review Load Files
Have you reviewed the contents of the data volume you are about to load?
Have you reviewed your data load file for acceptable delimiters and date formats?
Do you have fields set in place for data that you are importing?
Have you verified that the Bates number for the first record to be loaded does not
overlap with the last Bates number used in the existing collection? If it does
overlap, a correction should be requested from the source prior to loading.
Did you receive an image load file along with your images? If not, you can create
one.
Did you adjust the directory path of your image load files, if need be?
Have you reviewed how your OCR has been formatted, named and organized?
Dataset Structure
Did you create additional custom fields for the dataset?
Case Review
Have you reviewed case records to understand what types of files you are
importing?
Did you review case records to plan your dataset field structure?
Do you understand the file and media requirements for print productions, especially
for opposing counsel?
Ongoing Maintenance
Have you outlined maintenance processes and schedules that affect your new
dataset?
Creating datasets
In the Admin dashboard, datasets can be created from the System pane and the Matter
dashboard. You can also create a dataset from the Folder dashboard if you are creating the
dataset from a folder under a matter.
© 2015 LexisNexis. All rights reserved.
106
Concordance Evolution
To create a dataset from the System pane:
1. Click the Admin tab to open the Admin dashboard.
2. In the System pane on the left, locate and right-click a matter or a folder under a matter,
and then click Create Dataset.
Clicking Create Dataset opens the Create Dataset dashboard.
3. In the Name field, type the dataset name.
The dataset name must be unique from other datasets at the same level. Dataset
names can include alphanumeric characters, and the following special
characters: !@##$%^&*()_-+
4. In the Description field, type the dataset description.
5. In the Location for extracted files field, type the path where you want files extracted
from Concordance Evolution to be saved.
6. To validate the directory you entered, click the Test Path button.
If the path is valid, the message Server location is valid is displayed next to the Test Path
button. If the path is invalid, the message Invalid server location is displayed next to the
Test Path button.
7. Select the Enable send to CaseMap check box to send document data from the dataset
to CaseMap.
For more information, see Using CaseMap with Concordance Evolution.
8. From the Near Duplication list to the view and compare documents with duplicate
metadata content, select one of the following:
Disabled - (Default) Near Deduplication comparison is not activated for the dataset
External Load File - uses an external file to process near duplication data
Near-Deduplication Job - uses Concordance Evolution's internal near-deduplication
processing feature
The DCN Field Name field defaults to DCN.
The DCN Field Name field determines the name of the document control number (DCN)
field automatically created for the dataset by Concordance Evolution. A document
control number is a document-level number assigned to a document when it is imported
into Concordance Evolution.
The Document control number text preference value on the Edit Preference dashboard
determines how the document control number label is displayed in the Review
dashboard. For more information about preferences, see About preferences.
When you import documents into a dataset, Concordance Evolution automatically
assigns a unique document control number to each document.
9. To change the document control number field name, in the DCN Field Name field, edit
the field name.
© 2015 LexisNexis. All rights reserved.
Administrating Concordance Evolution
107
10. In the DCN Prefix field, type document control number prefix.
The document control number prefix can be up to 15 alphanumeric characters.
The DCN Starting Number field defaults to 00000001.
The DCN Starting Number field determines the starting number for the document control
number and the length of the document control number. The leading zeros determine
the length of the number.
11. To change the starting number or length of the document control number, in the DCN
Starting Number field, edit the starting document control number and/or length.
The document control number length can be up to 15 numeric characters.
Once a dataset is created, you cannot edit the document control number prefix, starting
number, or length. You can edit the document control number field name on the Edit
Field dashboard.
12. Click the Create button to add the dataset and open the dataset's dashboard.
Once you have created the dataset, you will need to add fields to the dataset. For more
information, see Adding fields to datasets.
To create a dataset from the Matter dashboard:
1. Click the Admin tab to open the Admin dashboard.
2. In the System pane on the left, locate and click the matter to create the dataset.
Clicking a matter in the System pane opens the dashboard for the selected matter.
3. On the matter's dashboard toolbar, click the Add button, and then click Create Dataset.
Clicking Create Dataset opens the Create Dataset dashboard.
4. In the Name field, type the dataset name.
The dataset name must be unique from other datasets at the same level. Dataset
names can include alphanumeric characters, and the following special
characters: !@##$%^&*()_-+
5. In the Description field, type the dataset description.
6. In the Location for extracted files field, type the path where you want files extracted
from Concordance Evolution to be saved.
7. To validate the directory you entered, click the Test Path button.
If the path is valid, the message Server location is valid is displayed next to the Test Path
button. If the path is invalid, the message Invalid server location is displayed next to the
Test Path button.
8. Select the Enable send to CaseMap check box to send document data from the dataset
© 2015 LexisNexis. All rights reserved.
108
Concordance Evolution
to CaseMap.
For more information, see Using CaseMap with Concordance Evolution.
7. From the Near Duplication list to the view and compare documents with duplicate
metadata content, select one of the following:
Disabled - (Default) Near Deduplication comparison is not activated for the dataset
External Load File - uses an external file to process near duplication data
Near-Deduplication Job - uses Concordance Evolution's internal near-deduplication
processing feature
The DCN Field Name field defaults to DCN.
The DCN Field Name field determines the name of the document control number field
automatically created for the dataset by Concordance Evolution.
The Document control number text preference value on the Edit Preference dashboard
determines how the document control number label is displayed in the Review
dashboard. For more information about preferences, see About preferences.
When you import documents into a dataset, Concordance Evolution automatically
assigns a unique document control number to each document.
10. To change the document control number field name, in the DCN Field Name field, edit
the field name.
11. In the DCN Prefix field, type document control number prefix.
The document control number prefix can be up to 15 alphanumeric characters.
The DCN Starting Number field defaults to 00000001.
The DCN Starting Number field determines the starting number for the document control
number and the length of the document control number. The leading zeros determine
the length of the number.
12. To change the starting number or length of the document control number, in the DCN
Starting Number field, edit the starting document control number and/or length.
The document control number length can be up to 15 numeric characters.
Once a dataset is created, you cannot edit the document control number prefix, starting
number, or length. You can edit the document control number field name on the Edit
Field dashboard.
13. Click the Create button to add the dataset and open the dataset's dashboard.
Once you have created the dataset, you will need to add fields to the dataset. For more
information, see Adding fields to datasets.
© 2015 LexisNexis. All rights reserved.
Administrating Concordance Evolution
109
Editing datasets
You can edit a dataset's name, description, production share path(s), Send to CaseMap, and
Enable Equivio settings on the Edit Dataset dashboard. You can also define the Redactable
Document Set for the dataset.
After importing the documents into the dataset, define the Redactable Document Set for the
dataset on the Edit Dataset dashboard. The Redactable Document Set is the set of dataset
documents reviewers can redact and markup in the Near Native view in the Review dashboard.
Each dataset can only have one Redactable Document Set. A document set can be the images
document set, native file document set, or produced documents document set. The native file
document set is automatically created by Concordance Evolution and has the same name as
the dataset. Image document sets are the image sets created for the dataset, and produced
documents document sets are the production sets created for the dataset.
It is best practice to use the native file document set as the Redactable Document Set for
a dataset.
The Options menu in the Near Native view determines which document set is displayed in the
Near Native view. The Markup toolbar is only available in the Near Native view when the
document set selected in the Redactable Document Set list on the Edit Dataset dashboard is
selected in the Near Native view. When other document sets are selected, the Markup toolbar
is disabled.
If you need to edit dataset fields, dataset fields are edited on the Edit Field dashboard. For
more information, see Editing dataset fields.
If you want to change the security policy settings for a dataset, see Customizing user group
security policies.
To edit a dataset:
1. Click the Admin tab to open the Admin dashboard.
2. In the System pane on the left, locate and click the dataset you want to edit.
Clicking the dataset opens the dataset's dashboard.
3. In the Actions column, click the edit link for the dataset you want to change.
Clicking the edit link opens the Edit Dataset dashboard.
4. Make the applicable edits.
7. To define the Redactable Document Set for the dataset, in the Redactable Document
Set list, click the document set you want make available for reviewers to redact and
mark up in the Near Native view of the Review dashboard.
It is best practice to use the native file document set as the redactable document set
for a dataset. The native file document set is automatically created by Concordance
Evolution, and has the same name as the dataset.
8. To create a CaseMap link conversion file, click the Create CaseMap Link Conversion File
© 2015 LexisNexis. All rights reserved.
110
Concordance Evolution
button.
The Create CaseMap Link Conversion File button is only enabled for a dataset if
documents from a Concordance DCB file have been imported into the dataset. For more
information and step-by-step instructions for creating a CaseMap link conversion file,
see Using CaseMap with Concordance Evolution.
9. When finished, click the Save button to return to the dataset's dashboard.
Deleting datasets
You can delete datasets from the Edit Dataset dashboard, but it is best practice to archive a
dataset instead of deleting a dataset.
Warning: When you delete a dataset, all documents, review sets, and other document
information will be deleted from Concordance Evolution along with the dataset.
To delete a dataset:
1. Click the Admin tab to open the Admin dashboard.
2. In the System pane on the left, click the dataset you want to delete to open the
dataset's dashboard.
3. In the Dataset Tasks pane under Dataset Management, click Dataset Settings.
4. Click the Delete button.
Clicking the Delete button opens the following message on the Remove Dataset Warning
dashboard:
You are about to delete a dataset from the system. It is recommended you archive the
dataset instead of deleting it. All documents and associated workflow information will be lost
upon deletion. Do you want to continue?
5. When prompted, click Yes to confirm the deletion.
Clicking Yes opens the following message on the Delete Dataset Status dashboard:
Dataset delete is in progress. Job has been queued to delete dataset.
6. Click OK to delete the dataset.
© 2015 LexisNexis. All rights reserved.
Administrating Concordance Evolution
111
About dataset fields
Before you begin creating fields for a dataset, it is important to understand the types of data
you will receive, and how that information can be categorized into the data format of
Concordance Evolution dataset fields.
Concordance Evolution Data Field Types
Use the following table as a reference when you review your data.
Concordance Evolution Data Field Types
Data Type
Capacity
Notes
Date
8 bytes
Only valid dates
Numeric
1-30 digits
Currency, zero-filled, comma
Text
Variable (2
gigabytes (GB))
Alphanumeric, allows rich-text format. When
you enter a zero for a text field's length, the
field's maximum capacity is 2 gigabytes (GB) of
data.
Reason Code
1-100 characters
Alphanumeric, allows rich-text format. A dataset
can only have one reason code field. The
reason code field is displayed in the Privilege
Log panel in the Review dashboard, and is
used by reviewers to indicate why a document
was redacted for privilege.
Document
Description
1-100 characters
Alphanumeric, allows rich-text format. A dataset
can only have one document description field.
The document description field is displayed in
the Privilege Log panel in the Review
dashboard, and is used by reviewers to add
additional information about the document or
why a document was redacted for privilege.
Concordance Evolution System Fields
The following fields are automatically created by Concordance Evolution when you create a
dataset. These fields are considered system fields.
© 2015 LexisNexis. All rights reserved.
112
Concordance Evolution
Concordance Evolution System Fields
Field Name
Description
Capacity
DCN
(Document Control
Number)
Field name, prefix, and length defined by user
when creating a dataset. DCN field cannot be
deleted. A dataset can only have one DCN
field. The DCN number is unique per record.
Prefix - 15
alphanumeric
characters
_EVPagesNatives
Field populated during load file import with
number of pages native documents from the
Near Native conversion.
_EVPagesImages
Field populated during load file import with
number of pages of converted images from
the Near Native conversion.
_EVDocumentModifiedDa
te
Last modified date of a document
_EVDocumentFileType
File type for imported file
_EVFileExtension
File extension for imported file
_EVImportDescription
Field populated during load file import. The
default text is <Date(MM/DD/YYY)>_<Import
type>_<Import job name>. This field can be
edited during time of import.
_EVFileSize
File size of imported native file
_EVLawDocId
Used when importing LAW PreDiscovery
cases.
Matches the ID field within LAW PreDiscovery
_EVRelationShipParentI
D
If a document is part of a family, this field
displays the Parent documents
_EVRelationShipDocumentID for all children
documents. If the document is standalone,
the field displays a 0 for the value.
_EVRelationShipDocume
ntID
If a document is part of a family, this field
displays the document relationship ID. Each
document will have a unique number.
_EVImportMessage
During import if errors are encountered, an
error message is displayed in the field.
_EVMD5Hash
MD5 hash value of native file during import
© 2015 LexisNexis. All rights reserved.
Length - 15
numeric
characters
Administrating Concordance Evolution
113
Concordance Evolution System Fields
Field Name
Description
Capacity
_EVSHA1Hash
SHA-1 hash value of native file during import
_EVTitle
Alphanumeric, allows rich-text format. A
dataset can only have one Title field. The Title
field is used as a hyperlink in the snippet view
to open the document. The title field is
required to map during import. If the field is
not populated with valid data, "No title
available" is displayed for the document in the
Snippet view for a review set.
100
Characters
Content
Alphanumeric, allows rich-text format. A
dataset can only have one Content field. The
content field can store up to 2GB of data and
can store all OCR content.
2 gigabytes
(GB)
System fields are automatically populated by Concordance Evolution. System fields cannot
be edited or deleted, with the exception of the DCN field. You can change the field order of
system fields on the Add Field to Dataset dashboard. For the DCN field, you can edit the DCN
field's name on the Edit Field dashboard and manage security for the DCN field in the Field
Security dialog box.
About the DCN Field
When you create a dataset, Concordance Evolution automatically creates the DCN
(document control number) field. There can only be one DCN field in a dataset, and the field
cannot be deleted from the dataset.
The DCN Field Name field on the Create Dataset dashboard determines the name and
numbering convention of the document control number field automatically created for the
dataset by Concordance Evolution.
The Document control number text preference value on the Edit Preference dashboard
determines how the document control number label is displayed in the Review dashboard.
For more information about preferences, see About preferences.
Once you create the dataset, if you need to change the document control number field
name, you can edit the name on the Edit Field dashboard.
About the Content Field
When you create a dataset, Concordance Evolution automatically creates the Content field.
The Content field is an alphanumeric type field and allows rich-text format. A dataset can
only have one content field. The content field stores up to 2GB of data and can store all OCR
content.
© 2015 LexisNexis. All rights reserved.
114
Concordance Evolution
About the _EVTitle Field
When you create a dataset, Concordance Evolution automatically creates the _EVTitle field.
The _EVTitle field is an alphanumeric type field and allows rich-text format. A dataset can
only have one _EVTitle field. The _EVTitle field is used for the dataset's document title field. If
the document title field is not created with the Title field type, No title available is displayed
for the document in the Snippet view of the Review dashboard. When you enter a zero for a
title field's length, the field's maximum capacity is 2 gigabytes (GB) of data.
Fields for Near-Duplicate mapping
When comparing documents the following fields are necessary for mapping duplicate
metadata content:
Field Name
Description
ND_IsMaster
The document is the master document.
Within a family, the master document is the one with greatest overall
similarity to all the other documents in the family. It has to be a nearduplicate of every other document in the family.
ND_Sort
The document's sort order ID.
The Near-Duplicate utility sorts documents based on document similarity.
The closer documents are to one another, the closer their sort order ID
will be to each other.
ND_FamilyID
A unique ID for each near-duplicate document family.
All documents within the same near-duplicate family will have the same
ID in the ND_Family field. The ND_FamilyID value matches the master
document's value, and is padded with zeros to eight digits. For
example, if the master ID is 112, the ND_FamilyID value is 00000112.
ND_Similarity
The percentage of similarity between the document and its master
document.
Within a family, the master document is the one with the greatest
overall similarity to all the other documents in the family. It has to be a
near-duplicate of every other document in the family
ND_ClusterID
A unique ID for each near-duplicate document cluster.
Documents in a cluster my be similar, but not as closely related as
documents in the near-duplicate family, and some documents in a
cluster may not be similar, but are connected by a chain of relationships
between documents.
ND_EquiSortAtt
© 2015 LexisNexis. All rights reserved.
Administrating Concordance Evolution
Concordance Evolution
fields
Equivio fields
LAW PreDiscovery fields
ND_IsMaster
Pivot
ND_IsMaster
ND_Sort
Equisort
ND_Sort
ND_EquiSortAtt
Equisortatt
ND_FamilyID
Equiset
ND_ClusterID
Dupsubset
ND_Similarity
Similarity
115
ND_FamilyID
ND_Similarity
Understanding Field Structure and Applying Properties
Concordance Evolution does not have a pre-defined field structure. However, preliminary
planning in how you construct fields and apply properties to each is essential.
Concordance Ev olution’s field profile includes:
No limit to number of fields per dataset
No limit to length of dataset field names
Field security is available for each user defined field and three of the system-created
fields, _EVTitle, Content, and DCN. All other system-created fields are preset and not
editable.
For more information, see Managing field security.
Concordance Evolution Field Properties
Concordance Evolution Field Properties
Field is hidden
Field cannot be seen by users in the Review dashboard.
Allow field sorting
Field data can be sorted in ascending or descending order in the
Table view.
Allow group by
Field will be available for selection in the Group By pane in the
Review dashboard for sorting document data. By default, check box
is selected for all field types except content fields.
User writable field
Field can be edited by users. If this check box is not selected, field is
read-only in the Edit Document Data view.
Enable send to
CaseMap
Field data is exported to CaseMap when the send to CaseMap
feature is enabled for the dataset. For more information, see Using
CaseMap with Concordance Evolution.
Advance on data
entry
In the Edit Document Data view in the Review dashboard, cursor will
automatically move to next field after user enters data in the field.
No Default Date
Value
By default, this option is selected for all date fields. This option
should be selected unless you want the field to automatically be
© 2015 LexisNexis. All rights reserved.
116
Concordance Evolution
Concordance Evolution Field Properties
populated with the document's import date or last edited date.
(only available for date fields)
Use Create Date
Field is automatically populated with the date the document was
imported. This date is populated from the ImportedDate field. (only
available for date fields)
Use Last Edit Date
Field is automatically populated with the date the document was
last edited in the Edit Document Data view. This date is populated
from the DocumentModifiedDate field. (only available for date fields)
Allow mixed case
text
Field allows both uppercase and lowercase text. (only available for
text fields)
Convert text to
UPPERCASE
All text entered in the field is automatically converted to uppercase.
(only available for text fields)
Convert text to
lowercase
All text entered in the field is automatically converted to lowercase.
(only available for text fields)
About Field Names in Concordance Evolution
It is best practice not to use special characters and keywords used by the Vivisimo®
Velocity® search engine in dataset field or tag names in Concordance Evolution. If you use
them in the names, Velocity will use them as Velocity keywords and your document search
results will return more data than expected.
Special Characters and Keywords Used by Velocity
/
%field%:
FOLLOWEDBY
phrase
\
.au
greater-than
quotes
[
.ti
greater-than-or-equal
range
]
[au]
host
regex
;
[ti]
image
site
:
all
intitle
stem
|
AND
inurl
THRU
=
and
language
title
*
and+
less-than
url
?
ANDNOT
less-than-or-equal
weight
<
andnot
link
wildcard
>
any
linktext
wildchar
@
author
NEAR
WITHIN
© 2015 LexisNexis. All rights reserved.
Administrating Concordance Evolution
“
BEFORE
not
,
category
NOT
&
CONTAINING
NOTCONTAINING
()
CONTENT
NOTWITHIN
(,)
default-and-1
OR
+
domain
or
-
equal
OR0
~
filetype
OR1
117
WORDS
Adding fields to datasets
There are two ways to add fields to a dataset. You can manually add individual fields to a
dataset or add fields from a field template. If you are going to be creating numerous datasets
that will be using the same fields, in Concordance Evolution you can create a set of fields and
save the fields to a template, which can be used to quickly add fields to new datasets.
Once a field is created, you can assign field security in the Field Security dialog box. Field
security can be applied to all fields except system-created fields, with the exception of the DCN
system field. You can apply security to the DCN field.
For more information about dataset fields, see About dataset fields.
For more information about field security, see Managing field security.
To manually create a date field:
1. Click the Admin tab to open the Admin dashboard.
2. In the System pane on the left, locate and click the dataset to add a date field.
Clicking the dataset opens the dataset's dashboard.
3. On the dataset's dashboard toolbar, click the Settings button, and then click Fields.
4. On the Field Settings dashboard, click the Add Field button.
When creating fields, be aware that the order the fields are listed on the Field Setting
Management dashboard is the order the fields are displayed in the Document Data view
in the Review dashboard. By default, fields are listed in the order they are created. Once
fields are created for a dataset, if you need to, you can rearrange the order of the fields.
For more information, see Editing dataset fields.
5. In the Name field, type the field name.
© 2015 LexisNexis. All rights reserved.
118
Concordance Evolution
The field name must be unique from other fields in the dataset. The Name field only
allows alphanumeric characters.
It is best practice not to use special characters and keywords used by the Vivisimo® Velocity®
search engine in dataset field or tag names in Concordance Evolution. If you use them in the
names, Velocity will use them as Velocity keywords and your document search results will
return more data than expected. For a list of the special characters and keywords used by
Velocity, see the About Field Names in Concordance Evolution section in the "About dataset
fields" topic.
6. In the Type list, click the Date field type.
7. In the Description field, type the field description.
8. In the Format list, click the date format you want to use for the field.
There are three date formats:
DDMMYYYY (default)
MMDDYYYY
YYYYMMDD
For date fields, you do not need to fill out the Length and Decimal Places fields.
It is best practice to use the same date format for all dataset date fields, and to have
users enter dates in Concordance Evolution using the same date format you are using
for the dataset date fields.
9. In the Default Date Value section, select one of the following:
No Default Date Value — By default, this option is selected for all date fields. This
option should be selected unless you want the field to automatically be populated with
the document's import date or last edited date.
Use Create Date — Field is automatically populated with the date the document was
imported. This date is populated from the ImportedDate field.
Use Last Edit Date — Field is automatically populated with the date the document was
last edited in the Edit Document Data view. This date is populated from the
DocumentModifiedDate field.
10. Select the check boxes for the property options that apply to the field:
Hidden
Allow field sorting
Allow Group By
User writeable field
Enable send to CaseMap
For more information about the field properties, see the Understanding Field Structure
and Applying Properties section in the About dataset fields topic.
11. To create a pick list for the field, click the Pick List field, and enter the value(s) for the
list.
© 2015 LexisNexis. All rights reserved.
Administrating Concordance Evolution
119
Pick lists (Authority Word Lists) are a list of words, numbers, and/or phrases that open in
the Edit Document Data view when a user places their cursor in a field associated with a
word list.
Each value needs to be on a separate line in the list, so press ENTER after typing each
value to add each value on a separate line.
12. Select the check boxes for the properties that apply to the pick list:
Data entry must be from list — Users must select a value from the authority list in
order to populate the field.
Case sensitivity matching — Authority word list is case sensitive. For example, Milk
and milk will be two different values in the list, they are not considered duplicate
values. If a user enters a value in the field in the Edit Document Data view, and the
value already exists in the authority word list but the case does not match, the value
will be considered a new value.
Allow user to add to the list — User can add values to the authority list by typing a
new value in the field in the Edit Document Data view. When a users types a new
value, the value is automatically added to the field's authority word list.
Allow duplicate entries — User can add duplicate values to the field. If the Allow user
to add to the list check box is selected along with the Allow duplicate entries check
box, when a user enters a duplicate value, the duplicate value is saved to the
authority word list.
Single entry field — Field only allows users to enter or select one value for the field. If
this check box is not selected, user can enter multiple values in the field in the Edit
Document Data view.
For more information, see To edit a field's pick list.
13. To make changes to the security settings for the field, in the Security section, select or
clear the check boxes of the Can Read and Can Write columns for each group listed in
the Group with Dataset Access column as needed.
14. When finished, click the Save button to save the field and return to the Field Settings
Management dashboard.
To manually create a numeric field:
1. Click the Admin tab to open the Admin dashboard.
2. In the System pane on the left, locate and click the dataset to add a numeric field.
Clicking the dataset opens the dataset's dashboard.
3. On the dataset's dashboard toolbar, click the Config button, and then click Fields.
4. On the Field Settings dashboard, click the Add Field button.
When creating fields, be aware that the order the fields are listed on the Field Settings
Management dashboard is the order the fields are displayed in the Document Data view
in the Review dashboard. By default, fields are listed in the order they are created. Once
fields are created for a dataset, if you need to, you can rearrange the order of the fields.
For more information, see Editing dataset fields.
© 2015 LexisNexis. All rights reserved.
120
Concordance Evolution
5. In the Name field, type the field name.
The field name must be unique from other fields in the dataset. The Name field only
allows alphanumeric characters. Special characters are not allowed.
It is best practice not to use special characters and keywords used by the Vivisimo®
Velocity® search engine in dataset field or tag names in Concordance Evolution. If you
use them in the names, Velocity will use them as Velocity keywords and your document
search results will return more data than expected. For a list of the special characters
and keywords used by Velocity, see the About Field Names in Concordance Evolution
section in the "About dataset fields" topic.
6. In the Type list, click the Numeric field type.
7. In the Description field, type the field description.
8. In the Format list, click the number format you want to use for the field.
There are four number formats:
Plain (default)
Currency
Comma
ZeroFilled
9. In the Length field, type the maximum number of characters allowed for the field.
For numeric fields, the Length field default value is 5.
10. In the Decimal field, type the number of decimal places to use for the field.
The Decimal field defaults to 2. The decimal places are automatically applied to numbers
added to a numeric field. For example, if the Decimal field is set to 2, and the user types
1050 in the numeric field in the Edit Document Data view, the system automatically
changes the number to 10.50.
11. Select the check boxes for the property options that apply to the field:
Hidden
Allow field sorting
Allow Group By
Enable send to CaseMap
User writeable field
For more information about the field properties, see the Understanding Field Structure
and Applying Properties section in the About dataset fields topic.
12. To create a pick list for the field, click within the Pick List field, and enter the value(s) for
the list.
Pick lists (Authority Word lists) are a list of words, numbers, and/or phrases that open in
the Edit Document Data view when a user places their cursor in a field associated with a
word list.
Each value needs to be on a separate line in the list, so press ENTER after typing each
© 2015 LexisNexis. All rights reserved.
Administrating Concordance Evolution
121
value to add each value on a separate line.
13. Select the check boxes for the properties that apply to the pick list:
Data entry must be from list — Users must select a value from the authority list in
order to populate the field.
Case sensitivity matching — Authority word list is case sensitive. For example, Milk
and milk will be two different values in the list, they are not considered duplicate
values. If a user enters a value in the field in the Edit Document Data view, and the
value already exists in the authority word list but the case does not match, the value
will be considered a new value.
Allow user to add to the list — User can add values to the authority list by typing a
new value in the field in the Edit Document Data view. When a users types a new
value, the value is automatically added to the field's authority word list.
Allow duplicate entries — User can add duplicate values to the field. If the Allow user
to add to the list check box is selected along with the Allow duplicate entries check
box, when a user enters a duplicate value, the duplicate value is saved to the
authority word list.
Single entry field — Field only allows users to enter or select one value for the field. If
this check box is not selected, user can enter multiple values in the field in the Edit
Document Data view.
For more information, see To edit a field's pick list.
14. To make changes to the security settings for the field, in the Security section, select or
clear the check boxes of the Can Read and Can Write columns for each group listed in
the Group with Dataset Access column as needed.
15. When finished, click the Save button to save the field and return to the Field Settings
Management dashboard.
To manually create a text field:
1. Click the Admin tab to open the Admin dashboard.
2. In the System pane on the left, locate and click the dataset to add a text field.
Clicking the dataset opens the dataset's dashboard.
3. On the dataset's dashboard toolbar, click the Config button, and then click Fields.
4. On the Field Settings dashboard, click the Add Field button.
When you are creating fields, be aware that the order the fields are listed on the Field
Settings Management dashboard is the order the fields are displayed in the Document
Data view in the Review dashboard. By default, fields are listed in the order they are
created. Once fields are created for a dataset, if you need to, you can rearrange the
order of the fields. For more information, see Editing dataset fields.
5. In the Name field, type the field name.
The field name must be unique from other fields in the dataset. The Name field only
allows alphanumeric characters. Special characters are not allowed.
© 2015 LexisNexis. All rights reserved.
122
Concordance Evolution
It is best practice not to use special characters and keywords used by the Vivisimo®
Velocity® search engine in dataset field or tag names in Concordance Evolution. If you
use them in the names, Velocity will use them as Velocity keywords and your document
search results will return more data than expected. For a list of the special characters
and keywords used by Velocity, see the About Field Names in Concordance Evolution
section in the "About dataset fields" topic.
6. In the Type list, click the Text field type.
7. In the Description field, type the field description.
For text fields, you do not need to fill out the Format and Decimal Places fields.
8. In the Length field, type the maximum number of characters allowed for the field.
For text fields, the Length field defaults to 10. If the field is user-writeable field, make
sure that the field length is large enough to hold the data that will be imported into the
field.
9. From the Casting list, select one of the following options:
Allow mixed case text — Field allows both uppercase and lowercase text.
Convert text to UPPERCASE — All text entered in the field is automatically converted
to uppercase.
Convert text to lowercase — All text entered in the field is automatically converted to
lowercase.
10. Select the check boxes for the property options that apply to the field:
Hidden
Allow field sorting
Allow Group By
Enable send to CaseMap
User writeable field
For more information about the field properties, see the Understanding Field Structure
and Applying Properties section in the About dataset fields topic.
11. To create a pick list for the field, click the Pick List field, and enter the value(s) for the
list.
Pick lists (Authority Word lists) are a list of words, numbers, and/or phrases that open in
the Edit Document Data view when a user places their cursor in a field associated with a
word list.
Each value needs to be on a separate line in the list, so press ENTER after typing each
value to add each value on a separate line.
12. Select the check boxes for the properties that apply to the pick list:
Data entry must be from list — Users must select a value from the authority list in
order to populate the field.
Case sensitivity matching — Authority word list is case sensitive. For example, Milk
and milk will be two different values in the list, they are not considered duplicate
values. If a user enters a value in the field in the Edit Document Data view, and the
value already exists in the authority word list but the case does not match, the value
© 2015 LexisNexis. All rights reserved.
Administrating Concordance Evolution
123
will be considered a new value.
Allow user to add to the list — User can add values to the authority list by typing a
new value in the field in the Edit Document Data view. When a users types a new
value, the value is automatically added to the field's authority word list.
Allow duplicate entries — User can add duplicate values to the field. If the Allow user
to add to the list check box is selected along with the Allow duplicate entries check
box, when a user enters a duplicate value, the duplicate value is saved to the
authority word list.
Single entry field — Field only allows users to enter or select one value for the field. If
this check box is not selected, user can enter multiple values in the field in the Edit
Document Data view.
For more information, see To edit a field's pick list.
13. To make changes to the security settings for the field, in the Security section, select or
clear the check boxes of the Can Read and Can Write columns for each group listed in
the Group with Dataset Access column as needed.
14. When finished, click the Save button to save the field and return to the Field Settings
Management dashboard.
To manually create a reason code field:
A dataset can only have one reason code field. Once a reason code field is created for a
dataset, the ReasonCode selection is no longer available in the Type list on the Add Field
and Edit field dashboards.
The reason code field is displayed on the Privilege Log panel in the Review dashboard, and
is used by reviewers to indicate why a document was redacted for privilege. When you are
creating a reason code field, you need to create an authority list containing the reasons a
document can be redacted for privilege. On the Privilege Log panel in the Review dashboard,
the Reason code field is displayed with the name Reason Code regardless of the name you
enter for the field in the Add Field or Edit field dashboard, and the field is displayed as a list.
If you do not create an authority list for the field, reviewers cannot populate the field for
documents.
1. Click the Admin tab to open the .
2. In the System pane on the left, locate and click the dataset to add a reason code field.
Clicking the dataset opens the dataset's dashboard.
3. On the dataset's dashboard toolbar, click the Settings button, and then click Fields.
4. On the Field Settings dashboard, click the Add Field button.
When you are creating fields, be aware that the order the fields are listed on the Field
Settings Management dashboard is the order the fields are displayed in the Document
Data view in the Review dashboard. By default, fields are listed in the order they are
created. Once fields are created for a dataset, if you need to, you can rearrange the
order of the fields. For more information, see Editing dataset fields.
5. In the Name field, type the field name.
© 2015 LexisNexis. All rights reserved.
124
Concordance Evolution
The field name must be unique from other fields in the dataset. The Name field only
allows alphanumeric characters. Special characters are not allowed.
It is best practice not to use special characters and keywords used by the Vivisimo® Velocity®
search engine in dataset field or tag names in Concordance Evolution. If you use them in the
names, Velocity will use them as Velocity keywords and your document search results will
return more data than expected. For a list of the special characters and keywords used by
Velocity, see the About Field Names in Concordance Evolution section in the "About dataset
fields" topic.
On the Privilege Log panel in the Review dashboard, the reason code field is displayed
with the name Reason Code regardless of the name you enter for the field in the Add
Field or Edit Field dashboard.
6. In the Type list, click the ReasonCode field type.
Once a reason code field is created for a dataset, the ReasonCode selection is no longer
available in the Type list on the Add Field and Edit field dashboards.
7. In the Description field, type the field description.
For reason code fields, you do not need to fill out the Format, Length, and Decimal Places
fields.
8. From the Casting list, select one of the following options for the text field:
Allow mixed case text — Field allows both uppercase and lowercase text.
Convert text to UPPERCASE — All text entered in the field is automatically converted
to uppercase.
Convert text to lowercase — All text entered in the field is automatically converted to
lowercase.
9. Select the check boxes for the property options that apply to the field:
Hidden
Allow field sorting
Allow Group By
Enable send to CaseMap
User writeable field
For the reason code field, the Index field for group by check box is selected by default. If
you do not want the field to be available for selection on the Group By pane in the
Review dashboard, clear the check box. Also, the User writeable field check box should
be selected for the reason code field to ensure users can select a reason code from the
Review dashboard.
For more information about the field properties, see the Understanding Field Structure
and Applying Properties section in the About dataset fields topic.
10. To create a pick list for the field, click the in the Pick List field, and enter the value(s) for
the list.
Pick lists (Authority Word lists) are a list of words, numbers, and/or phrases that open in
the Edit Document Data view when a user places their cursor in a field associated with a
© 2015 LexisNexis. All rights reserved.
Administrating Concordance Evolution
125
word list.
Each value needs to be on a separate line in the list, so press ENTER after typing each
value to add each value on a separate line.
11. Select the check boxes for the properties that apply to the pick list:
Data entry must be from list — Users must select a value from the authority list in
order to populate the field.
Case sensitivity matching — Authority word list is case sensitive. For example, Milk
and milk will be two different values in the list, they are not considered duplicate
values. If a user enters a value in the field in the Edit Document Data view, and the
value already exists in the authority word list but the case does not match, the value
will be considered a new value.
Allow user to add to the list — User can add values to the authority list by typing a
new value in the field in the Edit Document Data view. When a users types a new
value, the value is automatically added to the field's authority word list.
Allow duplicate entries — User can add duplicate values to the field. If the Allow user
to add to the list check box is selected along with the Allow duplicate entries check
box, when a user enters a duplicate value, the duplicate value is saved to the
authority word list.
Single entry field — Field only allows users to enter or select one value for the field. If
this check box is not selected, user can enter multiple values in the field in the Edit
Document Data view.
For more information, see To edit a field's pick list.
12. To make changes to the security settings for the field, in the Security section, select or
clear the check boxes of the Can Read and Can Write columns for each group listed in
the Group with Dataset Access column as needed.
13. When finished, click the Save button to save the field and return to the Field Settings
Management dashboard.
To manually create a document description field:
A dataset can only have one document description field. Once a document description field is
created for a dataset, the Document Description selection is no longer available in the Type
list on the Add Field and Edit field dashboards.
The document description field is displayed on the Privilege Log panel below the Reason
Code field in the Review dashboard, and is a text field used by reviewers to add additional
information about the document or why a document was redacted for privilege. The name
you enter for the document description field on the Add Field or Edit Field dashboard is
displayed on the Privilege Log panel.
1. Click the Admin tab to open the Admin dashboard.
2. In the System pane on the left, locate and click the dataset to add a document
description field.
Clicking the dataset opens the dataset's dashboard.
© 2015 LexisNexis. All rights reserved.
126
Concordance Evolution
3. On the dataset's dashboard toolbar, click the Settings button, and then click Fields.
4. On the Field Settings dashboard, click the Add Field button.
When you are creating fields, be aware that the order the fields are listed on the Field
Settings Management dashboard is the order the fields are displayed in the Document
Data view in the Review dashboard. By default, fields are listed in the order they are
created. Once fields are created for a dataset, if you need to, you can rearrange the
order of the fields. For more information, see Editing dataset fields.
5. In the Name field, type the field name.
The field name must be unique from other fields in the dataset. The Name field only
allows alphanumeric characters. Special characters are not allowed.
It is best practice not to use special characters and keywords used by the Vivisimo® Velocity®
search engine in dataset field or tag names in Concordance Evolution. If you use them in the
names, Velocity will use them as Velocity keywords and your document search results will
return more data than expected. For a list of the special characters and keywords used by
Velocity, see the About Field Names in Concordance Evolution section in the "About dataset
fields" topic.
6. In the Type list, click the Document Description field type.
Once a document description field is created for a dataset, the Document Description
selection is no longer available in the Type list on the Add Field and Edit field
dashboards.
7. In the Description field, type the field description.
8. From the Casting list, select one of the following options for the text field:
Allow mixed case text — Field allows both uppercase and lowercase text.
Convert text to UPPERCASE — All text entered in the field is automatically converted
to uppercase.
Convert text to lowercase — All text entered in the field is automatically converted to
lowercase.
9. Select the check boxes for the property options that apply to the field:
Hidden
Allow field sorting
Allow Group By
Enable send to CaseMap
User writeable field
For more information about the field properties, see the Understanding Field Structure
and Applying Properties section in the About dataset fields topic.
10. To create a pick list for the field, click the in the Pick List field, and enter the value(s) for
the list.
Pick lists (Authority Word lists) are a list of words, numbers, and/or phrases that open in
the Edit Document Data view when a user places their cursor in a field associated with a
© 2015 LexisNexis. All rights reserved.
Administrating Concordance Evolution
127
word list.
Each value needs to be on a separate line in the list, so press ENTER after typing each
value to add each value on a separate line.
11. Select the check boxes for the properties that apply to the pick list:
Data entry must be from list — Users must select a value from the authority list in
order to populate the field.
Case sensitivity matching — Authority word list is case sensitive. For example, Milk
and milk will be two different values in the list, they are not considered duplicate
values. If a user enters a value in the field in the Edit Document Data view, and the
value already exists in the authority word list but the case does not match, the value
will be considered a new value.
Allow user to add to the list — User can add values to the authority list by typing a
new value in the field in the Edit Document Data view. When a users types a new
value, the value is automatically added to the field's authority word list.
Allow duplicate entries — User can add duplicate values to the field. If the Allow user
to add to the list check box is selected along with the Allow duplicate entries check
box, when a user enters a duplicate value, the duplicate value is saved to the
authority word list.
Single entry field — Field only allows users to enter or select one value for the field. If
this check box is not selected, user can enter multiple values in the field in the Edit
Document Data view.
For more information, see To edit a field's pick list.
12. To make changes to the security settings for the field, in the Security section, select or
clear the check boxes of the Can Read and Can Write columns for each group listed in
the Group with Dataset Access column as needed.
13. When finished, click the Save button to save the field and return to the Field Settings
Management dashboard.
To add a pick list to an existing field:
Pick lists (Authority Word list) are lists of words, numbers, and/or phrases that open in the
Edit Document Data view when a user places their cursor in a field associated with an
authority word list. Pick list entries are always inserted at the current cursor location in the
Edit Document Data view.
An authority word list can contain anything, including zip codes, author's names, and
complex chemical names. Any data entry task that is repetitive and prone to errors is a good
candidate for an authority list. Selecting entries from the list lowers the number of errors
introduced through data entry, and the number of keystrokes — thus saving labor and
expense while improving accuracy.
You can create an authority word list for date, numeric, and text fields. You cannot create
authority word lists for the Document Control Number field or content fields.
1. On the Field Settings dashboard, click the edit link for the field to add a pick list.
2. In the Pick list field, type the pick list values.
© 2015 LexisNexis. All rights reserved.
128
Concordance Evolution
Each value needs to be on a separate line in the list, so press ENTER after typing each
value to add each value on a separate line.
3. Select the check boxes for the properties that apply to the authority word list:
Data entry must be from list — Users must select a value from the authority list in
order to populate the field.
Case sensitivity matching — Authority word list is case sensitive. For example, Milk
and milk will be two different values in the list, they are not considered duplicate
values. If a user enters a value in the field in the Edit Document Data view, and the
value already exists in the authority word list but the case does not match, the value
will be considered a new value.
Allow user to add to the list — User can add values to the authority list by typing a
new value in the field in the Edit Document Data view. When a users types a new
value, the value is automatically added to the field's authority word list.
Allow duplicate entries — User can add duplicate values to the field. If the Allow user
to add to the list check box is selected along with the Allow duplicate entries check
box, when a user enters a duplicate value, the duplicate value is saved to the
authority word list.
Single entry field — Field only allows users to enter or select one value for the field. If
this check box is not selected, user can enter multiple values in the field in the Edit
Document Data view.
4. Click Save to save the list values and return to the Field Settings Management
dashboard.
To add dataset fields from a template:
Currently, Concordance Evolution comes with two predefined field templates:
SystemTemplateForOpticon for documents imported from a Concordance Image files (.dir),
and SystemTemplateForEmail/Edocs for documents imported from email and electronic
documents.
1. Click the Admin tab to open the Admin dashboard.
2. In the System pane on the left, locate and click the dataset to add a fields.
Clicking the dataset opens the dataset's dashboard.
3. On the dataset's dashboard toolbar, click the Settings button, and then click Fields.
Clicking Fields opens the Field Settings dashboard. A list of templates, if available, are
displayed in the Templates list when you click the Templates button on the Field Setting
Management toolbar.
If there are existing fields in the dataset, and any of the field names and types match
the names and types of fields in the field template you are importing into the dataset,
the fields from the template overlay the existing fields.
4. From the Templates list, click the template you want to import into the dataset.
© 2015 LexisNexis. All rights reserved.
Administrating Concordance Evolution
129
5. Click the Add Fields button to add the fields to the dataset.
When you are creating fields, be aware that the order the fields are listed on the Add
Fields To Dataset dashboard is the order the fields are displayed in the Document Data
view in the Review dashboard. By default, fields are listed in the order they are created.
Once fields are created for a dataset, if you need to, you can rearrange the order of the
fields. For more information, see Editing dataset fields.
6. Once you have finished adding the fields to the dataset, click the Done button to save
the fields and field settings.
To create a dataset field template:
If you are going to be creating numerous datasets that will be using the same fields, in
Concordance Evolution you can create a set of fields and save the fields to a template, which
can be used to quickly add fields to new datasets. You can save dataset fields to an existing
custom field template or create a new custom field template. If you want to save the fields
to an existing field template, see To save fields to an existing field template in this topic.
When you save dataset fields to a field template, the fields, field settings, and field order are
saved to the template.
System-created fields are not saved to dataset field templates.
1. Click the Admin tab to open the Admin dashboard.
2. In the System pane on the left, locate and click the dataset create a field template.
Clicking the dataset opens the dataset's dashboard.
3. On the dataset's dashboard toolbar, click the Settings button, and then click Fields.
4. On the Field Settings Management dashboard, add the dataset fields you want to save
to the field template.
5. Once you have finished adding the fields, on the Field Settings Management dashboard
toolbar, click the Templates button.
6. In the Save Current fields as Template box, type the name of the field template.
Field template names must be unique from other custom field templates. The template
name field only allows alphanumeric characters. Special characters are not allowed.
6. When finished, click Save.
Once the fields are saved to the field template, the The fields have been successfully
saved to template message is displayed on the Field Settings Management dashboard.
To save fields to an existing field template:
© 2015 LexisNexis. All rights reserved.
130
Concordance Evolution
You can save dataset fields to an existing custom field template or create a new custom field
template. If you are adding fields to an existing field template, you can only add the fields to
a custom field template. Fields cannot be added to the pre-defined field templates:
SystemTemplateForOpticon and SystemTemplateForEmail/Edocs. If you want to save the
fields to a new field template, see To create a dataset field template in this topic.
When you save dataset fields to a field template, the fields, field settings, and field order are
saved to the template.
System-created fields are not saved to dataset field templates.
1. Click the Admin tab to open the Admin dashboard.
2. In the System pane on the left, locate and click the dataset to save fields.
Clicking the dataset opens the dataset's dashboard.
3. On the dataset's dashboard toolbar, click the Settings button, and then click Fields.
4. On the Field Settings Management dashboard, add the dataset fields you want to save
to the existing field template.
5. Once you have finished adding the fields, on the Field Settings Management dashboard
toolbar, click the Templates button.
6. Click the Save Current fields as Template box, and then select the existing field
template.
6. Click Save.
Once the fields are saved to the field template, the The fields have been successfully
saved to template message is displayed on the Field Settings Management dashboard.
To create field definitions for CaseMap
Creating field definitions for CaseMap is optional and can be done for any dataset which has
the Enable send to CaseMap check box selected for any of the dataset's fields. Field
definitions are created for CaseMap by clicking the Export Definitions button on the Field
Settings Management dashboard toolbar. Clicking the Export Definitions button generates
an XML file that contains the Concordance Evolution dataset's field definitions for the fields
that have the Enable send to CaseMap check box selected.
Once the file is created, you can open the XML file in CaseMap to map the Concordance
Evolution fields in the XML file to the corresponding fields in CaseMap. For more information
about using CaseMap with Concordance Evolution and step-by-step instructions for creating
the casemap.cmbulk XML file, see Using CaseMap with Concordance Evolution.
© 2015 LexisNexis. All rights reserved.
Administrating Concordance Evolution
131
Editing dataset fields
When you create a dataset, Concordance Evolution automatically creates the DCN (document
control number), Content, and Title fields and some system fields. System fields cannot be
edited, with the exception of the DCN, Content, and Title fields. You can only change the field
order of system fields on the Field Settings Management dashboard. For the DCN field, you can
edit the DCN field's name on the Edit Field dashboard and manage security for the DCN field in
the Field Security dialog box.
For the rest of the fields created in a dataset, you can edit all the field properties and settings.
If you need to modify a field's security settings, see Managing field security. You can also edit a
dataset's field order. The order dataset fields are listed on the Add Fields To Dataset
dashboard is the order the fields are displayed in the Document Data view in the Review
dashboard. By default, fields are listed in the order they are created.
To edit a field:
1. Click the Admin tab to open the Admin dashboard.
2. In the System pane on the left, locate and click the dataset you want to add a field.
Clicking the dataset opens the dataset's dashboard.
3. On the dataset's dashboard toolbar, click the Settings button, and then click Fields.
4. On the Field Settings dashboard, in the Action column, click the Edit link.
Clicking the Edit link in the Actions column opens the Edit field dashboard.
5. Make the applicable edits.
Warning: If you are changing a field's type, and there is existing data in the field,
changing the field type can impact the existing data.
Here are the impacts for each conversion:
Text to Numeric: Non-numeric values in the field will be lost
Text to Date: Non-numeric values will be lost, along with the length of the numeric
information
Numeric to Date: Some numeric decimal and field length settings may be lost
Numeric to Text: Decimal information may be lost
Date to Numeric: Date format information will be lost
Date to Text: Field values are retained
Any type to Date: All field values will be lost unless the field is associated with an
authority list containing date values
You cannot change a content, reason code, document description, title, or container
field's field type to another field type, and you cannot change other field's field types
to the content, reason code, document description, title, or container field type.
6. If you want to modify or add a pick list for the field, in the Pick List field, type the new
© 2015 LexisNexis. All rights reserved.
132
Concordance Evolution
value(s).
For more information, see To edit a field's pick list.
7. Click the Save button to save your changes and return to the Field Settings
Management dashboard.
To edit a field's pick list:
A Pick list (Authority Word lists) are lists of words, numbers, and/or phrases that open in the
Edit Document Data view when a user places their cursor in a field associated with an
authority word list. Authority list entries are always inserted at the current cursor location in
the Edit Document Data view.
An authority list can contain anything, including zip codes, author's names, and complex
chemical names. Any data entry task that is repetitive and prone to errors is a good
candidate for an authority list. Selecting entries from the list lowers the number of errors
introduced through data entry, and the number of keystrokes — thus saving labor and
expense while improving accuracy.
You can create an authority word list for date, numeric, and text fields. You cannot create
authority word lists for the DCN field, system, or content fields.
1. On the Add Field or Edit Field dashboard, in the Pick List field, edit, delete, or add
additional authority word list values.
Each value needs to be on a separate line in the list, so press the ENTER key after typing
each value to add each value on a separate line.
2. Select the check boxes for the properties that apply to the authority word list:
Data entry must be from list — Users must select a value from the authority list in
order to populate the field.
Case sensitivity matching — A word list is case sensitive. For example, Milk and milk
will be two different values in the list, they are not considered duplicate values. If a
user enters a value in the field in the Edit Document Data view, and the value already
exists in the authority word list but the case does not match, the value will be
considered a new value.
Allow user to add to the list — User can add values to the authority list by typing a
new value in the field in the Edit Document Data view. When a users types a new
value, the value is automatically added to the field's authority word list.
Allow duplicate entries — User can add duplicate values to the field. If the Allow user
to add to the list check box is selected along with the Allow duplicate entries check
box, when a user enters a duplicate value, the duplicate value is saved to the
authority word list.
Single entry field — Field only allows users to enter or select one value for the field. If
this check box is not selected, user can enter multiple values in the field in the Edit
Document Data view.
3. Click Save to save the list values and return to the Field Settings Management
dashboard.
© 2015 LexisNexis. All rights reserved.
Administrating Concordance Evolution
133
To change a dataset's field order:
When you are creating fields, be aware that the order the fields are listed on the Add Fields
To Dataset dashboard is the order the fields are displayed in the Document Data view in the
Review dashboard. By default, fields are listed in the order they are created. Once fields are
created for a dataset, if you need to, you can rearrange the order of the fields.
1. Click the Admin tab to open the Admin dashboard.
2. In the System pane on the left, locate and click the dataset you want to edit.
Clicking the dataset opens the dataset's dashboard.
3. On the dataset's dashboard toolbar, click the Settings button, and then click Fields.
4. On the Field Settings dashboard toolbar, click the Reorder Fields button.
5. In the Reorder Fields dialog box, to move a single field, do any of the following:
To move a field up in the field list, click the up arrow button or drag the field up to the
desired position.
To move a field down in the field list, click the down arrow button or drag the field
down to the desired position.
6. To move multiple fields at one time, do any of the following:
To move consecutive fields, press SHIFT, click the first field, click the last field you want
to move, and then drag the fields to the desired position.
To move non-consecutive fields, press CTRL, click the fields you want to move, and
then drag the fields to the desired position.
7. When finished, click Save.
Managing field-level security
In Concordance Evolution you can add field-level security to individual fields in a dataset on the
Add Field or Edit Field dashboards . Field-level security allows you to assign read and/or write
access for each field in a dataset. By default, each field allows read and write access. The read
and write security settings determine whether a field is read-only, editable, or not displayed in
the Document Data and Edit Document Data views in the Review dashboard for users in a user
group.
You can add field security to all fields in a dataset except for the system-created fields, with the
exception of the DCN field. The DCN field is a system field, but you can add field security to the
field. Field security can be added to fields after the fields have been added to a dataset. You
cannot add field security to a field while you are adding the field to the dataset on the Add Field
dashboard. You can only access the Field Security dialog box from the Edit Field dashboard.
© 2015 LexisNexis. All rights reserved.
134
Concordance Evolution
Field-level security is assigned by user group. To assign field-level security to a user group, the
user group must have security policies allowing the user group access to the dataset assigned
to the user group on the Dataset Security dashboard for the dataset. For more information
about assigning user groups and security policies to datasets, see Assigning roles to user
groups and Customizing user group security policies.
If no user groups have access to a dataset, the following message is displayed in the Field
Security dialog box:
To manage security for a dataset field:
1. Click the Admin tab to open the Admin dashboard.
2. In the System pane on the left, locate and click the dataset you want to edit security.
Clicking the dataset opens the dataset's dashboard.
3. On the dataset's dashboard toolbar, click the Settings button, and then click Fields.
4. On the Field Settings dashboard, located the field you want edit.
5. In the Actions column, click the Edit link for the field you want to edit security settings.
You cannot manage security for the system-created fields, with the exception of the
DCN, Content, and Title fields.
6. In the Security section, make any of the following changes:
To make a field read-only for users in the user group in the Document Data and Edit
Document Data views, make sure that the Can Read check box is selected, and clear
the Can Write check box.
To allow users in the user group to view the field in the Document Data and Edit
© 2015 LexisNexis. All rights reserved.
Administrating Concordance Evolution
135
Document Data views, and edit the field in the Edit Document Data view, select the
Can Read and Can Write check box.
To prevent users in the user group from viewing and editing the field in the Document
Data and Edit Document Data view, clear the Can Read and Can Write check boxes.
7. When finished, on the Edit Field toolbar, click the Save button to return to the Field
Settings Management dashboard.
Deleting fields from a dataset
You can delete fields from a dataset on the Edit Field dashboard. If the field is already
populated with values, the field values will be deleted from the dataset along with the field.
To delete a field from a dataset:
1. Click the Admin tab to open the Admin dashboard.
2. In the System pane on the left, locate and click the dataset you want to remove a field.
Clicking the dataset opens the dataset's dashboard.
3. On the dataset's dashboard toolbar, click the Settings button, and then click Fields.
4. On the Field Settings dashboard, locate the field you want to delete.
5. In the Action column, and then click the Delete link.
6. When prompted, click OK to confirm the deletion.
Using CaseMap with Concordance Evolution
The Send to CaseMap feature in Concordance Evolution allows you to send a fact, a document,
or multiple documents to CaseMap. Selected document text will display in CaseMap's Facts
spreadsheet as a new Fact record. Selected documents sent to CaseMap display in the Objects
- Documents spreadsheet. All tags, tag groups, and tag folders associated with a document are
also included in the export.
All fact and document records in CaseMap will link directly back to the document or selected text
in Concordance Evolution. If you need to send updated fact text from the same document, the
associated Fact record in CaseMap will be updated.
© 2015 LexisNexis. All rights reserved.
136
Concordance Evolution
For more information about sending data to CaseMap from the Review dashboard, see Sending
documents to CaseMap.
Before users can send data to CaseMap from the Review dashboard, the Send to CaseMap
feature needs to be enabled for the dataset, dataset fields, and users in the Admin
dashboard.
Process for Using CaseMap with Concordance Evolution:
In order to use the Send to CaseMap feature in Concordance Evolution, certain actions need
to be performed in the Admin and Review dashboards. The following steps define how to
enable and use the Send to CaseMap feature in Concordance Evolution.
1. Allow Can Send to CaseMap policy.
Make sure that the Can Send to CaseMap security policy is set to Allow. The Can Send to
CaseMap security policy is located under Document Data Viewer on the Security
dashboard.
For more information about defining security policies, see Customizing user group
security policies.
2. Activate the Enable send document links to CaseMap preference.
To activate the Enable send document links to CaseMap preference for the system, an
organization, a folder, matter, dataset, user, or user group, in the Value field on the Edit
preference dashboard in the Admin dashboard, click the True option. By default, the
Value field is set to False.
For more information about setting system folder, matter, dataset, user, or user group
preferences, see Customizing admin preferences.
If you are enabling the Enable send document link to CaseMap preference for yourself, in
the Set Preference For Enable send document links to CaseMap field on the My
Preference dashboard, click the True option. By default, the Set Preference For Enable
send document links to CaseMap field is set to False.
For more information about setting personal preferences, see Customizing personal
preferences.
When the Enable send document links to CaseMap preference is set to True, in the
Admin dashboard, the Save Definitions button on the Add Fields to Dataset dashboard in
the CaseMap Field Definitions box is enabled, and the Create CaseMap Link Conversion
File button at the bottom of the Edit Dataset dashboard is enabled for a dataset after
documents are imported into the dataset from a Concordance DCB file. In the Review
dashboard, the Send to CaseMap button,
, is enabled.
3. Define the Maximum number of document links preference.
© 2015 LexisNexis. All rights reserved.
Administrating Concordance Evolution
137
Define the Maximum number of document links preference to determine the maximum
number of document links allowed per export to CaseMap. By default, the Maximum
number of documents links preference is set to 100 documents.
To modify the Maximum number of document links preference for the system, a user, or
user group, in the Value field on the Edit preference dashboard, type the maximum
number of links allowed per export to CaseMap. By default, the Value field is set to 100.
If you are modifying the Maximum number of document links preference for yourself, in
the Set Preference For Maximum number of document links field on the My Preference
dashboard, type the maximum number of links allowed per export to CaseMap. By
default, the Set Preference For Maximum number of document links field is set to 100.
Click Save to save your changes.
4. Enable the Send to CaseMap feature for a dataset.
To enable the Send to CaseMap feature for a dataset, on the Create Dataset or Edit
Dataset dashboard in the Admin dashboard, select the Enable send to CaseMap check
box for the dataset containing the documents and/or document text you want to export
to CaseMap, and then click Save to save your changes.
5. Enable the Send to CaseMap feature for dataset fields.
To enable the Send to CaseMap feature for dataset fields, on the Add Field or Edit Field
dashboard in the Admin dashboard, select the Enable send to CaseMap check box for
the dataset fields containing the data you want to export to CaseMap, and then click
Save to save your changes.
In Concordance Evolution, fact text can only be exported from the Content type field in
Concordance Evolution to CaseMap. If you are going to be sending facts to CaseMap
from Concordance Evolution, make sure that the Enable send to CaseMap check box is
selected for the dataset's content field.
6. Create field definitions XML file for CaseMap (Optional).
This step is optional and can be done for any dataset which has the Enable send to
CaseMap check box selected for any of the dataset's fields. The field definitions XML file
contains the Concordance Evolution dataset's field definitions for the fields that have the
Enable send to CaseMap check box selected.
This step will generate the casemap.cmbulk XML file. Once the file is created, you can
open the casemap.cmbulk XML file in CaseMap to map the Concordance Evolution fields in
the XML file to the corresponding fields in CaseMap. The casemap.cmbulk XML file is
generated from the Add Fields to Dataset dashboard by clicking the Save Definitions
button. The Save Definitions button is enabled on the Add Fields to Dataset dashboard
once the Enable send document link to CaseMap preference is set to True.
© 2015 LexisNexis. All rights reserved.
138
Concordance Evolution
To create the field definitions XML file for CaseMap:
1. Click the Admin tab to open the Admin dashboard.
2. In the System pane on the left, click the dataset containing the fields you want to
map to CaseMap.
Before you create the casemap.cmbulk XML file, make sure that the Enable send to
CaseMap check box selected on the Add Field or Edit Field dashboard for each field
you want to map to CaseMap.
3. On the dataset's dashboard toolbar, click the Config button, and then click Fields.
4. Click the Export Definitions button to open the File Download dialog box.
5. Click Save to open the Save As dialog box.
6. Browse to where to want to save the casemap.cmbulk file.
7. To rename the file, in the File name field, rename the file.
8. Make sure that .cmbulk Document is selected in the Save as type field, and then
click Save.
9. In the Download complete dialog box, click the Open button to open the Bulk 'Send
to CaseMap' Wizard and map the Concordance Evolution fields to the CaseMap
fields, or click the Close button to close Download complete dialog box.
Refer to the CaseMap documentation for how to use the Send to CaseMap wizards.
8. Create a review set containing the documents you want to send to CaseMap. For more
information, see Creating review sets.
9. Send documents and/or facts to CaseMap.
You can send individual documents and facts to CaseMap from the Document Data view,
and you can send multiple documents from the Snippet, Thread, and Table views in the
Review dashboard. For more information, see Sending documents to CaseMap.
Using Equivio with Concordance Evolution
Equivio® is an optional companion product for Concordance E-mail and Attachments databases.
In Concordance, Equivio highlights the textual differences between two e-mail documents.
Equivio helps you identify and skip redundant text during document reviews in Concordance,
allowing you to focus on the unique text in each e-mail message.
© 2015 LexisNexis. All rights reserved.
Administrating Concordance Evolution
139
See, About deduplication.
Importing
About importing files
Once you have created a Concordance Evolution organization, folder, matter, dataset and set
up the dataset fields, you can populate the dataset by importing the following types of files
from the corresponding Share location:
Load files (delimited text files)
Importing Law PreDiscovery Cases
Files are imported into Concordance Evolution by creating import jobs. You can import files into
a Concordance Evolution dataset from the dataset's dashboard. The priority for import jobs
can be set as low, medium, or high. High priority jobs are processed first, based on the order
in which they were setup. Low priority import jobs are processed after high and medium level
priority processes.
Concordance Evolution has the ability to remove blank pages when importing and converting
Microsoft Word or Excel files. This option is set on the Server Management dashboard. For
more information about enabling this option, please contact your Concordance Evolution
System Administrator or Field Service Engineer.
If the file has already been converted with blank pages and is produced, the blank pages
will not be removed.
Concordance Evolution does not support importing or exporting of live redactions to or
from a traditional Concordance 10.x databases and Concordance Image 5.x imagebases.
If you want to view redactions from a traditional Concordance 10.x databases and
Concordance Image 5.x imagebases in Concordance Evolution, you will need to produce
the applicable documents and burn the redactions and redlines onto the produced TIFF
files in Concordance Image, and then import the produced TIFF files into Concordance
Evolution. The redactions and redlines will not be editable in Concordance Evolution since
they will be part of the TIFF files.
About delimiter characters
The following four columns represent the available delimiter characters. For each delimiter, the
displayed symbol is on the left and the decimal equivalent is in parenthesis on the right. If the
source program you are importing from uses a different font, it can change the symbolic
representation of the delimiters. If this happens, match the delimiter characters with the
decimal equivalents instead of relying on the displayed symbol. Using the decimal equivalents
© 2015 LexisNexis. All rights reserved.
140
Concordance Evolution
will always result in a correct delimiter match.
© 2015 LexisNexis. All rights reserved.
Administrating Concordance Evolution
141
Importing delimited text files
You can import documents and files into a dataset from the Dataset dashboard. Documents and
files are imported into Concordance Evolution by creating import jobs.
With the Load File Import, you can import load files (delimited text files) into Concordance
Evolution. Load files or delimited text files typically have extensions ending in .dat, .csv, or .txt.
Each file contains record metadata, but some may also include document text.
Files can be received from a client, data processing vendor, or third party. As an administrator,
when receiving data, you should always review all files on the disk, prior to loading the data.
Opening and reviewing the delimited text files helps you ensure the file has the proper formats
for Concordance Evolution.
There are two ways to import delimited text files into Concordance Evolution. You can manually
create an import job or you can create an import job using an import template. If you are going
to be creating numerous import jobs for a dataset, you can create an import job and save the
import settings to an import template, which can be used to quickly create new import jobs for
the dataset.
When rev iewing your data load files, always check for the following:
Field names – each line of metadata is one record, check each header column to verify data
Delimiters – unique characters that appear in the delimited text file and do not exist in your
actual data
Date format – date fields are an 8-character maximum with slashes. If dates include
slashes, you can import any format. If slashes are not used, then you must use the
universal date format of YYYYMMDD or the mm-dd-yyyy date format with dashes.
Carriage return – a final carriage return ensures that the last record will load into the
database.
Concordance Delimiters
Comma
Field break indicator, default is ? (ASCII 20), customizable, avoid characters in
data
Quote
Keeps text together, default is þ (ACSII 254) and is only required around fields
that have text and spaces, customizable, avoid characters in data
New Line
Manual line break and text wraps within a field, default is ® (ASCII 174),
customizable, avoid characters in data
New Record
Starts a new record, final carriage return loads the last record, cannot be
changed, industry standard
Delimiters are customizable for an organization's internal database design, but many
organizations ask vendors to use Concordance default delimiters. If your case records
contain the registered trademark symbol, you may want to consider changing the ® to
another symbol in the load file.
To review and edit delimited text files:
© 2015 LexisNexis. All rights reserved.
142
Concordance Evolution
Before importing a delimited text file into a Concordance Evolution, review the delimited text
file, and make any necessary corrections.
1. Open the delimited text file in any text editor program.
Delimited text files can be opened with any text editor program, such as Microsoft®
Notepad. We recommend using an advanced text editor program like TextPad ® or
UltraEdit®.
Below is an example of a delimited text file opened in UltraEdit:
2. Review the delimited text file for the following elements:
File Type: The file must be a text-based format with an extension of
.dat, .csv, .txt, .rtf, or any normal text file extension.
Field Names: If there is not a header row containing field names, open the associated
file for the first record and match the data in the record to the data in the file.
Delimiters: Note the delimiters used in the file. Concordance Evolution can handle any
standard text delimiters.
Date Format: Note the date format used in the file. Concordance Evolution can load
dates containing slashes in any order with either 2- or 4-digit years, with a maximum
of 8 digits. The only date formats Concordance Evolution can load without slashes is
the universal date format of YYYYMMDD and the mm-dd-yyyy date format with dashes.
3. Make the necessary edits, if applicable.
4. Save a copy of the file.
© 2015 LexisNexis. All rights reserved.
Administrating Concordance Evolution
143
To import delimited text files:
1. Click the Admin tab to open the Admin dashboard.
2. In the System pane on the left, click the dataset you want to import documents and
files.
Clicking the dataset opens the dataset's dashboard.
3. On the dataset dashboard toolbar, Import / Export button, and then click Import Load
File.
4. Define the Job Details
1. In the Job Name field, type the import job name.
2. (Optional) In the Description field, type the import job description.
3. (Optional) To load a saved job settings, from the Template list, select the template to
load and then click Next.
5. Define the Job Settings
1. For the Import File field, do one of the following:
Enter the directory, including the load file name, for the delimited text files you
want to import.
Click the Browse button and locate the file you want to import.
2. The first time you import delimited text files into a dataset that does not contain any
documents, only the Append option is available for selection in the Import Options
section.
If you are importing additional delimited text files into a dataset or importing a
delimited text file into a dataset that already contains documents, see Importing
subsequent data loads and overlays for more information.
3. When finished, click Next .
6. Define the File Formatting settings
Documents are likely to contain text delimiters — commas, quotes, and carriage returns
— that may confuse other programs, when reading the delimited text file. To avoid this
problem, Concordance Evolution allows you to specify the characters recognized as the
comma, quote, and newline delimiters in delimited text files.
If you are exporting and importing documents within the Concordance Evolution system,
then you will not need to change these default values. Change them only if you need to
match the delimiters in the load file.
1. Verify the default delimiter settings for the load file:
Delimiter Set list defaults to ConcordanceDefault delimiters.
Column (comma) list defaults to ¶(20). The Column (comma) delimiter is a field
delimiter that separates one field from the other.
© 2015 LexisNexis. All rights reserved.
144
Concordance Evolution
Quote list defaults to Þ(254). The Quote delimiter is a text qualifier delimiter that
encloses text to differentiate it from field delimiters which may appear in the data.
Newline defaults to ®(174). The Newline delimiter is a substitute carriage return.
Some programs use this character to designate multi-level fields or fields-withinfields. Concordance Evolution replaces all carriage returns or carriage return
linefeed combinations with the newline code within the data of a field. The record
itself is still terminated with a real carriage return and a line feed.
The delimiters available from the Column (comma), Quote, and Newline fields may
appear as square symbols or may not be displayed. How the lists are displayed
depends on the computer's language environment. The delimiters listed in the About
delimiter characters topic use the Tahoma font, which displays the characters
regardless of the language environment. All of the characters listed in the delimiter
character list can be selected as the delimiter, even if the symbols they represent do
not appear in the Column (comma), Quote, and Newline fields.
To see the list of available delimiter characters, see About delimiter characters.
Delimiters are customizable for an organization's internal database design, but many
organizations ask vendors to use Concordance Evolution default delimiters. If your
case records contain the registered trademark symbol, you may want to consider
changing the ® to another symbol in the load file.
2. In the Date Format list, click the date format used in the delimited text file.
The Date Format field defaults to the universal date format, yyyymmdd.
3. In the File Encoding Type list, select the Unicode™ type file encoding used for the
delimited text file:
ANSI (Default)
UTF-8
UTF-16
4. If the delimited text file contains a header row, select the File contains header row
check box.
By default, the File contains header row check box is not selected. If the delimited
text file does not contain a header row, make sure that the File contains header
row check box is not selected.
5. Click the Load Data button.
When you click the Load Data button a preview of the contents of the delimited text
file is displayed below the Load Data button.
6. When finished, click Next.
7. Define the Image import settings
© 2015 LexisNexis. All rights reserved.
Administrating Concordance Evolution
145
When you are importing delimited text files into Concordance Evolution, you can also
import the images associated with the delimited text files.
1. To import image files, select the Import Images check box.
2. In the Image Type list, click the format of the images to import.
All (Default)
TIFF
PDF
JPG
3. To specify the .LOG or .OPT file for the images associated with the records you are
importing, do one of the following:
Click the Browse button, in the Select File dialog box, locate and select the .LOG
or .OPT file for the images and then click OK.
In the Path to .LOG or .OPT file field, type the directory, including the .LOG or
.OPT file name for the images.
4. To add a substitution to part of the file path, first enter the directory for the .LOG or
.OPT file, then click the File Path Substitution button.
Clicking the File Path Substitution button opens the File Path Substitution dialog
box. In the Replace this field, enter the portion of the file path directory you want to
replace, and in the With this field, enter what you want to replace the portion of the
file path directory with. Click the Display New Path button to generate and view the
new path. Click the Save button to save the substitution.
5. When you are importing images, you can create a new image set for the images, or
add the images to an existing image set in Concordance Evolution. To specify the
imageset, do any of the following:
To create a new image set, click the New Imageset option and type the name of
the new image set.
To add the images to an existing image set, click the Existing Imageset option,
and in the image set list, click the image set name.
6. When finished, click Next.
8. Define the Text/OCR settings.
1. To import Text/OCR files, select the Import Text/OCR check box.
2. Do any of the following:
Select the Load File field with body content (choose first field if more than one)
option, and then select the field in the delimited text file that contains the content.
Import extracts content from one or more fields in the delimited text file. When you
select the Load File field with body content (choose first field if more than one)
option, in the field list, select the field you want to extract content. If you are
extracting from multiple delimited text file fields, click the first field you want to
extract content.
For example, if you have two content fields, OCR1 and OCR2, and you click the
OCR1 field, and Concordance Evolution will automatically extract the content from
© 2015 LexisNexis. All rights reserved.
146
Concordance Evolution
the OCR2 field after it has finished extracting the content from the OCR1 field.
Select the Load File field with text file location option, select the field from the
list.
If you want to add a substitution to part of the file path, click the File Path
Substitution button.
Clicking the File Path Substitution button opens the File Path Substitution dialog
box. In the Replace this field, enter the portion of the file path directory you want
to replace, and in the With this field, enter what you want to replace the portion of
the file path directory with. Click the Display New Path button to generate and
view the new path. Click the Save button to save the substitution.
Select the Text file location option, click the Browse button, locate and select the
top-level folder that contains the text files you want to import, and then from the
Matching field list select the field name that contains the document text.
Select the Text file located at .LOG or .OPT file location option, click the Browse
button, and then locate and select the .LOG or .OPT file containing the content you
want to import.
If you want to add a substitution to part of the file path, first enter the directory for
the .LOG or .OPT file, then click the File Path Substitution button.
Clicking the File Path Substitution button opens the File Path Substitution dialog
box. In the Replace this field, enter the portion of the file path directory you want
to replace, and in the With this field, enter what you want to replace the portion of
the file path directory with. Click the Display New Path button to generate and
view the new path. Click the Save button to save the substitution.
3. For Select field to import text, leave the default Content field selected.
If the text is not imported into the Content field (default), the text is not displayed in
the Snippet view. However, the field data is available for searching and can be
included in binders.
4. When finished, click Next.
9. Define the native file import settings.
When you are importing delimited text files into Concordance Evolution, you can also
import the native files associated with the delimited text files.
1. To include native files, click the Import Native check box.
2. Select the field in the delimited text file that contains the name and path of the
native files associated with each record.
If you want to add a substitution to part of the native file path, first select the
applicable field, then click the File Path Substitution button. Clicking the File Path
Substitution button opens the File Path Substitution dialog box. In the Replace this
field, enter the portion of the file path directory you want to replace, and in the With
this field, enter what you want to replace the portion of the file path directory with.
Click the Display New Path button to generate and view the new path. Click the
© 2015 LexisNexis. All rights reserved.
Administrating Concordance Evolution
147
Save button to save the substitution.
3. When finished, click Next.
10. Define the Family & Threads settings.
1. To include document family group relationships in the import, select the Family
Group and Parent to Child Mapping check box.
2. From the Document Id or Beginning Bates Field list, click the field in the delimited
text file that contains the document ID or beginning Bates number.
If the field you selected contains values that are a range, select the Field is a range
check box.
3. From the Parent ID or Beginning Attachment Field list, click the field in the delimited
text file that contains the parent document ID or beginning attachment number.
If the field you selected contains values that are a range, select the Field is a range
check box.
4. To add e-mail threading, select the Include the conversations check box, and select
the field in the delimited text file that contains the conversation index.
5. When finished, click Next.
11. Define the Field Mapping settings
The Field Mapping section allows you to specify which delimited text file source data is
stored in which dataset field. The dataset's field names are listed in the Destination Field
column, and the available source field names are listed in the Source Field column.
By default the Automatically Map fields with same name check box is selected above the
Field Mapping section. When the check box is selected, Concordance Evolution
automatically maps any dataset field names that exactly match the available source field
names.
1. To manually map the fields, clear the Automatically Map fields with same name
check box.
2. In the Source Field lists, click the delimited text file source field that corresponds to
each dataset field.
3. When finished, click Next.
12. Define the job options.
1. In the Import Description section, the _EVImportDescription field is automatically
© 2015 LexisNexis. All rights reserved.
148
Concordance Evolution
populated with during the import.
The default text is <Date(MM/DD/YYY)>_<Import type>_<Import job name>.
This
field can be edited if needed.
2. .In the
Cross Reference Field list, select a field from the delimited text file to use to
find documents that did not import properly.
3.
If you want Concordance Evolution to automatically generate and send a notification
to users when the import job is completed, select the Send Notification when this
job completes check box
4.
Click the Assign button, in the Choose User(s) & User Group(s) dialog box select
the recipients, and then click Save.
5.
In the Message field, type the notification message.
6.
To set the Near Native Conversion Priority processing, select one of the following
options:
Low
Medium
High
All jobs that are assigned a priority are processed the order of first in first processed.
High priority jobs take precedence over Low and Medium priority jobs.
6. To save the job settings as a template for another time, select the Save Job as
Template check box, and select one of the following:
Select New Template to save the settings as a new template.
Select Overwrite Existing Template to replace the settings of an existing
template.
7. Type a template name in the text box, and then click the Save button.
8. When finished, click Next.
For more information about notifications, see About notifications and alerts.
13. On the Summary tab, review the import settings you defined.
If you need to change any of the settings, click the import setting tab on the left, and
make the applicable edits.
14. In the Scheduling section of the Summary tab, select one of the following:
To run the import job immediately, select the Run immediately option.
To schedule the import to run at a later time, select the Run at a specified time
option, and then type the date and time or click the Calendar button to select the
© 2015 LexisNexis. All rights reserved.
Administrating Concordance Evolution
149
date, and time you want to run the import.
15. When ready, click Finish.
The import job is then created and displayed in the import job list on the Import
dashboard. Once the import job is complete, the Status column will display Completed
for the import job.
After importing the documents into the dataset, define the redactable document set for
the dataset on the Edit Dataset dashboard. The redactable document set is the set of
documents reviewers can redact and mark up in the Near Native view. A document set
can be the images document set, native file document set, or produced documents
document set. For more information, see Editing datasets.
To create an import job using a template:
Import job templates retain all the load file import job settings except for the import job
name, description and schedule settings. When you create a load file import job using an
import template you will need to enter the import job name and description, and schedule
the import job. And if you want to change any of the import template settings for the import
job, you will need to make those changes.
Import templates can only be used for datasets created under the same matter, and can
only be used for the same type of import from which the import template was originally
created.
1. Click the Admin tab to open the Admin dashboard.
2. In the System pane on the left, click the dataset for which you want to import
documents.
3. On the dataset dashboard toolbar, click the Import / Export button, and then click
Import Load File.
4. In the Job Name field, type the import job name.
5. In the Description field, type the import job description.
6. From the Template list, click the import template to use for the current import job.
The only load file import settings not included in the load file import template are the
import job name, description, and schedule settings. When you create an import job
using a load file import template you will need enter the import job name and
description, and schedule the import job. If you want to change any of the import
template settings for the import job, you will need to make those changes.
7. On the Summary tab, review the import settings you defined.
If you need to change any of the settings, click the import setting tab on the left, and
make the applicable edits.
8. In the Scheduling section of the Summary tab, select one of the following:
To run the import job immediately, select the Run immediately option.
© 2015 LexisNexis. All rights reserved.
150
Concordance Evolution
To schedule the import to run at a later time, select the Run at a specified time
option, and then type the date and time or click the Calendar button to select the
date, and time you want to run the import.
9. When ready, click Finish.
The import job is then created and displayed in the import job list on the Import
dashboard. Once the import job is complete, the Status column will display Completed
for the import job.
After importing the documents into the dataset, define the redactable document set for
the dataset on the Edit Dataset dashboard. The redactable document set is the set of
dataset documents reviewers can redact and mark up in the Near Native view in the
Review dashboard. A document set can be the images document set, native file
document set, or produced documents document set. For more information, see Editing
datasets.
To create a new import template:
If you are going to be creating numerous import jobs that will be using the same or similar
import settings, in Concordance Evolution you can create an import job and save its settings
to an import template. Load file import templates retain all the load file import job settings
except for the import job name, description and schedule settings.
When you are creating an import job and select an import template, the import settings from
the import template are automatically defined for the new import job.
Import templates can only be used for datasets created under the same matter, and can
only be used for the same type of import from which the import template was originally
created.
1. Click the Admin tab to open the Admin dashboard.
2. In the System pane on the left, click the dataset for which you want to create a Load
File import template.
3. On the dataset dashboard toolbar, click the Import / Export button, and then click
Import Load File.
4. In the Job Name field, type the import job name.
5. In the Description field, type the import job description.
6. Click Next.
7. Define all the import settings.
8. On the Job Options tab, click the Save Job as Template checkbox.
9. Click the New Template option and type the new import template name.
Import template names must be unique.
10. Click the Save button to save the import template.
© 2015 LexisNexis. All rights reserved.
Administrating Concordance Evolution
151
Load file import templates retain all the import job settings except for the import job
name, description and schedule settings.
11. When finished, click Next.
12. In the Summary section, review the import settings you defined.
If you need to change any of the settings, click the individual import section links in the
Summary section, and make the applicable edits.
To save import settings to an existing import template:
1. Click the Admin tab to open the Admin dashboard.
2. In the System pane on the left, click the dataset for which you want to modify a Load
File Import template.
Clicking the dataset opens the dataset's dashboard.
3. On the dataset dashboard toolbar, click the Import / Export button, and then click
Import Load File.
4. In the Import Job Name field, type the import job name.
5. In the Import Job Description field, type the import job description, and then click Next.
6. Define all the import settings.
7. On the Job Options tab, click the Save Job as Template button at the bottom of the
page.
8. Click the Overwrite Existing Template option and then select the existing template to
overwrite.
9. Click the Save button to save the import template.
Load file import template retain all the import job settings except for the import job
name, description and schedule settings.
10. When finished, click Next.
11. In the Summary section, review the import settings you defined.
If you need to change any of the settings, click the individual import section links in the
Summary section, and make the applicable edits.
Importing LAW PreDiscovery cases
With the LAW PreDiscovery Import command, you can import LAW PreDiscovery case documents
without using a load file. The LAW PreDiscovery project.ini file is the link between Concordance
Evolution and the LAW PreDiscovery Server. Once Concordance Evolution is connected to a
LAW PreDiscovery SQL server and the project.ini file is loaded, the case files are available to
import into a dataset for tracking and review.
© 2015 LexisNexis. All rights reserved.
152
Concordance Evolution
Before im porting a LAW PreDiscov ery case, keep the following in m ind:
Concordance Evolution only supports importing for LAW PreDiscovery SQL cases.
Only one LAW PreDiscovery case can be assigned to a dataset.
Do not import the same LAW PreDiscovery case into multiple datasets at the same time.
The LAW PreDiscovery project.ini file must be in one of the registered shares for the
organization.
The following fields are mapped automatically when importing LAW PreDiscovery cases:
LAW PreDiscovery
fields
Concordance Evolution
DocumentID
_EVLawDocId
AttachPID
_EVRelationShipParentID
ID
_EVRelationShipDocumentID
To load a LAW PreDiscovery case into Concordance Evolution:
1. Click the Admin tab to open the Admin dashboard.
2. In the System pane, locate and click the dataset you want to add a LAW PreDiscovery
case.
3. On the dataset's dashboard toolbar, click the Settings button, and then click LAW
PreDiscovery Case.
4. On the LAW PreDiscovery Cases dashboard toolbar, click the Add LAW PreDiscovery
Case button.
5. Click the Browse button, and then locate and select the project.ini file for the case you
want to load.
6. When finished, click OK.
7. Click the Test Connection button to validate the path entered in the field.
8. When finished, click the Save button.
The LAW PreDiscovery case files are now available for importing.
To import a LAW PreDiscovery case:
1. Click the Admin tab to open the Admin dashboard.
2. In the System pane on the left, click the dataset to import LAW PreDiscovery case files.
Clicking the dataset opens the dataset's dashboard.
3. On the dataset dashboard toolbar, click the Import / Export button, and then click
Import LAW PreDiscovery Case.
The Create Import Job dashboard opens.
© 2015 LexisNexis. All rights reserved.
Administrating Concordance Evolution
153
4. Define the Job Details
1. In the Job Name field, type the import job name.
2. (Optional) In the Description field, type the import job description.
3. (Optional) To load an existing job template, from the Template list, select the
template you want to load, and then click Next.
5. Define the Job Settings
Only the cases that are loaded into the selected organization are available.
1. In the Import Options section, select one of the following for importing Images and
Natives.
Append New - imports any new images and native files into the dataset.
Replace Matching - imports and replaces only those files that contain the same
unique identifier.
Append and Replace Matching - adds new images and native files and replaces
any files that contain the same unique identifier.
2. In the Document Selection section, to select documents for import, do one of the
following:
Select All Documents to import all the case documents.
Select Specific Tags, and then select the tag(s) to filter the selected case
documents for importing.
3. When finished, click Next.
6. Define the Content settings
1. To import a set of images, select the Import Images check box, and then select one
of the following:
To create a new imageset for the imported image files, click the New Imageset
option, and then type the name of the new imageset.
To add the images to an existing image set, click the Existing Imageset option,
and then in the imageset list click the name of the imageset to import.
2. To set the text import precedence for extracted, printed, or OCR text, select the
Import Text/OCR check box, and then in the Text Import Order field, select a text
option and using the arrows, rearrange the text import order as needed.
3. For documents that contain redacted text, from the Select field to import text list,
click the field you want to place redacted text.
If the redacted text is not imported into the Content field (default), the text is not
displayed in the Snippet view. However, the field data is available for searching and
can be included in binders.
© 2015 LexisNexis. All rights reserved.
154
Concordance Evolution
4. To import native files, select the Import Natives check box.
5. In the Family & Threads section, do any of the following:
To import the family group information from the case files, select the Create Family
Groups check box.
To import the conversation index from the case files, select the Create Threads
check box.
6. When finished, click Next.
7. Define the field mapping
The Field Mapping section allows you to map the LAW PreDiscovery case field data to
fields in Concordance Evolution where the data will be stored. Concordance Evolution
automatically reads the LAW PreDiscovery case field names and field types and creates
the same field name and type for the dataset. Dataset field names can be renamed
after import as needed.
Boolean tag fields from LAW PreDiscovery will not appear in the Field Mapping table.
Do not change the field name for near-deduplication fields as this will cause an error
when writing the data to the fields and the document will not appear in the Near
Duplicate view.
The following table defines the conversions for the LAW PreDiscovery field type to
Concordance Evolution field type:
LAW
Concordance
PreDiscover Evolution
y
Description
Text
Text
Default text field
Auto
increment
Text
Default text field
Date
Date
Date field matching the same date format as in
LAW PreDiscovery
List
Text (Authority List) Default text field. The information will populate the
Authority list in Concordance Evolution
Memo
Text
Default text field
Numeric
Number
Default numeric field
1. To select case fields for mapping, do any of the following:
To select all the case fields on the current page, click the check box in the title row
of the table.
© 2015 LexisNexis. All rights reserved.
Administrating Concordance Evolution
155
To select all the case fields available, use the paging at the bottom of the field list,
and then select the check box in the title row of the table for each page.
To select individual case fields, click the check box for the fields to map.
By default only 10 fields are shown per page. To change the number of fields
displayed, select the maximum number of fields to display from the Items per page
list.
2. For each field selected, in the Dataset Field column, do any of the following:
To map a case field to different dataset field, select the field name from the list.
To rename any of the selected fields, select the dataset field name, and then type
a new name for the field.
3. When finished, click Next.
8. Define the tag mapping
Tag Mapping allows you to map LAW PreDiscovery case tags to tags in Concordance
Evolution. Concordance Evolution automatically reads the LAW PreDiscovery case tag
names and creates the same tag name and type for the dataset. Selected Tag names
can be renamed as needed.
When a LAW PreDiscovery case tag is selected for import, the tag is applied to the
associated documents in Concordance Evolution. If the LAW PreDiscovery case tag is
renamed, the new tag name is applied to the associated documents.
1. To map case tags, in the Tag Mapping table, do any of the following:
To select all the LAW PreDiscovery tag fields on the current page, click the check
box in the title row of the table.
To select all the LAW PreDiscovery tag fields available, use the paging at the
bottom of the Tag Mapping table, and then select the check box in the title row of
the table for each page.
To select individual LAW PreDiscovery tag fields, click the check box for the tags to
map.
By default only 10 Tag fields are shown per page. To change the number displayed,
select the number from the Items per page list.
2. For each tag selected, in the Tag column, do any of the following:
To map a case tag to a different tag, select the tag name from the list.
To rename any of the selected tag names, in the Tag column, select the current
tag name, and then type a new name for the tag.
3. When finished, click Next
9. Define the job options
1.
For the Import Description section, in the _EVImportDescription field type the
© 2015 LexisNexis. All rights reserved.
156
Concordance Evolution
information you want to store in the dataset field regarding the import.
By default the field displays the date the import job was created, the job type, and
the job name.
2.
To send a notification to specific users when the production set job is completed,
select the Send a notification when this job completes check box.
3.
Click the Assign button, select the users to send the notification, and then click
Save.
The selected users are displayed in the Recipients field.
4.
In the Message field, type the notification message.
5.
To set the Near Native Conversion Priority processing, select one of the following
options:
Low
Medium
High
All jobs that are assigned a priority are processed the order of first in first processed.
High priority jobs take precedence over Low and Medium priority jobs.
6.
To save the job settings as a template for another time, select the Save Job as
Template check box, and select one of the following:
Select New to save the settings as a new template.
Select Overwrite Existing to replace the settings of an existing template.
6. Type a template name in the text box, and then click the Save button.
7. When finished, click Next.
For more information about notifications, see About notifications and alerts.
10. On the Summary tab, review the import settings.
If you need to change any of the settings, click the import setting tab on the left, and
make the applicable edits.
11. In the Scheduling section, select one of the following options:
To run the import job now, select Run immediately.
To schedule the import to run at a later time, select Run at a specified time, and then
type the date and time or click the Calendar button to select the date, and time you
want to run the import.
12. When ready, click Finish.
The import job is then created and displayed in the import job list on the Import
dashboard. Once the import job is complete, the Status column for the import job will
display Completed.
© 2015 LexisNexis. All rights reserved.
Administrating Concordance Evolution
157
Related Topics
About LAW PreDiscovery cases
Synchronizing data with LAW PreDiscovery
Importing subsequent data loads and overlays
Typically, all data for a specific case is not processed or received at the same time. Subsequent
loads of data may arrive on an ongoing basis. You may receive delimited text files to replace
existing data or need to load more data into existing records.
When you import additional delimited text files into a dataset, you can append the documents
to the dataset after the last record in the dataset or overlay the existing documents in the
dataset.
The overlay option compares the data between a single field in the load file and dataset to
determine if documents match each other. When documents match each other, the import loads
the data from the delimited text files into the matching existing dataset documents. When you
use the overlay option for a log file import you can choose whether documents that do not
match are appended to the dataset or not imported into the dataset. You can also choose
whether tags are deleted from or retained on the existing documents that match documents
being imported.
To import subsequent data loads using the Append option:
If you are going to append the documents you are importing, the import process is the same
process as a standard load file import, just make sure that the Append option is selected in
the Job Settings tab on the Create Import Job dashboard. For more information, see
Importing delimited text files.
To import subsequent data loads using the Overlay option:
1. Click the Admin tab to open the Admin dashboard.
2. In the System pane on the left, click the dataset you want to import documents.
Clicking the dataset opens the dataset's dashboard.
3. On the dataset dashboard toolbar, click the Import / Export button, and then click
Import Load File.
The Create Import Job dashboard opens.
© 2015 LexisNexis. All rights reserved.
158
Concordance Evolution
4. Define the Job Details
1. In the Job Name field, type the import job name.
2. (Optional) In the Description field, type the import job description.
The Destination Dataset list defaults to the currently selected dataset.
3. (Optional) To load a saved template, from the Template list, select the template to
load, then click Next.
5. Define the Job Settings
1. For the Import File field, do one of the following:
Enter the directory, including the load file name, for the delimited text files you
want to import.
Click the Browse button and locate the file you want to import.
2. In the Import Options section, select one of the following:
To append the records to the end of the dataset, select the Append option.
To overlay the existing records, select the Overlay option.
3. If the Overlay option is selected, specify the following:
For Images and Natives, select Replace matching records and append new
records or Replace matching records only.
For Tag Options, select Retain all tags on affected records or Remove all tags on
affected records.
4. When finished, click Next .
6. Define the File Formatting settings
Documents are likely to contain text delimiters — commas, quotes, and carriage returns
— that may confuse other programs, when reading the delimited text file. To avoid this
problem, Concordance Evolution allows you to specify the characters recognized as the
comma, quote, and newline delimiters in delimited text files.
If you are exporting and importing documents within the Concordance Evolution system,
then you will not need to change these default values. Change them only if you are
using these characters in the text of your documents.
1. Verify the default delimiter settings for the load file:
Delimiter Set list defaults to ConcordanceDefault
Column (comma) list defaults to ¶(20). The Column (comma) delimiter is a field
delimiter that separates one field from the other.
Quote list defaults to Þ(254). The Quote delimiter is a text qualifier delimiter that
encloses text to differentiate it from field delimiters which may appear in the data.
Newline defaults to ®(174). The Newline delimiter is a substitute carriage return.
Some programs use this character to designate multi-level fields or fields-withinfields. Concordance Evolution replaces all carriage returns or carriage return
linefeed combinations with the newline code within the data of a field. The record
© 2015 LexisNexis. All rights reserved.
Administrating Concordance Evolution
159
itself is still terminated with a real carriage return and a line feed.
The delimiters available from the Column (comma), Quote, and Newline fields may
appear as square symbols or may not be displayed. How the lists are displayed
depends on the computer's language environment. The delimiters listed in the About
delimiter characters topic use the Tahoma font, which displays the characters
regardless of the language environment. All of the characters listed in the delimiter
character list can be selected as the delimiter, even if the symbols they represent do
not appear in the Column (comma), Quote, and Newline fields.
To see the list of available delimiter characters, see About delimiter characters.
Delimiters are customizable for an organization's internal database design, but many
organizations ask vendors to use Concordance Evolution default delimiters. If your
case records contain the registered trademark symbol, you may want to consider
changing the ® to another symbol.
2. In the Date format list, click the date format used in the delimited text file.
The Date format field defaults to the universal date format, yyyymmdd.
3. In the File Encoding Type list, select one of the following Unicode™ type file
encoding used for the delimited text file:
ANSI (Default)
UTF-8
UTF-16
4. If the delimited text file contains a header row, select the File contains header row
check box.
By default, the File contains header row check box is not selected. If the delimited
text file does not contain a header row, make sure that the File contains header
row check box is not selected.
5. Click the Load Data button.
When you click the Load Data button a preview of the contents of the delimited text
file is displayed below the Load Data button.
6. When finished, click Next.
7. Define the Image import settings
When you are importing delimited text files into Concordance Evolution, you can also
import the images associated with the delimited text files.
1. To import image files, select the Import Images check box.
2. In the Type of images to import list, click the type of images to import.
All (Default)
© 2015 LexisNexis. All rights reserved.
160
Concordance Evolution
TIFF
PDF
JPG
3. To specify the .LOG or .OPT file for the images associated with the records you are
importing, do one of the following:
Click the Browse button, in the Select File dialog box, locate and select the .LOG
or .OPT file for the images and then click OK.
In the Path to .LOG or .OPT file field, type the directory, including the .LOG or
.OPT file name for the images.
4. If you want to add a substitution to part of the file path, first enter the directory for
the .LOG or .OPT file, then click the File Path Substitution button.
Clicking the File Path Substitution button opens the File Path Substitution dialog
box. In the Replace this field, enter the portion of the file path directory you want to
replace, and in the With this field, enter what you want to replace the portion of the
file path directory with. Click the Display New Path button to generate and view the
new path. Click the Save button to save the substitution.
When you are importing images, you can create a new image set for the images, or
add the images to an existing image set in Concordance Evolution.
5. To specify the image set, do any of the following:
To create a new image set, click the New Imageset option and type the name of
the new image set.
To add the images to an existing image set, click the Existing Imageset option,
and in the image set list, click the image set name.
6. When finished, click Next.
8.Define the Text/OCR settings.
1. To import Text/OCR files, select the Import Text/OCR check box.
2. Do any of the following:
Select the Load File field with body content (choose first field if more than one)
option, and then select the field in the delimited text file that contains the name
and path of the text or OCR file containing the content.
Import extracts content from one or more fields in the delimited text file. When you
select the Load File field with body content (choose first field if more than one)
option, in the field list, select the field you want to extract content. If you are
extracting from multiple delimited text file fields, click the first field you want to
extract content.
For example, if you have two content fields, OCR1 and OCR2, and you click the
OCR1 field, and Concordance Evolution will automatically extract the content from
the OCR2 field after it has finished extracting the content from the OCR1 field.
Select the Load File field with text file location option, select the field from the
list.
© 2015 LexisNexis. All rights reserved.
Administrating Concordance Evolution
161
If you want to add a substitution to part of the file path, first enter the directory for
the .LOG or .OPT file, then click the File Path Substitution button.
Clicking the File Path Substitution button opens the File Path Substitution dialog
box. In the Replace this field, enter the portion of the file path directory you want
to replace, and in the With this field, enter what you want to replace the portion of
the file path directory with. Click the Display New Path button to generate and
view the new path. Click the Save button to save the substitution.
Select the Text file location option, click the Browse button, locate and select the
top-level folder that contains the text files you want to import, and then from the
Matching field list, select the field name in the load file that contains the document
text.
Select the Text file located at .LOG or .OPT file location option, click the Browse
button, and then locate and select the .LOG or .OPT file containing the content you
want to import.
If you want to add a substitution to part of the file path, first enter the directory for
the .LOG or .OPT file, then click the File Path Substitution button.
Clicking the File Path Substitution button opens the File Path Substitution dialog
box. In the Replace this field, enter the portion of the file path directory you want
to replace, and in the With this field, enter what you want to replace the portion of
the file path directory with. Click the Display New Path button to generate and
view the new path. Click the Save button to save the substitution.
3. To import the text into a specific Concordance Evolution field, from the Select field to
import text list, click the field name.
If the text is not imported into the Content field (default), the text is not displayed in
the Snippet view. However, the field data is available for searching and can be
included in binders.
4. When finished, click Next.
9.Define the native file import settings.
When you are importing delimited text files into Concordance Evolution, you can also
import the native files associated with the delimited text files.
1. To import native files, click the Import Native check box.
2. Select the field in the delimited text file that contains the name and path of the
native files associated with each record.
If you want to add a substitution to part of the native file path, first select the
applicable field, then click the File Path Substitution button. Clicking the File Path
Substitution button opens the File Path Substitution dialog box. In the Replace this
field, enter the portion of the file path directory you want to replace, and in the With
this field, enter what you want to replace the portion of the file path directory with.
Click the Display New Path button to generate and view the new path. Click the
Save button to save the substitution.
© 2015 LexisNexis. All rights reserved.
162
Concordance Evolution
3. When finished, click Next.
10.Define the Family & Threads settings.
1. To include e-mail threading and document family group relationships in the import,
select the Family group and parent to child mapping check box.
2. From the Document ID or Beginning Bates Field list, click the field in the delimited
text file that contains the document ID or beginning Bates number.
If the field you selected contains values that are a range, select the This Field is a
range check box.
3. From the Parent ID or Beginning Attachment Field list, click the field in the delimited
text file that contains the parent document ID or beginning attachment number.
If the field you selected contains values that are a range, select the Field is a range
check box.
4. To add e-mail threading, select the Include conversations check box, and then from
the Load file field with conversation index list, select the field in the delimited text
file that contains the conversation index data.
5. When finished, click Next.
11.Define the Field Mapping settings
The Field Mapping section allows you to specify which delimited text file source data is
stored to which dataset field. The dataset's field names are listed in the Destination
Field column, and the available source field names are listed in the Source Field
column.
By default the Automatically map fields with same name check box is selected above
the Field Mapping section. When the check box is selected, Concordance Evolution
automatically maps any dataset field names that exactly match the available source field
names.
1. To manually map the fields, clear the Automatically map fields with same name
check box.
2. In the Source Field liss, click the delimited text file source field that corresponds to
each dataset field.
3. In the Select unique field to match column, select one field as the key field for
matching the documents from the load file to the dataset.
4. When finished, click Next.
12.Define the job options settings.
© 2015 LexisNexis. All rights reserved.
Administrating Concordance Evolution
163
1. From the Cross Reference Field list, select the field to use as a cross reference for
any load file import errors.
2. If you want Concordance Evolution to automatically generate and send a notification
to users when the import job is completed, select the Send Notification when this
job completes check box
3. Click the Assign button, in the Choose User(s) & User Group(s) dialog box select
the recipients, and then click Save.
4. In the Message field, type the notification message.
5. To set the Near Native Conversion Priority processing, select one of the following
options:
Low
Medium
High
All production jobs that are assigned a priority are processing the order of first in first
processed. High priority jobs take precedence over Low and Medium priority.
6. To save the job settings as a template for another time, select the Save Job as
Template check box, and select one of the following:
Select New to save the settings as a new template.
Select Overwrite Existing Template to replace the settings of an existing
template.
7. Type a template name in the text box, and then click the Save button.
8. When finished, click Next.
For more information about notifications, see About notifications and alerts.
13. On the Summary tab, review the import settings you defined.
If you need to change any of the settings, click the individual import section tabs on the
left, and make the applicable edits.
14. In the Scheduling section of the Summary tab, select one of the following:
To run the import job immediately, select the Run immediately option.
To schedule the import to run at a later time, select the Run at a specified time
option, and then type the date and time or click the Calendar button to select the
date, and time you want to run the import.
15. When ready, click Finish.
The import job is then created and displayed in the import job list on the Import
dashboard. Once the import job is complete, the Status column will display Completed
for the import job.
After importing the documents into the dataset, define the redactable document set for
the dataset on the Edit Dataset dashboard. The redactable document set is the set of
© 2015 LexisNexis. All rights reserved.
164
Concordance Evolution
dataset documents reviewers can redact and mark up in the Near Native view in the
Review dashboard. A document set can be the images document set, native file
document set, or produced documents document set. For more information, see Editing
datasets.
Viewing dataset documents
After importing documents into a dataset, you can quickly view the documents associated with
a dataset in the Snippet view of the Review dashboard to verify that the documents and
associated information imported correctly.
To view dataset documents:
1. Click the Admin tab to open the Admin dashboard.
2. In the System pane on the left, click the dataset to view documents.
3. On the dataset dashboard toolbar, click the View Documents button.
The Snippet tab of the Review dashboard opens to display the documents associated the
current dataset.
4. When finished viewing the documents, click Cancel.
Working with LAW PreDiscovery Cases
About LAW PreDiscovery and Concordance Evolution
LAW PreDiscovery converts electronic and paper documents for review and production.
Concordance Evolution has the ability to populate an empty dataset with tags, fields and files
directly from LAW PreDiscovery. Utilizing the LAW PreDiscovery case project.ini file as a link to
the data in the LAW PreDiscovery SQL server, Concordance Evolution can import the files for
review, including fields and tags.
Once the review process is completed, if images have redactions, the Concordance Evolution
administrator can execute a production run in Concordance Evolution to create images with
headers, footers, and redactions. The files are now ready to be synchronized with the LAW
PreDiscovery case. The synchronization writes the updated data back to LAW PreDiscovery and
places the new images in the LAW PreDiscovery $Image Archive\EVImages\Job# folder. The
documents, images, and tags are now accessible by LAW PreDiscovery to take advantage of its
processing power to generate a set of endorsed, numbered TIFF files for electronic production
or blow-back.
The following diagram depicts the LAW PreDiscovery/Concordance Evolution workflow:
© 2015 LexisNexis. All rights reserved.
Administrating Concordance Evolution
165
© 2015 LexisNexis. All rights reserved.
166
Concordance Evolution
Related Topics
Importing LAW PreDiscovery cases
Synchronizing data with LAW PreDiscovery
Importing LAW PreDiscovery cases
With the LAW PreDiscovery Import command, you can import LAW PreDiscovery case documents
without using a load file. The LAW PreDiscovery project.ini file is the link between Concordance
Evolution and the LAW PreDiscovery Server. Once Concordance Evolution is connected to a
LAW PreDiscovery SQL server and the project.ini file is loaded, the case files are available to
import into a dataset for tracking and review.
Before im porting a LAW PreDiscov ery case, keep the following in m ind:
Concordance Evolution only supports importing for LAW PreDiscovery SQL cases.
Only one LAW PreDiscovery case can be assigned to a dataset.
Do not import the same LAW PreDiscovery case into multiple datasets at the same time.
The LAW PreDiscovery project.ini file must be in one of the registered shares for the
organization.
The following fields are mapped automatically when importing LAW PreDiscovery cases:
LAW PreDiscovery
fields
Concordance Evolution
DocumentID
_EVLawDocId
AttachPID
_EVRelationShipParentID
ID
_EVRelationShipDocumentID
To load a LAW PreDiscovery case into Concordance Evolution:
1. Click the Admin tab to open the Admin dashboard.
2. In the System pane, locate and click the dataset you want to add a LAW PreDiscovery
case.
3. On the dataset's dashboard toolbar, click the Settings button, and then click LAW
PreDiscovery Case.
4. On the LAW PreDiscovery Cases dashboard toolbar, click the Add LAW PreDiscovery
Case button.
5. Click the Browse button, and then locate and select the project.ini file for the case you
want to load.
6. When finished, click OK.
© 2015 LexisNexis. All rights reserved.
Administrating Concordance Evolution
167
7. Click the Test Connection button to validate the path entered in the field.
8. When finished, click the Save button.
The LAW PreDiscovery case files are now available for importing.
To import a LAW PreDiscovery case:
1. Click the Admin tab to open the Admin dashboard.
2. In the System pane on the left, click the dataset to import LAW PreDiscovery case files.
Clicking the dataset opens the dataset's dashboard.
3. On the dataset dashboard toolbar, click the Import / Export button, and then click
Import LAW PreDiscovery Case.
The Create Import Job dashboard opens.
4. Define the Job Details
1. In the Job Name field, type the import job name.
2. (Optional) In the Description field, type the import job description.
3. (Optional) To load an existing job template, from the Template list, select the
template you want to load, and then click Next.
5. Define the Job Settings
Only the cases that are loaded into the selected organization are available.
1. In the Import Options section, select one of the following for importing Images and
Natives.
Append New - imports any new images and native files into the dataset.
Replace Matching - imports and replaces only those files that contain the same
unique identifier.
Append and Replace Matching - adds new images and native files and replaces
any files that contain the same unique identifier.
2. In the Document Selection section, to select documents for import, do one of the
following:
Select All Documents to import all the case documents.
Select Specific Tags, and then select the tag(s) to filter the selected case
documents for importing.
3. When finished, click Next.
6. Define the Content settings
© 2015 LexisNexis. All rights reserved.
168
Concordance Evolution
1. To import a set of images, select the Import Images check box, and then select one
of the following:
To create a new imageset for the imported image files, click the New Imageset
option, and then type the name of the new imageset.
To add the images to an existing image set, click the Existing Imageset option,
and then in the imageset list click the name of the imageset to import.
2. To set the text import precedence for extracted, printed, or OCR text, select the
Import Text/OCR check box, and then in the Text Import Order field, select a text
option and using the arrows, rearrange the text import order as needed.
3. For documents that contain redacted text, from the Select field to import text list,
click the field you want to place redacted text.
If the redacted text is not imported into the Content field (default), the text is not
displayed in the Snippet view. However, the field data is available for searching and
can be included in binders.
4. To import native files, select the Import Natives check box.
5. In the Family & Threads section, do any of the following:
To import the family group information from the case files, select the Create Family
Groups check box.
To import the conversation index from the case files, select the Create Threads
check box.
6. When finished, click Next.
7. Define the field mapping
The Field Mapping section allows you to map the LAW PreDiscovery case field data to
fields in Concordance Evolution where the data will be stored. Concordance Evolution
automatically reads the LAW PreDiscovery case field names and field types and creates
the same field name and type for the dataset. Dataset field names can be renamed
after import as needed.
Boolean tag fields from LAW PreDiscovery will not appear in the Field Mapping table.
Do not change the field name for near-deduplication fields as this will cause an error
when writing the data to the fields and the document will not appear in the Near
Duplicate view.
The following table defines the conversions for the LAW PreDiscovery field type to
Concordance Evolution field type:
© 2015 LexisNexis. All rights reserved.
Administrating Concordance Evolution
LAW
Concordance
PreDiscover Evolution
y
Description
Text
Text
Default text field
Auto
increment
Text
Default text field
Date
Date
Date field matching the same date format as in
LAW PreDiscovery
List
Text (Authority List) Default text field. The information will populate the
Authority list in Concordance Evolution
Memo
Text
Default text field
Numeric
Number
Default numeric field
169
1. To select case fields for mapping, do any of the following:
To select all the case fields on the current page, click the check box in the title row
of the table.
To select all the case fields available, use the paging at the bottom of the field list,
and then select the check box in the title row of the table for each page.
To select individual case fields, click the check box for the fields to map.
By default only 10 fields are shown per page. To change the number of fields
displayed, select the maximum number of fields to display from the Items per page
list.
2. For each field selected, in the Dataset Field column, do any of the following:
To map a case field to different dataset field, select the field name from the list.
To rename any of the selected fields, select the dataset field name, and then type
a new name for the field.
3. When finished, click Next.
8. Define the tag mapping
Tag Mapping allows you to map LAW PreDiscovery case tags to tags in Concordance
Evolution. Concordance Evolution automatically reads the LAW PreDiscovery case tag
names and creates the same tag name and type for the dataset. Selected Tag names
can be renamed as needed.
When a LAW PreDiscovery case tag is selected for import, the tag is applied to the
associated documents in Concordance Evolution. If the LAW PreDiscovery case tag is
renamed, the new tag name is applied to the associated documents.
1. To map case tags, in the Tag Mapping table, do any of the following:
To select all the LAW PreDiscovery tag fields on the current page, click the check
box in the title row of the table.
© 2015 LexisNexis. All rights reserved.
170
Concordance Evolution
To select all the LAW PreDiscovery tag fields available, use the paging at the
bottom of the Tag Mapping table, and then select the check box in the title row of
the table for each page.
To select individual LAW PreDiscovery tag fields, click the check box for the tags to
map.
By default only 10 Tag fields are shown per page. To change the number displayed,
select the number from the Items per page list.
2. For each tag selected, in the Tag column, do any of the following:
To map a case tag to a different tag, select the tag name from the list.
To rename any of the selected tag names, in the Tag column, select the current
tag name, and then type a new name for the tag.
3. When finished, click Next
9. Define the job options
1.
For the Import Description section, in the _EVImportDescription field type the
information you want to store in the dataset field regarding the import.
By default the field displays the date the import job was created, the job type, and
the job name.
2.
To send a notification to specific users when the production set job is completed,
select the Send a notification when this job completes check box.
3.
Click the Assign button, select the users to send the notification, and then click
Save.
The selected users are displayed in the Recipients field.
4.
In the Message field, type the notification message.
5.
To set the Near Native Conversion Priority processing, select one of the following
options:
Low
Medium
High
All jobs that are assigned a priority are processed the order of first in first processed.
High priority jobs take precedence over Low and Medium priority jobs.
6.
To save the job settings as a template for another time, select the Save Job as
Template check box, and select one of the following:
Select New to save the settings as a new template.
Select Overwrite Existing to replace the settings of an existing template.
6. Type a template name in the text box, and then click the Save button.
© 2015 LexisNexis. All rights reserved.
Administrating Concordance Evolution
171
7. When finished, click Next.
For more information about notifications, see About notifications and alerts.
10. On the Summary tab, review the import settings.
If you need to change any of the settings, click the import setting tab on the left, and
make the applicable edits.
11. In the Scheduling section, select one of the following options:
To run the import job now, select Run immediately.
To schedule the import to run at a later time, select Run at a specified time, and then
type the date and time or click the Calendar button to select the date, and time you
want to run the import.
12. When ready, click Finish.
The import job is then created and displayed in the import job list on the Import
dashboard. Once the import job is complete, the Status column for the import job will
display Completed.
Related Topics
About LAW PreDiscovery cases
Synchronizing data with LAW PreDiscovery
Synchronizing data with LAW PreDiscovery
After reviewing LAW PreDiscovery case records in Concordance Evolution, you can write the
information back to the LAW PreDiscovery server for further processing.
As a best practice, make sure that the case file is not open in LAW PreDiscovery before
executing the synchronization job.
To write data back to a LAW PreDiscovery case:
1. Click the Admin tab to open the Admin dashboard.
2. In the System pane on the left, click the dataset you want to export.
Clicking the dataset opens the dataset's dashboard.
© 2015 LexisNexis. All rights reserved.
172
Concordance Evolution
3. On the dataset's dashboard toolbar, click the Import / Export button, and then click
LAW PreDiscovery Sync.
4. Define the Job Details
1. In the Job Name field, type the synchronization job name..
2. (Optional) In the Description field, type the export job description.
3. (Optional) To load a saved job template, from the Template list, select the template
to load, then click Next.
5. Define the Job settings:
1. In the Sync Tag Name field, type a tag name to tag all records for the job in the LAW
PreDiscovery case.
All synchronized documents are tagged automatically with the Sync Tag Name.
2. In the Select Documents for Sync, do one of the following:
To send all the documents in the dataset, click the All documents option.
To send only the documents from the results from a saved query, click the Saved
Query option, and then select a saved query from the list to execute the query
and pull the documents.
To send only the documents that are tagged with a specific tag, click the Tag
option, and then select a tag from the list.
To send only the documents from the results of a query, click the Query option,
and then type the query in the field.
3. When finished, click Next.
4. When prompted, click OK to confirm the number of documents.
6. Define the Markup settings:
1. To update the images associated with the selected documents, click the Images
check box, and then do one the following.
To send only the images from the results of a save query, click the Saved Query
option, and then select a saved query from the list.
To send only the image that are tagged with a specific tag, click the Tag option,
and then select a tag from the list.
To send only the images from the results of a query, click the Query option, and
then type a query in the field.
Images produced will be from the Redactable Set that is assigned to the dataset and
the images must meet both query criteria specified in the job. If the image does not
meet both query criteria, the image is excluded from the synchronization job process.
2. In the Color section, select one of the following:
To convert the documents to shades of gray, select Black and White.
To produce the image in color (4-bit -16 colors), select Color.
© 2015 LexisNexis. All rights reserved.
Administrating Concordance Evolution
173
Concordance Evolution creates single page images to place into LAW PreDiscovery.
3. To burn markups onto the images, select the Include Burn Markups check box, and
then select the check box for each markup to burn onto the images.
4. When finished, click Next.
The synchronization job will create a new folder, EVImage, within the case $Image
Archive folder. All synchronization jobs will have it's own folder. Each job folder will
consist of volume folders each containing a maximum 50 documents with no page
limits. For example, $Image Archive\EVImage\Job<JobID>\0001 etc.
7. Define the Field mappings:
The Field Mapping section allows you to map the field data in Concordance Evolution to
the case fields in LAW PreDiscovery for updating and processing.
The default Concordance Evolution fields are mapped to the default corresponding LAW
PreDiscovery field. The data in the selected Concordance Evolution field will overwrite
the data in the corresponding LAW PreDiscovery field.
For new fields, the conversion from Concordance Evolution to LAW PreDiscovery is as
follows:
Concordance Evolution Field Type
LAW PreDiscovery Field Type
Text
Memo
Date
Date
Numeric
Numeric
The following fields cannot be synchronized: Begdoc#, Enddoc#, Attachmt, Batesrng,
BegAttach, EndAttach, EDFolder, EdFolderID, EdSession, EdSessionID, EdSource,
EDSourceID, ID, PgCount, ParentID, TimeZoneProc, TimeZoneID, and CustodianID.
1. To select fields for mapping, do any of the following:
To select all the fields, select the check box at the top of the of the Field Mapping
table.
To select individual fields, select the check box next to the field to map.
2. To change the field mappings for the selected fields, in the LAW PreDiscovery Fields
column, do any of the following:
To map to an existing field, click the arrow next to the LAW PreDiscovery field, and
then select the field name.
To map to a new field, click the field to highlight the current field name, type a new
field name, and the press Enter.
3. When finished, click Next.
4. When prompted, click OK to confirm the number of documents to be imaged.
8. Define the Tags mapping:
© 2015 LexisNexis. All rights reserved.
174
Concordance Evolution
Tag Mapping allows you to select which Concordance Evolution tags are written back to
LAW PreDiscovery. LAW PreDiscovery automatically reads the Concordance Evolution tag
names and updates the mapped tag for the corresponding document in the database.
Selected Tag names can be renamed as needed. If the LAW PreDiscovery tag is
renamed, the new tag name is applied to the associated documents.
1. To write tag information back to LAW PreDiscovery, do any of the following:
To select all the tags, select the check box at the top of the Tag Mapping table.
To select one or more tags, in the Concordance Evolution Tag column, select the
check box next to the tag name.
2. In the LAW PreDiscovery Tag column, do any of the following:
To map to an existing tag, click the arrow next to the LAW PreDiscovery tag, and
then select a tag name.
To map to a new tag, click the field to highlight the current tag name, type a new
tag name, and the press Enter.
When sending Concordance Evolution tags to LAW PreDiscovery the tags are
converted to Tag (Boolean) type fields. All Concordance Evolution folders, structure,
and rules will be lost.
3. When finished, click Next.
9. Define the Job Options
1. To generate and send a notification to users when the export job is completed, in
the Notifications box, select the Send Notification check box.
2. For the Recipients, click the Assign button, and select the check box for the user
groups and/or individual users to which you want to send the notification, and then
click OK.
3. In the Message field, type the notification message.
4. To set the Near Native Conversion Priority processing, select one of the following
options:
Low
Medium
High
All jobs that are assigned a priority are processed the order of first in first processed.
High priority jobs take precedence over Low and Medium priority jobs.
5. To save the job settings as a template for use at a later time, select the Save Job as
Template check box, and then do one of the following:
Click New, in the template field type the name of the template, and then click
Save.
Click Overwrite Existing, from the list select a saved template, and then click
Save.
© 2015 LexisNexis. All rights reserved.
Administrating Concordance Evolution
175
6. When finished, click Next.
10. On the Summary tab, review the synchronization settings you defined.
If you need to change any of the settings, click the individual import section tabs on the
left, and make the applicable edits.
11. In the Scheduling section of the Summary tab, select one of the following:
To run the synchronization job immediately, select the Run immediately option.
To schedule the synchronization to run at a later time, select the Run at a specified
time option, and then type the date and time or click the Calendar button to select the
date, and time you want to run the import.
12. When ready, click Finish.
After the job is complete, make sure to view the job log or job reprocessing log to locate
documents that did not synchronize with LAW PreDiscovery.
Related Topics
About LAW PreDiscovery cases
Importing LAW PreDiscovery cases
Viewing jobs
Reprocessing jobs
Binders
About binders
Once the data is imported into a dataset you can use Binders to organize the data for reviews.
In Concordance Evolution, binders are used as containers to organize and track review set
documents for different review stages. For example, Review_First_Pass and
Review_Second_Pass.
Each binder within a dataset may contain multiple review sets The following table shows how
a single dataset can be structured to distribute documents among multiple binders and review
sets. A single document may be assigned within multiple binders; however, the document can
only be assigned to one review set within a single binder. For example, document
DCN0000126 appears in three binders, but only one review set per binder.
© 2015 LexisNexis. All rights reserved.
176
Concordance Evolution
When organizing binders and rev iew sets, keep the following in m ind:
A single dataset may contain one or more binders
A single binder may contain one or more review sets
A single document can only be assigned to one review set within a binder; however, the
document can be included in multiple binders within a dataset.
Binders provide the ability to restrict review sets to near-native, image, and/or production
sets
Secure check in/check out option can be setup for review sets within a binder
Binders are traceable with specific reviewed/not reviewed tags
Each binder can be setup to appear only on the Review dashboard for the user group(s)
assigned to the binder.
Related Topics
Creating Binders
Managing Binders
Creating binders
After creating a dataset and importing the documents, you can create one or more binders to
organize review sets and documents. Each binder may contain multiple review sets and a
single document may only be assigned to one review set within a binder.
To create a binder:
1. Click the Admin tab to open the Admin dashboard.
2. In the System pane on the left, click the dataset to which you want to add a review set.
3. On the dataset dashboard toolbar, click the Create Binder button.
© 2015 LexisNexis. All rights reserved.
Administrating Concordance Evolution
177
4. In the Binder Name field, type a name for the binder.
5. (Optional) In the Description field, type a description for the binder.
6. To give users permission to check the documents in and out securely, make sure that the
Secure Check Out Enabled check box is selected.
If your Concordance Evolution system administrator set up the Binder with Secure
Check Out Enabled option, when a review set is checked out it locks the review set so
that others cannot check them out or view the documents. If the Secure Check Out
Enabled option is not selected, when a review set is checked out the Reviewed and Not
Reviewed tags for the review set are not available for other users.
7. To select the documents to include in the binder, in the Enable Document & Image Sets
section, do any of the following:
To select all the documents and image sets assigned to the dataset, select the All
Sets option.
To include a selected set of documents and image sets, select the Specific Sets
option, and then select the check box for each set to include from the dataset.
8. When finished, click Save.
Managing binders
The Binder Management dashboard provides the tools for managing permissions, review sets,
and assigning user groups and user access for reviewing in the Review dashboard. For more
information about review sets, see Creating review sets.
Once a binder is created, the binder is available from the Review dashboard for the assigned
reviewers. Binder access is managed by user groups. If multiple binders exist for a dataset,
you may need to limit which user group(s) can view a binder and its review sets. For example,
three binders are assigned to Dataset0001; however, user group A only needs to view one of
the binders. Using policies, you can deny user group A access to the other two binders. When
the reviewers associated with user group A open Concordance Evolution, only one binder is
displayed on the Review dashboard.
Assigning users to a binder:
1. Click the Admin tab to open the Admin dashboard.
2. In the System pane on the left, locate and open the dataset with the binder and review
sets you want to assign users.
3. On the dataset's dashboard toolbar, click the Manage Permissions button.
4. On the Datasets Permissions dashboard toolbar, click the Add Group button.
5. In the Select User Group(s) dialog box, select the User Group to grant access to the
binder and review set, and then click Save.
© 2015 LexisNexis. All rights reserved.
178
Concordance Evolution
6. In the Actions column, click the Permissions link.
7. In the Permissions for User Group section, click the Assign Roles button.
8. Click the check box next to the role name for each user group to assign to the dataset,
and then click OK.
9. When finished, click the Save button to save the role(s)
10. On the Dataset Permissions dashboard toolbar, click the Back button.
The user group is added to the Authorized Users table.
Editing a binder:
1. Click the Admin tab to open the Admin dashboard.
2. In the System pane on the left, click the dataset that contains the binder you want to
edit.
3. On the dataset dashboard, in the Review Binders table, click the Edit link for the binder
you want to edit.
4. Make any necessary changes, and then click Save.
Deleting a binder:
1. Click the Admin tab to open the Admin dashboard.
2. In the System pane on the left, click the dataset that contains the binder you want to
delete.
3. On the dataset dashboard, in the Review Binders table, click the Delete link for the
binder you want to edit.
4. When prompted to confirm the deletion, in the Delete Binder dialog box, type the name
of the binder, and then click Yes.
Review Sets
About review sets
Review sets in Concordance Evolution are used to organize review documents in a dataset.
Review sets are associated with a binder and a single binder may contain multiple review sets.
A single review set may contain all documents in the dataset or selected documents. Dataset
documents are not visible to a reviewer in the Review dashboard until documents are added to
a review set and the user is assigned to the review set. A Concordance Evolution System
Admin can grant read-only access to any user that is not assigned to a review set to view
those documents.
Unlike other jobs in Concordance Evolution, you do not schedule review set jobs. Once you
create the review set job, the job runs immediately. Once the job is completed, you will receive
a notification and the review set information is displayed on the Binder Management
© 2015 LexisNexis. All rights reserved.
Administrating Concordance Evolution
179
dashboard. For more information about creating a review sets, see Creating review sets.
Review sets can be split into additional review sets and the review set(s) are added to the
binder the original review set was created in. Additional documents can be added to a review
set. For more information, see Managing review sets.
Related Topics
Creating review sets
Assigning reviewers
Managing review sets
About Binders
Creating review sets
Once a binder is created, review sets can be created from the document or image sets
assigned to the binder on the Binder Management dashboard. Unlike other jobs in
Concordance Evolution, you do not schedule review set jobs to run immediately or at a later
time. Once you create the review set, the job runs immediately.
To create a review set:
1. Click the Admin tab to open the Admin dashboard.
2. In the System pane on the left, click the binder name for the dataset you want to add a
review set.
The Binder Management dashboard is displayed.
3. On the Binder Management toolbar, click the Create Review Sets button.
4. In the Reviewset Name field, type a name for the review set.
The review set name must be unique for the dataset.
5. (Optional) In the Description field, type a description for the review set.
6. In the Start Date field, enter the start date for reviewing the documents in the review
set.
You can type the start date or click the calendar button and then click the start date.
The Start Date field defaults to today's date.
7. In the End Date field, enter the end date for completing the review of the documents in
© 2015 LexisNexis. All rights reserved.
180
Concordance Evolution
the review set.
You can type the end date or click the calendar button to click the end date.
The End Date field defaults to tomorrow's date.
8. In the Select documents section, select one of the following:
All Dataset Documents (default)
1. Click the All Dataset Documents option.
2. Click the Retrieve Documents button.
When you click the Retrieve Documents button, a message appears at the top of
the dashboard indicating the number of documents available in the dataset that
are not currently part of the review set.
3. To manually select a subset of all the retrieved documents to include in the review
set, click the Document Explorer button.
When you click the Document Explorer button, all documents retrieved are
displayed in the Snippet view. By default, all the documents retrieved are selected
in the Snippet or Table view. To select only a subset of the documents, remove
the check mark for the documents you do not want to include in the review set.
4. When finished, click the Done button.
When you click the Done button, you are returned to the Add Documents to
Reviewset dashboard. Only the selected documents are now ready to be added
to the review set.
Filter by Tag
The Filter by Tag option locates all the documents in the dataset that have been
assigned a specific tag(s) you select.
1. Click the Filter by Tag option.
When you click the Tag option, the tag list for the dataset is displayed.
2. Click the tag(s) you want to use to locate documents.
To select multiple tags, use SHIFT+click or CTRL+click.
3. Click the Retrieve Documents button.
When you click the Retrieve Documents button, a message appears at the top of
the dashboard indicating the number of documents available in the dataset that
are not currently part of the review set.
3. To manually select a subset of all the retrieved documents to include in the review
set, click the Document Explorer button.
When you click the Document Explorer button, all documents retrieved are
displayed in the Snippet view. By default, all the documents retrieved are selected
© 2015 LexisNexis. All rights reserved.
Administrating Concordance Evolution
181
in the Snippet or Table view. To select only a subset of the documents, remove
the check mark for the documents you do not want to include in the review set.
4. When finished, click the Done button.
When you click the Done button, you are returned to the Add Documents to
Reviewset dashboard. Only the selected documents are now ready to be added
to the review set.
Filter by Saved Query
The Query option locates all the documents in the dataset that match the search
query you enter.
1. Click the Filter by Saved Query option.
2. Select the saved search query you want to use to locate documents.
3. Click the Retrieve Documents button.
When you click the Retrieve Documents button, the a message appears at the top
of the dashboard indicating the number of documents available in the dataset
that are not currently part of the review set.
4. To manually select a subset of all the retrieved documents to include in the review
set, click the Document Explorer button.
When you click the Document Explorer button, all documents retrieved are
displayed in the Snippet view. By default, all the documents retrieved are selected
in the Snippet or Table view. To select only a subset of the documents, remove
the check mark for the documents you do not want to include in the review set.
5. When finished, click the Done button.
When you click the Done button, you are returned to the Add Documents to
Reviewset dashboard. Only the selected documents are now ready to be added
to the review set.
Query
The Query option locates all the documents in the dataset that match the search
query you enter.
1. Click the Query option.
2. In the Query field type the search query to locate documents.
3. Click the Retrieve Documents button.
When you click the Retrieve Documents button, the a message appears at the top
of the dashboard indicating the number of documents available in the dataset
that are not currently part of the review set.
4. To manually select a subset of all the retrieved documents to include in the review
set, click the Document Explorer button.
© 2015 LexisNexis. All rights reserved.
182
Concordance Evolution
When you click the Document Explorer button, all documents retrieved are
displayed in the Snippet view. By default, all the documents retrieved are selected
in the Snippet or Table view. To select only a subset of the documents, remove
the check mark for the documents you do not want to include in the review set.
5. When finished, click the Done button.
When you click the Done button, you are returned to the Add Documents to
Reviewset dashboard. Only the selected documents are now ready to be added
to the review set.
In Concordance Evolution you can divide the documents within a review set into multiple
review sets. When you create multiple review sets using this option, when the review
sets are created, each of the review sets will have the same name with a number
appended to each review set name to make the names unique, and the review set
description, start date, and due date will be the same for each of the review sets.
9. To divide the documents into multiple review sets, select any of the following options:
To create one reviewset, click Single Reviewset.
To divide the documents into multiple reviewset, click Reviewsets and type the
number of review sets you want.
To divide the reviewset by a specific number of documents, click the Doc(s) per
Reviewset, and then type the number of documents you want in each reviewset.
By default, the following rules are selected for the review set:
Keep families and threads together if there are documents in the review set that
belong to a document family group or the same e-mail thread, those documents are
kept together in the review set.
Keep duplicates together if there are duplicate documents and/or e-mail messages in
the review set, the duplicate documents or e-mail messages are kept together in the
review set.
10. If you do not want a review set rule to apply to the review set(s), clear the check box for
the rule.
Once the review set rules are defined and saved for the review set, they cannot be
modified.
11. When finished, click the Save button to create the review set job.
Clicking the Confirm button opens the Binder Management dashboard. Once the review
set job has finished running, the review set(s) will be displayed in the review sets table
on the Binder Management dashboard, and you can assign users to the review set on
the Edit Review Set dashboard.
Assigning reviewers
After creating a review set, reviewers are generally assigned to a review set at the binder level
© 2015 LexisNexis. All rights reserved.
Administrating Concordance Evolution
183
as part of a user group. You can assign a single user at the review set level when the Secure
Checkout option is enabled for the binder. However, if the reviewer is part of a user group that
has been denied access to the binder, the user will not have access to the review set.
For more information about assigning users to review sets, see Managing Binders.
To assign users to a review set:
1. Click the Admin tab to open the Admin dashboard.
2. In the System pane on the left, click the binder name for the dataset to which you want
to assign users to a review set.
The Binder Management dashboard is displayed.
3. In the Review Sets table, in the Action column, click the Edit link for the review set you
want to assign users.
4. On the Edit Review Set dashboard, next to the Assigned Users field, click the Assign
button.
5. In the Choose User(s) dialog box, select the user to assign to the review set, and then
click Save.
6. When finished, click the Save button.
Managing review sets
Once a review set is created, you can edit the review set's name, description, user assignment,
and due date. You can also add additional documents to the review set or remove individual
documents, or split a review set into more than one set. After a review set is created, you
cannot edit the review set's start date or review set rules.
To edit a review set:
Review sets can be edited on the Edit Reviewset dashboard. You can edit the review set's
name, description, user assignments, and due date. You cannot edit the review set's start
date or review set rules.
1. Click the Admin tab to open the Admin dashboard.
2. In the System pane on the left, click the binder name under the dataset that contains
the review set to edit.
The Binder Management dashboard is displayed.
3. In the Review Sets table, from the Action column, click the Edit link for the review set to
edit.
© 2015 LexisNexis. All rights reserved.
184
Concordance Evolution
4. Make any necessary changes.
5. To edit the users list, do any of the following:
To add additional users, click the Assign button, in the Choose User(s) dialog box,
select the check box next to user(s) and/or group(s) you want to assign to the review
set, and then click Save.
To remove a user, in the Assigned Users field, select the name you want to remove,
and then click the Unassign button.
6. When finished, click the Save button.
When you click the Save button, your changes are saved and the Binder Management
dashboard opens.
To add additional documents to a review set:
Once a review set is created, you can add additional documents from the dataset to the
review set on the Add Documents to Reviewset dashboard.
1. Click the Admin tab to open the Admin dashboard.
2. In the System pane on the left, click the binder name for the dataset to add documents
to a review set.
The Binder Management dashboard opens.
3. In the Review Sets table, in the Action column, to open the Add Documents to Reviewset
dashboard, do one of the following:
Click the Edit link, and then click the Add Docs button.
Click the Add link.
The Add Documents to Reviewset dashboard opens.
4. To add additional documents from the current dataset to the review set, in the Select
documents section, select one of the following:
All Dataset Documents (default)
1. Click the All Dataset Documents option.
2. Click the Retrieve Documents button.
When you click the Retrieve Documents button, a message appears at the top of
the dashboard indicating the number of documents available in the dataset that
are not currently part of the review set.
3. To manually select a subset of all the retrieved documents to add to the review
set, click the Document Explorer button.
When you click the Document Explorer button, all documents retrieved are
displayed in the Snippet view. By default, all the documents retrieved are selected
© 2015 LexisNexis. All rights reserved.
Administrating Concordance Evolution
185
in the Snippet or Table view. To select only a subset of the documents, remove
the check mark for the documents you do not want to include in the review set.
4. When finished, click the Done button.
When you click the Done button, you are returned to the Add Documents to
Reviewset dashboard. Only the selected documents are now ready to be added
to the review set.
Filter by Tag
The Filter by Tag option locates all the documents in the dataset that have been
assigned a specific tag(s) you select.
1. Click the Filter by Tag option.
When you click the Tag option, the tag list for the dataset is displayed.
2. Click the tag(s) you want to use to locate documents.
To select multiple tags, use SHIFT+click or CTRL+click.
3. Click the Retrieve Documents button.
When you click the Retrieve Documents button, a message appears at the top of
the dashboard indicating the number of documents available in the dataset that
are not currently part of the review set.
3. To manually select a subset of all the retrieved documents to add to the review
set, click the Document Explorer button.
When you click the Document Explorer button, all documents retrieved are
displayed in the Snippet view. By default, all the documents retrieved are selected
in the Snippet or Table view. To select only a subset of the documents, remove
the check mark for the documents you do not want to include in the review set.
4. When finished, click the Done button.
When you click the Done button, you are returned to the Add Documents to
Reviewset dashboard. Only the selected documents are now ready to be added
to the review set.
Filter by Saved Query
The Query option locates all the documents in the dataset that match the search
query you enter.
1. Click the Filter by Saved Query option.
2. Select the saved search query you want to use to locate documents.
3. Click the Retrieve Documents button.
When you click the Retrieve Documents button, a message appears at the top of
the dashboard indicating the number of documents available in the dataset that
© 2015 LexisNexis. All rights reserved.
186
Concordance Evolution
are not currently part of the review set.
3. To manually select a subset of all the retrieved documents to add to the review
set, click the Document Explorer button.
When you click the Document Explorer button, all documents retrieved are
displayed in the Snippet view. By default, all the documents retrieved are selected
in the Snippet or Table view. To select only a subset of the documents, remove
the check mark for the documents you do not want to include in the review set.
4. When finished, click the Done button.
When you click the Done button, you are returned to the Add Documents to
Reviewset dashboard. Only the selected documents are now ready to be added
to the review set.
Query
The Query option locates all the documents in the dataset that match the search
query you enter.
1. Click the Query option.
2. In the Query field type the search query to locate documents.
3. Click the Retrieve Documents button.
When you click the Retrieve Documents button, the a message appears at the top
of the dashboard indicating the number of documents available in the dataset
that are not currently part of the review set.
4. To manually select a subset of all the retrieved documents to add to the review
set, click the Document Explorer button.
When you click the Document Explorer button, all documents retrieved are
displayed in the Snippet view. By default, all the documents retrieved are selected
in the Snippet or Table view. To select only a subset of the documents, remove
the check mark for the documents you do not want to include in the review set.
5. When finished, click the Done button.
When you click the Done button, you are returned to the Add Documents to
Reviewset dashboard. Only the selected documents are now ready to be added
to the review set.
The selected documents are displayed at the top of the page.
The Assigned Users field on the Add Documents to Reviewset dashboard determines
which users will receive a notification about the change to the review set. When you add
users, the users will receive a notification about the changes to the review set. It does
not mean the users are assigned to the review set.
8. To notify additional users about the additional documents being added to the review set,
click the Assign button.
9. Select or clear the check box next to the user(s) and/or group(s) to which you want to
© 2015 LexisNexis. All rights reserved.
Administrating Concordance Evolution
187
send the notification, and then click Save.
The user list is updated with the changes.
11. On the Add Documents to Reviewset dashboard toolbar, click the Save button.
When you click the Save button, the documents you selected are added to the review
set and the Binder Management dashboard opens.
To view the updated review set, you will need to refresh the Binder Management
dashboard by navigating away from and back to the dashboard.
To split a review set into multiple review sets:
Once a review set has been created, you can split the review set into additional review sets
on the Split Reviewset dashboard. When you split a review set into new review sets, the
original review set is archived, and any documents in the review set that you did not select
to add to the new review sets are released from the review set.
The original review set's name, description, start date, due date, review set rules settings,
and user assignments are automatically applied to the new review sets. Any tags,
comments, edits, redactions, and markups made to the documents in the original review set
are retained in the documents when the review set is split.
1. Click the Admin tab to open the Admin dashboard.
2. In the System pane on the left, locate and click the binder containing the review set you
want to split.
Clicking the binder opens the Binder Management dashboard.
3. In the Actions column of Review Sets table, click the Split link for the review set to split.
Clicking the Split link opens the Split Review Set dashboard.
4. To select the documents in the review set to divide into a new review set(s), do one of
the following:
All documents(default)
The All documents option selects all the documents in the review set.
To select all review set documents:
1. Click the All documents option.
2. Click the Retrieve Documents button.
When you click the Retrieve Documents button, the a message appears at the top
of the dashboard indicating the number of documents available in the dataset
that are not currently part of the review set.
© 2015 LexisNexis. All rights reserved.
188
Concordance Evolution
3. To manually select a subset of all the retrieved documents to add to the review
set, click the Document Explorer button.
When you click the Document Explorer button, all documents retrieved are
displayed in the Snippet view. By default, all the documents retrieved are selected
in the Snippet or Table view. To select only a subset of the documents, remove
the check mark for the documents you do not want to include in the review set.
4. When finished, click the Done button.
When you click the Done button, you are returned to the Add Documents to
Reviewset dashboard. Only the selected documents are now ready to be added
to the review set.
The Document Explorer button is used to view all documents in the dataset in
the Review dashboard, including documents already included in a review set.
When you click the Document Explorer button, you will navigate away from the
Split Review Set dashboard without saving the review set you are creating. For
more information, see Viewing all documents in a dataset.
Filter by Tag
The Tag option locates documents in the review set that have been assigned the
tag(s) you select.
To locate review set documents from a tag:
1. Click the Filter by Tag option.
When you click the Filter by Tag option, the dataset tag list is displayed.
2. Click the tag(s) you want to use to locate documents.
To select multiple tags, use CTRL+SHIFT or CTRL+click.
3. Click the Retrieve Documents button.
When you click the Retrieve Documents button, the a message appears at the top
of the dashboard indicating the number of documents available in the dataset
that are not currently part of the review set.
4. To manually select a subset of all the retrieved documents to add to the review
set, click the Document Explorer button.
When you click the Document Explorer button, all documents retrieved are
displayed in the Snippet view. By default, all the documents retrieved are selected
in the Snippet or Table view. To select only a subset of the documents, remove
the check mark for the documents you do not want to include in the review set.
5. When finished, click the Done button.
© 2015 LexisNexis. All rights reserved.
Administrating Concordance Evolution
189
When you click the Done button, you are returned to the Add Documents to
Reviewset dashboard. Only the selected documents are now ready to be added
to the review set.
The Document Explorer button is used to view all documents in the dataset in
the Review dashboard, including documents already mapped to a review set.
When you click the Document Explorer button, you will navigate away from the
Split Review Set dashboard without saving the review set you are creating. For
more information, see Viewing all documents in a dataset.
Filter by Saved Query
The Filter by Save Query option locates only those documents in the review set that
match the selected saved query.
To locate review set documents from a saved search query:
1. Click the Filter by Saved Query option.
2. Click the saved search query to use to locate the documents.
3. Click the Retrieve Documents button.
When you click the Retrieve Documents button, a message appears at the top of
the dashboard indicating the number of documents available in the dataset that
are not currently part of the review set.
4. To manually select a subset of all the retrieved documents to add to the review
set, click the Document Explorer button.
When you click the Document Explorer button, all documents retrieved are
displayed in the Snippet view. By default, all the documents retrieved are selected
in the Snippet or Table view. To select only a subset of the documents, remove
the check mark for the documents you do not want to include in the review set.
5. When finished, click the Done button.
When you click the Done button, you are returned to the Add Documents to
Reviewset dashboard. Only the selected documents are now ready to be added
to the review set.
The Document Explorer button is used to view all documents in the dataset in
the Review dashboard, including documents already mapped to a review set.
When you click the Document Explorer button, you will navigate away from the
Split Review Set dashboard without saving the review set you are creating. For
more information, see Viewing all documents in a dataset.
Query
© 2015 LexisNexis. All rights reserved.
190
Concordance Evolution
The Query option locates only those documents in the review set that match the
search query you enter.
To locate review set documents from a search query:
1. Click the Query option.
2. Type the search query in the Query field or click the Saved Searches link and
then click the saved search query you want to use to locate documents.
3. Click the Retrieve Documents button.
When you click the Retrieve Documents button, a message appears at the top of
the dashboard indicating the number of documents available in the dataset that
are not currently part of the review set.
4. To manually select a subset of all the retrieved documents to add to the review
set, click the Document Explorer button.
When you click the Document Explorer button, all documents retrieved are
displayed in the Snippet view. By default, all the documents retrieved are selected
in the Snippet or Table view. To select only a subset of the documents, remove
the check mark for the documents you do not want to include in the review set.
5. When finished, click the Done button.
When you click the Done button, you are returned to the Add Documents to
Reviewset dashboard. Only the selected documents are now ready to be added
to the review set.
The Document Explorer button is used to view all documents in the dataset in
the Review dashboard, including documents already mapped to a review set.
When you click the Document Explorer button, you will navigate away from the
Split Review Set dashboard without saving the review set you are creating. For
more information, see Viewing all documents in a dataset.
When you split a review set, when the new review sets are created, each of the review
sets will have the same name as the original review set with a number added to the end
of each review set name to make the names unique, and the new review sets will have
the same review set description, start date, due date, review set rules settings, and
user assignments as the original review set.
5. In the Split the documents into section, indicate how you want to divide the documents
into the review sets.
To divide the documents by number of review sets, click the Reviewsets option, and
type the number of review sets to create.
To divide the documents by number of documents per review set, click the Doc(s) per
Reviewset option and type the number of documents to put into each new review
set.
The documents you selected in the review set are evenly distributed between each of
© 2015 LexisNexis. All rights reserved.
Administrating Concordance Evolution
191
the new review sets.
The Assigned Users field determines which users receive a notification about the change
to the review set. The Assigned Users field defaults to the users currently assigned to
the original review set. When you split a review set, the users assigned to the original
review set are automatically assigned to the new review sets. When you add additional
users to the Assigned Users field the new users will also receive a notification about the
changes to the review set. It does not mean the users are assigned to the new review
sets.
6. To notify additional users about the changes to the review set, click the Assign button.
7. Select the check box next to the user(s) and/or group(s) to send the notification.
If you want to remove a users or user groups from the list, clear the check box next to
the user(s) and/or group(s) you want to remove from the review set.
8. When finished, click Save.
Clicking Save updates the user list in the Assigned Users field.
9. When finished, on the Split Reviewset dashboard toolbar, click the Save button.
When you click the Save button, the review set is split into the new review sets and the
Binder Management dashboard opens. The original review set is archived, and any
documents in the original review set that were not added to the new review sets are
released from the original review set.
To view the newly created review set(s), you will need to refresh the Binder
Management dashboard by navigating away from and back to the Binder Management
dashboard.
Exporting review sets
After creating a review set, you can export the following information for a review set(s) to a
comma-separated formatted (.csv) file:
Review set name
Review set due date
User who has the review set checked out
Number of Documents
Number of documents tagged as Reviewed
Number of document tagged as Not Reviewed
To export a review set report:
1. Click the Admin tab to open the Admin dashboard.
© 2015 LexisNexis. All rights reserved.
192
Concordance Evolution
2. In the System pane on the left, locate and click the Binder that contains the review set
information you want to export.
3. In the Review Sets table, do any of the following:
To export a single review set, select the check box for the review set to export.
To export multiple review sets, select the check box for each review set export.
To export all the review sets, select the check box in the upper left corner.
4. On the Binder Management dashboard toolbar, click the Export Review Sets button.
5. In the File Download dialog box, do one of the following:
Click Open to view the file, in the Download Complete dialog box, click Open to open
the file in your default spreadsheet application.
Click Save to save the file, in the Save As dialog box, navigate to where you want to
save the file, and then in the File Name field, type the file name and click Save.
6. In the Download Complete dialog box, click Open to view the file or click Close to close
the dialog box.
Deleting review sets
Before deleting a review set, make sure that no one is reviewing the documents.
To delete a review set:
1. Click the Admin tab to open the Admin dashboard.
2. In the System pane on the left, locate and click the Binder that contains the reviewset you
want to remove.
3. In the Review Sets table, do any of the following:
To delete a single review set, in the Actions column, click the Delete link for the review
set.
To delete multiple review sets, select the check box for each review set, and then on the
Binder Management dashboard toolbar, click the Delete Review Sets button.
To delete all the review sets, select the check box in the upper left corner, and then on
the Binder Management dashboard toolbar, click the Delete Review Sets button.
4. When prompted to confirm the deletion, click Yes.
© 2015 LexisNexis. All rights reserved.
Administrating Concordance Evolution
193
Tags
About tags
Tagging records is a critical step in the discovery process. It is your organization’s way of
essentially putting color-coded flags on your documents to categorize them by privilege, review
status, or other criteria during document review.
Typically a Concordance Evolution administrator or Litigation Support Manager works with a
lead attorney to build a set of tags for case review that include standard naming conventions
and adhere to internal guidelines for a case review. These tags are often organized into folder
structures that indicate phases of review, case topics, or are designated by reviewer. Once
tagging conventions are determined, as the administrator you will most likely be setting up
these tags and folders after you build the dataset so the review team can be begin searching
and tagging immediately.
If you are working with a team of administrators, we recommend that only one or two people
be in charge of tag management, especially when making new ones and deleting unnecessary
tags. This prevents duplication of efforts and helps to keep tag structures uncluttered for all
reviewers working in the dataset.
Tag Hierarchy
In Concordance Evolution, for each dataset you can create:
Tag folders
Tag folders are used to organize tag groups and tags. Tag folders can only be created
under other tag folders. Tag folders cannot be created under tag groups or tags.
Tag groups
Tag groups are similar to tag folders, in that they are used to organize tags groups and
tags, but unlike tag folders, a tag group is also a tag that can be applied to documents
or document text. It is essentially a parent tag that you can create child tags under. Tag
groups can only be created under tag folders or other tag groups. Tag groups cannot be
created under tags.
Document-level and text-level tags
A tag can only be a document-level tag or a text-level tag. One tag cannot be used as
both a document and text-level tag. Tags can only be created under tag folders and tag
groups. Tags cannot be created under other tags.
Tag Group Families
Tag group families are system created tags that can be added to each dataset. Currently,
there is one tag group family that is installed with Concordance Evolution:
Review Status
When you add the Review Status tag group family to a dataset, the Not Reviewed and
Reviewed tags are automatically added to the dataset. These tags are used to indicate
whether a document has been reviewed. Concordance Evolution uses these two tags to
track the review progress for documents in the dataset and its review sets.
You can edit a tag group family tag's name, shortcut key, and behavior properties, but you
© 2015 LexisNexis. All rights reserved.
194
Concordance Evolution
cannot modify the tag's type or scope, or move the tag under a tag folder or tag group on
the Edit Tag dashboard.
Tag Security
In Concordance Evolution you can add tag-level security to individual tags in a dataset in the
Tag Security dialog box. Tag security determines whether users in a user group can create,
view, delete, edit, and/or change the state of a tag.
For more information about tag security, see Managing tag security.
Public versus Personal Tags
Public tag folders, tag groups, and tags are available to all users that have access to the
dataset and are available for selection from the Tags pane in the Review dashboard, unless
tag security limits a user's access to the them. Public tag folders, groups, and tags can be
created by the administrator on the Add Tag dashboard, and by users in the Tags pane in
the Review dashboard.
Personal tag folders, tag groups, and tags are only available to the user that created them
and Concordance Evolution administrators. Other users cannot view the personal tag
folders, tag groups, and tags in the Tags pane in the Review dashboard. Personal tag
folders, tag groups, and tags are created by users in the Tags pane in the Review
dashboard. The administrator can view all personal tag folders, tag groups, and tags, and
can convert them from personal to public on the Edit Tag dashboard.
To distinguish between personal and public tags in the Review dashboard, a
is displayed
next to personal tag folders, tag groups, and tags in the Tags pane in the Review
dashboard.
Tag Names
It is best practice not to use special characters and keywords used by the Vivisimo®
Velocity® search engine in dataset field or tag names in Concordance Evolution. If you use
them in the names, Velocity will use them as Velocity keywords and your document search
results will return more data than expected.
Special Characters and Keywords Used by Velocity
/
'
FOLLOWEDBY
phrase
\
.au
greater-than
quotes
[
.ti
greater-than-or-equal
range
]
[au]
host
regex
© 2015 LexisNexis. All rights reserved.
Administrating Concordance Evolution
;
[ti]
image
site
:
all
intitle
stem
|
AND
inurl
THRU
=
and
language
title
*
and+
less-than
url
?
ANDNOT
less-than-or-equal
weight
<
andnot
link
wildcard
>
any
linktext
wildchar
@
author
NEAR
WITHIN
“
BEFORE
not
WORDS
,
category
NOT
%field%:
&
CONTAINING
NOTCONTAINING
()
CONTENT
NOTWITHIN
(,)
default-and-1
OR
+
domain
or
-
equal
OR0
~
filetype
OR1
195
Creating tags
There are two ways to add tag folders, tag groups, and tags to a dataset. You can manually
add them individually to a dataset or add them from a saved template.
If you are going to be creating numerous datasets that will be using the same tags and tag
structure, in Concordance Evolution you can create a set of tag folders, tag groups and tags
and save the them to a template. Once a template is created, it can be used to quickly add the
tag structure to new datasets.
When creating a tag structure, you specify the properties and security settings for each tag
folder, tag group, or tag properties. For more information, see Managing tag security and
Editing tags.
For more information about tags, see About tags.
To create a tag folder:
1. Click the Admin tab to open the Admin dashboard.
© 2015 LexisNexis. All rights reserved.
196
Concordance Evolution
2. In the System pane on the left, click the dataset you want to add a tag group.
Clicking the dataset opens the dataset's dashboard.
3. On the dataset's dashboard toolbar, click the Config button, and then click Tags.
4. On the Tags dashboard toolbar, click the Add Tag button.
5. In the Name field, type the tag folder name.
It is best practice not to use special characters and keywords used by the Vivisimo®
Velocity® search engine in dataset field or tag names in Concordance Evolution. If you
use them in the names, Velocity will use them as Velocity keywords and your document
search results will return more data than expected. For a list of the special characters
and keywords used by Velocity, see the Tag Names section in the "About tags" topic.
6. In the Tag Type list, click Tag Folder.
7. From the Scope list, do one of the following:
Select Document to set the tag group as a document-level tag group.
Select Text to set the tag group as a text-level tag group.
8. In the Behaviors section, select any of the following options:
Dynamic — additional tag folders, tag groups, and/or tags can be created under the
tag folder.
Fixed — no additional tag folders, tag groups, and/or tags can be created under the
tag folder.
9. When finished, click Save to add the tag group and return to the Tags dashboard.
The tag folder is displayed in the tag list. If you created the tag folder under another tag
folder, on the Tags dashboard, an arrow,
, is displayed next to the parent tag folder
name. To view the tag folder you created, click the parent tag folder name link to expand
the tag subfolder list.
To create a tag group::
1. Click the Admin tab to open the Admin dashboard.
2. In the System pane on the left, click the dataset you want to add a tag group.
Clicking the dataset opens the dataset's dashboard.
3. On the dataset's dashboard toolbar, click the Config button, and then click Tags.
4. On the Tags dashboard toolbar, click the Add Tag button.
5. In the Name field, type the tag group name.
6. From the Type list, click Tag Group.
7. From the Scope list, do one of the following:
© 2015 LexisNexis. All rights reserved.
Administrating Concordance Evolution
197
Select Document to set the tag group as a document-level tag group.
Select Text to set the tag group as a text-level tag group.
8. In the Behaviors section, select any of the following options:
Unique — only one tag group of this tag type can exist for the dataset.
Exclusive — only one tag in the tag group may be used.
Locked — no user can edit the tag or tag group unless they has the Tag Override
policy set to Allow.
Child Updates Parent — if any child tag of the tag group is selected then the parent
tag group is selected.
Clear Parent to Clear group — if the parent tag group is cleared, then all of its
children are cleared.
Dynamic — additional tag folders, tag groups, and/or tags can be created under the
tag folder.
Fixed — no additional tag folders, tag groups, and/or tags can be created under the
tag folder.
Cannot be deleted — the tag or tag group cannot be deleted unless the user has the
Tag Override policy set to Allow.
9. In the Security section, for each admin org group, select or clear the check boxes for the
security settings for users in the user group:
To hide a tag group or tag, clear the Can View Tag check box. When you clear the Can
View Tag check box, all the other check boxes are automatically cleared.
To make a tag group or tag read-only for users in the user group in the Tags pane in
the Review dashboard, make sure that the Can View Tag check box is selected, and
clear the Can Change Tag State and Can Delete Tag check boxes.
To only allow users in the user group to apply or remove the tag group or tag, make
sure that the Can View Tag and Can Change Tag State check boxes are selected, and
clear the Can Delete Tag check box.
10. When finished, click Save to add the tag group and return to the Tags Summary
dashboard.
The Not Reviewed and Reviewed tags are automatically added to the dataset and are
displayed in the tag list. In the Tags panel in the Review dashboard, a circle, instead of a
check box, is displayed next to tags in a tag group family. A check box is displayed next
to all other tag groups, folders and tags in the Tags panel in the Review dashboard.
To create a tag:
1. Click the Admin tab to open the Admin dashboard.
2. In the System pane on the left, click the dataset you want to add a tag group.
Clicking the dataset opens the dataset's dashboard.
3. On the dataset's dashboard toolbar, click the Config button, and then click Tags.
4. On the Tags dashboard toolbar, click the Add Tag button.
© 2015 LexisNexis. All rights reserved.
198
Concordance Evolution
5. In the Tag Name field, type the tag name.
It is best practice not to use special characters and keywords used by the Vivisimo®
Velocity® search engine in dataset field or tag names in Concordance Evolution. If you
use them in the names, Velocity will use them as Velocity keywords and your document
search results will return more data than expected. For a list of the special characters
and keywords used by Velocity, see the Tag Names section in the "About tags" topic.
5. In the Tag Type list, click Tag.
6. From the Scope list, do one of the following:
Select Document to set the tag group as a document-level tag group.
Select Text to set the tag group as a text-level tag group.
7. To create a shortcut key for the tag, in the Shortcut Keys list, click the shortcut key you
want to use for the tag.
When you create a shortcut key for a tag, users can add and remove the tag on
documents or text using the shortcut key. The shortcut key you select in the Shortcut
Keys list will be displayed next to the tag name in the Tags pane in the Review
dashboard.
You can only assign one shortcut key to one tag. Once a shortcut key is assigned to a
tag, the shortcut key is no longer available for selection in the Shortcut Keys list. If you
remove a shortcut key from a tag by clicking (none) in the Shortcut Keys list on the Edit
Tag dashboard, once you remove the shortcut key from the tag, the shortcut becomes
available again in the Shortcut Keys list on the Create a Tag and Edit tag dashboards.
8. In the Behaviors section, select any of the following options:
Locked — no user can edit the tag or tag group unless they has the Tag Override
policy set to Allow.
Cannot be deleted — the tag or tag group cannot be deleted unless the user has the
Tag Override policy set to Allow.
Tag applies to all duplicates
Tag always applies to entire family group
Tag always applies to entire thread
9. In the Security section, for each admin org group, select or clear the check boxes for the
security settings for users in the user group:
To hide a tag group or tag, clear the Can View Tag check box. When you clear the Can
View Tag check box, all the other check boxes are automatically cleared.
To make a tag group or tag read-only for users in the user group in the Tags pane in
the Review dashboard, make sure that the Can View Tag check box is selected, and
clear the Can Change Tag State and Can Delete Tag check boxes.
To only allow users in the user group to apply or remove the tag group or tag, make
sure that the Can View Tag and Can Change Tag State check boxes are selected, and
clear the Can Delete Tag check box.
10. When finished, click the Save button to add the tag and return to the Tags dashboard.
The tag is displayed in the tag list. If you created the tag under a tag folder or tag
group, on the Tags dashboard, an arrow,
, is displayed next to the parent tag folder
© 2015 LexisNexis. All rights reserved.
Administrating Concordance Evolution
199
or tag group name. To view the tag you created, click the parent tag folder or tag group
name link to expand the tag list.
To save a Tags template
You can save tag groups, tag folders, and/or tags to an existing tag template or create a
new tag template. When you save tag groups, tag folders, and/or tags to a tag template,
the tag groups, tag folders, and/or tags and their settings are saved to the template.
1. Click the Admin tab to open the Admin dashboard.
2. In the System pane on the left, click the dataset you want to add a tag group.
Clicking the dataset opens the dataset's dashboard.
3. On the dataset's dashboard toolbar, click the Config button, and then click Tags.
4. On the Tags dashboard toolbar, click the Templates button to display the Tags
Templates menu.
5. In the Save current tags as template field, do one of the following:
To create a new template, type the template name in the field, and then click Save.
To overwrite an existing template, click the arrow in the field, select the template you
want to overwrite, and then click Save.
6. When prompted to confirm the template action, click OK.
To create tags for a dataset from a template
1. Click the Admin tab to open the Admin dashboard.
2. In the System pane on the left, click the dataset you want to add a tag group.
Clicking the dataset opens the dataset's dashboard.
3. On the dataset's dashboard toolbar, click the Config button, and then click Tags.
4. On the Tags dashboard toolbar, click the Templates button to display the Tags
Templates menu.
4. In the tag template list, click the template you want to import into the dataset.
5. Click the Load link to add the tag groups, tag folders and/or tags from the template to
the dataset.
6. When prompted to confirm loading the tags from the selected template, click OK.
The tag folders, tag groups, and/or tags from the template are displayed in the tag list.
To modify the tag folder, tag group, or tag properties or security settings, see Editing
tags and Managing tag security.
© 2015 LexisNexis. All rights reserved.
200
Concordance Evolution
Managing tag security
In Concordance Evolution you can add tag-level security to individual tags in a dataset when
you create a tag group, folder or tag. Tag security determines whether users in a user group
can create, view, delete, edit, and/or change the state of a tag. By default, each tag allows
users to create, view, delete, edit, and/or change the state of a tag. The tag security settings
determine whether users in a user group can create, view, delete, edit, and/or change the
state of a tag in the Tags pane in the Review dashboard.
Tag Security is set when you create the tag group, tag folder, or tag on the Edit Tag
dashboard. You can add tag security to all public tags groups and tags in a dataset, including
tags from tag families. However, tag security cannot be added to public tag folders or any
personal tag groups, tag folder, or tags.
Tag-level security is assigned by user group. To assign tag-level security to a user group, the
user group must have security policies allowing the user group access to the dataset assigned
to the user group on the Dataset Permissions dashboard for the dataset. For more information
about assigning user groups and security policies to datasets, see Assigning roles to user
groups and Customizing user group security policies.
To manage security for a tag group or tag:
1. Click the Admin tab to open the Admin dashboard.
2. In the System pane on the left, click the dataset you want to edit the security settings
for the tag group or tag.
Clicking the dataset opens the dataset's dashboard.
3. On the dataset's dashboard toolbar, click the Config button, and then click Tags.
4. In the Actions column of the Tags table, click the edit link for the tag group or tag you
want to edit.
5. In the Security section, clear the check boxes for the tag group or tag security settings
you want to disallow for users in the user group.
To hide a tag group or tag, clear the Can View Tag check box. When you clear the Can
© 2015 LexisNexis. All rights reserved.
Administrating Concordance Evolution
201
View Tag check box, all the other check boxes are automatically cleared.
To make a tag group or tag read-only for users in the user group in the Tags pane in
the Review dashboard, make sure that the Can View Tag check box is selected, and
clear the Can Change Tag State and Can Delete Tag check boxes.
To only allow users in the user group to apply or remove the tag group or tag, make
sure that the Can View Tag and Can Change Tag State check boxes are selected, and
clear the Can Delete Tag check box.
6. When finished, click the Save button to save the tag group or tag security settings and
return to Tags dashboard.
Editing tags
You can only edit public tag folders, tags groups, and tags. You cannot edit or assign security to
private tag folders, tag groups, or tags.
Once a public tag folder is created, you can edit the folder's name and parent, and define the
folder properties on the Edit Tag Folder dashboard. Once a public tag group or tag is created,
can edit the tag or tag group's name and parent, edit the tag shortcut, define the tag group or
tag properties, and assign tag security on the Edit Tag Group or Edit Tag dashboard.
If you want to change the security policy settings for a public tag group or tag, see Managing
tag security.
Also, if a user has created a personal tag folder, tag group, or tag that you want to make
available to all dataset users, you can convert the personal tag folder, tag group, or tag to a
public folder, tag group, or tag on the Edit Folder, Edit Tag Group, and Edit Tag dashboards.
To edit a tag:
1. Click the Admin tab to open the Admin dashboard.
2. In the System pane on the left, click the dataset you want to add a tag group.
Clicking the dataset opens the dataset's dashboard.
3. On the dataset's dashboard toolbar, click the Config button, and then click Tags.
4. In the Actions column of the Tags table, click the edit link for the tag folder you want to
edit.
5. In the Edit Tag dashboard, make the applicable edits.
6. To modify the tag properties, in the Behaviors section, select or clear the check boxes
for the properties you want to apply to the tag.
Locked — no user can edit the tag or tag group unless they has the Tag Override
policy set to Allow.
© 2015 LexisNexis. All rights reserved.
202
Concordance Evolution
Cannot be deleted — the tag or tag group cannot be deleted unless the user has the
Tag Override policy set to Allow.
Tag applies to all duplicates
Tag always applies to entire family group
Tag always applies to entire thread
7. To modify the security settings for the tag group, in the Security section, for each admin
org group, select or clear the check boxes for the security settings you want to allow or
disallow for users in the user group:
To hide a tag, clear the Can View Tag check box. When you clear the Can View Tag
check box, all the other check boxes are automatically cleared.
To make a tag read-only for users in the user group in the Tags pane in the Review
dashboard, make sure that the Can View Tag check box is selected, and clear the Can
Change Tag State and Can Delete Tag check boxes.
To only allow users in the user group to apply or remove the tag, make sure that the
Can View Tag and Can Change Tag State check boxes are selected, and clear the Can
Delete Tag check box.
8. When finished, click the Save button to add the tag and return to the Tags dashboard.
To edit a tag folder:
1. Click the Admin tab to open the Admin dashboard.
2. In the System pane on the left, click the dataset you want to add a tag group.
Clicking the dataset opens the dataset's dashboard.
3. On the dataset's dashboard toolbar, click the Config button, and then click Tags.
4. In the Actions column of the Tags table, click the edit link for the tag folder you want to
edit.
5. In the Edit Tag dashboard, make the applicable edits.
6. To modify the tag folder properties, in the Behaviors section, select or clear the check
boxes for the properties you want to apply to the tag folder:
Dynamic — additional tag folders, tag groups, and/or tags can be created under the
tag folder.
Fixed — no additional tag folders, tag groups, and/or tags can be created under the
tag folder.
7. To modify the security settings for the tag folder, in the Security section, for each admin
org group, select or clear the check boxes for the security settings you want to allow or
disallow for users in the user group:
To hide a tag folder or tag, clear the Can View Tag check box. When you clear the Can
View Tag check box, all the other check boxes are automatically cleared.
To make a tag folder or tag read-only for users in the user group in the Tags pane in
the Review dashboard, make sure that the Can View Tag check box is selected, and
clear the Can Change Tag State and Can Delete Tag check boxes.
To only allow users in the user group to apply or remove the tag folder or tag, make
© 2015 LexisNexis. All rights reserved.
Administrating Concordance Evolution
203
sure that the Can View Tag and Can Change Tag State check boxes are selected, and
clear the Can Delete Tag check box.
8. When finished, click the Save button to save your changes and return to the Tags
dashboard.
To edit a tag group:
1. Click the Admin tab to open the Admin dashboard.
2. In the System pane on the left, click the dataset you want to add a tag group.
Clicking the dataset opens the dataset's dashboard.
3. On the dataset's dashboard toolbar, click the Config button, and then click Tags.
4. In the Actions column of the Tags table, click the edit link for the tag group you want to
edit.
5. In the Edit Tag dashboard, make the applicable edits.
6. To modify the tag group properties, in the Behaviors section, select or clear the check
boxes for the properties you want to apply to the tag group:
Unique — only one tag group of this tag type can exist for the dataset.
Exclusive — only one tag in the tag group may be used.
Locked — no user can edit the tag or tag group unless they has the Tag Override
policy set to Allow.
Child Updates Parent — if any child tag of the tag group is selected then the parent
tag group is selected.
Clear Parent to Clear group — if the parent tag group is cleared, then all of its
children are cleared.
Dynamic — additional tag folders, tag groups, and/or tags can be created under the
tag folder.
Fixed — no additional tag folders, tag groups, and/or tags can be created under the
tag folder.
7. To modify the security settings for the tag group, in the Security section, for each admin
org group, select or clear the check boxes for the security settings you want to allow or
disallow for users in the user group:
To hide a tag group, clear the Can View Tag check box. When you clear the Can View
Tag check box, all the other check boxes are automatically cleared.
To make a tag group read-only for users in the user group in the Tags pane in the
Review dashboard, make sure that the Can View Tag check box is selected, and clear
the Can Change Tag State and Can Delete Tag check boxes.
To only allow users in the user group to apply or remove the tag group, make sure
that the Can View Tag and Can Change Tag State check boxes are selected, and
clear the Can Delete Tag check box.
8. When finished, click the Save button to save your changes and return to the Tags
dashboard.
© 2015 LexisNexis. All rights reserved.
204
Concordance Evolution
To make a personal tag group, tag folder, or tag public:
1. Click the Admin tab to open the Admin dashboard.
2. In the System pane on the left, click the dataset you want to view tags.
3. Clicking the dataset opens the dataset's dashboard.
4. On the dataset's dashboard toolbar, click the Config button, and then click Tags.
5. In the Actions column of the Tags table, click the edit link for the private tag group, tag
folder, or tag you want to convert to public.
6. On the Edit Tag dashboard toolbar, click the Convert To Public Tag button.
7. Make the applicable edits.
8. To modify the tag group, folder, or tag properties, in the Behaviors section, select or
clear the check boxes for the properties you want to apply.
9. To modify the security settings for the tag group, folder, or tag, in the Security section,
for each admin org group, select or clear the check boxes for the security settings you
want to allow or disallow for users in the user group:
To hide a tag group, folder, or tag, clear the Can View Tag check box. When you clear
the Can View Tag check box, all the other check boxes are automatically cleared.
To make a tag group, folder, or tag read-only for users in the user group in the Tags
pane in the Review dashboard, make sure that the Can View Tag check box is
selected, and clear the Can Change Tag State and Can Delete Tag check boxes.
To only allow users in the user group to apply or remove the tag group, folder, or tag,
make sure that the Can View Tag and Can Change Tag State check boxes are
selected, and clear the Can Delete Tag check box.
10. When finished, click the Save button to save your changes and return to the Tags
dashboard.
Reordering tags
When reordering tags in the Tags table, keep the following in mind:
You cannot move a tag assigned to a tag group or tag folder into another tag group or tag
folder.
You cannot move tag folders within a tag group into another tag group
When moving a tag group or tag folder, the entire contents tag group, tag folder are moved
to the new structure location
© 2015 LexisNexis. All rights reserved.
Administrating Concordance Evolution
205
To reorder tags in the Tags table
1. Click the Admin tab to open the Admin dashboard.
2. In the System pane on the left, click the dataset you want to add a tag group.
Clicking the dataset opens the dataset's dashboard.
3. On the dataset's dashboard toolbar, click the Config button, and then click Tags.
4. On the Tags dashboard toolbar, click the Reorder Tags button.
5. In the Reorder Tags dialog box, drag the tag, tag folder, or tag group to the desired
position in the structure.
The Tags dashboard will automatically refresh and display the new tag structure in the Tags
table.
Deleting tags
If you have the proper permissions are enabled, you can delete both public and private tag
folders, tag groups and tags. Otherwise, you can only delete public tag folders, tags groups,
and tags. You cannot delete private tag folders, tag groups, or tags. If you want to delete
personal tag folders, tag groups, or tags, you will first need to convert them from personal to
public, and then delete them. For more information about converting personal tag folders, tags
groups, and tags from personal to public, see Editing tags.
When you delete tag groups or tags that are currently assigned to documents, the tag group
or tags and their documents assignments will be deleted. If you delete a tag folder containing
other tag folders, tag groups, and/or tags, the contents of the tag folder will automatically be
deleted when you delete the tag folder. The same is true for tag groups. If you delete a tag
group, if the tag group contains other tags groups and/or tags, they will automatically be
deleted when you delete the tag group.
Please be aware that deleting the Review Status tag group family from a dataset also removes
the review status for the documents in the dataset.
To delete a tag folder, tag group or tag:
1. Click the Admin tab to open the Admin dashboard.
2. In the System pane on the left, click the dataset containing the tag group, tag folder, or
tag you want to delete.
Clicking the dataset opens the dataset's dashboard.
3. On the dataset's dashboard toolbar, click the Config button, and then click Tags.
4. In the Tags table, locate the tag folder, tag group, or tag you want to delete.
5. In the Actions column, click the delete link.
6. When prompted to confirm the delete, click OK to delete the tag folder and any tag
© 2015 LexisNexis. All rights reserved.
206
Concordance Evolution
folders, tag groups, and/or tags in the tag folder, and their document assignments.
Monitoring tags statistics
The Tag Statistics panel to the right of the dataset dashboard allows you to monitor tags
applied to the documents within the dataset. This is useful when monitoring an individual's
review progress.
The Tag Statistics panel shows the number of tags applied by tag name or by user for a single
dataset. The Overview tab displays each tag, and the number of times the tag has been
applied to a document. The User tab displays a list of users and the number of times they have
tagged a document.
To review tag statistics:
1. In the System pane, locate and open the dataset dashboard for the tag statistics you
want to view.
2. In the Tags Statistics panel, do any of the following:
Click the Overview tab to display the name of the tag, and how many times the tag
was applied to a document.
Click the Users tab to display each reviewer, the total number of tags they applied,
and the name of the tag and how many times it was applied by the reviewer
Productions
About productions
Once a document collection review is completed, documents typically need to be produced to
opposing parties, this is known as a production. Concordance Evolution administrators prepare
the electronic production using the production tools, based on queries or tagged sets of
documents that are identified for production during the review phase.
Managing Rolling Productions
Due to the ever-increasing size of electronic productions, litigation support staff are often
faced with the task of handling and tracking large volumes of data that are incoming and
outgoing during the life cycle of an e-discovery project. As a best practice, we recommend
establishing an organized tracking method to ensure that all data is properly handled and
© 2015 LexisNexis. All rights reserved.
Administrating Concordance Evolution
207
nothing is missed.
Examples of Data Handled during E-discovery:
Here are some examples of data that can be handled during a large e-discovery:
Data coming from clients that need to be processed. This could include paper
documents, electronic files, e-mail files, images, metadata load files, and graphic files.
Data produced from opposing parties to be loaded into a review tool, such as
Concordance, for review by attorneys, paralegals, experts or investigators.
Data going out to vendors for processing, scanning, coding, or printing.
Data to be processed in-house using an e-discovery processing software, such as
LAW PreDiscovery.
Data such as exhibits, graphics, and presentations being prepared for trial to be
loaded into trial presentation software.
Data being copied or produced to other parties for review such as co-counsel and
experts.
Data being produced to opposing parties.
Data that is to be archived from the network to disk or hard drive storage.
Data that requires special handling, such as compliance with destruction or
preservation orders.
When handling forensically collected data, be sure to follow appropriate legal
procedures for preservation, handling, and chain of custody to avoid spoliation issues.
Tracking Data
There are many ways that data can be tracked using database software tools specifically
designed to help facilitate data tracking for e-discovery, such as Concordance Evolution,
Concordance, Microsoft® Access ®, or Microsoft® Excel®.
CDs, DVDs, and external hard drives are typically labeled using some sort of uniform
numbering system so that it is possible to track all incoming and outgoing volumes.
Production volumes are also usually numbered in a series for record-keeping purposes. It
is also important to keep track of production Bates number series to avoid accidental
production of documents with overlapping Bates numbers.
Archiving Data
Establishing a uniform system for archiving data that must be preserved, but is no longer
being actively used is also important. Maintaining a uniform archival tracking system
makes it easier to locate data in the event that it must be recovered from storage and
uploaded to the network at a later date.
We also recommend that you become familiar with your organization's backup, retrieval,
and data retention policies so that you are prepared in the event that you need to
recover data on short notice.
© 2015 LexisNexis. All rights reserved.
208
Concordance Evolution
Production Elements
Numbering Documents
As part of the production process, a new set of images are generated for documents that
need to be produced. A Bates number series is then applied to all pages of all documents
included in the production, with the option of “burning” or “fusing” the numbers to the
image during the process. This number series usually differs from that of your internal
collection. You can then track what has actually been produced and your Bates number
series for the production is sequential with no gaps in the numbering.
Fusing Annotations
Redactions or other markups can be “burned” or “fused” to the images during production
so that they cannot be altered. Confidentiality headers or footers can also be fused to
the images during production. Bates numbers and/or document production numbers
(DPN) are usually cross-referenced to those in the original review collection.
If the Concordance Evolution administrator included fields for Bates numbers and/or
document production numbers in your dataset, these numbers are then written to the
Bates number and/or document production number fields during the production process.
Later when you look at your internal document collection, you are able to see the Bates
and/or document production number for any documents that were produced.
Creating production sets
Images or PDF files are produced in Concordance Evolution by creating a production set job.
There are two ways to create production set jobs in Concordance Evolution. You can manually
create a job or you can create a production set job using a previously saved production
template. Production templates are best used to append documents to an existing production
set for numbering continuity.
When a production job is complete, the produced files are saved to the directory you specified
for extracted files. Th Job Status column of the Create Production Set dashboard is also
updated to Complete. After a production set is complete, you can use the file to create a
production database DCB and load files using the Export features in Concordance Evolution. For
more information, see About exporting files.
The traditional Concordance DCB files generated by Concordance Evolution are compatible with
Concordance 10.x or later.
Concordance Evolution does not support importing or exporting of live redactions to or
from traditional Concordance 10.x databases and Concordance Image 5.x imagebases.
© 2015 LexisNexis. All rights reserved.
Administrating Concordance Evolution
209
If you want to retain redactions and markups applied in Concordance Evolution when you
export documents to a DCB file, you will need to produce the applicable documents and
burn the redactions and markups onto the produced images in Concordance Evolution.
The produced files can then be exported to a DCB file. The redactions and markups will not
be editable in Concordance since they will be part of the produced files.
Production jobs provide the following options for producing images:
Burning markups onto images
Creating Bates and/or document production numbers
Applying header and footer information
Selecting type of image files to create
Excluding documents from productions
Creating placeholders for excluded documents
To create a production set:
1. Click the Admin tab to open the Admin dashboard.
2. In the System pane, locate and click the dataset to produce.
3. On the dataset's dashboard toolbar, click the Processing button, and then click Create
Production Set.
The Create Production Job dashboard opens.
4. Define the job details:
1. In the Job Name field, type the production set name.
2. (Optional) In the Description field, type a description for the production set.
3. To use a saved production settings template, from the Template list, click a saved
template.
Dataset production templates are exclusive to the dataset for which the template
was created.
4. When finished, click Next.
5. Define the job settings:
1. In the Production Set Name field, type a name for the production set.
The Production Set Name is used as the folder name for the produced documents
and for the name in the Near Native viewer.
2. To specify the location for the production files, click the Browse button, and then
navigate to the location to store the produced documents.
© 2015 LexisNexis. All rights reserved.
210
Concordance Evolution
3. In the Increment Folder Name field, type the starting incremental value.
Zero fill the starting number to determine the desired number width. For example:
4. In the Maximum Number of Documents in a Folder field, type the maximum number
of production documents to include in a folder.
The contents of the folder can be copied to a CD or DVD for distribution. If you plan
to copy the production files to a CD or DVD, make sure that you know the the
recording capacity of the CD or DVD prior to setting the Maximum Number of
Documents value. This ensures that the entire contents of the folder can be copied
without running out of disk space.
After a folder fills to the maximum size, a new folder is created and, if requested, will
continue sequentially. Production files will not be split across folders.
5. Click the Preview Path button to view the full path for the initial folder.
6. In the Select Documents from Production Set, select one of the following options to
locate the documents to produce:
All documents
The All documents in Production Set option locates all documents in the selected
image set or dataset.
1. Click the All documents option.
Saved Query
The Saved Query option, executes a saved query to locate documents in the
image set or dataset that match the saved search query.
1. Click the Saved Query option.
2. In the Saved Query list, click the saved search query to locate documents.
Tag
The Tag option locates documents in the image set or dataset that have been
assigned the tag.
1. Click the Tag option.
2. In the Tag list, click the tag to use to locate the documents.
Query
© 2015 LexisNexis. All rights reserved.
Administrating Concordance Evolution
211
The Query option, executes a typed query, and then locates the documents in the
image set or dataset that match the query.
1. Click the Query option.
An empty query field is opened below the options.
2. In the query field, type the query to use to locate documents.
7. When finished, click Next.
8. When prompted, click OK to verify the number of documents found.
7. Define the markup settings:
The Markups tab determines the document markups that are burned onto the production
set images.
1. To include markups in the production, click the Burn Markups check box.
2. To select markups to burn onto the produced file, do one of the following:
To select all the markups, click the Select All check box.
To select individual markups, click the check box for the markup.
3. To exclude a markup, clear the markup's check box.
4. When finished, click Next.
8. Define the output settings:
The Output tab determines the file type and color settings for the produced documents.
1. In the Image Type list, do one of the following:
Click PDF (Default)
Click TIFF, and then in the Color list, click the color setting to use for the produced
TIFF images.
2. To produce a single page for each page of a document, select the Create one image
per page check box.
3. To produce files with the text removed from under a redaction, select the Create
scrubbed text file(s) check box.
4. When finished, click Next.
9. Define the numbering settings:
The Production Set Numbering determines whether Bates numbers and/or document
production numbers (DPN) are created for the produced images. The Bates numbers are
used for page-level numbering and are usually stamped onto produced images. The
© 2015 LexisNexis. All rights reserved.
212
Concordance Evolution
document production numbers are used for document-level numbering that can be
referenced for native productions and the Privilege Log.
The Field Name - Prefix and Field Value - Prefix must be unique for both the
Bates Numbering and Document Production Numbering sections.
1. To create Bates numbers for the produced files, click the Use Bates Numbering check
box.
2. In the Field Name - prefix field, type the field name to create for storing the Bates
number.
The Begin, End, and Range fields can be modified as needed. These fields are
appended to the Bates name for each field. The Preview section displays how the
field names will appear in Concordance Evolution. For example, Bates_Begin,
Bates_End, and Bates_Range.
3. In the Field Value - prefix field, type the numbering prefix to use for the Bates
numbering.
The Bates number prefix can be up to 15 alphabetic characters.
4. In the Starting Number field, type the starting Bates number.
Make sure to use leading zeros to set the length of the number. For example, if you
type 0000000001, the starting number is 1 and the number length will be 10 digits
long. The Bates number length can be up to 15 numeric characters.
5. To create document production numbers for the produced files, select the Document
Production Numbering check box.
6. In the Field Name field, type the field name to create to store the production
numbers.
7. In the Field Value - prefix field, type the prefix to use for the document production
numbering.
The document production number prefix can be up to 15 alphabetic characters.
8. In the Starting Number field, type the starting number and length of the document
production number.
Make sure to use leading zeros to set the length of the number. For example, if you
type 0000000001, the starting number is 1 and the number length will be 10 digits
long. The document production number length can be up to 15 numeric characters.
9. When finished, click Next.
10. Define the document placeholders.
The Document Placeholder Page Options box determines whether to exclude some
documents from the production set and create a placeholder for excluded documents in
the production. If you do not need to exclude any documents, this step can be skipped.
© 2015 LexisNexis. All rights reserved.
Administrating Concordance Evolution
213
1. To exclude documents from the production set and insert placeholder pages for the
documents, click the Insert placeholder page for excluded documents check box.
2. To include field content on the placeholder page, from the field list select the field(s),
and then click the To Right arrow to move the field(s) to the selected fields list.
The maximum number of fields to include on the placeholder page is 5.
If the field content is greater than 245 characters, the content shown on the
placeholder page will be truncated. Also, if the field content does not have any
spaces and contains more than 45 characters, then the content shown on the
placeholder page will be truncated.
3. To change the order the field content will appear on the page, select the field and
then using the up or down arrow, move the field to the desired position.
4. To add additional text to the placeholder page, click the Placeholder Text check box,
and then type the text in the field.
The Placeholder Text may contain up to a maximum of 1000 characters and will
appear after the field content.
5. To specify documents to exclude and replace with placeholder page, select one of
the following:
Saved Query
The Saved Query option locates documents in the image set or dataset that
match the saved search query.
1. Click the Saved Query option.
2. In the Saved Query list, click the search query name to use to locate
documents.
Tag
The Tag option locates documents in the dataset that have been assigned the
tag.
1. Click the Tag option.
When you click the Tag option, the dataset tag list is displayed.
2. Click the tag to use to locate documents.
Query
The Query option locates documents in the dataset that match a search query.
© 2015 LexisNexis. All rights reserved.
214
Concordance Evolution
1. Click the Query option.
2. In the Query field, type the search query.
5. When finished, click Next.
6. When prompted, click OK to verify the number of documents found.
11. Define the header and footer settings.
The Header/Footer tab determines what headers and/or footers are burned onto the
produced images. Headers can be burned onto images in the upper left corner, at the
center of the top of the document, and/or the upper right corner of the document.
Footers can be burned onto images in the lower left corner, at the center of the bottom
of the document, and/or the bottom right corner of the document.
1. To include headers and footers, click the Header/Footer check box.
Each header and footer defaults to Text with the Auto-Increment check box selected.
2. For each Header and/or Footer, from the Select Field list select any of the following:
Field name — the contents of the field are burned onto the produced files.
Text — If you select Text, type the text, Prefix, and Starting Number to burn onto
the files. When the Auto Increment check box is selected, the number will be
incremented for each page.
Date & Time — Date and time the image was produced
Date — Date the image was produced
Time —Time the image was produced
Page Number — The page number is auto-generated for the produced files.
3. To exclude any header or footer text from the produced images, in the applicable
header or footer list, click None.
4. When finished, click Next.
12. Define the job options settings:
1. To send a notification to specific users when the production set job is completed,
select the Send a notification when this job completes check box.
2. Click the Assign button, select the users to send the notification, and then click
Save.
The selected users are displayed in the Recipients field.
3. In the Message field, type the notification message.
4. To set the Near Native Conversion Priority processing, select one of the following
options:
© 2015 LexisNexis. All rights reserved.
Administrating Concordance Evolution
215
Low
Medium
High
All production jobs that are assigned a priority are processed in order of first-in, firstprocessed. High priority jobs take precedence over Low and Medium priority.
5. To save the job settings as a template for another time, select the Save Job as
Template check box, and select one of the following:
Select New to save the settings as a new template.
Select Overwrite Existing to replace the settings of an existing template.
6. Type a template name in the text box, and then click the Save button.
7. When finished, click Next.
13. On the Summary tab, review the production settings you defined.
If you need to change any of the settings, click the individual production settings tab on
the left, and make the applicable edits.
14. In the Scheduling section of the Summary tab, select one of the following:
To run the production job immediately, select the Run immediately option.
To schedule the production to run at a later time, select the Run at a specified time
option, and then type the date and time or click the Calendar button to select the
date, and time you want to run the job.
15. When ready, click Finish.
The production job is then created and displayed in the production job list on the Create
Production Job dashboard. Once the production job is complete, the Status column will
display Completed for the associated job.
To create a production set job using a template:
Production job templates retain all production settings with the exception of the Job Name,
selected documents for production, and the placeholder setting for excluded documents.
Production set templates can be used for any dataset within the same Matter.
When you select a Template to use, the production set settings are automatically loaded for
each tab of the Production Job.
1. Click the Admin tab to open the Admin dashboard.
2. In the System pane on the left, click the dataset to produce.
© 2015 LexisNexis. All rights reserved.
216
Concordance Evolution
Clicking the dataset opens the dataset's dashboard.
3. On the dataset's dashboard toolbar, click the Processing button, and then click Create
Production Set.
The Create Production Job dashboard opens.
4. In the Production Set Name field, type the production set name.
5. (Optional) In the Production Set Description field, type the production set description.
6. In the Template list, click the production set template you want to use.
7. When finished, click the Next button.
8. Review each production setting and make any necessary changes.
To create a new production job template:
Production set templates retain all production settings with the exception of the Job Name,
selected documents for production, and the placeholder setting for excluded documents.
Production set templates can be used for any dataset within the same Matter.
When you select a Template to use, the production set settings are automatically loaded for
each tab of the Production Job.
You can save production settings to an existing template or create a new template. If you
want to save the production set settings to an existing production template, see To save
production job settings to an existing template in this topic.
1. Click the Admin tab to open the Admin dashboard.
2. In the System pane on the left, click the dataset to create a production template.
Clicking the dataset opens the dataset's dashboard.
3. On the dataset's dashboard toolbar, click the Processing button, and then click Create
Production Set.
The Create Production Job dashboard opens.
4. In the Production Set Name field, type the production set name.
5. (Optional) In the Production Set Description field, type the production set description.
7. Define the production settings.
8. On the Job Options tab, in the Template section, click the Save Job as Template check
box.
9. Select the New option, type a name for the template in the field, and then click the Save
button.
Once the production set template is saved, the Template created successfully message is
displayed at the top of the page.
© 2015 LexisNexis. All rights reserved.
Administrating Concordance Evolution
217
To save production job settings to an existing template:
You can save production job settings to an existing production job template or create a new
template.
If you want to save the production set settings as a new template, see To create a new
production job template in this topic.
1. Click the Admin tab to open the Admin dashboard.
2. In the System pane on the left, click the dataset to save production settings.
Clicking the dataset opens the dataset's dashboard.
3. On the dataset's dashboard toolbar, click the Processing button, and then click Create
Production Set.
The Create Production Job dashboard opens.
4. In the Production Set Name field, type the production set name.
5. (Optional) In the Production Set Description field, type the production set description.
6. Define the production settings.
7. On the Job Options tab, in the Template section, click the Save Job as Template check
box.
8. Select the Overwrite Existing option, type a template name in the text box, and then
click the Save button.
Once the production set template is saved, the Template created successfully message is
displayed at the top of the page.
Exporting
About exporting files
Dataset documents are exported from Concordance Evolution by creating export jobs. You can
access the dataset export feature from the Dataset dashboard. When exporting dataset
documents, you will also be able to include native, image, and text files with the export, as well
as recreate family groupings based a family ID field that identifies all the related attachments.
Productions sets can also be exported as DAT load files.
Concordance Evolution does not support importing or exporting of live redactions to or
© 2015 LexisNexis. All rights reserved.
218
Concordance Evolution
from traditional Concordance 10.x databases and Concordance Image 5.x imagebases.
If you want to retain redactions and markups applied in Concordance Evolution when you
export documents to a DCB file, you will need to produce the applicable documents and
burn the redactions and markups onto the produced files in Concordance Evolution, and
then export the produced files to a DCB file. The redactions and markups will not be
editable in Concordance since they will be part of the actual files.
Related Topics
Exporting to load files
Synching cases with LAW PreDiscovery
Exporting files
Concordance Evolution datasets can be exported as a .DAT load file. The export job provides
the tools needed to include native, image, and text files with the export, as well as recreate
family groups.
When exporting native, image, and text files, additional options are available for naming the
files using a selected dataset field, excluding date and numeric fields. Choosing a field for one
file type does not limit the selections for the others; meaning, the same field can be used for
native, image, and text files.
If a field is blank for the native, image, or text file, the file will not export and an error is
recorded in the job log. For more information about job logs, see About jobs.
When exporting image files, the Auto-increment file name on selected field option automatically
increments the numbering of the file names. Below is a sample image set and the export
results detailing how the files are named using the BegDoc field both with and without the
Auto-increment file name on selected field option selected:
Sample Image Set
Document ID
# of Pages
BegDoc
0001
4
ABC001
0002
5
ABC005
0003
1
ABC010
0004
3
ABC011
© 2015 LexisNexis. All rights reserved.
Administrating Concordance Evolution
219
Export Results
Document ID
Name image file incrementally Option selected
Name image file incrementally Option not selected
0001
ABC001
ABC001_001
0001
ABC002
ABC001_002
0001
ABC003
ABC001_003
0001
ABC004
ABC001_004
0002
ABC005
ABC005_001
0002
ABC006
ABC005_002
0002
ABC007
ABC005_003
0002
ABC008
ABC005_004
0002
ABC009
ABC005_005
0003
ABC010
ABC010_001
0004
ABC011
ABC011_001
0004
ABC012
ABC011_002
0004
ABC013
ABC011_003
When exporting single page images with overlapping field name numbers, the newest
document with the same name will overwrite the older document.
Data is exported from Concordance Evolution by creating export jobs. The export job
processes the selected files and saves them to the location specified. If you are going to be
creating numerous export jobs that will be using the same or similar export settings, you can
create an export job and save it as a template. Export templates retain all export job settings
except the export job name, document selection, and export job schedule.
To export a dataset to a load file:
1. Click the Admin tab to open the Admin dashboard.
2. In the System pane on the left, click the dataset you want to export.
© 2015 LexisNexis. All rights reserved.
220
Concordance Evolution
Clicking the dataset opens the dataset's dashboard.
3. On the dataset's dashboard toolbar, click the Import / Export button, and then click
Export Load File.
The Create Export Job dashboard opens.
4. Define the Job Details
1. In the Job Name field, type the export job name.
2. (Optional) In the Description field, type the export job description.
3. (Optional) To load a saved job template, from the Template list, select the template
to load, then click Next.
5. Define the Job settings
1. For the Export File Name field, do one of the following:
Enter the directory, including the file name, for the load files to export.
Click the Browse button, locate the folder to store the exported load files, in the
File Name field type a file name for the exported files, and then click OK.
2. In the Select Documents for export, do any of the following:
Click All documents to include all the documents in the dataset.
Click Filter by Saved Query, and then select a saved query from the list to
execute the query, and include only the documents from the results of the query.
Click Filter by Tag, and then select a tag from the list to include only the
documents that are tagged with the selected tag.
3. When finished, click Next.
4. When prompted to confirm the number of documents to export, click OK.
6.
Define the Images Settings
1. To include images with the export, click the Include Images check box.
2. Do any of the following:
Click the Production Set option to export the images and documents associated
with a dataset's production set, and then select the production set from the list.
Click the Image set option to export the images and documents associated with
the dataset's image set, and then click the image set from the list.
2. From the Field for image file names from dataset list, select the field name to use
for naming the exported image files.
3. To automatically increment numbering for the exported image files, click the Autoincrement file name on selected field check box.
4. When finished, click Next.
7. Define the Files settings
© 2015 LexisNexis. All rights reserved.
Administrating Concordance Evolution
221
1. To include native files in the export, select the Include native files check box.
2. In the Field Name for native path field, type the field name to create for the native
file path in the load file.
3. From the Field for native files name from dataset list, select the field that contains
the name for the native files.
4. To select only the native files that are tagged with a specific tag, click the Include
native for tagged documents only check box, and then do one of the following:
To select a public tag, click the Public Tags option, and then select a tag from the
tag list.
To select a private tag, click the Private Tags option, and then select a tag from
the tag list.
When selecting the Include native for tagged documents only option, if a document is
tagged and not part of the export selection, the native file will not be exported. Or, if
the document is part of the export selection but not tagged, the native file will not be
exported.
5. To include text files in the export, select the Include text files check box, and do one
of the following:
Click the Use OPT file for text file name option to use the name of the .opt file for
the text file name.
Click the Use Field in load file for text file name option, in the Field name for text
file name field, type the field name for the path to the location of the text files, and
then from the Field for text files name from dataset list, select the field that
contains the name for the text file.
6. To export text, from the Select field to export from list, select the field name that
contains the text that you want to export. By default the Content field is selected.
7. To set Text Priority for Scrubbed and Extracted text, from the Option 1 list, select
the text with the highest priority, and then from the Option 2 list, select the text
with the lowest priority.
8. When finished, click Next.
8. Define the Tags settings
Keep the following in m ind when exporting a tag list:
Tag folders and structures will not be exported
Tag rules will not be exported
Personal tags will be converted to public tags
Hidden tags will be visible
1. To export tags assigned to the documents in the dataset, select the Include Tags
(will create tags in the load file) check box.
© 2015 LexisNexis. All rights reserved.
222
Concordance Evolution
2. In the New Tag Field Name field, type the new field name you want the export to
create in the load file for the exported tags.
3. From the Tag Separator Delimiter list, select the delimiter you want to use to
separate the exported tags in the load file. The default value is ;(Semicolon).
The Tags to Export list displays all the dataset's public tags. To display personal
tags, select the Show personal tags check box below the displayed tag list.
4. In the Tags to Export list, select the check box next to the tags you want to export.
5. When finished, click Next.
9. Define the Formatting settings
When exporting within the Concordance Evolution system you will not need to change
these default values. Change them only if you are using these characters in the text of
your documents.
1. Verify the default delimiter settings for the load file:
Delimiter Set list defaults to ConcordanceDefault
Column (comma) list defaults to (20). The Column (comma) delimiter is a field
delimiter that separates one field from the other.
Quote list defaults to Þ(254). The Quote delimiter is a text qualifier delimiter that
encloses text to differentiate it from field delimiters which may appear in the data.
Newline defaults to ®(174). The Newline delimiter is a substitute carriage return.
Some programs use this character to designate multi-level fields or fields-withinfields. Concordance Evolution replaces all carriage returns or carriage return
linefeed combinations with the newline code within the data of a field. The record
itself is still terminated with a real carriage return and a line feed.
The delimiters available from the Column (comma), Quote, and Newline fields may
appear as square symbols or may not be displayed. How the lists are displayed
depends on the computer's language environment. The delimiters listed in the About
delimiter characters topic use the Tahoma font, which displays the characters
regardless of the language environment. All of the characters listed in the delimiter
character list can be selected as the delimiter, even if the symbols they represent do
not appear in the Column (comma), Quote, and Newline fields.
To see the list of available delimiter characters, see About delimiter characters.
Delimiters are customizable for an organization's internal database design, but many
organizations ask vendors to use Concordance Evolution default delimiters. If your
case records contain the registered trademark symbol, you may want to consider
changing the ® to another symbol in the load file.
2. In the Date format list, click the date format to be used in the delimited text file.
The Date format field defaults to yyyy/mm/dd.
3. In the File Encoding Type section, select any of the following:
© 2015 LexisNexis. All rights reserved.
Administrating Concordance Evolution
223
Allow Unicode™ to permit Unicode type file encoding in the delimited text file.
Decode to ANSI to remove Unicode type file encoding in the delimited text file.
10. Define the Fields settings
The Fields tab allows you to recreate family groupings during an export. The Recreate
Family group option provides the ability to select a field that determines the beginning
and ending numbering for the exported data.
You also can specify which dataset source fields are written to which field name in the
delimited text file. The dataset's source field names are listed in the DataSet Field
column, and the available load file field names are listed in the Load File Field column.
The default names can be changed as needed.
1. To recreate family groups based on production numbers or other fields in the export
job, click the Recreate Family group check box.
2. In the Family ID section, do the following:
From the Beg Number list, select the field to use to create the family group
beginning number.
From the End Number field, select the field to use to create the family group
ending number.
The End Number field is optional and should only be used with page number fields.
The End Number field is not needed when a document level number field, such as
DOCID, is used for the beginning number.
3. To create fields for any attachments, from the Attachment Field list, do one of the
following:
To create beginning and ending attachment fields, click Beg Attach and End attach.
To create a single attachment range field, click Attachment range.
4. In the Select fields to map section, to specify the order the fields are listed in the
delimited text file, click the Reorder Fields button.
5. In the Reorder Fields dialog box, select the field(s) you want to move, and then click
the Up or Down arrow.
6. When finished, click Save.
7. To manually map the fields, clear the Select All check box.
8. In the Load File Field, type the name of the field you want the data written to in the
delimited text file.
9. When finished, click Next.
11. Define the Output Settings
By default, the Use relative path check box is selected.
1. Do one of the following:
© 2015 LexisNexis. All rights reserved.
224
Concordance Evolution
To assign a relative path to the exported files, click the Use relative path check
box.
To assign the actual file path to the exported files, clear the Use relative path
check box.
By default, the Use volume folders and Create separate folders for image, native,
and text files check boxes are selected. The Use volume folders check box
determines whether the exported files are organized into volume folders during the
export.
2. Do one of the following:
To create volume folders, click the Use volume folders check box.
To not create volume folders, clear the Use volume folders check box.
3. In the Base folder name for volumes field, type the volume folder name you want
the export to create. Default is Vol.
4. To create separate folders for image, native, and text files, make sure that the
Create separate folders in the volume folder for image, native, and text files
check box is selected.
If you do not want the export to create separate folders, clear the Create separate
folders in the volume folder for image, native, and text files check box.
5. In the Base folder name for image files field, type the image folder name you want
the export to create. Default is images.
6. In the Base folder name for native files field, type the native folder name you want
the export to create. Default is natives.
7. In the Base folder name for text files field, type the text folder name you want the
export to create. Default is text.
The Increment volume folder names check box determines whether all files are
exported to one volume folder or whether you want to allow a maximum number of
files or volume size for volume folders, and if the maximum number of files or volume
is exceeded, to have the export create incremental volume folders for the exported
files. By default, the Increment volume folder names check box is selected. When the
check box is selected, the export will create incremental volume folders when
needed.
For example, if the base folder name is VOL, the volume folder limit is 500, the
volume folder numbering format is 001, and the number of exported files is exporting
1500, the export will create three folders, VOL001, VOL002, and VOL003 with 500
files in each of the folders.
8. To increment the volume folder names, select the Increment volume folder names
check box and type the numbering format you want the export to use for
incrementing volume folders. Default is 001.
9. In the Maximum number of files in a folder field, type the maximum number of files
allowed in each volume folder. Default is 500.
10. To set a maximum volume size for volume folders, select the Maximum volume size
check box, type the maximum volume size, and then click the volume size
measurement. Default is 800 MB.
© 2015 LexisNexis. All rights reserved.
Administrating Concordance Evolution
225
You can select MB (megabytes), GB (gigabytes), or TB (terabytes) for the volume
size measurement.
If you have a maximum number of files allowed and a maximum volume size defined
for volume folders, the export job will create incremental volume folders when either
the maximum number of files or maximum volume size is reached.
11. When finished, click Next.
12. Define the Job Settings
1. To generate and send a notification to users when the export job is completed, in
the Notifications box, select the Send Notification check box.
2. For the Recipients, click the Assign button, and select the check box for the user
groups and/or individual users to which you want to send the notification, and then
click OK.
3. In the Message field, type the notification message.
4. To save the job settings as a template for use at a later time, select the Save Job as
Template check box, and then do one of the following:
Click New, type the name of the template in the template field, and then click
Save.
Click Overwrite Existing, select a saved template from the list, and then click
Save.
5. When finished, click Next.
13. On the Summary tab, review the export settings you defined.
If you need to change any of the settings, click the individual import section tabs on the
left, and make the applicable edits.
14. In the Scheduling section of the Summary tab, select one of the following:
To run the export job immediately, select the Run immediately option.
To schedule the export to run at a later time, select the Run at a specified time
option, and then type the date and time or click the Calendar button to select date
and time you want to run the export.
15. When ready, click Finish.
To create a load file export job using a template:
Export templates retain all export job settings except the export job name, document
selection, and export job schedule. You can change any of the export template settings as
needed prior to running the job.
Export templates can only be used for the same type of export from which the template was
originally created.
© 2015 LexisNexis. All rights reserved.
226
Concordance Evolution
1. Click the Admin tab to open the Admin dashboard.
2. In the System pane on the left, click the dataset you want to create an export template.
Clicking the dataset opens the dataset's dashboard.
3. On the dataset's dashboard toolbar, click the Import / Export button, and then click
Export Load File.
The Create Export Job for Dataset dashboard opens.
4. On the Job Details tab, in the Job Name field, type the export job name.
5. (Optional) In the Description field, type the export job description.
6. To load a job template, from the Template list, select the template settings you want to
load, then click Next.
7. For each of the Export Job tabs review the settings and make any necessary changes.
8. On the Summary tab, review the export settings you defined.
If you need to change any of the settings, click the individual export section tabs on the
left, and make the applicable edits.
9. In the Scheduling section of the Summary tab, select one of the following:
To run the export job immediately, select the Run immediately option.
To schedule the export to run at a later time, select the Run at a specified time
option, and then type the date and time or click the Calendar button to select the date
and time you want to run the export.
11. When ready, click Finish.
To create a new or overwrite an export template:
Export templates retain all export job settings except the export job name, document
selection, and export job schedule. You can change any of the export template settings as
needed prior to running the job.
Export templates can only be used for the same type of export from which the template was
originally created. For example, if the template was created from a DCB export, you can only
use the export template for other DCB exports.
You can also save export settings to an existing export template or create a new export
template.
1. Click the Admin tab to open the Admin dashboard.
2. In the System pane on the left, click the dataset to use to create an export template.
Clicking the dataset opens the dataset's dashboard.
3. On the dataset's dashboard toolbar, click the Import / Export button, and then click
Export Load File.
© 2015 LexisNexis. All rights reserved.
Administrating Concordance Evolution
227
The Create Export Job for Dataset dashboard opens.
4. On the Job Details tab, in the Job Name field, type the export job name.
5. (Optional) In the Description field, type the export job description.
6. Click Next.
7. For each of the Export Job tabs, review the settings and make any necessary changes.
8. On the Job Options tab, in the Template section, click the Save Job as Template
checkbox.
9. Do one of the following, and then click the Save button:
Click New, type the name for the template in the template field.
Click Overwrite Existing, select a saved template from the list to overwrite.
10. When finished, click Next.
11. On the Summary tab, review the export settings you defined.
If you need to change any of the settings, click the individual export section tabs on the
left, and make the applicable edits.
13. In the Scheduling section of the Summary tab, select one of the following:
To run the export job immediately, select the Run immediately option.
To schedule the export to run at a later time, select the Run at a specified time
option, and then type the date and time or click the Calendar button to select the date
and time you want to run the export.
14. When ready, click Finish.
Synchronizing data with LAW PreDiscovery
After reviewing LAW PreDiscovery case records in Concordance Evolution, you can write the
information back to the LAW PreDiscovery server for further processing.
As a best practice, make sure that the case file is not open in LAW PreDiscovery before
executing the synchronization job.
To write data back to a LAW PreDiscovery case:
1. Click the Admin tab to open the Admin dashboard.
2. In the System pane on the left, click the dataset you want to export.
Clicking the dataset opens the dataset's dashboard.
© 2015 LexisNexis. All rights reserved.
228
Concordance Evolution
3. On the dataset's dashboard toolbar, click the Import / Export button, and then click
LAW PreDiscovery Sync.
4. Define the Job Details
1. In the Job Name field, type the synchronization job name..
2. (Optional) In the Description field, type the export job description.
3. (Optional) To load a saved job template, from the Template list, select the template
to load, then click Next.
5. Define the Job settings:
1. In the Sync Tag Name field, type a tag name to tag all records for the job in the LAW
PreDiscovery case.
All synchronized documents are tagged automatically with the Sync Tag Name.
2. In the Select Documents for Sync, do one of the following:
To send all the documents in the dataset, click the All documents option.
To send only the documents from the results from a saved query, click the Saved
Query option, and then select a saved query from the list to execute the query
and pull the documents.
To send only the documents that are tagged with a specific tag, click the Tag
option, and then select a tag from the list.
To send only the documents from the results of a query, click the Query option,
and then type the query in the field.
3. When finished, click Next.
4. When prompted, click OK to confirm the number of documents.
6. Define the Markup settings:
1. To update the images associated with the selected documents, click the Images
check box, and then do one the following.
To send only the images from the results of a save query, click the Saved Query
option, and then select a saved query from the list.
To send only the image that are tagged with a specific tag, click the Tag option,
and then select a tag from the list.
To send only the images from the results of a query, click the Query option, and
then type a query in the field.
Images produced will be from the Redactable Set that is assigned to the dataset and
the images must meet both query criteria specified in the job. If the image does not
meet both query criteria, the image is excluded from the synchronization job process.
2. In the Color section, select one of the following:
To convert the documents to shades of gray, select Black and White.
To produce the image in color (4-bit -16 colors), select Color.
© 2015 LexisNexis. All rights reserved.
Administrating Concordance Evolution
229
Concordance Evolution creates single page images to place into LAW PreDiscovery.
3. To burn markups onto the images, select the Include Burn Markups check box, and
then select the check box for each markup to burn onto the images.
4. When finished, click Next.
The synchronization job will create a new folder, EVImage, within the case $Image
Archive folder. All synchronization jobs will have it's own folder. Each job folder will
consist of volume folders each containing a maximum 50 documents with no page
limits. For example, $Image Archive\EVImage\Job<JobID>\0001 etc.
7. Define the Field mappings:
The Field Mapping section allows you to map the field data in Concordance Evolution to
the case fields in LAW PreDiscovery for updating and processing.
The default Concordance Evolution fields are mapped to the default corresponding LAW
PreDiscovery field. The data in the selected Concordance Evolution field will overwrite
the data in the corresponding LAW PreDiscovery field.
For new fields, the conversion from Concordance Evolution to LAW PreDiscovery is as
follows:
Concordance Evolution Field Type
LAW PreDiscovery Field Type
Text
Memo
Date
Date
Numeric
Numeric
The following fields cannot be synchronized: Begdoc#, Enddoc#, Attachmt, Batesrng,
BegAttach, EndAttach, EDFolder, EdFolderID, EdSession, EdSessionID, EdSource,
EDSourceID, ID, PgCount, ParentID, TimeZoneProc, TimeZoneID, and CustodianID.
1. To select fields for mapping, do any of the following:
To select all the fields, select the check box at the top of the of the Field Mapping
table.
To select individual fields, select the check box next to the field to map.
2. To change the field mappings for the selected fields, in the LAW PreDiscovery Fields
column, do any of the following:
To map to an existing field, click the arrow next to the LAW PreDiscovery field, and
then select the field name.
To map to a new field, click the field to highlight the current field name, type a new
field name, and the press Enter.
3. When finished, click Next.
4. When prompted, click OK to confirm the number of documents to be imaged.
8. Define the Tags mapping:
© 2015 LexisNexis. All rights reserved.
230
Concordance Evolution
Tag Mapping allows you to select which Concordance Evolution tags are written back to
LAW PreDiscovery. LAW PreDiscovery automatically reads the Concordance Evolution tag
names and updates the mapped tag for the corresponding document in the database.
Selected Tag names can be renamed as needed. If the LAW PreDiscovery tag is
renamed, the new tag name is applied to the associated documents.
1. To write tag information back to LAW PreDiscovery, do any of the following:
To select all the tags, select the check box at the top of the Tag Mapping table.
To select one or more tags, in the Concordance Evolution Tag column, select the
check box next to the tag name.
2. In the LAW PreDiscovery Tag column, do any of the following:
To map to an existing tag, click the arrow next to the LAW PreDiscovery tag, and
then select a tag name.
To map to a new tag, click the field to highlight the current tag name, type a new
tag name, and the press Enter.
When sending Concordance Evolution tags to LAW PreDiscovery the tags are
converted to Tag (Boolean) type fields. All Concordance Evolution folders, structure,
and rules will be lost.
3. When finished, click Next.
9. Define the Job Options
1. To generate and send a notification to users when the export job is completed, in
the Notifications box, select the Send Notification check box.
2. For the Recipients, click the Assign button, and select the check box for the user
groups and/or individual users to which you want to send the notification, and then
click OK.
3. In the Message field, type the notification message.
4. To set the Near Native Conversion Priority processing, select one of the following
options:
Low
Medium
High
All jobs that are assigned a priority are processed the order of first in first processed.
High priority jobs take precedence over Low and Medium priority jobs.
5. To save the job settings as a template for use at a later time, select the Save Job as
Template check box, and then do one of the following:
Click New, in the template field type the name of the template, and then click
Save.
Click Overwrite Existing, from the list select a saved template, and then click
Save.
© 2015 LexisNexis. All rights reserved.
Administrating Concordance Evolution
231
6. When finished, click Next.
10. On the Summary tab, review the synchronization settings you defined.
If you need to change any of the settings, click the individual import section tabs on the
left, and make the applicable edits.
11. In the Scheduling section of the Summary tab, select one of the following:
To run the synchronization job immediately, select the Run immediately option.
To schedule the synchronization to run at a later time, select the Run at a specified
time option, and then type the date and time or click the Calendar button to select the
date, and time you want to run the import.
12. When ready, click Finish.
After the job is complete, make sure to view the job log or job reprocessing log to locate
documents that did not synchronize with LAW PreDiscovery.
Related Topics
About LAW PreDiscovery cases
Importing LAW PreDiscovery cases
Viewing jobs
Reprocessing jobs
Bulk Printing
About bulk printing
The Bulk Print feature in Concordance Evolution is used to print documents from a production
set, image set or native set by creating a bulk print job. Documents within the production set,
image set, or native set can be added to bulk print jobs by search, query, or tag.
Individual or multiple documents in a dataset can be printed directly from the Review
dashboard by selecting the check boxes next to the documents they want to print in the
Snippet or Table view and clicking the print button.
Before any documents can be printed using the Bulk Print feature, the applicable printer
services must be running. For more information, see . Maintaining server services
© 2015 LexisNexis. All rights reserved.
232
Concordance Evolution
Creating bulk print jobs
Bulk print jobs can be created for any dataset documents in a production set, image set, or
native set. After determining the type of set the documents will be printed from, you can
narrow down the document selection within the set by search query or tag.
When printing docum ents, keep the following in m ind:
When printing documents that have been reviewed and redacted, any redaction placed on
the document will print transparent, revealing the text underneath. If you want to print
redactions as opaque, you must produce the documents in Concordance Evolution, then
print the produced document.
Printing documents that contain markups to Adobe PDF using the File > Print option, does
not permanently burn the markups in the document. If you want markups burned in, you
must produce the documents in Concordance Evolution, then print the produced document.
To print a set of documents:
1. Click the Admin tab to open the Admin dashboard.
2. In the System pane on the left, locate and click the dataset you want to print.
3. On the dataset's dashboard toolbar, click the Processing button, and then click Create
Bulk Print Job.
The Create Print Job for Dataset dashboard opens.
4. In the Bulk Print Job Name field, type the name of the bulk print job.
5. (Optional) In the Bulk Print Job Description field, type the description for the bulk print
job.
6. For the Select file output folder, click the Browse button, locate the folder to print the
files, and then click OK.
7. From the Select Field for Naming Files, click the field to use to name the print files.
8. From the Select Printer list, click the printer to use to print the files.
9. In the Select Images to Print section, do any of the following:
Click Production Set to print a selected set of produced documents, and then in the
Production Set list, click the production set containing the documents you want to
print.
Click Image Set to print a selected set of images, and then in the Image Set list, click
the image set containing the documents you want to print.
Click Native Set to print the documents directly from the dataset's document native
set.
10. In the Select Documents from [set type] for Bulk Print section, click one of the
following:
Click the All Documents option.
Click the Saved Search option, and then from the list, click the query to use to locate
the documents to print.
© 2015 LexisNexis. All rights reserved.
Administrating Concordance Evolution
233
Click the Tag option, and then from the list, click the tag to use to locate the
documents to print.
11. Click the Retrieve Documents button.
12. To schedule the bulk print job, do any of the following:
Click the Now option to run the bulk print job immediately.
Click the Schedule option to schedule the bulk print job to run at a specific date and
time. You can then type the date and time or click the Calendar button to select the
date, and select the time you want to run the bulk print job.
13. When finished, on dashboard toolbar, click the Print button to run the job when
scheduled.
After clicking the Print button, the bulk print job is created and displayed in the bulk print
job list on the Bulk Print dashboard. Once the bulk print job is completed, Completed will
be displayed for the bulk print job in the Status column.
When the bulk print job runs, Concordance Evolution creates a log that contains the
following information:
Job Name
Timestamp of the print job
How many documents successfully printed.
How many documents failed.
List of DCNs, with the error codes and descriptions.
Dataset Logs
About dataset logs
Depending on the fields you choose, you can use the Create Job command to create any of the
following job logs (.csv file) for a dataset:
Privilege Log - a list of all documents that have associated privilege tags and/or reasons
and descriptions applied during review.
Chain of Custody - a list of documents containing a MD5 hash value when the documents
were imported, along with any selected tag(s) and/or field value.
Cross-Reference - a list of tags and fields to compare documents
Related Topics
Adding fields to datasets
Tagging individual documents
© 2015 LexisNexis. All rights reserved.
234
Concordance Evolution
Tagging multiple documents
Applying privilege reasons
Creating privilege logs
Creating dataset logs
There are two ways to generate a job log in Concordance Evolution. You can manually create a
log job or you can create a job log using a job log profile. If you are going to be creating
numerous log jobs for a dataset, you can create a log job and save the settings to a profile,
which can be used to quickly create new log jobs for the dataset.
To create a Log job:
1. Click the Admin tab to open the Admin dashboard.
2. In the System pane on the left, locate and click the dataset to create a job log.
Clicking the dataset opens the dataset's dashboard.
3. On the dataset's dashboard toolbar, click the Processing button, and then click Create
Log.
The Create Job Log for Dataset dashboard opens.
4. In the Log Job Name field, type the name for the log job.
5. In the Log Job Description field, type a description for the log job.
6. Click Next.
7. In the Path to Log Folder field, do one of the following:
Type the directory and file where you want to save the log file.
Click the Browse button and navigate to the location you want to save the log file.
9. In the File Name field, type the name for the file, and then click OK.
10. In the Select Documents from [dataset name] for Log section, select the documents
you want to create a log for by clicking one of the following options:
Saved Query
The Saved Query option locates documents in the dataset that match the saved
search query.
1. Click the Saved query option.
2. In the Saved query list, click the saved search query you want to use to locate
© 2015 LexisNexis. All rights reserved.
Administrating Concordance Evolution
235
documents.
3. To locate and add all documents in the query to the log, click the Retrieve
Documents button.
When you click the Retrieve Documents button, the documents are added to the
log job and the message [number of documents] Documents Found as Result is
displayed next to the Retrieve Documents button.
Tag
The Tag option locates documents in the dataset that have been assigned the
selected tag.
1. Click the Tag option.
2. In the Tag list, click the tag you want to use to locate the documents.
3. To locate and add all documents assigned the selected tag to the log job, click
the Retrieve Documents button.
When you click the Retrieve Documents button, the documents are added to the
log job and the message [number of documents] Documents Found as Result is
displayed next to the Retrieve Documents button.
11. Click Next.
12. In the Log Field Selection list, select the check box for the fields to include in the log.
To select all fields, select the check box at the top of the Log Field Selection list.
13. Make sure that the fields you selected have a corresponding field name in the Log Field
column.
You can edit the field name displayed on the log by editing a field name in the Log Field
column.
14. Click Next.
15. To include tags in the log, in the Select tags for Log section, do any of the following:
To include a list of personal tag, click the Show personal tags list.
To select individual tags, click the check box for the tag.
To select all tags, click the Select all link.
16. In the Select Reason for redaction list, select the check box for each redaction reason
to include on the log.
To select all fields, select the check box at the top of the Select Reason for redaction
list.
17. Click Next.
© 2015 LexisNexis. All rights reserved.
236
Concordance Evolution
18. In the Summary box, verify the selections made for the log job.
19. To make changes, click the Change Log Options link to start over, or click the links in the
Summary box for the individual option.
20. Click the Test Paths button to validate the log path entered in the Path to Log Folder
field.
21. To run the job, do one of the following:
Click the Run Now button to run the log job immediately.
Click the Schedule button to schedule the log job to run at a specific date and time.
Clicking the Schedule button opens the Scheduling section. You can type the date and
time or click the Calendar button to select the date, and select the time you want to
run the log job.
After clicking the Run Now or Save button in the Scheduling section, the log job is
created and displayed in the log list on the Log dashboard. Once the job is completed,
Completed will be displayed in the Status column.
To save job log settings to a profile:
To create a job log from a saved profile:
Log profiles retain all log field selection and field name settings. When you create a job log
using a log profile you will need to enter the job log name, and all log settings except the
field selections and field names. And if you want to change any of the log field selection and
field name settings for the job log, you will need to make those changes.
1. Click the Admin tab to open the Admin dashboard.
2. In the System pane on the left, locate and click the dataset to load log profile settings.
Clicking the dataset opens the dataset's dashboard.
3. On the dataset's dashboard toolbar, click the Processing button, and then click Create
Log.
The Create Job Log for Dataset dashboard opens.
4. Clicking Create job log opens the Create job log dashboard.
5. In the job log Name field, type the name for the job log.
6. In the job log Description field, type a description for the job log.
7. In the Log Profile list, click the log profile you want to use for the job log.
8. Click Next.
9. In the Path to Log Folder field, enter the directory where you want to save the log.
10. In the Select Documents from [dataset name] for Log section, select the documents to
© 2015 LexisNexis. All rights reserved.
Administrating Concordance Evolution
237
create a log for by clicking one of the following options:
Saved Query
The Saved Query option locates documents in the dataset that match the saved
search query.
To add documents in the dataset from a search query:
1. Click the Saved query option.
2. In the Saved query list, click the saved search query you want to use to locate
documents.
3. To locate and add all documents in the query to the job log, click the Retrieve
Documents button.
When you click the Retrieve Documents button, the documents are added to the
job log and the message [number of documents] Documents Found as Result is
displayed next to the Retrieve Documents button.
Tag
The Tag option locates documents in the dataset that have been assigned the
selected tag.
To add documents in the dataset from a tag:
1. Click the Tag option.
2. In the Tag list, click the tag you want to use to locate the documents.
3. To locate and add all documents assigned the selected tag to the job log, click
the Retrieve Documents button.
When you click the Retrieve Documents button, the documents are added to the
job log and the message [number of documents] Documents Found as Result is
displayed next to the Retrieve Documents button.
11. In the Log Field Selection list, make any necessary changes, and then click Next.
12. In the Select tags for log section, make any necessary changes.
13. In the Select Reason for redaction list, select the check box for each redaction reason
to include on the log.
To select all the redaction reasons, select the check box at the top of the Select Reason
for redaction list.
© 2015 LexisNexis. All rights reserved.
238
Concordance Evolution
14. Click Next.
15. In the Summary box, verify the selections made for the job log.
16. If you need to make changes, click the Change Log Options link to start over, or click the
links in the Summary box for the individual option.
17. Click the Test Paths button to validate the log path entered in the Path to Log Folder
field.
18. To run the job, do one of the following:
Click the Run Now button to run the job log immediately.
Click the Schedule button to schedule the job log to run at a specific date and time.
Clicking the Schedule button opens the Scheduling section. You can type the date and
time or click the Calendar button to select the date, and select the time you want to
run the job log.
After clicking the Run Now or Save button in the Scheduling section, the job log is
created and displayed in the log list on the Log dashboard. Once the job is completed,
Completed will be displayed for the job log in the Status column.
Deduplication
About deduplication
The Deduplication command in Concordance Evolution compares the documents in a dataset to
determine if the dataset contains duplicate documents. Deduplication compares the unique
fingerprint for each file, based on the contents of that file. These fingerprints are known as
hash tables, and are also used in cryptography and security applications. Concordance
Evolution then compares the hash tables for all the documents in the selected dataset. If any
document hash values match up, those files are considered to be duplicates of each other.
To compare and identify duplicate documents, a deduplication job is created and run against a
dataset. When a Deduplication job is created, you have the option of deleting any duplicate
documents or grouping and then tagging the duplicate document without deleting them from
the dataset.
Creating deduplication jobs
Deduplication jobs can be created for any dataset containing documents. When you are
creating a deduplication job you can determine how duplicate documents are identified in the
dataset and what to do with the duplicate documents that are found. After each deduplication
job runs a log file is created for the job and can be accessed from the Deduplication dashboard
by clicking the Log link in the Log column.
© 2015 LexisNexis. All rights reserved.
Administrating Concordance Evolution
239
To deduplicate within a dataset:
1. Click the Admin tab to open the Admin dashboard.
2. In the System pane, locate and click the dataset to create a deduplication job.
Clicking the dataset opens the dataset's dashboard.
3. On the dataset dashboard toolbar, click the Processing button, and then click Create
Deduplication Job.
Clicking the Create Deduplication Job opens the Create Duplication Job dashboard.
4. In the Job Name field, type a name for the deduplication job.
5. (Optional) In the Job Description field, type a description for the deduplication job.
The Dataset list defaults to the currently selected dataset. The Compare By list defaults
to Original Document. The original document is defined as the first document that
Concordance Evolution finds in the selected dataset.
6. In the Algorithm list, click SHA1 (default) or MD5.
The algorithm is used for creating hash tables for each file. The algorithm is used to
search for duplicates within the selected dataset.
7. In Action section, select how you want duplicates to be handled by Concordance
Evolution.
Delete duplicates - duplicate documents found within the dataset will be deleted.
Group duplicate documents - duplicate documents found within the dataset are
grouped together and marked without being deleted from the dataset.
8. To schedule a time for the deduplication job to run, do one of the following:
Click the Now option if you want to run the deduplication job immediately.
Click the Schedule option to schedule the deduplication job to run at a specific date
and time. You can then type the date and time or click the Calendar button to select
the date, and select the time you want to run the deduplication job.
9. To request Concordance Evolution to generate and send a notification to users when the
import job is completed, select the Yes option, type the notification message, and do
one of the following:
To send the notification to all users currently logged on to Concordance Evolution, click
the Send to all Logged in users option.
To send the notification to specific users and/or user groups, click the Send to specific
users/groups option, click the Assign button, select the check box for the user groups
and/or individual users to which you want to send the notification, and then click OK.
For more information about notifications, see About notifications and alerts.
10. When finished, click the Create button.
After clicking the Create button, the deduplication job is created and displayed in the
deduplication job list on the Deduplication dashboard. Once the deduplication job is
completed, Completed will be displayed in the Status column.
© 2015 LexisNexis. All rights reserved.
240
Concordance Evolution
Near-Deduplication
About Near-Deduplication
In near duplication, a family is a collection of one or more near-duplicate documents. The NearDeduplication feature in Concordance Evolution compares the text of documents within a
selected dataset to determine the percentage of likeness between documents. The process
then assigns a master document to each family. The master document is the document most
representative of the document family. Within a family, the master document is the one with
the greatest overall similarity to all the other documents in the family. It has to be a nearduplicate of every other document in the family. The Family Threshold setting in the NearDuplicate Analysis utility determines the percentage of similarity between the master document
and the documents within its document family.
A document cluster contains documents more loosely related to each other than a document
family. The documents in a cluster contain similar content. How similarly the documents are
related is determined by the Cluster Threshold setting. Documents assigned to a document
cluster will have a percentage of similarity at or above the current Cluster Threshold setting in
the Near-Duplicate Analysis utility. Documents which have no direct relationship to each other
might still belong to the same cluster, as long as there is some chain of relationships at or
above the Cluster Threshold setting that connects them. There is no limit on how long this
chain can be, so two documents in the same cluster may be very distant cousins with no
apparent similarity.
After running the Near-Duplicate Analysis utility, six near-duplicate fields are automatically
populated with the applicable near-duplicate data for the case's documents:
ND_Sort
ND_EquiSortAtt
ND_FamilyID
ND_ClusterID
ND_Similarity
ND_IsMaster
Do not change the field name for near-deduplication fields as this will cause an error when
writing the data to the fields and the document will not appear in the Near Duplicate view.
Creating near-deduplication jobs
Near-Deduplication jobs can be created for any dataset containing documents with text. After
each Near-Deduplication job runs a log file is created for the job and can be accessed from the
Jobs dashboard and clicking the Log link in the Log column.
The Near-Deduplication job is for datasets in which near deduplication has not been loaded
from an external load file, the dataset does not contain any near deduplication data, or the
data needs to be updated (overwritten).
© 2015 LexisNexis. All rights reserved.
Administrating Concordance Evolution
241
Create Near-Deduplication Job dialog box
Executing a Near-Deduplication job on an existing dataset will overwrite any previous
data stored in the associated near-deduplication fields.
Do not change the field name for near-deduplication fields as this will cause an error when
writing the data to the fields and the document will not appear in the Near Duplicate view.
To create a near-deduplication job:
1. Click the Admin tab to open the Admin dashboard.
2. In the System pane on the left, locate and click the dataset to create a deduplication
job.
Clicking the dataset opens the dataset's dashboard.
© 2015 LexisNexis. All rights reserved.
242
Concordance Evolution
3. To make sure the dataset can run the Near-Deduplication process, in the Actions column,
click the Edit link for the dataset.
4. From the Near Deduplication list, select Near-Deduplication Job, and then click Save.
5. On the dataset dashboard toolbar, click the Processing button, and then click Create
Near-Deduplication Job.
The Create Near-Deduplication Job dialog box opens.
6. In the Options section, do the following:
For the Cluster Threshold, move the slider to adjust the similarity threshold.
For the Family Threshold, move the slider to adjust the family threshold.
The Cluster Threshold setting determines the minimum similarity to be considered when
assigning clusters of related documents. The Family Threshold setting determines the
minimum similarity to be considered when assigning documents to near-duplicate
families.
By default, the Cluster Threshold is set to 70 and the Family Threshold is set to 85. Once
you run the Near-Duplicate Analysis utility, the utility retains the last cluster and family
threshold settings.
Moving the slider to the right increases the threshold, and moving the slider to the left
decreases the threshold.
7. In the Scheduling section, select one of the following:
To run the production job immediately, select the Run immediately option.
To schedule the production to run at a later time, select the Run at a specified time
option, and then type the date and time or click the Calendar button to select the
date, and time you want to run the job.
8. In the Notifications section, to send a notification to specific users when the neardeduplication job is completed, select the Send a notification when this job completes
check box.
9. Click the Assign button, select the users to send the notification, and then click Save.
The selected users are displayed in the Recipients field.
10. In the Message field, type the notification message.
11. When finished, click Ok.
Knowledge M anagement
Managing the knowledge base
In Concordance Evolution, each dataset has its own knowledge base, which is used to support
searching and applying redactions in the Review dashboard. Administrators can customize the
following knowledge base lists for a dataset:
Spelling Variations - can be used to apply spelling variations to a search word. When the
© 2015 LexisNexis. All rights reserved.
Administrating Concordance Evolution
243
word is searched on, results will include documents containing the spelling variations that
were added to the spelling variations list.
Thesaurus - is used to add synonyms to a search word. When the word is searched on,
results will include documents containing the synonyms that were added to the thesaurus
list.
Stop Words - are used to omit words from the searching index. Stop words are the most
common words in the English language (and, the, but, etc.). Stop words are not words that
are generally searched for by reviewers. Eliminating stop words from the index ensures that
searches run much faster and efficiently.
Reason for Redaction - is used to add redaction reason which will be available to reviewers
while applying redactions in the Near Native view.
The Customize Knowledge Base section on Search Settings dashboard determines which
knowledge base features are used by the dataset. By default, each of the above knowledge
base features are enabled for a dataset.
For more information about the other search settings on the Search Setting dashboard, see
Defining dataset search settings.
Related Topics
Defining dataset search settings
Managing spelling variations
Managing stop words
Managing reasons for redaction
Managing spelling variations
When executing a search, if the Spelling Variations feature is enabled and the search term has
a spelling variation associated with it in the Spelling variations list, the search engine looks for
the search term and its associated spelling variations, and returns both the search term and its
spelling variations in the results.
For example, if a name in the case documents has different variations, such as Ken, Kenneth,
and Kenny, you can add each of the variations to the Spelling Variations list, and if someone
searches on any version of Ken, the search engine will include all versions of Ken in the search
results.
Administrators can add, edit, or delete spelling variations and can import and export a spelling
variations list to and from a .csv file.
© 2015 LexisNexis. All rights reserved.
244
Concordance Evolution
To add spelling variations:
1. Click the Admin tab to open the Admin dashboard.
2. In the System pane on the left, locate and click the dataset to add a spelling variation.
Clicking the dataset opens the dataset's dashboard.
3. On the dataset's dashboard toolbar, click the Settings button, and then click Search
Settings.
4. On the Search Settings toolbar, click the Knowledge Management button, and then click
Spelling Variations.
Clicking Spelling Variations opens the Spelling Variations dashboard.
5. Click the Add a word button to open the Add Spelling Variations dashboard.
6. In the Original Word field, type the original search term you want to add spelling
variations.
7. In the Add one variation per line box, type each of the spelling variations for the search
term you entered in the Original Word field.
When adding multiple spelling variations, make sure that there is only one spelling
variation per line.
8. On the dashboard toolbar, click the Add Word button.
The original word and its spelling variations are added to the Spelling Variations list on
the Spelling Variations dashboard.
9. When finished, click the Close button.
To import a spelling variation list:
1. Click the Admin tab to open the Admin dashboard.
2. In the System pane on the left, locate and click the dataset to import a list of spelling
variations.
Clicking the dataset opens the dataset's dashboard.
3. On the dataset's dashboard toolbar, click the Settings button, and then click Search
Settings.
4. On the Search Settings toolbar, click the Knowledge Management button, and then click
Spelling Variations.
Clicking Spelling Variations opens the Spelling Variations dashboard.
5. In the Import Spelling Variations box, click the Browse button.
6. In the Choose File to Upload dialog box, navigate to and select the .csv file containing
© 2015 LexisNexis. All rights reserved.
Administrating Concordance Evolution
245
the spelling variations to import, and then click Open.
Clicking Open adds the file name and location to the Import Spelling Variations box.
7. Click the Import button.
Clicking the Import button imports the spelling variations and adds the spelling
variations to the Spelling Variations list on the Spelling Variations dashboard.
8. When finished, click the Close button.
To export a spelling variation list:
1. Click the Admin tab to open the Admin dashboard.
2. In the System pane on the left, locate and click the dataset to export the spelling
variations.
Clicking the dataset opens the dataset's dashboard.
3. On the dataset's dashboard toolbar,click the Settings button, and then click Search
Settings.
4. On the Search Settings toolbar, click the Knowledge Management button, and then click
Spelling Variations.
Clicking Spelling Variations opens the Spelling Variations dashboard.
5. To export a list of spelling variations, from the list of spelling variation words, do one of
the following:
Click the check box for each spelling variation you want to export.
Click the Select All link to export all the spelling variations in the list.
6. In the Export Spelling Variations section, click the Export button.
7. In the File Download dialog box, click Save.
8. In the Save As dialog box, navigate to where you want to save the .csv file.
9. In the File name field, type the file name.
The Save as type field defaults to Microsoft Office Excel Comma Separated Value.
10. Click Save.
11. In the Download complete dialog box, click Open to view the .csv file or click Close to
close the dialog box.
12. When finished, click the Close button
To edit a spelling variation:
1. Click the Admin tab to open the Admin dashboard.
© 2015 LexisNexis. All rights reserved.
246
Concordance Evolution
2. In the System pane on the left, click the dataset containing the spelling variation to edit.
Clicking the dataset opens the dataset's dashboard.
3. On the dataset's dashboard toolbar,click the Settings button, and then click Search
Settings.
4. On the Search Settings toolbar, click the Knowledge Management button, and then click
Spelling Variations.
Clicking Spelling Variations opens the Spelling Variations dashboard.
5. In the Spelling Variations table, from the Words column, click the word link for the word
you want to edit.
6. In the Edit Spelling Variations dashboard, make the applicable edits.
7. When finished, click the Update button.
Clicking the Update button saves your edits, and closes the Edit Spelling Variations
dashboard.
To delete a spelling variation:
1. Click the Admin tab to open the Admin dashboard.
2. In the System pane on the left, click the dataset containing the spelling variation to edit.
Clicking the dataset opens the dataset's dashboard.
3. On the dataset's dashboard toolbar,click the Settings button, and then click Search
Settings.
4. On the Search Settings toolbar, click the Knowledge Management button, and then click
Spelling Variations.
Clicking Spelling Variations opens the Spelling Variations dashboard.
5. In the Spelling Variation table, click the word link for the word you want to delete.
6. On the Edit Spelling Variations dashboard toolbar, click the Remove button.
7. When prompted to confirm the deletion, click OK.
Managing the thesaurus
If the Thesaurus feature is enabled, when a search runs, if the search term is associated with
thesaurus words (synonyms) in the Thesaurus list, the search engine looks for the term and its
associated thesaurus words, and returns both the term and its thesaurus words in the results.
© 2015 LexisNexis. All rights reserved.
Administrating Concordance Evolution
247
For example, if a word in the case documents contains other words with the same meaning,
such as dog, hound, puppy, or canine, you can add each of the words to the Thesaurus list,
and if someone searches on any version of dog, the search engine will include all words
associated with dog in the search results.
Administrators can add, edit, or delete thesaurus words and can import and export a thesaurus
word list to and from a .csv file.
To add a word to the thesaurus:
1. Click the Admin tab to open the Admin dashboard.
2. In the System pane on the left, click the dataset to add a thesaurus word.
Clicking the dataset opens the dataset's dashboard.
3. On the dataset's dashboard toolbar, click the Settings button, and then click Search
Settings.
4. On the Search Settings toolbar, click the Knowledge Management button, and then click
Thesaurus.
Clicking Thesaurus opens the Thesaurus dashboard.
5. Click the Add a word link to open the Add Word to Thesaurus dashboard.
6. In the Original Word field, type the original search term you want to add synonyms to.
7. In the Add one synonym per line box, type each of the synonyms for the search term
you entered in the Original Word field.
When adding multiple synonyms, make sure that there is only one synonym per line.
8. On the dashboard toolbar, click the Add Word button.
The original word and its synonyms are added to the Thesaurus list on the Thesaurus
dashboard. Synonyms are listed by the search term entered in the Original Word field on
the Add Word to Thesaurus dashboard.
9. Click the Close button to return to the dataset's dashboard.
To import a thesaurus list:
1. Click the Admin tab to open the Admin dashboard.
2. In the System pane on the left, click the dataset to import a list of thesaurus words.
Clicking the dataset opens the dataset's dashboard.
3. On the dataset's dashboard toolbar, click the Settings button, and then click Search
Settings.
4. On the Search Settings toolbar, click the Knowledge Management button, and then click
Thesaurus.
© 2015 LexisNexis. All rights reserved.
248
Concordance Evolution
Clicking Thesaurus opens the Thesaurus dashboard.
5. In the Import Thesaurus section, click the Browse button.
6. In the Choose File to Upload dialog box, navigate to and select the thesaurus list's .csv
file you want to import, and then click Open.
Clicking Open adds the file name and location to the Import Thesaurus field.
7. Click the Import button.
Clicking the Import button imports the thesaurus list and adds the thesaurus words and
their synonyms to the Thesaurus list on the Thesaurus dashboard.
8. Click the Close button to return to the dataset's dashboard.
To export a thesaurus list:
1. Click the Admin tab to open the Admin dashboard.
2. In the System pane on the left, click the dataset to export a list of thesaurus words.
Clicking the dataset opens the dataset's dashboard.
3. On the dataset's dashboard toolbar, click the Settings button, and then click Search
Settings.
4. On the Search Settings toolbar, click the Knowledge Management button, and then click
Thesaurus.
Clicking Thesaurus opens the Thesaurus dashboard.
5. In the Thesaurus table, select the check box next to the words you want to export.
To select all thesaurus words, select the check box at the top of the Thesaurus list.
6. In the Export Thesaurus section, click the Export button.
7. In the File Download dialog box, click Save.
8. In the Save As dialog box, navigate to where you want to save the .csv file.
9. In the File name field, type the file name.
The Save as type field defaults to Microsoft Office Excel Comma Separated Value.
10. Click Save.
11. In the Download complete dialog box, click Open to view the .csv file or click Close to
close the dialog box.
12. When finished, click the Close button
To edit a word in the thesaurus:
© 2015 LexisNexis. All rights reserved.
Administrating Concordance Evolution
249
1. Click the Admin tab to open the Admin dashboard.
2. In the System pane on the left, click the dataset to edit thesaurus words.
Clicking the dataset opens the dataset's dashboard.
3. On the dataset's dashboard toolbar, click the Settings button, and then click Search
Settings.
4. On the Search Settings toolbar, click the Knowledge Management button, and then click
Thesaurus.
Clicking Thesaurus opens the Thesaurus dashboard.
5. In the Thesaurus table, in the Words column, click the thesaurus word link.
Clicking the thesaurus word link opens the Edit Synonyms dashboard.
6. Make the applicable edits.
7. Click the Update button.
Clicking the Update button saves your edits, and closes the Edit Synonyms dashboard.
8. Click the Close button to return to the dataset's dashboard.
To delete a word from the thesaurus:
1. Click the Admin tab to open the Admin dashboard.
2. In the System pane on the left, click the dataset delete a thesaurus word.
Clicking the dataset opens the dataset's dashboard.
3. On the dataset's dashboard toolbar, click the Settings button, and then click Search
Settings.
4. On the Search Settings toolbar, click the Knowledge Management button, and then click
Thesaurus.
Clicking Thesaurus opens the Thesaurus dashboard.
5. In the Thesaurus table, click the word link for the word you want to delete, and then
click the Remove button.
6. When prompted, click Yes to confirm the deletion.
The word is deleted from the Thesaurus table.
© 2015 LexisNexis. All rights reserved.
250
Concordance Evolution
Managing stop words
Stop words are the most common words in the English language (and, the, but, etc.). Stop
words are not words that are generally searched for by reviewers. Stop words in the Stop
Words list are automatically excluded from the search index and search queries, ensuring that
searches run much faster and efficiently.
Reviewers may request adding a specific word that is common to the case review
documentation and needs to be avoided during searches. Administrators can add, edit, or
delete stop words and can export the stop words list to a .csv file.
The Stop Words list cannot contain any keywords used by the Vivisimo® Velocity® search
engine. For a list of Velocity keywords, see About dataset fields.
Commonly used stop words
The following table contains a list of words commonly added to the stop words list for a
dataset:
Commonly Used Stop Words
AN
AND*
AND/OR
ANY*
ARE
AREN'T
AS
BE
BEEN
BEING
BUT
BY
DO
DOES
DOESN'T
FOR
HAD
HAS
HAVE
HAVING
HE
HE'LL
HE'S
HER
HERE
HERSELF
HIM
HIMSELF
HIS
IF
INSTEAD
IS
ISN
ISN'T
IT
IT'S
ITS
ITSELF
LET
LET'S
LL
MAYBE
ME
MERELY
MR
MRS
MUCH
MUST
MY
MYSELF
NONE
NOR
NOT*
NOTHING
OF
OFF
OFTEN
OKAY
© 2015 LexisNexis. All rights reserved.
PUT
RE
SAME
SHE
SHE'LL
SO
THAN
THAT
THAT'S
THATS
THE
THEIR
THEM
THEMSELVES
THEN
THERE
THERE'S
THEREABOUTS
THEREAFTER
THEREFOR
THEREFORE
THEREOF
THERETO
THESE
THEY
THEY'D
THEY'LL
THEY'RE
THIS
WASN'T
WE
WE'D
WE'LL
WE'RE
WE'VE
WERE
WEREN'T
WHAT
WHAT'S
WHATEVER
WHATSOEVER
WHEN
WHENEVER
WHERE
WHEREAS
WHEREBY
WHEREUPON
WHETHER
WHO
WHOEVER
WHOM
WHOSE
WITH
WON'T
WOULD
WOULDN'T
YET
YOU
Administrating Concordance Evolution
HOWEVER
I'D
I'LL
I'M
I'VE
I.E.
OTHER
OTHERS
OUR
PER
PERHAPS
PROBABLY
THOSE
THOUGH
TO
TOO
VE
WAS
251
YOU'D
YOU'LL
YOU'RE
YOU'VE
YOUR
YOURS
YOURSELF
* Keyword used by Velocity
To add a stop word:
1. Click the Admin tab to open the Admin dashboard.
2. In the System pane on the left, click the dataset for which you want to add stop
word(s).
Clicking the dataset opens the dataset's dashboard.
3. On the dataset's dashboard toolbar, click the Settings button, and then click Search
Settings.
4. On the Search Settings toolbar, click the Knowledge Management button, and then click
Stop Words.
Clicking Stop Words opens the Stop Words dashboard.
5. In the Add Stop Words section, type the words you want to omit from the searching
index.
When adding multiple stop words, make sure that there is only one stop word per line.
You can also copy and paste words into the Add Stop Words box. For example, you can
copy the stop words from the .csv file of an exported stop words list and paste the
words into the Add Stop Words box to quickly create a stop words list.
6. Click the Add Stop Words button.
The new stop word(s) now display in the dataset's Stop Words table, and the new stop
words will be excluded from the dataset's search index.
7. Click the Close button to return to the dataset's dashboard.
To edit a stop word:
1. Click the Admin tab to open the Admin dashboard.
2. In the System pane on the left, click the dataset to edit the stop words list.
Clicking the dataset opens the dataset's dashboard.
© 2015 LexisNexis. All rights reserved.
252
Concordance Evolution
3. On the dataset's dashboard toolbar, click the Settings button, and then click Search
Settings.
4. On the Search Settings toolbar, click the Knowledge Management button, and then click
Stop Words.
Clicking Stop Words opens the Stop Words dashboard.
5. In the Stop Words table, in the Stop Words column, click the stop word link.
Clicking the stop word link opens the Edit Stop Word dialog box.
6. Edit the stop word.
7. Click the Update button.
Clicking the Update button saves your edits, and closes the Edit Stop Word dialog box.
8. Click the Close button to return to the dataset's dashboard.
To export a stop word list:
1. Click the Admin tab to open the Admin dashboard.
2. In the System pane on the left, click the dataset to export the stop words list.
Clicking the dataset opens the dataset's dashboard.
3. On the dataset's dashboard toolbar, click the Settings button, and then click Search
Settings.
4. On the Search Settings toolbar, click the Knowledge Management button, and then click
Stop Words.
Clicking Stop Words opens the Stop Words dashboard.
5. In the Stop Words table, to select words to export, do any of the following:
To select individual stop words, click the check box next to the stop word.
To select all the stop words in the table, click the Select All link at the bottom of the
table.
6. In the Export Stop Words section, click the Export button.
7. In the File Download dialog box, click Save.
8. In the Save As dialog box, navigate to where you want to save the exported file.
9. In the File name field, type the file name.
The Save as type field defaults to Microsoft Office Excel Comma Separated Value.
10. Click Save.
11. In the Download complete dialog box, click Open to view the .csv file or click Close to
close the dialog box.
© 2015 LexisNexis. All rights reserved.
Administrating Concordance Evolution
253
12. When finished, click the Close button
To delete a stop word:
1. Click the Admin tab to open the Admin dashboard.
2. In the System pane on the left, click the dataset to delete stop words.
Clicking the dataset opens the dataset's dashboard.
3. On the dataset's dashboard toolbar, click the Settings button, and then click Search
Settings.
4. On the Search Settings toolbar, click the Knowledge Management button, and then click
Stop Words.
Clicking Stop Words opens the Stop Words dashboard.
5. In the Stop Words table, select the check box for the stop word(s) you want to delete.
6. On the dashboard toolbar, click the Remove button.
7. When prompted, click Yes to confirm the deletion.
The stop words are deleted from the dataset's Stop Words list. If documents in the
dataset contain the deleted stop words, the deleted stop words will now be included in
the dataset's search index.
8. Click the Close button to return to the dataset's dashboard.
Managing reasons for redaction
Administrators can create pre-defined redaction reasons so that when reviewers apply
redactions to documents in the Near Native view, the reviewers can select one of the predefined reasons from the Enter Reason dialog box.
Administrators can add, edit, or delete the redaction reasons, as well as import and export a
.csv formatted file containing a list of redaction reasons.
To add a reason for redaction:
1. Click the Admin tab to open the Admin dashboard.
2. In the System pane on the left, click the dataset for which you want to add redaction
reasons.
Clicking the dataset opens the dataset's dashboard.
© 2015 LexisNexis. All rights reserved.
254
Concordance Evolution
3. On the dataset's dashboard toolbar, click the Settings button, and then click Search
Settings.
4. On the Search Settings toolbar, click the Knowledge Management button, and then click
Redaction Reasons.
Clicking Redaction Reasons opens the Reasons for Redaction dashboard.
5. Click the Add a Reason for Redaction link to open the Add Reasons for Redaction
dashboard.
6. In the Reason for Redaction field, type the redaction reason.
7. (Optional) In the Description field, type the redaction reason description.
8. Click the Add Reason button.
The reason for redaction is added to the Reasons for Redaction table on the Reasons for
Redaction dashboard.
By default, the Add a reason for each redaction check box is selected. When the check
box is selected, each time a reviewer applies a redaction in the Near Native view, the
reviewer is required to assign a reason for redaction to the redaction.
To make assigning a reason for redaction to redactions mandatory for reviewers, clear
the Add a reason for each redaction check box.
9. To reorder the redaction reasons, in the Up/Down column, click the up or down arrow
for a selected redaction reason.
10. When finished, click the Close button.
To import a reasons for redaction list:
1. Click the Admin tab to open the Admin dashboard.
2. In the System pane on the left, click the dataset to import a list of redaction reasons.
Clicking the dataset opens the dataset's dashboard.
3. On the dataset's dashboard toolbar, click the Settings button, and then click Search
Settings.
4. On the Search Settings toolbar, click the Knowledge Management button, and then click
Redaction Reasons.
Clicking Redaction Reasons opens the Reasons for Redaction dashboard.
5. In the Import a Reason for Redaction section, click the Browse button.
6. In the Choose File to Upload dialog box, navigate to and select the reason for redaction
list's .csv file you want to import, and then click Open.
Clicking Open adds the file name and location to the Import a Reason for Redaction field.
7. Click the Import button.
© 2015 LexisNexis. All rights reserved.
Administrating Concordance Evolution
255
Clicking the Import button imports the reason for redaction list and adds the redaction
reasons to the Reasons for Redaction table on the Reasons for Redaction dashboard.
8. When finished, click the Close button.
To export a reasons for redaction list:
1. Click the Admin tab to open the Admin dashboard.
2. In the System pane on the left, click the dataset to export a list of redaction reasons.
Clicking the dataset opens the dataset's dashboard.
3. On the dataset's dashboard toolbar, click the Settings button, and then click Search
Settings.
4. On the Search Settings toolbar, click the Knowledge Management button, and then click
Redaction Reasons.
Clicking Redaction Reasons opens the Reasons for Redaction dashboard.
5. In the Reasons for Redaction table, to select redaction reasons for export, do one of the
following:
To select individual redaction reasons, click the check box next to the redaction
reasons to export.
To select all redaction reasons, click the Select All link at the bottom of the redaction
reasons table.
6. In the Export a Reason for Redaction section, click the Export button.
7. In the File Download dialog box, click Save.
8. In the Save As dialog box, navigate to where you want to save the .csv file.
9. In the File name field, type the file name.
The Save as type field defaults to Microsoft Office Excel Comma Separated Value.
10. Click Save.
11. In the Download complete dialog box, click Open to view the .csv file or click Close to
close the dialog box.
12. When finished, click the Close button
To edit a reason for redaction:
1. Click the Admin tab to open the Admin dashboard.
2. In the System pane on the left, click the dataset containing the redaction reason to edit.
Clicking the dataset opens the dataset's dashboard.
© 2015 LexisNexis. All rights reserved.
256
Concordance Evolution
3. On the dataset's dashboard toolbar, click the Settings button, and then click Search
Settings.
4. On the Search Settings toolbar, click the Knowledge Management button, and then click
Redaction Reasons.
Clicking Redaction Reasons opens the Reasons for Redaction dashboard.
5. In the Reasons for Redaction table, click the redaction reason link in the Reason column.
Clicking the redaction reason link opens the Edit Reason for Redaction dashboard.
6. Make the applicable edits.
7. Click the Update Reason button.
Clicking the Update Reason button saves your edits, and closes the Edit Reason for
Redaction dashboard.
8. When finished, click the Close button.
To delete a reason for redaction:
1. Click the Admin tab to open the Admin dashboard.
2. In the System pane on the left, click the dataset containing the redaction reasons to
delete.
Clicking the dataset opens the dataset's dashboard.
3. On the dataset's dashboard toolbar, click the Settings button, and then click Search
Settings.
4. On the Search Settings toolbar, click the Knowledge Management button, and then click
Redaction Reasons.
Clicking Redaction Reasons opens the Reasons for Redaction dashboard.
5. In the Reasons for Redaction table, select the redaction reason link you want to delete.
6. On the Edit Reason for Redaction dashboard toolbar, click the Remove button.
7. When prompted, click Yes to confirm the deletion.
The stop words are deleted from the dataset's Stop Words list. If documents in the
dataset contain the deleted stop words, the deleted stop words will now be included in
the dataset's search index.
8. When finished, click the Close button.
© 2015 LexisNexis. All rights reserved.
Administrating Concordance Evolution
257
Searching - Admin
Running admin dashboard searches
There are two ways to search in the Admin dashboard. You can search the System pane for a
specific folder, matter, or dataset using the search field in the System pane, or the Admin
Search bar in the Admin dashboard to search the entire system or specific categories in the
Admin dashboard.
To search using the System pane:
1. Click the Admin tab to open the Admin dashboard.
2. In the System pane search field, type your search term.
3. Click the Find button.
4. The search term is highlighted in yellow in the system.
To search using the Admin Search bar:
1. Click the Admin tab to open the Admin dashboard.
2. In the Admin Search bar, type your search term, click the magnifying glass button,
, and then select the check box next to the search category you want to search.
By default, all the category check boxes are selected. To search the entire system, click
the Select All check box.
3. Click the Search button.
The search results are displayed on the Search Result dashboard.
Results are organized by category. To view the search results in a category, click the
right arrow, , next to the category. To close the search results in a category, click the
down arrow,
, next to the category.
4. To view a specific item on the Search Result dashboard, click the item's name link in the
Name column.
5. To view a user in the User Names category, click the user name link in the Login Id
column.
© 2015 LexisNexis. All rights reserved.
258
Concordance Evolution
Search Settings
Defining dataset search settings
The Search Settings dashboard in the Admin dashboard is used to define the document search
settings for a dataset in the Review dashboard. The search settings are defined for each
dataset, and determine whether concept searching is enabled in the Review dashboard, the
amount of data previewed for search results in the Snippet view, and whether the
Concordance Evolution thesaurus, dictionary, stop words, and/or reasons for redaction are
used for searching and applying redactions in the Review dashboard.
By default concept searching, the thesaurus, stop words, spelling variations, and the reasons
for redaction are all enabled for searching and applying redactions in the Review dashboard.
To define a dataset's search settings for the Review dashboard:
1. Click the Admin tab to open the Admin dashboard.
2. In the System pane on the left, click the dataset you want to add a tag group.
Clicking the dataset opens the dataset's dashboard.
3. On the dataset's dashboard toolbar, click the Settings button, and then click Search
Settings.
Clicking Search Settings opens the Search Settings dashboard.
4. In the Concept Searching section, to enable or disable concept searching in the Review
dashboard, select or clear the Allow Concept Searching check box.
By default the Allow Concept Search check box is selected in the Concept Searching
section. When the check box is selected, concept searching is enabled for the dataset in
the Review dashboard, and the Concept Searching check box is displayed in the Quick
Search bar in the Review dashboard.
When you clear the Allow Concept Searching check box, concept searching is disabled
for the dataset in the Review dashboard, and the Concept Searching check box is
removed from the Quick Search bar in the Review dashboard.
5. In the Preview Size field, type the number of kilobytes (KB) to display for each
document listed in the Snippet view of the Review dashboard.
The Preview Size field defaults to 50 kilobytes.
6. In the Customize Knowledge Base section, enable or disable the features you want
include or exclude from searches in the Review dashboard.
You can use the Concordance Evolution thesaurus, stop words, spelling variations, and
reasons for redaction for searching and applying redactions in the Review dashboard.
By default, all the options are selected, the features are enabled and used for searches
in the Review dashboard. When you clear the check boxes, the features are disabled
and are not used for searches in the Review dashboard.
For more information about the knowledge base settings, see Managing the knowledge
base.
© 2015 LexisNexis. All rights reserved.
Administrating Concordance Evolution
259
7. When finished, click Save to save the dataset's search settings.
To manage the knowledge base settings for a dataset:
1. Click the Admin tab to open the Admin dashboard.
2. In the System pane on the left, locate and click the dataset you want to add a field.
Clicking the dataset opens the dataset's dashboard.
3. On the dataset's dashboard toolbar, click the Settings button, and then click Search
Settings.
4. On the Search Settings dashboard toolbar, click the Knowledge Management button,
and then click Spelling Variations.
By default, the Thesaurus, Stop Words, Spelling Variations, and Reasons for
Redaction check boxes are selected in the Customize Knowledge Base box for each
dataset. When a check box is selected, the feature is enabled for the dataset. When a
check box is not selected, the feature is disabled for the dataset.
5. In the Customize Knowledge Base box, verify the knowledge base settings.
6. Select the check boxes for the knowledge base features you want to be enabled for the
dataset.
7. Clear the check boxes for the knowledge base features you want to be disabled for the
dataset.
When the Thesaurus and Spelling Variations check boxes are selected, reviewer search
results will include the spelling variations and synonyms defined by the administrator in
the knowledge base.
When the Reason for Redaction check box is selected, reviewers will be able to add
redaction reasons while applying redactions in the Near Native view.
When the Stop Words check box is selected, the stop words in the stop words list are
automatically excluded from search queries when running searches in the dataset.
8. Click Save.
Clicking Save applies the knowledge base settings to the dataset in the current session.
Managing saved search results
You can view the saved search results on the Manage Saved Search Results dashboard, which
displays the search result number, search results name, search query, Binder:Review Set
name, number of documents, the date and time the search was saved, and the user who
saved the search. Search results do not display until the background task is completed.
© 2015 LexisNexis. All rights reserved.
260
Concordance Evolution
When you save, compare, or export search results, the process can run as a background task
while you continue working. When the compare or export process completes, you will receive a
notification with a link to open the .csv file.
When you delete a saved search result, it is deleted from the list on the Saved Search Results
tab. Any .csv files that were made to compare the results and were saved within the dataset
directory location are also deleted. Any .csv files that are saved outside the dataset directory
location will not be deleted.
To view saved search results:
1. Click the Admin tab to open the Admin dashboard.
2. In the System Tree pane on the left, click the dataset you want to add a tag group.
Clicking the dataset opens the dataset's dashboard.
3. On the dataset's dashboard toolbar, click the Settings button, and then click Saved
Search Results.
The Manage Saved Search Results dashboard is displayed.
To compare search results from a previous query:
1. Click the Admin tab to open the Admin dashboard.
2. In the System Tree pane on the left, click the dataset to run the compare option.
Clicking the dataset opens the dataset's dashboard.
3. On the dataset's dashboard toolbar, click the Settings button, and then click Saved
Search Results.
4.
In the Manage Saved Search Results table, locate the query you want to compare, and
then click the Compare link.
5. Click the Run in Background button to continue working while the process completes.
The search query is rerun on the dataset or review set.
Clicking the Run in Background button helps ensure that the process saves properly,
especially for search results with a large number of documents.
You will receive a notification when the process completes. The notification will contain a
link so you open the exported .csv file.
6. Open the exported .csv file.
To compare the data to a previous saved search result, the data must first be exported
to a .csv file. When you rerun the query, results from both searches are saved in the
same spreadsheet for comparison.
To export search results:
1. Click the Admin tab to open the Admin dashboard.
© 2015 LexisNexis. All rights reserved.
Administrating Concordance Evolution
261
2. In the System Tree pane on the left, click the dataset to export the search results.
Clicking the dataset opens the dataset's dashboard.
3. On the dataset's dashboard toolbar, click the Settings button, and then click Saved
Search Results.
4. In the Manage Saved Search Results table, locate the search results you want to
export, and then click the Export link.
5. In the File Download dialog box, click Save.
6. In the Save As dialog box, type a name for the search results file in the File name field.
7. Navigate to the directory folder where you want to save the file, then click Save.
8. When finished in the Download Complete dialog box, click Close.
To delete saved search results:
1. Click the Admin tab to open the Admin dashboard.
2. In the System Tree pane on the left, click the dataset to export the search results.
Clicking the dataset opens the dataset's dashboard.
3. On the dataset's dashboard toolbar, click the Settings button, and then click Saved
Search Results.
4. In the Managed Saved Search Results table, locate the search results you want to
delete, and then click the Remove button.
5. When prompted, click Yes.
The search results listing is now deleted from the Manage Saved Search Results table.
Managing Persistent Highlight
Persistent Highlight terms can be added and deleted from the list. To save time, a list of terms
from a text (.txt) or comma-separated value (.csv) formatted file can be imported and the terms
are automatically assigned a color. You can also export selected terms to a comma-separated
value (.csv) formatted file.
If you do not have permission to edit the Persistent Highlight terms, contact your Concordance
Evolution administrator to make changes.
Keep the following in m ind when adding highlight term s:
Terms are limited to 150 characters
Terms may not contain boolean operators (i.e., AND, OR, NOT)
© 2015 LexisNexis. All rights reserved.
262
Concordance Evolution
Terms may not contain special characters (i.e., &,%:;)
Terms cannot be Concordance Evolution stop words
Terms in an import list may only contain one term per line
Persistent Highlight is not available for production or image sets.
To add a Persistent Highlight term:
1. From the System pane, locate and open the dataset you want to add Persistent
Highlight terms.
2. On the Dataset Management dashboard toolbar, click the Settings button, and then
click Persistent Highlight.
The Persistent Highlight Management dashboard is displayed.
3. On the Persistent Highlight Management dashboard, click the Add a Highlight Term
button.
4. In the Term field, type the term.
5. From the Color list select the color to highlight the term when viewing documents, and
then click Save.
The term is added to the Highlight Term table.
To filter the list of terms shown in the table:
1. From the System pane, locate and open the dataset you want to filter Persistent
Highlight terms.
2. On the Dataset Management dashboard toolbar, click the Settings button, and then
click Persistent Highlight.
The Persistent Highlight Management dashboard is displayed.
3. On the Persistent Highlight Management dashboard, in the Highlight Term column, click
the Filter button .
4. To filter by one set criteria, do the following, and then click Filter:
From the items with value that list, select the comparison command.
Type the term in the field to filter on.
5. To filter by multiple criteria, do the following, and then click Filter:
From the items with value that list, select the comparison command, and then type
the term in the field to filter on.
From the boolean list, select a boolean operator, and then type the term in the field to
filter on.
6. To clear the filter(s), click the Filter button
, and then click Clear.
To enable or disable a Persistent Highlight term:
© 2015 LexisNexis. All rights reserved.
Administrating Concordance Evolution
263
1. From the System pane, locate and open the dataset you want to add Persistent
Highlight terms.
2. On the Dataset Management dashboard toolbar, click the Settings button, and then
click Persistent Highlight.
The Persistent Highlight Management dashboard is displayed.
3. On the Persistent Highlight Management dashboard, do one of the following:
For the term you want to enable, and then in the Actions column, click the Enable link.
For the term you want to enable, and then in the Actions column, click the Disable link.
To edit a Persistent Highlight term:
1. From the System pane, locate and open the dataset you want to add Persistent
Highlight terms.
2. On the Dataset Management dashboard toolbar, click the Settings button, and then
click Persistent Highlight.
The Persistent Highlight Management dashboard is displayed.
3. On the Persistent Highlight Management dashboard, in the Actions column, click the Edit
link.
4. In the Edit Highlight Term dialog box, make the necessary changes, and then click the
Save button.
To delete a Persistent Highlight term:
1. From the System pane, locate and open the dataset you want to add Persistent
Highlight terms.
2. On the Dataset Management dashboard toolbar, click the Settings button, and then
click Persistent Highlight.
The Persistent Highlight Management dashboard is displayed.
3. On the Persistent Highlight Management dashboard, do one of the following:
Locate the term you want to delete, and then in the Actions column, click the Delete
link.
Click the check box for the term you want to delete, and then at the top of the table,
click the Delete button.
4. In the Term field, type the term.
5. From the Color list select the color to highlight the term when viewing documents, and
then click Save.
The term is added to the Highlight Term table.
To import a list of Persistent Highlight terms:
© 2015 LexisNexis. All rights reserved.
264
Concordance Evolution
When importing a list, if any imported terms do not meet the term criteria described above,
the term's status will be set to false until the term is edited.
1. From the System pane, locate and open the dataset you want to import a list of
Persistent Highlight terms.
2. On the Dataset Management dashboard toolbar, click the Settings button, and then
click Persistent Highlight.
The Persistent Highlight Management dashboard is displayed.
3. In the Import List of Highlight Terms section, click the Browse button.
4. Locate and click the list file that contains the terms you want to import, and then click
Open.
5. When ready, click the Import button.
The terms are added to the list of Persistent Highlight terms and automatically assigned
a color.
To export a list of Persistent Highlight terms:
1. From the System pane, locate and open the dataset you want to export a list of
Persistent Highlight terms.
2. On the Dataset Management dashboard toolbar, click the Settings button, and then
click Persistent Highlight.
The Persistent Highlight Management dashboard is displayed.
3. In the Highlight Term table, do one of the following:
To export specific Highlight Terms, select the check box for each term you want to
export.
To export all the Highlight Terms listed on the current page of terms, click the check
box at the top of the column.
To export all the Highlight Terms on all pages, click the Select All button.
4. In the Export List of Highlight Terms section, click the Export button.
5. Locate and click the list file that contains the terms you want to import, and then click
Open.
6. When prompted, save the file to your local directory.
© 2015 LexisNexis. All rights reserved.
Administrating Concordance Evolution
265
Reporting
Audit Logs
About audit logs
Audit Logs provide an account of events in Concordance Evolution both at the system and
matter level. Events are records of user actions throughout the application, such as user access
and data modification. The System Audit Log helps administrators track the system actions
users performed during a session. The Matter Audit Log records the events of user's actions for
a given matter such as searching, tagging and documents viewed.
Related Topics
Viewing the System Audit Log
Viewing the Matter Audit Log
Exporting Audit Logs
Archiving System events
Viewing the system audit log
The System Audit Log is displayed on the Audit Management dashboard and provides a list of
all events created in the system. The Audit Management dashboard displays the Event Date/
Time, Event Type, Event Name, Performed By, and Description.
The System Audit Log displays information for each of the following event types:
Event type
Description
AD Domain
An Active Directory Domain was added or
modified
Auditing
An audit log was exported
Folder
A folder was created, deleted, or modified
Licensing
A seat license was added, removed, assigned
or unassigned
Login Logout
A user session created, failed, or ended
Matter
A matter was created, deleted or modified
Notifications
A notification was sent
Organization
An organization was created, deleted, or
modified
Security
A security role was created, deleted, or
© 2015 LexisNexis. All rights reserved.
266
Concordance Evolution
modified
User
A user was created, deleted, or modified
User Group
A user group was created, deleted, or
modified
The events shown on the Audit Management page can be exported to a comma-separated
(.csv) formatted file. For more information, see Exporting Audit Logs.
To view events in the Audit Log:
1. Do one of the following:
Point to the Admin tab, and then click System Audit Log.
Click the Admin tab to open the Admin dashboard, and then on the Admin toolbar click
the System Audit Log button.
The Audit Management dashboard opens. By default, the Audit Management dashboard
displays the 10 most recent events. To change the number of events displayed, in the
lower right corner, from the Items Per Page list, select the number of events to display.
2. To refine the results, do any of the following:
To view events by date, from the Filter By Last Modified list, select the days to
display.
To view events by type, from the Filter By Event Type list, select the check box for
one or more event types to display.
To view events by the user(s) who executed the event, from the Filter Performed By
list, select the check box for one or more users to display.
3. To locate a specific event or events, type a value in the field below a column header and
then press Enter to search for events that match the value specified.
Only one value is allowed in each column header field.
4. To reset the event list back to the original list, do one of the following:
Delete the field value and press Enter.
Click the Clear link.
Viewing the matter audit log
The Matter Audit Log is displayed on the Audit Management dashboard and provides a list of all
events created in the matter. The Audit Management dashboard displays the Event Date/Time,
Event Type, Event Name, Performed By, and Description.
The Matter Audit Log displays information for each of the following event types:
© 2015 LexisNexis. All rights reserved.
Administrating Concordance Evolution
Event type
Description
Binder
A binder was created, deleted, or modified
CaseMap
A fact, document, link or text was sent to
CaseMap
Dataset
A dataset was created, deleted or modified
Document
A document was viewed (Near Native or
Document Data views), added, deleted,
modified, downloaded, emailed, exported,
produced tagged, untagged, or printed
Markup
A markup was created, deleted, or modified
Review Set
A review set was created, deleted, or modified
Search
A search was executed and saved search
results were created, deleted, or modified
Search Administration
A search was executed using the quick search
bar on the Admin dashboard
Tagging
A tag was created, deleted, modified, queried,
or the tag was applied or removed
267
The events shown on the Audit Management page can be exported to a comma-separated
(.csv) formatted file. For more information, see Exporting Audit Logs.
To view events in the Matter Audit Log:
1. In the System pane, locate and open the matter you want to view audit events.
2. On the Matter's dashboard toolbar, click the Audit Log button.
The Audit Management dashboard opens.
The Audit Management dashboard opens. By default, the Audit Management dashboard
displays the 25 most recent events. To change the number of events shown in the
table, in the lower right corner, from the Items Per Page list, select the number of events
to display.
3. To refine the results, do any of the following:
To view events by date, from the Filter By Last Modified list, select the days to
display.
To view events by type, from the Filter By Event Type list, select the check box for
one or more event types to display.
To view events by the user(s) who executed the event, from the Filter Performed By
list, select the check box for one or more users to display.
4. To locate a specific event or events, type a value in the field below a column header and
then press Enter to search for events that match the value specified.
Only one value is allowed in each column header field.
© 2015 LexisNexis. All rights reserved.
268
Concordance Evolution
5. To reset the event list back to the original list, do one of the following:
Delete the field value and press Enter.
Click the Clear link.
Exporting an audit log
The Audit Log can be exported to a comma-separated (.csv) formatted file. You can export the
entire table of events or you can select specific events.
To export audit log events:
1. To export the event of an audit log, do one of the following:
To export the System Audit Log events, on the Admin dashboard, and then on the
Admin toolbar click the System Audit Log button.
To export the Matter Audit Log events, from the System pane, locate and open the
matter to export events, and then on the matter's dashboard toolbar click the Audit
Log button.
2. Do any of the following to refine the results:
To view events by date, from the Filter By Last Modified list, select the number of
days to display.
To view events by type, from the Filter By Event Type list, select the check box for
one or more event types to display.
To view events by the user(s) who executed the event, from the Filter Performed By
list, select the check box for one or more users to display.
3. From the results, do one of the following:
To select all the events to export, select the check box in the upper left corner of the
Events table or in the bottom left corner, click the Select All link.
To one or more events to export, select the check box for each event.
4. On the Audit Management toolbar, click the Export Audit Log Events.
5. In the File Download dialog box, do one of the following:
Click Open to view the file, in the Download Complete dialog box, click Open to open
the file in your default spreadsheet application.
Click Save to save the file, in the Save As dialog box, navigate to where you want to
save the file, and then in the File Name field, type the file name and click Save.
6. In the Download Complete dialog box, click Open to view the file or click Close to close
the dialog box.
© 2015 LexisNexis. All rights reserved.
Administrating Concordance Evolution
269
Archiving system events
To prevent the server where the audit events are stored from getting bogged down with an
endless amount of audit events, Concordance Evolution automatically archives the audit events
and then deletes the events from the server. When Concordance Evolution servers are set up,
the archive folder location and the maximum number of days to store system events on the
server are specified. When the number of days is reached, Concordance Evolution exports the
events as a comma-separated (.csv) formatted file and stores the file in the specified location.
The exported .csv file is dated and saved using the following naming format:
<Archive Date-Archive Time>_System_Audit_Log.csv
For example, 20140325-09.33.38_EVMaster_SystemAuditLog.csv
All archive audit file names are time stamped using Greenwich Mean Time (GMT).
The default location on the SQL Server for the archive folder is: C:\ConcordanceEV
\EV_AgentJobLogs\SystemAuditLogArchive and the default number of days is 90. These
settings can be edited to meet your organization's needs.
To edit the system audit archive settings:
1. From the Admin tab, click Servers.
2. Locate the SQL Server and click the server name link.
3. In the Services column, click the System Configuration Service link.
4. On the System Configuration Service tab, do any of the following:
To change the number of days the audit events are stored on the server, in the
System audit log archival days field, type the number of days.
To change the location of the archive folder, in the System audit log archival location
field, type the path for the archive folder.
5. When finished, on the Configure Services dashboard toolbar, click Save.
Billing Reports
Creating billing reports
The billing report provides information regarding the file count size for native documents and
image sets for each matter in an organization.
To generate a billing report:
1. Click the Admin tab to open the Admin dashboard.
2. On the System toolbar, click the Billing Report button.
© 2015 LexisNexis. All rights reserved.
270
Concordance Evolution
The Billing Report dialog box is displayed.
3. To change the number of items shown in the table, in the Items Per Page list, select the
number of items to display.
4. To export a billing report, do any of the following:
To export a report for a single matter, click the check box for the matter.
To export a report for multiple matters, click the check box for each matter you want to
include in the report.
To export a report for all the matters in the system, click the Select All button.
At any time you can use the Clear All button to clear the matter selections. However,
please be aware that this also clears all Filter settings as well.
4. When finished, click Export.
5. When prompted that the billing report job is completed, click the Please click here to
download billing report link.
6. In the File Download dialog box, do one of the following:
Click Open to view the file, in the Download Complete dialog box, click Open to open
the file in your default spreadsheet application.
Click Save to save the file, in the Save As dialog box, navigate to where you want to
save the file, and then in the File Name field, type the file name and click Save.
7. In the Download Complete dialog box, click Open to view the file or click Close to close
the dialog box.
The exported billing report contains the following information:
Organization
Matter name
Users
Count of Native Files
Size of Native Files (MB)
Count of Images
Size of Images (MB)
Total Size of Native + Images (MB)
Database Size (MB)
Total Size of Matter (MB)
The report can also be accessed from the Notification Management dashboard, see
Viewing notifications.
To filter the list of matters and organizations:
1. Click the Admin tab to open the Admin dashboard, and then on the System toolbar click
the Billing Report button.
© 2015 LexisNexis. All rights reserved.
Administrating Concordance Evolution
271
The Billing Report dialog box is displayed.
2. In the Billing Report dialog box, do one of the following:
In the Matter column, click the Filter button
.
In the Organization column, click the Filter button
.
3. To filter by a single term, from the items with value that list, select the comparison
command, and then type the term in the field.
4. To filter by multiple terms, from the items with value that list, select the comparison
command, type the first term in the field, select a boolean operator to use to combine
the search terms, and then type the second term in the field.
5. When ready click Filter.
6. To clear the filter(s), in the Matter or Organization column click the Filter button
then click Clear.
, and
Matter reports
Viewing matter reports
Concordance Evolution provides matter-level reports for tracking reviewer activity such as
document comments, document edits, markups applied, tags applied, and documents viewed.
When a matter dashboard is opened, the default matter report is displayed at the bottom of
the page. Concordance Evolution ships with the following system reports:
System Report
Description
Events
Document
Comments
Displays the number of comments for all
active users for the current date
Comment Created
Document Edits
Displays the number of documents that were Document Modified
changed/edited in the matter per user for the
current date
Markup
Displays a line chart with the number of
markups applied to documents per user in
the matter for the current date
Productivity
Displays a bar type chart for the listed events Comment Created,
for all active users for the current date
Document Modified,
Markup Created, Document
Tagged, Document Viewed
Document Data, Document
Viewed Near Native
Tag
Displays the tag name and the number of
times the tag was applied
Markup Created
Document Tagged
© 2015 LexisNexis. All rights reserved.
272
Concordance Evolution
View Documents
Displays the number of documents viewed in
the Near Native or Document Data views
Document Viewed
Document Data, Document
Viewed Near Native
System matter reports cannot be overwritten. However, a system matter report can be
used as a template and saved under a different report name.
To view a matter report:
1. In the System pane, locate and open the matter to view reports.
2. In the Reports section, the default report is displayed.
3. To change between reports, select the report from the report list.
4. To view more details, click the View Report button.
The Matter Reports dashboard opens.
To change the chart display:
You can use the matter report tools to adjust the information displayed on the chart.
System matter reports can be adjusted to display the information that fits your needs;
however, the system reports cannot be overwritten. To save the changes, you need to
save the report using a different report name.
1. In the System pane, locate and open the matter to view reports.
2. In the Reports section, from the Reports list, select the report to show.
3. To open the Matter Reports dashboard, click the View Report button.
4. To show/hide the matter chart or grid, from the Display list, click Chart or Grid.
A check mark next to the option indicates the display is activated.
5. To display a bar or line chart, from the Display list, click Bar or Line.
A check mark next to the option indicates the current active chart option.
6. To show/hide the chart legend, from the Display list, click Legend.
A check mark next to the option indicates the legend is displayed above the chart.
7. To show/hide the chart labels, from the Display list, click Labels.
A check mark next to the option indicates the labels are shown in the chart.
To change the display filters:
© 2015 LexisNexis. All rights reserved.
Administrating Concordance Evolution
273
You can use the matter report tools to adjust the information displayed on the Matter
Reports dashboard.
1. In the System pane, locate and open the matter to view reports.
2. In the Reports section, click the View Report button.
The matter reports dashboard opens. You can use one of the system reports as a
template and then save the changes under a new report name.
3. To change the reporting dates, from the Date Range list do any of the following:
Click Custom and then specify the from and to dates in the date fields to display the
data for dates that fall between the specified dates.
Click Today (default) to display only the events from the current date.
Click Yesterday, to display the data for the previous day's events.
Click Last 7 Days to display the data for the previous seven days from the date the
report is executed.
Click Last 30 Days to display the data for the previous 30 days from the date the
report is executed.
Click Last 60 Days to display the data for the previous 60 days from the date the
report is executed.
Click Last 90 Days to display the data for the previous 90 days from the date the
report is executed.
4. To specify the scale values, from the Group By list do any of the following:
Click User to show the data for all users for the datasets within the matter for the
date(s) specified.
Click Hourly to show the data for the hour of the day for the date(s) specified.
Click Hour of Day to show the data for every hour of the day for the date(s) specified.
Click Daily (Default) to show the data for each day for the date(s) specified.
Click Day of Week to show the data for each day of the week for the date(s) specified.
Click Weekly to show the data for the week Sunday thru Saturday of the date(s)
specified.
Click Monthly to show the data for the month of the date(s) specified.
Click Month of Year to show the data for each month of the date(s) specified.
Click Quarterly to show the data for the monthly quarter of the date(s) specified.
Click Yearly to show the data for the yearly totals of the date(s) specified.
The Group By options display the scale values displayed for the X-axis of the Bar and
Line chart and the first column of the Grid table.
5. To specify the variables, from the Summarize By list select one of the following:
Click User to summarize the variables by user(s) assigned to the matter for the
date(s) specified.
Click Event to summarize the variables by event(s) that occurred in the matter for the
date(s) specified.
Click Tag Name to summarize the variables by tag name(s) applied to the matter for
the date(s) specified.
© 2015 LexisNexis. All rights reserved.
274
Concordance Evolution
The Summarize By option defines the list of variables shown in the legend and the
column names of the Grid table.
6. To specify additional filters, click the More Filters link.
7. To add or remove an event(s), do any of the following:
If events are listed, click any event, and then click an event from the list.
If no events are listed, click the Select... link, and then click an event from the list.
To remove an event, click the (X) next to the event name.
Available Events
Events
Document Viewed Document Data
Document Created
Document Viewed Near Native
Document Deleted
Document Modified
Document Downloaded
Document Tagged
Document Emailed
Markup Created
Document Printed
Document link Sent to CaseMap
Document Untagged
Send One or More Documents
Markup Deleted
Fact Sent To CaseMap
Tag Created
Comment Deleted
Tag Deleted
8. To add or remove a specific matter user(s), do any of the following:
To add a user, click the Select... link, and then select the user(s) to include in the
report.
To remove a user, click the (X) next to the user name.
9. To add or remove a specific matter tag(s), do any of the following:
To add a tag, click the Select... link, and then select the tag(s) to include in the report.
To remove a tag, click the (X) next to the tag name.
Creating custom matter reports
The Matter Reports dashboard provides several tools for creating and saving customized
matter reports. Custom matter reports can be saved as Public or Private. Public reports are
available to any user that has access to the matter's dashboard and can be edited or deleted.
You can use the default Concordance Evolution matter reports as a basis for creating a custom
report, however, you cannot overwrite any of the default Concordance Evolution system matter
reports.
© 2015 LexisNexis. All rights reserved.
Administrating Concordance Evolution
275
To create a custom matter report:
1. In the System pane, locate and open the matter to view reports.
2. In the Reports section, click the View Report button.
The matter reports dashboard opens. You can use one of the system reports as a
template and then save the changes under a new report name.
3. To define the type of report to create, from the Display list, do the following:
Click Chart to display the graph.
Click Grid to display the grid table below the graph.
Click Bar or Line to display a bar or line type graph.
Click Legend to show/hide the chart legend.
Click Labels to show/hide the chart labels.
A check mark next to the option indicates the selected options.
4. To specify the report dates, from the Date Range list do any of the following:
Click Custom and then specify the from and to dates in the date fields to display the
data for dates that fall between the specified dates.
Click Today (default) to display only the events from the current date.
Click Yesterday, to display the data for the previous day's events.
Click Last 7 Days to display the data for the previous seven days from the date the
report is executed.
Click Last 30 Days to display the data for the previous 30 days from the date the
report is executed.
Click Last 60 Days to display the data for the previous 60 days from the date the
report is executed.
Click Last 90 Days to display the data for the previous 90 days from the date the
report is executed.
5. To change the scale values, from the Group By list do any of the following:
Click User to show the data for all users for the datasets within the matter for the
date(s) specified.
Click Hourly to show the data for the hour of the day for the date(s) specified.
Click Hour of Day to show the data for every hour of the day for the date(s) specified.
Click Daily (Default) to show the data for each day for the date(s) specified.
Click Day of Week to show the data for each day of the week for the date(s) specified.
Click Weekly to show the data for the week Sunday thru Saturday of the date(s)
specified.
Click Monthly to show the data for the month of the date(s) specified.
Click Month of Year to show the data for each month of the date(s) specified.
Click Quarterly to show the data for the monthly quarter of the date(s) specified.
Click Yearly to show the data for the yearly totals of the date(s) specified.
© 2015 LexisNexis. All rights reserved.
276
Concordance Evolution
The Group By options display the scale values displayed for the X-axis of the Bar and
Line chart and the first column of the Grid table.
6. To change the variables, from the Summarize By list select one of the following:
Click User to summarize the variables by user(s) assigned to the matter for the
date(s) specified.
Click Event to summarize the variables by event(s) that occurred in the matter for the
date(s) specified.
Click Tag Name to summarize the variables by tag name(s) applied to the matter for
the date(s) specified.
The Summarize By option defines the list of variables shown in the legend and the
column names of the Grid table.
7. To add or remove an event(s), do any of the following:
If events are listed, click any event, and then click an event from the list.
If no events are listed, click the Select... link, and then click an event from the list.
To remove an event, click the (X) next to the event name.
Available Events
Events
Document Viewed Document Data
Document Created
Document Viewed Near Native
Document Deleted
Document Modified
Document Downloaded
Document Tagged
Document Emailed
Markup Created
Document Printed
Document link Sent to CaseMap
Document Untagged
Send One or More Documents
Markup Deleted
Fact Sent To CaseMap
Tag Created
Comment Deleted
Tag Deleted
8. To add or remove a specific matter user(s), do any of the following:
To add a user, click the Select... link, and then select the user(s) to include in the
report.
To remove a user, click the (X) next to the user name.
9. To add or remove a specific matter tag(s), do any of the following:
To add a tag, click the Select... link, and then select the tag(s) to include in the report.
To remove a tag, click the (X) next to the tag name.
10. When finished, on the report's dashboard toolbar, point to the Save button, and then do
any of the following:
To save the report as new, select the New option.
© 2015 LexisNexis. All rights reserved.
Administrating Concordance Evolution
277
To replace the report settings for an existing report, select the Overwrite option.
To save the report so that only you can view it, select the Private check box.
To save the report so that other users can view it, clear the Private check box.
If you are using a system report as template, the Overwrite option is not available and
the report must be saved using a new report name.
11. Type the report name in the field, and then click Save.
12. When prompted that the report was saved successfully, click the close button (X) to
close the dialog box.
13. To set the report as the default report to appear on the matter's dashboard, on the
report's dashboard toolbar, click the Set as Default button.
The report automatically display on the matter's dashboard each time the dashboard is
opened. The report name appears in the report list with a red asterisk (*) next to the
report name indicating it is the default report.
Deleting matter reports
All custom matter reports can be deleted. System reports cannot be deleted.
To delete a matter report:
1. In the System pane, locate and open the matter to view reports.
2. In the Reports section, click the View Report button.
3. On the dashboard toolbar, select the report to delete from the reports list, and then click
the Delete button.
4. When prompted, click Yes to confirm the deletion.
Exporting matter reports
Concordance Evolution matter reports can be exported to a comma-separated (.csv) formatted
file and saved for later use.
Matter reports export as a comma-separated (.csv) formatted files for Internet Explorer 10
or later and as a text (.txt) formatted file for Internet Explorer 9, Chrome, Firefox, and
Safari. The Export feature is not compatible for Internet Explorer 8 or earlier.
To export a matter report:
© 2015 LexisNexis. All rights reserved.
278
Concordance Evolution
1. In the System pane, locate and open the matter to view reports.
2. In the Reports section, click the View Report button.
3. On the dashboard toolbar, select the report to export from the reports list.
The report is displayed in the dashboard.
4. Make any necessary changes.
5. When finished, on the dashboard toolbar, click the Export button.
The data from the report is displayed in a new browser window.
6. In the Save HTML Document dialog box, navigate to the location to save the file, type a
name for the file, and then click Save.
© 2015 LexisNexis. All rights reserved.
Administrating Concordance Evolution
User Guide
Reference Information
Chapter
6
280
Concordance Evolution
Reference Information
Unicode support
The Unicode Standard provides a consistent way to digitally represent the characters used in
the written languages of the world. As an accepted universal standard in the computer
industry, the Unicode Standard assigns each character a unique numeric value and name. This
encoding standard provides a uniform basis for processing, storing, searching, and exchanging
text data in any language.
Concordance Evolution supports importing load and LAW PreDiscovery case files, viewing,
exporting, producing, and searching Unicode. However, the application itself cannot be
localized. Searching Unicode is shown only for the space bounded occurrences of the search
expression.
Unicode searches cannot be used in conjunction with concept, spelling variation or the
thesaurus.
Glossary
A - L (Alert - LAW PreDiscovery)
Alert
There is a notification called a search alert that can be set up to alert users when the
search results for a saved search query change. Both administrators and users can create
search alerts. Search alerts are system generated notifications that are sent to the users
selected when the search alert was created.
Bates Numbering
Documents in litigation collections are assigned a unique sequential number on each page
of every document. These numbers are referred to as Bates numbers (named after the
Bates automatic numbering machine) and are used to identify a document or page. In
Concordance, these numbers are often referred to as BEGNO (beginning number) and
ENDNO (ending number).
Brava
IGC Brava! Enterprise and IGC Redact-It Enterprise are used to provide Concordance
Evolution with a near native viewer in order to view, annotate and redact multiple file
formats in a single interface.
Concept Search
© 2015 LexisNexis. All rights reserved.
Reference Information
281
When a search query is run, the system finds synonyms and similar concepts to return
additional results. When the concept search check box is not selected, Concordance
Evolution will not return the additional synonyms and concepts.
Content Field
The content field can store all OCR content. A dataset can only have one content field.
The content can store rich-text, alphanumeric characters and stores up to 2 GB.
Database Server
This server is the primary SQL server for storing configuration data, metadata and work
product. It also acts as the reporting infrastructure back-end.
Dataset
Datasets created under matters can be used to organize the documents for your client
cases.
DCN (Document Control Number)
The DCN field is a system created field that stores a dataset’s document control number.
The administrator can define the prefix and length at the time of dataset creation. The
DCN field cannot be deleted. A dataset can only have one DCN field.
Delimited file
A digital file that has a text qualifier, a delimiter, and a line separator to structure data
uniformly.
Deponent
A person who testifies under oath, especially in writing.
Deposition
The memorialized minutes of an interview between a member of the legal profession and
a litigant or witness.
Document
In Concordance Evolution, a document record is a record associated with a logical
combination of pages. With paper, this term refers to collections of pages. With electronic
files, this term refers to a digital file.
Document Data View
Document Data view displays the entire contents of the document. This view is similar to
© 2015 LexisNexis. All rights reserved.
282
Concordance Evolution
the traditional Concordance Browse view.
Electronic Data Discovery (EDD) or E-Discovery
The process of collecting electronic files.
Folder
Folders created under the system can be used to represent your clients. Folders store
matters and datasets.
Group By
The Group By panel is a great tool for gaining an item count for a specific field, organizing
documents by field type, narrowing search results off a reduced set of records, and
performing quick quality assurance checks. The Group By panel is similar to the Tally
feature in traditional Concordance.
Jobs
In Concordance Evolution, certain tasks, such as running imports, exports, print jobs, and
productions, or creating review sets, are performed using jobs.
LAW PreDiscovery
LAW PreDiscovery® software offers you and your litigation teams the power to produce
and organize paper and electronic files with a dynamic imaging and electronic discovery
processing application. With LAW PreDiscovery, pre-reviewing and culling non-responsive
e-discovery and scanned documents before reviewing and processing helps you eliminate
unnecessary costs and reduce time.
M - Z (Markups - Web Server(IIS))
Markups
Subjective text, notes, or symbols placed on a graphical image by a reviewer, which
represent subjective information about the image.
Matter
Matters created under client folders can be used to represent your client cases. Matters
are used to store datasets.
Metadata
Properties associated with a document that might or might not be contained within the
body of the document, including the author, the creation date, and last modified date.
© 2015 LexisNexis. All rights reserved.
Reference Information
283
Microsoft SQL Server
Microsoft SQL Server is a relational model database server produced by Microsoft.
Multi-page TIFF
A specific type of Tagged Image File Format (TIFF) image file in which many pages are
combined into a single .TIF file.
Native File
An original electronic document. For example, Microsoft® Word document, Excel®
document, Adobe ® PDF document, etc.
Native View
Native view allows you to view documents in the source software program.
Near Native View
The Near Native viewer allows you to view and redact electronic files, emails, and
attachments without the need to have the software program installed. The viewer
maintains the formatting of the files so that you can see them as they were originally
created. The Near Native viewer is supported by Brava from Informative Graphics.
Notifications
Notifications are messages sent by the system or administrator to Concordance Evolution
users. They can be used to request users to log out of Concordance Evolution, to notify
users when a job, such as an import or export job, is completed, or to share other
information with users. The administrator can send notifications to all users currently
logged on to Concordance Evolution, individual users, or all users in a user group.
Optical Character Recognition (OCR)
An electronic process where the text in paper documents or digital files is extracted and
prepared for eventual loading into a full-text information retrieval system.
Personal Tag Folders/Groups/Tags
Personal tag folders, tag groups, and tags are only available to the user that created
them and Concordance Evolution administrators. Other users cannot view the personal
tag folders, tag groups, and tags in the Tags pane in the Review dashboard.
Production
A process where you “produce” a copy of your images and files based on a current
Concordance Evolution query, which can be renamed and renumbered to fit your needs.
Productions are often run for internal case review and to provide opposing counsel with
© 2015 LexisNexis. All rights reserved.
284
Concordance Evolution
records in preparation for trial.
Public Tag Folders/Groups/Tags
Public tag folders, tag groups, and tags are available to all users that have access to the
dataset and are available for selection on the Tags pane in the Review dashboard, unless
tag security limits a user's access to the folder, group, or tag.
Redaction
A blocked section of text intended to prevent others from viewing sensitive information in
a document.
REST API
The REST API will allow clients to write scripts in standard web scripting languages like
VBScript, JavaScript, Python, C#, and others. REST (Representational State Transfer) is a
style of web software architecture.
Review Sets
Review sets are used to organize documents in a dataset for review. Review sets can be
created by query, tag, or by locating all unassigned documents in a dataset. Review sets
can then be divided by different logic and then assigned to an individual user or a group
of users.
Search Server
This server provides the search engine infrastructure for providing real-time clustered
results.
Security Roles
Security roles are used as security profiles that are assigned to user groups.
Single-page TIFF
A specific type of Tagged Image File Format (TIFF) image file in which many individual
pages are separated into individual files. For example, a 40-page document could be
represented as 40 individual .TIF files.
SMTP Server
The SMTP server is the server that will be used for generating and sending the system
notification emails for Concordance Evolution.
Snippet View
© 2015 LexisNexis. All rights reserved.
Reference Information
285
Snippet view provides a brief look at the initial content of the document (about the first
96 words), so you can quickly assess the contents without opening the full document in
Preview, Native, Near Native, or Document Data views.
Spelling Variations
Concordance Evolution provides a default list of common spelling variations, which can be
modified for each dataset. When you run a search, any spelling variations for a particular
word will also be located depending on how the search query is written.
Stop Words
Stop words are a list of words that include the most common words in the English
language (and, the, but, etc.). Stop words are not words you would generally want to
search for and their elimination from a dataset index ensures that searches are run faster
and efficiently.
Table View
Table view provides a list of records in your review set. This view is similar to the Table
View in traditional Concordance.
Tag
A descriptive marker in Concordance Evolution that can be used to categorize a document
or a section of text within a document.
Thesaurus
Concordance Evolution includes a global thesaurus that helps process advanced, full-text
query searches for synonyms. Search results will include synonyms found in the global
thesaurus or synonyms added to the thesaurus for this dataset.
User Groups
User groups act as user role templates and allow you to use pre-defined security policy
settings when you create a new user to help speed up the user creation process.
Vivisimo Velocity
Concordance Evolution utilizes Vivisimo's Velocity search platform, which also provides
concept and clustering technology.
Web Server
The Web server provides all access for Web-based clients to communicate with the
product.
Web Server (IIS)
© 2015 LexisNexis. All rights reserved.
286
Concordance Evolution
Internet Information Services (IIS) - A Web server application and set of feature
extension dashboards created by Microsoft for use with Microsoft Windows.
© 2015 LexisNexis. All rights reserved.
Index
Index
-Aactivating, users
49
Active Directory
AD user groups
31
AD users
41
adding domains
45
adding servers
46
deleting domains
47
deleting servers
48
using
44
adding, fields
117
alerts
76
about (Admin)
76
deleting search alerts (Admin)
85
editing search alerts (Admin)
85
viewing search alerts (Admin)
84
Audit Log
about
86, 265
archive, events
90, 269
export
89, 268
system
86, 88, 265, 266
authority word lists
adding to fields
117
-Bbilling
creating reports
269
binders
about
175
creating
176
managing
177
bulk printing
about
231
creating jobs
232
image sets
232
native files
232
productions
232
-CConcordance Evolution
© 2015 LexisNexis. All rights reserved.
about
8
navigating
22
security
26
what's new
18
creating
billing reports
269
binders
176
datasets
105
folders
94
matter reports
274
matters
99
near-deduplicatin jobs
notifications
77
production sets
208
review sets
179
search alerts (Admin)
tags (Admin)
195
240
80
-Ddata
exporting files
218
exporting, about
217
datasets
103
about
103
about dataset fields
111
adding fields to datasets
117
binders, about
175
creating
105
creating binders
176
defining search settings
258
deleting
110
deleting dataset fields
135
editing
109
editing dataset fields
131
manage shares
73
managing binders
177
managing field security
133
viewing documents
164
deactivating, users
49
deduplication
about
238
creating jobs
238
deleting
dataset fields
135
datasets
110
folders
97
matter reports
277
287
288
Concordance Evolution
deleting
matters
101
notifications (Admin)
80
review sets
192
search alerts (Admin)
85
tags (Admin)
205
users
49
delimiter characters
139
discovery process
10
documents
about importing
139
viewing documents
164
domains
adding AD domains
45
deleting AD domains
47
-Eediting
dataset fields
131
datasets
109
folders
96
matters
100
search alerts (Admin)
85
tags (Admin)
201
users
49
exporting
about
217
audit logs
89, 268
exporting dataset files
218
matter reports
277
search results (Admin)
259
users
51
-Ffields
about dataset fields
111
adding authority lists
117
adding to datasets
117
deleting dataset fields
135
editing dataset fields
131
managing field security
133
folders
94
about
94
creating
94
deleting
97
editing
96
-Gglossary
280
-Iimage sets
printing bulk
232
importing
139
about
139
about delimiter characters
139
delimited text files
141
LAW PreDiscovery Cases
151, 166
subsequent data loads and overlays
157
users
43
-Jjobs
about
65
near-deduplication
240
reprocessing Near Native files
viewing
65
67
-Kknowledge base
242
-LLAW PreDiscovery
importing case files
151, 166
synchronizing case files
171, 227
load files
exporting files
218
importing
141
-Mmanage shares
about
73
creating
74
deleting
75
modifying
75
© 2015 LexisNexis. All rights reserved.
Index
managing
binders
177
datasets
177
matters
101
matters
about
98
creating
99
creating reports
274
deleting
101
deleting reports
277
editing
100
exporting audit log
89, 268
exporting reports
277
managing
101
viewing reports
271
-Nnative files, printing bulk
232
navigating
Concordance Evolution
22
Near Native
jobs
67
reprocessing
67
near-deduplication
about
240
creating jobs
240
notifications
76
about (Admin)
76
creating
77
deleting (Admin)
80
viewing (Admin)
79
-Oorganizing, data
overlays
157
175
-Ppasswords
changing user passwords
preferences
about
52
customizing (Admin)
57
printers
62
printing
bulk
231
privilege logs
about
233
creating
234
productions
206
about
206
bulk printing
232
creating production sets
manage shares
73
-Rreasons for redaction
about
242
adding
253
deleting
253
editing
253
exporting
253
importing
253
redactions
importing
139
reports
audit log, matter
88, 266
billing, creating
269
exporting, audit log
89, 268
matter level, creating
274
matter level, deleting
277
matter level, exporting
277
matter level, viewing
271
system level viewing
86, 265
reprocessing
Near Native files
67
review sets
178
about
178
assigning users
177
creating
179
deleting
192
managing
183
managing, binders
177
roles
assigning to user groups
35
creating security roles
33
49
© 2015 LexisNexis. All rights reserved.
208
-Ssearch server
searching
62
289
290
Concordance Evolution
searching
about alerts (Admin)
76
comparing results (Admin)
259
creating search alerts (Admin)
80
defining search settings (Admin)
258
deleting search alerts (Admin)
85
editing search alerts (Admin)
85
exporting results (Admin)
259
managing results (Admin)
259
running admin searches
257
viewing search alerts (Admin)
84
security
about
26
assigning roles to user groups
35
assigning user group policies
35
binder policies
177
creating security roles
33
customizing user group security
34
managing field security
133
managing tag security
200
servers
adding AD servers
46
deleting AD servers
48
management
62
printers
62
search server
62
SMTP
62
SQL Server
62
SMTP
62
spelling variations
about
242
adding
243
deleting
243
editing
243
exporting
243
importing
243
SQL Server
62
stop words
about
242
adding
250
deleting
250
editing
250
exporting
250
synchronizing, LAW PreDiscovery cases
171, 227
system
archive, events
90, 269
exporting audit log
89, 268
-Ttags
193
about
193
creating (Admin)
195
deleting (Admin)
205
editing (Admin)
201
managing tag security
200
thesaurus
about
242
adding words
246
deleting words
246
editing words
246
exporting
246
importing
246
-Uunlocking users
49
user groups
Active Directory
31
assigning policies
35
assigning roles
35
assigning to Binders
177
creating
31
customizing security
34
users
activating
49
Active Directory
41
creating
41
deactivating
49
deleting
49
exporting
51
importing
43
managing user sessions
64
modifying
49
unlocking
49
-Vviewing
audit log, matter
88, 266
audit log, system
86, 265
dataset documents
164
jobs
65
matter reports
271
© 2015 LexisNexis. All rights reserved.
Index
viewing
notifications (Admin)
search alerts (Admin)
79
84
-Wwhat's new, Concordance Evolution
word lists
adding to fields
117
© 2015 LexisNexis. All rights reserved.
18
291


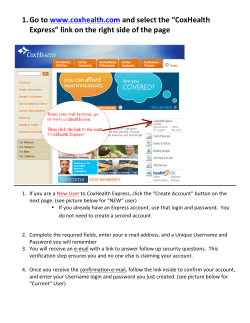


© Copyright 2026