
The purpose of this guide is to introduce you to Articulate Storyline
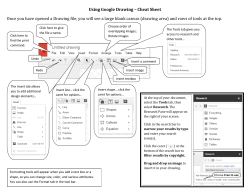
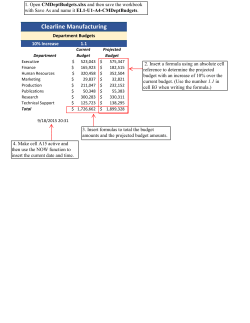
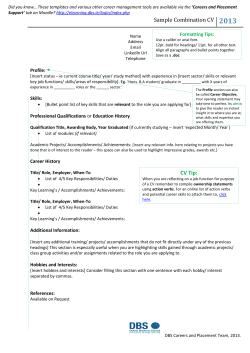
Articulate Storyline
Resource Material
The purpose of this guide is to introduce you to
Articulate Storyline and the various interactions
available in it. And to help you get started with
Storyline. The guide contains a list of interactions
with overview and step by step procedure to create
them. Also, some interaction sample links are
provided for reference.
Table of Contents
1.
Getting Started with Articulate Storyline
2.
Insert Tab
3.
Drag and Drop
4.
Tabs
5.
Interactive Marker
6.
Hotspots
7.
Getting started with Quizzes
8.
Building Quizzes
9.
Results Page
10.
Publishing the Course
Getting Started with Articulate Storyline The below screenshot shows how a slide looks when you open a new project.
Triggers: This allows to
activate the objects and
assign specific properties to
make them work.
Slide :This is the work area
where you would insert
videos, text, images etc.
Layers: This allows to display
additional content when
learner does something. For
example, clicks a picture, text
box etc.
States: This allows to change
the states of an object in
response to users action. For
example, when a user clicks a
button it shows visited state.
Triggers, layers and states are the main items for developing interactive content.
Sample: http://persian.sdsu.edu/Persian%20Alphabet/story.html
Insert Tab
We’ll look at the sections of insert tab which is used to add content to your slides. The content can be images, text, videos etc.
A
B
C
B
A SLIDE
E
D
ILLUSTRATIONS
C MEDIA
This section includes 5 buttons for various
functions as explained below.
This section includes 5 buttons for adding
various images. Each has a different function
as explained below.
This section includes 4 buttons for which
allows you to include different types of
media. Each of them are explained below.
•
New Slide to insert a new slide.
•
Picture to insert images from a file.
•
•
Slide Layer to insert a new layer in the
same slide.
•
Screenshot to insert clipping of the
program you’re using.
Video to record or import video into the
slide.
•
Shape to insert various shapes such as
circles, rectangles etc.
Flash to insert a flash (swf) file into the
slide.
•
Caption to insert ready-made caption
styles.
Sound to record or import a sound clip or
music into the slide.
•
Web Object to embed web-based
resources into the slide, such as URL,
html file etc.
•
•
•
Convert to Freeform to add built-in quiz
templates to the slide.
Zoom Region to add a zoom effect to a
particular region in the slide.
Record Screen to add a zoom effect to
a particular region in the slide.
•
•
•
Character to insert a photographic or
illustrated character into the slide.
CLICK on any of these buttons to insert them in to the slide.
Most of the adding of videos, images, text, and interactive buttons will happen at the insert tab.
Sample: http://persian.sdsu.edu/Persian%20Alphabet/story.html
Continued on Next Page
We’ll look at the sections of insert tab which is used to add content to your slides. The content can be images, text, videos etc.
Insert Tab
A
B
C
E
D TEXT
Text Book to insert a text placeholder into
the slide.
•
INTERACTIVE OBJECTS
This section includes 7 buttons for adding various interactive objects. Each has a different function
as explained below.
This section includes 4 buttons for various
functions as explained below.
•
E
D
•
Trigger to add a trigger to the selected
object to specify what should happen when
you click/hover.
Symbol to insert characters such as
copyright, trademark etc. which are not on
your keyboard.
•
Button to insert ready made button such as
checkboxes, radio button.
•
Reference to link to stored data variables.
•
•
Hotspot to insert an interactive hotspot to a
particular region in the slide.
Hyperlink to create a link to a webpage,
email address, picture or a program.
•
Marker to insert ready-made markers to
add interactivity to the slide.
CLICK on any of these buttons to insert them in to the slide.
Most of the adding of videos, images, text, and interactive buttons will happen at the insert tab.
•
Data Entry to insert a numeric or text input
field.
•
Scrolling Panel to insert a panel that
allows users to scroll the content inside.
•
Mouse to add cursor buttons.
Sample: http://persian.sdsu.edu/Persian%20Alphabet/story.html
Drag and Drop
This interaction provides an interesting and engaging way for presenting information or assessing user’s knowledge.
2
1
Select the Object which you
want to drag.
Note: There are many ‘Action’
options available which you
can choose based on what
you want the learners to do.
For example, go to next slide
on clicking the object or
display a video etc.
Sample: http://persian.sdsu.edu/Quiz/story.html
Click on Trigger button from
the Insert menu.
3
Choose Change State of option
for the Action drop-down menu.
4
Select the object (character, text
box etc. to be dragged) in the On
Object menu.
5
Choose Drag Over for the To
State drop-down menu.
6
Select Object dragged over on
for the When drop-down menu.
7
Choose the object (character,
text box etc. to be dragged) in the
Object menu.
8
Click the object (character, text
box etc. to be dropped on) in the
Hover over menu.
9
Click the OK button.
Finally, click Preview and choose ‘this slide’ to see how it works.
Tabs Interaction
Tabs interaction are best for chunking the content into meaningful sections and present it in a single interactive slide.
1
Click Insert tab.
2
Click Button option and choose a button design.
3
Click on the Slide and a button gets inserted.
Note: Add the number of buttons based on the number of
tabs you want to present your content. You can also have
the buttons set to different states based on learner’s
action for example, selected, clicked, hover etc.
4
Click Insert and choose a Shape which will hold the
content/image for the tabs.
5
Click New Layer button.
Note: This will duplicate the Tabs main slide you have
created in previous step. Repeat this step based on the
number of tabs. Also, label these layers as it helps while
assigning triggers.
6
Click Insert and select Text Box to add text in the
layer.
Note: You can also include pictures in the layer if needed.
Next, go back to the Main Slide in which you created the buttons.
Continued on Next Page
Tabs Interaction
Tabs interaction are best for chunking the content into meaningful sections and present it in a single interactive slide.
7
Select all the buttons and right-click.
8
Click the Button Set option and select Button Set 1.
9
Click Add Trigger button. The Trigger Wizard window
displays.
10
Select Show layer from the drop down menu for
Action.
11
Select the layer you want to display when user clicks
the button from the drop down menu for Layer.
12
Select User clicks from the drop down menu for
When.
13
Click OK.
Note: Repeat step 9 to11 for the remaining buttons.
Finally, click Preview and choose ‘this slide’ to see how it works.
Sample: http://persian.sdsu.edu/Adverbs/story.html
Interactive Marker This interaction is useful when you want to highlight features on an image and provide more information.
You will need to insert an image in the background to
highlight the features.
1
Click on the Insert tab.
2
Click the Marker button.
A drop-down menu with different set of markers displays.
3
Select a Marker and click on the image.
4
Click the Marker to view the more information area.
5
Click to Add Title.
6
Click to Add Description.
You can also insert videos in the more info area.
When you click to add description the Format tab
gets activated. Select Media option and insert
video from an existing file.
Finally, click Preview and choose this slide to see
how it works.
There are many types of in-built markers available in the tool which allows you to
choose the marker design based on various categories. Markers are an effective
way to reveal the content, only when the learners need it.
You can insert as many markers needed by repeating
step 3 to 6.
Sample: http://persian.sdsu.edu/Sentence%20Formation/story.html
Hotspots
This interaction is useful when you want to display more information or navigate users to another slide.
You will need to insert an image/text in the background
to add a hotspot.
1
Click on Insert tab.
2
Click on Hotspot button.
3
Select the type of Hotspot shape.
4
Click on the image to insert the hotspot
at the respective spot.
5
Right-click the hotspot and select show
hand cursor on hover.
These hotspot shapes are visible only to you for
working with them , whereas the user sees a handcursor on the hotspot area.
Next, let’s see how to add a layer which would display
when the hotspot is clicked.
Continued on Next Page
Hotspots
This interaction is useful when you want to display more information or navigate users to another slide.
6
Click on New Layer button.
The main slide gets duplicated and all of its
content appears in grey on the new layer
7
Click Insert tab to add a text box.
8
Click Insert tab to add a character. Select the character
and use the options under Design tab to make changes.
Once you are done with the changes to the layer
content (displays when hotspot is clicked), return to the
main slide to add triggers.
Sample: http://persian.sdsu.edu/Persian%20Alphabet/story.html
Continued on Next Page
Hotspots
This interaction is useful when you want to display more information or navigate users to another slide.
9
Select Hotspot 1 and click on Edit the selected
trigger.
The Trigger Wizard window displays.
10
Perform the following actions for each item by
clicking the drop-down menu:
Action – Select Show Layer
Layer – Assign the Layer that needs to appear
on clicking the hotspot
When – Select User clicks
Object – Select the Hotspot 1
11
Click OK.
Finally, click Preview and choose this
slide to see how it works.
Sample: http://persian.sdsu.edu/Persian%20Alphabet/story.html
Getting Started with Quizzes
Let’s have a look at the various question templates you can use to create quiz.
Storyline contains 11 default question templates that can be used in developing quizzes. All of these are graded question templates.
A
B
C
D
E
F
G
J
H
A
True/False – Allows users to select a single
response for a statement.
B
Multiple Choice – Allows users to select a single
response from 10 possible choices.
C
Multiple Response – Users can select all the
correct choices from a maximum of 10 possible
choices.
D
Fill in the Blank– Users are required to enter an
answer in a blank field.
E
Word Bank – Users drag and drop the correct
response into an empty box.
F
Matching Drag and Drop – Users drag and drop
items in the second column to match with first
column items.
G
Matching Drop-down – Requires users to select
responses from drop-down menu to match with
the statement/question.
H
Sequence Drag & Drop – Users drag and drop
items to arrange in a sequence.
I
Sequence Drop-down – Users select responses
from drop-down menu to arrange in a sequence.
J
Numeric – Useful when users are required to
enter a numeric value.
I
K
Sample: http://persian.sdsu.edu/Quiz/story.html
K
Hotspot – Users click on the correct area within
the image to respond.
Building Quizzes Let’s see how to create a multiple choice question.
6
Type the statement in ENTER THE QUESTION box.
7
Type the choices in ENTER THE CHOICES box.
8
Click on the row under Correct to assign the correct choice.
9
Type feedback in SET FEEDBACK and BRANCHING boxes.
1
Click on Insert tab.
2
Click on New Slide button.
3
Click on Quizzing option. It displays a list of question templates
4
Select Multiple Choice option.
5
Click the Insert button. The multiple-choice question window displays where you
can enter the question stem, choices and feedback.
Finally, Click Save & Close button.
Note: Storyline also has built-in templates for survey questions and question banks in the Quizzing section.
Results Results page can be displayed for the graded quiz questions. It allows you to inform your users about their performance.
Follow the same steps as you did to insert the quizzing section to navigate to
the section shown on the left screenshot.
In the result slide properties you can assign how to calculate the
score whether based on selected results slide or questions. Next
you need to assign the passing score.
1
Click on Result Slides tab.
2
Click on Grade Result Slide button.
3
Click the Insert button.
Publishing the Course
The final step is publishing the course.
To publish a course you can track
it in two ways:
•
Slides viewed
•
Results of the graded quiz
questions


![Dear [Insert Employers Name] I`m writing with regards to your](http://cdn1.abcdocz.com/store/data/001085065_1-b5c2ea463943ed18cfa6b628c4be74eb-250x500.png)
© Copyright 2026