
1 Jackie Slabbert-Redpath@NWU: ADS Vaal
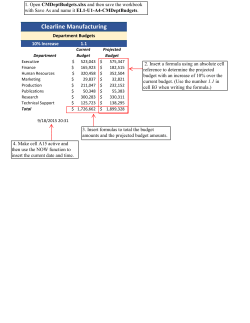
1
Jackie Slabbert-Redpath@NWU: ADS Vaal
HOW TO CREATE A NEW SITE:
1. Log onto eFundi@ http://efundi.nwu.ac.za
2. At the login page use your Novell login id + password to login to eFundi (same password you use
to start your office pc). Remember to click on LOGIN.
3. The following page will appear: (The arrows will explain the various buttons)
My Workspace
Message of the day!
Site tools
2
4. To begin: CLICK on Worksite setup (See picture on previous page)
5. Click on NEW.
6. The following screen will appear. Make sure that you select COURSE WEBSITE and make sure
the year is correct! Click on CONTINUE.
7. The following screen will appear, click on STILL CANNOT FIND YOUR COURSE/SECTION?
3
8. The following screen will appear:
8.1 PLEASE TAKE NOTE OF THE FOLLOWING FORMAT OF THIS PAGE AND THE WAY YOU ENTER THE
MODULE INFORMATION- IF DONE WRONG YOUR SITE NAME WILL BE CHANGED WITHOUT
YOUR CONSENT!
8.2 Everything on this page must be filled-in in CAPITAL letters.
8.3 Please only insert a module code like this: ONTV 111 V, it is not correct to use the abbreviations
B.Ed, FT in the name of the site!!! (It will be changed and corrected without your consent!)
8.4 Please open only one site per module even if there is more than one lecturer facilitation the
module (ask Jackie about the group tools where each lecturer can have contact with their own
students and run this one site like they are the only lecturer on the site!)
8.5 Please leave all the tools not mentioned here like it is (do not add anything at the space for :
Add more Rosters) Click on CONTINUE once you’re done!
Insert the
letters of
your
module
code
here
Insert the
numbers
of your
module
code here
Insert a “V” here!
(Meaning Vaal
Campus)
Insert your Novell id
here!
9. The following screen will appear. Leave everything like it is and click on CONTINUE.
4
Your details will be
displayed here!
10. The following screen will appear, select your tools and click on CONTINUE.
The tools used for basic eFundi use are:
Home
Announcements
Assignments
Resources
Schedule
Site stats
5
11. The following screen will appear, click on CONTINUE.
6
12. The following screen will appear, click on REQUEST SITE.
13. Your site is now created and can be accessed via option 1 or 2!
1.
Click here to access
your site!
2. Or click here to
access your site!


© Copyright 2026