
Build a Hovercraft and float on air!
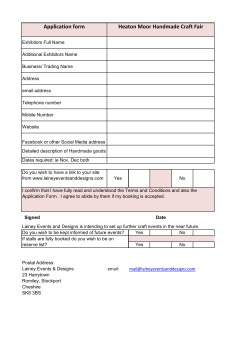
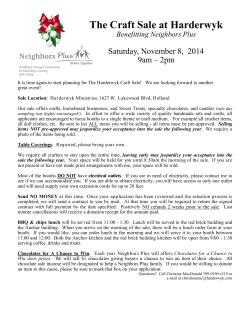
Build a Hovercraft
and float on air!
Experience frictionless motion!
Constructing a hovercraft adds exciting options
to your physics classroom and is lots of fun to
ride on too. It provides fun frictionless motion so
students can get a better grasp of the practical
implications of the laws of kinematics.
With the hovercraft you can vividly demonstrate
the First Law, accelerate different masses or
apply variable forces (Second Law) and easily
illustrate the Third Lawʼs action-reaction pairs.
We followed the classic design with a plastic
sheet attached around a 900 mm wooden
platform. The design allows for a mass of up to
100 kg to be supported.
How it works
A plastic sheet is attached below a circular wooden platform and securely stapled and taped
around the circumference of the platform. The center of the sheet is fastened with a wooden disk
to the platform. An air source such as a leaf blower is inserted through a hole at the top of the
platform. The air inflates the sheet and provides the air pressure needed to lift the rider, lifts the
holes from the floor and forms an ʻair barrierʼ to the escaping air. The air trapped in the inner
ʻdonut-holeʼ slowly leaks between the ʻskirtʼ and floor and forms an “air cushion” that provides a
constant padding of air.
Copyright © Prof Bunsen Science, 2010
1
www.profbunsen.com.au
Materials required
• Wooden platform. Our diameter is 900 mm. We bought a piece of plywood 900 x 1200 mm from
a hardware store. Thickness: 12 to 17 mm. If you have access to a larger piece of wood, then
make a 1.2 m diameter hovercraft as it will produce a better lift.
• Plastic sheet. A thick plastic paint drop sheet, thick shower curtain or builders concrete underlay.
We used: 1.2 x 1.2 m Make sure it is 200 mm wider than the wooden disk.
• Leaf blower. Better to use a cordless rechargeable one. A vacuum / blower from a wood
workshop will work too.
• Small plastic disk and wooden disk of approx. 9 cm diameter. Check Craft shops for foam sheets
and thin wooden sheets.
• Bolt and nut to fix small wooden and plastic disks to the platform. Approx. 12 mm x 5 mm diam.
• Two washers to fit the bolt.
• Rubber tube connector to connect blower outlet to PVC pipe on platform. (It is best to start with
the blower nozzle diameter and work back from there to the platform. My blower simply fits tightly
into the rubber connector without any clamp). Check plumbing section at shop.
• PVC pipe to be glued into wooden platform. Approx. 65 mm long. It should fit into the rubber
connector. Check plumbing section at shop.
• Metal pipe clamp to secure rubber connector to PVC pipe.
• Electric jigsaw, hobby knife, drill & drill bit.
• Black duct tape
• Spray paint (optional)
• Staple gun & staples
• Foam rubber, pipe insulation. Our circumference was: C = pi x diam. = 3.14 x 0.9 m = 2.9 m
• Silicone sealant for PVC pipe inlet & pipe insulation
• Door handles (x2) (optional)
• Liquid level (optional)
Constructing the Hovercraft
1. Mark the circumference of the wooden platform on the plywood using a pencil and string.
Mark the center position (important) and cut out the plywood disk with a jigsaw.
2. Drill a hole to fit the bolt and nut in the center of the platform.
3. Drill another hole 20 cm from the edge of the platform. This is for the air inlet PVC pipe. The
diameter of this hole will be determined by the size of the plastic PVC pipe you will use. It
neednʼt be a perfect fit but the tighter the better. You may need to use the jigsaw.
4. Paint the platform on one side if required.
Copyright © Prof Bunsen Science, 2010
2
www.profbunsen.com.au
5. Lay the plywood disk on the center of the plastic sheet. Fold the edges of the sheet up over the
plywood and staple it to the top of the plywood platform. Place a staple every 10 cm.
6. Use a hobby knife to cut off the excess plastic and tape the edge of the plastic down with duct
tape. Use tape lengths of 20 cm.
7. Poke a hole in the center of the small plastic disk and drill a similar hole for the bolt through the
center of the small wooden disk. Screw this onto the center of the wooden platform with the
plastic disk against the plastic sheet using the washers, bolt and nut. It pins the sheet to the
platform. Use washers on both sides of the bolt.
8. Reinforce the plastic around the small disks with a number of layers of duct tape.
9. Mark six holes of approx. 45 mm diameter (I used a jar lid) around the small wooden disk on
the plastic sheet. The edge of the holes should be about 3 to 4 cm from the edge of the small
disks. Space them evenly so you have plenty of plastic between them so they do not tear. Cut
the holes with a sharp hobby knife. It may be easier to do this with the small disks removed.
Copyright © Prof Bunsen Science, 2010
3
www.profbunsen.com.au
10. Turn the platform around and insert the PVC pipe into its hole. Glue it down with silicone and
let dry. When dry, push the rubber connector onto the pipe and affix with the clamp.
11. Glue or silicone the foam rubber bumper around the circumference of the platform.
12. Optional: Affix the bubble spirit level to the top of the platform so the rider can view it.
13. Optional: Affix two door handles to the top of the platform for rider comfort & safety.
Done!
Riding the Hovercraft
1. Place the hovercraft on a smooth, non-carpeted surface such as a vinyl, wooden or linoleum
floor. Gym floors work great!
2. Make a student sit in the center of the craft with folded legs (on the bolt).
3. Insert the air blower into the connector, make the rider hold onto the blower, then turn it on.
4. As the skirt inflates, the rider should center his/her weight to reduce friction.
5. Provide a brief push to the rider and observe the frictionless motion!
Safety
1. Close adult supervision is always required with this hovercraft.
2. Donʼt push it too fast. It can easily speed up in a large area such as a gym. Make sure the rider
knows how to stop it by turning the blower off or yanking it from the rubber connector.
3. Never get aboard while the air blower is running.
4. Do not turn the blower off when at speed. Newton I predicts that the passenger will continue in
a straight line while the craft stops dead.
5. Bystanders should stand off and watch their feet.
6. Remove all items at head height, such as tables, that may cause injuries to the rider.
7. Recommendation: A long rope can be attached to the craft to control the movement.
Copyright © Prof Bunsen Science, 2010
4
www.profbunsen.com.au
Classroom Extension
Newtonʼs 1st law
• Make the craft move slowly and observe the passenger's motion when it collides with an object;
• Use a large area such as a gym and have several students ready with masking tape to ʻrecordʼ
the position of the craft every second. Give the craft a brief push, shout out the time each second
and ʻmarkʼ the position per second. Measure the distance between the marks. What do these
suggest about the motion of the craft?
• Have students draw a ʻforce diagramʼ of the craft both while being pushed, after the push and
when stopped.
Newtonʼs 2nd Law
• Using a rope and force spring scale, provide a constant pull to the rider for 3 seconds.
• Have students tape the craft position every second for 5 seconds. Measure the distance
between the marks and have them draw a Displacement - Time graph.
• Now, accelerate the rider with double the force . . . . ensure that you have safety barriers at the
end of the ʻtrackʼ. Collect the new set of data.
• Or . . . change the mass on the craft by adding another / different student. Apply the same force
as before. Record the two masses. Make students study the acceleration.
• Have students draw a ʻforce diagramʼ of the craft while being pulled.
Newtonʼs 3rd Law
• Hand the rider a heavy object such as a ʻmedicine ballʼ and make him throw it horizontally away
while sitting still. Observe the motion.
• If you have a second hovercraft, position two riders next to each other and make one push
against the other rider. Observe the motion of both crafts.
• Propel the hovercraft with a fire extinguisher or another blower that is fired horizontally.
(Remember to refill the extinguisher.)
References
Various websites with free hovercraft plans such as Bill Beatyʼs
www.amasci.com/amateur/hovercft.html pages.
Have fun!
Copyright © Prof Bunsen Science, 2010
5
www.profbunsen.com.au


© Copyright 2026