
Document 161259
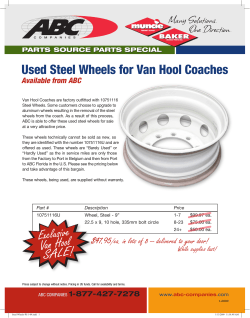
www.BobsPlans.com Traditional 6 Foot Picnic Table Plans & Instructions You won't need any fancy tools to build this traditional picnic table. All it requires are basic tools like a saw, a drill, and an adjustable wrench. This plan is based on a time honored classic design. For the prototype, I used treated lumber for the legs and regular pine for the rest of the parts. Pine will last for several years if kept painted. If you want to spend the extra money, you can make the whole thing from redwood. That was the wood of choice for picnic tables back when the supply of redwood was better and the prices were more affordable. Revised: July 4, 2006 Copyright © 2005 by Robert E. Reedy All rights reserved Traditional Picnic Table Plans Table of Contents Materials List .................................................................................................... 1 End & Side Views ............................................................................................. 2 Parts Dimensions ............................................................................................... 3 Hole Layout ...................................................................................................... 4 Cutout Diagrams ............................................................................................... 5 Mounting the Wheels ........................................................................................ 6 Attach the Stiffeners ......................................................................................... 7 Attach the Seats & Legs .................................................................................... 8 Attach the Top & Braces ................................................................................... 9 How the Wheels Work .................................................................................... 10 Introduction Thank you for purchasing our Picnic Table Plans. Please read these instructions before starting. I recommend you make the legs from treated lumber because they will have ground contact. The rest of the parts could be made from treated wood too, except the top. Since food will be served and eaten from the top, I recommend untreated wood for it. If kept painted, regular pine will last for several years. These plans include the use of wheels on two legs. The way the wheels are mounted keeps the weight on the legs when the table is sitting flat but the weight shifts to the wheels when the side of the table without the wheels is lifted. This allows for easy moving of the table when necessary. Of course, the wheels are optional, and they can always be added later if desired. These plans also include the use of four simple strips of ¾” by 1 ½” wood that I call Leg Protectors. Their purpose is to keep people’s legs from getting scratched on the ends of the bolts that secure the seat supports to the picnic table legs. Copyright © 2005 by Robert E. Reedy, Vandalia, Ohio Traditional Picnic Table Plans Materials List Page 1 Qty Item Length Material 5 Top Boards 72” 2 by 6 4 Seat Boards 72” 2 by 6 2 Seat Supports 57” 2 by 6 2 End Top Supports 26” 2 by 4 3 Top Stiffeners 26” 2 by 4 6 Seat Stiffeners 10” 2 by 4 4 Leg Protectors 10” 3/4 by 1 1/2 2 Braces 30 ¼” 2 by 4 4 Legs 32” 2 by 6 16 3/8” Carriage Bolts 3 1/2” Galvanized 16 3/8” Flat Washers Galvanized 16 3/8” Self Locking Nuts Galvanized 20 #8 Deck Screws 3” 54 #8 Deck Screws 2 1/2” 8 #8 Deck Screws 1 5/8” 2 6” Wheels 2 * 1/2” Hex Head Bolts 4 * 1/2” Flat Washers Galvanized 2 * 1/2” Self Locking Nuts Galvanized Plastic 4” Galvanized *The diameter of these bolts depends on the axle hole diameter of the wheels you use. For the wheels, I recommend plastic hubs and rubber tires because of rust concerns. Revised: 10/12/2012 Copyright 2005 by Robert E. Reedy, Vandalia, Ohio Traditional Picnic Table Plans - End & Side Views Page 2 29" 30 1/2" 17" 58 3/4" 72" 30 1/2" 17" 52" Copyright 2005 by Robert E. Reedy, Vandalia, Ohio Traditional Picnic Table Plans - Parts Dimensions Page 3 Top & Seat Boards (9 Required) 5 1/2 " 72 " 57 " 3 1/2 " Seat Supports (2 Required) 5 1/2 " 8 1/2 " 5 1/2 " 65° 65° Legs (4 Required) 32 " Note: To get the 65° angles, you may need to set your miter saw to 25°. This is because the scales on most miter saws are set so that a 90° cut is labeled as 0° on the scale. 26 " 26 " 2" 3 1/2 " 3 1/2 " End Top Supports (2 Required) Top Stiffener (3 Required) 2 1/2 " 10 " 10 " 3/4 " 1 1/2 " 3 1/2 " Seat Stiffener (6 Required) Leg Protector (4 Required) 90° 50° Brace (2 Required) 1/2" 40° 30 1/4 " Cut off a section of each end brace at the 40 degree end as shown in the detail view above. Copyright 2005 by Robert E. Reedy, Vandalia, Ohio Traditional Picnic Table Plans - Hole Layout Page 4 14" 2 1/4" 3" Seat Support 3" 14" 23" Drill four 3/8" holes in the Seat Supports for the Legs as shown 3/4 " 1 1/2" 4 3/4" 1 1/2" Seat Support 8" 4 3/4" 8" Drill six 3/16" diameter holes in the Seat Supports and countersink them for #8 deck screws as shown. These holes are for mounting the Seat Stiffeners to the End Top Supports. 14 5/8 " 15 3/16" 2 3/16" Seat Stiffener 3" 1" Leg Drill four 3/8" holes in each Leg as shown 26" 10" 2" 5" 3" 9" 9" 1 1/2" 2" 3/4" 5" Drill four 3'8" holes in the End Top Supports. These holes will be used for mounting the legs. 2 1/2" 1" Drill & countersink four holes in the Seat Stiffeners for #8 screws. 1 1/2" 1 1/2" 3" 2 1/2" 3 1/2" 3" 1 1/2" 1" 3 1/2" Drill & countersink four holes in the End Top Supports for #8 deck screws for mounting the stiffeners to the End Top Supports. 2 1/2" 2" 1" 11 3/4" 5 7/8" Top Stiffener Drill & countersink ten holes in the Top Stiffeners for # 8 screws. Leg Protector Drill & countersink two 3/16" holes in the Leg Protectors - 1 1/2" from from each end an centered top to bottom. Round off the outter edges on all four sides so they don't scratch anyones legs. Drill & countersink two holes on the ends of the braces for # 8 screws as shown. Copyright 2005 by Robert E. Reedy, Vandalia, Ohio 26" 26" 26" Brace (2 Required) Top Stiffener (3 Required) Stiffener (6 Required) Copyright 10" 30 1/4" Legs (4 Required) 30 1/4" 2005 by Robert E. Reedy, Vandalia, Ohio 32" Legs (4 Required) 32" Legs (4 Required) Legs (4 Required) Cut the legs from two 6' treated two by sixes as shown. Stiffener (6 Required) Stiffener (6 Required) Stiffener (6 Required) Top Stiffener (3 Required) 26" Brace (2 Required) 26" 10" Top Stiffener (3 Required) 10" Stiffener (6 Required) 10" Stiffener (6 Required) 10" End Top Supports (2 Required) 10" End Top Supports (2 Required) Cut the 3 1/3" wide pieces from three 8' two by fours as shown. Traditional Picnic Table Plans - Cutout Drawings Page 5 32" 32" Traditional Picnic Table Plans - Mounting the Wheels Page 6 1 1/8" Flush Wheels that are labeled 6" may not be exactly 6" in diameter. So, you'll need to place your wheel on the bottom of the leg as shown. The center of the axle hole should be 1 1/8" from the edge and the edge should be flush with the bottom of the leg as shown. Make a mark through the axle hole and drill a 1/2" hole, (or the diameter of the axle hole for your wheels), for the axle bolt in the marked position. 30 1/2" Cut off the end so the edge closest to the axle hole is 32 1/2" long as shown. Mount the wheels with 3 1/2" by 1/2" diameter (or the diameter of the axle hole for your wheels) hex head bolts. You should place a flat washer between the wheel and the leg and between the nut and the leg.. I recommend using galvanized bolts, nuts, and washers. You'll need to use self-locking nuts because the wheels won't turn if you tighten them against the leg. Tighten them just enough so the wheels are not too sloppy. Copyright 2005 by Robert E. Reedy, Vandalia, Ohio Traditional Picnic Table Plans - Attach the Stiffeners Page 7 Apply some weather proof glue to the mating surfaces and attach a Seat Stiffener to each end of each Seat Support with 3" long # 8 Deck screws as shown. Next, attach a Top Stiffener to each End Top Support. Arrange the 5 top boards as shown with a 3/8" gap between each board. Attach the two Top Supports (stiffeners should already be attached) to the top boards with 2 1/2" deck screws as shown. (Be sure the top boards line up properly and the ends are flush and square. Also be sure the center support is centered from end to end.) Attach the center stiffer as shown. 10" Copyright 2005 by Robert E. Reedy, Vandalia, Ohio Traditional Picnic Table Plans - Attach the Seats & Legs Page 8 Mount seat boards to the seat supports with 2 1/2" deck screws as shown. 1" 10" Mount the legs to the Seat Supports with 3 1/2" long 3/8" diameter galvanized carriage bolts as shown. Use flat washers for the side the nuts go on. can tighten them after you have finished mounting the top assembly. Leave these bolts snug for now.You can tighten them after mounting the top assembly. Attach the leg protectors with 1 5/8" #8 Deck Screws. Copyright 2005 by Robert E. Reedy, Vandalia, Ohio Note the dimensions shown. Traditional Picnic Table Plans - Attach the Top & Braces Page 9 Mount the legs to the Top Supports with 3 1/2" long 3/8" diameter galvanized carriage bolts as shown. Now you can tighten all the bolts for the seat assembly and the top supports.. Mount the braces to the seat supports and top as shown. The end of the braces with 40° tip goes against the center top stiffener. Page 2 gives a good illustration of how the braces are placed. This completes the assembly of your picnic table. Copyright 2005 by Robert E. Reedy, Vandalia, Ohio Traditional Picnic Table Plans - How the wheels work. Page 10 In the normal position, the weight is supported by the legs. When raised like this, the wheels support the weight and picnic table may be rolled. Copyright 2005 by Robert E. Reedy, Vandalia, Ohio More Plans from: www.bobsplans.com Router Table 6 Foot Bar Wheelbarrow Pocket Hole Jig Workbench Dog House Picnic Table Corner Desk Book Case Mantel Clock Spoke Wheel Panel Saw Trellis Tenoning Jig Table Saw Sled Octagon Table Redwood Planter Wheelbarrow Drill Press Table


© Copyright 2026