
RENDER LAYERS IN MAYA - Tips and Tricks
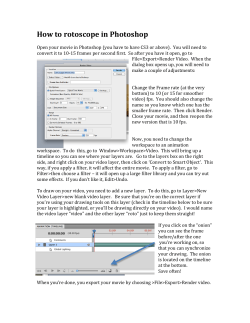
Render Layers Tutorial
Priya Panchal-Banerjee, MSC2017
RENDER LAYERS IN MAYA - Tips and Tricks
HOW TO SETUP RENDER LAYERS and compositing for transparency without
having to render transparency
This tutorial outlines the steps for creating basic render layers so that transparency can be added in post-processing, as well
as depth and ambient occlusion. We will use the example of a cell with outer membrane and inner nucleus.
Step 1: Setting up your scene
Create an inner sphere and an outer sphere. Label them accordingly in the Outliner.
Step 2: Creating shaders
In the Hypershade, create 2 blinn shaders. Name one ‘diffuse’, and the other ‘specular’.
Define attributes for ‘diffuse’:
Under ‘Material Attributes’, set colour to white
Under ‘Specular Shading’, set everything to 0 or black
March 24th 2015
1
Render Layers Tutorial
Priya Panchal-Banerjee, MSC2017
Define attributes for ‘specular’:
Set ‘Color’ to black (none), increase specular roll off and make color white.
Step 3: Create Render Layers
In the Channel Box/Layer Editor, select the ‘Render’ tab. Select the outer sphere and select the icon to add selected objects to
a new layer.
Label this render layer ‘outerDiffuse’
With the outer sphere selected in this render layer, assign the material ‘diffuse’
Now with your outer sphere selected in the master layer, create another render layer with the outer sphere in it, and label this
render layer ‘outerSpecular’.
Do the same for the inner sphere, creating a separate render layer with the two separate shaders.
You can add bump to the outer diffuse to add more texture to the surface.
Step 4: Batch Render
Set render settings: To avoid confusion with file names, name your file with a prefix and right click on the text window - you will
see options for naming including “layer name”. Batch render and lets move into After Effects.
March 24th 2015
2
Render Layers Tutorial
Priya Panchal-Banerjee, MSC2017
Step 5: After Effects
Import all image series.
Layer outer diffuse at the bottom, then inner diffuse & specular, then outer specular on top. Composite the speculars as an
‘add’ layer mode. Using the pen tool, draw a mask onto the diffuse specular layer. Invert the mask and adjust the mask feather
and opacity to get the desired effect.
March 24th 2015
3
Render Layers Tutorial
Priya Panchal-Banerjee, MSC2017
This concludes the transparency part of the tutorial. You may also choose to render the following depth and ambient occlusion
passes to incorporate into your composition in after effects.
OTHER USEFUL RENDER LAYERS:
Depth Layer - Select all objects, and create a new layer, label this ‘depth’. Right click the layer and select ‘Attributes’.
Near the top right of the panel, select ‘Presets’, and select ‘Luminance Depth’.
March 24th 2015
4
Render Layers Tutorial
Priya Panchal-Banerjee, MSC2017
Click the small arrow to the right of ‘Out Color’, and you will be in the ‘setRange2’ tab. In the ‘Set Range Attributes’ you will find
‘Old Min’ and ‘Old Max’. Right click on each of these and select ‘Break connections’. Set the min distance from the camera for
the old min, and max distance from camera for the old max. This should set a proper depth of field map for your render.
Ambient Occlusion - To set this up, create a render layer with all objects and lights, and create a new render layer.
Call this ‘ao’. Go to the attributes and from the presets select ‘Occlusion’.
Select the small arrow next to ‘Out Color’ and increase the samples to at least 64. Also, select the dark colour panel and for the
‘v’ value, set to -0.1. This will create darker darks, so you can adjust the amount of occlusion in post-processing.
In this final image below, I added camera lens blur using the depth map from maya. Some particles, a gradient background,
and colour corrections were added just for fun.
March 24th 2015
5
Render Layers Tutorial
Priya Panchal-Banerjee, MSC2017
If you are animating your objects and need a moving mask, please see Stuart’s tutorial on 3D Tracking in After Effects
(https://www.youtube.com/watch?v=Ana12T7R6p8&feature=youtu.be).
DEFINITIONS:
Render Layers:
These are layers which will render whatever objects and lighting that have been assigned to them. In this way, we can assign
specific lights to specific objects in specific render layers so that we gain more control over our post-processing (i.e. We can
change the color/intensity, etc., of the light source and the objects).
Render Passes:
These are separate attributes that can be extracted from the render layer that it is associated with. Though testing the right
settings can be slightly more time consuming, this can save on render time.
Another possible level of rendering are the passes contribution layers. For example, if we have a render layer with 2 objects in
it, and we only want the specular for one of the objects, we can create a contribution pass within the render pass for that
specific object. This can sometimes make your life easier, but can also get complicated, so we are not covering it here.
March 24th 2015
6


© Copyright 2026