
DatacastWisconsin Receive Site Set Up Instructions Table of Contents
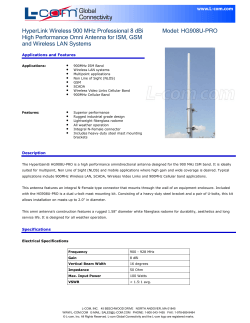
DatacastWisconsin Receive Site Set Up Instructions: 02/01/2006v7 vwk Table of Contents: UPDATES PARTS NEEDED PART I: DTV RF RECEPTION PART II: PHYSICAL INSTALLATION OF BBTI RECEIVE CARD PART III: BBTI RECEIVE CARD CONFIGURATION BBTI HARDWARE DRIVER INSTALLATION BBTI HARDWARE SOFTWARE INSTALLATION BBTI HARDWARE SOFTWARE CONFIGURATION PART IV: TRIVENI SOFTWARE TRIVENI SOFTWARE INSTALLATION TRIVENI SOFTWARE CONFIGURATION PART V: DISTRIBUTION OF RECEIVED CONTENT ON YOUR NETWORK PART VI: REQUESTING DATACAST CONTENT PART VII: UTILIZING DATACAST CONTENT 1 UPDATES Instructions will be updated regularly. For latest version, please: 1. Open your Internet browser and go to http://www.DatacastWisconsin.org/ 2. At the partner login, please enter your assigned Username and Password for Documentation and click the Enter button. Login information can be obtained from your DatacastWisconsin support person. Username: ____________________________________ Password: _____________________________________ OVERVIEW: PARTS NEEDED -Compass for pointing antenna at WPT DTV tower -Outdoor UHF* Antenna: (Please refer to antennaweb.org or Receive Site Set Up Instructions at DatacastWisconsin.org for antenna recommendations for your site.) *Milwaukee receivers on WMVS-DT channel 8 need a VHF antenna instead of UHF. -Tripod or other mount for Outdoor UHF antenna aimed at WPT DTV tower -Grounding connector on outdoor UHF antenna -Grounding wire -Ground rod -RG-6 Coaxial cable running between outdoor UHF antenna and input to tower computer (Please respect your site’s requirements for plenum cable and appropriate cable paths.) -Threaded F-Connectors -Coaxial Cable Crimp Tool -Outdoor cable ties (as needed for your site) -Indoor cable ties or Velcro wraps (as needed for your site) -Administrative installation privileges on a Windows XP or 2000 Operating System -Windows 2000/XP Tower (minimum specs: 1.4 GHz Pentium IV Processor, 512 MB or greater RAM, 100 GB or greater installed hard drive storage or network drive with 100 GB of hard drive storage or Ethernet access to a 100 GB network shared drive, and an empty PCI slot) -BBTI Airstar-HD5000-PCI card -Ethernet cable -Network connection -Datacast installation software from ECB (latest version information available at DatacastWisconsin.org) 2 PART I: DTV RF RECEPTION Parts Needed: -Compass for pointing antenna at WPT DTV tower -Outdoor UHF* Antenna: (Please refer to antennaweb.org or Receive Site Set Up Instructions at DatacastWisconsin.org for antenna recommendations for your site.) *Milwaukee receivers on WMVS-DT channel 8 need a VHF antenna instead of UHF. -Tripod or other mount for Outdoor UHF antenna aimed at WPT DTV tower -Grounding connector on outdoor UHF antenna -Grounding wire -Ground rod -RG-6 Coaxial cable running between outdoor UHF antenna and input to tower computer (Please respect your site’s requirements for plenum cable and appropriate cable paths.) -Threaded F-Connectors -Coaxial Cable Crimp Tool -Outdoor cable ties (as needed for your site) -Indoor cable ties or Velcro wraps (as needed for your site) 1. On the Internet, go to http://www.antennaweb.org/ to determine the proper angle at which to aim your antenna. a. Click Choose an antenna b. Enter your address. c. Answer questions. d. Click Submit. e. You will receive a list of analog and DTV stations that you should be able to receive at your location with an appropriate antenna. Disregard all stations except the PBS DT station closest to you. Please note: ___ Compass Orientation in Degrees ___ Miles From ___ Frequency (DTV Channel is listed in the far right column) f. If you click on the “Antenna Type” indicated for your local PBS DT station, Antenna Web will recommend an antenna type for your location. DatacastWisconsin makes the following recommendations for choosing an antenna: The higher the antenna is installed, the better reception is. An outdoor antenna will always get better reception than an indoor antenna. The bigger the antenna, the greater gain it will provide for the signal. However, you may not need as much gain if you’re within 25 miles of the PBS DT tower. Too much gain could cause a receive issue. DatacastWisconsin cannot endorse specific RF receive equipment. However, we do list equipment that we are familiar with on our website at DatacastWisconsin.org. This information is provided as a courtesy only. 3 Call Sign WHA-DT WPNE-DT Ch Lower Frequency 20 506 MHz 42 638 MHz ECB DTV Channels City Point Antenna Towards Madison Green Bay WHRMDT WLEF-DT 24 530 MHz Wausau 47 668 MHz Park Falls WHLA-DT 30 566 MHz WHWCDT 27 548 MHz West Town Mall County Highway X in De Pere. Aim towards Scrays Hill. Top of Rib Mountain Due east of Park Falls 9.3 miles on state highway 182. 45-56-43 Latitude.90-16-28 Longitude. La Crescent, West side of the Mississippi River next to La MN Crescent, MN Menomonie 2.3 miles NE of Wheeler Far Northeastern Corner of Wisconsin* *DatacastWisconsin datacast service is not currently available in this coverage area. WDSE-DT 38 617 MHz Duluth/Supe 46.791667Latitude 92.12246 Longitude. Top of rior, the ridge on the west side of Duluth, MN. Minnesota Milwaukee Area* *DatacastWisconsin datacast service is not currently available in this coverage area. WMVS-DT 8 183 MHz Milwaukee Northeast Milwaukee, just on the border of Shorewood. 1 mile West of WITI 6 tower. WMVT35 599 Milwaukee Northeast Milwaukee, just on the border of DT MHz Shorewood. 1 mile West of WITI 6 tower. . 2. Install the antenna on your building roof or other high location. a. Use your compass to ensure that the antenna is properly aimed. b. Whenever possible, avoid pointing the antenna directly through or at the following reception obstacles that attenuate or reflect the signal off of hard surfaces on nearby concrete or steel buildings, tall trees, water bodies, or 4 c. d. e. f. g. h. land between your location and the PBS DT tower that has a higher elevation than your location. Mount your antenna securely to the building. Install a grounding wire and grounding connectors between your antenna and a ground rod. While always a good idea, grounding is especially important for a DTV receive antenna because the coaxial cable output of the antenna will feed a computer card that is sensitive to electro static discharge. The receive computer is likely to be connected to other network devices that should also be protected from electro static discharge. Run a RG-6 coaxial cable between the output of your antenna and the coaxial input on your datacast receive computer located indoors. Please be aware of any building guidelines that may require the use of plenumrated cable. Ensure that there is strain-relief present where the coaxial cable is attached to the antenna. Terminate the coaxial cable at both ends with threaded F-connectors. Install protective weather boot on antenna end of coaxial cable or use appropriate tape to weatherproof. 5 PART II: PHYSICAL INSTALLATION OF BBTI RECEIVE CARD Parts Needed: -Administrative installation privileges on a Windows XP or 2000 Operating System -Windows 2000 (SP4) / XP Tower (minimum specs: 1.4 GHz Pentium IV Processor, 512 MB or greater RAM, 100 GB or greater installed hard drive storage or network drive with 100 GB of hard drive storage or Ethernet access to a 100 GB network shared drive, and an empty PCI slot) -BBTI Airstar-HD5000-PCI card -Datacast installation software from ECB (latest version information available at DatacastWisconsin.org) 1. Power down PC. For safest installation, remove power cord during install process. 2. Open up the case. Please observe proper grounding practices. 3. Open up an unused PCI slot. For best results, avoid placing the BBti receive card in the bottommost PCI slot on the computer or immediately underneath a graphics card. 4. Close up the computer case. 5. Reinsert power cord. 6. Connect the F-connector on your coaxial cable to the RF input on the BBti receive card. 6 PART III: RECEIVE CARD CONFIGURATION HARDWARE DRIVER INSTALLATION 1. Power up PC. 2. Place the DatacastWisconsin Installation CD in the CD drive. 3. Upon Windows loading, the “Found New Hardware Wizard” may be displayed. If the “Found New Hardware Wizard” is displayed, select Install from a list or specific location (Advanced). Click Next button. You may skip ahead to step 15. In the service tray, a “Found New Hardware: Network Controller” bubble may be displayed. 4. If the “Found New Hardware Wizard” is not displayed, open the Control Panel. 5. If the Control Panel is in Category View, we recommend that you click on “Switch to Classic View.” With the Control Panel in Classic View, click “Add Hardware.” 7 6. The “Add Hardware Wizard” will appear. Click “Next” button. 7. The Wizard will search for new hardware that has been connected to your system recently, but not installed. The Wizard may ask “Have you already connected this hardware to your computer?” Click “Yes, I have already connected the hardware.” Click “Next.” 8 8. A list will appear that says, “The following hardware is already installed on your computer.” The datacast card is the Network Controller. Select “Network Controller” and then click “Next”. 9 9. The Wizard may state, “Here is the current status of the hardware you selected: The drivers for this device are not installed. (Code 28) To start a troubleshooter that can help you resolve any problems you might be having, click Finish.” Click Finish. 10. The “Hardware Update Wizard” will appear. The Wizard asks, “Can Windows connect to Windows Update to search for software?” Select “No, not this time.” Click “Next.” 10 11. The Wizard will ask how to install software for the network controller. Click “Install from a list or specific location (Advanced).” 11 12. In the Hardware Update Wizard GUI, select “Search for the best driver in these locations.” Click “Next.” If your Wizard finds the driver and begins installing, skip ahead to step 15. 13. If your computer cannot locate a driver, then go back and check the boxes for “Search removable media (floppy, CD-ROM)” and “Include this location in the search: CD Drive:\” Click Browse button. 12 14. Navigate to your computer’s directory structure until you locate the CD drive. Once in the CD drive directory, click on Drive:\Triveni_Install\DataHardware\Install\Setup.exe. 13 Click the “Open” button. 14 15. The Hardware Update Wizard will appear with the message “Please wait while the wizard installs the hardware.” 16. Welcome to the InstallShield Wizard. Click “Next”. 17. You may receive a Windows logo certification warning. This is not a problem. Click Continue Anyway button. 18. If you’re installing to a Windows XP computer, a system restore point will be created. When prompted, click Next. 15 19. You may be asked if you wish to overwrite an existing database. If so, click “Yes”. 20. When the Found New Hardware Wizard is complete, click Finish button. 21. Upon successful completion, you may or may not see a popup balloon above the task bar that says “Your new hardware is installed and ready to use.” 16 BBTI SOFTWARE INSTALLATION 1. Now that the BBti PCI receive card hardware driver has been installed, it is time to install the BBti PCI software driver. From the Windows Start Menu, select the Control Panel. 2. In the Control Panel, select Add or Remove Programs. 17 3. In Add or Remove Programs panel, click on “Add New Programs” icon. Click CD or Floppy. 18 4. If the “DVB-PC TV Stars” launch interface auto-executes, please click Exit to close the “DVB-PC TV Stars” GUI. 5. The next interface to appear may be “Run Installation Program”, with a message that “Windows was unable to find the installation program. Click Back to try again. Click Browse to find the installation program manually.” Click “Browse.” 6. Click Next. 7. Click Browse button. 19 8. Navigate to your computer’s directory structure until you locate the CD drive. Once in the CD drive directory, double-click on Drive:\Triveni_Install\DatacastHardware\Install\ 9. Click on Setup.exe 10. The Wizard will display the selected path. Click “Finish.” 11. Installation Wizard will initiate. 12. Choose Setup Language. Click “Ok.” 13. The DatacastWisconsin Datacast Receiver Setup interface will appear. Click Next button. 20 14. Read the license agreement and click Yes if you accept it. 15. Choose an installation destination. Click Next button to accept the default location. We recommend that you accept the default install location. Click Next. 16. Select the Program Folder. If you accept the default by clicking Next, the BBti software will install in its own Datacast Hardware folder. We recommend that you accept the default install location. 21 17. You may be asked, “Do you want to overwrite existing database?” If so, click “Yes.” 18. You will be asked “Do you want to read the README file now?” Click Yes if you would like to read the README.TXT file now. It contains support, requirement, and troubleshooting information. If you would like to access the README.TXT file later, you can access it on the DatacastWisconsin CD at Drive:\Triveni_Install\DatacastHardware\Install\README.TXT. 19. The InstallShieldWizard is complete. Click Finish to select Yes, I want to restart my computer now. 15. Restart computer. 22 16. Please note that the Datacast Hardware PCI card will appear to be an additional NIC on your computer, just like an Ethernet NIC that you use for your network connection. As such, it may be subject to security policies on your Microsoft operating system. 23 BBTI SOFTWARE CONFIGURATION 1. When computer boots up, you should see an icon of a broadcast tower with a red circular background in the Windows service tray. 2. In the Windows Start Menu, select Datacast HardwareSetup4PC or click on the icon of a broadcast tower with a red circular background in the Windows service tray and select Setup4PC. 3. In the Setup4PC interface, click the Location Drop Down Menu button to select the transmitter nearest to your location. 24 4. Click the □ Current Location check box. Caution: If you forget this step, your receiver will not tune in the proper channel. Ideally, the Status tower icon’s background will turn green after you check the □ Current Location check box. 5. If the Status light behind the tower turns green, click the Close button. 25 6. If the Status light remains red, click the Status button. a. If your antenna is properly aimed, without obstructions, and you have a solid coaxial cable connection between the antenna and input to the card, the Channel Information should display the following: Lock Status: In Lock. (Neon Green) Signal Strength: High 90th Percentile value (Neon Green) Signal Quality: 80th Percentile value or > (Neon Green) SNR (dB): 20.0 or > Uncorrected Blocks: Value does not matter. b. If the Channel Information displays red or yellow, an “Out of Lock” message, or values are lower than the desired minimums, please refocus your efforts on antenna set up until you achieve the desired Channel Information results. 7. On Setup4PC main interface, click the Statistics Tab. If you’re set up is correct and your receiving a signal of adequate strength, you should see: i. Active PIDs, 0x004A and 0x004B. ii. Several listings under the MAC Address iii. A Tower Icon with a Green background by the Status button. iv. Later, when all software has been configured and if datacast content is being transmitted on the channel you have tuned in, you will see a data rate above 0 for the Total Data Rate __ kbps. 26 8. If status corresponds with suggested readings, click the Close button. If readings do not seem to meet the criteria above, please review your previous set up steps for a problem. 9. If all goes well, you are done configuring your BBti PCI datacast receive card at this point. If the DTV signal is being received properly, the Bbti tower icon in the service tray will have a green background. Caution: You must allow the BBTI software to run in the background at all times in order to receive datacasting. 10. If the BBti tower icon in the service tray will has a red background, there is a problem. However, the Broadband Technologies, Inc. (Bbti) tower icon in the tray will have a red background as the Windows XP operating system is booting up. 11. Your BBTI receiver should be configured for reception of datacast content. The BBTI receiver must always be left running in order for you to receive content. 27 PART IV a: TRIVENI SOFTWARE INSTALLATION AND CONFIGURATION Parts Needed: -Administrative installation privileges on a Windows XP or 2000 Operating System -Windows 2000 (SP4)/ XP Tower (minimum specs: 1.4 GHz Pentium IV Processor, 512 MB or greater RAM, 100 GB or greater installed hard drive storage or network drive with 100 GB of hard drive storage or Ethernet access to a 100 GB network shared drive, and an empty PCI slot) -BBTI Airstar-HD5000-PCI card -Ethernet cable -Network connection -Datacast installation software from ECB (latest version information available at DatacastWisconsin.org) 1. Now that the BBti PCI receive card hardware driver has been installed, it is time to install the Triveni SkyScraper BasicReceiver software. Please note that the Triveni software must be installed and configured from an Administrative login to Windows. From the Windows Start Menu, select the Control Panel. 2. In the Control Panel, select Add or Remove Programs. 3. Click Add New Programs. 4. In Add or Remove Programs panel, click on CD or Floppy. 28 5. Place the DatacastWisconsin Installation CD in the CD drive. 6. Click Next. 7. Click Browse button. 8. Navigate to your computer’s directory structure until you locate the CD drive. Your computer may still be pointing toward the Datacast Hardware directory from the previous installation of the datacast receive card. Once in the CD drive directory, click on Drive:/Triveni_Install/DataReceiver/Setup.exe. 9. Click Finish button. Installation Wizard will initiate. 29 10. Click Next. 11. Read the license agreement and click Yes if you accept it. 12. Enter your customer information. Enter any Username and Company Name that you would like. It doesn’t really matter what you enter for a user name and company name, as long as there is text entered in both fields. On the same screen, you’re also asked decide who can use this application. We recommend that you choose the radial button to “Install this application” for “●Anyone who uses this computer (all users).” Click Next. 13. Choose an installation destination. Click Next button to accept the default location. We recommend that you accept the default install location. Click Next. 30 14. Select an installation type. We recommend the “Typical” installation. Click Next. 15. Installation will begin when you click Next. 16. SkyScraper InstallShield Wizard will perform the requested operations. Click Finish when the installation completes. 17. If you wish to read documentation from Triveni Digital, it is available on your installation CD at Drive:/Triveni_Install/DataReceiverUserGuide.PDF 18. Close the Control Panel. 19. You should now see the Triveni Digital BasicReceiver in your Start Menu and there should be a SkyScraper Receiver shortcut on your desktop. 31 PART IV b: TRIVENI SOFTWARE CONFIGURATION 20. Open the BasicReceiver application. 21. The first time you open BasicReceiver in Windows XP, you may receive a “Windows Security Alert” warning. The BasicReceiver uses an application called javaw. This is a necessary and harmless application. Click Unblock in order to enable the BasicReceiver to operate. You will not be able to receive datacast content unless you unblock javaw. 22. It is necessary to configure the BasicReceiver the first time you use it. On the menu bar, select EditPreferences. 32 23. OPTIONAL: If you’re saving all of the incoming datacast files on the same hard drive that the BasicReceiver is installed on, it is not necessary to change the Cache settings. If you wish to save the full content files to a different drive or a storage area on your network, click the Select button for the Cache Folder to choose a new location. 33 24. Within the Preferences Interface, click “Connection” tab. For the “Network Interface” drop down menu, select DatacastHardware PCI – Packet Scheduler Miniport. 25. Now, you must add the multicast addresses that you wish to receive. Click the Add button. The Add Multicast Address interface will appear. Enter the following addresses, clicking the Ok button after you have added each one. 225.0.0.2 225.0.0.3 226.0.0.1 226.0.0.2 226.0.0.3 Click the Ok button when finished. 26. Your receiver should be configured for reception of datacast content. The Basic Catalog is configured to start running as soon as the application is opened. However, if you click the Stop button for some reason, then you will need to click the Catalog Viewer Start button to begin receiving content again. Caution: You 34 must leave the Catalog Viewer open and running at all times in order to receive datacast content. 27. Each datacast Catalog Viewer is assigned a random ID number upon installation. DatacastWisconsin needs to know that number in order to send targeted content to your datacast receiver. Please email [email protected] with your name, site location, email address, and the ID# so that we may begin sending content to your datacast receiver. It is possible that you may receive generic, untargeted content until the time that your receiver ID is added to our service. PART IV ADDENDUM A: TRIVENI SOFTWARE INSTALLATION AND CONFIGURATION FOR USER LEVEL LOGINS TO MS-WINDOWS 1. Now that the BBti Triveni SkyScraper BasicReceiver software has been installed and configured from an Administrative login to Windows, you can choose to make this software function for user level logins on the same computer. This is accomplished by applying full recursive Full Control, Write, and Modify (FC, W, M) privileges to the Triveni Basic Receiver folder for all users who you wish to be able to operate the software while logged in. Please note that if you don’t modify the privileges of the Triveni Basic Receiver folder for all users, the users will encounter a receiver initialization error upon starting the Triveni software, and the computer will not be able to receive any datacast content. 2. The steps necessary to apply full FC, W, M privileges recursively for users will vary according to your OS and its settings. We cannot address every scenario, but can give you an example of a successful method. 3. Open Windows Explorer. Locate the folder at C:\Program Files\Triveni Digital\SkyScraper DataReceiver 3.2 4. Right-click on the SkyScraper DataReceiver 3.2 Folder. 5. Select Sharing and Security…. 6. Click on the Security Tab 7. Select the most global User group available or select the specific User group that you wish to add Permissions to. 35 8. Check the Allow boxes for Full Control, Modify, and Write. 9. Click the Ok box. PART IV ADDENDUM B: TRIVENI SOFTWARE INSTALLATION AND CONFIGURATION FOR USER EMAIL NOTIFICATION UPON ARRIVAL OF CONTENT (In development- Not available at this time) 1. You must first email your DatacastWisconsin Support person with the email address of the person at your site who should receive an email notification when content arrives. Please email your notification email address to [email protected]. 2. Please check back for documentation updates. 36 PART V: DISTRIBUTION OF RECEIVED CONTENT ON YOUR NETWORK Parts Needed: -Ethernet cable -Network connection -Multicast enabled network switches Please check back for updates. Simple Method: Share the received content Cache folder across your network. Elaborate Methods: Set up an Apache Server to share across your network. Integrate received content in to your existing content management and distribution system. 37 PART VI: REQUESTING DATACAST CONTENT (Under Development) Parts Needed: -Ethernet cable -Network connection 1. Open your Internet browser and access http://www.DatacastWisconsin.org/ 2. At the partner login, please enter your assigned Username and Password for the Catalog and click the Enter button. Login information can be obtained from your DatacastWisconsin support person. Username: ____________________________________ Password: _____________________________________ 3. You will be directed to the Content Ordering Catalog. You can also access the Content ordering catalog directly at http://datacasting.ecb.org/ At the login, please enter your assigned Username and Password for the Catalog and click the Enter button. This login is customized for your receive site. Login information can be obtained from your DatacastWisconsin support person. Username: ____________________________________ Password: _____________________________________ 4. Enter your Login and Password. Click the Enter button. 5. View the list of content available on request. Check the box next to each content item that you would like to order. When you have selected all of the content that you seek, click the “Download checked content” link in the lower right corner. 6. Your content requests will be added to a queue, and will be transmitted as soon as earlier requests have been completed. It is best to request the desired content at least 24 hours ahead of time to ensure that you will receive by the time it is needed. For datacast receive sites that have registered for the DatacastWisconsin email notification service, a designated email address at your site can receive an email notification once the content has arrived on your datacast server. Additional onsite set up is required for the email notification service. If you have not received your content within 24 hours and are concerned, please email [email protected]. 7. When you are done requesting content, please click the Log Out button to exit the Request page. 38 PART VII: UTILIZING DATACAST CONTENT Content features may include: HTML Launch Page Captioned and Uncaptioned Versions XML metadata file with descriptive information for import in to your local media asset management system Live low-bandwidth multicast media stream Teacher’s Guide Windows Media Player and MPEG4 for QuickTime file formats 768 kbps full-screen WMP version and 330 kbps MP4 for QTP version. Streaming Media: Please check back for updates. Content pushed to your site by DatacastWisconsin: Please check back for updates. Content requested by your site: Please check back for updates. 39


© Copyright 2026