
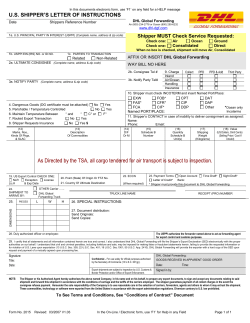
How to Complete a Bulk Manifest Field Field Name Description Bulk Manifest
How to Complete a Bulk Manifest 1 1 2 2 3 3 9 9 4 4 5 5 6 6 7 7 8 8 10 10 12 12 11 11 13 13 Field Field Name Description 1 Paid by Meter If payment is by meter impression, place a check mark in box. Enter the meter serial number below the meter box (see example). The meter tape(s) must be affixed to the back of the Data Processing Copy. 2 Your Reference No. Use the reference field as required, e.g., purchase order number. This information will appear on your invoice. 3 Telephone No. Enter the Shipper’s telephone number. 4 Customer (Sold to) No. Enter the Shipper’s 7-digit customer number. 5 Agreement No. Enter the Shipper’s 8-digit agreement number. 6 Site No. For Canada Post use only. To be completed by the accepting employee. 7 Date For Canada Post use only. To be completed by the accepting employee. 8 Page Number Enter the number of the manifest indicating the total number of manifests used for the shipment. (e.g. 1 of 3) 9 Shipper’s Name and Address Enter the Shipper’s company name and address. 10 Shipper (Paid by) No. Enter the 7-digit customer number of the Party paying for the shipment. 11 Shipper’s Postal Code Enter the Shipper’s 6-character postal code. 12 Total No. of Postage Paid Items Enter the number of Postage Paid (prepaid) Items that are being shipped. This quantity will contribute to your scheduled pickup service fee calculation. For information on purchasing additional options, see page 3. 13 Shipper’s Name and Signature Print the Shipper’s name and sign each page of the manifest. 14 Acceptance Signature For Canada Post use only. To be completed by the accepting employee. 14 14 The Bulk Manifest is to be used for domestic Collect on Delivery (COD), Return Parcels, Flat Rating, Book Presort, Literature for the Blind, Postage Paid (prepaid) with options, or USA/International shipments. All information appearing in the fields of the samples found in this document, e.g., numbers, addresses and names, are for illustrative purposes only. Mandatory Fields Canada Post Fields Automation Discount – Customers using an electronic shipping s ystem may qualify for additional discounts. To learn about Electronic Shipping Tools, contact your sales representative or visit www.canadapost.ca/business/tools/default-e.asp Specific Fields 1 2 3 4 5 6 7 8 9 10 11 Field Field Name Description 1 Product Code Enter the appropriate numeric product code of the Item(s). Product codes are supplied by the sales representative and the commercial service Network (CSN). 2 Shipped To Enter the destination address of the Item(s). 3 Postal Code Domestic – Enter the full 6-character postal code of the destination (see back of manifest). USA – Enter the State Code (i.e., FL for Florida). International – Enter the Country Code (i.e., GB for England). 4 Number of pieces Enter 1 Item per line, except for flat rated Items. For flat rated I tems, enter the total number of Items applicable to the service identified per line. 5 Weight Enter the weight of the Item(s) in kilograms. Record the higher of the actual weight or the volumetric* weight. Flat Rating – All pieces indicated on the line must be the same weight. Enter the weight in kg of one item for the line. 6 Oversize / Unpackaged Enter the number of Item(s) identified on this line, that are oversize (any dimension larger than 1 m) or unpackaged. 7 Mailing Tube** Enter the number of Item(s) identified on this line that are mailing tubes that are cylindrical in shape. Entry of items that are not cylindrical in shape (e.g. triangular shape) is not required. 8 Delivery Confirmation** Enter the number of Item(s) identified on this line, requiring Delivery Confirmation. 9 Signature** Enter the number of Item(s) identified on this line, requiring the recipient’s Signature. 10 C.O.D.** Enter the number of Item(s) identified on this line requiring Collect On Delivery (C.O.D.). 11 Declared Value for Coverage** Enter the declared value of the Item identified on this line for coverage against loss or damage – enter only one item per line. 12 Total Fee Use as required to record the cost of all Items identified on this line. 13 Item ID Affix or record the reference Item ID number from the shipping label to each line item. Note: Item ID must be completed for order to be accepted. 12 13 * Volumetric Weight Example An Xpresspost Item measures 100 cm x 60 cm x 40 cm and weighs 25 kg. 100 cm x 60 cm x 40 cm = 240, 000 cm3 (volume) 240,000 ÷ 6,000 = 40 kg (volumetric weight) **See Parcel Services Customer Guide for product features and options. Postage Paid (Prepaid) Item requiring additional options Scenario One – Purchasing Additional Options for Prepaid Items (Signature, C.O.D.) 1 2 Note Field Field Name Description 1 Product Code Enter the appropriate product code: 926 – Xpresspost postage paid (prepaid), 1654 – Priority Courier Postage Paid (prepaid). One item per line. 2 Delivery Confirmation, Signature, C.O.D. Enter the total number of Items, in the appropriate box, receiving additional options. The Bulk Manifest must be used to purchase additional options on postage paid (prepaid) Items. Scenario Two – Purchasing Additional Options for Prepaid Items (Additional Coverage) 1 2 Complete form as per scenario one, in addition, a second line must be completed as follows: Field Field Name Description 1 Product Code Enter the product code for additional coverage: 1015 – Additional Coverage. One item per line. 2 Declared Value for Coverage Enter the value of the Item being shipped, on line two. Collect on Delivery 1 2 Field Field Name Description 1 Product Code Enter the appropriate product code: 1469 – Priority Courier, 908 – Xpresspost, 967 – Expedited Parcel, 966 – Regular Parcel. One item per line. 2 C.O.D. Enter the total number of Items receiving C.O.D. 3 Item ID Affix or record the reference Item ID number from the manual C.O.D. form. 3 DK12435 T455415 (9/12)


© Copyright 2026