
Welcome to the Guide on How to Set Up The... Theme I Used to Revolutionize the Adsense Market!
Welcome to the Guide on How to Set Up The Very Same
Theme I Used to Revolutionize the Adsense Market!
Thank you for purchasing the EXACT same website template I used
to bank like a boss with Adsense!
You will be happy with your purchase when you see how the site
looks when it is set up…
This template has some kickass features that will ensure you start
earning like a pro!
So instead of keeping you waiting, lets get to it!
Table of Contents:
Transferring a WordPress Directory The Easy Way…………………….2
Activating The Theme……………………….……………………….………………..6
Activating Plugins……………………….……………………….……………………….8
Importing the Settings You Need To BANK…………………………………10
1 Step to Setup Adsense Ads……………………….…………………………….17
Setting Up Social Media……………………….……………………….…………….20
Configuring Plugins To Make The Magic Happen………………………..31
Colors Make Them Come Back For More……………………….……………35
One Little Change……………………….……………………….………………………36
Final Touches……………………….……………………….…………………………….38
1
Transferring a WordPress Directory The
Easy Way
First of all, make sure you have your domain, hosting and
WordPress set up…
I have given step-by-step instructions on how to do this in the
Adsense Cash Revolution ebook.
So if you haven’t set up your domain, hosting and WordPress, go
ahead and do that now.
Right, lets move on…
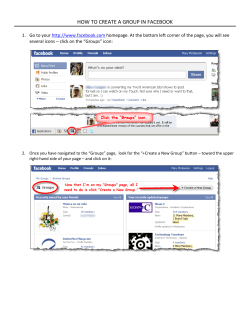
Go to www.yourdomain.com/cpanel
For example: www.lmaopics.org/cpanel
Fill in your login details that HostGator have given you and click
“Log in”.
Click on “File Manager” under the “Files” category.
2
Select your domain from the drop-down menu under “Document
Root for:” and then click on “Go”.
If you have installed WordPress correctly using the QuickInstall
method I showed you in the Adsense Cash Revolution ebook, you
should see files like in the screenshot below…
Go ahead and click on “Upload”.
3
When the “Upload” page opens, click on “Choose File” and then
select the “fpw.zip” file that you downloaded earlier. Click on
“Choose” and the file will upload.
Now look at the screenshot above…
You will see the file has uploaded (if you cannot see it, just refresh
your page).
Click on the “fpw.zip” file and click on “Extract” like I have shown in
the screenshot above.
4
Click on “Extract File(s)”.
Now that you have extracted the files, go to
www.yourdomain.com/wp-admin/ …
For example: www.lmaopics.org/wp-admin/ …
You will see a page like the screenshot above. Click on “Update
WordPress Database”.
Click on “Continue”.
You will then be redirected to the WordPress login page… Fill in your
login details and… login :p
5
Activating The Theme
Once you are logged into your WordPress dashboard, go ahead and
click on “Appearance” and then “Themes”.
Find the “Adsense Cash Revolution Theme” and click on “Activate”.
Congratulations, you have now installed the base theme of your
website
6
Now don’t freak out when you check out your website and it looks
blank… Read on and finish the set up guide!
You have to trust me, finish the guide and your site will look
amazing!
Lets move on…
7
Activating Plugins
Next, I want you to click on “Plugins” and then click on “Installed
Plugins” from the WordPress sidebar.
You will be taken to the Plugins page.
I want you to tick the “Contact Form 7”, “Share This” and the
“Simple Facebook Comments” plugins and then click on the dropdown menu next to “Apply” and select “Activate” like I have done in
the screenshot below.
Click on “Apply”.
This will activate these 3 plugins with one click (why do things
the hard way when there is an easy way!)
8
9
Importing the Settings You Need To
BANK
Click on “Tools” in the WordPress sidebar and then click “Import” as
I have shown below.
On the import page, click on “WordPress”.
A pop-up will appear… You must click on the “Install Now” button.
10
Click on “Activate Plugin & Run Importer”…
The plugin will activate and go to a new page. Click on “Choose
File” and find the “adsensecashrevolution.wordpress.xml” file you
downloaded earlier. Select it and click on “Choose”.
11
On the next page, tick the “Download and import file attachments”
and then click on “Submit”.
You will then see the page below… Do not worry about the “Failed
to Create” messages.
12
Good job so far, we’re one step closer to installing the EXACT same
theme I used to bank with Adsense!
If you go to your website, and click on the “Submit a Pic” link in the
sidebar, you will see you will be redirected to a page where users
can upload their pictures!
Yes, you read that correctly…
Using that form, users will be able upload pictures which will be
sent directly to your email. This completely automates the finding
content process…
Pretty cool right?!
To do this, we need to slip your email into that form.
So head on over to the “Contact” link in your WordPress sidebar as
shown in the screenshot below.
Click on “Edit” under the “Contact Form 1”…
You will notice that there are two “Contact Form 1” links.
You need to look for the one with “id=”41””, as I have circled in the
screenshot above.
13
A page will open that looks like the page in the screenshot above.
Look where the red circle is above, and change that email to your
email that you want to receive the funny pictures on.
One more tiny change has to be made to make sure the “Submit a
Pic” link in your sidebar actually sends the user to the correct page.
Go to your WordPress dashboard and click on “Settings” and then
“Permalinks” as shown in the screenshot below…
You will then see a page like the page below:
14
Click on “Custom Structure” and type /%category%/%postname%/
into the box and then click “Save Changes”…
It is all shown in the screenshot below.
Make sure you don’t skip this step, otherwise your “Submit a Pic”
feature will not work properly.
15
That’s it, you don’t need to do anything else…
The rest of the work is done for you
16
1 Step to Setup Adsense Ads
Now if you have read through the Ad Placement module in my
Adsense Cash Revolution ebook, you would have realized that
placing your Adsense ads can be quite difficult!
This theme eliminates ALL the problems you face when you want to
place an Adsense ad
Right, so to do this, go to “Appearance” in your WordPress
dashboard and click on “Widgets”.
You will see all your Adsense Placements are right there…
All you have to do is place your Adsense codes inside these widgets!
This is ridiculously easy!
As you can see, your Facebook and Twitter widgets are ready to be
added too!
17
So I am going to show you how to add one Adsense code, and you
must do the same to place any of the other Adsense ads… It is the
same process…
Click on the drop-down arrow in the top right hand corner of the
“300x250 Sidebar” widget, and drag the “Text” widget to the
“300x250 Sidebar” widget…
You will see the “Text” widget will drop down as you can see in the
screenshot above.
Now I want you to go and log into your Adsense account.
18
Click on “My Ads”, find your 300x250 ad you created in the Adsense
Cash Revolution ebook and click on “Get Code”. A pop-up will
appear like in the screenshot above.
Select the code, right click and select “Copy”.
Go back to your WordPress widget page and paste this code into the
“Text” widget under the “300x250 Sidebar” widget as shown in the
screenshot above.
Click “Save”.
Go to www.yourdomain.com (whatever domain you chose in the
Adsense Cash Revolution ebook) and you will see your 300x250
Adsense ad in the sidebar!
Success!
So much easier than placing them manually in the .php files right?
Right so go ahead and place your 728x90 Adsense code in the
“728x90 Header” widget and place your 468x60 Adsense code into
the “Single Page Ad” widget.
Just follow the exact same process as above for those codes.
19
Setting Up Social Media
Now it is time to place your Facebook Like Box and Twitter Follow
Button.
Stay on the “Widgets” page under “Appearance. You will see a
“Like Us on Facebook” widget and a “Follow Us on Twitter” widget.
Go ahead and drag a “Text” widget to the Facebook widget and the
Twitter widget as shown below.
20
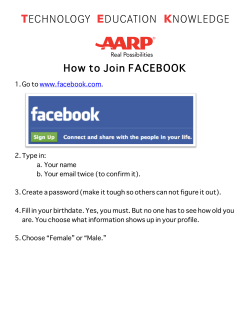
To set up your Facebook Page, head on over to Facebook, login,
and go to this URL: http://www.facebook.com/pages ...
Go ahead and click on “Create Page”.
You can then click on “Brand or Product”, select “Website” from the
drop down menu and type in the name of your page.
21
I advise naming your page after your website name. For example if
your website is called www.lolfails.com, I would name your
Facebook Page: “LOLFails.com”.
Click on “Get Started”…
Its pretty simple after this…
All you have to do is upload a profile picture and start posting some
content!
To post content to your Facebook Page, go to your page that you
just created.
22
Click on “Photo/Video” and I have shown above…
Then click on “Upload Photo/Video”.
Chose the funny picture you want to upload and click on “Post”.
You have now posted your very first funny picture to your Facebook
Page, good job
Next on the to-do list: Make sure you put a Facebook Like Box in
the sidebar of your website linking to your website’s Facebook Page.
So how do you create a Facebook Like Box?
Go to http://developers.facebook.com/docs/reference/plugins/likebox/ …
23
Copy your Facebook Page’s URL (as shown by the top red arrow)
into the “Facebook Page Url” box (as shown by the second red
arrow).
As you can see, it automatically fetches your profile picture and
your page’s information…
Pretty cool right?
You can choose whether you want it to show the profile pictures of
the people who like your page or not by checking or unchecking the
“Show Faces” bubble.
Once you have customized your like box, click on “Get Code”.
24
Right click on the code it gives you and copy it…
Time to put this code into your sidebar so that you will have the
Like Box on your kickass website!
Go to your wordpress admin panel (www.yourdomain.com/wpadmin).
So for my site, the domain would be www.lmaopics.org/wp-admin …
Type in your username and password given to you when you did
the QuickInstall.
Once you have logged in, click on “Appearance” and then click on
“Editor”.
25
Click on “Header.php” as I have circled in the screenshot above…
Paste the code you copied from the Facebook Like Box before the
</head> tag like I have shown you in the screenshot.
Click on “Update File”.
Great job if you are following my instructions correctly!
26
I now want you to copy the other Facebook Like Box code given to
you earlier.
You are then going to paste this code into the “Like Us on
Facebook” “Text” widget.
EXACTLY the same process as the Adsense codes, just a different
code to paste :P Click on “Save”.
Great, lets move on to Twitter.
Once you have signed up for twitter (sign up with the same
username as your Facebook Page), go to
http://twitter.com/about/resources/buttons#follow
27
Type in your Twitter username as I have done above, click on
“Show Username” and then click on “Large Button”.
You will then see a code on the right as I have shown with a red
arrow above. Select this code and copy it.
28
Paste the Twitter code into the “Follow Us on Twitter” “Text” widget
and click on “Save”.
Once again, it’s exactly the same process as the placing the
Adsense codes, just with a different code!
29
As you can see above, a Twitter button is under the “Follow us on
Twitter” and below that is the Adsense 300x250 Advertisement!
Its all coming together pretty well right? ;)
30
Configuring Plugins To Make The Magic
Happen
Time to set up your sharing buttons plugin!
Go to “Settings” and then click on “ShareThis”.
31
Set up the page like I have above…
32
Click on “Click to modify other widget options” and paste this link in
the box:
<script charset="utf-8" type="text/javascript">var
switchTo5x=true;</script><script charset="utf-8"
type="text/javascript"
src="http://w.sharethis.com/button/buttons.js"></script><script
type="text/javascript">stLight.options({publisher:'wp.9f890084bbbf-404d-9814-59e4c5fd9468'});var
st_type='wordpress3.2.1';</script>
Scroll down to the bottom of the page after you have made all the
changes and click on “Update ShareThis Options”.
33
Go to your homepage and you will see the sharing button shown in
the screenshot above!
Looks cool right?
34
Colors Make Them Come Back For More
Now for the coolest feature of all…
You ready for it?
This theme comes in THREE different colors!
This is a truly amazing setting for a site like yours, because “color”
is what keeps people coming back…
When people visit a colorless and boring page, they rarely
remember it.
These different template colors will really help your visitors return!
Click on “Appearance” and then “Color Theme Options”.
From this page you can select whether you want a blue, red or
green theme…
This is a kickass feature that allows you to be unique!
Click on “Save Changes” when you have decided on a color you like,
and check out the changes!
I guarantee that all these colors look great!
35
One Little Change
Now for a little change that you need to make…
Go to “Appearance” and then “Menus” as shown in the screenshot
below.
Click on “Main Menu” and I have circled above, click on the dropdown arrow in the top-right-hand corner of “Home” and you will see
a link http://demos.webphpservices.com/fpw/.
Please replace this link with www.yourdomain.com…
So delete that link in there and type in your domain that you
registered earlier!
36
Click on “Save Menu”.
37
Final Touches
Now you probably want to change the logo right?
Log back into your HostGator cPanel…
Go to File Manager…
Open the “wp-content” folder by double clicking on it.
Open on the “themes” folder by double clicking on it.
Open the “fpw” folder by double clicking on it.
Open the “images” folder by double clicking on it.
38
Now if you have made a logo or have had a logo made, rename the
logo file to “logo.jpg” (without the quotation marks/inverted
commas).
Click on “Upload” (as shown below) and upload your logo.
It will ask you if you want to overwrite the existing file, and you
must say “Yes”.
Now if you go back to your website and refresh the page, you will
see your new logo
Congratulations, you have now successfully set up your website
to start banking like a true king!
You can now start adding some funny pictures!
39


© Copyright 2026