
Aligning Scan Data to Nominal Datum Balls Goal
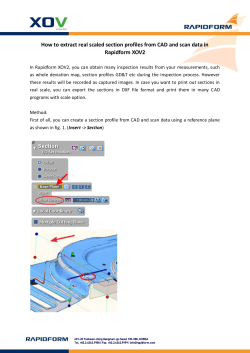
Aligning Scan Data to Nominal Datum Balls
Goal
To align scan data to nominal datum balls using Auto Alignment, and RPS Alignment.
When aligning scan data to nominal data, situations where datum balls are the only nominal data
available can occur. Alignment can be difficult in this situation because nominal data requires scan
pair points on scan data. Since there is so much scan data in relationship to nominal data, it renders
RPS, 3-2-1, and Datum Alignment ineffective due to amount of scan pair points that exist.
Auto alignment can also be affected because Auto alignment creates an alignment based on shape
data and the shape data between the entire scan and nominal datum balls are too different to
internally compare and results will not be as expected.
This tech tip will show you what to do in a situation where an entire scan file is being aligned to
only nominal datum balls.
Last Revised: June, 2012
Related Product Version: XOV2 SP2 and older
601-20 Yeoksam-dong Gangnam-gu Seoul 135-080, KOREA
Tel. +82.2.6262.9900 | Fax. +82.2.6262.9999 | [email protected]
Method
Process1: Importing Nominal and Scan Files
1. Import the NominalDatumBalls.igs nominal Data file by going to File > Import Nominal Data.
The nominal datum balls that will be used for alignment will be displayed in the Model View.
2. Import the ScanData.stl file by going to File > Import Scan Data and name it Scan1. Hide it in
the Model Tree.
3. Import the ScanData.stl file again. Click No in the prompt to align box. Name the scan Scan2.
601-20 Yeoksam-dong Gangnam-gu Seoul 135-080, KOREA
Tel. +82.2.6262.9900 | Fax. +82.2.6262.9999 | [email protected]
Note
The reason the second scan is opened is to serve as a reference file as the datum alignment balls
will be extracted from one of the scan files, rendering it incomplete.
Process2: Editing Scan Files
1. Click the Scan button in Tool Palette to enter the Scan Mode.
2
Use the Flood Fill command to select the poly-face of datum balls. Once all balls are selected,
right click and select Inverse – Poly-Faces.
Note
Make sure Scan1 is hidden. If it is not, it can accidentally be selected.
3. Press the Delete key to delete the selection. Click the Confirm button to exit Scan Mode.
601-20 Yeoksam-dong Gangnam-gu Seoul 135-080, KOREA
Tel. +82.2.6262.9900 | Fax. +82.2.6262.9999 | [email protected]
Process3: Auto Alignment
1. Right-Click Scan2 in the Inspection Tree and select Active Scan Data in the pop-up menu. This
sets Scan2 as the active scan data in the inspection.
Note
Scan2 is set as the active scan data in this situation because if it was not, both scans would be used
for further commands.
2. Run the auto alignment command by going to Insert > Align > Auto.
601-20 Yeoksam-dong Gangnam-gu Seoul 135-080, KOREA
Tel. +82.2.6262.9900 | Fax. +82.2.6262.9999 | [email protected]
3. Make sure the Apply To Active Scan Data option is active. Click the OK button. Scan2 will now
be aligned with the nominal datum balls.
4. Select the newly created Auto Alignment1 in the Inspection Feature Tree.
5. Click the Matrix button in the Properties. Export the matrix as “Auto_Align.trm”.
Note
Matrix files will be used later in the tech tip for alignment purposes.
601-20 Yeoksam-dong Gangnam-gu Seoul 135-080, KOREA
Tel. +82.2.6262.9900 | Fax. +82.2.6262.9999 | [email protected]
Process4: RPS Alignment
1. Perform a RPS alignment by going to Insert > Align > RPS.
2. Select faces on each of the six datum balls on the nominal data to define them as RPS Pairs. Six
datums need to be created to match them with the extracted datum balls in the scan data. Click
the OK button.
Note
After RPS alignment is performed, the deviation between the center points of nominal geometry
and scan pair geometry will be shown.
3. Using the same process as Step 5 in the Alignment section, select RPS Alignment1 in the
Inspection Feature Tree and click the Matrix button in the Properties.
4. Export the matrix as “RPS.trm”.
601-20 Yeoksam-dong Gangnam-gu Seoul 135-080, KOREA
Tel. +82.2.6262.9900 | Fax. +82.2.6262.9999 | [email protected]
Process5: Apply Transform Matrix to Scan Data
1. Perform a transform alignment by going to Insert > Align > Transform.
2. Select By Matrix as the Method, and select Set for Apply Matrix File.
3. Open the Auto_Align.trm file using the matrix file open button. Do not click the OK button.
4. Select Multiply for Apply Matrix File.
5. Open the RPS.trm file using the matrix file open button. Click the OK button.
601-20 Yeoksam-dong Gangnam-gu Seoul 135-080, KOREA
Tel. +82.2.6262.9900 | Fax. +82.2.6262.9999 | [email protected]
6. Show Scan1 in the Model View. The scan and nominal data will now be aligned.
601-20 Yeoksam-dong Gangnam-gu Seoul 135-080, KOREA
Tel. +82.2.6262.9900 | Fax. +82.2.6262.9999 | [email protected]


© Copyright 2026