
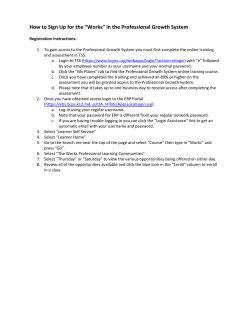
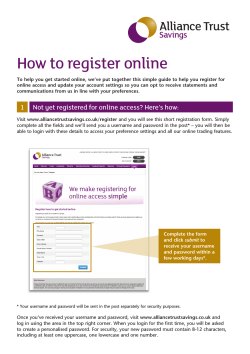
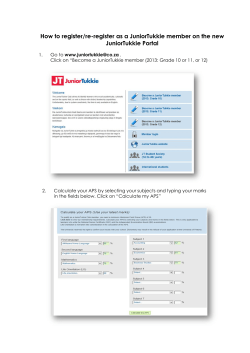
How to Utilize the HPS Website Table of Contents
How to Utilize the HPS Website
Table of Contents
Table of Contents..................................................................... 1
1. Completing the Registration Process........................................ 2
2. Adding Accounts to Your Profile .............................................. 4
Editing Accounts ............................................................... 6
Removing Accounts ........................................................... 7
Multiple Accounts .............................................................. 7
3. Logging in to the HPS System ................................................ 8
Did You Forget Your Password? ........................................... 8
4. Editing Your Profile ............................................................... 10
Change Email Address ....................................................... 10
Reset Password ................................................................ 11
5. Viewing Historical Bid Information........................................... 12
6. Updating Future Bid Information ............................................. 14
1
1. Completing the Registration Process
Once on the main HPS website, the first rule of business is to register an account.
To do this, simply click the ‘Register’ button on the far right hand side of your screen. You
will be taken to our secure site where you need to enter your email address, company
name, company contact name, pick a secret question and answer, and create a password
(see Figure 1.1 below).
Figure 1.1 Account Registration Page
After all information is entered, click the ‘Submit’ button to continue to the
verification page. On the verification page, simply double-check all information for
accuracy. If anything requires updating/changing, click ‘No’ and make your changes before
continuing. If your information is correct, click ‘Yes’ to complete registration (see Figure
1.2).
2
Figure 1.2 Account Registration Verification
Upon clicking ‘Yes,’ to verify your information is correct, your new online account
registration is completed and you will be prompted to tie one or more electric account
numbers to your online profile.
3
2. Adding Accounts to Your Profile
After creating an online profile, you then have the ability to add one or more account
numbers to this profile. This is done on the ‘Adding An Account’ page. Access to this page
can happen in various ways. The first way you will see this page is an auto-redirect
immediately after registering a new online profile. You will also encounter this page if you
attempt to access a section of the website in which an account number is required and you
have not yet provided one. However, the more common way of accessing this page is by
clicking the ‘Profile Information’ link in the top right corner of any screen, after successfully
logging in (see section 3 ‘Logging in to the HPS System’), then click ‘Add Account.’
To use this section, simply enter the information needed. Enter your account
number in the format shown, the zip code corresponding to that account number and a
brief description to help distinguish this account from any other potential accounts (see
Figure 2.1 and Figure 2.2).
Figure 2.1 Adding An Account (First Account)
Figure 2.2 Adding An Account (Additional Accounts)
4
When adding additional accounts, the option to make the new account your primary
account is available (refer to Figure 2.2). If this option is selected, it takes the place of any
other primary account, as you may only have one primary account at a time, and moves
the old primary account to the ‘Other Accounts’ section.
Once you enter all account information correctly, simply click ‘Add Account’ to
process the information. If any of the information is incorrect, you will be returned to this
page and required to fix the information and try again. If the information is correct, you will
see a processing page and be taken to a page that lists all of your associated accounts (see
Figure 2.3 and Figure 2.4).
Figure 2.3 View Your Account(s) (One Account)
Figure 2.4 View Your Account(s) (Multiple Accounts)
5
When viewing your associated accounts, you have multiple options. You can click
‘Add an Account’ to add another account, click the ‘Edit’ or ‘Remove’ link to edit or remove
associated accounts or click ‘Done’ to exit this section.
Editing Accounts
The only information on your associated accounts you are able to edit is the
description. If you wish to edit this information, click the ‘Profile Information’ link in the
right hand corner on your screen, then click ‘View/Edit Accounts.’ Once inside (refer to
Figure 2.3 and Figure 2.4), click the ‘Edit’ link next to the account you wish to edit. Make
your changes to the description and click ‘Process Changes’ (see Figure 2.5 and Figure 2.6).
Figure 2.5 Editing Accounts (One Account)
Figure 2.6 Editing Accounts (Multiple Accounts)
6
Removing Accounts
If at any time you wish to remove an associated account from your profile, simply
click ‘Profile Information’ in the right corner of your screen, then click ‘View/Edit Accounts.’
Click the ‘Remove’ link next to the account you wish to remove. You will be prompted to
verify your decision for safety reasons. If you are still positive you wish to remove your
associated account, click ‘OK’ and your account will be removed.
NOTE: This DOES NOT remove your online account profile. It only removes
an account number associated with your online profile. Also, if you remove your
only account number, please keep in mind an account number is required to
access most sections of this website.
Multiple Accounts
For those of you whom add more than one associated account to your profile, a drop
down box will become available to easily switch between accounts. When logged in to the
website, you can switch the account you are currently viewing by simply using this drop
down box. For example, when viewing historical bid information (see Section 5 ‘Viewing
Historical Bid Information’) for one account, you wish to view the information for another
account associated with your profile. Simply click the drop down box, select the account
you wish to view and the page will refresh, during this online session, with that account as
the new active account.
7
3. Logging in to the HPS System
In order to log in to the HPS system, you must first have an online account
registered. If you have not completed the registration process, please refer to Section 1,
‘Completing the Registration Process,’ above before continuing. If you have already
completed this section, read on.
On the main HPS website, click the ‘Login’ button on the right hand side of the
screen. There is a small lock symbol next to this button to signify the security of the login
process for your protection. Next, you will be taken to the login screen on our secure site.
To log in, simply enter your email address and password, choose if you would like the
website to remember your login information, then click ‘Login’ (see Figure 3.1).
Figure 3.1 Login Screen
Did You Forget Your Password?
That’s not a problem. On the login screen, simply click the ‘Forgot password?’ link.
On the next page, enter your email address and click ‘Continue’ (see Figure 3.2).
8
Figure 3.2 Forgot Password
Next, you will be asked your secret question, which you chose during registration.
Simply answer your secret question and your password will be emailed to you. You will
have three attempts to answer your secret question correctly. If you fail to do so, your
password will be reset and emailed to you. In either case, it is recommended you change
your password the next time logging in (see Section 4 ‘Editing Your Profile’) to ensure your
password is still secure.
9
4. Editing Your Profile
If, at any time, you need to update information contained within your online profile,
you can simply log in and click the ‘Profile Information’ link in the right hand corner. On
the following menu, click the ‘Edit Profile’ link. Here, you will be able to update your
information. Make any changes necessary and click ‘Process Updates’ when completed (see
Figure 4.1).
Figure 4.1 Edit Profile
Change Email Address
Changing your email address is another feature of the ‘Edit Profile’ section. To
change your email address, simply click the ‘Change Email for Login’ button. Next, you
need to enter your new email address as well as re-type your new email address for
verification purposes. Once complete, click the ‘Change’ button (see Figure 4.2).
NOTE: Be sure to remember you are also changing your login email as well. Once
this step is complete, the original email address you provided will no longer be
used by the HPS website.
10
Figure 4.2 Change Email Address
Reset Password
If, at any time, you need to change your login password, simply click the ‘Reset
Password’ link on the ‘Edit Profile Information’ page. Next, you need to enter your old
password, create a new password and re-type your new password for verification (see
Figure 4.3).
Figure 4.3 Reset Password
When finished, click the ‘Change’ button. If your new passwords do not match, you
will be prompted to correct them. Otherwise, your new password will be in effect.
11
5. Viewing Historical HPS Information
Historical HPS information is available from the day before today and beyond. To
view this information, log in to the HPS website (see Section 3 ‘Logging in to the HPS
System’). If you do not have any account numbers associated with your online profile, you
will need to do so before this section becomes available (see Section 2 ‘Adding Accounts to
Your Profile’). If you do indeed have at least one account associated with your online
profile, you will be taken to the main HPS information page (see Figure 5.1).
Figure 5.1 HPS Information Page
To view your historical HPS information, click the ‘View’ link. The next page displays
the account number currently viewed, the date information was gathered, a table of hourby-hour information (if any) and a place to change the date currently viewed (see Figure
5.2).
12
Figure 5.2 View HPS Information
To view other dates, click the calendar image and select a new date, then click the
‘Change View’ button. The page will be refreshed with the new data (if any) for the date
selected.
13
6. Updating Future Bid Information
Finally, the primary objective of this website. To update future bid information, log in
to the HPS website (see Section 3 ‘Logging in to the HPS System’). If you do not have any
account numbers associated with your online profile, you will need to do so before this
section becomes available (see Section 2 ‘Adding Accounts to Your Profile’). If you do
indeed have at least one account associated with your online profile, you will be taken to
the main HPS information page (refer to Figure 5.1).
Click on the ‘Update’ link. If information is available for updating, it will be shown in
a table as hour-by-hour data, with empty boxes for updating purposes. Simply enter the
numbers you wish to use into the appropriate boxes and click the ‘Update’ button. Figures
will then be updated. You do not need to update all values at once. You may do as little as
one at a time. Keep in mind you only have between the hours of 8-10AM to complete all
updates for the next day(s) ahead. If you are able to update more than one day ahead
(e.g. weekends and holidays), links will be available at the top of this page for the
respective days. To change information on a different day, simply click the link for that day
and repeat the process mentioned above (see Figure 6.1 and Figure 6.2).
14
Figure 6.1 Update HPS Information (One Day)
15
Figure 6.2 Update HPS Information (Multiple Days)
NOTE: Daylight savings days will have the ‘Hour Ending’ column adjusted
due to special cases with the time.
16


© Copyright 2026