
How to Use Video to Promote Your Art Website by Nicolette Tallmadge
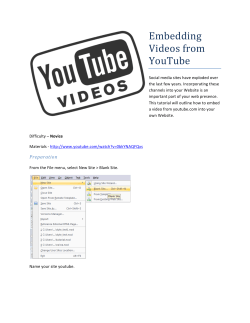
How to Use Video to Promote Your Art
Website
by Nicolette Tallmadge
Copyright Notice
Copyright © 2009 by Nicolette Tallmadge
All rights reserved worldwide
No part of this publication may be reproduced or transmitted in any for
by any means, mechanical or electronic, including photocopying and
recording, or by any information storage and retrieval system, without
permission in writing from the publisher. Requests for permission or
further information should be addressed to The Crafted Webmaster, P.O.
Box 1056, Chesapeake, Virginia 23320, USA
Published by:
The Crafted Webmaster
P.O. Box 1056
Chesapeake, Virginia 23320
Email: [email protected]
Produced in the United States of America.
Legal Notice
This manual is designed to provide accurate and authoritative
information in regard to the subject matter covered. Every effort has been
made to ensure that the content is free from errors and problems.
However, some links and information in this manual may change.
All product names are the property of their respective owners. None of
the owners has authorized, sponsored, endorsed, or approved this
manual. The publisher accepts no liability for any losses or damages
caused, or alleged to be caused, directly or indirectly, from using the
information offered in this manual.
www.craftedweb.com
2
Why Video Is Important
Did you know that 52% of all web traffic video-related? Or that over 70%
of people surfing the web watch online video? Or that an average
YouTube visitor spends 27 minutes watching video? So what does that
mean for you as the average artist or crafter working away in your studio?
It means that if you don't have video on your craft website, you are
missing out on a huge opportunity.
Here are some reasons why video is a great idea for your website:
1. Video makes your website “sticky” - when you have video on
your website, visitors tend to stay longer in order to watch the
video.
2. Video is seen as high quality content- while everyone can write
a short article or tutorial, a video on the exact same topic will be
seen as more valuable and useful
3. Video can help in your search engine rankings- one of the
things that search engines look at when ranking your website is
how long people hang around. Since video can make your website
“stickier”, this will also help with your search engine rankings.
4. One video is worth a thousand words- while you can write an
article that tells the story behind what you do, a single 2 minute
video can do more to connect you with potential customers than
that1,000 word article. Plus, people are more likely to watch that
video than they are to read that article.
What are some of the things that you might want to make a video of?
Here are some ideas to get started:
•
A video tour of your art studio- If you don't hold open studios,
this is a fantastic way for your customers to see where you make
your art.
•
A video of you working in your studio- People love to watch craft
being made.
www.craftedweb.com
3
•
A video artist's statement- Written artist statements are common.
A video artist statement where you talk about your creative
philosophy will make you stand out. Even though you may have a
written copy of your artist statement already, people are more
likely to watch a short 1 to 3 minute video than they are to read
your artist statement.
•
A historical roots video- If your craft has historical roots, create a
video where you explore the history of your craft.
•
How to care for your artwork- If your artwork or craft item
requires some maintenance or special cleaning, create a video with
tips on how to care for and clean your artwork.
•
Frequently Asked Questions- if you have an unusual craft or art
technique, chances are that you have alot of questions from your
customers that you answer over and over again. Create a video that
answers some of your customer's most frequently asked questions.
•
A day-in-the life video- customers find the artist's life
fascinating, so try shooting some scenes from a typical day in the
studio.
•
A "how to" or "advice" videos- A lot of craft and art items are
used as personal accessories or in interior design. If you paint for
example, create a video showing the best way to hang or light your
paintings. If you make hair accessories, demonstrate the latest
fashions using your accessories.
•
Lectures and presentations- If you're lucky enough to land a artrelated speaking engagement or were invited to lecture at an craft
related conference...ask for permission to videotape your session
and to post brief clips on your website. This shows you as an
authority in the art world...plus it has the added bonus of
encouraging more speaking engagements.
•
Media appearances- If you've landed some time on the small
screen, see if you can get a copy of your television appearance and
permission to show clips on your website. For tips on how to
prepare for a television appearance, check out this past post: 9
Ways to Prepare Your Site for a Television Appearance at:
www.craftedweb.com
4
http://www.craftedweb.com/web-marketing/9-ways-to-prepareyour-site-for-a-television-appearance
•
Participate in Etsy's "Handmade Story" video project- Right now
in conjunction with the "Handmade Pledge" project, the online craft
marketplace site Etsy is creating a documentary project in which
they encourage artists to explain how making and selling their
artwork affects their lives. You can find out how to participate at:
http://www.etsy.com/storque/section/craftivism/article/videoproject-tell-us-your-handmade-story/324/
•
Your art in motion- Does your art move? Then still pictures won't
do your work justice. Have video showing your art in motion. Artist
Ann P. Smith does this perfectly with her video animations of her
handmade robots on her website. Check it out at:
http://burrowburrow.com/robots.html
Bonus Tip:- Remember that you can extract the audio from your video
and make an mp3 audio download, a podcast, or even an audio CD.
Especially useful if the video itself is not the best quality.
www.craftedweb.com
5
Video Equipment
Shooting video can be as easy or as complicated or as cheap or expensive
as you want to make it. To get started with video, here’s a list of basic
equipment you’ll need:
Video Camera
Don’t think that you’ll need to spend thousands of dollars on the latest
and greatest digital video camera in the store. I’ve seen perfectly good
video shot using a digital camera, a web cam, or even a cell phone!
The type of camera you’ll need depends on the type of video that you’re
planning on shooting. For shooting quick, on-the-fly videos like
customer testimonials, quick video tours, you’ll want something that’s
lightweight, portable, and easy to operate. Something like a FlipVideo
camera runs less than $150, will take up to 60 minutes worth of video,
and would be perfect for this type of video work.
If you’re planning on doing longer, higher quality videos, such as how to
videos, presentations, or a video brochure, you’ll want to get a higher
quality video camera. I’m not going to get into specific brands and
models, but here are some features that you’ll want to keep an eye out
for:
•
The ability to zoom in and out, and the ability to focus both
manually and automatically
•
A external microphone jack that allows you to connect a separate
microphone to the camera (more on this later)
•
The ability to control contrast, exposure, and white balance
•
The ability to connect your camera to your computer through USB,
Firewire, or an iLink (specifically on Sony cameras) connection
Don’t overlook the last point about being able to easily connect your
camera to your computer. That appears to be a main point of frustration
for most people when they are first experimenting with video.
www.craftedweb.com
6
Microphone
Most cameras come with a built-in microphone and while they can be
adequate for quick, on the fly videos, but if you’re planning on doing
higher quality videos, you’ll want to use an external microphone.
The problem with using the in-camera microphone is that you get an
echoey sound in your video that can become quite distracting especially if
your recording a presentation or workshop, or speech. Using a lavaliere
microphone that attaches to your collar will greatly improve your sound
quality. This is why it’s important to make sure any new camera you buy
also has an external microphone jack, or simply put, a hole in which you
can plug in an additional microphone.
Some of the higher quality wireless microphones (Seinhesser is a good
brand) can run you several hundred dollars. But you can start off with a
wireless microphone that runs on a transmitter from Radio Shack, which
costs about $50 or so. While the sound quality is not the same as a $200
Seinhesser, it is much, much better than using the microphone on the
camera.
Lighting
One common problem with amateur video is that there’s usually not
enough light. Low light in digital video can cause the picture to look dark
and pixilated. When you’re shooting, you’ll want to make sure that
there’s as much available light as possible. Shooting beside a window is
one option, but that can limit you to just shooting on sunny days.
You can also bring in more light by using some inexpensive work lights,
clip lighting, or construction lights from hardware stores like Home
Depot. Even bringing in a couple of household floor lamps can help you
lighting up your space considerably. Just be careful to arrange your
lighting so that you don’t create overly bright areas or “hot spots” in your
video.
If you know that you’ll be shooting a lot of video in the future, you may
want to invest in a Lowell professional lighting kit. Your basic two light
kit can run you about $700 brand new, but you can find used lights for a
www.craftedweb.com
7
fraction of the cost on eBay. A lighting kit should also come with stands
for the lights plus reflecting umbrellas to refract the light.
Tripod with a fluid head
If you’ll be shooting a lot of videos by yourself or videos in which you’ll
be stationary, you’ll need to invest in a tripod. When shopping around for
a tripod, you’ll need to get one with a “fluid head”, that is the head of the
tripod allows you to pan and tilt the camera into different angles without
any sticking or sharp jerks while you’re shooting.
Headphones
You should also get a pair of headphones where so you can monitor the
sound coming into the camera. When you’re shooting you want to make
sure that the sound coming into the camera is not too loud or too soft or
that it’s coming into the camera at all!
Computer
You’ll need to have a computer edit your videos and of course to upload
to your website, blog, or video sharing website like YouTube. Editing
video can eat up a lot of hard drive space and a lot computer memory.
Plus, the faster your computer’s processor is, the easier and faster it will
be to edit your video. Most modern computers built within the last three
to four years by big name computer manufacturers like Dell, HewlettPackard, Sony, and Apple are capable of basic video editing, especially if
you’re dealing with short 1 to 5 minute clips.
Now while I usually don’t weigh in on the whole PC/Mac debate about
which is better, when it comes to video I can say that it’s a bit easier to
deal with editing video on a Mac than it is on PC. Does this mean that I’ll
buy new computer just to put a few videos online? No, it just means that
I’ll expect to have a few more minor snags working on a PC.
The only time I would consider getting a new computer is if I’m planning
on working on a lot of video on a regular basis or if I’m planning a largescale project like a video DVD. What you would pay for a new computer
www.craftedweb.com
8
you’ll more than make up for in time lost by using a slow, ill equipped
computer.
External hard drives
As I mentioned before, video eats up a great amount of hard drive space.
While a computer with a 60 or 80-gigabyte hard drive can easily store a
bunch of 1 to 5 minute video clips, you’ll still take up a lot of your hard
drive space, which can slow your computer down. Plus, you’ll lose all of
those clips if your hard drive crashes.
To store your video projects and clips, plan on getting at least one
external hard drive. If you know that you may be shooting a lot of video,
or if you’re thinking about doing a large scale video project like a 30 to
60 minute DVD, you’ll need to get a couple of high capacity (500 or more
Gigabytes of storage) external hard drives. Some good brands include
LaCie and Western Digital.
Now don’t think that you have to run out and get all of this equipment at
once. You can still get started with the most basic camera and your
existing computer and add your equipment as you start doing more or as
your skills increase.
www.craftedweb.com
9
Video Production Software
Once you have your basic video equipment in place like a camera, a
tripod, possibly a microphone, and some lighting, the next thing you’ll
need to help you produce great video is the right software. The most
important type of software you’ll need is video editing software.
Video Editors
Video editing software will allow you to be able to cut out parts of your
video, rearrange parts of your video, add video clips from one video
shoot to another, and add “transitions” like fade to black, page turns, and
page wipes between scenes. Some of the more powerful video editors will
also allow you to do more advanced techniques like color correction,
special effects, title screens, and moving end credits.
Another thing that video editors can do is they can save or “export” your
video into different video formats. One thing that’s important to
remember when it comes to dealing with video is that you want to make
sure that your final video is in the correct format for your project. There
are several different formats that video needs to be save as in order to be
viewed online. Some of these formats include; QuickTime (.mov),
Windows Media (.wmv), Flash (.swf or .flv), and MPEG (.mpg). I’ll talk a
little bit more about what these formats are and which one to pick in later
articles, but when you’re looking for a video editor, you’ll want to make
sure that it can save video in at least one or two of these formats.
The type of video editor that you should get depends on your budget,
what kind of computer you’re using, how much experience you have with
video editing, on what you’re planning on doing with your video, and how
much video you’re going to be doing in the future. Here is a list of some
popular video editors that you’ll want to check out:
For PC
•
Windows Movie Maker- free video basic level video editing
software for Windows XP- (free)
www.craftedweb.com
10
•
Sony Vegas Studio- beginner to intermediate level video editing
software for XP and Vista
•
Sony Vegas Pro- professional level video editing for XP and Vista
•
Adobe Premiere- professional level video editing software for XP
and Vista
For Mac
•
iMovie- basic level video editing software. Comes installed with all
new Macs or bundled in the iLife 09 suite
•
Final Cut Express- intermediate level video editing software
•
Adobe Premiere- professional level video editing
•
Final Cut Studio- professional level video editing
For a full list of these resources, visit:
http://www.craftedweb.com/resources/software/
Video Converters
Video converters are small pieces of software that allows you to convert
your video from one format to another. For example you can take an
MPEG video (.mpg) and convert it to a QuickTime video (.mov) with a few
simple clicks. Video converters are useful because they allow you to
change your videos from one format to another without having to go
through your video editor. Since you often have to have your video in
several different formats when you’re dealing with online video, having a
video converter can help you save a lot of time and effort. Here are a
couple video converters that you can check out:
•
MPEG Streamclip- converts video into a wide range of formats(for PC and Mac)- free
•
FLV Producer- converts .avi videos to .flv videos. This is useful for
creating Flash videos to put on your website (PC only)
•
Handbrake- useful for taking video from DVDs to an editable
format- (for PC and Mac)
www.craftedweb.com
11
For a full list of these resources, visit:
http://www.craftedweb.com/resources/software/
Sound Editors
Most people concentrate on what their video will look like, but the sound
in your video is also equally important. You may find on occasion that
you’ll need a way to edit the sound in your video, record sound for a
voiceover, or include some kind of music in your video. While most video
editing software have basic audio editing tools included, there may be
some cases in which you need a dedicated audio editor. Here are a few
editors you can take a look at:
•
Audacity- audio editing and recording software - (for PC and Mac)
- free
•
SoundForge Audio Studio- audio editing and recording software($55)
•
GarageBand- sound and music creation software. Comes installed
with all new Macs or bundled in the iLife 09 suite - (free - $80)
•
ACID Music Studio- sound and music creation software- ($55)
•
SonicFire Pro- scoring software and music library. Gives you the
ability to add music to video and audio. Comes with royalty-free
music clips- ($99 and up)
For a full list of these resources, visit:
http://www.craftedweb.com/resources/software/
Just like with your video equipment, don’t think that you have to get all of
this software all at once. You’ll definitely need some kind of video editor
to start with and you can add other software as you go.
If you’re new to video editing, give yourself a learning curve to figure out
how this stuff works. Don’t think that you have to get the most advanced
software available to get the job done. Start off with the beginner level
software like iMovie or Sony Vegas and upgrade to the more advanced
software as your needs and skills grow. Some of the software comes with
some pretty good tutorials, so be sure to go through them to familiarize
www.craftedweb.com
12
yourself with the tools. Don’t try to get too fancy too fast. Practice with
some basic editing like trimming and adding video clips, adding basic
transitions, and titles.
You also might what to get some reference materials as well to help ease
your learning curve. Here are a few that can help you out:
•
Digital Video for Dummies by Keith Underdahl
•
Final Cut Pro for Dummies by Helmut Kobler
•
Final Cut Express 4: Visual QuickStart Guide by Lisa Brenneis
•
50 Fast Final Cut Express Techniques by Tim Meehan
•
Final Cut Express Editing Workshop by Tom Wolsky
•
Teach Yourself Adobe Premiere Pro in 24 Hours
•
Adobe Premiere for Dummies by Keith Underdahl-
For a full list of these resources, visit:
http://www.craftedweb.com/resources/recommended-books/
www.craftedweb.com
13
Shooting Your First Video
In the previous newsletters, I discussed how important video has become
on the web and I’ve also discussed some basic equipment and software
you’ll need to get started. In this article, I’m going to share some video
production tips that will help make shooting your video as smooth and
error-free as possible.
While good editing can make even mediocre video look good, it’s always
a good idea to get the best possible video footage to begin with. You can
help ensure that your first shoot will go well with a bit of pre-planning.
Begin with the end in mind
Before you start shooting you should have a good idea of what you want
your final video to look like. While in my experience the video almost
never looks exactly like how I envision it in my head, just having a vision
makes it easier to plan. Before you shoot your video ask yourself:
•
What is my video about?
•
What’s the purpose for my video? Marketing? Instructional? Public
Relations?
•
Where will I shoot my video?
•
Will I shoot indoors or outdoors?
•
If I shoot outdoors can I avoid outdoor noise?
•
If I shoot indoors will I have enough light?
•
Will I need help shooting my video? If so, who?
•
Will other people be appearing in my video?
•
How long will my final video be?
•
How am I going to show my video? On my website? On YouTube?
On a DVD?
www.craftedweb.com
14
You’ll find that asking yourself these questions will help you think of
details you need to think through before you start videotaping. So before
you start, flesh out what your want your final video to look like
beforehand.
Script or no script?
A lot of video first-timers ask me if they should write a script or
“storyboard” their video. While it might be useful to write a general
outline if you’re going to do a video say 20 minutes or longer,
storyboarding may be a bit of overkill, especially for a fairly short video of
10 minutes or less.
As far as writing a script I’ve found that most people have trouble
sounding natural when they are following a script because they are
spending their time trying to remember what to say rather than
concentrating on being themselves.
What usually works better is that you write a list of questions that
touches on the things that you want mentioned on your video. Then ask
someone off camera to ask you these questions while you’re shooting
your video. Since you already know the answers, you’ll sound a lot more
natural. Then during editing you’ll be able to string your answers
together in a natural way that sounds like you’re well rehearsed and
professional.
What to not to wear
There are a couple things you need to remember when it comes to what
to wear in your video. First avoid wearing red, black, and/or white
clothing. Digital video can have problems properly processing those
colors. Also, avoid wearing any kind of close patterns like pinstripes,
checks, hounds tooth, and plaid. These patterns cause a very distracting
“shimmer” on the recording called a “moiré” effect. You’ll also want to
make sure that anything you wear fits you properly and isn’t too loose or
too tight. The ill fit will definitely show in your video.
Your pre-shoot checklist
www.craftedweb.com
15
Right before you start shooting, here are some things that you’ll want to
check before you begin:
•
Turn off any machine or appliance that makes any kind of
background noise such as fans, air conditioning, and computers
•
Turn off all cell phones, beepers, and landline telephones
•
Make sure other little “noisemakers” like pets and children are away
from your taping area
•
Make sure that you have plenty of digital video tape or space on
your camera’s memory or hard drive
•
Be sure that any batteries you’re going to need for the shoot
(camera batteries, microphone batteries, etc) are charged and ready
to go
•
If you’re taping indoors, place a “Quiet, Video Taping in Progress”
or
“Do Not Disturb” sign on the door to keep people from barreling
into your video shoot.
•
Tape one to two minutes of “ambient sound” in your taping room.
That is, let your video camera record in the empty room for a
several minutes. This gives you some background sound to edit
into your video if needed.
•
Check the sound coming through your camera using headphones
to make sure that it’s coming through properly. If your camera has
a sound levels indicator, check to make sure that your sound isn’t
coming in too loud or too soft. The levels should peak toward the
middle of the indicator. If it peaks too high, the sound in your
video could get distorted.
During your video shoot
After you’ve run through your checklist, it’s time to start taping! While
you’re taping, here are a few things that you’ll want to be aware of:
Watch your framing- “Framing” refers to how you “frame” the subject in
www.craftedweb.com
16
your video. Framing can vary from extreme wide angles where your entire
body is framed in the shot to extreme close angles, where only a small
part of your body is apparent in the shot. Boring videos are those that
don’t have variety between the shots. Mix up your framing between close,
wide, and medium shots.
Also when you’re framing a person in your video, make sure that you
don’t cut their bodies off at the wrists, elbows, knees, or at any type of
joint. Try to frame them so that the end of the frame cuts across an area
above or below a joint.
Keep track of your takes- When you’re shooting your video, it’s a good
idea to have a notepad around so you can keep track of your “takes”. It’s
rare to do a shoot and not have several “do-overs” or “takes. Keeping
track of which “takes” are good and which takes you’re not going to
bother to including in the final video will help you in the editing process
because you won’t have to waste time transferring or editing bad takes.
During my shoots, I simply keep track of my takes by naming them Take
1, Take 2, Take 3 and labeling them either “Good” or “Bad” on my
notepad. If I have to change locations or “scenes”, I keep track of that by
labeling my takes, Scene 1 - Take 1, Scene 2 - Take 1, and so on.
It’s also useful to visually indicate your takes directly on your video
recording. Professionals do this by using a “slate” a piece of equipment
that has the scene and take number on the front. The person responsible
for keeping track of takes holds the slate in front of the camera for a few
seconds at the beginning of every take so that the camera records the
scene and take number. That way the video editor has a visual indicator
of the scene and take number during the editing process. Combined with
the take notes, the editor is quickly able to figure out which takes to
capture and edit and which to ignore.
You can do this yourself by using a small notepad or a small dry erase
board, writing the scene or take number on it, and holding it in front of
the camera a few seconds before each take. On really quick shoots, I
simply indicate the take and scene number by counting them off on my
fingers at the beginning of the taping.
Pause at the beginning and end of each take- Resist the urge to start
talking the moment that little red “record” light appears on your camera.
www.craftedweb.com
17
By starting as soon as the camera goes on, you give yourself very little
room to edit the beginning of your video. Instead, when you begin
shooting your take, give yourself a couple of seconds of record time
before you start talking so that you have that editing wiggle room at the
beginning of your take.
The same goes for the end of your take. Give yourself a couple seconds
of pause at the end of each take instead of immediately running off
camera so that you have that same editing wiggle room at the end of
every take as well.
Do some insurance shots- Even if you do a good take the first time, it’s
a good idea to do what’s called an “insurance shot” in which you do the
same take over again to make sure that you have at least two good takes
of the same scene. You can also do some insurance shots using different
angles or different framing so that you have several different options to
choose from during editing. In a lot of cases your “insurance shots” can
come out better than the original. So get in the habit of doing a scene a
couple of times to make sure you get some good footage.
Be yourself- A lot of people, especially shy or introverted people, think
they have to put on this very dramatic or outgoing personality when they
are being videotaped. Unfortunately, the fact that you’re putting on an
“act” shows on tape because you don’t look or sound natural. The
important thing to remember is that you just need to relax and be
yourself. If you’re going to pretend, pretend that the camera is your best
friend or your favorite customer and that you’re talking directly to them.
After a while, you’ll even forget that the camera is there. Just be yourself,
and your video will come out great.
www.craftedweb.com
18
Editing Your Video
Once you've shot your first video, it’s time to put a little editing magic to
it. In most cases, you’ll be adding a few things here or cutting a few
things there. If you’ve done your first shoot right, it won’t usually require
a great deal of editing. Here are some tips to help making the editing
process a little easier.
Keep your files organized
One huge mistake that a lot of beginning video editors make is that they
do not keep the files for their video projects organized. Professional
video editors are fanatical about keeping their video project files
organized because they know that one missing file can hold up an entire
video production. So before you start editing your video, create a new
folder for your video project and put everything that has to do with your
project, such as videos, sound clips, pictures, scripts, and graphics into
that folder.
While you're editing, don’t let parts of your project end up outside of your
project folder. Make sure that you save everything within your project
folder and keep it that way. You’ll waste more time tracking down parts
of your project than you will editing if you don’t keep things organized
from start to finish.
Go easy on the unnecessary transitions and special effects
Video editing software has a lot of nifty transitions and special effects
that can make your video whiz around, explode, burst into fireworks and
all different types of things. Fight the urge to put all of those special
effects into your final video. It’s okay to experiment with your software
and see what you can do with it, but ultimately, you want your viewers to
see the video for its content, not for the special effects. Stick with simple
transitions and special effects, like fades, title screens, and lower thirds.
Make marketing use of title screens, lower thirds, and watermarks
There are three special effect elements that you should know how to
create and you should use them to market yourself in your video. Those
www.craftedweb.com
19
effects are: lower thirds, title screens, and watermarks.
Lower thirds are those bars that you see across the lower third of the
screen. These bars usually has some type of information written inside
them, such as the name of the person talking in the video or written
narration, or facts or statistics. You usually see them on the news,
documentaries, and talk shows. Most editing software gives you the
ability to create lower thirds in your video.
Title screens are those frames that are either still shots, photographs, or
plain colored backgrounds that has some type of a titling or writing. Title
screens are usually used to introduce the beginning of the video or to
end a video, or they can be used to transition from one segment of a
video to another.
Watermarks are small transparent words or graphics that are usually
located in the lower right or left hand corner of the screen. Unlike title
screens and lower thirds, watermarks don’t fade in and out. Rather they’ll
remain where they are throughout the length of the video. You most
often see watermarks on TV in the form of the television station logo in
the corner of the screen.
While in most cases, these special effects are used to convey information,
you can also use them to market your video as well. If you’re going to
post your video on YouTube or a similar video sharing site, put your
website address in the form of a watermark on your video so that people
will see the address to your website while they are watching your video.
Use title screens and lower thirds to convey call to actions. For example,
if you’re showing a special piece of artwork or an intricate technique, you
can use a lower third to tell everyone to go to a certain page on your
website to learn more or to buy. You can also use a title screen at the end
of your video to tell people to call you, email you, or visit your website or
your blog as well.
Don’t forget the music
You can add a lot of personality and excitement to your video with the
addition of a little music. You can use music to open or end a video. You
can also use music throughout various parts of a video to emphasize a
www.craftedweb.com
20
point or to create a mood.
When you’re choosing music, you’ll want to stay away from using music
from your personal CD collection. All of that music is licensed under
ASCAP (American Society of Composers, Authors, and Publishers) or BMI
(Broadcast Music Inc) and you will be required to purchase a license to
use this music in your video. These licenses can run you in the hundreds
or even thousands of dollars. Also using unlicensed music in your video
is frowned upon on most video sharing sites and is a good way to get
your video banned off of the site.
Instead, you’ll want to find some royalty free music to include in your
video. Royalty free music is less expensive than regular licensed and the
licensing terms are less restrictive. A couple of places where you can buy
royalty free music include:
•
Music Bakery
•
Partners In Rhyme
•
Premium Beat
For a full list of these resources, visit:
http://www.craftedweb.com/resources/software/
Another alternative to using royalty-free music is a piece of software
called SonicFire Pro. SonicFire is a music scoring software that allows you
to easily place music clips in your video. The cool thing about SonicFire is
that the software allows you to place music clips at any point on your
video, specify how long you want the music to play and automatically
calculates a beginning and an end. It also loops music automatically so
that it will play seamlessly no matter the length of the clip. It can save a
lot of time and frustration in editing music for your video and all of the
clips that you buy with the program are royalty free. The software is
available for both PC and Mac and you can check out out here:
•
SonicFire Pro
For a full list of these resources, visit:
http://www.craftedweb.com/resources/software/
www.craftedweb.com
21
Edit with your final destination in mind
If you know that you will be posting your video on a video sharing site
like YouTube or DailyMotion, be sure to keep any limitations these sites
have on video submissions in mind. For example, YouTube only allows
videos that are 10 minutes in length or less and videos that are less than
100 megabytes in size. That means if you want to put you video on
YouTube, that you need to edit it so that it is less than a 100 megabytes
in size and less than 10 minutes in length .
What you don’t want is to divide your video into two or more parts unless
it's a running series of videos. Because while people may be willing to
look at part one of your video, they may not be interested in checking out
parts 2 and 3 as well unless it's very compelling. So you want to make
sure that your entire video fits into a single clip.
Even if you are planning on posting your video to your website or your
blog, you still may not want to have a video that’s much longer than 10
minutes. Remember that people has a limited attention span and unless
your video is really interesting or exciting a 20 to 30 minute web video
may prove to be way too long. It’s better to tighten up on your editing
rather than to have an overly long video.
Use the right video format for the job
Video files tend to be pretty big files. It’s not unusual for a 3 minute
video to be 40 to 50 megabytes in size. The trick with web video is that
you want the video to be small enough file size-wise so that it doesn’t
take an hour for the video to load on your website, but high enough in
quality so that people can easily watch the video.
There are several different ways to “compress” or make video files
smaller. One way is the reduce the physical size of the video. So instead
of a video that has a viewing size of 720 x 480 you can reduce it down to
about 400 x 300, which will cut down on the final file size of your video.
Another way is to reduce the quality of the picture and/or the sound of
your video. That means that your picture or the sound quality of your
video won’t be as crisp or clear as your original video. You may want to
experiment with your video editor in adjusting the quality of your videos.
In most cases, you'll be able to find a quality setting that's gives you a
decent file size while still giving you decent video quality.
www.craftedweb.com
22
Finally, another way to reduce the file size of your video is to choose the
right video format. There are some video formats that allow you to create
videos with smaller file sizes that is suitable for online viewing. These
include, .mov (Quicktime), .wmv (Windows Media), and .flv or .swf (Flash)
Some video sharing sites will take file formats that are of a slightly higher
quality than some of the web friendly formats. These formats include.avi
and.mpg. These formats are more suitable for publishing on a CD
because the a higher quality. If you know that you’ll be posting your
videos on a video sharing site, you may wish to save your video in a
slightly higher quality format as each service will end up reformatting
your videos into their own format.
Now for putting video on your website, the format that’s most compatible
across all computers and web browsers is Flash video. Other formats like
Quicktime and Windows Media require your visitors to have the Windows
Media or Quicktime software installed on their computers. Most PCs will
come with Windows Media installed (but not Quicktime) and most Macs
come with Quicktime installed (but not Windows Media). So you’re
beginning to see the problem with using either one. Flash video is one of
the few formats that’s compatible in both PC and Mac.
While most video editing software don't save video in a Flash format, you
can use a video converter like FLV Producer to convert your video into
Flash. While it does require an extra step after you edit, you’ll be sure
that most people will be able to view your video.
Save your edits
Because videos and video project files takes up so much hard drive space,
you might be tempted to erase them once you’ve finished editing. Don’t
do it! There may be an occasion where you want to go back to your
project and reformat it for a different purpose, or perhaps you want add
to your edits. If you throw away all of your original edits, you’ll have to
start over again from scratch. Instead, save your video projects on an
external hard drive to keep it from eating up space on your computer.
Study other videos
You can get some of the best ideas for editing your video is by simply
watching other people’s videos, movies, television shows, documentaries,
www.craftedweb.com
23
and even commercials. Observe how shows and movies transitions from
one scene to another or how they use editing to follow narration or a line
of dialogue. If you’re watching the news, talk shows, or documentaries,
watch how they use lower thirds, watermarks, and title screens to
encourage viewers to stick around for the next segment or to advertise
an upcoming show. Even infomercials are useful for observing how to edit
product demonstrations, how-tos, and how to effectively get people to
call you or visit your website.
www.craftedweb.com
24
Posting Your Video Online
Now that you’ve shot and edited your first video, you need to put it out
there on the Internet for the whole world to see. There’s several different
ways you can distribute your videos online:
1. Video sharing sites
2. Your own website or blog
Posting on Video Sharing Sites
The easiest way to get your videos online is by posting them on a video
sharing site like YouTube. YouTube and websites like it are called “video
sharing sites” because they give you the ability to post and share your
videos with the public and other members of website. Posting your video
on these sites is quite easy and is a great place to start getting your video
online. First thing you need to do is sign up for an account at one or two
of these places. Signing up is easy and free in most cases. This is a short
list of some of the most popular sites video sharing sites:
•
YouTube- http://www.youtube.com
•
Blip.tv- http://www.blip.tv
•
Viddler- http://www.viddler.com
•
Google Video- http://video.google.com
•
Daily Motion- http://www.dailymotion.com
•
Vimeo- http://www.vimeo.com
•
Yahoo Video- http://video.yahoo.com
And don’t forget that you can and should post videos to your Myspace or
Facebook accounts as well.
What service you use to post videos on is entirely up to you. YouTube is
of course the most well-known site, but other sites like blip.tv, Viddler,
www.craftedweb.com
25
and Daily Motion are also quite popular as well and may have features
that you find more useful than those you find on YouTube. There’s also
nothing stopping you from opening up accounts at a number of these
places. One, you’ll be able to take advantage of the different features of
each service. Two, having your videos on more than one site means more
places where people can see your video. Remember that not everyone
uses just YouTube! There are some audiences that love YouTube and
others that swear by Viddler. Why not introduce your video to both
audiences?
After you set up your account, be sure to read over the instructions for
uploading your video carefully. Most sharing sites have size, time, length,
and format requirements for all videos uploaded to their site. YouTube
for example only allows videos that are 10 minutes or less in length, 1
Gigabyte or less in size, and videos in .mov, .avi. .mpg. or .wmv formats.
Other sites may have requirements that may be a bit different, so be sure
to check on each service that you’re signed up with before you start
uploading.
In addition to uploading videos, some of these services like blip.tv and
YouTube will allow you to “cross-post” your video to other social
networking sites like Twitter, Facebook, StumbleUpon, and Myspace. If
the service you choose allows you to do that, be sure to take advantage.
This can help bring more viewers for your video.
Also, most of these video sharing sites also allow you to create your own
profile page where people can view all of your videos and learn more
about you. Be sure to fill out your profile and include a link to your
website.
Posting Video on Your Website or Blog
While it’s fairly easy to post video on a video sharing site, you certainly
don’t want to confine yourself to just YouTube. In some cases, you’ll be
posting the same videos that are on Viddler or blip.tv to your website and
blog as well. In other cases, you’ll make videos that are exclusive to your
blog or website. Or you’ll be making videos exclusively for customers or
members of your newsletter and not put them on YouTube at all. If you’re
going to post your videos to your website or blog there are several ways
to do so.
www.craftedweb.com
26
First the easiest way to post your videos to your website or blog is to
upload your video to a video sharing site and add the “embed” code to
your web page or blog post. Just about every video sharing site gives you
the option to post your video on your blog or website. All you need to do
is to find the “embed” option in your video account and copy the code
provided there. Then paste that code in the appropriate place on your
website or your blog.
The next way to post your video to your website or blog is a bit trickier. If
you want to put video on your website, the best format to do so is to
convert it to a Flash video (.flv or .swf). As mentioned earlier in the series,
Flash video is fairly universal across PCs and Macs. Most video editing
software don’t convert videos to Flash video. Most output the video to
another format such as Quicktime (.mov) or Windows Media (.wmv). So
you will need a separate piece of software to convert your videos to Flash
video.
Posting video online isn’t just a matter of just linking to the video like
you would another web page or an image. Videos also require a “player”
which is basically just some additional programming that gives you the
little buttons that allow you to stop, pause, and play your video. So this
means that in addition to the actual video files, you may also have a
bunch of other files associated with it that you’ll also need put on your
website to make your video run properly. It’s for this reason that I always
recommend that you create a separate folder for each of your videos and
to make sure that all of the required files for that video is contained in
that folder. Be sure to follow the instructions that come with your video
converter and save everything into a designated folder from the very
beginning.
The software I use to convert videos to .flv is called “FLV Producer”. This
software will convert your video to the .flv format and create the
additional files needed to have your video on run properly on your
website. It is however PC only (sorry Mac folks!).
•
FLV Producer
www.craftedweb.com
27
If you run your own Wordpress blog (the blog you install, not the free
Wordpress.com service you sign up for), there are a number of different
plug-ins that you can use to post video on your Wordpress blog. The
most popular plug-in is called “Podpress” and is available as a free
download. The neat thing about Podpress is that it accepts different types
of video formats including .mov, .flv, .avi. and .wmv. It also creates it’s
own video player, which means that you don’t have to worry about
converting your video to .flv or producing a player file.
•
Podpress
Optimizing Your Video for Search
At the beginning of this series, I mentioned that one of the advantages of
video is that it can help out with your search engine rankings. One way
video does this is that they make your site “stickier”. That is if a person
“sticks” around to watch a 3 minute video on your website that increases
the amount of time that they tend to hang around on your website. The
more time people spend on your site, the more favorable your search
engine positioning tends to be.
Another way video can help with search engine rankings is the fact that
you can optimize the videos themselves so that they show up on search
engines. Now search engines can’t search within a video (at least not
yet!), but they can search through these things:
•
Titles: when you post your video on a site like YouTube, you’ll have
the opportunity to give your video a title. Optimizing the titles for
your video is probably the most important thing you can do to
optimize your videos for search engines. Make sure that your video
has a title that has relevant keywords and it accurately describes
what’s in your video. If you’re posting your video on your website
make sure your page title tags contains the name of your video. If
you’re posting your video on your blog, be sure that you include
the name of your video in your blog post title.
•
Tags: most video sharing sites allow you to associate your video
with specific words or phrases or “tags”. Essentially, these are just
keywords for your video that makes it easier for people to
categorize and find videos. Be sure that you apply tags to all of the
videos you post on video sharing sites. Plus if you post your video
www.craftedweb.com
28
on your blog and your blog service or software allows you to use
tags, be sure to put the right tags on that blog post.
•
File names: search engines can also read the file names of your
video. So it’s a good idea to include keywords in the file name of
your video if possible. For example, if you did a video about on
how you make your wheel-thrown pottery you should name your
video “wheel-thrown-pottery.mov” instead of “myvideo.mov”.
* If you want to learn more about search engine optimization and how to
find the correct keywords in your video, you should check out my CD on
search engine optimization here: http://www.craftedweb.com/SEOsecrets
So there you have it! Once you get the first video down, it will be much
easier to start doing more and more videos.
www.craftedweb.com
29


© Copyright 2026