
Tutorial : how to make a new Tships entry by Topcross
Tutorial : how to make a new Tships entry by Topcross
I had someone asking me questions about this and instead of just PMing him with the answer, I
decided to make this little tutorial to help all starting shipmakers.
Note that the methods I explain here are the way I do it, it is possible that there are other ways I
don’t know off, most of my knowledge is either gathered from the other tutorials out there or by
reverse engineering the Tships file.
Another note, I use the first version of the X3 Editor, because, well no reason except that I’m used to
using that version and it works fine for me so far and don’t feel like updating to the new version as
long as the old one works.
Please keep in mind that English is my 3rd language so please excuse me for any spelling or grammar
mistakes I’ve made. (And feel free to point them out to me.)
1
1 Getting started
Ok, so you are done with making your ship model and exporting both the body and scene file. Now
comes editing the Tships file. It’s in fact not that hard at all, but for the people that still have issues:
here it comes.
For people who don’t read introductions, it is VERY important to use the X3 editor. Editing the Tships
file in a text editor is next to impossible and just asking to do something wrong.
Ok, first things first, adding a new entry to the Tships file. (The first thing would actually be to extract
the Tships file but I’m going under the assumption that you know how to extract your game files, if
not, there is a great tutorial for this in the stickies that covers all the basics of modding.)
To do this, simply right click in the left column and pick ‘add’. It might however also be a good idea to
copy an entry of an existing ship to use its statistics as a template. The editor will ask you if you want
to add the new entry to the end of the list or insert it. I strongly recommend adding it at the end of
the list as I had issues in the past when inserting it that satellites end up being Arrows or Starbursts,
as far as I know this is due to the fact that satellites don’t actually have their own scene.
Ok we got our new entry, time to move on to the first tab, the info tab.
2
2 The ‘INFO’ tab
Before continuing, if you are saying to yourself: I don’t have an ‘Info’ tab!, check at the top of the
right section if it is set to ‘Ship Info’ and not ‘Raw data’.
The info tab contains, as you might have guessed, general information about the ship you are
creating. I’ll just briefly explain everything in it.
ID: the ID, is, well the ships ID in the Tships file. The vanilla standard is : SS_SH_race_shipclass. I stick
to this as much as possible but as you can’t have the same ID twice, I always add the name of the
ship I’m adding after the ship’s class.
Class: explains itself.
Type: explains itself.
Race: explains itself.
Cargo type, Cargo min, Cargo max: explains itself.
Docking slots: the size of the hanger of a ship.
Variation index: no idea myself, as far as I know this is always 0 so leave it at that.
Description: add the ID of the name of the ship here. The name is stored in a T file. Important to
remember when making your text file is that the entry right behind the entry of the name is used for
the description of the ship, so always first enter the name in an entry on its own followed by the
ships description.
Volume: again, no idea myself. I always keep this at 1.
3
Production RelVal (NPC) and Price modifier (1 and 2): Determines the price of the ship ingame.
For the price of a ship, F.A.B. pointed this formula out to me, so I’d like to thank him for that:
-with RelVal = 0; pricemod. 1 = 0; pricemod. 2 = 0), we get the base price of a ship, which is:
TL
TS
TP
TM
M1
M2
M3
M4
M5
M6
M7
M8
GO (Ranger)
161,740
11,116
8,000
155,816
171,568
171,568
5,192
5,192
5,192
155,816
161,740
5,192
155,816
-and with 1 point RelVal = 64.9238892 credits, we come to the following formula:
Price = ( 64.9238892 * RelVal) + Base price
-now, if we get the RelVal at the left side, we get :
RelVal = (Price – Base price)/64.9238892
Which brings us to the following formula’s:
For TL/M7 :
RelVal = (Price –161740)/64.9238892
For TS :
RelVal = (Price –11116)/64.9238892
For TP :
RelVal = (Price –8000)/64.9238892
For TM/M6/GO :
RelVal = (Price –155816)/64.9238892
For M1/M2 :
RelVal = (Price –171568)/64.9238892
For M3/M4/M5/M8 :
RelVal = (Price –5192)/64.9238892
all with pricemod. 1 and 2 = 0
Ware class: not sure why this is here for a ship but keeping it at Tiny Containers always seems to
work just fine.
4
Min. Notoriety: the minimum notoriety required to buy this ship, expressed in numbers, to know
how these match with the actual ingame ranks :
10
333 333 (to 1 000 000)
9
100 000
8
33 333
7
10 000
6
3 333
5
1 000
4
333
3
100
2
33
1
10
0
-10
-1
-100
-2
-1 000
-3
-10 000
-4
-100 000
-5
-1 000 000
(Source: FAQ section of the forum)
Video ID and Skin Index: again no idea what this is but keeping both at 0 works.
I’m sorry for the things I don’t know myself, nobody is perfect and I’m far from a modding-god.
Normally, if you stick to everything I said above, it should work fine.
5
3 The ‘PERFORMANCE’ tab
The ‘performance’ tab contains everything considering, well performance. In other words, speed,
acceleration, …
Yaw/Pitch/Roll: determines the maneuverability of a ship. I sometimes find it rather hard to fill in a
number here myself so I usually use existing ships as reference and fill in similar stats to a ship I know
has about the same maneuverability as I want my ship to have.
Speed: fill in the min speed here, the max speed is then determined by the number of engine
tunings.
Acceleration: determines how fast your ship accelerates.
Angular acceleration: as far as I know from science lessons, this determines the change in velocity
when turning, not really sure how that translates itself ingame.
Max number of engine tunings: this determines the max speed of the ship, the editor automatically
calculates the max speed based on this number and the min speed. Obviously this is also the number
of engine tunings that can be installed on a ship.
Max number of rudder tunings: determines the number of rudder tunings available (makes a ship
turn faster).
Reactor output (power): in more common used words: the shield generator.
Hull strength: explains itself.
Average reaction delay: the time it takes on average before a shield starts recharging after being hit
(for the last time). In normal cases, keep this at 1.
6
Max recharge time: leave this untouched the editor calculates this itself, determined by the shield
generators and the shields.
Again, not too hard, for some stats it is difficult to know how that translates ingame, I find it best to
use a ship I know has about the same stats I want for my ship as a reference.
7
4 The ‘MODEL tab
The model tab just consists the path to the scene file and some visual aspects of the ship.
Ship scene: the path to the ships scene is defined here, the game automatically searches the objects
folder, so normally it should start with ships\... . Egosoft made quite a mess of their ‘structure’ inside
the ships folder, due to the fact that they just added to what they had over time instead of keeping it
organized. I suggest you just create a folder with your name in there and place all what you add in it,
keeping it easy for you to find everything you make, and easy for other people to know that these are
ships you’ve created.
Cockpit scene: just pick one fitting to your ship, in other words the shipclass and race.
Engine effect (color) – Body explosions effect: ok for all these entries, I don’t know what all the
different numbers stand for myself, just use reference ships here, it is too much work to check every
time which number stands for which color/effect/sound.
Particle emitter- Body file: leave these at 0, not sure what they are used for.
Still quite easy.
8
5 The ‘WEAPONS’ tab
You probably guessed it, everything concerning weaponry is in here.
Shield type: explains itself.
Max shield count: explains itself.
Weapon energy: the size of the laser batteries.
Weapons recharge rate: the rate with which the laser batteries recharge.
Number of missiles (NPC): not sure what this does, I usually use reference of a ship of the same class.
Gun count – Possible lasers: don’t touch these, the editor will fill these in himself.
Easy, again.
9
6 The ‘COCKPITS’ tab
This is where the paths of the cameradummies inside the scene are defined. This is the part where
some people might start to get in trouble, in fact it is not that hard at all, your just have to know how
to edit this.
Ok, first thing you’ll have to do here is open your scene file in a text editor, you’ll need it to check the
Path indexes.
On a side note, when creating your scene in 3ds max, it’s a good idea to keep everything ordered, in
my experience, DBOX2 exports everything in the order it was added to the scene. So for example,
first add the body of the ship, then all camera’s then all turrets and last any other stuff you might
have to add like engine emitters and docking bays. This makes it easier to fill in path indexes, as the
camera’s and turrets will all have indexes that follow on each other, instead of one big scrambled
mix.
Ok, to make things easier to understand I’ve included an extract of the scene of the ship in the
example.
10
P 1; B ships\props\cameradummy; C 1; N Bships\props\cameradummy_1; b // idx 1
{ 0x2002; 0; 45988; 643000; 0.000000; 0.000000; 0.000000; 0.000000; -1; 1; } // 0
P 2; B ships\props\cameradummy; C 2; N Bships\props\cameradummy_2; b // idx 2
{ 0x2002; 0; -114368; 1077149; 0.000000; 0.000000; 0.000000; 0.000000; -1; 1; } // 0
P 3; B ships\props\cameradummy; C 3; N Bships\props\cameradummy_3; b // idx 3
{ 0x2002; -312418; -114368; 206797; 0.250000; 0.000000; -1.000000; 0.000000; -1; 1; } // 0
P 4; B ships\props\cameradummy; C 4; N Bships\props\cameradummy_4; b // idx 4
{ 0x2002; 0; -70638; -1152113; 0.500000; 0.000000; 1.000000; 0.000000; -1; 1; } // 0
P 5; B ships\props\cameradummy; C 5; N Bships\props\cameradummy_5; b // idx 5
{ 0x2002; 312418; -114368; 206797; 0.250000; 0.000000; 1.000000; 0.000000; -1; 1; } // 0
P 6; B ships\props\cameradummy; C 6; N Bships\props\cameradummy_6; b // idx 6
{ 0x2002; 0; 45988; -732450; 0.250000; -1.000000; 0.000000; 0.000000; -1; 1; } // 0
P 7; B ships\props\cameradummy; C 7; N Bships\props\cameradummy_7; b // idx 7
{ 0x2002; 0; -257530; 803937; 0.250000; 1.000000; 0.000000; 0.000000; -1; 1; } // 0
11
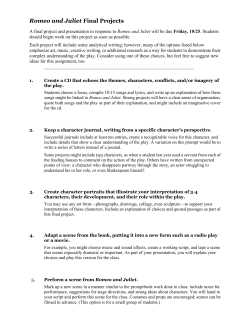
Ok, let’s start by adding a cockpit, this obviously
can be done by clicking on ‘Add Turret’. You’ll
have to add one for every camera in your scene,
this means you’ll have to add a maximum of 7 of
these (bridge + 6 turrets), however smaller ships
obviously won’t have all 7.
When clicking on the added entry, this screen will
pop up. The first two cells can’t be edited
manually, so just leave them.
The path index can be found in the scene file, I
have marked all the Path Indexes (PI from now on) like this in the extract of the scene above.
Next is the body ID, 99% of the cases this will be the cameradummy (the larger vanilla ships use
others but just use the cameradummy for everything), so fill in ships\props\cameradummy.
Next is the turret type, this determines which lasers are compatible with the turrets linked to this
cockpit, to check which cockpit has which lasers, open the Tcockpits file in the editor and check it in
there.
On a side note, the ‘default cockpit’ is used for missile turrets, so if you want to make missile turrets,
use this cockpit.
Lastly, the position, fill in the right position for the turret here, this isn’t just random, the position has
to be the same as the position it was in your scene. There is no way to know this except
remembering which number you used for every position, it is a good idea to either use your own
system and stick to that or stick to the vanilla structure. (If you did happen to forget, open up your
scene file in 3ds max, not the .bod file, but the actual .max file and check it.)
The vanilla structure is this one : bridge : 1, front : 2, right : 3, rear : 4, left : 5, top : 6, down : 7. These
are NOT the PIs, these are the numbers you added behind the path in your scene, however if you
made your scene like I suggested, these should correspond to that. (If you first add the body to your
scene, then the camera’s in the right order, but go under the assumption they don’t correspond and
CHECK them!)
This might seem a bit complicated at first, but it’s quite easy as well once you get the hang of it. The
biggest danger here would be to fill in the wrong PIs or make a typo. If you’d happen to fill in a wrong
PI, this is quite easy to notice ingame, your camera will simply be in the middle of your ship. To avoid
typos, simple type the path once, and then copy and paste it. Make sure however that the path you
copied is actually correct.
12
7 The ‘GUNS’ tab
This is probably by far the most difficult tab, for anyone, it is in fact again not hard, it just requires
getting to understand how it works. This is however the biggest work when adding a ships entry (for
big ships that is, ships without turrets don’t need any work here ), it is also the most annoying one
to do, an option to copy entries here and paste them would have been very useful as most of the
times all that is required is editing the PIs, so be prepared for a few minutes of boredom and also, …
concentration. Making sure it is all correct the first time can save you a bug hunt afterwards. (no not
the Kha’ak or any annoying little fly that keeps bugging you while modding, of which I’ve had my fair
share lately. Damn those little nasty things are fast. )
When first opening this tab, there should be a entry in the upper section for every cockpit you’ve
added earlier in the cockpits tab.
What we have to do here is add a gun entry for every weapon on the ship, on every turret.
Before I’ll explain this in more detail, it might be useful to explain how turrets work.
You should be familiar with the turretdummies, but maybe you don’t know what happens with these
dummies when ingame. Basically, every turret gets replaced by the real thing ingame. A turret
usually consists of a few parts. Some don’t rotate at all, other rotate, both of these things don’t really
matter to us when editing the Tships file however. The important thing however is the weapon part
of the turret. This is the part from which the lasers are fired, and this is also the parts we have to
define in our file so that the game knows from where the lasers should be fired. The exact
information for this is defined in the components file and isn’t really any concern to us either. What
does matter is that we know that these weapon parts exist and that we have to add an entry for
every weapon part of every turret. I myself prefer to have all weapon parts in one single part, this
saves a bit of work when editing the Tships file and the only difference it is that if all weapons are in
one part, when one laser is installed all barrels are visible, something that is in my opinion even
logical as barreled aren’t removed from a gun when the weapon itself isn’t installed. If each laser
goes in a different weapon part, the barrel will only be visible when a laser is mounted in it.
Most vanilla dummies however use more than one weapon part, so you’ll have to add an entry for
each of them.
To make this a bit more clear as I’m sure a lot of people won’t be able to follow my insanely difficult
explanation (I don’t mean you are too stupid or anything to understand it, I mean I probably did a
terrible job at explaining this) above, I’ll give an example of the same ship again.
13
Ok so to start, select a position in the top section, then add gun entries, as many as you have guns in
that section, the maximum would obviously be 12 as it is hardcoded that only 12 lasers can be added
per turret array.
Then we’ll have to fill in every entry, one by one. I strongly recommend using the tab-key, the arrowkeys and a lot of ctrl+v. (Both to make things go a bit faster, and again, to avoid typos.)
Ok when editing a entry a box will pop up. The first cell can’t be edited, so leave it for what it is. The
second cell, the ‘count’, is the number of lasers in this entry. If there only one weapon part in your
turret, this is the same as the number of lasers on your turret. If there are more than one, well then
this number is obviously how many lasers are in that part, knowledge of these turrets will be
required (I will give an example of multiple weapon parts later on).
Next, the box ‘primary’, defines the turretdummy, the easiest way to fill this in is by copying it from
the scene file, I’ve marked this in the extract of my scene below like this. The PI is basically the same
as earlier, it can also be found in your scene file, in my extract it is marked like this.
Also, to know which turrets go with which camera, they should have the same number at the end,
something you should have done yourself when making the scene.
14
P 13; B ships\mace\props\boron_m1turretB_dummy; C 3; N Bships\mace\props\boron_m1turretB_dummy_3; b // idx 13
{ 0x2002; -220941; -110910; 0; 0.500000; -0.707107; 0.000000; 0.707107; -1; 1; } // 0
The final box, the ‘secondary’, defines the actual weapon part. It can’t be found in your scene file, it
is basically also the path to where this file can be found in your game files. It can however be found in
the scene of the turret if you want. The PI here is quite easy if there is only one weapon part in your
turret, 1 should always work in this case.
Repeat this process for every weapon part, on every turret, for all turret arrays.
Ok, I’ll give a little example as well of a turret that uses multiple weapon parts.
As you can see here both entries are for the same turret, as the PI is the same twice. However, there
are two weapon parts on this turret, the rightweapon, and the leftweapon. So each part needs a
different entry and as its own secondary PI, these can be found in the scene file of the turret.
/
Mon Sep 12 19:44:09 2005
/
Node Bships\props\bigturret_rightweapon Class [Editable Mesh, GEOMOBJECT_CLASS_ID]
P 3; B ships\props\bigturret_rightweapon; N Bships\props\bigturret_rightweapon; b
{ 0x2002; 0; 6603; 0; 0.000000; 0.000000; 0.000000; 0.000000; 3333; 1; } // 1
{ 0x2002; 0; 6603; 0; 0.000000; 0.000000; 0.000000; 0.000000; -1; -1; } // -1
/
Mon Sep 12 19:44:09 2005
/
Node Bships\props\bigturret_leftweapon Class [Editable Mesh, GEOMOBJECT_CLASS_ID]
P 4; B ships\props\bigturret_leftweapon; N Bships\props\bigturret_leftweapon; b
{ 0x2002; 0; 6603; 0; 0.000000; 0.000000; 0.000000; 0.000000; 3333; 1; } // 1
{ 0x2002; 0; 6603; 0; 0.000000; 0.000000; 0.000000; 0.000000; -1; -1; } // -1
(The reason this scene file here looks a bit different is because it is not one created with DBOX2, but
one created by Egosoft.)
Now, if you use the ‘invisible_weapon’, for example for cockpit lasers or for missile tubes, you only
have to fill in the primary box, leave the secondary open. (It should automatically fill in -1 as
secondary ID.)
This covers this section, this is by far the most difficult one, both to understand and to explain, I hope
I made everything a bit easier for you.
15
8 The ‘FRONT LASERS’ tab
Very easy here, just add all the lasers to the left side that you want the cockpit guns to be able to use.
16
9 The ‘MISSILES’ tab
Basically the same as the front lasers tab but only this determines the missiles that can be used on
the ship.
17
10 The ‘WARES’ tab
This tab determines which wares are installed on the ship, these ware are always on the ship and
don’t have to be equipped anymore. What the Warelist ID stands for can be found in the Wareslist
file. Again, it is easier to just use another ship as reference, as it is also visible in the Tships file what
wares will be available when the ID is filled in.
18
11 Conclusion
I hope this helps you in all your ship-making-endeavors. If there is anything you don’t understand,
please feel free to ask. Please keep in mind that I myself know far from everything and that it was
also sometimes rather difficult to explain everything properly.
Maybe a few ending tips, I already said them all but I cannot stress them enough, they will raise your
chances of success a lot.
1. Use COPY/PASTE as much as possible, it the best way to avoid typos. Trust me, it can be
extremely frustrating to waste one hour of your modding time, looking for what you
could have done wrong to find out at the end that it was a typo you didn’t notice while
rechecking the paths like five times.
2. Use REFERENCE. The first reason would be, well you can’t do much wrong if you do it the
exact same way as the vanilla ships are made, if you are trying do some something that
isn’t really done on vanilla ships, check out someone else’s mod and use it as a reference.
I said use it as a reference, don’t steal/copy ideas, which is WRONG, not to mention
illegal! The second reason would be, if you don’t use reference you’ll have to have a
lot of types files open, just to check things all the time, which not only makes your
workspace cluttered, like this it will also take longer for you to finish your work.
3. The TAB-, ENTER- and ARROW-keys are your friends, it is a lot faster to move around
then grabbing your mouse, click, go back to your keyboard, type and repeat.
4. When making your scene, keep it ORGANISED, this makes things a lot easier and can save
you a headache.
5. Maybe new one to end with. Keep BACK-UPS, both of the vanilla files, and all the stages
in your work, well not all of them but one now and then. Like this you don’t have to start
all over when you did something so wrong that it is hard to fix.
19


© Copyright 2026