
2 Q Desire
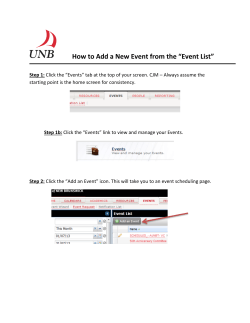
2
Desire Learn
Overview
Quickguide: Accessing Wimba
Wimba Classroom is a multifaceted real-time communication tool in which you can talk with your class via a headset,
present slideshows, text chat, and more.
How to Access
Follow the instructions below.
In this Guide
Adding Wimba to Your Navbar
Creating a Wimba Room
Accessing Your Wimba Classroom
For More Information
For more information, go to http://teachingcommons.depaul.edu/technology/D2L/index.html.
Adding Wimba to Your
Navbar
In order for students to access your Wimba
Classroom, you must create a link to it. The
best place to link to Wimba Classroom is in
your Navbar. You must create a custom
Navbar in order to change the links in your
Navbar. See the Navbars Quickguide for
more information.
1. On the “Navbars” page, click the name
of your custom navbar.
Figure 1
2. Click the Links tab (Figure 1).
3. Click the down arrow in the “Bottom
Left Link Area” box (Figure 2).
4. Select Add New Custom Link….
5. In the “Name” field, type “Wimba”.
6. Next to the URL field, click the
a Quicklink icon (Figure 3).
Figure 2
Insert
7. In the “Category” drop-down menu,
select External Learning Tools.
8. In the “Link Details” drop-down menu,
select Wimba Classroom (Figure 4).
9. Click Insert.
Figure 3
Desire2Learn Quickguide: Classlist Tool (Page 2 of 3)
10. In the “Window” drop-down menu,
select New Window.
11. For best results, enter a height of 700 px
and a width of 500 px and deselect
Menubar and Toolbar (Figure 5).
12. Click Save and Close.
Note: Make sure you have set your custom
navbar as active. The Wimba link will be
visible when you refresh your Web browser or
navigate to another page in the course.
Creating a Wimba Room
Figure 4
Wimba allows you to create multiple “rooms”
in which you and students can meet online.
You may want a separate room for each
Wimba session, separate rooms for groups, or
just one room for your entire course.
Note: Wimba rooms cannot be copied from
one course to another. You will have to
manually create new Wimba rooms every time
the course is offered.
1. Click the Wimba link you created in your
Navbar. A pop-up window should appear.
Figure 5
2. Click the blue plus sign labeled New
(Figure 6).
3. Enter a title for your room.
4. Use the tabs to customize the Wimba
room options.
5. Click Create (Figure 7).
Access Your Wimba
Classroom
Figure 6
The process for accessing the Wimba
Classroom is the same for instructors and
students.
Note: Click the icon under “Room
Details” to see the dial-in phone number and
PIN code (Figure 8).
1. Select the name of the room you created
and click Launch (Figure 9). Depending
on your Web browser’s pop-up settings,
one or two new windows will appear.
Figure 7
Figure 8
Desire2Learn Quickguide: Classlist Tool (Page 3 of 3)
• If your Web browser has a pop-up
blocker enabled, you will see a white
window and a pop-up message from
your browser. Click the words this link
(Figure 10) to open the Wimba window,
or adjust your browser’s pop-up settings
to show the blocked pop-up window.
• If your browser does not have a pop-up
blocker or it is disabled, two windows
will open, and you will see the Wimba
logo on the second window.
2. If you have not used Wimba on your
computer, click Run Wizard and follow
the on-screen directions to make sure
your computer and browser are
configured to use Wimba. Otherwise,
click the words click here to bypass the
set-up wizard and directly enter the
Wimba Classroom (Figure 11).
Figure 9
Figure 10
Figure 11
This work is licensed under the Creative Commons Attribution 3.0 United States License. To view a copy of this license, visit
http://creativecommons.org/licenses/by/3.0/us/ or send a letter to Creative Commons, 171 Second Street, Suite 300, San Francisco, California, 94105, USA.
Screen captures are presumed to be fair use for copyright purposes and are not covered by this license.


© Copyright 2026