
How To - Add extra content to your site
How To - Add extra content to your site
Difficulty: Beginner
Once you've got the hang of adding standard content to a Clikpic site - such as photos
and articles - you'll soon want to add some of your own content, often into the areas
around the edge of the page like the top ("header") and the bottom ("footer"). In the
Clikpic system you do this by adding "content sections", which can be as simple as a bit
of text, or they can be more complicated like panels of photos or lists of articles.
Understanding the page layout
HEADER
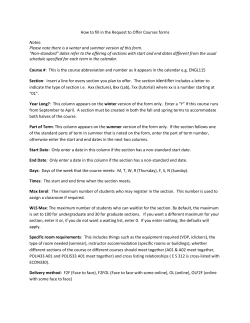
Before adding some content, you'll need
to understand how the page on a Clikpic
site is laid out. The exact configuration
depends on your chosen style, but all
styles have a header, a footer, and a main
column. Some styles also have a
sub column. The extra column (shown
with a dashed border) can be added 1 but
isn’t present by default.
0F
SUB
COLUMN
MAIN COLUMN
EXTRA
COLUMN
The main column is also divided into four
areas – top, bottom, left, and right.
Some styles also have extra positions –
you will see the layout for your style when
you come to add or edit a content section.
FOOTER
To avoid any confusion when reading this
guide, ensure you only add content into
one of the following four positions: Header, Footer, Main column (top) and
Main column (bottom).
Adding new content
Once you’ve decided where you want to place your content, go to the Other content
section in the admin system. Using the form at the bottom of the page, select "general"
as the type. You’ll also need to give your content item a name – this isn’t usually used
for anything other than your own reference. For example, add a content item of “contact
telephone number” to display your telephone number on every page, or “copyright
message” for a copyright message at the foot of every page.
After clicking “Add content item” you’ll be taken to the main content form. Enter some
text into the text content field and select the position you want to the content item to
appear in. Continuing our examples above you could add
Tel: 07123 123456
Or
© 2011 Joe Bloggs Photography Ltd
Then update the record and preview your site to see the content section in place.
1
We cover this topic in another guide - "Customising the page layout"
Page 1 of 5
How to add extra content to your site
Showing the item only on specific sections
Often you want to add content that appears on specific sections only. To do this, you can
specify the sections by selecting “Only show on the sections selected” in Apply to
sections and then choosing the relevant sections in Sections. This is often used to
show content on the home page only.
Also useful is the ability to “Show on all sections except…” which is used 90% of the time
to show on all sections except the home page. Using this makes configuring new sections
easier, meaning you don’t have to assign your content sections every time you create a
new section.
You may also have seen that there is the option to put content items in the
“extra column”. As you have to specially configure sections to show this column, the
content item will only show on sections which have this column. This can also be quite
useful for determining which content to show. For more information, see the separate
guide "Customising the page layout".
Adding images
Using the Other content section you can add images to your site in two different ways:
1. To show images from your galleries, use a content type of either “photo” or
“photo panel”.
The options for the content section will include the “source” of the images – either
a gallery or one of your image sets 2.
1F
2. To show single images or graphics you can use a “general” or “text” content
section type and upload the image directly on the content section edit form. Use
the “image” field in the same way as the photo upload system.
For an example of (1) – see Add a gallery panel to the home page, page 5. For an
example of (2) – see Adding an affiliate logo to your site, page 4.
Linking content items
Often you’ll want to link the content item to another part of your site. To do this you can
use the link to section field.
By selecting this section you can link your content section to that section, BUT you’ll
need at least one of the following three things:
1. Some text in the Link text field, e.g. “more details”.
2. An image for the content section. You can create a graphic to promote offers or
something similar. When the user clicks on the graphic they will link to the related
section.
3. You can also tick “Show title”. This will enclose the text and any image in a border
and show the title of the content section at the top. The title will be linked to the
related section.
You can also use the [link] tag if you are familiar with it – see the user guide for full
details.
2
Image sets are used to group your photos for showing on slideshows and other pages that aren’t part of your
galleries. In a standard Clikpic site the home page shows images from a set called “Home page images”. By
assigning images to this, you control which images appear on the home page. You can also create your own
image sets. Click “photos” in the admin system menu and then click “image sets”.
Page 2 of 5
How to add extra content to your site
To link to a different web site, use the field External URL. Enter the FULL web address
including the http:// part.
Formatting the content items
If you are familiar with how the custom styling works in the Clikpic system, you can
format your content sections by going to the Styling tab on the content sections edit
form. If you have never used the styling system, we strongly recommend reading the
guide “Introduction to styling your site” before using this part of the system.
Editing the standard items
All content on the Clikpic system is constructed using content sections, and as well as
adding your own, it's also possible to edit the standard ones. Sometimes the options for
editing the standard items are limited – for complete control untick “Live” for the
standard content and replace them with your own.
Customising your home page
Most of the standard Clikpic sites have three content items by default on the home page.
You can change this by editing the section specific content items for the home page (see
the previous paragraph).
One common customisation of the home page is displaying a panel of gallery thumbnails
in addition to or instead of the main image.
You can also show short lists of news items. To do this, create a content item of type
“articles”. You will need to link it to a news section to show articles from that section. You
don’t need to actually show that section on the site! See the user guide for full details on
creating multiple articles sections.
Styling galleries
Often users want to know how to style the list of galleries differently from the list of
photos in the individual galleries. The answer to this lies in styling the individual content
items.
In the Other content section of the admin system, select the pre-defined tab and then
open up the section specific branch. In here you will see two content items for every
photo gallery section. One is the gallery menu and one is the gallery photos. They can be
styled individually.
Page 3 of 5
How to add extra content to your site
Some Examples of Using Content Sections
Adding an affiliate logo to your site
Here we will add an affiliation logo below the menu in the popular “Simple” site style.
1. First select the logo to use. We are using one of the SWPP logos available from
http://www.swpp.co.uk/download.htm
2. Create a new “text” content section and call it “[your society] logo”.
3. For the image field, select your chosen logo.
4. Select “Sub column” as the position
5. Enter a large number for the sort order to ensure it appears at the bottom of the
column, e.g. 1000.
6. In the external URL field, enter the web address of your society, e.g.
http://www.swpp.co.uk
7. Submit the record and preview your site.
The logo is now shown at the bottom of the menu.
You can add your chosen logo to any style using a similar method – you could add it
to the header or the footer if you prefer.
Add a Facebook 'Like' or Twitter 'Follow' button
First you will need to generate the necessary code from Facebook or Twitter.
1. Facebook
Go to http://developers.facebook.com/docs/reference/plugins/like to generate the
required code. Fill in the details in the 'configurator', and then click 'Get Code'.
Copy the code from the popup window (select the code, then right click and
'Copy') - you can use either the iframe or XFBML version - XFMBL is more flexible,
but can be slower to load.
2. Twitter
Go to http://twitter.com/about/resources, choose a widget, and then fill in the
required information.
Page 4 of 5
How to add extra content to your site
Now, go back to the Clikpic admin system and create a new content item of type “text”.
Copy and paste your code from the previous stage code into the 'Text content' field. Now
click 'Update record', and preview your site.
You can adjust where and how the button appears in the same way as any other content
section.
Add a gallery panel to the home page
Some users prefer to have a gallery panel on their home page in addition to or instead of
a main photo.
To do this, create a new content item of type “photo panel” and call it “home page
photos”. Now ensure it is set to show on the home page only. Select a position – usually
somewhere in the main column, and then select “image set” from the Images to
display. Select “home page images” from the Image set field, and then select a
Style scheme that’s likely to fit the images onto the page – horizontal carousel or
ticker carousel are good choices.
Save the content section and preview your site.
If you’d like to replace the main photo, you can then go back to the Other content
section and click on the Pre-defined tab. Locate the home page image in the
Section specific branch, edit it, and untick “live”. It isn’t possible to delete the
pre-defined sections but they can be turned off.
Adding news snippets to your home page
Sometimes users want to add little snippets of news to their homepage without having a
complete news section. You could do this by manually editing a big “general” content
section, but this is easier done using a content section of type “articles”.
To do this, you’ll first need to create a normal section for the articles even if you don’t
want to show it on your site. Go to Sections and create a multiple articles section. Give
it a name and if you don’t want it to appear in the menu, untick “show in menu”.
Now go to the Articles section (in the main admin menu) and create a new article by
clicking new in the top menu. Add a Headline and some text into the Introduction
field. Select your Section that you create previously. Leave the Body blank. You can
also add thumbnail photos if you like by uploading an image to the Image field.
Finally you can now go the Other content section to create the content item. Create a
new content section of type “articles” and then on the editing screen, select the section
you previously created in the “link to section” field.
The advantage of using this method over just creating the listing by hand is that you can
control the layout better, easily display thumbnail images and dates with the text, and
you don’t have to worry about editing your home page every time you add a snippet or
blog entry.
Page 5 of 5


© Copyright 2026