
T 9 How to Develop Code as a Non-Admin
Brown_PT01.qxd
7/28/2004
3:35 PM
Page 35
9
How to Develop Code
as a Non-Admin
code in a nonprivileged environment is to
have your main interactive logon be nonprivileged but to keep an
admin logon in your pocket for those times that you need it. Look, it
doesn’t take administrative privileges to edit a text file, and that’s what
you’re doing most of the time when you’re programming, right? And you
don’t want your programs to require admin privileges to run, which is the
point of this whole exercise. So your main logon, where you write, compile,
link, and test your code (and where you surf the Internet, of course) should
be nonprivileged. However, during development you will occasionally
need to create a virtual directory in IIS, add a user account, or add an
assembly to the global assembly cache, and that’s where your secondary
logon comes in handy.
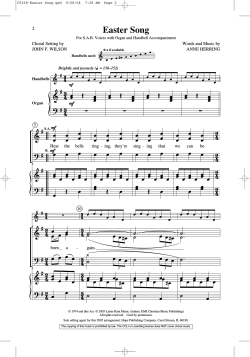
By far the easiest and cleanest way to get a second logon is through Terminal Services. For example, if you develop code on Windows Server 2003,
just run the command mstsc to bring up the remote desktop connection
dialog; then press the Options button, fill out the form as I’ve done in Figure 9.1, and press “Connect.” You’ll get a window running in a second terminal services session, with a new desktop, running as whomever you
specified when you filled out the form. Just minimize this window and
bring it up whenever you need to do something as an administrator! If this
doesn’t work for you at first, then bring up the System control panel applet
T
HE TRICK TO DEVELOPING
35
Brown_PT01.qxd
36
7/28/2004
2:44 PM
Page 36
PART I: THE BIG PICTURE
Figure 9.1 TermServ into your own computer!
as an administrator. On the Remote tab, check the box that says “Allow
users to connect remotely to this computer.”
Unfortunately, as of this writing this trick only works on Windows
Server 2003, not on older platforms like Windows XP, because of licensing
restrictions. With the version of Terminal Services that’s built in to the operating system, you’re allowed only a single connection to the console on
Windows XP. Even on Windows Server 2003, you may not be able to use
this feature because it’s mutually incompatible with the “offline files” feature, which you may already be relying on. If for some reason you can’t use
this mechanism, don’t give up hope. You can use the Secondary Logon
Service instead. Read on.
The Secondary Logon Service
This service, introduced in Windows 2000, allows you to easily run with
multiple logons. If you’re familiar with UNIX, this facility is similar to the
Brown_Ch01.qxd
6/29/2004
9:54 AM
Page 37
ITEM 9 HOW TO DEVELOP CODE AS A NON-ADMIN
su command, at least in spirit. The secondary logon service can be accessed
three ways:
• Programmatically (via CreateProcessWithLogonW)
• From the command line (via the runas command)
• From Explorer (via the “Run As” context menu item)
If you’re not familiar with this service, try the following experiment.
Running as an administrator, log out and log back in as a non-admin
(create a normal user account locally if necessary). Once you’re running as
a normal user, press the Start button in Explorer and navigate into All Programs, Accessories, and select (but don’t click) the Command Prompt
shortcut. Once it’s highlighted, right-click it to bring up the context menu
(if you’re running Windows 2000, you’ll need to hold down the Shift
key while you right-click—for some screwy reason this feature was hidden
in that operating system). When the context menu appears, you should
see a menu item called “Run As.” Click it to bring up the Run As dialog.
Select the radio button that says “The following user:” and notice that the
built-in local administrator account is selected by default. Type the password for the admin account and press OK. You should see a new command
prompt appear—this one running as the administrator. Verify this by running the command whoami1 from this new command prompt or, if that’s
not available, just type set username instead. Now, imagine keeping a little command prompt like this down at the bottom of your desktop, always
open, always waiting to execute your commands in a privileged security
context. Any program you start from this command prompt will run as
administrator. Nifty, eh? But we’re nowhere near being done yet. Read on.
But I Hate the Command Prompt!
Many developers are comfortable using the command prompt to get tasks
done. For example, I much prefer netsh for configuring my IP settings over
messing around with the GUI. But for some tasks in Windows, using a GUI
1.
If you don’t have this tool, I show where to get it in Item 21.
37
Brown_PT01.qxd
7/28/2004
38
2:45 PM
Page 38
PART I: THE BIG PICTURE
is pretty much unavoidable. For example, the command-line ACL editor,2
cacls, doesn’t correctly propagate inheritable ACEs (in English this
means it can screw up your file system ACLs over time), so I prefer to use
the GUI to modify my file system ACLs. You really need a special Explorer
window for performing administrative tasks. Unfortunately, simply typing
explorer from your admin command prompt will very likely not do what
you want. explorer.exe normally uses a single process, and when the
new process starts it simply sends a message to the earlier instance and terminates. This means that the new window you get is not running in a different security context. There is an option to force every Explorer window
to run in its own process, however I’ve never managed to get it to solve
this problem. On the other hand, there is another facade that you can use
to start an Explorer window in its own process: iexplore.exe. If you type
\program files\internet explorer\iexplore.exe from your admin
command prompt, the new Explorer window will run in its own process,
with admin privileges. If you type “Control Panel” into the address bar,
you’ll quickly see that there’s not much you can’t do from here. One odd
thing that I’ve noticed, and that you should watch out for, is that this copy
of Explorer won’t refresh things automatically. For example, if you create
a new file, it might not show up in your admin Explorer window. Don’t fret,
though, just press F5 to force a refresh.
Take a close look at this new window. You likely can’t distinguish the
admin Explorer window from any other Explorer window, and you will
make a royal mess of your system if you leave things this way. For example,
you might accidentally create a directory with your admin Explorer when
you really intend to have your normal account own and manage that directory. Take it from my own painful experience: You don’t want to stop here.
The trick is to use per-user customization to make the admin window stand
out so you can’t miss it. There’s an utterly cool way to do this, too. Skin it!
Run regedit from your admin command prompt and drill down to the
following registry key: HKEY_CURRENT_USER\Software\Microsoft\
Internet Explorer\Toolbar. Add a named string value, BackBitmap,
whose value is the path to a bitmap file. At the moment, I use a boring lit2.
If you’re not sure what an ACL or ACE is, be sure to read Item 43.
Brown_PT01.qxd
7/28/2004
2:49 PM
Page 39
ITEM 9 HOW TO DEVELOP CODE AS A NON-ADMIN
tle red 32×32-pixel bitmap, but you can get more fancy if you like. Since
Explorer tiles this all over the toolbar, this means my admin Explorer ends
up with a bright red toolbar that I can’t miss. The Toolbar key has a sibling
called Main. Surf over there and add a named string value, Window Title.
Set this to “ADMIN” or whatever you like. This will help you see which
window is which when you press Alt-Tab repeatedly to switch between
programs.
Network Credentials
The only problem with our setup so far is that our admin prompt lacks
domain credentials. This may not be a big deal if you’re not in a domain,
but if you are it’s really annoying to be prompted for domain credentials
when you’re simply trying to administer your local machine. Try to edit an
ACL (Item 43) on a file using your admin Explorer window, for example.
At some point the GUI will contact the domain asking for a list of users
and groups, and you’ll be prompted for domain credentials because your
local admin account can’t be authenticated by the domain. To avoid your
fingers falling off from typing your domain, user name, and password
over and over, use this nifty trick to impart a set of domain credentials to a
local admin command prompt: runas /netonly /u:MyDomain\MyUserAccount cmd. After prompting you for a password, the system creates a
new command prompt that has a split personality. On your machine it’s
running as your local administrator, but on the network it will be authenticated using your domain credentials. Close your old admin command
prompt. That was yesterday’s news!
A Sample Setup for a VS.NET Developer
To be productive, it’s important to have an admin command prompt ready
at all times, so I find it useful to automate as much as possible the process
of getting one. I suggest creating a couple of batch files to help (I call mine
adminShell.cmd and adminShellInit.cmd). Use the first batch file to
house two runas commands, the first initializing a local admin shell and
the second creating a new shell that has your domain credentials. Here’s
39
Brown_PT01.qxd
40
7/28/2004
3:39 PM
Page 40
PART I: THE BIG PICTURE
my adminShell.cmd. Note that XYZZY\la is the local admin account on
my box (I always rename the Administrator account to annoy potential
hackers).
REM adminShell.cmd
REM Starts a command prompt running as the local admin (XYZZY\la)
REM but with my domain credentials (ps\kbrown)
runas /u:xyzzy\la "runas /netonly /u:ps\kbrown \"cmd /K
c:\etc\utils\adminShellInit.cmd\""
I’ve heard reports that, on some systems, allowing the first command
prompt to exit results in painting problems for applications. I’ve not personally run into this, but if you do you might find knowledge base article
322906 helpful. In short, the workaround is to modify the batch file just
shown so that the second reference to runas becomes cmd /K runas.
My second batch file initializes the environment and makes the command prompt stand out by changing its color to black on red and setting an
obvious title. Because the current directory of the admin prompt will be
SYSTEM32, I change to a less dangerous directory by default. I don’t want to
accidentally modify anything in there!
REM adminShellInit.cmd
@echo off
title *** ADMIN ***
color C0
call "c:\program files\microsoft visual studio .net
2003\common7\tools\vsvars32.bat"
cd "%USERPROFILE%\My Documents"
cls
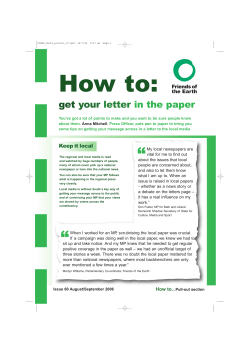
Figure 9.2 shows what my desktop looks like with my normal and
admin command prompts running.
Debugging
Contrary to popular belief, you don’t normally need any special privileges
to debug programs on Windows. If you start a process, you own it and thus
have full permissions to it. That’s all a debugger needs. However, if you
want to debug processes running in other logon sessions (services, for
Brown_PT01.qxd
7/28/2004
2:52 PM
Page 41
ITEM 9 HOW TO DEVELOP CODE AS A NON-ADMIN
Figure 9.2 An admin secondary logon
instance, or IIS worker processes) you’ll need the Debug privilege. This
privilege allows you (and therefore your debugger) to open any process on
the machine for full permissions, even operating system services. It’s a
really powerful privilege normally granted to the local Administrators
group, so instead of granting this to my account I simply start the debugger
from my admin prompt (if you’ve set up your environment like I do for
.NET, you can just type devenv to get it started).
If you’re running Visual Studio .NET, you must add your low-privilege
developer account to the local Debugger Users group. This is not an operating system requirement, rather it’s a policy enforced by Visual Studio
.NET. If you aren’t a member of this group, you aren’t allowed to do JIT
debugging, remote debugging, or pretty much debugging of any kind
using Visual Studio .NET.
41
Brown_PT01.qxd
7/28/2004
42
3:00 PM
Page 42
PART I: THE BIG PICTURE
Creating Web Projects in VS.NET
The Visual Studio .NET Web Project wizard doesn’t work very well if
you’re not running as an administrator. I’ve found the easiest way to get a
Web project started as a non-admin is to first create the virtual directory
using the IIS admin tool from the computer management console3 and
then run the wizard and point it to the URL I just created. You can also add
yourself to the VS Developers group, which grants you write access to
\inetpub\wwwroot and seems to make the wizard a lot happier.
Writing Code That Can Be Used by a Non-Admin
One result of developing code as a nonprivileged user is that you’ll be more
likely to produce programs that run without requiring elevated privileges.
So this item would not be complete without pointing out the most common
reasons that programs break for nonprivileged users, and helping you do
better.
If there were only one bit of advice I could give on this topic, it would be
this: Separate program files (executables, DLLs, etc.) from data files! Normal users don’t have write permission under the Program Files section
of the file system,4 which means that your program won’t be able to write
here either, so don’t try (this is an example where running as a normal user
can help you catch silly mistakes early). This is by far the most common bug
that causes programs to require elevated privileges in order to run.
As part of the Windows Logo program, Microsoft provides guidelines on
where to store data files. The .NET Framework has methods that allow your
program to discover the appropriate location for data files at runtime, so
there’s really no excuse for the plethora of apps that insist on writing data
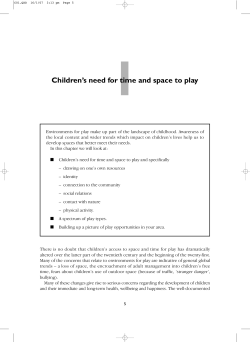
to their install directories. Figure 9.3 shows the various types of data, the recommended locations, and the enumerations in the .NET Framework used
3.
The quickest way to run this very useful console as an administrator is to launch
compmgmt.msc from your admin command prompt. But if you are a mouse clicker,
you can also navigate from your admin Explorer window into Control Panel |
Administrative Tools | Computer Management.
4.
There’s a good reason for this: On a multiuser system, you wouldn’t want a malicious
program overwriting WINWORD.EXE with a Trojan horse, for example.
Brown_PT01.qxd
7/29/2004
3:09 PM
Page 43
ITEM 9 HOW TO DEVELOP CODE AS A NON-ADMIN
Description
Environment.Special
Recommended Section of File System Folder enum
Static, read-only data files
c:\Program Files
ProgramFiles
Writable data files shared by c:\Documents and Settings\All Users\
all users of the application
Application Data
CommonApplicationData
Writable data files specific to c:\Documents and Settings\username\
a single user
Application Data
ApplicationData
Writable data files specific to c:\Documents and Settings\username\
a single user and machine
Local Settings\Application Data
LocalApplicationData
User documents
Personal
c:\Documents and Settings\username\
My Documents
Figure 9.3 Recommended data file locations
to look up these locations at runtime, because the actual paths I provide here
may be different on each machine. Here’s a link to the Logo requirements.
http://www.microsoft.com/winlogo/
I strongly recommend reading the section on data and settings management, as it provides further tips on using these common directories.
Note that I’m not recommending writing directly into any of these
directories. Rather, you should create a subdirectory that’s unique to your
application and store your data files under it. The Logo requirements specify the directory structure as follows: [company name]\[product name]\
[version]. Here’s some C# code that prints out the recommended directory for the second item in Figure 9.3.
using System;
class App {
static void Main() {
string path = Environment.GetFolderPath(
Environment.SpecialFolder.CommonApplicationData
);
Console.WriteLine(path);
}
}
If you’re building a Windows Forms application, your life is even easier,
because the Logo requirements for forming your product’s subfolders are
43
Brown_PT01.qxd
44
7/28/2004
3:02 PM
Page 44
PART I: THE BIG PICTURE
implemented for you via the following properties on the Application
class.
• UserAppDataPath
• LocalUserAppDataPath
• CommonAppDataPath
Here’s a program that prints out these paths. Compile and run it; then
go look at your user profile directory (Item 19)! The subfolders for your
product are created automatically. The first time you read one of these
properties, the Application class creates the folder on your behalf
(if it doesn’t already exist), using the metadata provided by the three
assembly-level attributes shown in the following code sample:
using System;
using System.Windows.Forms;
using System.Reflection;
[assembly: AssemblyCompany("ACME")]
[assembly: AssemblyProduct("WidgetManager")]
[assembly: AssemblyVersion("1.1.0.0")]
class App {
static void Main() {
// simply accessing these properties creates
// subfolders based on company/product name
// and version, according to logo requirements!
Console.WriteLine("Roaming Settings Folder: {0}",
Application.UserAppDataPath);
Console.WriteLine("Local Settings Folder: {0}",
Application.LocalUserAppDataPath);
Console.WriteLine("Shared Settings Folder: {0}",
Application.CommonAppDataPath);
}
}
Isolated Storage
For storing per-user settings (as opposed to documents that the user might
want to manipulate directly in the file system), you should consider using
the .NET Framework’s isolated storage system. This is really just another
Brown_PT01.qxd
7/28/2004
3:43 PM
Page 45
ITEM 9 HOW TO DEVELOP CODE AS A NON-ADMIN
way to access files stored under the user profile directory, but the .NET
Framework manages the location of the storage so that each assembly gets
its very own private root directory where files can be stored. Once you
realize that an isolated storage file is just a real file in the file system, you’ll
see how easy it is to use. Because IsolatedStorageFileStream derives
from FileStream, if you’ve used the FileStream class, using a file from
Isolated Storage isn’t any different. Here’s an example that creates a text file
using IsolatedStorage.
using System;
using System.IO;
using System.IO.IsolatedStorage;
class App {
static void Main() {
IsolatedStorageFile myRoot =
IsolatedStorageFile.GetUserStoreForAssembly();
using (FileStream media =
new IsolatedStorageFileStream("myFile.txt",
FileMode.Create, FileAccess.Write,
FileShare.None, myRoot))
using (StreamWriter w =
new StreamWriter(media)) {
w.Write("Hello, isolated storage!");
}
}
}
There is now a file called myFile.txt somewhere on your hard
drive. To find it, configure Explorer to show hidden files and drill down
into your user profile directory a bit: c:\Documents and Settings\
[user name]\Local Settings\Application Data\IsolatedStorage.
From here names are mangled, but just keep drilling down and you’ll eventually find your file. Open it in Notepad and see that there’s nothing
magical happening here. To see how your assembly’s storage location is
identified, use storeadm /list. You’ll notice that by default your storage
is indexed by your assembly’s URL. This means that, if your assembly is
loaded from a different location, it will be looking at a new storage location.
If this is a problem, give your assembly a strong name. Now the storage
location will depend only on your assembly’s strong name, which means
that, if the version of your assembly changes, it will be looking at a new
45
Brown_Ch01.qxd
46
6/29/2004
9:54 AM
Page 46
PART I: THE BIG PICTURE
storage location, but this is usually acceptable if you plan ahead. Run
storeadm /list after giving the previous example a strong name and see
how things change.
Installation Tips
Even well-written programs that don’t require special privileges are usually installed by administrators. Let me say this another way, with emphasis: You must assume that your program will be run by one person and
installed by another! This means that there’s no point messing with peruser settings during an installation. For all you know, an administrator is
setting up a machine for a new user who doesn’t even have an account in
the domain yet, let alone a user profile on the machine. So wait until your
program is launched the first time to initialize per-user settings. Also consider that your program may be installed on a machine where more than
one user normally logs in (think of the front desk at your company). Test for
this! Use runas as a quick way to launch your app under different security
contexts and ensure that it works properly.
Strive for a power user installation. Power Users is a special group
granted read-write access to the Program Files directory tree. Unless you
need to install an NT service or COM+ component, or put assemblies in the
GAC, it’s very likely that the person installing your software doesn’t even
need full admin privileges, which is a very good thing. When someone
installs your app as a power user instead of an admin, she can rest assured
that your installer won’t be allowed to do nasty things such as overwrite
parts of the operating system, install kernel-mode code like device drivers,
which can do anything they want, and so forth. Even better would be an
xcopy deploy that doesn’t require any privilege at all, or a “no-touch”
deployment over the network. Remember the principle of least privilege
(Item 4) when designing your installer as well as your app!
Brown_PT02.qxd
8/4/2004
2:12 PM
Page 85
19
What Is a User Profile?
that the first time a particular user logs on
to a machine it takes a little while longer for the shell (typically
explorer.exe) to start up? You can hear the disk drive whirring and
clunking—obviously something is going on. Subsequent logons are much
faster. What’s happening is this: A profile is being created on the machine
for the user.
A user profile consists of a home directory for the user, along with some
standard subdirectories and files that allow the operating system to store
per-user settings. If you’re sitting in front of a computer, bring up Explorer
and surf to the Documents and Settings folder, which is on the drive
where the operating system was installed. You should see subdirectories for
all user principals that have ever logged on interactively to the machine. If
you view hidden folders (which I recommend for this experiment), you’ll
see one called Default User. It’s this folder that’s being copied when you
first log on with a new user account. This is the seed for all new user
profiles.
If you drill down into your own user profile, you’ll see a couple of
hidden files, called NTUSER.DAT and NTUSER.DAT.LOG, which make up the
registry hive for your user profile. Bring up the registry editor and look
under HKEY_USERS to see what I mean. The operating system dynamically
loads the subkeys under HKEY_USERS as users log on and off interactively.
To see this happen, bring up a command prompt and run the following
H
AV E Y O U E V E R N O T I C E D
85
Brown_PT02.qxd
8/4/2004
86
2:12 PM
Page 86
PART II: SECURITY CONTEXT
command using a local account on your machine (I’ll assume you’re using
a user account named Alice):
runas /u:Alice cmd
You’ll be prompted for a password, and once you enter it you’ll see a
new command prompt that’s running under an interactive logon for Alice.
Refresh the registry editor, and you’ll see a couple of new keys under
HKEY_USERS. These keys point into the NTUSER.DAT file in Alice’s home
directory. Close this new command prompt and refresh the registry editor
again. You should see that those keys have now disappeared. The profile
has been unloaded.
HKEY_CURRENT_USER is a very interesting key. The operating system
dynamically maps it onto one of the subkeys under HKEY_USERS based on
the security context you’re running in when you open it. Thus, if I were to
run the following code from Alice’s command prompt, I would be reading
from her registry hive.
using System;
using Microsoft.Win32;
class ReadFromUserProfile {
static void Main() {
// this opens HKEY_CURRENT_USER
RegistryKey hkcu = Registry.CurrentUser;
foreach (string keyName in hkcu.GetSubKeyNames()) {
Console.WriteLine(keyName);
}
}
}
On the other hand, if I were to run this same code from a command
prompt as myself, I would be reading from the registry hive in my own user
profile and looking at an entirely different set of data. Note that the mapping of HKEY_CURRENT_USER is affected by impersonation (Item 31), so if
a process running as Bob uses a thread impersonating Alice to open
HKEY_CURRENT_USER, Alice’s hive will be opened, not Bob’s. Of course,
this assumes that Alice’s profile has been loaded, as you’ll see later in this
item.
Brown_PT02.qxd
8/4/2004
2:12 PM
Page 87
ITEM 19 WHAT IS A USER PROFILE?
Now, you might wonder why I’m spending so much time on how
the registry works, given that it’s being deemphasized in .NET. What
you’ve got to keep in mind is that the operating system still relies quite a
bit on the registry for tracking per-user settings. So, when you do something as simple as set the background color of a form to SystemColors.
Window, under the covers you’re actually doing a registry lookup under
HKEY_CURRENT_USER to find out what window color the current user
prefers. If you’ve ever worked with certificate stores,1 you should be aware
that they are stored on a per-user basis (unless you specifically request a
machine-wide store). This sort of thing is important to know when you’re
writing server code because you often need to ensure that you actually
have a user profile loaded to be able to access your certificates. But more
on loading user profiles later!
When writing desktop applications, it’s critical that you store your
settings under the user profile as opposed to your program’s installation directory. If you try to store data anywhere under the Program Files
directory tree, your program will break when run by a nonprivileged user
(Item 8). The DACL (Item 43) on Program Files allows only privileged
users to write to that directory tree. Go see for yourself! But in Alice’s user
profile, she’s the owner of all the files and subdirectories. So no matter
which user is running your program, you’ll always be able to store settings
under that user’s profile. As I describe in Item 9, Isolated Storage works out
of the user profile, so it’s a great way to store application settings and it
even works in most partial-trust scenarios!
Here’s another experiment: Bring up a command prompt running under
your own account (just start one from Explorer) and run the following command from there:
set u
This will display all environment variables that start with the letter “u.”
Do the same thing from Alice’s command prompt and notice how the
environment variables are different there. The environment variable USERPROFILE is really important, as it points applications to the appropriate
1.
As of this writing, to access certificate stores you must use the CryptoAPI (CAPI), but
version 2.0 of the .NET Framework is slated to include this support directly.
87
Brown_PT02.qxd
8/4/2004
88
2:12 PM
Page 88
PART II: SECURITY CONTEXT
place to store per-user settings. You’ll never need to look at this variable
directly because the programs you write will use .NET Framework classes
to figure out where various user profile directories are located. To see how
this works, compile the following C# console application and run it in your
two command prompts to see how the output changes depending on the
user running it.
using System;
class WhereIsMyUserProfile {
static void Main() {
string myDocuments = Environment.GetFolderPath(
Environment.SpecialFolder.Personal);
string desktop = Environment.GetFolderPath(
Environment.SpecialFolder.DesktopDirectory);
string localAppData = Environment.GetFolderPath(
Environment.SpecialFolder.LocalApplicationData);
Console.WriteLine("My Documents: {0}", myDocuments);
Console.WriteLine("Desktop: {0}", desktop);
Console.WriteLine("Local App Data: {0}", localAppData);
}
}
I show an even more compelling example for Windows Forms programmers in Item 9.
There’s a special user profile called All Users, where you should store
state shared by all users of your application (note that Isolated Storage
never uses this shared profile, so you can’t use Isolated Storage to store
shared state for an application). Be very careful with shared state. Remember that all users of the machine are granted read-write permissions to the
All Users folder. This means that a malicious user can write malformed
data to one of your shared files, causing your application to malfunction the
next time some other, innocent user runs it. Frankly, though, you should
consider all data coming from any of your users to be untrusted, regardless of which user profile it comes from (Item 1). You don’t ever want to
crash or, even worse, lose control of your application because some user
tweaked one of the files in her user profile!
The last point I want to make has to do with daemons (Item 27). You see,
loading a user profile (setting up the environment, loading a new registry
Brown_PT02.qxd
8/12/2004
10:05 AM
Page 89
ITEM 19 WHAT IS A USER PROFILE?
hive under HKEY_USERS, etc.) takes a nontrivial amount of time. For example, compare the time it takes to run the following two commands (first
close any programs you might already be running as Alice to ensure that
her user profile is unloaded).
runas /u:Alice /noprofile cmd
runas /u:Alice cmd
If you use the first command, you will see that no registry hive is loaded.
Although this allows the new program to launch quicker, it also means that
the program won’t have access to Alice’s user profile. In fact, run the following command from the noprofile command prompt for Alice:
set u
The USERPROFILE points to the Default User folder. It would be a mistake
to try writing to this profile because it’s not the right one for Alice. In fact,
this is the profile used by SYSTEM. If Alice isn’t an administrator, she won’t
be allowed to write to this profile (look at the DACL on the Default User
home directory to see what I mean, and note that it’s a hidden folder).
Normal desktop applications won’t need to worry about this because
Windows will always load a user profile for a user who logs on interactively via winlogon.exe. But some daemons won’t have their user profiles loaded for them, as I mention in Item 27, and this can cause you major
headaches if you’re not prepared for it. The most notable case is for COM
servers because the COM SCM doesn’t load profiles for a COM server configured to run as a particular user.
It’s possible to load a user profile programmatically using the Win32
API LoadUserProfile, but this is a privileged operation so a wellconfigured daemon that runs with least privilege (Item 4) won’t be able to
load its own profile. For that reason, when working with operating system
functionality such as the certificate stores I mentioned earlier, or even the
DPAPI (Item 70), you’ll need to use machine-level as opposed to user-level
functionality if you know you won’t have a profile loaded.
89
Brown_PT02.qxd
8/4/2004
2:12 PM
Page 90
Brown_PT02.qxd
8/4/2004
2:12 PM
Page 151
31
What Is Impersonation?
the most useful mechanisms in Windows
security. It’s also fragile and easy to misuse. Careful use of impersonation can lead to a secure, easy-to-administer application. Misuse can open
gaping security holes.
After an application authenticates a user, the application can take on
that user’s identity through impersonation. Impersonation happens on a
thread-by-thread basis to allow for concurrency, which is important for
multithreaded servers as each thread might be servicing a different client.
In Figure 31.1, the server process is configured to run as Bob. It contains five
threads, two of which are impersonating in order to do work on behalf of
authenticated clients.
In this scenario, if one of the three normal threads tries to open a file (or
any other secure kernel object), the operating system makes its accesschecking and auditing decisions by looking at the process token. If Bob has
the requisite access, the call will succeed and any audits will show that Bob
opened the file. On the other hand, if the thread impersonating Alice tries
to open the same file, the operating system makes its access-check decision
based on Alice’s token, not Bob’s, so Alice, not Bob needs to be granted
access to the file in this case. As for auditing, the operating system cares
about both identities and will record that Bob was impersonating Alice
when the file was opened. Of course, auditing must be enabled for any
audits to be generated at all (Item 10)!
I
M P E R S O N AT I O N I S O N E O F
151
Brown_PT02.qxd
152
8/4/2004
2:12 PM
Page 152
PART II: SECURITY CONTEXT
Bob
Alice
Rajesh
Authenticates
with
A
Impersonating
R
server.exe
Figure 31.1 Impersonation basics
It may seem surprising that Bob can impersonate his client and actually
become more privileged than before. This (and the reverse) is true. Bob
might have very little privilege and have access to very few resources on his
own, but think about the benefits of this model. If the server process is
somehow hijacked by a bad guy, perhaps via a buffer overflow (Item 1), the
bad guy won’t immediately obtain access to lots of valuable resources.
Instead, he’ll immediately be able to use only the few piddly resources that
Bob can access. Either he’ll have to exploit another hole in the system to elevate privileges or he’ll have to wait around until a client connects and use
the client’s credentials to access those resources (via impersonation!). And
unless the client is highly privileged, the bad guy won’t immediately have
access to all the resources but rather only to the ones that that client can
access. This can slow down an attack, giving your detection countermeasures (Item 2) time to kick in and allowing you to react and cut off the
attack.
Imagine the opposite scenario, where the server runs as SYSTEM and
impersonates incoming clients. If the server process is hijacked, it’s pretty
much over as far as any local resources go. And you should be aware that
impersonating a low-privileged account, even the null session (Item 35),
won’t stop an attacker from simply removing the impersonation token by
calling the Win32 function RevertToSelf before doing his evil deeds. This
call requires no special privileges and no arguments. It simply removes the
impersonation token from the thread, reverting the thread back to the
process’s identity.
You see, in the first scenario there’s a trust boundary between the server
process and the resources it’s accessing. The resources won’t accept Bob’s
credentials but rather want proof that an authorized client has connected.
Brown_PT02.qxd
8/4/2004
2:12 PM
Page 153
ITEM 31 WHAT IS IMPERSONATION?
There’s also a trust boundary between the server process and the operating system. There’s none in the second scenario! These trust boundaries
become even more important when impersonation turns into delegation
(Item 62).
None of this is perfect. Even when Bob is untrusted, he can still do bad
things. He can collect client tokens (Item 16), which never time out and so
effectively elevate the overall privilege level of his process over time. When
Alice connects and asks to read resource A, Bob can instead choose to misuse her credentials and write to resource B. But don’t let that dissuade you
from running your servers with least privilege (Item 4). Security is a balancing act, and least privilege usually gives the defender an advantage.
Pitfalls to Watch For
As you’ve seen, impersonation can be a very useful tool in the hands of
an architect. Implemention pitfalls abound, however, so read on to make
sure you don’t fall into one. First of all, impersonation puts your thread
into a somewhat wacky state. You’ve got two identities, controlled by
your process token and your thread token. In some cases, this can cause
surprising behavior. For example, almost all my students are surprised
when I tell them how process creation works. Say the thread impersonating Alice in Figure 31.1 creates a new process, perhaps by calling
Process.Start. Alice will need to have execute permissions on the EXE
being launched, but the new process will run with a copy of Bob’s token.
That’s right—even when impersonating, new processes are naturally
launched with a copy of their parent’s process token. A special function,
CreateProcessAsUser, allows you to specify a different token, but it’s
very tricky to use (Brown 2000a), and you can often accomplish the same
thing more easily with the Secondary Logon Service (Item 30).
Here’s another gotcha. When making an outgoing DCOM call, unless a
rather esoteric feature called “cloaking” is enabled, COM ignores the
impersonation token and uses your process’s credentials to make the
call. Thus a COM server sees Bob making the call instead of Alice in our
example. Now in many important cases, cloaking is enabled by default,
such as in any COM+ server process (DLLHOST.EXE) or in an IIS worker
process (W3WP.EXE). But if you write a service, for example, and you don’t
153
Brown_PT02.qxd
8/4/2004
154
2:12 PM
Page 154
PART II: SECURITY CONTEXT
call CoInitializeSecurity yourself (Item 52), cloaking won’t be on by
default.
Here’s a nasty one. Imagine you’re running a trusted server such as in
our second example, which ran as SYSTEM. Say you’re impersonating some
low-privileged account and you make some call that happens to either
create a new thread or switch threads to implement the call, perhaps via an
asynchronous delegate (BeginInvoke). As of this writing, the operating
system makes no effort to propagate the impersonation token to the secondary thread. Let me give you a classic example that lots of people have
run into in ASP Web applications and that’s still present today in ASP.NET.
A trusted ASP.NET application is configured to run as SYSTEM. It’s also configured for impersonation so that it impersonates each client as it performs
its work. If part of that work is to call to an in-process COM component
that’s thread unaware (like all those VB6 components out there), there will
be a hidden thread switch during the call and the component will run on a
COM worker thread instead of on the caller’s thread.1 That VB6 component
is now running as SYSTEM, and that’s probably not what you intended!
Here’s a rather esoteric gotcha in ASP.NET. If you write an asynchronous handler by implementing IHttpAsyncHandler, realize that if you
want to handle the request on a worker thread, you need to propagate any
impersonation token manually. This is the case if, for example, you set up
your web.config file to enable impersonation for your application.
<configuration>
<system.web>
<identity impersonate='true'/>
</system.web>
</configuration>
Manually propagating the token won’t be that hard. Just call
WindowsIdentity.GetCurrent() to get a WindowsIdentity that wraps the
impersonation token (Item 24) in your BeginProcessRequest code, and
communicate it to your worker thread. Before your worker thread executes
the request, it should call WindowsIdentity.Impersonate and then Undo
1.
If you know anything about the COM apartment model, here are the details: The .NET
Framework runs in the multithreaded apartment by default, but VB6 components run in
single-threaded apartments, which causes the often unexpected thread switch.
Brown_PT02.qxd
8/4/2004
2:12 PM
Page 155
ITEM 31 WHAT IS IMPERSONATION?
the impersonation after the work is finished. Assume that each request
comes from a different user. Be absolutely certain that each request executes
using the correct impersonation token. Don’t get those tokens crossed!
On a final note, be careful to close kernel handles aggressively when
impersonating. You see, handles to objects are like preauthorized sessions.
Once a handle is open to a file, registry key, mutex, and the like, the system
performs no further access checks when it is used. The handle itself is
tracked by the operating system based on which permissions were granted
when it was opened, so the system can ensure that a handle opened for
reading isn’t subsequently used for writing. But if our thread in Figure 31.1
impersonating Alice decides to open a file that only Alice has access to,
nothing but careful programming prevents any other threads in that
process from using that handle as well. If the handle isn’t closed when
Alice disconnects, it might “leak” and be used by the server accidentally
when the next user connects. In a nutshell, handles are insensitive to security context changes. Start impersonating, stop impersonating, impersonate
someone else—no matter: The handles you’ve already opened don’t care
(even with auditing enabled, the only time an event is normally recorded
is when a handle is first opened). Oh, and you’re not exempt if you’re
using the .NET Framework library to open files and other objects. Each
FileStream holds a file handle under the covers, so call Dispose on those
FileStream objects aggressively!
155
Brown_PT02.qxd
8/4/2004
2:12 PM
Page 156
Brown_PT03.qxd
8/4/2004
3:03 PM
Page 187
41
What Is Ownership?
components of ACL-based security
in Windows is unfortunately also one of the most subtle and overlooked: ownership. Discretionary access control is all about ownership. If
I create an object, I become its owner, and ownership conveys certain
inalienable rights: the right to read and to change the object’s access control policy. A car, for example, has a very simple access control policy: It’s
either locked or it’s not. When the car is locked, it denies access to everyone,
regardless of who they are. When the car is unlocked, it allows access to
everyone. As the owner of the car, you hold the keys that allow you to
change the car’s access control policy. You’re always allowed to do this. Of
course, you can give your keys to someone else, but then you’ve given
ownership away.
Windows carefully tracks who owns each kernel object, each file, each
service, and so forth. Any object that implements discretionary access
control in Windows has a security descriptor associated with it (Item 42),
and two important parts of that descriptor are the owner SID and the
DACL (Item 43). The owner and DACL are tightly related.
A funny thing about the owner SID is that it can be a user or a group.
The latter is a special case that occurs only with the local Administrators
group. Microsoft likes to simplify administration by removing as many barriers as possible from system administrators. In this spirit, the operating
O
N E O F T H E M O S T I M P O R TA N T
187
Brown_Ch03.qxd
7/7/2004
188
1:22 PM
Page 188
PART III: ACCESS CONTROL
system has traditionally set the default owner SID for administrators to be
the Administrators local group, which means that, if Alice is an administrator on her machine, when she creates objects the owner SID won’t be
Alice personally but rather the Administrators group. If the machine in
question is used only by administrators, for example, it’s highly unlikely
that anyone ultimately will be denied access to anything because they all
share ownership. It’s as if they all have copies of those car keys I was talking about earlier. The owner SID won’t be set to a group for a normal user
though, and in modern versions of Windows workstation products, it may
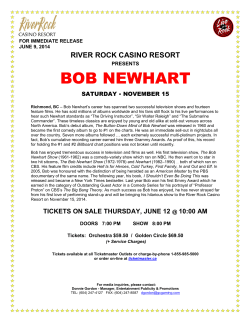
not even be set this way for an administrator.1 Figure 41.1 shows an example of this special case behavior. One file was created by a normal user, the
other by an administrator. Oh, and if you’re not sure how to find these
dialogs, just bring up the security properties for a file, press the Advanced
button, and select the Owner tab.
Figure 41.1 Who owns these files, anyway?
1.
As of Windows XP, this behavior can be controlled via security policy (see the security
option entitled “System objects: Default owner for objects created by members of the
Administrators group”). On Windows XP, the default policy has changed: Administrators
have personal ownership of objects they create, just as normal users do. On Windows
Server 2003, the default policy is what it has always been: Administrators are treated
specially, and they share ownership of objects by default.
Brown_PT03.qxd
8/4/2004
2:42 PM
Page 189
ITEM 41 WHAT IS OWNERSHIP?
Sadly, because most developers run as administrators (Item 8), they
never have to deal with this notion of ownership and thus they never really
learn about it. This is yet another reason to develop code as a non-admin
(Item 9), because you’ll start to see firsthand how Windows security works.
Okay, I’ll get off my soapbox now.
Technically, as the owner of an object, Windows implicitly grants you
two permissions (Item 44):
• READ_CONTROL (“Read Permissions”)
• WRITE_DAC (“Change Permissions”)
So, if you’re the owner of an object, you’re always allowed to open it for
one or both of these permissions, regardless of what the DACL says! It’s like
walking up to your car with its doors locked. The DACL on the car says
everyone is denied access, but that doesn’t keep you out. Using your keys,
you can change that DACL to allow everyone in, then hop in the car. Once
inside, you can change the access control policy again if that helps make
you feel any safer.2
There’s a very important permission that you should know about
because it impacts ownership in a big way. Its friendly name is “Take
Ownership,” and the programmatic name for it is WRITE_OWNER. This is a
permission that you can grant to anyone via an object’s DACL, and it’s
specifically designed to be used to transfer ownership from one user to
another. Here’s a very typical example that shows how it works. The
administrator of a system, say Alice, has created a file for some user, say
Bob. She’s gone to all the work of initializing the file and putting it in the
right place, and now she wants to hand ownership off to Bob. So she edits
the DACL on the file, granting Bob the “Take Ownership” permission. Bob
can now bring up the security properties for the file, hit the Advanced button, select the Owner tab (as shown in Figure 41.1), and change the owner
of the file by selecting his name from the “Change owner to” list box
and pressing Apply. Now that he’s the owner, he can change the DACL
2.
Note that I’m conveniently ignoring the special case that anyone inside the vehicle can
change its access control policy. Also note that there’s a race here (a bad guy can jump in
the car before you get the door locked again). It’s not a perfect analogy, but I hope it helps.
189
Brown_PT03.qxd
190
8/6/2004
8:46 AM
Page 190
PART III: ACCESS CONTROL
however he likes. Note that the actual change of ownership was instigated
by the new owner. I know of no way in Windows to assign ownership
directly to someone other than by using SeRestorePrivilege, which
allows you to set the owner to any user..
It may come as a surprise that when you grant someone “Full Control”
over an object, you’re also granting permission for a transfer of ownership!
As a practical example, take a look at Figure 41.2 and note the subtle difference between the two permission grants I’ve given to Alice.
In the right screen, I granted Alice permission to read and modify the
file, but I didn’t grant “Full Control.” What’s so subtle about this is that, if
you look in the “Advanced” dialog that enumerates the granted permissions (Figure 41.3), you’ll see what “Full Control” really means. These
dialogs show the permissions actually granted based on the settings in Figure 41.2. Granting “Full Control” is subtly different from just granting Read
and Modify permissions: It also allows the user to change the DACL and
take ownership of the object. So be wary about giving out “Full Control.”
It’s bad enough to allow someone less trusted to change the DACL of your
object, but taking it away from you permanently via an ownership transfer is even worse.
Figure 41.2 Forfeiting ownership accidentally?
Brown_Ch03.qxd
7/7/2004
1:22 PM
Page 191
ITEM 41 WHAT IS OWNERSHIP?
Figure 41.3 Subtle difference between Read and Modify and Full Control
There’s one last thing to say about ownership. Windows has a privilege
(Item 21) that allows its holder to wrest ownership away from someone
without his or her knowledge or consent. It’s called SeTakeOwnershipPrivilege, and if it’s been granted to you and you’ve enabled it (Item 22),
you can open up any object in the system for WRITE_OWNER permission,
which means that you can transfer ownership to yourself. Needless to
say, this is a very useful tool in the hands of a trusted administrator but
a terribly dangerous one in the hands of a bad guy. By default it’s granted
to the Administrators local group. See Item 46 to learn how to use this
privilege.
191
Brown_Ch03.qxd
7/7/2004
1:22 PM
Page 192
Brown_Ch05.qxd
7/13/2004
2:25 PM
Page 315
62
What Is Delegation?
I T E M 3 1 , I described the concept of impersonation, where a server
can temporarily take on a client’s identity in order to perform some
work on the client’s behalf. Usually when a server impersonates a client, it’s
only to access resources that are local to the server. When the server
attempts to use the client’s credentials to access remote resources, well,
that’s delegation and by default it’s disallowed. If a server (Bob) impersonates a remote client (Alice) and tries to authenticate with another
server (Charlie), by default Charlie will see a null session (Item 35)
rather than a logon for Alice.
Before Windows embraced Kerberos in Windows 2000, a simple
challenge-response authentication protocol called NTLM was in place.
Basically this said that to verify Alice’s identity, Bob would challenge her
by sending a unique number that she would then encrypt with a master key
derived from her password. Bob would then send the challenge and
Alice’s response to a domain controller for verification. Bob didn’t know
Alice’s password, and after this exchange he still didn’t know her password. He therefore had no possible way to impersonate Alice on the network because, when Charlie challenged Bob to encrypt a number with
Alice’s password, Bob couldn’t respond. The only way to make this work
would be for Alice to tell Bob her password, and that would be very dangerous indeed because passwords are long-term secrets. There would be no
practical constraint over Bob’s use of Alice’s password, either in space or
I
N
315
Brown_PT05.qxd
316
8/6/2004
2:27 PM
Page 316
PART V: NETWORK SECURITY
in time. Bob could impersonate Alice to any server for months on end.
This is why delegation simply was not supported in Windows NT 4
domains.
But along came Windows 2000 with Kerberos. If you read Item 59 (and
I recommend that you do before you continue reading this item), you know
that a Kerberos credential isn’t the client’s password. It’s a temporary
“ticket” plus a corresponding session key, and that ticket has a lifetime of
a single workday. So in Windows 2000 you can flip a switch called “Trust
this computer for delegation . . .” in Active Directory, and a server will suddenly be allowed to receive these types of delegated credentials. In fact,
Active Directory even advertises this to clients: If Bob is a server account
trusted for delegation, any tickets for Bob issued to clients contain a flag:
ok-as-delegate.
Let’s say you set up an IIS server on an intranet and configure it to use
Integrated Windows Authentication (Kerberos). Let’s say you also mark
that computer account as “trusted for delegation” in Active Directory.
When Alice points Internet Explorer to that Web server, during authentication the browser will see the ok-as-delegate flag and will check to see
if Alice has a “forwardable” ticket (technically this is a ticket-granting
ticket) for her domain authority. This will be the case only if Alice’s
account hasn’t been marked “sensitive and cannot be delegated” in Active
Directory. If she has a forwardable ticket, the browser will ask her domain
authority for a “forwarded” ticket with a new session key and send that off
to the Web server (the session key will be encrypted so an eavesdropper
can’t use it). The Web server can now use Alice’s Kerberos credential
(ticket plus session key) to obtain tickets to any other server on the network
in her name. A Web programmer doesn’t notice any of this magic happening. All he knows is that he can now impersonate his client (Alice) and
access remote resources as her! Remember that tickets have a limited lifetime, and this delegated ticket will only be valid for ten hours from when
Alice first logged in. So, in essence, Windows 2000 provides delegation
that’s constrained in time but not in space.
Let’s back off of the mechanics for a minute and think about what this
means. Before delegation, we had some serious limitations in how we could
design multitier systems. Because the middle-tier server couldn’t delegate
the client’s credentials to the back end, the back end had to trust the middle tier to perform any access checks that were necessary (see Figure 62.1).
Brown_PT05.qxd
8/12/2004
2:59 PM
Page 317
ITEM 62 WHAT IS DELEGATION?
Bob
Alice
Charlie
Bob
Alice
Web server
Browser
Database
Without delegation
Bob
Alice
Alice
Browser
Alice
Web server
Charlie
Database
With delegation
Figure 62.1 A three-tier system without and with delegation
Think about it: No matter who the real client happened to be (Alice or
somebody else), the back end always saw the middle tier’s identity (Bob).
This was one of the main motivations for Microsoft Transaction Server
(MTS), which provided a framework for doing these access checks in the
middle tier in Windows NT 4, before delegation was supported. That
framework was called role-based security, and it still exists today in the successor to MTS, COM+.
With delegation, things look a bit different. Now the middle tier (Bob)
can pass through the client’s identity directly to the back end. Whereas the
middle tier can still perform some role-based access checks, the back end
has ultimate authority and can perform very fine-grained access control
based on the original client’s level of authorization.
There are pros and cons to either scenario. Without delegation, the
middle tier can use pooled connections to access the back end. This is faster
than warming up a connection for every client. But think about what happens if the middle tier is compromised! Because the middle tier uses its own
credentials (Bob) to do work on behalf of all clients, an attacker who compromises it can do anything Bob can do with that back-end server. The
attacker can run any stored procedure that Bob can run, can view any tables
that Bob can view, and can make any changes that Bob is allowed to make.
The back end trusts Bob, so if Bob falls to an attacker, the back end falls
immediately as well.
317
Brown_PT05.qxd
318
8/6/2004
2:30 PM
Page 318
PART V: NETWORK SECURITY
With delegation, the middle tier (Bob) has very little privilege on the
back end (possibly none at all), for the clients are the ones granted permissions to the back-end server. If the middle tier is compromised, the attacker
has to wait for individual users to connect so he can impersonate them and
use their credentials to attack the back end. But each individual user presumably has access only to a very small set of data on the back end. In this
scenario, if the middle tier falls to an attacker, the back end is still quite
insulated because it doesn’t intrinsically trust the middle tier. One problem
with this picture is that in Windows 2000 delegation isn’t constrained in
space. So if the middle tier is attached to servers other than the back end
with which it’s designed to work, the attacker might use clients’ delegated
credentials to attack these other servers. This problem is solved in Windows
Server 2003, as you’ll see. The other problem is that the middle tier can no
longer use connection pooling to talk to the back end. You need a new connection for each user you impersonate. (Remember what a database connection is: It’s an authenticated connection to the database!)
I happen to think using a mix of the two approaches in Figure 62.1 is
your best bet. If you categorize interactions with the back end into lowprivileged and high-privileged, you can allow the middle tier to perform all
low-privileged interactions using Bob’s credentials, making the best use of
pooled connections. A high-privileged interaction requires the original
client’s credentials to be delegated to the back end. If the middle tier is
compromised, the attacker has immediate access only to the interactions
categorized as low-privileged. Damage is limited in the short term, and
your detection countermeasures (Item 2) can kick in and notify the administrator that there’s a problem. Not all systems can be built this way, but it’s
certainly a design worth considering.
Another thing to consider when delegating client credentials is that
because the back end now grants permissions directly to clients as opposed
to the middle tier, what’s to stop the client from connecting directly to the
back end instead of going through the middle tier? You probably don’t
want to allow this, but when talking to a traditional server like SQL Server,
there’s really no way to constrain this other than using conventional techniques such as firewalls. This is one place where I see Web services coming
to the rescue. Because the Web service security specs are so flexible, there’s
no stopping the middle tier from passing two sets of credentials to a Web
Brown_PT05.qxd
8/12/2004
3:02 PM
Page 319
ITEM 62 WHAT IS DELEGATION?
service back end: his own credentials (Bob) and those of his client (Alice).
The back end can do a quick check to make sure Bob’s credentials are valid
and then use Alice’s credentials to perform authorization. This prevents
Alice from going directly to the back end, because she doesn’t have Bob’s
credentials! I think it’s an interesting idea to consider when building new
systems.
Windows Server 2003 makes delegation more palatable by constraining
it not only in time but also in space. I show the delegation options in a Windows Server 2003 domain in Figure 62.2. In Windows 2000 there were only
two options for allowing an account to delegate client credentials:
• Don’t allow this account to delegate client credentials.
• Allow this account to delegate client credentials to any server on the
network.
Windows Server 2003 domains add a third option: Allow delegation to
specified services only. This mitigates the problem of an attacker who has
taken over the middle tier and wants to use delegated client credentials to
Figure 62.2 Constrained delegation in Windows Server 2003
319
Brown_PT05.qxd
320
8/6/2004
2:33 PM
Page 320
PART V: NETWORK SECURITY
attack servers that the middle tier wasn’t even designed to talk to. With an
extension to Kerberos, Windows Server 2003 domain authorities can now
constrain delegating servers by restricting whom they can talk to using delegated credentials. In Figure 62.2, the middle-tier server is configured so that
it can delegate client credentials, but only to SQL Server running on a
machine called DATASERVER. This feature is known as “constrained delegation,” and to learn more about how it works under the hood, see Brown
(2003).
Delegation is an important security feature in Windows, one that requires virtually no programming (well, you have to impersonate to make
it happen, but that’s it). It’s really a design issue, and one that should be
considered early in the life cycle of an N-Tier project. Used carefully, delegation can help slow down an attack. Used carelessly, it can lead to middletier servers teeming with juicy client credentials that can be used to attack
other network servers. See Item 64 to learn how to use delegation.
Brown_PT05.qxd
8/6/2004
2:35 PM
Page 321
63
What Is Protocol Transition?
is a new feature that’s been added to Windows Server 2003 domains. Put bluntly, it allows certain designated
servers to establish logon sessions with valid Kerberos credentials for
an arbitrary domain user without knowing that user’s password! As I
showed in Item 26, if you’re one of these designated servers, you can create
a WindowsIdentity for a user, with a real token (Item 16) and logon
session (Item 17) behind it. Simply use the WindowsIdentity constructor
that takes a single string argument, the user’s account name—technically
the user principal name (UPN) for the account, which is typically the user’s
e-mail address.
There are a couple of scenarios where this can be helpful. The first (and
the reason for the name “protocol transition”) is when you simply can’t use
Kerberos to authenticate users on the front end of a distributed application.
For example, if users are contacting your server over the Internet (without
a VPN connection), they likely won’t be able to talk to your domain controller to get the tickets necessary to talk to the server because firewalls prevent them from contacting your domain controller (Item 59). This means
you’ll need to use some other form of authentication, perhaps a client-side
certificate in conjunction with SSL, to authenticate your client. In Windows 2000, whatever authentication protocol you chose, once your middle
tier authenticated the client, in order to map the user onto a legitimate
Windows user account, the middle tier had to know the password for that
P
ROTOCOL TRANSITION
321
Brown_PT05.qxd
322
8/6/2004
2:37 PM
Page 322
PART V: NETWORK SECURITY
account in order to establish a logon session and get a token (typically via
the Win32 API LogonUser that I discussed in Item 26).
In a perfect world, a user’s master key should be known only by that
user and her domain authority. But when you need to transition from one
authentication protocol (such as SSL) to Kerberos on the back end, the
server performing this transition (authenticating the client using SSL in this
case and mapping that client onto a Windows account with Kerberos
credentials) ends up with a big juicy password database that just screams,
“Attack me!” The point of protocol transition is to make it possible for designated servers (think of them as gateways) to be able to perform this
service without having to store passwords.
At this point you might be wondering how protocol transition helps.
Just because the gateway no longer stores passwords, it can still get a logon
for any user it wants (including highly privileged users in the domain).
This means an attacker who has compromised the gateway can do the same
thing, right? Yes, but protocol transition works hand in hand with the
constrained delegation feature in Windows Server 2003 that I discussed in
Item 62. In other words, the gateway can’t use this feature to obtain tickets
for just any servers on the network. Once it logs in the user via protocol
transition (without knowing her password, in other words) and impersonates her, when it attempts to use her credentials to talk to other servers on
the network, the domain authority only issues tickets for the servers on the
gateway’s “allow-to-delegate-to” list.
For example, in Figure 63.1, the WEBSERVER gateway will be allowed to
log in users without knowing their passwords, but will only be able to use
those credentials to talk to SQL Server on a machine called DATASERVER.
This sort of constraint wouldn’t be possible if WEBSERVER were storing
passwords for user accounts. Because we’re using protocol transition on
WEBSERVER, if that machine is compromised by an attacker, the attacker will
find, much to her dismay, that the domain authority simply won’t issue
tickets for other servers on the network. She won’t be able to authenticate
with those servers and will be denied access, assuming you’ve configured
your servers to disallow anonymous requests (Item 35)! Sure, the attacker
will be able to use a variety of user credentials to get to DATASERVER, but
he would have been able to do that (and more) had you stored passwords
on WEBSERVER instead. And remember that you should mark highly privi-
Brown_PT05.qxd
8/12/2004
3:05 PM
Page 323
ITEM 63 WHAT IS PROTOCOL TRANSITION?
Figure 63.1 Configuring protocol transition for a gateway
leged accounts “sensitive and cannot be delegated” (Item 62), which would
restrict the attacker from using those accounts to talk to DATASERVER.
Configuring protocol transition is exactly like configuring constrained
delegation, which I cover in Item 64. The only difference is what I’ve highlighted in Figure 63.1: You must select the option that says “Use any
authentication protocol.”
Here’s another interesting new feature: On any Windows Server 2003
machine that’s running in a native Windows Server 2003 domain, you can
obtain a token for a domain user without knowing her password. If your
server account isn’t marked as being trusted to delegate to other servers,
you can only use this token to find out what groups the user is in. If your
server process is running with the SeTcbPrivilege enabled (SYSTEM is
the only security context with this privilege by default, as I discussed in
Item 28), you get what’s called an impersonation token and you can use it
to impersonate and open up local secured objects such as files. Access
checks to these resources are made based on the identity in the impersonation token. Without this privilege, you get what’s called an identification
token, designed only for doing access checks and group lookups. If you try
323
Brown_Ch05.qxd
324
7/13/2004
2:25 PM
Page 324
PART V: NETWORK SECURITY
to impersonate using this token, you’ll be successful, but if you do anything
interesting like try to open a local file, the request will fail.
But even if you get only an identification token, it’s still useful because
you can use it to see what groups the user is a member of. This has been a
really hard problem on Windows 2000, if you can believe it. Recall from
Item 20 that group membership lists are decentralized in Windows. Global
group memberships are stored in the client’s domain, domain local group
memberships are stored in the server’s domain, and universal group memberships are stored in the Global Catalog. Plus, these domain groups can be
nested! Oh, and don’t forget local groups, which are stored on individual
machines. Trying to discover these group memberships manually is expensive and it’s very difficult to get an authoritative answer. The best way to
discover the groups for a user is to get a token for her. In the past, however,
that required knowing the user’s password. With this new feature, you can
get a token for a user and get an authoritative list of groups without any
hassle. Your server doesn’t have to have any special trust to be able to do
this (although there’s an access check to make sure the server is allowed to
read the group memberships for the user).


© Copyright 2026