
How to set up an OCA Learning Log on Wordpress Contents
How to set up an OCA Learning Log on
Wordpress
V2: January 2013
Contents
1)
2)
3)
4)
5)
6)
Introduction - What's this for?
Setting up your blog in 7 steps
Structure (most important bit)
Dealing with images
Adding menus
Design and layout
1) Introduction - What's this for?
This is a practical guide to setting up a learning log on the free blogging service
Wordpress.com, following the 'OCA Learning Log Sampler'.
It is designed for OCA courses, and aims to cover the absolute minimum of
things you have to do to set up a learning log on Wordpress.com, at the
beginning of your course.
Once done, you shouldn’t need to think about the structure again, you can just
get on with enjoying the course. Unless you want to, in which case this is just
the beginning, but remember, don’t over-complicate it, simplicity is all…
Your learning log is for you to organise and document your learning process –
for yourself, your tutor, your assessors and to share with other students. All of
you are using it in different ways, so you need to organise it so that all of you
can find what you want to read, quickly and easily.
The first thing you need to do is read your coursebook. Then open it at the
contents page, and use this Step-by-step guide to take you through the process
of setting up your own Learning Log, based on the Sampler.
To learn about using WordPress read the starter guide: Learn WordPress.com
Before you sign up for your WordPress blog, take 2 minutes to read Get started,
and then Get acquainted, and read the rest if you want to!
And before you start to write your log, you really should find time to read OCA’s
guides on learning logs: Introducing Learning Logs and Keeping an Online
Learning Log - they will help you focus on what you are supposed to be doing!
WordPress.com is a fast moving world, and changes and improvements happen
on a regular basis. Unfortunately, so do exhortations to buy extra stuff, so be
wary. At time of writing, all of the things suggested above can be done without
buying any extras. Please let us know if you notice things that are out of date.
1
2) Setting up your blog in 7 steps
The aim of this section is to step through the basic tasks of signing up for and
setting up a free blog on wordpress.com to use as a learning log. It's aiming for
the absolute minimum you need to do. This is a step by step guide, following
the Sampler, and by the end of this section, you will have signed up for a
Wordpress.com blog, chosen a theme, edited a page and a post, added a couple
of widgets, learned how to backup your blog and looked at your privacy and
sharing options.
Step 1: sign up for your Wordpress account
Go to Wordpress.com and click the 'Get started' button to sign up. You'll need
an email address (preferably the one you signed up to OCA with, a username, a
password and a title for your learning log. The password should be a good one –
use at least 8 lower and upper case letters, numbers and punctuation. Make a
note of all of these.
As you go through the signup process, remember you're signing up for a free
blog, and ignore all attempts to lure you into spending money. There will be no
problem adding additional paid for services later, should you want to.
2
Create your blog and activate it. Then continue through the various steps to set
up your blog. Do all of this on the default – just keep clicking the 'next step'
button, any changes you want to make can be done later. When you've clicked
the 'Finish' button you'll see your 'Dashboard'.
On the black menubar top right, in the righthand corner, you'll see an icon with
an outline of a person, and your username - click on it to open the following
dropdown menu, and Sign out.
3
You should now be able to login again... and check your password works! When
you've logged in, look for your your blog under the 'My Blog(s)' tab and click on
'Blog Admin' to open your Dashboard:
Sometimes, when you log in, you will be taken straight to your Dashboard.
Dashboard: note the menu on the lefthand side, and you might want to watch
the Welcome video...
4
Step 2: Choose a theme
The theme used for the Sampler is called '2012'. On your dashboard, look in the
lefthand menu for 'Appearance', then 'Themes'. Your 'active' theme is at the
top. If it is not 'Twenty Twelve', then use the search box to find 'Twenty Twelve'
or '2012', and 'activate' it.
Your active theme should have updated – to check what it looks like, click on
your blog's name on the top black menu bar – it's on the lefthand side. This will
open the public view of your blog – it should look a bit like this..
Step 3: Edit the About page
Go back to your dashboard (the black menu at the top will get you there).
In the lefthand menu look for pages, open 'All pages' find the 'About' page (it
should be the only one), and select 'Edit' from the menu that appears under the
page name when you hover your mouse over it.
You are now in the Editor...
Replace the text with your own – you should include enough information to
remind people who you are, what course you are doing, your student number,
and something about yourself – you could include all or part of your student
profile. Keep it simple, and when you’ve finished, click the ‘Update’ button on
the right hand side, to save the changes. Then click on ‘View page’ to see what
it looks like.
5
If you look carefully on the ‘live’ side (front) of your blog, you will notice an edit
button on the page. This will always be there when you’re logged into
Wordpress, as will the black toolbar at the top. This way you can quickly move
backwards and forwards between the front of your blog and the editor and
dashboard at the Admin back. It’s also quite useful to have the front of your
blog and the back of your blog open in separate tabs in your web browser, so
you can move between them quickly.
Step 4: Set up the sidebar widgets
Back in the Dashboard… the third job is to set up the box on the right hand side
with your name and contact details.
On the lefthand menu, in ‘Appearance’, open ‘Widgets’. These are basically the
info boxes on the sidebars and footers of Wordpress blogs.
6
In ‘Available widgets’ find a ‘Text’ widget and drag it into the ‘Main sidebar’ on
the righthand side. Then open it, add your name, coursename, student number
and email address. Tick the box that says ‘Automatically add paragraphs’ and
save it. Then go to the front of your website and check it looks ok.
Then, back in Widgets, look for a ‘Categories’ widget and drag that across
underneath, so you now have 2 widgets in your Main sidebar. This will become
your sidebar menu. Open it and make sure that the 'Show hierarchy' box is
ticked, and the other boxes left empty, as below:
7
Step 5: Edit your first post
In the Dashboard menu, open Posts. This is the main place for content – it’s
where your learning log will live.
To create a new post, choose 'Add New' to open the post editor, where you can
add a title and a sentence or two.
Notice that under the 'Publish button is a section for ‘Categories’. There is just
one category, with a tick in the box, called ‘Uncategorized’.
8
Then click the 'Publish' button on the right hand side to save it. Wordpress will
now show you what your post looks like on the front of your website. Look for
the Edit link at the bottom of your post, which will take you back to the editor.
When you’ve set up your blog, the next job will be to create a set of categories
for your coursework and your assignments. The categories become the
structure for the righthand menu. Then, as you write your blog posts, you can
assign them to the relevent categories. But we’ll come back to that, first finish
setting up your blog.
Step 6: Set up your backup
You need to know how to back up your blog. Under the dashboard menu item
‘Tools’, open up ‘Export’.
Click on the ‘Export’ Export option and in the next window, click on ‘Download
Export File’ as in the next picture:
9
This will create a backup file in code ('xml' format) of all your categories, posts
and pages etc. Save it somewhere safe, and replace it regularly. If anything
terminal happens to your blog, you can import your backup file back into it. You
can also use this file to transfer your blog into other blogging systems, or
another Wordpress website.
The beginning of your 'xml' backup file will look similar to this:
<?xml version="1.0" encoding="UTF-8" ?>
<!-- This is a WordPress eXtended RSS file generated by WordPress as an export
of your site. -->
<!-- It contains information about your site's posts, pages, comments,
categories, and other content. -->
<!-- You may use this file to transfer that content from one site to another. -->
<!-- This file is not intended to serve as a complete backup of your site. -->
<!-- To import this information into a WordPress site follow these steps: -->
<!-- 1. Log in to that site as an administrator. -->
<!-- 2. Go to Tools: Import in the WordPress admin panel. -->
<!-- 3. Install the "WordPress" importer from the list. -->
<!-- 4. Activate & Run Importer. -->
<!-- 5. Upload this file using the form provided on that page. -->
<!-- 6. You will first be asked to map the authors in this export file to users -->
<!-- on the site. For each author, you may choose to map to an -->
<!-- existing user on the site or to create a new user. -->
<!-- 7. WordPress will then import each of the posts, pages, comments,
categories, etc. -->
<!-- contained in this file into your site. -->
<!-- generator="WordPress.com" created="2012-12-19 18:42"-->
<rss version="2.0"
10
>
xmlns:excerpt="http://wordpress.org/export/1.2/excerpt/"
xmlns:content="http://purl.org/rss/1.0/modules/content/"
xmlns:wfw="http://wellformedweb.org/CommentAPI/"
xmlns:dc="http://purl.org/dc/elements/1.1/"
xmlns:wp="http://wordpress.org/export/1.2/"
What it won’t do… it won’t include any pictures, files or video you upload into
your blog. So you need to set up a system for keeping copies of these
elsewhere. If you want to keep a readable copy of your posts as well (not a bad
idea), you might want to experiment with copying and pasting the text from
your post into a Word document, when you've written it.
Step 7: Privacy and access
Who do you want to be able to share your blog with? Back in the Dashboard
menu go to Settings, open ‘Reading’, and look for ‘Site visibility’ near the middle
of the form.
11
These are your choices:
Hide your blog from search engines
You can choose to hide your blog from search engines like Google. This is a
halfway house between making your blog totally public, and making it public but
not findable unless you know the url address.
Make your blog private
You can also choose ‘I would like my site to be private, visible only to users I
choose'. Choose this option if you want your blog to be private, but remember
you will need to share it with at least one other person – your tutor. To invite
someone to share your blog, go to 'Users' in the Dashboard menu, and then
‘Invite Users’.
If you change any of these settings remember to save your changes at the
bottom of the form.
Allow people to post comments – or not
Still in Settings, open ‘Discussion’ and under ‘Default article settings’ at the top,
note the tickbox ‘Allow people to post comments on new articles’. If you don’t
want them to be able to do this, untick the box, and save the settings (the
button is at the bottom of the form).
12
3) Structure (the most important bit)
Now you’ve set up your blog, you need to step back and think about the content,
and how you are going to organise it. You need to think about the people who
are going to use and view your blog - what are they going to be looking for?
There are three main areas or 'categories' of information you should include:
Coursework
The main set of categories will be for your coursework, set up following
the contents page of your coursebook. This will mainly be for you, your
tutor, and your fellow students.
Assignment hand-in work
There will need to be categories for the hand-in work for each of your
assignments, which your tutor and assessors will need to be able to find
quickly. You may also want to include tutor reports and follow-up work.
Research and Reflection
The third category ‘Research and Reflection’ is for all the learning work
you will be doing around your coursework – and where you can add
reports of gallery visits, studies of other artists work, research, personal
projects, and so on. Your tutor and assessors will be very interested in
this section.
The following picture shows the sidebar menu on the Sampler, which reflects the
structure of all OCA courses, and it's built using Wordpress categories. This
section shows you how to set this up on your own learning log. It will take a bit
of time, but once you've done it, you shouldn't need to think about it again.
13
Planning your coursework categories
The first thing you need is your coursebook. Open it at the Contents page....
OCA level 1 courses are generally divided into 5 sections, or parts. Within each
part there are several projects or exercises leading up to the assignment for that
section. This gives you a three level hierarchy:
14
The aim is to set up this structure as Wordpress categories, so for example,
when you write up a learning log post for the first project, and tick the box to
assign it to the category for that project, it will automatically get added to the
relevant categories above as well.
15
You will need to create separate categories for each of Parts one to five, and for
each of the projects/exercises in each Part, as well as a category for the
preparatory work leading up to each assignment. It might be easiest to plan
this out first – follows one way of doing this, and a couple of examples, one for
‘Textiles1: A creative Approach’, and one for ‘The art of photography’.
Textiles 1 Course sample
Parts or sections
Projects, exercises and assignment work
Part one Building a visual
vocabulary: Drawing, markmaking and stitches
Project 1 Making marks
Project 2 Developing your marks
Part 1 assignment
Part two Building a visual
vocabulary: Colour,design,
printing and painting
Project 3 Colour
Project 4 Developing design ideas
Project 5 Painting and printing
Part 2 assignment
Part three Creating shapes
and three-dimensional forms
Project 6 Manipulating fabrics
Project 7 Your theme book
Part 3 assignment
Part 4 Part four Textile
structures
Project 8 Yarns
Project 9 Woven structures
Part 4 assignment
Part five A piece of your own
Project 10: A design project
Part 5 assignment
This needs a bit of editing – the part titles need pruning, and it’s useful to
number everything that you want to keep in order. It will look better and be
easier to use, like this:
Parts or sections – category
names
Projects, exercises and assignment work –
category names
Part 1 Building a visual
vocabulary
1 Making marks
2 Developing your marks
Part 1 assignment
Part 2 Building a visual
vocabulary
3 Colour
4 Developing design ideas
5 Painting and printing
Part 2 assignment
16
Part 3 Creating shapes
6 Manipulating fabrics
7 Your theme book
Part 3 assignment
Part 4 Textile structures
8 Yarns
9 Woven structures
Part 4 assignment
Part 5 A piece of your own
10 A design project
Part 5 assignment
The art of photography Course sample
Parts or sections
Projects, exercises and assignment work
Introduction
Getting to know your camera
Focus
Photographing movement
Part one: The frame
Looking through the viewfinder
Focal lengths
Dividing the frame
Frame shapes and sizes
Cropping and extending
Part 1 assignment
Part two: Elements of design
Points
Lines
Using lines in composition
Shapes
Rhythm and pattern
Part 2 assignment
Part three: Colour
What makes colour
Building a library of colours
Colour relationships
Part 3 assignment
Part four: Light
The intensity of light
The colour of light
The time of day
Available light
Photographic lighting
Part 4 assignment
Part five: Narrative and
illustration
Narrative
Illustration
Part 5 assignment
17
And with a few adjustments:
Parts or sections – category
names
Projects, exercises and assignment work –
category names
Introduction
1 Getting to know your camera
2 Focus
3 Photographing movement
Part 1 The frame
4 Looking through the viewfinder
5 Focal lengths
6 Dividing the frame
7 Frame shapes and sizes
8 Cropping and extending
Part 1 assignment
Part 2 Elements of design
9 Points
10 Lines
11 Using lines in composition
12 Shapes
13 Rhythm and pattern
Part 2 assignment
Part 3 Colour
14 What makes colour
15 Building a library of colours
16 Colour relationships
Part 3 assignment
Part 4 Light
17 The intensity of light
18 The colour of light
19 The time of day
20 Available light
21 Photographic lighting
Part 4 assignment
Part 5 Narrative and
illustration
22 Narrative
23 Illustration
Part 5 assignment
(Unless you are doing one of these courses), draft a category structure for your
coursebook in a similar way. When you’ve finished, look at it critically – is it
appropriate for how you are planning to use your learning log? If you don’t
expect to make more than one post for each project, then maybe you don’t need
all the project categories on the righthand side? If in any doubt, go with it – all
can be changed later.
18
And now, to set up the categories on your blog
On the Dashboard menu, in Posts, open categories. On the lefthand side, add
the following new categories:
Assignment 1
Assignment 2
Assignment 3
Assignment 4
Assignment 5
Coursework
Research and Reflection
Just add the name and save, you can ignore the other options for now. Your
category list should begin to look something like this:
Next, you need to add your Coursework ‘sub-categories’, from the list you made
from the Contents page.
First add all the categories for the Parts, and this time note the ‘Parent’ box
under the box where you add a new category. For each Part, select ‘Coursework’
as the parent category, and check on the righthand side that they are indented
with a '-' underneath the Coursework category (as in the picture above, towards
the bottom of the list).
19
Next, add your Project and Assignment categories, this time selecting the
appropriate Part category as the parent.
You should now have a structure that follows the pattern below. Note that you
can edit your categories by hovering over the category name to reveal the edit
button.
Then go into ‘Posts’ and open your first post in the editor. You’ll notice you’ve
now got a long list of categories to choose from. To try it out, tick the boxes to
add your post to several categories, and Update it. Go to the front of your blog
and check the Category list on the right. You should see that for every category
you’ve added your post to, there’s a link to it in the list – and all those links will
open your first post.
A note on display order - categories and sub-categories are listed by default in
alphabetical order. Numbers are used to force projects to display in order – but
if you have more than 9 projects, then you may find project no '10' stubbornly
20
appearing under '1' and not '9'. You can force it into place by prefixing numbers
1-9 with a zero as 01,02,03 and so on.
So, once the structure is there, as soon as you add a post to a particular
category, the category appears on the list – which means the menu will grow as
you add blog posts.
You can also move posts around between categories, and add posts to more
than one category. Experiment with your first post!
A note on the assignment categories - Part 1 assignment and Part 2
assignment, and so on. These categories under Coursework are intended for
logging your work on preparing your assignments. The separate categories for
Assignment 1, 2, 3 etc are where your tutor and assessors will look for the
presentation of your assignment, with links to your finished work, tutor reports
and any subsequent follow-up work. You may not be intending to submit your
work for assignment in this way, however it’s still worth setting up the
categories, as you’ll find it really useful when you’ve finished your course, and
are preparing your work for assessment.
4) Dealing with images
When you are writing about your work you need to illustrate it with photos of
your work, step by step. Your tutor will want to see, visually, how you reached
your final piece of work. So, adding visual content to your learning log is
absolutely crucial, and it's worth spending a bit of time experimenting here.
Remember that on a blog post or page, the text and the images relate to each
other, and hold each other in place. How they relate to each other is largely
controlled by the theme, and the best way to see this effect is by resizing your
browser window – make it thicker and thinner and see what happens. Often, it
may look like the images are flying around all over the place, but there will be a
pattern to it. If you are going to be using your blog on your phone or tablet, you
need to check that it looks ok on them too.
Here are some tips for dealing with images in your blog.
a) Resize your images in an editor before you upload them
Generally, 1000 pixels wide is plenty big enough, and keep your file sizes as
small as possible. If you are a photographer this might not apply – check with
your tutor. An image in a blog post will generally display about 500-600 pixels
wide, and open to full size. If you are thinking of displaying thumbnails, or
experimenting with galleries, it can be worth cropping your images into a square
shape. Wordpress automatically resizes and reshapes images, but don't rely in it
– it's really good at chopping off heads.
21
b) How to add an image to a post
Open a new post in the editor, and click on the 'Add media' button to upload an
image.
Drag your image file into the space, and wait for the file to upload. The file
you've just uploaded should appear as in the picture below. If a lot of files are
displaying, in the dropdown menu top left, select 'uploaded to this post'. On the
righthand side, edit the 'Title' if you wish, and add some 'Alt text' – this is a
short description of the image that is used when it's not possible to display the
image. Towards the bottom in the 'Link to' dropdown, select 'Media file'. Then
click 'Insert into post'.
22
Back in the post editor, update your post and check what it looks like on the live
blog.
c) Tips for adding pictures to blog posts
Add your text first and update your post to save it. Then, add your images one
at time underneath your text, and make sure there is a clear blank line between
your text and image, and between all subsequent images. If your images are
smaller than about 500 pixels, then in the 'Alignment' dropdown (bottom right
corner in the picture above) select 'Center'. This way you should get your text
and images nicely spaced.
23
d) How to add a Gallery to your post
If you want to add several images to a post, to document your way through a
project, say, then you can add a 'Gallery' to display them all. After you've
uploaded your photos, and edited any of the details, select 'Create Gallery' in the
left hand menu of the 'Add Media' box, make sure you select all the pictures you
want to include – it tells you how many you have selected at the bottom of the
box - and click on 'Create a new gallery'.
You'll then get a chance to rearrange your images, then click 'Insert Gallery' to
add them to your post. Back in the post editor, this is how it will look:
24
Save your post, or publish it, and then check how it looks on the live side of your
blog. Then click on a picture to view the gallery as a slideshow.
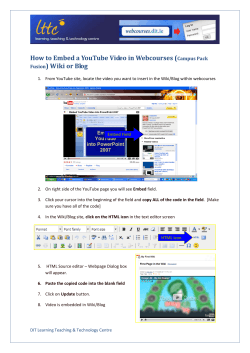
e) How to photograph your artwork
This is a really useful video by Mark Lomas: 'How to photograph works of art'
from Open College of the Arts – don't be put off by the kit at the beginning, it
gets smaller and humbler as the video progresses.
For more notes ion adding visual material to yopur blog, check the 'Tips and
tricks' section on the Sampler sidebar.
5) Adding Menus
Currently the menu on the righthand sidebar of the Sampler is created by adding
a category widget to the Main sidebar (widgets can be found on the Dashboard
under 'Appearance'). If you open up the Categories widget you created, you will
see you can change the title and the display type but nothing else. You can give
yourself much more flexibility by creating a 'Menu'.
25
On the Dashboard, you'll find 'Menus' under 'Appearance'. At the moment you
have no menus, the default menu for your theme displays your 'Home' page and
your 'About' page at the top of your blog. If you are going to experiment with
menus, then it's a good idea to fix this arrangement as your 'Primary Menu' first.
On the Dashboard, you'll find 'Menus' under 'Appearance'. On the righthand
side, create a new menu called 'Main'. In the 'Pages' box on the left hand side,
open the 'View All' tab and tick 'Home' and 'About' pages and then 'Add to
Menu'. You'll now have a 2-item menu, as in the following picture. Click on
'Save Menu' and then, in the 'Theme Locations' box, top left, select 'Main' as
your 'Primary Menu' and click 'Save'.
Then if you go to the front of your blog and refresh the page in your browser you
should notice... no change. However, behind the scenes this has fixed your top
menu in place.
Now back in Menus, create a 2nd menu and call it 'Log' or something similar. You
want to create a menu that contains all your learning log categories – in the
Categories box, open the 'View all' tab, click on 'Select All' at the bottom, and
then 'Add to menu'. You've now got a long list of menu items.
Now you need to arrange them into your hierarchy, as in the picture below:
a) Re-arrange the order of the items in the list, by dragging them up and down
the list and nudging them into place.
26
b) You can re-create your coursework hierarchy by dragging the Parts subcategories onto the 'Coursework' category, and placing them underneath,
indented to the right.
c) Repeat this process for the 'Projects', placing them under the 'Parts'
categories, and indenting them to the right again.
Do this a step at a time, saving your menu regularly. You can remove an item
altogether either by dragging it out of the list, or opening up the menu item and
deleting it. When you've finished editing your menu, save it.
In the picture below I've moved 'Research and reflection' higher up the list under
'Assignment 5', and deleted 'Uncategorized'. Note that deleting or renaming
them is only deleting or renaming the menu item, not the category.
Then, add your 'Home' and 'About ' pages to the top of your menu (as before in
your 'Main' menu. Finally, check all your menu items are in the right place and
save your menu.
27
Now swap over your 'Primary menu' in the Theme Locations box (top left) –
select your new long menu, and save. Then go to the front of your blog, refresh
the page if necessary, and check your new top menu, which should look pretty
similar to the menu on the Sampler.
If you create more than one menu, you can choose which menu to set as your
'Primary menu'. The other menus could be added to your Sidebar.
Look for a 'Custom Menus' widget in the Widgets section of your Dashboard
(under Appearance). Drag it to your sidebar and open it. Give it an appropriate
title, select the menu by name, and save the widget.
6) Design and layout
As an arts student, you'll appreciate the importance of the visual aspect of your
blog. Keep the layout simple and concentrate on visually stimulating content.
Read about your theme and what else you can do with it. An easy way to liven
it up is to add a header image (Appearance, then Header on your Dashboard
menu). If you want a bolder theme with the option for a dark background, try
’2011′ – check the demo site. Alternatively explore the free themes available
(Appearance, then Themes on your Dashboard menu). It’s a good idea to
decide on your theme before you start using your log, not halfway through, as it
controls the layout of your posts. It’s also a good idea to test a theme to see
how it looks on all the computers/tablets/phones you expect to be using with
your blog. Finally, ask the question – how is it going to complement your work
and make it look really good!
28


© Copyright 2026