
HOW TO SETUP GOOGLE AUTHORSHIP: THE UNOFFICIAL MANUAL
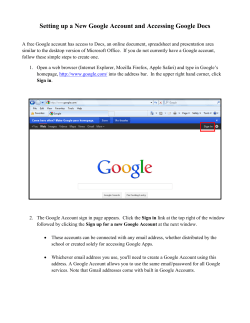
HOW TO SETUP
GOOGLE AUTHORSHIP:
THE UNOFFICIAL
MANUAL
This unofficial manual was written for anyone who writes regularly
online and website owners/administrators of a website with or without
a blog. It is designed to help you understand what Google Authorship is,
why you need it and how to ensure you have it setup for the greatest
personal and/or professional benefit.
This unofficial manual was written by Ross Dunn, CEO
StepForth Web Marketing Inc.
“Increasing the bottom-line online for businesses since 1997”
Google Authorship
is widely considered
to be the next
greatest ranking
factor to be added
to Google’s
algorithms in the
coming years.
This information is accurate as of July/August 2013
Contents
What is Google Authorship? ..................................................................................................................................................... 2
The Benefits of Google Authorship....................................................................................................................................... 2
What You Must Do Before Installing Rel=Author ..................................................................................................................... 4
Various Methods of Google Authorship Implementation ........................................................................................................ 6
A) Quick Setup Using the Google Authorship Page .............................................................................................................. 6
B) Setup for a One-Author, Blog-Only Website (Basic HTML editing required) ................................................................... 7
C) Multiple Authors: Each Author Links Directly to Google Plus .......................................................................................... 7
D) Multiple Authors: Use the Rel=Me Link from Each Author’s Bio Page ............................................................................ 8
E) Sites With Multiple Authors: WordPress Plugin Options ................................................................................................. 9
F) Setup for a One-Author Site on WordPress.com ............................................................................................................ 12
G) How to Setup Rel=Author on a SquareSpace Blog ......................................................................................................... 13
H) How to Setup Rel=Author on a Blogspot Blog................................................................................................................ 13
How to Setup Rel=Publisher ................................................................................................................................................... 14
The Benefits ........................................................................................................................................................................ 14
The Setup Process ............................................................................................................................................................... 14
Troubleshooting Google Authorship Installation & Setup...................................................................................................... 16
How to Stay Current on Google Authorship ........................................................................................................................... 17
How to Setup Google Authorship: The Unofficial Manual
Have us install it for you
Page 1
This information is accurate as of July/August 2013
What is Google Authorship?
Google Authorship is Google’s answer to identifying the true owner of unique content written online so the original author
can get the credit they deserve. The Authorship process was brought about for many reasons but one of the simplest was to
attribute the ownership of a piece of content which may have been duplicated on the net to the true, original author. As
such, the original content would receive the benefit of their work versus others who copied the content and are trying to
benefit from it. The trick, which this unofficial manual focuses on, is to ensure your Authorship is in place on your website.
What this requires is outlined step-by-step in its simplest form here and grows in complexity in specific applications shown
later but for now you just need to know you will have to sign-up for a Google Plus account in order to claim Google
Authorship on anything you have written or will write.
The Benefits of Google Authorship
Claiming your original content as your own is wonderful in itself but Google has provided some added benefits:
1) If your content is seen within ranking results and Google has a high regard for your credibility as a writer your
author image and Google Plus follower data will appear next to the search result. This extra exposure has been
proven to heighten the visibility and likelihood of being clicked. Below is a shot of a search result showing an article
I wrote and the resulting authorship enhancement to the search result:
2) It has been shown that anyone who visits your content and returns to Google after spending time on your page will
then find Google providing more of your content within search results. THAT is a huge perk! (read more)
3) In #1 I mentioned “credibility” because Google needs to see that an author is an authority on the content written in
order to provide the face time in search results; you could be an authority in your job/industry and in gardening
(there is no set limit to how many topics you can be an authority on that I know of). The benefit here lies within the
ability to connect yourself with original content you have written on websites all over the web and not just on your
own website.
For example, perhaps over the years you wrote content on hobbyist sites and on industry blogs which have built
How to Setup Google Authorship: The Unofficial Manual
Have us install it for you
Page 2
This information is accurate as of July/August 2013
you a strong reputation online. If that is the case then it would be to your great advantage to associate this writing
to your Google Plus account so Google builds a better picture of your credibility which can afford you with benefits
available now to credible authors and the greater benefits coming in the near future.
4) At the time I wrote this manual Google still had not publicly stated Authorship was directly contributing to how well
your site ranked online. That said it is not if, but when Authorship play a role in determining where your content
ranks above or below your competitors; or at all.
5) Once your Authorship setup has been acknowledged by Google you will begin to see search statistics for the
content Google has verified as your own. This data is found within your Google Webmaster Tools account.
6) If you install rel=publisher on your business website’s home page you create the potential for your business logo
and details to show up under your brand-related search terms. Additionally, searchers can now access and follow
your Google Plus Business Page directly from search results. They can even see the latest article you have written if
you have a blog. That’s right rel=publisher can be installed on any website regardless whether you have a blog or
not. In fact, if you have no reason to install rel=author you can skip directly to the rel=publisher installation
instructions.
How to Setup Google Authorship: The Unofficial Manual
Have us install it for you
Page 3
This information is accurate as of July/August 2013
What You Must Do Before Installing Rel=Author
Before you can do any implementation you need to create a Google Plus account (if you haven’t already) and copy your
profile URL into notepad or some other program you can copy and paste from later on. Here is a quick tutorial on this
process:
1) Setup a Google Plus Profile using your real name: https://plus.google.com
2) After setup when you are looking at your new page click on the “Profile” button found on the left-hand navigation.
3) Next look at the address bar on your web browser and copy the shown URL but leave out “/posts”
4) Open Notepad or some kind of text editor on your computer and paste the URL you just copied which is your direct
Google Plus Profile URL.
5) You now have your Google Plus Profile URL which will be used in all but one of the implementation scenarios
covered in this manual. Save this file somewhere on your computer where you can access it easily; the desktop is a
good bet.
6) Next go to your Google Plus Profile, select “About” in the top navigation and scroll down the page until, on the
right-hand column you see “Links”. In that box click on “Edit”
How to Setup Google Authorship: The Unofficial Manual
Have us install it for you
Page 4
This information is accurate as of July/August 2013
7) Now go to the Contributor section and add a link to the website you are implementing Authorship and click save.
8) Congratulations! You are ready to move on to implementation.
How to Setup Google Authorship: The Unofficial Manual
Have us install it for you
Page 5
This information is accurate as of July/August 2013
Various Methods of Google Authorship Implementation
Due to the wide variety of website configurations Google has provided a few options for setting up Google Authorship.
Immediately following this section is the quickest setup of all and the remaining options proceed in order of complexity.
A)
B)
C)
D)
E)
F)
G)
H)
I)
Quick Setup Using the Google Authorship Page
Setup for a One-Author Site Solely Composed of Blog Content
Multiple Authors: Each Author Links Directly to Google Plus
Multiple Authors: Use the Rel=Me Link from Each Author’s Bio Page
Multiple Authors: WordPress Plugin
Setup for a One-Author WordPress.com Blog
How to Setup Rel=Author on a SquareSpace Blog
How to Setup Rel=Author on a Blogspot Blog
How to Setup Rel=Publisher
(!) Troubleshooting a Google Authorship Installation
(!) How to Keep Up to Date on Authorship News
A) Quick Setup Using the Google Authorship Page
This setup applies only if you have a website with your own top-level-domain (yourdomain.com) with a blog section where
you are the only person writing content and you have an email address on your domain (i.e. [email protected])
1. Setup a Google Plus Profile using your real name following the instructions What you Must Do Before Installing
Rel=Author. Also make certain everything you write on your blog uses your real name as the byline. (i.e. by John
Doe) or this won’t work.
2. Ensure your profile has a clear and recognizable headshot.
3. Submit your email address using the Google Authorship setup page: https://plus.google.com/authorship
4. Verify your email address using the email Google sends you by clicking on the link in the email.
5. Double-check all of the posts on your blog used/s the same name as shown on your Google Plus profile.
6. Done! Yes, it is really that easy!
How to Setup Google Authorship: The Unofficial Manual
Have us install it for you
Page 6
This information is accurate as of July/August 2013
B) Setup for a One-Author, Blog-Only Website (Basic HTML editing required)
This is also a very simple installation for anyone who can make an extremely basic edit to the code within a webpage. That
said this implementation is recommended only for a website composed entirely of blog content (having an about page is
okay but not product/service pages) because it involves adding rel=author site-wide.
1) Complete the process found in “What you Must Do Before Installing Rel=Author”
2) Copy and paste the code shown below into your text editor and then substitute “put your Google Plus Profile URL
here” with, well, your Google Plus Profile URL.
<link rel="author" href="put your Google Plus Profile URL here" />
3) Now either you or your webmaster need to copy and paste this code into all of the pages in your blog site within
the <head></head> of the source code. If you don’t understand that last sentence then it is okay, just pass it
along to a person with the necessary basic skills to make the change.
4) Once the code is in place you need to verify everything is working by testing one of your blog post URLs in Google’s
Structured Data Testing Tool.
5) Assuming everything went well with the test you are now done!
C) Multiple Authors: Each Author Links Directly to Google Plus
The following is the simplest option for enabling Google Authorship on most Content Management Systems but the one I
am using as an example is WordPress:
1) Complete the process found in “What you Must Do Before Installing Rel=Author”
2) As an Author access your Author Profile in WordPress after logging in to the their administration area and in the
“Contact Info” section under “Website” copy and paste your Google Plus Profile URL with “?rel=author” (minus
quotes) tagged to the end without spaces. Make sure everything looks good and then click Save.
How to Setup Google Authorship: The Unofficial Manual
Have us install it for you
Page 7
This information is accurate as of July/August 2013
(i.e. this is how mine looks: https://plus.google.com/110164376606045981534?rel=author)
3) Go to your Google Plus Profile and under “About” click “Edit” in the Links section (far right column, lower down) and
then add this blog URL (the domain of the site, i.e. www.xyzname.com) within the “Contributor to” field and then
save.
4) Revisit a post you wrote on this blog and check to make sure your byline (where it says “by <yourname>”) sends you
to your Google Plus Profile page when clicked. If you end up with broken link or error then revisit the URL you
placed in the “Website” field.
5) Verify everything is working by testing one of your blog post URLs in Google’s Structured Data Testing Tool. If you
run into any problems follow the suggestions provided by the tool and check over the process again to ensure you
didn’t miss anything. If all else fails then contact an expert or qualified friend to assist you; sometimes another pair
of eyes can fix it in no time.
6) You are done! In time Google will have indexed all of your articles with the new rel=author link and if any of the
posts are ranking well in search results they should soon show your Google Profile headshot and social connection
information.
D) Multiple Authors: Use the Rel=Me Link from Each Author’s Bio Page
The other option for any multiple author site is to have each author byline link directly to their onsite bio page with the
“rel=author” microformat added to the hyperlink as shown below.
<a href=http://www.stepforth.com/blog/author/rossdunn rel=”author">by Ross Dunn</a>
How to Setup Google Authorship: The Unofficial Manual
Have us install it for you
Page 8
This information is accurate as of July/August 2013
Now that all of the Author’s bylines are using “rel=author” and are pointing to their Bio page you then include a single link
to their Google Plus Profile from their About Page using the “rel=me” microformat (shown in code below). You can place the
link either as a Google Plus button or include the following code in the header of the Author page:
<link rel="me" href="put Author’s Google Plus Profile URL here" />
The trick with any Content Management System (CMS) is to ensure this process is automated using each Author’s unique
information. This is not usually difficult for a website developer of even the most modest experience; however, that does
depend entirely on the capabilities and datedness of the CMS in use.
IMPORTANT: If you happen to be using a Content Management System (CMS) which does not support Google’s
Authorship markup then consult the makers of the program and request they add functionality as soon as possible.
Why? Well I have already established how important Authorship will be in the near future but aside from that if the
CMS provider hears enough requests for this functionality it is likely to be released sooner than later. That said if
the CMS provider flat-out ignores or denies your request then I would strongly consider questioning the long term
validity of the system you are utilizing.
E) Sites With Multiple Authors: WordPress Plugin Options
There are a few plugins available for adding Google Authorship capabilities to a WordPress site for multiple authors which
could make your life easier if you do not have a person you can trust to make the minor but necessary changes to your site.
Important: Before you can proceed remember you must complete the process found in “What you Must Do Before
Installing Rel=Author”
Here is a list from WordPress.org’s plugin directory but the few I have heard the most positive feedback from are:
1) WordPress SEO by Yoast (5/5 stars from 2500+ users, 5.3 million downloads)
Joost de Valk is the foremost leader in the development of useful marketing plug-ins for WordPress. In this case, the
plugin I am touting is my hands-down favourite for the ongoing search engine optimization of any WordPress
website and just so happens to have built-in rel=author functionality for multiple authors.
The trick Joost has added is a field within each Author’s WordPress Profile which allows them to add their Google
Plus Profile URL which is then shown within each piece of content written by that author. By simply appending
“?rel=author” to their Google Plus Profile URL they then fulfill the necessary Google Authorship requirements;
assuming they have already noted in Google Plus they are contributing to the said blog.
The following is an example of my own profile on our site and you can see where the additional fields were added
which have extended the capability of WordPress to promote my social presence; the main piece of interest being
How to Setup Google Authorship: The Unofficial Manual
Have us install it for you
Page 9
This information is accurate as of July/August 2013
the Google Plus field. Here is an article from Joost (pronounced Yoast) walking through the functionality and some
other great capabilities he worked in for Authorship.
IMPORTANT TIP: if you are converting from another SEO wordpress plugin to Yoast’s plugin then pay close attention
to the incredibly simple and helpful importing options Joost has built-in to his system; with a simple click you can
import all of your settings from popular plugins like All-in-One-SEO and HeadSpace.
2) AuthorSure (5/5 stars from 22 users, 45,968 downloads)
This is a highly regarded plugin which focuses entirely on authorship integration.
PLUGIN CAVEATS: Many people install WordPress plugins to add functionality to their sites without much thought;
however, each plugin installed does create an additional vulnerability to hacking and can slow down your website.
How to Setup Google Authorship: The Unofficial Manual
Have us install it for you
Page 10
This information is accurate as of July/August 2013
So, consider these rules:
1) Install only the plugins you absolutely need and always consolidate when you can find a great plugin that fulfills the
objectives of multiple plugins (like the WordPress SEO by Yoast).
2) Upgrade plugins regularly! This goes for your WordPress installation as well but you may want to spend some time
researching any side-effects which could result from upgrading. I say this because I have experienced instances
where upgrading to the latest version of WordPress caused havoc on my site. The updates for WordPress are
generally a very good idea but in some instances you may find it worthwhile to wait for issues to shake out with the
latest version before upgrading.
3) Delete any plugins that are installed but are not active because even when inactive the plugins are potential entry
points for hackers.
4) If you are concerned a particular plugin is causing speed issues on your website, or perhaps you don’t know but
want to test out your theory try running site speed test before and after disabling it. If you see a major discrepancy
(even half a second is significant) then you should either find a better plugin or remove it and if you must have the
functionality then get a developer to build it in to your site so a plugin is not necessary.
Here are some more resources on how to keep your WordPress installation fast without using a plugin:
•
•
•
•
15 easy ways to speed up WordPress… (basic to moderate complexity)
How to optimize WordPress for more speed (basic to advanced)
5 quick changes to speed up your WordPress website (moderate complexity)
How to speed up WordPress in the Cloud (very technical and won’t apply to the average install)
Here are some more resources on how to improve WordPress security to minimize/avoid successful hacks:
•
•
Official Manual on the Subject: “Hardening WordPress” (basic to advanced)
WordPress Security tips from SiteGround (complex for beginners)
Other services and plugins to consider if you wish:
•
•
•
Cloudflare service: offers speed increases, security, analytics and apps. Costs $
Secure WordPress plugin: disables many known vulnerabilities
Other WordPress security plugins (link to WordPress.org plugin search).
How to Setup Google Authorship: The Unofficial Manual
Have us install it for you
Page 11
This information is accurate as of July/August 2013
F) Setup for a One-Author Site on WordPress.com
If you currently have your site hosted for free on WordPress.com then adding rel=author is
very simple but does require you to follow these steps closely:
1) Complete the process found in “What you Must Do Before Installing Rel=Author”
2) Open Notepad and copy the following code into it. Then replace the red URL with
your Google Plus profile URL and the name with your own:
<a href=”https://plus.google.com/110164376606045981534” rel=”author”>+Your Name</a>
3) Login to your WordPress.com account and in the left-hand
menu choose “Appearance” and then “Widgets”
4) In the Widgets page choose to add a “Text” widget (half way
down the page of optional widgets) by dragging it to the righthand sidebar. It will automatically open allowing you to add a
title and content.
5) In Widget’s “Title” name this box “Authors”
6) In the box below “Title” copy and paste the code you just
customized in #2 and then click SAVE.
7) Now when you look at your website you will see a box
somewhere on the right-hand column of your page that says
“Authors” followed by “+YourName”.
8) You are done! Just check to ensure this authorship has worked by using Google’s Structured Data Testing Tool. A
live version of this implementation can be seen on this demo I created on WordPress.com
How to Setup Google Authorship: The Unofficial Manual
Have us install it for you
Page 12
This information is accurate as of July/August 2013
G) How to Setup Rel=Author on a SquareSpace Blog
If you currently have your site hosted on SquareSpace they have made the implementation of
Authorship very straight forward.
1) Complete the process found in “What you Must Do Before Installing Rel=Author”
2) Login to your account, go to your Site Manager and then click on the “Preview Mode” (shown by an Eye on the left
hand menu).
3) Click on your name within the “Preview Editor” that appears: your name (or alias if it is different) is shown next to
your headshot at the bottom right of the screen and right below your name it will say “Logout”.
4) In the resulting popup you will see your account information followed by a field where you are told to insert your
Google Plus Profile URL. Save after doing so.
5) Check your implementation using Google’s Structured Data Testing Tool.
H) How to Setup Rel=Author on a Blogspot Blog
If you currently have your site hosted on BlogSpot please follow these instructions:
1) Complete the process found in “What you Must Do Before Installing Rel=Author”
2) Copy and paste the code shown below into your text editor and then substitute “put your
Google Plus Profile URL here” with, well, your Google Plus Profile URL.
<link rel="author" href="put your Google Plus Profile URL here" />
3) Now either you or your webmaster need to copy and paste this code into the template of your blogspot account
within the <head></head> of the source code. If you don’t understand that last sentence then it is okay, just
pass it along to a person with the necessary basic skills to make the change.
If you want to take a leap and do this yourself then:
a) “Go to Setting> Template > Edit your template as HTML”
b) Select all of the code (Ctrl+A) and paste it into a Notepad document and save it as a backup.
How to Setup Google Authorship: The Unofficial Manual
Have us install it for you
Page 13
This information is accurate as of July/August 2013
c) Go back to the template and look until you find the </ head> tag.
d) Immediately before that tag copy and paste the Google Plus Profile URL code you created in #2.
e) Save your file and check to ensure your blog is still working okay. If you see any major issues don’t panic! Just go
back to the template again, select all and delete the code, then copy and paste your backup code into the page.
Save, and then check online and everything will be back to normal. Next either follow this process again more
carefully or call in some professional assistance.
4) Once the code is in place you need to verify everything is working by testing one of your blog post URLs in Google’s
Structured Data Testing Tool.
5) Assuming everything went well with the test you are now done!
How to Setup Rel=Publisher
It is quite possible you have never heard of rel=publisher and that is because it is not talked about very often in comparison
to the rel=author component of Google Authorship. That said it is a part of the authorship puzzle which should be
implemented for any business site with a Google Plus Business Page.
The Benefits
The benefit of a rel=publisher setup is your logo from your Google Plus business page can show up in search results when
the home page is ranking. This establishes a more authoritative appearance in results and can improve click-throughs to
your website. It also allows searchers to go directly to your Google Plus business page from results if they wish to add your
business to the desirable businesses they follow on Google Plus.
The Setup Process
Rel=publisher is setup by adding a simple rel=publisher tag within the code of the home page of your website. When
Google’s algorithms have determined your site should get the extra attention rel=publisher can offer you may see results
like the following search for “all things digital”; the popular tech site AllThingsD is highlighted along with its Google Plus
profile on the right side and the latest article published.
How to Setup Google Authorship: The Unofficial Manual
Have us install it for you
Page 14
This information is accurate as of July/August 2013
Here is a screenshot of the code within the home page of AllThingsD.com showing the rel=publisher directive installed:
Here are the instructions for how to install rel=publisher on your website:
1) Create a Google Plus Page for your business using this great introduction and guide by Google.
During the setup make certain to provide the optional link to your website using the simplest of formatting such as:
http://www.allthingsd.com and NOT http://www.xyzname.com/home/index.php (if that actually was the home
page – and it is for some sites)
2) Go to your Google Plus Business Page and copy the URL. Here are some examples:
The popular AllThingsD has a vanity URL: https://plus.google.com/+AllThingsD/
The more standard version you are likely to have is: https://plus.google.com/110616321701663005596/
How to Setup Google Authorship: The Unofficial Manual
Have us install it for you
Page 15
This information is accurate as of July/August 2013
3) Replace address in the following code example with your business page address (URL):
<link href=”address” rel=”publisher” />
The result should look like this but with your own business page address:
<link href=”https://plus.google.com/110616321701663005596/” rel=”publisher” />
4) Copy the finalized version of the code and paste it before the </head> tag within your home page code. Yes this
may require some technical assistance but I assure you if it will cost you anything it should be marginal for someone
you trust to add this code.
5) Once installed use the Structured Data Testing Tool to check if the code is working properly. If everything is working
you should be able to scroll down to the “Publisher” section and see “Publisher markup is verified for this page”
along with a link to your business page (test this to make sure it is accurate).
Troubleshooting Google Authorship Installation & Setup
Occasionally there will be goof-ups or unique issues that arise when setting up Google Authorship… Murphy has a tendency
to abiding by only his law ;-) Just keep in mind Google does not guarantee your Authorship will show up in search results
and that if the Structured Data Testing Tool shows everything is working then there is little you can do at this time to affect
change.
All of that said here are a few tips for troubleshooting but keep in mind this is FAR from exhaustive so when possible I
added links to supporting resources:
1) Ensure your Google Plus Profile is visible to search (it was visible by default so you would have disabled it before).
a) Open your Google Plus Profile.
b) Click on “Settings” at the bottom of the left-hand menu (the menu fly’s out when you hover over “Home >”
c) Scroll down the page to the section titled “Profile” and enable “Help others discover my profile in search results”
d) Done! Keep in mind if this setting was disabled originally it was definitely the key obstacle to success.
If the above instructions do not work or no longer apply (things change quickly at Google) then try this support URL
which they should update regularly: Change your profile’s search results setting.
2) You must have a clear profile picture that shows your entire face so be sure that is the case or showing up in search
results is highly unlikely. For example, if your photo is cropped and does not show the rest of your head above the
How to Setup Google Authorship: The Unofficial Manual
Have us install it for you
Page 16
This information is accurate as of July/August 2013
brow then it would not likely be acceptable.
3) If all else fails and you have not seen your picture in search results within a couple of months then go to this Google
Product Forum and first read other Google Authorship incidents and how they were resolved and ultimately leave
your own question if necessary.
4) Don’t forget we are here to help! I and my team at StepForth can assist you with setup and troubleshooting for a
fee; we designed the price of this service to be palatable for even the smallest businesses. We want you to
succeed! Just submit a service inquiry for Google Authorship assistance and we will respond as soon as possible.
How to Stay Current on Google Authorship
Authorship is already important but it is going to be one of the mainstays to having a successful Internet presence so it is
important you keep up to date on what is happening on this topic. Here are a few options for doing so:
1) Here is a link to the online version of this manual which is likely to be updated more frequently than the PDF.
2) I created a special list for anyone who wants specifically to be notified when this manual is updated or if other news
on Google Authorship becomes available. Your email address will be kept strictly private, you will not receive any
other email from any other topic, and you can unsubscribe at any time.
Sign up for Google Authorship-only email updates here (the link takes you to an online form).
3) Subscribe to StepForth’s Web Marketing Newsletter to receive news on Authorship and other web marketing news
of interest. That, and/or subscribe to our web marketing RSS feed so you see the latest news as it is published on
our blog.
4) Every week I host SEO 101 Podcast on WebmasterRadio.FM with my good friend and
co-host John Carcutt where we discuss Authorship regularly along with other
optimization tactics for increasing the visibility of your website. In fact, John Carcutt is
one of the authorities on Authorship and implementation so you can bet you will get
news fast and accurately from him on a regular basis.
You can listen live at 2pm PST / 5pm EST on WebmasterRadio.fm or download any of
our past 150+ shows at iTunes or our home page any time. We also have a fantastic
Community page on Google Plus where we have (at this time) just under 1000 members who ask and answer
questions regularly on all things SEO; you are bound to learn a lot just reading it occasionally!
How to Setup Google Authorship: The Unofficial Manual
Have us install it for you
Page 17


© Copyright 2026