
Creating a Publication
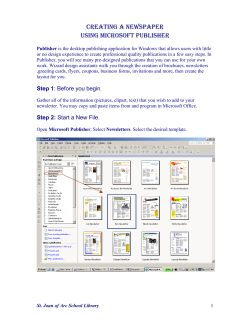
Creating a
Publication
When you open
Publisher this screen appears. On the left-hand
side of the screen choose
to start from a design template, choose a blank publication, or open an existing Publisher document.
Publisher offers design templates for:
Newsletters
Brochures
Catalogs
Flyers
Signs
Postcards
Invitation Cards
Greeting Cards
Business Cards
Resumes
Letterhead
Envelopes
Business Forms
Banners
Calendars
Advertisements
Award Certificates
Gift Certificates
Labels
With Compliments Cards
Menus
Publisher Print Limitations:
Please note that Publisher does have certain limitations when it comes to printing. If you are wanting to create
and print a publication at home, in the office or at a print shop like Kinko’s then Publisher is for you. However,
professional printers cannot support Publisher files.
The Tools & Workspace
Your workspace may not look exactly the same as the space below. Toolbars can be added on by going to View, then Toolbars and
selecting the bar you want to add. Toolbars can be moved to any place on the workspace by clicking on the left-hand side of the bar
and dragging to another position.
Formatting TB
Choose Font
Choose Font Size
Formatting
Arrange
Rotate
Zoom in/out
Border
Shadow 3D
Bold, Italic, Underline, Justification
Standard TB
Pointer / Select Tool: use to select, move, and resize objects in the workspace.
O
b
j
e
c
t
s
T
B
Text Box Tool: use to draw a text box to insert text in the workspace.
Table Tool: use to draw a table in the workspace.
Fill Color
Line Color
Font Color
Word Art Tool: use to insert WordArt into the workspace.
Insert Picture Tool: use to insert a picture saved on your computer or on disk into the workspace.
Insert Clip Art Tool: use to insert clipart on your computer or online into the workspace.
Line Tool: use to draw a line.
Arrow Tool: use to draw a line with an arrow.
Oval Tool: use to draw a circle or an oval.
Rectangle Tool: use to draw a square or a rectangle.
Auto Shapes Tool: use to draw other shapes such as hearts, triangles, stars, etcetera in to the workspace.
Page Navigation
Inserting/ Editing Text and Textboxes
To type text in Publisher you need to create a text box, unlike a Word document where you can immediately start typing on the page.
To create a textbox:
1. Choose the Textbox tool in the Object Toolbar.
2. Holding down your left mouse button drag the pointer to form a box. Then release.
3. A text box will appear. Click on the textbox to begin typing into it.
Editing text in Publisher is done they same way as in a word document.
To change the font type and size:
1. Highlight the text
2. To change the font type go to the Font Tool in the Formatting Toolbar. Pull down the arrow to the right to view a drop-down list
of all the fonts available. Choose one.
3. To change the font size go to the Size Tool on the Formatting Toolbar. Pull down the arrow to the right to view a drop down list
of all the font size available or type your own font size in.
To change the font color:
1. Highlight the text.
2. Go to the Font Color Tool in the Formatting Toolbar. Pull down the arrow to the right to view your
color palette. To choose from additional colors or create your own choose More Colors.
3. A pop-up box will appear with a tab for Standard and Custom.
4. The standard box gives you a large color palette of colors to choose from. Simply click on the
color you would like and push OK. The color will be added to the initial color palette for later use.
5. The custom box allows you to drag you pointer to find any available color or allows you to manually type in the RBB (Red Green Blue) to mix your own color. Then push ok. The color will be
added to the initial color palette for later use.
Standard
Custom
Inserting/ Editing Text and Textboxes
To create various tints with text color:
1. Highlight the text
2. Go to the Font Color Tool in the Formatting Toolbar. Pull down the arrow to the and choose Fill
Effects.
3. A pop-up tint box will appear with various shades of the original color. Choose the tint you would
like and push OK.
Adding format options to a text box works the same way as text boxes do in a Word Document.
To add a border to a text box:
1. Select the textbox.
2. Go to the Line Color Tool in the Formatting Toolbar. Pull down the arrow to the right to view
your color palette. To choose from additional colors or to create your own choose More Line Colors.
3. Like the Text Color Tool you are given a pop-up box with Standard and Custom tabs. However
with the Line Color Tool you are given a option for Transparency.
4. The standard box gives you a large color palette of colors to choose from. Simply click on the
color you would like and push OK. The color will be added to the initial color palette for later use.
The custom box allows you to drag you pointer to find any available color or allows you to manually
type in the RBB (Red Green Blue) to mix your own color. Then push ok. The color will be added to
the initial color palette for later use.
To add a patterned border to a text box:
1. Select the textbox.
2. Go to the Line Color Tool in the Formatting Toolbar. Pull down the arrow to
the right and choose Patterned Lines.
3. A pop up box will appear with options for Pattern and Tint. Choose Pattern.
4. Choose from an array of available patterns.
5. Choose the foreground and background colors from the drop down or create
your own colors.
6. Push OK.
To add a fill color to a textbox:
1. Select the textbox.
2. Go to the Fill Color Tool in the Formatting Toolbar. Pull down the arrow to
the right to view your color palette. To choose from additional colors or to
create your own choose More Fill Colors.
1.
Inserting/ Editing Text and Textboxes
To add a fill effect to a textbox:
1. Select the textbox.
2. Go to the Fill Color Tool in the Formatting Toolbar. Pull down the arrow to the right and choose Fill Effects.
3. A pop up box appears with tabs for Gradient, Texture, Pattern, Picture, and Tint.
Inserting/ Editing Text and Textboxes
To create a bulleted list or a numbered list:
1. Inside your text box place your cursor where you would like your list to begin.
2. Choose Format—Indents and Lists
3. A pop-up box will appear. Choose Bulleted List or Numbered List.
4. Options will appear. Choose the type and size of the bullets or the format of the numbers.
5. Push OK
Normal Options
Bulleted List Options
To create more or less line spacing:
1. Highlight the text you would like to add line spacing to if it
is already typed. If you haven't’ begun typing yet just
choose:
2. Format—Line Spacing
3. A pop-up box will appear. The first option reads “Between
Lines” and has two arrows on the right facing up and down.
4. If you would like to increase the spacing push the arrow up.
If you would like to decrease the spacing push the arrow
down. Or simply type the amount of spacing you would
like in the box.
5. Push OK.
Numbered List Options
Inserting WordArt
To add WordArt:
1. Choose the WordArt Tool from the Objects Toolbar.
2. A pop up box appears with a variety of WordArt
styles to choose from. Choose one and click OK.
3. A second pop up box appears in which to type your
text. After typing, push OK and your finished WordArt
will appear.
Adjust Character Spacing
Adjust Justification
Make WordArt Vertical/Horizontal
Make Letters Same Height
To edit WordArt:
1. Select the WordArt.
2. A Word Art Toolbox appears.
Create new WordArt
Edit the WordArt text
Change WordArt styles
Formatting WordArt Colors and Lines
1. In the WordArt toolbox select Format WordArt.
2. A pop up box appears.
3. Under the Color and Lines tab you have fill color options, transparency options, line color options, line styles and line weights.
4. Under Color options you can choose from the palette, create your
own, or make a color fill. For full information on Color Fill
choices see the To Add a Fill to the Textbox section on page 5.
Adjust Text Wrapping
Change WordArt Shape
Format WordArt
Inserting Images
To insert an image:
1. Choose Insert—Picture.
2. Choose from Clip Art: both files stored on your computer and on
the web
from File: browse your personal computer files or a floppy/
cd to find an image
from Scanner/Camera: Import from a scanner or camera
Format
Editing Images
1.
2.
3.
Select the image.
Your Picture Toolbar will appear.
Choose the image editing function of your choice.
Read on to find out more about
specific functions.
Transparency
Reset Picture
Text Wrapping
Crop
Border Style
Brightness: Lightens or darkens the image.
Contrast: Add less or more contrast to image
Color: Changes picture to grayscale or black & white
The Format Picture Tool
The Colors & Lines tab under “Format Picture”
Fill & Transparency:
If the image is clipart or a photo with a transparent background you can fill the image
with a color and edit the transparency of the fill.
Line: Add a line around the image and edit the color, style, weight & type of line.
Editing Images
The Size tab under “Format Picture”
Size, Rotate, & Scale
If you want to use exact measurements for height, width and rotation. You can also
choose to “reset” the image to it’s original size in case you make a mistake.
The Layout tab under “Format Picture”
Size, Rotate, & Scale
If you want to use exact measurements for height, width and rotation. You can also
choose to “reset” the image to it’s original size in case you make a mistake.
Line: Add a line around the image and edit the color, style, weight & type of line.
Setting a background transparency:
If your image has an area OF ONE COLOR that you would like to take out, you
can make that section transparent.
Select the image.
Your Picture Toolbar will appear.
1. Select the image.
2. Your Picture Toolbar will appear.
3. Choose the image editing function of your choice.
Read on to find out more about
specific functions.


© Copyright 2026