
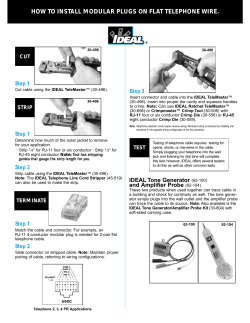
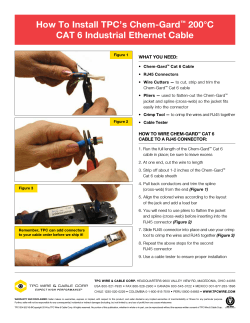
How to Make a Category 6 Patch Cable plug.
How to Make a Category 6 Patch Cable
Using Sentinel™ 111-08080054L34 Category 6 modular
plug.
568-B Wiring
Pair #
1White/Blue
Wire
568-A Wiring
Pin #
White/Blue
5
Blue/White
4
White/Orange
2White/Orange Orange White
1
White/Green
3White/Green Green/White
3
White/Brown
4White/Brown Brown/White
7
<< 568-B Diagram
2
6
8
Pair #
1White/Blue
Wire
Pin
#
White/Blue
5
Blue/White
4
White/Green
2White/Green Green/White
1
White/Orange
3White/Orange Orange/White
3
White/Brown
4White/Brown Brown/White
7
2
6
8
<< 568-A Diagram
Notes for wiring diagrams above:
1. For patch cables, 568-B wiring is by far, the most common method.
2. There is no difference in connectivity between 568B and 568A cables. Either wiring
should work fine on any system*. (*see notes below)
3. For a straight through cable, wire both ends identical.
4. For a crossover cable, wire one end 568A and the other end 568B.
5. Do not confuse pair numbers with pin numbers. A pair number is used for reference only
(eg: 10BaseT Ethernet uses pairs 2 & 3). The pin numbers indicate actual physical locations
on the plug and jack.
LANshack.com
Toll Free: 888-568-1230
E-mail: [email protected]
Steps in Making a Perfect Category 6 Patch
Cable
Using Sentinel™ 111-08080054L34 Category 6 modular
plug.
1) If you are planning
to use boots than
slide them on to the
cable as shown. If
you prefer not to use
boots than start from
step 2.
2) Skin off
approximately 1 ½”
of the cable's jacket.
For precise and
effortless cable
skinning we
recommend the EZ
UTP Cable Stripper
3) Partially untwist
the pairs leaving one
twist remaining at the
bottom being sure not
to untwist into the
cable's jacket.
Straighten and
organize the conductors to the diagram above.
Note: Choose 568B (most common) or 568A
wiring. For crossover see Below
5) Slide the
conductors into the
load bar in their
proper order with the
hollow portion of the
load bar facing the
jacket. The holes in
the load bar alternate up and down. For that
reason, you may find it easier to insert the
conductors one at a time. This would be a good
time to re-check the color order.
LANshack.com
Toll Free: 888-568-1230
E-mail: [email protected]
the next step.
4) (Optional) Cut the
end of the conductors
on an angle while
holding them in
proper order. This will
make it easier to
install the load bar on
6) Push the load bar
as far down as it will
go. Then cut the
conductors straight
across approximately
0.14" from the front
of the load bar. It is
very important to get a very straight and even cut.
The use of a pair of Electrician's Scissors is highly
recommended.
7) Pull the load bar
back up near to the
cut end of the
conductors. Then
slide wires and load
bar into the connector
body holding it with
the pins facing you. That is the way the wiring
diagrams above are shown so be sure to look at
the color order. A very slight amount of jiggling
may be helpful to make the wires find their slots in
the connector body.
9) Crimp the
connector using a
high quality crimp
tool such as the
Ratchet Type RJ-45
and RJ-11/12 that is
sold on this website.
8) Once all of the
wires have entered
their slots firmly push
the connector body
toward the cable. You
will need to be sure
that a) the wires have
reached the end of the connector body, and b) that
the cable's jacket is about half way into the
connector and past the first crimp point (the jacket
crimp).
10) Install the connector on the other end of the
cable. For a straight through (standard) cable use
the same wiring. To make a crossover cable, wire
one end using the 568A method and the other end
using the 568B method.
11) Test the cable for continuity and proper wiring using a high quality cable
tester such as the LANTEST-PRO Cable Tester that is sold on this website.
Optional: Use a "Scanner" to test for NEXT, and other parameters. Please
note that scanners that test for Category 6 cable usually start at around
$4000.
LANshack.com
Toll Free: 888-568-1230
E-mail: [email protected]


© Copyright 2026