
| 56 February 2008
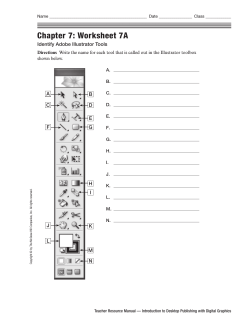
|
56 February 2008
ART145.tut_1 56
18/12/07 12:39:31
TUTORIAL |
ILLUSTRATOR • 3DS MAX • PHOTOSHOP
ORNATE LETTERING
Go Media’s Jeff Finley shows you how to create ornate lettering from sketches and vectors in Illustrator,
make it three-dimensional in 3ds Max and fine-tune the final result in Photoshop
ON THE CD
You’ll find all the files you
need for this tutorial in the
folder marked Tutorials\
ornate on your CD.
TIME NEEDED
1 hour
SKILLS
• Pathfinder and Live
Trace in Illustrator
• Materials, cameras
and Extrude Modifier
in 3ds Max
• Lighting effects
and blending modes
in Photoshop
INFO
Jeff Finley is
an artist and
designer living
in Cleveland,
Ohio. He works at Go
Media and has been
involved in a wide array
of projects for clients
ranging from Pepsi to
Warner Bros. View
more of Jeff’s work
at www.gomedia.us.
Ornate lettering isn’t anything
new. It’s been around for
centuries and there are many ways to
create it. You can get out your pens,
pencils, brushes, rulers, French curves
and a compass, but I can almost
guarantee that most young designers
today would rather just use the
computer than create it by hand.
Although we’re going to be using the
computer, we’ll still start with a sketch.
We’ll scan it into the computer and use
Illustrator to create a vector version
and add some additional detail. Then
we’ll use 3ds Max to give it some
depth. We’ll take it back into Illustrator
and Live Trace your 3D render and
then finally take the lettering into
Photoshop to add the finishing touches.
The purpose of this tutorial is to give
you an insight into my workflow and
inspire you to create your own
lettering. Have fun!
Start with drawing a bunch of
sketches. Once you’ve found one
you’re happy with, scan it and place it
into a new Illustrator document. Put the
sketch onto its own layer and lock it.
Create a new layer and this is where I
start putting in some basic vector shapes
to block out the letters.
1
2
5
3
6
Create the basic form of your letters
using the Pen tool. Then create a
rectangle and put a Round Corners effect
on it. Play with the settings until you’ve
achieved the look you want. Draw simple
shapes to indicate where you’ll be
‘knocking out’ the lettering.
Tutorial and illustration by Jeff Finley
www.gomedia.us
Select all the white shapes and group
them together. With the group still
selected, add the black shape to your
selection. Choose the Pathfinder tool and
use its Subtract function to knock out the
white shapes from the black shape. You’ll
start to see the letters forming.
4
Make all the knock-out shapes white
and your basic form-shape black. I
added some more details where I planned
on cutting out the shapes. This step, along
with most steps here, isn’t an exact
science, so feel free to experiment.
Using the Pen tool, draw the
connecting line inside the letter N.
This step isn’t difficult, but it’s essential
as the first stage to adding more detail
and improvising in Illustrator.
Create a triangle shape and put it on
the left side of the letter O. This is just
some more detail.
February 2008
ART145.tut_1 57
| 57
18/12/07 12:39:37
| TUTORIAL
ILLUSTRATOR • 3DS MAX • PHOTOSHOP
SKETCH!
7
Duplicate and resize the triangle
shapes accordingly, so they’re on
the left and right of each letter. Use your
judgment on size and positioning.
10
This is where things start to get
much more fun. Using the Pen
tool and a triangular brush, begin to add
some shapes and embellishments onto
the outside of your design.
Brainstorm and
come up with ideas
first and then go to
the computer with a
solid plan of action.
When you’re
sketching, you have
less pressure to
create something
great. You can make
mistakes and not
show anyone. You
can also work small
and quickly, and
are not limited by
software constraints.
Add some lines to the text and
some stars to finish it off. To do
this, create some rectangles that
progress from thick to thin to give the
appearance of a wood-cut gradient. Then
use the Subtract function to trim off the
excess lines and keep it neatly inside the
letters. After that, copy and paste your
shapes into a new Illustrator document.
Use the Pathfinder tool to simplify your
artwork into a single black shape, then
save it as an Illustrator 8 AI file.
13
11
Start tweaking the ‘feet’ of your
letters. I don’t always want the letters
to connect, but I want the lettering to have
a consistent look overall. Using the Pen
and Pathfinder tools, just experiment until
you get a look you like.
8
Use Transform>Reflect to copy
what you’ve done on the left side to
the right. I do this to keep some symmetry
in the design. But a word of advice: it looks
lazy if you do this too much. Sometimes
it’s better to create two sides that at first
glance appear symmetrical, but are in
fact a little different. That’s your goal.
Launch 3D Studio Max and import
your AI file as a single object.
Scale it up a touch because it comes in
really small. Then rotate it 90 degrees so
it’s facing forward.
14
GOING 3D
9
After I’d finished tweaking and
detailing the basic letter forms, this
is what they looked like.
I played around in Illustrator for a
while and added a lot more detail.
I even fitted in a simple skull with a
bandana, but I’m not done quite yet.
12
I used 3D Studio Max
to extrude my text,
but it’s not required
or necessary to
create some good
lettering. I enjoy
using 3ds Max and
find that it suits my
workflow. But if you
prefer, you can use
the extrude effect in
Illustrator and just
try to fake it yourself.
Either way can work.
15
I prepared my cameras pretty
much looking head-on at my
object. Experiment yourself for whatever
placement suits you.
|
58 February 2008
ART145.tut_1 58
18/12/07 12:39:42
TUTORIAL |
19
16
Use an Extrude Modifier on your path and play with the settings
to get what you like. The Extrude Modifier will take your 2D
vector path and create a 3D object out of it. This is one of the most
satisfying parts of this process.
Render out a large
version of about
2500x2500 pixels. Save
a TGA file with alpha
channels and then open it
up in Photoshop. Copy
your layer and give it a
semi-thick white stroke.
Ctrl-click on the layer
thumbnail to make a
selection around your art
and fill it with white.
Flatten the layer and send
it behind your other layer,
so now it adds a bit more
depth to the piece.
At this stage I
took my layers
into Illustrator to Live
Trace them, but I’ll skip
going over this feature
because I’m sure you’re
already familiar with Live
Trace’s capabilities. I also
changed my colours a bit
in Illustrator.
20
21
This is just for fun. Add a skylight
and turn on the Advanced Lighting.
Render out a soft-looking version of your
object, so you can get a nice example of
the form. I always like to see what my
object will look like in this lighting setup.
17
18
Set up your textures, one black
and one white. Both are selfilluminated, so they’ll not be affected by
any light sources and will maintain full
colour without shading. This is important
to get better Live Trace results later.
TAKE SHORTCUTS
Don’t be afraid to
copy letters and
modify them to
create new letters,
because this helps
keep your letters
consistent. Also, use
the Pathfinder and
Align tools as needed
– you don’t have to do
everything by eye.
Making letterforms
is both an art and a
science, so there are
certain areas you can
eyeball, but other
parts you need to line
up perfectly. Use
your judgement!
Bring your
vector art into
a new Photoshop
document and put a
nice wood texture in
the background. I
used some splatter
and watercolour
brushes to distress
and fade my artwork.
22
Make final tweaks.
I used a Rainbow
Gradient Overlay, some
layer opacity, Overlay
blending modes, lighting
effects and some cool
sharpening: Select All,
then Edit>CopyMerged
and Paste. Duplicate the
new layer and Filter>High
Pass. Change the layer’s
blending mode to Hard
Light and then reduce
opacity to 50%.
February 2008
ART145.tut_1 59
| 59
18/12/07 12:39:48


© Copyright 2026