
Manual for Space Temperature Control System Option D19 Applies to:
Form CP-Y-D19 (Version 0.2)
Obsoletes CP-Y-D19 (Version 0.1)
Applies to: Model YDSA and YDHA
Manual for Space Temperature Control System Option D19
Table of Contents
1.0 Digital Controller............................................................1
1.1 Display Function Keys.............................................. 1
1.2 Controller hardware input – output points................. 2
2.0 Sequence of Operation..................................................3
2.1 States of Operation................................................... 3
2.2 External Contacts Description
(ID4 Through ID8).................................................... 3
3.0 Controls...........................................................................5
3.1 Supply Fan Control .................................................. 5
3.2 Exhaust Fan Control................................................. 5
3.3 Intake Damper Control............................................. 6
3.4 Temperature And Humidity Control........................... 7
3.6 Cooling Control......................................................... 8
3.5 Heating Staging Control........................................... 8
3.7 Dehumidification ...................................................... 9
3.8 Energy Recovery...................................................... 9
5.0 Start Up..........................................................................14
5.1 Set the Date and Time on the Controller Clock...... 14
5.2 Setting the Unit for Operation with the D19 Control Sequence
14
5.3 Unit Test Mode........................................................ 14
5.4 Supply Fan Airflow (cfm) / Pressure Drop (iwc) Table by Fan
and Unit Size......................................................... 19
5.5 Power Exhaust PE4 Airflow (cfm) / Pressure Drop (iwc) Table
by Fan and Unit Size............................................. 21
5.6 Power Exhauxt PE5 Airflow (cfm) / Pressure Drop (iwc) Table by
Fan and Unit Size.................................................. 22
6.0 Controller History.........................................................23
7.0 Controller Display Menus............................................24
8.0 Communication Cards and Point Lists......................32
8.1 BACnet® MSTP (Option BHB8) Communication.... 32
8.2 LonWorks® (Option BHB7) Communication............ 36
4.0 Safeties and Alarms.....................................................10
4.1 Alarms..................................................................... 10
4.2 Alarm Management ............................................... 12
INDEX...................................................................................40
1.0 Digital
Controller
The digital controller has an integral display allowing for complete access to unit test features, schedules, discharge
air setpoints, fan control, alarms, and other unit operational setpoints.
The control features include:
• Local and remote alarming
• Integrated time clock
• Compressor anti-cycle protection and minimum
•
“on/off” cycle rates
Multiple protocol support [BACnet® (MSTP) or LonWorks®]
1.1 Display Function
Keys
The function keys will be referred to throughout the pre-startup test. The unit controller display or the optional remote display may be used. The function key symbols for
Alarm, Prg, and Esc differ on the remote display. See examples below for clarification.
Example of Unit Controller
Display Key Symbols
Function Key Identification
• Alarm shutdown feature
• Commissioning and test mode functions
• Optional wall mounted or handheld remote display
• Energy conscious applications
• TAB menu for creating a backup of setpoints
Example of Remote Controller Display
(Option RB5 or RB6) Key Symbols
Alarm
Prg
Esc
Up
Enter
Down
Function Key Display on the
System Controller
Function Key Display on the
Remote Controller
Form CP-Y-D-19, P/N 273649 R1, Page 1
1.0 Digital Controller (cont’d)
1.2 Controller hardware input – output points
Input
Input Point
Input Description
Terminal
Name
U1
OA_Hum_Raw Outside Air Humidity
U2
OA_Temp_Raw Outside Air Temp
U3
Ext_Dmpr_Cmd External Unit Damper Command
U4
DA_Temp
Discharge Air Temp
U5
CC_Temp
Cooling Coil Discharge Air Temp
U6
MA_Temp
Mixed Air Temp
Duct Static Pressure
U7
Air_Pressure
Building Static Pressure
U8
(spare)
U9
Spc_CO2
Space CO2
U10
ERV_DA_Temp Energy Recovery Wheel Discharge Air Temp
ID1
SF_Sts
Supply Fan Status
ID2
Filter_Sts
Main or ERV Dirty Filter Status
ID3
Safety_Sts
Safety Input Status
ID4
Ext_OCC
Occupied Mode Input
ID5
Ext_Call_Fan External Fan Call Input (G)
ID6
Ext_Call_Heat External Heat Call Input (W1)
ID7
Ext_Call_Cool External Cool Call Input (Y1)
ID8
Ext_Call_Dh
External Dehum Call Input
ID9
Ext_ Switch_1 External Damper Position Sw 1
ID10
Ext_ Switch_2 External Damper Position Sw 2
ID11
EF_Sts
Exhaust Fan Status
ID12
Comp_Alarm Modulating Compressor General Alarm
ID13
Reheat_Alarm Modulating Reheat Compressor General Alarm
ID14
Phase_Alarm Phase Protection Alarm
ID15
Htr_1_Sts
Gas Heater 1 Status
ID16
Htr_2_Sts
Gas Heater 2 Status
ID17
ID18
Outputs
Terminal
Y1
Y2
Y3
Output Point Name
Damper_Cmd
SF_VFD_Cmd
Comp_Mod_Cmd
Y4
HX_Mod_Cmd
Y5
Y6
NO1
NO2
NO3
NO4
NO5
NO6
NO7
NO8
NO9
NO10
NO11
NO12
NO13
NO14
NO15
NO16
NO17
NO18
J26
FBus2
RH_Mod_Cmd
CF_Spd_Cmd
SF_Cmd
Comp_Stg2_Cmd
Comp_Stg3_Cmd
Comp_Stg4_Cmd
Cond_A_Cmd
Cond_B_Cmd
Alm_Rly_Cmd
HX_Stg1_Cmd
HX_Stg2_Cmd
HX_Stg3_Cmd
HX_Stg4_Cmd
HX_Stg5_Cmd
HX_Stg6_Cmd
Damper Output Command
Supply Fan VFD Command
DX Modulation Command
Gas Heating Modulation Command
Electric Heating Modulation Command
Reheat Modulation Command
Condenser Fan Speed Command
Supply Fan Command
Compressor Stage 2 Command
Compressor Stage 3 Command
Compressor Stage 4 Command
Condenser Section A Command
Condenser Section B Command
Unit General Alarm Relay Command
Heating Stage 1 Command
Heating Stage 2 Command
Heating Stage 3 Command
Heating Stage 4 Command
Heating Stage 5 Command
Heating Stage 6 Command
Energy Recovery Wheel Command
Electric Preheat Command
EF_Cmd
EF_Spd_Cmd
Exhaust Fan Cmd
Exhaust Fan Speed Command
Form CP-Y-D19, P/N 273649 R1, Page 2
Signal Range
0 -10 Vdc
Thermistor 10K-2
0 -10 Vdc
Thermistor 10K-2
Thermistor 10K-2
Thermistor 10K-2
0 to 100% RH
-35° to 240°F (-37° to 115°C)
0 to 100%
-35° to 240°F (-37° to 115°C)
-35° to 240°F (-37° to 115°C)
-35° to 240°F (-37° to 115°C)
0 – 2.5” w.c.
-0.5” iwc thru + 0.5”iwc
0 -10 Vdc
0 -10 Vdc
Thermistor
Dry Contact
Dry Contact
Dry Contact
Dry Contact
Dry Contact
Dry Contact
Dry Contact
Dry Contact
Dry Contact
Dry Contact
Dry Contact
Dry Contact
Dry Contact
Dry Contact
Rib Relay N.O.
Contact Rib Relay N.O.
Contact (spare)
(spare)
Output Description
ERV_Cmd
Preheat_Cmd
Signal type
Signal / Range
0 - 10Vdc
0 - 10Vdc
1 - 5 Vdc
2 - 10Vdc
0 -10Vdc 1 - 5Vdc
0 -10Vdc 24Vac Contact
24Vac Contact
24Vac Contact
24Vac Contact
24Vac Contact
24Vac Contact
24Vac Contact
24Vac Contact
24Vac Contact
24Vac Contact
24Vac Contact
24Vac Contact
24Vac Contact
(spare)
24Vac Contact
24Vac Contact
(spare)
(spare)
RS-485
Communication
0 – 2000 ppm
-35° to 240°F (-37° to 115°C)
Open = “OFF” / Close = “ON”
Open = “OFF” / Close = “ON”
Open = “ALARM” / Close = “NORMAL”
Open = “OFF” / Close = “ON”
Open = “OFF” / Close = “ON”
Open = “OFF” / Close = “ON”
Open = “OFF” / Close = “ON”
Open = “OFF” / Close = “ON”
Open = “OFF” / Close = “ON”
Open = “OFF” / Close = “ON”
Open = “OFF” / Close = “ON”
Open = “OFF” / Close = “ON”
Open = “OFF” / Close = “ON”
Open = “OFF” / Close = “ON”
Always
Active
x
x
x
x
x
x
x
x
Open = “OFF” / Close = “ON”
Open = “OFF” / Close = “ON”
Signal Range
0 - 100% Open
0 - 100% Flow
0 - 100% Capacity
0 - 100% Capacity
0 - 100% Capacity
0 - 100% Capacity
Fixed at 90% Speed
Open = “OFF” / Close = “ON”
Open = “OFF” / Close = “ON”
Open = “OFF” / Close = “ON”
Open = “OFF” / Close = “ON”
Open = “OFF” / Close = “ON”
Open = “OFF” / Close = “ON”
Open = “OFF” / Close = “ON”
Open = “OFF” / Close = “ON”
Open = “OFF” / Close = “ON”
Open = “OFF” / Close = “ON”
Open = “OFF” / Close = “ON”
Open = “OFF” Close = “ON
Open = “OFF” / Close = “ON”
Open = “OFF” / Close = “ON”
Open = “OFF” / Close = “ON”
Always
Enabled
x
x
x
x
x
x
2.0 Sequence of
Operation
The control system operates the supply fan, exhaust fan, intake dampers energy
recovery, DX cooling, and gas/electric heat to maintain a set of discharge air temperature control setpoints.
The unit discharge air temperatures fall within the following three categories
1. Unit supplies Neutral air temperature that does not affect space conditions.
2. Unit supplies Cold air temperature to provide space cooling.
3. Unit supplies Hot air temperature to provide space heating.
The sequence is broken into three primary states of operation.
2.1 States of
Operation
The unit operates in the following states of operation:
1. Enable ON
The unit is permitted to operate based upon field supplied contact closures. The
unit will only switch to the Enable ON state when the state is manually selected
through the user interface device, unit display, or building automation network
communication point.
2. Enable OFF
The unit supply fan and all associated mechanical equipment is OFF in this state.
There are no associated sequences of operation in this state. The unit will only
switch to the OFF state when the state is manually selected through the user
interface device, unit display, or building automation network communication point.
Mechanical System Selections are only permitted in the Enable OFF State.
3. Enable OFF / Alarm
The Enable OFF / Alarm state can only occur from a sequence “failure”. The unit
will stop all mechanical operation until the “failure” condition(s) are resolved. Upon
resolving the failure, the unit will return to its externally commanded condition.
Alarms can also be cleared by resetting power to the unit.
2.2 External
Contacts
Description
(ID4 Through
ID8)
The unit will operate based upon the following field-supplied contact closures:
1. Occupied Contacts (ID4)
When the occupied contacts are closed, the unit will be considered in the occupied
mode. The Dampers, Exhaust Fan, and ERV will follow the occupied mode
sequence. When the contacts are open, the Dampers, Exhaust Fan, and ERV
will operate in the unoccupied mode sequence. There are no other time clock
or schedule functions associated with the unit. (See the damper control section,
Paragraph 3.3, for specific details.)
2. Fan Contacts (ID5)
The unit supply fan will be on whenever the supply fan contacts are closed.
The fan will also automatically start whenever the heating, cooling or
dehumidification contacts are closed, otherwise the fan will be OFF. The auto
sequence can be activated from the fan control when the mechanical cooling and
heating contacts are open. For continuous supply fan operation the ID5 contacts
need to remain closed.
3. Heating Contacts (ID6)
Whenever the contacts are closed, the supply fan will start and the heating
sequence will be enabled. Mechanical heat will operate to maintain the following
heating discharge air temperature setpoint.
#
State
1
Heating
Contacts
Unit Discharge Setpoints
Discharge Air
Variable
Control
Space Heating Air
DA_SpcHtg_SP
Temperature
Default
Setpoint
90°F
(32°C)
Setpoint
Range
50 -140°F
(10 - 60°C)
The unit will not automatically switch to other states except Unit Alarm. When
the contacts are open, the heat and supply fan will turn OFF or operate in
auto-sequence.
Form CP-Y-D-19, P/N 273649 R1, Page 3
2.0 Sequence of
Operation
(Cont’d)
4. Cooling Contacts (ID7)
Whenever the cooling contacts are closed, the supply fan will start. The
mechanical cooling will operate to maintain the unit discharge air temperature
setpoint.
2.2 External
Contacts
Description
(ID4 Through
ID8) (Cont’d)
#
State
1
Cooling
Contacts
Unit Discharge Setpoints
Discharge Air
Variable
Control
Space Cooling Air
DA_SpcClg_SP
Temperature
Default
Septoint
55°F
(12°C)
Range
50 -100°F
(10 - 37°C)
The unit will not automatically switch to other states except Unit alarm. When
the contacts are open, the cool and supply fan will turn OFF or operate in
auto-sequence.
5. Dehumidification Contacts (ID8)
When the contacts are closed and the cooling and heating contacts are open, the
supply fan will start and the unit reheat system will be active.
6. Auto Sequence
When the Fan contacts are closed and the mechanical cooling, heating, and
dehumidification contacts are open, the unit will operate in the auto sequence.
The unit will operate to maintain the following discharge air temperature setpoints.
If both heating and cooling contacts are enabled, the unit will not turn on any
mechanical system until the condition is removed.
#
Unit Discharge Setpoints
OAT
Discharge Air
Default
Variable
Range
Allowed
Control
Septoint
Neutral Air
80°F
50 -100°F
MAT > 65F
DA_NAClg_SP
Temperature
(26°C) (10 - 37°C)
Neutral Air
60°F
50 -140°F
MAT < 65F
DA_NAHtg_SP
Temperature
(15°C) (20 - 60°C)
State
Auto Sequence
Cool
Auto Sequence
Heat
1
2
If both heating and cooling contacts are enabled, the unit will not turn on any
mechanical system until the condition is removed.
Unit Operation
Thermostat or DDC
Contact Inputs
Enable
ON
Enable
OFF
Fan
Contract
(ID5)
Closed
Active Fan
Control
Sequence
Enable OFF /
Alarm
Fan = OFF
Opened
Heating
Contact
(ID6)
Closed
1. Fan Auto Starts
2. Space Heating
3. DAT Stpt = 90°F
Active Sequences
Dampers
ERV
Exhaust Fan
Opened
Cooling
Contact
(ID7)
Closed
1. Fan Auto Starts
2. Space Cooling
3. DAT Stpt = 55°F
Active Sequences
Dampers
ERV
Exhaust Fan
Dehumification
Contact
(ID8)
Reheat Pump
OFF or Auto
Sequence
Closed
Opened
Form CP-Y-D19, P/N 273649 R1, Page 4
User has
pseudo
manual
control of all
mechanical
operation
Tab : Function
Set Fan
Speeds
Both True
Heating = Open
Cooling = Open
Dehumidification
= Open
Auto
Sequence
Fan Contact =
Closed
1. Fan Auto Starts
2. Space Dehum
3. DAT Stpt = 70°F
Active Sequences
Dampers
ERV
Exhaust Fan
Fan Contact =
Open
All Mechanical
Equipment is OFF
MAT < 65°F
Follow Neutral Air
Heating Setpoint
MAT > 65°F
Follow Neutral Air
Cooling Setpoint
Closed
Opened
Occ/Unocc
Contact
(ID4)
Unit Test
Mode
See Damper Control Options for details.
Occupied
Mode
Dampers
ERV
Exhaust Fan
Unoccupied
Mode
Dampers
ERV
Exhaust Fan
Neutral Air Dehumidification
All Are True
1. OA Dp > 58°F
2. Dmpr > 5% Open
3.0 Controls
3.1 Supply Fan
Control
3.2 Exhaust Fan
Control
Upon a call for the supply fan, the supply fan will start. If the unit is configured with a
100% outside air damper, the damper actuator is electrically interlocked such that the
supply fan cannot start until the damper is 80% open.
When the Supply fan is commanded off, any active heating or cooling operation will be
shut down and the supply fan will stop after an adjustable time delay.
When the supply fan contacts are open or the cooling, heating, or dehumidification
contacts are open, the supply fan is OFF. No other functions can automatically turn the
fan ON except test mode.
A 30-second acceleration and deceleration rate for the supply fan to ramp between the
minimum and maximum motor frequency is factory set via the unit variable frequency
drive.
The supply fan will operate in one of the following three conditions.
1. Summer/Winter Constant Volume (Option VFC9)
The variable frequency drive is commanded ON from NO1. The unit ramps up to
a user set supply fan speed setting. There are two individual supply fan speed %
setpoints one for heating and one for cooling. When the unit is in Space or Neutral
Air Heating, the supply fan will use the heating speed % setpoint. When the unit is
in any other mode, the supply fan will use cooling speed % setpoint.
2. Duct Static Pressure Control (0.0” to 2.5” iwc) (Option VFC3)
The variable frequency drive is commanded ON from NO1. The fan modulates
between the user adjustable minimum and maximum fan speed setpoints using a
PI loop to maintain the duct static pressure setpoint (+0.5”w.c. default).
3. High - Low Fan Speed Control (VFC1)
The variable frequency drive is commanded ON from NO1. There are two fan
speed states - active heating/cooling and fan only. When the fan is ON and the
heating or cooling contacts are closed, the unit will operate to high fan speed.
When the fan is ON and the cooling or heating contacts are open, the supply fan
will operate on low fan speed.
The exhaust fan provides a volume of air expelled to outdoors. The rate is controlled
by one of three sequences of operation.
The exhaust fan has a 30-second acceleration and deceleration rate to ramp between
the minimum and maximum speeds.
Occupied Mode
1. Constant Volume (Option EFC9)
The ECM motor is commanded via Modbus communication. The unit ramps up to
a user set exhaust fan speed setting. There are two individual exhaust fan speed
% setpoints, one for heating and one for cooling. When the unit is in Space or
Neutral Air Heating, the exhaust fan will use the heating speed % setpoint. When
the unit is in any other mode the exhaust fan will use cooling speed % setpoint.
2. High - Low Fan Speed Control
The ECM motor is commanded via Modbus communication. There are two fan
speed states, one for active heating/Cooling and fan only. When the fan is ON and
the heating or cooling contacts are closed, the unit will operate to high fan speed.
When the Fan is ON and the cooling or heating contacts are open, the fan will
operate to low fan speed.
3. Building Static Pressure Control (-0.5” to 0.5” w.c.) (Option EFC4)
The ECM motor is commanded via Modbus communication. The fan will operate
between the user adjustable minimum and maximum fan speed setpoints
and modulate using a PI loop to maintain the building static pressure setpoint
(+0.1”w.c. default).
Exhaust Fan Control : Unoccupied Mode
The exhaust fan is normally OFF in the unoccupied mode. The unit exhaust fan will be
permitted to operate in the unoccupied mode if the unit is configured for 100% outside
air. For intake damper control options 2. and 3., the exhaust fan will be permitted to
operate if the unoccupied ventilation enable variable is set to ON.
Form CP-Y-D-19, P/N 273649 R1, Page 5
3.0 Controls
(Cont’d)
3.3 Intake Damper
Control
The intake dampers operate based upon state, mode, and one of five user selected
sequences. The dampers are normally open and operational in the occupied mode and
closed to outside air in the unoccupied mode, depending on the user selection.
1. 100% OA
When the unit is to start, the outside air damper will modulate (point Y1 = 10Vdc)
and the supply fan will be commanded ON (point NO1 = On). If the unit is
equipped with an outside air damper, the damper actuator is electrically interlocked
to the fan start/stop such that the supply fan cannot start until the damper is 80%
open. Options AR8, AR2D, AR2L, and AR2Y are electrically interlocked with the
supply fan.
OFF and Alarm Modes
The damper will be closed (Y1 = 0%).
2. External 0-10vdc Input, (Option GF1)
Occupied & Unoccupied Mode
The dampers will modulate from 0 -100% (point Y1 = 0 to 10Vdc) based user
supplied 0-10Vdc input. 0 Volts input is 0% damper while 10V input is 100%
damper position. This is not allowed with Options AR8, AR2D, AR2L, and AR2Y.
The software does not prevent the selection of this option. The fan status switch
will handle the block flow condition. The damper is NOT electrically interlocked
with the supply fan.
Unoccupied OFF and Alarm Modes
The damper will be closed (Y1 = 0%).
NOTE: For unoccupied operation of this damper control option, set the unoccupied
ventilation enable variable to ON.
3. Two Position Dampers (Option GF2)
Occupied Mode
The damper will open to the user adjustable occupied damper position setpoint
value (point Y1 = 100%). For the damper options with only 100% outside air, the
mechanical interlock of 80% will not allow the fan to start. Adjust the outside air
setpoint to reach the minimum electrical interlock position.
Unoccupied Mode
With the unoccupied ventilation enable variable set to ON, the damper will open to
the user adjustable unoccupied damper position setpoint value (point Y1=0Vdc).
For the damper options with only 100% outside air, the mechanical interlock of
80% will not allow the fan to start. Adjust the outside air setpoint to reach the
minimum electrical interlock position. With the unoccupied ventilation enable
variable set to off the damper will be commanded to 0%.
OFF and Alarm Modes
The damper will be closed (Y1 = 0%).
4. Four Positions based on 2 Digital Inputs (Option GF4)
Occupied Mode
The damper will open to the user adjustable defined position based upon two
hardware input switches (ID9 & ID10).
Variable
Name
Aux_1_SP
Aux_2_SP
Aux_3_SP
Aux_4_SP
Input Switch
ID9
ID10
Open
Open
Close
Open
Open
Close
Close
Close
Default Dmpr
Position
20%
40%
60%
80%
Display
Range
0-100%
0-100%
0-100%
0-100%
Y1 Output
Range
0 – 10V
0 – 10V
0 – 10V
0 – 10V
This option is not allowed with AR8, AR2D, AR2L, and AR2Y. The software does
not prevent the selection of this option. The fan status switch will handle the block
flow condition.
Unoccupied, OFF and Alarm Modes
The damper will be closed (Y1 = 0%).
Form CP-Y-D19, P/N 273649 R1, Page 6
5. Economizer Package (Option GF8)
Occupied Mode
The dampers will modulate to the user adjustable minimum position setting when
the unit is in occupied mode (MinDmprSP, Default = 10%). When the CO2 sensor
option is selected (input U9), the minimum damper position will be determined as
follows: If the Space CO2 level exceeds the (SpcCO2SP, default = 1000 ppm)
with a 200 ppm differential (SpcCO2Diff, default = 200 ppm), the user adjustable
(CO2DmprOsSP, Default = 10%) value will be added to the (MinDmprSP, Default
= 10%).
CO2 > 1000 ppm = Active Minimum Damper Position 20%
CO2 < 800 ppm = Active Minimum Damper Position 10%
When cooling is required via the thermostat input ID7 and the outdoor air
temperature is less than the economizer temperature lockout and the economizer
dewpoint lockout, the dampers will modulate using a PID from the minimum
position to the maximum position to maintain the mixed air temperature at the
DA_SpcClg_SP.
When cooling is required via Auto Sequence Cool and the outdoor air temperature
is less than the economizer temperature lockout and the economizer dewpoint
lockout, the dampers will modulate using a PID from the minimum position to the
maximum position to maintain the mixed air temperature at the DA_NAClg_SP.
When cooling is not required, the dampers will revert to the minimum position.
Unoccupied, OFF and Alarm Modes
The damper will be closed (Y1 = 0%).
3.4 Temperature
And Humidity
Control
The unit is inherently a discharge air temperature control system. The unit will operate
to maintain one of the following discharge air setpoints depending on the state and
mode. All setpoints are user adjustable from the unit display and the wall mounted user
interface.
The unit switches setpoints based upon states, mode, and space control requirements.
Heating Setpoint Selection
The unit will automatically switch between the two setpoints based on the following:
#
1
2
State
Auto Sequence
Heat
Heating
Contacts
Unit Discharge Setpoints
Discharge Air
Variable
Control
Neutral Air
DA_NAHtg_SP
Temperature
Space Heating Air
DA_SpcHtg_SP
Temperature
Default
Septoint
60°F
(15°C)
90°F
Range
50 -120°F
(10 - 48°C)
50 -140°F
(10 - 60°C)
Sliding Scale: Neutral Air Heating Temperature Reset Schedule Setpoint
The user can also select a reset schedule for the discharge setpoint used when in
neutral air heating mode.
Reset Schedule
Outside Air
Discharge Air
Temperature Temperature
30°F
75°F
(-1.1°C)
(23.8°C)
65°F
65°F
(18.2.8°C
(18.2.8°C)
Form CP-Y-D-19, P/N 273649 R1, Page 7
3.0 Controls
(Cont’d)
3.4 Temperature
And Humidity
Control (Cont’d)
3.5 Heating Staging
Control
Sliding Scale: Space Heating Temperature Reset Schedule Setpoint
The user can also select a reset schedule for the discharge setpoint used when in
space heating mode.
Reset Schedule
Outside Air
Temperature
Discharge Air
Temperature
30°F
(-1.1°C)
65°F
(18.2.8°C)
120°F
(48.9°C)
90°F
(32.2°C)
A call for mechanical heat will occur when the discharge air temperature is 5°F(2.8°C)
below the active setpoint. When the OAT is below 65°F(18°C) (Heating Lockout SP),
the unit enables the mechanical heat to maintain the active setpoint. The modulated
heat output (gas or electric) will be set to 24% output, and NO8 will be ON. The system
will remain in this state for 30 seconds. After the initial timer has expired, the unit will
stage as shown in the staging chart and the PI loop will be active. Stages should be
assumed cumulative from the previous stage.
Gas or Electric Heat Staging
PI Loop Control:
All Statements Must Be True To Activate or De-Activate . All stages will have an adjustable min ON and OFF time.
Increase
De-activate
Stage
Outputs
Inter-Stg
Activate
No timers to de-activate except as shown
Timer
Y4 = 30% for 30
• DAT 5°F (2.8°C) below setpoint • Y4 < 2.5% Modulation &
Stg 1
seconds
• DAT 5°F (2.8°C) above setpoint for 10 mins
(Y4 Modulates, PI Loop)
& NO8 = ON
• Y4 > 70% Modulation &
• Y4 < 5% Modulation &
Stg 2
NO9 = ON
5 min
• DAT 5°F (2.8°C) below setpoint • DAT 5°F (2.8°C) above setpoint
• Y4 > 75% Modulation &
• Y4 < 10% Modulation &
Stg 3
NO10 = ON
5 min
• DAT 5° (2.8°C) F below setpoint • DAT 5°F (2.8°C) above setpoint
• Y4 > 80% Modulation &
• Y4 < 20% Modulation &
Stg 4
NO11 = ON
5 min
• DAT 5°F (2.8°C) above setpoint
• DAT 5°F below setpoint
•
Y4 > 85% Modulation &
• Y4 < 30% Modulation &
Stg 5
NO12 = ON
5 min
• DAT 5°F (2.8°C) below setpoint • DAT 5°F (2.8°C) above setpoint
• Y4 > 90% Modulation &
• Y4 < 40% Modulation &
Stg 6
NO13 = ON
5 min
• DAT 5°F (2.8°C) below setpoint • DAT 5°F (2.8°C) above setpoint
All parameters are factory level access.
3.6 Cooling Control
3.6.1 Cooling Setpoint
Selection
The unit will switch between the setpoints based on the following:
#
1
2
State
Auto Sequence
Cooling
Cooling
Contacts
Occ /
Unocc
Occ
Occ
Unit Discharge Setpoints
Discharge Air
Variable
Control
Neutral Air
DA_NAClg_SP
Temperature
Space Cooling
DA_SpcClg_SP
Air Temperature
Default
Septoint
80°F
(26°C)
55°F
(12°C)
Range
50 - 100°F
(10 - 37°C)
50 -100°F
(10 - 37°C)
If the dehum switch is closed or the unit is in dehum mode and the unit is occupied, the
DX will stage to maintain a cooling coil leaving air temperature (U5) to a DX_Dehum_
Coil_SP of 52°F(11°C).
The unit will return to auto sequence if the dehum mode indexes OFF.
The unit will return to the cooling sequence if the cooling contacts are closed.
3.6.2 Cooling Staging
Control
A call for mechanical cooling will occur when the discharge air temperature is 5°F
(2.8°C) above the active setpoint. The unit enables the mechanical cooling Y3 to main-
Form CP-Y-D19, P/N 273649 R1, Page 8
tain the active setpoint. Cooling capacity/staging will follow a PI loop to maintain the
active setpoint, Y3 = 1-5V, 0-100% Capacity, Y3 = 1V is an OFF condition. Stages
should be assumed cumulative from the previous stage.
DX Mechanical Cooling Staging
PI Loop Control:
All Statements Must Be True To Activate or De-Activate. All stages will have an adjustable min ON and OFF time.
Inter Stage
Compressor /
Stage
Output
Activate
De-activate
Condenser
Timing
0 – 70% Modulation;
< 10 % Modulation;
Stg 1
Y3
A
5 min
DAT 5°F (2.8°C) above setpoint
DAT 5°F (2.8°C) below setpoint
> 70% Modulation &
< 50% Modulation &
Stg 2
NO2
A&B
5 min
DAT 5°F (2.8°C) above setpoint
DAT 5°F (2.8°C) below setpoint
> 80% Modulation &
< 55% Modulation &
Stg 3
NO3
A, B & C
5 min
DAT 5°F (2.8°C) above setpoint
DAT 5°F (2.8°C) below setpoint
> 90% Modulation &
< 60% Modulation &
Stg 4
NO4
A, B, C & D
5 min
DAT 5°F (2.8°C) above setpoint
DAT 5°F (2.8°C) below setpoint
NO5
Cond_Sec_A
When Y3 > 0%
When Y3 = 0%, OFF
NO6
Cond_Sec_B
When NO2,NO3 or NO4 = ON
When NO2,NO3 or NO4 = OFF
All parameters are factory level access.
3.7 Dehumidification
There is a call for dehumidification if one of the following is true.
1. Space Dehumidifaction Mode - The dehum contact is closed.
2. Neutral Air Dehumidification Mode - The outdoor air dewpoint is above the dew
point setpoint. (58°F/14°C, dewpt_sp) and the mixed air dampers are more than
5% open and the unit is in auto sequence cooling or heating.
Dehumidification Commands
The following conditions can lockout the Space Dehumidification Mode.
1. The outdoor air temperature is below the reheat lockout setpoint, (58°F/14°C,
reheat lockout, range 50-100°F/10-37°C) Drybulb.
2. The outdoor air temperature is above the reheat high lockout setpoint.
(100°F/37°C, reheat high lockout, range 50-120°F/10-48°C) Drybulb
3. The space cooling mode is active.
4. Cooling Coil Sensor failure.
The following conditions can lockout the Neutral Air Dehumidification Mode.
1. The outdoor air temperature is below the reheat lockout setpoint, (58°F/14°C,
reheat lockout, range 50-100°F/10-37°C) Drybulb.
2. The outdoor air temperature is above the reheat high lockout setpoint.
(100°F/37°C, reheat high lockout, range 50-120°F/10-48°C) Drybulb
3. Outside Air Humidity Sensor or Cooling Coil Sensor failure.
4. OA dewpoint must be greater than 58°F(14°C) and the outside air damper
command must be greater than the adjustable % open position setpoint (with a 5%
differential) for the dehumidification mode to start.
When either the space dehumidification mode or the neutral air dehumidification
mode are active, the Y3 compressor output will be enabled to maintain a
52°F(11°C) cooling coil discharge setpoint and will use the U5 CC_Temp sensor.
The reheat pump Y5 will be enabled to modulate to maintain the reheat setpoint
70°F(21°C) via the U4 DAT temp sensor, Y5 = 1-5V, 0-100% Capacity, Y5 = 1V is
in OFF condition.
3.8 Energy
Recovery
The energy recovery wheel will operate whenever the exhaust fan is ON in any mode.
Exhaust Fan Status ID11= ON
ERV Wheel, NO15 = ON
In the event of an exhaust fan failure,the ERV will not be permitted to operate.
The energy recovery preheat NO16 will operate whenever the ERV supply air temperature is less than 33°F/.5°C (with a 2°F/.9°C differential) and the outdoor air temperature is below 32°F/0°C (with a 2°F/.9°C differential). Otherwise the electric heat is OFF.
In the event that the ERV Supply Air Temp Sensor fails, the energy recovery preheat
will not be permitted to operate.
Form CP-Y-D-19, P/N 273649 R1, Page 9
4.0 Safeties and
Alarms
4.1 Alarms
Selected safeties have an adjustable delay to prevent nuisance alarms. All alarms are
time stamp logged. If a critical shutdown alarm occurs, the unit will not restart until the
alarm is cleared via the display, or power cycled.
1. Safety (Critical Shutdown Alarm)
The unit is equipped with a safety status relay which is energized in the normal
state. The coil of the safety relay is piloted by an optional firestat and field or
factory provided duct smoke detector. If at any time the status of the safety relay
(ID3 = Alarm) contact closure opens, the unit will immediately shut down. All
mechanical equipment will be turned OFF. The unit alarm display shall show “Unit
Safety Alarm - Unit OFF”. The unit will not restart until the condition has cleared
and the alarm is acknowledged via the unit controller or remote display.
2. Supply Fan Failure (Critical Shutdown Alarm)
If, at any time after an adjustable 120-second time delay from a supply fan start
command (NO1 = ”ON”), fan operation does not prove via the airflow switch
(ID1=OFF), the controller will shut down the system. The unit alarm display shall
show “Supply Fan Failure - Unit OFF”. The unit will not restart until the alarm is
acknowledged via the unit controller or remote display.
3. Low Discharge Temperature Limit (Critical Shutdown Alarm)
When the heat is called to be ON and the 1st stage is enabled, the low discharge
temperature limit alarm will be allowed. If the Discharge Air Temperature (U4)
falls below 33°F/.5°C (Low Limit Alarm Setpoint) for more than 10 minutes,
the controller shuts down the system. The unit alarm display shall show “Low
Discharge Air Temperature Alarm - Unit OFF”. The unit will not restart until the
alarm is acknowledged via the unit controller or remote display.
4. Heat Failure Alarm Gas or Electric (Critical Shutdown Alarm)
When the heat is called to be ON and the 1st stage is enabled, the heat
failure alarm will be allowed. If the Discharge air temperature (U4) is not within
25°F(13.8°C) of the current discharge air setpoint for more than 20 minutes, the
unit shuts down. All equipment will be turned OFF. The unit alarm display shall
show “Possible Heat Failure – Unit OFF”. The unit will not restart until the alarm
is acknowledged via the unit controller or remote display.
5. Discharge Air Temperature Sensor Failure (Critical Shutdown Alarm)
If the discharge air temperature sensor reading (U4) is “invalid”, the unit shuts
down. All equipment will be turned OFF. The unit alarm display shall show
“Discharge Air Temperature Sensor Failure – Unit OFF”. The unit will not
restart until the condition has cleared and the alarm is acknowledged via the unit
controller or remote display.
6. Unit Phase Loss (Critical Shutdown Alarm)
If at any time the phase loss input ID14 shows ON, the unit shuts down. All
equipment will be turned OFF. The unit alarm display shall show “Phase Loss –
Unit OFF”. The unit will not restart until the condition has cleared and the alarm is
acknowledged via the unit controller or remote display.
7. Gas Heating Status Alarm (Heaters 1 and 2)
When the first stage of heating associated with Gas Heater 1 is enabled and proof
of flame is not proven via the heater ignition control board within five minutes, the
unit alarm display shall show “Possible Failure Gas Heater 1 Check Ignition
Control Board”.
When the first stage of heating associated with Gas Heater 2 is enabled and proof
of flame is not proven via the heater ignition control board within five minutes, the
unit alarm display shall show “Possible Failure Gas Heater 2 Check Ignition
Control Board”.
8. Compressor Failure Alarm
If the compressor alarm input ID12 shows ON for more than 5 minutes, all DX
mechanical equipment will be turned OFF. The DX mechanical equipment will
automatically restart when the alarm point is opened. The unit alarm display shall
show “Modulating Compressor Failure”.
Form CP-Y-D19, P/N 273649 R1, Page 10
9. Reheat Compressor Failure Alarm
If the reheat compressor alarm input ID13 shows ON for more than 5 minutes, the
reheat compressor will be turned OFF. The reheat compressor will automatically
restart when the alarm point is opened. The unit alarm display shall show
“Modulating Reheat Compressor Failure”.
10. Exhaust Fan Failure Alarm
If at any time after an adjustable 60-second time delay from an exhaust fan start
command via Modbus, the fan operation does not prove via the airflow switch
ID11=OFF, the unit alarm display shall show “Exhaust Fan Failure”.
11. Exhaust Fan Warning Messages
When the exhaust fan is enabled and is in a diagnostic warning state, one or more
of the following messages will be reported to the unit alarm display:
“Out Stage High Temp; Intern.Circ.High Temp; Motor High Temperature;
DC-link Voltage Low, Limited Mains Power; Limited Mains Current; Brake
Mode”
12. Exhaust Fan Alarm Messages
When the exhaust fan is enabled and is in a diagnostic alarm state, one or more of
the following messages will be reported to the unit alarm display:
“Device Offline; Phase Fault; Motor Blocked; Mains Undervoltage;
Mains Overvoltage;, DC-link Overvoltage; DC-link Undevoltage; Motor
Superheating; Intern.circ.Superheat.; Ouput Stage Superheat.; Hall Sensor
Error; Communication Error; Generic Error”
13. Outdoor Air Temperature Sensor Failure
If the outdoor air temperature sensor reading (U2) is “invalid”, the controller will
turn off heating and cooling functions. The unit alarm display shall show “Outdoor
Air Temperature Sensor Failure – Blower Only”. The unit will automatically
return to normal operation when the temperature sensor value returns.
14. Outside Air Humidity Sensor Failure (Optional – Critical Alarm)
If the outdoor air humidity sensor reading (U1) is “invalid”, the controller will turn
off the OA dewpoint enabled dehumidification mode. The alarm display shall show
“Outdoor Air Humidity Sensor Failure”. The unit will automatically return to
normal operation when the humidity sensor value returns.
15. Cooling Coil Temp Sensor Failure
If the cooling coil temperature sensor reading (U5) is “invalid”, the controller will
turn off all dehumidification functions. The alarm display shall show “Cooling Coil
Temp Sensor Failure”. The unit will automatically return to normal operation
when the temperature sensor value returns.
16. Mixed Air Temp Sensor Failure
If the mixed air temperature sensor reading (U6) is “invalid”, the unit alarm display
shall show “Mixed Air Temp Sensor Failure”.
17. Duct or Building Air Pressure Sensor Failure
If the pressure sensor reading (U7) is “invalid”, the unit alarm display shall show
“Duct or Building Air Pressure Sensor Failure”.
18. ERV Discharge Temp Sensor Failure
If the outdoor air temperature sensor reading (U10) is “invalid”, the controller will
turn off the electric preheat functions. The unit alarm display shall show “ERV
Discharge Air Temp Sensor Failure”. The unit will automatically return to normal
operation when the temperature sensor value returns.
19. Filter Status
When the main unit filter pressure switch activates ID2 = ON, the unit alarm
display shall show “Dirty Filter Status – Check Filters”. No other action will be
taken by the control system.
Form CP-Y-D-19, P/N 273649 R1, Page 11
4.0 Safeties
and Alarms
(Cont’d)
Alarm Status Reporting
When the unit controller has an active or unacknowledged alarm, the alarm status will
be reflected with the following devices / methods:
4.2 Alarm
Management
Controller
Display
Flashing
Alarm Key
Option RB5 or
RB6 Remote
Display
Flashing
Alarm Key
The controller is also equipped with an output configured to energize a factory-mounted
Unit General Alarm Relay (NO7). The alarm relay has a set of normally open and
normally closed contacts available for customer use. The status of the controller output (NO7) is also reported to the optional BAS communication cards (LonWorks® and
BACnet®)
The following active alarms will energize the unit general alarm relay:
Safety (Critical Shutdown Alarm)
Supply Fan Failure (Critical Shutdown Alarm)
Low Discharge Temperature Limit (Critical Shutdown Alarm)
Heat Failure Alarm Gas or Electric (Critical Shutdown Alarm)
Discharge Air Temperature Sensor Failure (Critical Shutdown Alarm)
Unit Phase Loss (Critical Shutdown Alarm)
Gas Heating status Alarm (Heaters 1 and 2)
Compressor Failure Alarm
Reheat Compressor Failure Alarm
Exhaust Fan Failure Alarm
Outdoor Air Temperature Sensor Failure
Outside Air Humidity Sensor – Failure
Cooling Coil Temp Sensor Failure
Mixed Air Temp Sensor Failure
Duct or Building Air Pressure Sensor Failure
ERV Discharge Temp Sensor Failure
Form CP-Y-D19, P/N 273649 R1, Page 12
Acknowledging Unit Alarms and Viewing the Alarm Logger
When a unit has an active and or unacknowledged alarm, it needs to be managed
locally from the unit controller display or from an Option RB5 or RB6 remote display.
Active and or unacknowledged alarms are indicated from either of the above mentioned devices with a flashing LED alarm key.
Press the
flashing
alarm
key.
The most recently queued active and or unacknowledged alarm and message will be
displayed.
Press the down
key to scroll
through the
current list of
active and or
unacknowledged
alarms.
When you reach the end of the queued alarm list, you will be prompted to either press
the alarm key to clear the alarms or press the enter key to display the alarm logger.
Pressing the alarm key will perform the following two functions:
1. The controller will be prompted to attempt a reset of any critical shutdown alarms
that have occurred. If the critical shutdown condition is no longer active, the
controller will re-enable the unit.
2. The controller will clear any of the non-critical alarms that are no longer active.
Alarm
Key
Enter
Key
Pressing the enter key will display the first page of the alarm logger. The first page of
the alarm logger will contain the most recently logged alarm with a date, time, and a
snapshot of the OA Temp, OA Humidity, DA Temp, CC Temp, and MA Temp sensors
at the time the alarm was logged. Pressing the up key in succession will display any
remaining logged alarms from the most recent to least recent entry.
Up Key
Form CP-Y-D-19, P/N 273649 R1, Page 13
5.0 Start Up
5.1 Set the Date and Time on the Controller Clock
1. From the Main Screen, press the
program key to access the main menu.
Press the up or down arrow keys to
navigate to the B. Schedule submenu
and press the enter key to select.
2.From Screen B.1, press
the enter key to access the
modifiable date and time
fields and set them to the
current date and time.
3.Once set, press the enter
key in succession until the
cursor is blinking in the
uppermost left hand corner
of the screen and press the
down arrow key to advance
to Screen B.2.
From Screen B.2, press the enter key to access the modifiable
DST fields and set the values accordingly.
Once set, press the escape key in succession to return to the main
screen.
5.2 Setting the Unit
for Operation
with the
D19 Control
Sequence
From the Main Screen: press the
program key to access the main
menu.
From the Main Menu, press the up
or down arrow keys to navigate to
the A. Quick Setpoints submenu
and press the enter key to select.
the System Enable: field and set the
value to ON.
Press the escape key in succession
to return to the main screen.
The unit will control according to the
inputs provided by a conventional
thermostat or other external source.
The status of the unit contacts can
be viewed from main screen M.4.
From the Quick Setpoints Screen
A.1, press the enter key to access
5.3 Unit Test Mode
The test mode is accessed via the service menu (from the unit mounted display) and
can only be entered when the unit is in the off state. Once the test mode is enabled,
it remains active for a 2 hour time period adjustable from 0-4 hours. When the timer
expires or test mode is disabled, the unit will return to the off state.
In the test mode, all sequences of operation stop. Upon the test mode being enabled
the following devices shall be automatically commanded:
1. The Unit Damper Position Y1 shall be automatically be commanded to = 100%.
2. The Unit Supply Fan NO1 will be automatically commanded ON.
3. The optional unit exhaust fan will be automatically commanded ON via Modbus.
4. The Fan(s) will operate at their maximum fan speed setpoint values.
Form CP-Y-D19, P/N 273649 R1, Page 14
Once supply air flow is proven via Supply Fan Status ID1, the user can manually select
all of the remaining controller outputs to be commanded ON and OFF or modulated
between 0-100% with the exceptions shown in the Compressor Test State Automatic
Interlock Table.
Compressor Test State Automatic Interlock Table
Output Terminal Output Point Name
Output Description
Y3
Comp_Mod_Cmd
DX Modulation Command
NO2
Comp_Stg2_Cmd
Compressor Stage 2 Command
Interlocked Output
Condenser Fan Section A NO5 = ON
When Y3 greater than 1.44 vdc
Condenser Fan Section B NO6 = ON
NO3
NO4
Comp_Stg3_Cmd
Comp_Stg4_Cmd
Compressor Stage 3 Command
Compressor Stage 4 Command
Condenser Fan Section B NO6 = ON
Condenser Fan Section B NO6 = ON
Test Mode Detailed
Description
With the unit de-energized, open and secure the supply fan access door and the
damper access door. Turn on the main unit disconnect to energize the unit. The unit
digital controller will take two to three minutes to initialize.
1. From the Main Screen check to ensure that the unit
is in the OFF state. If the unit is in the OFF state,
proceed to Step 4.
If the unit is not in the OFF state, proceed to Step 2.
2. Press the Program Key to access the main menu and
then press the up or down arrow keys to navigate to
the A. Quick Setpoints submenu.
Press the enter key to select.
3. Press the enter key until the cursor is blinking on the
State_Sel: field and press the down arrow key to set
the unit to the OFF state.
4. Press the escape key to access the main menu and
use the up or down arrow keys to navigate to the
E. Service submenu. Press the enter key to select.
When prompted to enter the Service Password, use
the up or down arrow keys and enter the service
password of 7125, and press the enter key.
5. Use the up or down arrow keys to navigate to the
a.Test Mode menu and press the enter key to select.
6. From the test mode Screen E.a.1, press the enter key
to select the Enable: field, and press the up or down
arrow key to turn the test mode ON.
Once enabled ON, press the enter key in succession
until the cursor is flashing in the uppermost left hand
corner of the screen and use the down arrow key to
navigate to the next Test Mode Screen E.a.2.
7.If applicable, visibly check that the optional unit
dampers have actuated to the full open position
(Outside Air) and full closed position (Return Air).
NOTE: The damper actuators will have up to a 120
second time period for full stroke.
If the unit is equipped with damper(s) and they have
not actuated to the appropriate positions, refer to
Form O-Y for instructions.
NOTE: Damper operation is required in order to
complete the Test Mode.
Form CP-Y-D-19, P/N 273649 R1, Page 15
5.0 Start Up (Cont’d)
Capacity: field. Press the up arrow key to set the
Comp Capacity value to 100%. Using a digital volt
meter, check for the appropriate line voltage on the
load side of the “A” circuit compressor contactor to
verify that it has energized and visibly check that the
Condenser Section “A” Fan(s) is operating. When
verified, press the down arrow key to set the Comp
Capacity value back to zero.
5.3 Unit Test Mode (Cont;d)
With proper damper operation, close the damper
access door and resume the test at Step 8.
8. Visibly check the rotation decal in the unit fan
compartment to verify proper rotation of the unit
supply fan. If the fan rotation is incorrect, the main
unit electrical supply must be de-energized. Once
de-energized, the electrical phasing will need to be
switched at the main unit disconnect. After the unit
phasing is corrected, re-verify the unit supply fan
rotation.
With proper supply fan rotation, close the supply fan
access door, and resume the test mode at Step 9.
9. From the Test Mode Screen E.a.2, verify that the
Supply Fan Airflow Status: and the Exhaust
Airflow Status: (if applicable) are reading ON.
I f the airflow status values are not reading ON, refer to
Form O-Y for instructions.)
NOTE: Proof of supply fan airflow is required in order to
complete the Test Mode.
If no voltage is present or the Condenser Section
“A” Fan(s) is not operable, refer to Form O-Y for
instructions.
12. If the unit is equipped with an optional reheat
circuit, from the Test Mode Screen E.a.3, press the
enter key until the cursor is flashing on the Reheat
Capacity: field. Press the up arrow key to set the
Comp Capacity value to 100%. Using a digital volt
meter, check for the appropriate line voltage on the
load side of the reheat circuit compressor contactor
to verify that it has energized. When verified, press
the down arrow key to set the Reheat Capacity
value back to zero.
10. Instructions for Setting Fans to Test and
Balance Airflow
Adjusting the unit fan speeds to achieve the desired airflow performance is accomplished on test mode screen
E.a.2. Reference the supply & exhaust fan airflow
tables, on pages 19 thru 22, for setting the maximum
fan speeds.
Using field-supplied tees connect a manometer to the
appropriate set of pressure tap tubes associated with
the fan -- (Blue and Clear tubes for the Supply Fan) (Yellow and Clear tubes for the Exhaust Fan).
Measure the actual fan differential pressure and compare it to the appropriate fan airflow table. If an adjustment is required use the Supply: % and the Exhaust: %
modifiable fields and the up and down keys to increase
or decrease the commanded fan speed until the differential pressure matches the differential pressure from
the fan airflow table.
If an adjustment is required, the adjusted values will
need to be saved in the TAB Menu. Instructions for saving setpoint values are in Step 17 at the end of the Test
Mode Description instructions.
Press the enter key in succession until the cursor
is flashing in the uppermost left hand corner of the
screen and use the down arrow key to navigate to
the next Test Mode Screen E.a.3.
11. From the Test Mode Screen E.a.3, press the
enter key until the cursor is flashing on the Comp
Form CP-Y-D19, P/N 273649 R1, Page 16
If no voltage is present, refer to Form O-Y for
instructions.
Press the enter key in succession until the cursor
is flashing in the uppermost left hand corner of the
screen and use the down arrow key to navigate to
the next Test Mode Screen E.a.4.
13. From the Test Mode Screen E.a.4, press the enter
key until the cursor is flashing on the Stage 2:
field. Press the up arrow key to set the Stage 2
value to ON. Using a digital volt meter, check for
the appropriate line voltage on the load side of the
Stage 2 contactor to verify that it has energized and
visibly check that the Condenser Section “B” Fan is
operating. Once verified, press the down arrow key
to set the Stage 2 value back to OFF.
• Press the enter key until the cursor is flashing on
If no voltage is present, or the Condenser Section
“B” Fan is not operable, refer to Form O-Y) for
instructions.
Depending upon configuration, the unit may
be equipped with up to 4 stages of cooling. If
applicable, perform the same procedure for the
compressors associated with Stages 3 and 4.
Press the enter key in succession until the cursor
is flashing in the uppermost left hand corner of the
screen and use the down arrow key to navigate to
the next Test Mode Screen E.a.5.
14. Electric Heat Only - From the Test Mode Screen
E.a.5, press the enter key until the cursor is flashing
on the Heat Capacity: field.
Press the up arrow key to set the Heat Capacity
value to 100% and press the enter key until the
cursor is flashing on the Stg 1: field. Press the up
arrow to set the Stg 1 value to ON. Using a digital
volt meter, check for the appropriate line voltage on
the load side of the Stg 1 contactor to verify that it
has energized. Once verified, press the down arrow
key to set the Stg 1 value back to OFF.
If no voltage is present, refer to Form O-Y for
instructions.
Depending upon configuration the unit may be
equipped with up to 6 stages of electric heating.
Perform the same procedure for the remaining
applicable heating stages.
NOTE: The heat capacity: field is only associated
with Stg 1.
15. Gas Heat Only - If the unit is equipped with
gas control system Option AG73 or AG74, the
modulating gas valve and its associated heat
capacity value will need to be used to verify and
(if required) adjust the manifold pressure settings.
See Form I-Y, Paragraph 9.2. To test staged flame
proving, see the following instructions.
From the Test Mode Screen E.a.5, press the enter
key until the cursor is flashing on the Heat Capacity
Field:
• Option AG73 or AG74 only - Press the up arrow
key to set the Heat Capacity value to 24%.
the Stg 1: field.
• Press the up arrow to set the Stg 1 value to ON.
NOTE: Depending on the gas control option (Option
AG71, AG72. AG73, or AG74), the unit may be
equipped with up to 4 stages of gas heating turned
on via the controller menu. If applicable, perform the
following step for stage 2.
• Press the enter key until the cursor is flashing on
the Stg 2: field.
• Press the up arrow to set the Stg 2 value to ON.
Press the enter key in succession until the cursor
is flashing in the uppermost left hand corner of the
screen and use the down arrow key to advance to
the Test Mode Screen E.a.11.
If the gas heating section(s) have proved flame, the
associated DI15 (and DI16 if applicable) will show
status ON.
NOTE: Allow a 3-minute period for flame proving.
Once verified, press the down arrow key to set the
Stg 1 and Stg 2 values back to OFF.
If the DI15 and (DI16) fail to show status ON, refer
to Form O-Y for instructions.
Press the enter key in succession until the cursor
is flashing in the uppermost left hand corner of the
screen and use the up arrow key to navigate to the
Test Mode Screen E.a.6.
16. Optional Energy Recovery with or without
Optional Preheat - From the Test Mode Screen
E.a.6, press the enter key until the cursor is flashing
on the Wheel: field.
Press the up arrow key to set the wheel value to
ON. Press the enter key to select the Preheat: field.
Press the up arrow to set the preheat value to ON.
Using a digital volt meter, check for the appropriate
line voltage on the load side of the wheel contactor
and preheat contactor (if applicable) to verify that
they have energized. Once verified, set the values
for the Wheel: field and the Preheat: field to OFF.
If no voltage is present at the contactor(s), refer to
Form O-Y for instructions.
Press the enter key in succession until the cursor
is flashing in the uppermost left hand corner of the
Form CP-Y-D-19, P/N 273649 R1, Page 17
5.0 Start Up (Cont’d)
5.3 Unit Test Mode (Cont;d)
screen and use the up arrow key to navigate to Test
Mode Screen E.a.1. Press the enter key to select
the Enable: field. Press the down arrow key to set
the value to OFF.
17. Saving Adjusted Maximum Fan Speed Values
Press the escape key to return to the service menu
and navigate to the TAB sub menu.
Press the enter key to access the TAB menu screen
E.b.1
This screen is used to save all adjustable unit
parameters. The Set Max SF Spd? and Set Max EF
Spd? modifiable fields are used to set the optional
Summer / Winter and High/ /Low fan speed setpoints
Form CP-Y-D19, P/N 273649 R1, Page 18
for saving to the maximum fan speed values
determined in Step 10.
Press the enter key to navigate to the Set SF Max
Spd? modifiable field and press the up key to set the
value to YES. After a two-second period, the value
will automatically return to the NO state.
If applicable, press the enter key to advance to the
Set Max EF Spd? modifiable field and press the
up key to set the value to YES. After a two-second
period, the value will automatically return to the NO
state.
To save unit and fan speed parameters press the
enter key to navigate to the Save? modifiable field
and press the up key to set the value to YES. After
a two-second period, the value will automatically
return to the NO state.
Unit parameters have now been successfully saved
to the controller permanent memory. From this point
forward the most recently saved unit parameters
can be restored using the Restore? modifiable field.
The unit test and setting fan speed procedure is now
complete. Press The escape key in succession to return
to the main screen.
5.4 Supply Fan Airflow (cfm) / Pressure Drop (iwc) Table by Fan and
Unit Size
Static
Pressure
YDSA
(iwc)
120
150
0.5
----0.6
----0.7
----0.8
----0.9
----1.0
1966 1966
1.2
2154 2154
60
---------------
90
1025
1123
1213
1297
1376
1450
1588
120
1025
1123
1213
1297
1376
1450
1588
Supply Fan Airflow (cfm) - by Model and Size
YDHA
150
180
210
240
60
90
1025
----------1123
----------1213
----------1297
----------1376
----------1450 1966 1966 1966
----1588 2154 2154 2154
-----
120
1025
1123
1213
1297
1376
1450
1588
YDMA
150
180
1025
--1123
--1213
--1297
--1376
--1450
--1588 1687
210
----------1966
2154
Static
Pressure
(iwc)
240
--0.5
--0.6
--0.7
--0.8
--0.9
1966
1.0
2154
1.2
1.4
2326
2326
---
1716
1716
1716
2326
2326
2326
---
---
1716
1716
1822
2326
2326
1.4
1.6
1.8
2.0
2.2
2.4
2.6
2.8
3.0
3.2
3.4
3.6
3.8
4.0
4.2
4.4
4.6
4.8
5.0
5.2
5.4
5.6
5.8
6.0
6.2
6.4
6.6
6.8
7.0
7.2
7.4
7.6
7.8
8.0
8.2
8.4
8.6
8.8
9.0
9.2
9.4
9.6
9.8
10.0
10.2
10.4
10.6
10.8
11.0
2487
2638
2780
2916
3046
3170
3290
3405
3517
3625
3730
3832
3932
4029
4124
4217
4307
4396
4483
4569
4652
4735
4816
4895
4974
5051
5127
5202
5275
5348
5420
5491
5561
5630
5698
5765
5832
5898
---------------------
2487
2638
2780
2916
3046
3170
3290
3405
3517
3625
3730
3832
3932
4029
4124
4217
4307
4396
4483
4569
4652
4735
4816
4895
4974
5051
5127
5202
5275
5348
5420
5491
5561
5630
5698
5765
5832
5898
---------------------
--621
655
687
717
747
775
802
828
854
878
903
926
949
971
993
1014
1035
1056
1076
1096
1115
1134
1153
1171
1189
1207
1225
1242
1259
1276
1293
1310
1326
1342
1358
1373
1389
1404
1420
1435
1449
1464
1479
1493
1507
1522
1536
1834
1945
2051
2151
2246
2338
2426
2511
2594
2674
2751
2827
2900
2972
3042
3110
3177
3242
3307
3369
3431
3492
3552
3610
3668
3725
3781
3836
3891
3944
3997
4050
---------------------------------
1834
1945
2051
2151
2246
2338
2426
2511
2594
2674
2751
2827
2900
2972
3042
3110
3177
3242
3307
3369
3431
3492
3552
3610
3668
3725
3781
3836
3891
3944
3997
4050
---------------------------------
1834
1945
2051
2151
2246
2338
2426
2511
2594
2674
2751
2827
2900
2972
3042
3110
3177
3242
3307
3369
3431
3492
3552
3610
3668
3725
3781
3836
3891
3944
3997
4050
---------------------------------
2487
2638
2780
2916
3046
3170
3290
3405
3517
3625
3730
3832
3932
4029
4124
4217
4307
4396
4483
4569
4652
4735
4816
4895
4974
5051
5127
5202
5275
5348
5420
5491
5561
5630
5698
5765
5832
5898
---------------------
2487
2638
2780
2916
3046
3170
3290
3405
3517
3625
3730
3832
3932
4029
4124
4217
4307
4396
4483
4569
4652
4735
4816
4895
4974
5051
5127
5202
5275
5348
5420
5491
5561
5630
5698
5765
5832
5898
---------------------
2487
2638
2780
2916
3046
3170
3290
3405
3517
3625
3730
3832
3932
4029
4124
4217
4307
4396
4483
4569
4652
4735
4816
4895
4974
5051
5127
5202
5275
5348
5420
5491
5561
5630
5698
5765
5832
5898
---------------------
--621
655
687
717
747
775
802
828
854
878
903
926
949
971
993
1014
1035
1056
1076
1096
1115
1134
1153
1171
1189
1207
1225
1242
1259
1276
1293
1310
1326
1342
1358
1373
1389
1404
1420
1435
1449
1464
1479
1493
1507
1522
1536
--621
655
687
717
747
775
802
828
854
878
903
926
949
971
993
1014
1035
1056
1076
1096
1115
1134
1153
1171
1189
1207
1225
1242
1259
1276
1293
1310
1326
1342
1358
1373
1389
1404
1420
1435
1449
1464
1479
1493
1507
1522
1536
1834
1945
2051
2151
2246
2338
2426
2511
2594
2674
2751
2827
2900
2972
3042
3110
3177
3242
3307
3369
3431
3492
3552
3610
3668
3725
3781
3836
3891
3944
3997
4050
---------------------------------
1834
1945
2051
2151
2246
2338
2426
2511
2594
2674
2751
2827
2900
2972
3042
3110
3177
3242
3307
3369
3431
3492
3552
3610
3668
3725
3781
3836
3891
3944
3997
4050
---------------------------------
1948
2066
2178
2284
2386
2483
2577
2667
2755
2840
2922
3002
3080
3156
3230
3303
3374
3444
3512
3579
3644
3709
3772
3835
3896
3956
4016
4074
4132
4189
---
2487
2638
2780
2916
3046
3170
3290
3405
3517
3625
3730
3832
3932
4029
4124
4217
4307
4396
4483
4569
4652
4735
4816
4895
4974
5051
5127
5202
5275
5348
5420
5491
5561
5630
5698
5765
5832
5898
---------------------
2487
2638
2780
2916
3046
3170
3290
3405
3517
3625
3730
3832
3932
4029
4124
4217
4307
4396
4483
4569
4652
4735
4816
4895
4974
5051
5127
5202
5275
5348
5420
5491
5561
5630
5698
5765
5832
5898
---------------------
1.6
1.8
2.0
2.2
2.4
2.6
2.8
3.0
3.2
3.4
3.6
3.8
4.0
4.2
4.4
4.6
4.8
5.0
5.2
5.4
5.6
5.8
6.0
6.2
6.4
6.6
6.8
7.0
7.2
7.4
7.6
7.8
8.0
8.2
8.4
8.6
8.8
9.0
9.2
9.4
9.6
9.8
10.0
10.2
10.4
10.6
10.8
11.0
---------------------------------
Form CP-Y-D-19, P/N 273649 R1, Page 19
5.0 Start Up (Cont’d)
5.4 Supply Fan Airflow (cfm) / Pressure Drop (iwc) Table by Fan and Unit Size (Cont’d)
Static
Pressure
(iwc)
11.2
11.4
11.6
11.8
12.0
12.2
12.4
12.6
12.8
13.0
13.2
13.4
13.6
13.8
14.0
14.2
14.4
14.6
14.8
15.0
YDSA
120
150
---------------------------------------------------------------------------------
60
1549
1563
1577
1590
1604
1617
1630
1643
1656
1669
1682
1695
1707
1720
1732
1745
1757
-------
90
-----------------------------------------
Form CP-Y-D19, P/N 273649 R1, Page 20
120
-----------------------------------------
Supply Fan Airflow (cfm) - by Model and Size
YDHA
150
180
210
240
60
90
--------1549 1549
--------1563 1563
--------1577 1577
--------1590 1590
--------1604 1604
--------1617 1617
--------1630 1630
--------1643 1643
--------1656 1656
--------1669 1669
--------1682 1682
--------1695 1695
--------1707 1707
--------1720 1720
--------1732 1732
--------1745 1745
--------1757 1757
-------------------------------------
120
-----------------------------------------
YDMA
150
-----------------------------------------
180
-----------------------------------------
210
-----------------------------------------
240
-----------------------------------------
Static
Pressure
(iwc)
11.2
11.4
11.6
11.8
12.0
12.2
12.4
12.6
12.8
13.0
13.2
13.4
13.6
13.8
14.0
14.2
14.4
14.6
14.8
15.0
5.5 Power Exhaust PE4 Airflow (cfm) / Pressure Drop (iwc) Table by Fan and
Unit Size
Static
Pressure
(iwc)
0.2
0.4
0.6
0.8
1.0
1.2
1.4
1.6
1.8
2.0
2.2
2.4
2.6
YDSA
120
150
670
670
947
947
1160 1160
1340 1340
1498 1498
1641 1641
1772 1772
1895 1895
2010 2010
2118 2118
2222 2222
2321 2321
2415 2415
60
539
762
933
1078
1205
1320
1426
1524
1617
1704
1787
1867
1943
90
539
762
933
1078
1205
1320
1426
1524
1617
1704
1787
1867
1943
Power Exhaust PE4 Airflow (cfm) - by Model and Size
YDHA
YDMA
120
150
180
210
240
60
90
120
150
180
539
539
670
670
670
539
539
539
539
670
762
762
947
947
947
762
762
762
762
947
933
933
1160 1160 1160
933
933
933
933
1160
1078 1078 1340 1340 1340 1078 1078 1078 1078 1340
1205 1205 1498 1498 1498 1205 1205 1205 1205 1498
1320 1320 1641 1641 1641 1320 1320 1320 1320 1641
1426 1426 1772 1772 1772 1426 1426 1426 1426 1772
1524 1524 1895 1895 1895 1524 1524 1524 1524 1895
1617 1617 2010 2010 2010 1617 1617 1617 1617 2010
1704 1704 2118 2118 2118 1704 1704 1704 1704 2118
1787 1787 2222 2222 2222 1787 1787 1787 1787 2222
1867 1867 2321 2321 2321 1867 1867 1867 1867 2321
1943 1943 2415 2415 2415 1943 1943 1943 1943 2415
210
670
947
1160
1340
1498
1641
1772
1895
2010
2118
2222
2321
2415
240
670
947
1160
1340
1498
1641
1772
1895
2010
2118
2222
2321
2415
Static
Pressure
(iwc)
0.2
0.4
0.6
0.8
1.0
1.2
1.4
1.6
1.8
2.0
2.2
2.4
2.6
2.8
2507
2507
2016
2016
2016
2016
2507
2507
2507
2016
2016
2016
2016
2507
2507
2507
2.8
3.0
3.2
3.4
3.6
3.8
4.0
4.2
4.4
4.6
4.8
5.0
5.2
5.4
5.6
5.8
6.0
6.2
6.4
6.6
6.8
7.0
7.2
7.4
7.6
7.8
8.0
8.2
8.4
8.6
8.8
9.0
9.2
9.4
9.6
9.8
10.0
10.2
10.4
10.6
10.8
11.0
2595
2680
2762
2842
2920
2996
3070
3142
3213
3282
3350
3416
3481
3545
3608
3669
3730
3790
3848
3906
3963
4020
4075
4130
4184
4237
4290
4342
4393
4444
4494
4544
4593
4641
4689
4737
4784
4831
4877
4923
4968
2595
2680
2762
2842
2920
2996
3070
3142
3213
3282
3350
3416
3481
3545
3608
3669
3730
3790
3848
3906
3963
4020
4075
4130
4184
4237
4290
4342
4393
4444
4494
4544
4593
4641
4689
4737
4784
4831
4877
4923
4968
2087
2156
2222
2286
2349
2410
2470
2528
2584
2640
2694
2748
2800
2852
2902
2952
3000
3048
3096
3142
3188
3233
3278
3322
3365
3408
3451
3492
3534
3575
3615
3655
3694
3734
3772
3811
3848
3886
3923
3960
3997
2087
2156
2222
2286
2349
2410
2470
2528
2584
2640
2694
2748
2800
2852
2902
2952
3000
3048
3096
3142
3188
3233
3278
3322
3365
3408
3451
3492
3534
3575
3615
3655
3694
3734
3772
3811
3848
3886
3923
3960
3997
2087
2156
2222
2286
2349
2410
2470
2528
2584
2640
2694
2748
2800
2852
2902
2952
3000
3048
3096
3142
3188
3233
3278
3322
3365
3408
3451
3492
3534
3575
3615
3655
3694
3734
3772
3811
3848
3886
3923
3960
3997
2087
2156
2222
2286
2349
2410
2470
2528
2584
2640
2694
2748
2800
2852
2902
2952
3000
3048
3096
3142
3188
3233
3278
3322
3365
3408
3451
3492
3534
3575
3615
3655
3694
3734
3772
3811
3848
3886
3923
3960
3997
2595
2680
2762
2842
2920
2996
3070
3142
3213
3282
3350
3416
3481
3545
3608
3669
3730
3790
3848
3906
3963
4020
4075
4130
4184
4237
4290
4342
4393
4444
4494
4544
4593
4641
4689
4737
4784
4831
4877
4923
4968
2595
2680
2762
2842
2920
2996
3070
3142
3213
3282
3350
3416
3481
3545
3608
3669
3730
3790
3848
3906
3963
4020
4075
4130
4184
4237
4290
4342
4393
4444
4494
4544
4593
4641
4689
4737
4784
4831
4877
4923
4968
2595
2680
2762
2842
2920
2996
3070
3142
3213
3282
3350
3416
3481
3545
3608
3669
3730
3790
3848
3906
3963
4020
4075
4130
4184
4237
4290
4342
4393
4444
4494
4544
4593
4641
4689
4737
4784
4831
4877
4923
4968
2087
2156
2222
2286
2349
2410
2470
2528
2584
2640
2694
2748
2800
2852
2902
2952
3000
3048
3096
3142
3188
3233
3278
3322
3365
3408
3451
3492
3534
3575
3615
3655
3694
3734
3772
3811
3848
3886
3923
3960
3997
2087
2156
2222
2286
2349
2410
2470
2528
2584
2640
2694
2748
2800
2852
2902
2952
3000
3048
3096
3142
3188
3233
3278
3322
3365
3408
3451
3492
3534
3575
3615
3655
3694
3734
3772
3811
3848
3886
3923
3960
3997
2087
2156
2222
2286
2349
2410
2470
2528
2584
2640
2694
2748
2800
2852
2902
2952
3000
3048
3096
3142
3188
3233
3278
3322
3365
3408
3451
3492
3534
3575
3615
3655
3694
3734
3772
3811
3848
3886
3923
3960
3997
2087
2156
2222
2286
2349
2410
2470
2528
2584
2640
2694
2748
2800
2852
2902
2952
3000
3048
3096
3142
3188
3233
3278
3322
3365
3408
3451
3492
3534
3575
3615
3655
3694
3734
3772
3811
3848
3886
3923
3960
3997
2595
2680
2762
2842
2920
2996
3070
3142
3213
3282
3350
3416
3481
3545
3608
3669
3730
3790
3848
3906
3963
4020
4075
4130
4184
4237
4290
4342
4393
4444
4494
4544
4593
4641
4689
4737
4784
4831
4877
4923
4968
2595
2680
2762
2842
2920
2996
3070
3142
3213
3282
3350
3416
3481
3545
3608
3669
3730
3790
3848
3906
3963
4020
4075
4130
4184
4237
4290
4342
4393
4444
4494
4544
4593
4641
4689
4737
4784
4831
4877
4923
4968
2595
2680
2762
2842
2920
2996
3070
3142
3213
3282
3350
3416
3481
3545
3608
3669
3730
3790
3848
3906
3963
4020
4075
4130
4184
4237
4290
4342
4393
4444
4494
4544
4593
4641
4689
4737
4784
4831
4877
4923
4968
3.0
3.2
3.4
3.6
3.8
4.0
4.2
4.4
4.6
4.8
5.0
5.2
5.4
5.6
5.8
6.0
6.2
6.4
6.6
6.8
7.0
7.2
7.4
7.6
7.8
8.0
8.2
8.4
8.6
8.8
9.0
9.2
9.4
9.6
9.8
10.0
10.2
10.4
10.6
10.8
11.0
Form CP-Y-D-19, P/N 273649 R1, Page 21
5.0 Start Up (Cont’d)
5.6 Power Exhauxt PE5 Airflow (cfm) / Pressure Drop (iwc) Table by Fan
and Unit Size
Power Exhaust PE5 Airflow (cfm)
by Model and Size
Static Pressure
(iwc)
YDSA
YDHA
YDMA
150
180
210
240
210
240
0.2
1059 1059 1059 1059 1059
1059
0.4
1497 1497 1497 1497 1497
1497
0.6
1833 1833 1833 1833 1833
1833
0.8
2117 2117 2117 2117 2117
2117
1.0
2367 2367 2367 2367 2367
2367
1.2
2593 2593 2593 2593 2593
2593
1.4
2801 2801 2801 2801 2801
2801
1.6
2994 2994 2994 2994 2994
2994
1.8
3176 3176 3176 3176 3176
3176
2.0
3347 3347 3347 3347 3347
3347
2.2
3511 3511 3511 3511 3511
3511
2.4
3667 3667 3667 3667 3677
3667
2.6
3817 3817 3817 3817 3817
3817
Static Pressure
(iwc)
0.2
0.4
0.6
0.8
1.0
1.2
1.4
1.6
1.8
2.0
2.2
2.4
2.6
2.8
3961
3961
3961
3961
3961
3961
2.8
3.0
3.2
3.4
3.6
3.8
4.0
4.2
4.4
4.6
4.8
5.0
5.2
5.4
5.6
5.8
6.0
6.2
6.4
6.6
6.8
7.0
7.2
7.4
7.6
7.8
8.0
4100
4234
4365
4491
4614
4734
4851
4965
5077
5186
5293
5398
5500
5601
5700
5798
5894
5988
6081
6172
6262
6351
6439
6525
6611
6695
4100
4234
4365
4491
4614
4734
4851
4965
5077
5186
5293
5398
5500
5601
5700
5798
5894
5988
6081
6172
6262
6351
6439
6525
6611
6695
4100
4234
4365
4491
4614
4734
4851
4965
5077
5186
5293
5398
5500
5601
5700
5798
5894
5988
6081
6172
6262
6351
6439
6525
6611
6695
4100
4234
4365
4491
4614
4734
4851
4965
5077
5186
5293
5398
5500
5601
5700
5798
5894
5988
6081
6172
6262
6351
6439
6525
6611
6695
4100
4234
4365
4491
4614
4734
4851
4965
5077
5186
5293
5398
5500
5601
5700
5798
5894
5988
6081
6172
6262
6351
6439
6525
6611
6695
4100
4234
4365
4491
4614
4734
4851
4965
5077
5186
5293
5398
5500
5601
5700
5798
5894
5988
6081
6172
6262
6351
6439
6525
6611
6695
3.0
3.2
3.4
3.6
3.8
4.0
4.2
4.4
4.6
4.8
5.0
5.2
5.4
5.6
5.8
6.0
6.2
6.4
6.6
6.8
7.0
7.2
7.4
7.6
7.8
8.0
Form CP-Y-D19, P/N 273649 R1, Page 22
6.0 Controller
History
Hardware Inputs, Outputs and selected setpoints will be sampled in five minute intervals. The history log will roll over when the data fills the available log space.
To access the controller history log:
Press the alarm and enter key
simultaneously for 5 seconds, and the
system bios screen will appear. Use
the down key to select LOG DATA and
press the enter key.
The #3 record selection screen will
appear. Use the up and down keys to
select the desired record by date and
time, and press the enter key to view
the data.
The #1 DISPLAY LOG DATA screen will
appear. Press the enter key to advance.
Use the up and down keys to scroll
through the history log point values for
that date and time record.
The #2 DISPLAY LOG DATA screen will
appear. Press the enter key to advance.
Press the escape key in succession to
return to the previous screens.
Form CP-Y-D-19, P/N 273649 R1, Page 23
7.0 Controller Display Menus
Option D19 Control Program - User and Service Menu Structure 8/25/13
Main Screen M.1
Name
DA_Temp:
DA_SP:
Enable:
Mode:
Fan:
Main Screen M.1 (Monitor Only)
Description
Discharge Air Temp - Current Discharge Air Temperature
Discharge Air Temp Active SP - Active Discharge Air Temperature Setpoint
Unit Enable - Status unit enabled and available for operation
Current Unit Mode - Occ or Unocc
Current Supply Fan Commanded Speed
Default Unit Min Max
Deg F
Deg F
OFF
Off On
%
Main Screen M.x Main Screen M.2 or M.3 will be displayed depending upon unit configuration. (Monitor Only)
Name
Temperature:
Humidity:
Dew Point:
U09 Spc_CO2:
SpcCO2SP:
Description
Current Outside Air Temp
Current Outside Air Humidity
Current Outside Air Dew Point
Space CO2 - Current Space CO2
Space CO2 SP - Current Space CO2 Setpoint
Default Unit Min Max
Deg F
%rH
Deg F
ppm
1000
ppm
0 2000
Main Screen M.4 Main Screen M.4 (Monitor Only)
Name
Occ:
Fan:
Htg:
Clg:
Dehum:
Description
Occupied Mode Input - Current status of the Occupied Mode Input
External Fan Call Input (G) - Current status of the External Fan Call Input (G)
External Heat Call Input (W1) - Current status of the External Heat Call Input (W1)
External Cool Call Input (Y1) - Current status of the External Cool Call Input (Y1)
External Call Dehum Input - Current status of the External Call Dehum Input
Default Unit
Min Max
Off On
Off On
Off On
Off On
Off On
Name Description
Default Unit
Spc_Clg_Md: Space Cooling Mode - Unit controls applicable cooling stages to maintain the DA_SpcClg_SP.
Spc_Htg_Md: Space Heating Mode - Unit controls applicable heating stages to maintain the DA_SpcHtg_SP.
Space Dehum Mode - Unit controls reheat compressor to maintain the DA_Dh_SP and applicable
Spc_Dehum_Md:
cooling stages to maintain the CC_DA_SP.
NA_Clg_Md: Neutral Air Cooling Mode - Unit controls applicable cooling stages to maintain the DA_NAClg_SP.
NA_Htg_Md: Neutral Air Heating Mode - Unit controls applicable heating stages to maintain the DA_NAHtg_SP.
Neutral Air Dehum Mode - Unit controls reheat compressor to maintain the DA_Dh_SP and
NA_Dehum_Md:
applicable cooling stages to maintain the CC_DA_SP.
Min Max
Off On
Off On
Main Screen M.x Main Screen M.5 or M.6 will be displayed depending upon unit configuration (Monitor Only)
Off
On
Off
Off
On
On
Off
On
Main Menu
A. Quick Setpoints Quick Setpoints Menu
Quick Setpoints A.1
Quick Setpoints Screen A.1
Name Description
System Enable: Unit Enable - Sets unit enabled and available for operation
DA_SpcClg_SP:
DA_SpcHSPSel:
DA_SpcHtg_SP:
DA_SpcHRst_SP:
Quick Setpoints A.2
Discharge Air Temp Space Cooling SP - Sets the discharge setpoint used when in Space
Cooling Mode.
Space DA Heating SP Select - Used to select desired discharge setpoint for Space Heating
Mode. Single Setpoint or Reset Setpoint.
Discharge Air Temp Space Heating SP - Sets the discharge setpoint used when in Space
Heating Mode.
Discharge Air Temp Space Heating Reset SP - Display of optional calculated reset
schedule setpoint used when in Space Heating Mode.
Default Unit
5
55
Deg F
Setpt
90
Min
Max
2
5
50
100
Setpt Reset
Deg F
50
140
Deg F
50
140
Quick Setpoints Screen A.2 will be displayed when Space DA Heating SP select is set to Reset.
Name Description
OA_Temp: Current Outside Air Temp
Discharge Air Temp Space Heating Reset SP - Display of optional calculated reset
schedule setpoint used when in Space Heating Mode.
Space Heat DA SP Reset OA Max - Sets the maximum space heating discharge air temp
SpcHRDaMax:
reset setpoint.
Space Heat DA SP Reset DA Min - Sets the minimum space heating discharge air temp
SpcHRDaMin:
reset setpoint.
Space Heat DA SP Reset OA Max - Sets the maximum space heating outside air temp
SpcHROaMax:
reset setpoint.
Space Heat DA SP Reset OA Min - Sets the minimum space heating outside air temp reset
SpcHROaMin:
setpoint.
Form CP-Y-D19, P/N 273649 R1, Page 24
Default Unit Min
Deg F
DA_SpcHRst_SP:
Max
Deg F
50
140
120
Deg F
50
140
90
Deg F
50
140
65
Deg F
0
100
30
Deg F
0
100
A. Quick Setpoints Quick Setpoints Menu (Cont’d)
Quick Setpoints A.3 Quick Setpoints Screen A.3
Name Description
Mixed Air Temp Auto Change Over SP - Mixed air temp setpoint used to used to enable
MA_ChgOvr_SP:
neutral air heating or neutral air cooling
MA_ChgOvrDiff: Mixed Air Temp Auto Change Over SP Differential - Differential for the MA_ChgOvr_SP.
DA_NAClg_SP:
DA_NAHSPSel:
DA_NAHtg_SP:
DA_NAHRst_SP:
Discharge Air Temp Neutral Cooling SP - Sets the discharge setpoint used when in Neutral
Air Cooling Mode.
Neutral DA Heating SP Select - Used to select desired discharge setpoint for Neutral Air
Heating Mode. Single Setpoint or Reset Setpoint.
Discharge Air Temp Neutral Heating SP - Sets the discharge setpoint used when in Neutral
Air Heating Mode.
Discharge Air Temp Neutral Heat Reset SP - Display of optional calculated reset schedule
setpoint used when in Neutral Air Heating Mode.
Default Unit
Min
Max
65
Deg F
45
80
5
Deg F
0.5
10
80
Deg F
50
100
Setpt
60
Setpt Reset
Deg F
50
140
Deg F
50
140
Quick Setpoints A.4 Quick Setpoints Screen A.4 will be displayed when Neutral DA Heating SP select is set to Reset.
Name Description
Default Unit Min
OA_Temp: Current Outside Air Temp
Deg F
Discharge Air Temp Neutral Heat Reset SP - Display of optional calculated reset schedule
DA_NAHRst_SP:
Deg F 50
setpoint used when in Neutral Air Heating Mode.
Neutral Air Heat DA SP Reset DA Max - Sets the maximum neutral air heating discharge air
NAHRDAMax:
75
Deg F 50
temp reset setpoint.
Neutral Air Heat DA SP Reset DA Min - Sets the minimum neutral air heating discharge air
NAHRDAMin:
65
Deg F 50
temp reset setpoint.
Neutral Air Heat DA SP Reset OA Max - Sets the maximum neutral air heating outside air
NAHROAMax:
65
Deg F 0
temp reset setpoint.
Neutral Air Heat DA SP Reset OA Min - Sets the minimum neutral air heating outside air
NAHROAMin:
30
Deg F 0
temp reset setpoint.
Quick Setpoints A.5
140
140
140
100
100
Quick Setpoints Screen A.5 will Be displayed when the unit is configured for Dehumidification.
Name Description
Sets the Dehum OA Dew Point SP - Used to allow Neutral Air Dehumidification Mode when
DhOADP_SP:
the OA dew point is greater than SP.
DhOADP_Diff: Dehum OA Dew Point SP Differential - Sets the differential for the DhOADP_SP.
Quick Setpoints A.6
Default
Unit
Min
Max
58
Deg F
50
100
2
Deg F 0.5
10
Quick Setpoints Screen A.6 will Be displayed when the unit is configured for Duct or Building Pressure Control.
Name
Pressure Control
Controlled Device
Air_Pressure
Setpoint:
Quick Setpoints A.7
Max
Description
Factory Selection: Duct or Building
Factory Selection: Supply Fan - Exhaust Fan - Dampers
Duct or Building Static Pressure
Building Static Pressure SP
Duct Static Pressure SP
Default
Unit
Min
Max
01
05
iwc
iwc
-0.5
0
0.5
25
Quick Setpoints Screen A.7 Will Be displayed when the unit is configured for Economizer Control and CO2.
Name Description
SpcCO2SP: Space CO2 SP - Current Space CO2 Setpoint
SpcCO2Diff: Space CO2 SP Differential - Differential for the SpcCO2SP.
Default
1000
200
Unit
ppm
ppm
Min Max
0 2000
10 500
Default
Unit
Min
Max
Default
Unit
Min
Max
Main Menu
B. Schedule
Schedule B.1
Schedule Menu
Schedule Screen B.1
Name Description
Date: Sets the current month day and year. - Default Value: Factory Date
Hour: Sets the current time. - Default Value: Factory Time
Schedule B.2
Name
DST:
Transition Time:
Start:
End:
Schedule Screen B.2
Description
Set to enable DST. - Default Value: Enable
Sets Transition Time. - Default Value: 60 min
Sets Start day , month and time - Default Value: Last Sunday in March at 2:00
Sets End day , month and time - Default Value: Last Sunday in October at 3:00
Form CP-Y-D-19, P/N 273649 R1, Page 25
7.0 Controller Display Menus (Cont’d)
Main Menu
C. Points List
Points List Menu - Applicable screens and content will be displayed depending upon unit configuration.
See Hardware Point Table on Page 2 for Complete List of IO Points and Serial Communication Connections.
Points List C.1 Points List Screen C.1
Applicable Analog Outputs for Unit Configuration.
Points List C.2 Points List Screen C.2
Applicable Relay Outputs for Unit Configuration.
Points List C.3 Points List Screen C.3
Applicable Relay Outputs for Unit Configuration.
Points List C.4 Points List Screen C.4
Applicable Relay Outputs for Unit Configuration.
Points List C.5 Points List Screen C.5
Applicable Analog Inputs for Unit Configuration.
Points List C.6 Points List Screen C.6
Applicable Analog Inputs for Unit Configuration.
Points List C.7 Points List Screen C.7
Applicable Digital Inputs for Unit Configuration.
Points List C.8 Points List Screen C.8
Applicable Digital Inputs for Unit Configuration.
Points List C.9 Points List Screen C.9
Applicable Digital Inputs for Unit Configuration.
Points List C.10 Points List Screen C.10
Name Description J26 FBUS2 - Powered Exhaust Fan if applicable.
Default Unit
EF_Cmd: Current Exhaust Fan Cmd
EF_Spd_Cmd: Current Exhaust Fan Speed Command
%
Actual: Current Exhaust Fan rpm
rpm
Min
Off
15
Max
On
100
Main Menu
D. Alarms
Alarms Menu - Active Alarms are displayed with the option of entering the Alarm Logger.
See Alarm Management Section on pages 10-13 for detailed information on Active and Logged alarms.
Main Menu
E. Service
a. Test Mode
Test Mode E.a.1
Name
Enable:
Time Out:
Countdown:
Test Mode E.a.2
Service Menu
Test Mode Menu
Test Mode Screen E.a.1
Description
Modifiable Field Used to enable the Test Mode.
Modifiable Field Used to adjust the test mode time duration.
Current status of the time remaining for Test Mode if active.
Default
Unit
Min
Max
120
min
min / s
0
240
Unit
%
Min
100
Max
100
%
30
100
%
15
100
Off
On
Min
0
1
Off
90
0
1
Max
100
5
On
90
100
5
Test Mode Screen E.a.2
Name Description
Default
Damper: Automatically Commanded Percentage Output to unit Damper(s).
100
Supply: Automatically Commanded Supply Fan Start Output.
Supply Fan Speed Output Modifiable Field used to test unit Supply Fan VFD and set Air
100
Balance fan speed adjustment.
Airflow Status: Status of Supply Fan Air Proving Switch.
Exhaust Fan Speed Output Modifiable Field used to test to unit ECM Fan and set Air Balance
Exhaust:
100
fan speed adjustment.
Airflow Status: Status of Supply Fan Air Proving Switch.
rpm Current Exhaust Fan RPM
Test Mode E.a.3
Name
Comp Capacity:
Output:
Condenser Sec A:
Cond Fan:
Reheat Capacity
Output:
rpm
Test Mode Screen E.a.3
Description
Modifiable Field used to adjust the output to the A Compressor Emerson Controller.
Output in vdc to the A Compressor Emerson Controller.
Automatically Commanded Condenser Section A Fan Contactor(s) output.
Output Signal to ECM Condenser Fans if applicable.
Modifiable Field used to adjust the output to the Reheat Compressor Emerson Controller.
Output in vdc to the Reheat Compressor Emerson Controller.
Form CP-Y-D19, P/N 273649 R1, Page 26
Default
0
1
Off
90
0
1
Unit
%
vdc
%
%
vdc
E. Service
Test Mode E.a.4
Name
Stage 2:
Stage 3:
Stage 4:
Condenser Sec B:
Test Mode E.a.5
Service Menu (cont’d)
Test Mode Screen E.a.4
Description
Modifiable Field used to turn on Compressor Stage 2.
Modifiable Field used to turn on Compressor Stage 3.
Modifiable Field used to turn on Compressor Stage 4.
Automatically Commanded Condenser Section B Fan Contactor(s) output
Min
Off
Off
Off
Off
Max
On
On
On
On
Default
0
Unit
%
Min
0
Max
100
0
vdc
0-2
10
Off
Off
Off
Off
Off
Off
On
On
On
On
On
On
Min
Max
Off
Off
Off
Off
Off
Off
Test Mode Screen E.a.6
Name Description
Wheel: Modifiable Field used to turn on the Energy Recovery Wheel.
Preheat: Modifiable Field used to turn on the Electric Preheat
Test Mode E.a.7
Unit
Test Mode Screen E.a.5
Name Description
Heat Capacity: Modifiable Field used to adjust the heating output
Output in vdc to modulated heating component Electric= SCR 0-10;
Output:
Gas = Modulating Valve 2-10
Stage 1: Modifiable Field used to turn on Heating Stage 1.
Stage 2: Modifiable Field used to turn on Heating Stage 2.
Stage 3: Modifiable Field used to turn on Heating Stage 3.
Stage 4: Modifiable Field used to turn on Heating Stage 4.
Stage 5: Modifiable Field used to turn on Heating Stage 5.
Stage 6: Modifiable Field used to turn on Heating Stage 6.
Test Mode E.a.6
Default
Off
Off
Off
Off
Default
Off
Off
Unit
Test Mode Screen E.a.7 - Applicable screens E.a.7 through E.a.11 and content will be displayed depending upon
unit configuration.
Applicable Analog Inputs for Unit Configuration.
Test Mode E.a.8 Test Mode Screen E.a.8
Applicable Analog Inputs for Unit Configuration.
Test Mode E.a.9 Test Mode Screen E.a.9
Applicable Digital Inputs for Unit Configuration.
Test Mode E.a.10 Test Mode Screen E.a.10
Applicable Digital Inputs for Unit Configuration.
Test Mode E.a.11 Test Mode Screen E.a.11
Applicable Digital Inputs for Unit Configuration.
b. TAB
TAB E.b.1
TAB Menu - Used to perform a Service Save of controller setpoints and to perform a Service Restore of previously
saved setpoints.
TAB Screen E.b.1
Name Description
Modifiable Field used to set the optional SFSpdClgSP, SFSpdHtgSP and SFSpdLoSP
Set Max SF Spd?
SFSpdHiSP to the SFSpdMax_SP for saving.
Modifiable Field used to set the optional EFSpdClgSP, EFSpdHtgSP and EFSpdLoSP
Set Max EF Spd?
EFSpdHiSP to the EFSpdMax_SP for saving.
Save? Modifiable Field used to perform a Service Save of current setpoints.
Restore? Modifiable Field used to perform a Service Restore of current setpoints.
c. Supply Fan
Supply Fan E.c.1
Default Unit Min Max
No
No
Yes
No
No
Yes
No
No
No
No
Yes
Yes
Supply Fan Menu - Applicable screens and content will be displayed depending upon unit configuration.
Supply Fan Screen E.c.1
Name Description
Control: Selected Fan Control Strategy - Constant Vol, High / Low Spd or Duct Pressure
Default Unit Min Max
SFSpdClgSP: Supply Fan Speed Cooling SP - Sets commanded speed for the supply fan when in cooling mode.
100
%
30
100
SFSpdHtgSP: Supply Fan Speed Heating SP - Sets commanded speed for the supply fan when in heating mode.
100
%
30
100
SFSpdLoSP: Supply Fan Low Speed SP - Sets commanded speed for the supply fan when in low speed control.
Supply Fan High Speed SP - Sets commanded speed for the supply fan when in high speed
SFSpdHiSP:
control.
100
%
30
100
100
%
30
100
(continued)
Form CP-Y-D-19, P/N 273649 R1, Page 27
7.0 Controller Display Menus (Cont’d)
Supply Fan E.c.2
Name
Duct Pressure
Setpoint:
PI Output:
SF_VFD_Cmd
Supply Fan Screen E.c.2 will be displayed if Supply Fan is selected for Duct Pressure Control.
Description - Supply Fan Duct Pressure Control Loop Monitoring
Current Duct Static Pressure
Current Duct Static Pressure SP
Current output of the control loop
Current Supply Fan VFD Command in vdc
Default Unit Min Max
iwc
0
25
05
iwc
0
25
%
0 100
vdc
0
10
d. Capacity Capacity Menu - Applicable screens and content will be displayed depending upon unit configuration.
Capacity E.d.1 Capacity Screen E.d.1 (Monitor Only)
Name
Heat Type:
Heating Stages:
Cooling Stages:
Reheat:
Capacity E.d.2
Name
OAHtgLo_SP
OAHtgLoDiff
OAClgLo_SP
OAClgLoDiff
Capacity E.d.3
Description
Selected Heating Type Gas or Electric
Number of Heating Stages
Number of Cooling Stages
Unit Reheat Selection - Enable or Disabled
Default Unit Min Max
Capacity Screen E.d.2
Description
OA Heating Lockout SP - Sets OA setpoint used to disable heating.
OA Heating Lockout SP Differential - Sets differential used for the OAHtgLo_SP.
OA Cooling Lockout SP - Sets OA setpoint used to disable mechanical cooling.
OA Cooling Lockout SP Differential - Sets differential used for the OAClgLo_SP.
Default
120
2
-10
2
Unit Min
Deg F 0
Deg F 05
Deg F -10
Deg F 05
Max
150
10
150
10
Default
Unit Min
Deg F
Max
Capacity Screen E.d.3 will be displayed if the unit is configured with Heating.
Name Description - Heating Demand Control Loop Monitoring
DA_Temp Current Discharge Air Temp
Setpoint: Current Discharge Air SP
Deg F
PI Output: Current output of the control loop
%
0
100
HX_Mod_Cmd Heating Modulation Command in vdc
vdc
0-2
10
Unit
Min
Off
Off
Off
Off
Off
Off
Max
On
On
On
On
On
On
Unit Min
Deg F
Deg F
%
0
vdc
1
Max
Capacity E.d.4
Name
HX_Stg1_Cmd
HX_Stg2_Cmd
HX_Stg3_Cmd
HX_Stg4_Cmd
HX_Stg5_Cmd
HX_Stg6_Cmd
Capacity E.d.5
Name
Active Input:
Setpoint:
PI Output:
Comp_Mod_Cmd
Capacity E.d.6
Name
Comp_Stg2_Cmd
Comp_Stg3_Cmd
Comp_Stg4_Cmd
Cond_A_Cmd
Cond_B_Cmd
Capacity E.d.7
Name
DA_Temp
Setpoint:
PI Output:
RH_Mod_Cmd
Capacity Screen E.d.4 will be displayed if the unit is configured with Heating.
Description - Heating Stages
Current Heating Stage 1 Command
Current Heating Stage 2 Command
Current Heating Stage 3 Command
Current Heating Stage 4 Command
Current Heating Stage 5 Command
Current Heating Stage 6 Command
Default
Capacity Screen E.d.5
Description - Cooling Demand Control Loop Monitoring
Current controlling input for cooling - DA_Temp or (CC_Temp used in Dehumidification Mode)
Current Discharge SP or (Cooling Coil SP used in Dehumidification Mode)
Current output of the control loop
Current DX Modulation Command in vdc
Default
100
5
Capacity Screen E.d.6
Description - Cooling Stages
Current Compressor Stage 2 Command
Current Compressor Stage 3 Command
Current Compressor Stage 4 Command
Current Condenser Section A Command
Current Condenser Section B Command
Default
Unit
Min Max
Off On
Off On
Off On
Off On
Off On
Capacity Screen E.d.7 will be displayed if the unit is configured with Reheat.
Description - Reheat Demand Control Loop Monitoring
Current Discharge Air Temp
Current Reheat Discharge Air Temp SP
Current output of the control loop
Current Reheat Modulation Command in vdc
Form CP-Y-D19, P/N 273649 R1, Page 28
Default
Unit Min Max
Deg F
Deg F
%
0
100
vdc
1
5
E. Service
Capacity E.d.8
Name
OADhHLo_SP
OADhHLoDiff
OADhLLo_SP
OADhLLoDiff
Capacity E.d.9
Service Menu (cont’d)
Capacity Screen E.d.8 will be displayed if the unit is configured with Reheat.
Description
OA Dehum High Lockout SP - Sets OA setpoint used to disable dehumidification.
OA Dehum High Lockout SP Differential - Sets differential used for the OADhHLo_SP.
OA Dehum Low Lockout SP - Sets OA setpoint used to disable dehumidification.
OA Dehum Low Lockout SP Differential - Sets differential used for the OADhLLo_SP.
Name
Run Hours:
Num Starts:
Reset to Zero?
Capacity E.d.11
Name
Run Hours:
Num Starts:
Reset to Zero?
Capacity E.d.12
Name
Run Hours:
Num Starts:
Reset to Zero?
Capacity E.d.13
Name
Run Hours:
Num Starts:
Reset to Zero?
Capacity E.d.14
Name
Run Hours:
Num Starts:
Reset to Zero?
e. Dampers
Dampers E.e.1
Unit Min Max
Deg F 0
110
Deg F 0
10
Deg F 50 100
Deg F 0.5 10
Capacity Screen E.d.9 will be displayed if the unit is configured with Reheat.
Name Description
Discharge Air Temp Dehum SP - Sets the discharge air setpoint used to control the reheat
DA_Dh_SP
compressor during dehumidification mode.
Cooling Coil Dehum DA SP - Sets the discharge air setpoint used to control unit primary cooling
CC_DA_SP
when in dehumidification Mode.
Dehum Damper SP - Used to allow Neutral Air Dehumidification Mode to start when the unit
DhDmpr_SP
Damper Command is greater than SP.
DhDmpr_Diff Dehum Damper Differential - Sets the differential for the DhDmpr_SP.
Capacity E.d.10
Default
110
2
58
2
Default
Unit
Min Max
70
Deg F
50
100
52
Deg F
45
80
5
%
0
100
5
%
0.5
10
Default
Unit
hrs
Min Max
Default
Unit
hrs
Min Max
Default
Unit
hrs
Min Max
Default
Unit
hrs
Min Max
Unit
hrs
Min Max
Capacity Screen E.d.10
Description - Digital Scroll Compressor A
Accumulated Total Run Hours
Accumulated Total Number of Starts
Used to reset accumulators to zero
Capacity Screen E.d.11 will be displayed if the unit is configured with a Compressor 2
Description - Fixed Capacity Compressor 2
Accumulated Total Run Hours
Accumulated Total Number of Starts
Used to reset accumulators to zero
Capacity Screen E.d.12 will be displayed if the unit is configured with a Compressor 3
Description - Fixed Capacity Compressor 3
Accumulated Total Run Hours
Accumulated Total Number of Starts
Used to reset accumulators to zero
Capacity Screen E.d.13 will be displayed if the unit is configured with a Compressor 4
Description - Fixed Capacity Compressor 4
Accumulated Total Run Hours
Accumulated Total Number of Starts
Used to reset accumulators to zero
Capacity Screen E.d.14 will be displayed if the unit is configured with a Reheat Compressor
Description - Digital Scroll Reheat Compressor 4
Accumulated Total Run Hours
Accumulated Total Number of Starts
Used to reset accumulators to zero
Default
Damper Menu - Applicable screens and content will be displayed depending upon unit configuration.
Dampers Screen E.e.1
Name Description
Default
Selected Damper Control Strategy - 100% OA, 0-10Vdc Input, Two Position, Four Position or
Control:
Economizer
Unoccupied Ventilation Enable - Allows OA during the unoccupied mode for damper control
UnoccVnt_Ena:
Off
options Two Position and External 0-10 vdc input.
Two Position Damper Occ SP - Sets the value that the unit dampers will be commanded to when
Dmpr_SP_Occ:
100
the unit is occupied.
Two Position Damper Unocc SP - Sets the value that the unit dampers will be commanded to
Dmpr_SP_Unocc: when the unit is unoccupied. For an unoccupied setpoint above zero UnoccVnt_Ena must be
0
turned on.
Aux_1_SP: Aux 1 Damper Position SP - Damper position setpoint based on Ext Switches 1 and 2.
20
Aux_2_SP: Aux 2 Damper Position SP - Damper position setpoint based on Ext Switches 1 and 2.
40
Aux_3_SP: Aux 3 Damper Position SP - Damper position setpoint based on Ext Switches 1 and 2.
60
Aux_4_SP: Aux 4 Damper Position SP - Damper position setpoint based on Ext Switches 1 and 2.
80
Unit
Min Max
%
0
100
%
0
100
%
%
%
%
0
0
0
0
100
100
100
100
Form CP-Y-D-19, P/N 273649 R1, Page 29
7.0 Controller Display Menus (Cont’d)
Dampers E.e.2
Dampers Screen E.e.2 will be displayed if the Dampers are selected for Economizer Control.
Name Description - Dampers Econ Demand Control Loop Monitoring
MA_Temp Current Mixed Air Temp
Current Mixed Air Temp SP - DA_SpcClg_SP = 55 Deg F when in space cooling - DA_NAClg_
Setpoint:
SP = 80 Deg F when in neutral air cooling.
PI Output: Current output of the control loop
Damper_Cmd Current Damper Output Command in vdc
Dampers E.e.3
Deg F
%
vdc
Name
Bldg Pressure
Setpoint:
PI Output:
EF_Spd_Cmd:
Actual:
Exh Fan and
ERV E.f.3
58
Deg F
2
10
Deg F 0.5
%
0
10
%
Description - Exhaust Fan Bldg Pressure Control Loop Monitoring
Current Building Static Pressure
Current Building Static Pressure SP
Current output of the control loop
Exhaust Fan Speed Command
Current rpm of the exhaust fan
Default
01
Default
Selection - None, With Elec Heat or Without Elec Heat
Energy Recovery Wheel DA Preheat SP - Sets the ERV Discharge Temp Setpoint
Energy Recovery Wheel DA Preheat Differential SP - Sets the differential for the ERVDAPH_SP
Energy Recovery Wheel OA Preheat SP - Sets the OA ERV Preheat Enable Setpoint
Energy Recovery Wheel OA Preheat Differential SP - Sets the differential for the ERVOAPH_SP
Information Menu
Information Screen E.g.1
h. BMS Config
0
120
10
100
100
Unit
Min Max
%
15
100
%
15
100
%
15
100
%
15
100
Unit
iwc
iwc
%
%
rpm
Min Max
-0.5 0.5
-0.5 0.5
0
100
15 100
Unit
Min Max
Exh Fan and ERV Screen E.f.3
g. Information
BMS Config E.h.1
0
Exh Fan and ERV Screen E.f.2 will be displayed if the Exhaust Fan is selected for Bldg Pressure Control.
Dampers E.g.1
Name
Control Program:
Ver:
Bios:
Boot:
100
10
Exh Fan and ERV Menu - Applicable screens and content will be displayed depending upon unit configuration.
Name Description
ERV:
ERVDAPH_SP:
ERVDAPHDiff:
ERVOAPH_SP:
ERVOAPHDiff:
0
0
Default Unit Min Max
60
Deg F 0
120
2
Deg F 0.5 10
Exh Fan and ERV
Exh Fan and ERV Screen E.f.1
E.f.1
Name Description
Default
Control: Selected Exhaust Fan Control Strategy - None, Constant Vol or Bldg Pressure
Exhaust Fan Speed Cooling SP - Sets the commanded speed for the exhaust fan when in
EFSpdClgSP:
100
cooling mode.
Exhaust Fan Speed Heating SP - Sets the commanded peed for the exhaust fan when in heating
EFSpdHtgSP:
100
mode.
Exhaust Fan Speed Low SP -Sets commanded speed for the exhaust fan when in low speed
EFSpdLoSP:
100
control.
Exhaust Fan Speed High SP - Sets commanded speed for the exhaust fan when in high speed
EFSpdHiSP:
100
control.
Exh Fan and
ERV E.f.2
Unit Min Max
Deg F
Dampers Screen E.e.2 will be displayed if the Dampers are selected for Economizer Control.
Name Description - Dampers Econ Demand Control Loop Monitoring
Ec_OALO_SP: Economizer OA Temp Lockout SP - OA Temp setpoint value that economizer is enabled.
Ec_OALODiff: Economizer OA Temp Lockout Diff - Differential for the Ec_OALO_SP
Economizer OA Dew Point Lockout SP - OA Dew Point setpoint value that economizer is
Ec_OADPLO_SP:
enabled.
Ec_OADPLODiff: Economizer OA Dew Point Lockout Diff - Differential for the Ec_OADPLO_SP
MinDmprSP: Minimum Damper SP - Sets the unit minimum damper position.
CO2 Minimum Damper Offset SP - Value added to the MinDmprSP when CO2 is above
CO2DmprOsSP
setpoint.
f. Exh Fan and
ERV
Default
Description
Program Option currently loaded into the controller
Current Software Version (number and date)
Current Bios Version (number and date)
Current Boot Version (number and date)
33
2
32
2
Default
Deg F 25
Deg F 0.5
Deg F 25
Deg F 0.5
Unit
Min
45
10
45
10
Max
BMS Config Menu - Applicable screens and content will be displayed depending upon unit configuration.
BMS Config Screen E.h.1
Name Description
Protocol: Sets BMS Protocol - BACnet MSTP, BACnet IP/Eth or Lon - Default = BACnet
Default
Unit
Min
Max
(continued)
Form CP-Y-D19, P/N 273649 R1, Page 30
E. Service
BMS Config
E.h.2
Service Menu (cont’d)
BMS Config Screen E.h.2 will be shown when the BMS Protocol is set to BACnet MSTP or BACnet IP/Eth.
Name Description
Termconf PlugIn? Sets the BACnet Plugin command
BMS Config E.h.4
Name
Instance:
Baudrate:
MAC Addr:
MaxMasters:
MaxInfoFrames:
BMS Config E.h.5
Default
No
Name
DNS 1:
DNS 2:
Type:
BMS Config E.h.7
Default
77000
38400
0
127
20
Max
Unit
Min
Max
0
0
0
127
127
255
Unit
Min
Max
Unit
Min
Max
BMS Config Screen E.h.5 will be shown when the BMS Protocol is set to BACnet IP/Eth.
Default
BMS Config Screen E.h.6 will be shown when the BMS Protocol is set to BACnet IP/Eth.
Description
Sets DNS 1 - [0-255] [0-255] [0-255] [0-255]
Sets DNS 1 - [0-255] [0-255] [0-255] [0-255]
Sets the Type IP/Eth
Default
BMS Config Screen E.h.7 will be shown when the BMS Protocol is set to BacNet MSTP or BACnet IP/Eth.
Name Description
Function: Sets Function - Read or Write
Update: Sets Update - Yes or No
BMS Config E.h.8
Min
BMS Config Screen E.h.4 will be shown when the BMS Protocol is set to BACnet MSTP.
Description
Sets the Instance
Sets the Baudrate - 9600, 19200, 38400 or 76800
Sets the Mac Address
Sets the Max Masters
Sets the Max Info Frames
Name Description
Instance: Sets the Instance
STATIC IP: Sets the Static IP Address - [0-255] [0-255] [0-255] [0-255]
Sets the Subnet Address - 000.000.000.00 / 255.000.000.00 / 255.255.000.00 /
Subnet:
255.255.255.00
Gatewy: Sets the Gateway - [0-255] [0-255] [0-255] [0-255]
BMS Config E.h.6
Unit
Default
Read
Yes
Unit
Min
Max
Default
Unit
Min
Max
Probe
.
Probe
BMS
Probe
.
Probe
BMS
BMS Config Screen E.h.8
Name Description
Share OA Humidity from BMS (0=Probe, 1=BMS) - Set value to BMS for OA
OA_Hum_Sel:
humidity share from BMS.
Share OA Temp from BMS (0=Probe, 1=BMS) - Set value to BMS for OA temp
OA_Temp_Sel:
share from BMS.
Main Menu
F. Factory Settings Factory Settings Menu is password protected. Consult factory for access.
Form CP-Y-D-19, P/N 273649 R1, Page 31
8.0 Communication Cards and Point Lists
With the addition of an optional BMS Communication card, the building automation
system can remotely adjust setpoints and view status points and alarms. The current
supported building automation protocols are:
• BACnet® MSTP (Option BHB8)
• LonWorks® (Option BHB7)
Contact factory if additional protocol support is needed.
Communication Card
(Option BHB7 or BHB8)
8.1 BACnet® MSTP
(Option BHB8)
Communication
The BACnet® MSTP (Option BHB8) communication allows access to selected unit
function parameters. The standard communication protocol is identified as BACnet®
over MS/TP (Master Slave / Token Passing). This protocol is used for communicating
BACnet® over a network of BACnet® only controllers. The network is considered open
communication, whereas any device on the network has the capability to receive input
from any other controller on the network.
In all Y Series units included on a BACnet® network, there are certain configuration
parameters that need to be set before communication can be established with other
devices. These settings and configuration parameters must be set properly or the
device will not respond when prompted by other devices in the network.
Follow the procedure below to modify the BACnet® MSTP parameters required by the BMS network.
1. From the main menu navigate to E. Service and
press the enter key to access the service menu.
2. From the service menu navigate to the h. BMS Config
submenu and press the enter key to select.
3. From the BMS Config screen E.h.1 verify that the
Protocol: field is set to BACnet® MSTP. On a BAS
card retrofit the Protocol: field may need to be set.
To change the protocol press the enter key until the
cursor is flashing on the Protocol: field and use the
up or down key to scroll through the available choices
and select BACnet® MSTP then press enter to confirm
the protocol change.
Form CP-Y-D19, P/N 273649 R1, Page 32
Press the enter key in succession until the cursor
is flashing in the uppermost left hand corner of the
screen and use the down arrow key to navigate to the
next screen.
4. From the BMS Config screen E.h.2 Press the enter
key to access the Termconf PlugIn? Field and set the
value to yes. Press the enter key in succession until the cursor
is flashing in the uppermost left hand corner of the
screen and use the down arrow key to navigate to the
next screen.
8.0 Optional Communication Cards (Cont’d)
8.1 BACnet® MSTP (Option BHB8) Communication (cont’d)
5. From Screen E.h.4 Set the desired values for the
Instance:,Baudrate:, and Mac Addr:. typcally the
MaxMasters: and MaxInfoFrames: do not need to be
modified.
arrow key to set the value to Write and then press the
enter key to access the update field and use the up
arrow key to set the value to yes. After a two second
pulse the update value will return to the value of NO.
the modified BACnet® values are now saved.
Press the enter key in succession until the cursor
is flashing in the uppermost left hand corner of the
screen and use the down arrow key to navigate to the
next screen.
6. The modified values from the previous screen E.h.4
will need to be saved. From Screen E.h.7 press the
enter key to access the Function: field and use the up
BACnet® Communication Card Layout
The BACnet® communication card has
two sets of LEDs (Controller Status and
MSTP Status), a push button, and three
jumpers. The controller status LED
indicates the status of communication
between the card and the controller. It is
located above the push button.
After saving the new setpoints, the controller must
be power cycled to complete the process. Once the
power has been restored and the BACnet® card has
initialized, return to the MSTP Setup screen E.h.4 to
confirm the changes were accepted.
1) Serial port connection
2) Terminal block for BACnet®
network (GND, +, -)
3) MSTP status LED
4) Controller status LED
5) Line resistance jumpers
6) Factory configuration push
button
LED Lights (4 above) Description
Troubleshooting
Quick green-off-green Communication with controller is established and working.
Slow red-off-red
Communication is not established and no data is passing to card. 1. Confirm card is firmly plugged in.
2. Confirm BMS Protocol is set to BACnet MSTP
The MSTP status LED lights are located on the bottom side of the communication
card below the controller status LED. The MSTP LED indicates the status of communication between the card and the network. Wait at least one minute after setting the
communication parameters and plugging in the communication cable before determining the status of the network communication.
LED Lights (3 above)
Green with
occasional red
Green and red both
on
Description
Communication with network is established
and working.
Communication is not established and no
data is passing to the card.
Troubleshooting
1. Confirm system and card baudrate are the same.
2. Confirm card Max Master is equal to or greater than the Station (MAC)
Address of the Master with the highest address.
The push button on the communication card is used to return the card to factory configuration. Read and follow the procedure below to reset the card.
1. With controller OFF, depress and hold the push button located on the BACnet®
board while powering the controller back ON.
Continue to hold the button, while watching the Status LEDs. Wait at least 20
seconds; the Status LED will flash SLOWLY 3 times, red-off.
2. Once the flashing begins, release the push button. After the 3 red flashes, the
LED comes on green. The LED then confirms recognition of the button by flashing
QUICKLY 3 times red-off, and then comes on green again.
Form CP-Y-D-19, P/N 273649 R1, Page 33
8.0 Optional Communication Cards (Cont’d)
8.1 BACnet® MSTP (Option BHB8) Communication (cont’d)
3. Wait for about one minute for the factory parameters to be loaded.
The jumpers are used to create built-in end-of-line resistance for a BACnet® MSTP
network.
• Jumper P1 adds a 510 ohm polarization resistance between the
•
•
negative data line (-) and GND;
Jumper P2 adds a 120 ohm terminal resistance between the two data
lines (+) and (-);
Jumper P3 adds a 510 ohm polarization resistance between the
positive data line (+) and the +5 Vdc internal voltage.
Insert all three jumpers on the unit at the start of network and the unit at the
end of the network. DO NOT insert the jumpers on the intermediate units.
BACnet® MSTP
Points List
R = Read
W = Write
AV = Analog variable
BV = Binary variable
Option D19 BACnet® Point List
Analog Variables
Name
Description
R/W
BMS Address
Unit
Default
Min
Max
CC_Temp
Cooling Coil Discharge Air Temp
R
AV1
Deg F
CO2DmprOsSP
CO2 Minimum Damper Offset SP
R/W
AV2
%
10
0
100
Comp_Mod_Out
DX Modulation Output %
R
AV3
%
DA_NAClg_SP
Discharge Air Temp Neutral Cooling SP
R/W
AV4
0
100
Deg F
80
50
100
DA_NAHtg_SP
Discharge Air Temp Neutral Heating SP
R/W
AV5
Deg F
60
50
140
DA_SP
Discharge Air Temp Active SP
DA_SpcClg_SP
Discharge Air Temp Space Cooling SP
R
AV6
Deg F
R/W
AV7
Deg F
55
50
100
DA_SpcHtg_SP
Discharge Air Temp Space Heating SP
R/W
AV8
Deg F
90
50
140
DA_Temp
Discharge Air Temp
Damper_Cmd
Damper Output Command
R
AV9
Deg F
R
AV10
%
0
100
DhOADP_SP
Dehum OA Dew Point Sp
R/W
AV11
Deg F
58
50
100
Ec_OADPLO_SP
Economizer OA Dew Point Lockout SP
R/W
AV12
Deg F
58
0
120
Ec_OALO_SP
Economizer OA Temp Lockout SP
R/W
AV13
Deg F
60
0
120
EF_Spd_Cmd
Exhaust Fan Speed Command
R
AV14
%
0
15
100
ERV_DA_Temp
Energy Recovery Wheel Discharge Air Temp
R
AV15
Deg F
Ext_Dmpr_Cmd
External Unit Damper Command
R/W
AV16
%
0
100
HX_Mod_Cmd
Heating Modulation Command
R
AV17
%
0
100
MA_ChgOvr_SP
Mixed Air Temp Auto Change Over SP
R/W
AV18
Deg F
65
45
80
MA_Temp
Mixed Air Temp
R
AV19
Deg F
MinDmprSP
Minimum Damper SP
R/W
AV20
%
10
0
100
OA_Dew_Point
Outside Air Dew Point
R
AV21
Deg F
OA_Hum_BMS
Outside Air Humidity BMS
R/W
AV22
%rH
OA_Hum_Raw
Outside Air Humidity
OA_Temp_BMS
Outside Air Temperature BMS
OA_Temp_Raw
R
AV23
%rH
R/W
AV24
Deg F
Outside Air Temp
R
AV25
Deg F
RH_Mod_Out
Reheat Modulation Output %
R
AV26
%
0
100
SF_VFD_Cmd
Supply Fan VFD Command
R
AV27
%
0
100
Form CP-Y-D19, P/N 273649 R1, Page 34
BACnet® MSTP Points List (Cont’d)
Integer Variables
Name
Description
R/W
BMS Address
Unit
Default
Min
Max
Bldg_Press_SP*
Building Static Pressure SP
R/W
AV1001
iwc
100
-500
500
Duct_Press_SP*
Duct Static Pressure SP
R/W
AV1002
iwc
500
0
2500
0
2000
0
2000
Air_Pressure*
Duct or Building Static Pressure
R
AV1003
iwc
Spc_CO2
Space CO2
R
AV1004
ppm
Space CO2 SP
R/W
AV1005
* Note: Divide by 1000 with the supervisory system to reflect the appropriate decimal precision.
ppm
1000
Unit
Default
Min
Max
Off
Off
On
SpcCO2SP
Digital Variables
Name
Description
R/W
BMS Address
Unit_Enable
Unit Enable
R/W
BV1
Alm_Rly_Cmd
Unit General Alarm Relay Command
R
BV2
Off
On
Comp_Alarm
Modulating Compressor General Alarm
R
BV3
Off
On
Comp_Stg2_Cmd
Compressor Stage 2 Command
R
BV4
Off
On
Comp_Stg3_Cmd
Compressor Stage 3 Command
R
BV5
Off
On
Comp_Stg4_Cmd
Compressor Stage 4 Command
R
BV6
Off
On
EF_Cmd
Exhaust Fan Cmd
R
BV7
Off
On
EF_Sts
Exhaust Fan Status
R
BV8
Off
On
ERV_Cmd
Energy Recovery Wheel Command
R
BV9
Off
On
Ext_Call_Cool
External Cool Call Input (Y1)
R
BV10
Off
On
Ext_Call_Dh
External Call Dehum Input
R
BV11
Off
On
Ext_Call_Fan
External Fan Call Input (G)
R
BV12
Off
On
Ext_Call_Heat
External Heat Call Input (W1)
R
BV13
Off
On
Ext_OCC
Occupied Mode Input
R
BV14
Off
On
Ext_Switch_1
External Damper Position Sw 1
R
BV15
Off
On
Ext_Switch_2
External Damper Position Sw 2
R
BV16
Off
On
Htr_1_Sts
Gas Heater 1 Status
R
BV17
Off
On
Htr_2_Sts
Gas Heater 2 Status
R
BV18
Off
On
HX_Stg1_Cmd
Heating Stage 1 Command
R
BV19
Off
On
HX_Stg2_Cmd
Heating Stage 2 Command
R
BV20
Off
On
HX_Stg3_Cmd
Heating Stage 3 Command
R
BV21
Off
On
HX_Stg4_Cmd
Heating Stage 4 Command
R
BV22
Off
On
HX_Stg5_Cmd
Heating Stage 5 Command
R
BV23
Off
On
HX_Stg6_Cmd
Heating Stage 6 Command
R
BV24
Off
On
NA_Clg_Md
Neutral Air Cooling Mode
R
BV25
Off
On
NA_Dehum_Md
Neutral Air Dehum Mode
R
BV26
Off
On
NA_Htg_Md
Neutral Air Heating Mode
R
BV27
Off
On
OA_Hum_Sel
Share OA Humidity from BMS (0=Probe 1=BMS)
R/W
BV28
Off
Off
On
OA_Temp_Sel
Share OA Temp from BMS (0=Probe 1=BMS)
R/W
BV29
Off
Off
On
Phase_Alarm
Phase Protection Alarm
R
BV30
Off
On
Preheat_Cmd
Electric Preheat Command
R
BV31
Off
On
Reheat_Alarm
Modulating Reheat Compressor General Alarm
R
BV32
Off
On
Safety_Sts
Safety Input Status
R
BV33
Normal
Alarm
SF_Cmd
Supply Fan Command
R
BV34
Off
On
SF_Sts
Supply Fan Status
R
BV35
Off
On
Spc_Clg_Md
Space Cooling Mode
R
BV36
Off
On
Spc_Dehum_Md
Space Dehum Mode
R
BV37
Off
On
Spc_Htg_Md
Space Heating Mode
R
BV38
Off
On
Filter_Sts
Main or ERV Dirty Filter Status
R
BV39
Off
On
Form CP-Y-D-19, P/N 273649 R1, Page 35
8.0 Optional Communication Cards (Cont’d)
8.2 LonWorks®
(Option BHB7)
Communication
LonWorks® is an open protocol that was originally developed by Echelon Corporation. It is now maintained by Echelon in collaboration with members of the LonMark®
Interoperability Association. It requires the use of Echelon’s Neuron microprocessor to
encode and decode the LonWorks® packets.
The LonWorks® protocol is based on the concept of using standardized functional profiles to control similar pieces of equipment. The LonWorks® (Option BHB7) communication allows access to selected unit function parameters. The network is considered
open communication, whereas any device on the network has the capability to receive
input from any other controller on the network. In all Y Series units included on a LonWorks® network, the unit protocol configuration parameters must be set before communication can be established with other devices.
Follow the procedure below to set the BMS protocol to LonWorks®.
1. From the main menu navigate to E. Service and
press the enter key to access the service menu.
3. From the BMS Config screen E.h.1 verify that the
Protocol: field is set to LON. On a BAS card retrofit
the Protocol: field may need to be set. To change the
protocol press the enter key until the cursor is flashing
on the Protocol: field and use the up or down key to
scroll through the available choices and select LON
then press enter to confirm the protocol change.
2. From the service menu navigate to the h. BMS Config
submenu and press the enter key to select.
When complete press the escape key to return to the
main menu.
The LonWorks® communication card
has the following components.
1. Serial port connection
2. Terminal block for LonWorks® network (GND, A, B)
3. Service pin
4. Service green LED
5. Anomaly red LED
To activate the service pin, simply short-circuit the two pins for an instant using the tip of a screwdriver or similar tool.
The activation is confirmed by the lighting of the service LED.
The service LED has several function listed below.
LED Light
Green
Description
1. Signals the status of the mode, as per the LonWorks® protocol;
2. Remains ON during the activation of the service pin;
3. Remains ON for a second when receiving a WINK command from the network
Troubleshooting
The anomaly LED indicates the status of communication between the card and the controller.
LED Light
Off
Red
Description
Communication with controller is established and working.
Communication is not established and no data is passing to the card.
Form CP-Y-D19, P/N 273649 R1, Page 36
Troubleshooting
1. Confirm card is firmly plugged in.
2. Confirm BMS Protocol is set to LON.
LonWorks® Points List
Option D19 Lon Point List
Analog Variables
Name
Description
TypeNV
Unit
CC_Temp
Cooling Coil Discharge Air Temp
R
1
nvoCC_Temp
SNVT_temp_p
Deg F/C
CO2DmprOsSP
CO2 Minimum Damper Offset SP
R/W
2
nviCO2DmprOsSP
SNVT_lev_
percent
%
R
3
nvoComp_Mod_Out
SNVT_lev_
percent
%
Comp_Mod_Out DX Modulation Output %
R/W Index
Name NV
Bit#
Default
Min
Max
10
0
100
0
100
DA_NAClg_SP
Discharge Air Temp Neutral Cooling SP
R/W
4
nviDA_NAClg_SP
SNVT_temp_p
Deg F/C
70/21.1
50/10
100/37.7
DA_NAHtg_SP
Discharge Air Temp Neutral Heating SP
R/W
5
nviDA_NAHtg_SP
SNVT_temp_p
Deg F/C
70/21.1
50/10
140/60
DA_SP
Discharge Air Temp Active SP
R
6
nvoDA_SP
SNVT_temp_p
Deg F/C
DA_SpcClg_SP
Discharge Air Temp Space Cooling SP
R/W
7
nviDA_SpcClg_SP
SNVT_temp_p
Deg F/C
55/12.7
50/10
100/37.7
DA_SpcHtg_SP
Discharge Air Temp Space Heating Sp
R/W
8
nviDA_SpcHtg_SP
SNVT_temp_p
Deg F/C
90/32.2
50/10
140/60
DA_Temp
Discharge Air Temp
R
9
nvoDA_Temp
SNVT_temp_p
Deg F/C
Damper_Cmd
Damper Output Command
R
10
nvoDamper_Cmd
SNVT_lev_
percent
%
0
100
DhOADP_SP
Dehum OA Dew Point SP
R/W
11
nviDhOADP_SP
SNVT_temp_p
Deg F/C
58/14.4
50/10
100/37.7
Ec_OADPLO_SP Economizer OA Dew Point Lockout SP
R/W
12
nviEc_OADPLO_SP
SNVT_temp_p
Deg F/C
58/14.4
0
120/48.8
Ec_OALO_SP
R/W
13
nviEc_OALO_SP
SNVT_temp_p
Deg F/C
60/15.5
0
120/48.8
%
15
100
Economizer OA Temp Lockout SP
EF_Spd_Cmd
Exhaust Fan Speed Command
R
14
nvoEF_Spd_Cmd
SNVT_lev_
percent
ERV_DA_Temp
Energy Recovery Wheel Discharge Air
Temp
R
15
nvoERV_DA_Temp
SNVT_temp_p
Deg F/C
Ext_Dmpr_Cmd External Unit Damper Command
R
16
nvoExt_Dmpr_Cmd
SNVT_lev_
percent
%
0
100
HX_Mod_Cmd
R
17
nvoHX_Mod_Cmd
SNVT_lev_
percent
%
0
100
R/W
18
nviMA_ChgOvr_SP
SNVT_temp_p
Deg F/C
65/18.3
45/7.2
80/26.6
R
19
nvoMA_Temp
SNVT_temp_p
Deg F/C
10
0
100
Heating Modulation Command
MA_ChgOvr_SP Mixed Air Temp Auto Change Over SP
MA_Temp
Mixed Air Temp
MinDmprSP
Minimum Damper SP
R/W
20
nviMinDmprSP
SNVT_lev_
percent
%
OA_Dew_Point
Outside Air Dew Point
R
21
nvoOA_Dew_Point
SNVT_temp_p
Deg F/C
OA_Hum_BMS1
Outside Air Humidity BMS -Sets OA
Humidity when OA_Hum_Sel is set to
1=BMS
R/W
22
nviOA_Hum_BMS
SNVT_lev_
percent
%rH
OA_Hum_Raw
Outside Air Humidity
R
23
nvoOA_Hum_Raw
SNVT_lev_
percent
%rH
R/W
24
nviOA_Temp_BMS
SNVT_temp_p
Deg F/C
R
25
nvoOA_Temp_Raw
SNVT_temp_p
Deg F/C
%
0
100
%
0
100
Outside Air Temp BMS - Sets OA Temp
OA_Temp_BMS when OA_Temp_Sel is set to 1=BMS
OA_Temp_Raw
Outside Air Temp
RH_Mod_Out
Reheat Modulation Output %
R
26
nvoRH_Mod_Out
SNVT_lev_
percent
SF_VFD_Cmd
Supply Fan VFD Command
R
27
nvoSF_VFD_Cmd
SNVT_lev_
percent
Integer Variables
Name
Description
R/W Index
Name NV
Bit#
TypeNV
Unit Default Min
Max
Bldg_Press_SP Building Static Pressure SP
R/W
1
nviBldg_Press_SP*
SNVT_press_p
Pa
24.9
-124
124
Duct_Press_SP Duct Static Pressure SP
R/W
2
nviDuct_Press_SP*
SNVT_press_p
Pa
124
0
622
1000
0
2000
Air_Pressure
Duct or Building Static Pressure
R
3
nvoAir_Pressure*
SNVT_press_p
Pa
Spc_CO2
Space CO2
R
4
nvoSpc_CO2
SNVT_ppm
ppm
SpcCO2SP
Space CO2 SP
R/W
5
nviSpcCO2SP
SNVT_ppm
ppm
Digital Variables
Name
Description
R/W Index
TypeNV
Unit Default Min
Max
Unit_Enable
Unit Enable
R/W
1
nviUnit_Enable
Name NV
Bit#
SNVT_switch
Off
Off
On
OA_Hum_Sel
Share OA Humidity from BMS
(0=Probe 1=BMS)
R/W
28
nviOA_Hum_Sel
SNVT_switch
Off
Off
On
OA_Temp_Sel
Share OA Temp from BMS (0=Probe
R/W
1=BMS)
29
nviOA_Temp_Sel
Off
Off
On
.
SNVT_switch
.
Note 1: Divide the BMS humidity value by 20 before writing to the OA_Hum_BMS variable (scale 1=20%).
Form CP-Y-D-19, P/N 273649 R1, Page 37
8.0 Optional Communication Cards (Cont’d)
8.2 LonWorks® (Option BHB7) Communication (Cont’d)
LonWorks® Points List (Cont’d)
Digital Variables Digital Outputs
Name
Description
Alm_Rly_Cmd
Unit General Alarm Relay Command
R/W
Index
Name NV
Bit#
TypeNV
Unit
Default
Min
Max
R
nvoDoStat1
0
SNVT_state
Off
On
Comp_Stg2_Cmd Compressor Stage 2 Command
R
nvoDoStat1
1
SNVT_state
Off
On
Comp_Stg3_Cmd Compressor Stage 3 Command
R
nvoDoStat1
2
SNVT_state
Off
On
Comp_Stg4_Cmd Compressor Stage 4 Command
R
nvoDoStat1
3
SNVT_state
Off
On
EF_Cmd
Exhaust Fan Cmd
R
nvoDoStat1
4
SNVT_state
Off
On
ERV_Cmd
Energy Recovery Wheel Command
R
nvoDoStat1
5
SNVT_state
Off
On
HX_Stg1_Cmd
Heating Stage 1 Command
R
nvoDoStat1
6
SNVT_state
Off
On
HX_Stg2_Cmd
Heating Stage 2 Command
R
nvoDoStat1
7
SNVT_state
Off
On
HX_Stg3_Cmd
Heating Stage 3 Command
R
nvoDoStat1
8
SNVT_state
Off
On
HX_Stg4_Cmd
Heating Stage 4 Command
R
nvoDoStat1
9
SNVT_state
Off
On
HX_Stg5_Cmd
Heating Stage 5 Command
R
nvoDoStat1
10
SNVT_state
Off
On
HX_Stg6_Cmd
Heating Stage 6 Command
R
nvoDoStat1
11
SNVT_state
Off
On
Preheat_Cmd
Electric Preheat Command
R
nvoDoStat1
12
SNVT_state
Off
On
SF_Cmd
Supply Fan Command
R
nvoDoStat1
13
SNVT_state
Off
On
Digital Variables Digital Inputs
Name
Description
Name NV
Bit#
TypeNV
Min
Max
Ext_OCC
Occupied Mode Input
R/W
R
Index
nvoDiStat1
0
SNVT_state
Unit
Default
Off
On
Ext_Call_Fan
External Fan Call Input (G)
R
nvoDiStat1
1
SNVT_state
Off
On
Ext_Call_Heat
External Heat Call Input (W1)
R
nvoDiStat1
2
SNVT_state
Off
On
Ext_Call_Cool
External Cool Call Input (Y1)
R
nvoDiStat1
3
SNVT_state
Off
On
Ext_Call_Dh
External Dehum Call Input
R
nvoDiStat1
4
SNVT_state
Off
On
Name NV
Bit#
TypeNV
Digital Variables Digital Inputs
Name
Description
R/W Index
Comp_Alarm
Modulating Compressor General Alarm
R
nvoDiStat2
0
EF_Sts
Exhaust Fan Status
R
nvoDiStat2
1
Ext_Switch_1
External Damper Position Sw 1
R
nvoDiStat2
Ext_Switch_2
External Damper Position Sw 2
R
Htr_1_Sts
Gas Heater 1 Status
Htr_2_Sts
Gas Heater 2 Status
Phase_Alarm
Unit Default
Min
Max
SNVT_state
Off
On
SNVT_state
Off
On
2
SNVT_state
Off
On
nvoDiStat2
3
SNVT_state
Off
On
R
nvoDiStat2
4
SNVT_state
Off
On
R
nvoDiStat2
5
SNVT_state
Off
On
Phase Protection Alarm
R
nvoDiStat2
6
SNVT_state
Off
On
Reheat_Alarm
Modulating Reheat Compressor
General Alarm
R
nvoDiStat2
7
SNVT_state
Off
On
Safety_Sts
Safety Input Status
R
nvoDiStat2
8
SNVT_state
SF_Sts
Supply Fan Status
R
nvoDiStat2
9
SNVT_state
Off
On
Filter_Sts
Main or ERV Dirty Filter Status
R
nvoDiStat2
10
SNVT_state
Off
On
Normal Alarm
Digital Variables Unit Modes
Name
Description
Name NV
Bit#
TypeNV
Min
Max
NA_Clg_Md
Neutral Air Cooling Mode
R
nvoMdStat1
0
SNVT_state
Off
On
NA_Dehum_Md
Neutral Air Dehum Mode
R
nvoMdStat1
1
SNVT_state
Off
On
NA_Htg_Md
Neutral Air Heating Mode
R
nvoMdStat1
2
SNVT_state
Off
On
Spc_Clg_Md
Space Cooling Mode
R
nvoMdStat1
3
SNVT_state
Off
On
Spc_Dehum_Md
Space Dehum Mode
R
nvoMdStat1
4
SNVT_state
Off
On
Spc_Htg_Md
Space Heating Mode
R
nvoMdStat1
5
SNVT_state
Off
On
Form CP-Y-D19, P/N 273649 R1, Page 38
R/W Index
Unit Default
Notes:
Form CP-Y-D-19, P/N 273649 R1, Page 39
INDEX
A
Airflow (cfm) / Pressure Drop (“w.c.) Table 19, 20,
21
Airflow (cfm) / Pressure Drop (“w.c.) Tables 22
Compressor Failure Alarm 10
Exhaust Fan Alarm Messages 11
Exhaust Fan Failure Alarm 11
Gas Heating Status Alarm 10
Heat Failure Alarm Gas or Electric 10
Reheat Compressor Failure Alarm 11
Safety (Critical Shutdown Alarm) 10
Alarm key 13
Alarm Logger 13
Alarm Management 12
Alarms 10, 12
Alarm Status Reporting 12
B
BACnet® MSTP (Option BHB8) Communication 32
BACnet® MSTP Points List 34, 35
Building Static Pressure Control (Option EFC4) 5
C
Optional Communication Cards 32
Constant Volume (Option EFC9) 5
Constant Volume (Option VFC9) 5
Cooling Contacts 4
Dehumidification Contacts 4
Fan Contacts 3
Heating Contacts 3
Occupied Contacts 3
Controller 1, 2
Controller hardware input – output points 2
Controller History 23
Cooling Setpoint Selection 8
Cooling Staging Control 8
D
Intake Damper Control 6
Set the Date and Time 14
Dehumidification 9
Discharge Setpoints 3, 4
Display 1
Duct Static Pressure Control (Option VFC3) 5
E
Economizer Package (Option GF8) 7
Energy Recovery 9
Exhaust Fan Control 5
External Contacts Description
(ID4 Through ID8) 3
F
H
Heating Setpoint Selection 7
Heating Staging Control 8
I
INDEX 40
Input Points 2
L
LonWorks® (Option BHB7) Communication 36
LonWorks® Points List 37, 38
M
Controller Display Menus 24, 26, 28, 30
O
Output Points 2
P
Unit Phase Loss 10
Power Exhaust PE4 Airflow (cfm) / Pressure Drop
(iwc) Table 21
Power Exhauxt PE5 Airflow (cfm) / Pressure Drop
(iwc) Table 22
R
Remote Controller 1
S
Safeties 10, 12
Cooling Coil Temp Sensor Failure 11
Duct or Building Air Pressure Sensor Failure 11
ERV Discharge Temp Sensor Failure 11
Mixed Air Temp Sensor Failure 11
Outside Air Humidity Sensor Failure 11
Discharge Air Temperature Sensor Failure 10
Outdoor Air Temperature Sensor Failure 11
Sequence of Operation 3, 4
Setting Fans to Test and Balance Airflow 16
Setting the Unit for Operation with the D19 Control
Sequence 14
High - Low Fan Speed Control 5
Gas or Electric Heat Staging 8
States of Operation 3
Supply Fan Airflow (cfm) / Pressure Drop (iwc)
Table 19
T
Temperature And Humidity Control 7, 8
Low Discharge Temperature Limit 10
Test Mode 14, 15, 16, 18
W
Exhaust Fan Warning Messages 11
Supply Fan Failure 10
Supply Fan Control 5
Filter Status 11
Function Keys 1
www.ReznorHVAC.com; (800) 695-1901
Form CP-Y-D19, P/N 273649 R1, Page 40
©2014 Reznor LLC, All rights reserved.
Trademark Note: Reznor® is registered in at least the United States.
All other trademarks are the property of their respective owners.
07/14 (Serial No. Date Code BNG) Form CP-Y-D19 (Version 0.2)


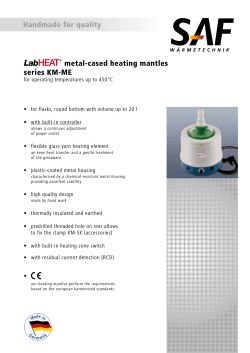


© Copyright 2026