
Image for Windows User Manual TeraByte Unlimited
Image for Windows
User Manual
TeraByte Unlimited
Las Vegas, Nevada, USA
http://www.terabyteunlimited.com
Revision: 2014-06-05
Copyright © 1996-2014 by TeraByte, Inc. All Rights Reserved.
Trademarks
BootIt, BING, TBOS, PHYLock, TBScript, TBIMount, and TBIView are trademarks
of TeraByte, Inc.
Microsoft, MS, MS-DOS and Windows are registered trademarks of Microsoft
Corporation.
IBM, PC-DOS and OS/2 are registered trademarks of the International Business
Machines Corporation.
All other trademarks and copyrights referred to are the property of their respective
owners.
Technical Support Policy
Technical support is provided online. Software and documentation updates are
available at www.terabyteunlimited.com.
*
The Image for Windows home page, with software and documentation update
information, and support resources, can be found at
www.terabyteunlimited.com/image-for-windows.htm.
*
A support knowledge base for all TeraByte Unlimited products, including Image
for Windows, can be found at www.terabyteunlimited.com/kb.
Registered users can email their questions to [email protected] if you
can’t find a suitable resolution via the aforementioned support resources. If we
cannot resolve the issue via email, we may provide telephone support.
Unregistered users will be provided technical support and product information
through email only.
In all cases, TeraByte Unlimited reserves the right to refuse any communication
method that would incur a cost.
Ombudsman Statement
This program is produced by a member of the Association of Software
Professionals (ASP). ASP wants to make sure that the shareware principle works
for you. If you are unable to resolve a shareware-related problem with an ASP
member by contacting the member directly, ASP may be able to help. The ASP
Ombudsman can help you resolve a dispute or problem with an ASP member, but
does not provide technical support for members' products. Please contact the ASP
Ombudsman online at www.asp-software.org/omb.
Image for Windows User Manual
Page 2 of 218
Table of Contents
TABLE OF CONTENTS ........................................................................................ 3
SYSTEM REQUIREMENTS ................................................................................. 6
DATA STORAGE SIZE UNIT CONVENTIONS .................................................... 7
HOW IMAGE FOR WINDOWS WORKS .............................................................. 7
WAYS TO USE IMAGE FOR WINDOWS ............................................................. 8
IMAGE FOR WINDOWS QUICK START .............................................................. 9
QUICKSTART: CREATING A RECOVERY BOOT DISC...................................................... 10
Boot Media and UEFI Systems ........................................................................................ 10
QUICKSTART: MAKING A BACKUP ............................................................................... 12
QUICKSTART: RESTORING AN IMAGE .......................................................................... 12
QUICKSTART: VALIDATING AN IMAGE .......................................................................... 13
OBTAINING IMAGE FOR WINDOWS ................................................................ 13
INSTALLING IMAGE FOR WINDOWS ............................................................... 15
FORMULATING A BACKUP PLAN .................................................................... 24
CONSIDER THE DESTINATION FOR YOUR BACKUP ....................................................... 24
PLAN YOUR BACKUP WITH A RESTORE STRATEGY IN MIND .......................................... 24
STRIKE YOUR OWN BALANCE BETWEEN CONVENIENCE AND RESILIENCY ...................... 25
CREATING BACKUPS WITH IMAGE FOR WINDOWS ..................................... 25
CREATING A FULL BACKUP ........................................................................................ 25
UNDERSTANDING OPTIONS ........................................................................................ 35
Setting Image for Windows Program Options .................................................................. 35
Setting Backup Options .................................................................................................... 46
Additional Backup Options for Removable Media ............................................................ 50
CREATING A DIFFERENTIAL OR INCREMENTAL BACKUP ................................................ 52
RESTORING AN IMAGE FILE............................................................................ 57
RESTORING A BACKUP WITH IMAGE FOR DOS ............................................................. 59
Creating a Bootable Image for DOS Disc ......................................................................... 59
Navigating the Image for DOS Interface .......................................................................... 71
Restoring the Backup ....................................................................................................... 72
Image for DOS Restore Options for an Entire Drive ........................................................ 75
Image for DOS Restore Options for an Individual Partition .............................................. 79
RESTORING A BACKUP WITH IMAGE FOR W INDOWS ..................................................... 82
Using Image for Windows in BartPE ................................................................................ 83
Using Image for Windows to Restore an Image ............................................................... 85
Geometry Settings ............................................................................................................ 92
Image for Windows Restore Options ................................................................................ 94
VALIDATING BACKUPS WITH IMAGE FOR WINDOWS .................................. 98
Image for Windows User Manual
Page 3 of 218
VALIDATING A BACKUP............................................................................................... 99
UNDERSTANDING VALIDATION OPTIONS .................................................................... 102
COPYING PARTITIONS OR DRIVES WITH IMAGE FOR WINDOWS ............ 102
COPYING A PARTITION OR DRIVE.............................................................................. 102
UNDERSTANDING COPY OPTIONS............................................................................. 106
USING SIMPLE OPERATIONS MODE ............................................................ 111
CREATING A BACKUP ............................................................................................... 112
RESTORING A BACKUP ............................................................................................ 113
VALIDATING A BACKUP............................................................................................. 114
DEPLOYING YOUR IMAGE ............................................................................. 114
IMAGE FOR WINDOWS ADVANCED CONFIGURATION OPTIONS .............. 117
IMAGE FOR W INDOWS INI FILE ................................................................................. 117
IMAGE FOR W INDOWS ENVIRONMENT VARIABLES ...................................................... 118
IMAGE FOR W INDOWS FILE PATH VARIABLES ............................................................ 118
IMAGE FOR W INDOWS AND W INDOWS SERVICES ....................................................... 119
RUNNING IMAGE FOR WINDOWS FROM THE COMMAND LINE................. 120
IMAGE FOR W INDOWS BACKUP OPTIONS .................................................................. 145
IMAGE FOR W INDOWS RESTORE OPTIONS ................................................................ 156
IMAGE FOR W INDOWS VALIDATE OPTIONS ................................................................ 169
IMAGE FOR W INDOWS COPY OPTIONS ...................................................................... 173
IMAGE FOR W INDOWS LIST OPTIONS ........................................................................ 183
IMAGE FOR W INDOWS COMBINE OPTIONS................................................................. 185
TROUBLESHOOTING ...................................................................................... 188
APPENDIX A: UNDERSTANDING THE TYPES OF BACKUPS ...................... 189
FILE-BASED BACKUP ............................................................................................... 189
SECTOR-BASED BACKUP ......................................................................................... 189
APPENDIX B: BACKUP STRATEGIES ............................................................ 190
FULL BACKUPS ....................................................................................................... 190
INCREMENTAL BACKUPS .......................................................................................... 190
DIFFERENTIAL BACKUPS .......................................................................................... 191
APPENDIX C: INTRODUCTION TO HARD DRIVE STORAGE ....................... 193
THE PHYSICAL HARD DRIVE ..................................................................................... 193
THE LOGICAL HARD DRIVE—HARD DRIVE DATA ORGANIZATION ................................ 193
APPENDIX D: SCHEDULING BACKUPS ......................................................... 196
APPENDIX E: RESTORING TO A SMALLER DRIVE OR PARTITION ............ 200
PREPARING FOR THE MOVE ..................................................................................... 201
EXAMPLES .............................................................................................................. 206
GLOSSARY ...................................................................................................... 209
Image for Windows User Manual
Page 4 of 218
WHAT IS SHAREWARE? ................................................................................. 211
TERABYTE UNLIMITED (TRIAL-USE) LICENSE AGREEMENT ..................... 212
TERABYTE UNLIMITED (FULL-USE) LICENSE AGREEMENT ...................... 215
Image for Windows User Manual
Page 5 of 218
System Requirements
Any of the following operating systems (including x64** and server versions) are
supported:
•
•
•
•
•
•
•
•
•
•
Windows 8 *
Windows 7 *
Windows 2008 *
Windows Vista *
Windows XP *
Windows 2003 *
Windows 2000 *
Windows NT *
Windows Millennium
Windows 98
* These operating systems require Administrator privileges to install and run
Image for Windows.
** x64 versions of Windows are supported (AMD64/EM64T).
Recommended: External hard drive
Note: You can use a writable CD or DVD drive, but an external hard drive is the
preferred method.
If you will be restoring outside of Windows, as most home users will, or you are
running Windows 98/Me, your computer’s BIOS must provide access to the hard
drive. In addition, it must meet the following minimum system requirements of
Image for DOS:
IBM-compatible personal computer (Pentium or newer)
32-MB RAM
Warning to Windows 8 Users
You must disable the Windows 8 Fast startup option or you risk corruption of your
partitions and data when the partitions are used outside of Windows 8 (e.g. you
boot into Image for Linux after shutdown and save an image to a data drive).
To disable using Windows 8: Open the Control Panel and select Power Options.
Click the Choose what the Power buttons do from the links on the left. Click the
Change settings that are currently unavailable link and then remove the checkmark
from the Turn on fast startup (recommended) option under Shutdown settings.
To disable using BooIt BM: Boot into BootIt BM, click Partition Work on the
desktop, then select the Windows 8 partition and click Properties. Click the Disable
Fast Start button.
Image for Windows User Manual
Page 6 of 218
Data Storage Size Unit Conventions
Since Image for Windows and this document refer to data storage size units, this
section provides clarification on the definitions we use. Storage device
manufacturers typically define gigabytes (GB) in base decimal, where 1 GB = 1,000
MB = 109 bytes = 1,000,000,000 bytes. Microsoft Windows, on the other hand,
defines GB in base binary, where 1 GB = 1,024 MB = 230 bytes = 1,073,741,824
bytes.
Because of the confusion that can result when these different data storage size unit
conventions are each referred to as “gigabytes”, the gibibyte (along with the
kibibyte, mebibyte, etc.) was established in 1998 by the International
Electrotechnical Commission (IEC). A gibibyte (abbreviated GiB) is a base binary
unit, so 1 GiB = 230 bytes = 1,073,741,824 bytes. The IEC retained the term
gigabyte to refer to base decimal, where 1 GB = 109 bytes = 1,000,000,000 bytes.
Image for Windows and this document will follow IEC recommendations, and will
thus use the terms megabyte (MB), gigabyte (GB), etc. to refer to base decimal,
and mebibytes (MiB), gibibytes (GiB), etc. to refer to base binary. So, when you
read about the data storage size convention used by Windows, the units will appear
as mebibytes (MiB) or gibibytes (GiB), even though Windows itself refers to the
units as megabytes (MB) or gigabytes (GB).
How Image for Windows Works
Image for Windows is a backup program that is designed to function in the
Windows operating environment but can back up a hard disk containing any type of
operating system. Image for Windows protects your system by creating a
compressed or uncompressed “snapshot” of all used areas of your FAT, FAT32,
NTFS, Ext2/3/4, ReiserFS, or HSF+ partition or volume. For other file systems, it
saves and restores a compressed or uncompressed snapshot of all sectors in the
partition or volume, both used and unused areas.
The snapshot backup created by Image for Windows is referred to as an image.
You can write the image backup to a set of files that you store in a different partition
of the hard drive you are backing up, on an external hard drive (the recommended
approach), on a network drive, or directly to most USB 2, IEEE 1394, ATAPI CDR/RW, or DVD/RW drives. Image for Windows can also work with drives that make
use of ASPI drivers, if you provide the appropriate DOS-based driver.
When you create the image, Image for Windows backs up the file system and files
exactly as they are stored on the sectors of your hard drive at the time you make
the backup, effectively taking a snapshot of your hard drive when you create the
image. Image for Windows does not examine the files on your hard drive to make
decisions about whether they should be backed up.
Note: See Appendix A: Understanding the Types of Backups on Page 189 for a
description of file-based backups vs. sector-based backups. Appendix B: Backup
Strategies on Page 190 describes the types of backup strategies you can use, and
Image for Windows User Manual
Page 7 of 218
the strategy you choose plays an important role when you need to restore a
backup.
When you create a backup using Image for Windows, you back up not only your
data files but also the operating system, in its entirety. To understand the full impact
of having an image backup, suppose that you install a program to test it and
discover it is not what you expected. You attempt to uninstall it and it misbehaves.
Before you know it, the fully functional, well-behaved computer you fondly
remember from 30 minutes ago is gone, and, in its place, you now have a devil
child that won’t even boot. If you restore an image backup taken before you
installed the errant program, you effectively remove all traces of the program—your
computer returns to the state it was in before you installed the errant program and
life goes on as if the errant program never existed on your hard drive. To
understand the technical details of how Image for Windows creates a sector-based
image, see Appendix C: Introduction to Hard Drive Storage on Page 193.
After backing up with Image for Windows, your computer is protected from crashes,
data loss, hardware problems, and malicious software (i.e. viruses), since you can
restore the snapshot image whenever necessary.
You can view and extract individual files or folders from an image backup by using
the free TBIView or TBIMount add-ons, which are included as part of the Image for
Windows setup.
When you are ready to restore a backup file, you typically don’t use Image for
Windows because you cannot restore a Windows image while you work in that
instance of Windows. So, instead, you can create an Image for DOS or an Image
for Linux boot disc and then use either of those programs to restore your image. In
both cases, when you boot your computer, you don’t boot to Windows, so your
Windows installation is not in use and you can safely restore it.
Note: When you purchase Image for Windows, you automatically receive copies of
Image for DOS and Image for Linux. If you download the trial version of Image for
Windows, you can also download the trial versions of Image for DOS and Image for
Linux.
You can easily create an Image for DOS or Image for Linux boot disc using the
MakeDisk utility that comes with those programs; just follow the steps in the section
“Installing Image for DOS” or “Installing Image for Linux” of the respective manual.
The images you create using Image for Windows are fully compatible with the other
TeraByte Unlimited Version 2 imaging programs, such as Image for DOS and
Image for Linux. For example, you can create an image using Image for Windows
and restore it using Image for DOS or Image for Linux. The reverse is also true:
Images created by other TeraByte Unlimited imaging programs are compatible with
Image for Windows.
Ways to Use Image for Windows
You can use Image for Windows in a variety of ways:
Image for Windows User Manual
Page 8 of 218
*
Local Usage: You can make a backup with Image for Windows and the free
add-on PHYLock that comes with Image for Windows. You can store the
backup on a secondary hard drive partition, on an external hard drive, or on
CD’s or DVD’s. Then, when you need to restore, boot from a CD/DVD, USB
flash drive (UFD), floppy diskette, or other bootable media that has Image for
DOS installed on it, and use Image for DOS to perform the restore operation.
*
Across a Network: You can use Image for Windows to create an image file to a
mapped network drive or UNC path. Using Image for DOS (after creating a
network-capable boot media) or Image for Linux, you also can restore an image
file from a mapped or mounted network drive. You can use push technology
(not included) to automatically start the back up or restore across a network.
You also can use Image for Windows from the Windows PE environment as
described in the next bullet and in the section, “Using Image for Windows in
BartPE” on Page 83 to back up and restore from a network path.
*
In Windows PE or Windows RE: TBWinPE is based on the Windows 7 AIK
(requires AIK download from Microsoft). Windows 7 and Windows 8 users can
easily create TBWinRE boot media (does not require downloading the Windows
AIK) and add Image for Windows to the Windows Recovery Environment. The
TBWinRE files are automatically installed in the tbwinre sub-folder of the Image
for Windows installation folder and can be accessed there or from the Create
Recovery Boot Disk shortcut in the Start menu.
When you boot your computer using this boot media, you boot to a Windows
preinstallation environment state, where you can use Image for Windows to
back up or restore your backup.
*
In Bart PE or Vista PE: Image for Windows includes the “PE Builder Plugin
Installer.” You can use the plugin with the free Bart PE Builder, which allows you
to build a bootable Windows CD or UFD that also contains Image for Windows
(BartPE tutorial). A VistaPE build can also be created.
When you boot your computer using this boot media, you boot to a Windows
preinstallation environment state, where you can use Image for Windows to
back up or restore your backup.
Image for Windows Quick Start
In this section, you’ll find a general overview of the major processes Image for
Windows can perform: making a recovery boot disk that you can use to boot your
computer and restore a partition or a hard drive, backing up, restoring, and
validating an existing backup image. Each of these processes is described in detail,
including pictures, later in this manual.
Warning to Windows 8 Users: You must disable the Windows 8 Fast startup option
or you risk corruption of your partitions and data. For instructions see “System
Requirements” on page 6.
Image for Windows User Manual
Page 9 of 218
QuickStart: Creating a Recovery Boot Disc
Follow the steps in the section, “Installing Image for Windows” on Page 15 to install
the product. While installing Image for Windows, you can also create the Image for
DOS recovery boot media that you can use to boot your computer and restore a
partition or a hard drive. This recovery media plays an important role in your use of
Image for Windows. It is particularly useful if either your hard drive or the partition
you use to boot become unusable. You use the MakeDisk utility to create the
recovery boot media.
Boot Media and UEFI Systems
Computer systems that come from the manufacturer with Windows 8 installed
include a new BIOS interface known as the Unified Extensible Firmware Interface
(UEFI). This new BIOS interface boots media differently than a traditional BIOS.
Microsoft also requires these systems to use a feature of UEFI called Secure Boot.
When Secure Boot is enabled, the system will only boot items that have a digital
signature that is included in the system firmware. The manufacturers include a
digital certificate, provided by Microsoft, to boot Windows on their systems. Secure
boot can be disabled (on non-ARM systems) to allow you to boot other operating
systems and environments. Boot media must be specifically created for UEFI to
allow UEFI to boot from it. However, most systems also include the ability to boot
traditional boot media though a method or mode typically called Legacy or BIOS.
Using TeraByte Boot Media on UEFI Systems
When creating the boot media for a UEFI system it’s important to understand which
media will boot properly on the UEFI system. System settings may require changing
to boot Image for Linux or Image for DOS depending on the implementation of UEFI
on the system.
•
TBWinRE (the Image for Windows boot media) supports booting via CD or
USB flash drive on UEFI systems. Secure Boot is supported and the BIOS
can be in either UEFI mode or Legacy mode. TBWinRE is automatically
installed with Image for Windows on Windows 7, 8, or later. You must run
TBWinRE to create your boot media.
•
Image for Linux (IFL) v2.81 or later supports booting via CD or USB flash
drive on UEFI systems (Secure Boot is supported).
•
Image for DOS (IFD) will not boot on UEFI systems configured in UEFI
mode. To boot on these systems Secure Boot must be disabled and you
must enable or use Legacy mode.
Creating the Image for DOS Boot Media
Note: If you prefer, you can create TBWinPE or TBWinRE boot media (tutorials for
creating TBWinPE and TBWinRE can be found on TeraByte’s website). You can
also create BartPE or Image for Linux recovery media. To create a BartPE recovery
disc, see the section, “Using Image for Windows in BartPE” on Page 83. To create
Image for Windows User Manual
Page 10 of 218
an Image for Linux recovery disk, see the Image for Linux manual. If your keyboard
connects to your computer via a USB port, you might prefer to create and use an
Image for Linux or a BartPE recovery media because both of those products
support USB keyboards that DOS might not support.
The steps below assume that you have installed MakeDisk, but that you opted not
to create the Image for DOS bootable recovery media at the same time that you
installed Image for Windows. When you create the recovery media while installing
Image for Windows, you skip Step 1 below.
Note: For detailed steps on creating a bootable recovery disc, see the section,
“Creating a Bootable Image for DOS Disc” on Page 59.
1.
Choose Start, All Programs, Terabyte Unlimited, Image for Windows, V2,
Image for DOS, Create Recovery Boot Disk. This will trigger a UAC prompt in
Windows Vista and Windows 7 if UAC is enabled. Select to allow the program
to run.
2.
Click Next on the MakeDisk welcome screen. The License Agreement screen
appears.
3.
Read the Image for DOS license agreement, and if you accept it, select the “I
accept the agreement” button and click Next to display either the “Select
Options” screen or the “Select the optional components” screen.
Note: If you don’t have a copy of Image for DOS and a pre-existing copy of IFD.INI,
the “Select the optional components” screen doesn’t appear. If you do have a copy
of IFD.INI in the folder where MAKEDISK.EXE resides, you can select the “IFD.INI
file from local directory” option on the “Select the optional components” screen to
include that file in the Image for DOS bootable disc or diskette, and then click Next
to display the “Select Options” screen.
4.
Enable the desired options on the “Select Options” screen. Click Next, and the
Global Geometry and MBR Options screen appears. See the section,
“Creating a Bootable Image for DOS Disc” on Page 59 for a detailed
description of these options.
5.
Click Next, and the Additional IFD.INI Options screen appears. Most of the
options needed to use Image for DOS are set for you by default, but you can
use this screen to set additional options.
6.
Click Next, and the License Key screen appears. If you own a licensed copy of
Image for DOS, supply your serial number.
7.
Click Next, and the “Select Target” screen appears. Choose the target that
MakeDisk should use to create the bootable Image for DOS media.
You can create a bootable USB flash drive (UFD) with MakeDisk as long as the
UFD is not larger than 64 GB.
Image for Windows User Manual
Page 11 of 218
8.
Click Finish, and respond to subsequent prompts as necessary. MakeDisk will
then create your bootable media or ISO image. When MakeDisk finishes, the
Success screen appears.
9.
Click Close on the MakeDisk Success screen.
QuickStart: Making a Backup
To make a full backup of a drive or partition using Image for Windows, follow these
steps:
Note: For detailed steps on creating a full backup, see the section, “Creating
Backups with Image for Windows” on Page 25.
1.
Click Start, All Programs, Terabyte Unlimited, Image for Windows, V2, Image
for Windows or you can double-click the Image for Windows Desktop shortcut.
2.
Select Backup (Full) and click Next.
3.
Select a drive or partition to back up.
4.
Select the target location where you want to store the backup image file(s).
5.
Provide a name for the backup image file.
6.
Set backup options.
*
For details on available backup options, see the section, “Setting Backup
Options” on Page 46.
You can make a differential or incremental backup using the same steps; you
simply select the Changes Only option on the Image for Windows menu instead of
the Full Backup option. For details on backup strategies—that is, deciding whether
to make full backups or use a combination of full backups and differential or
incremental backups—see Appendix B: Backup Strategies on Page 190. For details
on creating a differential or incremental backup, see the section, “Creating a
Differential or Incremental Backup” on Page 52.
QuickStart: Restoring an Image
You can restore an Image for Windows backup using these steps:
Note: For detailed steps to restore a backup, see the section, “Using Image for
Windows to Restore an Image” on Page 82
1.
Boot your computer using the Image for DOS boot disk you can create using
the steps in the section, QuickStart: Creating a Recovery Boot Disc or using
the BartPE boot disk you can create using the steps in the section, “Using
Image for Windows in BartPE.”
Image for Windows User Manual
Page 12 of 218
2.
On the Image for DOS main menu, select Restore (Normal).
Tip: If you select Restore (Automatic), Image for DOS will try to select for you the
target location and the options you would ordinarily select in Steps 5 and 6.
3.
Select the source location that contains the backup image file that you want to
restore.
4.
Select the backup image file you want to restore.
5.
Select the target location that you want Image for Windows to overwrite with
the information contained in the backup image file.
6.
Set restore options.
*
For details on available restore options when you are restoring an entire
drive, see the section, “Image for DOS Restore Options for an Entire Drive”
on Page 75.
*
For details on available restore options when you are restoring an individual
partition, see the section, “Image for DOS Restore Options for an Individual
Partition” on Page 79.
QuickStart: Validating an Image
You can validate a backup as you create it or, if you don’t have time to validate it
when you create it, you can validate it later. Follow these steps:
Note: For detailed steps to validate a backup, see the section, “Validating Backups
with Image for Windows” on Page 98.
1.
Boot your computer using the Image for DOS boot media you can create using
the steps in the section, QuickStart: Creating a Recovery Boot Disc or using
the BartPE boot disk you can create using the steps in the section, “Using
Image for Windows in BartPE.”
2.
On the Image for Windows main menu, select Validate.
3.
Select the source location that contains the backup image file that you want to
validate.
4.
Select the backup image file you want to validate.
5.
Set validation options.
*
For details on available validation options, see the section, “Understanding
Validation Options” on Page 102.
Obtaining Image for Windows
Image for Windows User Manual
Page 13 of 218
You can download either the unregistered trial version, or the registered version
of Image for Windows:
*
If you have not purchased Image for Windows, click here to download the
unregistered trial version.
*
If you have purchased Image for Windows, click here to display a product
download form for obtaining the registered version. You will need to provide
your name, email address, and Image for Windows order number.
Note: If you use the trial version of Image for Windows to make a backup, you will
be able to restore that image for 30 days. After that time, you will only be able to
restore that image using a registered version of Image for DOS, Image for Linux, or
Image for Windows.
If you are currently using an older version of Image for Windows, you do not need
to uninstall it before installing Image for Windows 2.0. In fact, you may want to keep
your older version for awhile. Image for Windows 2.0 can restore only those
backups you create using Image for Windows 2.0; to restore backups you made
using older versions of Image for Windows, you need those versions. You should
update older versions to Image for Windows 1.7c or later so that your older version
will be compatible with the version of PHYLock installed by Version 2.0.
Image for Windows User Manual
Page 14 of 218
Installing Image for Windows
You install Image for Windows the same way you install most Windows programs.
1.
Run the setup program you downloaded from the link provided above by
double-clicking it. (This will trigger a UAC prompt on Windows Vista and
Windows 7 if UAC is enabled. Select to allow the program to run.) The
“Welcome to the Image for Windows (V2) Setup Wizard” screen appears.
Image for Windows User Manual
Page 15 of 218
2.
Click Next. The License Agreement window appears. Read the Image for
Windows license agreement, and if you accept it, select the “I accept the
agreement” option button.
Image for Windows User Manual
Page 16 of 218
3.
Click Next. The Select Destination Location window appears. To change the
default folder where Image for Windows will be installed, click Browse and
navigate to the appropriate folder. Otherwise, continue to Step 4.
Image for Windows User Manual
Page 17 of 218
4.
Click Next. The Select Components window appears. From the drop-down
menu, you can choose Full Installation (as shown in the figure below),
Compact Installation, or Custom Installation.
The optional components you can install include:
PHYLock: A free add-on that enables Image for Windows to create a consistent,
reliable backup of a partition or volume that is in use—also called an unlocked
partition or volume. We recommend that you install PHYLock so that you can
back up a Windows volume while using it.
TBIView: A free add-on you can use to view and extract individual files from image
backups you’ve created. Includes TBIMount.
TBICD2HD: A free command line utility you can use to copy to your hard drive
TeraByte image files that were directly burned to optical discs.
BINGBURN: A free utility you can use to burn previously-created TeraByte image
files to CD, DVD, or BD discs.
BurnCDCC: A free utility that provides a quick, easy way to write CD, DVD, or BD
.ISO files to optical discs.
PE Builder: A free utility you can use to integrate Image for Windows into BartPE
or VistaPE, which are standalone Windows environments. When booted to a
Windows PE build, you can perform maintenance tasks or create or restore an
image of your main Windows partition.
Image for Windows User Manual
Page 18 of 218
BartPE is a third-party product and is not included with Image for Windows. To
learn more about BartPE or to download it, please visit the BartPE Builder home
page at www.nu2.nu/.
PartInfo: A free utility you can use to view or export partition information. Supports
MBR, EMBR, and GPT disks.
TeraByte OS Deployment Tool Suite Professional: A collection of specialized
tools for IT professionals and power users. These powerful tools in the right
hands have many uses such as virus and rootkit removal and repair,
installation of software and drivers, and much more. Note: This option is not
available with the trial version of the program.
Image for DOS Recovery Disk: Image for DOS is a standalone backup and
restore utility that you can use to restore your Windows partition. If you choose
the “Image for DOS Recovery Disk” component, you will be able to create a
bootable CD/DVD disc, USB flash drive, ISO file, or floppy diskette that you
can use to run Image for DOS. Please note that your purchase of Image for
Windows also includes Image for DOS at no additional charge.
Image for Linux Recovery Disk: Image for Linux is a standalone backup and
restore utility that you can use to restore your Windows partition. If you choose
the “Image for Linux Recovery Disk” component, you will be able to create a
bootable CD/DVD disc, USB flash drive, ISO file, or floppy diskette that you
can use to run Image for Linux. Please note that your purchase of Image for
Windows also includes Image for Linux at no additional charge. This option is
only available if you’re using the installer that includes Image for Linux.
Image for UEFI Recovery Disk: Image for UEFI is a standalone backup and
restore utility that you can use to restore your Windows partition. If you choose
the “Image for UEFI Recovery Disk” component, you will be able to create a
bootable CD/DVD disc, USB flash drive, ISO file, or floppy diskette that you
can use to run Image for UEFI. Please note that your purchase of Image for
Windows also includes Image for UEFI at no additional charge. This option is
only available if you’re using the installer that includes Image for UEFI.
5.
Click Next, and the Select Start Menu Folder window appears. You can click
Browse to change the Start Menu Folder or you can accept the default.
Image for Windows User Manual
Page 19 of 218
6.
Click Next, and the Select Additional Tasks window appears. Check the
appropriate boxes to create Desktop and/or Quick Launch toolbar icons. The
following optional setup tasks appear:
Add PHYLock Setup to Program Group: This option simply adds a shortcut to the
Image for Windows menu (under the Start menu) that will allow you to
uninstall/reinstall PHYLock in the future. If you selected the PHYLock option in
Step 4, it will be installed regardless of what you select here.
Show TBIView Setup Wizard: If you check this option, the TBIView setup routine
runs interactively, allowing you to select the installation and Start menu folders,
and you see the installation progress. If you don’t check this option, TBIView
setup will run silently in the background instead (assuming you opted to install
TBIView in Step 4).
Copy TBICD2HD to Windows Folder: When you need to copy image files from a
directly-burned CD/DVD to your hard drive, you must use TBICD2HD. By
selecting this option, the TBICD2HD program is copied to your Windows
folder, which is in the system path by default. Having TBICD2HD in the
Windows folder allows you to run TBICD2HD easily from a command line
regardless of the current directory.
Add Image for Windows to Context Menus: This option allows you to right-click
on a drive in Explorer and select to create a backup of that partition. The
backup will be saved in the “My Backups” folder in the user’s “Documents”
Image for Windows User Manual
Page 20 of 218
folder. It is recommended to move the backup image to another location after it
has finished.
Show TBOSDT Setup Wizard: If you check this option, the TBOSDT setup routine
runs interactively, allowing you to select the installation and Start menu folders,
and you see the installation progress. If you don’t check this option, TBOSDT
setup will run silently in the background instead (assuming you opted to install
TBOSDT in Step 4).
Create Image for DOS Recovery Disk: This option runs the MakeDisk utility,
which helps you create a bootable Image for DOS USB flash drive, CD/DVD,
ISO image, or floppy diskette. If you don’t check this option, MakeDisk will not
run, but the Image for DOS recovery disk files will still be installed (if you
selected the applicable option in Step 4).
Create Image for Linux Recovery Disk: This option runs the MakeDisk utility,
which helps you create a bootable Image for Linux USB flash drive, CD/DVD,
ISO image, or floppy diskette. If you don’t check this option, MakeDisk will not
run, but the Image for Linux recovery media files will still be installed (if you
selected the applicable option in Step 4).
Create Image for UEFI Recovery Disk: This option runs the MakeDisk utility,
which helps you create a bootable Image for UEFI USB flash drive, CD/DVD,
ISO image, or floppy diskette. If you don’t check this option, MakeDisk will not
run, but the Image for UEFI recovery media files will still be installed (if you
selected the applicable option in Step 4).
Image for Windows User Manual
Page 21 of 218
7.
Click Next, and the Ready to Install window appears, summarizing your
choices.
Image for Windows User Manual
Page 22 of 218
8.
Click Install, and the Installing window appears. A progress bar shows
installation progress. When installation completes, the final window of the
Image for Windows Installation Wizard appears.
If you opted to install MakeDisk or to run the TBIView Setup Wizard, the final
window of the Image for Windows Installation wizard won’t appear until you
complete the other tasks you selected. If you opted to install MakeDisk, skip to Step
2 of the section, “Creating a Bootable Image for DOS Disc” for detailed steps on
using MakeDisk to create the Image for DOS bootable media.
9.
Since the installation won’t be complete until you restart your computer, we
recommend that you click the “Yes, restart the computer now” option and click
Finish.
If you opt not to install PHYLock, or if you already had the latest version of
PHYLock installed when you started the installation, you don’t need to reboot and
you won’t be prompted to do so.
Image for Windows User Manual
Page 23 of 218
Formulating a Backup Plan
Before you create your first backup with Image for Windows, we suggest that you
formulate a backup plan. There are very few rules to follow; please consider the
following ideas to help you create a backup that will help you easily recover from a
disaster. For more information on backup strategies, see Appendix B: Backup
Strategies on Page 190.
Consider the Destination for Your Backup
Suppose that you will be backing up around 30 GB of data. In this case, you
probably will not want to store the backup on a set of CD-R/RW discs, since the
resulting backup will likely require 20 discs or more (based on an expected
compression ratio of 40-60%). Better options in this case would be:
*
Back up directly to a set of DVD discs.
*
Backup to an alternate hard drive partition (and perhaps use the free add-on
utility BINGBURN later to burn the backup to a set of DVD discs).
*
Backup to an external hard drive—the recommended alternative.
Plan your Backup with a Restore Strategy in Mind
As obvious as it sounds, we need to say it: Backing up isn’t truly helpful unless you
can restore the backup. So, plan not only your backup strategy but your restore
strategy.
First and foremost, validate your backup to make sure that you can, if necessary,
restore it.
Regardless of whether you store your backup on a set of CD/DVD discs, an
alternate hard drive partition, or an external hard drive, you can restore by booting
your computer using a recovery boot media you create using either Image for DOS
or Image for Linux. That boot media automatically contains a copy of Image for
DOS/Image for Linux that you can use to restore your Image for Windows backup.
If you prefer, you can use the the “PE Builder Plugin Installer” included with Image
for Windows along with free Bart PE to build a bootable Windows CD/DVD that also
contains Image for Windows. When you boot your computer using this CD/DVD,
you boot to a Windows preinstallation environment state, where you can use Image
for Windows to restore your backup. Tutorials for creating a BartPE CD as well as
other types of WinPE-based media (e.g. TBWinPE and TBWinRE) can be found on
TeraByte’s website.
Using either approach, your Image product can recognize USB, USB2, IEEE 1394,
eSATA, and ATAPI devices where you have stored backup files without any
interference on your part. Image for Windows and Image for Linux also support
USB3 devices.
Image for Windows User Manual
Page 24 of 218
Note: Image can also recognize ASPI devices if you provide the ASPI driver.
Strike Your Own Balance between Convenience and Resiliency
Consider these simple ideas:
*
Save your backups directly to an alternate hard drive partition or external hard
drive, and then use the free utility BINGBURN to burn a secondary copy of the
backup to a set of CD/DVD discs. Then, if you need to restore, you can quickly
and conveniently use the backup stored on the hard drive. But, if things really
go wrong and the primary copy of the backup isn’t available, you can fall back
on the copy of the backup that you saved on CD/DVD discs.
*
Don’t get rid of an existing set of backup discs when you create a new set.
Instead, keep two or more sets of backup discs. That way, you can fall back to
an older backup if something should go wrong with the newest backup.
*
If you are using multiple sets of backup CD/DVD discs, keep the newest set
offsite, to guard against physical damage.
*
Use multiple external hard drives and rotate between them. Keep at least one
drive offsite.
Creating Backups with Image for Windows
When you create a backup, you can create either a full backup, a differential
backup, or an incremental backup. A full backup is exactly what it sounds like—
Image for Windows backs up your entire hard disk. Differential and incremental
backups works in conjunction with a full backup—you create a full backup the first
time and then create differential or incremental backups, which contain only
changes, for subsequent backups. A differential backup will, initially, be smaller
than a full backup but, as you make changes on your hard drive, the size of the
differential backup will grow over time. And, because Image for Windows is a
sector-based backup, the smaller file size may not be as small as you expect. An
incremental backup will contain only the changes since the last full or incremental
backup.
Before you make the decision concerning the type of backup you want to create,
read Appendix B: Backup Strategies for a detailed explanation of full, differential,
and incremental backups.
Creating a Full Backup
You walk through a series of windows to create a full backup. If you are backing up
to CD/DVD discs, be aware that Image for Windows can automatically overwrite
CD-RW, and DVD+RW media. However, if you wish to use DVD-RW media, it must
be fully formatted, fully blanked, or brand new before being used. To fully blank the
DVD-RW media, use your burning software’s “full erase” function. (The “quick
erase” function will not work for this purpose.)
Image for Windows User Manual
Page 25 of 218
Tip: It’s always a good idea to validate your backup as you create it.
Follow these steps to create a full backup:
1.
Double-click the Image for Windows icon on your desktop or launch the
program from its program group on the Start menu. If you downloaded a trial
version, a reminder message appears. You can click OK to continue
evaluating, click Enter Key to record your registration key, or click Buy Now!
to purchase Image for Windows.
2.
On the Image for Windows Welcome window, select Backup (Full).
Image for Windows User Manual
Page 26 of 218
3.
You can click the Settings button to display settings you can establish for the
Image for Windows program. In the section “Understanding Options”
immediately following these steps, you’ll find details on the purpose of each
setting. Click OK to redisplay the Image for Windows Welcome window shown
previously.
Image for Windows User Manual
Page 27 of 218
4.
Click Next. In the window that appears, select the hard drive or partition you
want to back up.
Selecting a Drive or a Partition
To back up an entire drive, check the box beside the Drive icon—
HD0, HD1, etc. Remember, you can back up only one drive at a
time. If you want to back up a partition, check the box beside that
partition. When restoring an image of a partition, you might need
to use the Update BOOT.INI, Set Active, and Write Standard MBR
Code (or Restore First Track) options described in the section,
“Image for Windows Restore Options.”
If you individually select all partitions on a drive, Image for
Windows handles the backup as individual partition backups, not
as a full drive backup. You can restore an entire drive in one
restore operation using individual partitions, but you can’t set
sizing or rescaling options or restore to a different location
(sector/LBA).
Image for Windows provides a visual clue as you make your
backup selections. If you select a partition, a check appears in the
Drive box, but the box turns gray. If you select all partitions on a
drive, the Drive box still remains gray and Image for Windows
backs up partitions separately instead of storing the entire backup
for the drive in one backup file.
Image for Windows User Manual
Page 28 of 218
When a partition is highlighted, the following options are available:
Information – Click the Information button to view the details of the partition (used
space, free space, size needed to restore, etc.).
Note: You can also right-click on a drive or partition and select Details to view
the information.
Compact – Click the Compact button to compact the partition’s file system.
FAT/FAT32 and NTFS file systems are supported. This option allows you to
reduce the size required for a restore. You will be prompted to confirm the
compaction and then asked for the compaction value (size in MiB).
For example, if you have a 250GB partition that contains 50GB of data and
requires 150GB of space to restore and you need to restore it to a 100GB
partition, you can compact the file system to under 100GB before imaging it
and then restore it to the 100GB partition.
5.
Click Next. Image for Windows searches for available locations to which you
can save a backup file. In the window that appears, select the location where
you want to save the backup file. You can save a backup file to CD/DVD
media, an external hard drive, network share, a virtual drive, etc.
Note: By default, Image for Windows searches your entire network; if the process of
searching takes longer than you’d like, unselect the Show Entire Network option
shown in the settings window in Step 3.
Image for Windows User Manual
Page 29 of 218
Caution: It’s generally not recommended to save your image to the same partition
you are backing up. If you must do this, move the backup image to another location
after it has completed.
By default, Image for Windows will create a Single File Set backup. This type of
backup is comprised of a single image, regardless of how many individual partitions
you are backing up. The first file created for the image set will be named
<name>.TBI, where <name> is a character string you supply. If Image for
Windows creates additional files, Image for Windows will name them <name>.1,
<name>.2, <name>.3, and so on. The number of files Image for Windows will
create depends on the overall size of the backup and the File Size setting you
choose when you set the options for the backup in a later step.
By checking the Multi File checkbox Image for Windows will create a Multiple File
Set backup. This type of backup is comprised of one image for every individual
partition that Image for Windows backs up. Image for Windows names the first file
created for the first image set <name>_0.TBI, where <name> is a character string
you supply. Image for Windows adds _0 to identify the image file set. If Image for
Windows creates additional files for the same image set, they will be named
<name>_0.1, <name>_0.2, <name>_0.3, and so on. Image for Windows names
the files of the second image set (i.e. the second partition included in the backup)
<name>_1.TBI, <name>_1.1, <name>_1.2, <name>_1.3, and so on. Image for
Windows will name subsequent image sets accordingly with _2, _3, and so on,
appended to the file name.
Image for Windows User Manual
Page 30 of 218
*
If you choose this option, each file Image for Windows creates represents
only a single partition and you won’t be able to completely restore a drive with
one menu option but will have to restore each partition separately.
*
The number of files Image for Windows will create for each image set
depends on the size of the corresponding partition and the File Size setting
you choose in a later step.
Virtual Drives and Image for Windows
You can use Image for Windows to back up to or restore from a
single file virtual drive. In most cases, you’re likely to use a virtual
drive with Image for Windows if you want to back up a physical
drive and then restore it to the virtual drive of a virtual machine
you’ve created using VirtualPC, VMWare, or Hyper-V. You can
add a virtual drive while working in Image for Windows. Click the
Add Virtual Drive button to display an Open dialog box. In the File
name box, type the name of the virtual drive you want to add and
click Open. If the virtual drive name you type doesn’t exist, Image
for Windows displays a message asking if you want to create a file
for the virtual drive. Click Yes, and Image for Windows displays
this dialog box, where you can define the type and size of the
virtual drive. You can specify the size in bytes by including no
letters. Or, you can specify the size in Mebibytes by supplying an
M or in Gibibytes by supplying a G.
Note that a new virtual drive must be partitioned and formatted
before you can use it. However, you can restore an image or copy
a partition into a new virtual drive without needing to partition or
format it first.
You can create any of the following types of virtual drives:
•
RAW - Fixed Size – Creates a plain (raw) file as the virtual
drive. Its size is fixed and allocated with zeros on creation.2
•
VHD - Dynamic Expanding – Creates a VirtualPC Dynamic
Expanding virtual hard drive.1
Image for Windows User Manual
Page 31 of 218
6.
•
VHD - Fixed Size – Creates a VirtualPC Fixed Size virtual hard
drive.2
•
VHDX - Dynamic Expanding – Creates a Hyper-V Dynamic
Expanding virtual hard drive.1,3
•
VHDX - Fixed Size – Creates a Hyper-V Fixed Size virtual hard
drive.2,3
•
VHDX - Dynamic 4KiB Sector Size – Creates a Hyper-V
Dynamic Expanding virtual hard drive with a sector size of 4KiB
(4096 bytes).1,3
•
VHDX - Fixed Size 4KiB Sector Size – Creates a Hyper-V
Fixed Size virtual hard drive with a sector size of 4KiB (4096
bytes).2,3
•
VMDK - Monolithic Sparse (IDE) – Creates a VMWare Sparse
IDE virtual hard drive.1
•
VMDK - Monolithic Sparse (SCSI) – Creates a VMWare
Sparse SCSI virtual hard drive.1
1
Dynamic expanding virtual drives append data to the file as you add
data to the virtual drive. The file size starts small and grows as needed.
2
Fixed size virtual drives allocate data for the file when it’s created and
the file size does not change. The file size will be the same as the
virtual drive size (e.g. a 40GiB virtual drive will use 40GiB of space).
3
For Windows caching reasons, it is highly recommended to create
partitions within a VHDX file that are aligned on at least a 1MiB
boundary. That is either 2048 sectors for 512 byte sized sectors or 256
sectors for 4096 byte sized sectors.
Click Next. The window that appears next depends on the target you chose in
Step 5.
*
If you selected CD/DVD drive, Image for Windows displays a window that
suggests a filename.
*
If you selected a standard drive or network share, the window shown below
appears, also suggesting a filename. At the top of the window, open the list
of drives and select the drive on which Image for Windows should save the
backup file. If you want to store the backup on a drive not displayed by
Image for Windows or a network drive, you can click the Windows/Network
Browse button to navigate to the drive. You can use UNC paths.
Note: The suggested filename includes identifying information. For example, in the
default name shown in the screen below, “w” stands for Windows, “0” represents
the drive being backed up, and “$~YYYY$-$~MM$-$~DD$-$~HHMM$” represent
the date (in 4-digit year, 2-digit month, and 2-digit day format) and time (in 2-digit
hour and minute format) the backup started. If you opt to back up a partition instead
Image for Windows User Manual
Page 32 of 218
of an entire drive, the partition ID follows the drive number. You can change the file
name; you don’t need to include either the drive letter or the file name extension.
Tip: If you want, you can manually delete existing image files from the window
shown above. Simply select the file(s) you wish to delete, and then press the Delete
key. Please keep in mind that, by default, only .TBI files appear in the window, even
if an image has additional files associated with it (i.e. .1, .2, etc.). To view such files,
enter a file name mask (without quotes) in the Filename text box, and then press
Enter. For example, you can type "backup.*" to view all files with a name of backup
and any extension, including TBI, 1, or 2. Or, you can simply type * to view all files
on the target disk.
7.
Click Next. In the window that appears, set the options you want Image for
Windows to use during the backup. See the section, “Setting Backup Options”
on Page 46 for an explanation of each option.
8.
If you are backing up to CD/DVD discs, insert a blank disc.
9.
On the Summary screen that appears, select Start when you are ready to
begin the backup process. A progress bar appears on-screen. You can
interrupt the backup and validation operations at any time by clicking Cancel
or pressing the Esc key. Image for Windows will ask you to confirm that you
want to cancel before it interrupts the current operation.
While the backup is in process, you can change the power options and
Image for Windows User Manual
Page 33 of 218
process priority options using the drop-down boxes. The default power option
is Auto, which will prompt to reboot when finished if a reboot is necessary. If
the selected power option is not supported by the system, the next one will be
used in the following order: suspend, hibernate, shutdown. Select Exit Only to
have Image for Windows exit when finished. The selected process priority will
remain in effect until the program ends or is changed manually.
When Image for Windows finishes, a window appears to inform you that Image for
Windows created the backup successfully. You can click Close.
Note: If Image for Windows reports that it cannot obtain a lock and directs you to
consider using PHYLock and PHYLock is already installed, read this article and
follow the instructions in it: http://www.terabyteunlimited.com/kb/article.php?id=338
If PHYLock is not installed (or not available) and VSS is not being used (e.g. you’re
using Image for Windows in TBWinRE), see:
http://www.terabyteunlimited.com/kb/article.php?id=050
To continue you can abort, retry, or ignore the problem. Aborting will abort the
backup. Retry will attempt another lock (enabling the “Attempt Aggressive Lock on
Retry” option will invalidate all opened handles to the volume and try to force
dismount it before locking – this may result in lost data). Ignore will attempt to force
all open handles off the partition and continue with the backup without locking the
partition.
Image for Windows User Manual
Page 34 of 218
Understanding Options
You can set program options for Image for Windows as well as options you want in
effect during the backup.
Setting Image for Windows Program Options
The options you can set for Image for Windows and for PHYLock are really onetime settings. That is, review them and make changes only if necessary. Once you
establish a set of options that works for you, you don’t need to make changes each
time you run Image for Windows.
General Settings
Simple Operations – Enable this option to have Image for Windows automatically
handle most options for you. You simply choose which physical drive you want to
back up and, if needed, which drive you want to save to. Only Backup, Validate,
and Restore are available in this mode. The target storage area is automatically
maintained and files are deleted as needed when it runs out of free space.
Use New Windows MBR – Windows Vista and later tied the kernel loader to the
MBR code such that using previous MBR code may not allow Windows Vista or
later to boot on certain machines. Enable this option to have Image for Windows
use the code base compatible with Windows Vista or later. The new MBR code will
continue to boot older OSes with the exception of some (rare) configurations using
Win9x on FAT32.
Image for Windows User Manual
Page 35 of 218
Retain Failed Backups – If you enable this option and a backup operation fails,
Image for Windows won’t delete the files from the failed backup.
Accessible Check Boxes – Changes the checklist boxes to be compatible with
screen readers.
Automatic Scaling Restrictions – If this option is enabled, Image for Windows will
restrict the scaling of partitions which are the smaller of 15GiB or 1/8 the drive size.
Using this option is an easy way to avoid scaling system reserved, recovery, and
utility partitions to larger sizes when upgrading to a larger drive.
Automatic Boot Partition Update – If this option is enabled, Image for Windows
will automatically update the boot partition (including an EFI system partition) when
a full drive image is restored. When enabled, the Update Boot Partition option will
not be displayed when restoring a full drive image.
Automatic Restore Drive Search – Select to enable Image for Windows to search
for the destination drive using the disk signature or GUID when performing an
automatic restore (virtual drives will not be searched). If a match isn’t found or if this
option is not enabled, the drive number of the backed up drive will be used.
Use Volume Label – If you enable this option, Image for Windows will use the
volume label instead of the name in the MPT for FAT/FAT32/NTFS/HPFS partition
names, regardless of whether an EMBR exists.
Output Disk ID to Command Line – Select to enable command line output and
relevant log entries to use the Disk ID (NT Signature or GUID) instead of drive
numbers where the drive has an ID and the ID is unique. Specifying the Disk ID
instead of the drive number may be more stable (especially for setup of scheduling
backups) since Windows may reorder drives at boot.
Automatic PHYLock RAM Mode Select – Disables VSS and PHYLock Disk Mode
(forcing PHYLock RAM Mode) when a Backup Unused Sectors or Copy Unused
Sectors operation is being performed. This option does not enable PHYLock if
PHYLock is disabled. Forcing RAM mode prevents a cache file from being created
on the source partition(s), which may be desirable when backing up or copying
unused sectors. This option is enabled by default.
Sequential Volume IDs – Changes the ID used for volumes to be numbered
sequentially within the extended partition instead of using the normal ID (which can
appear random).
Disable Cancel – Check this box to disable the Cancel button while Image for
Windows backs up, restores, copies, or validates.
Completion Alarm – Checking this option will enable an audible alarm upon
completion of an operation, errors, or when user interaction is required (insert
media, etc.).
Resize with Caching – Enable this option to reduce the time required to resize a
partition by using a cache.
Image for Windows User Manual
Page 36 of 218
Disable Power Changes – Check this box to disable the Power Options combo
box while Image for Windows backs up, restores, copies, or validates.
Disable Priority Changes – Check this box to disable the Process Priority combo
box while Image for Windows backs up, restores, copies, or validates.
No Service Control – Check this box to have Image for Windows ignore the
services.ins file. See the section, “Image for Windows and Windows Services” on
Page 119 for details on using the services.ins file to let Image for Windows control
the services running under Windows.
Show Entire Network – This option determines whether the Entire Network item
appears in the window where you select a location to back up or use to save
backup files. When you enable this option, Image for Windows searches the
network for servers, shares, drives, and partitions. If you find that the search takes
longer than you’d like, disable this option.
Bold Views – Select to enable using bold fonts on certain radio buttons, tree views,
and list views.
Use Windows FS Support – This option allows Image for Windows to back up or
copy used areas of certain File Systems supported by Windows but not directly by
Image for Windows. While it's able to access only used areas for a smaller and
faster backup or copy, it does not allow resizing or file exclusions of those volumes.
As of this writing, ReFS is the only file system supported by this option.
Delete Restore Destination – Enable this option to have Image for Windows
delete the target partition before restoring or copying to it. Depending on the
partition being restored or copied to a GPT drive, this may be necessary to allow
the operation to complete successfully with byte-for-byte validation. Otherwise, if
Windows makes changes to the existing target partition while in the locked state
byte-for-byte validation will fail.
Partition Selection – These options control how Image for Windows allows
partitions to be selected. The default is Linked Check Boxes.
CD Boot Image – This option allows you to choose which product you want
bootable on any backups directly stored on CD/DVD. It does this by using
variations of the CDBOOT.INS file. See the Image for DOS/Linux manuals for
details on CDBOOT.INS.
Log File – Enter a path and file name for the log file you want Image for Windows
to maintain. Don’t add quotes. If you leave this blank, Image for Windows creates
the log file, IFW.LOG, in the same folder where you installed imagew.exe; the
default location is “C:\Program Files\TeraByte Unlimited\Image for Windows\V2”.
You can enable or disable logging using the “Log Results to File” option (please
refer to the section below, “Setting Backup Options”). Clicking the Notepad button
will display the current log file using Notepad.
Max (Log File Maximum Size) – Enter the maximum size for the IFW log file. You
can specify bytes, Kibibytes (KiB), or Mebibytes (MiB) for the value. Decimal values
Image for Windows User Manual
Page 37 of 218
(e.g. 2.5MiB) are supported. For example, to limit the log file to 32KiB you can
specify 32KiB or 32768. Data will be removed from the beginning of the log file as
necessary to enforce the size. Note: If you specify a size smaller than the current
log file size, the new size will not take effect until the log is written to or IFW is
closed. The default maximum size is 1MiB.
Email – Use this group of options to provide information necessary to have Image
for Windows email the results of an operation. This causes the email to be sent
even if logging is disabled. However, if an operation never starts (including a LogIn
failure) an email is not sent.
The Server, From, and To values are required. The Port, User, Password, and
Subject values are optional.
If the Subject is net set, Image for Windows determines the text for the subject.
The subject can be customized for success, failure, or both by inserting the ][
characters (brackets) into the subject. The text before ][ is the success text; the text
after is for a failure. Additionally, you can include the place holder ~ec~, which is
replaced by the error code (otherwise, Image for Windows appends the completion
code text to the subject).
You can also specify a stored password (configure in Settings or with the /login:
option) by using the following format (where name is the stored password name for
the login):
{#name#}
If SSL is required, please see the KB article Sending Emails from Image for
Windows to Servers that Require SSL for details.
Examples are shown below:
Using default subject text:
Subject: ][
Using custom failure subject text:
Subject: ][IFW Backup Failed (Error ~ec~)
Using custom success/failure subject text, default port, and a stored password:
Port: (leave blank)
Password: {#loginname#}
Subject: IFW Backup Completed][IFW Backup Failed (Error ~ec~)
Using the default subject text (as used by version 2.71 and earlier):
Subject: (leave blank)
Image for Windows User Manual
Page 38 of 218
Using the custom subject text (as used by version 2.71 and earlier):
Subject: IFW Operation Result ~ec~
Note: Emails will not be sent if using Log Level 10 (LogLevel=10) or higher unless
logging is disabled for the operation.
Geometry Settings
The Global Geometry Settings are used to control the geometry options for the
target drive of copy and restore operations. These global options offer a convenient
way to control how the program sets up the target drive. They only apply to
interactive sessions. Command line restores always require specific options on the
command line.
Disabled – Check this box to disable the global geometry settings and revert to
using program defaults or drive specific overrides equivalent to versions prior to
2.52.
Align Partitions on 1MiB Boundaries – This option provides a convenient way to
enable 1MiB partition alignment for all drives (drives with 512 byte sectors will be
aligned on 2048 sectors; drives with 4096 byte sectors will be aligned on 256
sectors). This is popular with users of SSD type drives. It is the equivalent to
enabling the individual overrides Align on 1MiB Boundaries, Align MBR Ending HS,
Align MBR HS when Truncated, and disabling Align on End.
Align MBR for BIOS Auto Mode – This option is enabled by default to prevent
problems with unaligned partitions on systems with their BIOS using Auto Mode.
Image for Windows User Manual
Page 39 of 218
Many newer systems use auto mode by default, and some even don't have an
option to turn it off. This is equivalent to enabling the individual overrides Align
MBR Ending HS and Align MBR HS when Truncated.
Assume Same Target System – Enable this option to prevent problems where
users restore an image from another system to a drive that will be put back in the
other system. For example, the hard drive from PC-A is backed up; PC-B is used
to restore to a new hard; that new drive is placed back in PC-A. Without this option
enabled, Image for Windows would setup the partition to properly boot on the hard
drive for PC-B which can sometimes (not always) be a problem when the hard drive
is going back to PC-A. This option solves that and is equivalent to the individual
Use MBR Geometry override.
Validate Geometry Before Use – This option is used to ensure that the geometry
from the MBR on the original system is aligned to known standards before
accepting it for use. It only applies when Assume Same Target System is enabled
Use Source Host Geometry – This option is the global equivalent to the individual
Use Original Geometry override.
PHYLock/VSS Settings
PHYLock is an optional software component for Windows NT/2000/XP/2003, Vista,
Windows 7, and Windows 8 that enables Image for Windows to create a consistent,
reliable backup of a partition or volume that is in use based on a point in time. To
back up a Windows partition while you are using that partition, you need to use
PHYLock.
Image for Windows User Manual
Page 40 of 218
By default, PHYLock settings are saved in the registry and are stored separately for
the 32-bit and 64-bit versions of Image for Windows. For example, to change a
PHYLock setting in both versions you will need to run each version and make the
setting change.
Note: Image for Windows attempts to pick a “clean” point in time. Like all backup
software packages that back up a partition or volume that is in use, Image for
Windows cannot guarantee that all programs, internal caches, and other processes
are in a clean state.
If you don’t enable any of the options listed below, then Image for Windows will use
PHYLock if you installed it.
Disable Usage – Check this box if you do not want to use PHYLock, even if you
installed it.
Use If Locking Fails – Check this box to have Image for Windows use PHYLock if
Image for Windows cannot obtain a normal lock on the partition you are trying to
back up.
Use and Release Lock – Check this box to have Image for Windows attempt a
normal lock and then use PHYLock even if Image for Windows obtained the lock. If
Image for Windows obtained a normal lock, Image for Windows releases the lock
after enabling PHYLock.
Volume Flush – Check this box to have Image for Windows attempt to force
Windows to clear the volume’s cache buffers. You can’t hurt anything if you check
this box.
Use Disk Storage – Check this box to have PHYLock use hard disk storage in
addition to memory, up to the limit specified in the Disk Cache Size setting. Note
that even if you check this box, PHYLock may sometimes run in RAM mode. It's
recommended that you leave this option checked.
Due to fast compression and the design of low level storage drivers, you may
experience slow response times using applications during backup operations. This
slowness is actually caused by IO being delayed on slower traditional spinning hard
drives and not CPU utilization. IO throttling was introduced to alleviate this
condition at the cost of potentially slowing down the backup operation. IO throttling
is currently only used when PHYLock is active.
Note: The default timer in Windows has a resolution of 10ms. This means option
values like 5ms, 12ms, etc.. really mean something more like 10ms or 20ms.
Throttle on Reads – Check this box to enable IO throttling on disk reads.
Throttle on Writes – Check this box to enable IO throttling on disk writes.
Memory – Use this option to control the amount of memory PHYLock allocates to
its internal tracking buffers. The furthest right location on the slider uses the most
memory and covers worse case scenarios. The furthest left location uses the least
Image for Windows User Manual
Page 41 of 218
amount of memory and covers 1/8 of worse case. The other two positions use 1/4
and 1/2 of worse case scenarios respectively. If you receive an error saying that
PHYLock requires more memory or that it failed to cache changes and you've
already increased the disk cache, try increasing this setting. Note that if PHYLock
won't start due to not enough memory, you may have to decease this setting or the
RAM cache.
Write Free Time (ms) – In this box, type the amount of time, in milliseconds, that
must pass before PHYLock becomes enabled. During this time, you cannot update
the backup source partition contents. You should try to keep the value above 1250;
the default value is 4250.
Max Wait Time (M) – In this box, type the maximum amount of time, in minutes,
that you want PHYLock to wait for the Write Free Time to occur before forcing the
backup to start. Make sure you type an amount other than zero; if you type 0,
PHYLock waits indefinitely
RAM Cache Size (KB) – In this box, type the size of the internal cache, in
kilobytes, you want PHYLock to use to maintain data consistency. The default value
is 8192 (8192 KB / 1024 = 8 MB). You should not use a value below 2048 for this
setting, even if you enabled the Use Disk Storage setting.
If you back up an NTFS partition and you don’t check the Use Disk Storage box,
then you need to weigh the value of the RAM Cache Size (KB) setting against the
size of the NTFS log. You should keep the value of the RAM Cache Size above the
size of the NTFS log by increasing the RAM Cache Size value, reducing the size of
the NTFS log, or both.
You can check the size of the NTFS log file using the command line:
CHKDSK <drive letter>: /L
The same command line will show you the default NTFS log size for the volume in
question. You can change the size of the NTFS log using:
CHKDSK <drive letter>: /L:<log file size (KB)>
Do not set the size of the NTFS log to a value lower than 4096 KB. If you make the
NTFS log too small, your computer may experience performance degradation or it
may fail to boot. Again, you only need to consider the log file size when you're not
using the Use Disk Storage option.
Disk Cache Size (MB) – In this box, type the amount of hard disk space Image for
Windows should allocate to PHYLock when you also check the Use Disk Storage
box.
IO Throttle Delay (ms) – This value controls the amount of time the application
delays after allowing pending IO to occur. This value should be kept low otherwise
the program could be doing nothing if the IO completes before this delay expires.
The only time you may want to extend it is if you expect multiple IO requests to
occur that you want the application to wait for to prevent potential thrashing. This
Image for Windows User Manual
Page 42 of 218
option is relevant only if IO throttling is enabled (Throttle on Reads/Writes).
(Default: 0, Max: 20)
IO Throttle Abort (ms) – The abort value is the maximum amount of time to wait
for other IO to complete before continuing, even if more IO is pending. This value
will be adjusted to be a multiple (rounded up) of the Delay value above. If set to
zero then throttling is disabled. This option is relevant only if IO throttling is enabled
(Throttle on Reads/Writes). (Default: 80, Max: 500)
IO Throttle Interval (ms) – This controls how often the throttle may engage. Lower
values throttle more often for better response time of other applications, but at the
cost of slowing down the backup. Larger values throttle less often for a faster
backup, but at the cost of potentially slowing down other applications. Setting this
value to zero disables IO Throttling. This option is relevant only if IO throttling is
enabled (Throttle on Reads/Writes). (Default: 100)
The VSS Settings group of options allow enabling VSS and configuring other VSS
specific settings.
Use VSS When Available – This option will cause Image for Windows to try using
Microsoft's Volume Shadow Copy Services before using PHYLock on Windows
2003 or later. If VSS is unable to be started then PHYLock may be used.
Exclude Files To Not Backup – If you have configured the VSS
FilesNotToBackup registry key, you can enable this option to have Image for
Windows exclude those files/folders when creating a backup image or copying a
partition. This option applies only when Use VSS When Available is enabled and
VSS is used.
Exclude Files To Not Snapshot – If you have configured the VSS
FilesNotToSnapshot registry key, you can enable this option to have Image for
Windows exclude those files/folders when creating a backup image or copying a
partition. This option applies only when Use VSS When Available is enabled and
VSS is used.
Lock Unsupported Volumes – Enable to have Image for Windows attempt to lock
a partition when its volume name is in a format unsupported by VSS. If the lock fails
and the Ignore Unsupported Volumes option is enabled, the partition will be
ignored. Otherwise, PHYLock may be used. This option applies only when Use
VSS When Available is enabled and VSS is used.
Ignore Unsupported Volumes – Enable to have Image for Windows ignore a
partition when its volume name is in a format unsupported by VSS. The partition will
be backed up in the unlocked state. If any changes are made to the data on the
partition during the backup operation and Validate Byte-for-Byte is used the
validation will fail. This option applies only when Use VSS When Available is
enabled and VSS is used. Additionally, it will be used for applicable Simple
Operations mode procedures, if enabled.
Image for Windows User Manual
Page 43 of 218
Scheduled Tasks
Use the Scheduled Tasks tab to manage your scheduled tasks. New tasks can be
created manually or, more easily, by clicking the Schedule Backup button in the
backup wizard. Existing tasks can be edited or deleted by selecting them and
clicking the appropriate button. New manually added tasks will be removed (not
saved) if the Cancel button is clicked. Clicking the Task Scheduler button will open
the Windows Task Scheduler.
Image for Windows User Manual
Page 44 of 218
Password Settings
Use the Password tab to manage your stored passwords. Stored passwords are
saved encrypted in the registry and can be used with the email or login password
so clear-text passwords are not needed. Enclose the name between {# and #}
when using them (e.g. {#StoredName#}). It’s important to note that they are only
valid when running under the same platform and user account that created them
(e.g. a password stored using the x64 version of Image for Windows won’t be
available to the x86 version).
To run the application as a particular user, hold down the shift key while rightclicking the program icon and choose Run as different user… (or similar, depending
on your version of Windows).
To add a password enter the name and password (twice for verification) into the
fields and then click Add. To delete a password, select it in the list and press the
Del key on the keyboard.
Image for Windows User Manual
Page 45 of 218
Setting Backup Options
You can set the same options when backing up in Image for Windows whether you
are backing up a partition or an entire drive. The options shown below are for a Full
backup.
Validate – If you select this option, Image for Windows will perform internal
consistency checks on the backup file(s) after creating them. Enabling this option
increases the overall processing time, but can help ensure that the backup is
reliable.
Validate Byte-for-Byte – If you select this option, Image for Windows will verify
that every byte in the source data was backed up correctly, ensuring 100%
accuracy. This option generally doubles the processing time of the overall backup
operation, but is advisable to use where maximum reliability is required. You can
(but do not need to) select the Validate option if you select the Validate Byte-forByte option.
Encrypt Data – If you select this option, Image for Windows will encrypt the backup
file(s) with 256-bit AES encryption prior to saving them to the target medium. If you
select the Encrypt Data option, you must also supply a password in the Password
text boxes. Enter the password in the first Password text box and retype it in the
second Password text box for verification.
Image for Windows User Manual
Page 46 of 218
Note: If you create a backup with the Encrypt Data option, you will be required to
supply the password whenever you wish to validate the backup, restore it, or open it
in TBIView or TBIMount. If you lose and/or forget the password, you won’t be able
to open or restore from the backup. TeraByte Unlimited has no way of
recovering data from an encrypted backup with an unknown password.
If the Encrypt Data setting is not enabled, the Password text boxes have no effect
and may be left blank.
The maximum password length is 128 characters. Passwords are case sensitive
and may contain upper-case letters, lower-case letters, numbers, special
characters, spaces, and non-ASCII characters. Note: You may want to avoid using
special language characters in a password if it will be difficult or impossible to enter
those characters in Image for Dos or Image for Linux.
Omit Page File Data – If you select this option, the page files (pagefile.sys,
swapfile.sys) that reside in the root directory of the source partition will not be
backed up. If the page files reside anywhere else on the source partition other than
the root directory, Image for Windows will back them up, regardless of this setting.
Omit Hibernation Data – If you select option and the hiberfil.sys file resides
in the root directory of the source partition, Image for Windows will not back up
hiberfil.sys. If hiberfil.sys resides anywhere else on the source partition
other than the root directory, Image for Windows will back it up, regardless of this
setting.
Ignore IO Errors – This option only affects how Image for Windows handles bad
sectors on the source drive, and it applies to both the back up phase and the
validation phase of the backup operation. Normally, if Image for Windows
encounters a bad sector on a source partition during a backup operation, it will
abort with an error. If you select this option, Image for Windows will ignore the error
and continue. Generally, you should select this option only if you need to back up a
source partition on a drive you know contains bad sectors. On some systems, if you
select this setting and Image for Windows encounters bad sectors, there will be a
significant delay as the internal retry/recovery routine of the drive attempts to
handle the bad sector(s).
Disable Media Ejection – When removable media is used, this option prevents
Image for Windows from automatically ejecting the removable media. If you don’t
select this option, Image for Windows will eject the media whenever new media is
needed, and at the completion of the backup operation.
Log Results to File – Select this option to make Image for Windows log the details
of the operations it performs. Image for Windows saves the log as IFW.LOG in the
IMAGEW.EXE program folder. To be able to save IFW.LOG, Image for Windows
must have permissions to write to the target folder (this is usually not a problem in
Windows).
Image for Windows User Manual
Page 47 of 218
Reboot when Completed – Select this option to have Image for Windows request
that the computer reboot after completing the backup operation.*
Shutdown when Completed – Select this option to have Image for Windows
request that the computer shut down after completing the backup operation.*
Suspend when Completed – Select this option to have Image for Windows
request that the computer suspend (sleep) after completing the backup operation.*
Hibernate when Completed – Select this option to have Image for Windows
request that the computer hibernate after completing the backup operation.*
*If multiple power options are selected, precedence is as follows: suspend,
hibernate, shutdown, reboot.
Backup Unused Sectors – By default, if the file system(s) you are backing up are
one of the recognized types (i.e. FAT, FAT32, NTFS, Ext2/3/4, ReiserFS, or HSF+),
Image for Windows will back up only used sectors. If you select this option, Image
for Windows will include all used and unused sectors in the backup. This option has
no effect on partitions that do not contain a recognized file system; such partitions
will always be backed up in full, regardless of this setting.
NOTE: This option will cause Validate Byte-for-Byte to fail if VSS or PHYLock is
used. This option also causes Image for Windows to ignore the Omit Page File
Data and Omit Hibernation Data options.
For entire drive backups this option causes a raw sector by sector backup (and later
restore) of the entire drive without regard to any partitions or adjustments.
This option is not available when creating a differential or incremental backup.
Instead, the new backup will use the setting as specified when the base image was
created.
Disable TRIM – Reduces the amount of caching required for the source drive on
systems with TRIM enabled by disabling TRIM during the backup operation. When
TRIM is enabled the original contents of deleted sectors must be cached, whereas
a normal delete doesn’t overwrite the sectors and instead just updates the directory
entry. Note: If the operation doesn’t complete (due to reboot, shutdown, process
forced to end, etc.) TRIM will stay disabled until enabled using the Windows fsutil
program (fsutil behavior set DisableDeleteNotify 0). If IFW
completes the operation, even with errors reported, TRIM will be properly reset to
the enabled state.
Speed up Changes Only Backup – Select this option to have Image for Windows
create a hash file to speed up creating a Changes Only (differential or incremental)
backup. This option is only available when creating an image that is not being
saved to CD/DVD/BD. By default, this option is also ignored if the Backwards
Compatible option is enabled. The hash file will be limited to the max file size and
have the same file name as the backup with an extension starting at .#0 followed by
.#1, .#2, etc. as needed. The actual speed increase realized when creating an
image will vary depending on the system. If the hash file is deleted the back up will
Image for Windows User Manual
Page 48 of 218
proceed as normal without it. To create a hash for an existing image use the /hash
operation command line parameter.
Backwards Compatible – Current versions of Image for Windows may use a TBI
format that is not compatible with prior versions. Select this option to have Image
for Windows create the TBI file using a format that is compatible with version 2.50.
If desired, use the BackwardsCompatibleLevel INI file option to specify a more
current file version. Note that this option will not be available if the backup requires
a newer version to support it.
Multi-Pass – This option appears when you make a differential or incremental
backup (Backup, Change Only) and tells Image for Windows to use a two step
process to make the differential backup. In the first step, Image for Windows looks
for what it needs to back up and then, in the second step, Image for Windows
makes the actual backup. In some situations, using the Multi-Pass option can make
the operation go faster.
Compression – Select Standard or one of the Enhanced options to compress the
backup files that Image for Windows creates. With compression, Image for
Windows typically produces smaller image files but takes longer to back up. If you
select None, Image for Windows creates your backup more quickly but produces
larger image file(s). The attainable compression ratio depends on a number of
factors, including the number, size, and content of the files on the source partition
and the level of file fragmentation on the source partition. Typically, Image for
Windows compresses backup files 40% - 60%. However, if the source partition
primarily contains files that do not compress well, such as media files like MP3,
JPG, and AVI, or archive files like 7Z, RAR, and ZIP, the compression ratio will be
much lower.
The Enhanced Size - A/B/C options correspond to the Enhanced - Normal/
Slower/Slowest options used by version 2.71 and earlier. These options provide
greater compression, but the backups may take considerably longer. The
Enhanced Size - D/E/F options are faster than their A/B/C counterparts, but offer
slightly less compression. The Enhanced Speed - A/B options offer decent
compression with the emphasis on back up speed over backup file size. Note: The
Enhanced Size - D/E/F and Enhanced Speed - A/B options require version 2.72
or later (they are not backwards compatible).
File Size – This option appears only when saving images to hard drives. Select this
option to choose the maximum size of the image files created by Image for
Windows. The available options are:
*
Max – Automatically creates the largest file(s) allowed by the file system in use
on the target medium. For example, the largest files that may reside on FAT,
FAT32, and NTFS partitions are 2 GiB, 4 GiB, and (just under) 16 TiB,
respectively.
*
7.95 GiB – Useful if the image file(s) will later be burned to standard dual-layer
DVD disc(s).
Image for Windows User Manual
Page 49 of 218
*
4.37 GiB – Useful if the image file(s) will later be burned to standard single-layer
DVD disc(s).
*
4 GiB – Useful for FAT32 compatibility.
*
2 GiB – Useful for FAT compatibility.
*
698 MiB – Useful if the image file(s) will later be burned to 700-MiB CD disc(s).
*
648 MiB – Useful if the image file(s) will later be burned to 650-MiB CD disc(s).
*
You can also type in the desired value in bytes, Kibibytes (KiB), Mebibytes
(MiB), or Gibibytes (GiB). Decimal values are supported (e.g. 2.5GiB).
Description – You can use this text box to assign descriptive text to individual
backups. The description you enter will be visible in the file list that appears when
you are preparing to restore or validate a backup. You view the description by
selecting the backup and clicking the File Description button in Image for Windows
or pressing F1 in Image for DOS/Linux.
Save Defaults – Click this button to save the settings you establish. In the future,
Image for Windows will display these settings automatically.
Show Command – Click this button to display the information you would type at a
command prompt to start a backup with the options you selected as you displayed
the various windows in Image for Windows. You can use this information to create a
batch file or TBScript (.TBS) file that runs Image for Windows by selecting the Save
to File option. The command line can be edited before being saved. For details on
using Image for Windows from a command prompt, see the section, “Running
Image for Windows from the Command Line” on Page 120.
Schedule Backup – Click this button to create a task in the Windows Task
Scheduler, with a command line that corresponds to the current backup operation.
Please refer to Appendix D: Scheduling Backups for more information.
Additional Backup Options for Removable Media
When saving images to removable media such as CD/DVD discs, the following
additional options appear:
Validate Disc – If you check this option, Image for Windows will validate each disc
after writing the disc to ensure that the disc is readable. If the disc is not readable,
Image for Windows User Manual
Page 50 of 218
you can have Image for Windows write the individual disc again without restarting
the entire backup.
Limit Usage – Use this option to instruct Image for Windows to leave the last 10%
of each disc unused to help prevent data errors that occur near the edges of discs.
Drop Down List to Set Maximum CD/DVD Burning Speed: Use this list to specify
the maximum disc writing speed that Image for Windows should use when burning
a CD or DVD disc. You can force a lower writing speed than that automatically used
by the optical drive’s firmware; slower writing speeds may increase reliability.
The maximum writing speed that Image for Windows actually uses is determined by
whichever is lower: the setting you select here or the speed deemed appropriate by
the drive’s firmware, according to the CD/DVD media in use. For example, if you
are using media that is rated at 8X for burning, the maximum writing speed will be
no more than 8X, regardless of the setting you choose here. Similarly, if you supply
a value that is higher than or invalid for the drive’s design limits, the drive will
automatically use the highest speed supported by both the drive and the media in
use.
DVD speeds are approximately 1/8 CD speeds, therefore a maximum burning
speed of 32X for a CD disc corresponds to 4X for a DVD disc, 16X for a CD
corresponds to 2X for a DVD, and so on.
Image for Windows User Manual
Page 51 of 218
Creating a Differential or Incremental Backup
When you create a differential backup, Image for Windows compares the condition
of the source partition or hard drive to a full backup you identify to determine what
changes have occurred on the source partition or hard drive since you created the
full backup.
When you create an incremental backup, Image for Windows compares the
condition of the source partition or hard drive to the incremental backup (or full
backup, if no incrementals) you identify to determine what changes have occurred
on the source partition or hard drive since you created the specified incremental
backup.
Note: When creating incremental backups remember to limit the chain length to a
reasonable number. Each backup in the chain requires additional memory to
process and adds another potential point of failure.
Both differential and incremental backups contain only the changed sectors. For
details on differential and incremental backups, see Appendix B: Backup Strategies
on Page 190.
The process for creating a differential or incremental backup is very similar to the
process for creating a full backup, and you set many of the same options during
both processes. When you analyze the steps you take, you’ll notice the following
differences:
*
When you create a full backup, you identify the source drive you want to back
up.
*
When you create a differential backup, you identify the full backup Image for
Windows should reference when creating the differential backup.
*
When you create an incremental backup, you identify the incremental backup
(or full backup, if no incrementals) Image for Windows should reference when
creating the new incremental backup.
Tip: It’s always a good idea to validate your backup as you create it.
1.
Double-click the Image for Windows icon on your desktop or launch the
program from its program group on the Start menu.
2.
In the window that appears, select Backup (Changes Only).
Image for Windows User Manual
Page 52 of 218
Image for Windows User Manual
Page 53 of 218
3.
Click Next. In the window that appears, select the location where you stored
the existing full or incremental backup file. If you stored the backup image on a
device that Image for Windows doesn’t display, just highlight any Windows
drive and continue to the next step.
Image for Windows User Manual
Page 54 of 218
4.
Click Next. Image for Windows displays a window where you can select the
name of the existing backup.
If the existing backup you want to select doesn’t appear, open the list of drives
at the top right corner of the window and select the drive containing the backup
file. If you stored the backup on a network drive or a drive Image for Windows
does not display, you can click the Windows/Network Browse button to
navigate to the drive. After selecting a drive, select the backup file so that its
name appears in the Filename box at the bottom of the window.
If you select a file that you created using the encryption or the passwordprotect option, you will need supply the correct password to continue.
Additionally, Image for Windows will prompt for the locations of any backups in
the selected chain if it’s unable to locate them in the folder of the existing
backup.
5.
Click Next. In the window that appears, select the location to save the
differential backup file. You can select a CD/DVD drive, an external hard drive,
a virtual drive, or a partition other than the one you are backing up. If you want
to store the differential backup on a device that Image for Windows doesn’t
display, just highlight any Windows drive and continue to the next step.
Note: You do not need to store files from a differential or incremental backup in the
same location where you store full backup files. When you restore a differential or
Image for Windows User Manual
Page 55 of 218
incremental backup, Image for Windows will prompt you for the locations of the full,
differential, and incremental backup files.
6.
Click Next and Image for Windows displays a window that closely resembles
the window shown in Step 4.
You can open the list of drives at the top of the window and select the drive
where you want to store the differential/incremental backup file. If you want to
store the file on a network drive, you can type in the UNC or click the
Windows/Network Browse button to navigate to the share. If you want to
store the backup on a drive Image for Windows does not display, you can click
the Windows/Network Browse button to navigate to the drive.
Note: Windows Vista & Windows 7 users must select the Desktop item or show the
folders window on the left pane for the network option to appear.
Type a name for the differential/incremental backup file or accept the default
name Image for Windows suggests that includes identifying information. The
suggested name includes the following information in the order it appears: “w”
(for Windows), a number representing the drive being backed up, the letters
“chg” which represent the word “changes,” and “$~YYYY$-$~MM$-$~DD$$~HHMM$” representing the date (in 4-digit year, 2-digit month, and 2-digit day
format) and time (in 2-digit hour and minute format) the backup starts. If you
selected a backup of a partition instead of an entire drive, the partition ID
follows the drive number.
7.
On the Backup Options screen that appears, select the options you want to
use. See the section, “Setting Backup Options” on Page 46 for an explanation
of each option.
8.
If you are backing up to CD/DVD discs, insert a blank disc.
9.
On the Summary screen that appears, select Start when you are ready to
begin the backup process. A progress bar appears on-screen. You can
interrupt the backup and validation operations at any time by clicking Cancel
or pressing the Esc key. Image for Windows will ask you to confirm that you
want to cancel before it interrupts the current operation.
While the backup is in process, you can change the power options and
process priority options using the drop-down boxes. The default power option
is Auto, which will prompt to reboot when finished if a reboot is necessary. If
the selected power option is not supported by the system, the next one will be
used in the following order: suspend, hibernate, shutdown. Select Exit Only to
have Image for Windows exit when finished. The selected process priority will
remain in effect until the program ends or is changed manually.
When Image for Windows finishes, a window appears to inform you that Image for
Windows created the backup successfully. You can click Close.
Image for Windows User Manual
Page 56 of 218
Restoring an Image File
You can’t restore an image to a partition or drive that is in use by your computer.
That is, you cannot boot to a copy of Windows and then restore an image over that
copy of Windows.
Boot Media and UEFI Systems
Computer systems that come from the manufacturer with Windows 8 installed
include a new BIOS interface known as the Unified Extensible Firmware Interface
(UEFI). This new BIOS interface boots media differently than a traditional BIOS.
Microsoft also requires these systems to use a feature of UEFI called Secure Boot.
When Secure Boot is enabled, the system will only boot items that have a digital
signature that is included in the system firmware. The manufacturers include a
digital certificate, provided by Microsoft, to boot Windows on their systems. Secure
boot can be disabled (on non-ARM systems) to allow you to boot other operating
systems and environments. Boot media must be specifically created for UEFI to
allow UEFI to boot from it. However, most systems also include the ability to boot
traditional boot media though a method or mode typically called Legacy or BIOS.
Using TeraByte Boot Media on UEFI Systems
When creating the boot media for a UEFI system it’s important to understand which
media will boot properly on the UEFI system. System settings may require changing
to boot Image for Linux or Image for DOS depending on the implementation of UEFI
on the system.
•
TBWinRE (the Image for Windows boot media) supports booting via CD or
USB flash drive on UEFI systems. Secure Boot is supported and the BIOS
can be in either UEFI mode or Legacy mode. TBWinRE is automatically
installed with Image for Windows on Windows 7, 8, or later. You must run
TBWinRE to create your boot media.
•
Image for Linux (IFL) v2.79 or later supports booting via CD or USB flash
drive on UEFI systems. Secure Boot is not currently supported and must be
disabled in the BIOS. Attempting to boot with Secure Boot enabled will
result in the boot being blocked.
•
Image for DOS (IFD) will not boot on UEFI systems configured in UEFI
mode. To boot on these systems Secure Boot must be disabled and you
must enable or use Legacy mode.
You can deal with this situation in several ways:
*
You can use Image for DOS or Image for Linux to restore an image to a
Windows partition.
Image for Windows User Manual
Page 57 of 218
Note: When you purchase Image for Windows, you automatically receive copies of
Image for DOS and Image for Linux.
*
You can use TBWinPE or TBWinRE. TBWinPE is based on the Windows 7 AIK
(requires AIK download from Microsoft). Windows 7 and Windows 8 users can
easily create TBWinRE boot media (does not require downloading the Windows
AIK) and add Image for Windows to the Windows Recovery Environment. The
TBWinRE files are automatically installed in the tbwinre sub-folder of the Image
for Windows installation folder and can be accessed there or from the Create
Recovery Boot Disk shortcut in the Start menu. Tutorials for creating TBWinPE
and TBWinRE boot media can be found on TeraByte’s website.
*
You can use the free Bart PE and the “PE Builder Plugin Installer” included with
Image for Windows to build a bootable Windows CD or DVD that also contains
Image for Windows. When you boot your computer using this CD/DVD, you
boot to a Windows pre-installation environment state, where you can use Image
for Windows to restore your backup. A tutorial for creating a BartPE CD can be
found on TeraByte’s website.
In the sections that follow, you find information on creating the Image for DOS boot
media and using it to restore a backup. Using Image for Linux is very similar, so, if
you prefer Linux, you can create the Image for Linux boot media and use it to
restore. For more information on either product, see their respective manuals.
The information about using Image for Windows to restore an image follows the
information about using Image for DOS. So, read the section appropriate to your
situation.
Before you dive into restoring an image, consider the size of the target location
where you plan restore the image. The target must be large enough to
accommodate the data from the source partition. The minimum amount of space
Image needs to restore an image in the target location equals the amount of space
encompassed from the beginning of the source partition to the last used area of the
source partition. For example, suppose that the source partition had 2 GB of data
and the last part of that data ended 15 GB from the beginning of the source
partition. In this case, the target area needs to be at least 15 GB in size, regardless
of the overall size of the source partition.
If the target is larger than the source partition, there will be an area of free space
left over unless you use the “Resize Partition” or “Resize After Restore” option or
perform the restore via command line using the /X parameter as explained later in
this manual.
Also, please remember the following.
*
If your computer contains more than one CD/DVD drive and you are restoring
using Image for DOS from a CD/DVD disc, please make sure that you insert
your Image for DOS bootable disc in one CD/DVD drive and no other CD/DVD
drive contains a bootable disc.
Image for Windows User Manual
Page 58 of 218
*
Since the hard drive order during the boot process may be different than it is
while Windows is running, you may need to press a key when prompted to
access the Image for DOS menu that will allow you to select the appropriate
drive from which to restore.
Restoring a Backup with Image for DOS
You run Image for DOS by creating bootable media (CD/DVD disc, USB flash drive,
floppy diskette) that contains the Image for DOS program. Then, you simply use the
Image for DOS boot media to boot the computer containing the drive that you want
to back up or restore. Once the computer boots, Image for DOS automatically
starts.
Creating a Bootable Image for DOS Disc
In Windows, you can create the Image for DOS boot media using the MakeDisk
utility. MakeDisk is included when you download Image for DOS or Image for
Windows.
Follow these steps to use the MakeDisk utility to create the Image for DOS boot
media:
Note: These steps assume that you installed the optional “Image for DOS Recovery
Disk” component during Image for Windows setup; if you did not, re-run the Image
for Windows setup and select the component on the Additional Components
window. If you also select the Create Image for DOS Recovery Disk option on the
Select Additional Tasks window, skip Step 1 below.
1.
Choose Start, All Programs, Terabyte Unlimited, Image for Windows, V2,
Image for DOS, Create Recovery Boot Disk. (This will trigger a UAC prompt in
Windows Vista and Windows 7 if UAC is enabled. Select to allow the program
to run.) The MakeDisk welcome screen appears.
Image for Windows User Manual
Page 59 of 218
2.
Click Next on the MakeDisk welcome screen. The “License Agreement” screen
appears.
3.
Read the Image for DOS license agreement, and if you accept it, select the “I
accept the agreement” button and click Next.
4.
If you are creating the Image for DOS (GUI) boot media or you’ve placed a
customized IFD.INI file in the directory with the MakeDisk files, the “Select the
Image for Windows User Manual
Page 60 of 218
optional components” screen will be displayed. Otherwise, the “Device and
Checkbox Options” screen will be shown (skip to Step 5).
Check boxes to enable the options and then click Next:
*
CD Boot Image Files – Depending on the boot media type being created
(e.g. floppy disk) you may need to exclude the CD Boot Image files to save
space. These files are needed to make any direct burned discs bootable
(e.g. when you save a backup image directly to a DVD).
*
IFD.INI file from the local directory – The IFD.INI file was found in the
MakeDisk directory. If you select this option it will be included in the build.
This allows you to use an already customized version of the file (you will not
be prompted for IFD options/settings).
If using Image for DOS (CUI) skip to Step 5. The following options apply only
to Image for DOS (GUI).
The “Mouse Support” screen is displayed. Select to enable or disable mouse
support and then click Next. Note that the BIOS must support the mouse. This
may require enabling the USB Legacy Support in the BIOS.
The “Video Method” screen is displayed. Select the desired video method and
then click Next.
*
VESA Video – Uses the VESA Video standard for the display instead of a
specific chipset implementation. Support is provided by the video card’s
BIOS. This is the recommended video method. Will fall back to Chipset
Video if VESA is not supported.
*
Chipset Video – Attempts to access the video chipset directly for supported
chipsets. It is not recommended to select this option unless you know for
certain it is required (e.g. VESA doesn’t work or you’re instructed to use it by
Image for Windows User Manual
Page 61 of 218
TeraByte support). Will fall back to VESA Video if chipset detected is not
supported.
Note: While each video method should fall back to the other one if it fails, this
may not always happen. In this case, try the other video method.
The “Video Mode” screen will be displayed. Select the desired video mode and
then click Next. For the best viewing experience, it is recommended to select
800x600 or higher with 64K colors.
5.
The “Device and Checkbox Options” screen is displayed.
Enable the desired options on the “Device and Checkbox Options” screen:
*
ATAPI DMA (PATA) – If your PATA CD/DVD drive supports ATAPI DMA,
enabling this option dramatically speeds up the process of reading from and
writing to the CD/DVD drive. This option will not work with some drives;
Image for Windows User Manual
Page 62 of 218
therefore, if you enable this option and have problems using your CD/DVD
drive with Image for DOS, recreate the boot media and leave the option
disabled.
6.
*
Disable SATA – Image for DOS includes low level support for SATA when
the SATA controller is configured in AHCI mode. If the BIOS doesn’t provide
enough information to allow Image for DOS to identify the SATA drives
when Image for DOS takes control of the SATA drives, Image for DOS may
default to using the BIOS drive; in this case, the system will hang until the
BIOS returns control (if ever). If you experience hangs and/or the inability to
access a hard drive without an error message, recreate the boot media with
the Disable SATA checkbox checked.
*
Disable SATA Bias – Because some systems have no support whatsoever
to match BIOS and SATA drives (see paragraph above), Image for DOS
employs a special matching routine to try to identify the BIOS drives that
relate to each SATA drive. In some cases, Image for DOS might
inadvertently match a BIOS drive to a SATA drive incorrectly. If you
experience such an issue, recreate the boot media with the Disable SATA
Bias checkbox checked.
*
USB 1.1 (UHCI) – If you need USB 1.1 (UHCI) support for older systems
that don’t support USB 2.0, enable this option. In addition, some new
systems require this option or the USB port will hang and Image for DOS
won’t detect any USB devices. USB 2.0 support is always enabled
regardless of this option.
*
Correct USB Hang (1) – If you experience problems with USB devices
hanging, you can enable this option to attempt to correct it. This option can
degrade USB IO performance.
*
Correct USB Hang (2) – If you experience problems with USB devices
hanging, you can enable this option to attempt to correct it. This option can
degrade USB IO performance.
*
Disable Checkbox Selection – Disables the use of check boxes to select
partitions and makes partition selection function the same as previous
versions.
Click Next, and the “Global Geometry Options” screen appears.
Image for Windows User Manual
Page 63 of 218
Check boxes to enable the options:
*
Disable Global Geometry - Check this box to disable the global geometry
settings and revert to using program defaults or drive specific overrides
equivalent to versions prior to 2.52.
*
Disable Align MBR for BIOS Auto Mode - This option is enabled by
default to prevent problems with unaligned partitions on systems with their
BIOS using Auto Mode. Many newer systems use auto mode by default,
and some even don't have an option to turn it off. Check the box if you want
to disable this option. This is equivalent to enabling the individual overrides
Align MBR Ending HS and Align MBR HS when Truncated. However, you
can disable this option by checking the box.
*
Align Partitions on 1MiB Boundaries – This option provides a convenient
way to enable 1MiB partition alignment for all drives (drives with 512 byte
sectors will be aligned on 2048 sectors; drives with 4096 byte sectors will be
aligned on 256 sectors). This is popular with users of SSD type drives. It is
the equivalent to enabling the individual overrides Align on 1MiB
Boundaries, Align MBR Ending HS, Align MBR HS when Truncated, and
disabling Align on End.
*
Assume Same Target System – Enable this option to prevent problems
where users restore an image from another system to a drive that will be put
back in the other system. For example, the hard drive from PC-A is backed
up; PC-B is used to restore to a new hard; that new drive is placed back in
PC-A. Without this option enabled, Image for Windows would setup the
partition to properly boot on the hard drive for PC-B which can sometimes
(not always) be a problem when the hard drive is going back to PC-A. This
Image for Windows User Manual
Page 64 of 218
option solves that and is equivalent to the individual Use MBR Geometry
override.
*
Use Source Host Geometry - This option is the global equivalent to the
individual Use Original Geometry override.
*
Disable Validate Geometry Before Use - This option is enabled by default
and used to ensure that the geometry from the MBR on the original system
is aligned to known standards before accepting it for use. It only applies
when Assume Same Target System is enabled. Check this box to disable
this option.
Note: The above options are also available in Image for DOS by clicking the
Settings button (IFD GUI) or selecting Global Settings (IFD CUI).
7.
Click Next, and the “Miscellaneous Global Options” screen appears.
Check boxes to enable the options:
*
Simple Operations – Enable this option to have Image for DOS
automatically handle most options for you. You simply choose which
physical drive you want to back up and, if needed, which drive you want to
save to. Only Backup, Validate, and Restore are available in this mode. The
target storage area is automatically maintained and files are deleted as
needed when it runs out of free space.
*
Use Windows 9x MBR – Windows Vista and later tied the kernel loader to
the MBR code such that using previous MBR code may not allow Windows
Vista or later to boot on certain machines. Leave this option unselected (the
Image for Windows User Manual
Page 65 of 218
default) to have Image for DOS use the code base compatible with
Windows Vista or later. The new MBR code will continue to boot older
OSes with the exception of some (rare) configurations using Win9x on
FAT32.
*
Disable Automatic Scaling Restrictions – Select to have Image for DOS
scale small partitions when restoring a full drive image. By default, small
partitions will not be scaled and will be restored at their original sizes.
*
Disable Automatic Boot Partition Updates – Select to prevent Image for
DOS from automatically updating the boot partition when restoring a full
drive image.
*
Disable Automatic Restore Drive Search – Select to prevent Image for
DOS from searching for the destination drive using the disk signature or
GUID when performing an automatic restore (USB, 1394, and virtual drives
will not be searched). If a match isn’t found or if this option is enabled, the
drive number of the backed up drive will be used.
*
Retain Failed Backups – If you enable this option and a backup operation
fails, Image for DOS won’t delete the files from the failed backup.
*
Completion Alarm – Select to enable an audible alarm upon completion of
an operation, errors, or when user interaction is required (insert media, etc.).
*
Disable Resize with Caching – Select to prevent Image for DOS from
using a cache to reduce the time required to resize a partition. By default,
the Resize with Caching option is enabled.
Note: The above options are also available in Image for DOS by clicking the
Settings button (IFD GUI) or selecting Global Settings (IFD CUI).
8.
Click Next, and the “Additional IFD.INI Options” screen appears. Most of the
options you should set to use Image for DOS are set for you by default, but
you can use this screen to set additional options. For example, you might want
to use the TimeZone variable to identify your time zone for Image for DOS. Or
you might want the Scale to Fit option enabled by default to expand partitions
when restoring. Note that for non-global options (those not in the [Options]
section) you will need to specify the section (e.g. [Restore_Defaults]). See
image below for examples. For a complete list of available environment
variables, see the section titled “Image for DOS Environment Variables” in the
Image for DOS manual.
Image for Windows User Manual
Page 66 of 218
9.
Click Next, and the “License/Product Key” screen appears. If you own a
licensed copy of Image for DOS, supply your serial number.
10. Click Next, and the “Select Target” screen appears. Choose the target that
MakeDisk should use to create the bootable Image for DOS media.
Image for Windows User Manual
Page 67 of 218
You can create a bootable USB flash drive with MakeDisk as long as the USB flash
drive is not larger than 64 GB.
*
If you choose the “ISO File” option, also supply an ISO file name in the box
provided.
*
If you choose the “3 ½ Floppy” option, be sure to insert a floppy diskette
before proceeding. The entire contents of this floppy diskette will be
overwritten.
*
If you choose the “CD/DVD” option, be sure to insert a writable CD or DVD
disc before proceeding. The entire contents of this disc will be overwritten.
MakeDisk can automatically overwrite CD-RW, and DVD+RW media. However, if
you wish to use DVD-RW media, it must be either brand new or fully blanked before
being processed by MakeDisk. To fully blank the DVD-RW media, use your burning
software’s “full erase” function. (The “quick erase” function will not work for this
purpose.)
*
If you select a USB flash drive (UFD), you also must select the USB Mode
to use: Normal, No Partition, Partition, or Partition Ex—whichever works on
your computer; your computer’s BIOS determines which option works.
Normal - Raw Boot Image – Creates a 1.44 MB floppy diskette image
on the UFD. Any additional space on the UFD (beyond the floppy image
size) is not available for use. Think of this option as if MakeDisk were
formatting the UFD to be a 1.44 MB floppy. If you were to view the UFD
Image for Windows User Manual
Page 68 of 218
in Windows, the drive would appear to be 1.44 MB, even though it might
have originally been a 4 GB drive, and formatted as FAT.
No Partition - FAT/FAT32 Volume – The entire UFD is configured as
one big unpartitioned device. If you were to view a 4 GB UFD created
using this option in Windows, you’d see free space beyond the amount
used by MakeDisk up to the size of the drive. This free space is
available to be used normally. If the UFD is 4GB or smaller, it's
formatted as FAT. Otherwise, it's formatted as FAT32.
Partition - MBR FAT/FAT32 Partition – The entire UFD is used as a
single bootable partition. The computer's BIOS will usually detect this
type of UFD as a hard drive. Any unused space on the UFD is available
to be used normally. If the UFD is 4GB or smaller, it's formatted as FAT.
Otherwise, it's formatted as FAT32.
Partition - MBR FAT/FAT32 Partition (Int13h Extensions) – This is
the same as the Partition - MBR FAT/FAT32 Partition mode except that
the INT 13 Extension is used (this is required for some computers to
boot a UFD).
The Geometry Calculation Method options control how the drive
geometry is calculated for the USB/SD device. It is recommended to try
the Default option first. If the device fails to boot properly (e.g. black
screen, boot failure, device not found, etc.), the other options can be
tried. Make note of which option works properly for future use.
Note: More information on using UFD boot media can be found in this
TeraByte KB article.
11. Click Finish, and respond to subsequent prompts as necessary. MakeDisk will
then create the boot media or ISO image. When MakeDisk finishes, the
Success screen appears, as shown below.
Image for Windows User Manual
Page 69 of 218
12. Click Close on the MakeDisk Success screen.
*
If you selected the “3½ Floppy”, “CD/DVD”, or “USB/SD” option in Step 10,
you can now use that media to boot and run Image for DOS.
*
If you selected the “ISO File” option in Step 10, you will have to use
CD/DVD authoring software to create a bootable disc from the ISO file.
(TeraByte’s BurnCDCC utility can be used for this.)
Tip: Be sure to test your boot media to make sure that it works and you can see
backup images you made previously.
Image for Windows User Manual
Page 70 of 218
Navigating the Image for DOS Interface
After you boot your computer with your Image for DOS boot media, the main menu
of Image for DOS appears. Image for DOS (GUI) is shown below.
To select menu items in Image for DOS, use the arrow keys to select the desired
option and then press Enter to display the next screen. Some screens, such as the
Restore Options screen, contain several sections of options; some of which can be
toggled on or off. On these screens, use the Tab key to move from section to
section. For options that you can toggle on and off, highlight the option using the
arrow keys and then use the space bar to toggle the option on or off, as desired.
Image for DOS also makes wide use of accelerator keys. An accelerator key is an
individual letter that can be pressed (or pressed in combination with the Alt key) to
select an option or a menu item. In Image for DOS, accelerator keys are highlighted
in yellow or are underlined.
How you use an accelerator key depends on the current location of the cursor; if it
is in the same section of the screen as the desired accelerator key, simply press the
applicable letter (i.e. the letter highlighted in yellow). If the cursor is in any other
section, press and hold the Alt key, and then press the applicable letter.
You can use the Esc key or click Back to move back to the previous menu. If you
use Esc/Back in this manner, Image for DOS remembers the selections you have
already made throughout the Image for DOS session, in the event that you return to
the same screen.
Image for Windows User Manual
Page 71 of 218
When using the GUI version of Image for DOS you can also use the mouse to
select controls, toggle options, click buttons, etc.
Restoring the Backup
Insert your Image for DOS boot media into the appropriate drive or USB port and
boot your computer. Then, follow these steps:
1.
On the Image for DOS Main Menu, select Restore.
2.
On the Restore/Select screen that appears, select an option to determine how
Image for DOS handles the selection of the target drive and options:
*
If you choose Automatic, Image for DOS attempts to choose the target
drive and options automatically using information stored in the backup
files. If Image for DOS cannot identify the target drive and options or you
don't accept the suggested target drive, Image for DOS will use the
Normal option and ask you to select the target drive and options.
Tip: Remember that you set the default values of many restore options
when creating the boot media. Enter the INI file options on the appropriate
page of the MakeDisk wizard. For example, if you wish the Automatic
Restore to expand your partitions (Scale to Fit) you would include the
Expand=1 option in the [Restore_Defaults] section. See Creating the
Image for DOS Boot Media in the Image for DOS manual.
Note: Performing an automatic partial restore will not change the disk type
(MBR/EMBR/GPT) of the destination drive if it doesn’t match the type of
the source drive.
*
If you choose Normal, Image for DOS will ask you to select the target
drive and options.
Note: If you created a backup in Image for Linux or Image for Windows and restore
using Image for DOS, Image for DOS might not be able to use the Automatic option
because Image for DOS might not be able to match the disk signature in the
backup with the target disk on the machine to which you want to restore. In this
case, Image for DOS uses the Normal option, where you select the target drive and
options.
3.
From the Restore From/Select File Access Method screen that appears,
select between the following options, which refer to the location where Image
for DOS should look for the backup file you want to restore:
*
File (Direct) – This option allows you to look for image file(s) in a folder on a
hard drive that does not have a drive letter assigned to it by DOS.
*
File (CD/DVD) – This option allows you to look for image file(s) on a CD or
DVD disc.
Image for Windows User Manual
Page 72 of 218
4.
On the Restore From/Select Drive Interface screen that appears, select one
of the following options. These options refer to how Image for DOS should
attempt to access the hard drive or CD/DVD drive where your image is stored:
If you chose File (Direct) in Step 3, you can choose one of the following
options:
*
BIOS – Locates and accesses drives using the system BIOS. Please note
that any problems or limitations inherent to the system BIOS will apply.
*
BIOS (Direct) – Attempts to locate the hard drive using the system BIOS,
but then attempts to access it directly, bypassing the BIOS. This can
sometimes be helpful in cases where performance with the BIOS option is
very poor. In order to get the most out of this option when creating an
image, you should select a File (Direct)—rather than File (OS)—for the File
Access Method of as the target for restoring the image.
Use BIOS (direct) when you are going to be accessing SATA hard drives and
CD/DVD drives at any time during the Restore process.
*
USB – Examines the attached USB controller, if any, for available hard
drives.
*
IEEE1394 – Examines the attached IEEE 1394 controller, if any, for
available hard drives.
*
Virtual Drive – Select this option if the backup resides on a virtual drive.
Use the screens that follow to navigate to and select the virtual drive
containing the backup.
If you chose File (CD/DVD) in Step 3, you can choose one of the following
options:
*
ATAPI – Select this option if your CD/DVD drive is an ATAPI device, and
none of the other selections apply. This is the most common option.
*
ASPI – Select this option if your CD/DVD drive will be accessed using an
ASPI layer. (You must supply the ASPI driver for this option to work.)
*
USB2 – Select this option if your CD/DVD drive is attached to a USB 2
controller.
*
IEEE1394 – Select this option if your CD/DVD drive is attached to an IEEE
1394 controller.
If your USB device does not appear at first, please try pressing the Esc key, waiting
a few seconds, and selecting the USB or USB2 option again.
5.
Either the Restore From/Select File Drive screen shown in the following
figure or the Restore From/Select Target Drive screen appears, depending
Image for Windows User Manual
Page 73 of 218
on whether you are restoring from a hard drive or from CD/DVD discs. Select
the target CD/DVD drive or hard drive.
Note: If you select a hard drive, the Restore From/Select File Location on HD
screen appears. You can select a partition on the hard drive if it contains partitions;
otherwise, press Enter.
6.
On the Restore From/File Name screen that appears, navigate to and select
the backup file you want to restore. Next, select either the entire drive or
partitions to restore. The options you can set in Step 9 change, depending on
your choice here. You can click the Information button to get details on the
selected drive or partition (e.g. number of MiB used, free, and needed to
restore).
Note: If you select a differential or incremental backup to restore and Image for
DOS is unable to locate any of the base images, you will be prompted to locate the
required backup file(s). You will also have the option to restore in a single pass or in
multiple passes. If you stored your backup on CD/DVD’s, select the Multi Pass
option.
7.
On the Restore To/Select Drive Interface screen that appears, select the
access method you wish to use for the source hard drive. The choices on this
screen are the same as the choices described under Step 4 if you chose File
(Direct).
Image for Windows User Manual
Page 74 of 218
8.
On the Restore To/Select Target Drive screen that appears, select the hard
drive onto which you want to restore the image you selected in Step 6. Then,
select the partition on that drive. The partition you select will be deleted before
Image for DOS restores the image.
9.
On the Restore Options screen that appears, select the options you want to
use while restoring. For an explanation of each option, see the next two
sections, “Image for DOS Restore Options for an Entire Drive” on Page 75 and
“Image for DOS Restore Options for an Individual Partition” on Page 79.
10. On the Summary screen that appears, click Start when you are ready to begin
the restore process. During the restore process, a progress bar appears onscreen. A message appears when Image for DOS finishes.
After you press Enter, the main menu for Image for DOS reappears. At this point, if
you are finished using Image for DOS, select Exit, remove the Image for DOS boot
media, and then press Enter to reboot your computer.
Note: Until you reboot, the operating system reflects the contents of the
drive/partition and file system in the state they were before you restored. Not
rebooting can cause data corruption. You can override the reboot prompt by
restoring using the command line /rb:0 switch, but do this only if you are an
advanced user and understand the potential ramifications of not rebooting.
Image for DOS Restore Options for an Entire Drive
You can set options to restore an image if you choose the Normal option instead of
the Automatic option on the Restore/Select screen. The options you can set while
restoring using Image for DOS depend on whether you restore an entire drive or a
partition. When you restore an entire drive, Image for DOS offers these options that
you can set:
Image for Windows User Manual
Page 75 of 218
Update Boot Partition - This option updates any references to the restored
partition in the active boot partition on the target drive. This is useful for situations
where the boot partition differs from the system partition. However, you typically
wouldn't want to use this option if you're creating a copy of an existing partition you
want to keep, unless the target drive will be independent of the original drive. For
this to be useful, the active boot partition should already be on the target drive or
part of the same copy or restore operation. Note: This option is not displayed if the
Automatic Boot Partition Update global option is enabled (the default).
Scale to Fit – On FAT, FAT32, NTFS, or EXT 2/3/4 file systems, selecting this
option will make Image for DOS assume that the size of the original hard drive is
based on the location of the end of the last partition; Image for DOS then applies
the same scaling to the target hard drive. If any unpartitioned space existed at the
end of the source drive, that unpartitioned space won’t exist on the target drive after
you restore your image. This option has no effect on images restored to hard drives
using other file systems. You cannot use this option in conjunction with the Scale to
Target option. If you inadvertently enable both options, Scale to Fit will take
precedence.
Align to Target – If you select this option, Image for DOS will force alignment to
the target drive regardless of the alignment used on the source drive. For example,
if the Align Partitions on 1MiB Boundaries global option is enabled the restored
drive will be aligned on 1MiB boundaries. If this option is not selected, the alignment
used on the target drive will be determined automatically based on the source drive.
Image for Windows User Manual
Page 76 of 218
Change Disk ID and GUIDs – This option only applies to full drive restores. It
allows you to change the NT Signature restored to the target drive. For target GPT
drives, the MBR NT Signature, the GPT Disk GUID, and the partition GUIDs will all
be changed. This can be useful if you plan on having both the original and restored
hard drive in the same computer at the same time; otherwise Windows may detect
the duplicate signature and modify it which may (depending on the OS) prevent the
restored hard drive from booting properly.
Validate Before Restore – If you select this option, Image for DOS will validate the
image file(s) prior to restoring them, will perform internal consistency checks on the
backup file(s). If Image for DOS encounters an error during validation, Image for
DOS will abort the restore operation without overwriting the partition. If you select
this option, the overall processing time Image for DOS takes to restore the image
will increase, but you can restore the image with greater certainty that the restored
image will be reliable.
Validate Byte-for-Byte – If you select this option, Image for DOS will verify that
every byte in the source backup image file was written back to the drive correctly,
ensuring 100% accuracy. This option generally increases the processing time of the
overall backup operation, but is advisable to use where maximum reliability is
required.
Write Standard MBR Code – If you select this option, Image for DOS will install
standard master boot code to the Master Boot Record (MBR) after completing the
restore operation. The other portions of the MBR (i.e. the partition table, disk
signature, etc.) will not be affected. Otherwise, Image for DOS will only install the
standard master boot code when it appears that there is no existing boot code.
Wipe Unused Sectors – This option will wipe (zero-out) unused sectors on the
restored drive. When restoring a full drive, the entire drive is wiped, including all
gaps between any partitions. Using this option provides an easy way to wipe a drive
and restore in a single operation (such as when deploying images to used
systems).
Remove Gaps on Restore – Select this option to remove any gaps (free space)
between partitions. Partitions will be restored adjacent to each other.
Write Changed Sectors Only – Enable this option when restoring to write only the
changed sectors to the target drive (target will be read to compare). Useful in cases
where a large portion of the data is the same and it’s desirable to reduce wear on
the target drive (e.g. restoring to SSD drive).
GPT Hidden From OS – Use this option when restoring to a GPT drive to indicate
that the operating system being restored will not see the destination drive as GPT
when booted. For example, an iMac using BootCamp or cases where the 0xEE
placeholder partition is missing from the MBR. Using this option prevents Image for
DOS from using GPT specific fix-up information on the drive after the restore.
Assume Original HD – If you select this option, which mainly applies to Linux
partitions, Image for DOS will keep references to the source hard drive number
intact within the partitions that have been restored to the target. If you do not select
Image for Windows User Manual
Page 77 of 218
this option and the target drive number differs from that of the source drive,
applicable drive references residing within the restored partitions will be updated to
reflect the new hard drive number.
This option has no effect if you are restoring to a target drive whose number
matches that of the source drive. If you are restoring to a target drive whose
number differs from that of the source drive, but you plan to subsequently move the
target drive so that its number matches the source drive again, enabling this option
can be beneficial.
Scale to Target – If you use this option when restoring an image, Image for DOS
restores the image proportionally to the target drive. For example, suppose that you
backed up a 250 GB hard drive and restored the image to a 500 GB hard drive. If
you use this option, you allow Image for DOS to double the size of the restored
image. This option only works for FAT, FAT32, NTFS, and EXT2/3/4 file systems
and has no effect on images restored to hard drives using other file systems. You
cannot use this option in conjunction with the Scale to Fit option. If you
inadvertently enable both options, Scale to Fit will take precedence.
Ignore IO Errors – Under ordinary circumstances, if Image for DOS encounters a
bad sector on the target partition while restoring, Image for DOS will notify you
concerning the write error and give you the option to continue or abort. If you select
the Ignore IO Errors option, Image for DOS will ignore the error and continue.
Generally, you should select this option only if you need to restore to a target drive
that contains known bad sectors. On some systems, if you select this setting and
Image for DOS encounters bad sectors, there will be a significant delay as the
internal retry/recovery routine of the drive attempts to handle the bad sector(s). In
addition, some systems may hang if the BIOS option is used to access the source
drive. In such cases, try using the BIOS (Direct) option instead.
Disable Auto Eject – This option prevents Image for DOS from automatically
opening the optical drive tray. If you don’t select this option, Image for DOS will
open the drive tray whenever a disc is needed and at the completion of the restore
operation.
Reboot When Completed – Use this option to automatically reboot your computer
after the restore finishes.
Shutdown When Completed – Use this option to automatically shut down your
computer after the restore finishes.
Log Results to File – Select this option to make Image for DOS log the date and
time it completes the restore operation. Image for DOS saves the log as IFD.LOG
in the IMAGE.EXE program directory. To be able to save IFD.LOG, Image for DOS
must be running from a writable medium such as a non-write-protected floppy
diskette or UFD. You can use the /logfile or LogFile options to specify an alternate
location for IFD.LOG.
Change Volume SN – Select this option to change the file system volume serial
number of copied FAT//FAT32/NTFS/HPFS partitions and the UUID of Ext2/3/4
partitions.
Image for Windows User Manual
Page 78 of 218
First Track Sectors – This text box allows you to specify how many sectors of the
first track of the hard drive should be restored. If you enter AUTO in this box, the
tracks needed for the EMBR will be restored. If you aren’t sure, type AUTO in this
box.
Image for DOS Restore Options for an Individual Partition
When you restore an individual partition, Image for DOS offers these options that
you can set:
Set Active – If you select this option, Image for DOS will make the restored
partition the active partition after completing the restore operation. Otherwise,
Image for DOS will make the restored partition active only if no other partition is
active and the target drive is HD0.
Update BOOT.INI – When you select this option, Image for DOS updates all
partition(w) entries in the boot.ini file found in the restored location to point to itself.
This can be useful when restoring Windows NT, Windows 2000, Windows XP, and
Windows 2003 operating systems to a new drive or location.
Update Boot Partition - This option updates any references to the restored
partition in the active boot partition on the target drive. This is useful for situations
where the boot partition differs from the system partition. However, you typically
wouldn't want to use this option if you're creating a copy of an existing partition you
want to keep, unless the target drive will be independent of the original drive. For
Image for Windows User Manual
Page 79 of 218
this to be useful, the active boot partition should already be on the target drive or
part of the same copy or restore operation.
Write Standard MBR Code – If you select this option, Image for DOS will install
standard master boot code to the Master Boot Record (MBR) after completing the
restore operation. The other portions of the MBR (i.e. the partition table, disk
signature(s), etc.) will not be affected. Otherwise, Image for DOS will install the
standard master boot code only when it appears that there is no existing boot code.
Restore Disk Signature – This option applies when you restore a partition that had
been assigned a drive letter within Windows prior to being backed up. If you select
this option, Image for DOS will restore the disk signature associated with the source
partition. If you don’t select this option, Image for DOS will use the disk signature
already present in the MBR of the target drive; if none exists, Image for DOS will
create one. If you are restoring a partition that had been assigned a drive letter in
Windows and you wish to keep that drive letter assignment, select this option.
Restore First Track – Whenever you back up any partition, Image for DOS also
backs up the first track of the source hard drive. If you select this option, Image for
DOS will restore the first track, which includes the master boot code and the disk
signature, enabling you to restore the MBR/EMBR. Restoring the first track may
also change the disk type (MBR/EMBR/GPT) of the destination drive if it doesn’t
match that of the source drive (the restore will abort if the change is required and
cannot be applied).
Validate Before Restore – If you select this option, Image for DOS will validate the
image file(s) prior to restoring them. If Image for DOS encounters an error during
validation, Image for DOS will abort the restore operation without overwriting the
target.
Change GUID – When restoring to a GPT drive, selecting this option will change
the GUID of each partition restored.
Validate Byte-for-Byte – If you select this option, Image for DOS will verify that
every byte in the source data was restored correctly, ensuring 100% accuracy. This
option generally doubles the processing time of the overall operation, but is
advisable to use where maximum reliability is required. You can but do not need to
select the Validate Before Restore option if you select the Validate Byte-for-Byte
option.
Wipe Unused Sectors – This option will wipe (zero-out) unused sectors in the
restored partition(s) or drive, depending on the type of restore performed.
When restoring single partitions or when restoring multiple partitions to a drive with
existing partitions, sectors located outside of the restored partition(s) are not wiped.
If a partition is resized during the restore, the wiped area for that partition is the final
size of the restored partition (not the size of the source partition).
When restoring multiple partitions to a drive with no existing partitions, the entire
drive is wiped, including all gaps between any partitions. Using this option provides
Image for Windows User Manual
Page 80 of 218
an easy way to wipe a drive and restore in a single operation (such as when
deploying images to used systems).
Move to Original MBR Entry – If you select this option, Image for DOS will move
the partition table entry of the restored partition to the same location in the master
partition table as it had on the source drive. Image for DOS will also move the
existing partition table entry to another location rather than overwrite it. You may
want to enable this option if you use an environment that tracks master partition
table entries, such as Linux.
Write Changed Sectors Only – Enable this option when restoring to write only the
changed sectors to the target drive (target will be read to compare). Useful in cases
where a large portion of the data is the same and it’s desirable to reduce wear on
the target drive (e.g. restoring to SSD drive).
GPT Hidden From OS – Use this option when restoring to a GPT drive to indicate
that the operating system being restored will not see the destination drive as GPT
when booted. For example, an iMac using BootCamp or cases where the 0xEE
placeholder partition is missing from the MBR. Using this option prevents Image for
DOS from using GPT specific fix-up information on the drive after the restore.
Assume Original HD – If you select this option, which mainly applies to Linux
partitions, Image for DOS will keep references to the source hard drive number
intact within the partitions that have been restored to the target. If you do not select
this option and the target drive number differs from that of the source drive,
applicable drive references residing within the restored partitions will be updated to
reflect the new hard drive number.
This option has no effect if you are restoring to a target drive whose number
matches that of the source drive. If you are restoring to a target drive whose
number differs from that of the source drive, but you plan to subsequently move the
target drive so that its number matches the source drive again, enabling this option
can be beneficial.
Ignore IO Errors – Under ordinary circumstances, if Image for DOS encounters a
bad sector on the target drive while restoring an image, Image for DOS will notify
you concerning the write error and give you the option to continue or abort. If you
select the Ignore IO Errors option, Image for DOS will ignore the error and continue.
Generally, you should select this option only if you need to restore to a target drive
that contains known bad sectors. On some systems, if you select this setting and
Image for DOS encounters bad sectors, there will be a significant delay as the
internal retry/recovery routine of the drive attempts to handle the bad sector(s). In
addition, some systems may hang if the BIOS option is used to access the source
drive. In such cases, try using the BIOS (Direct) option instead.
Disable Auto Eject – This option prevents Image for DOS from automatically
opening the optical drive tray. If you don’t select this option, Image for DOS will
open the drive tray whenever a disc is needed and at the completion of the restore
operation.
Image for Windows User Manual
Page 81 of 218
Reboot When Completed – Use this option to automatically reboot your computer
after the restore finishes.
Shutdown When Completed – Use this option to automatically shut down your
computer after the restore finishes.
Log Results to File – Select this option to make Image for DOS log the date and
time it completes the restore operation. Image for DOS saves the log as IFD.LOG
in the IMAGE.EXE program directory. To be able to save IFD.LOG, Image for DOS
must be running from a writable medium such as a non-write-protected floppy
diskette or UFD. You can use the /logfile or LogFile options to specify an alternate
location for IFD.LOG.
Change Volume SN – Select this option to change the file system volume serial
number of copied FAT//FAT32/NTFS/HPFS partitions and the UUID of Ext2/3/4
partitions.
First Track Sectors – This text box allows you to specify how many sectors of the
first track of the hard drive should be restored. If you enter AUTO in this box, the
tracks needed for the EMBR will be restored. If you aren’t sure, type AUTO in this
box.
Resize Partition – Currently available only for FAT, FAT32, NTFS, and EXT 2/3/4
partitions, you can use this text box to specify a new size for the restored partition,
bound by the Minimum and Maximum values specified by Image for DOS. The
units used here are mebibytes, abbreviated MiB. (Please refer to the section titled
Data Storage Size Unit Conventions at the beginning of this manual for more
information.)
New Name – Enter the new volume name (label) for the restored partition. If left
blank the name will not be changed from its restored value.
Restoring a Backup with Image for Windows
You can use Image for Windows to restore an image as long as you are not trying
to restore the image to the copy of Windows you are currently using. Image for
Windows can restore images to partitions not in use. To use Image for Windows to
restore an image of a Windows installation when you have no other operating
systems available, you can:
*
Use Image for DOS, as described in the preceding two sections.
*
Use Image for Linux, as described in the Image for Linux manual.
*
Use TBWinPE or TBWinRE. TBWinPE is based on the Windows 7 AIK (requires
AIK download from Microsoft). Windows 7 and Windows 8 users can easily
create TBWinRE boot media (does not require downloading the Windows AIK)
and add Image for Windows to the Windows Recovery Environment. The
TBWinRE files are automatically installed in the tbwinre sub-folder of the Image
for Windows installation folder and can be accessed there or from the Create
Image for Windows User Manual
Page 82 of 218
Recovery Boot Disk shortcut in the Start menu. Tutorials for creating TBWinPE
and TBWinRE boot media can be found on TeraByte’s website.
*
Use the “PE Builder Plugin Installer” and create a Bart PE or other WinPEbased bootable Windows CD/DVD that also contains Image for Windows. When
you boot your computer using this CD/DVD, you boot to a Windows
preinstallation environment state, where you can use Image for Windows to
restore your backup. Tutorials for creating a BartPE CD can be found on
TeraByte’s website.
Note: The version of Image for Windows installed in the BartPE and other WinPEbased media is a fully-functional product and you can use it to both back up and
restore.
Using Image for Windows in BartPE
The Image for Windows plugin for Bart's PE Builder enables you to run Image for
Windows in Bart's Preinstallation Environment (commonly referred to as BartPE).
Essentially, BartPE provides you with a core Windows environment separate from
your main Windows installation, allowing you to perform maintenance tasks you
would not be able to perform from within the primary Windows environment itself.
For example, running Image for Windows from BartPE will allow you to restore your
Windows partition—something you cannot do while your Windows partition is in
use. For more information on BartPE, please visit its home page.
Note: BartPE is a third-party product and is not included with Image for Windows. A
plug-in to install Image for Windows in BartPE is included with Image for Windows,
but, to obtain BartPE or to learn more about BartPE, please visit the BartPE home
page: http://www.nu2.nu/pebuilder/. You’ll also find a tutorial that guides you
through creating a BartPE boot disc that contains Image for Windows at
http://www.terabyteunlimited.com/howto/index.htm.
Before running Image for Windows in BartPE, you must first create the Image for
Windows plugin for BartPE as well as the BartPE CD/DVD itself. Fortunately, this is
a simple process. To create the Image for Windows BartPE plugin, follow these
steps:
1.
Choose Start, All Programs, Terabyte Unlimited, Image for Windows, V2, PE
Builder Plugin Installer. The PE Builder Plug-In installer window will appear:
If you don’t find this shortcut on your system, run Image for Windows setup again,
being sure to select the component titled “PE Builder – PE plugin builder for
BartPE, VistaPE…”.
2.
In the PE Builder Location text box, type in or navigate to the location where
you installed BartPE (i.e. the folder containing PEBUILDER.EXE). Your path
may differ from the one shown in the figure below.
Image for Windows User Manual
Page 83 of 218
3.
If you are a registered user of Image for Windows, use the Product Key section
to supply your registration name and key in the corresponding text boxes.
Please note that the BartPE plugin installer does not validate your registration
information, so be sure to enter it correctly—copying and pasting is
recommended. The registration information you supply here will be copied to a
file named imagew.ini, which is used by the plugin so that you won’t be
prompted to enter your registration information each time you boot to the
BartPE environment and run Image for Windows.
4.
By default, Image for Windows will not run when BartPE starts up. Select the
“Run Image for Windows automatically” option to make Image for Windows run
automatically when BartPE loads. You can also select to include the TBIView,
TBIMount, and TeraByte OSD Tool programs, if they are installed.
5.
It is recommended to select the “Preserve key for writable media” option if the
PE build will be saved to writable media (such as a flash drive).
6.
Click OK. The installer will copy the applicable files to a folder named
“plugin\ifwv2”, which will reside directly under the folder you specified in the
“PE Builder Location” text box. You should see a confirmation dialog when the
installer has finished:
Image for Windows User Manual
Page 84 of 218
Tip: If you wish, you may create/edit the IFW.INI file that resides in the
“plugin\ifwv2” folder to apply custom settings each time you run Image for Windows
under BartPE. Editing the IFW.INI file to include those settings stores them so that
you don’t have to enter them manually each time you run Image for Windows under
BartPE. Please refer to the section titled “Image for Windows INI File” for more
information.
7.
Run Bart’s PE Builder to create the BartPE disc or .ISO file. The Image for
Windows plugin is enabled by default.
If you need a utility to burn an .ISO file to disc, try TeraByte Unlimited's free BurnCDCC
utility. You can install BurnCDCC as an optional component during Image for Windows
setup or you can download it separately and install it.
If you are running Image for Windows in BartPE and an attached USB drive does
not appear, try closing and then restarting Image for Windows.
Using Image for Windows to Restore an Image
To use Image for Windows to restore an image, run Image for Windows in Windows
or run it by booting your computer from the TBWinPE/RE or BartPE media. Then,
follow these steps:
1.
Double-click the Image for Windows icon on your desktop or launch the
program from its program group on the Start menu. (By default, Image for
Windows will automatically launch when TBWinPE/RE is booted.)
2.
On the Image for Windows Welcome window, select Restore (Automatic) or
Restore (Manual).
*
If you choose Automatic, Image for Windows attempts to choose the
target drive and options automatically using information stored in the
backup files. If Image for Windows cannot identify the target drive and
options or you don't accept the suggested target drive, Image for Windows
will use the Normal option and ask you to select the target drive and
options.
Tip: Remember that you can set the default values of many restore options
by configuring the IFW.INI file. For example, if you wish the Automatic
Image for Windows User Manual
Page 85 of 218
Restore to expand your partitions (Scale to Fit) you would include the
Expand=1 option in the [Restore_Defaults] section.
*
If you choose Normal, Image for Windows will ask you to select the target
drive and options.
Note: If you created a backup in Image for DOS or Image for Linux and restore
using Image for Windows, Image for Windows might not be able to use the
Automatic option because Image for Windows might not be able to match the disk
signature in the backup with the target disk on the machine to which you want to
restore. In this case, Image for Windows uses the Normal option, where you select
the target drive and options.
3.
Click Next. In the window that appears, select the drive letter or device that
contains the image you want to restore.
Note: If the device containing the image is a device that Image for Windows doesn’t
display, just highlight any Windows drive and continue to the next step.
4.
Click Next. At the top of the window that appears next, if necessary, open the
list of drives and select the external drive containing the image to restore or
click the Windows/Network Browse button to navigate to the drive; you can use
UNC paths. Then, select the name of the image file you want to restore, which
Image for Windows displays in the Filename box at the bottom of the window.
Image for Windows User Manual
Page 86 of 218
Note: If you select a differential or incremental backup to restore and Image for
Windows is unable to locate all of the base images, you will be prompted to locate
the required backup file(s).
5.
Click Next. In the window that appears, select the drive or partition to restore.
Image for Windows User Manual
Page 87 of 218
While on this screen, the following function is available:
•
Information – Click to view the details of the selected drive or partition
(e.g. number of MiB used, free, and needed to restore).
Image for Windows User Manual
Page 88 of 218
6.
Click Next. In the window that appears, select the drive or partition where you
want to restore the backup file.
While on this screen, the following functions are available:
•
Right-click on a drive or partition to open the context menu: Select Details
to view information about the drive/partition. To delete a partition, select
Delete and then confirm the action (check the Aggressive Delete box if a
normal attempt fails and you need to force the deletion). Note: You can
also delete the partition by selecting it and pressing the Del key.
•
Information – Click to view the details of the selected drive, partition or
virtual drive (e.g. number of MiB used, free, and needed to restore).
•
Geometry – Click to set the geometry for the selected (target) drive. Read
more about this function in the “Geometry Settings” section below.
•
Create Extended – Click after selecting a free space partition to create an
extended partition. You can then restore the backup to that partition.
•
Change Disk – Click to change the drive type. This allows you to change
the partitioning scheme used on the drive. MBR, EMBR, and GPT drive
types are supported.
Image for Windows User Manual
Page 89 of 218
•
Add Virtual Drive – Click to add a virtual drive while working in Image for
Windows.
You can use Image for Windows to back up to or restore from a virtual
drive used in conjunction with VirtualPC, VMWare, or Hyper-V. To add a
virtual drive while working in Image for Windows, click the Add Virtual
Drive button to display an Open dialog box. In the File name box, type the
name of the virtual drive you want to add and click Open. If the virtual drive
name you type doesn’t exist, Image for Windows displays a message
asking if you want to create a file for the virtual drive. Click Yes, and Image
for Windows displays a dialog box where you can define the type and size
of the virtual drive. You can specify the size in bytes by including no
letters. Or, you can specify the size in Mebibytes by supplying an M or in
Gibibytes by supplying a G.
You can create any of the following types of virtual drives:
o
RAW - Fixed Size – Creates a plain (raw) file as the virtual drive.
Its size is fixed and allocated with zeros on creation.2
o
VHD - Dynamic Expanding – Creates a VirtualPC Dynamic
Expanding virtual hard drive.1
o
VHD - Fixed Size – Creates a VirtualPC Fixed Size virtual hard
drive.2
o
VHDX - Dynamic Expanding – Creates a Hyper-V Dynamic
Expanding virtual hard drive.1,3
o
VHDX - Fixed Size – Creates a Hyper-V Fixed Size virtual hard
drive.2,3
o
VHDX - Dynamic 4KiB Sector Size – Creates a Hyper-V Dynamic
Expanding virtual hard drive with a sector size of 4KiB (4096
bytes).1,3
o
VHDX - Fixed Size 4KiB Sector Size – Creates a Hyper-V Fixed
Size virtual hard drive with a sector size of 4KiB (4096 bytes).2,3
o
VMDK - Monolithic Sparse (IDE) – Creates a VMWare Sparse
IDE virtual hard drive.1
o
VMDK - Monolithic Sparse (SCSI) – Creates a VMWare Sparse
SCSI virtual hard drive.1
1
Dynamic expanding virtual drives append data to the file as you add data to
the virtual drive. The file size starts small and grows as needed.
2
Fixed size virtual drives allocate data for the file when it’s created and the file
size does not change. The file size will be the same as the virtual drive size
(e.g. a 40GiB virtual drive will use 40GiB of space).
Image for Windows User Manual
Page 90 of 218
3
For Windows caching reasons, it is highly recommended to create partitions
within a VHDX file that are aligned on at least a 1MiB boundary. That is
either 2048 sectors for 512 byte sized sectors or 256 sectors for 4096 byte
sized sectors.
7.
Click Next. A message appears, warning you that Image for Windows will
overwrite the selected partition and all data currently in the selected partition
will be lost.
8.
Click Yes. In the window that appears, set the options you want Image for
Windows to use during the restore operation. See the section, “Image for
Windows Restore Options” on Page 94 for an explanation of each option.
If you click No, Image for Windows switches back to a Normal restore operation,
where you select the target drive and partition as well as restore options.
9.
If you are restoring from CD/DVD discs, insert the first disc in the backup set.
10. On the Summary screen that appears, select Start when you are ready to
begin the restore process. A progress bar appears on-screen. You can
interrupt the backup and validation operations at any time by clicking Cancel
or pressing the Esc key. Image for Windows will ask you to confirm that you
want to cancel before it interrupts the current operation.
While the restore is in process, you can change the power options and process
priority options using the drop-down boxes. The default power option is Auto,
which will prompt to reboot when finished if a reboot is necessary. If the
selected power option is not supported by the system, the next one will be
used in the following order: suspend, hibernate, shutdown. Select Exit Only to
have Image for Windows exit when finished. The selected process priority will
remain in effect until the program ends or is changed manually.
Image for Windows User Manual
Page 91 of 218
Note: If Image for Windows reports that it cannot obtain a lock, you’ll need to
restore using the Image for DOS or Image for Linux recovery boot disk, or using
Image for Windows from a preinstallation environment disc such as Bart PE,
TBWinPE, or TBWinRE as mentioned earlier.
Geometry Settings
When you use the Restore (Normal) option, you can use the Geometry Override
settings to set alignment options as well as a specific Cylinder (C), Head (H), or
Sector (S) to use for a given drive. In addition to manually entering the values, you
can select the Use Original Geometry option to have Image for Windows use the
geometry from the backup image.
You’ll need the CHS option when the geometry assigned by Windows to a given
drive does not match the BIOS geometry for the drive. This situation occurs most
often when you attach a hard drive from another machine to the USB port to restore
the image.
C – Last Cylinder (0 to 1023)
H – Last Head (0 to 254)
S – Sectors per Track (1 to 63)
Image for Windows User Manual
Page 92 of 218
Use MBR Geometry – Use drive geometry based on the MBR entry of the first
partition in the backup file. This is useful when restoring to a drive on a machine
separate from where the drive will ultimately be booted.
Validate MBR Geometry - This option is used to ensure that the geometry from the
MBR is aligned to known standards before accepting it for use. It only applies when
Use MBR Geometry is enabled.
Use Original Geometry – Use the drive geometry saved in the backup file as
opposed to the drive geometry of the machine where you’re restoring the backup.
Note: Suppose that you move a drive from Machine A to Machine B and then back
up Machine A’s drive using Machine B. If you then restore this backup and select
the Use Original Geometry option, Image for Windows restores the backup using
the geometry from Machine B.
Align on End – Use this option to instruct Image for Windows to align restored
partitions at the end of a cylinder, or when the Align on 1MiB Boundaries option is
enabled, at the end of a 1MiB boundary.
Align End by Resizing – Use this option to make Image for Windows align both
the beginning and end of a partition by resizing. This option works only on partitions
that Image for Windows can resize.
Align on 1MiB Boundaries – Use this option to instruct Image for Windows to
align restored partitions on 1MiB boundaries (drives with 512 byte sectors will be
aligned on 2048 sectors; drives with 4096 byte sectors will be aligned on 256
sectors).
Align MBR Ending HS – Use this option to make Image for Windows force a
restored partition’s ending head and sector values in the MBR to match the current
geometry.
Align MBR HS when Truncated – Use this option to make Image for Windows set
a restored partition’s head and sector values in the MBR to match the current
geometry when it is located outside the range of the current geometry.
Use Global Settings – Enable to allow global geometry settings to control the
drive.
Save as Default – Select this option to save the current settings to the IFW.INI
file as the defaults.
Image for Windows User Manual
Page 93 of 218
Image for Windows Restore Options
During the restore process, you can set a variety of options. These options will vary
depending on whether you are restoring a full drive image or a partition image.
Options available when restoring a partition are shown in the figure below.
Set Active – If you select this option, Image for Windows will make the restored
partition the active partition after completing the restore operation. Otherwise,
Image for Windows will make the restored partition active only if no other partition is
active and the target drive is HD0.
Update BOOT.INI – When you select this option, Image for Windows will update all
partition(w) entries in the boot.ini file found in the restored location to point to itself.
This can be useful when restoring Windows NT, Windows 2000, Windows XP, and
Windows 2003 operating systems to a new drive or location.
Update Boot Partition - This option updates any references to the restored
partition in the active boot partition on the target drive. This is useful for situations
where the boot partition differs from the system partition. However, you typically
wouldn't want to use this option if you're creating a copy of an existing partition you
want to keep, unless the target drive will be independent of the original drive. For
this to be useful, the active boot partition should already be on the target drive or
part of the same copy or restore operation. Note: This option is not displayed when
restoring a full drive image if the Automatic Boot Partition Update global option is
enabled (the default).
Image for Windows User Manual
Page 94 of 218
Write Standard MBR Code – If you select this option, Image for Windows will
install standard master boot code to the Master Boot Record (MBR) after
completing the restore operation. The other portions of the MBR (i.e. the partition
table, disk signature, etc.) will not be affected. Otherwise, Image for Windows will
install the standard master boot code only when it appears that there is no existing
boot code.
Restore Disk Signature – This option applies when you restore a partition that had
been assigned a drive letter within Windows prior to being backed up. If you select
this option, Image for Windows will restore the disk signature associated with the
source partition. If you don’t select this option, Image for Windows will use the disk
signature already present in the MBR of the target drive; if none exists, Image for
Windows will create one. If you are restoring a partition that had been assigned a
drive letter in Windows and you wish to keep that drive letter assignment, select this
option. For GPT drives the disk GUID will not be changed.
Restore First Track – Whenever you back up any partition, Image for Windows
also backs up the first track of the source hard drive. If you select this option, Image
for Windows will restore the first track, which includes the master boot code and the
disk signature. This enables you to restore the MBR/EMBR. Restoring the first track
may also change the disk type (MBR/EMBR/GPT) of the destination drive if it
doesn’t match that of the source drive (the restore will abort if the change is
required and cannot be applied).
Change GUID – When restoring to a GPT drive, selecting this option will change
the GUID of each partition restored.
Validate Before Restore – If you select this option, Image for Windows will validate
the image file(s) prior to restoring them and perform internal consistency checks on
the backup file(s). If Image for Windows encounters an error during validation,
Image for Windows will a bort the restore operation without overwriting the partition.
If you select this option, the overall processing time Image for Windows takes to
restore the image will increase, but you can restore the image with greater certainty
that the restored image will be reliable.
Validate Byte-for-Byte – If you select this option, Image for Windows will verify
that every byte in the source backup image file was written back to the drive
correctly, ensuring 100% accuracy. This option generally increases the processing
time of the overall backup operation, but we advise you use this option where
maximum reliability is required.
Wipe Unused Sectors – This option will wipe (zero-out) unused sectors in the
restored partition(s) or drive, depending on the type of restore performed.
When restoring single partitions or when restoring multiple partitions to a drive with
existing partitions, sectors located outside of the restored partition(s) are not wiped.
If a partition is resized during the restore, the wiped area for that partition is the final
size of the restored partition (not the size of the source partition).
When restoring a full drive or when restoring multiple partitions to a drive with no
existing partitions, the entire drive is wiped, including all gaps between any
Image for Windows User Manual
Page 95 of 218
partitions. Using this option provides an easy way to wipe a drive and restore in a
single operation (such as when deploying images to used systems).
Move to Original MBR Entry – If you select this option, Image for Windows will
move the partition table entry of the restored partition to the same location in the
master partition table as it had on the source drive. Image for Windows will also
move the existing partition table entry to another location rather than overwrite it.
You may want to enable this option if you use an environment that tracks master
partition table entries, such as Linux.
Write Changed Sectors Only – Enable this option when restoring to write only the
changed sectors to the target drive (target will be read to compare). Useful in cases
where a large portion of the data is the same and it’s desirable to reduce wear on
the target drive (e.g. restoring to SSD drive).
GPT Hidden From OS – Use this option when restoring to a GPT drive to indicate
that the operating system being restored will not see the destination drive as GPT
when booted. For example, an iMac using BootCamp or cases where the 0xEE
placeholder partition is missing from the MBR. Using this option prevents Image for
Windows from using GPT specific fix-up information on the drive after the restore.
Assume Original HD – If you select this option, which mainly applies to Linux
partitions, Image for Windows will keep references to the source hard drive number
intact within the partitions that have been restored to the target. If you do not select
this option and the target drive number differs from that of the source drive,
applicable drive references residing within the restored partitions will be updated to
reflect the new hard drive number.
This option has no effect if you are restoring to a target drive whose number
matches that of the source drive. If you are restoring to a target drive whose
number differs from that of the source drive, but you plan to subsequently move the
target drive so that its number matches the source drive again, enabling this option
can be beneficial.
Ignore IO Errors – Under ordinary circumstances, if Image for Windows
encounters a bad sector on the target drive while restoring an image, Image for
Windows will notify you concerning the write error and give you the option to
continue or abort. If you select the Ignore IO Errors option, Image for Windows will
ignore the error and continue. Generally, you should select this option only if you
need to restore to a target drive that contains known bad sectors. On some
systems, if you select this setting and Image for Windows encounters bad sectors,
there will be a significant delay as the internal retry/recovery routine of the drive
attempts to handle the bad sector(s).
Disable Media Ejection – When removable media is used, this option prevents
Image for Windows from automatically ejecting the removable media. If you don’t
select this option, Image for Windows will eject the media whenever new media is
needed, and at the completion of the restore operation.
Log Results to File – Select this option to make Image for Windows log the details
of the restore operation. By default, Image for Windows saves the log as IFW.LOG
Image for Windows User Manual
Page 96 of 218
in the IMAGEW.EXE program folder. You can use program settings or the /logfile or
LogFile options to specify an alternate location for IFW.LOG. Note that Image for
Windows must be able to write to the specified folder to save the log.
Change Volume SN – Select this option to change the file system volume serial
number of copied FAT//FAT32/NTFS/HPFS partitions and the UUID of Ext2/3/4
partitions.
Reboot when Completed – Select this option to have Image for Windows request
that the computer reboot after completing the restore operation.*
Shutdown when Completed – Select this option to have Image for Windows
request that the computer shut down after completing the restore operation.*
Suspend when Completed – Select this option to have Image for Windows
request that the computer suspend (sleep) after completing the restore operation. If
a shutdown or reboot is required, a shutdown is performed instead.*
Hibernate when Completed – Select this option to have Image for Windows
request that the computer hibernate after completing the restore operation. If a
shutdown or reboot is required, a shutdown is performed instead.*
*If multiple power options are selected, precedence is as follows: suspend,
hibernate, shutdown, reboot.
Scale to Fit – This option only applies to full drive restores. On FAT, FAT32, NTFS,
or EXT 2/3/4 file systems, selecting this option will make Image for Windows
assume that the size of the original hard drive is based on the location of the end of
the last partition; Image for Windows then applies the same scaling to the target
hard drive. If any unpartitioned space existed at the end of the source drive, that
unpartitioned space won’t exist on the target drive after you restore your image.
This option has no effect on images restored to hard drives using other file systems.
You cannot use this option in conjunction with the Scale to Target option. If you
inadvertently enable both options, Scale to Fit will take precedence.
Align to Target – This option only applies to full drive restores. If you select this
option, Image for Windows will force alignment to the target drive regardless of the
alignment used on the source drive. For example, if the Align Partitions on 1MiB
Boundaries global option is enabled the restored drive will be aligned on 1MiB
boundaries. If this option is not selected, the alignment used on the target drive will
be determined automatically based on the source drive.
Change Disk ID and GUIDs – This option only applies to full drive restores. It
allows you to change the NT Signature restored to the target drive. For target GPT
drives, the MBR NT Signature, the GPT Disk GUID, and the partition GUIDs will all
be changed. This can be useful if you plan on having both the original and restored
hard drive in the same computer at the same time; otherwise Windows may detect
the duplicate signature and modify it which may (depending on the OS) prevent the
restored hard drive from booting properly.
Image for Windows User Manual
Page 97 of 218
Remove Gaps on Restore – This option only applies to full drive restores. Select
this option to remove any gaps (free space) between partitions. Partitions will be
restored adjacent to each other.
Scale to Target – This option only applies to full drive restores. If you use this
option when restoring an image, Image for Windows restores the image
proportionally to the target drive. For example, suppose that you backed up a 250
GB hard drive and restored the image to a 500 GB hard drive. If you use this option,
you allow Image for Windows to double the size of the restored image. This option
only works for FAT, FAT32, NTFS, and EXT 2/3/4 file systems and has no effect on
images restored to hard drives using other file systems. You cannot use this option
in conjunction with the Scale to Fit option. If you inadvertently enable both options,
Scale to Fit will take precedence.
First Track Sectors – This text box allows you to specify how many sectors of the
first track of the hard drive should be restored. If you enter AUTO in this box, the
tracks needed for the EMBR will be restored. If you aren’t sure, type AUTO in this
box.
Resize After Restore – Currently available only for FAT, FAT32, NTFS, and EXT
2/3/4 partitions, you can use this text box to specify a new size for the restored
partition, bound by the Minimum and Maximum values specified by Image for
Windows. The units used here are mebibytes, abbreviated MiB. (Please refer to the
section titled Data Storage Size Unit Conventions at the beginning of this manual
for more information.)
New Name – Enter the new volume name (label) for the restored partition. If left
blank the name will not be changed from its restored value.
Save Defaults – Click this button to save the settings you establish. In the future,
Image for Windows will display these settings automatically.
Show Command – Click this button to display the information you would type at a
command prompt to start a restore with the options you selected as you displayed
the various windows in Image for Windows. You can use this information to create a
batch file or TBScript (.TBS) file that runs Image for Windows by selecting the Save
to File option. The command line can be edited before being saved. For details on
using Image for Windows from a command prompt, see the section, “Running
Image for Windows from the Command Line” on Page 120.
Validating Backups with Image for Windows
You can use Image for Windows to validate backups at the time you create them
and also before you restore a backup. You also can validate a backup at any time
using the instructions provided below.
When you validate a backup, Image for Windows performs internal consistency
checks on the backup file(s), helping to ensure that the backup will be reliable if you
need to restore from it.
Image for Windows User Manual
Page 98 of 218
Tip: You should consider validating your backup images using your Image for DOS,
Image for Linux, or BartPE/WinPE recovery media to make sure that you can see
your backups while working in the recovery environment.
Validating a Backup
When you use the steps that follow to validate a backup, Image for Windows
performs a standard validation, not the byte-for-byte validation that provides a more
intense scrutiny of a backup file. You can perform a byte-for-byte validation only as
part of a backup operation. See the section, “Setting Backup Options” on Page 46
for details on a byte-for-byte validation.
1.
Double-click the Image for Windows icon on your desktop or launch the
program from its program group on the Start menu.
2.
On the Image for Windows Welcome window, select Validate.
Image for Windows User Manual
Page 99 of 218
3.
Click Next. Image for Windows searches your network for resources that might
contain backup files. In the window that appears, select the hard drive,
partition, or virtual drive containing the image you want to validate.
Note: If you want to validate an image stored on a device that Image for Windows
doesn’t display, just highlight any Windows Drive and continue to the next step.
Image for Windows User Manual
Page 100 of 218
4.
Click Next. In the window that appears, select the file you want to validate. At
the top of the window, open the list of drives and select the drive containing the
image file you want to validate. If you stored the file on a drive Image for
Windows doesn’t display or on network drive, you can click the
Windows/Network Browse button to navigate to the drive. After you select the
file, the name of the file appears in the Filename box at the bottom of the
window.
5.
Click Next. If you selected a differential or incremental backup to validate and
Image for Windows is unable to locate all of the base images, you will be
prompted to locate the required backup file(s). Otherwise, in the window that
appears, select the drive or partition(s) to validate. Click Next. Set the options
you want Image for Windows to use while validating. See the next section,
“Understanding Validation Options” on Page 102 for an explanation of these
options.
6.
If you are validating from CD/DVD discs, make sure the first disc is inserted.
7.
On the Summary screen that appears, select Start when you are ready to
begin the validation process. A progress bar appears on-screen. You can
interrupt the operation at any time by clicking Cancel or pressing the Esc key.
Image for Windows will ask you to confirm that you want to cancel before it
interrupts the operation.
While the validation is in process, you can change the power options and
process priority options using the drop-down boxes. If the selected power
Image for Windows User Manual
Page 101 of 218
option is not supported by the system, the next one will be used in the
following order: suspend, hibernate, shutdown. Select Exit Only to have Image
for Windows exit when finished. The selected process priority will remain in
effect until the program ends or is changed manually.
When Image for Windows finishes, a window appears to inform you that Image for
Windows successfully validated the selected backup. You can click Close.
Understanding Validation Options
There are several options available when you validate an image:
Log Results to File – Select this option to make Image for Windows log the details
of the validation operation. Image for Windows saves the log as IFW.LOG in the
directory where you installed Image for Windows. You can use program settings or
the /logfile or LogFile options to specify an alternate location for IFW.LOG. Note that
Image for Windows must be able to write to the specified folder to save the log.
Disable Media Ejection – When removable media is used, this option prevents
Image for Windows from automatically ejecting the removable media. If you don’t
select this option, Image for Windows will eject the media whenever new media is
needed, and at the completion of the validate operation.
Save Defaults – Click this button to save the settings you establish. In the future,
Image for Windows will display these settings automatically.
Show Command – Click this button to display the information you would type at a
command prompt to start a validation with the options you selected as you
displayed the various windows in Image for Windows. You can use this information
to create a batch file or TBScript (.TBS) file that runs Image for Windows by
selecting the Save to File option. The command line can be edited before being
saved. For details on using Image for Windows from a command prompt, see the
section, “Running Image for Windows from the Command Line” on Page 120.
Copying Partitions or Drives with Image for
Windows
You can use the Copy operation to place an copy of the contents of one partition or
drive on another partition or drive. Suppose, for example, that you have a hard drive
all set up and configured just the way you want it, and you want to clone that setup
so that you can place it in another computer. You can use the Copy operation.
Copying a Partition or Drive
Using the Copy operation, Image for Windows makes a sector-by-sector copy of the
used areas of the partition or drive you select and places that copy on the partition
or drive you designate, overwriting any information stored on the target location. If
the partition or drive you copy is a bootable partition or drive, the copy will also be
bootable.
Image for Windows User Manual
Page 102 of 218
Note: Unless you copy an entire drive, Image for Windows does not automatically
set the copy as the active boot partition unless you select the Set Active option.
To create a copy of a partition or drive, follow these steps:
1.
Double-click the Image for Windows icon on your desktop or launch the
program from its program group on the Start menu.
2.
On the Image for Windows Welcome window, select Copy.
Image for Windows User Manual
Page 103 of 218
3.
Click Next. In the window that appears, select the hard drive, partition, or
virtual drive that you want to copy.
When a partition is highlighted, the following options are available:
Information – Click the Information button to view the details of the partition (used
space, free space, size needed to restore, etc.).
Compact – Click the Compact button to compact the partition’s file system.
FAT/FAT32 and NTFS file systems are supported. This option allows you to
reduce the size required for a copy. You will be prompted to confirm the
compaction and then asked for the compaction value (size in MiB).
For example, if you have a 250GB partition that contains 50GB of data and
requires 150GB of space to restore and you need to copy it to a 100GB
partition, you can compact the file system to under 100GB before copying it to
the 100GB partition.
Image for Windows User Manual
Page 104 of 218
4.
Click Next. In the window that appears, select the partition, drive, or free space
where you want to save the copy.
5.
Click Next. If the selected destination contains data, Image for Windows
displays a warning that indicates that all data in the partition or on the drive
that you selected in Step 4 will be overwritten and lost.
Image for Windows User Manual
Page 105 of 218
6.
Click Yes to display the Options window. See “Understanding Copy Options”
for a detailed description of each option.
7.
Select any options you want to use and click Next.
8.
On the Summary screen that appears, click Start when you are ready to begin
the Copy process. A progress bar appears on-screen. You can interrupt the
operation at any time by clicking Cancel or pressing the Esc key. Image for
Windows will ask you to confirm that you want to cancel before it interrupts the
operation.
While the copy is in process, you can change the power options and process
priority options using the drop-down boxes. The default power option is Auto,
which will prompt to reboot when finished if a reboot is necessary. If the
selected power option is not supported by the system, the next one will be
used in the following order: suspend, hibernate, shutdown. Select Exit Only to
have Image for Windows exit when finished. The selected process priority will
remain in effect until the program ends or is changed manually.
When Image for Windows finishes, a window appears to inform you that Image for
Windows created the copy successfully. You can click Close.
Understanding Copy Options
During the copy process, you can set a variety of options. These options will vary
depending on whether you are copying an entire disk or a partition. Options
available when copying a partition are shown in the figure below.
Image for Windows User Manual
Page 106 of 218
Set Active – If you select this option, Image for Windows will make the copied
partition the active partition after completing the copy operation. Otherwise, Image
for Windows will make the copied partition active only if no other partition is active
and the target drive is HD0.
Update BOOT.INI – When you select this option, Image for Windows will update all
partition(w) entries in the boot.ini file found in the target location to point to itself.
This can be useful when copying Windows NT, Windows 2000, Windows XP, and
Windows 2003 operating systems to a new drive or location.
Update Boot Partition - This option updates any references to the copied partition
in the active boot partition on the target drive. This is useful for situations where the
boot partition differs from the system partition. However, you typically wouldn't want
to use this option if you're creating a copy of an existing partition you want to keep,
unless the target drive will be independent of the original drive. For this to be
useful, the active boot partition should already be on the target drive or part of the
same copy operation. Note: This option is not displayed when copying a full drive if
the Automatic Boot Partition Update global option is enabled (the default).
Write Standard MBR Code – If you select this option, Image for Windows will
install standard master boot code to the Master Boot Record (MBR) after
completing the copy operation. The other portions of the MBR (i.e. the partition
table, disk signature, etc.) will not be affected. Otherwise, Image for Windows will
install the standard master boot code only when it appears that there is no existing
boot code.
Image for Windows User Manual
Page 107 of 218
Copy Disk Signature – This option applies when you copy a partition that had
been assigned a drive letter within Windows. If you select this option, Image for
Windows will copy the disk signature associated with the source partition. If you
don’t select this option, Image for Windows will use the disk signature already
present in the MBR of the target drive; if none exists, Image for Windows will create
one. If you are copying a partition that had been assigned a drive letter in Windows
and you wish to keep that drive letter assignment, select this option. For GPT drives
the disk GUID will not be changed.
Copy First Track – If you select this option, Image for Windows will copy the first
track of the source hard drive, which includes the master boot code and the disk
signature. This enables you to restore the MBR/EMBR. Copying the first track may
also change the disk type (MBR/EMBR/GPT) of the destination drive if it doesn’t
match that of the source drive (the copy will abort if the change is required and
cannot be applied).
Change GUID – When copying to a GPT drive, selecting this option will change the
GUID of each partition copied.
Validate Byte-for-Byte – If you select this option, Image for Windows will verify
that every byte in the source location was written to the target location correctly,
ensuring 100% accuracy. This option generally increases the processing time of the
overall operation, but we advise you use this option where maximum reliability is
required.
Copy Unused Sectors – By default, Image for Windows copies only sectors in use.
If you select this option, Image for Windows will copy all sectors on a partition or
drive, regardless of whether they contain data. For entire drive copies, this option
causes a raw sector by sector backup (and later restore) of the entire drive without
regard to any partitions or adjustments. NOTE: This option will cause Validate
Byte-for-Byte to fail if PHYLock is used (VSS is not allowed). This option also
causes Image for Windows to ignore the Omit Page File Data and Omit Hibernation
Data options.
Wipe Target Unused Sectors – This option will wipe (zero-out) unused sectors in
the copied partition(s) or drive, depending on the type of copy performed.
When copying single partitions or when copying multiple partitions to a drive with
existing partitions, sectors located outside of the copied partition(s) are not wiped. If
a partition is resized during the copy, the wiped area for that partition is the final
size of the copied partition (not the size of the source partition).
When copying a full drive or when copying multiple partitions to a drive with no
existing partitions, the entire drive is wiped, including all gaps between any
partitions. Using this option provides an easy way to wipe a drive and copy to it in a
single operation.
Omit Page File Data – Selected by default, this option eliminates page file data
from the copy process.
Image for Windows User Manual
Page 108 of 218
Omit Hibernation Data – Selected by default, this option eliminates hibernation
data from the copy process.
Move to Original MBR Entry – If you select this option, Image for Windows will
move the partition table entry of the copied partition to the same location in the
master partition table as it had on the source drive. Image for Windows will also
move the existing partition table entry to another location rather than overwrite it.
You may want to enable this option if you use an environment that tracks master
partition table entries, such as Linux.
Write Changed Sectors Only – Enable this option when copying to write only the
changed sectors to the target drive (target will be read to compare). Useful in cases
where a large portion of the data is the same and it’s desirable to reduce wear on
the target drive (e.g. copying partition to SSD drive).
GPT Hidden From OS – Use this option when copying to a GPT drive to indicate
that the operating system being copied will not see the destination drive as GPT
when booted. For example, an iMac using BootCamp or cases where the 0xEE
placeholder partition is missing from the MBR. Using this option prevents Image for
Windows from using GPT specific fix-up information on the drive after the copy
completes.
Assume Original HD – If you select this option, which mainly applies to Linux
partitions, Image for Windows will keep references to the source hard drive number
intact within the partitions that have been copied to the target location. If you do not
select this option and the target drive number differs from that of the source drive,
applicable drive references residing within the restored partitions will be updated to
reflect the new hard drive number. This option is useful when copying Linux
partitions.
Ignore IO Errors – Under ordinary circumstances, if Image for Windows
encounters a bad sector on the target drive while copying, Image for Windows will
notify you concerning the write error and give you the option to continue or abort. If
you select the Ignore IO Errors option, Image for Windows will ignore the error and
continue. Generally, you should select this option only if you need to copy to a
target drive that contains known bad sectors. On some systems, if you select this
setting and Image for Windows encounters bad sectors, there will be a significant
delay as the internal retry/recovery routine of the drive attempts to handle the bad
sector(s).
Log Results to File – Select this option to make Image for Windows log the details
of the copy operation. By default, Image for Windows saves the log as IFW.LOG in
the IMAGEW.EXE program folder. You can use program settings or the /logfile or
LogFile options to specify an alternate location for IFW.LOG. Note that Image for
Windows must be able to write to the specified folder to save the log.
Change Volume SN – Select this option to change the file system volume serial
number of copied FAT//FAT32/NTFS/HPFS partitions and the UUID of Ext2/3/4
partitions.
Image for Windows User Manual
Page 109 of 218
Reboot When Completed – Selecting this option tells Image for Windows to reboot
the computer after completing the Copy operation.*
Shutdown When Completed - Selecting this option tells Image for Windows to
shut down the computer after completing the Copy operation.*
Suspend when Completed – Select this option to have Image for Windows
request that the computer suspend (sleep) after completing the restore operation. If
a shutdown or reboot is required, a shutdown is performed instead.*
Hibernate when Completed – Select this option to have Image for Windows
request that the computer hibernate after completing the restore operation. If a
shutdown or reboot is required, a shutdown is performed instead.*
*If multiple power options are selected, precedence is as follows: suspend,
hibernate, shutdown, reboot.
Disable TRIM – Reduces the amount of caching required for the source drive on
systems with TRIM enabled by disabling TRIM during the copy operation. When
TRIM is enabled the original contents of deleted sectors must be cached, whereas
a normal delete doesn’t overwrite the sectors and instead just updates the directory
entry. Note: If the operation doesn’t complete (due to reboot, shutdown, process
forced to end, etc.) TRIM will stay disabled until enabled using the Windows fsutil
program (fsutil behavior set DisableDeleteNotify 0). If IFW
completes the operation, even with errors reported, TRIM will be properly reset to
the enabled state.
Scale to Target – This option only applies to full drive copies. If you use this option
when copying a disk or partition, Image for Windows copies the image
proportionally to the target drive. For example, suppose that you want to copy a 250
GB hard drive to a 500 GB hard drive. If you use this option, you allow Image for
Windows to double the size of the copy. This option only works for FAT, FAT32,
NTFS, and EXT 2/3/4 file systems and has no effect on copies made to hard drives
using other file systems. You cannot use this option in conjunction with the Scale to
Fit option. If you inadvertently enable both options, Scale to Fit will take
precedence.
Scale to Fit – This option only applies to full drive copies. On FAT, FAT32, NTFS,
EXT 2/3/4 file systems, selecting this option will make Image for Windows assume
that the size of the original hard drive is based on the location of the end of the last
partition; Image for Windows then applies the same scaling to the target hard drive.
If any unpartitioned space exists at the end of the source drive, that unpartitioned
space won’t exist on the target drive after you restore your image. This option has
no effect on copies made to hard drives using other file systems. You cannot use
this option in conjunction with the Scale to Target option. If you inadvertently
enable both options, Scale to Fit will take precedence.
Align to Target – This option only applies to full drive copies. If you select this
option, Image for Windows will force alignment to the target drive regardless of the
alignment used on the source drive. For example, if the Align Partitions on 1MiB
Boundaries global option is enabled the restored drive will be aligned on 1MiB
Image for Windows User Manual
Page 110 of 218
boundaries. If this option is not selected, the alignment used on the target drive will
be determined automatically based on the source drive.
Change Disk ID and GUIDs – This option only applies to full drive copies. It allows
you to change the NT Signature restored to the target drive. For target GPT drives,
the MBR NT Signature, the GPT Disk GUID, and the partition GUIDs will all be
changed. This can be useful if you plan on having both the original and restored
hard drive in the same computer at the same time; otherwise Windows may detect
the duplicate signature and modify it which may (depending on the OS) prevent the
restored hard drive from booting properly.
Remove Gaps on Copy – Select this option to remove any gaps (free space)
between partitions. Partitions will be copied adjacent to each other.
First Track Sectors – This text box allows you to specify how many sectors of the
first track of the hard drive should be copied. If you enter AUTO in this box, the
tracks needed for the EMBR will be copied. If you aren’t sure, type AUTO in this
box.
Resize After Copy – Currently available only for FAT, FAT32, NTFS, and EXT
2/3/4 partitions, you can use this text box to specify a new size for the copied
partition, bound by the Minimum and Maximum values specified by Image for
Windows. The units used here are mebibytes, abbreviated MiB. (Please refer to the
section titled Data Storage Size Unit Conventions at the beginning of this manual
for more information.)
New Name – Enter the new volume name (label) for the copied partition. If left
blank the name will not be changed from its copied value.
Save Defaults – Click this button to save the settings you establish. In the future,
Image for Windows will display these settings automatically.
Show Command – Click this button to display the information you would type at a
command prompt to start a copy with the options you selected as you displayed the
various windows in Image for Windows. You can use this information to create a
batch file or TBScript (.TBS) file that runs Image for Windows by selecting the Save
to File option. The command line can be edited before being saved. For details on
using Image for Windows from a command prompt, see the section, “Running
Image for Windows from the Command Line” on Page 120.
Using Simple Operations Mode
Simple Operations mode allows Image for Windows to automatically handle most
options for you. Backup, Restore, and Validate operations are available in this
mode. To use Simple Operations mode, enable the Simple Operations option in
Settings.
Backups are saved to a store on the destination drive (e.g.
E:\TeraByte_TBI_Backups). The storage area is automatically maintained and files
are deleted as needed when it runs out of free space.
Image for Windows User Manual
Page 111 of 218
You can run the script to create the TBWinRE boot media by clicking the Create a
TBWinRE Boot Disk button. The TBWinRE boot media can be used to restore the
Windows drive or partition (restoring the Windows partitions while it’s running is not
possible).
Creating a Backup
To create a backup of a drive you simply choose which physical drive you want to
back up and, if needed, which drive you want to save to.
1. Select Backup this computer to an alternate drive on the main window and
click Next.
2. Select the drive you wish to back up and then click Next.
Note: If using Image for Windows outside of Windows (e.g. TBWinRE,
TBWinPE), the drive letters shown are as assigned by the first Windows
installation found on the system.
Image for Windows User Manual
Page 112 of 218
3. Select where you want to save the backup and then click Next.
Note: If a store already exists for the drive being backed up you will not be
prompted to select one (the existing store will be used).
Note: When using Image for Windows in TBWinRE or TBWinPE, accessible
partitions not assigned a drive letter will also be available for selection.
4. The summary screen is shown. Click Start to create the backup.
Alternatively, if there are no scheduled backups, you can click the Schedule
Backup button to schedule the current backup. By default, it’s scheduled to run
at 1AM daily. Refer to Appendix D: Scheduling Backups on page 196 for details.
Restoring a Backup
1. Select Restore a backup to this computer on the main window and click Next.
2. Select the backup you wish to restore and then click Next. Keep in mind that
you can’t restore the current Windows drive while Windows is running (you’ll
need to use the boot media to perform the restore).
While on this screen you can select to view or mount a backup using TBIView or
TBIMount. If using a mouse, right-click the backup and then select the desired
action from the pop-up menu. If using the keyboard, select the desired backup
and then press F5 to open with TBIView or F9 to open with TBIMount.
3. If existing partitions will be replaced by the restore a warning will appear
showing the drive and partitions affected. Click Yes to continue if everything
looks correct.
4. The summary screen is shown. Click Start to run the restore.
Image for Windows User Manual
Page 113 of 218
Validating a Backup
1. Select Validate a previous backup to check its integrity on the main window
and click Next.
2. Select the backup you wish to validate and then click Next.
While on this screen you can select to view or mount a backup using TBIView or
TBIMount. If using a mouse, right-click the backup and then select the desired
action from the pop-up menu. If using the keyboard, select the desired backup
and then press F5 to open with TBIView or F9 to open with TBIMount.
3. The summary screen is shown. Click Start to run the validation.
Deploying Your Image
When you deploy an image, you restore it to a number of computers in an
organization. Therefore, the information in this section does not apply to most home
users.
Image for Windows does not change the SID of Windows NT/2000/XP/2003, Vista,
or Windows 7 systems. If you are using Image for Windows for deployment
purposes and want to change the SID for Windows you should use the MS sysprep
utility or you can download a free utility named NewSID.
You may want to set up the base machine so that the last partition ends at one
track less than the actual end of the hard drive (around 8 MB less) to leave room for
different brands or models of the same size hard drive.
You might also want to read the following information stored on the Terabyte
website:
http://www.terabyteunlimited.com/kb/article.php?id=033
See the following for more information on how to prepare for deployment for
Windows XP:
How to Use the Sysprep Tool to Automate Successful Deployment of Windows XP
http://support.microsoft.com/kb/302577
Image for Windows User Manual
Page 114 of 218
Windows XP How-to and Technical Article Resources
http://technet.microsoft.com/en-us/library/bb878149.aspx
Download for the Microsoft Windows XP SP1 Deployment Tools
http://www.microsoft.com/downloads/details.aspx?familyid=7A83123D-507B4095-9D9D-0A195F7B5F69&displaylang=en
Download for the Microsoft Windows XP SP2 Deployment Tools
http://www.microsoft.com/downloads/info.aspx?na=47&p=1&SrcDisplayLang=
en&SrcCategoryId=&SrcFamilyId=0c4bfb06-2824-4d2b-abc10e2223133afb&u=details.aspx%3ffamilyid%3d3E90DC91-AC56-4665-949BBEDA3080E0F6%26displaylang%3den
See the following for more information on how to prepare for deployment for
Windows Vista:
http://technet2.microsoft.com/WindowsVista/en/library/2957d7c4-02c7-4205afb5-f03434d8f37d1033.mspx?mfr=true
See the following for an overview of Windows 7 Desktop Deployment:
http://technet.microsoft.com/en-us/library/dd939988(WS.10).aspx
See the following for more information on how to prepare for deployment for
Windows 2003 Server:
What is Sysprep?
http://technet2.microsoft.com/windowsserver/en/library/c03a5469-ef71-4545b970-ce2add5e715c1033.mspx?mfr=true
Download for the Microsoft Windows 2003 Server Sysprep Tool:
http://www.microsoft.com/downloads/details.aspx?familyid=93F20BB1-97AA4356-8B43-9584B7E72556&displaylang=en
See the following for more information on how to prepare for deployment for
Windows 2000:
Download for the Microsoft Windows 2000 Sysprep Tool:
http://www.microsoft.com/downloads/details.aspx?familyid=0C4BFB06-28244D2B-ABC1-0E2223133AFB&displaylang=en
Using Sysprep to Duplicate Disks
http://www.microsoft.com/technet/prodtechnol/windows2000serv/reskit/deploy/
dgcb_ins_izyl.mspx?mfr=true
Image for Windows User Manual
Page 115 of 218
See the following for more information on how to prepare for deployment for
Windows NT:
Windows NT Workstation Deployment
http://www.microsoft.com/technet/archive/ntwrkstn/deploy/depopt/default.mspx
?mfr=true
Image for Windows User Manual
Page 116 of 218
Image for Windows Advanced Configuration
Options
Image for Windows offers a number of advanced configuration options. You can set
these options in a user-created IFW.INI file or using environment variables that
you include on the command line or in a batch file. You also can create a
services.ins file to control Windows services while working in Image for
Windows.
The way you run Image for Windows affects the way Image for Windows processes
advanced options. If you run Image for Windows using the menu interface as
described earlier in this manual, Image for Windows sets all options using
IFW.INI, and you can customize IFW.INI. If you also want to set environment
variables, store them in a batch file that you run prior to running Image for
Windows.
If you run Image for Windows from the command line as described in the section,
“Running Image for Windows from the Command Line,” Image for Windows
processes the command line switches and uses IFW.INI to process global default
options (but ignores all other options in IFW.INI) and finally processes any
environment variables you set. So, environment variables take precedence over
IFW.INI. The services.ins file functions independently and Image for
Windows will process it if it exists unless you include a switch to ignore
services.ins.
Image for Windows INI File
To apply settings to Image for Windows, you create a text file named IFW.INI
using a text editor such as Notepad. The default location for this file is the Image for
Windows program folder. For more advanced users, please note that Image for
Windows will search for this file in the following locations until found: the current
path, the system path, the program folder.
Settings you specify in IFW.INI need to be placed under a section name. For
details on the settings available, refer to Tables 1 to 11 in the section, “Running
Image for Windows from the Command Line.” A typical backup IFW.INI file might
look like this:
[Options]
SeqVolID=1
TimeZone=PST8PDT
[BACKUP_DEFAULTS]
PostValidate=2
[HD0]
UseOrgGeo=1
Image for Windows User Manual
Page 117 of 218
Tip: If you are manually using BartPE/WinPE and the Image for Windows plug-in,
you can use the [License] section of the imagew.ini file to automate entering your
Image for Windows product key using the format shown below. Use the “PE Builder
Plugin Installer” included with Image for Windows, to have this information entered
automatically.
[License]
key=username licensenumber
Image for Windows Environment Variables
You use the SET command to establish Image for Windows environment variables.
The format for Image for Windows environment variables is:
SET IFW=option1:value;option2:value;option3:value
You set all of the environment variables you can use with Image for Windows by
using the same options as you would use from the command line (not the INI
options). The command line options appear in the left column of Tables 1 to 11.
You can display a list of currently set environment variables from the command line
by typing the set command with no parameters. To remove an environment
variable, type the set command, the variable name, and an equal sign (=) followed
by no value. For example, to clear the IFW variable, type the following:
SET IFW=
Image for Windows File Path Variables
You use a set of special variables in the image file name path. The variables are
inserted in the file name path by using a special format of $~variablename$. The
available variable names are:
YYYY (four digit year), YY (two digit year), MM (two digit month), DD (two digit day
of month), DOY (three digit day of year), DOW (three character day of week),
HHMM (four digit hours and minutes), HHMMSS (six digit hours, minutes, and
seconds), and VER for the program version, or any variable name created by using
the "savename" option..
For Example, the following variables would embed the 4-digit year, 2-digit month,
and 2-digit day in the image file name.
“Backup on $~YYYY$-$~MM$-$~DD$”
The "savename" option is useful when scheduling ongoing differential backups that
need to reference a full backup that is created using date based names as the
example above shows. For example, if you setup the full backup schedule using
the option "/savename:lastfullbackup" then you could reference it in the differential
as shown below:
Image for Windows User Manual
Page 118 of 218
"/base:$~lastfullbackup$"
Image for Windows and Windows Services
To control Windows services from within Image for Windows before and after
PHYLock starts, set up a file called services.ins. Place each service’s entry on
a separate line and save the file as a comma-separated values (CSV) file. You can
set the following parameters in the order listed on each line:
*
Service name - the name of service to control
*
The action to take before backing up - start/stop/pause/continue/none
*
The number of milliseconds to wait before backing up – a value in milliseconds
that represents the maximum wait time for action completion
*
The action to take after PHYLock starts - start/stop/pause/continue/none
*
The number of milliseconds to wait after PHYLock starts - a value in
milliseconds that represents the maximum wait time for action completion
*
The action to take after completing the backup - start/stop/pause/continue/none
*
The number of milliseconds to wait after completing the backup - a value in
milliseconds that represents the maximum wait time for action completion
For example, suppose that you create a services.ins file that contains the
following string:
my service,stop,30000,none,,start,10000
Using this information, Image for Windows will stop the service named “my service”
before backing up, waiting up to 30000 milliseconds before backing up. In addition,
Image for Windows will take no action after PHYLock starts. After the backup
finishes, Image for Windows will restart “my service,” waiting a maximum of 10000
milliseconds after completing the backup.
Note: Image for Windows will process services.ins if it exists unless you include
the /ignsvc switch on the command line or the IgnoreServices parameter in the
IFW.INI file to ignore services.ins.
Image for Windows User Manual
Page 119 of 218
Running Image for Windows from the Command Line
You can run Image for Windows (IMAGEW.EXE) from the command line. Be sure to
separate the command line options with spaces or colons (:). When run under
Windows Vista or Windows 7, Image for Windows will trigger a UAC prompt if UAC
is enabled.
When running Image for Windows from the command line, you might need to
include references to hard drive numbers and/or partition IDs. To determine the
correct hard drive number or partition ID, complete Steps 1 through 4 in the section
“Creating a Full Backup,” making sure that you select the hard drive whose number
and/or partition IDs you need to obtain. The hard drive number will then appear in
the format “HD n” (e.g. “HD 0” or “HD 1”). The partition ID appears in parenthesis at
the end of each partition description and consists of either two or four characters. In
the figure, the first hard drive, HD 0, has two partitions, and their numbers, 01 and
02, appear in parentheses at the end of each partition’s description.
Note: Under certain configurations, hard drive numbers may be different under DOS
than they are under Windows or other environments.
The basic format for running Image for Windows from the command line is:
imagew [action] [options]
Valid values for [action] are:
Image for Windows User Manual
Page 120 of 218
B
Backup
R
Restore
Copy
Copy
V
Validate
L
List partitions, optical drives, or file contents
Combine
Combine incrementals with the base image
REBOOT
Reboot system
When you specify command line options, you precede each option by typing the /
(slash) character.
For example, you might type the following at the command prompt to create a
backup using Image for Windows. The command specifies the source drive and
partition, the target drive and partition, and the backup filename.
imagew /b /d:0@0x01 /f:1@0x01:\mypath\filename
The first parameter, /b, identifies that you want to perform a backup.
The second parameter, /d:0, identifies the drive to back up. This example backs
up Hard Drive 0.
The next part of that parameter, @0x01, identifies the partition to back up on the
selected hard drive; this example backs up the first partition. If you want to back up
the entire drive, simply omit the part of the parameter that identifies the partition.
The third parameter, /f, identifies that you are about to specify where to store the
backup file. 1 identifies the target drive and @0x01 again identifies the partition; in
this example, Image for Windows will store the backup file on Hard Drive 1 in the
partition with ID 0x01. The information after @0x01 represents the path and file
name where you want to store the backup file. In this example, Image for Windows
stores the backup file in \mypath\filename.
To list partitions on a hard drive, you would type:
imagew /l /d:0 > filename.txt
In this example, /d:0 identifies hard drive 0 as the drive for which you want to list
partitions and > filename.txt indicates the file where Image for Windows will write
the list of partitions.
In Table 1, you find the global parameters you can set for Image for Windows
regardless of the action you set (backup, restore, validate, or copy).
Image for Windows User Manual
Page 121 of 218
Important Note: It’s highly recommended that all global options to be set be done
before those specific to the operation. This is because certain command line
options use whatever global option is set at the time the parameter is handled. For
example, if using the /geoa2k option when restoring, specify it before the /r
parameter: imagew /geoa2k /r …
The table shows you both the command line option and the INI file variable. In
some instances, both forms of the parameter are available; in other cases, only one
is available. When one form of an option isn’t available, N/A appears. To set up an
INI file, place these parameters in the [Options] section except as otherwise noted.
Table 1: Image for Windows Global Parameters
Command Line Option
INI Variable
/uvl:0
VolumeLabels=0
Instructs Image for Windows to display the string found in the partition table of the
EMBR, if possible, rather than volume labels.
Default if omitted: Image for Windows will display volume labels, even if identifiers for
applicable partitions exist in the EMBR.
/seq
SeqVolID=1
Instructs Image for Windows to assign ID numbers to volumes in sequential order rather
than random order.
Default if omitted: Image for Windows will assign ID numbers to the volumes in random
order.
/cb:n
CheckBoxes=n
Determines if check boxes are used for partition selection.
0 = No, only a drive or single partition can be selected.
1 = Use individual checkboxes. Each partition has its own selection.
2 = Use linked checkboxes. Each partition has its own selection, but they are linked and
selection of an extended partition only selects the individual volumes.
Default if omitted: Image for Windows uses linked checkboxes.
/acc
Accessible=1
Changes the checklist boxes to be compatible with screen readers.
0 = Normal check boxes
1 = Screen reader accessible check boxes
Default if omitted: Image for Windows uses normal check boxes.
/shownet:n
ShowNetwork=n
Determines if the Entire Network option is available in the file location tree dialog box.
You'd use this option to disable the Entire Network option if searching the network for
Image for Windows User Manual
Page 122 of 218
servers and shares takes too much time.
0 = No.
1 = Yes.
Default if omitted: Image for Windows displays the Entire Network option.
/cdbins:n
CDBIns=n
Determines which CD Boot Instruction file to use. 0=Image for DOS (cdboot.ifd),
1=Image for Linux (cdboot.ifl), 2=Custom (CDBOOT.INS).
Default if omitted: Image for DOS option is used.
/nocan
NoCancel=1
Tells Image for Windows not to permit use of the F12 key to cancel the backup, restore,
validate, or copy operation once it has begun.
Default if omitted: You can use the F12 key to cancel the current operation.
/w7mbr:0
Win7MBR=0
Windows Vista and later tied the kernel loader to the MBR code such that using previous
MBR code may not allow Windows Vista or later to boot on certain machines. By
default, Image for Windows uses the code base compatible with Windows Vista or later.
The new MBR code will continue to boot older OSes with the exception of some (rare)
configurations using Win9x on FAT32.
Specify this option to have Image for Windows use Windows 9x compatible MBR code.
Note that the .ini file value is not used on command-line based operations.
Default if omitted: MBR code compatible with Vista/Windows 7 or later is used.
/vn:filename,cr,type,sizeinmb
Vn=filename,cr,type,sizeinmb
Makes a virtual drive available for use by Image for Windows. n is a number between 0
and 9 you use to represent any of 10 virtual drives. If you reuse a number, Image for
Windows will replace the prior definition for that virtual drive.
You must define the virtual device before using it with other command line parameters
using one of two formats:
a) Just include the filename of an existing virtual drive.
Example: /v0:"D:\VHD Files\myvirtualdisk.vhd"
b) Provide additional parameters after the filename using commas as shown in the
sample above and the following example:
/v2:myvirtualdisk.vmdk,r,vmdks,2048
For the cr parameter, use the letter C or the letter R:
C
Tells Image for Windows to create a new virtual drive if one doesn’t exist.
R
Tells Image for Windows to recreate the virtual drive even if one already
exists. Note that Image for Windows gives no warning before recreating a
virtual drive.
Image for Windows User Manual
Page 123 of 218
For the type parameter, the following values are supported:
raw
A plain raw file that is allocated as the virtual drive
vhdd
VirtualPC Dynamic Expanding file
vhdf
VirtualPC Fixed file
vhdxd
Hyper-V Virtual Hard Disk Dynamic Expanding file*
vhdxf
Hyper-V Virtual Hard Disk Fixed file*
vhdxd4
Hyper-V Virtual Hard Disk Dynamic Expanding file with a
sector size of 4KiB (4096 bytes)*
vhdxf4
Hyper-V Virtual Hard Disk Fixed file with a sector size of
4KiB (4096 bytes)*
vmdk
VMWare Monolithic Sparse IDE file
vmdks
VMWare Monolithic Sparse SCSI file
*For Windows caching reasons, it is highly recommended to create partitions within a
VHDX file that are aligned on at least a 1MiB boundary. That is either 2048 sectors for
512 byte sized sectors or 256 sectors for 4096 byte sized sectors.
You can use a special form of the command line parameter (/v0:) to remove all
references to any defined virtual drives. This special format is useful when you want to
override any Vn= references that may exist in an .INI file.
Default if omitted: No virtual drives are defined.
/kfb
KeepFailedBackups=1
Prevents Image for Windows from deleting the backup created when the backup
operation fails.
Default if omitted: The backup created is deleted if the backup failed.
/recover
Attempts to access image files that are reported as incomplete and suppresses the data
loss message/clearing of boot sector data on a failed validation during restore. If you
obtain an image stream corrupt message using this option the restored file system
should not be trusted. You should attempt to obtain the files you need (which may not
be valid) then reformat the partition or restore a good image.
Default if omitted: An incomplete image is reported when opened and boot sector data is
not updated or cleared on a restore that fails.
/logfile:”x:\path to\logfile.txt”
LogFile=”x:\path to\logfile.txt”
Use this parameter to specify the path and filename of the log file. x is a drive letter, path
is the desired path, logfile (or log file) is the name of the log file, and txt is the file
extension of the log file name. Image for Windows doesn’t automatically add a file
extension. If you use paths and/or filenames with imbedded spaces, enclose them in
quotation marks.
The folder you specify for the log file must exist prior to performing an applicable
operation in Image for Windows. If the path does not exist, Image for Windows will not
Image for Windows User Manual
Page 124 of 218
create the specified log file.
Default if omitted: If logging has not been disabled with /log:0, a log named IFW.LOG is
created in the current directory of the operating environment.
/logmax:n
LogMaxSize=n
Ensures the log file doesn't grow beyond the size n given. Once n is reached the data
from the top of the file is purged. Because of this, you typically don't want a large n
value. n can be bytes, KiB, or MiB. Decimal values (e.g. 2.5MiB) are supported.
For example: /logmax:32768 or /logmax:32KiB
Note: If you specify a size smaller than the current log file size, the new size will not take
effect until the log is written to or Image for Windows is closed.
Default if omitted: There is a 1MiB size limit on the log file.
/logl:n
LogLevel=n
Causes less or more information to be output to the log file. Use level 1 for errors only, 2
for warnings, 3 for status, 4 for information, 9 for debugging, 10 for debugging with flush.
For example, use /logl:3 to specify status level logging.
If using 10 or higher, the /email option will be ignored (emails will not be sent) unless
logging is disabled for the operation.
Default if omitted: Informational level logging is performed.
/ctf
CreateTagFiles=1
Use this option to cause a file named #TBTAG# in the root of any copied or restored
partition with information about what program was used and when it was restored or
copied. Note that if this option was enabled during a restore or copy then later backed
up and restored with tagging disabled, the old tag file remains on the partition. In other
words, with this option off, it doesn't delete tag files on restored or copied partitions.
Default if omitted: No tag file is created.
/of:8
OFlags=8
Setting this bit oriented option to 8 will cause single partition and multiple partition
backups created to have the "restore first track" and "write standard mbr code" options
restricted upon restoring with version 2.62 or later. This is not an option for normal use.
Default if omitted: No restrictions are set.
/evlogl:n
EventLogLevel=n
This option affects how Image for Windows writes to the Windows event log during
backup, restore, validation, and copy operations. Use one of the following values in
place of n:
0 – Disable all event logging
1 – Log errors only
2 – Log errors and warnings
Image for Windows User Manual
Page 125 of 218
3 – Log errors, warnings, and start/stop status
4 – Log errors, warnings, start/stop status, and information
The Windows Event Viewer can be used to access the Image for Windows event log
entries (located in Windows Logs | Application). The following events and categories are
logged:
Event ID: 257 (Information), 258 (Warning), 259 (Error)
Task Category: None (0), Backup (1), Restore (2), Validate (3), Licensing (4), Copy (5)
Default if omitted: Image for Windows will log errors, warnings, and start/stop status to
the event log (equivalent to /evlogl:3).
/relax:n
RelaxedMatching=n
Use this option when performing a differential or incremental backup to instruct Image
for Windows to relax some of the criteria it uses to determine the drive you used as the
source during the corresponding full backup. This option has no effect during full backup
operations. Use one of the following values in place of n:
1 – Enable relaxed criteria. Disk signature must match.
2 – Enable relaxed criteria and also ignore the disk signature.
Note: Specifying /relax is equivalent to /relax:1
Default if omitted: Image for Windows does not relax the criteria it uses to detect the full
backup source drive.
/quit
N/A
Use this option to cancel any operation before it occurs. Anything prior to the operation
beginning still occurs. This is useful for processing a global command line option without
bringing up the user interface. Image for Windows will return 1 if no error. Otherwise, an
error code for the failure will be returned (e.g. /quit is used with /login and the log-in
fails).
Default if omitted: The operation is not canceled.
/savename:varname
N/A
This option is used to save the main file name used on a successful backup, restore or
validate operation to the registry. You can then use the varname given on this option as
a file path variable on the same computer. See "Image for Windows File Path Variables"
section for an example.
Default if omitted: No filename is saved to the registry.
/email:smtphost*from*to*subject*p*u*pw
Email=smtphost*from*to*subject*p*u*pw
Use this option to have Image for Windows email the results of an operation. This
causes the email to be sent even if /log:0 is used. However, if an operation never
starts (including a /login failure) an email is not sent. The p, u, and pw values are
optional and relate to the port, user, and password that should be used. Port 25 is the
default SMTP port.
If the subject is omitted, Image for Windows determines the text for the subject. The
Image for Windows User Manual
Page 126 of 218
subject can be customized for success, failure, or both by inserting the ][ characters
(brackets) into the subject. The text before ][ is the success text; the text after is for a
failure. Additionally, you can include the place holder ~ec~, which is replaced by the
error code (otherwise, Image for Windows appends the completion code text to the
subject).
You can also specify a stored password (configure in Settings or with the /login: option)
by using the following format (where name is the stored password name for the login):
{#name#}
If SSL is required, please see the KB article Sending Emails from Image for Windows to
Servers that Require SSL for details.
Examples (each example should be on one line):
Using default subject text:
/email:"smtp.mydomain.com*[email protected]*[email protected]*][*25*
[email protected]*password"
Using custom failure subject text:
/email:"smtp.mydomain.com*[email protected]*[email protected]*][IFW
Backup Failed (Error ~ec~)*25*[email protected]*password"
Using custom success/failure subject text, default port, and a stored password:
/email:"smtp.mydomain.com*[email protected]*[email protected]*IFW Backup
Completed][IFW Backup Failed (Error ~ec~)**[email protected]*
{#loginname#}"
Using the default/custom subject text (as used by version 2.71 and earlier):
/email:"smtp.mydomain.com*[email protected]*[email protected]**25*
[email protected]*password"
/email:"smtp.mydomain.com*[email protected]*[email protected]*IFW
Operation Result ~ec~*25*[email protected]*password"
Note: Emails will not be sent if using Log Level 10 (/logl:10) or higher unless logging
is disabled.
Default if omitted: No email is sent.
/po:n
PerfOpt=n
This option is used to manually control various file caching options of Image for Windows
and Windows itself. The settings can have an impact on the overall performance and
can be used to fix some driver-based problems as well. The values for n can be as
follows and combined using addition:
0
Disable default cache settings used by Image for Windows
1
Disable Windows cache on writes
2
Disable Windows cache on reads
16
Disable Write Cache on Removable Drives (only applies if 257 not used)
32
Use smallest alignment (applies to 2.59 or later)
257
Use Windows Cache on Writes
Image for Windows User Manual
Page 127 of 218
514
Use Windows Cache on Reads
1028
Use Small Write cache on Backup
2056
Use Small Write cache on Restore
For example, users saving to an iPod may get an error "Unable to write data to file".
This can be fixed by using the /po:0 option (disabling the default option 16). Network
users may find some combination of values work better than what Image for Windows
determines to use itself.
Default if omitted: Image for Windows Disables Write Cache on Removable Drives (16)
and uses the other values as it sees fit.
/min
N/A
Use this option to have Image for Windows minimize itself.
Default if omitted: Image for Windows does not automatically minimize itself.
/hide
N/A
Use this option to have Image for Windows hide the user interface. Note: This option
applies only to the GUI version of Image for Windows.
Default if omitted: Image for Windows will display the GUI.
/priority:n
Priority=n
Use this option to have Image for Windows adjust its CPU priority when an operation
begins. The available options for n are: 0=Low, 1=Below Normal, 2=Normal, 3=Above
Normal, 4=High.
In addition, you can enable background mode by adding 8 to the previous values, for
example, 10=Normal CPU run in background mode. However, running in background
mode is VERY slow. For example, something that normally takes 30 seconds may take
10 minutes when Image for Windows is running in background mode. If background
mode is enabled you will not be able to change the priority during an Image for Windows
operation.
Default if omitted: Image for Windows does not change the priority.
/dpc
DisablePriorityChanges=1
Use this option to lock the CPU priority of Image for Windows so it can’t be adjusted
while the operation is in progress.
Default if omitted: Image for Windows allows priority changes.
/iop:n
IOPriority=n
Use this option to have Image for Windows adjust the priority of the image file itself. The
available options for n are: 0=Very Low (idle), 1=Low, 2=Normal.
Lowering the priority may allow the system to respond more quickly when running
operations on a live system. However, it may also cause the Image for Windows
Image for Windows User Manual
Page 128 of 218
operation to slow down substantially.
Default if omitted: Image for Windows uses Normal priority for the image file.
/dpwr
DisablePowerChanges=1
Use this option to lock the power options of Image for Windows so they can’t be adjusted
while the operation is in progress.
Default if omitted: Image for Windows allows power option changes.
/login:\\server\share*user*password
LogIn=\\server\share*user*password
Use this option to have Image for Windows attempt to automatically login to a share on a
server. This would typically be needed when Windows cannot automatically login to the
share for the user profile running Image for Windows.
Image for Windows also allows you to store an encrypted password to the registry so a
clear-text password is not needed. When doing this it's important to use the same
platform and user profile that will attempt to login when running Image for Windows
because it can only be decrypted by the user that created it (e.g. a password stored
using the x64 version of Image for Windows won’t be available to the x86 version). You
can also create and manage stored passwords using the Password tab in Settings.
Examples:
Store an encrypted password to the registry: /login:*ntdomain\user*password
Delete a stored encrypted password: /login:*ntdomain\user
Login using encrypted password: /login:\\server\share*ntdomain\user
Login using text password: /login:\\server\share*ntdomain\user*password
Tip: When storing a password you may want to use /log:0 to ensure it's not logged to
ifw.log and /quit if you don't need the user interface.
Default if omitted: Image for Windows does not attempt to manually login to a share.
/plur
PHYLockUseReg=1
Use this option to obtain PHYLock settings from the registry instead of using those
stored in the ifw.ini file and/or set using environment variables. This option is
enabled by default.
Note: PHYLock settings in the registry are stored separately for the 32-bit and 64-bit
versions of Image for Windows. For example, to change a PHYLock setting in both
versions you will need to run each version and make the setting change.
Default if omitted: PHYLock uses INI and/or environment variables.
/ignsvc
IgnoreServices=1
Use this option to tell Image for Windows to ignore the services.ins configuration
file.
Default if omitted: Image for Windows uses the services.ins file if it exists.
/usbign:n
Image for Windows User Manual
USBIgnoreMask=n
Page 129 of 218
Use this option to hide certain USB host controllers. For example, if you have a USB
keyboard, Image for Windows might disable the keyboard when it takes control of the
USB2 host controller. Using this option, you can hide the host controller of that USB
keyboard and attach the USB keyboard to a different controller. It usually takes some
experimentation to determine which controller to hide, but the two USB ports next to
each other are usually controlled by the same host controller. To hide the first USB
controller, use /usbign:1, and to hide the second USB controller, use /usbign:2. To hide
the third USB controller, use /usbign:4. To hide both the first and second USB
controllers, use /usbign:3.
Note: Use a basic Bit Mask numbering scheme.
Default if omitted: Image for Windows takes control of all detected USB2 host
controllers.
/cbs:0
ClearBootStatus=0
Use this option to prevent Image for Windows from forcing Windows to assume a clean
shutdown on Windows 2008 R2/Vista/7. This applies to copy and restore only.
Default if omitted: Windows 2008 R2/Vista/7 boot status is cleared.
/phc:n
PageHiberClear=n
This option is used to control how the default page file (pagefile.sys), swap file
(swapfile.sys), and hibernation file (hiberfil.sys) are treated after being restored
or copied when they have been omitted from the backup/copy. The values are bit based
and can be one of the following values or a combination of the following values added
together:
1 – Clear first 4096 bytes of the page file.
2 – Truncate page file to zero.
4 – Clear 8192 bytes of hibernation file.
8 – Truncate hibernation file to zero.
16 – Clear the first 4096 bytes of the swap file.
32 – Truncate swapfile.sys to zero.
For example, to truncate the page file and clear the first 8192 bytes of the
hibernation file, use 6.
Default if omitted: The first 4096 bytes of the page file and swap file are cleared and the
first 8192 bytes of the hibernation file is cleared.
/fnts:0
ForceNTSig=0
When Image for Windows notifies Windows of changed partitions (see /noosn option)
during copy or restore operations, Windows may alter the disk signature if a disk with
that signature already exists. This can cause problems that will prevent the target disk
from booting Windows properly. To prevent this, Image for Windows forces the disk
signature to the restored/copied value even if another disk with the same signature
exists. However, if you disconnect and reconnect the disk or add/delete partitions on the
disk, Windows will once again alter the disk signature to prevent duplicates.
Setting this option to zero will prevent Image for Windows from ensuring the
restored/copied disk signature is retained.
Image for Windows User Manual
Page 130 of 218
Default if omitted: Image for Windows will ensure the disk signature is set to the
restored/copied value even when there are duplicates.
/msg:”my message”
Message=”my message”
This option applies only to the console version of Image for Windows (IMAGEWC.EXE),
and not to the standard version (IMAGEW.EXE).
Use this option to specify the text Image for Windows displays while backing up,
restoring, validating, or copying. If your message text contains spaces, place the
message text in quotation marks:
/msg:"my message"
Use /n to force a new line; otherwise, text wraps to screen width only:
/msg:"first line\nsecond line"
Default if omitted: No message text is displayed.
/uggs:0
UseGlobalGeoSettings=0
Place under the [HDx] section
Use this parameter to disable the use of the global geometry settings for this individual
drive. This applies to interactive use of global geometry settings.
Default if omitted: Global geometry settings apply to the drive.
/npt
NoPartTable=0x10000
Place under the [HDx] section
Use this parameter to tell Image for Windows to treat the selected drive as a drive that
doesn’t use a partition table. If you use this option on the command line, you must place
it before the /d option. It stays in effect until you disable it using /npt:0. You may want to
disable this option if you use additional options to select a device/partition such as the
/f:0@0x1:\filename option. Note that the .ini file value is not used on command-line
based operations.
Default if omitted: Image for Windows treats the selected drive as a drive that uses a
partition table.
/anpt
AssumeNoPartTable=0x40000
Place under the [HDx] section
Use this parameter to tell Image for Windows to treat the selected drive as a drive that
doesn’t use a partition table only if the first sector on the drive is all zeros. If you use this
option on the command line, you must place it before the device is specified. Note that
the .ini file value is not used on command-line based operations.
Default if omitted: Image for Windows treats the selected drive as a drive that uses a
partition table.
/nptrm
NPTOptRemMedOnly=0x80000
Goes under the [HDx] section
Use this parameter to tell Image for Windows to apply the npt or anpt options on
Image for Windows User Manual
Page 131 of 218
removable media only. If you use this option on the command line, you must place it
before the device is specified. Note that the .ini file value is not used on command-line
based operations.
Default if omitted: Image for Windows applies the npt or anpt option to all drives..
/geodis
GlobalGeoDisable=1
Use this to disable the global geometry settings and revert to using program defaults or
drive specific overrides equivalent to versions prior to 2.52. This option only applies to
interactive sessions; it does not apply to command line restores.
Default if omitted: Global geometry options are not disabled.
/geoah
GlobalGeoAlignHS=1
When this option is enabled Image for Windows will prevent problems with unaligned
partitions being restored to systems with BIOS Auto Mode enabled. Many newer
systems use auto mode by default, and some even don't have an option to turn it off.
This is equivalent to enabling the individual overrides Align MBR Ending HS and Align
MBR HS when Truncated. This option only applies to interactive sessions; it does not
apply to command line restores. To disable use /geoah:0
Default if omitted: This option is enabled.
/geoa2k
GlobalGeoAlign2K=1
This option provides a convenient way to enable 1MiB partition alignment for all drives
(drives with 512 byte sectors will be aligned on 2048 sectors; drives with 4096 byte
sectors will be aligned on 256 sectors). This is popular with users of SSD type drives. It
is the equivalent to enabling the individual overrides Align on 1MiB Boundaries, Align
MBR Ending HS, Align MBR HS when Truncated, and disabling Align on End. This
option only applies to interactive sessions; it does not apply to command line restores.
Default if omitted: This option is disabled.
/geombr
GlobalGeoMBRGeo=1
This option is used to prevent problems where users restore an image from another
system to a drive that will be put back in the other system. For example, the hard drive
from PC-A is backed up; PC-B is used to restore to a new hard; that new drive is placed
back in PC-A. Without this option enabled, Image for Windows would setup the partition
to properly boot on the hard drive for PC-B which can sometimes (not always) be a
problem when the hard drive is going back to PC-A. This option solves that and is
equivalent to the individual Use MBR Geometry override. This option only applies to
interactive sessions; it does not apply to command line restores.
Default if omitted: This option is Disabled.
/geombrv
GlobalGeoMBRGeoValidate=1
This option is used to ensure that the geometry from the MBR on the original system is
aligned to known standards before accepting it for use. It only applies when /gemombr
(GlobalGeoMBRGeo) is enabled. This option only applies to interactive sessions; it
Image for Windows User Manual
Page 132 of 218
does not apply to command line restores. To disable use /geombrv:0
Default if omitted: This option is enabled.
/geoorg
GlobalGeoOrgGeo=1
This option is the global equivalent to the individual Use Original Geometry override.
This option only applies to interactive sessions; it does not apply to command line
restores.
Default if omitted: This option is disabled.
/nos:size
NoScale=size
This option offers a way to prevent scaling of small partitions when scaling to a larger
drive. Partitions that are size (in bytes) or smaller will not be scaled. For example:
200m would not scale partitions that are 200MiB or smaller. Note that the .ini file value
is not used on command-line based operations.
Default if omitted: All partitions are scaled when scaling is used.
/ue
N/A
This option instructs Image for Windows to pull both global and operation options from
the IFW environment variable. You must specify this option before the operation
parameter on the command line. For example, if creating a backup: imagew /ue /b …
Default if omitted: Image for Windows will only pull global options from the IFW
environment variable.
/u
N/A
Use this option to cause Image for Windows to not display the completion message on
success of the operation. A message will still be displayed if success with bad sectors or
an error occurred. This allows the rest of the user interactive prompts to continue to work
normally whereas with /uy or /un they would be auto-answered.
Default if omitted: The completion message will be displayed on success.
/un
N/A
Use this parameter to perform an unattended backup and tell Image for Windows to
assume the answer to all Yes/No prompts is No, the answer to all OK/Cancel messages
is Cancel, and the answer to all Abort/Retry/Ignore prompts is Abort. Image for Windows
then terminates the backup process when the first Yes/No prompt appears.
This option should be placed just after the action parameter (/b /r /v) to ensure this
parameter is in effect for prompts that may occur in other command line options.
If desired, you may override the effect of un for Abort/Retry/Ignore prompts by also
supplying the ui parameter. See the description of the ui parameter below for more
information.
This option is disabled when additional media is needed (file not found) and /um is not
specified.
Image for Windows User Manual
Page 133 of 218
Default if omitted: Image for Windows does not run an unattended backup.
/uy
N/A
Use this parameter to perform an unattended backup and tell Image for Windows to
assume the answer to all Yes/No prompts is Yes, the answer to all OK/Cancel
messages is OK, and the answer to all Abort/Retry/Ignore prompts is Ignore.
This option should be placed just after the action parameter (/b /r /v) to ensure this
parameter is in effect for prompts that may occur in other command line options.
This option is disabled when additional media is needed (file not found) and /um is not
specified.
Default if omitted: Image for Windows does not run an unattended backup.
/ui
N/A
Use this parameter when performing an unattended backup to tell Image for Windows to
assume the answer to all Abort/Retry/Ignore prompts is Ignore. You can use this
parameter alone or in conjunction with un. (Using ui with uy is unnecessary, since uy
alone causes Ignore to be selected.)
Default if omitted: Image for Windows assumes the answer to all Abort/Retry/Ignore
prompts is either Abort or Ignore, depending on whether you set un or uy (respectively).
If un, uy, and ui are all omitted, Image for Windows displays the Abort/Retry/Ignore
prompt.
/um
N/A
During an unattended backup using CD/DVD discs, use this parameter to tell Image for
Windows to ignore the first request for media. This option helps you start the backup if
you have already inserted a disc and a prompt appears asking for the disc. This option
works only for the first prompt—you need to respond to other prompts for media unless
you specify /uy or /un. If you combine /uy or /un with this option, then any additional disc
requests will cause the program to end with an error instead of prompting for the media.
For media other than CD/DVD discs or during a restore/validation, using this option
allows the program to end with an error instead of prompting for the media.
Place this option just after the action parameter (/b /r /v) to ensure this parameter is in
effect for prompts that may occur in other command line options.
Default if omitted: Media change requests will disable the /uy or /un options and you will
need to respond to the request.
/up
N/A
Use this parameter when performing an unattended backup to tell Image for Windows to
not prompt for a password if one is needed and not provided or is provided and is
incorrect. Instead, the program will just exit with an error code.
Default if omitted: Image for Windows will prompt for a password if one is needed.
/asr:0
Image for Windows User Manual
AutoScaleRestrict=0
Page 134 of 218
Use this option to prevent small partitions from being automatically scaled when
restoring or copying a full drive. All partitions will be scaled normally (per scaling option
selected) to fit the destination drive unless a minimum size is specified using the /nos
option.
Default if omitted: Partitions with a size of 15GiB or 1/8 the drive size (whichever is less)
or smaller will not be scaled when restoring a full drive image or copying a full drive. This
provides an automatic method to avoid scaling system reserved, recovery, and utility
partitions to larger sizes when upgrading to a larger drive.
/aubp:0
AutoUpdateBootPart=0
Use this option to prevent Image for Windows from automatically updating the boot
partition when a full drive image is restored or a drive is copied.
Default if omitted: The boot partition (including an EFI system partition) will automatically
be updated when a full drive image is restored or a drive is copied.
/sar:0
SearchOnAutoRestore=0
When performing an automatic restore, limits Image for Windows to using the drive
number of the backed up drive to determine the destination drive.
Default if omitted: Image for Windows will search for the destination drive when
performing an automatic restore (virtual drives will not be searched). The search
includes checking the disk signature or GUID, drive size, and empty drives. If a match
isn’t found the drive number of the backed up drive will be used.
/odid
OutputDiskID=1
Use this option to enable command line output and relevant log entries to use the Disk
ID (NT Signature or GUID) instead of drive numbers where the drive has an ID and the
ID is unique. Specifying the Disk ID instead of the drive number may be more stable
(especially for setup of scheduling backups) since Windows may reorder drives at boot.
Examples:
imagew /b /d:#0xFD2C4742@0x1 /f:"E:\mybackup"
imagew /b /d:{88AA61DC-7D91-4369-97FF-770EAE169F25}@0x4 …
Default if omitted: Drive numbers will be used in command line output.
/ca
CompletionAlarm=1
Use this option to enable an audible alarm upon completion of an operation, errors, or
when user interaction is required (insert media, etc.).
Default if omitted: The alarm will not be used.
/cr:0
CacheResize=0
Use this option to disable using a cache to reduce the time required to resize a partition.
Default if omitted: Image for Windows will use a cache to speed up resizing a partition.
/pruo:0
PHYLockRAMUnusedOp=0
Specify to allow VSS or PHYLock Disk Mode to remain enabled when backing up
Image for Windows User Manual
Page 135 of 218
unused sectors.
Default if omitted: Image for Windows disables VSS and PHYLock Disk Mode (forcing
PHYLock RAM Mode) when a Backup Unused Sectors or Copy Unused Sectors
operation is being performed. This option does not enable PHYLock if PHYLock is
disabled. Forcing RAM mode prevents a cache file from being created on the source
partition(s), which may be desirable when backing up or copying unused sectors.
/dwdl:0
DisableWinDL=0
Note: This option applies only when Image for Windows is used outside of Windows
(e.g. in TBWinRE or TBWinPE).
Use this option to disable searching for Windows drive letters when using the Simple
Operations mode of Image for Windows. Drive letters will not be displayed when
selecting a drive.
Default if omitted: Image for Windows will search for the drive letter mapping of the first
Windows installation found.
/eoo:0
EjectOpticalOnly=0
Use this option to allow Image for Windows to eject both optical and other removable
media (e.g. USB flash drives, ZIP drives, etc.) as required. Note that ejecting USB flash
drives may make them unavailable to Windows until disconnected and reconnected.
This option applies only when the /noej (NoEject=1) option is not used.
Default if omitted: Image for Windows will eject only optical media as required.
/bold:0
Bold=0
Disables using bold fonts on certain radio buttons, tree views, and list views.
Default if omitted: Bold fonts will be used except under TBWinRE/PE where bold fonts
will not be used.
/uwfs:0
UseWindowsFS=0
Disables allowing Image for Windows to back up or copy used areas of certain File
Systems supported by Windows but not directly by Image for Windows.
Default if omitted: Allows Image for Windows to back up or copy used areas of certain
File Systems supported by Windows but not directly by Image for Windows. While it's
able to access only used areas for a smaller and faster backup or copy, it does not allow
resizing or file exclusions of those volumes. As of this writing, ReFS is the only file
system supported by this option.
/simple
Simple=1
Use this option to enable the Simple Operations mode. Image for Windows will
automatically handle most options for you. For example, to back up a drive you simply
choose which physical drive you want to back up and, if needed, which drive you want to
save to.
Backups are saved to a store on the destination drive (e.g. E:\TeraByte_TBI_Backups).
The storage area is maintained automatically with backups being deleted as needed
Image for Windows User Manual
Page 136 of 218
when space runs out.
Only Backup, Restore, and Validate operations are available in this mode. When using
the command line only backing up is supported.
To use Simple Operations mode when backing up from the command line, use the /d
parameter to specify the drive to back up and, optionally, use the /f parameter to specify
the storage drive path (must be root path). Do not specify a base image or any
filenames. To specify the maximum number of incremental backups you want in each
chain use the /mi parameter.
Once a backup of a drive has been saved to a store it’s normally not necessary to
specify the store when later backups are run since the existing store will be located
automatically.
Note: Specifying unsupported parameters or values will cause Image for Windows to
ignore the Simple Operations mode request (Normal mode will be used).
Examples:
imagew /b /simple /d:w0 /f:E:\
imagew /b /simple /mi:3 /d:w1 /f:G:\
imagew64 /b /simple /d:1 /f:w3@0x2:\
imagew64 /b /vb /simple /d:0 /mi:10 /f:\\Server\share\
Default if omitted: Image for Windows will function in Normal mode.
/mi:n
MaxIncrementals=n
Use this option to specify the maximum number of incremental backups in each chain
when using Simple Operations mode (/simple). When the specified number is reached a
new chain will be started.
Default if omitted: Image for Windows limits each chain to six incremental backups.
/ds
DisableSettings=1
Use this option to disable access to global settings within the program. The Settings
button will be removed or the Settings key will be disabled (depending on the interface
used).
Default if omitted: Image for Windows will allow normal access to global settings within
the program.
/bcl:n
BackwardsCompatibleLevel=n
Use this option to specify the TBI file version to use when creating a backup using the
/bc (BackwardsCompatible) option. Valid values are 0 (version 2.50) and 278 – 285
(versions 2.78 through 2.85). Any value lower than 278 is considered 0.
Default if omitted: When /bc (BackwardsCompatible) is used, Image for Windows will
create the backup using the 2.50 TBI file version.
/iocf:n
IOCacheFlags=n
Use this option to configure when to use small cache I/O for sector I/O and accessing
Image for Windows User Manual
Page 137 of 218
the main image files. The values are bit based and can be one of the following values or,
when enabling, a combination of the following values added together:
0 – Disabled
1 – Read File
2 – Write File
4 – Read Sectors
8 – Write Sectors
16 – Copy Sectors (read/write)
For example, to enable the cache for reading and writing the main image files and
reading sectors, use the value 7 (/iocf:7).
This option can be useful in cases where Image for Windows is slower than previous
versions or there are I/O errors due to too large an I/O request (e.g. buggy hardware).
Actual speed differences may be negligible and depend on the system being used.
Users accessing RAID 0 or RAID 5 drives may see a benefit from disabling the small
cache (/iocf:0).
Default if omitted: Image for Windows will use 5 (small cache enabled for reading the
main image files and reading sectors).
/dt
DeleteTarget=1
Use this option to have Image for Windows delete the target partition before restoring or
copying to it. Depending on the partition being restored or copied to a GPT drive, this
may be necessary to allow the operation to complete successfully with byte-for-byte
validation. Otherwise, if Windows makes changes to the existing target partition while in
the locked state byte-for-byte validation will fail.
Normally an existing partition would be locked and unmounted but remain until the end
of the operation. However, on GPT drives it appears a Windows system process can
and sometimes does modify a locked volume for a brief time when the first writes to the
locked volume over $Boot begin. It does this by reading blocks of data from the area to
be written and writing them out to a VSS cache file on the locked volume then, after the
data being copied or restored has been written, overwrites $Boot. (We consider this a
Windows bug for the main reason that a locked volume is supposed to be guaranteed
exclusive access.)
Default if omitted: Image for Windows will not delete the existing target partition before
restoring or copying to it.
/csigut
ChangeSigUseTarget=1
Use this option to retain the existing signature of the target disk when restoring or
copying a drive and /csig is used. For example, this is useful when scheduling a drive
copy where /csig is used and you need to specify the target disk by its signature (drive
number not used since it could change).
Default if omitted: When /csig is used the target disk signature will not be retained.
/stdout:filename
N/A
Use this option to redirect program output that would normally be displayed in the
console to the specified file. For example:
Image for Windows User Manual
Page 138 of 218
imagew /l /d:0 /stdout:output.txt
The output from the /l operation will be saved to the file output.txt.
Default if omitted: Program output is displayed normally in the console.
/msvr:server
MServer=server
This option enables a simple network interface allowing Image for Windows to
communicate via TCP/IP with the specified server and report its current progress and
completion. The server can be the server name, an IP address, or localhost, depending
on the location. The port can be specified using the /mport option. Otherwise, the
default port 54313 will be used. All communication is plain text with each line terminated
by CR/LF. If problems are encountered, the communications will be shut down and
attempts to reconnect will be made approximately every 30 seconds. Pending
information, except R_AUTO statistics, will be sent upon reconnection.
Using this interface provides an easy method to monitor both local and remote
operations. Examples include:
•
•
•
Consultants monitoring backups for clients
Enterprise logging/monitoring of backups
Monitoring using custom interfaces
The following table lists the available commands. Commands are not case sensitive.
Each command sent must be terminated with CR/LF.
R_WHO
Reports the program and version (as shown in the title bar) as two
lines:
WHO:
Image for Windows 2.75
R_INFO
Reports the information lines displayed during the operation. The first
line is “INFO: n” (where n is the number of lines to follow). In the
example below, the fifth line is blank.
INFO: 5
Creating image ...
Processing Item: 1 of 1
Backup: Drive 0 (C:) Win7 Partition (02) 38810 MiB HPFS/NTFS
To: e:\Backups\Win7-2012-09.TBI
This information is also sent automatically as it’s updated during the
operation.
R_STATS
Reports the progress and statistics of the current operation. The first
line is “STATS: n” (where n is the number of lines to follow).
STATS: 6
6
3
1,483
44,182
0:00:00:54
23 minutes
Image for Windows User Manual
Page 139 of 218
The statistics reported (one per line) are the current item progress,
overall progress, MiB transferred, MiB remaining, time elapsed, and
time remaining.
R_AUTO n
Use this command to enable or disable statistics being automatically
sent at regular intervals. Specify the number of seconds to enable
sending or zero (or omit number) to disable.
R_AUTO 20
Statistics will be sent every 20 seconds.
R_AUTO
Automatic sending of statistics will be disabled.
A_CANCEL
Sending this command will cancel the current operation.
When the operation has finished, Image for Windows will report “COMPLETED: n”
(where n is the completion code). For example:
COMPLETED: 0
Usage examples:
imagew /b /v /d:w0 /f:"e:\MainDrive" /msvr:Office1
imagew /v /f:"g:\backups\data" /msvr:localhost /mport:45332
imagew /b /d:w0@0x1 /f:"i:\systembk" /msvr:192.168.0.154
Default if omitted: Image for Windows will not try to connect to a server.
/mport:n
MPort=n
Use this option to specify the port to use with /msvr. For example, to use port 45332:
imagew /b /d:w0@0x1 /f:"mybackup" /msvr:MyServer /mport:45332
Default if omitted: Port 54313 will be used.
/novss
N/A
Use this option to specify that Image for Windows will not attempt to use VSS even if it’s
enabled or specified on the command line. This option is mainly provided to allow Simple
Operations mode to run without using VSS (by default, Image for Windows will attempt
using VSS).
Default if omitted: Image for Windows will attempt using VSS per defaults or if set to do
so.
/alm
AutoLoadMedia=1
Use this option to allow Image for Windows to continue automatically after a removable
media change (CD/DVD, UFD, etc.). When a media change is required a prompt will be
displayed until the new media is detected, at which time the operation will continue (user
input is not required). If necessary, the operation can be canceled when the prompt is
displayed by using the Cancel button.
Default if omitted: Image for Windows will require user input to continue when it prompts
for a media change.
Image for Windows User Manual
Page 140 of 218
/nousbpwrfix
N/A
Use this option to prevent a short delay on Windows 8.0/8.1 systems when Image for
Windows is run from the command line (the delay is due to a workaround to fix a
Windows USB power bug). It is not recommended to use this option on affected systems
if using USB drives as the drives may remain powered off and be unavailable to Image
for Windows.
Default if omitted: On Windows 8.0/8.1 systems there will be a short delay when Image
for Windows runs an operation from the command line.
You also can set options to control the behavior of PHYLock; these options are
described in Table 2. In some instances, both forms of the parameter are available;
in other cases, only one is available. When one form of an option isn’t available,
N/A appears. To set up an INI file, place these parameters in the
[PHYLock_Options] section and, if necessary, disable the PHYLockUseReg option
in the [Options] section.
Table 2: PHYLock Parameters
Command Line Option
INI Variable
/pldis
PHYLockDisable=1
Use this option to disable PHYLock completely.
Default if omitted. Image for Windows uses PHYLock to lock the disk or partition.
/plifnl
PHYLockIfNoLock=1
Use this option to instruct Image for Windows to use PHYLock if Image for Windows
can’t obtain a normal lock.
Default if omitted: Image for Windows will report that it cannot perform the selected
operation because it cannot obtain a lock on the selected drive or partition.
/plrell
PHYLockReleaseLock=1
Use this option to instruct Image for Windows to attempt a normal lock and then use
PHYLock, even if the lock was obtained. If Image for Windows obtains a normal lock, the
lock is released after enabling PHYLock.
Default if omitted: Image for Windows uses a normal lock if it can obtain one; if not,
Image for Windows uses PHYLock to lock the disk or partition.
/plvolf
PHYLockVolFlush=1
Use this option to instruct Image for Windows to attempt to flush the disk cache of the
source drive before attempting to obtain a normal lock or enabling PHYLock.
Default if omitted: Image for Windows does not try to flush the disk cache.
/pldisk
PHYLockUseDisk=1
Use this option to instruct Image for Windows to attempt to use disk-based storage for
the PHYLock cache with a size specified by the /pldcs parameter.
Image for Windows User Manual
Page 141 of 218
Using a value of 0 will disable this option (e.g. /pldisk:0).
Default if omitted: This option will be enabled.
/plmem:n
PHYLockMemory=n
Use this option to control how much computer memory PHYLock will allocate for itself.
You only need to increase the allocation size if you receive the error “PHYLock failed to
cache changes” and increasing the PHYLock memory and/or disk cache (i.e. /plcs
and/or /pldcs) has not solved the problem.
Replace n with either 2, 1, or 0. Using a value of 2 instructs PHYLock to use a smaller
memory allocation, while 1 and 0 correspond to a normal and larger allocation,
respectively.
Default if omitted: PHYLock uses a normal memory allocation.
/pldcs:n
PHYLockDiskCacheSize=n
Use this option to set the size in MiB of the disk cache Image for Windows should use. n
should be a positive integer (e.g. 600, 1024, etc.) between 1 and 4095. You must also
use /pldisk for /pldcs to have any effect.
Default if omitted: Image for Windows uses 600 MiB for the disk cache size.
/plwft:n
PHYLockWaitTime=n
Use this option to set the amount of time, in milliseconds (ms), during which writes to the
source drive will prevent PHYLock from becoming enabled. Setting this parameter helps
ensure that file truncation and/or corruption does not occur. Keep this value above 1250.
Default if omitted: Image for Windows uses 4250 ms.
/plmwt:n
PHYLockMaxWaitTime=n
Use this option to set the maximum amount of time, in minutes, that PHYLock will wait
before it enables. You can use this option to prevent frequent disk writes from interfering
with the start of a backup operation. Setting a value of 0 will instruct PHYLock to wait
indefinitely.
Default if omitted: PHYLock will wait indefinitely until the wait time is satisfied or you
cancel the operation.
/plcs:n
PHYLockCacheSize=n
Use this option to set the size, in kibibytes, of the memory cache Image for Windows
should use for PHYLock. n should be a positive integer (e.g. 2048, 4096, etc.). You
should not use a value below 2048 for this setting.
Default if omitted: PHYLock uses a 8192-KiB (8 MiB) memory cache.
/pltr
PHYLockThrottleOnReads=1
Use this option to enable or disable IO throttle on reads. Due to fast compression and
the design of low level storage drivers, you may experience slow response times using
applications during backup operations. This slowness is actually caused by IO being
Image for Windows User Manual
Page 142 of 218
delayed on slower traditional spinning hard drives and not CPU utilization. IO throttling
was introduced to alleviate this condition at the cost of potentially slowing down the
backup operation. IO throttling is currently only used when PHYLock is active.
Using a value of 0 will disable this option (e.g. /pltr:0).
Default if omitted: This option will be enabled.
/pltw
PHYLockThrottleOnWrites=1
Use this option to enable or disable IO throttle on writes. Due to fast compression and
the design of low level storage drivers, you may experience slow response times using
applications during backup operations. This slowness is actually caused by IO being
delayed on slower traditional spinning hard drives and not CPU utilization. IO throttling
was introduced to alleviate this condition at the cost of potentially slowing down the
backup operation. IO throttling is currently only used when PHYLock is active.
Using a value of 0 will disable this option (e.g. /pltw:0).
Default if omitted: This option will be enabled
/pltd:n
PHYLockThrottleDelay =n
Use this option to control the amount of time the application delays after allowing
pending IO to occur. This value should be kept low otherwise the program could be
doing nothing if the IO completes before this delay expires. The only time you may want
to extend it is if you expect multiple IO requests to occur that you want the application to
wait for to prevent potential thrashing. This option is relevant only if IO throttling is
enabled (/pltr and/or /pltw). Valid values are 0 through 20.
Note: The default timer in Windows has a resolution of 10ms. This means option values
like 5ms, 12ms, etc.. really mean something more like 10ms or 20ms.
Default if omitted: PHYLock uses 0 for this setting.
/plta:n
PHYLockThrottleAbort =n
Use this option to set the maximum amount of time to wait for other IO to complete
before continuing, even if more IO is pending. This value will be adjusted to be a multiple
(rounded up) of the Delay value above. If set to zero then throttling is disabled. This
option is relevant only if IO throttling is enabled (/pltr and/or /pltw). Valid values are 0
through 500.
Note: The default timer in Windows has a resolution of 10ms. This means option values
like 5ms, 12ms, etc.. really mean something more like 10ms or 20ms.
Default if omitted: PHYLock uses 80 for this setting.
/plti:n
PHYLockThrottleInterval =n
Use this option to control how often the throttle may engage. Lower values throttle more
often for better response time of other applications, but at the cost of slowing down the
backup. Larger values throttle less often for a faster backup, but at the cost of potentially
slowing down other applications. Setting this value to zero disables IO Throttling. This
option is relevant only if IO throttling is enabled (/pltr and/or /pltw).
Note: The default timer in Windows has a resolution of 10ms. This means option values
Image for Windows User Manual
Page 143 of 218
like 5ms, 12ms, etc.. really mean something more like 10ms or 20ms.
Default if omitted: PHYLock uses 100 for this setting.
/usevss
UseVSS=1
This option will cause Image for Windows to try using Microsoft's Volume Shadow Copy
Services before using PHYLock on Windows 2003 or later. If VSS is unable to be
started then PHYLock may be used.
Note: If /novss is used no attempt will be made to use VSS even if this option is
specified.
Default if omitted: VSS is not used.
/uftnb
UseFilesToNotBackup=1
If you have configured the VSS FilesNotToBackup registry key, you can use this option
to have Image for Windows exclude those files/folders when creating a backup image or
copying a partition. This option applies only when VSS is enabled (/usevss) and used.
Exclusions will be applied in the same manner as if the /exlist option were used.
Default if omitted: When VSS is used, files/folders configured in the VSS
FilesNotToBackup registry key will not be excluded by Image for Windows in the backup
image or partition copy. Files/folders may still be excluded by VSS.
/uftns
UseFilesToNotSnapshot=1
If you have configured the VSS FilesNotToSnapshot registry key, you can use this
option to have Image for Windows exclude those files/folders when creating a backup
image or copying a partition. This option applies only when VSS is enabled (/usevss)
and used. Exclusions will be applied in the same manner as if the /exlist option were
used.
Default if omitted: When VSS is used, files/folders configured in the VSS
FilesNotToSnapshot registry key will not be excluded by Image for Windows in the
backup image or partition copy. Files/folders may still be excluded by VSS.
/vssluv
VSSLockUnsupportedVolumes=1
Enable to have Image for Windows attempt to lock a partition when its volume name is in
a format unsupported by VSS. If the lock fails and /vssiuv is used, the partition will be
ignored. Otherwise, PHYLock may be used. This option applies only when VSS is
enabled (/usevss) and used.
Note: If Image for Windows is unable to obtain a lock you can also specify the /vssfd
option to attempt a forced dismount of the volume.
Default if omitted: An attempt will not be made to lock unsupported volumes. Image for
Windows may revert to using PHYLock.
/vssiuv
VSSIgnoreUnsupportedVolumes=1
Enable to have Image for Windows ignore a partition when its volume name is in a
format unsupported by VSS. The partition will be backed up in the unlocked state. If any
changes are made to the data on the partition during the backup operation and a byte-
Image for Windows User Manual
Page 144 of 218
for-byte validation (/vb) is used the validation will fail. This option applies only when VSS
is enabled (/usevss) and used.
Note: This option can be used for Simple Operations mode procedures.
Default if omitted: Unsupported volumes will not be ignored. Image for Windows may
revert to using PHYLock.
/vssfd
VSSForceDismount=1
Use this option to have Image for Windows attempt to force dismount an unsupported
volume when attempting to lock it (/vssluv) if the lock fails. All open handles on the
volume will be invalidated, which may result in data loss. This option applies only when
VSS is enabled (/usevss) and used.
Default if omitted: Image for Windows will not attempt to force dismount unsupported
volumes.
Image for Windows Backup Options
In Table 3, you find the command line options that you must set to use Image for
Windows to make a backup image.
The table shows you both the command line option and the INI file variable. In
some instances, both forms of the parameter are available; in other cases, only one
is available. When one form of an option isn’t available, N/A appears. To set up an
INI file, place these parameters in the [Backup_Defaults] section.
Table 3: Image for Windows Required Backup Parameters
Command Line Option
INI Variable
/b
N/A
Use this option to indicate that you want to perform a backup.
Also required: Either /d option to specify a full backup or /base option (for differential or
incremental backup) and the /f option to specify target image file destination.
/d
N/A
Use when performing a full backup to identify the source hard drive and partition. For
most users, the partition ID will be a number from 1 through 4. For partition IDs of 9 or
below, you can use a single digit in place of hexadecimal notation (e.g. 1 is equivalent to
0x1, and 5 is equivalent to 0x5).
The volume ID will be a number formatted as 0xPVV, where P is the extended partition
and VV is the volume number in hexadecimal from 01 to FF.
If you are not sure what the partition or volume ID is, run Image for Windows using the
interface, choose the Backup option, and click Next. The screen that lists the partitions
and volumes also will display the ID in parentheses as a hexadecimal number. You
should prefix that number with a 0x on the command line.
/d:d@p
/d:wd@p
/d:?D:
Image for Windows User Manual
d is the source hard drive number
p is the source partition or volume ID (hex
Page 145 of 218
/d:#ntsig
/d:{GUID}
or decimal notation), depending on
whether you are referring to a partition or
a volume.
D: is the source drive letter.
# – NT Disk Signature Follows
{GUID} – GPT Disk GUID
You can use device modifiers as needed.
When you use them, you must place
them after the /d: and before the source
hard drive number:
w – Windows device.
v – Virtual drive.
? – Drive letter follows.
The /d option cannot be used with the
/base option.
/base
N/A
Use when performing a differential or incremental backup to identify the backup on
which Image for Windows should base this backup.
/base:x:\bkup
x:\ is source drive letter
/base:x:\mypath\bkup
mypath or my path is path to bkup
/base:"x:\my path\bkup"
bkup is name of existing backup (omit file
extension)
Or:
/base:d@p:\bkup
/base:d@p:\mypath\bkup
/base:"d@p:\my path\bkup"
/base:#ntsig@p:\mypath\bkup
/base:{GUID}@p:\mypath\bkup
Or:
Specify source device, partition, path, and
file name:
d is source hard drive number
p is source partition ID (hex or decimal
notation)
# – NT Disk Signature Follows
{GUID} – GPT Disk GUID
You can use device modifiers as needed.
When you use them, you must place
them after the /base: and before the
source hard drive number:
w – Windows Device
o – Optical drive
v – Virtual drive
Whether using drive letter or
device/partition, you may specify any path
Image for Windows User Manual
Page 146 of 218
desired. Paths and/or file names with
imbedded spaces require the use of
quotes.
The /base option cannot be used with the
/d option.
/f
N/A
Use this option to specify the target drive letter, path, and file name for a backup file.
/f:x:\filename
x:\ is target drive letter
/f:x:\mypath\filename
mypath or my path is path to filename
/f:”x:\my path\file name"
filename is target file name for image
Or:
Or:
/f:d@p:\filename
Specify target device, partition, path, and
file name:
/f:d@p:\mypath\filename
/f:"d@p:\my path\filename”
/f:#ntsig@p:\mypath\filename
/f:{GUID}@p:\mypath\filename
d is target hard drive number
p is target partition ID (hex or decimal
notation)
# – NT Disk Signature Follows
{GUID} – GPT Disk GUID
mypath or my path is path to filename
filename is target file name for image
Device modifiers may be used as needed.
When used, they must be placed after the
/f: and before the target hard drive
number:
w – Windows Device
o – Optical drive (when you combine this
option with the option mentioned above,
this option must come last)
v – Virtual drive
Whether using drive letter or
device/partition, you may specify any path
desired. Paths and/or file names with
imbedded spaces require the use of
quotes.
o can be use with a, u, f, and s
The above options are required when you perform a backup using Image for
Windows from the command line. In Table 4, you find a list of the optional backup
parameters you can use when you run Image for Windows from the command line.
Image for Windows User Manual
Page 147 of 218
The table shows you both the command line option and the INI file variable. In
some instances, both forms of the options are available; in other cases, only one is
available. When one form of an option isn’t available, N/A appears. To set up an INI
file, place these parameters in the [Backup_Defaults] section.
Table 4: Image for Windows Optional Backup Parameters
Command Line Option
INI Variable
/pw:mypassword or /pw:{#name#}
N/A
Use this option to set a password for Image for Windows to use in conjunction with
simple password protection or AES encryption. Your password cannot exceed 128
characters and may contain upper/lowercase letters, numbers, special characters,
spaces, and non-ASCII characters.
You can also specify a stored password (created in Settings or by the /login: option) by
using the following format (where name is the user for the login):
/pw:{#name#}
If the password or name contains spaces, surround it with quotation marks.
For example:
/pw:"my password"
or
/pw:"{#john doe#}"
You must use this option if you also specify enc:1 or enc:3, described later in this table.
This option can be specified multiple times as required by the backup image chain (base
+ differential/incrementals). The first password specified will be used for the newly
created image.
Default if omitted: Image for Windows does not assign a password, and the backup will
be neither password protected nor encrypted.
/sch:“path”
N/A
Use this parameter to specify the search paths Image for Windows uses when looking
for base images in the backup chain. path can use the d@p:\path format to specify the
drive and partition id.
This option can be used multiple times to specify multiple search paths (e.g. when the
images in the backup chain are not all stored in the same folder).
Examples (commands should be on one line):
imagew /b /v /hash /base:"E:\Backups\Win8System - Inc C"
/f:"E:\Backups\Win8System - Inc D" /sch:"E:\Backups"
/sch:"E:\Backups\Archive"
imagew /b /v /hash /base:"w1@0x2:\Images\WinXP Drive - Inc D"
/f:"w1@0x2:\Images\WinXP Drive - Inc E" /sch:"w1@0x2:\Images"
/sch:"w1@0x2:\Images\Full"
Default if omitted: Image for Windows searches only the folder of the specified image for
base images in the backup chain.
/fd
ForceDismount=1
Use this option to force dismounting a volume (partition) that can't be locked for backup
Image for Windows User Manual
Page 148 of 218
when PHYLock or VSS is not used. Using this option will invalidate all opened handles
to the volume, which may result in lost data. Image for Windows will attempt to lock the
volume after forcing the dismount.
Default if omitted: Normal locking without forcing a dismount occurs.
/rb:n
N/A
Instructs Image for Windows to reboot, shutdown, suspend, or hibernate the computer
after completing the backup operation. The value n can be 1 to reboot with all prompts, 2
to reboot with completion message, but without reboot message (error does not cancel
reboot), 4 to reboot without completion message or reboot message (error cancels
reboot), 8 to shutdown, 16 to suspend (sleep), or 32 to hibernate. If the specified option
is not supported by the system the next one will be used in the following order: suspend,
hibernate, shutdown.
Default if omitted: Image for Windows attempts to determine if the computer needs to be
rebooted after completing the backup and, if so, prompts you to reboot.
/bc
BackwardsCompatible=1
Current versions of Image for Windows may use a TBI format that is not compatible with
prior versions. Enable this option to have Image for Windows create the TBI file using a
format that is compatible with version 2.50. If desired, also use /bcl
(BackwardsCompatibleLevel) to specify a more current file version.
Default if omitted: Image for Windows uses the current TBI format.
/md
MakeDir=1
This option causes Image for Windows to always create the target path if doesn't exist.
Default if omitted: Image for Windows doesn't attempt to create the target path.
/mp
MultiPass=1
Use this parameter to tell Image for Windows to use Multi Pass mode when creating a
differential or incremental backup. In Multi Pass mode, Image for Windows compares
the source partition against the full backup in one pass and performs the backup in a
second pass. This setting is not applicable when performing a full backup. This option
must be used if the applicable full backup resides on removable media.
Default if omitted: Image for Windows uses Single Pass mode, identifying changes and
backing up in one pass.
/cdws:n
CDWriteSpeed=n
Use this setting to specify the maximum disc writing speed that Image for Windows will
use when burning a CD or DVD disc and force a lower writing speed than that
automatically used by the optical drive’s firmware. Slower writing speeds may increase
reliability.
n should be a positive integer (e.g. 2, 4, 16, etc.).
The maximum writing speed that Image for Windows actually uses is determined by
whichever is lower: The /cdws:n value you specify or the speed deemed appropriate by
Image for Windows User Manual
Page 149 of 218
the drive’s firmware, according to the CD/DVD media in use. For example, if you are
using media that is rated at 8X for burning, the maximum writing speed will be no more
than 8X, regardless of the setting you choose here. Similarly, if you supply a value that is
beyond or invalid for the drive’s design limits, the drive will automatically use the nexthighest speed supported by both the drive and the media in use.
DVD speeds are approximately 1/8 CD speeds, so if you are using DVD discs, multiply
the desired speed by 8 to determine the value to use. For example, to obtain a maximum
burning speed of 2X with a DVD, use /cdws:16, since 8 × 2X = 16.
Default if omitted: Image for Windows uses the Optimal speed setting.
/max:nMiB or /max:nGiB
MaxFileSize=nMiB or MaxFileSize=nGiB
Use this setting to specify the maximum file size of the image files that Image for
Windows creates.
n should be a positive integer (e.g. 648, 698, 877, 1003, etc.). Image for Windows can
use either mebibytes or gibibytes, so you must specify either MiB or GiB, respectively.
Do not place any spaces between the number and the unit designation. Decimal values
are supported (e.g. 2.5GiB).
The maximum file size is ultimately dictated by the file system used on the target drive.
Also, some network redirectors limit file size to 2 GiB, which can be a limiting factor for
backup files stored on a network drive.
Default if omitted: Image for Windows uses the maximum file size supported by the
target file system.
/raw
RawMode=1
Set this parameter to force Image for Windows to use raw mode, which backs up all
sectors, rather than just used sectors, even for recognized file systems.
NOTE: This option will cause Validate Byte-for-Byte to fail if VSS or PHYLock is used.
For entire drive backups this option causes a raw sector by sector backup (and later
restore) of the entire drive without regard to any partitions or adjustments.
Note: This option is not applicable when creating a differential or incremental backup.
Instead, the new backup will use the setting as specified when the base image was
created.
Default if omitted: Image for Windows backs up only used sectors backed up for
recognized file systems and uses raw mode automatically for unrecognized file systems.
/skp:0
SkipPageFile=0
Set this parameter to instruct Image for Windows to include the page files
(pagefile.sys, swapfile.sys) in the backup.
Default if omitted: Image for Windows skips page files.
/skh:0
SkipHiberFile=0
Set this parameter to instruct Image for Windows to include the hibernation file
(hiberfil.sys) in the backup.
Image for Windows User Manual
Page 150 of 218
Default if omitted: Image for Windows skips the hibernation file.
/v
PostValidate=1
Set this parameter to instruct Image for Windows to perform a standard validation of the
image file(s) as part of the backup operation.
Default if omitted: Image for Windows does not validate the backup image after creating
it.
/vb
PostValidate=2
Set this parameter to instruct Image for Windows to perform a byte-for-byte validation of
the image file(s) as part of the backup operation. This also performs a standard
validation.
Default if omitted: Image for Windows does not validate the backup image after creating
it.
/vpd
ValidateDisk=1
You can use this option when saving images to a CD or DVD drive. This option ensures
that the discs containing image files are readable and verifies that the data on the discs
appears to be the same as the data that Image for Windows used to create the discs.
Per-disc validation can detect media errors that may have occurred during the disc
writing process. If Image for Windows detects an error, Image for Windows will prompt
you to recreate the failed disc.
Default if omitted: If you do not enable this option, Image for Windows will notify you of
errors only after the backup process completes, and you will need to recreate all discs in
the backup.
/ldu
LimitDiscUsage=1
You can use this option when saving images to a CD or DVD drive. This option leaves
the last 10% of the disc unused which tends to encounter more data errors.
Default if omitted: If you do not enable this option, Image for Windows will use the entire
disc.
/comp:n
Compression=n
Specifies how Image for Windows should compress backup files as they are created.
Valid values for n are 0 through 15. The equivalent n values for the GUI compression
options are as follows:
0
1
2
7
10
11
12
13
14
– None
– Standard
– Enhanced Size - A (Enhanced - Normal prior to version 2.72)
– Enhanced Size - B (Enhanced - Slower prior to version 2.72)
– Enhanced Size - C (Enhanced - Slowest prior to version 2.72)
– Enhanced Size - D
– Enhanced Size - E
– Enhanced Size - F
– Enhanced Speed - A
Image for Windows User Manual
Page 151 of 218
15 – Enhanced Speed - B
The Enhanced Size - D/E/F options are faster than Enhanced Size - A/B/C, but provide
less compression. Backup files will normally be compressed more than the Standard
option. Enhanced Size values 2-10 offer increased compression as the value increases
at the expense of speed. Enhanced Size values 11-13 (D/E/F) offer slightly less
compression at a faster speed than their 2/7/10 (A/B/C) counterparts.
The Enhanced Speed - A/B options offer decent compression with the emphasis on
back up speed over backup file size. Backup files will normally be compressed less than
the Standard option. Value 15 offers higher compression than 14 at the expense of
speed.
Actual compression levels and speeds obtained will vary depending on the data being
backed up and the system being used.
Note: The Enhanced Size - D/E/F options and the Enhanced Speed - A/B options are
not backwards compatible and require version 2.72 or later. Attempting to open a
backup file created using a compression value higher than 10 with version 2.71 or earlier
will result in a message to use the newer version or an error message that the image is
corrupt (depending on the older version being used).
Default if omitted: Image for Windows uses standard compression.
/enc:1 or /enc:3
Encryption=1 or Encryption=3
Specifies whether simple password protection without encryption (/enc:1), or 256-bit
AES encryption (/enc:3) is to be used. If either /enc:1 or /enc:3 are specified, /pw is
also required.
Default if omitted: No encryption or password protection is used.
/noej
NoEject=1
Use this parameter to tell Image for Windows never to automatically open the optical
drive tray.
Default if omitted: Image for Windows will automatically open the optical drive tray
whenever a new disc is needed and at the completion of the backup operation.
/cdrs:n
CDReadSpeed=n
Use this setting to specify the maximum disc reading speed that Image for Windows will
use when reading a CD or DVD disc during the validation phase of a backup operation,
with n being a positive integer (e.g. 2, 4, 16, etc.). This setting may be used to force a
lower reading speed than that automatically used by the optical drive’s firmware. Slower
reading speeds may increase reliability.
n should be a positive integer (e.g. 2, 4, 16, etc.).
This setting is only applicable when you are backing up to CD/DVD media and you have
also included either the /v or /vb option.
The maximum reading speed that is actually used is determined by whichever is lower:
The /cdrs:n value that you specify, or the speed deemed appropriate by the drive’s
firmware, according to the CD/DVD media in use. For example, if you are using media
that is rated at 32X (for reading), the maximum reading speed will be no more than 32X,
Image for Windows User Manual
Page 152 of 218
regardless of the setting you choose here. Similarly, if you supply a value that is invalid
for or beyond the drive’s design limits, the drive will automatically use the next-highest
speed supported by both the drive and the media in use.
DVD speeds are approximately 1/8 CD speeds, so if you are using DVD discs, multiply
the desired speed by 8 to determine the value to use here. For example, to obtain a
maximum reading speed of 4X with a DVD, use /cdrs:32, since 8 × 4X = 32.
Default if omitted: Image for Windows uses the Optimal speed setting.
/iobs:n
IOBS=n
Include this option to try to improve I/O performance in cases where network or USB
device performance is poor. This can also help improve end-user performance of saving
data files while imaging is occurring, particularly when the backup target is a slower link.
Provide n as the letter A to automatically try to determine the best value, otherwise try a
value such as 1, 2, or 3.
Default if omitted: Image for Windows does not use this option.
/err
AllowErrors=1
Use this option to tell Image for Windows to ignore read/write errors caused by bad
sectors on the source drive during the backup operation. Image for Windows will also
ignore errors during the validation phase. This parameter does not apply to bad sectors
on the target drive.
Default if omitted: Image for Windows will notify you concerning the error and give you
the option to continue or abort.
/mf
N/A
Instructs Image for Windows to use Multiple File Set mode. Select this option to create
a backup that is comprised of one image for every individual partition that you back up.
Default if omitted: Image for Windows uses Single File Set mode and creates a single
image, regardless of the number of individual partitions you back up.
/desc:”my description”
N/A
Use this option to specify the descriptive text you want Image for Windows to associate
with the backup, up to 511 characters (note that command line length limits may not
allow a maximum length description). If your descriptive text includes spaces, surround it
with quotation marks: /desc:“my description”
Default if omitted: Image for Windows doesn’t add any descriptive text.
/purge:n
Purge=n
This option is used to delete image files that are n days old or older. You can think of it
as the number of days to retain images. It’s only used during a command line backup
and only processes the target folder of the current file specified using the /f option. Care
should be taken as the purge occurs prior to the backup. As an option you can have the
purge take place only after a successful backup by providing n as a negative number.
E.g. /purge:-15
Image for Windows User Manual
Page 153 of 218
Default if omitted: No image files are purged.
/filetpl:"filename"
FileTemplate=filename
Sets the default file name offered during interactive use of the program during backup
operations.
Default if omitted: The program uses a name that includes the device, partitions and
date.
/nt
NoTRIM=1
Reduces the amount of caching required for the source drive on systems with TRIM
enabled by disabling TRIM during the backup operation. When TRIM is enabled the
original contents of deleted sectors must be cached, whereas a normal delete doesn’t
overwrite the sectors and instead just updates the directory entry. Note: If the operation
doesn’t complete (due to reboot, shutdown, process forced to end, etc.) TRIM will stay
disabled until enabled using the Windows fsutil program (fsutil behavior set
DisableDeleteNotify 0). If IFW completes the operation, even with errors reported,
TRIM will be properly reset to the enabled state.
Default if omitted: Image for Windows does not disable TRIM during a backup operation.
/hash
CreateHash=1
Use this option to have Image for Windows create a hash file to speed up creating a
Changes Only (differential or incremental) backup. This option is only available when
creating an image that is not being saved to CD/DVD/BD. By default, this option is also
ignored if the /bc (BackwardsCompatible) option is enabled. The hash file will be limited
to the max file size and have the same file name as the backup with an extension
starting at .#0 followed by .#1, .#2, etc. as needed. The actual speed increase realized
when creating an image will vary depending on the system. If the hash file is deleted the
backup will proceed as normal without it.
This option can also be used to create a hash file for an existing image. For example:
/hash /f:"e:\backups\win7full.tbi"
Default if omitted: Image for Windows does not create the hash file during a backup
operation.
/exlist=filename
N/A
IMPORTANT NOTE: This option is used at your own risk. Please make sure to create
standard backups of important data.
This option allows you to specify a file which contains a list of paths and/or files to
exclude from the backup image. The file must be ANSI text and located on the local file
system. FAT, FAT32, and NTFS file systems are supported (the option will be ignored
for other file systems).
The data of the excluded files is essentially compressed to zero. When restored, the files
will either be deleted or truncated (depending on the options selected). Note that even
though excluded, the data will still affect the minimum restore size (just as if it wasn’t
excluded). Additionally, the excluded files and folders will still show up in TBIView and
TBIMount. Excluded files extracted from the image using TBIView or TBIMount will be
Image for Windows User Manual
Page 154 of 218
full of zeros. An exception to this are very small files on NTFS (the contents of those files
will be intact).
When creating a differential or incremental backup using a base full image created with
the /exlist option, the list from the base image will be used (a new list specified for the
backup will be ignored). Otherwise, the specified exclusion list will be used for the
backup.
Each line in the exclusion file should be in the following format:
[options]path >
Valid options are:
f - Exclude files only. Do not delete folders. If not specified, folders will be
deleted.
t - Truncate files instead of deleting them. Folders will not be deleted. Files
are restored with a size of zero bytes.
k - Keep the base folder (instead of deleting it) when recursion is used and the
entire contents are excluded.
The path can be complete to exclude a specific folder (e.g. \Games) or you can use
wildcards (*, ?) to specify matching files. When excluding a folder, use a trailing
backslash ( \ ) to indicate a folder is specified (otherwise, a search will be made for
matching files). Do not surround the path with quotes even if it includes spaces. Do not
specify a drive letter.
To also exclude files from subdirectories (apply recursion), include the > (greater than)
character after the path.
Examples:
- exclude all *.jpg files in the root folder, files will be truncated
- exclude all *.iso files in the root folder
- exclude all *.tbi files in the \Backups folder
- exclude the \Games folder and all sub-folders, keep
the \Games folder (use trailing backslash to indicate folder)
\Work\Archive\ - exclude the \Work\Archive folder, sub-folders not excluded
(use trailing backslash to indicate folder)
*.jpg >
- exclude all *.jpg files in the root folder and all sub-folders
[f]\Movies\*.mpg > - exclude all *.mpg files in the \Movies folder and all
sub-folders, folders will not be deleted
\ISO Files\Old\*.iso > - exclude all *.iso files in \ISO Files\Old folder and all
sub-folders
[t]*.jpg
\*.iso
\Backups\*.tbi
[k]\Games\ >
Default if omitted: Image for Windows includes all files on the partition in the backup (the
page file and hibernation file will be included or excluded per their respective options).
/log:0
Disables logging.
SaveLog=0
Default if omitted: Image for Windows logs during a backup operation.
Image for Windows User Manual
Page 155 of 218
Image for Windows Restore Options
In Table 5, you find the command line options that you must set to use Image for
Windows to restore a backup image.
The table shows you both the command line option and the INI file variable. In
some instances, both forms of the parameter are available; in other cases, only one
is available. When one form of an option isn’t available, N/A appears. To set up an
INI file, place these parameters in the [Restore_Defaults] section.
Table 5: Image for Windows Required Restore Parameters
Command Line Option
INI Variable
/r
N/A
Use this option to indicate that you want to restore an image file.
Also required: The /f option to specify image file Image for Windows should use when
restoring.
/d
N/A
Use when restoring a backup to identify the target hard drive and partition. Image for
Windows will restore the image to the same hard drive number and physical location on
the drive that you backed up unless you override this setting.
If the target partition was a volume and no extended partition now exists at the original
location, Image for Windows will attempt to create the original extended partition. If
Image for Windows cannot create the extended partition, Image for Windows will restore
the image as a primary partition.
If the target partition was originally a primary partition and an extended partition now
exists at that location, Image for Windows will restore the image as a volume.
If an existing partition or volume occupies the same starting location as the partition you
want to restore, Image for Windows will display a warning message before overwriting
the partition or volume. You can suppress this warning message, as described in Table
5.)
/d:d@p
/d:wd@p
/d:?D:
/d:#ntsig
/d:{GUID}
d is the target hard drive number
p is the target partition or volume ID (hex
or decimal notation), depending on
whether you are referring to a partition or
a volume. Use this parameter only if you
are restoring an individual partition.
D: is the target drive letter.
# – NT Disk Signature Follows (or omit
signature to match on original signature)
{GUID} – GPT Disk GUID (or omit GUID
to match on original GUID)
You can use device modifiers as needed.
When you use them, you must place
Image for Windows User Manual
Page 156 of 218
them after the /d: and before the target
hard drive number:
w – Windows device.
v – Virtual drive.
? – Drive letter follows.
/f
N/A
Use this option to specify the target drive letter, path, and file name for a backup file.
/f:x:\filename
x:\ is target drive letter
/f:x:\mypath\filename
mypath or my path is path to filename
/f:”x:\my path\file name"
filename is target file name for image
Or:
Or:
/f:d@p:\filename
Specify target device, partition, path, and
file name:
/f:d@p:\mypath\filename
/f:"d@p:\my path\filename”
/f:#ntsig@p:\mypath\filename
/f:{GUID}@p:\mypath\filename
d is target hard drive number
p is target partition ID (hex or decimal
notation)
# – NT Disk Signature Follows
{GUID} – GPT Disk GUID
mypath or my path is path to filename
filename is target file name for image
Device modifiers may be used as needed.
When used, they must be placed after the
/f: and before the target hard drive
number:
w – Windows device
o – Optical drive (when you combine this
option with the option mentioned above,
this option must come last).
Whether using drive letter or
device/partition, you may specify any path
desired. Paths and/or file names with
imbedded spaces require the use of
quotes.
Table 5 describes options required to restore a backup using Image for Windows
from the command line. Table 6 lists optional restore parameters for both the
command line option and the INI file variable. In some instances, both forms of the
parameter are available; in other cases, only one is available. When one form of an
option isn’t available, N/A appears. To set up an INI file, place these parameters in
the [Restore_Defaults] section, unless as noted otherwise.
Image for Windows User Manual
Page 157 of 218
Table 6: Image for Windows Optional Restore Parameters
Command Line Option
INI Variable
/o
N/A
Use this option to tell Image for Windows to overwrite the target without first prompting
for confirmation.
Default if omitted: Image for Windows prompts before overwriting the target.
/base
N/A
Note: Beginning with Image for Windows 2.78 this parameter is optional when restoring
a differential or incremental backup and should normally be omitted. Instead, use the
/sch option if it’s necessary to specify the location of any of the base images.
When restoring from a differential or incremental backup, use this parameter to identify
the base backup Image for Windows should use.
/base:x:\bkup
x:\ is source drive letter
/base:x:\mypath\bkup
mypath or my path is path to bkup
/base:"x:\my path\bkup"
bkup is name of the base backup (omit
the file extension)
Or:
/base:d@p:\bkup
/base:d@p:\mypath\bkup
/base:"d@p:\my path\bkup"
/base:#ntsig@p:\mypath\bkup
/base:{GUID}@p:\mypath\bkup
Or:
Specify source device, partition, path, and
file name:
d is source hard drive number
p is source partition ID (hex or decimal
notation)
# – NT Disk Signature Follows
{GUID} – GPT Disk GUID
You can use device modifiers as needed.
When you use them, you must place
them after the /base: and before the
source hard drive number:
w – Windows device
o – Optical drive (when you combine this
option with any of the options mentioned
above, this option must come last).
Whether using drive letter or
device/partition, you may specify any path
desired. Paths and/or file names with
imbedded spaces require the use of
quotes.
/clr
N/A
Use this option to have Image for Windows clear the MBR and EMBR prior to restoring
Image for Windows User Manual
Page 158 of 218
an image file.
Default if omitted: Image for Windows does not clear the MBR and EMBR.
/rb:n
N/A
Use this option to have Image for Windows reboot, shutdown, suspend, or hibernate the
system after restoring an image. The value n can be 1 to reboot with all prompts, 2 to
reboot with completion message, but without reboot message (error does not cancel
reboot), 4 to reboot without completion message or reboot message (error cancels
reboot), 8 to shutdown, 16 to suspend (sleep), or 32 to hibernate. If the specified option
is not supported by the system the next one will be used in the following order: suspend,
hibernate, shutdown. If suspend or hibernate is requested and a shutdown or reboot is
required, a shutdown is performed instead.
Default if omitted: Image for Windows attempts to determine if the computer needs to be
rebooted after restoring and, if so, prompts you to reboot.
/fd
ForceDismount=1
Use this option to force dismounting a volume (partition) that can't be locked for restore.
Using this option will invalidate all opened handles to the volume, which may result in
lost data. Image for Windows will attempt to lock the volume after forcing the dismount.
Default if omitted: Normal locking without forcing a dismount occurs.
/sp:p
N/A
Use this option to specify an individual partition ID to restore from a full backup. p is the
source partition ID (in hex or decimal notation).
Default if omitted: If you supply a backup of an entire hard drive as the source for
restoring, Image for Windows will restore all partitions contained in the backup.
/sig
ReplaceNTSig=1
This option applies when you restore a partition that had been assigned a drive letter
within Windows prior to being backed up. If you select this option, Image for Windows
will restore the disk signature associated with the source partition. If you are restoring a
partition that had been assigned a drive letter in Windows and you wish to keep that
drive letter assignment, select this option.
Note: The source Windows drive letter assignment will only be kept if it was previously
assigned on the Windows system where the restored partition is used and the drive
letter is not currently in use by another partition.
Note: The disk GUID of a target GPT drive will not be changed.
Default if omitted: Image for Windows will use the disk signature already present in the
MBR of the target drive; if none exists, Image for Windows will create one if necessary.
/csig
ChangeNTSig=1
When performing full drive restores, this option allows you to change the NT Signature
restored to the target drive. For target GPT drives, the MBR NT Signature, the GPT Disk
GUID, and the partition GUIDs will all be changed. This can be useful if you plan on
Image for Windows User Manual
Page 159 of 218
having both the original and restored hard drive in the same computer at the same time
while running Windows; otherwise Windows may detect the duplicate signature and
modify it which may (depending on the OS) prevent the restored hard drive from booting
properly.
When restoring single or multiple partitions to a GPT drive, this option will change the
GUID of each partition restored.
To retain the existing signature used by the target drive also specify the /csigut option.
Default if omitted: Image for Windows will not change the restored disk signature, drive
GUIDs, or partition GUIDs.
/chgvsn
ChgVolSN=1
Use this option to change the file system volume ID/serial number of restored
FAT//FAT32/NTFS/HPFS partitions and the UUID of Ext2/3/4 partitions.
Default if omitted: The file system volume ID/serial number or UUID is not changed.
/nvn:"name"
NewVolumeName=name
Use this option to specify the new volume name (label) for the restored partition. If
multiple partitions are being restored they will all be set to the specified name.
For example:
imagew /r /d:w3@0x4 /f:"H:\mybackup" /sp:0x4 /nvn:"Win8 Copy"
Default if omitted: The volume name will not be changed from its restored value.
/ohd
UseOrgHDNum=1
Use this option to tell Image for Windows to keep references to the source hard drive
number intact within the partition after Image for Windows has restored the partition to
the target drive. This option is primarily used for Linux partitions.
Default if omitted: If the target drive number differs from that of the source drive, Image
for Windows will update applicable drive references residing within the restored partition
to reflect the new hard drive number.
/a
SetActive=1
Use this parameter to make the partition you restore active.
Default if omitted: Image for Windows does not make the restored partition active unless
no other partitions are active and the restored partition is HD0.
/t
WriteMBR=1
Use this parameter to have Image for Windows install standard MBR code after
completing the restore operation. Standard MBR code is the code that boots the active
partition.
Default if omitted: Image for Windows does not write standard MBR code unless the
MBR is empty.
Image for Windows User Manual
Page 160 of 218
/e
UseSameMBREntry=1
Use this parameter to have Image for Windows move the partition table entry of the
restored partition to the same location in the master partition table as it appeared on the
source drive. Image for Windows will move the existing partition table entry to another
location rather than overwriting it.
Default if omitted: Image for Windows does not move the partition table of the restored
partition.
/ms:n
N/A
Use this parameter to have Image for Windows move the partition table entry of the
restored partition to a given slot in the MBR. The value n is 0 to 3. This option is only
applicable when restoring a single partition.
Default if omitted: Image for Windows does not move the partition table of the restored
partition.
/embrid:n
N/A
This parameter is used to set a specific ID value to the restored partition if an EMBR
exists. The ID is only used if not already in use by another partition. To assume the
same ID as a partition being overwritten, use the value zero for n.
Default if omitted: Image for Windows uses the restored partition’s original id.
/gpt
N/A
Instruct Image for Windows to create a GPT on the target drive. Note that restoring first
track overrides this option. This is mainly used with the /clr option to ensure the full size
of the drive that is greater than 2TiB is accessible. You can also provide an option
/nomsr if the GPT to be created should not have a Microsoft Reserved Partition created
on it. While Image for Windows supports a GPT, it does not currently officially support
an EFI based system.
Default if omitted: Image for Windows does not create a GPT on the drive.
/rft
RFT=1
Use this parameter to have Image for Windows restore the first track when it restores the
partition. Restoring the first track may also change the disk type (MBR/EMBR/GPT) of
the destination drive if it doesn’t match that of the source drive (the restore will abort if
the change is required and cannot be applied).
Default if omitted: Image for Windows does not restore the first track.
/fts:n
RFTS=n
Use this option to specify how many sectors of the first track of the hard drive Image for
Windows should restore. Use 0 to indicate the entire track
Default if omitted: Image for Windows determines the number of tracks needed to
restore.
Image for Windows User Manual
Page 161 of 218
/stt
Scale=1
For NTFS/FAT/FAT32/EXT 2/3/4 partitions, use this parameter to tell Image for Windows
to resize each restored partition proportionally, so that each partition takes up the same
relative amount of space on the target drive as it did on the source drive. Unpartitioned
free space that existed on the source drive at the time of the backup will still exist at the
end of the target drive after Image for Windows completes the restore operation.
This option only applies when you restore an entire hard drive;
Default if omitted: Image for Windows does not scale each restored partition.
/x
Expand=1
For NTFS/FAT/FAT32/EXT 2/3/4 partitions, when restoring to a target that is larger than
the source partition, use this parameter to have Image for Windows expand the partition
after completing the restore operation.
This option is equivalent to the “Scale to Fit” option for fully restoring drives.
Default if omitted: Image for Windows will not expand the partition, and free space will
remain after Image for Windows completes the restore operation.
/kf:n
KeepFree=n
Use this parameter if you also use either /x or /stt to specify the amount of space, in
mebibytes (MiB), that Image for Windows should leave free.
Default if omitted: Image for Windows will fill the entire available area.
/m
FirstFit=1
When restoring a partition, use this parameter to tell Image for Windows to choose the
target area automatically, based on the first area of available free space large enough to
accommodate the partition you want to restore.
When restoring or copying a full drive, this parameter will remove any gaps (free space)
between partitions, restoring them adjacent to each other.
Default if omitted: You must explicitly specify the target area when restoring a partition.
Gaps may exist between restored partitions when restoring or copying a full drive.
/v
PreValidate=1
Use this parameter to have Image for Windows perform a standard validation on the
image file(s) prior before restoring them.
Default if omitted: Image for Windows does not validate the image files before restoring
them.
/vb
PostValidate=2
Use this parameter to have Image for Windows check that each byte from the source
image file was restored to the drive properly.
Default if omitted: Image for Windows does not validate the restored data.
Image for Windows User Manual
Page 162 of 218
/sch:“path”
N/A
Use this parameter to specify the search paths Image for Windows uses when looking
for base images in the backup chain. path can use the d@p:\path format to specify the
drive and partition id.
This option can be used multiple times to specify multiple search paths (e.g. when the
images in the backup chain are not all stored in the same folder).
Examples (commands should be on one line):
imagew /r /f:"E:\Backups\Win8System - Inc D" /sch:"E:\Backups"
/sch:"E:\Backups\Archive"
imagew /r /f:"w1@0x2:\Images\WinXP Drive - Inc E"
/sch:"w1@0x2:\Images" /sch:"w1@0x2:\Images\Full"
Default if omitted: Image for Windows searches only the folder of the specified image for
base images in the backup chain.
/pw:mypassword or /pw:“my password”
N/A
Use this parameter to supply the password needed to decrypt a backup that you
encrypted and/or password protected when you created it. If your password contains
embedded spaces, place quotation marks around it.
This option can be specified multiple times as required by the backup image chain (base
+ differential/incrementals).
Default if omitted: Image for Windows does not supply a password.
/noej
NoEject=1
Use this parameter to tell Image for Windows to never automatically open the optical
drive tray.
Default if omitted: Image for Windows will automatically open the optical drive tray
whenever a new disc is needed and when Image for Windows finishes restoring.
/cdrs:n
CDReadSpeed=n
Use this setting to specify the maximum disc reading speed that Image for Windows will
use when reading a CD or DVD disc while restoring a backup image, with n being a
positive integer (e.g. 2, 4, 16, etc.). This setting may be used to force a lower reading
speed than that automatically used by the optical drive’s firmware. Slower reading
speeds may increase reliability.
n should be a positive integer (e.g. 2, 4, 16, etc.).
This setting is only applicable when you are restoring from CD/DVD media and you have
also included the /v option.
The maximum reading speed that is actually used is determined by whichever is lower:
The /cdrs:n value that you specify, or the speed deemed appropriate by the drive’s
firmware, according to the CD/DVD media in use. For example, if you are using media
that is rated at 32X (for reading), the maximum reading speed will be no more than 32X,
regardless of the setting you choose here. Similarly, if you supply a value that is invalid
for or beyond the drive’s design limits, the drive will automatically use the next-highest
Image for Windows User Manual
Page 163 of 218
speed supported by both the drive and the media in use.
DVD speeds are approximately 1/8 CD speeds, so if you are using DVD discs, multiply
the desired speed by 8 to determine the value to use here. For example, to obtain a
maximum reading speed of 4X with a DVD, use /cdrs:32, since 8 × 4X = 32.
Default if omitted: Image for Windows uses the Optimal speed setting.
/iobs
IOBS=1
Include this option to try to improve I/O performance in cases where network or USB
device performance is poor.
Default if omitted: Image for Windows does not use this option.
/err
AllowErrors=1
Use this option to tell Image for Windows to ignore read/write errors caused by bad
sectors on the target drive during the restore operation. This parameter does not apply
to bad sectors on the source drive.
Default if omitted: Image for Windows will notify you concerning the error and give you
the option to continue or abort.
/noosn:n
N/A
This option controls how the OS is notified of partition changes. It's useful for full drive
restores where your source and target drives are the same, but you're sure the restored
partitions won't overlap the source (which will be deleted after the restore).
/noosn:1 - never send notification to OS about partition changes (a reboot must be used
or corruption could occur if existing partitions existed where restored partitions are
located). Most users will NOT want to use this option – it's for very advanced users only.
/noosn:2 – defer the notification until all partitions are restored. This option is safe for all
to use.
Default if omitted: The OS is notified of partition changes as each partition is restored.
/irlm=n
N/A
Ignore restore locking mask. For example, to not care / ignore lock failures on drive G:
you'd use: /irlm:64. Likewise A: would be /irlm:1, and G: and A: combined would be
/irlm:65. This is an advanced option and typically used with the /noosn.
Default if omitted: Image for Windows does not ignore locking on restores.
/nlrm=n
N/A
No lock restore mask. For example, to not attempt a lock on drive G: you'd use:
/nlrm:64. Likewise A: would be /nlrm:1, and G: and A: combined would be /nlrm:65.
This is an advanced option and typically used with the /noosn.
Default if omitted: Image for Windows attempts to lock all required drives on restores.
/ubi
UpdateBootIni=1
This option only applies if a copy of boot.ini exists in the root directory of the restored
Image for Windows User Manual
Page 164 of 218
partition. If enabled, this option instructs Image for Windows to update all partition(n)
references in the restored partition's boot.ini file, to accommodate a partition layout that
differs from that of the original drive. Image for Windows will set all partition-based
entries in the applicable boot.ini to point to the restored partition (but will not change filebased entries). This option has no effect when doing a full drive restore.
Default if omitted: Image for Windows does not try to update the boot.ini file.
/ubp
UpdateBootPart=1
This option updates any references to the restored partition in the active boot partition on
the target drive. This is useful for situations where the boot partition differs from the
system partition. However, you typically wouldn't want to use this option if you're
creating a copy of an existing partition you want to keep, unless the target drive will be
independent of the original drive. For this to be useful, the active boot partition should
already be on the target drive or part of the same copy or restore operation.
Default if omitted: Image for Windows does not update the active boot partition.
/igpt
OSIgnoresGPT=1
Use this option when restoring to a GPT drive to indicate that the operating system being
restored will not see the destination drive as GPT when booted. For example, an iMac
using BootCamp or cases where the 0xEE placeholder partition is missing from the
MBR. This option prevents Image for Windows from using GPT specific fix-up
information on the drive after the restore.
Default if omitted: Image for Windows will use GPT specific fix-up information on GPT
drives.
/wipe
Wipe=1
This option will wipe (zero-out) unused sectors in the restored partition(s) or drive,
depending on the type of restore performed.
When restoring single partitions or when restoring multiple partitions to a drive with
existing partitions, sectors located outside of the restored partition(s) are not wiped. If a
partition is resized during the restore, the wiped area for that partition is the final size of
the restored partition (not the size of the source partition).
When restoring a full drive or when restoring multiple partitions to a drive with no existing
partitions, the entire drive is wiped, including all gaps between any partitions. Using this
option provides an easy way to wipe a drive and restore in a single operation (such as
when deploying images to used systems).
Default if omitted: Image for Windows will not perform any wiping of unused sectors.
/mp
MultiPass=1
Use this parameter to tell Image for Windows to use Multi Pass mode when restoring a
differential or incremental backup. In Multi Pass mode, Image for Windows restores the
full backup in one pass and then restores the differential backup in a second pass or
incrementals in multiple passes. This setting is not applicable when restoring a full
backup. You must use this option if the applicable full backup resides on removable
Image for Windows User Manual
Page 165 of 218
media.
Default if omitted: Image for Windows uses Single Pass mode, restoring the full backup
and the differential backup or incremental backups in one pass.
/cds
N/A
Use this parameter to tell Image for Windows to query all available CD/DVD drives when
trying to locate the appropriate source backup.
Default if omitted: You must explicitly specify the CD/DVD drive that contains the source
backup.
/mo
N/A
Instructs Image for Windows to display the following message immediately upon
running:
Press the <space bar> for the menu interface or wait for the restore to start...
If you press the space bar while this message appears, Image for Windows will switch to
interactive mode and wait for you to initiate the restore operation via the menu interface.
Default if omitted: The Press the <space bar>… message is not displayed and the
restore operation proceeds using the command line.
/att
AlignToTarget=1
When restoring a full drive image, use this option to instruct Image for Windows to force
alignment to the target drive regardless of the alignment used on the source drive. For
example, if the /a2k option is also specified the restored drive will be aligned on 1MiB
boundaries.
When restoring a single partition, specifying this option will instruct Image for Windows
to not adjust the alignment (1MiB partition alignment will be used if the target has it
already or not if it doesn’t and a partition already exists).
Default if omitted: The alignment used on the target drive will be determined
automatically based on the source drive.
/n2ka
N/A
By default, Image for Windows automatically uses 1MiB partition alignment when you
restore from the command line and the backup contains 1MiB aligned partitions. Use this
option to instruct Image for Windows not to automatically override normal cylinder-based
alignment.
If you don’t enable this option and Image for Windows determines that 1MiB partition
alignment is needed, then Image for Windows enables both the Align2048 and the
AlignEndHS options for the restore.
Note: This option has been deprecated, but will remain supported for backwards
compatibility. The /att option should be used instead.
Default if omitted. Alignment is automatically determined when restoring from the
command line. When a single partition is being restored and /a2k is not used, Image for
Windows will use 1MiB partition alignment if the destination drive contains a 1MiB
Image for Windows User Manual
Page 166 of 218
aligned partition or cylinder alignment if the drive contains a partition which is not 1MiB
aligned. Otherwise, the alignment used is obtained from the image being restored.
/aoe:n
AlignOnEnd=n
Place under the [HDx] section
Use this option to instruct Image for Windows to align restored partitions at the end of a
cylinder, or when the Align2048 option is enabled, end of a 1MiB boundary.
2 – Align on end by resizing
0 – Disable align on end
Default if omitted: Normal alignment (/aoe:1) is used.
/a2k
Align2048=1
Place under the [HDx] section
Use this option to instruct Image for Windows to align restored partitions based on 1MiB
boundaries (drives with 512 byte sectors will be aligned on 2048 sectors; drives with
4096 byte sectors will be aligned on 256 sectors).
If this option is enabled then you will normally want to enable the AlignEndHS (/ahs)
option and disable the AlignOnEnd (/aoe:0) option.
Default if omitted. Alignment is automatically determined when restoring from the
command line. When a single partition is being restored and /n2ka is not used, Image
for Windows will use 1MiB partition alignment if the destination drive contains a 1MiB
aligned partition or cylinder alignment if the drive contains a partition which is not 1MiB
aligned. Otherwise, the alignment used is obtained from the image being restored.
/ahs
AlignEndHS=1
Place under the [HDx] section
Use this option to instruct Image for Windows to force a restored partition’s ending head
and sector values in the MBR to match the current geometry.
Default if omitted. The actual ending head and sector values are used.
/ahst
AlignHSOnTrunc=1
Place under the [HDx] section
Use this option to instruct Image for Windows to set a restored partition’s head and
sector values in the MBR to match the current geometry when it is located outside the
range of the current geometry.
Default if omitted. The actual ending head and sector values are used.
/mg
UseMBRGeo=1
Place under the [HDx] section
Set this parameter to tell Image for Windows to use the geometry based on the MBR
entry of the first partition in the backup image when restoring a backup.
Default if omitted: Image for Windows uses the geometry of the target drive or the
UseOrgGeo option.
Image for Windows User Manual
Page 167 of 218
/mgv
UseValidMBRGeoOnly=1
Place under the [HDx] section
This option is used to ensure that the geometry from the MBR on the original system is
aligned to known standards before accepting it for use. It only applies when /mg
(UseMBRGeo) is used.
Default if omitted: This option is disabled.
/og
UseOrgGeo=1
Place under the [HDx] section
Set this parameter to tell Image for Windows to use, when restoring a backup, the
original geometry of the source drive based on the environment used when the backup
was created.
Default if omitted: Image for Windows uses the geometry of the target drive.
/c=n
c=n
Place under the [HDx] section
Use this parameter in conjunction with /h and /s to manually specify the cylinder, head,
and sector values for the target drive when you restore a backup image. This parameter
specifies the last cylinder, and n is a number you supply.
Default if omitted: Image for Windows uses the BIOS-reported values of the drive.
/h=n
h=n
Place under the [HDx] section
Use this parameter in conjunction with /c and /s to manually specify the cylinder, head,
and sector values for the target drive when you restore a backup image. This parameter
specifies the last head, and n is a number you supply.
Default if omitted: Image for Windows uses the BIOS-reported values of the drive.
/s=n
s=n
Place under the [HDx] section
Use this parameter in conjunction with /c and /h to manually specify the cylinder, head,
and sector values for the target drive when you restore a backup image. This parameter
specifies the last sector, and n is a number you supply.
Default if omitted: Image for Windows uses the BIOS-reported values of the drive.
/gc
GeoCalc=n
Place under the [HDx] section
Determine how a devices' geometry is obtained or calculated.
0=Default, 1=LBA, 2=Large, 3=Normal, 4=Bit-Shift, 5=Device Bit-Shift.
Default if omitted: Default method is used.
/rs:n
Image for Windows User Manual
N/A
Page 168 of 218
Use this parameter to resize a partition after restoring. n is the size in MiB’s that you
want to establish for the restored partition. If you try to use this parameter in conjunction
with /x, the Expand option, /x overrides /rs.
Default if omitted: Image for Windows restores the partition without resizing.
/exlist:n
ExcludeList=n
This option will override the method used when excluded files/folders are restored (the
backup image being restored must have been created with an exclusion list).
The following values for n are supported:
0 – Excluded files are restored with their actual sizes, but contain whatever data is
already on the drive (files are not wiped or zero-filled).
1 – Excluded files are deleted. Folders will not be deleted.
2 – Excluded files are truncated (files will exist, but all have a size of zero bytes).
3 – Excluded files and folders are deleted. This option does not delete base folders
specified to keep in the exclusion list.
Default if omitted: Image for Windows truncates or deletes the excluded files as specified
in the exclusion list.
/wco
WriteChangedSecsOnly=1
Use this option when restoring to write only the changed sectors to the target drive
(target will be read to compare). Useful in cases where a large portion of the data is the
same and it’s desirable to reduce wear on the target drive (e.g. restoring image to SSD
drive).
Default if omitted: Image for Windows will write all restored sectors normally.
/log:0
Disables logging.
SaveLog=0
Default if omitted: Image for Windows logs during a restore operation.
Image for Windows Validate Options
In Table 7, you find the command line options that you must set to use Image for
Windows to validate an image.
The table shows you both the command line option and the INI file variable. In
some instances, both forms of the parameter are available; in other cases, only one
is available. When one form of an option isn’t available, N/A appears. To set up an
INI file, place these parameters in the [Validate_Defaults] section, unless as noted
otherwise.
Table 7: Image for Windows Required Validate Parameters
Command Line Option
/v
Image for Windows User Manual
INI Variable
N/A
Page 169 of 218
Use this option to indicate that you want to validate an image file.
Also required: /CDn or a path name, as described below, to identify the location of the
backup image you want to validate.
/f
N/A
Use this option to specify the target drive letter, path, and file name for a backup file.
/f:x:\filename
x:\ is target drive letter
/f:x:\mypath\filename
mypath or my path is path to filename
/f:"x:\my path\file name"
filename is target file name for image
Or:
Or:
/f:d@p:\filename
Specify target device, partition, path, and
file name:
/f:d@p:\mypath\filename
/f:"d@p:\my path\filename"
/f:#ntsig@p:\mypath\filename
/f:{GUID}@p:\mypath\filename
d is target hard drive number
p is target partition ID (hex or decimal
notation)
# – NT Disk Signature Follows
{GUID} – GPT Disk GUID
mypath or my path is path to filename
filename is target file name for image
Device modifiers may be used as needed.
When used, they must be placed after the
/f: and before the target hard drive
number:
w – Windows device
o – Optical drive (when you combine this
option with the option mentioned above,
this option must come last).
Whether using drive letter or
device/partition, you may specify any path
desired. Paths and/or file names with
imbedded spaces require the use of
quotes.
In Table 8, you find the command line parameters that you might want to use with
Image for Windows when validating an image.
The table shows you both the command line option and the INI file variable. In
some instances, both forms of the parameter are available; in other cases, only one
is available. When one form of an option isn’t available, N/A appears. To set up an
INI file, place these parameters in the [Validate_Defaults] section, unless as noted
otherwise.
Image for Windows User Manual
Page 170 of 218
Table 8: Image for Windows Optional Validation Parameters
/noej
NoEject=1
Use this parameter to tell Image for Windows never to automatically open the optical
drive tray.
Default if omitted: Image for Windows will automatically open the optical drive tray
whenever a new disc is needed and at the completion of the validate operation.
/cdrs:n
CDReadSpeed=n
Use this setting to specify the maximum disc reading speed that Image for Windows will
use when reading a CD or DVD disc during validation, with n being a positive integer
(e.g. 2, 4, 16, etc.). This setting may be used to force a lower reading speed than that
automatically used by the optical drive’s firmware. Slower reading speeds may increase
reliability.
n should be a positive integer (e.g. 2, 4, 16, etc.).
This setting is only applicable when you are validating an image stored on CD/DVD
media.
The maximum reading speed that is actually used is determined by whichever is lower:
The /cdrs:n value that you specify, or the speed deemed appropriate by the drive’s
firmware, according to the CD/DVD media in use. For example, if you are using media
that is rated at 32X (for reading), the maximum reading speed will be no more than 32X,
regardless of the setting you choose here. Similarly, if you supply a value that is invalid
for or beyond the drive’s design limits, the drive will automatically use the next-highest
speed supported by both the drive and the media in use.
DVD speeds are approximately 1/8 CD speeds, so if you are using DVD discs, multiply
the desired speed by 8 to determine the value to use here. For example, to obtain a
maximum reading speed of 4X with a DVD, use /cdrs:32, since 8 × 4X = 32.
Default if omitted: Image for Windows uses the Optimal speed setting.
/iobs
IOBS=1
Include this option to try to improve I/O performance in cases where network or USB
device performance is poor.
Default if omitted: Image for Windows does not use this option.
/mp
MultiPass=1
Use this parameter to tell Image for Windows to use Multi Pass mode when validating a
differential or incremental backup. In Multi Pass mode, Image for Windows validates the
full backup in one pass and the differential backup in a second pass or incrementals in
multiple passes. This setting is not applicable when validating a full backup. This option
must be used if the applicable full backup resides on removable media.
Default if omitted: Image for Windows uses Single Pass mode, validating in one pass.
/base
N/A
Note: Beginning with Image for Windows 2.78 this parameter is optional when validating
Image for Windows User Manual
Page 171 of 218
a differential or incremental backup and should normally be omitted. Instead, use the
/sch option if it’s necessary to specify the location of any of the base images.
Use when validating a differential or incremental backup to identify the base backup
Image for Windows should use to validate the backup.
/base:x:\bkup
x:\ is source drive letter
/base:x:\mypath\bkup
mypath or my path is path to bkup
/base:"x:\my path\bkup"
bkup is name of existing base backup
(omit file extension)
Or:
/base:d@p:\bkup
/base:d@p:\mypath\bkup
/base:"d@p:\my path\bkup"
/base:#ntsig@p:\mypath\bkup
/base:{GUID}@p:\mypath\bkup
Or:
Specify source device, partition, path, and
file name:
d is source hard drive number
p is source partition ID (hex or decimal
notation)
# – NT Disk Signature Follows
{GUID} – GPT Disk GUID
You can use device modifiers as needed.
When you use them, you must place
them after the /base: and before the
source hard drive number:
w – Windows device
o – Optical drive (when you combine this
option with the option mentioned above,
this option must come last).
Whether using drive letter or
device/partition, you may specify any path
desired. Paths and/or file names with
imbedded spaces require the use of
quotes.
/sch:“path”
N/A
Use this parameter to specify the search paths Image for Windows uses when looking
for base images in the backup chain. path can use the d@p:\path format to specify the
drive and partition id.
This option can be used multiple times to specify multiple search paths (e.g. when the
images in the backup chain are not all stored in the same folder).
Examples (commands should be on one line):
imagew /v /f:"E:\Backups\Win8System - Inc D" /sch:"E:\Backups"
/sch:"E:\Backups\Archive"
imagew /v /f:"w1@0x2:\Images\WinXP Drive - Inc E"
/sch:"w1@0x2:\Images" /sch:"w1@0x2:\Images\Full"
Image for Windows User Manual
Page 172 of 218
Default if omitted: Image for Windows searches only the folder of the specified image for
base images in the backup chain.
/pw:mypassword or /pw:“my password”
N/A
Use this parameter to supply the password needed to decrypt a backup that you
encrypted and/or password protected when you created it. If your password contains
embedded spaces, place quotation marks around it.
This option can be specified multiple times as required by the backup image chain (base
+ differential/incrementals).
Default if omitted: Image for Windows does not supply a password.
/log:0
Disables logging.
SaveLog=0
Default if omitted: Image for Windows logs during a validate operation.
Image for Windows Copy Options
In Table 9, you find the command line options that you can set to use Image for
Windows to make a copy of a partition or drive.
The table shows you both the command line option and the INI file variable. In
some instances, both forms of the parameter are available; in other cases, only one
is available. When one form of an option isn’t available, N/A appears. To set up an
INI file, place these parameters in the [Copy_Defaults] section.
Table 9: Image for Windows Required Copy Parameters
Command Line Option
INI Variable
/copy
N/A
Use this option to indicate that you want to perform a copy.
/sd
N/A
Use this option to identify the source hard drive and partition. For most users, the
partition ID will be a number from 1 through 4. For partition IDs of 9 or below, you can
use a single digit in place of hexadecimal notation (e.g. 1 is equivalent to 0x1, and 5 is
equivalent to 0x5).
The volume ID will be a number formatted as 0xPVV, where P is the extended partition
and VV is the volume number in hexadecimal from 01 to FF.
If you are not sure of the partition or volume ID number, run Image for Windows using
the interface, choose the Backup option, and click Next. The screen that lists the
partitions and volumes also will display the ID in parentheses as a hexadecimal number.
You should prefix that number with a 0x on the command line.
/sd:d@p
/sd:wd@p
Image for Windows User Manual
d is the source hard drive number
Page 173 of 218
/sd:?D:
/sd:#ntsig@p
/sd:{GUID}@p
p is the source partition or volume ID (hex
or decimal notation), depending on
whether you are referring to a partition or
a volume.
D: is the source drive letter.
# – NT Disk Signature Follows
{GUID} – GPT Disk GUID
You can use device modifiers as needed.
When you use them, you must place
them after the /sd: and before the source
hard drive number:
w – Windows device.
v – Virtual drive.
? – Drive letter follows.
/td
N/A
Use this option to identify the target hard drive and partition. For most users, the partition
ID will be a number from 1 through 4. For partition IDs of 9 or below, you can use a
single digit in place of hexadecimal notation (e.g. 1 is equivalent to 0x1, and 5 is
equivalent to 0x5).
The volume ID will be a number formatted as 0xPVV, where P is the extended partition
and VV is the volume number in hexadecimal from 01 to FF.
If you are not sure of the partition or volume ID number, run Image for Windows using
the interface, choose the Backup option, and click Next. The screen that lists the
partitions and volumes also will display the ID in parentheses as a hexadecimal number.
You should prefix that number with a 0x on the command line.
/td:d@p
/td:wd@p
/td:?D:
/td:#ntsig@p
/td:{GUID}@p
d is the target hard drive number
p is the target partition or volume ID (hex
or decimal notation), depending on
whether you are referring to a partition or
a volume.
D: is the target drive letter.
# – NT Disk Signature Follows
{GUID} – GPT Disk GUID
You can use device modifiers as needed.
When you use them, you must place
them after the /td: and before the target
hard drive number:
w – Windows device.
v – Virtual drive.
? – Drive letter follows.
Image for Windows User Manual
Page 174 of 218
The above options are required when you perform a copy using Image for Windows
from the command line. In Table 10, you find a list of the optional copy parameters
you can use when you run Image for Windows from the command line.
The table shows you both the command line option and the INI file variable. In
some instances, both forms of the options are available; in other cases, only one is
available. When one form of an option isn’t available, N/A appears. To set up an INI
file, place these parameters in the [Copy_Defaults] section.
Table 10: Image for Windows Optional Copy Parameters
Command Line Option
INI Variable
/raw
RawMode=1
Set this parameter to force Image for Windows to use raw mode, which copies all
sectors, rather than just used sectors, even for recognized file systems.
Default if omitted: Image for Windows copies only used sectors backed up for
recognized file systems and uses raw mode automatically for unrecognized file systems.
/skp:0
SkipPageFile=0
Set this parameter to instruct Image for Windows to include the page files
(pagefile.sys, swapfile.sys) in the copy.
Default if omitted: Image for Windows skips the page file data.
/skh:0
SkipHiberFile=0
Set this parameter to instruct Image for Windows to include the hibernation file
(hiberfil.sys) in the copy.
Default if omitted: Image for Windows skips the hibernation file data.
/o
N/A
Use this option to tell Image for Windows to overwrite the target without first prompting
for confirmation.
Default if omitted: Image for Windows prompts before overwriting the target.
/clr
N/A
Use this option to have Image for Windows clear the MBR and EMBR prior to copying.
Default if omitted: Image for Windows does not clear the MBR and EMBR.
/rb:n
N/A
Use this option to have Image for Windows reboot, shutdown, suspend, or hibernate the
system after copying. The value n can be 1 to reboot with all prompts, 2 to reboot with
completion message, but without reboot message (error does not cancel reboot), 4 to
reboot without completion message or reboot message (error cancels reboot), 8 to
shutdown, 16 to suspend (sleep), or 32 to hibernate. If the specified option is not
Image for Windows User Manual
Page 175 of 218
supported by the system the next one will be used in the following order: suspend,
hibernate, shutdown. If suspend or hibernate is requested and a shutdown or reboot is
required, a shutdown is performed instead.
Default if omitted: Image for Windows attempts to determine if the computer needs to be
rebooted after copying and, if so, prompts you to reboot.
/fd
ForceDismount=1
Use this option to force dismounting a volume (partition) that can't be locked for copy.
Using this option will invalidate all opened handles to the volume, which may result in
lost data. Image for Windows will attempt to lock the volume after forcing the dismount.
Default if omitted: Normal locking without forcing a dismount occurs.
/sig
ReplaceNTSig=1
Use this option if you are copying a partition that Windows had assigned a drive letter
before you copied the drive. If you use this option, Image for Windows will copy the disk
signature associated with the source partition.
Note: The disk GUID of a target GPT drive will not be changed.
Default if omitted: Image for Windows will use the disk signature already present in the
MBR of the target drive, or, if none exists, Image for Windows will create one.
/csig
ChangeNTSig=1
When copying a full drive, this option allows you to change the NT Signature copied to
the target drive. For target GPT drives, the MBR NT Signature, the GPT Disk GUID, and
the partition GUIDs will all be changed. This can be useful if you plan on having both the
original and copied hard drive in the same computer at the same time while running
Windows; otherwise Windows may detect the duplicate signature and modify it which
may (depending on the OS) prevent the copied hard drive from booting properly.
When copying single or multiple partitions to a GPT drive, this option will change the
GUID of each partition copied.
To retain the existing signature used by the target drive also specify the /csigut option.
Default if omitted: Image for Windows will not change the copied disk signature, drive
GUIDs, or partition GUIDs.
/chgvsn
ChgVolSN=1
Use this option to change the file system volume ID/serial number of copied
FAT//FAT32/NTFS/HPFS partitions and the UUID of Ext2/3/4 partitions.
Default if omitted: The file system volume ID/serial number or UUID is not changed.
/nvn:"name"
NewVolumeName=name
Use this option to specify the new volume name (label) for the copied partition. If multiple
partitions are being copied they will all be set to the specified name.
For example:
Image for Windows User Manual
Page 176 of 218
imagew /copy /sd:w0@0x3 /td:w3@0x4 /nvn:"Win8 Copy"
Default if omitted: The volume name will not be changed from its copied value.
/ohd
UseOrgHDNum=1
Use this option to tell Image for Windows to keep references to the source hard drive
number intact within the partition after Image for Windows has copied the partition to the
target drive. This option is primarily used for Linux partitions.
Default if omitted: If the target drive number differs from that of the source drive, Image
for Windows will update applicable drive references residing within the copied partition to
reflect the new hard drive number.
/a
SetActive=1
Use this parameter to make the partition you copy active.
Default if omitted: Image for Windows does not make the copied partition active unless
no other partitions are active and the target partition is on HD0.
/t
WriteMBR=1
Use this parameter to have Image for Windows install standard MBR code after
completing the copy operation. Standard MBR code is the code that boots the active
partition.
Default if omitted: Image for Windows does not write standard MBR code unless the
MBR is empty.
/e
UseSameMBREntry=1
Use this parameter to have Image for Windows move the partition table entry of the
copied partition to the same location in the master partition table as it appeared on the
source drive.
Default if omitted: Image for Windows does not move the partition table of the copied
partition.
/ms:n
N/A
Use this parameter to have Image for Windows move the partition table entry of the
restored partition to a given slot in the MBR. The value n is 0 to 3. This option is only
applicable when restoring a single partition.
Default if omitted: Image for Windows does not move the partition table of the restored
partition.
/embrid:n
N/A
This parameter is used to set a specific ID value to the copied partition if an EMBR
exists. The ID is only used if not already in use by another partition. To assume the
same ID as a partition being overwritten use, the value zero for n.
Default if omitted: Image for Windows uses the copied partitions original id.
Image for Windows User Manual
Page 177 of 218
/gpt
N/A
Instruct Image for Windows to create a GPT on the target drive. Note that restoring first
track overrides this option. This is mainly used with the /clr option to ensure the full size
of the drive that is greater than 2TiB is accessible. You can also provide an option
/nomsr if the GPT to be created should not have a Microsoft Reserved Partition created
on it. While Image for Windows supports a GPT, it does not currently officially support
an EFI based system.
Default if omitted: Image for Windows does not create a GPT on the drive.
/rft
RFT=1
Use this parameter to have Image for Windows copy the first track when it copies the
partition. Copying the first track may also change the disk type (MBR/EMBR/GPT) of the
destination drive if it doesn’t match that of the source drive (the copy will abort if the
change is required and cannot be applied).
Default if omitted: Image for Windows does not copy the first track.
/fts:n
RFTS=n
Use this option to specify how many sectors of the first track of the hard drive Image for
Windows should copy. Use 0 to indicate the entire track
Default if omitted: Image for Windows determines the number of tracks needed to copy.
/stt
Scale=1
For NTFS/FAT/FAT32/EXT 2/3/4 partitions, use this parameter to tell Image for Windows
to resize each copied partition proportionally, so that each partition takes up the same
relative amount of space on the target drive as it did on the source drive. Unpartitioned
free space that existed on the source drive at the time of the backup will still exist at the
end of the target drive after Image for Windows completes the copy operation.
This option only applies when you copy an entire hard drive;
Default if omitted: Image for Windows does not scale each copied partition.
/x
Expand=1
For NTFS/FAT/FAT32/EXT 2/3/4 partitions, when copying to a target that is larger than
the source partition, use this parameter to have Image for Windows expand the partition
after completing the copy operation.
This option is equivalent to the “Scale to Fit” option for fully copying drives.
Default if omitted: Image for Windows will not expand the partition, and free space will
remain after Image for Windows completes the copy operation.
/kf:n
KeepFree=n
Use this parameter if you also use either /x or /stt to specify the amount of space, in
mebibytes (MiB), that Image for Windows should leave free.
Default if omitted: Image for Windows will fill the entire available area.
Image for Windows User Manual
Page 178 of 218
/m
FirstFit=1
Use this parameter to tell Image for Windows to choose the target area automatically,
based on the first area of available free space large enough to accommodate the
partition you want to copy.
Default if omitted: You must explicitly specify the target area.
/vb
PostValidate=1
Use this parameter to have Image for Windows check that each byte from the source
drive was copied to the target drive properly.
Default if omitted: Image for Windows does not validate the copied data.
/err
AllowErrors=1
Use this option to tell Image for Windows to ignore read/write errors caused by bad
sectors on the source or target drive during the copy operation.
Default if omitted: Image for Windows will notify you concerning the error and give you
the option to continue or abort.
/noosn:n
N/A
This option controls how the OS is notified of partition changes.
/noosn:1 - never send notification to OS about partition changes (a reboot must be used
or corruption could occur if existing partitions existed where restored partitions are
located). Most users will NOT want to use this option – it's for very advanced users only.
/noosn:2 – defer the notification until all partitions are copied. This option is safe for all
to use.
Default if omitted: The OS is notified of partition changes as each partition is copied.
/ubi
UpdateBootIni=1
This option only applies if a copy of boot.ini exists in the root directory of the copied
partition. If enabled, this option instructs Image for Windows to update all partition(n)
references in the restored partition's boot.ini file, to accommodate a partition layout that
differs from that of the original drive. Image for Windows will set all partition-based
entries in the applicable boot.ini to point to the copied partition (but will not change filebased entries). This option has no effect when doing a full drive copy.
Default if omitted: Image for Windows does not try to update the boot.ini file.
/wipe
Wipe=1
This option will wipe (zero-out) unused sectors in the copied partition(s) or drive,
depending on the type of copy performed.
When copying single partitions or when copying multiple partitions to a drive with
existing partitions, sectors located outside of the copied partition(s) are not wiped. If a
partition is resized during the copy, the wiped area for that partition is the final size of the
copied partition (not the size of the source partition).
Image for Windows User Manual
Page 179 of 218
When copying a full drive or when copying multiple partitions to a drive with no existing
partitions, the entire drive is wiped, including all gaps between any partitions. Using this
option provides an easy way to wipe a drive and copy to it in a single operation.
Default if omitted: Image for Windows will not perform any wiping of unused sectors.
/att
AlignToTarget=1
When copying an entire drive, use this option to instruct Image for Windows to force
alignment to the target drive regardless of the alignment used on the source drive. For
example, if the /a2k option is also specified the restored drive will be aligned on 1MiB
boundaries.
When copying a single partition, specifying this option will instruct Image for Windows to
not adjust the alignment (1MiB partition alignment will be used if the target has it already
or not if it doesn’t and a partition already exists).
Default if omitted: The alignment used on the target drive will be determined
automatically based on the source drive.
/n2ka
N/A
By default, Image for Windows automatically uses 1MiB partition alignment when you
copy from the command line and the source contains 1MiB aligned partitions. Use this
option to instruct Image for Windows not to automatically override normal cylinder-based
alignment.
If you don’t enable this option and Image for Windows determines that 1MiB partition
alignment is needed, then Image for Windows enables both the Align2048 and the
AlignEndHS options for the restore.
Note: This option has been deprecated, but will remain supported for backwards
compatibility. The /att option should be used instead.
Default if omitted. Alignment is automatically determined when copying from the
command line.
/aoe:n
AlignOnEnd=n
Place under the [HDx] section
Use this option to instruct Image for Windows to align copied partitions at the end of a
cylinder, or when the Align2048 option is enabled, end of a 1MiB boundary.
2 – Align on end by resizing
0 – Disable align on end
Default if omitted: Normal alignment (/aoe:1) is used.
/a2k
Align2048=1
Place under the [HDx] section
Use this option to instruct Image for Windows to align copied partitions based on 1MiB
boundaries (drives with 512 byte sectors will be aligned on 2048 sectors; drives with
4096 byte sectors will be aligned on 256 sectors).
If this option is enabled then you will normally want to enable the AlignEndHS (/ahs)
Image for Windows User Manual
Page 180 of 218
option and disable the AlignOnEnd (/aoe:0) option.
Default if omitted. The alignment is based on cylinders.
/ahs
AlignEndHS=1
Place under the [HDx] section
Use this option to instruct Image for Windows to force a copied partition’s ending head
and sector values in the MBR to match the current geometry.
Default if omitted. The actual ending head and sector values are used.
/ahst
AlignHSOnTrunc=1
Place under the [HDx] section
Use this option to instruct Image for Windows to set a copied partition’s head and sector
values in the MBR to match the current geometry when it is located outside the range of
the current geometry.
Default if omitted. The actual ending head and sector values are used.
/mg
UseMBRGeo=1
Place under the [HDx] section
Set this parameter to tell Image for Windows to use the geometry based on the MBR
entry of the first partition on the source drive.
Default if omitted: Image for Windows uses the geometry of the target drive or the
UseOrgGeo option.
/og
UseOrgGeo=1
Place under the [HDx] section
Set this parameter to tell Image for Windows to use the original geometry of the source
drive based on the environment being used to copy.
Default if omitted: Image for Windows uses the geometry of the target drive.
/c=n
c=n
Place under the [HDx] section
Use this parameter in conjunction with /h and /s to manually specify the cylinder, head,
and sector values for the target drive when you copy. This parameter specifies the last
cylinder, and n is a number you supply.
Default if omitted: Image for Windows uses the BIOS-reported values of the drive.
/h=n
h=n
Place under the [HDx] section
Use this parameter in conjunction with /c and /s to manually specify the cylinder, head,
and sector values for the target drive when you copy. This parameter specifies the last
head, and n is a number you supply.
Default if omitted: Image for Windows uses the BIOS-reported values of the drive.
Image for Windows User Manual
Page 181 of 218
/s=n
s=n
Place under the [HDx] section
Use this parameter in conjunction with /c and /h to manually specify the cylinder, head,
and sector values for the target drive when you copy. This parameter specifies the last
sector, and n is a number you supply.
Default if omitted: Image for Windows uses the BIOS-reported values of the drive.
/rs:n
N/A
Use this parameter to resize a partition after copy. n is the size in MiB’s that you want to
establish for the copied partition. If you try to use this parameter in conjunction with /x,
the Expand option, /x overrides /rs.
Default if omitted: Image for Windows copies the partition without resizing.
/nt
NoTRIM=1
Reduces the amount of caching required for the source drive on systems with TRIM
enabled by disabling TRIM during the copy operation. When TRIM is enabled the
original contents of deleted sectors must be cached, whereas a normal delete doesn’t
overwrite the sectors and instead just updates the directory entry. Note: If the operation
doesn’t complete (due to reboot, shutdown, process forced to end, etc.) TRIM will stay
disabled until enabled using the Windows fsutil program (fsutil behavior set
DisableDeleteNotify 0). If IFW completes the operation, even with errors reported,
TRIM will be properly reset to the enabled state.
Default if omitted: Image for Windows does not disable TRIM during a copy operation.
/exlist=filename
N/A
IMPORTANT NOTE: This option is used at your own risk. Be aware that you’re not
getting a complete image copy.
This option allows you to specify a file which contains a list of paths and/or files to
exclude when copying. The file must be ANSI text and located on the local file system.
FAT, FAT32, and NTFS file systems are supported (the option will be ignored for other
file systems).
The data of the excluded files is not copied – the files will either be deleted or truncated
(depending on the options selected). Note that even though excluded, the data will still
affect the minimum space required to copy (just as if it wasn’t excluded).
Each line in the exclusion file should be in the following format:
[options]path >
Valid options are:
f - Exclude files only. Do not delete folders. If not specified, folders will be
deleted.
t - Truncate files instead of deleting them. Folders will not be deleted. Files
will have a size of zero bytes.
k - Keep the base folder. If not specified, the base folder will be deleted.
Image for Windows User Manual
Page 182 of 218
The path can be complete to exclude a specific folder (e.g. \Games) or you can use
wildcards (*, ?) to specify matching files. When excluding a folder, use a trailing
backslash ( \ ) to indicate a folder is specified (otherwise, a search will be made for
matching files). Do not surround the path with quotes even if it includes spaces. Do not
specify a drive letter.
To also exclude files from subdirectories (apply recursion), include the > (greater than)
character after the path.
Examples:
- exclude all *.jpg files in the root folder, files will be truncated
- exclude all *.iso files in the root folder
- exclude all *.tbi files in the \Backups folder
- exclude the \Games folder and all sub-folders, keep
the \Games folder (use trailing backslash to indicate folder)
\Work\Archive\ - exclude the \Work\Archive folder, sub-folders not excluded
(use trailing backslash to indicate folder)
*.jpg >
- exclude all *.jpg files in the root folder and all sub-folders
[f]\Movies\*.mpg > - exclude all *.mpg files in the \Movies folder and all
sub-folders, folders will not be deleted
\ISO Files\Old\*.iso > - exclude all *.iso files in \ISO Files\Old folder and all
sub-folders
[t]*.jpg
\*.iso
\Backups\*.tbi
[k]\Games\ >
Default if omitted: Image for Windows includes all files when copying the partition (the
page file and hibernation file will be included or excluded per their respective options).
/wco
WriteChangedSecsOnly=1
Use this option when copying to write only the changed sectors to the target drive (target
will be read to compare). Useful in cases where a large portion of the data is the same
and it’s desirable to reduce wear on the target drive (e.g. copying partition to SSD drive).
Default if omitted: Image for Windows will write all copied sectors normally.
/log:0
Disables logging.
SaveLog=0
Default if omitted: Image for Windows logs during a copy operation.
Image for Windows List Options
Table 11 lists the List parameters you can use when you run Image for Windows
from the command line. There are no INI file variable equivalents for these
parameters – they are only valid on the command line.
Table 11: Image for Windows List Parameters
Command Line Option
INI Variable
/L
N/A
Use this option to indicate that you want to list the drives and partitions on the system or
Image for Windows User Manual
Page 183 of 218
those contained in a backup image file.
Output must be redirected to a file for viewing when using Image for Windows
(imagew.exe). Output can be redirected or viewed onscreen when using Image for
Windows (Console) (imagewc.exe).
Example 1: imagew /l /d:0 /stdout:output.txt
In this example, /d:0 identifies hard drive 0 as the drive for which you want to list
partitions and /stdout:output.txt indicates Image for Windows will save the output
to the file output.txt.
Example 2: imagewc /l /all
In this example, a detailed report of all drives and partitions will be shown onscreen.
/d:n
N/A
Specifies the drive for which you want to list the partitions, where n = the drive number.
Default if omitted: All drives and partitions are listed.
/opt
N/A
List optical drives. Includes drive number and name. Hard drives will not be listed.
Default if omitted: Optical drives are not listed.
/fs
N/A
Include “free space” available for each partition in listing. This option has no affect when
used with /all or /f.
Default if omitted: The amount of “free space” is not listed.
/all
N/A
Specify to produce a more detailed report. In addition to the basic information, it
includes:
•
Hard drive BIOS Device number, number of Sectors, Sector Size, and CHS
values.
•
Partition Start LBA, End LBA, FS ID, PE Flag, Free Sectors, Used Sectors, Last
Used Sector, MBR Entry number, MBR End CHS, and MBR Flag.
•
When used with /f, additional “Data Info” is listed, the base image filename is
listed for differential/incremental images, and the file exclusion list (if any) is
listed.
Default if omitted: Only the basic information is listed.
/f
N/A
List backup image drive and partition information from the specified backup image file.
Use with /all to obtain more details. It is not necessary to include the .TBI extension with
the file name. The image file description is listed if one exists.
When /all is not specified, no drive information is displayed and the partition information
Image for Windows User Manual
Page 184 of 218
is limited to the name, size, file system, and ID.
Example:
imagew /l /all /f:"e:\backups\my backup" /stdout:output.txt
In this example, detailed drive and partition information from the backup image file
e:\backups\my backup.tbi will be saved in output.txt.
Default if omitted: Physical drives and partitions are listed.
Image for Windows Combine Options
Table 12 lists the Combine parameters you can use when you run Image for
Windows from the command line.
Table 12: Image for Windows Combine Parameters
Command Line Option
INI Variable
/combine
N/A
Use this command to combine a differential or incremental images of a backup chain
into a single image file. The newly created image is a full image and can be used as the
base image for future differential or incremental backups.
The /f parameter is used to specify the file name of the new image file. Use the /base
parameter to specify the starting file to combine (all files from the this file back to the
original base file will be combined).
Optionally, you can specify the /hash option to automatically create the hash file for the
new image file. To remove the combined files, specify the /del option to delete the
original image files combined after the process has finished (deleting the files will render
any remaining incrementals in the chain unusable).
In the following examples, a full backup has been created followed by five incremental
backups:
E:\Backups\Win7
E:\Backups\Win7
E:\Backups\Win7
E:\Backups\Win7
E:\Backups\Win7
E:\Backups\Win7
Full.tbi
Inc 1.tbi
Inc 2.tbi
Inc 3.tbi
Inc 4.tbi
Inc 5.tbi
Running the following command will combine all five incremental backups and the base
full into a new backup image named Win7 Current. The existing incremental files will not
be deleted and a hash file will not be created for the new backup file. (The command
should be on one line.)
imagew /combine /f:"E:\Backups\Win7 Current"
/base:"E:\Backups\Win7 Inc 5"
Restoring Win7 Current would be the same as restoring Win7 Inc 5.
Running the following command will combine only the first three incremental backups
and the base full into a new backup image named Win7 Base3. Additionally, the original
combined files will be deleted and a hash file will be created for the new backup file.
Image for Windows User Manual
Page 185 of 218
(The command should be on one line.)
imagew /combine /f:"E:\Backups\Win7 Base3" /base:"E:\Backups\Win7
Inc 3" /del /hash
Restoring Win7 Base3 would be the same as if you restored Win7 Inc 3. Since the files
Win7 Full through Win7 Inc 3 were deleted, the remaining incremental files (Win7 Inc 4 &
Win7 Inc 5) are now unusable.
/f
N/A
Use this option to specify the target drive letter, path, and file name for the combined
backup file.
/f:x:\filename
x:\ is target drive letter
/f:x:\mypath\filename
mypath or my path is path to filename
/f:”x:\my path\file name"
filename is target file name for image
Or:
Or:
/f:d@p:\filename
Specify target device, partition, path, and
file name:
/f:d@p:\mypath\filename
/f:"d@p:\my path\filename”
/f:#ntsig@p:\mypath\filename
/f:{GUID}@p:\mypath\filename
d is target hard drive number
p is target partition ID (hex or decimal
notation)
# – NT Disk Signature Follows
{GUID} – GPT Disk GUID
mypath or my path is path to filename
filename is target file name for image
Device modifiers may be used as needed.
When used, they must be placed after the
/f: and before the target hard drive
number:
w – Windows Device
o – Optical drive (when you combine this
option with the option mentioned above,
this option must come last)
v – Virtual drive
Whether using drive letter or
device/partition, you may specify any path
desired. Paths and/or file names with
imbedded spaces require the use of
quotes.
o can be use with a, u, f, and s
/base
Image for Windows User Manual
N/A
Page 186 of 218
This parameter specifies the starting image file to combine. All image files in the chain
from this file back to the original base file will be combined.
/base:x:\bkup
x:\ is source drive letter
/base:x:\mypath\bkup
mypath or my path is path to bkup
/base:"x:\my path\bkup"
bkup is name of existing backup (omit file
extension)
Or:
/base:d@p:\bkup
/base:d@p:\mypath\bkup
/base:"d@p:\my path\bkup"
/base:#ntsig@p:\mypath\bkup
/base:{GUID}@p:\mypath\bkup
Or:
Specify source device, partition, path, and
file name:
d is source hard drive number
p is source partition ID (hex or decimal
notation)
# – NT Disk Signature Follows
{GUID} – GPT Disk GUID
You can use device modifiers as needed.
When you use them, you must place
them after the /base: and before the
source hard drive number:
w – Windows Device
o – Optical drive
v – Virtual drive
Whether using drive letter or
device/partition, you may specify any path
desired. Paths and/or file names with
imbedded spaces require the use of
quotes.
/del:n
N/A
Use this option to remove the combined files. After the combine process has finished,
the original image files will be deleted. Deleting the files will render any remaining
incrementals in the chain unusable. Use /del:1 (or /del) to delete all the original image
files. Use /del:2 to delete all except the base (full) image file.
Default if omitted: The original image files will not be deleted.
N/A
The following backup parameters can optionally be used when combining images:
/comp
/enc
/noej
/iobs
/desc
/bc
- select compression
- encryption and/or password protection
- don’t auto-open optical drive tray
- adjust I/O performance
- specify image description
- backwards compatible
Image for Windows User Manual
Page 187 of 218
/md
/v
/max
/log
/hash
/sch
/pw
- auto-create target path
- validate image
- specify maximum file size
- logging
- create hash file to speed up differential/incremental backups
- search path(s) for base or incremental images
- specify password(s)
For more information on the syntax of a specific option please refer to the Image for
Windows Backup Options section on page 145.
Troubleshooting
If you should encounter any problems while running Image for Windows, please
visit our on-line support page at http://www.terabyteunlimited.com/support-imagefor-windows.htm.
The Image for Windows log file and the Windows event log can also provide useful
information to resolve issues. By default, the log file (IFW.LOG) is saved in the
Image for Windows installation folder.
The Windows Event Viewer can be used to access the Image for Windows event
log entries (located in Windows Logs | Application). The following events and
categories are logged:
Event ID: 257 (Information), 258 (Warning), 259 (Error)
Task Category: None (0), Backup (1), Restore (2), Validate (3),
Licensing (4), Copy (5)
Use the /evlogl command line parameter or the EventLogLevel INI file variable
to adjust the level of logging. By default, Image for Windows will log errors,
warnings, and start/stop status.
Image for Windows User Manual
Page 188 of 218
Appendix A: Understanding the Types of Backups
Many software packages create file-based backups, while Image for Windows
creates a sector-based backup. This section describes both types of backups and
their differences.
File-Based Backup
When you create a file-based backup, you copy files from one storage location to
another using a third-party software package, the built in Microsoft backup utility or
by dragging-and-dropping files and/or folders using Windows Explorer.
Creating a file-based backup is simple, and you can backup or restore only certain
files or folders. But, a file-based backup it has drawbacks. For example, files that
are in use may not be backed up. And, restoring a file-based backup can be tricky:
Files in use cannot be restored.
If the required operating system environment and software is not installed and
accessible, you will first need to install it before you can restore any data.
Sector-Based Backup
A sector-based backup, also called imaging, differs from file-based backup because
imaging operates on the entire partition, including all files and the operating system
itself. This is the method of backup employed by Image for Windows.
When you create a sector-based image as your backup, you back up not only your
data files but also the operating system, in its entirety. If you restore a sector-based
backup, your computer returns to the state it was in when you created the image.
Image for Windows places all information on the target drive in the exact location
where it appeared when you created the image.
In addition, you can:
*
Restore a sector-based backup even if the operating system isn’t accessible—
effectively performing a bare-metal restoration.
*
Restore individual files, if you want, using the free TBIView or TBIMount addons.
Image for Windows User Manual
Page 189 of 218
Appendix B: Backup Strategies
Whether you create file-based backups or sector-based backups, you can choose
between three different backup methods:
*
Full Backups
*
Incremental Backups
*
Differential Backups
In this section, you will find information that explains each of these backup
methods. The backup method you choose actually affects you most when you need
to restore the backup; some backups are easier to restore than others.
In addition to understanding backup methods, it’s also important to store your
backup media in a safe, secure location. We strongly recommend that you store
your backup media in a different physical location than your computer and that you
place your backup media in a fire-proof safe designed for media. By storing your
backup media offsite, you don’t run the risk of losing both your computer and your
backups in the event of fire or theft. By storing your backups in a fire-proof safe
designed for media, your backups will be protected if a fire occurs at the location
where you store your backups.
Note: Be sure to use a fire-proof safe designed for media because, while paper
doesn't burn until 451 degrees Fahrenheit, media will melt. Computer media may be
damaged at temperatures above 125 degrees Fahrenheit and 80% humidity.
Full Backups
A full backup, as the name implies, involves backing up all specified data.
How Often Should I Back Up?
We hear this question a lot, and there is no right answer. Instead, there is the
answer that works best for you. To figure out how often to back up, ask yourself,
“How much data am I willing to re-enter?” because, once you restore your latest
backup, you will need to re-enter all information since you made that backup. Many
people do not want to re-enter any information, so they back up daily. Others feel
their computer usage is such that they are willing to back up once each week and
re-enter up to seven days worth of data. Decide how much data you are willing to
re-enter and set your backup schedule accordingly.
Incremental Backups
Incremental backups include only data that has changed since the most recent
backup was performed—whether the most recent backup was a full backup or a
previous incremental backup. To use this backup method, you perform a full backup
at an interval of your choice—say every two weeks. In between full backups, you
Image for Windows User Manual
Page 190 of 218
perform incremental backups. If you need to restore your entire system, you need
to restore the latest full backup followed by each of the incremental backups you
performed since that full backup (unless the backup program being used supports a
complete restore in one restore procedure).
For example, suppose that you are relying on file-based backups, and you perform
a full backup that includes FILE1, FILE2, and FILE3. Then, you change FILE2, and
you perform an incremental backup. This incremental backup will include only the
data of FILE2, since you did not change the other files in the most recent full
backup. Then, if you change FILE3 and add FILE4 and make another incremental
backup, the latest incremental backup will include only data from FILE3 and FILE4.
If you are relying on sector-based backups, you perform a full backup at an interval
of your choice and, in between, you perform incremental backups. But, an
incremental sector-based backup is not based on files that have been added or
changed. Instead, an incremental sector-based backup looks for and includes
newly allocated sectors and changes to the contents of any sector since the last
backup. Suppose that you move a file without changing its contents. In a sectorbased backup, the sector reallocation caused by moving the file is a change that
will be included in the next incremental backup, even though you didn’t change the
file itself.
Note: Although defragmenting the file system does not change file content, it can
lead to many sector-level changes, because defragmenting files moves them from
one disk location to another.
Incremental backups are hard to properly manage and tend to be troublesome
during disaster recovery. It is not uncommon to discover, while trying to recover
from a disaster, that an incremental backup is either lost or damaged, making all
subsequent incremental backups worthless. In addition, if you accidentally restore
incremental backups in the wrong order, the problems you experience may not
manifest themselves until some future date, at which point recovery can become
almost impossible.
Differential Backups
Differential backups include only data that has changed since the most recent full
backup was performed. To use this method, you make a full backup at an interval of
your choice. In between full backups, you perform differential backups, which
include all data that has changed since the last full backup. If you need to restore
your entire system, you need to restore the latest full backup followed by the latest
differential backup (unless the backup program being used supports a complete
restore in one restore procedure). Unlike incremental backups, which rely on every
other incremental backup in the chain, a differential backup relies only on the full
backup.
For example, suppose that you are relying on file-based backups and you perform a
full backup that includes FILE1, FILE2, and FILE3. Then, you change FILE2, and
you perform a differential backup. This differential backup will include only the data
of FILE2, since the other files in the most recent full backup have not changed. If
Image for Windows User Manual
Page 191 of 218
you then change FILE3 and perform another differential backup, this differential
backup will include data from both FILE2 and FILE3.
A differential sector-based backup includes any sector that has changed or been
allocated since you created the last full backup.
Differential backups are easy to manage during disaster recovery because you
need to restore only the last full backup followed by the last differential backup
(some programs will restore both the full and differential backup in one restore
procedure). You don’t run as much risk of discovering that a backup is damaged or
missing, and since you only need to restore two backups (at most), you are not as
likely to restore them in the wrong order.
By its nature, the size of a differential backup grows over time. If you wait long
enough between full backups, your differential backup could become almost as
large as a full backup, and take almost as much time to create.
Image for Windows User Manual
Page 192 of 218
Appendix C: Introduction to Hard Drive Storage
All modern (circa 2007) personal computers make use of at least one partitioned
hard drive. Knowing at least the basics of how hard drive partitioning and file
systems work can help you understand how to work with TeraByte Unlimited
imaging products. The information about physical hard drives that follows is
intended to be a broad overview to provide you with a general understanding of the
hard drive.
The Physical Hard Drive
Hard drives contain several round, thin, rigid disks called platters. The rigidity of
these platters serves as the basis for the terms “hard disk” and “hard drive”. In the
center of each platter is a hole by which the platter is mounted to a spindle. The
platters rotate around this spindle at high speed (typically 5,400 to 10,000 rotations
per minute, or RPM).
Internal view of a hard drive in operation. The arm appears blurred due to its rapid movement.
Photo courtesy of Michael Blessenohl
The Logical Hard Drive—Hard Drive Data Organization
Data is organized on the platters of hard drives in the form of tracks and sectors,
which are established during manufacturing. The tracks, which exist on each side of
each platter, are concentric circles. Sectors are defined by radial lines that go from
the center point of the platter to the outer edge.
When you set up a hard drive, you can create logical partitions. A logical partition is
simply a conceptual division on the hard disk. You can use different file systems in
different partitions, and many users partition hard disks so that they can store
different operating systems or segregate data on the same hard drive. If you set up
different partitions so that you can use different operating and file systems, you can
Image for Windows User Manual
Page 193 of 218
use Terabyte’s BootIT Bare Metal to select the operating system in which you want
to work each time you boot your computer.
Formatting is the process that prepares a partition on the hard disk to accept data
by creating an empty file system that is organized into clusters. A cluster, a logical
grouping of contiguous sectors, is the smallest logical unit of storage that you can
allocate to hold a file’s data.
Figures 1 through 3 depict the layout of files within clusters on a hypothetical
partition. In each figure shown, 44 clusters contain data. In Figure 1, the last cluster
in use (that is, the one closest to the bottom/right) is at the very end of the partition.
Figure 1
The location of this last cluster at the time that you create an image determines the
minimum amount of free space that must be available on the hard drive to which
you intend to restore—called the target drive.
Note: If you are restoring a partition with an image created using raw mode, or if the
partition uses an unrecognized file system, the target drive needs to be equal to the
full size of the source partition, regardless of cluster allocation.
Figure 2 shows the same number of clusters in use, but the last cluster in use is
located in the fifth row, rather than at the very end of the partition:
Figure 2
Image for Windows User Manual
Page 194 of 218
Although Figure 1 and Figure 2 depict the exact same number of used clusters,
the location of the last used cluster in Figure 2 allows you to restore an image of
that partition to a much smaller target because, when an image is restored, each
cluster is placed in a location on the target that is identical, relatively speaking, to its
original location on the drive you imaged—called the source drive.
Note: You can use the Compact feature of the Terabyte Unlimited imaging
programs to reduce the size required when restoring or copying.
Figure 3 shows the same number of clusters in use, but the clusters are arranged
optimally, with no unused clusters interspersed.
Figure 3
Although the used cluster arrangement of Figure 3 might be most ideal, you
generally can’t easily arrange clusters in this way.
Image for Windows User Manual
Page 195 of 218
Appendix D: Scheduling Backups
Image for Windows contains a feature you can use to create tasks to schedule
Image for Windows backups using the Windows Task Scheduler included with
Windows 98, 2000, 2003, XP, Vista, Windows 7, and Windows 8. What follows is a
step-by-step tutorial for using this feature.
1.
If creating a normal mode backup, run Image for Windows and select Backup
(Full). Be sure to select the source drive, destination drive, and backup options
you wish to have applied to the scheduled task.
If creating a Simple Operations mode backup, you would just need to select
the source drive and destination drive (if not auto-detected).
Refer to the section titled “Creating Backups with Image for Windows” if you need
more information on how to run a backup.
NOTE: Scheduled tasks that used network mapped drive letters may not run
properly because the mapped drive letter might not exist when the program is
launched or due to permission issues. To prevent this problem, use the UNC
instead of a mapped drive letter.
2.
On the Backup Options screen shown below (normal mode backup) or
Summary screen (Simple Operations mode), click the “Schedule Backup”
button.
Image for Windows User Manual
Page 196 of 218
3.
In the Image for Windows – Task 1 window that appears, the command line in
the Run box reflects the source, destination, and backup options that you
selected. The command line also includes the /uy and /um parameters that
allow Image for Windows to run an unattended backup. These parameters,
along with related parameters /un and /ui, are described in “Table 1: Image for
Windows Global Parameters”. Be sure to enter the automation options you
want to have in place (i.e. /uy /um, /un /um, or /un /ui).
Note: If you would like the backup to be password-protected or encrypted when the
scheduled task runs, you must append /pw:"my password" to the command line in
the task window, where “my password” is the password you wish to use. If the /enc
parameter is present without a valid /pw parameter also present, the backup task
will not run successfully.
4.
Click the Schedule tab, and then click the New button to create a schedule for
the backup task.
Note: If you close the task window without first setting a schedule for it, the task will
be deleted immediately.
Image for Windows User Manual
Page 197 of 218
5.
Click the Settings tab. Configure the task settings as desired. Note: If the
computer will be sleeping at the time backup should begin make sure to
enable the Wake the computer to run this task option.
Image for Windows User Manual
Page 198 of 218
6.
Click OK (or Apply). You will be prompted to enter account information.
7.
Supply the desired user name and password:
Note: So that Image for Windows can run successfully, the user account used must
be a member of the Administrators group.
8.
Click OK. A notice appears, telling you the task has been added to the
Windows Task Scheduler.
Image for Windows User Manual
Page 199 of 218
Note: Scheduled tasks can be managed using the Scheduled Tasks tab in
program Settings.
Appendix E: Restoring to a Smaller Drive or
Partition
Despite ever increasing hard drive sizes, many users find themselves in situations
requiring them to move to a smaller drive. The difficulty level of this process depends on
a number of factors, including the method used and the details of the particular
configuration. This appendix presents several methods to accomplish this task and,
hopefully, provide a trouble-free transition.
Typical reasons to move to a smaller drive or partition include:
•
Moving the OS partition to a faster drive (e.g. going from a 1TB hard drive to a
256GB SSD drive)
•
Segregating the OS from data (e.g. splitting a single 950GB partition into a
100GB OS partition and a 850GB data partition).
•
Splitting a RAID 0 setup into single drives
•
Migrating to a new physical system or to or from a virtual system
•
Emergency recovery using parts on hand
•
Testing recovery scenarios
Procedure Summary
The basic steps are as follows:
1. Determine the minimum space required to restore the partition(s)
If the source partition contains more data than can fit on the new smaller partition
it will be necessary to delete files or move files to a different drive.
When moving an entire drive to a smaller drive, you will need to check space
requirements for each partition on the source drive.
2. Check the file system for errors
Run chkdsk /f on the source partition(s) to check for file system errors. Errors
can cause compacting and resizing to fail. Note: You may want to run
MEMTEST86 before chkdsk if RAM integrity is unknown.
3. Compact or resize the partition(s)
Image for Windows User Manual
Page 200 of 218
Use the compact feature in the imaging programs to reduce the minimum
required size or use BootIt BM to resize the source partition smaller. In either
case, use a size less than that of the new smaller partition.
When moving an entire drive to a smaller drive, you may need to compact or
resize multiple source partitions.
4. Create a backup image of the drive or partition
Once the source partition or drive is ready (files moved, partitions compacted, file
systems checked, etc.), create a backup image.
5. Restore the image to the new location
When restoring, specify the desired new smaller size. Or, if restoring a drive
image, use one of the scale options (e.g. Scale to Fit).
If you are planning on copying the source partition(s) to the smaller drive you can skip
Step 4 and perform the copy instead of Step 5.
For more specific details on restoring to a smaller drive or partition as well as several
example scenarios, please continue reading.
Preparing for the Move
Depending upon the specifics of the move and which method will be used, it’s possible
extensive changes will be made to the existing data – file systems resized or compacted,
data deleted, programs uninstalled, file systems repaired, and so on. It is recommended
to create a backup image of the drive before proceeding if data safety or the ability to
return to the present state is important to you.
As an example, you may be moving from a 500GB Windows drive to a 128GB SSD. You
plan to delete many gigabytes of files you won’t need and uninstall several large
programs. However, you would also like to preserve the data on the 500GB drive. One
way to do this is to create a backup image of the drive and then make the desired
changes. A new backup image can then be created and restored to the SSD (or the
drive could be copied). Once the SSD is ready for use, the original drive image can be
restored to the 500GB source drive, returning it to its original state.
Understanding Partition Data Organization
When you set up a hard drive, you can create logical partitions. A logical partition is
simply a conceptual division on the hard drive. You can use different file systems in
different partitions, and many users partition hard drives so that they can store different
operating systems or segregate data on the same hard drive.
Formatting is the process that prepares a partition on the hard drive to accept data by
creating an empty file system that is organized into clusters. A cluster, a logical grouping
of contiguous sectors, is the smallest logical unit of storage that you can allocate to hold
a file’s data.
Image for Windows User Manual
Page 201 of 218
Table A depicts the layout of files within clusters on a hypothetical partition. 44 clusters
contain data, with the last cluster in use (the cluster closest to the end of the partition)
being located 75% into the partition.
Table A
Table B
The location of the last cluster at the time that you create an image determines the
minimum amount of free space that must be available on the hard drive to which you
intend to restore. In this example, assuming the partition size was 100GB, you would not
be able to restore it to a space smaller than 75GB.
Table B is a representation of the partition after being compacted. It contains the same
number of used clusters with no unused clusters interspersed. As a result, an image of
this partition can be restored to a much smaller destination.
Compacting and resizing are both operations that allow you to relocate the data in the
partition while maintaining its integrity. Compacting leaves the partition size unchanged
and moves the data so it fits the smaller specified size. Resizing a partition smaller is
similar to compacting, but also reduces the size of the partition.
More information on this subject can be found in Appendix C: Introduction to Hard Drive
Storage.
Determining the Space Required
When determining the minimum space required to restore a partition it's important to
understand that the TeraByte imaging programs restore the partition image as an actual
image. As explained in the previous section, this requires the same space for the data as
the source partition since the restored data is not relocated within the destination
partition while being written. Any resizing of the restored partition takes place after the
restore has completed. This may differ from non-TeraByte imaging programs which may
create the smaller destination partition first and then restore the files in the image
backup to it.
The minimum space required to restore a partition can be determined from the source
partition, from the image file, or by attempting to restore the partition image.
To Check the Source Partition:
Image for Windows User Manual
Page 202 of 218
1. Start the TeraByte imaging program of your choice and select to create a
backup.
2. Proceed though the steps until you get to the screen where you select which
partitions to include.
3. Highlight the partition and click the Information button in Image for Windows,
Image for DOS GUI, and Image for Linux GUI, or press F1 in Image for Windows
(Console), Image for DOS, and Image for Linux.
4. Along with other details, the number of MiB to Restore is displayed. This is the
minimum space required to restore this partition. Please note that this value
represents the data only – operating systems may require an additional minimal
amount of free space in order to function correctly.
To Check an Existing Image File from the Program Interface:
Note: Version 2.74 or later is required to use this method.
1. Start the TeraByte imaging program of your choice and select to restore a
backup.
2. Proceed though the steps until you get to the screen where you select which
partition(s) to restore.
3. Highlight the partition to check and click the Information button in Image for
Windows, Image for DOS GUI, and Image for Linux GUI, or press F1 in Image for
Windows (Console), Image for DOS, and Image for Linux.
4. Along with other details, the number of MiB to Restore is displayed. This is the
minimum space required to restore this partition. Please note that this value
represents the data only – operating systems may require an additional minimal
amount of free space in order to function correctly.
To Check an Existing Image File from the Command-line:
Run the TeraByte imaging program of your choice from the Command Prompt and
specify the /L, /ALL, and /F options. Program output can be redirected to a file for easy
reference. Note: Version 2.66 or later is required to use this method.
•
Using Image for Windows, Image for Windows (Console), or Image for DOS
1. If running in Windows, start an Administrator Command Prompt.
2. Change to the folder containing imagew.exe, imagewc.exe, or
image.exe.
3. Run the command (Image for Windows is used below):
imagew /l /all /f:"e:\backups\my backup" > output.txt
This will obtain all the partition information from the
e:\backups\my backup.tbi image and save it to a file named output.txt
in the same folder as imagew.exe.
Image for Windows User Manual
Page 203 of 218
If using Image for Windows (Console) or Image for DOS you can view the
output onscreen by not redirecting it. For example:
imagewc /l /all /f:"e:\backups\my backup"
•
Using Image for Linux from the IFL Boot Media
1. Boot to the IFL CD. If necessary, mount the partition or network share
that contains the backup image file. Use the Mount Network Shares
menu option or exit to the Command Prompt and use dpmount.
2. Select the Exit To Command Prompt menu option. By default the
current path is the one which contains imagel (/tbu).
3. Run the command:
imagel -l --all --f "mnt1/backups/my backup" > output.txt
This will obtain all the partition information from the
mnt1/backups/my backup.tbi image and save it to a file named
output.txt in the same folder as imagel. Note: The output.txt file may
contain escape code sequences as well as the partition data and may
look strange in a text editor.
Output can also be viewed onscreen by not redirecting it:
imagel -l --all --f "mnt1/backups/my backup"
Use Shift-PgUp and Shift-PgDn to scroll through the output. If the console
buffer is too small to let you view all the information you will most likely
need to redirect it to a file.
Examine the output and find the details of the partition you’re going to restore. The Last
Used Sector value determines the minimum space required to restore the partition.
For additional information on using this method, please see the corresponding TeraByte
KB article.
To Check by Attempting to Restore the Partition Image:
Note: This method is included for completeness only.
1. Start the TeraByte imaging program of your choice and select to do a normal
restore of the partition.
2. Select the destination partition or free space area and click Next.
3. A notice with the number of MiBs required will be displayed if the destination is
too small. If you must know the minimum size and the notice is not displayed,
you can select a very small partition (or one you know is too small) as the target.
Important Note: When restoring or copying a partition, any unallocated space
located adjacent to the destination partition will be included in the available size.
For example, if the drive contains a 10GB partition and has 25GB of free space
adjacent to it, you could successfully restore a partition image that requires 30GB
to the 10GB partition. The restored partition will begin at whichever location is
Image for Windows User Manual
Page 204 of 218
located towards the beginning of the drive. For example, if the free space is
located before the partition, the restored partition begins where the unallocated
space begins.
Disk images are treated differently than partition images. When restoring a disk
image you will not be notified if the image won’t fit after selecting the destination
drive. Instead, you must proceed to the options screen and click Next. The
reason for this is that alignment options or one of the scaling options (Scale to Fit
or Scale to Target) may be used, which could change the requirements. The
actual space necessary cannot be determined until the state of all options are
known.
Note: Mounting an image will not allow you to obtain the minimum size required
for a restore.
Removing Unwanted Programs and Files
Once you have determined the space that will required to restore or copy to the new
smaller drive or partition, you’ll know how much data will need to be removed to allow it
to fit. In many cases, this will require deleting large data files (archives, ISO downloads,
installers, videos, music, etc.) . You may also need to uninstall certain programs,
planning to reinstall them to a different partition when needed.
It should be noted that deleting files from a partition may not lower the minimum required
size to restore the partition since data may still exist at previous furthest “in use” location
on the partition. Check the space required after deleting files to determine the current
size.
If moving to an extremely small drive (like a small SSD), you will likely need to remove
almost everything that isn’t part of the standard Windows installation. In these cases,
you may want to consider the option of installing Windows to the new drive and starting
over fresh.
Make Sure the File System is Clean
Whether restoring to a smaller drive or to a smaller partition, file system errors on any of
the source partitions can cause numerous errors, including failure to resize or compact
the partition. If you are unsure of the condition of the file system, you may want to run
chkdsk /f on it before imaging or copying it. In general, it’s a good idea to run
MEMTEST86 before running chkdsk (bad memory may cause chkdsk to corrupt the
partition).
To do this, open a Command Prompt (an Administrator Command Prompt is required in
versions of Windows with UAC is enabled) and run the following command, making sure
to use the correct drive letter for the partition to be checked:
chkdsk c: /f
Note that checking some partitions, such as the Windows partition, may require
Windows to restart. In the case of multiple partitions needing to be checked it may be
advantageous to check them from WinPE (e.g. TBWinPE) – since Windows isn’t running
and no partitions are locked, restarts will not be required.
Image for Windows User Manual
Page 205 of 218
Compact or Resize the Partition(s)
Compacting or resizing a partition requires that it be available to be modified. If the only
source of the desired partition is an image backup, you must first restore the image to a
drive large enough to contain it so it can be compacted (or resized) and then reimaged
or copied.
Also note that you can’t compact a partition that’s in use (for example, you can’t compact
the booted Windows partition). You would need to boot to Image for DOS, Image for
Linux, or Image for Windows in WinPE.
To compact a partition:
1.
2.
3.
4.
5.
Start the TeraByte imaging program of your choice.
Select to create a backup.
On the partition selection screen highlight the partition that needs compacted.
Click the Compact button (graphical versions) or press F3 (console versions).
Enter the new size.
To resize a partition:
1.
2.
3.
4.
5.
Boot into BootIt Bare Metal.
Enter Partition Work.
Select the partition than needs resized.
Click the Resize button.
Enter the new size.
The time required to compact or resize a partition depends on the amount of data that
must be moved and the speed of the system.
Examples
Several examples of restoring to a smaller drive or partition are shown below:
•
•
Example 1 – Normal Restore
Example 2 – Compact/Resize, Image, and Restore
For more details and an additional method (using “robocopy”), please see the
corresponding TeraByte KB article.
Unless otherwise stated, the examples below are using the following base system
configuration:
•
The source drive is 500GB with a single 465GB partition containing Windows and
150GB of programs and data.
•
The source drive’s required space for restore is 220GB.
•
A backup image of the source drive has been created (SOURCE.TBI).
•
The destination drive is either a 128GB or 256GB SSD drive.
Image for Windows User Manual
Page 206 of 218
Example 1 – Normal Restore
For the purpose of this text, a “normal restore” is one which requires no compacting,
resizing, or special steps to accomplish prior to restoring. This type of restore can be
used any time the required space for the restore is less than the available space on the
destination drive – even if the source partition is actually much larger.
Using the example configuration, SOURCE.TBI can be restored normally to the 256GB
SSD since it requires only 220GB. It would not be possible to do a normal restore to the
128GB SSD due to insufficient available space.
When restoring an OS partition or disk image (entire drive), any standard options
necessary to ensure proper booting would also apply here (Set Active, Update
BOOT.INI, Update Boot Partition, Restore First Track, etc.). Additionally, when restoring
a disk image and the source drive was larger than the destination, the Scale to Target or
Scale to Fit option must be selected. Otherwise, the program will report that there’s not
enough space on the destination drive even if there is.
Example 2 – Compact/Resize, Image, and Restore
Using the example configuration, restoring an image of the 465GB partition to the
128GB SSD could be performed as follows:
Using Compact:
1. Move 100GB of data files to a USB drive to bring the total used space down to
around 70GB.
2. Boot to Image for Linux and select to create a backup.
3. Select the 465GB Windows partition.
4. Make sure the 465GB Windows partition is highlighted and use the Compact
option (press F3).
5. Specify a size of 100GB.
6. After the compaction completes, continue with creating the image of the partition.
7. Restore this image to the 128GB SSD, specifying to resize it to use all available
free space. When restoring an OS partition, any standard options necessary to
ensure proper booting would also apply here (Set Active, Update BOOT.INI,
Update Boot Partition, etc.) – just as with a normal restore.
Using Resize:
1. Move 100GB of data files to a USB drive to bring the total used space down to
around 70GB.
2. Use a partitioning program (such as BootIt BM) and resize the 465GB partition to
100GB.
3. Boot to Image for Linux and select to create a backup.
Image for Windows User Manual
Page 207 of 218
4. Select the 100GB Windows partition and create an image of it.
5. Restore this image to the 128GB SSD, specifying to resize it to use all available
free space. When restoring an OS partition, any standard options necessary to
ensure proper booting would also apply here (Set Active, Update BOOT.INI,
Update Boot Partition, etc.) – just as with a normal restore.
Either method will accomplish the same results. You may end up compacting some
partitions and resizing others depending on the particular need at the time.
Once a partition has been compacted or resized an alternative method would be to copy
it directly instead of imaging and restoring.
Image for Windows User Manual
Page 208 of 218
Glossary
Hard Drive (HD, HDD)
A high-capacity, non-volatile, data storage device. Hard drives are typically installed
inside a computer. In addition, they are used in many external devices, connected
via USB, eSATA, etc.
Partition
A unique area of a hard drive that is allocated for use by a file system. A hard drive
can contain many partitions.
File System
An organized structure that allows data to be stored and accessed by a filename.
You can basically think of it as the filing system used by the operating system to
store and retrieve your data. On a hard drive, the file system almost always resides
in a partition.
Volume
Generally, a volume is considered to be any file system or device that is used to
hold data, but, when using Image for Windows, it also represents a specific partition
that resides in an extended partition.
Extended Partition
A special type of partition that is divided in to one or more partitions called volumes.
Drive Letter
A single letter that represents a file system in Microsoft operating systems. Since a
file system on a hard drive is almost always in a partition or volume, it also
represents a partition or volume.
Logical Drive
A term used in Microsoft operating systems to describe the specific drive letters that
point to volumes. In practical terms, it is the same thing as a drive letter.
Source
Image for Windows User Manual
Page 209 of 218
When backing up, “source” refers to the hard drive that you want to back up. When
restoring, “source” refers to the location on a storage medium that contains a
backup you want to restore.
Target
When backing up, “target” refers to the location on a storage medium (usually
CD/DVD discs, a hard drive partition, or an external hard drive) where you want to
store a backup. When restoring, “target” refers to the location on a hard drive where
you want to restore a backup you previously created. A restore target can either be
an area of free space or a partition. In the latter case, the partition—and any
information it contains—will be deleted immediately prior to the restore.
Image for Windows User Manual
Page 210 of 218
What is Shareware?
Shareware distribution provides users with the opportunity to try software before
buying it. If you try a Shareware program and continue using it, you are expected to
register it. Individual programs differ on details; some request registration, others
require it, and some specify a maximum trial period. When you register the
software, you may receive anything from the right to continue using the software to
an updated program with printed manual.
Shareware is a distribution method, not a type of software. Because you can try
shareware before you buy, you can easily determine if a particular piece of software
will fill your needs. Also, because the overhead is low, prices are low. Shareware
has the ultimate money-back guarantee—if you don't use the product, you don't pay
for it.
Image for Windows User Manual
Page 211 of 218
TeraByte Unlimited (Trial-Use) License Agreement
If you are using the software for evaluation or trial purposes then this license applies to
you:
PLEASE READ THIS LICENSE AGREEMENT CAREFULLY
By using, copying, transmitting, distributing or installing all or any part of the TeraByte trial version computer software and
documentation accompanying this License Agreement (the "Evaluation Software"), you agree to all of the terms and
conditions of this License Agreement.
Please read the license terms and conditions below. If you do not agree to all of the terms and conditions, then do not
use, copy, transmit, distribute, or install the trial version computer software and documentation accompanying this license
Agreement.
TeraByte, Inc., dba TeraByte Unlimited ("TeraByte") and/or its suppliers own the Evaluation Software and its
documentation, which are protected under applicable copyright, trade secrets, and other laws. Your rights and license to
use the programs and the documentation are limited to the terms and subject to the conditions set forth below.
1. LICENSE:
(a) TRIAL USE IN YOUR OWN COMPUTER
(i) YOU MAY: use the Evaluation Software for evaluation purposes in your own computer, for a period not to
exceed thirty (30) days after your first installation or use of the Evaluation Software. You may not re-install or additionally
install the Evaluation Software for additional evaluation periods.
(ii) Not "Free Software". This Evaluation Software is not "free software", but a software copy with limited
license rights, as set forth in this Agreement.
(iii) Temporary Evaluation Use Only. You may use this Evaluation Software without charge for a limited time
only, and solely to decide whether to purchase a paid license for the software from TeraByte. If you wish to use the
Evaluation Software after the thirty (30) day evaluation period, then you must purchase a Full Use license for the software
from TeraByte. You can visit TeraByte's web site at www.terabyteunlimited.com, for further information.
(iv) NO CONTINUED USE WITHOUT REGISTRATION. Unregistered use of the Evaluation Software after the
thirty (30) day trial period is an infringement of TeraByte's legal and equitable rights, including but not limited to copyright
and trade secret rights, under U.S. and international laws.
(v) Notwithstanding the above, should you use, install, copy, or download the Evaluation Software for a
particular purpose, and should the Evaluation Software successfully accomplish that particular purpose, such use shall
not be considered evaluation purposes. In such case, you shall immediately obtain the appropriate end user license.
(b) LIMITED DISTRIBUTION LICENSE
(i) IF YOU ARE AN INDIVIDUAL, YOU MAY: distribute copies of the Evaluation Software to your friends or
associates, provided that you charge no fees nor request any donations for this service, and that you convey only a
complete and unaltered copy of the original Evaluation Software files, in the exact form that they were downloaded from
www.terabyteunlimited.com.
(ii) ALL OTHER DISTRIBUTION is allowed only under the terms set forth by TeraByte, if any, at the
www.terabyteunlimited.com web site. TeraByte may, at its sole discretion, append a data record to the distribution files
for the Evaluation Software, in which event such data record shall be automatically incorporated by reference. Any
distribution satisfying all of the distribution requirements expressed at the web site or in that data record, if any, is hereby
authorized; all other distribution requires TeraByte's advance written approval.
(iii) Each individual, and each vendor, wishing to distribute the Evaluation Software package must
independently satisfy all terms of the limited distribution license.
(iv) You may make as many copies of this Evaluation Software as you need, for purposes of the limited
distribution permitted in this Agreement.
Image for Windows User Manual
Page 212 of 218
(v) TERABYTE RESERVES THE RIGHT TO RETRACT OR CHANGE ANY OR ALL OF THE ABOVE
DISTRIBUTION RIGHTS AT ANY TIME, FOR ANY OR NO REASON.
(c) YOU MAY NOT:
(i) permit others to use the Evaluation Software unless they are properly licensed by TeraByte, either under this
Agreement or another agreement from TeraByte;
(ii) modify, translate, reverse engineer, decompile, disassemble, or create derivative works based on, the
Evaluation Software;
(iii) copy the Evaluation Software except as expressly permitted above;
(iv) distribute the Evaluation Software, bundle it with other products, rent, lease, sell, grant a security interest in,
or otherwise transfer rights to, or possession of, the Evaluation Software or any copy thereof, except as may be expressly
provided in this Agreement;
(v) remove or alter any proprietary notices, labels or legends on any copy of the Evaluation Software; or
(vi) ship or transmit (directly or indirectly) any copies of the Evaluation Software or their media, or any direct
product thereof, to any country or destination prohibited by the United States Government.
(d) RESERVATION OF RIGHTS. All rights and licenses not expressly granted by TeraByte in this Agreement are entirely
and exclusively reserved to TeraByte.
2. TERM AND TERMINATION: This Agreement shall remain effective until this Agreement is terminated, provided that in
no event shall your evaluation rights hereunder extend beyond the thirty (30) day period set forth in Section 1 above. You
may terminate it at any time by destroying the distribution media together with all of your copies of the Evaluation
Software in any form. This Agreement will also automatically terminate, without notice, if you fail to comply fully with any
term or condition of this Agreement, or if your normal business operations are disrupted or discontinued for more than
thirty days by reason of insolvency, bankruptcy, receivership, or business termination. Upon termination of this
Agreement, you must destroy all copies of the Evaluation Software in any form.
3. OWNERSHIP AND CONFIDENTIAL INFORMATION: TeraByte or its licensors own the Evaluation Software under
copyright, trade secret and all other laws that may apply. All product names, designs, and logos associated with the
Evaluation Software are trademarks of TeraByte. The source code of the Evaluation Software and all information
regarding the design, structure or internal operation of the Evaluation Software are valuable trade secrets of TeraByte or
third parties with which TeraByte has licensing arrangements ("Confidential Information"), provided however, that
"Confidential Information" shall not include information which otherwise would be Confidential Information to the extent
that such information was publicly known or otherwise known to you previously to the time of disclosure, which
subsequently became known through no act or omission by you, or which otherwise became known to you other than
through disclosure by TeraByte. You shall not sell, transfer, publish, disclose, display or otherwise permit access to any
Confidential Information by any third party, nor may you use any of the Confidential Information, except strictly as part of
the Evaluation Software in the form originally distributed by TeraByte.
4. LIMITED WARRANTY: THE EVALUATION SOFTWARE IS PROVIDED ENTIRELY "AS-IS". TERABYTE MAKES NO
WARRANTIES, EXPRESSED OR IMPLIED, WITH RESPECT TO THE EVALUATION SOFTWARE, ITS
MERCHANTABILITY, OR ITS FITNESS FOR ANY PARTICULAR PURPOSE. TERABYTE DOES NOT WARRANT
THAT THE EVALUATION SOFTWARE WILL MEET YOUR REQUIREMENTS OR THAT THE OPERATION OF THE
EVALUATION SOFTWARE WILL BE UNINTERRUPTED OR ERROR FREE. YOU ASSUME FULL RESPONSIBILITY
FOR SELECTING AND USING THE EVALUATION SOFTWARE, AND THAT IF YOU USE THE EVALUATION
SOFTWARE IMPROPERLY OR AGAINST INSTRUCTIONS, YOU CAN CAUSE DAMAGE TO YOUR FILES,
SOFTWARE, DATA OR BUSINESS. THE ENTIRE RISK AS TO THE QUALITY AND PERFORMANCE OF THE
EVALUATION SOFTWARE IS BORNE BY YOU. THIS DISCLAIMER OF WARRANTY CONSTITUTES AN ESSENTIAL
PART OF THE AGREEMENT. Some jurisdictions do not allow exclusions of an implied warranty, so this disclaimer may
not apply to you and you may have other legal rights that vary by jurisdiction.
5. LIMITATION OF LIABILITY. ANY LIABILITY OF TERABYTE WILL BE LIMITED EXCLUSIVELY TO PRODUCT
REPLACEMENT OR REFUND OF PURCHASE PRICE. IN ADDITION, IN NO EVENT WILL TERABYTE, NOR ANY
OTHER PERSON OR ENTITY INVOLVED IN THE CREATION, PRODUCTION, OR DELIVERY OF THE EVALUATION
SOFTWARE, BE LIABLE FOR INDIRECT, INCIDENTAL, CONSEQUENTIAL OR PUNITIVE DAMAGES WHATSOEVER,
INCLUDING WITHOUT LIMITATION LOSS OF INCOME, USE OR INFORMATION, RELATING EITHER TO THE USE
OF THE EVALUATION SOFTWARE, OR YOUR RELATIONSHIP WITH TERABYTE, EVEN IF TERABYTE HAS BEEN
ADVISED IN ADVANCE OF THE POSSIBILITY OF SUCH DAMAGES OR CLAIMS. Any suit or other legal action relating
in any way to this Agreement or to the Evaluation Software must be filed or commenced no later than one (1) year after it
accrues. You may also have other rights which vary from state to state.
Image for Windows User Manual
Page 213 of 218
6. HIGH RISK ACTIVITIES. The Evaluation Software is not fault-tolerant and is not designed, manufactured or intended
for use on equipment or software running in hazardous environments requiring fail-safe performance, including but not
limited to the operation of nuclear facilities, aircraft navigation or communication systems, air traffic control, direct life
support machines, or weapons systems, in which the failure of the Evaluation Software could contribute to death, personal
injury, or severe physical or environmental damage ("High Risk Activities"). TERABYTE AND ITS SUPPLIERS
SPECIFICALLY DISCLAIM ANY EXPRESS OR IMPLIED WARRANTY OF FITNESS OF THE EVALUATION
SOFTWARE FOR HIGH RISK ACTIVITIES. TERABYTE DOES NOT AUTHORIZE USE OF THE EVALUATION
SOFTWARE FOR ANY HIGH RISK ACTIVITY. YOU AGREE TO DEFEND AND INDEMNIFY TERABYTE, AND HOLD
TERABYTE HARMLESS, FROM AND AGAINST ANY AND ALL CLAIMS, ACTIONS, LOSSES, COSTS JUDGMENTS
AND DAMAGES OF ANY KIND IN CONNECTION WITH USE IN RELATION TO ANY HIGH RISK ACTIVITY OF ANY
COPY OF THE EVALUATION SOFTWARE RELATING TO THIS LICENSE.
7. RESTRICTED RIGHTS - COMMERCIAL COMPUTER SOFTWARE. The parties acknowledge and agree that: (a) any
and all products covered by this Agreement are, and shall be, deemed "commercial computer software" for all purposes in
relation to U.S. government acquisition laws, rules and regulations, and (b) all use, duplication and disclosure by, for, or
on behalf of the U.S. Government is subject to all conditions, limitations and restrictions applicable to "commercial
computer software" as set forth in FAR section 12.212 and in DFAR sections 227.7202-1, 227.7202-3, and 227.7202-4.
8. GENERAL.
(a) ENTIRE AGREEMENT. This Agreement constitutes the entire agreement between you and TeraByte in regard to the
subject matter herein, and supersedes all previous and contemporaneous agreements, proposals and communications,
written or oral between you and TeraByte. No amendment of this Agreement shall be effective unless it is in writing and
signed by duly authorized representatives of both parties.
(b) NON-WAIVER. Waiver by TeraByte of any violation of any provision of this License shall not be deemed to waive any
further or future violation of the same or any other provision.
(c) LAW AND JURISDICTION. This License and any dispute relating to the Evaluation Software or to this License shall
be governed by the laws of the United States and the laws of the State of Nevada, without regard to U.S. or Nevada
choice of law rules. You agree and consent that jurisdiction and proper venue for all claims, actions and proceedings of
any kind relating to TeraByte or the matters in this License shall be exclusively in courts located in Las Vegas, Nevada. If
a court with the necessary subject matter jurisdiction over a given matter cannot be found in Las Vegas, then jurisdiction
for that matter shall be exclusively in a court with the proper jurisdiction as close to Las Vegas as possible, and within
Nevada if possible.
(d) SEVERABILITY. If any part or provision of this License is held to be unenforceable for any purpose, including but not
limited to public policy grounds, then you agree that the remainder of the License shall be fully enforceable as if the
unenforceable part or provision never existed.
(e) NON-ASSIGNMENT. You may not assign this License without the prior written consent of TeraByte, except as part of
a sale of all or substantially all of the assets of your business.
(f) NO THIRD PARTY BENEFICIARIES. There are no third party beneficiaries of any promises, obligations or
representations made by TeraByte herein.
(g) HEIRS AND ASSIGNS. This Agreement shall be binding on and shall inure to the benefit of the heirs, executors,
administrators, successors and assigns of the parties hereto, but nothing in this paragraph shall be construed as a
consent by TeraByte to any assignment of this agreement except as provided hereinabove.
(h) SURVIVAL. The provisions of paragraphs 1(a)(iv), 1(c)(ii) and 3 of this Agreement shall survive any termination or
expiration of this Agreement.
Image for Windows User Manual
Page 214 of 218
TeraByte Unlimited (Full-Use) License Agreement
(Revised April 1, 2011)
PLEASE READ THIS LICENSE AGREEMENT CAREFULLY BEFORE UPGRADING, COPYING, INSTALLING OR
USING THE ACCOMPANYING SOFTWARE PROGRAM (the “Software”).
THIS AGREEMENT SETS FORTH THE STANDARD FULL-USE LICENSE FOR USE OF THE SOFTWARE ON YOUR
COMPUTER SYSTEM. IN ORDER TO USE THE SOFTWARE UNDER THIS FULL-USE LICENSE, YOU MUST
PURCHASE, OR HAVE PURCHASED, EITHER:
a)
ONE OR MORE COPIES OF THE SOFTWARE WITH FULL-USE LICENSE RIGHTS, FROM TERABYTE OR
A TERABYTE-AUTHORIZED LICENSING AGENT, OR
b)
FULL-USE LICENSE RIGHTS FROM TERABYTE OR A TERABYTE-AUTHORIZED LICENSING AGENT FOR
ONE OR MORE TIME-LIMITED "EVALUATION VERSION" COPIES OF THE SOFTWARE ALREADY IN
YOUR POSSESSION.
THERE MAY BE AN ACTIVATION PROCESS DESCRIBED IN THE SOFTWARE, PURCHASE RECEIPT OR IN
TERABYTE DOCUMENTATION THAT MUST BE FOLLOWED OR YOUR USE OF THE SOFTWARE MAY BE LIMITED
OR PREVENTED.
If you do not agree to all of the terms and conditions of this License Agreement as set forth below, then: (a) do not
install, upgrade, copy or use the Software, (b) if you received any registration codes or serial numbers, do not copy, use,
retain or disclose any of those registration codes or serial numbers, and (c) if you purchased packaged copies of the
Software with full-use rights, you may return the complete package, unused, to your place of purchase within fifteen (15)
days after purchase for a refund. The exercise of any or all of the rights set forth below constitutes acceptance of
all of the terms and conditions of the Agreement. Where you have received a signed Agreement directly from
TeraByte, any discrepancy between that signed Agreement and an unsigned Agreement shall be controlled by the signed
Agreement.
As further set forth below, TeraByte Inc., dba TeraByte Unlimited ("TeraByte") and/or its suppliers own the Software and
its documentation, which are protected under applicable copyright, trade secrets, and other laws. The Software is
licensed, not sold. Your rights and license to use the Software and the documentation are limited to the terms and subject
to the conditions set forth in this Agreement.
1.
LICENSE:
(a)
YOU MAY:
(i)
(Single Copy License) if you paid for a single copy license, use the Software on a single computer that
you or your organization owns or controls (“Computer System”), as further described in 1(c) below;
(ii)
(Multiple Copy License) if you paid for a multiple copy license, make and use the number of Software
copies for which you paid, provided that you may only use each copy of the Software as described in (i)
above;
(iii) (Transfer of Installation) physically transfer any installed, licensed copy of the Software from one
Computer System (the “Old System”) to another Computer System (the “New System”), provided that that
copy may be installed on only one Computer System at a time, and further provided that when you make
the transfer, you must uninstall and remove any and all copies of the Software from the Computer System
from which the programs are transferred. Where uninstalling from the Old System is impossible due to
such Old System being damaged or otherwise non-functional, the requirement for such uninstall and
removal shall be waived unless and until such Old System becomes functional. Such transfer shall be
permitted (a) when the New System is a replacement for the Old System, or (b) with written approval from
TeraByte. Unless otherwise authorized by TeraByte, in writing, each licensed copy of the Software shall
be licensed for one and only one Computer System. Such shall be the case whether or not the Software is
installed on a disk drive permanently attached to the Computer System for which the Software may be
licensed. Specifically, installation upon portable media including without limitation flash drives and CDs
shall not circumvent the requirement of maintaining a license for the Software on each Computer System
on which the Software may be used, although it is permissible for Software installed upon a portable drive
or other drive accessible from multiple Computer Systems to be executed upon more than one such
system, provided that licenses are maintained for each Computer System on which such Software may be
executed;
(iv) (Backup Copy) make a copy of each licensed copy of the Software solely for purposes of backup;
(v)
(Images) create and keep "per computer" Images, as described in paragraph 1(e)(i) below, if the Software
product, as licensed, provides imaging functionality; and
(vi) (Image Deployment) if you paid for additional “Image Deployment” license rights, create and distribute
additional Images as described in paragraph 1(e)(ii) below.
Image for Windows User Manual
Page 215 of 218
PROVIDED IN ALL CASES THAT all copyright and other proprietary and Federal acquisition notices, as
included by TeraByte with the Software, be fully and accurately reproduced by you on any and all copies of the
Software.
(b)
YOU MAY NOT: (i) permit others to use the Software unless they are properly licensed by TeraByte, either
under this Agreement or another agreement from TeraByte, nor install or use the Software on any computer or
computer-related device except Computer Systems as authorized in (a) above; (ii) under a single use license,
install a copy of the Software on one Computer System and also use it on one or more other Computer
Systems (no less than a two (2) copy license would be required for such use); (iii) permit concurrent use of any
copy of the Software; (iv) modify, translate, reverse engineer, decompile, disassemble, or create derivative
works based on, the Software; (v) copy the Software except as expressly permitted above; (vi) rent, lease, grant
a security interest in, or otherwise transfer rights to, or possession of, the Software or any copy thereof, unless
properly licensed by TeraByte, under another agreement that specifically permits such action; (vii) remove or
alter any proprietary notices, labels or legends on any copy of the Software; (viii) ship or transmit (directly or
indirectly) any copies of the Software or their media, or any direct product thereof, to any country or destination
prohibited by the United States Government; or (ix) disclose serial numbers or registration codes to others,
unless they are properly licensed to receive such information, either under this Agreement or another
agreement from TeraByte.
(c)
PERMITTED END USERS AND COMPUTER SYSTEMS.
(i)
(ii)
Commercial or Organizational Use. If you are a corporation, LLC, or other commercial entity, whether
public or private, for profit or not-for-profit, or a government entity, or if the Software is ever used for
purposes related to any such commercial or government entity, the permitted Software end users and
Computer Systems under this license are, as applicable:
(1)
Your own employees and in-house contractors, and your in-house Computer Systems owned or
controlled by you,
(2)
A parent organization that has majority ownership or control of your organization (if any), its
employees and in-house contractors, and that organization’s in-house Computer Systems owned or
controlled by that organization,
(3)
Your subsidiary organization or organizations (if any), those organizations’ employees and in-house
contractors, and those organization’s in-house Computer Systems owned or controlled by those
organizations, and
(4)
Your affiliated organizations (if any; “affiliated organization” means any organization which is under
majority control or ownership by the same parent that majority owns or majority controls you), those
organizations’ employees and in-house contractors, and those organization’s in-house Computer
Systems owned or controlled by those organizations.
Personal or Home Users. If you are a real person, and if all Software under this license is used
exclusively for personal non-commercial use only, then each licensed copy may be installed on two
additional Computer Systems owned or controlled by you, or a member of your immediate family.
“Control”: For purposes of this Agreement, a person or entity “controls” a Computer System when he, she or it
has actual control over the day-to-day use of that Computer System.
(d)
RESERVATION OF RIGHTS. All rights and licenses not expressly granted by TeraByte in this Agreement are
entirely and exclusively reserved to TeraByte.
(e)
IMAGE LICENSES. If the Software’s functionality, as licensed, includes the ability to create one or more disk
partition images or otherwise copy one or more partitions (“Images") then the use of each Image is subject to all
of the conditions and restrictions of this Agreement.
Your rights to create and distribute Images are based on the Software licensed and the type of license you
purchased (as may be indicated on your sales receipt or comparable sales documentation received by you from
TeraByte):
(i) "PER COMPUTER" IMAGE LICENSE: Each licensed copy of the Software includes, without extra charge, a
"per computer" license to create and keep Images for the same Computer System(s) on which you are licensed
to use the Software itself; those Images may not be distributed to, or used in any manner with, any other
computers (except for direct replacements for such systems as provided in subsection 1(a)(iii) above), nor may
you create or retain images for additional Computer Systems unless the previously created images are
destroyed, or you purchased additional licenses to cover such Computer Systems. You may create and keep
an unlimited number of Images for each licensed Computer System. For example, if you purchased a license
for five (5) copies of the Software, then you may create and keep an unlimited number of Images for up to five
Computer Systems with which you properly use those 5 Software copies as described in 1(a)(i) and 1(a)(ii)
above, but you may not distribute those Images to, or use them with, any other Computer System.
(ii) ”IMAGE DEPLOYMENT” LICENSE. If, in addition to the standard Software license, you purchased an
“Image Deployment" license (as indicated on your sales receipt from TeraByte), then: (A) you may make an
unlimited number of Images on any Computer System on which you may use the Software under this license,
Image for Windows User Manual
Page 216 of 218
and (B) you may deploy each Image to other Computer Systems, referred to as “deployment computers,” each
such deployment computer having been provided an Image Deployment license. Image Deployment licenses
remain allocated to such deployment computers until and unless such deployment computer is taken out of
service and replaced. In such case, said Image Deployment license may be transferred to such replacement
system subject to limitations as provided in subsection 1(a)(iii) above. For the right to distribute Images to
additional computers, you will need to purchase additional Image Deployment License rights from TeraByte.
Images deployed as described herein may only be restored or referenced on Computer Systems having been
licensed with at least an Image Deployment license, and once restored, may not be moved to any Computer
System not so licensed without prior authorization from TeraByte.
(f)
2.
PARTITION MANAGEMENT LICENSING. If the Software’s functionality, as licensed, includes the ability to
create, resize, slide or otherwise manage partitions on a hard drive, or otherwise to control or repair system
boot parameters, then the use of each such reparation or partition management change is likewise subject to all
of the conditions and restrictions of this Agreement, including without limitation, restriction of use of such
reparation or partition management change to Computer Systems licensed hereunder.
TERM AND TERMINATION: This Agreement, and your license rights hereunder, remain effective until this
Agreement is terminated.
(a)
Termination by You. You may terminate it at any time by destroying the distribution media together with all of
your copies of the Software in any form.
(b)
Termination for Breach. This Agreement may be terminated by TeraByte upon notice, at its sole discretion, if
you fail to completely remedy any breach by you of any term or condition herein within ten (10) days after notice
of such breach is delivered by TeraByte to you,
(c)
Automatic Termination. This Agreement will automatically terminate without notice if your normal business
operations are disrupted or discontinued for more than thirty days by reason of insolvency, bankruptcy,
receivership, or business termination. Upon termination of this Agreement, you must destroy all copies of the
Software in any form.
3.
OWNERSHIP AND CONFIDENTIAL INFORMATION: TeraByte or its licensors own the Software under copyright,
trade secret and all other laws that may apply. All product names, designs, and logos associated with the Software
are trademarks of TeraByte. The source code of the Software and all information regarding the design, structure or
internal operation of the Software are valuable trade secrets of TeraByte or third parties with which TeraByte has
licensing arrangements ("Confidential Information"), provided however, that "Confidential Information" shall not
include information which otherwise would be Confidential Information to the extent that such information was
publicly known or otherwise known to you previously to the time of disclosure, which subsequently became known
through no act or omission by you, or which otherwise became known to you other than through disclosure by
TeraByte without violation of any party's obligations to TeraByte. You shall not sell, transfer, publish, disclose,
display or otherwise permit access to any Confidential Information by any third party, nor may you use any of the
Confidential Information, except strictly as part of the Software in the form originally distributed by TeraByte.
4.
LIMITED WARRANTY: TeraByte Unlimited warrants that for a period of thirty (30) days from the date of purchase,
the Software will perform in conformity with the user documentation supplied by TeraByte, provided that your
EXCLUSIVE REMEDY under this warranty shall be to return the Software to TeraByte in exchange for repair,
replacement, or a full refund of your purchase price (at TeraByte's option) within forty-five (45) days after the date of
purchase. In addition, the above warranty does not apply to the extent that any failure of the Software to perform as
warranted is caused by the Software being (a) not used in accordance with the user documentation, or (b) modified
by any person other than authorized TeraByte personnel. EXCEPT FOR THE EXPRESS WARRANTY GRANTED
IMMEDIATELY ABOVE, TERABYTE MAKES NO WARRANTIES, EXPRESSED OR IMPLIED, WITH RESPECT TO
THE SOFTWARE, ITS MERCHANTABILITY, OR ITS FITNESS FOR ANY PARTICULAR PURPOSE. YOU
ACKNOWLEDGE AND AGREE THAT YOU HAD FULL OPPORTUNITY TO USE AND TEST THE SOFTWARE
BEFORE PURCHASE. TERABYTE DOES NOT WARRANT THAT THE SOFTWARE WILL MEET YOUR
REQUIREMENTS OR THAT THE OPERATION OF THE SOFTWARE WILL BE UNINTERRUPTED OR ERROR
FREE. YOU ASSUME FULL RESPONSIBILITY FOR SELECTING AND USING THE SOFTWARE, AND THAT IF
YOU USE THE SOFTWARE IMPROPERLY OR AGAINST INSTRUCTIONS, YOU CAN CAUSE DAMAGE TO
YOUR FILES, SOFTWARE, DATA OR BUSINESS. THE ENTIRE RISK AS TO THE QUALITY AND
PERFORMANCE OF THE SOFTWARE IS BORNE BY YOU. THIS DISCLAIMER OF WARRANTY CONSTITUTES
AN ESSENTIAL PART OF THE AGREEMENT. Some jurisdictions do not allow exclusions of an implied warranty, so
this disclaimer may not apply to you and you may have other legal rights that vary by jurisdiction.
5.
LIMITATION OF LIABILITY. ANY LIABILITY OF TERABYTE WILL BE LIMITED EXCLUSIVELY TO PRODUCT
REPLACEMENT OR REFUND OF PURCHASE PRICE. IN ADDITION, IN NO EVENT WILL TERABYTE, NOR ANY
OTHER PERSON OR ENTITY INVOLVED IN THE CREATION, PRODUCTION, OR DELIVERY OF THE
SOFTWARE, BE LIABLE FOR INDIRECT, INCIDENTAL, CONSEQUENTIAL OR PUNITIVE DAMAGES
WHATSOEVER, INCLUDING WITHOUT LIMITATION LOSS OF INCOME, USE OR INFORMATION, RELATING
EITHER TO THE USE OF THE SOFTWARE, OR YOUR RELATIONSHIP WITH TERABYTE, EVEN IF TERABYTE
Image for Windows User Manual
Page 217 of 218
HAS BEEN ADVISED IN ADVANCE OF THE POSSIBILITY OF SUCH DAMAGES OR CLAIMS. Any suit or other
legal action relating in any way to this Agreement or to the Software must be filed or commenced no later than one
(1) year after it accrues. You may also have other rights which vary from state to state.
6.
HIGH RISK ACTIVITIES. The Software is not fault-tolerant and is not designed, manufactured or intended for use on
equipment or software running in hazardous environments requiring fail-safe performance, including but not limited
to the operation of nuclear facilities, aircraft navigation or communication systems, air traffic control, direct life
support machines, or weapons systems, in which the failure of the Software could contribute to death, personal
injury, or severe physical or environmental damage ("High Risk Activities"). TERABYTE AND ITS SUPPLIERS
SPECIFICALLY DISCLAIM ANY EXPRESS OR IMPLIED WARRANTY OF FITNESS OF THE SOFTWARE FOR
HIGH RISK ACTIVITIES. TERABYTE DOES NOT AUTHORIZE USE OF THE SOFTWARE FOR ANY HIGH RISK
ACTIVITY. YOU AGREE TO DEFEND AND INDEMNIFY TERABYTE, AND HOLD TERABYTE HARMLESS, FROM
AND AGAINST ANY AND ALL CLAIMS, ACTIONS, LOSSES, COSTS JUDGMENTS AND DAMAGES OF ANY
KIND IN CONNECTION WITH USE IN RELATION TO ANY HIGH RISK ACTIVITY OF ANY COPY OF THE
SOFTWARE RELATING TO THIS LICENSE.
7.
RESTRICTED RIGHTS - COMMERCIAL COMPUTER SOFTWARE. The parties acknowledge and agree that: (a)
any and all products covered by this Agreement are, and shall be, deemed "commercial computer software" for all
purposes in relation to U.S. government acquisition laws, rules and regulations, and (b) all use, duplication and
disclosure by, for, or on behalf of the U.S. Government is subject to all conditions, limitations and restrictions
applicable to "commercial computer software" as set forth in FAR section 12.212 and in DFAR sections 227.7202-1,
227.7202-3, and 227.7202-4.
8.
GENERAL.
(a)
ENTIRE AGREEMENT. This Agreement constitutes the entire agreement between you and TeraByte in regard
to the subject matter herein, and supersedes all previous and contemporaneous agreements, proposals and
communications, written or oral between you and TeraByte. No amendment of this Agreement shall be effective
unless it is in writing and signed by duly authorized representatives of both parties.
(b)
NON-WAIVER. Waiver by TeraByte of any violation of any provision of this License shall not be deemed to
waive any further or future violation of the same or any other provision.
(c)
LAW AND JURISDICTION. This License and any dispute relating to the Software or to this License shall be
governed by the laws of the United States and the laws of the State of Nevada, without regard to U.S. or
Nevada choice of law rules. You agree and consent that jurisdiction and proper venue for all claims, actions
and proceedings of any kind relating to TeraByte or the matters in this License shall be exclusively in courts
located in Las Vegas, Nevada. If a court with the necessary subject matter jurisdiction over a given matter
cannot be found in Las Vegas, then jurisdiction for that matter shall be exclusively in a court with the proper
jurisdiction as close to Las Vegas as possible, and within Nevada if possible.
(d)
SEVERABILITY. If any part or provision of this License is held to be unenforceable for any purpose, including
but not limited to public policy grounds, then you agree that the remainder of the License shall be fully
enforceable as if the unenforceable part or provision never existed.
(e)
NON-ASSIGNMENT. You may not assign this License without the prior written consent of TeraByte, except as
part of a sale of all or substantially all of the assets of your business.
(f)
NO THIRD PARTY BENEFICIARIES. There are no third party beneficiaries of any promises, obligations or
representations made by TeraByte herein.
(g)
HEIRS AND ASSIGNS. This Agreement shall be binding on and shall inure to the benefit of the heirs,
executors, administrators, successors and assigns of the parties hereto, but nothing in this paragraph shall be
construed as a consent by TeraByte to any assignment of this agreement except as provided hereinabove.
(h)
SURVIVAL. The provisions of paragraphs 1(b)(iv), 1(b)(vii), 1(b)(ix), 2, 3 and 6 of this Agreement shall survive
any termination or expiration of this Agreement.
Image for Windows User Manual
Page 218 of 218


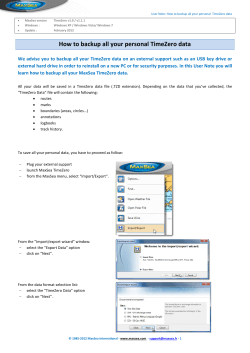


© Copyright 2026