
Administrator Manual v3.0
Administrator Manual v3.0 SecurityGateway for Email Servers Administrator Manual Copyright © 2007-2014. All rights reserved. Alt-N Technologies, Ltd. Products that are referred to in this document may be trademarks and/or registered trademarks of the respective owners. v3.0.0 - May 2014 Contents 3 Table of Contents Section I SecurityGateway 8 1 Overview ......................................................................................................................................8 2 New......................................................................................................................................13 in Version 3.0 Section II My Account 18 1 My Settings ......................................................................................................................................19 2 My Whitelist ......................................................................................................................................21 3 My Blacklist ......................................................................................................................................23 4 View......................................................................................................................................25 My Quarantine 5 View......................................................................................................................................26 My Message Log Section III Setup/Users 30 1 Accounts ......................................................................................................................................31 Dom ains and ..................................................................................................................................................................31 Users Domain List ............................................................................................................................................................31 Domain Properties ...................................................................................................................................................33 User List ............................................................................................................................................................36 User Edit ...................................................................................................................................................39 Adm inistrators ..................................................................................................................................................................41 Edit Administrator ............................................................................................................................................................41 User Verification ..................................................................................................................................................................43 Sources Edit Verification ............................................................................................................................................................45 Source Autom atic..................................................................................................................................................................49 Dom ain Creation User Options ..................................................................................................................................................................49 2 Mail......................................................................................................................................51 Configuration Dom ain Mail ..................................................................................................................................................................52 Servers Edit Mail Server ............................................................................................................................................................53 Rem ote POP ..................................................................................................................................................................54 Accounts Edit POP Account ............................................................................................................................................................55 Quarantine ..................................................................................................................................................................58 Configuration Mail Delivery ..................................................................................................................................................................59 Em ail Protocol ..................................................................................................................................................................60 3 Disclaimers ......................................................................................................................................63 (Headers/Footers) Edit Disclaim ..................................................................................................................................................................64 er 4 System ......................................................................................................................................68 Encryption..................................................................................................................................................................69 HTTP Server ..................................................................................................................................................................70 Branding/Custom ..................................................................................................................................................................71 Im ages Directories ..................................................................................................................................................................72 Disk Space ..................................................................................................................................................................73 View Configuration ..................................................................................................................................................................73 5 Database ......................................................................................................................................73 Maintenance Data Retention ..................................................................................................................................................................74 Backup ..................................................................................................................................................................75 Copyright © 2007-2014. All rights reserved. Alt-N Technologies, Ltd. 4 SecurityGateway for Email Servers v3.0 Restore ..................................................................................................................................................................77 6 Software ......................................................................................................................................78 Updates 7 Registration ......................................................................................................................................79 Section IV Security 82 1 Anti-Spam ......................................................................................................................................83 Outbreak ..................................................................................................................................................................84 Protection Heuristics..................................................................................................................................................................89 and Bayesian SGSpamD............................................................................................................................................................91 Configuration DNS Blacklists ..................................................................................................................................................................95 (DNSBL) URI Blacklists ..................................................................................................................................................................99 (URIBL) Greylisting ..................................................................................................................................................................102 Message..................................................................................................................................................................104 Certification Backscatter ..................................................................................................................................................................107 Protection Message..................................................................................................................................................................109 Scoring 2 Anti-Virus ......................................................................................................................................111 Virus Scanning ..................................................................................................................................................................111 Configure ..................................................................................................................................................................113 Updates 3 Anti-Spoofing ......................................................................................................................................114 Reverse ..................................................................................................................................................................115 Lookups DKIM Verification ..................................................................................................................................................................118 DK/DKIM Signing ..................................................................................................................................................................121 Sender Policy ..................................................................................................................................................................123 Fram ew ork (SPF) Sender ID ..................................................................................................................................................................126 Callback ..................................................................................................................................................................129 Verification 4 Anti-Abuse ......................................................................................................................................132 Relay Control ..................................................................................................................................................................133 SMTP Authentication ..................................................................................................................................................................134 IP Shielding ..................................................................................................................................................................135 Dynam ic ..................................................................................................................................................................136 Screening Tarpitting ..................................................................................................................................................................138 Bandw idth ..................................................................................................................................................................139 Throttling 5 Filtering ......................................................................................................................................140 Message..................................................................................................................................................................140 Content Attachm ents ..................................................................................................................................................................149 6 Blacklists ......................................................................................................................................151 Addresses ..................................................................................................................................................................152 Hosts ..................................................................................................................................................................154 IPs ..................................................................................................................................................................156 Action ..................................................................................................................................................................159 7 Whitelists ......................................................................................................................................159 Addresses ..................................................................................................................................................................160 Hosts ..................................................................................................................................................................162 IPs ..................................................................................................................................................................165 8 Advanced ......................................................................................................................................167 Sieve Scripts ..................................................................................................................................................................167 Creating............................................................................................................................................................170 Sieve Scripts Sieve Extensions ............................................................................................................................................................179 Section V Messages/Queues 188 Copyright © 2007-2014. All rights reserved. Alt-N Technologies, Ltd. Contents 5 1 Message ......................................................................................................................................189 Log 2 Message ......................................................................................................................................190 Queues Quarantined ..................................................................................................................................................................190 (User) Quarantined ..................................................................................................................................................................191 (Adm in) Queued for ..................................................................................................................................................................192 Delivery Bad Messages ..................................................................................................................................................................193 Section VI Logging 196 1 Message ......................................................................................................................................197 Log 2 Log......................................................................................................................................198 Files 3 Configuration ......................................................................................................................................199 Section VII Reports Index Copyright © 2007-2014. All rights reserved. Alt-N Technologies, Ltd. 204 211 Copyright © 2007-2014. All rights reserved. Alt-N Technologies, Ltd. Section I 8 SecurityGateway for Email Servers v3.0 1 SecurityGateway 1.1 Overview Alt-N Technologies has incorporated many years of mail server technology expertise into developing an email security firewall for users of any SMTP email server. SecurityGateway for Email Servers incorporates multiple defense layers that deliver comprehensive protection at the edge of your network to prevent spam, phishing, viruses, and other threats to your email communications. Built upon the industry standard SIEVE mail filtering language, SecurityGateway for Email Servers email security firewall offers performance and flexibility in managing inbound and outbound email traffic. The SecurityGateway email security firewall offers many advantages: Accurate Detection—With multiple analysis tools for separating threats from legitimate email, SecurityGateway leverages the best proven anti-spam 83 , anti-virus 111 , anti-spoofing 114 , and anti-abuse 132 technologies to produce a 99% spam blocking rate and achieve nearly zero false positive results. Simple Administration—An intuitive, task-oriented interface provides a Landing Page for each of SecurityGateway's main sections. These landing pages contain lists of common tasks and provide links to the pages where each task can be performed. This approach allows administrators 41 to perform common actions with minimal effort. Further, administrative responsibilities may be delegated to a Domain Administrator, allowing that administrator to manage one or more domains assigned by a Global Administrator. Additionally, end users are empowered 18 to determine the fate of a message without the need to contact the administrator. Data Loss Prevention—In addition to inbound email traffic filtering, SecurityGateway also filters outbound email. An easy-to-use interface allows policies to be created which detect and prevent the unauthorized transmission of sensitive information outside of your network. Powerful Filtering Engine—SecurityGateway's powerful filtering engine is based upon the SIEVE mail filtering language. Further, using the included Message Content Filter 140 and SIEVE Scripts Editor 167 , administrators may extend the functionality of SecurityGateway by creating their own SIEVE scripts. Comprehensive Reporting—Identify email traffic patterns and potential problems with SecurityGateway's comprehensive reporting 204 . All reports support point-and-click drill-down targeting allowing further analysis to be performed. Flexible Defense Layers—Administrators who wish to adjust the order of operation in SecurityGateway's multiple layers of defense, have the flexibility to prioritize the security rules for their unique email patterns. Copyright © 2007-2014. All rights reserved. Alt-N Technologies, Ltd. SecurityGateway 9 Features Overview SecurityGateway's navigation menu in the left pane contains six menus, with each menu corresponding to a section of SecurityGateway's features. The following is a brief overview of these six main sections: The Dashboard The first page that you see when you log in to SecurityGateway for Email Servers is the Dashboard. The Dashboard landing page gives you a quick overview of SecurityGateway's current status and several summary reports 204 of its activity for the last 24 hours. At the top of the Dashboard is the Server Status section. This section tells you whether or not the SMTP service is running, and it gives you a link to start or stop it. Further, the Dashboard lists your registration key size, provides a link to manage your registration 79 and activation, and lists how many domains and users currently exist. It also provides a link to the Domain List 31 to manage your domains and users. When a software update 78 is available, this section will also provide a link to details about the update. Below the Server Status section is the Server Statistics section. This section displays six of SecurityGateway's graphical reports: Inbound vs. Outbound Messages 204 , Total Bandwidth Used by Email 204 , Good vs. Junk Messages 204 , Junk Email Breakdown 204 , Top Email Recipients 206 , and Top Spam Domains 207 . Each report displays the statistics for the last 24 hours. In the Dashboard menu in the left pane there is a link to the Dashboard landing page, and there are links to your My Account 18 options, which allow you to manage your own account settings, quarantine, and message log. Domain Administrators 41 will only see statistics and options for the domains over which they have administrative access. Setup/Users 30 The Setup/Users menu has seven subsections containing links to SecurityGateway's core configuration options. You will use the options in these sections to setup your domains and user accounts, mail delivery options, quarantine settings, backup and database preferences, and other configuration options. The Setup/Users menu has these subsections: Accounts 31 —The Accounts section under the Setup/Users menu contains options related to your SecurityGateway user accounts and domains. There are five account-related links under this section that include options for creating domains and user accounts, designating User Verification Sources, setting the default values for a number of user options, and more. Mail Configuration 51 —The Mail Configuration section provides links to five Copyright © 2007-2014. All rights reserved. Alt-N Technologies, Ltd. 10 SecurityGateway for Email Servers v3.0 pages governing various mail-related functions. For example, you will use the options under this section to designate the servers on which your users' email accounts reside, set your quarantine options, configure various email delivery options, and manage other technical settings. Disclaimers (Headers/Footers) 63 —Message Disclaimers are portions of text that the server can add above or below the body of inbound, outbound or local email messages. Use this page to create and manage you disclaimers. System 68 —The System section under the Setup/Users menu contains links to various system functions, such as encryption settings, HTTP interface options, directory locations, disk space management options, and more. Database Maintenance 73 —The options reached from this section deal with the type and amount of data that is saved by SecurityGateway, automatic backup features, and options for restoring the server from backup files. Registration 79 —The Registration page lists your product registration information, including the name of the person or company to whom the product is registered, the registration key, and the status of your registration. For more information, see the section overviews or the individual pages under each section. Security 82 The Security menu has eight sections with various tools to help you protect your domains and users from spam, viruses, email abuse, and other security risks. Below is a brief overview of each security section. For more information, see the individual sections. Anti-Spam 83 —The Anti-Spam section under the Security menu contains options to help you prevent spam, or unsolicited junk email. There are eight anti-spam features listed under this section, including options for identifying and preventing spam by using heuristics, Bayesian analysis, DNS and URI blacklists, greylisting, and more. Anti-Virus 111 —The Anti-Virus section under the Security menu contains options to help you identify virus infected messages and prevent them from reaching your users. To offer an extensive level of virus protection, SecurityGateway includes two anti-virus engines: Clam AntiVirus (ClamAV™) and CYREN Anti-Virus. ClamAV is an open source (GPL) anti-virus toolkit designed especially for mail gateways. CYREN AV offers reliable protection from malicious and potentially hostile programs. It combines traditional anti-virus methods with the latest proactive technologies. SecurityGateway also includes Outbreak Protection 84 from CYREN, which offers an additional layer of protection against virus outbreaks. Anti-Spoofing 114 —The Anti-Spoofing section has tools to help you identify messages sent from forged, or "spoofed" addresses. There are six anti-spoofing features listed under this section, such as DKIM Verification, Sender ID, Callback Verification, and more. Anti-Abuse 132 —The Anti-Abuse section contains tools that help you prevent others from abusing or improperly using your email system to relay spam messages, use large amounts of bandwidth, connect to your server too Copyright © 2007-2014. All rights reserved. Alt-N Technologies, Ltd. SecurityGateway 11 frequently, and the like. There are six tools under the Anti-Abuse section. Filtering—The Filtering section contains two features: Message Content Filtering 140 and Attachment Filtering 149 . The Message Content Filtering page can be used to create filter rules to perform a number of actions. You can create rules to cause messages that match certain criteria to be refused, copied or redirected to a different address, quarantined, and more. The options on the Attachment Filtering page can be used to designate specific types of files that will cause a message to be either blocked or quarantined when one of those files is attached. You can define the filtering restrictions both globally and per domain. Blacklists 151 —Blacklists are lists of email addresses, hosts, and IP addresses whose messages you wish to block or quarantine. By default those messages will be refused during the SMTP session, but on the Blacklist Action page you can change this setting so that they will be quarantined instead. The action that will be taken can be set globally and for specific domains, and the blacklists themselves can also be set as global or domain specific. Whitelists 159 —Whitelists are lists of email addresses, hosts, and IP addresses whose messages you wish to exempt from a number of security restrictions. Heuristics and Bayesian, DNSBL, DKIM Verification, and almost every other Security feature in SecurityGateway has the option to exempt senders, hosts, messages, and so on if they appear on the appropriate whitelist. Each whitelist can be set as global or domain specific. Advanced 167 —The Advanced section provides a link to the Sieve Scripts page. SecurityGateway uses the Sieve email filtering language to perform many of its functions, and the Sieve Scripts page lets you see in what order those functions are performed. It also provides a Sieve Script Editor that you can use to create your own custom scripts. Messages/Queues 188 The Messages/Queues menu selection gives you access to two sections: Message Log 189 —The Message Log contains an entry for every message that your users send or receive. It lists the date and time the message was processed, the sender and recipient, and the subject of the message. It also lists the result of the delivery attempt, such as whether or not it was delivered, quarantined, or refused, and if it wasn't delivered it gives you a reason, such as the sender was blacklisted, the message contained a restricted attachment, or the like. Each entry in the log also lists the size of the message and its Message Score 109 . From the Message Log you can view the details of each message, including the transcript of its delivery and the message's content and source (when available). You can also mark messages as spam or non-spam to help refine SecurityGateway's Bayesian Learning features and more accurately categorize messages. Message Queues—This section provides links to four different message queues: User Quarantine, Administrative Quarantine, messages Queued for Delivery, and Bad Messages. The User Quarantine 190 is a designated holding queue for incoming messages that do not pass certain security features. Users can log in to SecurityGateway and view the contents of their quarantine folder, Copyright © 2007-2014. All rights reserved. Alt-N Technologies, Ltd. 12 SecurityGateway for Email Servers v3.0 and from there choose to view the messages, delete them, or release them from quarantine to be delivered normally. The Administrative Quarantine 191 is similar to the User Quarantine, but it is for outbound messages and messages containing viruses. Only Administrators have access to the Administrative Quarantine. Queued for Delivery 192 is a queue for all messages waiting to be delivered, including those that were undeliverable and are currently in the retry system. From this page you can view any message in the queue, bounce a message back its sender, stop a message's delivery, or immediately retry delivery of a selected message or all messages in the queue. The Bad Messages 193 queue is for messages that could not be delivered due to some fatal processing error, such as a message caught in a recursive loop, causing it to reach the Maximum message hop count 63 . From the Bad Message queue you can view any message in the queue, try to bounce a message back its sender, delete a message, or immediately retry delivery of a selected message or all messages in the queue. Logging 196 The Logging menu gives you access to three sections: Message Log 197 —This is an additional link the Message Log discussed under the Messages/Queues section above. It is provided in both places simply for the administrator's convenience. Log Files 198 —You can use the Log Files section to view SecurityGateway's various log files stored in your Logs folder 72 . Unlike the Message Log, the log files are not stored in the database, and therefore do not provide sortable lists and separate entries for each event. Instead, they are plain text files containing transcripts of the various SMTP connections and other functions that SecurityGateway performs. The All Log Files page under the Log Files section lists all of the log files contained in your logs folder, including the current log files and roll-over 199 log files. From that page you can view any of the files listed. The other pages in the Log Files section provide shortcuts to view SecurityGateway's current log files, such as the system log, inbound and outbound logs, virus update logs, and more. Configuration 199 —The Configuration section provides a link to the Logging Configuration page, which is used to configure your logging preferences and options. On that page you can designate how extensive you want the level of detail to be for the data written to the Inbound, Outbound, and HTTP logs. You can also choose the type of log files to create: a standard set, a new set each day with the date incorporated into the filenames, or a new set each day with the day of the week incorporated into the filenames. Finally, you can choose various log file maintenance settings, such as how large a file can be before it will be saved and a new file started, how many of these "roll-over" files can be created, how long a file can exist before it will be archived, and more. Reports 204 The Reports section provides interactive, detailed graphical reports of SecurityGateway's activity. You can generate reports showing the number of inbound versus outbound messages, reports showing a breakdown of the types of junk email received, bandwidth reports, top senders by cumulative message size, virus reports, Copyright © 2007-2014. All rights reserved. Alt-N Technologies, Ltd. SecurityGateway 13 and more. Further, each report provides options that allow you to designate the parameters of the report. For example, a report can include data for a specific domain or all domains; delineate data by hour, day, or month; and encompass fixed time periods such as a day, week, or month, or use a specific range of dates. Additionally, below each report there is a tabular breakdown of the report's content, providing links to the Message Log, which will filter the log to display only the data related to that entry in the report. For example, it can provide links to display all inbound messages received at a specific hour listed on a report, all message's that contained a virus received on a certain day, all of the messages received by the top recipient for a domain, and so on. System Requirements For the latest SecurityGateway system requirements and recommendations, see: Knowledge Base Article KBA-01887 at www.altn.com. Getting Help Visit www.altn.com/Support/ for SecurityGateway's latest technical support and help options, including: telephone support, email support, a Knowledge Base, Frequently Asked Questions, community forums, and more. SecurityGatew ay 3.0.0 - May 2014 1.2 New in Version 3.0 New Features Outbreak Protection 84 and CYREN AntiVirus 111 are now included in SecurityGateway! Consequently, the ProtectionPlus add-on is no longer needed to add an additional layer of antivirus and spam protection to SecurityGateway. Other Changes Kaspersky AV integration, which was previously provided via the ProtectionPlus add-on, has been replaced with CYREN AntiVirus built in to SecurityGateway. Commtouch® is now CYREN, therefore the interface has been changed in various places to reflect the name change. For a complete list of all changes and bug fixes, see the Release Notes located in the SecurityGateway program group under the Windows Start Menu. New in Version 2.0 Version 2.0 of SecurityGateway for Email Servers has a number of new features, changes, and bug fixes. The following is a list of the major new features and changes. For a complete list of all changes and bug fixes, see the Release Notes located in the SecurityGateway program group under the Windows Start Menu. Copyright © 2007-2014. All rights reserved. Alt-N Technologies, Ltd. 14 SecurityGateway for Email Servers v3.0 New Features Scheduled Statistics Report 204 —This is a general statistical report that can be used to quickly ascertain the status and filtering effectiveness of the server. It can be sent on a nightly or weekly basis to the global administrators, domain administrators, and a manually defined list of email addresses. For domain administrators, the report will only contain statistics for the domains over which the administrator has administrative rights. Disclaimers (Headers / Footers) 63 —SecurityGateway can now add headers and footers to incoming, outgoing, and local messages. You could use this feature, for example, to add "--- Message scanned by SecurityGateway for Email Servers ---" to the bottom of your messages. Extract text from attachments—Content filter rules and custom sieve scripts can perform actions based upon the content of an attachment. The sieve body test "text" tag automatically extracts text from several popular attachment formats. The iFilter interface is used to extract plain text from Microsoft Office and PDF documents. In order to search PDF documents, Adobe Reader must be installed on the SecurityGateway server. Office 2007 documents require the 2007 Office System Converter: Microsoft Filter Pack to be installed. Dashboard for domain administrators 9 —When domain administrators log in to their SecurityGateway account, they will now see a Dashboard with statistics for the domains over which they have administrative access. Collect mail from a POP3 mailbox 54 —Use the Remote POP Accounts option to configure SecurityGateway to use the POP3 protocol to download mail from a remote POP mailbox for redistribution to a given domain's users. Once collected, the messages are parsed according to the settings provided on the Edit POP Account 55 screen and then delivered to any valid users, just as if the messages had arrived at the server using conventional SMTP transactions. Domain aliases 33 —Aliases can now be defined for your domains. All of the domain's users are assumed to be valid for each domain alias. This is useful if a domain has registered multiple domain names, e.g. altn.com, altn.us, altn.biz, etc. Define multiple search strings for a single content filter condition 140 —The content filter is a graphical interface for building Sieve Scripts. Multiple search strings may now be defined for a single condition. The user may specify if the condition must match any or all or the defined strings. This is useful for searching a message header or body against a list of keywords. Added statistical charts to the "My Account" page 18 —The My Account page now contains four statistical reports for users. This is similar to the administrator Dashboard 9 , displaying account statistics for the past 24 hours. Improved heuristic rule update process 91 —The heuristic rule update process now has the ability to pull updates from updates.spamassassin.org in addition to updates from Alt-N Technologies. This ensures that your SpamAssassin rule-sets are always kept current. The SGSpamD Configuration UI has a new check box that governs this option. Copyright © 2007-2014. All rights reserved. Alt-N Technologies, Ltd. SecurityGateway 15 Other Changes Added option to redeliver messages from the Message Log 197 . This option requires that the content of the message has not been deleted from the database. Added a per user language option 49 . System generated messages sent to the user will be translated to this language. A default value may be applied on a server and individual domain basis. Added the ability for SGDBTool.exe to create a global administrator. This is useful in cases where the global administrator account created during installation is not accessible. Added the ability for SGDBTool.exe to promote a user to a global administrator. Updated SGSpamD, ClamAV, and CommTouch Outbreak Protection engines. There is now an Add to Message Score content filter 140 action. Greylisting is now supported for Sieve Scripts 167 that run during the DATA event. While it is preferred to greylist at RCPT, before the message is transferred, conditional greylisting in response to the DATA command can be a useful tool. This may be an attractive alternative to quarantining mid scoring messages. With the flexibility of Sieve, large messages can be excluded. Added "Total" summary line for numerical reports 204 . For a complete list of all changes and bug fixes, see the Release Notes located in the SecurityGateway program group under the Windows Start Menu. Copyright © 2007-2014. All rights reserved. Alt-N Technologies, Ltd. Copyright © 2007-2014. All rights reserved. Alt-N Technologies, Ltd. Section II 18 SecurityGateway for Email Servers v3.0 2 My Account My Account is the first page that you see when you sign in to your SecurityGateway user account. It contains two sections: Account Settings and Account Statistics. The Account Settings section contains links to common tasks that you might wish to perform. Clicking any of these links will take you to the page related to that task. The Account Statistics section displays four reports related to your account's activity during the last 24 hours. The Good vs. Junk Messages report shows the total of good or legitimate messages versus junk messages processed for your account. Junk messages are message identified as spam, spoofed, containing viruses, and the like. Junk Email Breakdown displays the total of all junk email received, categorized by type. Inbound vs. Outbound Messages shows the total of inbound messages you received and the total of outbound messages you sent. Top Spam Sources display the top senders of the spam messages you received. In the navigation pane on the left there are six links related to your user account: My Account—Takes you to the My Account page, which contains links to common account-related tasks and displays several statistical reports. My Settings 19 —This link takes you to your Account Settings page, which is used to change your password, set your quarantine preferences, turn on automatic white listing, and to specify the number of items that you wish to display on a page. My Whitelist 21 —Click this link to view your personal addresses whitelist. Adding an address to your whitelist can help prevent SecurityGateway from mistakenly identifying that sender's messages as spam or blocking them altogether. My Blacklist 23 —This link takes you to your personal addresses blacklist. Add an address to your blacklist when you do not wish to receive further messages from that address. View My Quarantine 25 —Your quarantine folder is where messages are stored that looked too suspicious to deliver to you when they were received by SecurityGateway. From this page you can view the quarantined messages, release them from quarantine (meaning that they are legitimate and should be delivered to you), delete them, or add their senders to your whitelist 21 or blacklist 23 . View My Message Log 26 —Click this link to view a log of all messages that have been sent or received by you. You can use this log to see the details of each messages, flag messages as spam or not spam, and whitelist or blacklist addresses. Some of these options may not be available to you, depending on the level of access your account has been given to SecurityGateway. Copyright © 2007-2014. All rights reserved. Alt-N Technologies, Ltd. My Account 19 2.1 My Settings The My Settings page is used to change your password, set your quarantine preferences, turn on automatic white listing, and to specify the number of items that you wish to display on a page. Some of these options may not be available to you, depending on the level of access your account has been given to SecurityGateway. Change Password Password To change your password, type the new password here. Password (confirm) After typing your new password in the Password box above, type it again here to confirm it, then click Save. Quarantine Use the default quarantine settings for my domain This is the option that is normally selected. Choosing this option leaves your quarantine 25 options set to however they were set up originally by the email administrator. Allow me to specify my own quarantine settings Choose this option if you wish to modify your quarantine settings, then choose the desired options below. Hold quarantined messages on the server If you select this option SecurityGateway will hold incoming messages in Quarantine 25 that it thinks are too suspicious and should be held for you to examine later. Send an email listing the contents of my quarantine folder: When you have chosen to have SecurityGateway quarantine suspicious messages, you can also choose to have it regularly send you an email listing the current contents of your quarantine folder. Never Select this option if you do not wish to receive an email listing your quarantined messages. Every [xx] hour(s) If you wish to receive the email once every certain number of hours, then choose this option and specify the desired value. Copyright © 2007-2014. All rights reserved. Alt-N Technologies, Ltd. 20 SecurityGateway for Email Servers v3.0 Daily This is the option that is normally selected. This will cause SecurityGateway to send you a message every day listing your quarantined messages. Weekly Choose this option if you wish to receive the email once per week. Allow my mail server or client to filter quarantined messages Choose this option if you do not want SecurityGateway to quarantine any of your incoming messages. Messages that would have been quarantined will be delivered normally. This is useful if you wish to allow your email server or mail client to filter your messages instead. To help identify messages that would have been quarantined you can use the two options below to add a tag to the message's Subject or add a special header to the message. You could then create a filter or rule on your server or in your mail client to search for that tag or header. ...tag subject with [text] When this box is checked, SecurityGateway will add some text to the Subject of any message that would have been quarantined if you had turned on the Quarantine option. The text that is provided in this option by default is: "*** SPAM ***". However, you can change that text to anything you wish. ...add header [text] When this box is checked it causes a special header to be added to any message that would have been quarantined by SecurityGateway. In most mail clients you will not be able to see this header without viewing the message properties or source, but in many mail clients and mail servers you can create filters to look for that header and then do specific things with messages that have it, such as place those messages in a specific folder or delete them. The header provided for you in this option is: "X-Spam-Flag: YES". But you can change that to something else if you choose. Options Do not perform anti-spam tests for messages addressed to this account Check this box if you do not want the server to perform anti-spam testing on messages addressed to your account. This will prevent various anti-spam tests from being performed and could greatly increase the amount of junk email that your account will receive. Automatically whitelist addresses I send mail to When this box is checked, any address to which you send an email message will be added to your whitelist 21 automatically. This helps to ensure that messages from those addresses will not be mistakenly identified as spam or blocked in the future. Language Use this drop-down list to set the language that you want the server to use when it sends you system-generated messages. Copyright © 2007-2014. All rights reserved. Alt-N Technologies, Ltd. My Account 21 Number of items displayed per page This option determines how many items to display per page when you are logged into SecurityGateway, such as addresses in your whitelist, entries in your message log, and so on. At the bottom of each page there are controls that can be used to move through the additional pages when there are too many items to display on a single page. 2.2 My Whitelist My Whitelist is your personal Addresses Whitelist. Adding an address to your whitelist can help prevent SecurityGateway from mistakenly identifying that sender's messages as spam or blocking them altogether. Typically you will add addresses to this list one at a time, but the whitelist also has an import feature that you can use to add multiple addresses at once contained in a text file. Further, your whitelist also has an export feature, which allows you to save the contents of the whitelist to a comma separated values (CSV) text file. Adding Addresses to the Whitelist To add an address to your whitelist, click New on the toolbar at the top of the page. This will open the Whitelist Entry 22 page for adding the address (see below). Editing a Whitelisted Address To edit one of the whitelisted addresses, double-click the entry you wish to edit, or select the desired entry and then click Edit on the toolbar at the top of the page. This will open that entry in the Whitelist Entry 22 page. Deleting Whitelisted Addresses To delete one or more of the whitelisted addresses, select the desired entries and then click Delete on the toolbar at the top of the page. You can select more than one entry by holding down the CTRL key while clicking each one. After clicking Delete, a confirmation box will pop up asking you if you are sure that you would like to delete the selected entries. Importing Addresses to the Whitelist To import a list of addresses to the whitelist, click Import on the toolbar at the top of the page. This will open the Import List page. Use the Browse button on this page to navigate to the text file containing the addresses that you wish to import, and then click Import Lists. The text file must contain only one address per line, and you should create it using a regular text editor (such as Notepad) to avoid inadvertently inserting any unusual formatting or characters that could interfere with the import process. Importing using a CSV File If you wish to add a corresponding comment for each imported address, then you will need to use a CSV file when you import the addresses instead of using a simple list of addresses. You can use any plain text editor such as Notepad to create the Copyright © 2007-2014. All rights reserved. Alt-N Technologies, Ltd. 22 SecurityGateway for Email Servers v3.0 CSV file. Simply create the file according to the format below and save it as filename.csv. The first line of the CSV file must be a mapping row, which allows SecurityGateway to know in what order the data will appear. Each item in this file must be contained in quotes and separated by a comma. Format: The CSV needs two columns: Value and Comments. The Value column is for the email addresses you wish to whitelist and the Comments column is for any notes you may wish to add regarding an entry. Any entry in the list that doesn't have a comment needs to have empty quotes to indicate that there is no comment for that entry. Example CSV file contents: "Value","Comments" "[email protected]","A comment about my friend." "[email protected]","" "[email protected]","A comment about mister." Exporting Addresses from the Whitelist To export your Addresses Whitelist: 1. Click Export on the toolbar at the top of the page. This will open the File Download dialog. 2. Click Save. 3. Choose a file name and location for the file. 4. Click Save and then Close. Whitelist Entry This page is used for adding new addresses to the whitelist and for editing existing entries. It will be opened whenever you click New or Edit on the toolbar at the top of the list. List Entry Email Address: In the first box, enter the email address that you wish to add to the whitelist. You can use an asterisk in the mailbox portion of the address to whitelist all addresses at that domain. For example, "*@example.org" would whitelist all messages from anyone at example.org. Comment: Use this area for any comments or notes you wish to make about this entry, for your own reference. Save and Close When you are finished with the entry, click Save and Close to save the entry to the whitelist. Copyright © 2007-2014. All rights reserved. Alt-N Technologies, Ltd. My Account 23 Close Click this button if you wish to close the Whitelist Entry page without saving it. 2.3 My Blacklist My Blacklist is your personal Addresses Blacklist. You should add addresses to your blacklist that you wish to prevent from sending you email. Typically you will add addresses to this list one at a time, but the blacklist also has an import feature that you can use to add multiple addresses at once contained in a text file. Further, your blacklist also has an export feature, which allows you to save the contents of the blacklist to a comma separated values (CSV) text file. Adding Addresses to the Blacklist To add an address to your blacklist, click New on the toolbar at the top of the page. This will open the Blacklist Entry 24 page for adding the address (see below). Editing a Blacklisted Address To edit one of the blacklisted addresses, double-click the entry you wish to edit, or select the desired entry and then click Edit on the toolbar at the top of the page. This will open that entry in the Blacklist Entry 24 page. Deleting Blacklisted Addresses To delete one or more of the blacklisted addresses, select the desired entries and then click Delete on the toolbar at the top of the page. You can select more than one entry by holding down the CTRL key while clicking each one. After clicking Delete, a confirmation box will pop up asking you if you are sure that you would like to delete the selected entries. Importing Addresses to the Blacklist To import a list of addresses to the blacklist, click Import on the toolbar at the top of the page. This will open the Import List page. Use the Browse button on this page to navigate to the text file containing the addresses that you wish to import, and then click Import Lists. The text file must contain only one address per line, and you should create it using a regular text editor (such as Notepad) to avoid inadvertently inserting any unusual formatting or characters that could interfere with the import process. Importing using a CSV File If you wish to add a corresponding comment for each imported address, then you will need to use a CSV file when you import the addresses instead of using a simple list of addresses. You can use any plain text editor such as Notepad to create the CSV file. Simply create the file according to the format below and save it as filename.csv. The first line of the CSV file must be a mapping row, which allows SecurityGateway to know in what order the data will appear. Each item in this file must be contained in quotes and separated by a comma. Copyright © 2007-2014. All rights reserved. Alt-N Technologies, Ltd. 24 SecurityGateway for Email Servers v3.0 Format: The CSV needs two columns: Value and Comments. The Value column is for the email addresses you wish to blacklist and the Comments column is for any notes you may wish to add regarding an entry. Any entry in the list that doesn't have a comment needs to have empty quotes to indicate that there is no comment for that entry. Example CSV file contents: "Value","Comments" "[email protected]","A comment about my enemy." "[email protected]","" "[email protected]","A comment about mister." Exporting Addresses from the Blacklist To export your Addresses Blacklist: 1. Click Export on the toolbar at the top of the page. This will open the File Download dialog. 2. Click Save. 3. Choose a file name and location for the file. 4. Click Save and then Close. Blacklist Entry This page is used for adding new addresses to the blacklist and for editing existing entries. It will be opened whenever you click New or Edit on the toolbar at the top of the list. List Entry Email Address: In the first box, enter the email address that you wish to add to the blacklist. You can use an asterisk in the mailbox portion of the address to blacklist all addresses at that domain. For example, "*@example.org" would blacklist all messages from anyone at example.org. Comment: Use this area for any comments or notes you wish to make about this entry, for your own reference. Save and Close When you are finished with the entry, click Save and Close to save the entry to the blacklist. Close Click this button if you wish to close the Blacklist Entry page without saving it. Copyright © 2007-2014. All rights reserved. Alt-N Technologies, Ltd. My Account 25 2.4 View My Quarantine The Quarantine is a holding place for incoming messages that SecurityGateway thinks are too suspicious to deliver. It is used to help protect you from receiving an influx of spam and other suspicious or unwanted messages. Your quarantined messages are held on the SecurityGateway server, where you can log in and view them, delete them, or release them from quarantine to be delivered to you normally. To help you manage your Quarantine, SecurityGateway will regularly send you messages to let you know the contents of your quarantine folder. Your quarantine settings can be managed on your My Settings 19 page. Not all users will have access to the Quarantine or be able to modify their quarantine settings. Each entry in the Quarantine has a column listing the date and time the message was quarantined, and columns for the sender, recipient, and subject. There are also columns for the reason the message was quarantined, its size, and its Message Score, which is an internal score that SecurityGateway uses to identify spam. There are several buttons on the toolbar at the top of the Quarantine that you can use to perform a number of tasks: Refresh—Click this button to refresh the Quarantine to display messages that may have been added since you started viewing it. Search—Use the extensive search feature to filter the Quarantine to display only specific messages. You can search based on the reason the message was quarantined, search for specific text in any header, search all dates or a range of dates, and more. To search the Quarantine: click Search on the toolbar to open the search window, then choose your search criteria, and finally click the Search button in that window to perform the search. The search results will appear below the search window—the Quarantine will be filtered to display only message matching the search parameters. To hide the search window while retaining the filtered results below it, click Search on the toolbar again. When you are finished with your search, click Cancel in the search window to return the Quarantine to normal. View—Select a message and then click this button to open the Message Information screen. This screen has three tabs: Transcript, Message, and Source. The Transcript tab contains a transcript of the delivery process, which is a technical log detailing the communication between SecurityGateway and the server or client sending the message. The Message tab contains the actual content of the message, and the Source tab contains the message's source, including the message's headers, html code, and so on. Release—Select a message and then click this button to release it from quarantine for delivery. Whitelist—Select a message and click this button to add the sender to your whitelist 21 . Delete—Select a message and click this button to delete it. Blacklist—Select a message and click this button to add the sender to your Copyright © 2007-2014. All rights reserved. Alt-N Technologies, Ltd. 26 SecurityGateway for Email Servers v3.0 blacklist 23 . Delete All—Click this button to delete all quarantined messages. . 2.5 View My Message Log The Message Log contains an entry for every message that you send or receive. It lists the date and time the message was processed, the sender and recipient, and the subject of the message. It also lists the result of the delivery attempt, such as whether or not it was delivered, quarantined, or refused, and if it wasn't delivered it gives you a reason, such as the sender was blacklisted, the message contained a restricted attachment, or the like. Finally, each entry also lists the size of the message and its message score. The message score is used internally by SecurityGateway to determine the likelihood that a message is spam. Not all users will have access to the Message Log. There are several buttons on the toolbar at the top of the Message Log that you can use to perform a number of tasks: Refresh—Click this button to refresh the message log to display entries that may have been added since you started viewing the log. Search—Use the extensive search feature to filter the message log to display only specific messages. You can search the log based on whether the message was inbound or outbound, search for specific text in any header, search all dates or a range of dates, and more. To search the message log: click Search on the toolbar to open the search window, then choose your search criteria, and finally click the Search button in that window to perform the search. The search results will appear in the Message Log. To hide the search window while retaining the search results in the log, click Search on the toolbar again. When you are finished with your search, click Cancel in the search window to return the Message Log to normal. Details—Select a message and then click this button to open the Message Information screen. This screen has three tabs: Transcript, Message, and Source. The Transcript tab contains a transcript of the delivery process, which is a technical log detailing the communication between SecurityGateway and the server or client sending the message. The Message tab contains the actual content of the message. This may or may not be available depending on how old the message is, whether or not the message was delivered successfully, and whether SecurityGateway is set to retain that data. The Source tab contains the message's source, including the message's headers, html code, and so on. The source may not be available if the message is old or SecurityGateway is not set to save that information. Redeliver—Select one or more messages from the list and then click this button to redeliver them. Use Ctrl+Click or Shift+Click to select multiple Copyright © 2007-2014. All rights reserved. Alt-N Technologies, Ltd. My Account 27 messages. This option can only be used when the message's content has not been deleted from the database. Spam—Select a message and click this button to mark the message as spam. This can help SecurityGateway more accurately identify spam messages in the future. This button may not be available in some situations or if SecurityGateway is not set to support this option. Not Spam—Select a message and click this button to mark the message as non-spam. This can help prevent SecurityGateway from mistakenly identifying legitimate messages as spam in the future. This button may not be available in some situations or if SecurityGateway is not set to support this option. Whitelist—Select an entry and click this button to add the sender or recipient to your whitelist 21 . Blacklist—Select an entry and click this button to add the sender or recipient to your blacklist 23 . Copyright © 2007-2014. All rights reserved. Alt-N Technologies, Ltd. Copyright © 2007-2014. All rights reserved. Alt-N Technologies, Ltd. Section III 30 SecurityGateway for Email Servers v3.0 3 Setup/Users The Setup/Users menu has seven sections containing links to SecurityGateway's core configuration options. You will use the options in these sections to setup your domains and user accounts, mail delivery options, quarantine settings, backup and database preferences, and other configuration options. Below is a brief overview of each section. For more information, see the section overviews or the individual pages under each section. Accounts 31 The Accounts section under the Setup/Users menu contains options related to your SecurityGateway user accounts and domains. There are five accountrelated links under this section that include options for creating domains and user accounts, designating User Verification Sources, setting the default values for a number of user options, and more. Mail Configuration 51 The Mail Configuration section provides links to four pages governing various mail-related functions. For example, you will use the options under this section to designate the servers on which your users' email accounts reside, set your quarantine options, configure various email delivery options, and manage other technical settings. Disclaimers (Headers/Footers) 63 Message Disclaimers are portions of text that the server can add above or below the body of inbound, outbound or local email messages. Use this page to create and manage you disclaimers. System 68 The System section under the Setup/Users menu contains links to various system functions, such as encryption settings, HTTP interface options, directory locations, disk space management options, and more. Database Maintenance 73 The options reached from this section deal with the type and amount of data that is saved by SecurityGateway, automatic backup features, and options for restoring the server from backup files. Software Updates 78 Use this page to check whether or not an updated version of SecurityGateway is available. You can check for updates manually or use an option to cause SecurityGateway to check for them automatically. When an update is available, you can download and install it from the web interface. Registration 84 The Registration page lists your product registration information, including the name of the person or company to whom the product is registered, the registration key, and the status of your registration. Copyright © 2007-2014. All rights reserved. Alt-N Technologies, Ltd. Setup/Users 31 3.1 Accounts The Accounts section under the Setup/Users 30 menu contains options related to your SecurityGateway user accounts and domains. There are five account-related links under this section: Domains 31 and Users 36 —The Domain List and User List are used to manage your domains and users. To open the Domain List, click Setup/Users on the navigation menu in the left pane, then click Domains and Users under the Accounts section of that pane. The User List is reached by clicking on the Users button on the Domain List's toolbar while a domain is selected. Administrators 41 —The Administrators list is used to manage all Global and Domain administrators that have been designated in SecurityGateway. Global Administrators have complete control over all settings and options in SecurityGateway, even over other administrator accounts and settings. Domain Administrators can access all settings and options relevant to the domain over which they have been given authority. They cannot edit global settings or access settings specific to other domains. User Verification Sources 43 —This page is used to manage all of your User Verification Sources, which are used to confirm the validity of unknown local addresses. Whenever an incoming message is addressed to an unknown local user, SecurityGateway will query the User Verification Sources configured for the user's domain to verify whether or not the unknown address is legitimate. If the address is valid then SecurityGateway will create a user account for that address and attempt to deliver the message to the domain's Domain Mail Servers 52 . If the address is invalid then the message will be rejected. Automatic Domain Creation 49 —This page is used to designate whether or not you wish to create a new SecurityGateway domain automatically whenever an incoming message for an unknown user at an unknown domain can be validated by your default User Verification Sources. User Options 49 —Use this page to designate which options your SecurityGateway users will be able to access by logging in to their SecurityGateway accounts. The User Options can be set globally and on a per domain basis. 3.1.1 Domains and Users 3.1.1.1 Domain List The Domain List is used to manage your domains and users. To open the list, click Setup/Users on the navigation menu in the left pane, then click Domains and Users under the Accounts section of that pane. You can also get to the Domain List via the View Domains link under the Domains section of the SecurityGateway Setup page Copyright © 2007-2014. All rights reserved. Alt-N Technologies, Ltd. 32 SecurityGateway for Email Servers v3.0 on the right. The Domain List has two columns: Name and Users. The Name column lists all of your domains and the Users column lists the number of user accounts belonging to each domain. To view or edit a domain's Properties 33 , double-click the desired domain in the list. To view a domain's User List 36 , click the Users link for the corresponding domain. The toolbar at the top of the page is used to initiate various tasks associated with the Domain List. Most of the toolbar buttons require you to first select a domain from the list before you can click the desired button. The only exceptions are: New, Import, and Export. Those buttons can be clicked without selecting a domain. The toolbar contains the following ten options: New Click New to open the Properties 33 dialog, used for creating a new SecurityGateway domain. Properties is where you will designate the name, mail server, and other desired settings for the domain. Edit Use the toolbar's Edit button to open the Properties 33 dialog corresponding to the domain currently selected in the Domain List. Alternatively, you can also open the Properties dialog by double-clicking an entry. Delete To delete one or more domains, select the domains from the list and then click Delete. A box will open asking you to confirm the decision to delete the domains. You can select multiple domains by holding down the Ctrl key while clicking each domain. Users Select an entry from the Domain List and then click Users on the toolbar to open the domain's User List 36 . Similar to the Domain List, the User List is used to manage a domain's user accounts. Messages This button is used to open the Message Log 189 for the selected domain. The Message Log contains an entry for each message sent either to or from the domain. From the Message Log you can then open the Message Information page for any entry, which displays the SMTP session transcript and the message's content and source (when available). Quarantine Click Quarantine to view the Quarantine 190 page for the selected domain. All quarantined messages for that domain are listed and can be reviewed from that page. Whitelist Use the Whitelist button to view the selected domain's Addresses Whitelist Blacklist Use the Blacklist button to view the selected domain's Addresses Blacklist 160 152 . . Copyright © 2007-2014. All rights reserved. Alt-N Technologies, Ltd. Setup/Users 33 Import You can use a comma separated values (CSV) file to import a list of domains to the Domain List. To do so, click Import on the toolbar at the top of the page. This will open the Import Domains dialog. Use the Browse button on this dialog to navigate to the CSV file containing the domains that you wish to import, and then click Import Domains. CSV File Format You can use any text editor such as Notepad to create the CSV file for adding domains to the Domain List. Simply create the file according to the format below and save it as filename.csv. The first line of the CSV file must be a mapping row, which allows the server to know in what order the data will appear. Two fields in the mapping row are supported: Domain and MaxUsers. Both fields must be contained in quotes and separated by a comma. The Domain field is for the domain name (e.g. example.com), and the MaxUsers field is for the maximum number of user accounts permitted to belong to that domain. All domain names must be in quotes, and if there is a MaxUsers value specified then it must be separated from the domain name by a comma. Example CSV file: "Domain","MaxUsers" "domain.com", 50 "example.com" "example.org", 10 Export You can export the list of your domains by clicking Export on the toolbar in the Domain List. This will list your domains in a CSV file with the same format as that used in the Import option outlined previously. To export the Domain List: 1. Click Export on the toolbar at the top of the page. This will open the File Download dialog. 2. Click Save. 3. Choose a file name and location for the file. 4. Click Save and then Close. 3.1.1.1.1 Domain Properties The Properties dialog is used to create a new SecurityGateway domain, or to edit an existing one. You can reach the Properties dialog by clicking New on the Domain List 31 or selecting an entry and clicking Edit. Properties has four tabs: Properties, Verification, Mail Servers, Admin. Domain Administrators 41 have read-only access to the lists of Verification sources and Mail Servers. Copyright © 2007-2014. All rights reserved. Alt-N Technologies, Ltd. 34 SecurityGateway for Email Servers v3.0 Properties The Properties tab is used for designating the domain name, the maximum number of user accounts permitted to belong to the domain, and an AUTH password. The user limit and password are optional. Domain Name: Enter the domain name into this text box. For example: "example.com", "domain.com", or the like. This is the domain that will be used in each user's email address. Limit number of users If you wish to limit the number of users that can belong to this domain, click this checkbox and enter the desired number below. This option is disabled by default. Maximum Users: If you desire to limit the number of user account that can belong to this domain, enable the Limit number of users option above and then enter the number of users here. SMTP AUTH password Use this option if you wish to designate an SMTP AUTH password for this domain, that your users or domain mail server 52 can use to authenticate when sending messages through SecurityGateway. To authenticate using this password, use the domain as the Logon/Username credential. For example, if the domain is "example.com" and you designate "1234Password" in this option, then you would authenticate using the credentials: "example.com" and "1234Password". If you leave this password option blank then any sender attempting to authenticate using only the domain name as the username will fail. The SMTP AUTH password may also be useful if the administrator wishes to use CRAM-MD5 authentication. This type of authentication requires that SecurityGateway know the password; the user verification source cannot be used. In most cases each user would simply use his or her own account email address and password as the authentication credentials, but there are certain email server configurations that might require the domain's email server to have its own credentials, or require multiple users to share one set of AUTH credentials. This option is provided to accommodate those with that type of requirement. Domain Aliases Use this option to designate any aliases for the domain. All of the domain's users are assumed to be valid for each domain alias. This is useful if a domain has registered multiple domain names, e.g. altn.com, altn.us, altn.biz, etc. Verification The Verification tab is used for assigning the User Verification Sources 43 that will be Copyright © 2007-2014. All rights reserved. Alt-N Technologies, Ltd. Setup/Users 35 used for the domain. When a message arrives for this domain addressed to an unknown user, these sources will be queried to see if the address is legitimate. If the address if found then a SecurityGateway account will be created for that recipient. Do not query a verification source, users will be managed manually Click this checkbox if you do not wish to query any verification sources for the specific domain. In that case all users must me managed manually for that domain. Available Sources: This box lists all available user verification sources that you have previously created. To assign a source to this domain, select it from the list and click the "--->" arrow. Selected Sources: This box lists all verification sources that you have assigned to this domain. To remove a source from the domain, select it from the list and click the "<---" arrow. Preference: Up/Down Verification sources will be queried in the order in which they appear in the Selected Sources list. To move a source to a higher or lower position, click the source and then use the Up and Down arrows to move it to the desired position. As soon as either a positive or negative result occurs, SecurityGateway will accept the result and stop querying the sources. For example, if three sources are listed and the first one states that the user doesn't exist, SecurityGateway will accept that result and reject the message without querying the other two sources. However, if a non-fatal error occurs, for example because the verification source is temporarily down, then the message will be rejected with a 4xx error code, indicating that the sender should try again later. New If you need to create a new user verification source to use for this domain, click New to open the New User Verification Source 45 screen. After creating the new source it will appear in the Available Sources list. Mail Servers The Mail Servers tab is used for assigning the Domain Mail Servers 52 that will be used for the domain. When a message arrives for a verified user of this domain, SecurityGateway will attempt to deliver that message to the Selected Servers listed here, in the order in which they are listed. Available Servers: This box lists all available Domain Mail Servers that you have previously created. To assign a server to this domain, select it from the list and click the "--->" arrow. Selected Servers: This box lists all Domain Mail Servers that you have assigned to this domain. To Copyright © 2007-2014. All rights reserved. Alt-N Technologies, Ltd. 36 SecurityGateway for Email Servers v3.0 remove a server from the domain, select it from the list and click the "<---" arrow. Preference: Up/Down SecurityGateway will attempt to deliver messages to the Domain Mail Servers in the order in which they appear in the Selected Servers list. To move a server to a higher or lower position, click the server and then use the Up and Down arrows to move it to the desired position. New If you need to create a new Domain Mail Servers to use for this domain, click New to open the New Mail Server 53 screen. After creating the new server it will appear in the Available Servers list. Admins The Admins tab is used for assigning the Administrators 41 that will have permission to administer this domain. Global administrators are not listed here since they already have permission to administer all domains. Available Administrators: This box lists all available Domain Administrators that you have previously designated, regardless of the domains over which they have control. To give an administrator permission to configure this domain, select it from the list and click the "--->" arrow. Selected Administrators: This box lists all Domain Administrators who have permission to administer this domain. To remove someone's admin-level access to this domain, select the administrator from the list and click the "<---" arrow. New If you need to create a new Administrator for this domain, click New to open the New Administrator 41 screen. After creating the new administrator it will appear in the Selected Administrators list. 3.1.1.2 User List The User List is used to manage a domain's user accounts. To open the list, click Setup/Users on the navigation menu in the left pane, then in the right pane under the Users and Administrators section, click the domain whose User List you wish to view. You can also get to the User List via each domain's entry in the Domain List 31 . The User List has three columns: Enabled, Name, and Mailbox. The Enabled column contains a checkbox for each user entry, which can be used to quickly enable/disable the user's account. The Name column lists the user's real name (e.g. Frank Thomas), and the Mailbox column lists the mailbox portion of the user's email address (e.g. "frank" in "[email protected]"). To edit a user, double-click the desired user in the list or select the user and then click Edit on the toolbar at the top of the page. This will open the User Edit 39 screen. Copyright © 2007-2014. All rights reserved. Alt-N Technologies, Ltd. Setup/Users 37 The toolbar at the top of the page is used to initiate various tasks associated with the User List. Most of the toolbar buttons require you to first select a user from the list before you can click the desired button. The only exceptions are: Back, New, Import, and Export. Those buttons can be clicked without selecting a user. The toolbar contains the following eleven options: Back When you get to the User List via the Domain List easily go back to the previous page. 31 , you can use this button to New Click New to open the New User 39 dialog, used for creating a new user account under this domain. Like the User Edit 39 dialog, New User is where you will designate the user's mailbox name, real name, password, and administrator privileges. Edit Use the toolbar's Edit button to open the User Edit 39 dialog corresponding to the user currently selected in the User List. Alternatively, you can also open the User Edit dialog by double-clicking an entry. Delete To delete one or more users, select the users from the list and then click Delete. A box will open asking you to confirm the decision to delete the users. You can select multiple users by using the Ctrl and Shift keys. Settings This button opens the selected user's My Settings 19 page, which you can use to change the user's password, set the account's quarantine preferences, turn on automatic white listing for the user, and to specify the number of items to display on a page when the user logs in to SecurityGateway. Messages This button is used to open the Message Log 189 for the selected user. The Message Log contains an entry for each message sent either to or from that user. From the Message Log you can then open the Message Information page for any entry, which displays the SMTP session transcript and the message's content and source (when available). Quarantine Click Quarantine to view the Quarantine 190 page for the selected user. All quarantined messages for that user are listed and can be reviewed from that page. Whitelist Use the Whitelist button to view the selected user's Addresses Whitelist the user's personal whitelist, applying to his or her account only. Blacklist Use the Blacklist button to view the selected user's Addresses Blacklist the user's personal blacklist, applying to his or her account only. Copyright © 2007-2014. All rights reserved. Alt-N Technologies, Ltd. 160 152 . This is . This is 38 SecurityGateway for Email Servers v3.0 Import You can use a comma separated values (CSV) file to import a list of users to the User List. To do so, click Import on the toolbar at the top of the page. This will open the Import Users dialog. Use the Browse button on this dialog to navigate to the CSV file containing the users that you wish to import, and then click Import Users. At the bottom of the Import Users dialog is the option: "Automatically create nonexistent domains." When you enable that option, a new domain will be created automatically when the list of users being imported contains an email address for a domain that doesn't already exist. If that option is disabled then addresses for domains that do not exist in SecurityGateway will be ignored; those entries will not be imported. CSV File Format You can use any text editor such as Notepad to create the CSV file for adding users to the User List. Simply create the file according to the format below and save it as filename.csv. The first line of the CSV file must be a mapping row, which allows the server to know in what order the data will appear. The following fields in the mapping row are supported: Email - the user's email address, such as "[email protected]". MailBox - the mailbox portion of the email address (i.e. "frank" of "[email protected]"). Domain - the domain portion of the address (i.e. "example.com"). FullName - the user's actual name, such as "Frank Thomas". Password - the user's password, used when logging into their account or authenticating when sending email through SecurityGateway. Enabled - designates whether or not the account is enabled or disabled. You can use "1", "yes", or "true" in this field for the account to be enabled, or you can use "0", "no", or "false" for disabled. The Email, Mailbox, and Domain fields are processed in order, so if the value of any of those fields contradict a previous field then the latter value will be used. For example, if you use "[email protected]" in the Email field but then use "domain.com" in the Domain field, then "[email protected]" is the address that will be used. All fields in all rows must be contained in quotes and separated by commas. Example CSV file: "Email", "MailBox", "Domain", "FullName", "Password", "Enabled" "[email protected]", "frank", "example.com", "Frank Thomas", "1234Password", "1" "[email protected]", "rip", "example.com", "Rip Collector", "FoundAPenny", "yes" "[email protected]", "big", "domain.com", "Mister Big", "NumeroUno", "1" Copyright © 2007-2014. All rights reserved. Alt-N Technologies, Ltd. Setup/Users 39 Export You can export the domain's User List by clicking Export on the toolbar. This will export the list to a CSV file with the same format as that used in the Import option outlined previously. To export the User List: 1. Click Export on the toolbar at the top of the page. This will open the File Download dialog. 2. Click Save. 3. Choose a file name and location for the file. 4. Click Save and then Close. 3.1.1.2.1 User Edit The User Edit screen is used to create a new user account or edit an existing one, under a SecurityGateway domain. You can reach this screen by clicking New on the User List 36 or by selecting an entry and clicking Edit. On User Edit you will specify the mailbox name, the user's name, the password, and designate whether or not the user is also an Administrator 41 . You can also specify any aliases that you wish to associate with the user. Properties This account is disabled Click this checkbox if you wish to disable this account. When an account is disabled, SecurityGateway will not accept messages to or from that user. Mailbox Name: This option is for designating the user's mailbox name and domain (e.g. [email protected]). This is the user's email address and is used when logging into their SecurityGateway account. It will also be used as the user name or login parameter in the user's email client when configuring it to use SMTP Authentication. Real Name: This option if for the user's name (e.g. "Frank Thomas"). Password: The is the password used for signing in to the user's account and for SMTP Authentication. Password (confirm): Whenever a new password is entered, this space must be used to confirm that the password was typed correctly. Account is an administrator When creating or editing a user account, click this checkbox and choose one of the options below if you wish the user to be a Global or Domain administrator 41 . Global Administrator Global Administrators 41 have complete control over all settings and options in Copyright © 2007-2014. All rights reserved. Alt-N Technologies, Ltd. 40 SecurityGateway for Email Servers v3.0 SecurityGateway, even over other administrator accounts and settings. For this reason you should exercise caution before designating an account as a Global Administrator. Domain Administrator Domain Administrators can access all settings and options relevant to the domain over which they have been given authority. They cannot edit global settings or access settings specific to other domains. When designating a domain administrator you must select at least one Available Domain for the user to administer. Available Domains: This box lists all of the SecurityGateway domains over which the user can be given domain administrator access. To give the user control over one or more of these domain, select the domains from the list and click the "--->" arrow. Selected Domains: This box lists all of the SecurityGateway domains over which the user has been given domain administrator access. To remove a domain from this list, select it and then click the "<---" arrow. Aliases Click the Aliases tab to designate any aliases that you wish to associate with the user. You can also merge any existing SecurityGateway users that you wish to convert to aliases rather than being separate users. Aliases: To assign an alias to the user, enter an email address in the space provided and click Add. To remove an alias from the list, select the desired entry and then click Remove. Merge Users: Use the Merge Users option when you wish to convert another user to an alias associated with this user. This is needed in instances where a user verification source mistakenly causes a separate SecurityGateway user to be created when the address is in fact an alias of an already existing user. You can quickly locate the address you wish to merge by typing the email address in the Merge Users box. The list of users will be filtered as you type, displaying only the addresses that match what you are typing. "Merge User" Link In the Merge Users list, click the Merge User link associated with the address that you wish to convert to an alias. The associated address will then be moved to the Aliases list. Copyright © 2007-2014. All rights reserved. Alt-N Technologies, Ltd. Setup/Users 41 3.1.2 Administrators The Administrators list is used to manage all Global and Domain administrators that have been designated in SecurityGateway. Global Administrators have complete control over all settings and options in SecurityGateway, even over other administrator accounts and settings. For this reason you should exercise caution before designating an account as a Global Administrator. Domain Administrators can access all settings and options relevant to the domain over which they have been given authority. They cannot edit global settings or access settings specific to other domains. When designating a domain administrator you must select at least one domain for the user to administer. The Administrator list has three columns: Enabled, Email, and Real Name. The Enabled column contains a checkbox for each entry, which can be used to quickly enable/ disable the administrator account. The Email column lists the administrator's email address, which is used for logging into SecurityGateway—the administrator account does not have to be local account belonging to one of your SecurityGateway domains. The Real Name column lists the user's real name (e.g. Frank Thomas). To edit an administrator, double-click the desired entry in the list or select it and then click Edit on the toolbar at the top of the page. This will open the Edit Administrator 41 screen. The toolbar at the top of the page contains the following fours options: New Click New to open the New Administrator screen, used for creating a new administrator account. This screen is identical to the Edit Administrator 41 screen. Edit Use the toolbar's Edit button to open the Edit Administrator 41 screen corresponding to the entry currently selected in the list. Alternatively, you can also open the screen by double-clicking an entry. Delete To delete one or more administrators, select the entry from the list and then click Delete. A box will open asking you to confirm the decision to delete the administrators. You can select multiple entries by using the Ctrl and Shift keys. For Domain: Use the For Domain: drop-down list box to choose which administrators to display in the list. By default all administrators are displayed, but you can choose "-- Global --" to display only Global administrators or pick a domain from the list to display only that domain's administrators. 3.1.2.1 Edit Administrator The Edit Administrator screen is used to edit an existing Global or Domain administrator or to create a new one. You can reach this screen by clicking New on the Administrators 41 page or by selecting an entry in the list and clicking Edit. On Edit Copyright © 2007-2014. All rights reserved. Alt-N Technologies, Ltd. 42 SecurityGateway for Email Servers v3.0 Administrator you will specify whether the administrator corresponds to a local account or is an external user, and you will provide the admin's local mailbox or external email address, password, and full name. You will also designate whether or not the user is a Global or Domain admin. Properties Local Users - member of a local domain Choose this option if the administrator account will correspond to a local account belonging to one of you SecurityGateway domains. External - not a member of a local domain Administrators need not correspond to a local user account. They can be external users with an external email address. Choose this option if you wish to designate this administrator as an external user. Mailbox or Email Address If you choose the Local Users option above, you will enter a Mailbox for the administrator and then choose a local domain from the drop-down list box. If you choose External, then you will simply enter the administrator's external Email Address. In both cases, the administrator's email address is used to log in to SecurityGateway. Full Name: Use this space to enter the administrators name (e.g. Frank Thomas). Password: This is for the administrator's password, used for logging in to SecurityGateway. Password (confirm): Whenever a new password is entered, you must retype it into this box to confirm that it was typed correctly. This account is disabled Click this checkbox if you wish to disable the administrator's account. Type Use these options to designate the type of Administrator: Global or Domain. Global Administrator Global Administrators 41 have complete control over all settings and options in SecurityGateway, even over other administrator accounts and settings. For this reason you should exercise caution before designating an account as a Global Administrator. Domain Administrator Domain Administrators can access all settings and options relevant to the domain over which they have been given authority. They cannot edit global settings or access settings specific to other domains. When designating a domain administrator you must select at least one Available Domain for the user to administer. Copyright © 2007-2014. All rights reserved. Alt-N Technologies, Ltd. Setup/Users 43 Available Domains: This box lists all of the SecurityGateway domains over which the domain administrator can be given access. To give the administrator control over one or more of these domain, select the domains from the list and click the "--->" arrow. Selected Domains: This box lists all of the SecurityGateway domains over which the domain administrator has been given control. To remove a domain from this list, select it and then click the "<---" arrow. 3.1.3 User Verification Sources This page is used to manage all of your User Verification Sources, which are used to confirm the validity of unknown local addresses. To open this page, click Setup/ Users on the navigation menu in the left pane, then click User Verification Sources under the Accounts section of that pane. Whenever an incoming message is addressed to an unknown local user, SecurityGateway will query the User Verification Sources configured for the user's domain to verify whether or not the unknown address is legitimate. If the address is valid then SecurityGateway will create a user account for that address and attempt to deliver the message to the domain's Domain Mail Servers 52 . If the address is invalid then the message will be rejected. Whenever a new account is created in this manner a welcome message 49 may be emailed to that user, containing a login link for SecurityGateway. For outbound messages from unknown local users, SecurityGateway will query the domain's User Verification Sources just as it does with inbound messages. Additionally, when a user attempts to authenticate the connection using his or her email address and password, SecurityGateway will pass those authentication credentials to the User Verification Sources. If the user fails authentication then the message will be rejected. If authentication is successful then the message will be accepted for delivery and a SecurityGateway account will be created for that user. For accounts that already exist, SecurityGateway will first check the user's login credentials against the local user database. If no match is found there then the verification sources will be checked. User Verification Sources are queried in the order in which they are listed on the Verification tab of the domain's Properties 33 screen. As soon as either a positive or negative result occurs, SecurityGateway will accept the result and stop querying the sources. For example, if three sources are listed and the first one states that the user doesn't exist, SecurityGateway will accept that result and reject the message without querying the other two sources. However, if a non-fatal error occurs, for example because the verification source is temporarily down, then the message will be rejected with a 4xx error code, indicating that the sender should try again later. Copyright © 2007-2014. All rights reserved. Alt-N Technologies, Ltd. 44 SecurityGateway for Email Servers v3.0 It is crucial that your verification sources are properly configured to verify ONLY valid users. If a verification source were an open relay or had a "catch-all" alias for one of your SecurityGateway domains, then every incoming email to an unknown user would be validated by that source. This would likely result in many erroneous users being created, since most incoming spam would be addressed to invalid users that would be erroneously verified by the source. This could cause the user limit of your Registration Key to be reached very quickly. The User Verification Sources page lists one entry per row and has four columns: Description, Server, Port, and Type. The Description column is for a description of the verification source (for example, "Server X at example.com"). The Server column lists the hostname or IP address of the verification source, Port is for the port that each source uses, and Type is the type of the verification source: SMTP Verification (call forward) 46 , Active Directory/Exchange 46 , MDaemon (Minger) 47 , or LDAP 47 . To edit a verification source, double-click an entry or select it and then click Edit on the toolbar at the top of the page. This will open the Edit User Verification Source 45 screen. All verification types but LDAP support dynamic authentication. When users attempt to authenticate or log in to SecurityGateway, their local SecurityGateway login credentials are first checked, but if they do not exist then the credentials are passed to the Verification Sources for authentication. This allows users to authenticate or log in to their SecurityGateway accounts without having to remember a separate set of credentials specifically for SecurityGateway. AUTH passwords cannot be verified dynamically when the CRAM-MD5 60 method of authentication is used. The toolbar at the top of the page contains the following five options: New Click New to open the New User Verification Source screen, used for creating a new verification source. This screen is identical to the Edit User Verification Source 45 screen. Edit Use the toolbar's Edit button to open the Edit User Verification Source 45 screen corresponding to the entry currently selected in the list. Alternatively, you can also open the screen by double-clicking an entry. Delete To delete one or more verification sources, select the entries from the list and then click Delete. A box will open asking you to confirm the decision to delete the sources. You can select multiple entries by using the Ctrl and Shift keys. Copyright © 2007-2014. All rights reserved. Alt-N Technologies, Ltd. Setup/Users 45 Verify Users When "-- All --" is selected in the For Domain: drop-down list box, clicking this button will cause SecurityGateway immediately to attempt to verify all users—even those who were already verified at some point in the past. Any users who cannot be verified by the User Verification Source will be deleted (including users who were added manually). When a specific domain is selected in the For Domain: box, SecurityGateway will only attempt to verify that domain's users. For Domain: Use the For Domain: drop-down list box to choose which User Verification Sources to display in the list. By default all sources are displayed, but you can choose "-Default --" to display only those sources which you have designated as default sources (on the Edit User Verification Source 45 dialog) or pick a domain from the list to display only that domain's verification sources. 3.1.3.1 Edit Verification Source The Edit User Verification Source screen is used to edit an existing User Verification Source 43 or to create a new one. You can reach this screen by clicking New on the User Verification Sources page or by selecting an entry in the list and clicking Edit. On this screen you will designate the type of source, its location, the port on which you will connect to it, any required authentication credentials, and the SecurityGateway domains that will use the source for verifying users. Properties Type: Use this drop-down list box to specify what method of user verification this entry will use: SMTP Verification (call forward) 46 , Active Directory/Exchange 46 , MDaemon (Minger) 47 , or LDAP 47 . The Description, Host or IP, and Port options below apply to all four types of verification sources. The remaining options will change depending on which type you choose. For all verification types, when an unknown local user is verified a SecurityGateway account will be created for that user and a welcome message 49 may be emailed to the new account, containing a login link for SecurityGateway. The user's email address and password can then be used to log in to his or her SecurityGateway account to view the message log, message quarantine, and so on. Because LDAP does not support dynamic authentication, if that verification type is selected then a SecurityGateway password must be supplied to your users before they will be able to log in to SecurityGateway. All verification types but LDAP support dynamic authentication. When users attempt to authenticate or log in to SecurityGateway, their local SecurityGateway login credentials are first checked, but if they do not exist then the credentials are passed to the Verification Sources for authentication. This allows users to authenticate or log in to their SecurityGateway accounts without having to remember a separate set of credentials specifically for SecurityGateway. AUTH passwords cannot be verified dynamically when the Copyright © 2007-2014. All rights reserved. Alt-N Technologies, Ltd. 46 SecurityGateway for Email Servers v3.0 CRAM-MD5 60 method of authentication is used. Description: Use this text box for a description of the verification source (for example, "Server X at example.com"). It corresponds to the Description column on the User Verification Sources 43 page. Host or IP: This is for the hostname or the IP address of the verification source. SecurityGateway will connect to this location when querying this source. This option corresponds to the Host column on the User Verification Sources page. Port: This is the port SecurityGateway will use when connecting to the verification source, and it corresponds to the Port column on the User Verification Sources page. SMTP Verification (call forward) Choose this type if you wish to use SMTP to verify unknown local recipients of incoming messages and unknown local senders of outbound messages. Similar to Callback Verification 129 , SecurityGateway will attempt to verify the user via the SMTP protocol. For unknown local senders who attempt to authenticate, SecurityGateway will pass the user's credentials to the SMTP Verification source for authentication. If authentication is successful then the message will be accepted for delivery by SecurityGateway and an account for the user will be created. For accounts that already exist, SecurityGateway will first check the user's login credentials against the local user database. If no match is found there then the SMTP Verification source will be checked. Requires authentication Click this checkbox if the SMTP Verification source requires authentication. Then include the user name and password below. User name: If the SMTP Verification source requires authentication, specify your user name here. Password: Enter your SMTP Verification source password here. Active Directory/Exchange Choose this type if you wish to use Active Directory or an Exchange server to verify unknown local users. As with SMTP Verification above, this verification type supports dynamic authentication. For unknown local senders who attempt to authenticate, SecurityGateway will pass the user's credentials to the Active Directory/Exchange server for authentication. If authentication is successful then the message will be accepted for delivery by SecurityGateway and an account for the user will be created. For accounts that already exist, SecurityGateway will first check the user's login credentials against the local user database. If no match is found there then the Copyright © 2007-2014. All rights reserved. Alt-N Technologies, Ltd. Setup/Users 47 SMTP Verification source will be checked. User name: This space is for the Active Directory/Exchange/Windows user name needed to log in to the verification source. Password: Use this space to enter the password that corresponds to the Active Directory/ Exchange user name specified above. Search Filter: This is the search filter that will be used when querying your Active Directory/ Exchange server for users. In most cases the default search filter should be sufficient. MDaemon (Minger) Choose this verification type if you wish to use an MDaemon server using Minger as the user verification source. This is an extended version of the Minger protocol exclusive to MDaemon servers and therefore this option cannot be used with other types of servers. This verification type supports dynamic authentication like the two previous verification types. This means that your users can authenticate or log in to their SecurityGateway accounts using their mail server login credentials. Requires authentication Click this checkbox if the MDaemon server requires authentication to use Minger. Password: Enter your MDaemon server's Minger password here. LDAP Choose this verification type if you wish to use an LDAP server to verify your users. However, unlike with the other verification types, you cannot use LDAP to authenticate a user's login credentials. Consequently, dynamic authentication, or authenticating "on the fly", isn't supported. Therefore, if you require your users to authenticate then users verified through an LDAP verification source will not be able to log in or send messages through SecurityGateway without using their SecurityGateway account's password. Bind DN: Enter the Distinguished Name (DN) that has access to your LDAP server so that SecurityGateway can query it for user names. This is the DN used for authentication in the bind operation. Password: This password will be passed to your LDAP server along with the Bind DN value for authentication. Base entry DN: This is the root DN or starting point in the Directory Information Tree (DIT) at Copyright © 2007-2014. All rights reserved. Alt-N Technologies, Ltd. 48 SecurityGateway for Email Servers v3.0 which SecurityGateway will search your Active Directory for users. Search Filter: This is the LDAP search filter that will be used when querying your LDAP server for users. In most cases the default search filter should be sufficient. Search Scope: This is the scope or extent of your LDAP searches. Base DN only Choose this option if you wish to limit your search to only the Base entry DN supplied above. The search will not proceed below that point in your tree (DIT). 1 level below base DN Use this option if you wish to extend your search to one level below the Base entry DN in your DIT. Base DN and all children This option will extend the scope of your search from the Base entry DN to all of its children, down to the lowest child entry in your DIT. This is the default option selected. Type This server is a default user verification source If you wish to designate this source as one of your default user verification sources, click this checkbox. The default User Verification Sources are used for all SecurityGateway domains that haven't had sources specifically designated for their use. They are also used by the Automatic Domain Creation 49 feature. Specify below which domains should utilize this user verification source... Use the options below to assign this verification source to one or more of your SecurityGateway domains. If multiple verification sources are assigned to a domain then you can designate the order in which they will be queried on the Verification 33 tab of the domain's Properties screen. Available Domains: This box lists all available SecurityGateway domains. To specify the domains that should utilize this verification source, select them from the list and click the "--->" arrow. Selected Domains: This box lists all SecurityGateway domains that you have configured to utilize this source to verify users. To remove a domain from the list, select it and click the "<---" arrow. Copyright © 2007-2014. All rights reserved. Alt-N Technologies, Ltd. Setup/Users 49 3.1.4 Automatic Domain Creation Use this page to designate whether or not you wish to create a new SecurityGateway domain automatically whenever an incoming message for an unknown user at an unknown domain can be validated by your default User Verification Sources 43 . To open this page, click Setup/Users on the navigation menu in the left pane, then click Automatic Domain Creation under the Accounts section of that pane. Configuration Enable automatic domain creation When enabled, SecurityGateway will query your default user verification sources whenever an incoming message is for an unknown address at an unknown domain. If the address is valid, SecurityGateway will create both the domain and user. Automatic Domain Creation requires at least one default user verification source 45 to be defined, and since queries will be made for all unknown addresses, a large number of queries might be made. This feature is disabled by default. When using this feature it is crucial that your verification sources are properly configured to verify ONLY valid users. If a verification source were an open relay, for example, then every incoming email to an unknown domain or user would be validated by that source. This would likely result in many erroneous domains and users being created, caused by incoming spam to invalid addresses. 3.1.5 User Options Use this page to designate which options your SecurityGateway users will be able to access by logging in to their SecurityGateway accounts. The User Options can be set globally and on a per domain basis. Access Control Allow users to modify their passwords This option allows users to modify their SecurityGateway account passwords via the My Settings 19 page. Allow users to disable anti-spam tests for messages addressed to their account Click this option if you wish to allow users to disable anti-spam testing on messages that are addressed to their accounts. When a user disables anti-spam testing for his or her account on the My Settings 19 page, this will prevent the DNSBL 95 , URIBL 99 , Heuristics and Bayesian 89 , and Outbreak Protection 84 spam tests from being performed. Copyright © 2007-2014. All rights reserved. Alt-N Technologies, Ltd. 50 SecurityGateway for Email Servers v3.0 Allow users to view and manage their own quarantine folders When this option is enabled, users can view and manage incoming messages for them that were placed into quarantine. This allows them to reach the View My Quarantine 25 page to release messages, delete them, and so on. Allow users to modify their own quarantine settings Click this option to allow each user to edit the quarantine settings located on the My Settings 19 page. Allow users to view a log of messages addressed to or from their account This allows each user to view his or her account's message log via the View My Message Log 26 link in SecurityGateway. All messages to or from that user's email address will be listed in the log. Display the "Forgot Password" link on the login screen By default, a "Forgot Password" link appears on the login page, which can be used to have your password emailed to the address associated with your SecurityGateway user account. Clear this checkbox if you do not wish to display this link. This option is on by default. Configuration Send welcome message to new users Enable this option if you wish to send a "welcome" message whenever a new user is created. This message provides a link to SecurityGateway so that the users can log in and manage their account preferences and quarantine folder. This option is disabled by default. Defaults Do not perform anti-spam tests for messages addressed to this account This option governs the default setting of the user option of the same name on the My Settings 19 page. When it is enabled, by default the server will not perform DNSBL 95 , URIBL 99 , Heuristics and Bayesian 89 , and Outbreak Protection 84 spam tests on messages addressed to the accounts. Automatically whitelist addresses user send mail to This option governs the default setting of the Automatically whitelist addresses I send mail to option under each user's My Settings 19 page. When that is enabled for a user, every address to which that user sends a message will be added to his or her addresses whitelist, reach via the My Whitelist 21 link. This will help to ensure that future incoming messages to that user from those addresses will not get flagged as spam erroneously. Language Use this drop-down list to set the default language that the server will use when it sends system-generated messages. There is a corresponding user option that individuals can use to override this setting for themselves. Copyright © 2007-2014. All rights reserved. Alt-N Technologies, Ltd. Setup/Users 51 Number of items displayed per page This option determines how many items to display per page when a user is logged into SecurityGateway, such as addresses in the whitelist, entries in the message log, and so on. At the bottom of each page there are controls that can be used to move through the additional pages when there are too many items to display on a single page. The default value for this option is 50. Exceptions - Domains If you select a specific domain in the "For Domain:" drop-down list box at the top of the page when configuring these settings, that domain will be listed here after saving the settings. Click the View/Edit link for the corresponding domain to review or edit its User Options settings, or click Reset to reset the domain's settings to the default Global values. 3.2 Mail Configuration The Mail Configuration section under the Setup/Users menu provides links to the following five pages that govern various mail-related functions: Domain Mail Servers 52 —This page is used to manage all of your domain mail servers, which are the mail servers for which SecurityGateway will be acting as a gateway. Generally these are the servers on which your users have their email accounts and where their messages are stored. When SecurityGateway receives a message for a verified user of one of your domains, it will attempt to deliver the message to the mail servers associated with that domain. Remote POP Accounts 54 —Use the Remote POP Accounts option to configure SecurityGateway to use the POP3 protocol to download mail from a remote POP mailbox for redistribution to a given domain's users. Once collected, the messages are parsed according to the settings provided on the Edit POP Account 55 screen and then delivered to any valid users, just as if the messages had arrived at the server using conventional SMTP transactions.. Quarantine Configuration 58 —This page makes it possible for you to override the "...quarantine the message" options located under many of the Security 82 features. Further, you can choose whether or not your users will individually be able to override the default quarantine options for their domain, and whether or not they will be able to view and manage the contents of their quarantine folder. Finally, you can also choose how often users will receive an email detailing the contents of their quarantine folder: never, daily, or weekly. Mail Delivery 59 —The options on the Mail Delivery page are for designating whether SecurityGateway will handle the delivery of outbound messages itself or pass that responsibility to another server. This page also contains options governing how long SecurityGateway will try to deliver inbound or outbound mail that encounters non-fatal errors, before giving up and returning the message to the sender as undeliverable. These options are global options, applying to all SecurityGateway domains. Email Protocol 60 —The Email Protocol page contains various options governing Copyright © 2007-2014. All rights reserved. Alt-N Technologies, Ltd. 52 SecurityGateway for Email Servers v3.0 SecurityGateway's technical handling of email. For example, you will use this page to designate the ports that will be used for receiving mail, the maximum number of concurrent SMTP sessions allowed, whether or not SecurityGateway will honor VRFY requests, whether or not you will allow plain text passwords, and other similar advanced options. 3.2.1 Domain Mail Servers This page is used to manage all of your domain mail servers, which are the mail servers for which SecurityGateway will be acting as a gateway. Generally these are the servers on which your users have their email accounts and where their messages are stored. When SecurityGateway receives a message for a verified user of one of your domains, it will attempt to deliver the message to the mail servers associated with that domain. Each SecurityGateway domain 31 will have one or more domain mail servers associated with it specifically or use the domain mail servers that you designate as default servers 53 . To open the Domain Mail Servers list, click Setup/Users on the navigation menu in the left pane, then click Domain Mail Servers under the Accounts section of that pane. The Domain Mail Servers page lists one entry per row and has three columns: Description, Server, and Port. The Description column is for a description of the mail server (for example, "Server X at example.com"). The Server column lists the hostname or IP address of the mail server. The Port column lists the port that should be used when sending messages to it. To edit a domain mail server, double-click an entry or select it and then click Edit on the toolbar at the top of the page. This will open the Edit Mail Server 53 screen. The toolbar at the top of the page contains the following four options: New Click New to open the New Mail Server screen, used for creating a new domain mail server. This screen is identical to the Edit Mail Server 53 screen. Edit Use the toolbar's Edit button to open the Edit Mail Server 53 screen corresponding to the entry currently selected in the list. Alternatively, you can also open the screen by double-clicking an entry. Delete To delete one or more domain mail servers, select the entries from the list and then click Delete. A box will open asking you to confirm the decision to delete the servers. You can select multiple entries by using the Ctrl and Shift keys. For Domain: Use the For Domain: drop-down list box to choose which domain mail servers to Copyright © 2007-2014. All rights reserved. Alt-N Technologies, Ltd. Setup/Users 53 display in the list. By default all servers are displayed, but you can choose "-Default --" to display only those which you have designated as default servers (on the Edit Mail Server 53 screen) or pick a domain from the list to display only that domain's mail servers. 3.2.1.1 Edit Mail Server The Edit Mail Server screen is used to edit an existing Domain Mail Server 52 or to create a new one. You can reach this screen by clicking New on the Domain Mail Servers page or by selecting an entry on that page and clicking Edit. On this screen you will provide a description of the server, its location, the port on which you will connect to it, any required authentication credentials, and the SecurityGateway domains that use it. You will also designate whether or not it is a default mail server. Properties Description: Use this text box for a description of the server (for example, "Server X at example.com"). It corresponds to the Description column on the Domain Mail Server 52 page. Host or IP: This is for the hostname or the IP address of the mail server. SecurityGateway will connect to this location when attempting to deliver your users' mail to it. This option corresponds to the Server column on the Domain Mail Servers page. Port: This is the port SecurityGateway will use when connecting to the server, and it corresponds to the Port column on the Domain Mail Servers page. Requires authentication Click this checkbox if the domain mail server requires that you authenticate before sending mail to it. Then include the user name and password below. User name: If the server requires authentication, specify your user name here. Password: Enter your domain mail server password here. Type This server is a default mail server If you wish to make this server one of your default domain mail servers, click this checkbox. The default servers are used for all SecurityGateway domains that haven't had domain mail servers specifically associated with them. Specify below which domains should utilize this mail server... Use the options below to assign this server to one or more of your SecurityGateway Copyright © 2007-2014. All rights reserved. Alt-N Technologies, Ltd. 54 SecurityGateway for Email Servers v3.0 domains. If multiple domain mail servers are assigned to a domain, then on the Mail Servers tab 33 of the domain's Properties screen you can designate the order in which delivery will be attempted to them. Available Domains: This box lists all available SecurityGateway domains. To specify the domains that use this domain mail server, select them from the list and click the "--->" arrow. Selected Domains: This box lists all SecurityGateway domains that you have configured to use this mail server. To remove a domain from the list, select it and click the "<---" arrow. 3.2.2 Remote POP Accounts Use the Remote POP Accounts option to configure SecurityGateway to use the POP3 protocol to download mail from a remote POP mailbox for redistribution to a given domain's users. Once collected, the messages are parsed according to the settings provided on the Edit POP Account 55 screen and then delivered to any valid users, just as if the messages had arrived at the server using conventional SMTP transactions. It is important to note, however, that messages stored in mailboxes and retrieved using the POP3 protocol will be devoid of the important routing information (often called the message's "envelope") that would ordinarily be supplied had the messages been delivered using the SMTP protocol. This is because POP mailboxes are traditionally meant to be associated with an individual rather than with an entire domain or multiple users—everything in the mailbox is assumed to be intended for the same recipient and therefore the initial routing information is no longer needed. Without this routing information, SecurityGateway is forced to use a set of parsing 57 options to examine each message's headers in an attempt to determine the intended recipient. Messages with headers found to contain valid recipients at the associated SecurityGateway domain will be delivered. Messages without any valid recipients will be removed from the POP mailbox and deleted from SecurityGateway. The Remote POP Accounts page lists one entry per row and has five columns: Enabled, Description, Host, Port, and Domain. For detailed information on each of these items and on creating and editing POP account entries, see the Edit POP Account 55 screen. The toolbar at the top of the page contains the following five options: New Click New to open the New POP Account screen, used for creating a new POP account entry. This screen is identical to the Edit POP Account screen. Edit Use the toolbar's Edit button to open the Edit POP Account 55 screen corresponding to the entry currently selected in the list. Alternatively, you can also open the screen by double-clicking an entry. Delete To delete one or more POP accounts, select the entries from the list and then click Copyright © 2007-2014. All rights reserved. Alt-N Technologies, Ltd. Setup/Users 55 Delete. A box will open asking you to confirm the decision to delete the entries. You can select multiple entries by using the Ctrl and Shift keys. Check Now Click this button to immediately check the selected POP accounts for new messages. For Domain: Use the For Domain: drop-down list box to choose which POP accounts to display in the list. By default all accounts are displayed, but you can choose a specific domain from the list to display only that domain's POP account entries. 3.2.2.1 Edit POP Account Use the New or Edit option on the Remote POP Accounts 54 page to open the Edit POP Account screen, used to create or edit your POP account entries. The Edit POP Account screen contains two tabs: Host and Options and Parsing. The Host and Options tab is used for specifying the host and login information associated with the POP account, the security protocol to use for the connection to the POP host, and for designating how often SecurityGateway will collect mail from the POP account. The Parsing tab is used to designate the headers that SecurityGateway will search for recipient addresses and sender IP addresses. Host and Options This account is disabled Click this check box if you wish to disable the POP account. The account will still appear in the Remote POP Accounts 54 list, but SecurityGateway will no longer attempt to collect mail from it. Clear the check box to begin collecting mail from it again. Collect mail for this domain Use the drop-down list to specify the domain with which this POP account is associated. When parsing message headers for recipient addresses, SecurityGateway will look for this domain's users in those headers. Mailbox Description Use this space to provide a name or description for the POP account. This is simply for your reference and appears in the POP accounts list. Host name or IP Enter the POP account's domain name or IP address here (for example: pop.example.com). Copyright © 2007-2014. All rights reserved. Alt-N Technologies, Ltd. 56 SecurityGateway for Email Servers v3.0 Port This is the port that SecurityGateway will use when collecting mail from the account. The default POP port is 110. User name Enter the POP account's login or user name here. Password The POP account's password. Security Use secure connection SecurityGateway for Email Servers supports the latest in encryption technology to protect your data and secure the connection. Choose the option that you wish to use when collecting this POP account's messages. Never—Choose this option if your POP host does not support, or you do not wish to use, an encrypted session. TLS, if available—Choose this option if you wish to use Transport Layer Security (TLS) encryption whenever possible when collecting mail from the POP account. If the POP host does not support TLS then SecurityGateway will collect the messages normally, without using encryption. This is the default option. TLS—Select this option if you wish to require TLS encryption when collecting messages from this POP account. SSL—Use this option if you wish to require SSL encryption when collecting messages from this POP account. Require secure authentication (APOP) Click this box if you wish to use the APOP command and CRAM-MD5 authentication when retrieving mail from this account. This makes it possible to authenticate yourself without having to send clear text passwords. Message Collection Leave messages on the server If selected, SecurityGateway will download but not remove the messages from the POP account's host server. ...until they are this many days old This is the number of days that a message can remain on the POP host before it will be deleted. Some hosts may limit the amount of time that you are allowed to store messages in the mailbox. Copyright © 2007-2014. All rights reserved. Alt-N Technologies, Ltd. Setup/Users 57 Polling interval: [xx] minutes This option governs how often SecurityGateway will check the POP host for new mail. Checking every five minutes is recommended. Timeout: [xx] seconds This is the number of seconds that SecurityGateway will wait for a response from the POP host before giving up. Sixty seconds is recommended. Parsing Recipient (RCPT) Parse these headers for recipient (RCPT) Use this option to designate the headers that you want SecurityGateway to parse for recipient email addresses. Every header listed here is checked for addresses. Parse 'Received' headers for recipient (RCPT) Because the recipient information found within a message’s SMTP envelope is sometimes found within the 'Received' headers as well, this can make it possible for you to parse these headers and possibly glean the actual recipient address. Click this check box if you wish to parse valid addresses from all of the 'Received' headers found within each message. Skip over the first [xx] 'Received:' headers In some server configurations you may wish to parse 'Received' headers but need to skip the first few of them. This setting allows you to enter the number of 'Received' headers that SecurityGateway will skip over before beginning its parsing. IP Address Parse 'Received' headers for sender's IP address Click this check box if you wish to parse the sender's IP address from all of the 'Received' headers found within each message. Obtaining the sender's IP address can be useful for various security lookups and spam blocking options. Skip over the first [xx] 'Received:' headers In some server configurations you may wish to parse 'Received' headers but need to skip the first few of them. This setting allows you to enter the number of 'Received' headers that SecurityGateway will skip over before beginning its parsing. Parse this header for sender's IP address: Use this option to list a specific header that you wish to parse for the sender's IP address. The default value is X-ORIGINATING-IP. Copyright © 2007-2014. All rights reserved. Alt-N Technologies, Ltd. 58 SecurityGateway for Email Servers v3.0 3.2.3 Quarantine Configuration The Quarantine Options page makes it possible for you to override the "...quarantine the message" options located under many of the Security 82 features; the quarantine can be overridden globally or for specific domains. Further, you can choose whether or not your users will individually be able to override the default quarantine options for their domain, and whether or not they will be able to view and manage the contents of their quarantine folder. Finally, you can also choose how often users will receive an email detailing the contents of their quarantine folder: never, daily, or weekly. Messages Hold quarantined messages on the SecurityGateway server When this option is selected, any message matching the "...quarantine the message" criteria specified under any Security 82 feature will be held on the SecurityGateway server. This is the default option. Send users and email listing the contents of their quarantine folder: When messages are held in quarantine on the SecurityGateway server, this option determines how often an email message will be sent to your users listed the contents of their quarantine. Never Choose this option if you do not wish to send each user a message listed his or her quarantine folder's contents. Daily When this option is selected, each account will receive a message each day outlining the contents of the user's quarantine folder. This is the default option. Weekly Choose this option if you wish to send the email once per week. Allow mail server or client to filter quarantined messages When this option is selected it will override each "...quarantine the message" option under the various Security 82 features. Messages that would have been quarantined will instead be sent to the recipient, allowing the recipient's client or server to quarantine or filter them. By using the "For Domain:" drop-down list box at the top of the page, you can set this option globally or for individual domains. ...tag subject with [text] Enable this option if you wish to add a tag to the subject of messages that would have been quarantined. This tag could be used by the recipient's client or server to filter messages. Copyright © 2007-2014. All rights reserved. Alt-N Technologies, Ltd. Setup/Users 59 ...add header [text] Enable this option if you wish to add a message header to messages that would have been quarantined. This header could be used by the recipient's client or server to filter messages. The default header is: "X-Spam-Flag: YES". Users The two user options below are identical to the two options of the same name located on the User Options 49 page. Any change you make to the settings on one page will be duplicated on the other. The options are provided in both locations merely for your convenience. Allow users to view and manage their own quarantine folders When this option is enabled, users can view and manage incoming messages for them that were placed into quarantine. This allows them to reach the View My Quarantine 25 page to release messages, delete them, and so on. Allow users to modify their own quarantine settings Click this option to allow each user to edit the quarantine settings located on the My Settings 19 page. Exceptions - Domains If you select a specific domain in the "For Domain:" drop-down list box at the top of the page when configuring these settings, that domain will be listed here after saving the settings. Click the View/Edit link for the corresponding domain to review or edit its Quarantine Options settings, or click Reset to reset the domain's settings to the default Global values. 3.2.4 Mail Delivery The options on the Mail Delivery page are for designating whether SecurityGateway will handle the delivery of outbound messages itself or pass that responsibility to another server. This page also contains options governing how long SecurityGateway will try to deliver inbound or outbound mail that encounters non-fatal errors, before giving up and returning the message to the sender as undeliverable. These options are global options, applying to all SecurityGateway domains. Remote Mail Delivery Always send all outbound email directly to the recipient's mail server When this option is selected, SecurityGateway will use the normal SMTP delivery process to attempt to deliver each outbound message directly to the recipient's mail server—normal DNS lookups will be performed, MX records will be checked, and the like. This option is selected by default. Copyright © 2007-2014. All rights reserved. Alt-N Technologies, Ltd. 60 SecurityGateway for Email Servers v3.0 Always send every outbound email to the server specified below Choose this option if you wish to send all outbound mail to another server, giving it the responsibility to deliver those messages. Mail server: Use this option to specify the mail server to which SecurityGateway will send all outbound messages, to let that server to handle their delivery. You can enter a host or IP address such as mail.example.com or 192.168.0.1. Port This is the port that SecurityGateway will use when sending the messages to the designated server. Access to the above mail server requires authentication If the designated mail server requires authentication, click this check box and enter the login credentials below. User name: If authentication is required, enter the user name login credential here. Password: Enter the password corresponding to the user name entered above. Undeliverable Mail Whenever any message, whether inbound or outbound, cannot be delivered due to a non-fatal error such as when the recipient's mail server is temporarily unavailable, these options govern how long SecurityGateway will continue trying to deliver the message before giving up and returning it to the sender. During the first hour, retry delivery every: [xx] minutes (recommended: 5) During the first hour after a message cannot be delivered, this is the interval that SecurityGateway will wait between making further delivery attempts. The default setting is 5 minutes. After that, retry delivery every: [xx] minutes (recommended: 240) After a message cannot be delivered for one hour, SecurityGateway will switch to this interval between further delivery attempts. The default setting is 240 minutes. If a message is still undeliverable after [xx] days then suspend all delivery attempts and inform the sender that the message could not be delivered. (recommended: 5) This is the number of days SecurityGateway will continue attempting to deliver a message before giving up. After that time it will cease delivery attempts and send a message to the sender stating that the message could not be delivered. 3.2.5 Email Protocol The Email Protocol page contains various options governing SecurityGateway's Copyright © 2007-2014. All rights reserved. Alt-N Technologies, Ltd. Setup/Users 61 technical handling of email. For example, you will use this page to designate the ports that will be used for receiving mail, the maximum number of concurrent SMTP sessions allowed, whether or not SecurityGateway will honor VRFY requests, whether or not you will allow plain text passwords, and other similar advanced options. Server HELO Domain Name: This is the domain name that SecurityGateway will use to identify itself during the SMTP process (e.g. mail.example.com, smtp.domain.com, or the like). This will also be used in Received headers, authentication-results headers, and other places where it is necessary to identify exactly what server was processing a message. SMTP Ports (comma delimited): These are the ports on which SecurityGateway will receive SMTP messages. You can list multiple ports by separating them with commas. The default SMTP port is 25. Dedicated SSL Ports (comma delimited): List your dedicated SSL ports here, on which you will receive mail. You can list multiple ports by separating them with commas. The default SSL port is 465. MSA Ports (comma delimited): This option is for listing you MSA ports. Separate multiple ports with a comma. The default MSA port is 465. Bind sockets to these IPs (comma delimited): If you wish to bind SecurityGateway to specific IP addresses, list those IPs here separated by commas. Maximum concurrent SMTP inbound sessions: This value controls the number of concurrent inbound SMTP sessions that SecurityGateway will accept before it begins responding with a "Server Too Busy" message. The default value is 100. Maximum concurrent SMTP outbound sessions: The value entered here is the maximum number of concurrent outbound SMTP sessions that will be created when sending mail. Each session will send outbound messages until all waiting messages are sent. For example, if this option is set to the default value of 30, then thirty sessions could be simultaneously created, allowing SecurityGateway to attempt to deliver 30 different messages at once. Maximum concurrent POP collection sessions: This value controls the maximum number of concurrent POP collection sessions that the server will accept before it begins responding with a "Server Too Busy" message. Default Domain: Choose a domain from the drop-down list box. This is the domain that SecurityGateway will assume should be used when someone attempts to log in without including a domain name, and it is the domain that will be used for MAIL, RCPT, and VRFY commands when no domain is specified. Further, SecurityGateway will use this domain when sending alerts and messages to external administrators 41 . Copyright © 2007-2014. All rights reserved. Alt-N Technologies, Ltd. 62 SecurityGateway for Email Servers v3.0 SMTP Protocol Settings Use ESMTP whenever possible When this option is enabled, SecurityGateway will use Extended SMTP commands whenever possible. This option is enabled by default. Honor VRFY command Use this option if you wish to honor VRFY 129 commands. This is disabled by default. Allow plain text passwords (SSL or CRAM-MD5 not required) By default, SecurityGateway accepts plain text passwords sent during SMTP authentication. If you disable this option then SSL or the CRAM-MD5 method of authentication is required. Honor CRAM-MD5 authentication method When this option is enabled, SecurityGateway will honor the CRAM-MD5 authentication method. This is enabled by default. Hide ESMTP SIZE command parameter Click this option if you wish to hide the ESMTP SIZE command (RFC-1870). This is disabled by default, meaning that the SIZE command parameter is not hidden. Check commands and headers for RFC compliance Enable this option if you wish to reject messages that are not compliant to RFC internet standards. When enabled, SecurityGateway will reject messages with parameters that contain control or 8-bit characters and messages missing a Date, Sender, or From header. Further, these required headers must have a corresponding value—they cannot exist as empty headers. If you do not wish to reject noncompliant messages, then clear this check box. Allow this many RCPT commands per message: [xx] (RFC says 100) This is the number of RCPT commands (i.e. the number of recipients) that will be allowed per message. The default value is 100. Maximum acceptable SMTP message size: [xx] KB (0 = no limit) Setting a value here will prevent SecurityGateway from accepting mail that exceeds a certain fixed size. When this feature is active SecurityGateway will attempt to use the ESMTP SIZE command specified in RFC-1870. If the sending agent supports this SMTP extension then SecurityGateway will determine the message size prior to its actual delivery and will refuse the message immediately. If the sending agent does not support this SMTP extension then SecurityGateway have to allow the sending server to begin transmitting the messages, but will reject the message later if the maximum size is reached. The default value of "0" mean that there is no size limit placed on messages. Kill connection if data transmission exceeds: [xx] KB (0 = never) If the transmission of data during an SMTP connection exceeds this threshold, SecurityGateway will close the connection. The default value in this option is "0", meaning that there is no size limit. Copyright © 2007-2014. All rights reserved. Alt-N Technologies, Ltd. Setup/Users 63 Loop Detection and Control Maximum message hop count (1-100): RFC standards stipulate that a mail server must stamp each message each time that it is processed. These stamps can be counted and used as a stopgap measure against recursive mail loops that can sometimes be caused by errant configurations. If undetected, these looping delivery cycles could consume your resources. By counting the number of times the message has been processed, such messages can be detected and placed in the Bad Messages 193 queue. The default value of this option is 20. 3.3 Disclaimers (Headers/Footers) This page is used to manage all of your Message Disclaimers. Message Disclaimers are portions of text that the server can dynamically add above or below the body of inbound, outbound and local email messages. Administrators can use the Edit Disclaimer 64 screen to create disclaimer templates, which can use either plain text or standard HTML and custom SecurityGateway tags. The disclaimer template is applied to both the HTML body and text body of emails, and templates can be assigned to a specific domain or can be applied globally. A Sieve Script 167 is created for each disclaimer, which links the template to the desired trigger. It is also possible to create these sieve scripts directly from the Sieve Script page. The Message Disclaimers page lists one entry per row and has seven columns: Enabled, Description, Type, Inbound, Outbound, Internal, Domain. For detailed information on each of these items and on creating and editing disclaimers, see the Edit Disclaimer 64 screen. The toolbar at the top of the page contains the following four options: New Click New to open the New Disclaimer screen, used for creating a new Message Disclaimer. This screen is identical to the Edit Disclaimer screen. Edit Use the toolbar's Edit button to open the Edit Disclaimer 64 screen corresponding to the entry currently selected in the list. Alternatively, you can also open the screen by double-clicking an entry. Delete To delete one or more disclaimers, select the entries from the list and then click Delete. A box will open asking you to confirm the decision to delete the disclaimers. You can select multiple entries by using the Ctrl and Shift keys. For Domain: Use the For Domain: drop-down list box to choose which domain's disclaimers to display in the list, or you can choose "-- Global --" to display only global disclaimers. By default all disclaimers are displayed, whether they are global or domain-specific. Copyright © 2007-2014. All rights reserved. Alt-N Technologies, Ltd. 64 SecurityGateway for Email Servers v3.0 3.3.1 Edit Disclaimer Use the New or Edit option on the Message Disclaimers 63 page to open the Edit Disclaimer screen, used to create or edit your message disclaimer templates. On this screen you can enable or disable a disclaimer, associate it with a specific domain, designate its Type (header, footer or custom), and specify what types of messages will use it: inbound, outbound, or local messages. This disclaimer is disabled Click this check box if you wish to disable the disclaimer. It will still appear in the Message Disclaimers 63 list, but SecurityGateway will no longer add it to any messages. Clear the check box to begin using it again. This disclaimer is for this domain: Use the drop-down list to designate the SecurityGateway domain to be associated with this disclaimer, or choose Global to associate it will all domains. Description Description Use this space to provide a name or description for the disclaimer. This is simply for your reference and appears in the Message Disclaimers list. Type This option is for specifying the disclaimer's Type: Header, Footer, or Custom. Header Choose Header if you wish to add the disclaimer to the top of the message, above the message body. Footer Choose Footer if you wish to add the disclaimer to the bottom of the message, below the message body. Custom Choose Custom if you wish to create a custom disclaimer, using the special SecurityGateway Tags outlined below. With a custom disclaimer you can add text both above and below the body. The "<sg:ORIGINAL_BODY>" tag is required in all Custom disclaimers. Rules This option is for specifying the type of messages that should have the disclaimer added. Copyright © 2007-2014. All rights reserved. Alt-N Technologies, Ltd. Setup/Users 65 Add disclaimer to incoming mail Choose this option if you wish to add the disclaimer to all incoming messages destined for the domain selected above. If you have designated this as a Global disclaimer, it will be added to all incoming messages regardless of the domain. Add disclaimer to outbound mail Choose this option if you wish to add the disclaimer to all outgoing messages from the domain selected above. If you have designated this as a Global disclaimer, it will be added to all outgoing messages regardless of who sent them. Add disclaimer to local mail Choose this option if you wish to add the disclaimer to any message that is both to and from the domain selected above. For example, a messages from [email protected] and to [email protected] would have the disclaimer added, but a message from [email protected] and to [email protected] would not. If you have designated this as a Global disclaimer, it will be added to every domain's local mail. Text This is where you specify the content of your disclaimer template and designate the template as either plain text or HTML. Plain text templates can only contain text, but HTML templates can contain HTML code and the special SecurityGateway Tags listed below. Plain text (HTML characters will be encoded) Plain text disclaimers are the default option. When this option is enabled, only plain text will be added to the message regardless of any HTML code that may exist in the text. Any HTML tags or characters will be encoded as plain text and added as well. Thus, the text "<b>My Disclaimer</b>" would be inserted exactly as is, including the HTML tags, rather than converted to bold text or having the HTML tags removed. Therefore if you create a plain text template do not include any HTML code. When you have designated the disclaimer Type as Custom, plain text templates can contain the "<sg:ORIGINAL_BODY>" tag, which allows you to place the body of the message anywhere within the template. All other tags or HTML characters will simply appear as plain text instead of being processed as code. Example plain text footer template: --------------------------------------------The views in this message are not necessarily those of example.com or its affiliates. --------------------------------------------Example plain text custom template: The following message was sent by an employee Copyright © 2007-2014. All rights reserved. Alt-N Technologies, Ltd. 66 SecurityGateway for Email Servers v3.0 of example.com. -<sg:ORIGINAL_BODY Field="body:all">{Original Email}</ sg:ORIGINAL_BODY> --------------------------------------------The views in this message are not necessarily those of example.com or its affiliates. --------------------------------------------- HTML Templates Disable the Plain text option if you wish to create an HTML disclaimer template. HTML templates can contain HTML code and the special SecurityGateway Tags listed below. Example HTML header template: <HTML><HEAD> <style type="text/css"> .blueboldtext { font-family: Geneva, fixed-width; font-size: 13; color: #114477; font-weight: bold; } </style></HEAD> <BODY> <DIV>This is my header text!</DIV> <sg:HTML_ONLY><span class="blueboldtext">Only show this text in the HTML body!</span></sg:HTML_ONLY> <sg:TEXT_ONLY>Only show this text in the Plain Text body!</ sg:TEXT_ONLY> <BR> -------------<br /> </BODY></HTML> Example Custom HTML Template: <DIV> </DIV> <DIV>This is my header text!</DIV> <br />---------</DIV> <sg:ORIGINAL_BODY Field="body:all">{Original Email}</ sg:ORIGINAL_BODY> <br />---------</DIV> <DIV>This is my footer text!</DIV> <DIV> </DIV> <DIV>This text will be in html and text body<br /> <sg:HTML_ONLY>Only show this text in HTML message!</sg:HTML_ONLY> <sg:TEXT_ONLY>Only show this text in Plain Text message!</ sg:TEXT_ONLY></DIV> You are not required to add HTML, HEAD or BODY tags to a disclaimer template. If you do add them, the tags will be merged with the corresponding tags in each email message. Copyright © 2007-2014. All rights reserved. Alt-N Technologies, Ltd. Setup/Users 67 SecurityGateway Tags There are three custom SecurityGateway tags that can be used in your disclaimer templates. All three tags can be used in HTML templates regardless of the template Type. Custom Type plain text templates can only use the "<sg:ORIGINAL_BODY>" tag. <sg:ORIGINAL_BODY></sg:ORIGINAL_BODY> This tag denotes in the template where the original body will be placed. The tag will be placed in the appropriate place automatically when you designate the disclaimer as a Header or Footer. For Custom Type disclaimers you must manually place this tag where you wish the message body to appear. For custom made Sieve Scripts 167 it can be placed anywhere, but must be present. This tag can be used in any Type of HTML disclaimer template: Header, Footer, or Custom. The body of the message will always appear wherever this tag dictates, regardless of the Type selected. For plain text templates, it can only be used in Custom Type disclaimers. <sg:HTML_ONLY></sg:HTML_ONLY> Anything placed within this tag will only appear in the HTML body of the message; it will not appear in the Text body. This tag cannot be used in Plain Text disclaimer templates. <sg:TEXT_ONLY></sg:TEXT_ONLY> Anything placed within this tag will only appear in the Text body of the message; it will not appear in the HTML body. This tag cannot be used in Plain Text disclaimer templates. Sieve Script Use the Sieve Script 167 editor if you wish to add a user defined, custom disclaimer. The conditions for triggering the disclaimer are the same as for any other sieve script. Some characters in the template will need to be escaped when using the sieve editor. The following sieve filter is provided as an example of a user defined disclaimer: require ["securitygateway","body"]; if allof(body :text :contains "Make money now!") { disclaimer "text: <HTML xmlns:sg = \"http://www.altn.com/Products/SecurityGatewayEmail-Firewall/\"> <HEAD><META http-equiv=\"Content-Type\" content=\"text/html; charset=UTF-8\" /> </HEAD> <BODY> <DIV>This is my header text!</DIV> <DIV>Another line of header text!</DIV> <DIV> </DIV> <DIV>---------<br /> Copyright © 2007-2014. All rights reserved. Alt-N Technologies, Ltd. 68 SecurityGateway for Email Servers v3.0 <sg:ORIGINAL_BODY Field=\"body:all\">{Original Email}</ sg:ORIGINAL_BODY> <br />---------</DIV> <DIV> </DIV> <DIV>This is my footer text!</DIV> <DIV>Another line of footer text!</DIV> <DIV> </DIV> <DIV>This text will be in html and text body<br /> <sg:HTML_ONLY>Only show the image and this text in HTML message!</ sg:HTML_ONLY> <sg:TEXT_ONLY>Only show this text in Plain Text message!</ sg:TEXT_ONLY></DIV> </BODY></HTML> ." ; } 3.4 System The System section under the Setup/Users menu contains links to the following system-related features: Encryption 69 —This page is used to configure SecurityGateway's various encryption settings. SecurityGateway includes support for the Secure Sockets Layer (SSL) protocol with the STARTTLS SMTP extension, which prevents others from being able to intercept and read your email. It also includes HTTPS support, which offers this same protection for the web interface. HTTP Server 70 —The HTTP Server page is used for configuring various settings related to SecurityGateway's web interface. You can designate the host name that will be used in login links created by SecurityGateway, the HTTP and HTTPS ports, and other HTTP related settings. Branding/Custom Images 71 —This page provide options for customizing the banner images that appear on the login page and the navigation sidebar. Directories 72 —This page lists the folders used by SecurityGateway to manage various types of files. You can customize the folder locations by changing any of the paths on this page. Disk Space 73 —The Disk Space page is used for configuring SecurityGateway to monitor your free disk space. It contains options that can be used to send a warning message to the administrators and/or stop receiving messages if the disk space is low. View Configuration 73 —This page displays all of your current SecurityGateway settings. This can be useful when trying to diagnose problems with your SecurityGateway server or when working with technical support. This page includes an option to save the current configuration to an XML file. Copyright © 2007-2014. All rights reserved. Alt-N Technologies, Ltd. Setup/Users 69 3.4.1 Encryption SecurityGateway incorporates the latest in encryption technology to protect your data. The Secure Sockets Layer (SSL) protocol—also known as Transport Layer Security (TLS)—with the STARTTLS SMTP extension prevent others from being able to intercept and read your email. HTTPS in SecurityGateway offers this same protection for the web interface. The SSL protocol, developed by Netscape Communications Corporation, is the standard method for securing server/client Internet communications. It provides server authentication, data encryption, and optional client authentication for TCP/IP connections. Further, because SSL is built into all current major browsers, simply installing a valid digital certificate on your server will activate the connecting browser's SSL capabilities when connecting to SecurityGateway. If you connect using a mail client, SecurityGateway supports the STARTTLS SMTP extension over SSL/TLS. However, you must first have your client configured to use SSL, and it must support that extension—not all mail clients support it, though most do. Email Encryption Enable SSL and STARTTLS support for SMTP Click this check box to activate support for the SSL/TLS protocol and the STARTTLS extension, using the "Active" certificate in the Select Certificate box below. This option must be enabled and a valid certificate must be active if you wish to log in to SecurityGateway's web interface using HTTPS. This option is disabled by default. Send messages with STARTTLS whenever possible Click this option if you want SecurityGateway to attempt to use the STARTTLS extension for every SMTP message it sends. If a server to which SecurityGateway is connecting doesn't support STARTTLS then the message will be delivered normally without using SSL. This option is disabled by default. Select Certificate This box lists all SSL certificates that you have created. SecurityGateway generates certificates that are self-signed, meaning that the Issuer of the certificate, or Certificate Authority (CA), is the same as the owner of the certificate. This is perfectly valid and allowed, but it is possible that some users may be asked whether or not they wish to proceed to the site and/or install the certificate whenever they connect to SecurityGateway's HTTPS URL, because the CA won't already be listed in your their list of trusted CAs. When they agree to install the certificate and trust your SecurityGateway domain as a valid CA they will no longer have to see the security alert message when connecting. Whether or not they have to go through that procedure at all depends on what browser they are using, what security restrictions they have in place, and so on. Creating SSL Certificates To create a new certificate, click New on the toolbar at the top of the Select Certificate box. This will open the SSL Certificate 70 screen. To delete an existing certificate, select the certificate and then click Delete. Copyright © 2007-2014. All rights reserved. Alt-N Technologies, Ltd. 70 SecurityGateway for Email Servers v3.0 Activating a SSL Certificate To activate a SSL certificate, click the "Make Active" link in the desired entry. SSL Certificate This screen is used to create new SSL certificates. To create a new certificate, click New on the Select Certificate toolbar on the Encryption 69 page and then enter your certificate's information. After you are finished, click Save and Close to create the certificate. Create Certificate Host Name Enter the host name to which your users will connect (for example, "mail.example.com"). Organization/Company Name Enter the organization or company that "owns" the certificate here. Alternative Host Names (separate multiple entries with a comma) SecurityGateway does not support separate certificates for each domain—all domains must share a single certificate. If there are alternative host names to which users may be connecting, and you want this certificate to apply to those names as well, then enter those domain names here separated by commas. Wildcards are permitted, such as "*.example.com". Encryption Key Length Choose the desired bit-length of the encryption key for this certificate. The longer the encryption key the more secure the transferred data will be. Note, however, that not all applications support key lengths longer than 512. Country/Region Choose the country or region in which your server resides. 3.4.2 HTTP Server The HTTP Server page is used for configuring various settings related to SecurityGateway's web interface. You can designate the host name that will be used in login links created by SecurityGateway, the HTTP and HTTPS ports, and other HTTP related settings. Server Host Name (used to create login links): This is the host name that will be used by SecurityGateway when creating login links in messages it sends to your users and administrators. For example, if the URL that your users need to use when connecting to SecurityGateway is "http:// sg.example.com:...", then enter "sg.example.com" into this box. If you want these links to use https, then you must enter the entire URL include "https" (for example, "https://sg.example.com:4443"). Copyright © 2007-2014. All rights reserved. Alt-N Technologies, Ltd. Setup/Users 71 HTTP Ports (comma delimited): This is the HTTP port that SecurityGateway's web interface will use. When connecting to SecurityGateway via their web browser, your users will need to include this port number in the URL after a colon. For example, "http:// sg.example.com:4000". You can enter multiple ports separated by commas. The default port is 4000. HTTPS Ports (comma delimited): This is the HTTPS port that SecurityGateway will monitor for HTTPS connections to the web interface. Users connecting to this port will need to use "https" in SecurityGateway's URL and include the port number after a colon (e.g. "https:// sg.example.com:4443"). You can enter multiple ports separated by commas. The default port is 4443. Bind sockets to these IPs (comma delimited): If you wish to restrict SecurityGateway to receiving connections made to specific IP addresses, enter them here separated by commas. Number of Threads for HTTP Requests: This is the number of threads that SecurityGateway will use for HTTP requests. The default value is 5. Session Timeout Enable session timeouts When this option is enabled, a user or administrator will be logged out of the web interface automatically when there is no activity from them for the number of minutes designated below. This option is enabled by default. Log users out after [xx] minutes This is the number of minutes of inactivity allowed before a user or administrator will be automatically logged out of the web interface. The default setting for this option is 15 minutes. 3.4.3 Branding/Custom Images This page provides options for customizing the banner image that appears on the login page and the the image used in the navigation sidebar. Customization Use default images Click this option to use SecurityGateway's default images. Use custom images Choose this option if you wish to designate custom images for SecurityGateway to use. Copyright © 2007-2014. All rights reserved. Alt-N Technologies, Ltd. 72 SecurityGateway for Email Servers v3.0 Login Page Image This is the main image that SecurityGateway will display on the login page. This section contains details about the default image size and provides options for you to upload your custom image. Navigation Sidebar Image This is the image that is displayed at the top of the navigation sidebar when you are signed in to SecurityGateway. This section contains details about the default image size and provides options for you to upload your custom image. Exceptions - Domains If you select a specific domain in the "For Domain:" drop-down list box at the top of the page when configuring these settings, that domain will be listed here after saving the settings. Click the View/Edit link for the corresponding domain to review or edit its Branding/Custom Images settings, or click Reset to reset the domain's settings to the default Global values. 3.4.4 Directories This page lists the folders used by SecurityGateway to manage various types of files. You can customize the folder locations by changing any of the paths below and then clicking Save on the toolbar. Directory Settings Attachments: This is the folder where SecurityGateway will store file attachments included with messages as long as those messages reside on the SecurityGateway server. The contents of this folder are not included in SecurityGateway's internal Backup 75 and Restore 77 files. If you wish to backup attachments then use your third party backup software or some other external method to do so. Backup: This is where backup 75 files are stored. For optimal performance, we recommend setting this folder to a different physical disk drive. Logs: SecurityGateway's log files are stored here. Inbound Queue: This is the folder SecurityGateway will use as a message queue for inbound messages. Temp: This is the temporary folder that will be used for processing. Copyright © 2007-2014. All rights reserved. Alt-N Technologies, Ltd. Setup/Users 73 Bayesian Learning Non-spam: When using the Bayesian Learning messages should be placed. 89 feature, this is the folder where non-spam Bayesian Learning Spam: When using the Bayesian Learning should be placed. 89 feature, this is the folder where spam messages 3.4.5 Disk Space The Disk Space page is used for configuring SecurityGateway to monitor your free disk space. It contains options that can be used to send a warning message to the administrators and/or stop receiving messages if the disk space is low. Enable disk space checking engine When this option is enabled, SecurityGateway will monitor the free disk space available on all volumes referenced on the Directories 72 page. This option is enabled by default. Send warning to global administrators if free disk space falls below [xx] KB When this option is enabled, a warning message will be sent to the global administrators 41 when the disk space falls below the designated value in kilobytes (KB). The default value is 10000 KB, and the option is enabled by default. Disable the SMTP engine if free disk space falls below [xx] KB With this option, when the disk space falls below the value designated, SecurityGateway will disable the SMTP engine and therefore no longer accept any messages. The default value is 1000 kilobytes, and the option is enabled by default. 3.4.6 View Configuration When you click View Configuration under Setup/Users»System on the navigation menu, this page will display all of your current SecurityGateway settings. This can be useful when trying to diagnose problems with your SecurityGateway server or when working with technical support. You can save the current configuration to an XML file by clicking "Download XML File" on the toolbar. Then, click Save on the box that opens, choose a location for the file, and then click Save again. 3.5 Database Maintenance The Database Maintenance section of the Setup/Users menu contains links to the following three pages, which deal with the type and amount of data saved by SecurityGateway, and with backing up and restoring your SecurityGateway database: Data Retention 74 —Use this page to configure how long SecurityGateway will keep Copyright © 2007-2014. All rights reserved. Alt-N Technologies, Ltd. 74 SecurityGateway for Email Servers v3.0 message database records, message content, and each message's SMTP session transcript. You can also designate under what circumstances message content will be retained or deleted. Database maintenance occurs each night at midnight, and all values on this page are in numbers of days. Backup 75 —Use the Backup page to schedule automatic backups of your SecurityGateway database. You can schedule backups of the entire database or just the configuration and settings. You can also designate the number of old backup files to store. Restore 77 —The Restore page lists all of the configuration and database backup files created using the Backup page that are currently saved on your system. From this page you can download the files, delete them, and restore your configuration or entire database from them. 3.5.1 Data Retention Use this page to configure how long SecurityGateway will keep message database records, message content, and each message's SMTP session transcript. You can also designate under what circumstances message content will be retained or deleted. Database maintenance occurs each night at midnight, and all values on this page are in numbers of days. Message Database Records Specify below how long you wish to retain message database records. Reports will be limited to this time frame. A longer time frame will result in a larger database. Take no action Choose this option if you do not wish to delete message database records. Delete records after [xx] day(s) If you wish delete old database records each night at midnight, choose this option and specify the number of days that you wish to keep each record. This is the default option and records are saved for 30 days. Message Content By default, the content of each email message is discarded when it is no longer needed, such as when the message is delivered successfully to the recipient, when a message is deleted from quarantine, and the like. However, because saving the content of an email message can be helpful for debugging purposes, there are options provided below to prevent automatic deletion of message content under various circumstances. All of these options are disabled by default. Enabling these options may result in degraded performance and a larger database. Copyright © 2007-2014. All rights reserved. Alt-N Technologies, Ltd. Setup/Users 75 Do not delete message content after successful delivery Click this option if you wish to retain message content, even after the message has been successfully delivered to the recipient's server. Do not delete message content when a message is deleted from the quarantine Enable this option if you do not wish to delete a quarantined message's content after it is deleted from the quarantine. Do not delete message content when a message is rejected When this option is enabled, SecurityGateway will not delete a message's content even if the message is rejected after receiving it. Do not delete message content after permanent delivery failure Click this option if you wish to retain messages that encounter a permanent delivery failure, such as when the recipient is invalid. Do not delete message content of incomplete messages Enable this option if you do not wish to delete the content of incomplete messages. Message Transcripts For each message, a comprehensive log of the SMTP session and SIEVE rule engine is maintained. These message transcripts can be very helpful in troubleshooting and debugging, however they do increase the size of the database. Process with the message database record (above) This is the default option. When it is selected, message transcripts will be processed according to the option selected in the Message Database Records section above. When old message database records are deleted, session transcripts will be deleted as well. Delete message transcripts after [xx] day(s) If you wish to retain message transcripts for a specific number of days, click this option and specify the number of days to keep them. Do not store message transcripts Choose this option if you do not wish to store message transcripts. Bandwidth Information Delete bandwidth information after [xx] day(s) Enable this option and specify a number of days if you wish to delete old bandwidth usage information each night at midnight. 3.5.2 Backup Use the Backup page to schedule automatic backups of your SecurityGateway database. You can schedule backups of the entire database or just the configuration Copyright © 2007-2014. All rights reserved. Alt-N Technologies, Ltd. 76 SecurityGateway for Email Servers v3.0 and settings. You can also designate the number of old backup files to store. Backup files are listed on the Restore 77 page. For optimal performance we recommend locating the backup folder (specified on the Directories 72 page) on a different physical disk drive. Further, we do not recommend using third party backup software or other external backup procedures to backup SecurityGateway's database file while the SecurityGateway service is running. The internal options provided on this page can be used regularly to backup the database while the service is running. If you wish to use some external backup procedure then you should stop the service first, or use that external procedure simply to backup the backup files created internally by SecurityGateway. Finally, SecurityGateway's internal backup options do NOT backup the contents of the Attachments 72 folder. If you wish to backup attachments then use your third party backup software or some other external method to do so. Automated Backup Do not perform automatic backup This is the default option. When selected, SecurityGateway will not automatically backup the database or server configuration. Automatically backup configuration data every [xx] day(s) at [xx:xx] Choose this option if you wish to export/backup SecurityGateway's configuration, but not backup the entire database. Specify the number of days to wait between automatic exports and the exact time to do it. These files will be listed on the Restore 77 page and have file names that begin with "Export". When using this backup method, ONLY SecurityGateway's configuration and settings are backed up, including user and domain information, not the entire database. Consequently, if you restore the system from this type of backup file then all messages, session transcripts, reports, the message log, and so on will be lost—only the configuration and settings will be restored. Automatically backup entire database every [xx] day(s) at [xx:xx] Choose this option if you wish to backup SecurityGateway's entire database, including your configuration and settings, the Message Log 189 , Reports 204 , transcripts, and so on. Specify the number of days to wait between automatic backups and the exact time to perform the backup. These files will be listed on the Restore 77 page and have file names that begin with "Backup". Copyright © 2007-2014. All rights reserved. Alt-N Technologies, Ltd. Setup/Users 77 The contents of the Attachments 72 folder are NOT included in the backup file. If you wish to backup attachments then use your third party backup software or some other external method to do so. Further, although the Message Log 197 is included when backing up the entire database, the Log Files 198 are not. If you wish to backup the log files then you must use your backup software or external method to do that as well. Store only [xx] backup file(s). The oldest backup file(s) will be deleted. Click this checkbox if you wish to store only a certain number of backup files, and specify the number of files to store. When the maximum number of files is reached, the oldest file will be deleted whenever a new backup file is created. This option is disabled by default. Manual Backup Click here to backup/export configuration data now Click this link to manually export SecurityGateway's configuration. This backup method is functionally identical to the "Automatically backup configuration data..." option above. It is simply initiated manually instead of automatically and is in addition to any scheduled automatic backups. Click here to backup entire database now Click this link to manually backup SecurityGateway's entire database. This backup method is functionally identical to the "Automatically backup entire database..." option above. It is simply initiated manually instead of automatically and is in addition to any scheduled automatic backups. 3.5.3 Restore The Restore page lists all of the configuration and database backup files created using the Backup 75 page that are currently saved on your system. From this page you can download the files, delete them, and restore your configuration or entire database from them. Upload Backup File Use the browse and upload options to upload a previously downloaded backup file and add it to the Restore list below. You can then use that file to restore your configuration or entire database, depending on what type of backup file it is. Browse Click this button to browse to the database or configuration file that you wish to upload to the Restore list below. The file should have been downloaded previously from this page and created using the options on the Backup 75 page. Upload Backup File After using the Browse button to locate the file, click this button to upload the file to Copyright © 2007-2014. All rights reserved. Alt-N Technologies, Ltd. 78 SecurityGateway for Email Servers v3.0 the Restore list below. Restore This list contains all files created from the Backup 75 page or uploaded using the Upload Backup File option above. Each entry contains the file name, the date and time that the backup file was created, the size of the file, and links to download, delete, or restore the file. File names starting with "Export" are files containing configuration data only. Files starting with "Backup" are backup files of the entire database. For more information on what exactly is included in each type of backup file, see the Backup 75 page. Download Click the Download link in a backup file entry to download the file. Files can be uploaded again to the Restore list later by using the Upload Backup File option above. Downloading a file will not delete it from the list. Delete Use this link to delete a backup file. If you wish to remove the file from SecurityGateway but save it to another location, use the Download option above before deleting the file. Restore Click this link to restore SecurityGateway's configuration or entire database from the corresponding file. All changes made since that backup file was created will be lost, and SecurityGateway will be unavailable until the restoration is complete. You will also have to log in again after it is finished. You will be asked to confirm your decision before proceeding. 3.6 Software Updates Use this page to check whether or not an updated version of SecurityGateway is available. You can check for updates manually or use an option to cause SecurityGateway to check for them automatically. When an update is available, you can download and install it directly from the web interface. Configuration Periodically check the software updates Check this box if you want SecurityGateway to check for software updates automatically each day at midnight. Click here to check for software updates now Click this link to manually check for software updates. The results of the check will Copyright © 2007-2014. All rights reserved. Alt-N Technologies, Ltd. Setup/Users 79 appear in the Updates box below. Updates This box contains the results of the software update checks. When a software update is available, all Global Administrators 41 are notified and a link is provided that you can use to open the Software Update Details page, which can be used to download and install the update. Software Update Details When an update check shows that a software update is available, a link to the Software Update Details page is provided on the Dashboard 9 , and also in the Updates section of the Software Updates page. This page displays the current version of software that is installed, the version that is available, and the file size of the new version. It also provides a link to see a list of changes in the update and a link to download and install it. 3.7 Registration This page lists your product registration information, including the name of the person or company to whom the product is registered, the registration key, and the status of your registration, such as the license size and other relevant information. SecurityGateway This section is for the SecurityGateway product registration information. License Name: This is the name under which the license is registered. Company or distributor: This is your company or the distributor of the license. SecurityGateway Registration Key: This box is for your Registration key. After entering your key, click Save. Registration Status This box lists the status of your registration, including the license size and other information. Copyright © 2007-2014. All rights reserved. Alt-N Technologies, Ltd. Copyright © 2007-2014. All rights reserved. Alt-N Technologies, Ltd. Section IV 82 SecurityGateway for Email Servers v3.0 4 Security The Security menu has eight sections with various tools to help you protect your domains and users from spam, viruses, email abuse, and other security risks. Below is a brief overview of each security section. For more information, see the individual sections. Anti-Spam 83 The Anti-Spam section under the Security menu contains options to help you prevent spam, or unsolicited junk email. There are eight anti-spam features listed under this section, including options for identifying and preventing spam by using heuristics, Bayesian analysis, DNS and URI blacklists, greylisting, and more. Anti-Virus 111 The Anti-Virus section under the Security menu contains options to help you identify virus infected messages and prevent them from reaching your users. Anti-Spoofing 114 The Anti-Spoofing section has tools to help you identify messages sent from forged, or "spoofed" addresses. There are six anti-spoofing features listed under this section, such as DKIM Verification, Sender ID, Callback Verification, and more. Anti-Abuse 132 The Anti-Abuse section contains tools that help you prevent others from abusing or improperly using your email system to relay spam messages, use large amounts of bandwidth, connect to your server too frequently, and the like. There are six tools under the Anti-Abuse section. Filtering The Filtering section contains two features: Message Content Filtering 140 and Attachment Filtering 149 . The Message Content Filtering page can be used to create filter rules to perform a number of actions. You can create rules to cause messages that match certain criteria to be refused, copied or redirected to a different address, quarantined, and more. The options on the Attachment Filtering page can be used to designate specific types of files that will cause a message to be either blocked or quarantined when one of those files is attached. You can define the filtering restrictions both globally and per domain. Blacklists 151 Blacklists are lists of email addresses, hosts, and IP addresses whose messages you wish to block or quarantine. By default those messages will be refused during the SMTP session, but on the Blacklist Action page you can change this setting so that they will be quarantined instead. The action that will be taken can be set globally and for specific domains, and the blacklists themselves can also be set as global or domain specific. Copyright © 2007-2014. All rights reserved. Alt-N Technologies, Ltd. Security Whitelists 83 159 Whitelists are lists of email addresses, hosts, and IP addresses whose messages you wish to exempt from a number of security restrictions. Heuristics and Bayesian, DNSBL, DKIM Verification, and almost every other Security feature in SecurityGateway has the option to exempt senders, hosts, messages, and so on if they appear on the appropriate whitelist. Each whitelist can be set as global or domain specific. Advanced 167 The Advanced section provides a link to the Sieve Scripts page. SecurityGateway uses the Sieve email filtering language to perform many of its functions, and the Sieve Scripts page lets you see in what order those functions are performed. It also provides a Sieve Script Editor that you can use to create your own custom scripts. 4.1 Anti-Spam The Anti-Spam section under the Security 82 menu contains options to help you prevent spam, or unsolicited junk email. There are eight anti-spam features listed under this section: Heuristics and Bayesian 89 - SecurityGateway uses a high performance, customized version of the popular open source SpamAssassin™ project for heuristic rules and Bayesian classification. The heuristics component can help identify spam by testing messages against a known set of characteristics common to spam messages. The Bayesian component can identify spam by analyzing a message and then comparing it to a database of message tokens compiled from both spam and non-spam messages provided by you. Outbreak Protection 84 - Outbreak Protection (OP) is a revolutionary real time antispam and anti-virus technology capable of proactively protecting your email infrastructure automatically and within minutes of a spam or virus outbreak. Because Outbreak Protection is designed specifically to deal with outbreaks, it is not a replacement for the other, more traditional, anti-virus and anti-spam tools included in SecurityGateway. It provides a specialized layer of protection in addition to the other tools. DNS Blacklists (DNSBL) 95 - This security feature allows you to specify several DNS blacklisting services (which maintain lists of servers known to relay spam) that will be checked each time someone tries to send a message to one of your domains. If the connecting IP has been blacklisted by any one of those services, the message(s) will be refused, quarantined, or flagged. URI Blacklists (URIBL) 99 - URI Blacklists are real-time blacklists designed to be used to block or tag spam based on uniform resource identifiers (usually domain names or websites) found within the message body. Also known as URI Blocklists, Spam URI Realtime Blocklists (SURBLs) and the like, URIBLs differ from DNS Blacklists in that they are not used to identify spam based on the content of message headers or on the connecting IP address. Instead, URIBLs block spam based on message content. Copyright © 2007-2014. All rights reserved. Alt-N Technologies, Ltd. 84 SecurityGateway for Email Servers v3.0 Greylisting 102 - Greylisting is a spam-fighting technique that works by informing the sending mail server that a temporary error has occurred and that it must try delivery again later. Because spammers do not typically make further delivery attempts when a message can't be delivered, but legitimate mail servers do, greylisting can help to reduce the amount of spam your users receive. Message Certification 104 - Message Certification is a process by which a source that you trust vouches for or "certifies" the good email conduct of an authenticated entity associated with a message. Consequently, messages sent from a domain who is vouched for by that source that you trust can be viewed with less suspicion. Thus you can be reasonably assured that the sending domain adheres to a set of good email practices and doesn't send spam or other problematic messages. Backscatter Protection 107 - "Backscatter" refers to response messages that your users receive to emails that they never sent. This occurs when spam messages or messages sent by viruses contain a "Return-Path" address that is forged. Consequently, when one of these messages is rejected by the recipient's server, or if the recipient has an auto responder associated with his account, the response message will then be directed to your user's forged address. To combat backscatter, SecurityGateway can use a private key hashing method to generate and insert a special time-sensitive code into the "Return-Path" address of your outbound messages. Then, when one of these messages encounters a delivery problem and is bounced back, or when an auto-reply is received with a "mailer-daemon@..." or NULL reverse path, SecurityGateway will see the special code and know that it is a genuine automated reply to a message that was sent by one of your domains. If the message doesn't contain the special code or if the code has expired, it will be logged and can be rejected. Message Scoring 109 - SecurityGateway calculates a Message Score for each message based on a number of tests it performs while processing the message. Effectively a "spam score," the Message Score is used to determine the likelihood that a message is spam. The options on the Message Scoring page are used to designate the actions that will be taken when a message's score exceeds certain thresholds. You can set thresholds for tagging messages as spam, quarantining them, or rejecting them during the SMTP session. 4.1.1 Outbreak Protection Outbreak Protection (OP) is a revolutionary real time anti-spam and anti-virus technology capable of proactively protecting your email infrastructure automatically and within minutes of an outbreak. OP is completely content agnostic, meaning that it doesn't rely on strict lexical analysis of message content. Thus, it doesn't require heuristic rules, content filtering, or signature updates. Further, that means it is not fooled by the addition of seed text, clever spelling changes, social engineering tactics, language barriers, or differences in encoding techniques. Instead, OP relies on the mathematical analysis of message structure and message distribution characteristics over SMTP — it analyzes "patterns" associated with an email transmission and compares them to similar patterns collected from millions of email messages worldwide, which are sampled and compared in real time. Because messages are being analyzed worldwide in real time, protection is provided within minutes (often seconds) of a new outbreak. For viruses, this level of protection is critical since it is often hours after an outbreak before a traditional antivirus vendor can verify and submit a virus signature update, and it can then be even longer before Copyright © 2007-2014. All rights reserved. Alt-N Technologies, Ltd. Security 85 that update is put into production use. During that interval, servers without Outbreak Protection are vulnerable to that particular outbreak. Similarly, for spam messages it will often take time and effort to analyze the spam and create a safe filtering rule before it will be recognized by traditional heuristic and content based systems. It is important to note, however, that the Outbreak Protection feature is not a replacement for traditional anti-virus and anti-spam techniques. In fact, OP provides another specialized layer of protection on top of the existing heuristics, signature, and content based tools found within SecurityGateway. Specifically, OP is designed to deal with large-scale outbreaks rather than old, unique, or specifically targeted messages that can be more readily caught by the traditional tools. Outbreak Protection is based on CYREN RPD™ (RecurrentPattern Detection) and Zero-Hour technology. It works by extracting patterns from your incoming mail and comparing them to patterns taken from millions of internet email messages sampled daily from numerous sources all over the world. In no way is the actual content of any message ever transmitted, nor can the message content ever be derived from the extracted patterns. Anti-Spam Enable Anti-Spam Outbreak Protection Outbreak Protection's Anti-Spam option is enabled by default. Incoming messages will be analyzed to see if they are part of an ongoing spam outbreak. The remaining options in this section are used to determine what will be done with messages found to be part of an outbreak, and to designate the senders that will be exempt from OP processing. If Outbreak Protection determines that a message is spam: The option selected below determines the action that will be taken when OP identifies a message as spam. ...refuse the message Choose this option if you wish to block messages during the SMTP process when OP confirms that they are part of a spam outbreak. These messages will not be quarantined or tagged as spam and delivered to their intended recipients — they will be rejected by the server. ...quarantine the message When this option is selected, Outbreak Protection will quarantine messages that it determines are spam. ...accept the message By default, OP will accept a message it determines to be spam and adjust its message score according to the "...add [XX] points to message score" option below. Copyright © 2007-2014. All rights reserved. Alt-N Technologies, Ltd. 86 SecurityGateway for Email Servers v3.0 ...tag subject with [text] This option is disabled by default. If you enable this option then it will add text to the beginning of a message's Subject header when Outbreak Protection determines that it is spam. The default text added is: "*** SPAM ***", but you can edit that text if you choose. There are a number of other places within SecurityGateway where you can optionally add text to the Subject header, including two other Outbreak Protection options below. When the designated text in those options is identical, the text will only be added to a message's Subject once, even if that message meets the criteria under each option. If, however, you change the text in one or more of those options to something else, then that customized text will be added as well. For example, if you set the text under multiple options to "*SPAM*" then that text would only be added to the subject once, regardless of whether or not it matched the criteria under more than one option. But, if you changed the text under one of the options to something else, such as "*Junk email*", then both tags would be added. ...add [XX] points to message score Using this option adds the designated number of points to a message's score when Outbreak Protection determines that it is spam. This option is enabled by default and adds 5.5 points to the Message Score. Even when SecurityGateway is configured to accept a message rather than refuse or quarantine it, it could still be refused or quarantined if its Message Score ends up being sufficiently high, depending on how you have configured the other Security 82 options and the options on the Message Scoring 109 page. If Outbreak Protection determines that a message is potentially spam: Outbreak Protection will categorize some messages as "potential" spam, being unable to make a more definitive determination. The option selected below determines what OP will do with those messages. ...refuse the message Choose this option if you wish to block messages during the SMTP process when OP determines that they are potentially spam. Because these messages are only categorized as potential spam, this option is not recommended since it will not quarantine or tag them, but refuse them completely. ...quarantine the message When this option is selected, Outbreak Protection will quarantine messages that are potentially spam. Copyright © 2007-2014. All rights reserved. Alt-N Technologies, Ltd. Security 87 ...accept the message By default, OP will accept a message it determines is to be potentially spam. If you choose, you can configure OP to then adjust its message score according to the "...add [XX] points to message score" option below. ...tag subject with [text] This option is disabled by default. If you enable this option then it will add text to the beginning of a message's Subject header when Outbreak Protection determines that it is potentially spam. The default text added is: "*** POTENTIAL SPAM ***", but you can edit that text if you choose. ...add [XX] points to message score Using this option adds the designated number of points to a message's score when Outbreak Protection determines that it is potential spam. This option is enabled by default and adds 2.0 points to the Message Score 109 . If Outbreak Protection determines that a message is bulk: Sometimes Outbreak Protection will identify certain largely distributed messages that can't be clearly identified as spam because they aren't being sent from a known spammer or bot-net — as is sometimes the case with legitimate bulk mailings and newsletters. OP classifies these types of messages as bulk rather than spam. The options below govern what will be done with these messages. ...refuse the message This option will cause SecurityGateway to reject a message during the SMTP session when OP classifies it as "bulk." This option is not recommended since it could cause some legitimate widely-distributed messages to be refused. ...quarantine the message Choose this option if you wish to quarantine messages that Outbreak Protection classifies as "bulk." ...accept the message By default, bulk messages aren't blocked or quarantined by OP, because messages classified as "bulk" could simply be a part of certain very large mailing lists or other similar widely-distributed content. ...tag subject with [text] This option is disabled by default. If you enable this option then it will add text to the beginning of a message's Subject header when Outbreak Protection determines that it is bulk mail. The default text added is: "*** BULK ***", but you can edit that text if you choose. ...add [XX] points to message score When this option is enable, the Message Score will be increased when OP classifies the message as "bulk." This is enabled by default and 3.0 points are added. Exclude messages from whitelisted senders By default, any messages from whitelisted senders Copyright © 2007-2014. All rights reserved. Alt-N Technologies, Ltd. 159 are exempt from Outbreak 88 SecurityGateway for Email Servers v3.0 Protection's Anti-Spam options. Exclude messages from authenticated sessions This option is enabled by default and used to exclude messages from Outbreak Protection when they are using an authenticated session. Exclude messages from domain mail servers Messages sent from your Domain Mail Servers 52 will be exempt from Outbreak Protection by default. Clear this option if you do not wish to exclude these messages from the Outbreak Protection restrictions. Anti-Virus Enable Anti-Virus Outbreak Protection Outbreak Protection's Anti-Virus option is enabled by default. Incoming messages will be analyzed to see if they are part of an ongoing virus outbreak. The remaining options in this section are used to determine what will be done with messages found to be part of an outbreak, and to designate the senders that will be exempt from Anti-Virus Outbreak Protection. If Outbreak Protection determines that a message is infected: The option selected below determines the action that will be taken when OP identifies a message as infected. ...refuse the message By default SecurityGateway will refuse a message during the SMTP session when Outbreak Protection determines that it is part of a virus outbreak. ...quarantine the message Choose this option if you wish to quarantine messages that Outbreak Protection determines are infected. Exclude messages from whitelisted IP addresses and hosts Click this checkbox if you wish to exempt a message from Anti-Virus Outbreak Protection when it is coming from a whitelisted IP address 165 or whitelisted host 162 . Exclude domain email server Messages sent from your Domain Mail Servers 52 will be exempt from Anti-Virus Outbreak Protection when this option is enabled. Proxy Settings SecurityGateway's Outbreak Protection technology must be able to communicate with the Outbreak Protection online service via HTTP. If necessary you can use the options in this section to define an HTTP proxy for Outbreak Protection to use. Exceptions - Domains If you select a specific domain in the "For Domain:" drop-down list box at the top of the page when configuring these settings, that domain will be listed here after saving the settings. Click the View/Edit link for the corresponding domain to review or edit Copyright © 2007-2014. All rights reserved. Alt-N Technologies, Ltd. Security 89 its Outbreak Protection settings, or click Reset to reset the domain's settings to the default Global values. 4.1.2 Heuristics and Bayesian SecurityGateway uses a high performance, customized version of the popular open source SpamAssassin™ project for heuristic rules and Bayesian classification. Messages are passed to this process and assigned a score based upon their content. Alternatively, SecurityGateway also allows you to utilize your own external SpamAssassin™ daemon if you do not wish to use the one that is built-in. Configuration Use heuristic rules and Bayesian classification to analyze messages By default this option is enabled, meaning that messages will be passed through the heuristic rules and Bayesian classification system and assigned a SpamAssassin score based on the results. Clear this checkbox if you wish to disable this system and make the other option on this page unavailable. You can configure options for automatically updating your heuristic rules, and options governing Bayesian classification on the SGSpamD Configuration 91 screen. You can reach that screen via the Click here to configure SGSpamD 91 link under the "Use built-in local SpamAssassin engine (SGSpamD)" option below. Add score returned by SpamAssassin to message score By default, this option is used to add the SpamAssassin score to the message score. When using the Message Scoring options, adding the SpamAssassin score to the final message score could give you another tier of spam protection and increase the likelihood of catching spam that wouldn't score high enough to be caught by SpamAssassin alone or by the other individual anti-spam scoring options. Reject message if SpamAssassin score greater or equal to... Use this option to designate a rejection threshold value for the SpamAssassin score. In other words, when the SpamAssassin score for a message is greater than or equal to this value, the message will be rejected at that point during the SMTP session rather than be quarantined or continue to be processed through the remaining antispam and message scoring options. Consequently, if you use this option in conjunction with the "Quarantine message if SpamAssassin score greater or equal to..." option below, you should always set the rejection threshold to a value greater than the quarantine value. Otherwise, no message would ever be quarantined due to its SpamAssassin score. Any message that would have a sufficient score to be quarantined would already have been rejected instead. The default value for this rejection threshold is "12.0". Quarantine message if SpamAssassin score greater or equal to... Activate this option if you wish to designate a quarantine threshold for the SpamAssassin score. Any message with a score greater than or equal to this value will be quarantined. Quarantined messages can be viewed and managed by the recipient or administrator by signing in to SecurityGateway. If you are using this option in conjunction with the "Reject message if SpamAssassin score..." option above, you should always set the Quarantine message... option to a lower value Copyright © 2007-2014. All rights reserved. Alt-N Technologies, Ltd. 90 SecurityGateway for Email Servers v3.0 than the Reject message... option. The default value for this option is "5.0". You should monitor the Heuristics and Bayesian system's performance and over time refine both the rejection and quarantine thresholds to suit your need. Generally the default values, however, will catch most spam, with relatively few false negatives (spam that slips through unrecognized) and rarely any false positives (messages flagged as spam that are not). The default rejection threshold of 12 is a good starting point, since in most cases a legitimate message will not score that high. Exclusions Exclude messages larger than [xx] KB Specify a desired value here (in kilobytes) if you wish to exclude larger messages from being scanned by the Heuristics and Bayesian system. Large messages are rarely considered spam; excluding them from scanning can conserve a great deal of resources. Exclude messages from whitelisted senders By default SecurityGateway will exclude messages from Heuristics and Bayesian processing when they originate from a whitelisted 159 sender. Clear this checkbox if you do not wish to exclude these messages. Exclude messages from authenticated sessions This option is used to exclude messages from the Heuristics and Bayesian system when the SMTP session on which they are arriving is authenticated. This option is enabled by default. Exclude messages from domain mail servers Messages coming from your domain mail servers 52 are excluded from Heuristics and Bayesian processing by default. Uncheck this option if you do not wish to exempt messages coming from those servers. Location (All Domains) Use built-in local SpamAssassin engine (SGSpamD) Choose this option if you wish to use SecurityGateway's built-in SpamAssassin engine, which runs as a separate daemon — the SecurityGateway Spam Daemon (SGSpamD). To configure SGSpamD, click the Click here to configure SGSpamD 91 link. If you wish to use a different SpamAssassin engine running at a remote location, then choose the "Use a remote SpamAssassin..." option below. Use a remote SpamAssassin daemon (SpamD) Choose this option if you wish to scan messages using a SpamAssassin daemon located at a remote location rather than use the built-in SGSpamD. Copyright © 2007-2014. All rights reserved. Alt-N Technologies, Ltd. Security 91 Host Address: Specify the IP address of the remote SpamD here. Port: Use this option to designate the port on which your remote SpamD is running. Test Click this button to test the connection to the remote SpamD. Exceptions - Domains If you select a specific domain in the "For Domain:" drop-down list box at the top of the page when configuring these settings, that domain will be listed here after saving the settings. Click the View/Edit link for the corresponding domain to review or edit its Heuristics and Bayesian settings, or click Reset to reset the domain's settings to the default Global values. 4.1.2.1 SGSpamD Configuration The Heuristic Rules system utilizes a process whereby the content of each message is compared to a set of static rules to determine the likelihood that a message is spam. Each rule is worth a specific value and therefore each message's SpamAssassin score is adjusted based upon the value of each rule that the message matches. Rules and values are regularly adjusted and changed to keep up with the current trends in spam and junk email. SecurityGateway's SGSpamD can be configured to check for heuristic rule updates automatically at designated intervals, or you can check for updates manually. Bayesian Classification is a statistical process that can optionally be used to analyze spam and non-spam messages in order to increase the reliability of spam recognition over time. You can designate a folder for spam messages and non-spam message that can be manually scanned or automatically scanned at a designated interval. All of the messages in those folders will be analyzed and indexed, or "Bayesian Learned", so that new messages can be compared to them statistically in order to determine the likelihood that they are spam. This can then increase or decrease a message's SpamAssassin score based upon the results of its Bayesian comparison. Heuristic Rule Updates Check for heuristic rule updates at midnight each night Choose this option if you want SecurityGateway to check for heuristic rule updates automatically each day at midnight. Check for heuristic rule updates once every [XX] hours Choose this option and designate a value if you want SecurityGateway to check for heuristic rule updates automatically every certain number of hours instead of simply once per day. Do not check for heuristic rule updates Choose this option if you do not want SecurityGateway to check for heuristic rule updates automatically. You can still manually check for updates by using the "Click Copyright © 2007-2014. All rights reserved. Alt-N Technologies, Ltd. 92 SecurityGateway for Email Servers v3.0 here to check..." option below. Run SA-Update as part of the update process Activate this check box if you wish to pull updates from updates.spamassassin.org in addition to updates from Alt-N Technologies. The feature ensures that your SpamAssassin rule-sets are always kept current. This option is enabled by default. Click here to check for heuristic rule updates now Click this link to manually check for updates to the heuristic rules. Bayesian Classification Enable Bayesian classification Check this box to enable SGSpamD's Bayesian classification system. Use this feature if you want each message's SpamAssassin score to be adjusted based on its comparison to the currently known Bayesian statistics. The Bayesian classifier needs a sample of both spam and nonspam messages to analyze before it can begin adjusting a message's SpamAssassin score. This is the Bayesian Learning process, and it is necessary in order to have a sufficient pool of statistics to draw from when making the Bayesian comparison. Once you have given the Bayesian Learning system these messages to analyze, it will be sufficiently equipped to begin applying the results of a Bayesian comparison to each message's SpamAssassin score. By continuing to analyze even more messages the Bayesian classifications will become more accurate over time. Non-spam messages which must be learned: This is the number of messages designated as "non-spam" that must be analyzed before the Bayesian classifier will begin scoring messages. The default value is 200 messages. Spam messages which must be learned: This is the number of messages designated as "spam" that must be analyzed before the Bayesian classifier will begin scoring messages. The default value is 200 messages. Bayesian Learning Schedule Bayesian learning for midnight each night Choose this option if you want the Bayesian Learning system to analyze the messages contained in the designated spam and non-spam folders automatically, once per day, beginning each night at midnight. Schedule Bayesian learning for once every [XX] hours Choose this option and specify a value if you want the Bayesian Learning system to analyze the messages contained in the designated spam and non-spam folders Copyright © 2007-2014. All rights reserved. Alt-N Technologies, Ltd. Security 93 automatically, once every specified number of hours, rather than each night at midnight. Do not perform scheduled Bayesian learning Choose this option if you do not wish to schedule Bayesian Learning. You can, however, still start the Bayesian Learning process manually at any time by clicking the "Click here to perform Bayesian learning now" link below. Path to known spam directory (false negatives): This is the path to the folder containing messages designated as spam. Spam messages can be placed here manually, or automatically using the Automatic Bayesian Learning options. Path to non-spam directory (false positives): This is the path to the folder containing messages designated as non-spam. Nonspam messages can be placed here manually, or automatically using the Automatic Bayesian Learning options. Spam forwarding address: Use this text box to designate an address to which your users can forward spam messages so that the Bayesian system can learn from them. The default address that SecurityGateway will use is "SpamLearn[@AnySGDomain.com]", but you can change it to whatever you choose. Messages sent to this address must be received via SMTP from a session that is authenticated using SMTP AUTH. Further, the messages must be forwarded to the above addresses as attachments of type "message/rfc822". Any message of another type that is sent to this email address will not be processed. Finally, when entering an address into this option, only use the mailbox portion of the address - do not include the "@" or domain portion. For example, "Spam", "SpamLearn", "SpamMail", or the like are all acceptable addresses to use in this option. Messages can then be forwarded to that address at any of SecurityGateway's domains (e.g. [email protected], [email protected], and so on). Non-spam forwarding address: Use this text box to designate an address to which your users can forward non-spam messages so that the Bayesian system can learn from them. The default address that SecurityGateway will use is "NonSpamLearn[@AnySGDomain.com]", but you can change it to whatever you choose. Messages sent to this address must be received via SMTP from a session that is authenticated using SMTP AUTH. Further, the messages must be forwarded to the above addresses as attachments of type "message/rfc822". Any message of another type that is sent to this email address will not be processed. Finally, when entering an address into this option, only use the mailbox portion of the address - do not include the "@" or domain portion. For example, "NonSpam", "NonSpamLearn", "GoodMail", or the like are all acceptable addresses to use in this option. Messages can then be forwarded to that address at any of SecurityGateway's domains (e.g. [email protected], [email protected], and so on). Don't learn from messages larger than [XX] bytes Because larger messages are generally not spam, and because analyzing them can Copyright © 2007-2014. All rights reserved. Alt-N Technologies, Ltd. 94 SecurityGateway for Email Servers v3.0 require a great deal of processing, messages over 50,000 bytes will not be analyzed by default. You can use this option to adjust the size value if you choose, or you can disable it completely if you wish to go ahead and analyze messages regardless of size. Click here to perform Bayesian learning now Click this link at any time to initiate the Bayesian Learning process manually, in addition to any scheduled interval that you may have set. Automatic Bayesian Learning Enable Bayesian automatic learning With Automatic Bayesian Learning you can designate Message Scoring thresholds for both legitimate (i.e. non-spam) messages and spam. Any message with a final Message Score below the non-spam threshold will be treated by automatic learning as non-spam, and any message scoring above the spam threshold will be treated as spam. Although it should be used with caution, automatic learning can be beneficial if you are careful in setting your thresholds values, because it will allow expired tokens that are removed from the database files (see Bayesian Database below) to be replaced automatically. It can give the Bayesian Learning system a constant fresh supply of messages from which to learn while preventing the need for manual retraining to recover expired tokens. Consider messages which score lower than [XX] to be legitimate Messages with a Message Score below this value will be categorized as legitimate/ non-spam messages for the purpose of Bayesian Learning. ...only learn non-spam from domain mail servers and authenticated sessions Click this option if you wish to apply Automatic Bayesian Learning of legitimate mail only to messages coming in over authenticated session or from one of your domain mail servers 52 . When using this option, inbound messages from non-local sources will not be used for Bayesian learning regardless of their final Message Score, unless coming from a domain mail server or authenticated source. However, you could still manually copy any legitimate messages to the designated "non-spam" folder listed above, thus providing the system those messages to learn from as well. Consider messages which score more than [XX] to be spam Messages with a Message Score above this value will be categorized as spam messages for the purpose of Bayesian Learning. ...only learn spam from inbound messages Click this option if you wish to apply Automatic Bayesian Learning of spam mail to inbound messages only. When using this option, outgoing messages will not be used for Bayesian learning, regardless of their final Message Score. You can, however, still place messages manually in the "spam" folder listed above. Bayesian Database Enable Bayesian automatic token expiration This option allows the Bayesian system to automatically expire database tokens Copyright © 2007-2014. All rights reserved. Alt-N Technologies, Ltd. Security 95 whenever the number of tokens specified below is reached. Setting a token limit can prevent your Bayesian database from getting excessively large and slowing down processing. Maximum Bayesian database tokens: This is the maximum number of Bayesian database tokens allowed. When this number of tokens is reached, the Bayesian system removes the oldest, reducing the number to 75% of this value or 100,000 tokens, whichever is higher. The number of tokens will never fall below the larger of those two values regardless of how many tokens are expired. Note: 150,000 database tokens is approximately 8Mb. Advanced Maximum message processing threads (1-6): Use this option to designate the maximum number of message processing threads that will be used by SGSpamD at any one time. You may set this value from 1 to 6 threads. The default is 4. Maximum TCP connections per thread (10-200): This is the maximum number of TCP connections to SGSpamD per message processing thread allowed at any one time. You may set this value from 10-200. The default is 200. 4.1.3 DNS Blacklists (DNSBL) DNS Blacklists (DNSBL) can be used to help prevent spam from reaching your users. This security feature allows you to specify several DNS blacklisting services (which maintain lists of servers known to relay spam) that will be checked each time someone tries to send a message to one of your domains. If the connecting IP has been blacklisted by any one of those services, the message(s) will be refused, quarantined, or flagged. Use of this feature can prevent most spam from being sent to your users. However, some sites are blacklisted by mistake and therefore using this feature could cause some difficulties if you use it to outright refuse messages from blacklisted IP addresses. It is, however, still worthwhile to use, especially if used in conjunction with SecurityGateway's other spam prevention features such as URI Blacklists, Message Scoring, and the Heuristics and Bayesian options. Configuration Enable DNSBL queries This option is used to check incoming mail against DNS Blacklists. SecurityGateway will query each DNSBL host listed below for the sending server's IP address. If a host replies to the query with a positive result indicating that the IP address is blacklisted, the message will be refused, quarantined, or accepted and flagged depending upon which options you have designated below. This option is enabled by default. Copyright © 2007-2014. All rights reserved. Alt-N Technologies, Ltd. 96 SecurityGateway for Email Servers v3.0 If the sending server of a message is listed: ...refuse the message If you choose this option then incoming messages from blacklisted IP addresses with be refused during the SMTP session. Optionally, while refusing the message, SecurityGateway can use a customized response associated with the blacklisting host to indicate to the connecting server why the message is being refused, rather than using the traditional "user unknown" response. You can specify the response that will be associated with each DNSBL host by using the Message option below when creating the host's entry. You can configure SecurityGateway to send those responses instead of the traditional "user unknown" response by enabling the When rejecting a message return 'Message' rather than 'user unknown' option. ...quarantine the message Choose this option if you wish to quarantine messages from DNS blacklisted IP addresses. ...accept the message By default, messages from blacklisted addresses will be accepted and can then be flagged as spam, have a tag added to the subject line, and/or have their Message Scores adjusted. Using this option can allow the mail servers or users to filter the messages themselves based on the results of SecurityGateway's DNSBL queries. ...tag subject with [text] Enable this option and specify some text if you wish to add something to the beginning of the message's Subject header when the message is coming from a blacklisted IP address. By default this option is disabled. If you enable this option then "*** SPAM ***" is added to the subject by default, but you can edit that text if you choose. There are a number of other places within SecurityGateway where you can optionally add text to the Subject header. For example, the Message Scoring 109 and URI Blacklists (URIBL) 99 pages also have this option. When the designated text in these options matches, the text will only be added to a message's subject once even if that message meets the criteria under each option. If, however, you change the text in one or more places then that customized text will be added as well. So, for example, if you set the text under all three of these options to "*SPAM*" then that text would only be added to the subject once, regardless of whether or not it matched the criteria under more than one of the options. But, if you changed the DNSBL optional text to "*DNS blacklisted*" and the message matched the criteria under this option and the others then the subject would have both "*SPAM*" and "*DNS blacklisted*" added to it. ...add [XX] points to message score Using this option adds the designated number of points to a message's score Copyright © 2007-2014. All rights reserved. Alt-N Technologies, Ltd. Security 97 when it is DNS blacklisted. This option is enabled by default and adds 5.0 points to the Message Score. Even when SecurityGateway is configured to accept a message rather than refuse or quarantine it, it could still be refused or quarantined if its Message Score ends up being sufficiently high, depending on how you have configured the other Security 82 options and the options on the Message Scoring 109 page. Exclusions Exclude messages from whitelisted senders By default, messages are excluded from DNSBL queries if they originate from a whitelisted 159 sender. Disable this option if you wish to query DNSBL hosts even when the sender is whitelisted. Exclude messages from authenticated sessions Use this option if you wish to exclude a message from DNSBL queries when the session on which it is arriving was authenticated. This option is enabled by default. Exclude messages from domain mail servers Messages coming from domain mail servers queries. 52 are always excluded from DNSBL host DNSBL Hosts (All domains) New host: To add a new host to the DNSBL Hosts list, enter the host that should be queried here (for example, zen.spamhaus.org), add a corresponding Message below, and then click Add. Message: This is the message corresponding to the New host entered above, which will be tracked into the log when a blacklisted IP address is found by SecurityGateway when querying that host, and which will be returned to the connecting server during the SMTP session if you are rejected messages from blacklisted addresses and have enabled the When rejecting a message return 'Message' rather than 'user unknown' option below. You can use the $IP$ macro in the message if you wish to include the blacklisted IP address in it. Add After entering the New host and corresponding Message, click this button to add it to the list of DNSBL Hosts. Remove If you want to remove an entry from the DNSBL Hosts list, select it and then click this button. Copyright © 2007-2014. All rights reserved. Alt-N Technologies, Ltd. 98 SecurityGateway for Email Servers v3.0 Stop DNSBL queries on first host which lists the connecting IP Oftentimes there are multiple IP addresses contained in the headers of each message and multiple DNSBL Hosts that are queried for these addresses. By default SecurityGateway will stop querying the DNSBL Hosts for any given message as soon as a blacklisted IP address is found. Disable this option if you wish to continue performing queries for all addresses and all DNSBL Hosts even after a blacklisted address is found. When rejecting a message return 'Message' rather than 'user unknown' When you have configured the DNSBL options to "...reject the message" when a blacklisted IP address is found, by default the short Message listed above corresponding the the DNSBL Host will be tracked into the log files and returned to the connecting server during the SMTP session. Uncheck this option if you wish to use the standard "user unknown" message instead. Advanced (All domains) Check 'Received' headers within collected messages By default, SecurityGateway only queries the DNSBL Hosts for the IP address of the host that is actually connected to it and attempting to deliver a message. Check this option if you wish to perform DNSBL queries for IP addresses found within the message's Received headers as well. Check only this many 'Received' headers ( 0=all ) When you have configured SecurityGateway to check Received headers for blacklisted IP addresses, enter an amount into this option if you wish to limit the number of headers that will be checked. Use "0" if you wish to check all of them. Skip this many of the most recent 'Received' headers ( 0=none ) When you have configured SecurityGateway to check Received headers for blacklisted IP addresses, enter an amount into this option if you wish to skip a certain number of the most recent headers. Depending upon your particular mail system's configuration, sometimes the most recent headers will contain IP addresses of trusted hosts or other computers on your network, which wouldn't need to be checked against any blacklist. Use "0" in this option if you do not wish to skip any of the most recent headers. Skip this many of the oldest 'Received' headers ( 0=none ) When you have configured SecurityGateway to check Received headers for blacklisted IP addresses, enter an amount into this option if you wish to skip a certain number of the oldest headers. Frequently the oldest headers do not contain any relevant addresses to check since they are added by the sender's internal mail server or forged to look legitimate. Use "0" in this option if you do not wish to skip any of the oldest recent headers. Exceptions - Domains If you select a specific domain in the "For Domain:" drop-down list box at the top of the page when configuring these settings, that domain will be listed here after saving the settings. Click the View/Edit link for the corresponding domain to review or edit its DNS Blacklists settings, or click Reset to reset the domain's settings to the Copyright © 2007-2014. All rights reserved. Alt-N Technologies, Ltd. Security 99 default Global values. 4.1.4 URI Blacklists (URIBL) URI Blacklists (URIBLs) are real-time blacklists designed to be used to block or tag spam based on uniform resource identifiers (usually domain names or websites) found within the message body. Also known as URI Blocklists, Spam URI Realtime Blocklists (SURBLs) and the like, URIBLs differ from DNS Blacklists 95 in that they are not used to identify spam based on the content of message headers or on the connecting IP address. Instead, URIBLs block spam based on message content. Complete details on how URIBLs work can be found at www.surbl.org. Configuration Enable URIBL queries By default SecurityGateway will perform URIBL queries on messages. Uncheck this option if you do not wish to perform these queries. If a message contains a listed URI: ...refuse the message Choose this option if you wish to refuse a message during the SMTP process when it is found to contain a blacklisted URI. This is not the recommended option in most situations, since a mere reference to a blacklisted URI in a message body does not guarantee that the message itself is spam. ...quarantine the message Choose this option if you wish to quarantine a message when it is found to contain a blacklisted URI. ...accept the message Choose this option if you wish to accept a message when it is found to contain a blacklisted URI, but wish to flag it as spam, add a tag to the subject line, and/or adjust the the Message Score. Using this option allows the mail servers or recipients to filter the message based on the results of SecurityGateway's URIBL queries. This is the default option. ...tag subject with [text] Enable this option and specify some text if you wish to add something to the beginning of a message's Subject header when the message is found to contain a blacklisted URI. If enabled, the default text added to the subject is: "*** SPAM ***". This option is disabled by default. There are a number of other places within SecurityGateway where you can optionally add text to the Subject header. For example, the DNS Blacklists (DNSBL) 95 and Message Scoring 109 pages also have this option. When the designated text in these options matches, the text will only be added to a message's subject once even if that message meets the criteria under each option. If, however, you change the text in Copyright © 2007-2014. All rights reserved. Alt-N Technologies, Ltd. 100 SecurityGateway for Email Servers v3.0 one or more places then that customized text will be added as well. So, for example, if you set the text under all three of these options to "*SPAM*" then that text would only be added to the subject once, regardless of whether or not it matched the criteria under more than one of the options. But, if you changed the URIBL optional text to "*URI blacklisted*" and the message matched the criteria under this option and the others then the subject would have both "*SPAM*" and "*URI blacklisted*" added to it. ...add score returned by URIBL engine to message score By default, when a URIBL query indicates that a message contains a blacklisted URI, the score associated with the queried URIBL Host will be added to the Message Score. Uncheck this option if you do not wish to adjust the Message Score based on the results of URIBL queries. Even when SecurityGateway is configured to accept a message rather than refuse or quarantine it, it could still be refused or quarantined if its Message Score ends up being sufficiently high, depending on how you have configured the other Security 82 options and the options on the Message Scoring 109 page. Exclusions Exclude messages from whitelisted senders By default, messages are excluded from URIBL queries if they originate from a whitelisted 159 sender. Disable this option if you wish to query URIBL hosts even when the sender is whitelisted. Exclude messages from authenticated sessions Check this option if you wish to exclude a message from URIBL queries when the SMTP session on which it is arriving was authenticated. By default this option is disabled. Exclude messages from domain mail servers By default, URIBL queries are performed for both inbound messages and messages from your domain mail servers 52 . Check this box if you wish to exclude from URIBL queries messages coming from your domain mail servers. URI Blacklists (All domains) This section lists the URIBL Hosts that will be queried by SecurityGateway. New To add a new URI Blacklist, click the New button. This will open the URI Blacklists Editor 101 (see below). Copyright © 2007-2014. All rights reserved. Alt-N Technologies, Ltd. Security 101 Edit To edit one of your URI Blacklists, select the entry you wish to edit and click the Edit button. This will open the URI Blacklists Editor 101 for that entry. Delete To delete a URI Blacklist, select the entry you wish to delete and click the Delete button. Exceptions - Domains If you select a specific domain in the "For Domain:" drop-down list box at the top of the page when configuring these settings, that domain will be listed here after saving the settings. Click the View/Edit link for the corresponding domain to review or edit its URI Blacklists settings, or click Reset to reset the domain's settings to the default Global values. URI Blacklists Editor Reached by clicking New or Edit on the URI Blacklists page, the blacklist editor is used for adding new URI Blacklists and for editing existing blacklists. Save and Close After adding or changing any of the settings for a blacklist, click this button to save the changes and close the editor. Close Click this button to close the editor without saving any changes that you may have made. URI Blacklist Enable queries to this URI Blacklist Use this option to enable or disable a given URI Blacklist. If you uncheck this box for an entry it will not be removed from the list, but that URI Blacklist will not be queried by SecurityGateway. URIBL Name: This is the name of the specific URI Blacklist that will be queried. Hostname or IP: This is the hostname or IP address corresponding to this URI Blacklist entry that will be queried by SecurityGateway when checking the URIs found in a message. Score: The URIBL Score is the designated value associated with this URIBL, used when a query results in a blacklisted URI being found in a message. This value will be added to the final Message Score 109 unless you have disabled the ...add score returned by URIBL engine to message score option on the URI Blacklists page. Copyright © 2007-2014. All rights reserved. Alt-N Technologies, Ltd. 102 SecurityGateway for Email Servers v3.0 Bitmask: The bitmask value is used to identify which list or data source is being queried when multiple lists are combined into a single bitmasked list. Specifically, all of the SURBL data sources are combined at: multi.surbl.org. For more information on this, see: www.surbl.org. If the URIBL being queried only contains information for a single list, "0" may be used. Resolve IP address of URI before performing query Use this option if you wish to resolve, or lookup, the IP address of the URIs contained in the message before querying this URI Blacklist.Similar to DNSBLs 95 , some URIBLs store IP addresses, but they store the addresses of the URIs contained in the messages rather than the addresses of the mail servers who send them. 4.1.5 Greylisting Greylisting is a spam-fighting technique that works by informing the sending mail server that a temporary error has occurred and that it must try delivery again at a future time. The theory is that, by and large, spam tools don't retry delivery, but legitimate mail servers do. Using this technique, when a message arrives from a non-whitelisted or otherwise previously unknown sender, its sender, recipient, and sending server's IP address will be logged and then the message will be refused with a temporary error during the SMTP session. Furthermore, for a designated number of minutes any future delivery attempts will also be temporarily refused. Because spammers do not typically make further delivery attempts when a message is refused, greylisting can help to reduce the amount of spam your users receive. But, even if the spammers should attempt to retry delivery at a later time, it is possible that by that time the spammers will have been identified and other spam-fighting options (such as DNS Blacklisting) will successfully block them. In spite of greylisting's ability to reduce spam, it is important to note that it can also delay legitimate and even important messages while doing so. But, the legitimate messages should still be delivered sometime later after the greylisting period has expired, and no further delays will be implemented against that same server/sender/ recipient combination again, unless the sender fails to send another message to that recipient for a designated number of days. It is also important to note that when a message is delayed you have no way of knowing how long the sending servers will wait before making further delivery attempts. It is possible that purposely refusing a message with a temporary error code could cause it to be delayed by as little as just a few minutes or by as much as an entire day. Because of this and other potential problems associated with greylisting, the feature is disabled by default in SecurityGateway. There are, however, a number of options designed to deal with the potential problems. First, some sending domains use a pool of mail servers to send outbound mail. Since a different mail server could be used for each delivery attempt, each attempt would be treated as a new connection to the greylisting engine. This could multiply the length of time it would take to get past Greylisting because each of those attempts would be greylisted as if they were separate messages instead of retries of a previous message. Copyright © 2007-2014. All rights reserved. Alt-N Technologies, Ltd. Security 103 By utilizing a Sender Policy Framework (SPF) lookup option, this problem can be solved for sending domains who publish their SPF data. Furthermore, there is an option to ignore the IP of the sending mail server completely. Using this option lowers the efficiency of greylisting but does solve the server pool problem. Next, greylisting traditionally entails a large database since each incoming connection must be tracked. SecurityGateway minimizes the need to track connections by placing Greylisting later in the SMTP processing sequence. This allows many of SecurityGateway's other options to refuse a message prior to reaching the greylisting stage. As a result, the size of the greylisting database is greatly reduced and causes little practical performance impact. Finally, several options are available to minimize the impact of greylisting on legitimate messages, such as options to exclude messages from greylisting when they are from whitelisted senders or are arriving over authenticated sessions, and messages coming from one of your domain mail servers are always exempt. For more information on greylisting, visit: http://en.wikipedia.org/wiki/Greylisting Configuration Enable greylisting Click this option to enable the Greylisting feature. Greylisting is disabled by default. Defer initial delivery attempt with temporary error for [xx] minutes Use this option to designate the number of minutes that each server/sender/recipient combination (i.e. "triplet") will be greylisted after the initial delivery attempt. During that time any subsequent delivery attempts by the same triplet will be refused with a temporary error code. After the designated number of minutes has elapsed, no further greylisting delays will be implemented on that triplet unless its greylisting database record expires. The default value for this option is 15 minutes. Expire unused greylisting database records after [xx] days Once a greylisted triplet has passed the initial greylisting period, no further delivery delays will be implemented against it unless no further messages matching that triple record are sent for this number of days. For example, if this value is set to 10 days, then as long as at least one message matching that same server/sender/recipient combination is received every 10 days then there will be no delays. If, however, no message is sent in that time then the record will expire and that triplet will have to go through another greylisting period before it can again be exempt from further delays. The default time that a record must be unused before it expires is 10 days. Ignore IP address when greylisting (use only MAIL & RCPT values) Click this check box if do not wish to use the sending server's IP address as one of the greylisting parameters. This will solve the potential problem that can be caused by server pools, but it will reduce Greylisting's efficiency. This option is disabled by default. Ignore IP address for connections that pass SPF processing When using this option, only the sender and recipient will be used for greylisting Copyright © 2007-2014. All rights reserved. Alt-N Technologies, Ltd. 104 SecurityGateway for Email Servers v3.0 when the sending server passes SPF processing This option is enabled by default. 123 ; the IP address will be ignored. Exclusions Exclude messages from whitelisted senders Messages from whitelisted 159 senders are excluded from greylisting by default— delivery of these messages will not be delayed. Clear this checkbox if you do not wish to exclude whitelisted senders from greylisting. Exclude messages from authenticated sessions By default messages arriving over authenticated sessions are exempt from greylisting. Clear this checkbox if you do not wish to exclude messages from greylisting when the session is authenticated. Exclude messages from domain mail servers Messages coming from your domain mail servers greylisting. 52 are always excluded from Exceptions - Domains If you select a specific domain in the "For Domain:" drop-down list box at the top of the page when configuring these settings, that domain will be listed here after saving the settings. Click the View/Edit link for the corresponding domain to review or edit its Greylisting settings, or click Reset to reset the domain's settings to the default Global values. 4.1.6 Message Certification Message Certification is a process by which a source that you trust vouches for or "certifies" the good email conduct of an authenticated entity associated with a message. Consequently, messages sent from a domain who is vouched for by that trusted source can be viewed with less suspicion. Thus the receiving server can be reasonably assured that the sending domain adheres to a set of good email practices and doesn't send spam or other problematic messages. Certification is beneficial because it can help ensure that messages will not be erroneously or needlessly subjected to unwarranted spam prevention analysis. It also helps lower the resources required to process each message. SecurityGateway accommodates Message Certification by including support for a new Internet mail protocol called "Vouch-By-Reference" (VBR), which Alt-N Technologies is working to help create and expand through its participation in the Domain Assurance Council (DAC). VBR provides the mechanism through which a Certification Service Providers (CSP) or "certifier" can vouch for the good email practices of specific domains. Messages from senders who claim to be certified by a CSP must be DK/DKIM signed 121 or be sent from an SPF 123 or Copyright © 2007-2014. All rights reserved. Alt-N Technologies, Ltd. Security 105 Sender-ID/PRA 126 approved server. This is necessary in order to guarantee that the message is genuinely from the purported domain rather than forged. Certifying Inbound Messages By default, SecurityGateway comes preconfigured to use the CSP located at vbr.emailcertification.org for certifying senders of inbound messages. When a sender claims to be certified by this CSP and is then that certification is confirmed, its inbound messages will be exempt from some of SecurityGateway's spam prevention tools. Alternatively, instead of exempting those messages completely, you can subtract a designated amount from their message scores, since they are much less likely to be spam. You can also change the CSP or add additional ones. Certifying Outbound Messages Before you can configure SecurityGateway to insert certification data into a domain's outbound messages, you will first need to arrange to have one or more CSPs certify that domain. Alt-N Technologies provides a certification service for our customers. For details, visit: www.altn.com/email-certification/. To configure SecurityGateway to insert certification data into a domain's outbound messages, after you have registered with a CSP: 1. Make sure that the domain is configured to sign outgoing messages with DKIM or DK 121 , or ensure that the domain's DNS records are configured properly to indicate that the messages are being sent from an SPF 123 or Sender-ID/PRA 126 approved server. This is necessary in order to guarantee that the message originated from you. A message cannot be certified unless the receiving server can first determine that the message is from the purported domain. 2. In SecurityGateway, in the navigation pane on the left, click Security»Message Certification to switch to the Message Certification page. 3. Select a domain in the "For Domain:" drop-down list box at the top of the page on the right. 4. In the Outbound Messages section at the bottom of the page, click the Insert certification data into outbound messages option. 5. In the Host name(s) of certification services that vouch for my messages option, enter the hosts corresponding to one or more CSPs that will vouch for the domain's email, separating each host with a space. 6. Click Save. VBR does not require the certified messages to be signed by or transmitted to your CSP. The CSP is not signing or validating specific messages — it is vouching for the domain's good email practices. Copyright © 2007-2014. All rights reserved. Alt-N Technologies, Ltd. 106 SecurityGateway for Email Servers v3.0 Inbound messages Use the globally defined default settings for this domain When editing a specific domain's Message Certification settings, click this option if you wish to apply the global settings for inbound messages to this domain. This option is only visible when you have selected a domain from the "For Domain:" dropdown list box at the top of the page. Use the custom settings defined below for this domain When editing a specific domain's Message Certification settings, click this option if you wish to customize the settings for inbound messages to this domain rather than use the global settings. This option is only visible when you have selected a domain from the "For Domain:" drop-down list box at the top of the page. Enable certification of inbound messages By default, when a sender claims that its messages are certified by one of the CSPs that you trust, SecurityGateway will attempt to confirm this. If you do not wish to use Message Certification for inbound messages then uncheck/clear this box. Host name(s) of certification services that I trust (space separated list): Use this area to list the host names of all CSPs that you trust, separating each with a space. The CSP host located at vbr.emailcertification.org is included by default. If the sender is certified: Choose the option below that you want SecurityGateway to use when it determines that the sender of a message is certified by one of your trusted CSPs. ...exempt the message from spam filtering When this option is selected, messages from certified senders will be exempt from some of SecurityGateway's spam prevention tools. This is the default option. ...add [xx] points to message score If you do not wish to exempt certified messages, use this option to designate the amount that will be added to the Message Score 109 . This should be a negative number so that certified messages will receive a beneficial adjustment, since it is less likely that they will be spam. The default setting is "-3.0". Outbound messages The options in this section are only available when you select a domain in the "For Domain:" drop-down list box at the top of the page. You cannot configure Global Message Certification settings for outbound messages. Insert certification data into outbound messages Enable this option if you wish to insert message certification data in to all of this domain's outbound messages. This option is disabled by default. Copyright © 2007-2014. All rights reserved. Alt-N Technologies, Ltd. Security 107 Host name(s) of certification services that vouch for my messages Use this text field to enter the hosts corresponding to one or more CSPs that will vouch for the domain's email, separating each host with a space. Exceptions - Domains If you select a specific domain in the "For Domain:" drop-down list box at the top of the page when configuring these settings, that domain will be listed here after saving the settings. Click the View/Edit link for the corresponding domain to review or edit its Message Certification settings, or click Reset to reset the domain's settings to the default Global values. 4.1.7 Backscatter Protection Backscatter "Backscatter" refers to response messages that your users receive to emails that they never sent. This occurs when spam messages or messages sent by viruses contain a "Return-Path" address that is forged. Consequently, when one of these messages is rejected by the recipient's server, or if the recipient has an autoresponder or "out of office"/vacation message associated with his account, the response message will then be directed to the forged address. This can lead to huge numbers of bogus Delivery Status Notifications (DSNs) or auto response messages ending up in your users' mailboxes. Further, spammers and virus authors frequently take advantage of this phenomenon and will sometimes use it to launch Denial of Service (DoS) attacks against email servers, causing a flood of invalid emails to arrive from servers located all over the world. Backscatter Protection To combat backscatter, SecurityGateway's Backscatter Protection (BP) feature can help to ensure that only legitimate Delivery Status Notifications and auto responders get delivered to your domains, by using a private key hashing method to generate and insert a special time-sensitive code into the "Return-Path" address of your outbound messages. Then, when one of these messages encounters a delivery problem and is bounced back, or when an auto-reply is received with a "mailer-daemon@..." or NULL reverse path, SecurityGateway will see the special code and know that it is a genuine automated reply to a message that was sent by one of your domains. If the message doesn't contain the special code or if the code has expired, it will be logged and can be rejected. Configuration Enable Backscatter Protection Click this checkbox if you wish to enable Backscatter Protection. SecurityGateway will then begin to generate and insert a special code into the return path of all outbound messages, and it will look for that code in all returned messages. Backscatter Protection is disabled by default. Copyright © 2007-2014. All rights reserved. Alt-N Technologies, Ltd. 108 SecurityGateway for Email Servers v3.0 If you disable this option, SecurityGateway will not insert the special Backscatter Protection code into outgoing messages. It will, however, continue to check incoming DSNs and autoresponse messages to ensure that any incoming message with a valid code is not rejected by mistake. Reject messages that fail Backscatter Protection verification Click this checkbox if you wish to reject DSNs or other auto-response messages that fail BP verification. Messages with a "mailer-daemon@..." or NULL reverse path will fail if they do not contain the special code or if the code's life-cycle has expired. Because of Backscatter Protection's solid reliability, there are no false positives or "gray areas" — a message is valid or it isn't. For this reason it is safe to configure SecurityGateway to reject invalid messages, as long as you ensure that all of your outbound messages contain the special BP code. In all cases, however, the result of BP verification will be logged, even when you choose not to reject messages that fail verification. When you enable Backscatter Protection, you should usually wait about a week before setting it to reject auto-response messages that fail BP verification. This is because during that time you might still receive DSNs or auto-responses to messages that were sent out before Backscatter Protection was activated. If it were configured to reject invalid messages during that time then those legitimate response messages would be rejected by mistake. After a week it should be safe to start rejecting messages that fail verification. This same warning applies when you create a new BP key but elect not to use the Retain previous Backscatter Protection encryption key for [xx] days option. Create a new Backscatter Protection encryption key every [xx] days By default a new Backscatter Protection encryption key will be generated every 7 days. The new key will be used to generate the BP code for all new outgoing messages. Retain previous Backscatter Protection encryption key for [xx] days By default SecurityGateway will continue to validate messages containing a Backscatter Protection code that was generated with the previous encryption key for 7 days after a new key encryption key is generated. This helps to ensure that valid messages do not inadvertently get rejected whenever a new key is generated. Disabling this option is not recommended (see the warning under the Reject messages that fail Backscatter Protection verification option above). Click here to immediately generate a new Backscatter Protection encryption key Click this option to manually generate a new Backscatter Protection key. If the Retain previous Backscatter Protection encryption key for [xx] days option above is enabled, messages containing codes generated by the previous key will remain valid for the number of days designated in that option. Copyright © 2007-2014. All rights reserved. Alt-N Technologies, Ltd. Security 109 Exclusions Exclude messages from globally whitelisted IP addresses and hosts By default, when Backscatter Protection in enabled, all messages coming from globally whitelisted 159 IP addresses and hosts are excluded from Backscatter Protection restrictions. Clear this checkbox if you wish to require even whitelisted IPs and hosts to adhere to these restrictions. Exclude messages from authenticated sessions When an incoming message is being sent over an authenticated session, it will be excluded from the Backscatter Protection restrictions by default. Uncheck this box if you wish to apply the restrictions to authenticated sessions as well. Exclude messages from domain mail servers When Backscatter Protection is enabled, incoming messages from one of your domain mail servers 52 are excluded from Backscatter Protection restrictions by default. Clear this checkbox if you do not wish to exclude domain mail servers from Backscatter Protection checks. 4.1.8 Message Scoring SecurityGateway calculates a Message Score for each message based on a number of tests it performs while processing the message. The score is effectively a "spam score" used to determine the likelihood that a message is spam. Heuristics and Bayesian 89 , DNSBL 95 , DKIM Verification 118 , and many other Security 82 options can be optionally set to modify the Message Score. Use the options on this page to designate the actions that will be taken when a message's score exceeds certain thresholds. You can set thresholds for tagging messages as spam, quarantining them, or rejecting them during the SMTP session. You can also set SecurityGateway to exclude messages from the Message Scoring restrictions when they are from whitelisted senders, authenticated sessions, or are outbound messages. The Message Scoring options can be set both globally and for specific domains. Configuration Enable actions based upon final message score By default, SecurityGateway will assign a score to each message and then take action based upon that score, according to scoring thresholds designated below. Clear this checkbox if you do not wish to base any actions on the Message Score. Reject messages with score greater or equal to [xx] By default, any message with a final score of 12.0 or greater will be rejected during the SMTP session. You can adjust this value if you choose, or you can disable the option completely if you do not wish any message to be rejected because of its score. Quarantine messages with score greater or equal to [xx] Messages scoring 5.0 or greater will be quarantined by default. This value can be adjusted, or you can disable the option completely if you do not wish to quarantine Copyright © 2007-2014. All rights reserved. Alt-N Technologies, Ltd. 110 SecurityGateway for Email Servers v3.0 messages based on their message scores. If you are also using the "Reject messages with score greater or equal to [xx]" option above, then messages scoring between this quarantine threshold and that rejection threshold above will be quarantined. Messages scoring at or above the rejection threshold will be refused. Add subject tag to messages with score greater or equal to [xx] Click this option if you wish to add some text to a message's subject when its final score is greater than or equal to this value. The default value is 5.0, but the option is disabled by default. Subject tag: When the "Add subject tag to messages..." option above is enabled, this is the text that will be added to a message's Subject when its score is at or above the required threshold. The default text added by this option is: "*** SPAM ***". There are a number of other places within SecurityGateway where you can optionally add text to the Subject header. For example, the DNS Blacklists (DNSBL) 95 and URI Blacklists (URIBL) 99 pages also have this option. When the designated text in these options matches, the text will only be added to a message's subject once even if that message meets the criteria under each option. If, however, you change the text in one or more places then that customized text will be added as well. So, for example, if you set the text under all three of these options to "*SPAM*" then that text would only be added to the subject once, regardless of whether or not it matched the criteria under more than one of the options. But, if you changed the URIBL optional text to "*URI blacklisted*" and it matched the criteria under that option and the others then the subject would have both "*SPAM*" and "*URI blacklisted*" added to it. Exclusions Exclude messages from whitelisted senders Messages are excluded by default from the Message Scoring restrictions when they are from whitelisted 159 senders. Clear this checkbox if you do not wish to exempt whitelisted senders from Message Scoring. Exclude messages from authenticated sessions By default any message being sent over an authenticated SMTP session is excluded from the Message Scoring restrictions. Uncheck this box if you do not wish to exclude these messages. Exclude messages from domain mail servers Click this checkbox if you wish to exclude from the Message Scoring restrictions all messages coming from your domain mail servers. This option is disabled by default. Copyright © 2007-2014. All rights reserved. Alt-N Technologies, Ltd. Security 111 Exceptions - Domains If you select a specific domain in the "For Domain:" drop-down list box at the top of the page when configuring these settings, that domain will be listed here after saving the settings. Click the View/Edit link for the corresponding domain to review or edit its Message Scoring settings, or click Reset to reset the domain's settings to the default Global values. 4.2 Anti-Virus The Anti-Virus section under the Security 82 menu contains options to help you identify virus infected messages and prevent them from reaching your users. There are two items under the Anti-Virus section: Virus Scanning 111 - To offer an extensive level of virus protection, SecurityGateway includes two anti-virus engines: Clam AntiVirus (ClamAV™) and CYREN Anti-Virus. ClamAV is an open source (GPL) anti-virus toolkit designed especially for mail gateways. CYREN AV offers reliable protection from malicious and potentially hostile programs. It combines traditional anti-virus methods with the latest proactive technologies. SecurityGateway also includes Outbreak Protection 84 from CYREN, which offers an additional layer of protection against virus outbreaks. Configure Updates 113 - Because virus threats can emerge quickly, having an outdated database of virus signatures could cause a virus to be missed. Thus it is very important to update your virus signatures regularly. Use the options on the Configure Updates page to cause SecurityGateway to check for virus signature updates automatically, to force an immediate check for an update, and to view the anti-virus update logs. 4.2.1 Virus Scanning To offer an extensive level of virus protection, SecurityGateway includes two anti-virus engines: Clam AntiVirus (ClamAV™) and CYREN AntiVirus. ClamAV is an open source (GPL) anti-virus toolkit designed especially for mail gateways. CYREN AV offers reliable protection from malicious and potentially hostile programs. It combines traditional antivirus methods with the latest proactive technologies. SecurityGateway also includes Outbreak Protection 84 from CYREN, which offers an additional layer of protection against virus outbreaks. Configuration Enable virus scanning Virus scanning is enabled by default in SecurityGateway. Clear this checkbox if you do not wish to scan messages for viruses. If the antivirus engine determines that a message is infected: Use this option to designate the action to take when a message is found to contain a virus. Copyright © 2007-2014. All rights reserved. Alt-N Technologies, Ltd. 112 SecurityGateway for Email Servers v3.0 If you have enabled the "Attempt to clean infected messages" option below, SecurityGateway will first try to clean an infected message (i.e. remove the virus) rather than immediately refuse or quarantine it. If it succeeds then the message will be accepted and delivered. If the message cannot be cleaned then the message will be refused or quarantined. ...refuse the message When this option is selected, messages are refused during the SMTP session when they are found to contain a virus. This is the default option. ...quarantine the message Choose this option if you wish to place infected messages in the administrative quarantine 191 rather than refuse them. Quarantine messages that cannot be scanned Click this option if you wish to quarantine messages that for some reason cannot be scanned by the anti-virus engine. An example of this type of message would be one with a password-protected zipped attached. When this option is disabled, messages that cannot be scanned will be delivered normally. This option is disabled by default. Attempt to clean infected messages By default SecurityGateway will first attempt to remove a virus from (i.e. "clean") an infected message rather than immediately refuse or quarantine it. If the message is successfully cleaned then it will be delivered normally. If the message cannot be cleaned then it will be refused or quarantined, depending on the option that you have selected above. Clear this checkbox if you do not wish to attempt to clean infected messages. In that case infected messages will immediately be refused or quarantined. Exclusions Exclude messages from whitelisted IP addresses and hosts Enable this option if you wish to exempt messages from virus scanning when they come from a whitelisted IP address 165 or host 162 . Exclude messages from domain mail servers Enable this option if you wish to exempt messages from virus scanning when they are from one of your domain mail servers 52 . Virus Scanning Engines (all domains) Use the ClamAV engine to scan messages By default SecurityGateway will use the ClamAV anti-virus engine to scan messages for viruses. Clear this checkbox if you do not with to use the ClamAV engine to scan messages. Copyright © 2007-2014. All rights reserved. Alt-N Technologies, Ltd. Security 113 Use the CYREN Anti-Virus engine to scan messages By default SecurityGateway will use the CYREN Anti-Virus engine to scan messages for viruses. Clear this checkbox if you do not with to use CYREN AV to scan messages. Enabling both of these options means that SecurityGateway will scan each message twice - once with each engine. This can give you an extra layer of protection since one engine could identify a virus that the other might miss. Exceptions - Domains If you select a specific domain in the "For Domain:" drop-down list box at the top of the page when configuring these settings, that domain will be listed here after saving the settings. Click the View/Edit link for the corresponding domain to review or edit its Virus Scanning settings, or click Reset to reset the domain's settings to the default Global values. 4.2.2 Configure Updates Because virus threats can emerge quickly, having an outdated database of virus signatures could cause a virus to be missed. Thus it is very important to update your virus signatures regularly. Use the options on this page to cause SecurityGateway to check for virus signature updates automatically, to force an immediate check for an update, and to view the anti-virus update logs. Virus Updates Enable automatic virus signature updates Use this option to configure SecurityGateway to check for updated virus signatures automatically at a regular interval. You can choose to check for updates automatically either once per hour or once per day. The auto-update feature is enabled by default. Hourly - At [xx] minutes after the hour By default SecurityGateway will check for updated virus signatures once per hour, at the designated number of minutes after the hour, specified in this option. For example, if you use "29" in this option then the hourly check will be performed at 1:29, 2:29, and so on. Click the Generate Random Time link to generate a random value for this option. A large number of systems check for updates at common times such as the top or bottom of the hour (e.g. 1:00, 1:30, and so on), thus choosing a random time could potentially speed up your checks for updates since there would be less traffic at those other times. Daily - At [xx:xx] Use this option if you wish to check for updated virus signatures once per day, at the time specified in this option. The time must be specified using the 24-hour clock format. For example, if you use "13:05" in this option then the daily check will be performed at 1:05 PM. Click the Generate Random Time link to generate a random value for this option. A large number of systems check for updates at Copyright © 2007-2014. All rights reserved. Alt-N Technologies, Ltd. 114 SecurityGateway for Email Servers v3.0 common times such midnight (i.e. 00:00). Choosing a random time could potentially speed up your checks for updates since there would be less traffic at other times. Click here to immediately force a check for updated virus signatures Click this link to cause SecurityGateway to check immediately for updated virus signatures. This immediate check will be performed in addition to any automatic update check that you have configured above. Click here to view the ClamAV update log file Click this link to view the update log for Clam AntiVirus. Click here to view the CYREN Anti-Virus update log file Click this link to view the update log for CYREN Anti-Virus. 4.3 Anti-Spoofing The Anti-Spoofing section under the Security 82 menu contains tools to help you identify messages sent from forged, or "spoofed" addresses. There are six antispoofing features listed under this section: Reverse Lookups 115 - Using these lookup options you can check to see if the sender's domain actually exists and if the sending server's IP address is associated with that domain. DKIM Verification 118 - This feature is used to verify DomainKeys Identified Mail (DKIM) and DomainKeys (DK) signatures in incoming messages. When an incoming message has been cryptographically signed, SecurityGateway will retrieve the public key from the DNS record of the domain taken from the signature and then use that key to test the message’s DKIM or DK signature to determine its validity. If the DKIM/DK signature passes the verification test, the message will continue on to the next step in the regular delivery process and can optionally have its Message Score 109 adjusted. DKIM verification helps to ensure not only that a message is coming from the purported sender, but that it hasn't been modified between the time it was signed and when it was delivered to you. DK/DKIM Signing 121 - The signing options are used to control whether or not your domains' outgoing messages are cryptographically signed, and to designate the method that will be used to sign them: DomainKeys (DK) and/or DomainKeys Identified Mail (DKIM). You can also create the selectors and keys used for signing the domain's messages, and to designate which selector to use. Sender Policy Framework (SPF) 123 - SPF is an open standard used to identify forged sender addresses in email messages. Specifically it protects the domain found in the SMTP envelope sender address, or return path. It does this by checking the domain's DNS record for an SPF policy to find out exactly which mail hosts are permitted to send messages on the domain's behalf. If the domain has an SPF policy and the sending host is not listed in that policy, then you can know that the address if forged. Copyright © 2007-2014. All rights reserved. Alt-N Technologies, Ltd. Security 115 Sender ID 126 - The Sender ID Framework is an email authentication protocol that is used to verify that a message originated from the domain from which it claims to have been sent. Similar to Sender Policy Framework (SPF), Sender ID checks the domain's DNS record for a list of hosts that are permitted to deliver mail on its behalf. If the host that is delivering the message isn't listed then you can know that the sender's address is forged. Callback Verification 129 - This is an anti-spoofing measure used to confirm the validity of the email address of an incoming message's purported sender. To do this, SecurityGateway will connect to the mail exchanger of the domain passed in the "MAIL From" statement during the SMTP session and attempt to verify whether or not that sender's address is a valid address at that domain. If the result of the check shows that the sender's address does not exist, then SecurityGateway can treat the message as if it is being sent from a forged address and therefore refuse the message, quarantine it, or accept it and optionally adjust its Message Score 109 and add a tag to the Subject. 4.3.1 Reverse Lookups PTR Perform reverse PTR record lookup on inbound SMTP connections By default SecurityGateway performs pointer record lookups on all inbound SMTP connections. Clear this option if you do not wish to do this. Send 501 and close connection if no PTR record exists (caution) If this box is checked then SecurityGateway will send a 501 error code (syntax error in parameters or arguments) and close the connection if no PTR record exists for the domain. This option is disabled by default. Send 501 and close connection if no PTR record match If this box is checked then SecurityGateway will send a 501 error code (syntax error in parameters or arguments) and close the connection if the results of a pointer record lookup fail to match. This option is disabled by default. Exclude authenticated sessions from punitive actions When this checkbox is enabled SecurityGateway will defer the PTR lookup on inbound SMTP connections until after the SMTP MAIL command, in order to see whether or not the connection used authentication. If the session is authenticated then no punitive actions will be taken against the sender. This option is disabled by default. Exclude global whitelisted IP addresses from punitive actions Click this checkbox if you wish to exclude Globally whitelisted IP addresses from PTR record lookups. This option is disabled by default. 30 HELO/EHLO Perform lookup on HELO/EHLO domain By default SecurityGateway performs a lookup on the domain name that is reported during the HELO/EHLO portion of the session. The HELO/EHLO command is used by Copyright © 2007-2014. All rights reserved. Alt-N Technologies, Ltd. 116 SecurityGateway for Email Servers v3.0 the client (sending machine) to identify itself to the server. The domain name passed by the client in this command is used by the server to populate the from portion of the Received header. Disable this option if you do not wish to perform these lookups. Send 501 and close connection on forged identification (caution) Click this check box if you want a 501 error code to be sent and then the connection closed when the result of a lookup appears to be a forged identification. This option if disabled by default. When the result of a reverse lookup states that the server is using a forged identification, this result may frequently be incorrect. It is very common for mail servers to identify themselves with values that do not match their IP addresses. This can be due to ISP limitations and restrictions and other legitimate reasons. For this reason, you should exercise caution before enabling this option. It is likely that using this option could result in your server refusing some legitimate messages. Refuse to accept mail if a lookup returns 'domain not found' When a lookup results in "domain not found", enabling this option will cause the message to be refused with a 451 error code (Requested action aborted: local error in processing) and then the session will be allowed to progress normally to its conclusion. This option is disabled by default. ...send 501 error code (normally sends 451 error code) Enable this checkbox if you want the error code that is sent in response to a "domain not found" result to be 501 (syntax error in parameters or arguments) instead of 451. ...and then close the connection Click this checkbox if you want the connection to be closed immediately instead of allowed to progress when "domain not found" is the result of the reverse lookup. Exclude authenticated sessions from punitive actions When this checkbox is enabled SecurityGateway will defer the lookup on inbound SMTP connections until after the SMTP MAIL command, in order to see whether or not the connection used authentication. If the session is authenticated then no punitive actions will be taken against the sender. This option is disabled by default. Exclude global whitelisted IP addresses and hosts from punitive actions Click this checkbox if you wish to exclude globally whitelisted IP addresses 30 and globally whitelisted hosts 162 from lookups on the HELO/EHLO domain. This option is disabled by default. Copyright © 2007-2014. All rights reserved. Alt-N Technologies, Ltd. Security 117 Mail Perform lookup on value passed in the MAIL command By default SecurityGateway will perform a lookup on the domain name that is passed during the MAIL command portion of the mail transaction. The address passed in the MAIL command is supposed to be the reverse-path for the message, and is usually the mailbox from which the message is originating. Sometimes, however, it is the address to which error messages should be directed instead. Disable this option if you do not wish to perform lookups on the MAIL value. ...send 501 and close connection on forged identification (caution) Click this check box if you want a 501 error code to be sent and then the connection closed when the result of a lookup appears to be a forged identification. This option is disabled by default. When the result of a reverse lookup states that the server is using a forged identification, this result may frequently be incorrect. It is very common for mail servers to identify themselves with values that do not match their IP addresses. This can be due to ISP limitations and restrictions and other legitimate reasons. For this reason, you should exercise caution before enabling this option. It is likely that using this option could result in your server refusing some legitimate messages. Refuse to accept mail if a lookup returns 'domain not found' By default, when a lookup on the MAIL value results in "domain not found," the message will be refused with a 451 error code (Requested action aborted: local error in processing) and then the session will be allowed to progress normally to its conclusion. Clear this checkbox if you do not wish to refuse these messages. ...send 501 error code (normally sends 451 error code) Enable this checkbox if you want the error code that is sent in response to a "domain not found" result to be 501 (syntax error in parameters or arguments) instead of 451. ...and then close the connection Click this checkbox if you want the connection to be closed immediately instead of allowed to progress when "domain not found" is the result of the lookup. Exclude messages from authenticated sessions Messages arriving over authenticated sessions are excluded from lookups on the MAIL command value by default. Disable this option if you do not wish to exclude those messages. Exclude globally whitelisted senders Message from any globally whitelisted senders are excluded from lookups by default. Clear this checkbox if you do not wish to exclude messages from those Copyright © 2007-2014. All rights reserved. Alt-N Technologies, Ltd. 118 SecurityGateway for Email Servers v3.0 senders. Configuration Insert warning headers into suspicious messages By default, SecurityGateway will insert a warning header into any message that fails a reverse lookup. The receiving mail server or client could then optionally use this header to filter the message. Uncheck this box if you do not wish to insert a warning header into suspicious messages. 4.3.2 DKIM Verification Use this page to configure SecurityGateway to verify DomainKeys Identified Mail (DKIM) and DomainKeys (DK) signatures in incoming messages. When this feature is enabled and an incoming message has been cryptographically signed 121 , SecurityGateway will retrieve the public key from the DNS record of the domain taken from the signature and then use that key to test the message’s DKIM or DK signature to determine its validity. If the DKIM/DK signature passes the verification test, the message will continue on to the next step in the regular delivery process and can optionally have its Message Score 109 adjusted. If a message has no signature, or if the signature is invalid, SecurityGateway can retrieve the Author Domain Signing Practices (ADSP) record of the domain in the From header to determine whether or not all of that domain’s messages should be signed. If the ADSP record indicates that a valid signature is required and the public key indicates that the signer is not merely testing DKIM, the message will receive a "Fail" result and be treated accordingly — by default the message is rejected, but you can configure SecurityGateway to instead quarantine the message or flag it and adjust its Message Score 109 . Finally, SecurityGateway supports Internet-Draft 06 of the DKIM Author Domain Signing Practices. If a site’s ADSP record uses an older draft’s syntax, if no ADSP record exists at all, or if the ADSP option below is disabled, the unsigned or invalidly signed message will be treated as if the domain signs only some of its messages. In those cases the message will be treated as "non-Suspicious." You can find Internet-Draft 06 of the DKIM Author Domain Signing Practices at: tools.ietf.org. For more on DKIM, see: www.dkim.org. Cryptographic verification Verify signatures created using DomainKeys Identified Mail (DKIM) By default SecurityGateway will verify messages that were signed using DKIM 121 . If you have configured SecurityGateway to verify both DKIM and DK signatures, and a given message contains both types of signatures, then no DK verification will be attempted if a DKIM signature produces a "pass" result. Clear this checkbox if you do not wish to verify DKIM signatures in messages. Verify signatures created using DomainKeys (DK) By default SecurityGateway will verify signatures that were created using DomainKeys. If you do not wish to verify DK signatures then uncheck this option. Copyright © 2007-2014. All rights reserved. Alt-N Technologies, Ltd. Security 119 When verification returns a FAIL result (requires ADSP processing): This is the action that will be taken when the verification process returns a "FAIL" result. The following punitive measures can only be applied to messages when the "Unsigned/improperly signed messages trigger ADSP processing" option below is enabled. When the ADSP option is disabled, no messages will be rejected or scored negatively by DKIM verification, regardless of these settings. ...refuse the message By default, when the DKIM/DK verification process returns a FAIL result, the message will be refused during the SMTP process. ...quarantine the message Choose this option if you wish to quarantine messages receiving a FAIL result rather than refuse or flag them. ...accept the message When this option is chosen, SecurityGateway will accept a message that receives a FAIL result, but it can then be tagged and have its Message Score adjusted. ...tag the subject with [ text ] When you have configured SecurityGateway to accept a message that receives a FAIL result, enable this option and specify some text if you wish to add something to the beginning of the message's Subject header. If enabled, the default text added to the subject is: "*** FRAUD ***". With this option you could leave it to the recipient's mail server or client to filter the message based on the tag. This option is disabled by default. There are a number of other places within SecurityGateway where you can optionally add text to the Subject header. For example, the SPF 123 and Message Scoring 109 pages also have this option. When the designated text in these options matches, the tag will only be added to a message's subject once even if that message meets the criteria under each option. If, however, the text differs between the options, then each unique tag will be added. For example, the default text in this option is "*** FRAUD ***" but the default text in Message Scoring is "*** SPAM ***". Because the two tags are different, both would be added to messages matching the criteria of both options. But, if you changed the text in one of the options to be identical to the other one, then the tag would be added only once. ...add [xx] points to message score By default, when you have configured SecurityGateway to accept a message Copyright © 2007-2014. All rights reserved. Alt-N Technologies, Ltd. 120 SecurityGateway for Email Servers v3.0 that receives a FAIL result and the ADSP record indicates that a valid signature is required, any message with an invalid signature or no signature at all will have this value added to its Message Score. If the final score is high enough then that could cause the message to be quarantined or refused, depending on your Message Scoring 109 settings. The default value for this option is 3.0. When verification returns a PASS result: ...add [xx] points to message score Use this option if you wish to adjust the Message Score when the message receives a PASS result from DKIM/DK verification. By default the value of this option is set to 0.0, meaning that no scoring adjustment will be made. If you choose to adjust the score of these messages, you should use a negative value in this option, which would give the Message Score a beneficial adjustment. For example, using -0.5 in this option would lower the final score by .5 points. Exclusions Exclude messages from whitelisted IP addresses By default, messages coming from whitelisted IP addresses 165 will be exempt from DKIM/DK verification. Clear this checkbox if you wish to verify DKIM/DK signatures even when the sender is on the IP Address whitelist. Exclude messages from authenticated sessions Messages arriving over authenticated SMTP sessions are excluded from DKIM/DK verification by default. Clear this checkbox if you wish to verify DKIM/DK signatures even when the SMTP session was authenticated. Exclude messages from domain mail servers Messages coming from one of your domain mail servers 52 will be exempt from DKIM verification by default. Clear this checkbox if you wish to verify DKIM signatures in message coming from those servers. DKIM Verification Options (All domains) Unsigned / improperly signed messages trigger ADSP processing Enable this option if you wish to query for and enforce Author Domain Signing Practices (ADSP) records when an incoming message is unsigned or improperly signed. SecurityGateway supports Internet-Draft 06 of the DKIM Author Domain Signing Practices. If the ADSP record uses an older draft's syntax or if this option is disabled, the message will be treated as if the domain "signs some" messages. In those cases unsigned messages will be treated as "non-Suspicious." This option is disabled by default. This option must be enabled if you wish to use any of the punitive measures outlined under the "When verification returns a FAIL result:" option above. When this option is disabled, no messages will be rejected or scored negatively by DKIM verification, regardless of the settings above. Copyright © 2007-2014. All rights reserved. Alt-N Technologies, Ltd. Security 121 Verifier honors body length count ("l=" tag) When this option is enabled, SecurityGateway will honor the body length count tag when it is found in an incoming message's DKIM signature. When the actual body length count is greater than the value contained in this tag, SecurityGateway will only verify the amount specified in the tag; the remainder of the message will remain unverified. This indicates that something was appended to the message, and consequently that unverified portion could be considered suspect. When the actual body length count is less than the value contained in this tag, the signature will not pass verification (i.e. it will receive a "FAIL" result). This indicates that some portion of the message was deleted, causing the body length count to be less than the amount specified in the tag. This option is disabled by default. Verifier requires signatures to protect the Subject header Enable this option if you wish to require the DKIM signature of incoming messages to protect the Subject header. This option is disabled by default. Exceptions - Domains If you select a specific domain in the "For Domain:" drop-down list box at the top of the page when configuring these settings, that domain will be listed here after saving the settings. Click the View/Edit link for the corresponding domain to review or edit its DKIM Verification settings, or click Reset to reset the domain's settings to the default Global values. 4.3.3 DK/DKIM Signing Use the options on the Sign Outbound Messages page to control whether or not a domain's outgoing messages will be cryptographically signed, and to designate the method that will be used to sign them: DomainKeys (DK) and/or DomainKeys Identified Mail (DKIM). You can also use this page to create the selectors and keys used for signing the domain's messages, and to designate which selector to use. All keys are unique — they are never the same from one domain to another, regardless of the selector specified. For more on DKIM, see: www.dkim.org. DK/DKIM Signing Sign outbound messages using DomainKeys Identified Mail (DKIM) Click this option if you wish to use DomainKeys Identified Mail to cryptographically sign the domain's outbound messages. In order for a message to be signed, it must be received by SecurityGateway on an authenticated session via SMTP AUTH. This is to ensure that the message is genuine before signing it. Sign outbound messages using DomainKeys (DK) Click this option if you wish to use DomainKeys to cryptographically sign the domain's outbound messages. In order for a message to be signed, it must be received by SecurityGateway on an authenticated session via SMTP AUTH. This is to ensure that the message is genuine before signing it. Copyright © 2007-2014. All rights reserved. Alt-N Technologies, Ltd. 122 SecurityGateway for Email Servers v3.0 Sign messages using this selector: From the drop-down list, choose the selector whose corresponding public/private key pair you wish to use when signing the domain's messages. If you wish to create a new selector, click the New button, type the desired Selector Name in the space provided, and click Save and Close. New Click this button to create a new selector used for signing the domain's messages. Enter a Selector Name in the space provided and then click Save and Close. Delete To delete a selector, choose it from the drop-down list box and then click Delete. View DNS configuration (public key) for this selector Choose a selector from the drop-down list box above and then click this link to view the selector's DNS configuration. This is the DKIM information that must be placed in the domain's DNS record. Without this information in the DNS record, no one will be able to verify the signatures in your messages. The DNS Configuration page lists the following information: DKIM selector record for DNS This is the information that other servers will need in order to verify the domain's DKIM signed messages. It contains the selector, the domain, the public key, and other necessary information. DKIM Author Domain Signing Practices (ADSP) record for DNS This section contains two ADSP records to choose from for the domain's DNS. First it lists a record to be used if you wish to declare that ALL of the domain's messages are signed, and next it lists a record to be used if only SOME of its messages are signed. Placing this information in the domain's DNS record is required if you wish to sign its outgoing messages. Without this, the receiving servers will have no way to verify the signatures. For more information and other parameters that may be included in your DNS records, visit www.dkim.org and the DomainKeys Distribution Options page at domainkeys.sourceforge.net. DK/DKIM Signing Options (All domains) Signatures expire after [xx] days ("t=" tag, default 7 days) Use this option to limit the number of days that a DKIM signature will be considered valid. Messages with expired signatures will always fail verification. This option corresponds to the signature's "x=" tag. It is enabled by default and is set to 7 days.. Signatures include query method(s) (include "q=" tag) This option is used to include the query method tag in the DKIM signature (i.e. q=dns). It is included by default. Copyright © 2007-2014. All rights reserved. Alt-N Technologies, Ltd. Security 123 Signatures include body length count (include "l=" tag) This option controls whether or not the body length count (the "l=" tag) will be included in DKIM signatures. This option is enabled by default. Signatures include original header content (include "z=" tag) Click this option if you wish to include the "z=" tag in the DKIM signature. This tag will contain a copy of the message's original headers, and can therefore potentially make signatures quite large. This option is disabled by default. Canonicalization Canonicalization is a process whereby the message's headers and body are converted into a canonical standard and "normalized" before the DKIM signature is created. This is necessary because some email servers and relay systems will make various inconsequential changes to the message during normal processing, which could otherwise break the signature if a canonical standard was not used to prepare each message for signing. Currently there are two canonicalization methods used for DKIM signing and verification: Simple and Relaxed. Simple is the strictest method, allowing little to no changes to the message. Relaxed is more forgiving than Simple, allowing several inconsequential changes. Canonicalize headers using: Simple, Relaxed This is the canonicalization method used for the message headers when signing the message. Simple allows no changes to the header field in any way. Relaxed allows for converting header names (not header values) to lower case, converting one or more sequential spaces to a single space, and other innocuous changes. The default setting is "Simple.". Canonicalize body using: Simple, Relaxed This is the canonicalization method used for the message body when signing the message. Simple ignores empty lines at the end of the message body — no other changes to the body are allowed. Relaxed allows for blank lines at the end of the message, ignores spaces at the end of lines, reduces all sequences of spaces in a single line to a single space character, and other minor changes. The default setting is "Simple." 4.3.4 Sender Policy Framework (SPF) Sender Policy Framework (SPF) is an open standard used to identify forged sender addresses in email messages. Specifically it protects the domain found in the SMTP envelope sender address, or return path. It does this by checking the domain's DNS record for an SPF policy to find out exactly which mail hosts are permitted to send messages on the domain's behalf. If the domain has an SPF policy and the sending host is not listed in that policy, then you can know that the address if forged. For more on SPF, visit: www.openspf.org Configuration Verify sending host using SPF By default, SecurityGateway will check the sending domain's DNS record to see if the Copyright © 2007-2014. All rights reserved. Alt-N Technologies, Ltd. 124 SecurityGateway for Email Servers v3.0 sending host has the authority to send email on its behalf. This uses the domain found in the MAIL value passed during SMTP processing. Clear this checkbox if you do not wish to use SPF processing. When SPF processing returns a HARD FAIL result: The following action will be taken when SPF processing of a message results in a HARD FAIL. ...refuse the message By default messages receiving a HARD FAIL will be refused during the SMTP process. ...quarantine the message Choose this option if you wish to quarantine messages that receive a HARD FAIL. ...accept the message If you wish to accept messages that receive a HARD FAIL, choose this option. You can then insert some text into the message's subject and modify its Message Score. ...tag the subject with [ text ] When you have configured SecurityGateway to accept a message that receives a HARD FAIL result, enable this option and specify some text if you wish to add something to the beginning of the message's Subject header. If enabled, the default text added to the subject is: "*** FRAUD ***". With this option you could leave it to the recipient's mail server or client to filter the message based on the tag. This option is disabled by default. There are a number of other places within SecurityGateway where you can optionally add text to the Subject header. For example, the DKIM Verification 118 and Message Scoring 109 pages also have this option. When the designated text in these options matches, the tag will only be added to a message's subject once even if that message meets the criteria under each option. If, however, the text differs between the options, then each unique tag will be added. For example, the default text in this option is "*** FRAUD ***" but the default text in Message Scoring is "*** SPAM ***". Because the two tags are different, both would be added to messages matching the criteria of both options. But, if you changed the text in one of the options to be identical to the other one, then the tag would be added only once. ...add [xx] points to message score By default, when you have configured SecurityGateway to accept a message that receives a HARD FAIL result, this value is added to its Message Score. If the final score is high enough then that could cause the message to be quarantined or refused, depending on your Message Scoring 109 settings. The default value for this option is 5.0. Copyright © 2007-2014. All rights reserved. Alt-N Technologies, Ltd. Security 125 When SPF processing returns a SOFT FAIL result: The following action will be taken when SPF processing of a message results in a SOFT FAIL. ...refuse the message Click this option if want messages receiving a SOFT FAIL to be refused during the SMTP process. ...quarantine the message Choose this option if you wish to quarantine messages that receive a SOFT FAIL. ...accept the message By default, messages that receive a SOFT FAIL will be accepted, but you can then insert some text into the message's subject and modify its Message Score. ...tag the subject with [ text ] When SecurityGateway is configured to accept a message that receives a SOFT FAIL result, enable this option and specify some text if you wish to add something to the beginning of the message's Subject header. If enabled, the default text added to the subject is: "*** FRAUD ***". With this option you could leave it to the recipient's mail server or client to filter the message based on the tag. This option is disabled by default. ...add [xx] points to message score By default, when you have configured SecurityGateway to accept a message that receives a SOFT FAIL result, this value is added to its Message Score. If the final score is high enough then that could cause the message to be quarantined or refused, depending on your Message Scoring 109 settings. The default value for this option is 2.0. When SPF processing returns a PASS result: ...add [xx] points to message score Click this option if you wish to adjust the Message Score when SPF processing of a message results in a PASS. This should be a negative number so the the score will be reduced, thus giving it a beneficial adjustment. Exclusions Exclude messages from whitelisted IP addresses Click this checkbox if you wish to exclude the sender from SPF processing when its IP address appears on the whitelist. This option is disabled by default. Exclude messages from authenticated sessions When the incoming message is using an authenticated session it will be excluded from the SPF processing requirement by default. Clear this option if you wish to use SPF processing even when the SMTP session was authenticated. Exclude messages from domain mail servers Messages coming from one of your domain mail servers 52 will be exempt from SPF processing by default. Clear this checkbox if you do not wish to exclude domain mail Copyright © 2007-2014. All rights reserved. Alt-N Technologies, Ltd. 126 SecurityGateway for Email Servers v3.0 servers from SPF requirements. Advanced Insert 'Received-SPF' header into messages By default a "Received-SPF" header is inserted into each message, containing the SPF results for the message. Clear this checkbox if you do not wish to insert this header. ...except when the SPF result is 'none' By default, no "Received-SPF" header is inserted when the result of an SPF lookup is "none." Uncheck this option if you wish to insert the header even if no SPF data is found for the sender's domain. Exceptions - Domains If you select a specific domain in the "For Domain:" drop-down list box at the top of the page when configuring these settings, that domain will be listed here after saving the settings. Click the View/Edit link for the corresponding domain to review or edit its SPF settings, or click Reset to reset the domain's settings to the default Global values. 4.3.5 Sender ID The Sender ID Framework is an email authentication protocol that is used to verify that a message originated from the domain from which it claims to have been sent. Similar to Sender Policy Framework (SPF) 123 , Sender ID checks the domain's DNS record for a list of hosts that are permitted to deliver mail on its behalf. If the host that is delivering the message isn't listed there then you can know that the sender's address is forged. For more on Sender ID, visit the Sender ID Home Page at Microsoft.com. Configuration Verify sending host using Sender ID Enable this option if you wish to use the Sender ID Framework to verify incoming messages. SecurityGateway will identify the Purported Responsible Address (PRA) of the incoming message through inspection of its headers and then verify whether or not the message originated from that location. The PRA is the most recent address purported to be responsible for the message, which may or may not be its original sender. Sender ID verification is enabled by default. When Sender ID processing returns a HARD FAIL result: The following action will be taken when Sender ID processing of a message results in a HARD FAIL. ...refuse the message By default messages receiving a HARD FAIL will be refused during the SMTP process. Copyright © 2007-2014. All rights reserved. Alt-N Technologies, Ltd. Security 127 ...quarantine the message Choose this option if you wish to quarantine messages that receive a HARD FAIL. ...accept the message If you wish to accept messages that receive a HARD FAIL, choose this option. You can then insert some text into the message's subject and modify its Message Score. ...tag the subject with [ text ] When you have configured SecurityGateway to accept a message that receives a HARD FAIL result, enable this option and specify some text if you wish to add something to the beginning of the message's Subject header. If enabled, the default text added to the subject is: "*** FRAUD ***". With this option you could leave it to the recipient's mail server or client to filter the message based on the tag. This option is disabled by default. There are a number of other places within SecurityGateway where you can optionally add text to the Subject header. For example, the DKIM Verification 118 and Message Scoring 109 pages also have this option. When the designated text in these options matches, the tag will only be added to a message's subject once even if that message meets the criteria under each option. If, however, the text differs between the options, then each unique tag will be added. For example, the default text in this option is "*** FRAUD ***" but the default text in Message Scoring is "*** SPAM ***". Because the two tags are different, both would be added to messages matching the criteria of both options. But, if you changed the text in one of the options to be identical to the other one, then the tag would be added only once. ...add [xx] points to message score By default, when you have configured SecurityGateway to accept a message that receives a HARD FAIL result, this value is added to its Message Score. If the final score is high enough then that could cause the message to be quarantined or refused, depending on your Message Scoring 109 settings. The default value for this option is 5.0. When Sender ID processing returns a SOFT FAIL result: The following action will be taken when Sender ID processing of a message results in a SOFT FAIL. ...refuse the message Click this option if want messages receiving a SOFT FAIL to be refused during the SMTP process. ...quarantine the message Choose this option if you wish to quarantine messages that receive a SOFT FAIL. Copyright © 2007-2014. All rights reserved. Alt-N Technologies, Ltd. 128 SecurityGateway for Email Servers v3.0 ...accept the message By default, messages that receive a SOFT FAIL will be accepted, but you can then insert some text into the message's subject and modify its Message Score. ...tag the subject with [ text ] When SecurityGateway is configured to accept a message that receives a SOFT FAIL result, enable this option and specify some text if you wish to add something to the beginning of the message's Subject header. If enabled, the default text added to the subject is: "*** FRAUD ***". With this option you could leave it to the recipient's mail server or client to filter the message based on the tag. This option is disabled by default. ...add [xx] points to message score By default, when you have configured SecurityGateway to accept a message that receives a SOFT FAIL result, this value is added to its Message Score. If the final score is high enough then that could cause the message to be quarantined or refused, depending on your Message Scoring 109 settings. The default value for this option is 2.0. When Sender ID processing returns a PASS result: ...add [xx] points to message score Click this option if you wish to adjust the Message Score when Sender ID processing of a message results in a PASS. This should be a negative number so the the score will be reduced, thus giving it a beneficial adjustment. Exclusions Exclude messages from whitelisted IP addresses Click this checkbox if you wish to exclude the sender from Sender ID processing when its IP address appears on the whitelist 165 . This option is disabled by default. Exclude messages from authenticated sessions When the incoming message is using an authenticated session it will be excluded from the Sender ID processing requirement by default. Clear this option if you wish to use Sender ID processing even when the SMTP session was authenticated. Exclude messages from domain mail servers Messages coming from one of your domain mail servers 52 are exempt from Sender ID by default. Clear this checkbox if you do not wish to exclude domain mail servers from Sender ID requirements. Advanced Interpret 'v=spf1' records as 'spf2.0/mfrom,pra' Sender ID prefers SPF 2.0 records. However, by default when no SPF 2.0 records are found, Sender ID will attempt to use SPF 1 data and retask it for Sender ID purposes. Ordinarily you should leave this option enabled, but if you do not wish to allow Sender ID to interpret SPF 1 records in this way then you can disable it by clearing the option. Copyright © 2007-2014. All rights reserved. Alt-N Technologies, Ltd. Security 129 Exceptions - Domains If you select a specific domain in the "For Domain:" drop-down list box at the top of the page when configuring these settings, that domain will be listed here after saving the settings. Click the View/Edit link for the corresponding domain to review or edit its Sender ID settings, or click Reset to reset the domain's settings to the default Global values. 4.3.6 Callback Verification Callback Verification is an anti-spoofing measure used to confirm the validity of the email address of an incoming message's purported sender. To do this, SecurityGateway will connect to the mail exchanger of the domain passed in the "MAIL From" statement during the SMTP session and attempt to verify whether or not that sender's address is a valid address at that domain. If the result of the check shows that the sender's address does not exist, then SecurityGateway can treat the message as if it is being sent from a forged address and therefore refuse the message, quarantine it, or accept it and optionally adjust its Message Score 109 or add a tag to the Subject. Because there are a number of potential problems and drawbacks associated with callback verification in general, this feature is disabled by default. For general information on callback verification, see the Callback verification article at Wikipedia.org. Configuration Use callback verification to verify senders Click this checkbox if you wish to use callback verification to check the validity of sender email addresses. SecurityGateway will use the value that is passed by the sending server during the SMTP "MAIL From" statement to connect to the purported sender's domain and verify whether or not that address exists. Callback verification is disabled by default. Try VRFY command first (if supported by the sender's mail server) By default, SecurityGateway will first try to use the SMTP "VRFY" command to verify a sender's address when the server indicates that it supports that command. Servers indicate they support VRFY by responding to SecurityGateway with the "250-VRFY" statement at the beginning of the SMTP session. If you disable this option or if the server does not support VRFY, then SecurityGateway will use the "MAIL From" and "RCPT To" commands instead. SecurityGateway verifies that the sender's address is valid at the domain by using these commands as if it were going to send a message to the address in question, although no message will actually be sent. Send message from this address: This is the From address that will be used in the "MAIL From" SMTP statement when a NULL from address is not permitted by the server, or when you disable the "Try NULL from address first" option below. The default value of this option is "postmaster". The domain portion that will be appended is the recipient's domain (e.g. [email protected]). If you specify a full email address in this option, then that address will be used instead. For example, using "[email protected]" in this option would mean that the recipient's domain would not Copyright © 2007-2014. All rights reserved. Alt-N Technologies, Ltd. 130 SecurityGateway for Email Servers v3.0 be used. No message is actually sent to the sender's email server. SecurityGateway connects to the server and sends the MAIL From and RCPT To commands as if it were going to send a message, but then ends the connection without sending one. By testing to see if the server will accept a message for the sender address in question, SecurityGateway can confirm that the server considers the address valid. Try NULL from address first When using the "MAIL From" and "RCPT To" commands to verify a sender's address, SecurityGateway will first try to use a From with NULL value (i.e. "MAIL From <>"). If this option is disabled or if the server does not allow a NULL From, then SecurityGateway will use the "Send message from this address:" value designated above. If a sender fails callback verification: When the callback verification test indicates that the sender's address is invalid, the message can be refused, quarantined, or accepted and optionally tagged and have its Message Score 109 adjusted. Select the option below that you wish to use for messages that fail callback verification. ...refuse the message When this option is selected, messages with senders who fail callback verification will be refused during the SMTP session. ...quarantine the message Choose this option if you wish to quarantine messages that fail callback verification. This is the default option. ...accept the message Use this option if you wish to accept a message that fails callback verification but wish to adjust its message score or add some text to the subject. ...tag the subject with [ text ] Click this option and specify some text if you wish to add something to the beginning of the message's Subject header when the sender's email address fails the callback verification test. By default this option is disabled. If you enable it, then "*** CBV ***" is added to the subject by default, but you can edit that text if you choose. There are a number of other places within SecurityGateway where you can optionally add text to the Subject header. For example, the Message Scoring 109 and URI Blacklists (URIBL) 99 pages also have this option. When the designated text in these options matches, the text will only be added to a message's subject once even if that message meets the Copyright © 2007-2014. All rights reserved. Alt-N Technologies, Ltd. Security 131 criteria under each option. If, however, you change the text in one or more places then that customized text will be added as well. So, for example, if you set the text under all three of these options to "*SPAM*" then that text would only be added to the subject once, regardless of whether or not it matched the criteria under more than one of the options. But, if you changed the DNSBL optional text to "*DNS blacklisted*" and the message matched the criteria under that option and the others then the subject would have both "*SPAM*" and "*DNS blacklisted*" added to it. ...add [xx] points to message score By default a message that fails the callback verification check will have its Message Score adjusted by 1.0 points. You can adjust this value if you choose, or you can disable the option if you do not wish callback verification to affect the score. Even when SecurityGateway is configured to accept a message rather than refuse or quarantine it, it could still be refused or quarantined if its Message Score ends up being sufficiently high, depending on how you have configured the other Security 82 options and the options on the Message Scoring 109 page. Exclusions Exclude messages from whitelisted senders Messages from whitelisted senders 159 are exempt from callback verification checks by default. Disable this option if you do not wish to exclude whitelisted senders from callback verification requirements. Exclude messages from authenticated sessions By default, messages being sent over authenticated sessions are excluded from callback verification requirements. Uncheck this box if you wish to verify senders even when the session is authenticated. Exclude messages from local senders Messages from your local senders are excluded from Callback Verification by default. Clear this checkbox if you do not wish to exempt local senders. Exceptions - Domains If you select a specific domain in the "For Domain:" drop-down list box at the top of the page when configuring these settings, that domain will be listed here after saving the settings. Click the View/Edit link for the corresponding domain to review or edit its Callback Verification settings, or click Reset to reset the domain's settings to the default Global values. Copyright © 2007-2014. All rights reserved. Alt-N Technologies, Ltd. 132 SecurityGateway for Email Servers v3.0 4.4 Anti-Abuse The Anti-Abuse section under the Security 82 menu contains tools to help you prevent others from abusing or improperly using your email system to relay spam messages, use large amounts of bandwidth, connect to your server too frequently, and the like. There are six items under the Anti-Abuse section: Relay Control 133 - When a message arrives that is neither to nor from a local domain, SecurityGateway is being asked to deliver, or relay, the message on behalf of some third party. The settings on the Relay Control page govern who is allowed to do that. Relay Control also has options for designating whether or not the address passed during the SMTP MAIL or RCPT command must exist when it contains a local domain. SMTP Authentication 134 - This page governs the SMTP-AUTH options, which extend SMTP to include an authentication step. This effectively allows users to log in to the server when sending messages, thus ensuring that their identity is known and valid. SMTP Authentication allows you to skip many other security steps designed to catch spammers or other unauthorized users attempting to relay mail through your server by using a forged identity. IP Shielding 135 - The IP Shield is a list of domain names with associated IP addresses that will be checked during the SMTP MAIL FROM command. An SMTP connection claiming to be from someone at one of the listed domains will be honored only if the IP address of the sending server matches one of the permitted IP addresses listed for that domain. Dynamic Screening 136 - Using this feature, SecurityGateway can track the behavior of sending servers to identify suspicious activity and then respond accordingly. For example, with Dynamic Screening you can ban an IP address from future connections to your server once a specified number of "unknown recipient" errors occur during a mail session with that IP address. You can ban senders that connect to your server more than a specified number of times in a specified number of minutes, and you can also ban senders that fail authentication attempts more than a designated number of times. However, a Dynamic Screening ban is not permanent. The IP address is banned only for the number of minutes that you specify, and each IP address and the amount of time that has passed since its ban is listed. Tarpitting 138 - Tarpitting makes it possible for you to deliberately slow down a connection once a specified number of RCPT commands have been received from a message's sender. This is to discourage spammers from trying to send unsolicited bulk email ("spam") to your domains. You can specify the number of RCPT commands allowed before tarpitting begins and the number of seconds to delay the connection each time a subsequent RCPT command is received from that host during the connection. The reasoning behind this technique is that if it takes spammers an inordinately long period of time to send each message to you then that will discourage them from trying to do so again in the future. Bandwidth Throttling 139 - This feature makes it possible for you to police the consumption of bandwidth used by SecurityGateway, both globally and for individual domains. Using Bandwidth Throttling you can control the rate at which each inbound and outbound SMTP session progresses. Further, you can exclude whitelisted senders, Copyright © 2007-2014. All rights reserved. Alt-N Technologies, Ltd. Security 133 authenticated sessions, and your domain email servers from these restrictions. 4.4.1 Relay Control When a message arrives that is neither to nor from a local domain, SecurityGateway is being asked to deliver, or relay, the message on behalf of some third party. SecurityGateway does not allow indiscriminate open relaying, but you can use the settings on this page to allow relaying for your domain mail servers 52 if necessary. Relay Control also has options for designating whether or not the address passed during the SMTP MAIL or RCPT command must exist when it contains a local domain. Mail Relaying This server does not 'relay' messages... SecurityGateway will not relay messages that are neither to nor from one of its domains, because spammers exploit open relay servers to hide their tracks, and therefore relaying mail indiscriminately could result in your domain being blacklisted by one or more DNSBL 95 services. ...unless sent from domain mail server Click this option if you wish to go ahead and relay messages if they are neither to nor from one of your domains but are being sent by one of your domain mail servers 52 . This option is disabled by default. Only domain email servers can send local mail By default SecurityGateway will only accept messages FROM a local domain when the sending server is one of the domain email servers 52 designated for that domain. Clear this checkbox if you do not wish to restrict the sending of local mail to each domain's designated email servers. ...unless message is TO a local account By default, when a message FROM a local domain is not being sent by one of the domain's designated email servers, SecurityGateway will still accept the message if it is also TO a local recipient. Uncheck this option if you do not wish to exempt messages that are TO local recipients. ...unless sent via authenticated SMTP session When a message from a local domain is not being sent by one of the domain's designated email servers, SecurityGateway will still accept the message if this option is enabled and the message is being sent over an authenticated session. An example of this would be a local user sending his outbound email directly through SecurityGateway rather than through the domain email server. This option is disabled by default. ...unless sent from whitelisted IP address or host Click this option if you wish to allow local mail to be sent from whitelisted 159 IP addresses and hosts, even when the sending server is not one of your domain email servers 52 . This option is disabled by default. Copyright © 2007-2014. All rights reserved. Alt-N Technologies, Ltd. 134 SecurityGateway for Email Servers v3.0 Account Verification SMTP MAIL address must exist if it uses a local domain By default SecurityGateway will verify that the MAIL value (i.e. the sender) passed during the SMTP process points to an actual valid account when the message is purported to be from a local domain. If the address does not exist then the message will be refused. ...unless sent from whitelisted IP address or host Click this option if you wish to exempt a message from the "SMTP MAIL address must exist..." option when it is being sent from a whitelisted 159 IP address or host. This is disabled by default. ...unless sent via authenticated SMTP session Click this option if you wish to exempt a message from the "SMTP MAIL address must exist..." option when it is being sent via an authenticated SMTP mail session. This option is disabled by default. ...unless sent via domain email server Click this option if you wish to exempt a message from the "SMTP MAIL address must exist..." option when it is being sent from a domain mail server 52 . This is disabled by default. SMTP RCPT address must exist if it uses a local domain SecurityGateway will verify that the RCPT value (i.e. the recipient) passed during the SMTP process points to an actual valid account when the message is purported to be for a local domain. If the address does not exist then the message will be refused. 4.4.2 SMTP Authentication The settings on this page govern SMTP-AUTH, which extends SMTP to include an authentication step. This effectively allows users to log in to the server when sending messages, thus ensuring that their identity is known and valid. SMTP Authentication allows you to skip many other security steps designed to catch spammers or other unauthorized users attempting to relay mail through your server by using a forged identity. SMTP Authentication Authentication is always required when mail is from local accounts Click this checkbox if you wish to require authentication whenever a message is purported to be from a local account. If the SMTP session is not authenticated then the message will be refused. This option is disabled by default. ...unless message is to a local account When you have enabled the Authentication is always required when mail is from local accounts option above, click this option if you wish to exempt messages from that requirement when the recipient is a local account. In other words, when a message from a local address is also to a local address, authentication will not be required. This option is disabled by default. Copyright © 2007-2014. All rights reserved. Alt-N Technologies, Ltd. Security 135 ...unless message is from a domain mail server Click this option if you wish to exempt messages from the Authentication is always required when mail is from local accounts option when they come from one of your domain mail servers 52 . Authentication credentials must match those of the email sender Use this option if you wish to require a sender to use only his own credentials for authentication. So, for example, [email protected] would only be allowed to authenticate using the [email protected] account credentials. If he attempted to authenticate using [email protected] then it would not be allowed, even if the [email protected] credentials were valid. This option is disabled by default. Mail from 'postmaster', 'abuse', 'webmaster' requires authentication When an email claims to be from postmaster, abuse, or webmaster at one of your local domains, authentication is required by default. This is because many spammers and unauthorized users know that those accounts or aliases exist on servers and attempt to use them to relay mail or pose as one of those authoritative addresses. Exceptions - Domains If you select a specific domain in the "For Domain:" drop-down list box at the top of the page when configuring these settings, that domain will be listed here after saving the settings. Click the View/Edit link for the corresponding domain to review or edit its SMTP Authentication settings, or click Reset to reset the domain's settings to the default Global values. 4.4.3 IP Shielding The IP Shield is a list of domain names with associated IP addresses that will be checked during the SMTP MAIL FROM command. An SMTP connection claiming to be from someone at one of the listed domains will be honored only if the IP address of the sending server matches one of the permitted IP addresses listed for that domain. Currently defined domain/IP pairs This is the list of domains and associated IP addresses that will be checked when a message is purported to be from one of those domains. The IP address of the server delivering the message must be listed for the corresponding domain. Exclude messages to valid local users By default when a message is addressed to a valid local user the server delivering the message will not be checked against the IP shield. Clear this checkbox if you do not wish to exclude messages from IP Shielding when they are addressed to local users. New To add a new domain/IP address entry to the list, click New. This will open the IP Shield Entry page. Edit To edit an existing entry, double-click that entry or select it from the list and click Copyright © 2007-2014. All rights reserved. Alt-N Technologies, Ltd. 136 SecurityGateway for Email Servers v3.0 Edit. This will open that entry in the IP Shield Entry page. Delete To delete an entry from the list, select the entry and click Delete. IP Shield Entry Domain & IP Information This is the page that will open when creating a new IP Shield entry or editing an existing one. Save and Close After adding or editing the domain, IP address, and any comments associated with an IP Shield entry, click Save and Close to save the entry and go back to the IP Shielding page. Close Click Close to go back to the IP Shielding page without saving any information or changes you may have made to the IP Shield Entry page. Domain Enter the domain name here that you wish to add to the IP Shield. IP Address Enter the IP address that will be associated with the domain listed above. When a message claims to be from this domain then the IP address of the server delivering the message must match this one. Comment Use this area for listing any comments associated with the entry. 4.4.4 Dynamic Screening Using the Dynamic Screening feature, SecurityGateway can track the behavior of sending servers to identify suspicious activity and then respond accordingly. For example, with Dynamic Screening you can ban an IP address from future connections to your server once a specified number of "unknown recipient" errors occur during a mail session with that IP address. You can ban senders that connect to your server more than a specified number of times in a specified number of minutes, and you can also ban senders that fail authentication attempts more than a designated number of times. However, a Dynamic Screening ban is not permanent. The IP address is banned only for the number of minutes that you specify on this page, and each IP address and the amount of time that has passed since its ban is listed in the Blocked IP List at the bottom of the page. Automatic IP Screening Enable Dynamic Screening Click this option to activate the Dynamic Screening feature. Dynamic Screening is Copyright © 2007-2014. All rights reserved. Alt-N Technologies, Ltd. Security 137 disabled by default. Ban senders who cause this many failed RCPT attempts: When Dynamic Screening is enabled, an IP address will be temporarily banned when a designated number of RCPT attempts from it fail during an SMTP session. It is a common tactic of spammers to send many RCPT commands, many of which will be invalid addresses. The default value for this option is 10. Ban senders that connect more than [xx] times in [xx] minutes This option designates how many times someone is allowed to connect to SecurityGateway in a given number of minutes. If they exceed that number of connections in the specified time then they will be temporarily banned. This option is disabled by default. Ban senders that fail this many authentication attempts: This is the number of times that a sender may fail to authenticate before being temporarily banned. Someone using an incorrect password is an example of something that would cause a failed authentication attempt. By default, if a sender fails to authenticate 3 times their IP address will be temporarily banned. Clear this checkbox if you do not wish to ban these senders, regardless of the number of failed attempts. Ban senders for this many minutes: This is the number of minutes that an IP address will be banned when it violates one of the restrictions above. The default length of time that an IP address will be banned is 10 minutes. Close SMTP session after banning sender When an IP address is banned, by default the SMTP session will be closed immediately. In other words, the session will not be allowed to continue through any further steps in the normal SMTP protocol; the connection will be cut. Clear this checkbox if you do not wish to immediately end the connection with a banned IP address. Exclusions Exclude messages from whitelisted IP addresses and hosts By default, all whitelisted 159 IP addresses and hosts are exempt from the Dynamic Screening restrictions. Clear this checkbox if you wish to require even whitelisted IPs and hosts to adhere to these restrictions. Exclude messages from authenticated sessions When an incoming message is being sent over an authenticated session, it will be exempt from the Dynamic Screening restrictions by default. Uncheck this box if you wish to apply the restrictions to authenticated sessions as well. Exclude messages from domain mail servers Messages coming from one of your domain mail servers 52 are exempt from Dynamic Screening by default. Clear this checkbox if you do not wish to exclude domain mail servers from Dynamic Screening restrictions. Copyright © 2007-2014. All rights reserved. Alt-N Technologies, Ltd. 138 SecurityGateway for Email Servers v3.0 Blocked IP List This area lists all currently banned IP addresses and the amount of time that has passed since each was banned. You can remove an entry from the list by selecting it and clicking the delete button on the toolbar above the list. 4.4.5 Tarpitting Tarpitting makes it possible for you to deliberately slow down a connection once a specified number of RCPT commands have been received from a message's sender. This is to discourage spammers from trying to send unsolicited bulk email ("spam") to your domains. You can specify the number of RCPT commands allowed before tarpitting begins and the number of seconds to delay the connection each time a subsequent RCPT command is received from that host during the connection. The reasoning behind this technique is that if it takes spammers an inordinately long period of time to send each message to you then that will discourage them from trying to do so again in the future. Tarpit Settings Activate tarpitting Click this checkbox to activate the Tarpitting feature. Tarpitting is disabled by default. SMTP EHLO/HELO delay (in seconds): Use this option to delay the SecurityGateway's response to EHLO/HELO SMTP commands. Delaying the responses by even as little as ten seconds can potentially save a significant amount of processing time by reducing the amount of spam received. Frequently spammers depend on rapid delivery of their messages and therefore do not wait long for a response to EHLO/HELO commands. With even a small delay, spam tools will sometimes give up and move on rather than wait for a response. Connections on the MSA port (designated on the Email Protocol 60 page) are always exempt from this delay. The default setting for this option is "0", meaning EHLO/HELO will not be delayed. Authenticated IPs experience a single HELO/EHLO delay per day When you have designated an EHLO/HELO delay, an IP address over which an authenticated SMTP session has taken place will experience only a single delay per day. This delay occurs right before the first time the session is authenticated. This option is disabled by default. SMTP RCPT tarpit threshold: Use this option to specify the number of SMTP RCPT commands that you wish to allow for a given host during a mail session before SecurityGateway will begin tarpitting, or delaying, that host. For example, if this number is set to 10 and a sending host attempts to send a message to 20 addresses (i.e. 20 RCPT commands), then SecurityGateway will allow the first 10 normally and then pause after each subsequent command for the number of seconds specified in the SMTP RCPT tarpit delay option below. The default value for this option if 5. Copyright © 2007-2014. All rights reserved. Alt-N Technologies, Ltd. Security 139 SMTP RCPT tarpit delay (in seconds): Once the SMTP RCPT tarpit threshold is reached for a host, this is the number of seconds that SecurityGateway will pause after each subsequent RCPT command is received during the mail session with that host. Each subsequent RCPT command will be delayed 10 seconds by default. Scaling Factor: This value is a multiplier by which the base tarpit delay will be increased over time. When the tarpit threshold is reached and the tarpit delay is applied to a session, each delay will be multiplied by this value to determine to length of the next delay in the session. For example, if the tarpit delay is set to 10 and the scaling factor is set to 1.5 then the first delay will be 10 seconds, the second will be 15 seconds, the third 22.5, then 33.75, and so on (i.e. 10 x 1.5 = 15, 15 x 1.5 = 22.5, etc.). The default Scaling factor is 1, meaning that the delay will not be increased. Exclusions Exclude messages from whitelisted senders By default all messages coming from whitelisted 159 senders are excluded from tarpitting restrictions. Clear this checkbox if you wish to subject whitelisted senders to the tarpitting rules as well. Exclude messages from authenticated sessions Messages coming in over authenticated sessions are exempt from tarpitting by default. Uncheck this box and the tarpitting restrictions will also apply to those messages. Exclude messages from domain mail servers Messages coming from one of your domain mail servers 52 are exempt from Tarpitting by default. Clear this checkbox if you do not wish to exclude domain mail servers from Tarpitting restrictions. 4.4.6 Bandwidth Throttling Bandwidth Throttling makes it possible for you to police the consumption of bandwidth used by SecurityGateway, both globally and for individual domains. Using Bandwidth Throttling you can control the rate at which each inbound and outbound SMTP session progresses. Further, you can exclude whitelisted senders, authenticated sessions, and your domain email servers from these restrictions. The Bandwidth Throttling system is calibrated in kilobytes (KB) per second, with default values of 10 for both inbound and outbound SMTP sessions (although both options are disabled by default). Up to 8 KB of data can be sent/received before Bandwidth Throttling takes effect. Therefore this could exceed your limits, depending upon the amounts you have designated below. Copyright © 2007-2014. All rights reserved. Alt-N Technologies, Ltd. 140 SecurityGateway for Email Servers v3.0 Bandwidth throttling Limit inbound SMTP connections to: [xx] KB per second Click this option if you wish to limit the bandwidth of inbound SMTP sessions. The default value of this option is 10 KB per second, but it is disabled by default. Limit outbound SMTP connections to: [xx] KB per second Click this option if you wish to limit the bandwidth of outbound SMTP sessions. The default value of this option is 10 KB per second, but it is disabled by default. Exclusions Exclude messages from whitelisted senders Enable this option if you wish to exempt all whitelisted senders 159 from the Bandwidth Throttling restrictions. This option is disabled by default. Exclude messages from authenticated sessions Use this option if you wish to exclude a session from the Bandwidth Throttling restrictions when the session is authenticated. This option is disabled by default. Exclude domain mail servers Check this box if you wish to exclude your domain mail servers Throttling restrictions. This option is disabled by default. 52 from the Bandwidth Exceptions - Domains If you select a specific domain in the "For Domain:" drop-down list box at the top of the page when configuring these settings, that domain will be listed here after saving the settings. Click the View/Edit link for the corresponding domain to review or edit its Bandwidth Throttling settings, or click Reset to reset the domain's settings to the default Global values. 4.5 Filtering 4.5.1 Message Content This page is used to manage your Message Content Filter Rules. From here you can create, edit, and delete your rules, and you can quickly enable or disable any rule by clicking a single checkbox in its entry. Filter rules can be used to designate certain criteria by which SecurityGateway will test each message it processes. Then, when a message matches a rule, a number of actions can be taken. You can create rules to check for the existence of specific headers, check for certain senders or recipients, search for specific text in a header or the message body, test against the size of the message, and many other things. When a message matches a rule's test, the rule can cause the messages to be refused, deleted, quarantined, copied or redirected to a different address, and more. The Content Filter Rules list has three columns: Enabled, Description, and Preview. The Enabled column contains a checkbox for each entry, which can be used to quickly Copyright © 2007-2014. All rights reserved. Alt-N Technologies, Ltd. Security 141 enable/disable the rule. The Description column contains the Rule Name, which you designate when creating a rule. The Preview column contains an icon for each rule, which will display a tooltip about the rule when you hover your pointer over it. The tooltip contains the actual Sieve Script 167 that was generated for the rule when it was created with the Content Filter Rule Editor 141 . The toolbar at the top of the page contains the following fours options: New Click New to open the Content Filter Rule Editor 141 , used for creating a new rule. Edit Select a rule and then click Edit on the toolbar to open it in the Content Filter Rule Editor 141 . Alternatively, you can simply double-click a rule to open it. Delete To delete one or more rules, select the entries from the list and then click Delete. A box will open asking you to confirm the decision to delete them. You can select multiple entries by using the Ctrl and Shift keys. For Domain: Use the For Domain: drop-down list box to choose which rules to display in the list. You can display Global rules, which apply to all domains, or you can display rules for specific domains. Content Filter Rule Editor The Content Filter Rule Editor is used to create new rules or edit existing ones. To create a new rule, click New on the Content Filter Rules toolbar and then step through the options on the editor from top to bottom, one option at a time. When you are finished, click Save and Close to create the new rule. This rule is enabled This box must be checked to create a new rule. For existing rules, you can uncheck the box to disable the rule. Disabled rules will not be used by SecurityGateway when testing messages. This option corresponds to the Enabled column in the Content Filter Rules list. For domain: Use this option to choose the domain to which this rule will apply. If "--Global--" is selected, all messages to or from all of your SecurityGateway domains will be tested against the rule. If a specific domain is selected then only messages to or from that specific domain will be tested against it. Rule name: Enter a descriptive name for your rule here. This options corresponds to the Description column in the Content Filter Rules list. Copyright © 2007-2014. All rights reserved. Alt-N Technologies, Ltd. 142 SecurityGateway for Email Servers v3.0 Apply this rule if: All conditions are met (AND) Choose this option if you want a message to match a rule ONLY when it meets ALL of the test conditions you supply below. This is performing a logical "AND" on the test conditions. In other words, "if condition A is true AND condition B is true, then perform the specified action." Any conditions are met (OR) Choose this option if you want a message to match a rule when it meets ANY of the test conditions you supply below. This is performing a logical "OR" on the test conditions. In other words, "if condition A is true OR condition B is true, then perform the specified action." Conditions: This box will display all of the test conditions that you have supplied for a rule, followed by the action that will be taken if a message matches the rule. You can edit any condition by clicking that condition in the box. You can remove any condition by clicking "(Remove)" next to the condition. Use the "Click here to add a condition for this rule" link below the box to add a new condition. Click here to add a condition for this rule Click the "Click here to add a condition for this rule" link below the Conditions box to add a condition. After adding a condition, you can add additional conditions by clicking that link again. For information on the different types of conditions you can add, see Rule Conditions 142 below. Action: Choose the action from this list that you wish to be performed when a message matches the rule's conditions. If additional data is required for a selected action, a corresponding control will appear below the action for you to enter that data. For information on the different types of actions that can be performed, see Actions 145 below. After you have set all of the conditions for your rule and selected an action, click Save and Close to close the editor and add the new rule to the list. Rule Conditions When you wish to add a test condition to a rule, you will use the "Click here to add a condition for this rule" link to open the Rule Conditions screen. When using this screen to create a test condition, you must first specify the message attribute, or item, that you wish to test or compare. Then, you must specify how to test or compare that item: does the item contain certain text, is it exactly equal to certain text, does a certain header exist, and so on. There are six items that can be tested and nine common ways to test them. Plus, three of the items have two additional ways to test. After selecting an item and test method and entering any required information, click Save and Close to add the test condition to your rule. Item to compare: This list contains the following items that you can test in a message: MAIL (From)—This test uses the value passed in the SMTP "MAIL From" command. This is who the message is from, but it will not necessarily be the Copyright © 2007-2014. All rights reserved. Alt-N Technologies, Ltd. Security 143 same information that is contained in the message's From header. Sometimes the From header will contain additional or different information. In addition to the nine common ways to test or compare items (see below), this item can also be compared using the "Is local user" and "Is not local user" tests. RCPT (To)—This test uses the value passed in the SMTP "RCPT To" command. This is who the message is to, but it will not necessarily be the same information that is contained in the message's To header. Sometimes the To header will contain additional or different information. In addition to the nine common ways to test or compare items (see below), this item can also be compared using the "Is local user" and "Is not local user" tests. IP—Select this item to test against the IP address of the sending server or client. Header—Select this item if you wish to specify a header to compare. When selected, a Name of header option will appear for you to specify which header to use for this test condition. In addition to the nine common ways to test items, this item can also be compared using the "Header exists" and "Header does not exist" tests. NOTE: when specifying the Name of header, do not use a colon in the header name. For example, use "From" as the Name of header, not "From:" if you wish to compare against the From header. Subject—This is the message's Subject header. Select this item if you wish to test against the subject of the message. Body—Choose Body if you wish to use the message body as the test item to compare. How to compare: This list contains the methods that can be used to test or compare the item selected in the Item to compare option above. There are nine ways to test that are common to all of the items. Mail (From), RCPT (To), and Header each have two additional ways to test. Common test methods: Each of these test methods compares the item selected in Item to compare above to the Search value that you will specify below the How to compare method selected. All of these types of comparison are available for all of the Item to compare options above. Contains—When this method is selected, the comparison will match or be "True" if the Search value is a substring or part of the Item to compare designated above. For example, if you select MAIL (From) as the item to compare, then choose Contains as the method of comparison, with "example.com" as the Search value, then any message from an address containing "example.com" will match the condition. Does not contain—This comparison will match or be "True" if the Search value is NOT a substring or part of the Item to compare designated above. For example, if you select MAIL (From) as the item to compare, then choose Does not contain as the method of comparison, with "@example.com" as the Search value, then every message EXCEPT those from an address at "example.com" will match the condition. Copyright © 2007-2014. All rights reserved. Alt-N Technologies, Ltd. 144 SecurityGateway for Email Servers v3.0 Is equal to—This method is similar to Contains above, except that the Search value must match the value of the Item to compare exactly, rather than simply be a part of that value. For example, if you select IP as the item to compare, then choose Is equal to as the method of comparison, with "192.168.0.1" as the Search value, then ONLY messages coming from that exact IP address will match the condition. Is not equal to—This type of comparison is the opposite of the previous method. If the value of the Item to compare is NOT exactly the same as the Search value, then the comparison will be true. For example, if you select IP as the item to compare, then choose Is not equal to as the method of comparison, with "192.168.0.1" as the Search value, then every message EXCEPT those coming from that exact IP address will match the condition. Starts with—Use this type of comparison if you wish to consider a condition to be true when the Search value matches the beginning of the value of the Item to compare designated above. For example, if you select Subject as the item to compare and "[allstaff]" as the Search value, then all messages with a Subject line beginning with "[allstaff]" will match the condition. Does not start with—This is the opposite of the previous comparison type. Use this option if you wish to consider a condition to be true when the Search value DOES NOT match the beginning of the value of the Item to compare designated above. For example, if you select Subject as the item to compare and "[allstaff]" as the Search value, then all messages EXCEPT those with a Subject line beginning with "[allstaff]" will match the condition. Ends with—This comparison means the condition will match whenever the value of the Item to compare ends with the Search value. For example, if you select RCPT (To) as the item to compare and Ends with as the comparison method, with ".cn" as the Search value, then ALL messages to anyone with an address ending with ".cn" will match the condition. Does not end with—This comparison means the condition will match whenever the value of the Item to compare DOES NOT end with the Search value. For example, if you select RCPT (To) as the item to compare and Ends with as the comparison method, with ".cn" as the Search value, then all messages EXCEPT those to addresses ending with ".cn" will match the condition. Matches regular expression—Choose this option if you wish to use a Regular Expression 147 when comparing the item selected in the Item to compare option above. Additional test methods: Is local user—This comparison method is only available for the MAIL (From) and RCPT (TO) options above. Choose this option when you want the condition to match or be "True" when the address is a local SecurityGateway user. For example, if you select MAIL (From) as the Item to compare, then only message from local users will match the condition. Is not local user—This comparison method is only available for the MAIL Copyright © 2007-2014. All rights reserved. Alt-N Technologies, Ltd. Security 145 (From) and RCPT (TO) options above. Choose this option when you want the condition to match or be "True" when the address is NOT a local SecurityGateway user. For example, if you select MAIL (From) as the Item to compare, then all messages from remote users will match the condition; messages from local users will NOT match. Header exists—This option is only available when have selected Header as the Item to compare. When you select this option and specify the Name of header in the option provided, the condition will match only if the specified header exists in the message. For example, if you specify "X-My-CustomHeader" as the Name of header, then all messages with that header will match the condition. Any message without that header will not match. Header does not exist—This option is only available when have selected Header as the Item to compare. When you select this option and specify the Name of header in the option provided, the condition will match only if the specified header DOES NOT exist in the message. For example, if you specify "X-My-Custom-Header" as the Name of header, then all messages WITHOUT that header will match the condition. Any message with that header will not match. Actions After setting all of the conditions for your rule, use the Action option on the Content Filter Rule Editor to choose the action that will be taken when a message matches the rule's conditions. There are seven actions to choose from: Reject—Choose this action if you wish to reject a message that matches the conditions of the rule. When this option is selected, an SMTP Response option will appear below the action so that you can specify a text response to send when the message is rejected. For example, if you used, "We don't want your spam!" in the SMTP Response option, SecurityGateway will send, "550 We don't want your spam!" during the SMTP process when it rejects a message that matches the rule. Discard—This action causes a message to be discarded when it matches the rule's conditions. Unlike the Reject action, this option does not send an SMTP response, nor does it send a delivery failure message; the message is simply deleted. Quarantine—When this action is selected, messages matching the rule's conditions will be placed into the recipient's Quarantine 190 when the recipient is a local user. If the recipient is a remote user, the message will be placed into the Administrative Quarantine 191 instead. Administrative Quarantine—Choose this action if you wish to send a message to the Administrative Quarantine 191 when it matches the rule's conditions. Redirect—Using this action redirects the message to a different address when it matches the rules's conditions. A To option is provided below the Action so that you can specify the email address to which to redirect the message. Redirected messages will NOT be delivered to the original recipient...they are rerouted to the address specified in the action. Copy—Use this option if you wish to copy a message to an additional email Copyright © 2007-2014. All rights reserved. Alt-N Technologies, Ltd. 146 SecurityGateway for Email Servers v3.0 address. A To option is provided below the Action so that you can specify the additional email address to which to send the message. This is similar to Redirect except that both the original recipient and the address specified in the Action will receive a copy of the message. If you wish to copy a message to multiple addresses, make an additional rule for each address. Send Note (Alert)—Use this action to send a note or alert email message to someone when a message matches the rule's conditions. When this action is selected, options are provided for you to specify the note's To, From, Subject, and Message Text (the body of the message). There are a number of macros that you can use in the note to include certain information dynamically. When SecurityGateway encounters a macro in the note's text, it will replace that macro with its corresponding value. You can use the following macros: $SENDER$—This is replaced by the SMTP MAIL From address that was used for the message that matched the rule. For example, "[email protected]". $SENDERMAILBOX$—This macro is replaced by only the mailbox portion of the email address that was passed in the SMTP MAIL From command. For example, "sender" from the "[email protected]" address. $SENDERDOMAIN$—This macro is replaced by only the domain portion of the email address that was passed in the SMTP MAIL From command. For example, "example.net" from the "[email protected]" address. $RECIPIENT$—This is replaced by the SMTP RCPT To address that was used for the message that matched the rule. For example, "[email protected]".. $RECIPIENTMAILBOX$—This macro is replaced by only the mailbox portion of the email address that was passed in the SMTP RCPT To command. For example, "recipient" from the "[email protected]" address. $RECIPIENTDOMAIN$—This macro is replaced by only the domain portion of the email address that was passed in the SMTP RCPT To command. For example, "example.com" from the "[email protected]" address. $SUBJECT$—This macro is replaced by the contents of the matched message's Subject header. $MESSAGEID$—This is replaced by value of the message's Message-ID header. $DATESTAMP$—This macro is replaced by the message's Date. $CURRENTTIME$—This is replaced by the current time when SecurityGateway creates the note. $HELONAME$—This is the HELO domain that was passed during the SMTP process when the matched message was received by SecurityGateway. Add to message score—Use this action if you wish to add a specific number of points to the message score when a message matches the rule's conditions. Copyright © 2007-2014. All rights reserved. Alt-N Technologies, Ltd. Security 147 Regular Expressions The Content Filter Rule Conditions 142 support "Matches regular expression" as a comparison method. Regular Expressions (regexp) is a versatile system that makes it possible for you to search not only for specific text strings, but also for text patterns. A regexp text pattern consists of a combination of special characters known as metacharacters and alphanumeric text characters, or "literals" (i.e. abc, 123, and so on). The pattern is used to match against text strings—with the result of the match being either successful or not. SecurityGateway's regexps implementation uses the PERL Compatible Regular Expression (PCRE) library. You can find more information on this implementation of regexps at: http:// www.pcre.org/ and http://perldoc.perl.org/perlre.html. For a comprehensive look at regular expressions, see: Mastering Regular Expressions, Third Edition published by O'Reilly Media, Inc. Metacharacters Metacharacters are special characters that have specific functions and uses within regular expressions. The regexp implementation within SecurityGateway's allows the following metacharacters: \ | () [] ^ $ * + ? . Metacharacter Description \ When used before a metacharacter, the backslash ( "\" ) causes the metacharacter to be treated as a literal character. This is necessary if you want the regular expression to search for one of the special characters that are used as metacharacters. For example, to search for "+" your expressions must include "\+". | The alternation character (also called "or" or "bar") is used when you want either expression on the side of the character to match the target string. The regexp "abc|xyz" will match any occurrence of either "abc" or "xyz" when searching a text string. [...] A set of characters contained in brackets ("[" and "]") means that any character in the set may match the searched text string. A dash ("-") between characters in the brackets denotes a range of characters. For example, searching the string "abc" Copyright © 2007-2014. All rights reserved. Alt-N Technologies, Ltd. 148 SecurityGateway for Email Servers v3.0 with the regexp "[a-z]" will yield three matches: "a," "b, " and "c. " Using the expression "[az]" will yield only one match: "a." ^ [^...] (...) Denotes the beginning of the line. In the target string, "abc ab a" the expression "^a" will yield one match—the first character in the target string. The regexp "^ab" will also yield one match—the first two characters in the target string. The caret ("^") immediately following the left-bracket ("[") has a different meaning. It is used to exclude the remaining characters within brackets from matching the target string. The expression "[^0-9]" indicates that the target character should not be a digit. The parenthesis affects the order of pattern evaluation, and also serves as a tagged expression that can be used in search and replace expressions. The results of a search with a regular expression are kept temporarily and can be used in the replace expression to build a new expression. In the replace expression, you can include a "&" or "\0" character, which will be replaced by the sub-string found by the regular expression during the search. So, if the search expression "a(bcd)e" finds a sub-string match, then a replace expression of "123-&-123" or "123-\0-123" will replace the matched text with "123-abcde-123". Similarly, you can also use the special characters "\1," "\2," "\3," and so on in the replace expression. These characters will be replaced only be the results of the tagged expression instead of the entire substring match. The number following the backslash denotes which tagged expression you wish to reference (in the case of a regexp containing more than one tagged expression). For example, if your search expression is "(123)(456)" and your replace expression is "a-\2-b-\1" then a matching sub-string will be replaced with "a-456-b-123" whereas a replace expression of "a-\0-b" will be replaced with "a123456-b" $ The dollar sign ("$") denotes the end of the line. In the text string, "13 321 123" the expression "3$" will yield one match—the last character in the string. The regexp "123$" will also yield one match—the last three characters in the target string. Copyright © 2007-2014. All rights reserved. Alt-N Technologies, Ltd. Security * The asterisk ("*") quantifier indicates that the character to its left must match zero or more occurrences of the character in a row. Thus, "1*abc" will match the text "111abc" and "abc." + Similar to the asterisk quantifier, the "+" quantifier indicates that the character to its left must match one or more occurrences of the character in a row. Thus, "1+abc" will match the text "111abc" but not "abc." ? The question mark ("?") quantifier indicates that the character to its left must match zero or one times. Thus, "1*abc" will match the text "abc," and it will match the "1abc" portion of "111abc." . The period or dot (".") metacharacter will match any other character. Thus ".+abc" will match "123456abc," and "a.c" will match "aac," abc," acc," and so on. 149 4.5.2 Attachments You can use the options on this page to designate specific types of files that will cause a message to be either blocked or quarantined when one of those files is attached. You can define the filtering restrictions both globally and per domain. Attachments to Block Specify file types in this section that you wish to block. When a message has one of these file types attached it will be refused during the SMTP process. If you list the same file type in both the Block and Quarantine section, messages containing attachments of that type will be blocked, they will not be quarantined. Add To add a new file type to the block list, enter it here and click Add. Remove To remove a file type from the block list, select the file from the list and click Copyright © 2007-2014. All rights reserved. Alt-N Technologies, Ltd. 150 SecurityGateway for Email Servers v3.0 Remove. You can select multiple files by pressing CTRL while selecting them. Suggestions These links provide a quick way to add common file types to the block list. Simply click a link and those types of files will be added. Block executable files: This link adds APP, CMD, COM, DMG, EXE, HTA, PIF, SCR, and VBS to the block list. Block image files: Clicking this link adds the following image file types to the block list: BMP, GIF, JPG, PNG, TIF, TIFF. Block movie files: Click this link to block these movie file types: 3GP, ASX, AVI, DIVX, M4U, MOV, MP4, MPEG, MPG, QT, RM, RTS, SWF, WM, WMV. Block audio files: This link blocks the following audio file types: AAC, AIF, AIFF, AU, CDR, M3U, M4A, MID, MIDI, MOD, MP3, OGG, RA, WAV, WAVE. Block compressed files: This link adds these file compression types to the block list: GZ, GZIP, RAR, TAR, TAR.GZ, TGZ, ZIP. Attachments to Quarantine Specify file types in this section that you wish to quarantine. When a message has one of these file types attached it will be accepted but then quarantined. If you list the same file type in both the Block and Quarantine section, messages containing attachments of that type will be blocked, they will not be quarantined. Add To add a new file type to the quarantine list, enter it here and click Add. Remove To remove a file type from the quarantine list, select the file from the list and click Remove. You can select multiple files by pressing CTRL while selecting them. Suggestions These links provide a quick way to add common file types to the quarantine list. Simply click a link and those types of files will be added. Quarantine executable files: This link adds APP, CMD, COM, DMG, EXE, HTA, PIF, SCR, and VBS to the quarantine list. Copyright © 2007-2014. All rights reserved. Alt-N Technologies, Ltd. Security 151 Quarantine image files: Clicking this link adds the following image file types to the quarantine list: BMP, GIF, JPG, PNG, TIF, TIFF. Quarantine movie files: Click this link to quarantine these movie file types: 3GP, ASX, AVI, DIVX, M4U, MOV, MP4, MPEG, MPG, QT, RM, RTS, SWF, WM, WMV. Quarantine audio files: This link quarantines the following audio file types: AAC, AIF, AIFF, AU, CDR, M3U, M4A, MID, MIDI, MOD, MP3, OGG, RA, WAV, WAVE. Quarantine compressed files: This link adds these file compression types to the quarantine list: GZ, GZIP, RAR, TAR, TAR.GZ, TGZ, ZIP. Exceptions - Domains If you select a specific domain in the "For Domain:" drop-down list box at the top of the page when configuring these settings, that domain will be listed here after saving the settings. Click the View/Edit link for the corresponding domain to review or edit its Attachment Filtering settings, or click Reset to reset the domain's settings to the default Global values. 4.6 Blacklists Blacklists are lists of email addresses, hosts, and IP addresses whose messages you wish to block or quarantine. By default those messages will be refused during the SMTP session, but on the Blacklist Action 159 page you can change this setting so that they will be quarantined instead. The action that will be taken can be set globally and for specific domains, and the blacklists themselves can also be set as global or domain specific. Further, although items are typically added to blacklists one at a time, each blacklist also has an import feature, which allows you to use a comma separated values (CSV) file to add multiple items at once. Finally, each list also has an export feature, which allows you to save the contents of the blacklist to a CSV file. There are three types of blacklists, all of which can be set globally and for specific domains: Addresses Blacklist 152 - Use this blacklist to block or quarantine messages that are from specific email addresses. Host Blacklist 154 - This blacklist is used to block or quarantine messages based on the specific hosts delivering them (e.g. mail.example.com, smtp.example.net, and so on). IP Blacklist 156 - The IP Blacklist blocks or quarantines messages based on the IP address of the host attempting to send them. Copyright © 2007-2014. All rights reserved. Alt-N Technologies, Ltd. 152 SecurityGateway for Email Servers v3.0 4.6.1 Addresses Use this blacklist to block or quarantine messages that are from specific email addresses. By default those messages will be refused during the SMTP session, but on the Blacklist Action 159 page you can change this setting so that they will be quarantined instead. The action that will be taken can be set globally and for specific domains, and the Addresses Blacklist itself can also be set as global or domain specific. Further, although items are typically added to this blacklist one at a time, it has an import feature that makes it possible for you to use a comma separated values (CSV) file to add multiple items at once. Finally, it also has an export feature that will allow you to save the contents of the blacklist to a CSV file. Adding Addresses to the Blacklist To add an address to the Addresses Blacklist, click New on the toolbar at the top of the page. This will open the Blacklist Entry 153 page for adding the address (see below). Editing a Blacklisted Address To edit one of the blacklisted addresses, double-click the entry you wish to edit, or select the desired entry and then click Edit on the toolbar at the top of the page. This will open that entry in the Blacklist Entry 153 page. Deleting Blacklisted Addresses To delete one or more of the blacklisted addresses, select the desired entries and then click Delete on the toolbar at the top of the page. You can select more than one entry by holding down the CTRL key while clicking each one. After clicking Delete, a confirmation box will pop up asking you if you are sure that you would like to delete the selected entries. Importing Addresses to the Blacklist To import a list of addresses to the Addresses Blacklist, click Import on the toolbar at the top of the page. This will open the Import List page. Use the Browse button on this page to navigate to the CSV file containing the addresses that you wish to import, and then click Import Lists. CSV File Formats You can use any text editor such as Notepad to create the CSV file for adding addresses to the blacklists. Simply create the file according to the format below and save it as filename.csv. The first line of each CSV file must be a mapping row, which allows the server to know in what order the data will appear. Each item in this file must be contained in quotes and separated by a comma. Importing addresses to the Global Blacklist: The Value column is for the email addresses you wish to blacklist, the Type column should say, "BlackListAddressGlobal", and the Comments column is for any notes you may wish to add regarding an entry, for your own reference. The Comments column is optional, but if you include it then use empty quotes for any entry for which you do not include a comment. Copyright © 2007-2014. All rights reserved. Alt-N Technologies, Ltd. Security 153 Example CSV file: "Value","Type","Comments" "[email protected]","BlackListAddressGlobal","This is a comment about the address." "[email protected]","BlackListAddressGlobal","" "[email protected]","BlackListAddressGlobal","This is another comment." Importing addresses to a specific domain's Addresses Blacklist: The Domain column is for the domain to which this blacklist belongs. For example, if you are wanting to add addresses to example.com's blacklist, then use "example.com" in the Domain column. The Value column is for the email addresses you wish to blacklist, the Type column should say, "BlackListAddressDomain", and the Comments column is for any notes you may wish to add regarding an entry, for your own reference. The Comments column is optional, but if you include it then use empty quotes for any entry for which you do not include a comment. Example CSV file: "Domain","Value","Type","Comments" "example.com","[email protected]","BlackListAddressDomain","This is a comment about the address." "example.com","[email protected]","BlackListAddressDomain","" "example.com","[email protected]","BlackListAddressDomain","This is another comment." Exporting Addresses from the Blacklist To export an Addresses Blacklist: 1. In the For Domain: drop-down list box, choose Global or a specific domain. 2. Click Export on the toolbar at the top of the page. This will open the File Download dialog. 3. Click Save. 4. Choose a file name and location for the file. 5. Click Save and then Close. Blacklist Entry This page is used for adding new addresses to the blacklist and for editing existing entries. It will be opened whenever you click New or Edit on the Addresses Blacklist. List Entry For Domain: Use this drop-down list box to add an address to a specific domain's blacklist, or choose Global if you wish to add the address to the global list. Copyright © 2007-2014. All rights reserved. Alt-N Technologies, Ltd. 154 SecurityGateway for Email Servers v3.0 Email Address: Enter the email address here whose messages you wish to block or quarantine. The settings on the Blacklist Action 159 page determine whether or not the messages will be blocked or quarantined. You can use an asterisk in the mailbox portion of the address to blacklist all addresses at that domain. For example, "*@example.org" would block or quarantine all messages from anyone at example.org. Comment: Use this area for any comments or notes you wish to make about this entry, for your own reference. Save and Close When you are finished with the entry, click Save and Close to save the entry to the blacklist. Close Click this button if you wish to close the Blacklist Entry page without saving it. 4.6.2 Hosts Use this blacklist to block or quarantine messages that are being delivered by specific hosts (for example, "mail.example.com"). By default those messages will be refused during the SMTP session, but on the Blacklist Action 159 page you can change this setting so that they will be quarantined instead. The action that will be taken can be set globally and for specific domains, and the Host Blacklist itself can also be set as global or domain specific. Further, although items are typically added to this blacklist one at a time, it has an import feature that makes it possible for you to use a comma separated values (CSV) file to add multiple items at once. Finally, it also has an export feature that will allow you to save the contents of the blacklist to a CSV file. Adding Hosts to the Blacklist To add a host to the Host Blacklist, click New on the toolbar at the top of the page. This will open the Blacklist Entry 156 page for adding the host (see below). Editing a Blacklisted Host To edit one of the blacklisted hosts, double-click the entry you wish to edit, or select the desired entry and then click Edit on the toolbar at the top of the page. This will open that entry in the Blacklist Entry 156 page. Deleting a Blacklisted Host To delete one or more of the blacklisted hosts, select the desired entries and then click Delete on the toolbar at the top of the page. You can select more than one entry by holding down the CTRL key while clicking each one. After clicking Delete, a confirmation box will pop up asking you if you are sure that you would like to delete the selected entries. Copyright © 2007-2014. All rights reserved. Alt-N Technologies, Ltd. Security 155 Importing Hosts to the Blacklist To import a list of hosts to the Host Blacklist, click Import on the toolbar at the top of the page. This will open the Import List page. Use the Browse button on this page to navigate to the CSV file containing the hosts that you wish to import, and then click Import Lists. CSV File Formats You can use any text editor such as Notepad to create the CSV file for adding hosts to the blacklists. Simply create the file according to the format below and save it as filename.csv. The first line of each CSV file must be a mapping row, which allows the server to know in what order the data will appear. Each item in this file must be contained in quotes and separated by a comma. Importing hosts to the Global Blacklist: The Value column is for the host that you wish to blacklist (e.g. mail.example.com, domain.com, and the like), the Type column should say, "BlackListHostGlobal", and the Comments column is for any notes you may wish to add regarding an entry, for your own reference. The Comments column is optional, but if you include it then use empty quotes for any entry for which you do not include a comment. Example CSV file: "Value","Type","Comments" "example.net","BlackListHostGlobal","This is a comment about the address." "mail.domain.com","BlackListHostGlobal","" "smtp.company.mail","BlackListHostGlobal","This is another comment." Importing hosts to a specific domain's Host Blacklist: The Domain column is for the domain to which this blacklist belongs. For example, if you are wanting to add hosts to example.com's Host Blacklist, then use "example.com" in the Domain column. The Value column is for the host that you wish to blacklist (e.g. mail.example.com, domain.com, and the like), the Type column should say, "BlackListHostDomain", and the Comments column is for any notes you may wish to add regarding an entry, for your own reference. The Comments column is optional, but if you include it then use empty quotes for any entry for which you do not include a comment. Example CSV file: "Domain","Value","Type","Comments" "example.com","example.net","BlackListHostDomain","This is a comment about the address." "example.com","mail.domain.com","BlackListHostDomain","" "example.com","smtp.company.mail","BlackListHostDomain","This is another comment." Exporting Hosts from the Blacklist To export a Host Blacklist: 1. In the For Domain: drop-down list box, choose Global or a specific domain. Copyright © 2007-2014. All rights reserved. Alt-N Technologies, Ltd. 156 SecurityGateway for Email Servers v3.0 2. Click Export on the toolbar at the top of the page. This will open the File Download dialog. 3. Click Save. 4. Choose a file name and location for the file. 5. Click Save and then Close. Blacklist Entry This page is used for adding new hosts to the blacklist and for editing existing entries. It will be opened whenever you click New or Edit on the Host Blacklist. List Entry For Domain: Use this drop-down list box to add a host to a specific domain's blacklist, or choose Global if you wish to add the host to the global list. Host: Enter the host here whose messages you wish to block or quarantine. The settings on the Blacklist Action 159 page determine whether or not the messages will be blocked or quarantined. You can use an asterisk in the host name if you wish to blacklist all hosts of a particular domain. For example, "*.example.org" would block or quarantine all messages coming from any sub-domain of example.org, such as mail.example.org, smtp.example.org, and so on. Comment: Use this area for any comments or notes you wish to make about this entry, for your own reference. Save and Close When you are finished with the entry, click Save and Close to save the entry to the blacklist. Close Click this button if you wish to close the Blacklist Entry page without saving it. 4.6.3 IPs Use this blacklist to block or quarantine messages that are being delivered by a specific IP address (e.g. "1.2.3.4," "192.168.0.1," and so on). By default those messages will be refused during the SMTP session, but on the Blacklist Action 159 page you can change this setting so that they will be quarantined instead. The action that will be taken can be set globally and for specific domains, and the IP Blacklist itself can also be set as global or domain specific. Further, although items are typically added to this blacklist one at a time, it has an import feature that makes it possible for you to use a comma separated values (CSV) file to add multiple items at once. Finally, it also has an export feature that will allow you to save the contents of the blacklist to a CSV Copyright © 2007-2014. All rights reserved. Alt-N Technologies, Ltd. Security 157 file. Adding IPs to the Blacklist To add an IP address to the IP Blacklist, click New on the toolbar at the top of the page. This will open the Blacklist Entry 158 page for adding the IP address (see below). Editing a Blacklisted IP Address To edit one of the blacklisted IP addresses, double-click the entry you wish to edit, or select the desired entry and then click Edit on the toolbar at the top of the page. This will open that entry in the Blacklist Entry 158 page. Deleting a Blacklisted IP Address To delete one or more of the blacklisted IP addresses, select the desired entries and then click Delete on the toolbar at the top of the page. You can select more than one entry by holding down the CTRL key while clicking each one. After clicking Delete, a confirmation box will pop up asking you if you are sure that you would like to delete the selected entries. Importing IP Addresses to the Blacklist To import a list of IP addresses to the IP Blacklist, click Import on the toolbar at the top of the page. This will open the Import List page. Use the Browse button on this page to navigate to the CSV file containing the IP addresses that you wish to import, and then click Import Lists. CSV File Formats You can use any text editor such as Notepad to create the CSV file for adding IP addresses to the blacklists. Simply create the file according to the format below and save it as filename.csv. The first line of each CSV file must be a mapping row, which allows the server to know in what order the data will appear. Each item in this file must be contained in quotes and separated by a comma. Importing IP addresses to the Global Blacklist: The Value column is for the IP address that you wish to blacklist (CIDR notation and *, ?, and # wildcards are all supported), the Type column should say, "BlackListIPGlobal", and the Comments column is for any notes you may wish to add regarding an entry, for your own reference. The Comments column is optional, but if you include it then use empty quotes for any entry for which you do not include a comment. Example CSV file: "Value","Type","Comments" "1.2.3.4","BlackListIPGlobal","This is a comment about the address." "1.1.1.1","BlackListIPGlobal","" "192.168.*.*","BlackListIPGlobal","This is another comment." Importing IP addresses to a specific domain's IP Blacklist: The Domain column is for the domain to which this blacklist belongs. For example, if you are wanting to add IP addresses to example.com's IP Blacklist, then use "example.com" in the Domain column. The Value column is for the IP address that Copyright © 2007-2014. All rights reserved. Alt-N Technologies, Ltd. 158 SecurityGateway for Email Servers v3.0 you wish to blacklist (CIDR notation and *, ?, and # wildcards are all supported), the Type column should say, "BlackListIPDomain", and the Comments column is for any notes you may wish to add regarding an entry, for your own reference. The Comments column is optional, but if you include it then use empty quotes for any entry for which you do not include a comment. Example CSV file: "Domain","Value","Type","Comments" "example.com","1.2.3.4","BlackListIPDomain","This is a comment about the address." "example.com","1.1.1.1","BlackListIPDomain","" "example.com","192.168.*.*","BlackListIPDomain","This is another comment." Exporting IP Addresses from the Blacklist To export an IP Blacklist: 1. In the For Domain: drop-down list box, choose Global or a specific domain. 2. Click Export on the toolbar at the top of the page. This will open the File Download dialog. 3. Click Save. 4. Choose a file name and location for the file. 5. Click Save and then Close. Blacklist Entry This page is used for adding new IP addresses to the blacklist and for editing existing entries. It will be opened whenever you click New or Edit on the IP Blacklist. List Entry For Domain: Use this drop-down list box to add an IP address to a specific domain's blacklist, or choose Global if you wish to add the IP address to the global list. IP Address: Enter the IP address here whose messages you wish to block or quarantine. The settings on the Blacklist Action 159 page determine whether or not the messages will be blocked or quarantined. CIDR notation is permitted, and you can use the wildcards: *, ?, and # to blacklist blocks of addresses with a single entry. Comment: Use this area for any comments or notes you wish to make about this entry, for your own reference. Save and Close When you are finished with the entry, click Save and Close to save the entry to the blacklist. Copyright © 2007-2014. All rights reserved. Alt-N Technologies, Ltd. Security 159 Close Click this button if you wish to close the Blacklist Entry page without saving it. 4.6.4 Action Whenever a message matches the requirements of any of SecurityGateway's Blacklists 151 , the action that will be taken is determined by the settings on this page. By default the message will be refused during the SMTP session, but you can change that setting so that it will be quarantined instead. The action can be set globally and for specific domains. To configure this setting for a specific domain, choose that domain from the For Domain: drop-down list box at the top of the page, choose your setting, and then click Save. Configuration If a message matches a blacklist: This is the action that will be taken when an incoming message is from a blacklisted sender. ...Refuse the message When this option is selected, the blacklisted sender's message will be refused during the SMTP session. This option is selected by default. Disconnect from the sending server By default when a message is refused the SMTP session will be allowed to continue normally. Click this checkbox if you instead would like the session to be ended immediately. SecurityGateway will disconnect from the sending server immediately after the message is refused. ...Quarantine the message Choose this option if you wish to quarantine messages from blacklisted senders instead of refusing them. Exceptions - Domains If you select a specific domain in the "For Domain:" drop-down list box at the top of the page when configuring these settings, that domain will be listed here after saving the settings. Click the View/Edit link for the corresponding domain to review or edit its Blacklist Action settings, or click Reset to reset the domain's settings to the default Global values. 4.7 Whitelists Whitelists are lists of email addresses, hosts, and IP addresses whose messages you wish to exempt from a number of security restrictions. Heuristics and Bayesian 89 , DNSBL 95 , DKIM Verification 118 , and almost every other Security 82 feature in Copyright © 2007-2014. All rights reserved. Alt-N Technologies, Ltd. 160 SecurityGateway for Email Servers v3.0 SecurityGateway has the option to exempt senders, hosts, messages, and so on if they appear on the appropriate whitelist. Each whitelist can be set as global or domain specific, and, although items are typically added to whitelists one at a time, each whitelist has an import feature, which allows you to use a comma separated values (CSV) file to add multiple items at once. Finally, each list also has an export feature, which allows you to save the contents of the whitelist to a CSV file. There are three types of whitelists, all of which can be set globally and for specific domains: Addresses Whitelist email addresses. 160 - Use this whitelist to exempt messages that are from specific Host Whitelist 162 - This whitelist is used to exempt specific hosts from designated security restrictions, and to exempt messages based on the specific hosts delivering them (e.g. mail.example.com, smtp.example.net, and so on). IP Whitelist 165 - The IP Whitelist exempts specific IP addresses from designated security restrictions, and exempts messages based on the IP address of the host attempting to send them. 4.7.1 Addresses The Addresses Whitelist is list of sender email addresses whose messages you wish to exempt from a number of security restrictions. Heuristics and Bayesian 89 , DNSBL 95 , and many other Security 82 features in SecurityGateway have the option to exempt messages based on the sender's email address. You can add addresses to this whitelist both globally and for specific domains, and even though addresses are typically added one at a time, there is also an import feature to allow you to use a comma separated values (CSV) file to add multiple addresses at once. Finally, the Addresses Whitelist also has an export feature, which allows you to save the contents of the whitelist to a CSV file. Adding Addresses to the Whitelist To add an address to the Addresses Whitelist, click New on the toolbar at the top of the page. This will open the Whitelist Entry 162 page for adding the address (see below). Editing a Whitelisted Address To edit one of the whitelisted addresses, double-click the entry you wish to edit, or select the desired entry and then click Edit on the toolbar at the top of the page. This will open that entry in the Whitelist Entry 162 page. Deleting Whitelisted Addresses To delete one or more of the whitelisted addresses, select the desired entries and then click Delete on the toolbar at the top of the page. You can select more than one entry by holding down the CTRL key while clicking each one. After clicking Delete, a confirmation box will pop up asking you if you are sure that you would like to delete the selected entries. Copyright © 2007-2014. All rights reserved. Alt-N Technologies, Ltd. Security 161 Importing Addresses to the Whitelist To import a list of addresses to the Addresses Whitelist, click Import on the toolbar at the top of the page. This will open the Import List page. Use the Browse button on this page to navigate to the CSV file containing the addresses that you wish to import, and then click Import Lists. CSV File Formats You can use any text editor such as Notepad to create the CSV file for adding addresses to the whitelists. Simply create the file according to the format below and save it as filename.csv. The first line of each CSV file must be a mapping row, which allows the server to know in what order the data will appear. Each item in this file must be contained in quotes and separated by a comma. Importing addresses to the Global Whitelist: The Value column is for the email addresses you wish to whitelist, the Type column should say, "WhiteListAddressGlobal", and the Comments column is for any notes you may wish to add regarding an entry, for your own reference. The Comments column is optional, but if you include it then use empty quotes for any entry for which you do not include a comment. Example CSV file: "Value","Type","Comments" "[email protected]","WhiteListAddressGlobal","This is a comment about the address." "[email protected]","WhiteListAddressGlobal","" "[email protected]","WhiteListAddressGlobal","This is another comment." Importing addresses to a specific domain's Addresses Whitelist: The Domain column is for the domain to which this whitelist belongs. For example, if you are wanting to add addresses to example.com's whitelist, then use "example.com" in the Domain column. The Value column is for the email addresses you wish to whitelist, the Type column should say, "WhiteListAddressDomain", and the Comments column is for any notes you may wish to add regarding an entry, for your own reference. The Comments column is optional, but if you include it then use empty quotes for any entry for which you do not include a comment. Example CSV file: "Domain","Value","Type","Comments" "example.com","[email protected]","WhiteListAddressDomain","This is a comment about the address." "example.com","[email protected]","WhiteListAddressDomain","" "example.com","[email protected]","WhiteListAddressDomain","This is another comment." Exporting Addresses from the Whitelist To export an Addresses Whitelist: 1. In the For Domain: drop-down list box, choose Global or a specific domain. Copyright © 2007-2014. All rights reserved. Alt-N Technologies, Ltd. 162 SecurityGateway for Email Servers v3.0 2. Click Export on the toolbar at the top of the page. This will open the File Download dialog. 3. Click Save. 4. Choose a file name and location for the file. 5. Click Save and then Close. Whitelist Entry This page is used for adding new addresses to the whitelist and for editing existing entries. It will be opened whenever you click New or Edit on the Addresses Whitelist. List Entry For Domain: Use this drop-down list box to add an address to a specific domain's whitelist, or choose Global if you wish to add the address to the global list. Email Address: Enter the email address here whose messages you wish to exempt from whatever security feature you have set to exempt "whitelisted senders." You can use an asterisk in the mailbox portion of the address to whitelist all addresses at that domain. For example, "*@example.org" would whitelist all messages from anyone at example.org. Comment: Use this area for any comments or notes you wish to make about this entry, for your own reference. Save and Close When you are finished with the entry, click Save and Close to save the entry to the whitelist. Close Click this button if you wish to close the Whitelist Entry page without saving it. 4.7.2 Hosts Use the Host Whitelist to exempt specific hosts (e.g. "mail.example.com") from a number of security restrictions. Heuristics and Bayesian 89 , DNSBL 95 , and many other Security 82 features in SecurityGateway have the option to exempt whitelisted hosts, or to exempt messages being delivered by those hosts. You can add hosts to this whitelist both globally and for specific domains, and even though hosts are typically added one at a time, there is also an import feature to allow you to use a comma separated values (CSV) file to add multiple hosts at once. Finally, the Host Whitelist also has an export feature, which allows you to save the contents of the whitelist to a CSV file. Copyright © 2007-2014. All rights reserved. Alt-N Technologies, Ltd. Security 163 Adding Hosts to the Whitelist To add a host to the Host Whitelist, click New on the toolbar at the top of the page. This will open the Whitelist Entry 164 page for adding the host (see below). Editing a Whitelisted Host To edit one of the whitelisted hosts, double-click the entry you wish to edit, or select the desired entry and then click Edit on the toolbar at the top of the page. This will open that entry in the Whitelist Entry 164 page. Deleting a Whitelisted Host To delete one or more of the whitelisted hosts, select the desired entries and then click Delete on the toolbar at the top of the page. You can select more than one entry by holding down the CTRL key while clicking each one. After clicking Delete, a confirmation box will pop up asking you if you are sure that you would like to delete the selected entries. Importing Hosts to the Whitelist To import a list of hosts to the Host Whitelist, click Import on the toolbar at the top of the page. This will open the Import List page. Use the Browse button on this page to navigate to the CSV file containing the hosts that you wish to import, and then click Import Lists. CSV File Formats You can use any text editor such as Notepad to create the CSV file for adding hosts to the whitelists. Simply create the file according to the format below and save it as filename.csv. The first line of each CSV file must be a mapping row, which allows the server to know in what order the data will appear. Each item in this file must be contained in quotes and separated by a comma. Importing hosts to the Global Whitelist: The Value column is for the host that you wish to whitelist (e.g. mail.example.com, domain.com, and the like), the Type column should say, "WhiteListHostGlobal", and the Comments column is for any notes you may wish to add regarding an entry, for your own reference. The Comments column is optional, but if you include it then use empty quotes for any entry for which you do not include a comment. Example CSV file: "Value","Type","Comments" "example.net","WhiteListHostGlobal","This is a comment about the address." "mail.domain.com","WhiteListHostGlobal","" "smtp.company.mail","WhiteListHostGlobal","This is another comment." Importing hosts to a specific domain's Host Whitelist: The Domain column is for the domain to which this whitelist belongs. For example, if you are wanting to add hosts to example.com's Host Whitelist, then use "example.com" in the Domain column. The Value column is for the host that you wish to whitelist (e.g. mail.example.com, domain.com, and the like), the Type column should say, "WhiteListHostDomain", and the Comments column is for any notes Copyright © 2007-2014. All rights reserved. Alt-N Technologies, Ltd. 164 SecurityGateway for Email Servers v3.0 you may wish to add regarding an entry, for your own reference. The Comments column is optional, but if you include it then use empty quotes for any entry for which you do not include a comment. Example CSV file: "Domain","Value","Type","Comments" "example.com","example.net","WhiteListHostDomain","This is a comment about the address." "example.com","mail.domain.com","WhiteListHostDomain","" "example.com","smtp.company.mail","WhiteListHostDomain","This is another comment." Exporting Hosts from the Whitelist To export a Host Whitelist: 1. In the For Domain: drop-down list box, choose Global or a specific domain. 2. Click Export on the toolbar at the top of the page. This will open the File Download dialog. 3. Click Save. 4. Choose a file name and location for the file. 5. Click Save and then Close. Whitelist Entry This page is used for adding new hosts to the whitelist and for editing existing entries. It will be opened whenever you click New or Edit on the Host Whitelist. List Entry For Domain: Use this drop-down list box to add a host to a specific domain's whitelist, or choose Global if you wish to add the host to the global list. Host: Enter the host here whose messages you wish to exempt from whatever security feature you have set to exempt "whitelisted senders" or "whitelisted hosts." You can use an asterisk in the host name if you wish to whitelist all hosts of a particular domain. For example, "*.example.org" would whitelist all messages coming from any sub-domain of example.org, such as mail.example.org, smtp.example.org, and so on. Comment: Use this area for any comments or notes you wish to make about this entry, for your own reference. Save and Close When you are finished with the entry, click Save and Close to save the entry to the whitelist. Copyright © 2007-2014. All rights reserved. Alt-N Technologies, Ltd. Security 165 Close Click this button if you wish to close the Whitelist Entry page without saving it. 4.7.3 IPs Use the IP Whitelist to exempt specific IP addresses (IPs) from a number of security restrictions. Heuristics and Bayesian 89 , DNSBL 95 , DKIM Verification 118 , and many other Security 82 features in SecurityGateway have the option to exempt whitelisted IPs, or to exempt messages being delivered by those IPs. You can add IP addresses to this whitelist both globally and for specific domains, and even though IPs are typically added one at a time, there is also an import feature to allow you to use a comma separated values (CSV) file to add multiple IP addresses at once. Finally, the IP Whitelist also has an export feature, which allows you to save the contents of the whitelist to a CSV file. Adding IPs to the Whitelist To add an IP address to the IP Whitelist, click New on the toolbar at the top of the page. This will open the Whitelist Entry 166 page for adding the IP address (see below). Editing a Whitelisted IP Address To edit one of the whitelisted IPs, double-click the entry you wish to edit, or select the desired entry and then click Edit on the toolbar at the top of the page. This will open that entry in the Whitelist Entry 166 page. Deleting a Whitelisted IP Address To delete one or more of the whitelisted IP addresses, select the desired entries and then click Delete on the toolbar at the top of the page. You can select more than one entry by holding down the CTRL key while clicking each one. After clicking Delete, a confirmation box will pop up asking you if you are sure that you would like to delete the selected entries. Importing IP Addresses to the Whitelist To import a list of IPs to the IP Whitelist, click Import on the toolbar at the top of the page. This will open the Import List page. Use the Browse button on this page to navigate to the CSV file containing the IP addresses that you wish to import, and then click Import Lists. CSV File Formats You can use any text editor such as Notepad to create the CSV file for adding IP addresses to the whitelists. Simply create the file according to the format below and save it as filename.csv. The first line of each CSV file must be a mapping row, which allows the server to know in what order the data will appear. Each item in this file must be contained in quotes and separated by a comma. Importing IP addresses to the Global Whitelist: The Value column is for the IP address that you wish to whitelist (CIDR notation and Copyright © 2007-2014. All rights reserved. Alt-N Technologies, Ltd. 166 SecurityGateway for Email Servers v3.0 *, ?, and # wildcards are all supported), the Type column should say, "WhiteListIPGlobal", and the Comments column is for any notes you may wish to add regarding an entry, for your own reference. The Comments column is optional, but if you include it then use empty quotes for any entry for which you do not include a comment. Example CSV file: "Value","Type","Comments" "1.2.3.4","WhiteListIPGlobal","This is a comment about the address." "1.1.1.1","WhiteListIPGlobal","" "192.168.*.*","WhiteListIPGlobal","This is another comment." Importing IP addresses to a specific domain's IP Whitelist: The Domain column is for the domain to which this whitelist belongs. For example, if you are wanting to add IP addresses to example.com's IP Whitelist, then use "example.com" in the Domain column. The Value column is for the IP address that you wish to whitelist (CIDR notation and *, ?, and # wildcards are all supported), the Type column should say, "WhiteListIPDomain", and the Comments column is for any notes you may wish to add regarding an entry, for your own reference. The Comments column is optional, but if you include it then use empty quotes for any entry for which you do not include a comment. Example CSV file: "Domain","Value","Type","Comments" "example.com","1.2.3.4","WhiteListIPDomain","This is a comment about the address." "example.com","1.1.1.1","WhiteListIPDomain","" "example.com","192.168.*.*","WhiteListIPDomain","This is another comment." Exporting IP Addresses from the Whitelist To export an IP Whitelist: 1. In the For Domain: drop-down list box, choose Global or a specific domain. 2. Click Export on the toolbar at the top of the page. This will open the File Download dialog. 3. Click Save. 4. Choose a file name and location for the file. 5. Click Save and then Close. Whitelist Entry This page is used for adding new IP addresses to the whitelist and for editing existing entries. It will be opened whenever you click New or Edit on the IP Whitelist. Copyright © 2007-2014. All rights reserved. Alt-N Technologies, Ltd. Security 167 List Entry For Domain: Use this drop-down list box to add an IP address to a specific domain's whitelist, or choose Global if you wish to add the IP address to the global list. IP Address: Enter the IP address here whose messages you wish to exempt from whatever security feature you have set to exempt "whitelisted senders" or "whitelisted IP addresses." CIDR notation is permitted, and you can use the wildcards: *, ?, and # to whitelist blocks of addresses with a single entry. Comment: Use this area for any comments or notes you wish to make about this entry, for your own reference. Save and Close When you are finished with the entry, click Save and Close to save the entry to the whitelist. Close Click this button if you wish to close the Whitelist Entry page without saving it. 4.8 Advanced 4.8.1 Sieve Scripts Sieve is a proposed standard email filtering language that is extensible and highly versatile. SecurityGateway makes extensive use of Sieve scripts in its core functionality, uses Sieve as the basis of the Message Content Filtering 140 feature, and supports custom scripts that can be used for a large variety of purposes. There are two categories of scripts used by SecurityGateway, managed from the Sieve Scripts page: System Generated—SecurityGateway's core functionality is implemented by these scripts. When a configuration change is made via the administrative interface, the script that is associated with the changed option is modified on the Sieve Scripts page. This is the only way that system generated scripts can be modified; they are read only and therefore cannot be edited directly on the Sieve Scripts page. However, even though you cannot edit the system generated scripts themselves, you can use the up and down arrows associated with each listed script to rearrange the order in which they will be processed. Administrator Defined—you can use the Sieve Scripts page to create your own custom scripts, and because Sieve provides such flexible filtering methodology, you can define any number of these scripts to suit your specific needs. However, a basic working knowledge of SMTP and scripting with the Sieve filtering language is required to create these scripts. SecurityGateway’s implementation of Sieve includes the base language, several standard extensions, and a significant number of custom extensions Copyright © 2007-2014. All rights reserved. Alt-N Technologies, Ltd. 168 SecurityGateway for Email Servers v3.0 179 . Although basic information about Sieve and how it is used in SecurityGateway is provided here and on the Creating Sieve Scripts 170 and SecurityGateway Sieve Extensions 179 pages, a complete discussion of the language itself is beyond the scope of this guide. For more information on Sieve, you should review the authoritative documents online at the IETF web site: Sieve: An Email Filtering Language (RFC-5228), Sieve's Copy Extension (RFC 3894), Sieve's Body Extension, Sieve's Reject Extension, and Spamtest and VirusTest Extensions (RFC-3685). Sieve Script List The Sieve Script page contains a list of all system generated and administrator defined scripts. The list contains six sections: IP, HELO, AUTH, MAIL, RCPT, and DATA. These sections correspond to the various stages or Mail Events of the SMTP process, with each script listed in the section to which it relates. Scripts are processed one section at a time, global scripts first and domain specific scripts second, in the order that they are listed. You can control the order in which the scripts are processed in each section by using the up and down arrows associated with a given script to change its position in the list. The toolbar at the top of the page contains the following three options: New Click New to open the Sieve Script Editor 169 , used for creating your script. Edit Select a script and then click Edit on the toolbar to open it in the Sieve Script Editor 169 . Alternatively, you can simply double-click the script. System generated scripts cannot be edited, but they can still be opened in the script editor for review or to copy the text of the script so that you can paste it into a new, custom rule. Delete To delete a custom script, select it in the list and then click Delete. A box will open asking you to confirm the decision to delete the script. System generated scripts cannot be deleted. The script list has the following five columns: Enabled This column has a checkbox for each listed script, so that you can quickly enable or disable a script by checking or clearing its corresponding box. Only custom scripts can be enabled and disabled using this option. To enable or disable a system generated script you must use the interface's controls that correspond to the feature associated with that script (i.e. Greylisting, IP Shielding, Bayesian Auto Learning, and so on). Copyright © 2007-2014. All rights reserved. Alt-N Technologies, Ltd. Security 169 Scope This column lists the scope of the script. The scope can be "Global" or domain specific. Global scripts are processed for all messages. Domain specific scripts are only processed for the associated domain's messages. Order Scripts are processed in the order in which they are listed. If you wish to change their order then you can use the up and down arrows in this column to rearrange them. Script Name This is a title or descriptive name used to identify the script. You will designate this name when you create a custom script. Script Hover your mouse over this icon to see the script's text displayed in a tooltip. If you wish to examine a script's text more thoroughly then double-click the script to open it in the Sieve Script Editor 169 . Sieve Script Editor The Sieve Script Editor is opened whenever you click New or Edit on the Sieve Script page's toolbar. It is used both to create new Sieve Scripts and to edit existing ones. After using the editor to create or edit your script, click Save and Close on the toolbar to save the script and return to the Sieve Scripts page. Script Properties Enable processing of this script This box corresponds to the Enabled column in the Sieve Script list. By default, scripts are enabled when you create them, meaning that they will be added to the list of scripts and processed during the Mail Event designated below. Clear this box if you wish to disable the script. When disabled, the script will still appear in the list but will not be processed with the others. Further, system generated scripts cannot be enabled or disable with this option. They must be managed via the options on the various interface pages corresponding to the specific scripts. Script Name: Use this text box to designate a title or descriptive name for your script. System generated scripts cannot be renamed. Mail Event: When creating a script, use this drop-down list to choose the mail event or stage of the SMTP session during which you wish the script to be processed. For example, if you create a script that compares something to the recipient of a message, then you would choose either RCPT or DATA in this option since the recipient of the message isn't known until the RCPT phase of the SMTP session is reached. The six mail events, listed in the order in which they occur, are: IP, HELO, AUTH, MAIL, RCPT, and DATA. Copyright © 2007-2014. All rights reserved. Alt-N Technologies, Ltd. 170 SecurityGateway for Email Servers v3.0 Scope: Use this option to designate the scope of the script: Global or Domain. When Global is chosen the script will be processed regardless of the domain to which the message is addressed. When Domain is chosen the script will only be tested against messages for the domain that you designate. Domain can only be chosen when the RCPT or DATA Mail Event is selected above, because the recipient's domain isn't known before those phases of the SMTP process. Domain: When you select Domain as the Scope of the script, this drop-down list will appear. Use it to choose the specific domain that you wish to associate with this script. Script Text: Use this area to enter the actual text of your script, using the Sieve email filtering language. For example scripts and basic information on the Sieve language, see: Creating Sieve Scripts 170 . 4.8.1.1 Creating Sieve Scripts This page, along with the Sieve Scripts 167 and SecurityGateway Sieve Extensions 179 pages, provides a basic outline of the Sieve email filtering language and its implementation within SecurityGateway. The first section of this page outlines the basic parts of a Sieve Script. The next section outlines various structural elements 172 of the language. Then there are lists of the standard Control 173 , Test 174 , and Action 176 commands that are supported. And last, there are several sample scripts 178 provided at the bottom of the page for your review. For a more extensive look at the Sieve email filtering language, you should review the authoritative documents online at the IETF web site: Sieve: An Email Filtering Language (RFC-5228), Sieve's Copy Extension (RFC 3894), Sieve's Body Extension, Sieve's Reject Extension, and Spamtest and VirusTest Extensions (RFC-3685). You can also visit www.altn.com/Support/ for SecurityGateway's latest technical support and help options, including: telephone support, email support, a Knowledge Base, Frequently Asked Questions, community forums, and more. Parts of a Sieve Script A Sieve Script has four basic parts: 1. Requirements—this part is used to declare the Sieve extensions that are required for a given script. When commands belonging to optional extensions will be used in a script, you MUST use the require control command to list those Copyright © 2007-2014. All rights reserved. Alt-N Technologies, Ltd. Security 171 required extensions at the beginning of the script. A semicolon is required at the end of the require command's arguments. Examples: require "securitygateway"; -andrequire ["securitygateway", "fileinto"]; 2. Conditions—this part of a script is where you declare the specific types of things you are looking for in a message and how you will be testing and comparing those things. Examples: if size :over 1M -andif header :contains ["to", "cc"] "Frank Thomas" 3. Actions—these are the actions that will be taken and commands that will be executed when the designated conditions are True. Each Action must be followed by a semicolon and each block of actions must be contained in curly braces (i.e. "{" and "}"). Examples: if size :over 1M { discard; } -andif header :contains ["to", "cc"] "Frank Thomas" { bayes-learn "spam"; fileinto "spam"; } 4. Comments—you can include comments in your Sieve scripts for your own reference, to remind you what the script does, and the like. There are two types of comments that you can use: single-line comments and multi-line comments. Single-line comments start with "#" and continue to the end of the line (i.e. until the next CRLF). Multi-line comments start with "/*", can span multiple lines, and then end with "*/". Examples: # discards messages over 1 mb if size :over 1M { discard; } -and- Copyright © 2007-2014. All rights reserved. Alt-N Technologies, Ltd. 172 SecurityGateway for Email Servers v3.0 if header :contains "from" "Frank Thomas" { /* Frank Thomas sends mostly spam to us, so this script will automatically move everything we get from him to the user quarantine. */ fileinto "spam"; } Structural Elements Strings Text strings start and end with a single double-quote. For example: "Frank Thomas". To include a backslash or double-quote within a quoted string the character must be preceded by another backslash. So, \\ will be treated as \ and \" will be treated as " in a quoted string. No other characters should be escaped in strings. String Lists Whenever you wish to use a groups of strings in a script, separate each quoted string with a comma and enclose the set in square brackets. Example: if header :contains ["to", "cc"] ["[email protected]", "[email protected]", "[email protected]"] The result of this test is True if either the To or CC header contains any of the three addresses. Headers Do not include a colon in header names. Example: if header :is "to:" (invalid) if header :is "to" (valid) Test Lists Similar to string lists, you can include a group of tests in a script by enclosing the group in parentheses. This is sometimes necessary when using the allof or anyof Test commands, since those are logical "AND" and logical "OR" statements respectively. Example: if anyof (size :over 1M, header :contains "subject" ["big file", "mega file"]) { discard; Copyright © 2007-2014. All rights reserved. Alt-N Technologies, Ltd. Security 173 } Arguments and Match Types Most commands take one or more arguments in order for you to specify what to do. There are several types of arguments, such as positional arguments, tagged arguments, and optional arguments. Tagged arguments and Match Type arguments, for example, are preceded by a colon. :contains, :is, :matches, :over, and :under are all examples of tagged arguments. Some tagged arguments are limited to specific commands. For more on the different types of arguments, see: RFC-5228. Actions Each action must be followed by a semicolon and each block of actions must be enclosed in curly braces. Example: if header :contains ["to", "cc"] "Frank Thomas" { bayes-learn "spam"; fileinto "spam"; } Control Commands There are three control commands used in the Sieve language: require This control command is used at the beginning of a script to declare which optional extensions will be used in the script. Example: require ["securitygateway", "fileinto"]; if / elsif / else The if command is the core control command. Although there are technically three interrelated commands, elsif and else cannot be used independently of if. When if is encountered in a script, the test condition will be evaluated to see if it is true. If it is, then the actions associated with it will be executed. If the if test is false then the first elsif test will be evaluated. If the elsif is true then the actions associated with that test will be executed. If the elsif test proves to be false as well, then the process will continue with the next elsif, and so on until one of them is true. If the if and all elsif tests are false, and if there is an else command, then that command's actions will be executed. stop The stop control command ends all processing. Copyright © 2007-2014. All rights reserved. Alt-N Technologies, Ltd. 174 SecurityGateway for Email Servers v3.0 Test Commands These are the standard Test commands supported in SecurityGateway's implementation of Sieve. The body and envelope commands are extensions, however, so you must include them in the require control command whenever you wish to use either of them in a script. Further, there is a significant number of additional Test commands included in the securitygateway extension outlined on the SecurityGateway Sieve Extensions 179 page. address With this command you can test on only an email address in a header rather than on the included phrase or name it might contain. For example, if the "to" header contained "Frank Thomas" <[email protected]>, then the result of the the test header :is "to" "[email protected]" would be false. But the test address :is "to" "[email protected]" would be true because only the address is considered in the evaluation. There are also three optional tagged arguments you can use with this command: ":localpart", ":domain", and ":all". The :localpart argument evaluates only the left part of the address (e.g. "frank" in "[email protected]"), the :domain argument only uses the domain portion of the address (e.g. "example.com"), and :all uses the entire address. If none of these arguments are included then :all is used by default. Example: require "fileinto"; if address :domain :is "from" "spammer.com" { fileinto "spam"; } allof This test is a logical "AND", meaning that ALL of the conditions being evaluated must be true in order for the action be taken. Example: if allof (header :contains "from" "J.Lovell", header :contains "to" "Bubba") { fileinto "spam"; } anyof This test is a logical "OR", meaning that if ANY of the conditions being evaluated are true then the associated action will be taken. Example: if anyof (size :over 1M, header :contains "subject" "big file attached") Copyright © 2007-2014. All rights reserved. Alt-N Technologies, Ltd. Security 175 { reject "I don't want messages that claim to have big files."; } body The body test command is an optional extension and therefore you must use the require "body" control command at the beginning of any script that will use it. This command compares against the message's body. For more on this command, see: Sieve's Body Extension, Example: require ["body", "fileinto"]; if body :text :contains "secret formula" { fileinto "admin"; } envelope The envelope command is an optional extension and therefore you must use the require "envelope" control command at the beginning of any script that will use it. This command compares against the SMTP MAIL From and RCPT To envelope parts when "from" or "to" is used respectively as the command's argument. Example: require "envelope"; if envelope :is "from" "[email protected]" { redirect "[email protected]"; } exists This test is true if the headers listed in the argument exist within the message. All listed headers must exist or the test is false. Example: if exists "x-custom-header" { redirect "[email protected]"; } -andif not exists ["from", "date"] { discard; } false This test always evaluates to "FALSE". Copyright © 2007-2014. All rights reserved. Alt-N Technologies, Ltd. 176 SecurityGateway for Email Servers v3.0 header The header test evaluates to true when the value of the named header matches the conditions set by the argument. When no Match Type argument is specified, :is will be used by default. Example: require "fileinto" if header :is "x-custom-header" "01" { fileinto "admin"; } not Using this command with another test means that the result of the test must be reversed in order for the test's action to be taken. For example, the test if not exists ["from", "date"] { discard; } means that if a message does NOT contain both "from" and "date" headers then the discard action will be taken. If the not command were omitted then that would mean the message would be discarded if the headers DID exist. size The size command accepts the tagged arguments ":over" and ":under", which must be followed by a numerical value. These arguments are used to designate whether a message's size must be higher or lower than the specified value in order for the test to be TRUE. You can use an M after the value to indicate megabytes, a K for kilobytes, or no letter for bytes. Example: if size :over 500K { discard; } true This test always evaluates to "TRUE". spamtest The spamtest command is an optional Sieve extension discussed in the Spamtest and VirusTest Extensions (RFC-3685) document at ietf.org. See that document for information on this extension. virustest The virustest command is an optional Sieve extension discussed in the Spamtest and VirusTest Extensions (RFC-3685) document at ietf.org. See that document for information on this extension. Action Commands These standard Action commands are supported by SecurityGateway. The fileinto Copyright © 2007-2014. All rights reserved. Alt-N Technologies, Ltd. Security 177 and reject commands are extensions, so you must include them in the require control command whenever you wish to use either of them in a script. There are many other action commands available via the securitygateway extension outlined on the SecurityGateway Sieve Extensions 179 page. fileinto The fileinto action command is an optional extension and therefore you must use the require "fileinto" control command at the beginning of any script that will use it. This command accepts two arguments: "spam" and "admin". "spam" moves the message to the User quarantine 190 and "admin" moves it to the Administrative quarantine 191 . Example: require "fileinto"; if header :contains "from" "Frank Thomas" { fileinto "spam"; } discard This action causes a message to be silently deleted, without sending a delivery status notification are any other message. Example: if size :over 2M { discard; } keep This action causes the message to be saved to the default location. redirect This command redirects the message to the address specified in the associated argument, without changing the message's body or existing headers. This command also supports the optional :copy extension, which will cause a copy of the message to be sent to the specified address rather then redirecting the message. This allows other actions to be performed in addition to sending a copy to the specified address. Example: require "copy"; if header :contains "subject" "Response to XYZ" { redirect :copy "[email protected]"; bayes-learn "ham"; } reject The reject action command is an optional extension and therefore you must use the require "reject" control command at the beginning of any script that will use it. This command causes the message to be refused during the SMTP process with a Copyright © 2007-2014. All rights reserved. Alt-N Technologies, Ltd. 178 SecurityGateway for Email Servers v3.0 5xx response code and an optional short message specified in the argument. require "reject"; if size :over 5M { reject "No way! This message is too big for me to accept."; } Sample Sieve Scripts Reject any message with subject containing "[SPAM]" require "reject"; if header :contains "subject" "[SPAM]" { reject "I don't want your spam"; } Reject any message to a specific real name require ["securitygateway","reject"]; if header :contains "to" "Real Name" { bayes-learn "spam"; reject "I don't want your spam"; } Custom Bayes Auto Learning require ["securitygateway","comparator-i;ascii-numeric"]; if whitelisted { bayes-learn "ham"; } elsif anyof(blacklisted,spamtotal :value "gt" :comparator "i;asciinumeric" "20.0") { bayes-learn "spam"; } Greylist DNSBL matches require "securitygateway"]; if not lookup "rblip" "all" {greylist;} Copyright © 2007-2014. All rights reserved. Alt-N Technologies, Ltd. Security 179 Notify admin when large message is received require ["securitygateway"]; if size :over 1M { alert text: To: [email protected] From: postmaster@$RECIPIENTDOMAIN$ Subject: SecurityGateway Content-Filter Message X-Attach-Msg: No $RECIPIENT$ received a message larger that 1MB. . ; } 4.8.1.2 Sieve Extensions To use any of SecurityGateway's custom Sieve extensions, you must include the following require command at the top of any script in which you wish to use them: require “securitygateway”; Test Commands ip The ip test can be performed during any stage of the SMTP process (i.e. during any mail event 169 ). cidr—second argument is IP address or pattern to compare with client IP address. Can be exact IP address, range specified using CIDR (eg. 10.0.0.0/24 ), or wildcard pattern: ? (1 any char), * (0+ any chars), # (1+ digits) in pattern (eg. 10.*.*.* ). Example code: if not ip :cidr "10.0.0.0/24" { greylist; } public—true if client IP address is not in the RFC-1918 private subnets, and not a loopback address and not a DHCP auto IP address, otherwise false (127.0.0.0/8, 192.168.0.0/16, 10.0.0.0/8, 172.16.0.0/12, 169.254.0.0/16). Example code: if ip “public” { greylist; } private—logical inverse of public. ssl—true if client has successfully negotiated a secure (SSL) connection des—true if client is a domain email server Copyright © 2007-2014. All rights reserved. Alt-N Technologies, Ltd. 180 SecurityGateway for Email Servers v3.0 lookup When the lookup test can be called depends on the first argument: ptr—when this is the first argument, the lookup test can be performed at any time. The second argument can be a standard tagged argument or “resolves”, “resolvestoclient”, or “error”. For example: if lookup "ptr" :matches "*.domain.com" { greylist; }. resolves—return true if the PTR record exists. resolvestoclient—returns true if the PTR record matches – that is to say the A lookup of the PTR host returns the IP address of the client. error—returns true if there was a temporary DNS query error. helo—when this is the first argument, the lookup test can only be performed in the HELO event or after. The second argument can be “resolves”, “resolvestoclient”, or “error”. resolves—return true if the HELO argument is a valid IP or hostname. resolvestoclient – returns true if the HELO argument matches – that is to say the A lookup of the HELO argument returns the IP address of the client. error – returns true if there was a temporary DNS query error. mail—when this is the first argument, the lookup test can be performed in the MAIL event or after. The second argument can be “resolves”, “resolvestoclient”, or “error”. resolves—return true if the MAIL FROM domain is a valid domain. resolvestoclient—returns true if the MAIL FROM domain matches – that is to say the A lookup of the MAIL FROM DOMAIN returns the IP address of the client. error—returns true if there was a temporary DNS query error. spf—when this is the first argument, the lookup test can be performed in the MAIL event or after. The second argument can be “pass” “fail” or “error”. pass—returns true if sender passes SPF, false for neutral or fail result. fail—returns true if sender fails SPF, false for neutral or pass result. error—returns true if there was an error in processing (usually DNS query error) rblip—when this is the first argument, the lookup test can be performed at any time. The second argument can be “all”, “any”, or “error”. all—returns true if client IP address passes all DNS blacklists any—returns true if client IP address passes any DNS blacklist. error—return trues if there was an error in processing (usually DNS query error) Copyright © 2007-2014. All rights reserved. Alt-N Technologies, Ltd. Security 181 rblhdr—when this is the first argument, the lookup test can only be performed in the DATA event. The second argument can be “all”, “any”, or “error”. all—returns true if received headers passes all DNS blacklists any—returns true if received headers address passes any DNS blacklist. error—return trues if there was an error in processing (usually DNS query error) port The port test can be performed at any time. The one and only argument is the port number to compare with the actual port the client connected to. Example code: if port 25 { greylist; } auth When the auth test can be called depends on the first argument: succeeded—true if authentication was successful. When this is the first argument, the auth test can be performed in the AUTH event or after. match—true if authentication successful and the MAIL FROM address matches the authenticated account. When this is the first argument, the auth test can be performed in the MAIL event or after. verify The verify test validates addresses (see: User Verification Sources 43 ). Unlike all other tests, this test is always performed, even if it is not encountered in a sieve filter. That is to say, every MAIL FROM and RCPT TO address is verified and the results cached. When the verify test can be called depends on the first argument: from—true if the MAIL FROM address is a valid local address. When this is the first argument, the verify test can be performed in the MAIL event or after. fromdomain—true if the MAIL FROM address is from a valid local domain. When this is the first argument, the verify test can be performed in the MAIL event or after. fail_from—true if there was an error verifying the MAIL FROM address. When this is the first argument, the verify test can be performed in the MAIL event or after. to—true if the RCPT TO address is a valid local address. When this is the first argument, the verify test can be performed in the RCPT event or after. todomain—true if the RCPT TO address is to a valid local domain. When this is the first argument, the verify test can be performed in the RCPT event or after. fail_to—true if there was an error verifying the RCPT TO address. When this is the first argument, the verify test can be performed in the RCPT event or after. Copyright © 2007-2014. All rights reserved. Alt-N Technologies, Ltd. 182 SecurityGateway for Email Servers v3.0 domainkeys The domainkeys test checks against DomainKeys performed in the DATA event. 118 verification and can only be pass—returns true if message is signed with domainkeys and the signature passes verification. fail—return true if domainkeys processing returns a hard fail. error—return true if there was an error in domainkeys processing. dkim The dkim test checks against DomainKeys Identified Mail (DKIM) only be performed in the DATA event. 118 verification and can pass—returns true if message is signed with DKIM and the signature passes verification. fail—return true if DKIM processing returns a hard fail. (requires SSP option) error—return true if there was an error in DKIM processing. senderid The senderid test checks against the Sender ID in the DATA event. 126 results and can only be performed pass—returns true if message passes Sender ID processing. fail—return true if Sender ID processing returns a hard fail. error—return true if there was an error in Sender ID processing. cbv The cbv test can be performed in the MAIL event or after. Without an argument, it returns true if the MAIL FROM address passes Callback Verification 129 . error—returns true if there was an error in CBV processing. spamtotal The spamtotal test checks against the Message Score 109 and can be performed in any event. However, in most cases it should be run in the last filter of the DATA event so that all other filters can make their contribution to the message score. The spamtotal test has a single argument: the threshold value. If the message score is greater than or equal to the threshold, it returns true, otherwise false. OutbreakProtection The OutbreakProtection test can only be performed in the DATA event. Without an argument it returns true if Outbreak Protection 84 classifies the message as spam, Copyright © 2007-2014. All rights reserved. Alt-N Technologies, Ltd. Security 183 virus, or bulk email. spam—returns true if Outbreak Protection classifies the message as spam. virus—returns true if Outbreak Protection classifies the message as containing a virus. phish—returns true if Outbreak Protection classifies the message as a phishing email. suspect—returns true if Outbreak Protection classifies the message as suspected spam. bulk—returns true if Outbreak Protection classifies the message as bulk email. error—returns true if there was an error in Outbreak Protection processing. whitelisted This test has an alias: exempt (for backwards compatibility). When this test can be performed depends on the first argument: all—same as no argument; returns true if client is whitelisted 159 . This can be called in any event and will only use the information available. For example, when called in the IP event (the first event), only the whitelisted IPs and Hosts that match the PTR record will be compared. ip—returns true if client is listed in the IPs whitelist event. 165 . Can be performed in any host—returns true if client is listed in the Hosts whitelist 162 . The match can be either with the HELO argument or the PTR host. Can be performed in the HELO event or after. mail—returns true if MAIL FROM is in the Addresses whitelist performed in the MAIL event or after. 160 from—returns true if From: header is in the Addresses whitelist performed in the DATA event. . Can be 160 . Can only be blacklisted This test has an alias: blocklist (for backwards compatibility). The arguments and functionality are identical to the whitelist test, except the comparison is to the Blacklists 151 . vbr The vbr (i.e. Message Certification 104 ) test has a single argument: comma-delimited list of trusted certifiers—returns true if the message is certified. The default list is “vbr.emailcertification.org”. error—returns true if there was an error in message certification. Copyright © 2007-2014. All rights reserved. Alt-N Technologies, Ltd. 184 SecurityGateway for Email Servers v3.0 Action Commands error The error command is identical to the reject command as defined in RFC 3028, except that it has 2 arguments. The first argument is the SMTP error code and the second argument is a text message. Both are sent in response to the current client command. disconnect The disconnect command is identical to the “error” command, except it also closes the TCP/IP socket. This is analogous to the shutdown option in MD. greylist The greylist command activates Greylisting 102 . dynamicscreen The dynamicscreen command activates Dynamic Screening 136 . tarpit The tarpit command activates Tarpitting 138 . sign The sign command adds a signature be: 121 header to the message. The first argument can dkim—sign the message with DKIM selector to use. 121 . The second argument is the name of the dk—sign the message with DomainKeys the selector to use. 121 . The second argument is the name of vbr—include a VBR-Info: header (for Message Certification 104 ) in the message. The second argument is the trusted certifiers to include in the mv= parameter. throttle The throttle command activates Bandwidth Throttling bandwidth limit in characters per second. 139 . The first argument is ipshield The ipshield command activates IP Shielding 135 . spamscore The spamscore command adds the first argument to the current message score total of the message. See the spamtotal test. 109 Copyright © 2007-2014. All rights reserved. Alt-N Technologies, Ltd. Security 185 tagheader The tagheader command prepends a tag to a header in the message. The first argument is the header to modify. The second argument is the text to insert in the header value. addheader The addheader command adds a new header to the message. The first argument is the header to add and the second argument is the value. removeheader The removeheader command deletes a header from the message. The first argument is the header to remove. alert The alert command sends a note. The single argument is an email body containing from:, to:, subject: and other headers. The entire string is subject to macro expansion. Copyright © 2007-2014. All rights reserved. Alt-N Technologies, Ltd. Copyright © 2007-2014. All rights reserved. Alt-N Technologies, Ltd. Section V 188 SecurityGateway for Email Servers v3.0 5 Messages/Queues The Messages/Queues menu selection in the left pane gives you access to two sections: Message Log and Message Queues. Message Log 189 The Message Log contains an entry for every message that your users send or receive. It lists the date and time the message was processed, the sender and recipient, and the subject of the message. It also lists the result of the delivery attempt, such as whether or not it was delivered, quarantined, or refused, and if it wasn't delivered it gives you a reason, such as the sender was blacklisted, the message contained a restricted attachment, or the like. Finally, each entry also lists the size of the message and its Message Score 109 . From the Message Log you can view the details of each message, including the transcript of its delivery and the message's content and source (when available). You can also mark messages as spam or non-spam to help refine SecurityGateway's Bayesian Learning 91 features and more accurately categorize messages. The Message Log can also be reached from the Logging 196 menu. Message Queues This section provides links to four different message queues: User Quarantine , Administrative Quarantine 191 , messages Queued for Delivery 192 , and Bad Messages 193 . 190 The User Quarantine 190 is a holding queue for incoming messages that do not pass SecurityGateway's various Security 82 features when a given feature is configured to place failed messages into quarantine instead of reject them or simply tag them. Users can log in to SecurityGateway and view the contents of their quarantine folder, and from there choose to view the messages, delete them, or release them from quarantine to be delivered normally. The Administrative Quarantine 191 is similar to the User Quarantine, but it is for outbound messages and messages containing viruses. Only Administrators 41 have access to the Administrative Quarantine. Queued for Delivery 192 is a queue for all messages waiting to be delivered, including those that were undeliverable and are currently in the retry system 60 . From this page you can view any message in the queue, bounce a message back its sender, stop a message's delivery, or immediately retry delivery of a selected message or all messages in the queue. The Bad Messages 193 queue is for messages that could not be delivered due to some fatal processing error, such as a message caught in a recursive Copyright © 2007-2014. All rights reserved. Alt-N Technologies, Ltd. Messages/Queues 189 loop, causing it to reach the Maximum message hop count 63 . From the Bad Message queue you can view any message in the queue, try to bounce a message back its sender, delete a message, or immediately retry delivery of a selected message or all messages in the queue. 5.1 Message Log The Message Log contains an entry for every message that your users send or receive. It lists the date and time the message was processed, the sender and recipient, and the subject of the message. It also lists the result of the delivery attempt, such as whether or not it was delivered, quarantined, or refused, and if it wasn't delivered it gives you a reason, such as the sender was blacklisted, the message contained a restricted attachment, or the like. Finally, each entry also lists the size of the message and its Message Score 109 . There are several buttons on the toolbar at the top of the Message Log that you can use to perform a number of tasks: Refresh—Click this button to refresh the message log to display entries that may have been added since you started viewing the log. Search—Use the extensive search feature to filter the message log to display only specific messages. You can search the log based on whether the message was inbound or outbound, search for specific text in any header, search all dates or a range of dates, and more. To search the message log: click Search on the toolbar to open the search window, then choose your search criteria, and finally click the Search button in that window to perform the search. The search results will appear in the Message Log. To hide the search window while retaining the search results in the log, click Search on the toolbar again. When you are finished with your search, click Cancel in the search window to return the Message Log to normal. Details—Select a message and then click this button to open the Message Information screen. This screen has three tabs: Transcript, Message, and Source. The Transcript tab contains the transcript of the delivery process, including the SMTP Session, internal processing, and so on. The Message tab contains the actual content of the message. This may or may not be available depending on how old the message is, whether or not the message was delivered successfully, and what options are enabled on the Data Retention 74 page. The Source tab contains the message's source, including the message's headers, html code, and so on. The source may not be available if the message is old or SecurityGateway's Data Retention 74 options are not set to save that information. Redeliver—Select one or more messages from the list and then click this button to redeliver them to the recipients. Use Ctrl+Click or Shift+Click to select multiple messages. This option can only be used when the message's content has not been deleted from the database. Spam—Select a message and click this button to mark the message as spam. This can help SecurityGateway more accurately identify spam messages in the Copyright © 2007-2014. All rights reserved. Alt-N Technologies, Ltd. 190 SecurityGateway for Email Servers v3.0 future. This option will not be available when the Bayesian Learning are disabled. 91 features Not Spam—Select a message and click this button to mark the message as non-spam. This can help prevent SecurityGateway from mistakenly identifying legitimate messages as spam in the future. This option will not be available when the Bayesian Learning 91 features are disabled. 5.2 Message Queues 5.2.1 Quarantined (User) The User Quarantine is a holding queue for incoming messages that do not pass SecurityGateway's various Security 82 features, providing a means whereby your mail servers and users can be protected from receiving an influx of spam and other suspicious or unwanted messages. Most of SecurityGateway's Security features provide an option to have messages which meet certain criteria quarantined rather than rejected or tagged. Messages in the User Quarantine will be held by SecurityGateway where they can be managed by the recipient or an administrator—users can log in and view the contents of their quarantine folder, and from there choose to view the messages, delete them, or release them from quarantine to be delivered normally. Quarantined outbound messages and messages containing viruses will be held in the Administrative Quarantine 191 . Only administrators 41 have access to those messages. Each entry in the Quarantine has a column listing the date and time the message was quarantined, and columns for the sender, recipient, and subject. There are also columns for the reason the message was quarantined, its size, and its Message Score 109 . There are several buttons on the toolbar at the top of the Quarantine that you can use to perform a number of tasks: Refresh—Click this button to refresh the Quarantine to display messages that may have been added since you started viewing it. Search—Use the extensive search feature to filter the User Quarantine to display only specific messages. You can search based on whether the message was inbound or outbound, search for specific text in any header, search all dates or a range of dates, and more. To search the Quarantine: click Search on the toolbar to open the search window, then choose your search criteria, and finally click the Search button in that window to perform the search. The search results will appear below the search window—the Quarantine will be filtered to display only message matching the search parameters. To hide the search window while retaining the filtered results below it, click Search on the toolbar again. When you are finished with your search, click Cancel in the search window to return the User Quarantine to normal. View—Select a message and then click this button to open the Message Copyright © 2007-2014. All rights reserved. Alt-N Technologies, Ltd. Messages/Queues 191 Information screen. This screen has three tabs: Transcript, Message, and Source. The Transcript tab contains the transcript of the delivery process, including the SMTP Session, internal processing, and so on. The Message tab contains the actual content of the message, and the Source tab contains the message's source, including the message's headers, html code, and so on. Release—Select a message and then click this button to release it from quarantine for delivery. Delete—Select a message and click this button to delete it. Delete All—Click this button to delete all quarantined messages. 5.2.2 Quarantined (Admin) The Administrative Quarantine is similar to the User Quarantine 190 . But rather than being for incoming messages, it is for messages containing viruses and outbound messages that do not pass SecurityGateway's various Security 82 features when a given feature is configured to place failed messages into quarantine instead of reject or tag them. Unlike the User Quarantine, only administrators have access to messages in the Administrative Quarantine. Administrators can view the messages, delete them, or release them from quarantine to be delivered normally. Each entry in the Administrative Quarantine has a column listing the date and time the message was quarantined, and columns for the sender, recipient, and subject. There are also columns for the reason the message was quarantined, its size, and its Message Score 109 . There are several buttons on the toolbar at the top of the Administrative Quarantine that you can use to perform a number of tasks: Refresh—Click this button to refresh the list of quarantined messages, to display messages that may have been added since you came to the page. Search—Use the extensive search feature to filter the Administrative Quarantine to display only specific messages. You can search based on whether the message was inbound or outbound, search for specific text in any header, search all dates or a range of dates, and more. To search the Administrative Quarantine: click Search on the toolbar to open the search window, then choose your search criteria, and finally click the Search button in that window to perform the search. The search results will appear below the search window —the Administrative Quarantine will be filtered to display only message matching the search parameters. To hide the search window while retaining the filtered results below it, click Search on the toolbar again. When you are finished with your search, click Cancel in the search window to return the Quarantine to normal. View—Select a message and then click this button to open the Message Information screen. This screen has three tabs: Transcript, Message, and Copyright © 2007-2014. All rights reserved. Alt-N Technologies, Ltd. 192 SecurityGateway for Email Servers v3.0 Source. The Transcript tab contains the transcript of the delivery process, including the SMTP Session, internal processing, and so on. The Message tab contains the actual content of the message, and the Source tab contains the message's source, including the message's headers, html code, and so on. Release—Select a message and then click this button to release it from quarantine for delivery. Delete—Select a message and click this button to delete it. Delete All—Click this button to delete all quarantined messages. 5.2.3 Queued for Delivery Queued for Delivery is a queue for all messages that are to or from a remote address and waiting to be delivered, including those that were undeliverable and are currently in the retry system 60 . From this page you can view any message in the queue, bounce a message back its sender, stop a message's delivery, or immediately retry delivery of a selected message or all messages in the queue. Each entry in the Queued for Delivery list shows whether the message is inbound or outbound, has a column listing the date and time the message was received, and has columns for the sender, recipient, subject, and size of the message. There are several buttons on the toolbar at the top of the Queued for Delivery list that you can use to perform a number of tasks: Refresh—Click this button to refresh the list of queued messages, to display messages that may have been added since you came to the page. Search—Use the extensive search feature to filter the list to display only specific messages. You can search based on whether the message is inbound or outbound, search for specific text in any header, search all dates or a range of dates, and more. To search the Queued for Delivery list: click Search on the toolbar to open the search window, then choose your search criteria, and finally click the Search button in that window to perform the search. The search results will appear below the search window—the Queued for Deliver list will be filtered to display only message matching the search parameters. To hide the search window while retaining the filtered results below it, click Search on the toolbar again. When you are finished with your search, click Cancel in the search window to return the list to normal. View—Select a message and then click this button to open the Message Information screen. This screen has three tabs: Transcript, Message, and Source. The Transcript tab contains the transcript of the delivery process, including the SMTP Session, internal processing, and so on. The Message tab contains the actual content of the message, and the Source tab contains the message's source, including the message's headers, html code, and so on. Bounce—Select a message and then click this button to return, or "bounce", the message to the sender. This will stop attempts to deliver the message to its intended recipient. Copyright © 2007-2014. All rights reserved. Alt-N Technologies, Ltd. Messages/Queues 193 Stop Delivery—Selecting one or more queued messages and then clicking this button changes the state of the messages to "Delivery Failed" and thus prevents them from being sent. However, if a message is already in the process of being delivered when this button is clicked, it will not stop that message from being sent. Stop All—This is like the Stop Delivery option above except that it applies to all messages in the queue. If you filter the list using the Search feature, only those messages that appear in the list will be stopped. Retry Delivery—Select a message in the queue and click this button to cause SecurityGateway to retry delivering the message immediately, rather than waiting for the next retry cycle 60 . Retry All—Click this button to cause SecurityGateway to attempt to deliver all queued messages immediately, rather than wait for the next retry cycle 60 for each message. 5.2.4 Bad Messages The Bad Messages 193 queue is for messages that could not be delivered due to some fatal processing error, such as a message caught in a recursive loop, causing it to reach the Maximum message hop count 63 . From the Bad Messages queue you can view any message in the queue, try to bounce a message back its sender, delete a message, or immediately retry delivery of a selected message or all messages in the queue. Each entry in the Bad Messages list shows whether the message was inbound or outbound, has a column listing the date and time the message was received, and has columns for the sender, recipient, subject, and size of the message. There are several buttons on the toolbar at the top of the Bad Messages list that you can use to perform a number of tasks: Refresh—Click this button to refresh the list of messages, to display messages that may have been added since you came to the page. Search—Use the extensive search feature to filter the list to display only specific messages. You can search based on whether the message was inbound or outbound, search for specific text in any header, search all dates or a range of dates, and more. To search the Bad Messages list: click Search on the toolbar to open the search window, then choose your search criteria, and finally click the Search button in that window to perform the search. The search results will appear below the search window—the Bad Messages list will be filtered to display only message matching the search parameters. To hide the search window while retaining the filtered results below it, click Search on the toolbar again. When you are finished with your search, click Cancel in the search window to return the list of messages to normal. View—Select a message and then click this button to open the Message Information screen. This screen has three tabs: Transcript, Message, and Source. The Transcript tab contains the transcript of the delivery process, including the SMTP Session, internal processing, and so on. The Message tab Copyright © 2007-2014. All rights reserved. Alt-N Technologies, Ltd. 194 SecurityGateway for Email Servers v3.0 contains the actual content of the message, and the Source tab contains the message's source, including the message's headers, html code, and so on. Bounce—Select a message and then click this button to attempt to return, or "bounce", the message to the sender. Delete—Select a message and then click this button to delete it from the Bad Messages queue. Retry Delivery—Select a message in the queue and click this button to cause SecurityGateway to attempt to deliver the message again. This will move the message to the Queued for Delivery 192 page. If the error that caused it to end up in the Bad Messages queue has been corrected, then delivery may succeed. Otherwise it may fail again and be placed back in the Bad Messages queue. Retry All—Click this button to cause SecurityGateway to reattempt to deliver all messages contained in the Bad Messages queue. This is useful if you have corrected some error that caused a lot of messages to be placed in the queue. Copyright © 2007-2014. All rights reserved. Alt-N Technologies, Ltd. Section VI 196 SecurityGateway for Email Servers v3.0 6 Logging The Logging menu selection in the left pane gives you access to three sections: Message Log, Log Files, and Configuration. Message Log 189 The Message Log contains an entry for every message that your users send or receive. It lists the date and time the message was processed, the sender and recipient, and the subject of the message. It also lists the result of the delivery attempt, such as whether or not it was delivered, quarantined, or refused, and if it wasn't delivered it gives you a reason, such as the sender was blacklisted, the message contained a restricted attachment, or the like. Finally, each entry also lists the size of the message and its Message Score 109 . From the Message Log you can view the details of each message, including the transcript of its delivery and the message's content and source (when available). You can also mark messages as spam or non-spam to help refine SecurityGateway's Bayesian Learning 91 features and more accurately categorize messages. The Message Log can also be reached from the Messages/Queues 188 menu. Log Files 198 You can use the Log Files section to view SecurityGateway's various log files stored in your Logs folder 72 . Unlike the Message Log, the log files are not stored in the database, providing sortable lists and separate entries for each event. Instead, they are plain text files containing transcripts of the various SMTP connections and other functions that SecurityGateway performs. The All Log Files page under the Log Files section lists all of the log files contained in your logs folder, including the current log files and roll-over 199 log files. From that page you can view any of the files listed. The other pages in the Log Files section provide shortcuts to view SecurityGateway's current log files, such as the system log, inbound and outbound logs, virus update logs, and more. Configuration 199 The Configuration section provides a link to the Logging Configuration 199 page, which is used to configure your logging preferences and options. On that page you can designate how extensive you want the level of detail to be for the data written to the Inbound, Outbound, and HTTP logs. You can also choose the type of log files to create: a standard set, a new set each day with the date incorporated into the filenames, or a new set each day with the day of the week incorporated into the filenames. Finally, you can choose various log file maintenance settings, such as how large a file can be before it will be saved and a new file started, how many of these "roll-over" files can be created, how long Copyright © 2007-2014. All rights reserved. Alt-N Technologies, Ltd. Logging 197 a file can exist before it will be archived, and more. 6.1 Message Log The Message Log contains an entry for every message that your users send or receive. It lists the date and time the message was processed, the sender and recipient, and the subject of the message. It also lists the result of the delivery attempt, such as whether or not it was delivered, quarantined, or refused, and if it wasn't delivered it gives you a reason, such as the sender was blacklisted, the message contained a restricted attachment, or the like. Finally, each entry also lists the size of the message and its Message Score 109 . There are several buttons on the toolbar at the top of the Message Log that you can use to perform a number of tasks: Refresh—Click this button to refresh the message log to display entries that may have been added since you started viewing the log. Search—Use the extensive search feature to filter the message log to display only specific messages. You can search the log based on whether the message was inbound or outbound, search for specific text in any header, search all dates or a range of dates, and more. To search the message log: click Search on the toolbar to open the search window, then choose your search criteria, and finally click the Search button in that window to perform the search. The search results will appear in the Message Log. To hide the search window while retaining the search results in the log, click Search on the toolbar again. When you are finished with your search, click Cancel in the search window to return the Message Log to normal. Details—Select a message and then click this button to open the Message Information screen. This screen has three tabs: Transcript, Message, and Source. The Transcript tab contains the transcript of the delivery process, including the SMTP Session, internal processing, and so on. The Message tab contains the actual content of the message. This may or may not be available depending on how old the message is, whether or not the message was delivered successfully, and what options are enabled on the Data Retention 74 page. The Source tab contains the message's source, including the message's headers, html code, and so on. The source may not be available if the message is old or SecurityGateway's Data Retention 74 options are not set to save that information. Redeliver—Select one or more messages from the list and then click this button to redeliver them to the recipients. Use Ctrl+Click or Shift+Click to select multiple messages. This option can only be used when the message's content has not been deleted from the database. Spam—Select a message and click this button to mark the message as spam. This can help SecurityGateway more accurately identify spam messages in the future. This option will not be available when the Bayesian Learning 91 features are disabled. Not Spam—Select a message and click this button to mark the message as Copyright © 2007-2014. All rights reserved. Alt-N Technologies, Ltd. 198 SecurityGateway for Email Servers v3.0 non-spam. This can help prevent SecurityGateway from mistakenly identifying legitimate messages as spam in the future. This option will not be available when the Bayesian Learning 91 features are disabled. 6.2 Log Files You can use the Log Files section to view SecurityGateway's various log files stored in your Logs folder 72 . Unlike the Message Log, the log files are not stored in the database, providing sortable lists and separate entries for each event. Instead, they are plain text files containing transcripts of the various SMTP connections and other functions that SecurityGateway performs. The All Log Files page under the Log Files section lists all of the log files contained in your logs folder, including the current log files and roll-over 199 log files. From that page you can view any of the files listed. The other pages in the Log Files section provide shortcuts to view SecurityGateway's current log files, such as the system log, inbound and outbound logs, virus update logs, and more. Log Files are not included in the backup files created using SecurityGateway's internal Backup 75 options. But you can use the archiving option located on the Logging Configuration 199 page to archive them. If you wish to save or backup the log files to a location other then the designated Logs 72 directory, then you must use your backup software or some other external method to do so. All Log Files The All Log Files page lists all log files contained in your Logs folder, designated on the Directories 72 page. It lists the current files, which are still being written to by SecurityGateway, and the roll-over 199 log files. Each entry lists the file's name, its size, and the date and time it was last modified. You can view any listed file by doubleclicking its entry or by selecting the entry and clicking View on the toolbar at the top of the page. You can download a file by selecting the file and clicking the Download button. You can delete a file by selecting it and clicking the Delete button. Current Logs The remaining links in the Log Files section take you directly to the current files being used by SecurityGateway. There are direct links to view the following current log files: System—The System Log is for events such as the SecurityGateway service starting and stopping, the SMTP, SSL, HTTP, and other services initializing, certain system errors occurring, and the like. Inbound—SecurityGateway's Inbound Log contains the session transcripts for all inbound messages. Outbound—This log contains the session transcripts for all outbound messages. Copyright © 2007-2014. All rights reserved. Alt-N Technologies, Ltd. Logging 199 Routing—The Routing Log lists all activity related to SecurityGateway routing messages to your users and servers after being received. HTTP—This log contains all HTTP related data and activities. ClamAV Update—The ClamAV Update log file lists the data regarding your ClamAV virus signature updates. CYREN AV Update—The CYREN AV Update Log lists the data regarding the CYREN AV updates performed. 6.3 Configuration Logging Configuration is used to configure your logging preferences and options. To reach the Logging Configuration page, click Logging»Configuration»Configure Logging in the left pane. On this page you can designate how extensive you want the level of detail to be for the data written to the Inbound, Outbound, and HTTP logs. You can also choose the type of log files to create: a standard set, a new set each day with the date incorporated into the filenames, or a new set each day with the day of the week incorporated into the filenames. Additionally, you can choose various log file maintenance settings, such as how large a file can be before it will be saved and a new file started, how many of these "roll-over" files can be created, how long a file can exist before it will be archived, and more. All log files are stored in the Logs folder designated on the Directories 72 page. Log Level The option selected in this section governs the size of the inbound SMTP, outbound SMTP, and HTTP log files 198 . This setting will not affect the system, routing, or other log files. Debug This is the most verbose of the logging options for the inbound, outbound, and HTTP log files. Because this option produces large log files, it can have a negative impact on performance and therefore shouldn't generally be the logging method chosen. It is helpful, however, when attempting to debug a problem. Informational This is the default option, and is the recommended setting for most situations. The logging isn't as extensive as the Debug option above, but log entries are still created for both successful and failed events. Warning Choose this option if you only wish to log failed events and other potential problems. Error When this option is selected, only failures are logged. Selecting this log level may improve performance. Copyright © 2007-2014. All rights reserved. Alt-N Technologies, Ltd. 200 SecurityGateway for Email Servers v3.0 None Choose this option if you do not wish to log any Inbound, Outbound, or HTTP events. This option is NOT recommended. Log Mode The option that you select in this section governs the naming convention used in the log files. Create a standard set of log files When selected, SecurityGateway will produce a standard set of log files, using the naming scheme: SecurityGateway-Inbound.log, SecurityGateway-Outbound.log, SecurityGateway-System.log, and so on. Create a new set of log files each day This is the default option. This option creates a new set of log files at midnight each night, and the date is incorporated into the name of each file. For example: SecurityGateway-20080315-Inbound.log for the Inbound SMTP log file created on March 15, 2008. Create log files based on the day of the week This option maintains log files based on the day of the week, with the name of the day incorporated into the filename. For example, SecurityGateway-SundayInbound.log and SecurityGateway-Sunday-Outbound.log. Log Maintenance The options in this section govern log file size, the number of roll-over log files allowed, whether existing log files will be overwritten, and how often to archive old log files. Maximum log file size: [xx] KB (0 = no size limitation) Use this option to designate the maximum size (in KB) allowed for any log file. When a file reaches the maximum size it is renamed to *.OLD and a new file is started. The number of these "roll-over" files allowed is determined by the Maximum number of log roll-over files option below. Maximum number of log roll-over files: This option governs how many roll-over files are allowed for each log file. A new rollover file is produced whenever a log file reaches the Maximum log file size designated above. These files use the following naming scheme: "filename(1).old", "filename(2).old", "filename(3).old", and so on. Each time a new roll-over file is produced, all of the other roll-over files are renamed so that the most recent data will be in the first file. For example, "filename(1).old" will always be the most recent roll-over file, "filename(2).old" will be the next most recent, and so on. When the maximum number of files is reached, the oldest will be deleted and the rest of the files will be renamed like normal. The default value of this option is 10. Overwrite existing log files when log file names change at midnight When the Create log files based on the day of the week option above is selected, each night at midnight SecurityGateway will create a new set of log files incorporating the day of the week into each filename. When that happens, this Copyright © 2007-2014. All rights reserved. Alt-N Technologies, Ltd. Logging 201 option determines whether or not existing files of the same name will be overwritten or if SecurityGateway will append the new data to the end of the old files. For example, if this option is enabled and on Sunday SecurityGateway finds that "SecurityGateway-Sunday-Inbound.log" already exists, then that file will be overwritten and therefore contain only information for the current day. If the option is disabled, then all of the current day's data will be appended to the end of the already existing file. This option is disabled by default. Automatically ZIP and archive log files older than: [xx] days (0 = never) At midnight each night, SecurityGateway will compress and move all log files older than the number of days specified in this option into the \Logs\OldLogs\ directory 72 . The default value of this option is 14 days. Copyright © 2007-2014. All rights reserved. Alt-N Technologies, Ltd. Copyright © 2007-2014. All rights reserved. Alt-N Technologies, Ltd. Section VII 204 SecurityGateway for Email Servers v3.0 7 Reports The Reports section provides interactive, detailed graphical reports of SecurityGateway's activity. You can generate reports showing the number of inbound versus outbound messages, reports showing a breakdown of the types of junk email received, bandwidth reports, top senders by cumulative message size, virus reports, and more. Further, each report provides options that allow you to designate the parameters of the report. For example, a report can include data for a specific domain or all domains; delineate data by hour, day, or month; and encompass fixed time periods such as a day, week, or month, or use a specific range of dates. Additionally, below each report there is a tabular breakdown of the report's content, providing links to the Message Log 197 , which will filter the log to display only the data related to that entry in the report. For example, it can provide links to display all inbound messages received at a specific hour listed on a report, all message's that contained a virus received on a certain day, all of the messages received by the top recipient for a domain, and so on. After selecting the parameters for a report, simply click View on the toolbar at the top of the page to generate a new report using that criteria. Adobe Flash Player 8.0 or later is required to view SecurityGateway reports. There are six sections under the Reports menu: Scheduled Reports This section contains the Statistics Report option: Statistics Report—This is a general statistical report that can be used to quickly ascertain the status and filtering effectiveness of the server. It can be sent on a nightly or weekly basis to the global administrators, domain administrators, and a manually defined list of email addresses. For domain administrators, the report will only contain statistics for the domains over which the administrator has administrative rights. On the Statistics Report screen, choose Nightly or Weekly in the Scheduling section to designate how often the report will be sent. Then in the Recipients section, click Send to all global administrators or Send to all domain administrators to send the report to all of your global or domain administrators respectively. If you wish to prevent certain administrators from receiving the report, use the option in the Exclusions section to specify those whom you wish to exclude. Use the Additional Recipients option to specify any additional email addresses that you wish to receive the report. Summary The reports in the Summary section are general summary reports that you can use to see the number of inbound versus outbound messages processed, the Copyright © 2007-2014. All rights reserved. Alt-N Technologies, Ltd. Reports 205 amount and type of good email versus junk email, and the amount of bandwidth used by email. Inbound vs. Outbound Messages—This report shows the total of inbound messages received and the total of outbound messages sent for the selected Domain during the Date Range specified in the report. The table below the graph contains columns for inbound messages and outbound messages, and each row corresponds to the Summary time period by which the report is delineated (hours, days, or months). Click any link in the table to open the Message Log and display the inbound or outbound messages processed during the corresponding time period for that entry. The number of entries in the report is limited by the Max Records setting. When the report is generated, SecurityGateway will start with the first Summary time period and continue until the Max Records value is reached. If the Max Records value isn't set high enough, then the report may not cover the entire Date Range specified. To generate a new report, specify its parameters and then click View on the toolbar above the report. Good vs. Junk Messages—This report shows the total of good or legitimate messages versus junk messages processed for the selected Domain during the Date Range specified in the report. Junk messages are message identified as spam, spoofed, containing viruses, and the like. The table below the graph contains columns for good messages and junk messages, and each row corresponds to the Summary time period by which the report is delineated (hours, days, or months). Click any link in the table to open the Message Log and display the good or junk messages processed during the corresponding time period for that entry. The number of entries in the report is limited by the Max Records setting. When the report is generated, SecurityGateway will start with the first Summary time period and continue until the Max Records value is reached. If the Max Records value isn't set high enough, then the report may not cover the entire Date Range specified. To generate a new report, specify its parameters and then click View on the toolbar above the report. Junk Email Breakdown—This report displays the total of all junk email, categorized by type, for the selected Domain during the Date Range specified in the report. Junk email is categorized into six types: Spam 83 , Virus 111 , Spoofing 114 , Abuse 132 , Incomplete, and User. The Incomplete category is for all sessions where a timeout occurs or the client closes the socket or issues a quit command before sending the data. SMTP probes fall under this category. The User category is for Blacklists 151 , Content Filter Rules 140 , Attachment Filtering 149 , and custom Sieve Scripts 167 . The remaining categories refer to their corresponding Security 82 sections. The table below the graph contains columns for each type, and each row corresponds to the Summary time period by which the report is delineated (hours, days, or months). Click any link in the table to open the Message Log and display the junk messages in that category that were processed during the corresponding time period for that entry. The number of entries in the report is limited by the Max Records setting. When the report is generated, SecurityGateway will start with the first Summary time period and continue until the Max Records value is reached. If the Max Records value isn't set high enough, then the report may not cover the entire Date Range specified. To generate a new report, specify its parameters and then click View on the toolbar above the report. Copyright © 2007-2014. All rights reserved. Alt-N Technologies, Ltd. 206 SecurityGateway for Email Servers v3.0 Total Bandwidth Used by Email—This report shows the amount of bandwidth used by email during the Date Range specified in the report. The table below the graph contains a column for the amount of bandwidth used, and each row corresponds to the Summary time period by which the report is delineated (hours, days, or months). Click any time period in the table to open the Message Log and display the messages processed during that period. The number of entries in the report is limited by the Max Records setting. When the report is generated, SecurityGateway will start with the first Summary time period and continue until the Max Records value is reached. If the Max Records value isn't set high enough, then the report may not cover the entire Date Range specified. As with all reports in this section, to generate a new report, specify its parameters and then click View on the toolbar above the report. Inbound Email The reports in the Inbound Email section deal with inbound messages only. You can generate reports detailing all inbound messages processed, reports of the top email recipients by number of messages, and reports of the top recipients by cumulative message size. Inbound Messages Processed—This report shows the total number of inbound messages processed for the selected Domain during the Date Range specified in the report. The table below the graph contains a column showing the total number of inbound message processed during each Summary time period by which the report is delineated (hours, days, or months). Click any of the time period links in the table to open the Message Log to display the inbound messages that were processed during that period. The number of entries in the report is limited by the Max Records setting. When the report is generated, SecurityGateway will start with the first Summary time period and continue until the Max Records value is reached. If the Max Records value isn't set high enough, then the report may not cover the entire Date Range specified. To generate a new report, specify its parameters and then click View on the toolbar above the report. Top Email Recipients—This report shows the top email recipients of incoming messages for the selected Domain during the Date Range specified in the report. The table below the graph contains a column for the recipient and for the number of messages each recipient received. Click any recipient to open the Message Log to display the inbound messages received by that recipient during the date range of the report. To generate a new report, specify its parameters and then click View on the toolbar above the report. Top Recipients by Cumulative Message Size—This report shows the top email recipients by cumulative message size or bandwidth, of incoming messages for the selected Domain during the Date Range specified in the report. The table below the graph contains a column for the recipient and a column for the combined size of the messages each recipient received. Click any recipient to open the Message Log to display the inbound messages received by that recipient during the date range of the report. To generate a new report, specify its parameters and then click View on the toolbar above the report. Copyright © 2007-2014. All rights reserved. Alt-N Technologies, Ltd. Reports 207 Outbound Email The reports in the Outbound Email section deal with outbound messages only. You can generate reports detailing all outbound messages processed, reports of the top email sender by number of messages, and reports of the top senders by cumulative message size. Outbound Messages Processed—This report shows the total number of outbound messages processed for the selected Domain during the Date Range specified in the report. The table below the graph contains a column showing the total number of outbound message processed during each Summary time period by which the report is delineated (hours, days, or months). Click any of the time period links in the table to open the Message Log to display the outbound messages that were processed during that period. The number of entries in the report is limited by the Max Records setting. When the report is generated, SecurityGateway will start with the first Summary time period and continue until the Max Records value is reached. If the Max Records value isn't set high enough, then the report may not cover the entire Date Range specified. To generate a new report, specify its parameters and then click View on the toolbar above the report. Top Email Senders—This report shows the top email senders of outbound messages from the selected Domain during the Date Range specified in the report. The table below the graph contains a column for the sender's address and for the number of messages sent. Click any sender's address to open the Message Log to display the outbound messages sent by that user during the date range of the report. To generate a new report, specify its parameters and then click View on the toolbar above the report. Top Senders by Cumulative Message Size—This report shows the top email senders by cumulative message size or bandwidth, of outbound messages from the selected Domain during the Date Range specified in the report. The table below the graph contains a column for the sender's address and a column for the combined size of the messages each user sent. Click any sender's address to open the Message Log to display the outbound messages sent by that user during the date range of the report. To generate a new report, specify its parameters and then click View on the toolbar above the report. Anti-Spam The reports in the Anti-Spam section allow you to quickly see which domains are sending the most spam to your users, and to see which of your users are receiving the most. Top Spam Domains—This report shows the top domains sending spam messages to the selected Domain during the Date Range specified in the report. The table below the graph contains a column for the domain sending the spam and for the number of messages received from that domain. Click any of the domains in the list to open the Message Log to display the messages sent by that domain to your users during the date range of the report. To generate a new report, specify its parameters and then click View Copyright © 2007-2014. All rights reserved. Alt-N Technologies, Ltd. 208 SecurityGateway for Email Servers v3.0 on the toolbar above the report. Top Spam Recipients—This report shows the top recipients of inbound spam for the selected Domain during the Date Range specified in the report. The table below the graph contains a column for the recipient's address and a column for the number of spam messages received. Click any recipient's address to open the Message Log to display the spam messages received by that user during the date range of the report. To generate a new report, specify its parameters and then click View on the toolbar above the report. Anti-Virus The reports in the Anti-Virus section allow you to quickly see the number of viruses in inbound and outbound messages that were stopped by SecurityGateway, and exactly which viruses there were. Inbound Viruses Blocked—This report shows the total number of inbound messages containing viruses that were stopped by SecurityGateway, for the selected Domain during the Date Range specified in the report. The table below the graph contains a column showing the total number of inbound messages with viruses stopped during each Summary time period by which the report is delineated (hours, days, or months). Click any of the time period links in the table to open the Message Log to display the inbound messages with viruses that were stopped during that period. The number of entries in the report is limited by the Max Records setting. When the report is generated, SecurityGateway will start with the first Summary time period and continue until the Max Records value is reached. If the Max Records value isn't set high enough, then the report may not cover the entire Date Range specified. To generate a new report, specify its parameters and then click View on the toolbar above the report. Top Inbound Viruses by Name—This report shows the top viruses in inbound messages that were stopped by SecurityGateway for the selected Domain during the Date Range specified in the report. The table below the graph contains a column listing the names of the viruses stopped, and a column listing the number of instances of each virus. Click any virus name to open the Message Log to display the inbound messages containing that particular virus that were stopped during the date range of the report. To generate a new report, specify its parameters and then click View on the toolbar above the report. Outbound Viruses Blocked—This report shows the total number of outbound messages containing viruses that were stopped by SecurityGateway, that were sent from the selected Domain during the Date Range specified in the report. The table below the graph contains a column showing the total number of outbound messages with viruses stopped during each Summary time period by which the report is delineated (hours, days, or months). Click any of the time period links in the table to open the Message Log to display the outbound messages with viruses that were stopped during that period. The number of entries in the report is limited by the Max Records setting. When the report is generated, SecurityGateway will start with the first Summary time period and continue until the Max Records value is reached. If the Max Records value isn't set high enough, Copyright © 2007-2014. All rights reserved. Alt-N Technologies, Ltd. Reports 209 then the report may not cover the entire Date Range specified. To generate a new report, specify its parameters and then click View on the toolbar above the report. Top Outbound Viruses by Name—This report shows the top viruses in outbound messages stopped by SecurityGateway, that were sent from the selected Domain during the Date Range specified in the report. The table below the graph contains a column listing the names of the viruses stopped, and a column listing the number of instances of each virus. Click any virus name to open the Message Log to display the outbound messages containing that particular virus that were stopped during the date range of the report. To generate a new report, specify its parameters and then click View on the toolbar above the report. Copyright © 2007-2014. All rights reserved. Alt-N Technologies, Ltd. Copyright © 2007-2014. All rights reserved. Alt-N Technologies, Ltd. Index Index -AAccount 18 Account Edit 39 Account List 36 Accounts Access Control 49 Accessing the user list 36 Addresses blacklist 36 Addresses whitelist 36 Defaults 49 Domain Administrator 39 Enable/Disable 36, 39 Exporting 36 Global Administrator 39 Importing 36 Mailbox 36, 39 Message Log 36 Name 39 Options 49 Password 39 Permissions 49 Quarantine 36 Restrictions 49 User List 36 Welcome message 49 Accounts section overview 31 Action when blacklisted 159 Activation 8, 79 Adding Accounts 36, 39 Administrators 41 Disclaimers 63 Domain Mail Servers 52, 53 Domains 31, 33 Message Disclaimers 63 POP Accounts 54, 55 Remote POP Accounts 54, 55 Text to a message body 63 User Verification Sources 43, 45 Users 31, 36, 39 Adding a header to a message 19 Adding a tag to the Subject 19 Addresses 21, 23 Copyright © 2007-2014. All rights reserved. Alt-N Technologies, Ltd. Addresses Blacklist 152 Addresses Whitelist 160 Administrative Quarantine 111, 191 Administrators Adding 41 Administrator List 41 Deleting 41 Domain 41 Editing 41 Email 41 Enable/Disable 41 External 41 Global 41 Local 41 Mailbox 41 Name 41 Password 41 Administrators List 41 ADSP 118, 121 Advanced 167 Anti-Abuse section overview 132 Anti-Spam Backscatter Protection 107 Bayesian 89, 91 DNS Blacklists 95 Greylisting 102 Heuristics 89, 91 Message Certification 104 Message Scoring 109 Outbreak Protection 84 SpamAssassin 89, 91 URI Blacklists 99 Anti-Spam Reports 204 Anti-Spam section overview 83 Anti-Spoofing section overview 114 Anti-Virus Administrative Quarantine 111 ClamAV 111 Cyren Anti-virus 111 Outbreak Protection 84 Quarantine 111, 191 Signatures 113 Updating virus signatures 113 Virus Scanning 111 Anti-Virus Reports 204 Anti-Virus section overview 111 Archiving 199 Logs 199 211 212 SecurityGateway for Email Servers v3.0 Attachment Filtering 149 Attachments 149 Backup 75 Attachments folder 72 Authentication 134 Author Domain Signing Practices Automated backup options 75 Automatic Domain Creation 49 Automatic IP Screening 136 Automatic whitelisting 19 -BBackscatter Protection 107 Backup Attachments 75 Automated 75 Configuration only 75 Entire database 75 Log files 75 Manual 75 Restoring from 77 Storing backup files 75 Backup folder 72 Bad message queue 193 Bandwidth Throttling 139 Bandwidth Usage 74 Banner image 71 Banning senders 136 Bayesian Automatic Learning 91 Classification 89, 91 Configuration 89, 91 Database Tokens 91 Learning 91 Tokens 91 Bayesian learning folders 72 Bind 60, 70 Blacklist Action 159 Blacklists Adding addresses 23 Addresses 152 CSV format 23, 152, 154, 156 Deleting addresses 23 DNS 95 Entry 152, 154, 156 Exporting addresses 23, 152 Exporting hosts 154 118, 121 Exporting IPs 156 Hosts 154 Importing addresses 23, 152 Importing hosts 154 Importing IPs 156 IPs 156 Overview 151 URI 99 Blacklists section overview 151 Blocking IP addresses 136 Blocking senders 23 Blocklists DNS 95 URI 99 Branding 71 Bulk messages 84 -CCallback Verification 129 Certificates 69 Certification Message 104 Certification Service Providers 104 Changing your password 19 ClamAV 111 Community Forums 8 Configuration Viewing SecurityGateway's configuration Configure Updates 113 Content Backup 75 Restoring from backup 77 Retaining message content 74 Content Filter Rules 140 Content Filtering Actions 140 Conditions 140 Macros 140 Regular Expressions 140 Rules 140 Test Methods 140 CRAM-MD5 authentication 60 Cryptographic Signing outbound messages 121 Verification 118 CSP 104 Custom images 71 73 Copyright © 2007-2014. All rights reserved. Alt-N Technologies, Ltd. Index Cyren 84 Cyren Anti-Virus 111 -DDashboard 8, 9 Database Backup 75 Bayesian Tokens 91 Restoring from backup 77 Retaining database records 74 Database Maintenance section overview Deleting Accounts 36 Administrators 41 Domain Mail Servers 52 Domains 31 User Verification Sources 43 Users 36 Deliver Status Notification 107 Directories 72 Attachments 72 Backup 72 Bayesian learning 72 Inbound Queue 72 Logs 72 Non-spam 72 Spam 72 Temp 72 Disclaimers 63 Disk Space 73 Disk space monitoring 73 DK/DKIM Signing 121 DKIM Verification 118 DNS Blacklists 95 DNS configuration 121 DNS lookups 115 DNSBLs 95 Domain Administrator 39 Domain Administrators Adding 33 Selecting 33 Domain List 31 Domain Mail Servers 52, 53 Adding 53 Authentication 53 Editing 53 Host 53 73 Copyright © 2007-2014. All rights reserved. Alt-N Technologies, Ltd. IP Address 53 Domain Properties 33 DomainKeys Identified Mail 118, 121 Domains Accessing the user list 31 Adding 33 Addresses blacklist 31 Addresses whitelist 31 Administrators 33 Automatic Creation 49 Creating Automatically 49 Domain Mail Servers 33, 52, 53 Domains List 31 Editing 33 Exporting 31 Importing 31 Limiting numbe of users 33 Maximum Users 33 Message Log 31 Properties 33 Quarantine 31 SMTP AUTH password 33 User Verification Sources 33 Users 31 DSN 107 Dynamic Screening 136 -EEdit Administrator screen 41 Edit Mail Server screen 53 Edit POP Account 54, 55 Editing Accounts 36, 39 Administrators 41 Disclaimers 63 Domain Mail Servers 52, 53 Domains 31, 33 Message Disclaimers 63 POP Accounts 54, 55 Remote POP Accounts 54, 55 User Verification Sources 43, 45 Users 36, 39 EHLO 115, 138 Email Authentication 134 Callback verification 129 CRAM-MD5 authentication 60 213 214 SecurityGateway for Email Servers v3.0 Email Cryptographic signatures 121 Cryptographic verification 118 Delivery method 59 DKIM signing 121 DKIM Verification 118 DNS lookups 115 DomainKeys Identified Mail 118, 121 EHLO 115 Encryption 69 ESMTP SIZE command 60 HELO 115 HELO domain name 60 Loop Detection 60 Maximum SMTP message size 60 Message hop count 60 MSA port 60 Port 59 Protocols 60 PTR records 115 RCPT commands 60 Relaying 133 Retaining message content 74 Retaining message transcripts 74 Retrying delivery 59 Reverse Lookups 115 Sender ID 126 Sender Policy Framework 123 Signed messages 118 Signing outbound messages 121 SMTP Authentication 134 SMTP port 60 SPF 123, 126 SSL Certificates 69 SSL port 60 Undeliverable 59 Verifying senders 129 Verifying signed messages 118 VRFY command 60, 129 Email Protocol 60 Email Servers 52, 53 Adding 53 Authentication 53 Editing 53 Host 53 IP Address 53 Encryption 69 ESMTP SIZE command 60 Exporting Accounts 36 Blacklist addresses 152 Configuration data 75 Domains 31 Hosts to a blacklist 154 Hosts to a whitelist 162 IPs to a blacklist 156 IPs to a whitelist 165 Users 36 Whitelist addresses 160 -FFAQs 8 Features 8, 13 Filter Rules 140 Filtering 140, 149 Actions 140 Attachments 149 Conditions 140 Macros 140 Regular Expressions 140 Rules 140 Test Methods 140 Filtering messages 19 Folders 72 Attachments 72 Backup 72 Bayesian learning 72 Inbound Queue 72 Logs 72 Non-spam 72 Spam 72 Temp 72 Forums 8 Frequently Asked Questions 8 -GGetting Help 8 Global Administrator Greylisting 102 GUI 70 39 Copyright © 2007-2014. All rights reserved. Alt-N Technologies, Ltd. Index -HHELO 60, 115, 138 Heuristics 89, 91 Rules 89 Heuristics Rules Updating 91 Holding messages on SecurityGateway Host name 70 Hosts Blacklist 154 Hosts Whitelist 162 HTTP ports 70 HTTP Server 70 HTTPS ports 70 25 -IImages Changing the banner 71 Custom 71 Importing Accounts 36 Blacklist addresses 152 Domains 31 Hosts to a blacklist 154 Hosts to a whitelist 162 IPs to a blacklist 156 IPs to a whitelist 165 Users 36 Whitelist addresses 160 Inbound Email Reports 204 Inbound Queue folder 72 Interface 70 IP Screening 136 IP Shielding 135 IPs Blacklist 156 IPs Whitelist 165 -KKnowledge Base 8 -LLicense 79 Links 70 Copyright © 2007-2014. All rights reserved. Alt-N Technologies, Ltd. Log Files 198 Logging Configuration 199 Logging section overview 196 Login links 70 Logs Archiving 199 Configuring 199 Current logs 198 Files 198 Level 199 Maintenance 199 Message Log 189, 197 Mode 199 Options 199 Restoring from backup 77 Roll-over files 199 Saving 199 Session transcripts 189, 197, 198 SMTP transcripts 189, 197 Storing 199 Transcripts 189, 197, 198 View My Message Log 26 Viewing 189, 197, 198 Logs folder 72 Lookups 115 Loop Detection 60 -MMail Authentication 134 Callback verification 129 CRAM-MD5 authentication 60 Cryptographic signatures 121 Cryptographic verification 118 Delivery method 59 DKIM signing 121 DKIM Verification 118 DNS lookups 115 DomainKeys Identified Mail 118, 121 EHLO 115 Encryption 69 ESMTP SIZE command 60 HELO 115 HELO domain name 60 Loop Detection 60 Maximum SMTP message size 60 Message hop count 60 215 216 SecurityGateway for Email Servers v3.0 Mail MSA port 60 Port 59 Protocols 60 PTR records 115 RCPT commands 60 Relaying 133 Retaining message content 74 Retaining message transcripts 74 Retrying delivery 59 Reverse Lookups 115 Sender ID 126 Sender Policy Framework 123 Signed messages 118 Signing outbound messages 121 SMTP Authentication 134 SMTP port 60 SPF 123, 126 SSL Certificates 69 SSL port 60 Undeliverable 59 Verifying senders 129 Verifying signed messages 118 VRFY command 60, 129 Mail Delivery 59 Mail section overview 51 Mail Servers 52, 53 Adding 53 Authentication 53 Editing 53 Host 53 IP Address 53 Managing your account settings 19 Manual backup options 75 Marking messages as non-spam 26 Marking messages as spam 26 Message Bad messages 193 Content 74 Content Filtering 140 Filtering 140 Log 26, 189, 196, 197 Quarantine (admin) 191 Quarantine (user) 190 Queues 188, 190, 191, 192, 193, 196 Rules 140 Score 89, 91, 95, 99 Scoring 109 Sieve Scripts 140 Source 25, 26 Transcripts 25, 26, 74 Message Certification 104 Message Disclaimers 63 Message Log 26, 189, 197 Message Queues 190, 191, 192, 193 Message Scoring 109 Messages/Queues section overview 188 MSA 60 My Account 18 My Account Overview 18 My Blacklist 23 My Quarantine 25 My Settings 19 My Whitelist 21 -NNew in this version 13 Non-spam 26 Address 91 Directory 91 Folder 91 Non-spam folder 72 Not spam 26 Number of items to display per page 19 -OOutbound Email Reports 204 Outbreak Protection 84 Overview Accounts section 31 Addresses Blacklist 151 Addresses Whitelists 159 Administrators 31 Anti-Abuse section 132 Anti-Spam section 83 Anti-Spoofing section 114 Anti-Virus section 111 Automatic Domain Creation 31 Backscatter Protection 83 Backup 73 Bandwidth Throttling 132 Blacklist Actions 151 Blacklists section 151 Copyright © 2007-2014. All rights reserved. Alt-N Technologies, Ltd. Index Overview Callback Verification 114 Data Retention 73 Database Maintenance 73 Directories 68 Disk Space 68 DK/DKIM Signing 114 DKIM Verification 114 DNS Blacklists 83 Domain Mail Servers 51 Domains 31 Dynamic Screening 132 Email Protocol 51 Encryption 51 Greylisting 83 Heuristics and Bayesian 83 Hosts Blacklist 151 Hosts Whitelists 159 HTTP Server 68 IP Shielding 132 IPs Blacklist 151 IPs Whitelists 159 Log Files 196 Logging Configuration 196 Logging section 196 Mail Delivery 51 Mail section 51 Message Certification 83 Message Log 196 Message Queues 188 Message Scoring 83 Messages/Queues section 188 My Account 18 Outbreak Protection 83 Quarantine 188 Quarantine Configuration 51 Queues 188 Registration 79 Relay Control 132 Reports section 204 Restoring from backup 73 Reverse Lookups 114 Scripts 167 Security section 82 SecurityGateway 8 SecurityGateway Sieve Extentions Sender ID 114 Sender Policy Framework 114 Setup/Users section 30 Sieve email filtering language 170 Sieve Extensions 179 Sieve Scripts 167 Sign Outbound Messages 114 SMTP Authentication 132 SPF 114 System section 68 Tarpitting 132 Updating Virus Signatures 111 URI Blacklists 83 User Options 31 User Verification Sources 31 Users 31 Verify Signed Messages 114 Virus Scanning 111 Whitelists section 159 -PPasswords Account 39 Administrator 41 Changing your 19 Forgotten 49 SMTP AUTH 33 User 39 Permissions 49 POP Accounts 54, 55 Ports HTTP 70 HTTPS 70 MSA 60 SMTP 60 SSL 60 Postmaster 134 Preventing spam 19, 25, 26 Properties Domain 33 Proxy settings 84 PTR record lookups 115 -Q179 Copyright © 2007-2014. All rights reserved. Alt-N Technologies, Ltd. Quarantine 25, 111 Administrative 191 Configuring 58 217 218 SecurityGateway for Email Servers v3.0 Quarantine 25, 111 Options 58 User 190 User Defaults 58 Quarantine Configuration 58 Quarantine contents message Quarantine Options 58 Quarantine settings 19 Quarantined messages 25 Queries DNSBL 95 URIBL 99 Queued for Delivery 192 Queues 190, 191, 192, 193 19 -RRCPT commands 60 Registration 8 Registration key 79 Registration section overview 79 Relay Control 133 Relaying mail 133 Releasing message from quarantine Remote POP Accounts 54, 55 Remote Queue 192 Reports 8 Anti-Spam 204 Anti-Virus 204 Inbound Email 204 Outbound Email 204 Restoring from backup 77 Summary 204 Reports section overview 204 Restore 77 Restoring the database 77 Restrictions 49 Retry System 59, 192 Reverse Lookups 115 RPD 84 Rules 140 Heuristics 91 Updating 91 -SSafe senders 21 25 Score 89, 91 Scoring Messages 109 Screening 136 Scripts Commands 170, 179 Conditions 170 Creating 170 Custom extensions 179 Extensions 179 Samples 170 Scripting basics 170 SecurityGateway Extensions 179 Sieve Script Editor 167 Sieve Script list 167 Sieve Script overview 167 Structural elements 170 Security Attachment Filtering 149 Backscatter Protection 107 Bandwidth Throttling 139 Bayesian 89, 91 Callback Verification 129 Content Filtering 140 DK/DKIM Signing 121 DKIM Verification 118 DNS Blacklists 95 Dynamic Screening 136 Filtering Messages 140 Greylisting 102 Heuristics 89, 91 IP Screening 136 IP Shielding 135 Message Certification 104 Message Content Filtering 140 Message Scoring 109 Outbreak Protection 84 Relay Control 133 Reverse Lookups 115 Sender ID 126 Sender Policy Framework 123 Sieve Scripts 167 Signing Outbound Messages 121 SMTP Authentication 134 SpamAssassin 89, 91 SPF 123 Tarpitting 138 URI Blacklists 99 Copyright © 2007-2014. All rights reserved. Alt-N Technologies, Ltd. Index Security Verifying Signed Messages 118 Virus Scanning 111 Security Features 82 Security section overview 82 SecurityGateway 8, 18 Activation 79 License 79 Registration 79 Updates 78 Sender ID 126 Sender Policy Framework 123 Sender Signing Practices 118, 121 Senders 21, 23 Server Statistics 9 Server Status 8, 9 Service SMTP 8 Session timeouts 70 Session transcripts 189, 197 Settings 19 Viewing SecurityGateway's settings Setup/Users section overview 30 SGSpamD 89, 91 Shielding 135 Sieve Scripts Commands 170, 179 Conditions 170 Creating 167, 170 Custom extensions 179 Extensions 179 Overview 167 Samples 170 Scripting basics 170 SecurityGateway Extensions 179 Sieve Script Editor 167 Sieve Script list 167 Sieve Script overview 167 Structural elements 170 Signed messages 118 Signing outbound messages 121 SMTP 60 SMTP Authentication 134 SMTP Service 8 SMTP transcripts 189, 197 Sockets 60, 70 Software Updates 78 Spam 19, 25, 26 73 Copyright © 2007-2014. All rights reserved. Alt-N Technologies, Ltd. Address 91 daemon 89, 91 Directory 91 Folder 91 Spam Directory 91 Spam folder 72 Spam Prevention Backscatter Protection 107 Bayesian 89, 91 DNS Blacklists 95 Greylisting 102 Heuristics 89, 91 Message Certification 104 Message Scoring 109 Outbreak Protection 84 SpamAssassin 89, 91 URI Blacklists 99 SpamAssassin Configuration 89, 91 daemon 89, 91 Remote 89 Score 89, 91 SGSpamD 89, 91 SPF 123, 126 SSL 60, 69 SSL Certificates 69 SSP 118, 121 Starting the SMTP Service 8 STARTTLS 69 Statistics 8 Status 8 Stopping the SMTP Service 8 Storing backup files 75, 77 Summary 8 Summary Reports 204 Support 8 SURBL 99 System Requirements 8 System section overview 68 -TTarpitting 138 Technical Support 8 Temp folder 72 Threads 70 Timeouts 70 Transcripts 189, 197, 198 219 220 SecurityGateway for Email Servers v3.0 Transcripts 189, 197, 198 Backup 75 Restoring from backup 77 Retaining message transcripts 74 -UUndeliverable Mail 59 Updates Checking for software updates 78 Updating virus signatures 113 URI Blacklists 99 URIBLs 99 User Edit 39 User List 36 User Options 49 User Quarantine 190 User Verification Sources 43 Adding 33, 43, 45 Authentication 45 Default 45 Description of 43, 45 Editing 43, 45 Host name 45 IP address 45 Location 43, 45 Password 45 Port 43, 45 Requiring authentication 45 Selecting 33, 45 Server 43, 45 Setting as default 45 Type 43, 45 Verifying Users 43 User Verification Sources editor 45 Users 31, 36, 39 Access Control 49 Accessing the user list 36 Addresses blacklist 36 Addresses whitelist 36 Defaults 49 Domain Administrator 39 Enable/Disable 36, 39 Exporting 36 Global Administrator 39 Importing 36 Mailbox 36, 39 Message Log 36 Name 39 Options 49 Password 39 Permissions 49 Quarantine 36, 190 Real Name 39 Restrictions 49 User List 36 Welcome message 49 -VVerification Sources 43 Adding 33, 43, 45 Authentication 45 Default 45 Description of 43, 45 Editing 43, 45 Host name 45 IP address 45 Location 43, 45 Password 45 Port 43, 45 Requiring authentication 45 Selecting 33, 45 Server 43, 45 Setting as default 45 Type 43, 45 Verifying Users 43 Verification Sources editor 45 Verifying senders 129 Verifying signed messages 118 View Configuration 73 View My Message Log 26 View My Quarantine 25 Viewing messages 26 Viewing quarantined messages 25 Virus Administrative Quarantine 111 ClamAV 111 Cyren Anti-virus 111 Outbreak Protection 84 Quarantine 111, 191 Scanning 111 Signatures 113 Updating virus signatures 113 Virus Scanning 111 VRFY command 60, 129 Copyright © 2007-2014. All rights reserved. Alt-N Technologies, Ltd. Index -WWarning message Low disk space 73 Welcome Message 49 What's New 13 Whitelist adding addresses 21 CSV format 21 deleting addresses 21 exporting addresses 21 importing addresses 21 Whitelists Addresses 160 CSV format 160, 162, 165 Entry 160, 162, 165 Exporting addresses 160 Exporting hosts 162 Exporting IPs 165 Hosts 162 Importing addresses 160 Importing hosts 162 Importing IPs 165 IPs 165 Overview 159 Whitelists section overview 159 -ZZero hour protection 84 Copyright © 2007-2014. All rights reserved. Alt-N Technologies, Ltd. 221


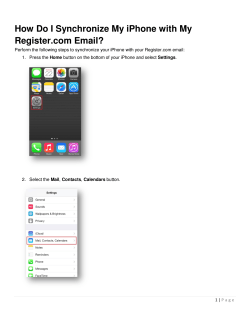


© Copyright 2026